

Page 1
1. SOFTWARE INSTALLATION:
Prior to installing the Warpia StreamHD software it is important to make sure there
is no prior installation of Wireless USB or Display Link software from Warpia or
other companies. IF YOU HAVE THIS SOFTWARE IN YOUR SYSTEM, THIS WILL
CAUSE THE STREAMHD SOFTWARE NOT TO WORK PROPERLY
If you see either Wireless USB or Display Link programs, first uninstall them by
going to the Control Panel- Programs and Features section and clicking on the
Uninstall tab.
StreamHD – SWP120A Rev B
Quickstart Guide
Next, Insert the StreamHD installation CD into the PC and begin the software
installation by running the Setup.exe file. Ensure that the PC Adapter is NOT
plugged into the PC at this time.
Page 2
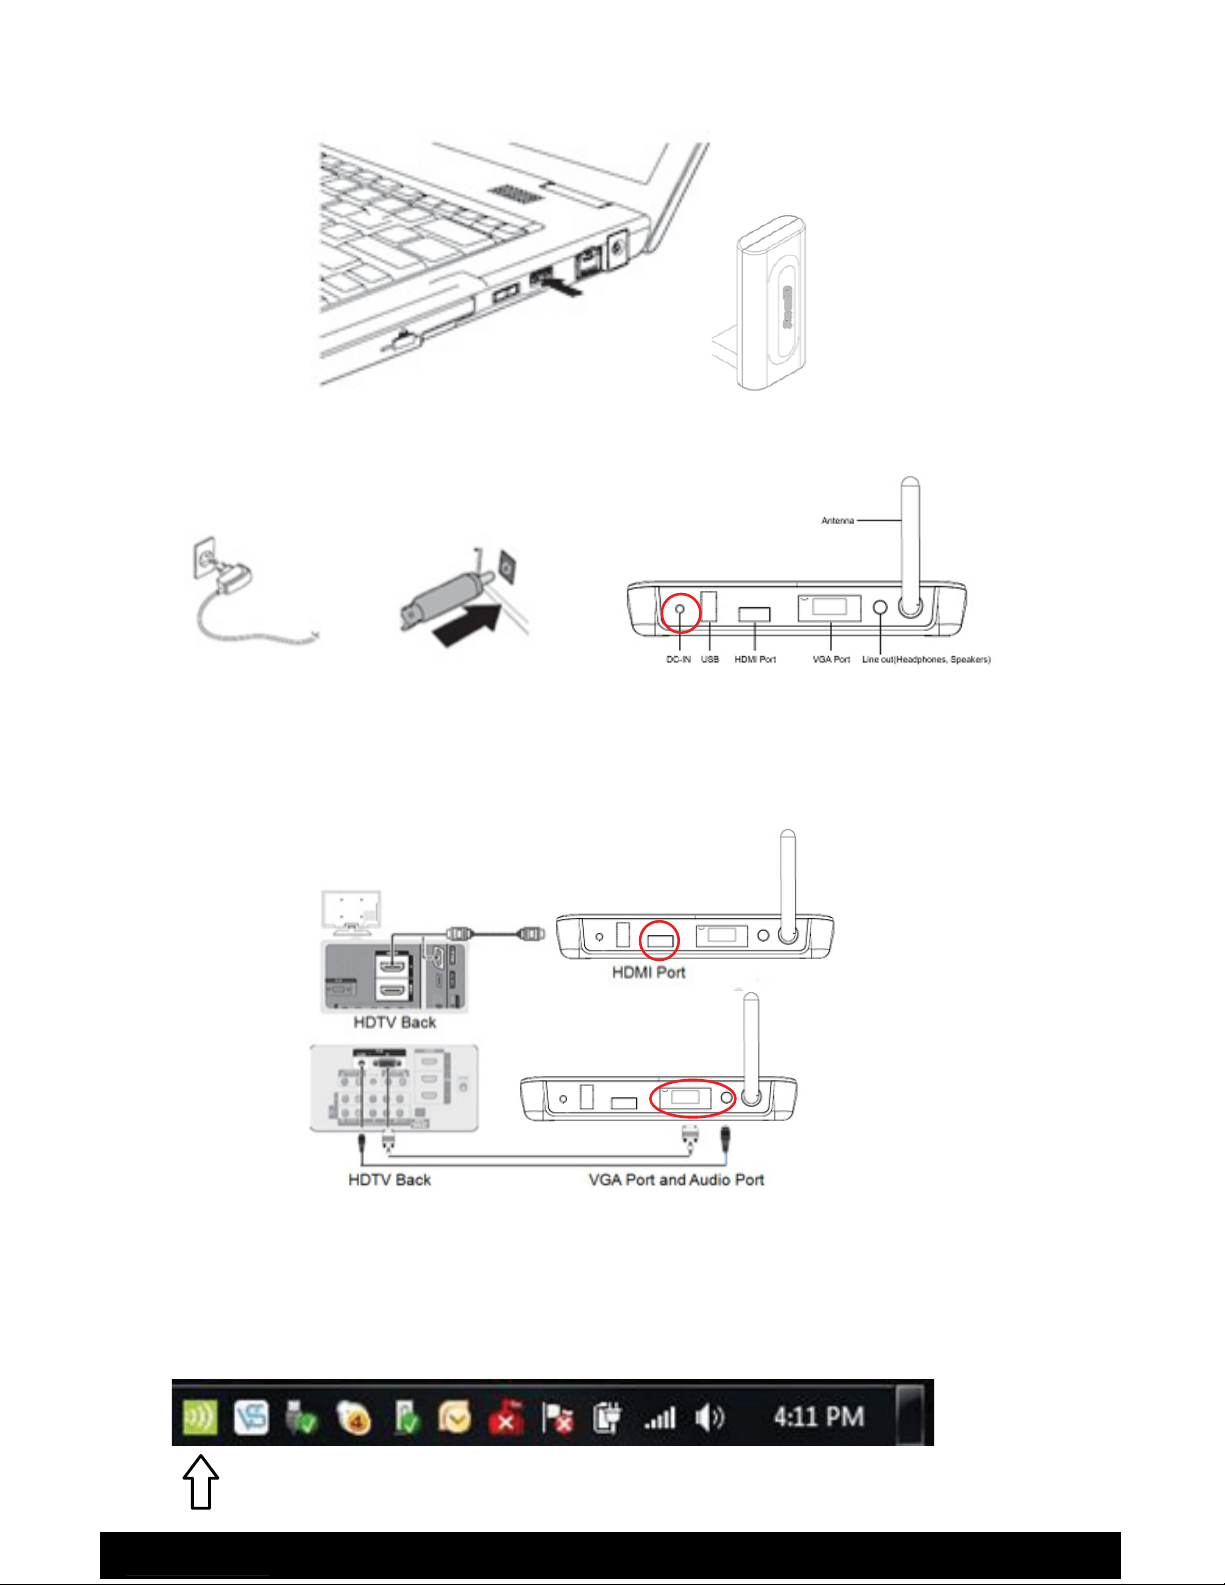
2. HARDWARE INSTALLATION:
After the software has been installed, insert PC Adapter into an available USB port.
3. ESTABLISHING INITIAL WIRELESS CONNECTION WITH
TV/MONITOR/PROJECTOR:
Plug the Receiver Base into an electrical outlet using the power cord provided.
Connect the Receiver Base to the TV/Monitor/Projector using an HDMI
or VGA cable with the appropriate sound cable when required.
(cables not included)
Open the UWB Connection Manager by double-clicking the UWB Connection
Manager icon located in the System tray/Notification Area of your Windows
®
desktop.
4. CONFIGURING VIDEO SETTINGS:
You can choose to set the StreamHD’s video output to either Extend mode or
Mirror mode. The default setting on most operating systems is Extend mode.
Extend mode extends your desktop space across multiple monitors.
Mirror mode duplicates the image on your computer screen on the external monitor
To configure the Video Settings in Windows
the P key( + P), and then the following menu will appear:
For Mirror Mode, choose Duplicate, for Extend Mode choose Extend
For changing the setting in Windows
Troubleshooting guide located on the CD or at www.warpia.com/support
Move the cursor over the StreamHD
Device Icon and click on the Connect
Tab to establish a connection
ure t
+
o
Page 3
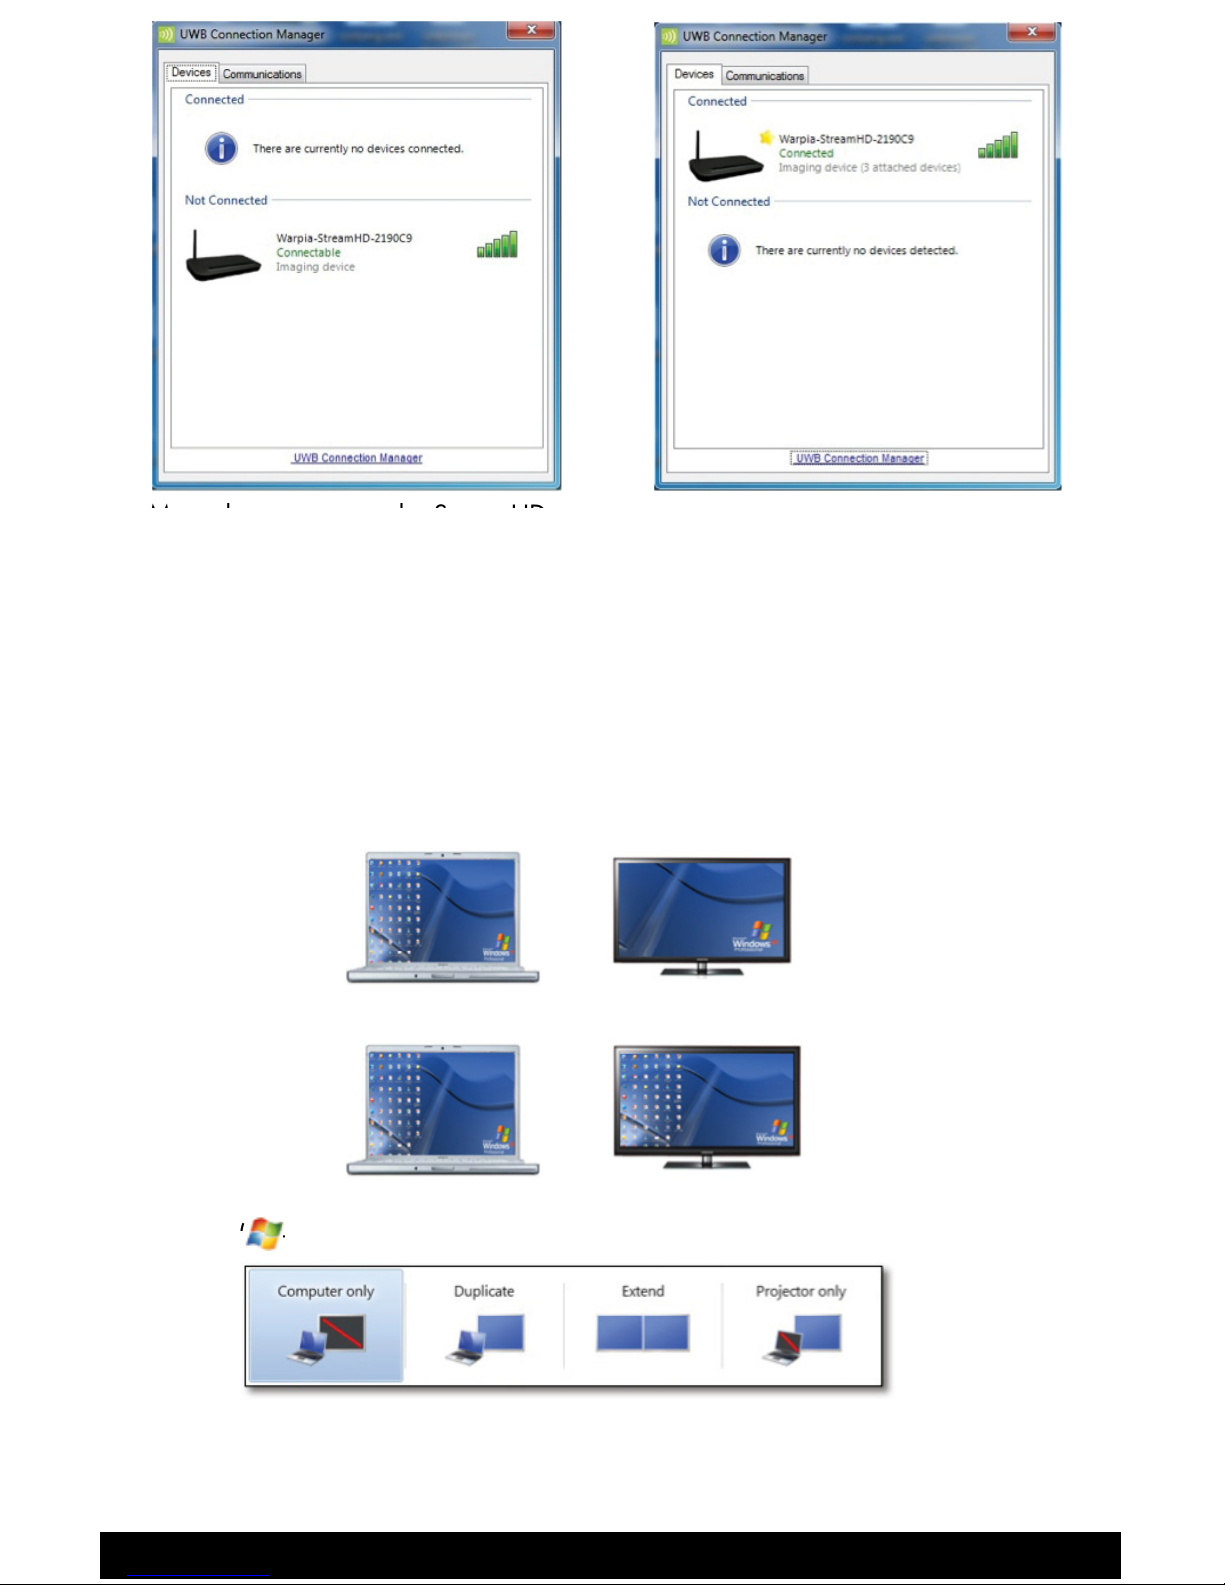
4. CONFIGURING VIDEO SETTINGS:
You can choose to set the StreamHD’s video output to either Extend mode or
Mirror mode. The default setting on most operating systems is Extend mode.
Extend mode extends your desktop space across multiple monitors.
Mirror mode duplicates the image on your computer screen on the external monitor
To configure the Video Settings in Windows
®
7, press the Windows key together with
the P key( + P), and then the following menu will appear:
For Mirror Mode, choose Duplicate, for Extend Mode choose Extend
For changing the setting in Windows
®
XP and Vista, refer to the Installation and
Troubleshooting guide located on the CD or at www.warpia.com/support
Move the cursor over the StreamHD
Device Icon and click on the Connect
Tab to establish a connection
After the wireless connection is
established,a yellow star will then appear
next to theStreamHD Device Icon, making
it thedefault device for future connections.
+
r computer screen
o
Page 4
1. SOFTWARE INSTALLATION:
Prior to installing the Warpia StreamHD software it is important to make sure there
is no prior installation of Wireless USB or Display Link software from Warpia or
other companies. IF YOU HAVE THIS SOFTWARE IN YOUR SYSTEM, THIS WILL
CAUSE THE STREAMHD SOFTWARE NOT TO WORK PROPERLY
If you see either Wireless USB or Display Link programs, first uninstall them by
going to the Control Panel- Programs and Features section and clicking on the
Uninstall tab.
StreamHD – SWP120A Rev B
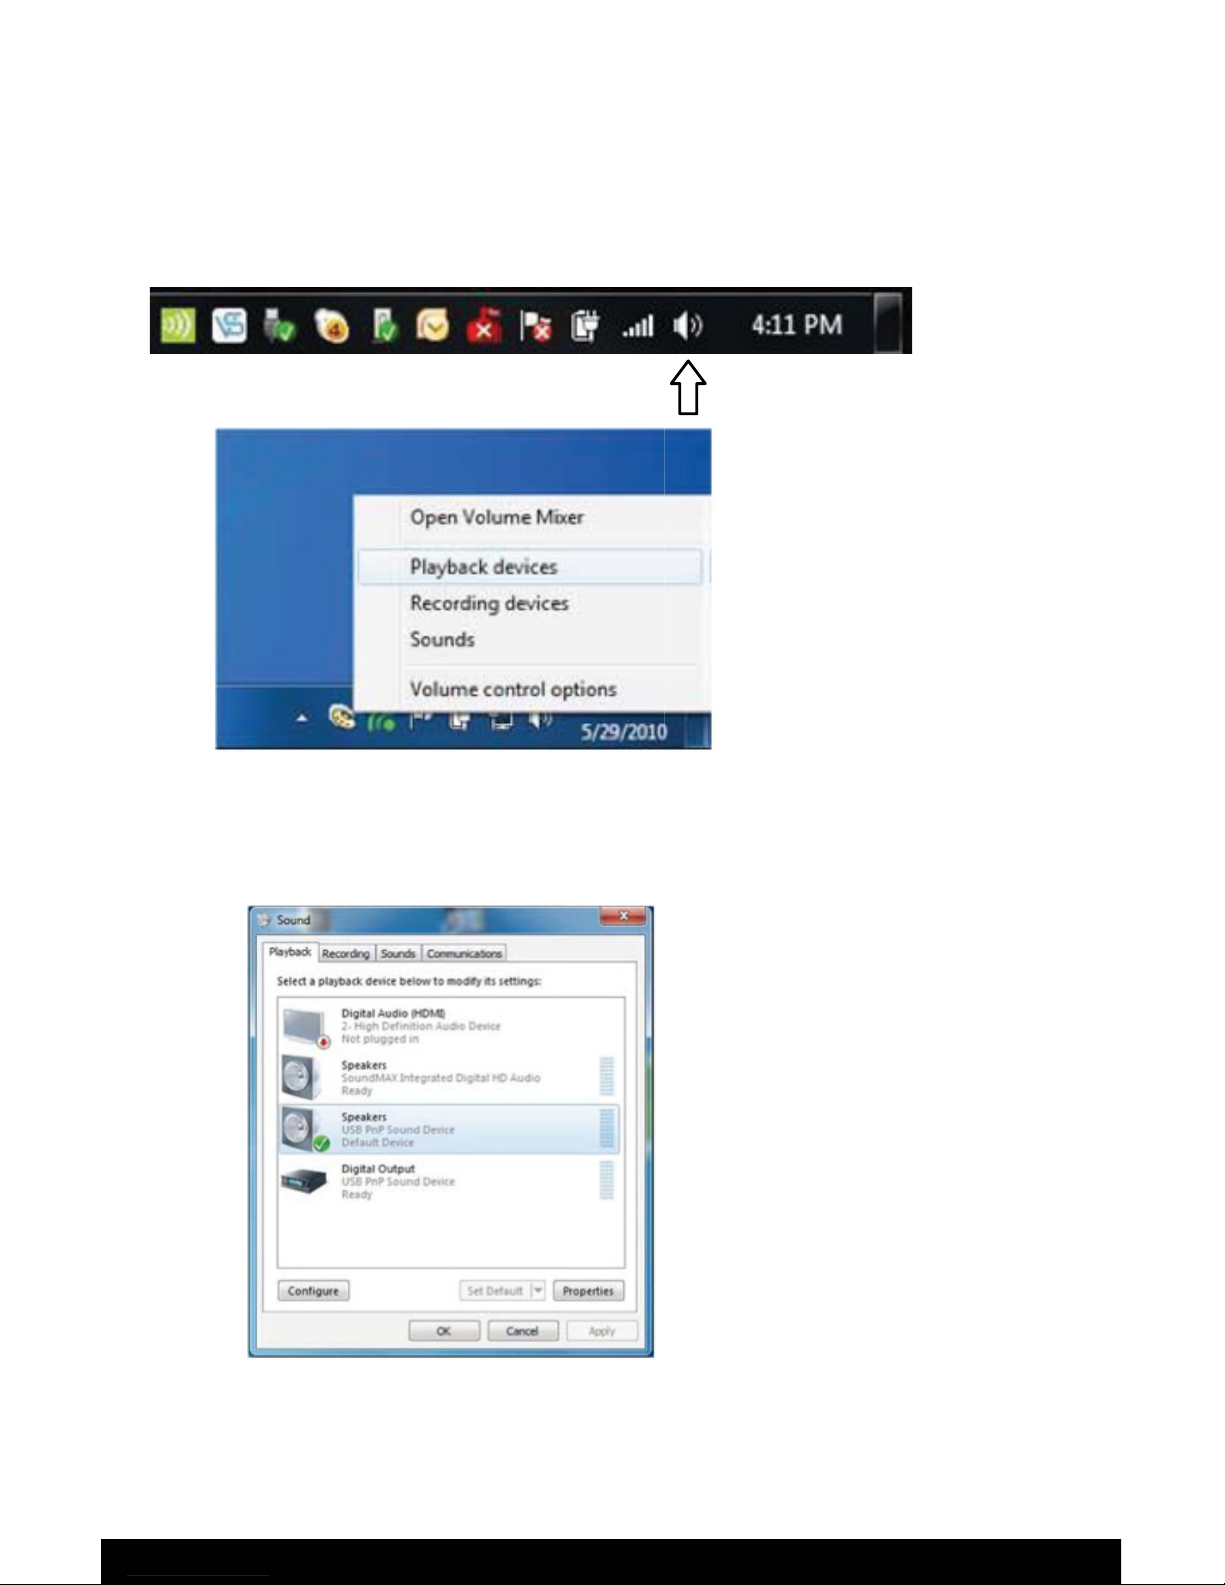
5. CONFIGURING AUDIO SETTINGS:
The PC should automatically connect via the StreamHD to the Wireless audio device.
If it does not, or if you would like to switch audio devices, you can select the Audio
Playback device from the drop down dialog in Windows
®
7 as follows:
Right click the Audio Properties icon in the System Tray and select Playback
devices.
For full details of installations procedures and troubleshooting for all Windows
®
Operating Systems, refer to the installation manual available on the installation CD,
or online at www.warpia.com/support
To Contact Support: [email protected]
For all audio outputs (HDMI, 3.5mm or S/PDIF)
Click “Speakers USB PnP Sound Device” and click “Set Default”
lick “Speakers USB PnP Sound Devic
e
Next, Insert the StreamHD installation CD into the PC and begin the software
installation by running the Setup.exe file. Ensure that the PC Adapter is NOT
plugged into the PC at this time.
 Loading...