

Page 1

MID-FRAME WINCH
WITH SYNTHETIC ROPE
INSTALLATION AND OPERATOR’S GUIDE
GUIDE D’INSTALLATION ET OPERATEUR
87970A2
Warn Industries, Inc.
12900 S.E. Capps Road
Clackamas, OR USA 97015-8903
1-503-722-1200 FAX: 1-503-722-3000
www.warn.com
Customer Service / Service Clients: 1-800-543-9276
© 2016 Warn Industries, Inc.
WARN®, the WARN logo are registered trademarks of Warn Industries, Inc.
WARN® et le logo WARN sont des marques
déposées de Warn Industries, Inc.
Page 2

English...........................................................................1
Français.......................................................................17
Español........................................................................33
Deutsch ....................................................................... 49
Svenska ......................................................................65
87970A2
87970A2
Page 3
WARN INDUSTRIES * WINCH
1
Every winching situation has the potential for personal injury. In order to minimize that risk,
it is important to read ALL instructions and safety information regarding your product. Please
familiarize yourself with the operation of your winch before using it and be constantly safety
oriented. These instructions provide important safety information and instructions on how to
install and operate your winch.
In this kit you will find the following pieces of literature:
• Winch Installation Guide/ First Time Operation Instructions
• Product Warranty
SAVE THIS MA NUAL and other product literature for future reference and review frequently
for continuing safe operation.
Instruct all users of this product to review this manual before operating this product.
Additional Product Literature Available Online
:
• Basic Guide to Winching Techniqu es
• Provides a basic understanding of the winch and teaches basics of proper winching
techniques. It is a valuable resource to help winch safely and efficiently.
• Product Specification and Performance Data
• Provides product specifications, performance data and replacement parts information.
• Other product literature specific to some products
Go to
www.warn.com/corporate/literaturerequest.shtml
for additional or replacement
product literature available to view/download.
WARN INDUSTRIES * WINCH
2
ORIGI NAL INSTRUC TIONS
Winch
Installation and Operator’s Guide
TABLE OF CONTENTS:
SAFETY
Symbol Index .......................................................................................................................................................3
General Safety Precautions ......................................................................................................................... 4-7
Safe Working Conditions .................................................................................................................................8
INSTRUCTIONS
Mounting Winch ................................................................................................................................................. 9
Electrical Connections ....................................................................................................................................10
Operating Instructions ............................................................................................................................ 11-12
Installing the Rope ....................................................................................................................................12-14
Rope Inspection ........................................................................................................................................15-16
Warn Industries Inc.
12900 SE Capps Road
Clackamas, OR 97015
USA
Customer Service: (800) 543-WARN
(9276)
International: (503) 722-1200
Fax: (503) 722-3000
www.warn.com
WARN® and the WARN l ogo are registere d trademarks of Wa rn Industries, In c.
© 2016 Warn Industries, Inc.
87970A2
87970A2
Page 4

WARN INDUSTRIES * WINCH
3
SYMBOL INDEX
SYMBOL EXPLANATION
Read All Product
Literature
Some literature available only
online at www.warn.com/
corporate/literaturerequest.shtml.
Always Wear Hearing and
Eye Protection
Never Use Winch as a
Hoist
Properly Seat Load in
Throat of Hook
Wind Rope on Bottom of
Drum
Finger/Fairlead Crushing
Hazard
Hand Piercing/Cutting
Hazard
Explosion/Bursting
Hazard
Never Route Electrical
Cables Across Sharp
Edges
Avoid Installing Electrical
Cables around Pinch and
Wear/Abrasion Points
SYMBOL EXPLANATION
Always Wear Leather
Gloves
Do Not Move People
Always Use Supplied
Hook Strap
Never Apply Load to
Hook Tip or Latch
Never Wind Rope Over
Top of Drum
Fairlead Pinch Point
Hot Surface Hazard
Fire and Burn Hazard
Never Route Electrical
Cables through or Near
Moving Parts
Exposed Wiring Hazard,
Insulate Exposed Wiring
and Terminals
Never Hook Back on
Rope
WARN INDUSTRIES * WINCH
4
GENERAL SAFETY PRECAUTIONS
As you read these instructions, you will see WARNINGS,
CAUTIONS, NOTICES and NOTES. Each message has a speci c
purpose. WARNINGS are safety messages that indicate a
potentially hazardous situation, which, if not avoided could
result in serious injury or death. CAUTIONS are safety messages
that indicate a potentially hazardous situation which, if not
avoided, could result in minor or moderate injury. A CAUTION
may also be used to alert against unsafe practice. CAUTIONS
and WARNINGS identify the hazard, indicate how to avoid the
hazard, and advise of the probable consequence of not avoiding
the hazard. NOTICES are messages to avoid property damage.
NOTES are additional information to help you complete a
procedure. PLEASE WORK SAFELY!
Warnings and Cautions
WARNING
MOVING PARTS ENTANGLEMENT HAZARD
Failure to observe these instructions could lead to
serious injury or death.
General Safety:
• Always Know Your Winch. Take time to fully read the
Instructions and/or Operations Guide, and/or Basic Guide to
Winching Techniques, in order to understand your winch and
its operations, found online at http://www.warn.com/
corporate/literaturerequest.shtml.
• Never exceed winch or winch rope rated capacity. Double
line using a snatch block to reduce winch load.
• Always wear heavy leather gloves when handling winch
rope.
• Never use winch or winch rope for towing. Shock loads can
damage, overload and break rope.
• Never use a winch to secure a load.
• Never operate this winch when under the in uence of drugs,
alcohol or medication.
• Never operate this winch if you are under 16 years of age.
Installation Safety:
• Always choose a mounting location that is suffi ciently strong
to withstand the maximum pulling capacity of your winch.
• Always use grade 5 (grade 8.8 metric) or better hardware.
• Never weld mounting bolts.
• Always use factory approved mounting hardware,
components, and accessories.
• Never use bolts that are too long.
• Always complete the winch installation and hook
attachment before installing the wiring.
• Always keep hands clear of winch rope, hook loop, hook and
fairlead opening during installation, operation, and when
spooling in or out.
• Always position fairlead with warning readily visible on top.
• Always prestretch rope and respool under load before use.
Tightly wound rope reduces chances of “binding”, which can
damage the rope.
MOVING PARTS ENTANGLEMENT HAZARD
Failure to observe these instructions could lead to
serious injury or death.
• Always ensure hook latch is closed and not
supporting load.
• Never apply load to hook tip or latch. Apply load only
to the center of hook.
• Never use a hook whose throat opening has
increased, or whose tip is bent or twisted.
• Always use a hook with a latch.
• Always ensure the operator and bystanders are aware
of the stability of the vehicle and/or load.
• Always keep wired remote control lead and power
cord clear of the drum, rope, and rigging. Inspect for
cracks, pinches, frayed wires or loose connections.
Damaged components must be replaced before
operation.
• Always pass remote lead thru window when used in
vehicle.
• Never hook back on rope.
WARNING
87970A2
87970A2
Page 5
WARN INDUSTRIES * WINCH
5
GENERAL SAFETY PRECAUTIONS
WARNING
MOVING PARTS ENTANGLEMENT HAZARD
Failure to observe these instructions could lead to
serious injury or death.
Winching Safety:
• Always inspect winch rope, hook, and slings before
operating winch. Frayed, kinked or damaged winch rope
must be replaced immediately. Damaged components must
be replaced before operation. Protect parts from damage.
• Always remove any element or obstacle that may interfere
with safe operation of the winch.
• Always be certain the anchor you select will withstand the
load and the strap or chain will not slip.
• Always use supplied hook strap whenever spooling winch
rope in or out, during installation and during operation.
• Always require operators and bystanders to be aware of
vehicle and or load.
• Always be aware of stability of vehicle and load during
winching, keep others away. Alert all bystanders of an
unstable condition.
• Always unspool as much rope as possible when rigging.
Double line or pick distant anchor point.
• Always take time to use appropriate rigging techniques for
a winch pull.
• Never touch winch rope or hook while someone else is at
the control switch or during winching operation.
• Never engage or disengage clutch if winch is under load,
winch rope is in tension or drum is moving.
• Never touch winch rope or hook while under tension or
under load.
• Always stand clear of winch rope and load and keep others
away while winching.
• Never use vehicle to pull load on winch rope. Combined
load or shock load can damage, overload and break rope.
• Never wrap winch rope back onto itself. Use a choker chain
or tree trunk protector on the anchor.
WARNING
FALLING OR CRUSHING HAZARD
Failure to observe these instructions could lead to
serious injury or death.
• Always stand clear, keep hands clear, keep others away.
• Never operate winch with less than 10 wraps of rope around
the drum. Rope could come loose from the drum, as the rope
attachment to the drum is not designed to hold a load.
• Never use winch as a hoist or to suspend a load.
• Always be certain anchor will withstand load, use
appropriate rigging and take time to rig correctly.
• Never use winch to lift or move persons.
• Never use excessive eff ort to freespool winch rope.
• Always use proper posture/lifting technique or get lifting
assistance while handling and installing product.
• Always spool the rope onto the drum in the direction
speci ed by the winch warning label on the winch and/or
documentation. This is required for the automatic brake (if so
equipped) to function properly.
• Always spool the winch rope onto the drum as indicated by
the drum rotation label.
WARNING
CUT AND BURN HAZARD
Failure to observe these instructions could lead to
serious injury or death.
To avoid injury to hands and ngers:
• Always wear heavy leather gloves when handling winch
rope.
• Always be aware of possible hot surfaces at winch motor,
drum or rope during or after winch use.
WARN INDUSTRIES * WINCH
6
GENERAL SAFETY PRECAUTIONS
WARNING
IMPACT AND MOVING PARTS
ENTANGLEMENT HAZARD
Failure to observe these instructions could lead to
serious injury or death.
To avoid injury to hands and ngers:
• Always know the Working Load Limit (WLL) of your rope.
• Always determine the suitability of a rope for a speci c
application.
• Never use the included rope on a winch with a rated line pull
greater than 10,000 lbs (4536 kg).
• Never use a rope if worn, damaged, abused, overloaded,
improperly maintained or over 1 year old.
• Never stand within the recoil (snapback) area.
• Never use rope over a rough surface without Chafe
Protection.
• Never bend rope around unprotected, sharp corners.
• Never leave clutch disengaged when not freespooling rope.
The automatic brake will not operate when clutch lever is in
freespool.
• Never exceed the load rating of 10,000lbs (4536 kg).
• Always replace rope every 12 months.
• Always use a WARN fairlead that is recommended for
synthetic rope.
• Always replace the WARN hawse fairlead if damaged or
abused with a WARN fairlead that is recommended for
synthetic rope.
WARNING
CHEMICAL AND FIRE HAZARD
Failure to observe these instructions could lead to
serious injury or death.
• Always remove jewelry and wear eye protection.
• Never route electrical cables across sharp edges.
• Never route electrical cables near parts that get hot.
• Never route electrical cables through or near moving parts.
• Always place the supplied terminal boots on wires and
terminals as directed by the installation instructions.
• Never lean over battery while making connections.
• Never route electrical cables over battery terminals.
• Never short battery terminals with metal objects.
• Always verify area is clear of fuel lines, fuel tank, brake
lines, electrical wires, etc., when drilling.
• Always consult operator’s manual for proper wiring details.
• Always insulate and protect all exposed wiring and
electrical terminals.
87970A2
87970A2
Page 6
WARN INDUSTRIES * WINCH
7
GENERAL SAFETY PRECAUTIONS
AVOID WINCH AND EQUIPMENT DAMAGE
• Always avoid side pulls which can pile up rope at one end of
the drum. This can damage rope or winch.
• Always ensure the clutch is fully engaged or disengaged.
• Always use care to not damage the vehicle frame when
anchoring to a vehicle during a winching operation.
• Never submerge winch in water.
• Always store the remote control in a protected, clean, dry
area.
• Always avoid continuous “Power-Out”. Heat build up from
continuous power out may damage the rope.
• Never expose the rope to harsh detergents, fuels, oils, or
Anti-freeze.
• Always use a chafe protector on all sharp edges to protect
rope.
• Never allow the rope to contact sharp objects. Severe
damage may result.
• Always respool rope in even wraps following any angled
winching activities.
• Never “jog” rope under load. Shock loads can momentarily
exceed capacity of rope and winch.
• Never install more than 100’ (CTI) / 80’ (XDC) of 3/8”
synthetic rope. Damage to the winch may result.
NOTICE
CAUTION
MOVING PARTS ENTANGLEMENT HAZARD
Failure to observe these instructions could lead to
minor or moderate injury.
To avoid injury to hands or ngers:
• Never leave remote control where it can be activated during
free spooling, rigging, or when the winch is not being used.
• Never leave the winch remote control plugged in when
installing, freespooling, rigging, servicing or when the winch
is not being used.
CAUTION
CUT AND BURN HAZARD
Failure to observe these instructions could lead to
minor or moderate injury.
• Never let winch rope slip through your hands.
WARN INDUSTRIES * WINCH
8
SAFE WORKING CONDITIONS
WARNING
Always stand clear,
keep hands clear,
keep others away.
SAFE WORKING CONDITIONS
The operator should always
operate the winch from a safe
position when pulling a load. The
safe areas are: (1) Perpendicular to
the rope, (2) Inside the vehicle with
the hood up (if winch is mounted on
front of vehicle). These safe positions
will help prevent the rope from
striking the operator if the rope fails
when under load.
Operate winch from the fully
extended remote control cord length
whenever possible. The operator
must always be at least 8 ft. (2.44 m)
from the winch while operating. This
will prevent entanglement with the
fairlead and keep the operator out of
harms way during winch load pulling.
Never work around the rope
while under load.
Sound Emissions
The winch is designed so that
the sound emissions do not exceed
70 dBa from the operator’s station.
The operator must be at least 8
ft. (2.44 m) from the winch while
operating. If the winch is exceeding
70 dBa from the operator’s station,
have the winch inspected at an
authorized service center.
Cleaning
Use low pressure water to
clean synthetic rope. Do not use any
chemicals.
Do not direct high pressure
water (pressure washers, car washes,
etc.) between the drum support and
drum ange or clutch lever.
Use low pressure water and a
soapy rag or sponge to clean the
winch.
Avoid using chemicals that may
damage the nish.
Thoroughly clean salt residue
from the winch as soon as possible to
minimize corrosion.
Maintenance
Replace rope every 12 months
with WARN rope.
No lubrication is required for
the life of the winch unless the winch
has been submerged in water. If this
occurs, a quali ed service center
must complete service as soon
as possible to prevent corrosion
damage. If the control pack is
submerged, it must be replaced
when the winch is serviced.
Check battery cables and
electrical connections at 90 day
intervals to be certain they are clean
and tight at all connection points.
Inspect the rope before and
after each winching operation. When
damaged, replace with the size
speci ed in the Replacement Parts
List, or go to the Warn website at
www.warn.com.
The rope must always spool
onto the drum as indicated by the
drum rotation decal on the winch.
WARNING
Always require
operators and
bystanders to be
aware of vehicle
and or load.
NOTICE
Never submerge
winch in water.
CAUTION
Never leave remote
control where it
can be activated
during free spooling,
rigging, or when the
winch is not being
used.
87970A2
87970A2
Page 7
WARN INDUSTRIES * WINCH
9
MOUNTING WINCH
MOUNTING WINCH
Choose a mounting location
that is suffi ciently strong enough
to withstand the loads you intend
to winch. Only the mounting
orientations shown are possible for
safe winching operation. All others
are improper and inappropriate.
The use of recommended bolt and
lock washer combinations torqued
to recommended levels will prevent
vibration during operation. The
mounting details indicate the proper
torque levels.
Remember the winch rope
must always spool onto the drum as
indicated by the drum rotation decal.
Refer to the following diagrams
for proper mounting orientation.
WARNING
Never use bolts that
are too long.
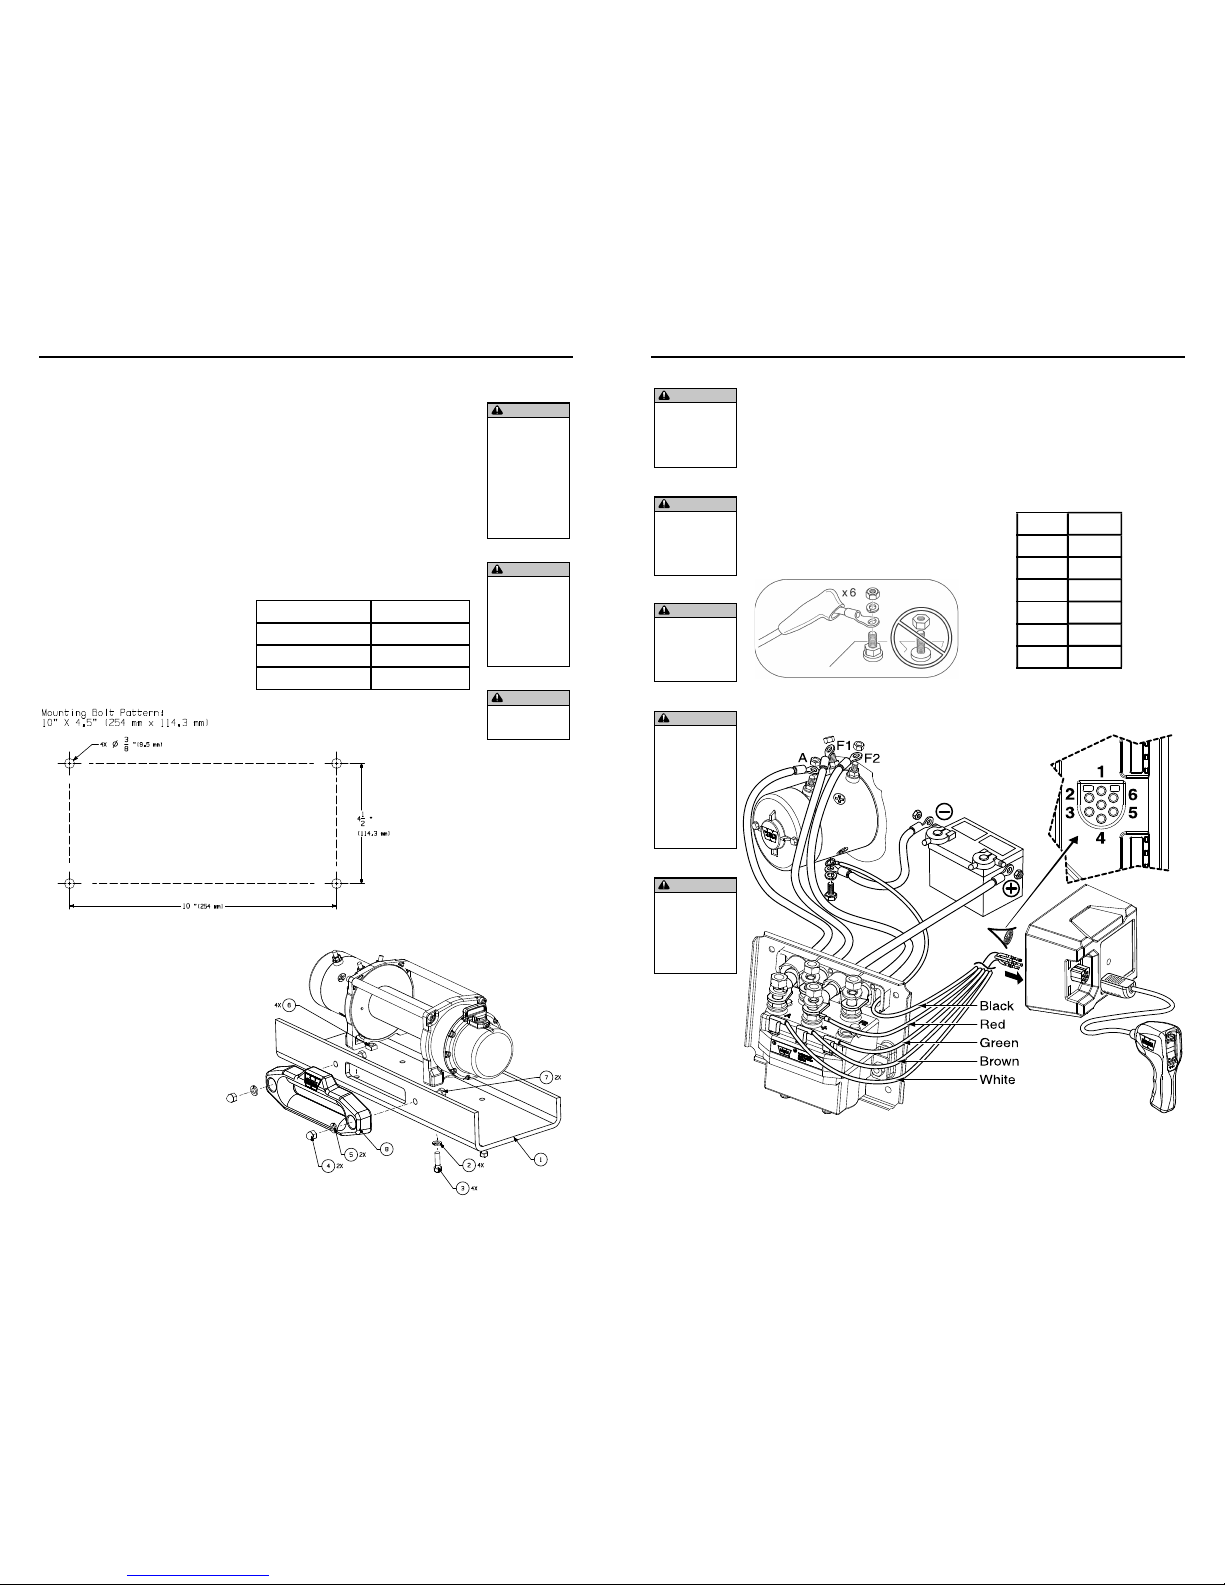
Mounting Details:
(1) Smooth and at, thickness = 1/4” (6.4 mm)
(2) 3/8” (9.525 mm) lockwasher X 4
(3) 3/8-16 X 1 1/4” long, grade 5 bolt X 4
Torque 30-35 ft. lbs. (41-47Nm)
(4) 1/2-13 Locknut
(5) 1/2 Flat washer
(6) 3/8-16 Sq. nut
(7) 1/2-13x2” button head bolt
(8) Aluminum Fairlead
Control Pack Installation
Mount the control pack
according to the instructions
included in the WARN mounting
system kit. Use the bracket included
in the kit.
WARNING
Always choose a
mounting location
that is suffi ciently
strong to withstand
the maximum
pulling capacity of
your winch.
WARNING
Always complete the
winch installation
and attach the hook
before installing the
wiring.
Plate Thickness Bolt Length
1/4” (7 mm) 1.25” (32 mm)
3/8” (10 mm) 1.5” (40 mm)
1/2” (13 mm) 1.5” (40 mm)
WARN INDUSTRIES * WINCH
10
ELECTRICAL CONNECTIONS
Electrical Diagrams:
ELECTRICAL CONNECTIONS
Use the included insulating
boots on exposed connections to
prevent electrical shorting. Route
battery connection cables in areas
which will not cause them to chafe or
cut through the insulation causing a
potential short circuit.
Upon completion of installation,
check winch for proper operation.
WARNING
Never route
electrical cables
across sharp edges.
WARNING
Never route
electrical cables near
parts that get hot.
WARNING
Never route
electrical cables
through or near
moving parts.
WARNING
Always place the
supplied terminal
boots on wires
and terminals
as directed by
the installation
instructions.
Battery Recommendations
A fully charged battery and
good connections are essential to
the proper operation of your winch.
The minimum requirement for a 12
volt DC battery is 650 Cold Cranking
Amps.
WARNING
Always insulate and
protect all exposed
wiring and electrical
terminals.
Pin # Color
1 Brown
2 White
3 Black
4 Green
5
6 Red
87970A2
87970A2
Page 8
WARN INDUSTRIES * WINCH
11
OPERATING INSTRUCTIONS
WARNING
Never engage or
disengage clutch
if winch is under
load, winch rope is
in tension or drum is
moving.
WARNING
Never operate
winch with less
than 10 wraps of
rope around the
drum. Rope could
come loose from
the drum, as the
rope attachment
to the drum is not
designed to hold
a load.
NOTICE
Do Not power-out
rope more than 30
ft. without allowing
the winch to cool for
20 minutes before
powering rope
back in. Instead,
place the clutch in
freespool and pull
the rope off by hand.
FIRST TIME OPERATING
INSTRU CTIONS
In this section, we’ll show you the
first time operating instructions for
effective basic winch ing. For complete
winch operation and techniques read
the Basic Guide to Winching Techniques
found online at
http://www.warn.com/
corporate/literaturerequest.shtml.
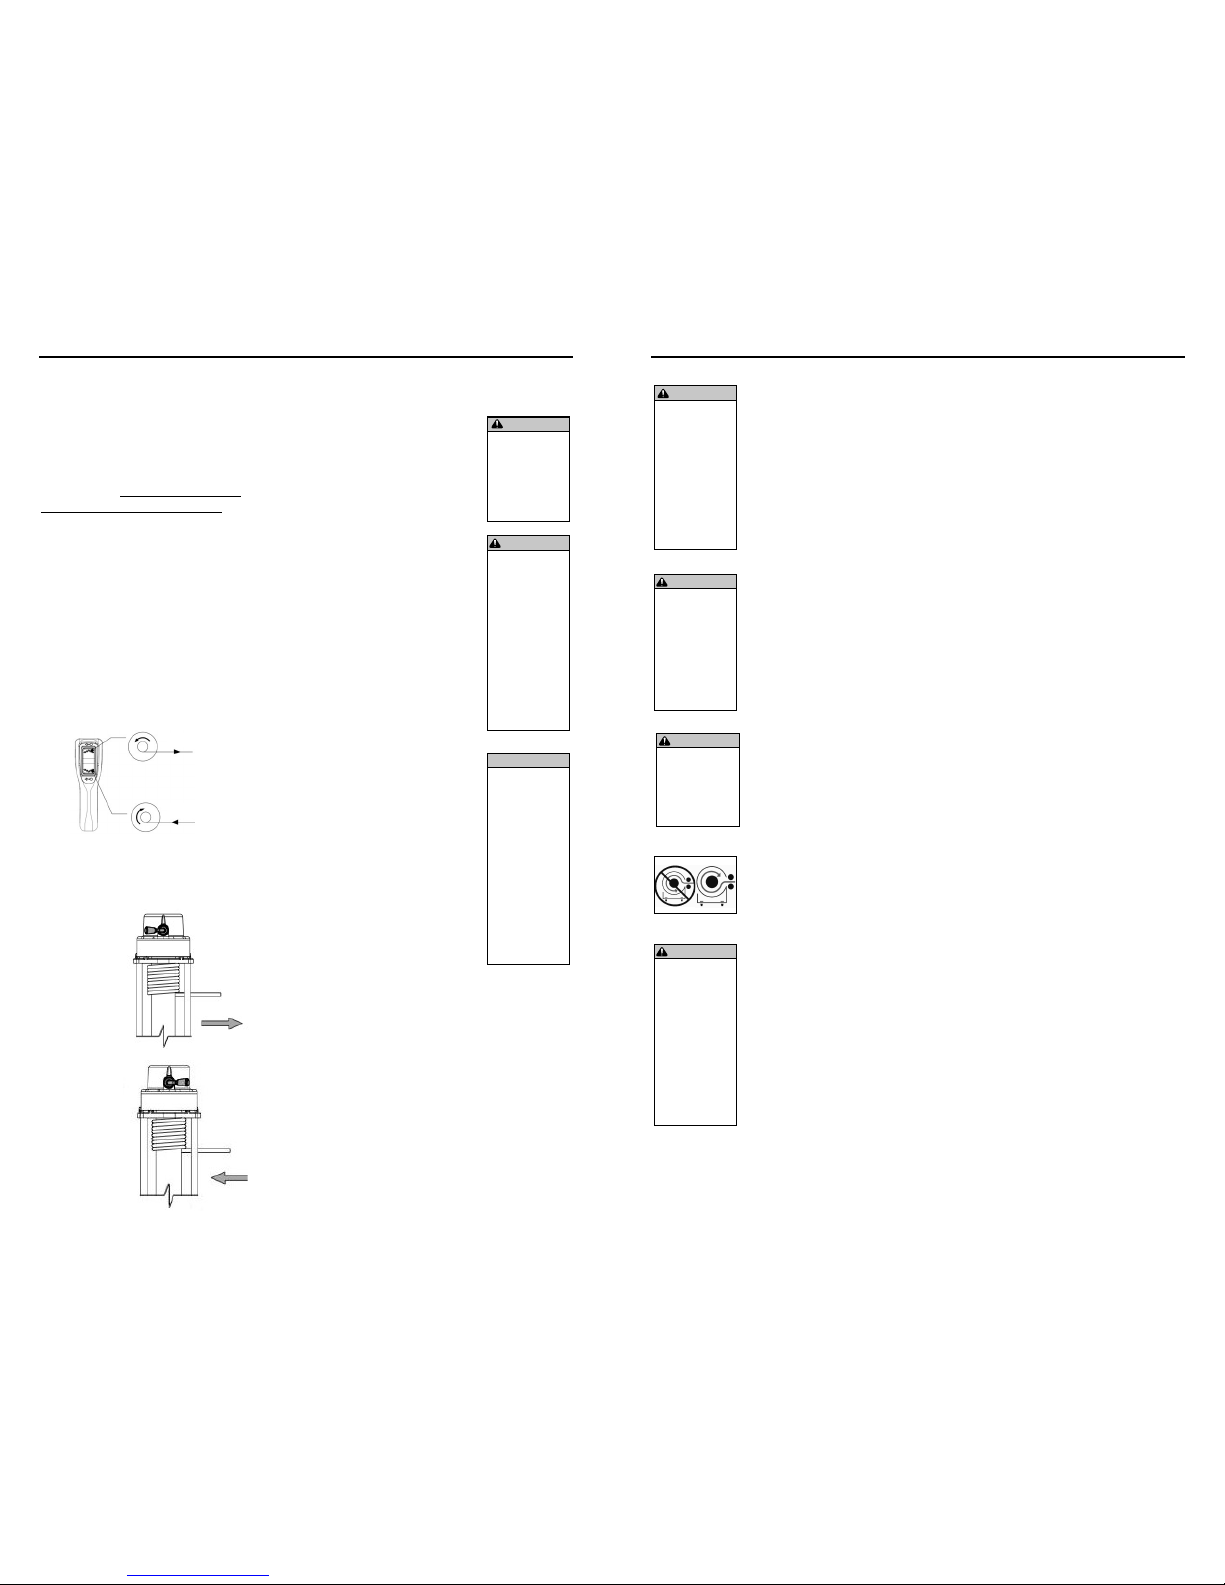
Remote Control Switch
The winch is co ntrolled by the hand
held remote contr ol. The remote control
provides control of the power-out (forward)
or power-in (reve rse) rotation of the
spooling drum
.
Do not leave the remote plugged
into the winch when not in use. Leaving
the remote plugged in, may result in
a dangerous condition and/or battery
drain.
Clutch Operation:
When the clutch is engaged, the gear
train is coupled to the winch drum and
power can be transferred from the winch
Disengaged:
Engaged:
Vertical/Horizontal Remote:
motor. When the clutch is disengaged
the drum is in the freespool position and
the gear train and winch rope drum are
uncoupled allowing the drum to rotate
freely.
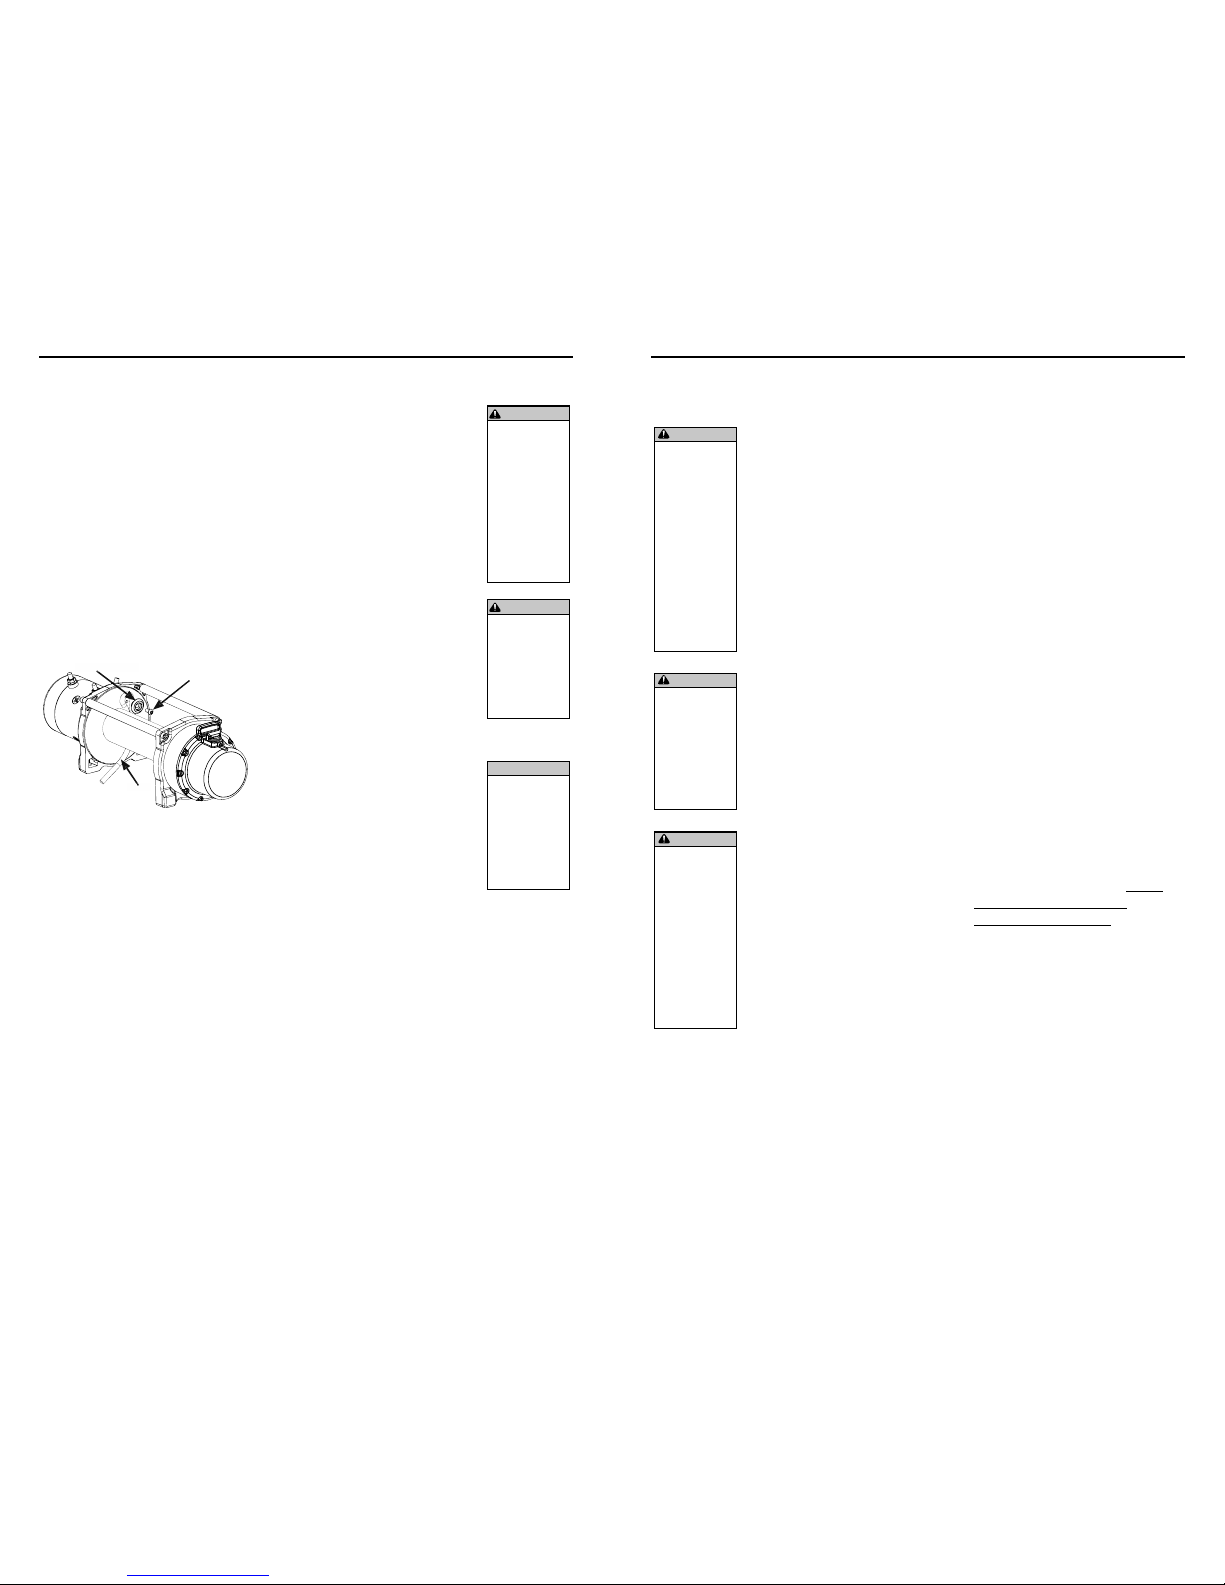
The clutch lever, located on the winch
housing opposite the motor, controls
the clutch position. To prevent damage,
always fully engage or fully disengage
the clutch lever.
Spooling Out
Freespooling is generally the
quickest and easiest way to spool out
wire rope. Before freespooling wire
rope out from the winch, power out
enough rope to remove any tension the
wire rope might be under. Disengage
the clutch. Then freespool by manually
spooling out enough wire rope for
the winching operation. See
The Basic
Guide to Winching Techniques
for more
information.
Always leave at least 5 wraps of
rope on the drum.
Spooling In Under Load
Never exceed winch’s rated line
pull.
Power-in the wire rope evenly and
tightly on the drum. This prevents the
outer wire wraps from sinking into the
inner wraps, binding, and damaging the
wire rope.
Avoid shock loads when spooling,
by pulsing the control switch to take
up wire rope slack. Shock loads can
momentarily far exceed the winch and
rope ratings.
Spooling In Under No Load
Spooling with an As sistant:
Have the
assistant hold the hook strap putting as
much constant tension on the wire rope
as possible. While keeping tension, the
assistant should walk toward the winch
while you operate the control switch
spooling in the wire rope. Release the
switch when the hook is a minimum of 6
ft. (2 m) from the fairlead opening.
Spool in the remainder for storage
as directed below.
IN
OUT
WARN INDUSTRIES * WINCH
12
OPERATING INSTRUCTIONS
Spooling Out
Freespooling is generally the
quickest and easiest way to spool out
rope. Before freespooling rope out from
the winch, power out enough rope to
remove any tension the rope might
be under. Disengage the clutch. Then
freespool by manually spooling out
enough rope for the winching operation.
See
The Basic Guide to Winching
Techniques
for more information.
Always leave at least 10 wraps of
rope on the drum.
Spooling In Under Load
Never exceed winch’s rated line pull.
Power-in the rope evenly and
tightly on the drum. This prevents the
outer wraps from sinking into the inner
wraps, binding, and damaging the rope.
Avoid shock loads when spooling,
by pulsing the control switch to take up
rope slack. Shock loads can momentarily
far exceed the winch and rope ratings.
Spooling In Under No Load
Spooling with an Assistant:
Have the
assistant hold the hook strap putting
as much constant tension on the rope
as possible. While keeping tension, the
assistant should walk toward the winch
while you operate the control switch
spooling in the rope. Release the switch
when the hook is a minimum of 6 ft. (2 m)
from the fairlead opening.
Spool in the remainder for storage
as directed below.
Spooling Alone:
Arrange the rope to be
spooled so it will not kink or tangle when
spooled. Be sure any rope on the drum is
tightly and evenly layered. Spool enough
rope to complete the next full layer on
the drum. Tighten and straighten the
layer.
Repeat process until the hook is a
minimum of 6 ft. (2 m) from the fairlead
opening.
Spool in the remainder for storage
as directed below.
Spooling Remainder for Storage
When the hook is within 6 ft. (2 m) of the
fairlead, disconnect the hook from the
anchor or load. Hold onto the supplied
WARNING
Always keep hands
clear of winch rope,
hook loop, hook and
fairlead opening
during installation,
operation, and when
spooling in or out.
WARNING
Always use
supplied hook strap
whenever spooling
winch rope in or out,
during installation
or operation to
avoid injury to
hands and ngers.
WARNING
Always wear heavy
leather gloves when
handling winch
rope.
WARNING
Never touch winch
rope or hook while
someone else is at
the control switch
or during winching
operation.
hook strap and hold tension on the
winch rope. Slowly power-in the winch
by “pulsing” the power-in switch on the
remote control until the hook is within 3
ft. (1 m) of the fairlead. Stop winching in
and attach the hook to a suitable anchor
point on the vehicle.
DO NOT POWER THE HOOK INTO
THE FAIRLEAD. This could cause damage
to the fairlead. Once the hook is suitably
attached to the vehicle, power-in the
remaining slack in the winch rope by
“pulsing” the power-in switch on the
remote control until there is minimal slack
in the winch rope.
Overloading/Overheating
This winch is rated for intermittent
duty. When the motor approaches stall
speed, very rapid heat buildup occurs
which may cause motor damage.
Double-line rigging (see
The Basic
Guide to Winching Techniques
) will reduce
the amperage draw, and reduce heat
buildup in the motor. This allows longer
continual use.
87970A2
87970A2
Page 9
WARN INDUSTRIES * WINCH
13
OPERATING INSTRUCTIONS
WARNING
Always prestretch
rope and respool
under load before
use. Tightly wound
rope reduces chances
of “binding”, which
can damage the
rope.
WARNING
Never touch rope or
hook while someone
else is at the control
switch or during
winching operation.
Spooling
THE FOLLOWING STEPS ARE VERY
IMPORTANT AND IF NOT PRECISELY
FOLLOWED THE LIFE OF THE WINCH
AND ROPE MAY BE COMPROMISED.
1. Mount the Warn Aluminum Hawse
Fairlead to the winch mount using
the supplied hardware. Always
mount the fairlead with the labels in
the upright position (labels on top
and clearly visible). Insert a 7/16” x
1 1/4” bolt through each of the two
fairlead mounting holes and through
the winch mount. Place a 7/16” at
washer onto each bolt. Install a 7/16”
lock nut onto each bolt and tighten to
35 ft. lbs.
6. It is now necessary to spool the
remaining rope onto the winch
drum. Choose a FLAT location that
is large enough to run out the entire
length of rope. Attach the hook end
of the rope to a suitable anchor point
and back the vehicle away from the
anchor point leaving approximately
6 ft of slack rope lying on the ground.
Before getting out of the vehicle, set
the parking brake, place the vehicle in
gear or park and turn the vehicle off .
7. Connect the remote control to the
winch. Standing approximately 8 ft
away from the winch, power in the
winch until there is 10 wraps onto the
winch drum. Disconnect the remote
control from the winch. Hold tension
on the rope with one hand; carefully
push the rope to the side of the drum
the rope is attached to so there are
no gaps between each coil on the
drum. Be sure to check that the rope
is winding off of the bottom of the
drum, not the top, or the automatic
load holding brake will not function
properly. (If the rope is winding off
the top you have powered the winch
“out” instead of “in” on the remote
control)
8. If there is still rope laying on the
ground, back the vehicle away until
the rope is off of the ground.
9. The following steps should be done
using two people for proper safety.
If you attempt to tension your rope
alone be sure to always engage the
parking brake, place the transmission
in gear and turn the vehicle off
every time you exit the vehicle to
inspect the winch rope. Never exit
the vehicle with a load on the winch
rope. Tensioning the rope is critical to
ensure a long product life. Tensioning
the rope prevents the rope from
sinking into the lower layers under
load.
10. Use care to evenly wrap each layer
to prevent damage to the rope.
2. Slide the abrasion sleeve over the
rope from the end opposite the hook.
Slide the sleeve back to the hook end
of the rope.
3. Apply Lock Tite 271 or equivalent
product to the supplied 1/4”-20 x 1/2”
long button head fastener.
4. Install the new synthetic rope using
the button head fastener supplied
and the machined rope washer.
Insert the synthetic rope through
the aluminum fairlead and around
the winch drum from the bottom.
Insert the button head bolt into the
machined rope washer and place the
synthetic rope on the machined rope
washer. Install the button head bolt
in the 1/4-20 hole in the side of the
winch drum. See Figure for detail.
5. Tighten the 1/4-20 button head
bolt to 8 ft. lbs. Turn the winch clutch
level to the “engaged” position.
NOTICE
Never install more
than 100’ (CTI) /
80’ (XDC) of 3/8”
synthetic rope.
Damage to the winch
may result.
Rope
Rope Washer
1/4-20 x 1/2”
Button Head
Bolt
WARN INDUSTRIES * WINCH
14
INSTALLING ROPE
WARNING
Never operate
winch with less
than 10 wraps of
rope around the
drum. Rope could
come loose from
the drum, as the
rope attachment
to the drum is not
designed to hold
a load.
11. Pass the remote control through
the driver’s window for the driver of
the vehicle to operate. Instruct your
assistant to stand to the side of the
vehicle and away from the winch
rope. Your assistant should signal you
if the rope is winding correctly by
watching it move across the fairlead
as the rope is powered in. Start the
vehicle and place the transmission
in neutral. Release the parking brake
while applying moderate brake pedal
pressure. Power the winch remote in.
After winching in for approximately 6
ft, stop winching. Slowly let up off of
the brake pedal and then apply the
parking brake. This will ensure that
there is no load on the winch rope.
Then place the transmission in park
or gear and turn the vehicle off . Exit
the vehicle and inspect the winch
rope is being evenly wound onto
the winch drum and not sinking into
the lower layer. If the rope is sinking,
power the rope out and repeat this
step from the beginning with more
brake pedal pressure.
12. Once you are convinced the rope
is winding on the winch properly,
return to the vehicle. Pass the remote
control through the driver’s window
for the driver of the vehicle to
operate. Start the vehicle and place
the transmission in neutral. Release
the parking brake while applying
moderate brake pedal pressure.
Power the winch remote in. After
winching in for approximately 6 ft,
stop winching. Slowly let up off of
the brake pedal and then apply the
parking brake. This will ensure that
there is no load on the winch rope.
Then place the transmission in park
or gear and turn the vehicle off . Exit
the vehicle and inspect the winch
rope is being evenly wound onto
the winch drum and not sinking into
the lower layer. If the rope is sinking,
power the rope out and repeat this
step from the beginning with more
brake pedal pressure.
INSTALLING THE ROPE Cont.
13. Repeat step 12 until the vehicle
is within 6 ft of the winch anchor.
Once within 6 ft, slowly let up off of
the brake pedal and then apply the
parking brake. This will ensure that
there is no load on the winch rope.
Then place the transmission in park
or gear and turn the vehicle off . Exit
the vehicle. Disconnect the hook from
the anchor. While holding onto the
supplied hook strap, hold tension on
the winch rope and slowly power-in
the winch by “pulsing” the power-in
on the remote control until the hook
is within 3 ft. of the fairlead. Stop
winching in and attach the hook to a
suitable anchor point on the vehicle.
DO NOT POWER THE HOOK INTO
THE FAIRLEAD. This would cause
irreparable damage to the fairlead.
Once the hook is suitably attached to
the vehicle, power in the remaining
slack in the winch rope by “pulsing”
the power-in on the remote until
there is minimal slack in the winch
rope.
Rigging
For complete rigging fundamentals,
Read the Basic Guide to Winching
Techniques, found online at
http://
www.warn.com/corporate/
literaturerequest.shtml.
WARNING
Always spool the
rope onto the drum
in the direction
speci ed by the
winch warning label
on the winch and/
or documentation.
This is required for
the automatic brake
(if so equipped) to
function properly.
WARNING
Always use
supplied hook
strap whenever
spooling winch rope
in or out, during
installation and
during operation.
87970A2
87970A2
Page 10
WARN INDUSTRIES * WINCH
15
ROPE INSPECTION
When rope is rst used, the outer
laments of the rope will quickly fuzz
up. This is the result of these laments
breaking and this roughened surface
will actually protect the bers
underneath. The condition should
stabilize, not progress. If the surface
roughness increases, excessive
abrasion is taking place and strength
is being lost. Look closely at both
the inner and outer bers. When
either is worn the rope is obviously
weakened. Open the strands and look
for powdered ber—this is a sign of
internal wear.
Rope should be replaced when:
• Rope bulk anywhere along the
length is reduced by 10% or
more by abrasion.
• Two or more adjacent strands
are cut.
• Flat areas or lumps are found
that are not eliminated by
exing rope.
• Excessive fused or melted bers
are found. Any such areas will
be stiff and the rope will have a
glazed appearance.
Rope Storage and Care
To ensure safety and
performance, the inspection and
maintenance of winching rope should
be among every user’s primary
concerns.
1. Inspect your winch rope for breaks,
cuts, abrasion and melted or fused
bers before each use.
2. Wash rope periodically to remove
dirt and grit. Simply rinse rope with a
garden hose, and allow it to air-dry.
DO NOT use solvents, bleach or
harsh detergents when washing rope,
and never apply a heat source to
speed drying.
3. Coil rope loosely, for storage, being
sure to remove any excess twists. To
maximize rope life, always store rope
line in a dark, dry place. Before using
any rope, refer to the following guide.
WARNING
Never operate
winch with less
than 10 wraps of
rope around the
drum. Rope could
come loose from
the drum, as the
rope attachment
to the drum is not
designed to hold
a load.
If the rope is damaged, remove
it from service immediately, and
replace it with undamaged rope.
Broken or cut strands reduce the
rope’s strength throughout its length
— not just in the area of damage. As
a general rule, retire your 12 strand
rope when more than 3 broken or cut
strands are visible, or if two adjacent
strands are compromised.
4. Replace your rope every 12
months with only WARN rope.
Normal Wear
When small surface bers break
on a rope, they create a fuzzy texture.
Known as “mild abrasion,” this is
considered good wear, and will not
aff ect the performance of the rope.
The nubby surface actually protects
the underlying ber from further
wear.
Excessive Wear–RETIRE THE ROPE
When bers are melted or
fused, it is generally the result of rope
abuse. Melted or fused polyester
bers result from bringing the rope’s
surface to a temperature in excess
of 430° F. Caused by excessive load
weights or powering out, these
damaged bers can compromise
strength, and should signal the rope’s
retirement.
Chemical Attack–RETIRE THE ROPE
(NOT ILLUSTRATED)
Localized discolorations could
potentially represent chemical attack
by anything from gear oil to battery
acid. When doubt exists, retire the
line.
WARN INDUSTRIES * WINCH
16
ROPE INSPECTION
WARNING
Always wear heavy
leather gloves when
handling winch
rope.
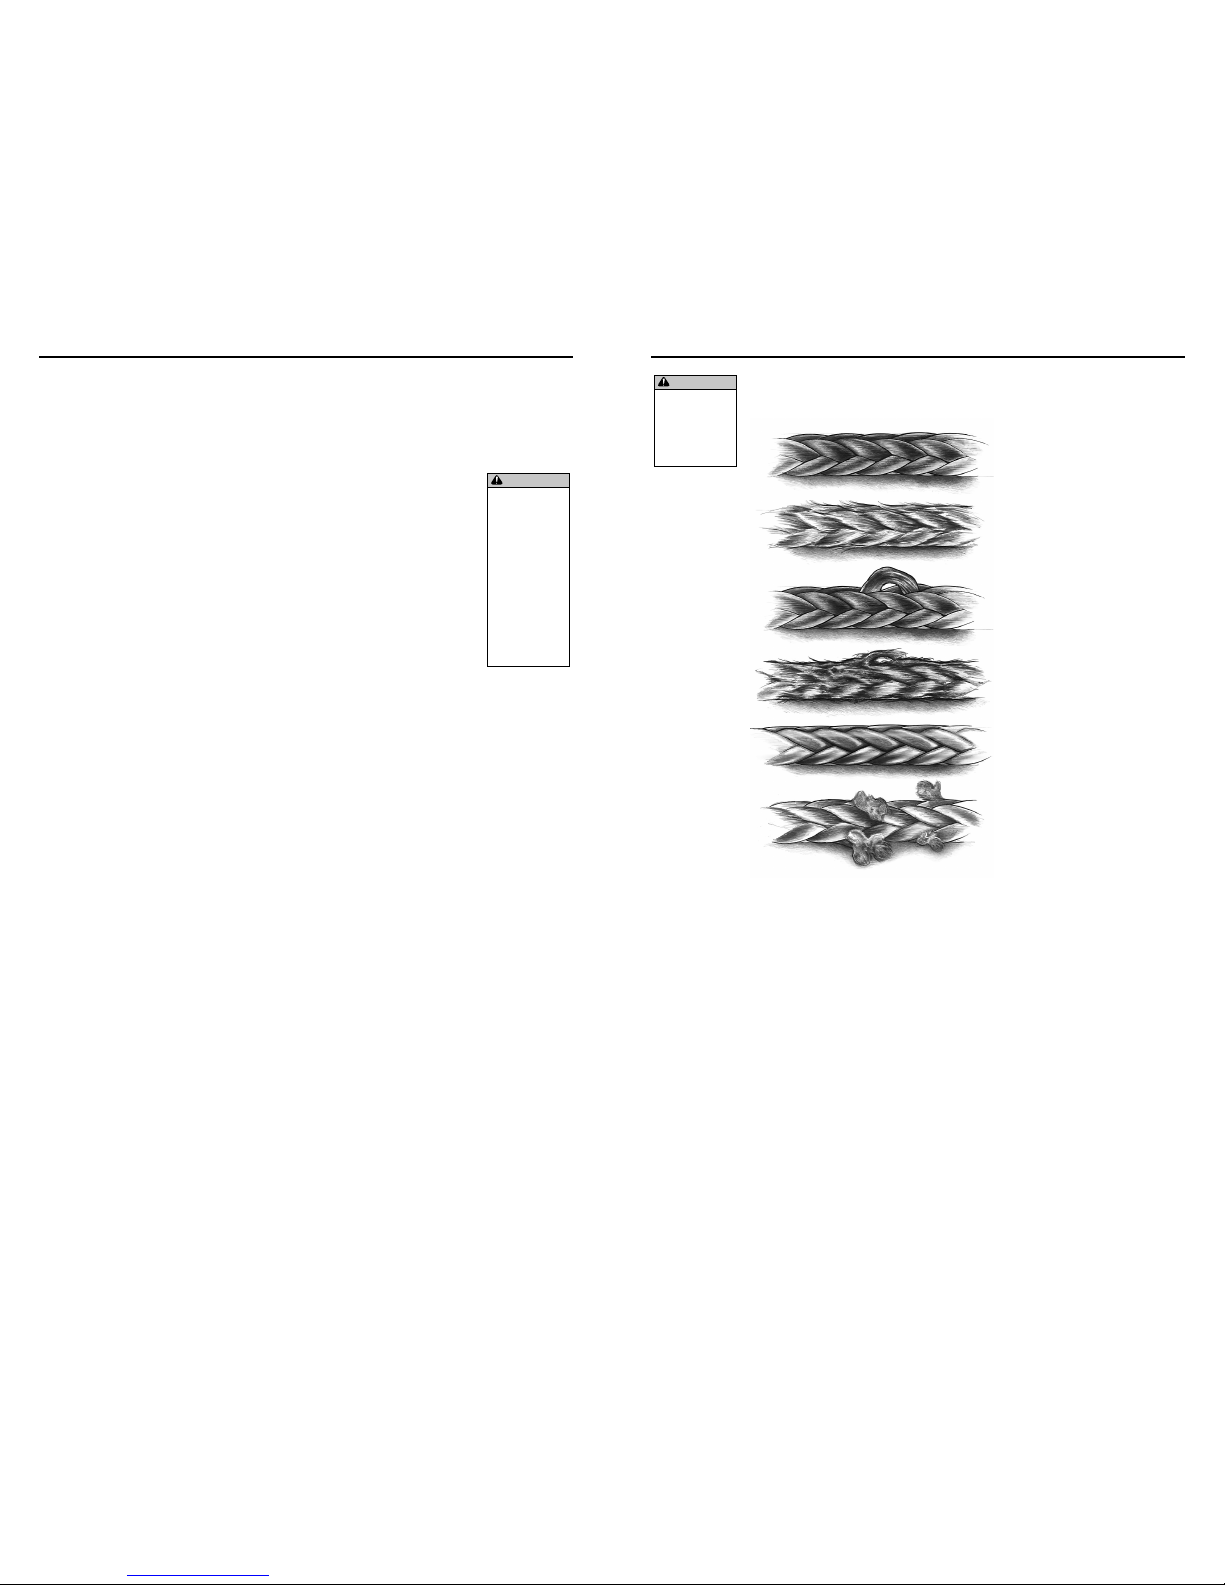
Examples:
Rope with original bulk.
Rope strand showing full volume.
Rope displaying 25% strand
volume reduction from
abrasion—rope should be
replaced.
Rope strand reduced by 25%
abrasion—rope should be
replaced.
Rope displays two adjacent
cut strands—rope should be
replaced.
Rope exhibits ber-set from
compression. A slight sheen is
visible. This is not a permanent
characteristic and can be
eliminated by exing the rope.
ROPE INSPECTION Cont.
87970A2
87970A2
Page 11
WARN INDUSTRIES * WINCH
17
Chaque situation de treuillage peut potentiellement occasionner des blessures. Afin
de minimiser ce risque, il est important de lire attentivement TOUTES les instructions
et informations de sécurité afférentes à votre produit. Veillez à vous familiariser avec le
maniement du treuil avant de l'utiliser et à vous préoccuper avant tout de la sécurité. Ces
instructions fournissent des informations et des consignes de sécurité importantes concernant
l’installation et l’utilisation du treuil.
Vous trouverez dans ce kit la documentation suivante:
• Guide d’installation du treuil / Instructions relatives à une première utilisation
• Garantie du produit
CONSERVEZ CE MANUEL et tous les autres documents relatifs au produit à titre de référence
et consultez-les fréquemment pour assurer un fonctionnement continu en toute sécurité.
Demandez à tous les utilisateurs de ce produit de lire le présent manuel avant de l'utiliser.
Autres documents relatifs au produit disponibles en ligne
:
• Manuel de base des techniques de treuillage
• Fournit une compréhension globale du treuil et vous enseigne les techniques de
treuillage. Il s’agit d’une ressource utile qui favorise l’utilisation efficace et sûre du
treuil.
• Caractéristiques du produit et données de performance
• Fournit les caractéristiques du produit, les données de performance et les
renseignements concernant les pièces de rechange.
• Autres documents rela tifs à des produits spécifiques
Consultez le site
www.warn.com/corporate/literaturerequest.shtml
pour accéder à d’autres
documents ou à des documents sur les produits de remplacement, disponibles en consultation/
téléchargement.
WARN INDUSTRIES * WINCH
18
TRADU CTION DE LA NOTICE ORIGIN ALE
Treuil Guide d'installation et manuel
del'utilisateur
TABLE DES MATIÈRES:
SÉCURITÉ
Index des symboles .........................................................................................................................................19
Mesures générales de sécurité ............................................................................................................. 20-23
Conditions de travail sûres ............................................................................................................................24
INSTRUCTIONS
Montage du treuil .............................................................................................................................................25
Raccordements électriques ..........................................................................................................................26
Instructions d’ utilisation ......................................................................................................................... 27-28
Installation du câble d’acier ................................................................................................................... 29-30
Inspection du câble d’acier ....................................................................................................................31-32
Warn Industries Inc.
12900 SE Capps Road
Clackamas, OR 97015
États-Unis
Service à la clientèle: (800) 543-WARN
(9276)
International: (503) 722-1200
Fax : (503) 722-3000
www.warn.com
Warn® et le logo WARN so nt des marques dép osées de Warn Indus tries Inc.
©2016 Warn Industries Inc.
87970A2
87970A2
Page 12

WARN INDUSTRIES * WINCH
19
INDEX DES SYMBOLES
SYMBOLE EXPLICATION
Lire tous les documents
relatifs au produit.
Certains littérature disponible
uniquement online www.warn.com/
corporate/literaturerequest.shtml.
Toujours porter un
dispositif de protection
auditive et oculaire
Ne jamais utiliser le treuil
comme palan
Positionner correctement
la charge dans la gorge
du crochet
Enrouler le câble sur le
dessous du tambour
Danger d’écrasement
des doigts dans le guidecâble
Risque de percement/
coupure des mains
Risque d’explosion/
rupture
Ne jamais faire passer
les câbles électriques
par-dessus des bords
tranchants.
Éviter les points de
pincement et d’usure/
abrasion lors de
l’installation des câbles
électriques
SYMBOLE EXPLICATION
Toujours porter des
gants de cuir
Ne pas déplacer des
personnes
Toujours utiliser la sangle
de crochet fournie
Ne jamais appliquer la
charge sur l’extrémité ou
le loquet du crochet
Ne jamais enrouler le
câble sur le dessus du
tambour
Point de pincement du
guide-câble
Risque de surface
chaude
Risque d’incendie et de
brûlure
Ne jamais faire passer
les câbles électriques
à travers des pièces
mobiles ou à proximité.
Danger de ls nus,
isoler les ls nus et les
terminaux
Ne jamais accrocher le
câble à lui-même
WARN INDUSTRIES * WINCH
20
MESURES GÉNÉRALES DE SÉCURITÉ
Les directives suivantes comprennent des indications
intitulées AVERTISSEMENT, ATTENTION, AVIS et REMARQUE. Chacune
d'entre elles comporte un objectif bien précis: AVERTISSEMENT
présente des consignes de sécurité soulignant un danger potentiel
qui, s’il n'est pas évité, peut entraîner des blessures graves ou la
mort. ATTENTION comprend des consignes de sécurité signalant
un danger potentiel qui, s'il n'est pas évité, peut entraîner des
blessures légères ou modérées. ATTENTION sert aussi à signaler une
utilisation dangereuse. ATTENTION et AVERTISSEMENT identi ent un
danger, indiquent comment l'éviter et montrent ses conséquences
possibles si on l'ignore. AVISprésente des consignes visant à éviter
les dommages matériels. REMARQUE donne des renseignements
additionnels qui aident à accomplir une procédure. TRAVAILLEZ
PRUDEMMENT!
Avertissements
et mises en garde
DANGER DE HAPPEMENT PAR DES PIÈCES
MOBILES
Le non-respect des consignes peut entraîner des
blessures graves ou la mort.
Consignes de sécurité générales:
• Il faut toujours avoir une bonne connaissance du treuil.
Prendre le temps de bien lire le manuel d’utilisation, et/
ou le manuel de base des techniques de treuillage, a n de
comprendre le treuil et son fonctionnement, trouvés en ligne à
http://www.warn.com /corporate/literaturerequest.shtml
.
• Ne jamais excéder la capacité nominale du treuil ou du câble
d'acier. Un câblage double avec poulie ouvrante permet de
réduire la charge subie par le treuil.
• Toujours porter des gants de cuir épais durant la
manipulation du câble du treuil.
• Ne jamais utiliser le treuil ou le câble du treuil pour faire du
remorquage. Cela peut endommager, surcharger et casser le
câble.
• Ne jamais se servir du treuil pour maintenir une charge.
• Ne jamais faire fonctionner l'appareil sous l'eff et de drogues,
de l'alcool ou de médicaments.
• Ne jamais laisser des personnes âgées de moins de 16 ans
utiliser ce treuil.
Consignes de sécurité se rapportant à l’installation:
• Toujours choisir une surface de montage suffi samment
résistante pour supporter la capacité de traction maximale du
treuil.
• Toujours utiliser un matériel de montage de catégorie 8,8 ou
supérieure.
• Ne jamais souder les boulons de montage.
• Toujours utiliser un matériel de montage, des composants et
des accessoires homologués par le fabricant.
• Ne jamais utiliser des boulons trop longs.
• Toujours achever le montage du treuil et la xation du crochet
avant d'eff ectuer le câblage.
• Toujours garder les mains éloignées du câble du treuil,
de la boucle du crochet, du crochet et de l'ouverture du
guide-câble durant l'installation et l’utilisation de l'appareil et
l'enroulement ou le déroulement du câble.
• Toujours positionner le guide-câble avec l'avertissement
visible sur le dessus.
• Toujours étirer au préalable le câble et l’enrouler sous charge
avant de l’utiliser. Un câble enroulé de manière serrée réduit le
risque qu'il coince et soit endommagé.
AVERTISSEMENT
DANGER DE HAPPEMENT PAR DES PIÈCES
MOBILES
Le non-respect des consignes peut entraîner des
blessures graves ou la mort.
•
Toujours
s’assurer que le loquet du crochet est fermé et
qu’il ne soutient aucune charge.
•
Ne jamais
appliquer la charge sur l’extrémité ou le loquet
du crochet. Appliquer la charge uniquement au centre du
crochet.
•
Ne jamais
utiliser un crochet dont l’ouverture de la gorge a
augmenté ou dont l’extrémité est courbée ou tordue.
•
Toujours
utiliser un crochet avec loquet.
•
Toujours
s’assurer que l’opérateur et les personnes
présentes sont conscients de la stabilité du véhicule et/ou
de la charge.
•
Toujours
garder le l de la télécommande et le cordon
d’alimentation à l’écart du tambour, du câble et du
câblage. S’assurer qu’il n’y a pas de ssures, de points de
pincement, de ls effi lochés ou de connexions desserrées.
Tous les composants endommagés doivent être remplacés
avant d’utiliser le produit.
•
Toujours
faire passer la télécommande par la fenêtre, si
on l’utilise de l’intérieur d’un véhicule.
•
Ne jamais
accrocher le câble à lui-même
AVERTISSEMENT
87970A2
87970A2
Page 13
WARN INDUSTRIES * WINCH
21
MESURES GÉNÉRALES DE SÉCURITÉ
DANGER DE HAPPEMENT
PAR DES PIÈCES MOBILES
Le non-respect des consignes peut entraîner des
blessures graves ou la mort.
Consignes de sécurité concernant le treuillage:
•
Toujours
inspecter le câble du treuil, le crochet et les élingues
avant de faire fonctionner le treuil. Tout câble de treuil effi loché,
tordu ou endommagé doit être remplacé immédiatement. Tous
les composants endommagés doivent être remplacés avant
d'utiliser le produit. Protéger toutes les pièces contre le risque de
dommages.
•
Toujours
s'assurer que tout objet ou obstacle pouvant gêner la
bonne utilisation du treuil est écarté.
•
Toujours
s'assurer que le point d'ancrage choisi peut supporter
la charge et que la sangle ou la chaîne ne glisse pas.
•
Toujours
utiliser la sangle de crochet fournie pourenrouler ou
dérouler le câble du treuil, durant l'installation ou l'utilisation.
•
Toujours
exiger de l'opérateur et des personnes présentes d’être
attentifs au véhicule et à la charge.
•
Toujours
être conscient de la stabilité du véhicule et de
la charge durant le treuillage. Veiller à ce que personne ne
s'approche. Alerter toutes les personnes alentour en cas
d'instabilité.
•
Toujours
dérouler autant de câble que possible avant de
procéder au câblage. Utiliser une ligne double ou choisir un point
d’ancrage distant.
•
Toujours
prendre le temps d'utiliser des techniques de câblage
adaptées avant d'utiliser le treuil pour tirer.
•
Ne jamais
toucher le câble du treuil ou le crochet lorsqu'une
autre personne est à l'interrupteur de commande ou durant le
fonctionnement du treuil.
•
Ne jamais
essayer d'embrayer ou de débrayer si le treuil est sous
charge, si le câble du treuil est entension ou si le tambour est en
train de tourner.
•
Ne jamais
toucher le câble ou le crochet lorsque lecâble est
tendu ou sous charge.
•
Toujours
se tenir à l'écart du câble du treuil et dela charge
durant l'utilisation et ne jamais laisser personne s'approcher.
•
Ne jamais
se servir d'un véhicule pour tirer une charge sur le
câble du treuil. La charge combinée ou un choc peut endommager,
surcharger et casser le câble.
•
Ne jamais
replier le câble du treuil sur lui-même. Utiliser
toujours une chaîne ou une protection detronc d'arbre sur le
point d'ancrage.
DANGER DE CHUTE OU D'ÉCRASEMENT
Le non-respect des consignes peut entraîner des
blessures graves ou la mort.
•
Toujours
rester à l'écart, en gardant les mains et les autres
personnes à l'écart également.
•
Ne jamais
utiliser le treuil avec moins de 10 spires de câble
enroulées autour du tambour. Le câble pourrait se dérouler du
tambour, étant donné que l'ancrage ducâble n'est pas conçu pour
retenir une charge.
•
Ne jamais
utiliser le treuil comme palan ou pour suspendre une
charge.
•
Toujours
s'assurer que le point d'ancrage peut supporter la
charge, et prendre le temps d'employer des techniques de câblage
appropriées.
•
Ne jamais
utiliser le treuil pour soulever ou transporter des
personnes.
•
Ne jamais
forcer trop fort pour dérouler le câble du treuil.
•
Toujours
utiliser une posture/technique de levage adéquate ou
demander de l'aide lors de la manipulation ou de l'installation du
produit.
•
Toujours
enrouler le câble sur le tambour dans le sens spéci é
par l’étiquette d'avertissement apposée sur le treuil ou la
documentation du treuil. Cela est nécessaire pour que le frein
automatique (le cas échéant) fonctionne correctement.
•
Toujours
enrouler le câble du treuil sur le tambour comme indiqué
par l’autocollant de rotation du
tambour.
RISQUE DE COUPURE ET DE BRÛLURE
Le non-respect des consignes peut entraîner des
blessures graves ou la mort.
Pour éviter de se blesser les mains et les doigts:
•
Toujours
porter des gants de cuir épais durant lamanipulation du
câble du treuil.
•
Toujours
penser aux surfaces chaudes au niveau dumoteur du
treuil, du tambour ou du câble durant ouaprès l'utilisation du
treuil.
AVERTISSEMENT
AVERTISSEMENT
AVERTISSEMENT
WARN INDUSTRIES * WINCH
22
MESURES GÉNÉRALES DE SÉCURITÉ
DANGER D'IMPACT ET DE HAPPEMENT PAR
DES PIÈCES MOBILES
Le non-respect des consignes peut entraîner des
blessures graves ou la mort.
Pour éviter de se blesser les mains
et les doigts:
• Toujours connaître la limite de charge de service (LCS) de
votre câble.
• Toujours déterminer si le câble est adapté à l'application
envisagée.
• Ne jamais utiliser ce câble sur un treuil avec un eff or t en 1ère
couche supérieur à 4536kg.
• Ne jamais utiliser un câble s'il est usé, endommagé, maltraité,
surchargé, mal entretenu ou s'il a plus d'un an.
• Ne jamais se tenir dans la zone de recul.
• Ne jamais utiliser le câble sur une surface rugueuse sans
protection contre les frottements.
• Ne jamais appuyer le câble sur des coins acérés
nonprotégés.
• Ne jamais laisser l'embrayage débloqué lorsqu'on
n'eff ectue pas de déroulement en roue libre du câble. Le
frein automatique ne fonctionnera pas lorsque le levier
d'embrayage se trouve en position de déroulement en roue
libre.
• Ne jamais dépasser la charge nominale de 4 536 kg.
• Remplacer le câble tous les 12 mois, sans exception.
• Toujours utiliser un guide-câble WARN recommandé pour les
câbles synthétiques.
• S’il a été endommagé ou maltraité, toujours remplacer
le guide-câble écubier WARN par un guide-câble WARN
recommandé pour les câbles synthétiques.
RISQUES ASSOCIÉS AUX PRODUITS
CHIMIQUES ET RISQUE D'INCENDIE
Le non-respect des consignes peut entraîner des
blessures graves ou la mort.
• Toujours retirer les bijoux et porter des lunettes
desécurité.
• Ne jamais faire passer les câbles électriques
par-dessus des bords tranchants.
• Ne jamais faire passer les câbles électriques àproximité de
pièces qui s'échauff ent.
• Ne jamais faire passer les câbles électriques àtravers des
pièces mobiles ou à proximité.
• Toujours placer les capuchons fournis sur les ls et les bornes,
conformément aux instructions d'installation.
• Ne jamais se pencher au-dessus de la batterie
enprocédant aux connexions.
• Ne jamais faire passer les câbles électriques
par-dessus les bornes de la batterie.
• Ne jamais court-circuiter les bornes de la batterie avec des
objets métalliques.
• Toujours s'assurer que la zone ne contient pas deconduites
de carburant, de réservoir de carburant, de conduites de
frein, de câblage électrique, etc., avant de percer.
• Toujours consulter le manuel de l'utilisateur pour
lesinformations correctes de câblage.
• Toujours isoler et protéger tous les ls et bornes
électriques exposés.
AVERTISSEMENT
AVERTISSEMENT
87970A2
87970A2
Page 14

WARN INDUSTRIES * WINCH
23
MESURES GÉNÉRALES DE SÉCURITÉ
ÉVITER D’ENDOMMAGER LETREUIL ET
L'ÉQUIPEMENT
• Toujours éviter de tirer sur le côté, ce qui a pour eff et
d'empiler le câble sur l'une des extrémités du tambour. Cela
peut endommager le câble ou le treuil.
• Toujours s’assurer d’avoir complètement embrayé
oucomplètement débrayé.
• Toujours faire attention à ne pas endommager lechâssis du
véhicule si l'on décide de s'arrimer
à un véhicule pour pouvoir travailler avec le treuil.
• Ne jamais submerger le treuil dans l'eau.
• Toujours ranger la télécommande dans un endroit sûr,
propre et sec.
• Toujours éviter un «déroulement» continu. La chaleur
générée par un déroulement continu peut endommager le
câble.
• Ne jamais exposer le câble à des détergents agressifs, des
carburants, des huiles ou de l'antigel.
• Toujours utiliser une protection contre les frottements sur
tous les bords tranchants pour protéger le câble.
• Ne jamais laisser le câble entrer en contact avec des objets
coupants. Cela pourrait causer de graves dommages.
• Toujours rembobiner le câble en couches uniformes après
des activités de treuillage en angle.
• Ne jamais «secouer» le câble sous charge. Les charges
de choc peuvent dépasser momentanément la capacité du
treuil et du câble.
• Ne jamais installer plus de 30(CTI)/24(XDC)m de câble
synthétique 3/8po. Le treuil pourrait être endommagé.
AVIS
DANGER DE HAPPEMENT
PAR DES PIÈCES MOBILES
Le non-respect des instructions peut entraîner des
blessures mineures ou modérées.
Pour éviter de se blesser les mains oulesdoigts:
• Ne jamais laisser la télécommande dans un emplacement où
elle peut être activée durant la mise en roue libre, le câblage ou
quand le treuil n'est pas utilisé.
• Ne jamais laisser la télécommande du treuil branchée
durant l'installation, le déroulement en roue libre, le câblage,
l'entretien ou quand le treuil n'est pas utilisé.
ATTENTION
RISQUE DE COUPURE
ET DE BRÛLURE
Le non-respect des instructions peut entraîner des
blessures mineures ou modérées.
• Ne jamais laisser le câble du treuil glisser dans lesmains.
ATTENTION
WARN INDUSTRIES * WINCH
24
CONDITIONS DE TRAVAIL SURES
AVERTISSEMENT
Toujours resterà
l'écart, en gardant
lesmains et les
autres personnes à
l'écart également.
CONDITIONS DE TRAVAIL SÛRES
Pendant la traction d'une
charge, l'opérateur doit toujours faire
fonctionner le treuil en se tenant
enposition sûre. Les emplacements
sûrs sont: (1) perpendiculaires
aucâble, (2) à l'intérieur du véhicule
avec le capot relevé (si le treuil
est monté à l'avant du véhicule).
Ces endroits sûrs permettront
d'empêcher que le câble ne frappe
l'opérateur encas de rupture sous
charge.
Autant que possible, utiliser
le treuil avec le câble de la
télécommande complètement
déployé. Celui-ci doit toujours
demeurer à une distance minimale
de 2,44 m du treuil pendant son
fonctionnement. Cela évite d'être
happé par le guide-câble et maintient
l'opérateur dans une zone de sécurité
durant la traction de la charge.
Ne jamais travailler à proximité
d'un câble sous charge.
Niveau de bruit
Ce treuil est conçu de manière
à ce que le niveau de bruit émis ne
dépasse pas 70dBa à l’endroit où
setrouve le manipulateur. Celuici doit demeurer à une distance
minimale de 2,44m du treuil
pendant son fonctionnement. Faire
inspecter le treuil dans un centre de
service agréé si le bruit dépasse 70
dBa auniveau de l’opérateur.
Nettoyage
Utiliser de l'eau à basse pression
pour nettoyer le câble synthétique.
N'utiliser aucun produit chimique.
Ne pas diriger un jet d’eau haute
pression (laveuses haute pression,
lave-auto, etc.) entre le support
etle rebord du tambour ou le levier
d’embrayage.
Nettoyer le treuil à l’aide d’eau
sous faible pression et d’une éponge
ou d’un chiff on savonneux.
Ne pas utiliser de produits
chimiques qui pourraient
endommager la nition.
Nettoyer soigneusement les
résidus de sel du treuil le plus vite
possible a n de minimiser l'eff et
decorrosion.
Entretien
Remplacer le câble tous
les12mois par un câble WARN.
Le treuil ne nécessite aucune
lubri cation pendant sa durée de
vie, sauf s’il a été immergé dans l’eau.
Si cela se produit, faire réaliser une
inspection complète par un centre de
service dès que possible pour éviter
tout dommage dû à la corrosion. Sile
coff ret de commande est immergé,
il doit être remplacé au moment de
l’intervention de service sur le treuil.
Véri er les câbles de batterie
etles connexions électriques tous
les 90 jours pour s’assurer qu’ils sont
propres et correctement serrés à tous
les points de connexion.
Inspecter le câble avant et après
chaque utilisation du treuil. S’il est
endommagé, le remplacer par un
câble de calibre conforme à la liste
des pièces de rechange, ou se rendre
sur le site Internet Warn à l'adresse
www.warn.com.
Le câble doit toujours s’enrouler
sur le tambour dans le sens indiqué
par l’étiquette de rotation du
tambour apposée sur le treuil.
Toujours exiger
de l'opérateur et
des personnes
présentes d’être
attentifs au véhicule
et àlacharge.
AVIS
Ne jamais
submerger le treuil
dans l'eau.
ATTENTION
Ne jamais laisser la
télécommande dans
un emplacement
où elle peut être
activée durant la
mise en roue libre,
le câblage ou quand
le treuil n'est pas
utilisé.
AVERTISSEMENT
87970A2
87970A2
Page 15

WARN INDUSTRIES * WINCH
25
MONTAGE DU TREUIL
MONTAGE DU TREUIL
Choisir une surface de montage
suffi samment résistante pour supporter
les charges qui seront halées. Seules les
orientations de montage indiquées sont
recommandées pour utiliser le treuil en
toute sécurité. Toute autre orientation
du treuil est inadaptée et ne doit pas
être utilisée. Utiliser les boulons et les
rondelles d’arrêt recommandés, ainsi que
les couples de serrage recommandés
pour éviter les vibrations du treuil
pendant son fonctionnement. Les
détails demontage indiquent les valeurs
decouple adéquates.
N'oubliez pas que le câble dutreuil
doit toujours s’enrouler sur le tambour
dans le sens indiqué par l’étiquette de
rotation du tambour.
Se reporter aux schémas suivants
pour l'orientation de montage correcte.
Ne jamais utiliser
des boulons trop
longs.
Installation du coff ret
decommande
Monter le coff ret de commande
suivant les instructions jointes au kit
de système de montage Warn. Utiliser
la console comprise dans lekit.
Toujours choisir une
surface de montage
suffi samment
résistante pour
supporter la capacité
de traction maximale
du treuil.
Toujours achever le
montage dutreuil
et xer lecrochet
avant d'eff ectuer
lecâblage.
Épaisseur
de plaque
Longueur
de boulon
1/4” (7 mm) 1,25” (32 mm)
3/8” (10 mm) 1,5” (40 mm)
1/2” (13 mm) 1,5” (40 mm)
Détails de montage:
(1) Lisse et plat, épaisseur 6,4 mm
(2) Rondelle d’arrêt 9,525 mm (quantité = 4)
(3) Boulon catégorie 3/8-16 X 1 1/4” de long X 4
Couple de 30-35 pieds-livres. (41-47Nm)
(4) Écrou de blocage 1/2-13
(5) Rondelle plate 1/2po
(6) Écrou carré 3/8-16
(7) Boulon à tête bouton 1/2-13x2”
(8) Guide-câble en aluminium
AVERTISSEMENT
AVERTISSEMENT
AVERTISSEMENT
Entraxe de xation :
WARN INDUSTRIES * WINCH
26
RACCORDEMENTS ÉLECTRIQUES
Schémas électriques:
RACCORDEMENTS ELECTRIQUES
Utiliser des capuchons d’isolation
inclus sur les connexions exposées
pour éviter les courts-circuits. Les ls de
batterie doivent passer par des endroits
qui ne risquent pas d'endommager
ou depercer l’isolation et de créer
desrisques de court-circuit.
Une fois l’installation terminée,
véri er que le treuil fonctionne
correctement.
Ne jamais faire
passer les câbles
électriques pardessus des bords
tranchants.
Ne jamais faire
passer les câbles
électriques à
proximité de pièces
qui s'échauff ent.
Ne jamais faire
passer les câbles
électriques à travers
des pièces mobiles
ou à proximité.
Toujours placer
les capuchons
fournis sur les
ls e t les bornes,
conformément
aux instructions
d'installation.
Recommandations concernant
labatterie
La charge de la batterie et
la qualité des connexions sont
essentielles pour que le treuil
fonctionne correctement. La capacité
de démarrage à froid minimum
requise pour une batterie de 12 Vc.c.
est de 650 A.
Toujours isoler et
protéger tous les ls
et bornes électriques
exposés.
Broche n° Couleur
1 Marron
2 Blanc
3 Noir
4 Vert
5
6 Rouge
AVERTISSEMENT
AVERTISSEMENT
AVERTISSEMENT
AVERTISSEMENT
AVERTISSEMENT
Noir
Rouge
Vert
Marron
Blanc
87970A2
87970A2
Page 16

WARN INDUSTRIES * WINCH
27
INSTRUCTIONS D’UTILISATION
Instructions relatives à une première
utilisation
Dans cette section, nous allons vous
montrer les premières instructions
d’utilisation de temps pour le treuillage de
base efficace. Pour le fonctionnement et les
techniques de treuil complet lire le guide
de base de treuillage Techniques trouvés en
ligne à
http://www.warn.com/corporate/
literaturerequest.shtml.
Télécommande
Le treuil est contrôlée par la
télécommande à main. La télécommande
permet de contrôler la puissance de sortie
(vers l’avant) ou de la puissance en (arrière)
rotation du tambour d’enroulement.
Ne pas laisser la télécommande
branchée dans le treuil lorsque celui-ci n’est
pas en usage. Une télécommande qui reste
branchée risque de créer des conditions
dangereuses et de vider la batterie.
Fonctionnement de l’embrayage :
Lorsque l’embrayage est en prise, le
train d’engrenages est couplé au tambour
du treuil et l’entraînement peut alors être
transféré du moteur du treuil. Lorsque
l’embrayage est débrayé, le tambour est
en position de déroulement en roue libre
et le train d’engrenages et le tambour du
treuil se désaccouplent, ce qui permet au
tambour de tourner librement.
Le levier d’embrayage, situé sur le carter
du treuil en face du moteur, permet d e
Télécommande verticale:
Libéré:
En prise:
Ne jamais
essayer
d'embrayer ou de
débrayer si le treuil
est sous charge, si le
câble du treuil est en
tension ou
si le tambour est
en train de tourner.
Déroulement du câble
Le déroulement en roue libre
constitue généralement la façon la plus
rapide et la plus facile de dérouler le
câble. Avant de mettre le treuil en roue
libre pour dérouler le câble, dérouler au
moteur une quantité suffi sante de câble
pour soulager le câble de toute tension.
Débrayer. Vous pouvez maintenant
dérouler manuellement une quantité
suffi sante de câble pour pouvoir
travailler avec le treuil. Voir le Manuel de
base des techniques de treuillage pour de
plus amples informations.
Toujours laisser au moins 10spires
de câble sur le tambour.
Enroulement sous charge
Ne jamais dépasser l’eff ort en1ère
couche du treuil.
Enrouler mécaniquement le câble
sur le tambour de manière uniforme
et serrée. Cela empêche les spires
extérieures de s’enfoncer dans les
spires intérieures, ce qui peut coincer et
endommager le câble.
Pour éviter les charges dechoc
durant l’enroulement du câble, actionner
l’interrupteur de commande de manière
intermittente a n d'éliminer le mou
du câble. Les charges de choc peuvent
momentanément dépasser de loin la
capacité du treuil et du câble du treuil.
Enroulement à vide
Déroulement avec un assistant:
demander à un assistant de tenir la
sangle de crochet en appliquant une
tension aussi constante que possible
Ne jamais utiliser
le treuil avec moins
de 10 spires de câble
enroulées autour du
tambour. Lecâble
pourrait se dérouler
du tambour, étant
donné que l'ancrage
du câble n'est pas
conçu pour retenir
une charge.
AVIS
Ne pas dérouler le
câble de plus de 9m
sans laisser refroidir
le treuil pendant
20minutes avant
de recommencer
l'enroulement.
Utiliser plutôt
l'embrayage en
déroulement libre
en tirant le câble à
la main.
ENTRÉE
SORTIE
AVERTISSEMENT
AVERTISSEMENT
commander la position de l’embrayage.
Pour éviter tout dommage, tourner
complètement le levier d’embrayage dans
l’une ou l’autre position.
WARN INDUSTRIES * WINCH
28
INSTRUCTIONS D’UTILISATION
sur le câble. Tout en maintenant
la tension, il devra se déplacer
en direction du treuil pendant
l'actionnement de l'interrupteur de
commande pour enrouler le câble.
Relâcher l’interrupteur lorsque le
crochet parvient à une distance
minimale de 2m de l’ouverture
duguide-câble.
Enrouler le reste du câble pour
le ranger, de la manière indiquée
ci-dessous.
Déroulement tout seul: arranger le
câble à enrouler de manière à ce
qu’il ne s’entortille ni ne s’emmêle
pendant le rembobinage. Veillez
à ce que le câble soit enroulé sur
le tambour de manière uniforme
et serrée. Enrouler une quantité
suffi sante de câble pour compléter
une couche entière sur le tambour.
Serrer et étaler de manière égale la
couche de câble. Refaire de même
jusqu’à ce que le crochet soit à
une distance minimale de 2m de
l’ouverture du guide-câble.
Enrouler le reste du câble pour
le ranger, de la manière indiquée
ci-dessous.
Enroulement du reste du câble
pour le ranger
Lorsque le crochet se trouve à moins
de 2m du guide-câble, détacher
lecrochet du point d'ancrage ou dela
charge. En tenant la sangle de crochet
fournie, maintenir la tension sur câble
du treuil. Enrouler lentement le treuil
en appliquant de petites pressions
sur la touche «Power in» (enrouler)
de la télécommande jusqu'à ce que
le crochet soit à moins de 1m du
guide-câble. Arrêter le treuillage et
xer le crochet sur un point d'ancrage
approprié sur le véhicule.
NE PAS LAISSER PAS LE
CROCHET ATTEINDRE LE GUIDECÂBLE. Cela pourrait endommager
leguide-câble. Une fois le crochet
xé correctement au véhicule,
Toujours garder
les mains éloignées
du câble du treuil,
de la boucle du
crochet, du crochet
et de l'ouverture du
guide-câble durant
l'installation et
l’utilisation du treuil
et l'enroulement
ou le déroulement
ducâble.
Toujours utiliser le
cordon de crochet
fourni pour enrouler
ou dérouler le câble,
durant l'installation
ou l’utilisation pour
éviter de se blesser
les mains ou les
doigts.
Toujours porter
des gants de cuir
épais durant la
manipulation du
câble du treuil.
Ne jamais toucher
le câble du treuil ou
le crochet lorsqu'une
autre personne
est à l'interrupteur
de commande
ou durant le
fonctionnement du
treuil.
INSTRUCTIONS D’UTILISATION
Suite
enrouler le câble de façon à éliminer
le mou restant en appliquant de
petites pressions sur la touche
«Power in» (enrouler) de la
télécommande jusqu'à ce que le mou
soit minime sur le câble du treuil.
Surcharge/surchauff e
Ce treuil est conçu pour un
service intermittent. Lorsque le
moteur est sur le point de caler, une
accumulation rapide de chaleur se
produit et peut endommager le
moteur.
Le câblage double (voir le Manuel
de base des techniques de treuillage)
permet de réduire la consommation
de courant et de réduire ainsi
l’accumulation de chaleur dans le
moteur. Cela permet une utilisation
continue prolongée.
AVERTISSEMENT
AVERTISSEMENT
AVERTISSEMENT
AVERTISSEMENT
87970A2
87970A2
Page 17

WARN INDUSTRIES * WINCH
29
INSTALLATION DE LA CORDE
Toujours étirer au
préalable le câble
et l’enrouler sous
charge avant de
l’utiliser. Un câble
enroulé de manière
serrée réduit le
risque qu'il coince et
soit endommagé.
Ne jamais toucher
le câble du treuil ou
le crochet lorsqu'une
autre personne
est à l'interrupteur
de commande
ou durant le
fonctionnement du
treuil.
Déroulement et enroulement
LES ÉTAPES SUIVANTES SONT TRÈS
IMPORTANTES ET LE NON-RESPECT
DE CELLES-CI PEUT INFLUENCER
NÉGATIVEMENT LALONGÉVITÉ DU TREUIL
ET DUCÂBLE.
1. Monter le guide-câble écubier
enaluminium Warn sur le support
detreuil en utilisant le matériel fourni.
Toujours monter le guide-câble avec
les autocollants en position dressée
(autocollants en haut et bien visibles).
Faire passer un boulon de 7/16po x 1
1/4po à travers chacun des deux trous
de montage du guide-câble et à travers
le support de treuil. Placer une rondelle
plate de 7/16po sur chaque boulon.
Poser un écrou de blocage de 7/16po sur
chaque boulon et serrer à 47,5Nm.
2. Faire glisser la gaine de protection sur le
câble en partant de l'extrémité opposée au
crochet. Ramener la gaine vers l'extrémité
crochet du câble.
6. Il faut maintenant enrouler le câble
restant sur le tambour du treuil. Choisir
un endroit PLAT suffi samment grand
pour pouvoir dérouler toute lalongueur
du câble. Fixer le crochet du câble à un
point d'ancrage approprié et éloigner le
véhicule du point d'ancrage en laissant
environ 1,8m de mou sur le sol. Avant de
descendre du véhicule, serrer le frein à
main et mettre le véhicule en prise ou en
position de stationnement, puiscouper
le moteur.
7. Connecter la télécommande au treuil.
Se tenir à environ 8m du treuil et enrouler
le câble sur le tambour du treuil jusqu'à
ce qu'il y ait 10spires sur le tambour de
treuil. Déconnecter la télécommande
du treuil. Maintenir le câble tendu d'une
main; pousser avec précaution le câble
d'acier vers le côté du tambour auquel
le câble est xé de façon àce qu'il n'y
ait pas d'espace entre les spires sur le
tambour. S'assurer que le câble d'acier
s'enroule sur lebas du tambour et non
sur le haut, sinon le frein de retenue
automatique de la charge ne fonctionnera
pas correctement. (Si le câble d'acier
s'enroule sur le dessus, cela signi e que
vous avez actionné le treuil en mode de
déroulement et non d'enroulement au
moyen de la télécommande).
8. S'il y a encore du câble sur le sol, reculer
le véhicule jusqu'à ce que lecâble ne soit
plus au sol.
9. Les étapes suivantes doivent être
eff ectuées par deux personnes pour plus
de sécurité. Si vous tentez de tendre le
câble tout seul, assurez-vous de toujours
mettre le frein à main, le levier de vitesses
en prise et d'éteindre le moteur du
véhicule chaque fois que vous descendez
du véhicule pour inspecter le câble du
treuil. Ne quittez jamais le véhicule alors
que le câble du treuil porte une charge.
Le tensionnement du câble est essentiel
pour assurer une longue durée de vie
au produit. Letensionnement du câble
l'empêche de s'enfoncer dans les couches
inférieures lorsqu'il est sous charge.
10. Prendre soin d'enrouler
uniformément chaque couche pouréviter
d'endommager le câble.
3. Appliquer du Lock Tite 271 ou un
produit équivalent sur la xation à tête
bouton longue fournie de 1/4po-20 x
1/2po.
4. Installer le nouveau câble synthétique en
utilisant la xation à tête bouton fournie et
la rondelle de câble usinée. Insérer le câble
synthétique à travers le guide-câble en
aluminium et autour du tambour de treuil
en partant du bas. Insérer le boulon à tête
bouton dans la rondelle de câble usinée
et placer le câble synthétique sur celle-ci.
Installer le boulon à tête bouton dans letrou
1/4-20 sur le côté du tambour de treuil. Pour
plus de détails, consulter l'illustration.
5. Serrer le boulon à tête bouton 1/4-20 à
10,85Nm. Mettre le levier d'embrayage du
treuil à la position «Engaged» (en prise).
AVIS
Ne jamais
installer pl us
de30(CTI) / 24(XDC)m
de câble sy nthétique
3/8po. Le treuil pourrait
être endomm agé.
AVERTISSEMENT
AVERTISSEMENT
Câble
Rondelle de câble
1/4-20 x
1/2po
Boulon à tête
bouton
WARN INDUSTRIES * WINCH
30
INSTALLATION DE LA CORDE
Ne jamais utiliser
le treuil avec moins
de 10 spires de câble
enroulées autour du
tambour. Lecâble
pourrait se dérouler
du tambour, étant
donné que l'ancrage
du câble n'est pas
conçu pour retenir
une charge.
11. Faire passer la télécommande par
la glace du conducteur a n del’utiliser.
Demander à l’assistant des'éloigner
du véhicule et du câble. L’assistant
doit indiquer si le câble s'enroule
correctement à mesure qu'il dé le sur
le guide-câble et s'enroule. Démarrer le
véhicule et mettre le levier de vitesses
au point mort. Desserrer le frein à main
tout en appuyant modérément sur
la pédale de frein. Enrouler le treuil à
l'aide de la télécommande. Eff ectuer
le treuillage sur environ 1,8m, puis
arrêter. Relâcher lentement la pédale
de frein, puis serrer le frein à main. Cela
permet d'assurer qu'il n'y a aucune
charge sur le câble. Mettre le levier de
vitesses en position destationnement
ou en prise, puis couper le moteur.
Quitter le véhicule et inspecter le câble
du treuil pour s'assurer qu'il s'enroule
uniformément sur le tambour du treuil
et qu'il ne s'enfonce pas dans la couche
inférieure. S'il s'enfonce, dérouler lecâble
et répéter cette étape à partir du début
en appliquant davantage depression sur
la pédale de frein.
12. Après s’être assuré que le câble
s'enroule correctement sur le treuil,
retourner au véhicule. Faire passer
la télécommande par la glace du
conducteur a n de l’utiliser. Démarrer
le véhicule et placer la transmission au
point mort. Desserrer le frein à main tout
en appuyant modérément sur la pédale
de frein. Enrouler le treuil à l'aide de la
télécommande. Eff ectuer le treuillage
sur environ 1,8m, puis arrêter. Relâcher
lentement la pédale de frein, puis serrer
le frein à main. Cela permet d'assurer
qu'il n'y a aucune charge sur le câble.
Mettre le levier de vitesses en position de
stationnement ou en prise, puis couper
le moteur. Quitter le véhicule et inspecter
le câble du treuil pour s'assurer qu'il
s'enroule uniformément sur le tambour
du treuil et qu'il ne s'enfonce pas dans la
couche inférieure. S'il s'enfonce, dérouler
le câble et répéter cette étape à partir
du début en appliquant davantage de
pression sur la pédale de frein.
13. Répéter l'étape 12 jusqu'à ce que le
véhicule soit à moins de 1,8m du point
INSTALLATION DU CÂBLE (suite)
d'ancrage. Une fois la distance atteinte,
relâcher lentement la pédale de frein,
puis serrer le frein à main. Cela permet
d'assurer qu'il n'y a aucune charge sur
le câble. Mettre le levier de vitesses en
position de stationnement ou en prise,
puis couper le moteur. Descendre du
véhicule. Décrocher le crochet du point
d'ancrage. Tout en retenant le cordon du
crochet fourni, maintenir la tension sur
câble et enrouler lentement le treuil par
de petites pressions sur l'interrupteur de
commande jusqu'à ce que le crochet soit
à moins de 1m du guide-câble. Arrêter le
treuillage et xer le crochet sur un point
d'ancrage approprié surle véhicule. NE
PAS LAISSER LE CROCHET ATTEINDRE LE
GUIDE-CÂBLE. Cela pourrait endommager
le guide-câble de façon irréparable.
Une fois le crochet xé correctement au
véhicule, enrouler le câble de façon à
éliminer le mou restant en appliquant de
petites pressions sur latouche «Power in»
(enrouler) de la télécommande jusqu'à
ce que le mou soit minime sur le câble
du treuil.
Câblage
Pour fondamentaux de gréement
complet, Lire le Guide de base des
techniques de treuillage, trouvés
en ligne à
http://www.warn.com/
corporate/literaturerequest.shtml.
Toujours enrouler
le câble sur le
tambour dans
le sens spéci é
par l’étiquette
d'avertissement
apposée sur
le treuil ou la
documentation
du treuil. Cela
est nécessaire
pour que le frein
automatique (lecas
échéant) fonctionne
correctement.
Toujours utiliser la
sangle de crochet
fournie pour
enrouler ou dérouler
le câble du treuil,
durant l'installation
oul'utilisation.
AVERTISSEMENT
AVERTISSEMENT
AVERTISSEMENT
87970A2
87970A2
Page 18

WARN INDUSTRIES * WINCH
31
INSPECTION DU CÂBLE
Lorsque le câble du treuil
estutilisé pour la première fois,
ses laments extérieurs s'effi lochent
rapidement. C'est le résultat d'une
rupture de ces laments et cette
surface rendue rugueuse protégera
en réalité les bres qui se trouvent
en dessous. Cette situation devrait
se stabiliser et ne plus évoluer. Si la
rugosité de surface augmente, on se
trouve en présence d'une abrasion
excessive et d'un aff aiblissement
du câble. Examiner attentivement
les bres internes et externes.
La présence d'usure sur l'une ou
l'autre de ces bres est le signe
d'unaff aiblissement. Ouvrir les torons
et rechercher des bres réduites
en poussières—il s'agit d'un signe
d'usure interne.
Le câble doit être remplacé lorsque:
• Le câble présente, n'importe où
sur sa longueur, une réduction
de volume d'au moins 10% liée
àune abrasion.
• Au moins deux torons voisins
sontcoupés.
• On découvre des zones plates
ou des protubérances qu'il n'est
paspossible d'éliminer en pliant
le câble.
• On découvre un nombre excessif
de bres fusionnées ou fondues.
Dans ce cas, la zone aff ectée est
raide et le câble a un aspect glacé.
Rangement et entretien du câble
Pour assurer sécurité et
performance, l'inspection et
l'entretien du câble du treuil
doivent être parmi les principales
préoccupations dechaque utilisateur.
1. Avant chaque utilisation, véri er
que le câble du treuil ne présente pas
de cassures, de coupures, d'abrasion
et de bres fondues ou fusionnées.
2. Laver le câble du treuil
périodiquement pour enlever la
saleté et la poussière. Il suffi t de le
rincer àl'aide d'un tuyau d'arrosage,
INSPECTION DU CÂBLE
et de lelaisser sécher à l'air.
Ne jamais utiliser de solvants,
d'eau de Javel, de détergents
agressifs pour laver le câble du treuil
et ne jamais appliquer de source de
chaleur pour accélérer le séchage.
3. Pour le stockage, enrouler le câble
de façon lâche, en veillant à éliminer
les torsions excessives éventuelles.
Pour une longévité maximale du
câble, il faut à toujours le stocker
dans un endroit sombre et sec.
Avant utilisation de n'importe quel
câble, consulter le guide suivant. Si
le câble est endommagé, il convient
de le mettre immédiatement hors
service, et de le remplacer par un
câble intact, référence WARN. Des
torons cassés ou coupés nuisent
à la solidité du câble sur toute sa
longueur — pas seulement à l'endroit
endommagé. En règle générale,
ilconvient de mettre hors service un
câble à 12torons lorsqu'on peut voir
que plus de 3 torons sont cassés ou
coupés, ou que deux torons voisins
sont endommagés.
4. Remplacer le câble tous les 12mois
exclusivement par un câble WARN.
Usure normale
Lorsque de petites bres de
surface se cassent sur un câble,
elles créent une texture effi lochée.
Connu sous le terme d'«abrasion
légère», ce phénomène est considéré
comme une bonne usure et n'aff ecte
pas les performances du câble. La
surface rêche protège en fait les
bres sous-jacentes contre une usure
supplémentaire.
Usure excessive –METTRE LECÂBLE
HORS SERVICE
Des bres fondues ou
fusionnées sont généralement le
résultat d'un usage abusif du câble.
Des bres de polyester fondues
ou fusionnées résultent d'une
température dépassant 221°C à la
surface du câble. Suite à des charges
ou des déroulements de câble
Ne jamais utiliser
le treuil avec moins
de 10spires de câble
enroulées autour du
tambour. Lecâble
pourrait se dérouler
du tambour, étant
donné que l'ancrage
du câble n'est pas
conçu pour retenir
une charge.
AVERTISSEMENT
WARN INDUSTRIES * WINCH
32
INSPECTION DU CÂBLE
Toujours porter
des gants de cuir
épais durant la
manipulation du
câble du treuil.
AVERTISSEMENT
excessifs, ces bres endommagées
peuvent compromettre la résistance
du câble et indiquent généralement
que celui-ci doit être mis hors
service.
Attaque chimique –METTRE
LECÂBLE HORS SERVICE
(NON ILLUSTRÉ)
Des décolorations localisées
peuvent être le signe d'une attaque
par une substance chimique
pouvant aller de l'huile pour
engrenages à l'acide de batterie. En
cas de doute, mettre le câble hors
service.
Exemples:
Encombrement original du câble.
Toron de câble présentant un volume complet.
Câble présentant une réduction de 25% du volume
de toron suite à une abrasion—le câble doit être
remplacé.
Toron de câble réduit de 25% suite à une
abrasion—le câble doit être remplacé.
Le câble présente deux torons voisins coupés—le
câble doit être remplacé.
Le câble présente un écart de bre résultant de la
compression. Un léger lustre est visible. Il ne s'agit
pas d'une caractéristique permanente et on peut
l'éliminer en pliant le câble.
INSPECTION DU CÂBLE (suite)
87970A2
87970A2
Page 19

WARN INDUSTRIES * WINCH
33
En cada situación donde se utiliza un cabrestante existe la posibilidad de ocasionar daños
personales. Para reducir al mínimo ese riesgo, es importante que lea TODAS las instrucciones
e información de seguridad en relación con su producto. Por favor, familiarícese con la
operación del cabrestante antes de usarlo y tenga siempre presente la seguridad. En esta
guía se incluye información de seguridad relevante, así como las instrucciones para instalar y
utilizar el cabrestante.
En este kit se incluyen los siguientes documentos:
• Guía de instalación del cabrestante e instrucciones para la primera operación
• Garantía del producto
GUARDE ESTE MANUAL y todos los documentos para consultas futuras y consúltelos con
frecuencia para garantizar la seguridad del funcionamiento en todo momento.
Advierta a todos los usuarios que deben leer este manual antes de poner en funcionamiento
el producto.
Información del producto adicional disponible en línea
:
• Guía básica de técnicas para el uso del cabrestante
• Proporciona un conocimiento básico del cabrestante y enseña las técnicas apropiadas
y fundamentales de su uso. Es una fuente valiosa para ayudar a utilizar el cabestrante
de forma segura y eficiente.
• Especificaciones del producto y datos de rendimiento
• Proporciona especificaciones del producto, datos de rendimiento e información sobre
piezas de repuesto
• Otra documentación del cabrestante específica para algunos productos
Vaya a
www.warn.com/corporate/literaturerequest.shtml
para documentación del
producto adicional o de repuesto disponible para visualizar y descargar.
WARN INDUSTRIES * WINCH
34
INSTRU CCIONES ORI GINALES
WARN INDUSTRIES
34
Cabrestante
Guía de instalación y del usuario
ÍNDICE:
SEGURIDAD
Índice de símbolos ...........................................................................................................................................35
Precauciones generales de seguridad ...............................................................................................36-39
Condiciones de trabajo seguras ..................................................................................................................40
INSTRUCCIONES
Montaje del cabrestante ................................................................................................................................41
Conexiones eléctricas .....................................................................................................................................42
Instrucciones de operación ................................................................................................................... 43-44
Instalación del cable ................................................................................................................................. 45-46
Inspección del cable ................................................................................................................................ 47-48
Warn Industries Inc.
12900 SE Capps Road
Clackamas, Oregón 97015
EE.UU.
Servicio de atención al cliente: (800) 543-WARN
(9276)
Desde fuera de EE.UU.: (503) 722-1200
Fax: (503) 722-3000
www.warn.com
WARN® y el logot ipo de WARN son marcas com erciales regis tradas de Warn Indust ries, Inc.
©2012 Warn Industries, Inc.
87970A2
87970A2
Page 20

WARN INDUSTRIES * WINCH
35
ÍNDICE DE SÍMBOLOS
SÍMBOLO EXPLICACIÓN
Lea toda la documentación
sobre el producto
Alguna literatura disponibl e sólo en
línea en ww w.warn.com/corporate/
literaturerequest.shtml.
Lleve siempre puesta
protección ocular
y auditiva
Nunca utilice el cabrestante
como
si fuese una grúa
Fije de forma apropiada la
carga en la garganta del
gancho
Enrolle el cable en la parte
inferior del tambor
Peligro de aplastamiento de
los dedos o de la guía
del cable
Peligro de perforación
o corte en las manos
Peligro de explosión
o rotura
Peligro de borde a lado
Evite la instalación de cables
eléctricos en torno a aristas
losas y puntos abrasivos o
desgastadores
SÍMBOLO EXPLICACIÓN
Lleve siempre puestos
guantes de cuero
No lo use para desplazar
personas
Use siempre la correa del
gancho suministrada
No aplique nunca una carga
a la punta del gancho o al
seguro
Nunca enrolle el cable en la
parte superior
del tambor
Punto de pellizco
de la guía del cable
Peligro de super cie
caliente
Peligro de incendio
y quemaduras
Peligros asociados
a la presencia
de piezas móviles
Aísle los cableados
expuestos
No enganche nunca el cable
sobre sí mismo
WARN INDUSTRIES * WINCH
36
PRECAUCIONES GENERALES DE SEGURIDAD
Al leer estas instrucciones, verá ADVERTENCIAS,
PRECAUCIONES, AVISOS y NOTAS. Cada mensaje tiene un propósito
especí co. Las ADVERTENCIAS son mensajes de seguridad que
indican que está ante una situación potencialmente peligrosa
que, si no se evita, puede resultar en lesiones graves o la muerte.
Las PRECAUCIONES son mensajes de seguridad que indican una
situación de posible peligro que, si no se evita, puede resultar en
lesiones menores o de poca gravedad. Las PRECAUCIONES pueden
alertar también contra prácticas no seguras. Las PRECAUCIONES
y ADVERTENCIAS identi can el peligro, indican cómo evitarlo y
advierten delas posibles consecuencias si no se evita tal peligro.
Los AVISOS son mensajes para evitar daños a la propiedad. Las
NOTAS son información adicional que leayudarán a llevar a cabo
un procedimiento. TRABAJE SIEMPRE DE FORMA SEGURA.
Advertencias
y precauciones
ADVERTENCIA
PELIGRO DE ENREDO
EN LAS PARTES MÓVILES
De no seguirse estas instrucciones, podrían producirse
lesiones graves o incluso la muerte.
Seguridad general:
• Conozca siempre el funcionamiento del cabrestante. Lea
detenidamente las Instrucciones, la Guía de operación y/o la
Guía básica de técnicas del cabrestante para comprender el
funcionamiento y la manipulación del cabrestante, que se
encuentran en línea en http://www.warn.com/corporate/
literaturerequest.shtml.
•
Nunca
exceda la capacidad nominal del cabrestante nidel cable
del cabrestante. Emplee un cable doble con una polea para reducir
la carga del cabrestante.
• Lleve puestos
siempre
guantes gruesos de cuero para manipular
el cable del cabrestante.
•
Nunca
use el cabrestante o el cable del cabrestante para
remolcar. Las cargas repentinas puede dañar, sobrecargar o
romper el cable.
•
Nunca
utilice el cabrestante para amarrar una carga.
•
Nunca
ponga en funcionamiento este cabrestante sise encuentra
bajo los efectos de drogas, alcohol omedicamentos.
•
Nunca
ponga en funcionamiento este cabrestante
si es menor de 16 años de edad.
Seguridad en la instalación:
• Elija
siempre
una ubicación de montaje que sea
losu cientemente sólida para soportar la capacidad decarga
máxima del cabrestante.
• Utilice
siempre
piezas de grado 5 (grado 8,8 métrico) o superior.
•
Nunca
suelde los pernos de montaje.
• Utilice
siempre
piezas de montaje, componentes yaccesorios
aprobados por el fabricante.
•
Nunca
utilice pernos que sean demasiado largos.
• Complete
siempre
la instalación del cabrestante y el
acoplamiento del gancho antes de instalar el cableado.
• Mantenga
siempre
las manos alejadas del cable del cabrestante,
del bucle del gancho, del gancho y de la abertura de la
guía durante la instalación, la operación y en el enrollado y
desenrollado.
• Ponga
siempre
la guía del cable con la etiqueta deadvertencia
visible en la parte superior.
• Realice
siempre
un estiramiento previo del cable y vuelva a
enrollarlo con carga antes de usarlo. Uncable bien enrollado
reduce las posibilidades de tener “dobleces” que puedan dañar el
cable.
PELIGRO DE ENREDO
EN LAS PARTES MÓVILES
De no seguirse estas instrucciones, podrían producirse
lesiones graves o incluso la muerte.
• Veri que
siempre
que el seguro del gancho está cerrado y que
no soporta carga.
•
Nunca
aplique una carga a la punta del gancho o al seguro. Aplique la
carga únicamente al centro del gancho.
• No utilice
nunca
un gancho cuya abertura haya aumentado o
cuya punta esté doblada o retorcida.
• Utilice
siempre
un gancho con seguro.
• Asegúrese
siempre
de que el operador y otras personas sean
conscientes de la estabilidad del vehículo y/o de lacarga.
• Mantenga
siempre
el cable del control remoto y el cable de
alimentación alejados del tambor, del cable y del cordaje.
Inspeccione el aparato para comprobar la posible existencia de
grietas, pellizcos, cables deshilachados oconexiones sueltas.
Los componentes dañados deberán reemplazarse antes de la
operación.
• Pase
siempre
el control remoto a través de una ventana cuando
lo utilice en un vehículo.
•
No enganche
nunca
el cable sobre sí mismo
ADVERTENCIA
87970A2
87970A2
Page 21

WARN INDUSTRIES * WINCH
37
PRECAUCIONES GENERALES DE SEGURIDAD
PELIGRO DE ENREDO
EN LAS PARTES MÓVILES
De no seguirse estas instrucciones, podrían producirse
lesiones graves o incluso la muerte.
Seguridad durante la operación delcabrestante:
• I nspeccione
siempre
el cable del cabrestante, elgancho y las
eslingas antes de poner el cabrestante en funcionamiento. Si el
cable del cabrestante está deshilachado, retorcido o dañado, deberá
reemplazarse de inmediato. Los componentes dañados deberán
reemplazarse antes de la operación. Evite que las piezas resulten
dañadas.
• Retire
siempre
cualquier elemento u obstáculo quepueda provocar
inseguridad en la operación delcabrestante.
• Veri que
siempre
que el anclaje seleccionado soportará la carga y
que la correa o la cadena
no se deslizará.
• Use
siempre
la correa suministrada con el gancho cuando vaya a
enrollar o desenrollar el cable delcabrestante, durante la instalación y
durante laoperación.
• H aga
siempre
que los operadores y otras personas presentes vigilen
el vehículo y/o la carga.
• Tenga
siempre
presente la estabilidad del vehículo y de la carga
durante el uso del cabrestante; haga que las personas presentes se
mantengan alejadas. Alerte a todas las personas presentes de una
posible inestabilidad.
• D esenrolle
siempre
tanto cable como sea posible al prepararse para
el maniobrado. Emplee un cable doble o elija un punto de anclaje
distante.
• Tómese
siempre
su tiempo para asegurar la carga con técnicas
apropiadas antes de arrastrarla con elcabrestante.
•
Nunca
toque el cable ni el gancho si hay alguien cerca del interruptor
de control, o si el cabrestante está en funcionamiento.
•
Nunca
embrague ni desembrague si el cabrestante está soportando
una carga, si el cable está entensión o si el tambor está en
movimiento.
•
Nunca
toque el cable del cabrestante ni el gancho mientras están
tensos o con carga.
• Manténgase
siempre
alejado del cable del cabrestante y de la carga, y no
deje que otros se acerquen cuando el cabrestante esté en funcionamiento.
•
Nunca
utilice un vehículo para tirar de la carga en el cable del cabrestante.
La carga combinada o un golpe en la carga pueden dañar, sobrecargar o
romper el cable.
•
Nunca
enrolle el cable del cabrestante sobre sí mismo. Utilice una
cadena de estrangulación o un protector de tronco de árbol en el
anclaje.
PELIGRO DE CAÍDA O APLASTAMIENTO
De no seguirse estas instrucciones, podrían producirse
lesiones graves o incluso la muerte.
• Manténgase
siempre
alejado y haga que otras personas también lo
estén.
•
Nunca
accione el cabrestante si no hay, al menos, 10vueltas de cable
alrededor del tambor. El cable podría soltarse del tambor, ya que el
acoplamiento del cable al tambor no está construido para soportar
cargas.
•
Nunca
use el cabrestante como grúa o para suspender una carga.
• Compruebe
siempre
que el anclaje soportará la carga. Utilice
técnicas de maniobrado adecuadas y tómese tiempo para operar de
forma correcta.
•
Nunca
utilice el cabrestante para levantar o desplazar personas.
•
Nunca
realice esfuerzos excesivos para enrollar elcable del
cabrestante.
• Utilice
siempre
posturas y técnicas de levantamiento adecuadas o
solicite ayuda a la hora de manipular einstalar el producto.
• Enrolle y desenrolle
siempre
el cable al tambor en la dirección
especi cada en la etiqueta de advertencia del cabrestante o en la
documentación. Esto es necesario para el funcionamiento correcto
del freno automático (si viene equipado con ello).
• Enrolle
siempre
el cable del cabrestante alrededor del tambor en el
sentido indicado por la marca de rotación del cabrestante.
PELIGRO DE CORTES Y QUEMADURAS
De no seguirse estas instrucciones, podrían producirse
lesiones graves o incluso la muerte.
Para evitar daños en las manos:
• Lleve
siempre
guantes gruesos de cuero para manipular el cable
del cabrestante.
• Tenga
siempre
en cuenta que las super cies del motor, del
tambor o del cable del cabrestante pueden estar calientes
durante o después del uso del mismo.
ADVERTENCIA
ADVERTENCIA
ADVERTENCIA
WARN INDUSTRIES * WINCH
38
PRECAUCIONES GENERALES DE SEGURIDAD
PELIGRO DE IMPACTO Y ENREDO EN LAS
PIEZAS MÓVILES
De no seguirse estas instrucciones,
podríanproducirse lesiones graves
o incluso la muerte.
Para evitar daños en las manos:
• Tenga siempre en cuenta el límite de carga de trabajo del
cable.
• Veri que siempre que el cable sea apto para cadaaplicación.
• Nunca use este cable en un cabrestante que tenga una
tracción nominal superior a 4.536 kg (10.000 lb).
• Nunca use un cable si está desgastado, dañado, si se le ha
dado un mal uso, si está sobrecargado, si ha recibido un
mantenimiento inadecuado o si tiene más de 1 año.
• Nunca se sitúe en la zona de retroceso.
• Nunca use un cable sobre una super cie escabrosa sin
protegerlo contra la abrasión.
• Nunca doble el cable por esquinas cortantes sinprotegerlo.
• Nunca deje el embrague desembragado cuando la cuerda no
se enrolle manualmente. El freno automático no funcionará
cuando la palanca del embrague esté en posición de
enrollado manual.
• No supere nunca la capacidad de carga de 10.000 libras
(4536kg.)
• Sustituya el cable siempre cada 12 meses.
• Utilice siempre una guía WARN recomendada para cable
sintético.
• Sustituya siempre la guía de escobén WARN con una guía
WARN recomendada para cable sintético si está dañada o se
le ha dado un mal uso.
PELIGRO DE INCENDIO O POR PRESENCIA
DE PRODUCTOS QUÍMICOS
De no seguirse estas instrucciones,
podríanproducirse lesiones graves oincluso la
muerte.
• Quítese siempre las joyas que lleve puestas y utilice
siempre protección ocular.
• Nunca pase los cables eléctricos por bordes a lados.
• Nunca pase los cables eléctricos cerca de piezas que se
calienten.
• Nunca pase los cables eléctricos por partes móviles o cerca
de ellas.
• Coloque siempre las fundas para los terminales
suministradas en los cables y los terminales, tal como se
indica en las instrucciones de instalación.
• Nunca se apoye en la batería si está haciendo conexiones.
• Nunca pase los cables eléctricos sobre los bornes dela
batería.
• Nunca ponga en cortocircuito los bornes de la batería con
objetos metálicos.
• Veri que siempre que en el área no haya tuberías o
tanques de combustible, tuberías de sistema de frenado,
cables eléctricos, etc., si se va a perforar.
• Consulte siempre el manual del usuario para obtener
detalles de cableado adecuados.
• Aísle y proteja siempre los cables y terminales eléctricos
que estén expuestos.
ADVERTENCIA ADVERTENCIA
87970A2
87970A2
Page 22

WARN INDUSTRIES * WINCH
39
PRECAUCIONES GENERALES DE SEGURIDAD
EVITE DAÑOS A L CABRESTANTE YAL
EQUIPO
• Evite siempre los arrastres laterales, ya que pueden apilar el
cable en un extremo del tambor. Esto puede dañar el cable o
el cabrestante.
• Compruebe siempre que se ha embragado odesembragado
completamente.
• Sea siempre precavido para no dañar la estructura
cuando vaya a anclar su vehículo en una operación con el
cabrestante.
• Nunca sumerja el cabrestante en agua.
• Almacene siempre el control remoto en un área protegida,
limpia y seca.
• Evite siempre el desenrollado continuo. Si se acumula
mucho calor por causa del desenrollado continuo, podría
dañarse el cable.
• Nunca exponga el cable a detergentes agresivos,
combustibles, aceites o anticongelante.
• Use siempre un protector contra la abrasión en todos los
los para proteger el cable.
• Nunca permita nunca que el cable entre en contacto con objetos
cortantes. Podría resultar gravemente dañado.
• Vuelva a enrollar siempre el cable en vueltas igualadas
después de cualquier actividad angulada del cabrestante.
• Nunca desplace el cable en pequeñas sacudidas cuando
esté con carga. Las cargas repentinas pueden exceder
momentáneamente la capacidad del cable ydel cabrestante.
• Nunca instale más de 100(CTI) / 80 (XDC) pies de cable
sintético de3/8 pulg. Puede dañar el cabrestante.
AVISO
PELIGRO DE ENREDO
EN LAS PARTES MÓVILES
Si no observa estas instrucciones, podrían
producirse lesiones menores o moderadas.
Para evitar daños en las manos:
• Nunca deje el control remoto donde pueda activarse durante
el enrollado libre, el maniobrado o cuando elcabrestante no
esté en uso.
• Nunca deje el control remoto del cabrestante conectado
cuando se esté instalando o haciendo enrollado libre,
maniobras o mantenimiento ni cuando no se esté utilizando
el cabrestante.
PRECAUCIÓN
PELIGRO DE CORTES YQUEMADURAS
Si no observa estas instrucciones, podrían
producirse lesiones menores o moderadas.
• Nunca deje que el cable se deslice por sus manos.
PRECAUCIÓN
WARN INDUSTRIES * WINCH
40
CONDICIONES DE TRABAJO SEGURAS
CONDICIONES DE TRABAJO
SEGURAS
Cuando desplace una carga, el
operador debe hacerlo siempre desde
una posición segura. Las áreas seguras
son: (1)perpendiculares al cable o (2)
el interior del vehículo con la capota
subida (si el cabrestante está montado
delante del vehículo). Estas posiciones
seguras ayudan a evitar que el cable
alcance al operador si dicho cable no
aguanta lacarga y se rompe.
Siempre que sea posible,
accione el cabrestante desde la
longitud total del cable del control
remoto. El usuario debe situarse
siempre a 2,44 m (8 pies), por lo
menos, del cabrestante. Esto evitará
que se enganche con la guía y le
situará fuera del alcance de cualquier
latigazo del cable durante el
desplazamiento de la carga.
No trabaje nunca cerca del cable
de tracción cuando elcabrestante
lleve carga.
Emisiones acústicas
El cabrestante está diseñado de
tal forma que las emisiones acústicas
audibles desde el emplazamiento
del operador no superen los
70dBa. El usuario debe situarse a
2,44 m (8pies), por lo menos, del
cabrestante. Si el cabrestante excede
70 dBa desde el lugar donde se
encuentra el usuario, llévelo a un
centro de servicio autorizado para ser
inspeccionado.
Limpieza
Utilice agua a baja presión para
limpiar el cable sintético. No utilice
productos químicos.
No aplique directamente agua
a presión (limpiadores a presión,
lavadores de coches, etc.) entre el
soporte y el reborde del tambor o
lapalanca del embrague.
Utilice agua a baja presión y una
bayeta o esponja enjabonada para
limpiar el cabrestante.
Evite utilizar productos químicos
que puedan dañar el acabado.
Limpie totalmente los residuos
de sal en el cabrestante, tan pronto
como sea posible, para reducir al
mínimo la posibilidad de corrosión.
Mantenimiento
Sustituya el cable cada 12 meses
por el cable WARN.
No será necesario la lubricación
del cabrestante a no ser que éste
se haya sumergido en agua. Si esto
ocurre, se deberá llevar lo antes
posible a un centro autorizado
de servicio para evitar daños de
corrosión. Si sumerge el sistema de
control, éste debe ser reemplazado
cuando se realice el servicio del
cabrestante.
Revise los cables de la batería
y las conexiones eléctricas cada 90
días a n de asegurarse de que estén
limpios y bien apretados.
Compruebe el cable de tracción
antes y después de cada operación
que se efectúe con el cabrestante.
Cuando se dañe, reemplácelo con
eltamaño especi cado en la Lista
de piezas de repuesto o visite el sitio
Web de Warn en www.warn.com.
El cable debe enrollarse
alrededor del tambor en el sentido
que indica la marca de rotación que
hay en el cabrestante.
ADVERTENCIA
Manténgase
siempre alejado
y haga que otras
personas también
lo estén.
ADVERTENCIA
Haga siempre
que los operadores
y otras personas
presentes vigilen
el vehículo y/o
lacarga.
AVISO
Nunca sumerja el
cabrestante enagua.
PRECAUCIÓN
Nunca deje el
control remoto
donde pueda
activarse durante
el enrollado libre,
el maniobrado
o cuando el
cabrestante noesté
en uso.
87970A2
87970A2
Page 23

WARN INDUSTRIES * WINCH
41
MONTAJE DE CABRESTANTE
MONTAJE DEL CABRESTANTE
Elija un lugar de montaje que sea
lo su cientemente resistente como para
soportar las cargas que desee desplazar.
Para garantizar un funcionamiento
seguro del cabrestante, utilice sólo las
orientaciones de montaje recomendadas.
Cualquier otra orientación de montaje
es incorrecta e inadecuada. El uso de
las combinaciones recomendadas de
arandelas de presión y pernos, aplicando
los niveles de apriete recomendados,
evita las vibraciones durante el
accionamiento. Los detalles del montaje
indican los niveles adecuados del par de
torsión.
Recuerde que el cable del
cabrestante debe enrollarse alrededor
del tambor en el sentido indicado por la
marca de rotación.
Consulte los diagramas siguientes
para obtener orientación adecuada
sobre montaje.
Instalación del paquete de control
El montaje del paquete de control
se debe realizar de acuerdo a las
instrucciones incluidas en el conjunto
del sistema de montaje de WARN.
Utilice el soporte que seincluye en el
paquete.
Grosor
de la placa
Longitud
del perno
7 mm
(1/4 pulg.)
32 mm
(1,25 pulg.)
10 mm
(3/8 pulg.)
40 mm
(1,5 pulg.)
13 mm
(1/2 pulg.)
40 mm
(1,5 pulg.)
Detalles del montaje:
(1)
Lisa y plana, grosor = 6,4 mm
(¼ pulg.)
(2)
Arandela de presión de 9,525 mm
(3/8 pulg.) X 4
(3)
3/8-16 X 1 1/4 pulg. de largo,
perno de calibre 5 X 4
Par de torsión 41-47 Nm (30-55 pies-lb)
(4)
Contratuerca de 1/2-13 pulg.
(5)
Arandela plana de ½ pulg.
(6)
Tuerca cuadrada de 3/8-16 pulg.
(7)
Perno de cabeza de botón de 1/2-13x2 pulg.
(8)
Guía de aluminio.
Patrón de los pernos de montaje:
ADVERTENCIA
Nunca utilice pernos
que sean demasiado
largos.
ADVERTENCIA
Elija siempre
una ubicación de
montaje que sea
lo su cientemente
sólida para soportar
la capacidad de
carga máxima
delcabrestante.
ADVERTENCIA
Complete siempre
la instalación del
cabrestante y el
acoplamiento del
gancho antes de
instalar elcableado.
WARN INDUSTRIES * WINCH
42
CONEXIONES ELÉCTRICAS
Diagramas eléctricos:
CONEXIONES ELÉCTRICAS
Utilice los manguitos
aislantes provistos en las
conexiones expuestas a n de
evitar cortocircuitos. No instale los
cables de la batería donde puedan
desgastarse debido al roce o
sufrir cortes en el material aislante
produciéndose así un cortocircuito.
Cuando haya nalizado
la instalación, compruebe si el
cabrestante funciona correctamente.
Recomendaciones para la batería
Una batería completamente
cargada y unas conexiones correctas
resultan esenciales para el buen
funcionamiento del cabrestante.
Elrequisito mínimo para una batería
de 12 voltios de CC es de 650
amperios para el arranque en frío.
Pasador nº Color
1 Marrón
2 Blanco
3 Negro
4 Verde
5
6 Rojo
Negro
Rojo
Verde
Marrón
Blanco
ADVERTENCIA
Nunca pase los
cables eléctricos por
bordes a lados.
ADVERTENCIA
Nunca pase los
cables eléctricos
cerca de piezas que
se calienten.
ADVERTENCIA
Nunca pase los
cables eléctricos por
partes móviles o
cerca de ellas.
ADVERTENCIA
Ponga siempre
las fundas para
los terminales
suministradas en
los cables ylos
terminales, tal
como se indica en
las instrucciones
deinstalación.
ADVERTENCIA
Aísle y proteja
siempre los cables y
terminales eléctricos
que estén expuestos.
87970A2
87970A2
Page 24

WARN INDUSTRIES * WINCH
43
INSTRUCCIONES DE OPERACIÓN
Primero Tiempo de funcionamiento Instrucciones
En esta sección, le mostraremos las primeras
instrucciones de uso de tiempo para la izada
básica efectiva. Para el funcionamiento del
cabrestante completa y técnicas de leer
la Guía básica para el uso del cabrestante
técnicas que se encuentran en línea
en
http://www.warn.com/corporate/
literaturerequest.shtml.
Control remoto
El cabrestante es controlado por el
mando a distancia de mano. El control
remoto permite el control de la potencia de
salida (hacia delante) o el poder-en (inversa)
de rotación del tambor de enrollado.
No deje el control remoto conectado
al cabrestante cuando no se esté utilizando.
El dejar el control enchufado puede
producir una situación peligrosa o desgastar
la batería.
Accionamiento del embrague:
Cuando el embrague está activado, el
sistema deengranajes se acopla al tambor
del cabrestante y, en estas condiciones,
puede transferirse movimiento desde el
motor del cabrestante. Cuando el embrague
está desembragado el tambor se encuentra
en posición de enrollado manual y el
sistema de engranajes y el tambor del cable
del cabrestante están desengranados, lo
que permite que el tambor gire libremente.
Control remoto vertical:
Desembragado:
Embragado:
Enrollado bajo carga
No exceda nunca los límites
detracción del cable del cabrestante.
Enrolle el cable uniformemente y
bien tensado alrededor del tambor. Esto
evita que las vueltas más externas del
cable se hundan en las vueltas internas,
lo cual puede ocasionar atascamientos y
daños al cable.
Evite cargas repentinas cuando
esté enrollando; para ello, pulse el
interruptor de control a n de tensar
y hacer entrar las porciones del cable
que puedan quedar ojas. Lascargas
repentinas pueden hacer sobrepasar
momentáneamente la capacidad
nominal del cabrestante ydel cable.
Enrollado sin carga
Enrollado o desenrollado con un ayudante:
Pida al ayudante que sujete la correa
del gancho tensando el cable de forma
constante y tanto como sea posible.
Manteniendo tenso el cable, el ayudante
debe caminar hacia el cabrestante
mientras usted acciona el interruptor de
control para enrollar el cable. Suelte el
interruptor cuando el gancho esté a una
distancia mínima de 2 m (6 pies) de la
abertura de la guía.
Luego, enrolle la parte nal del
cable para almacenarlo tal como se
indica a continuación.
Enrollado o desenrollado solo: Disponga
el cable de forma que nose doble ni
se trabe al enrollarlo. Asegúrese de
que el cable ya enrollado alrededor del
ENROLLADO
DESENROLLADO
ADVERTENCIA
Nunca embrague
ni desembrague si
el cabrestante está
soportando una
carga, si el cable
está en tensión o
si el tambor está
enmovimiento.
ADVERTENCIA
Nunca accione
el cabrestante si
no hay, almenos,
10vueltas de cable
alrededor del
tambor. Elcable
podría soltarse del
tambor, ya que el
acoplamiento del
cable al tambor no
está construido para
soportar cargas.
AVISO
No desenrolle el cable
más de 9metros
sin dejar que el
cabrestante se enfríe
durante 20 minutos
antes de volver a
enrollar el cable. En
su lugar, coloque el
embrague en posición
de enrollado libre ytire
del cable amano.
La palanca del embrague, ubicada en
la cubierta delcabrestante, enfrente del
motor, controla la posición del embrague.
Para evitar daños, engrane y desengrane
siempre completamente la palanca del
embrague.
WARN INDUSTRIES * WINCH
44
INSTRUCCIONES DE OPERACIÓN
tambor esté bien tenso y dispuesto
en capas uniformes. Enrolle su ciente
cable como para formar la siguiente
capa completa en el tambor. Tense y
enderece la capa. Repita el proceso
hasta que el gancho quede a una
distancia mínima de 2 m (6 pies) dela
abertura de la guía.
Luego, enrolle la parte nal
delcable para almacenarlo tal como
se indica a continuación.
Enrollado del resto del cable
parael almacenamiento
Cuando el gancho se encuentre a 2m
(6 pies) de la guía, desconéctelo del
punto de anclaje o carga. Sostenga
la correa del gancho (incluida con
el producto) y mantenga la tensión
en el cable del cabrestante. Enrolle
el cabrestante lentamente pulsando
el botón de enrollado en el control
remoto hasta que el gancho se
encuentre a 1 metro (3 pies) de la
guía. Pare de enrollarlo y enganche
el gancho al punto de anclaje
apropiado en el vehículo.
NO PERMITA QUE EL GANCHO
TOQUE LA GUÍA. Esto podría causar
daños a la guía. Una vez que el gancho
esté bien acoplado al vehículo, enrolle
el resto del cable suelto pulsando el
interruptor de enrollado en el control
remoto hasta que haya una holgura
mínima en el cable.
Sobrecarga/sobrecalentamiento
El cabrestante está indicado
para un servicio intermitente.
Cuando el motor se aproxima a la
velocidad crítica, se genera calor muy
rápidamente, lo que puede ocasionar
daños al motor.
El maniobrado con línea de
doble cable (consulte la Guía básica
de técnicas para el uso del cabrestante
reduce el consumo de amperaje
y el recalentamiento del motor.
Esto permite un uso continuo más
prolongado.
INSTRUCCIONES DE
FUNCIONAMIENTO Cont.
ADVERTENCIA
Mantenga siempre
las manos alejadas
del cable del
cabrestante, del
bucle del gancho,
del gancho y de
la abertura de
la guía durante
la instalación,
laoperación y
en el enrollado
ydesenrollado.
ADVERTENCIA
Utilice siempre la
correa del gancho
suministrada
cuando vaya
a enrollar o
desenrollar el cable
del cabrestante
o durante la
instalación o el
funcionamiento
para evitar daños en
las manos.
ADVERTENCIA
Utilice siempre
guantes gruesos
de cuero para
manipular el cable del
cabrestante.
ADVERTENCIA
Nunca toque el
cable ni el gancho
si hay alguien cerca
del interruptor
de control, o si el
cabrestante está en
funcionamiento.
87970A2
87970A2
Page 25

WARN INDUSTRIES * WINCH
45
INSTALACIÓN DEL CABLE
ENROLLADO Y DESENROLLADO
LOS PASOS SIGUIENTE TIENEN
UNA GRAN IMPORTANCIA Y, DE NO
SEGUIRSE CON PRECISIÓN, LA VIDA
ÚTIL DEL CABRESTANTE Y DE LA
CUERDA PODRÍA VERSE AFECTADA.
1. Monte la guía de escobén de
aluminio Warn en el cabrestante
utilizando las piezas que se
proporcionan. Instale siempre la guía
con las etiquetas hacia arriba (en la
parte superior y claramente visibles).
Introduzca un perno de 7/16 pulg. x 1
¼ pulg. a través de cada uno de los dos
ori cios de montaje de la guía y por el
soporte del cabrestante. Coloque una
arandela plana de 7/16pulg. en cada
perno. Ponga unatuerca de jación de
7/16 pulg. en cada perno y apriete a
35 pies-lb.
Consulte laFigura para ver los detalles.
5. Apriete el perno de cabeza de botón
de 1/4-20 pulg. a 8 pies-lb. Gire la
palanca de embrague del cabrestante
hasta la posición de embragado.
6. Ahora es necesario enrollar el resto
del cable en el tambor del cabrestante.
Escoja una super cie PLANA que sea
lo su cientemente amplia como para
poder extender todo el cable. Acople
el extremo del cable con gancho a un
punto de anclaje apropiado y aleje
el vehículo de tal punto dejando
aproximadamente 2 metros (6 pies)
de cable suelto reposando en el suelo.
Antes de salir del vehículo, ponga el
freno de mano, deje una velocidad
puesta o en aparcado (vehículos
automáticos) y apague el vehículo.
7. Conecte el control remoto al
cabrestante. Desde una distancia de
aproximadamente 2,5 metros (8 pies)
del cabrestante, enrolle el cable hasta
que haya 10 vueltas en el tambor del
cabrestante. Desconecte el control
remoto del cabrestante. Mantenga
la tensión en el cable con una mano;
empuje cuidadosamente el cable
hacia el lado del tambor al que esté
enganchado, de forma que no haya
espacios libres en el tambor entre
cada vuelta. Veri que que el cable se
enrolle en la parte inferior del tambor
y no en la superior, ya que, en caso
contrario, el freno de carga automático
no funcionará correctamente. (Si el
cable se enrolla en la parte superior,
habrá activado en el control remoto el
desenrollado del cabrestante en lugar
del enrollado.)
8. Si todavía hay cable en el suelo,
retroceda el vehículo hasta haberlo
recogido todo.
9. Para una mayor seguridad, los pasos
siguientes deberán realizarlos dos
personas. Si trata de tensar el cable
usted solo, veri que siempre que el
freno de mano esté puesto, deje una
marcha puesta y apague elvehículo
cada vez que lo abandone para
inspeccionar el cable. No salga nunca
del vehículo con una carga aplicada al
cable. Tensar el cable es fundamental
para garantizar una larga vida útil del
2. Deslice la funda protectora contra la
abrasión por el cable desde el extremo
opuesto al gancho. Vuelva adeslizar la
funda protectora hasta elextremo del
gancho del cable.
3. Aplique Loctite 271 o un producto
similar al perno de cabeza de botón
de ¼ pulg.-20 x ½ pulg. que se
proporciona.
4. Instale el nuevo cable sintético
utilizando el perno de cabeza de botón
proporcionado y la arandela del cable
mecanizado. Pase el cable sintético
por la guía de aluminio y alrededor
del tambor del cabrestante de la parte
inferior. Inserte el perno de cabeza
de botón en la arandela del cable
mecanizado y coloque el cable sintético
en la arandela del cable mecanizado.
Introduzca el perno de cabeza de botón
en el ori cio de 1/4-20 pulg. situado en
el lateral del tambor del cabrestante.
ADVERTENCIA
Realice siempre
un estiramiento
previo del cable y
vuelva a enrollarlo
con carga antes de
usarlo. Un cable bien
enrollado reduce
las posibilidades
de tener “dobleces”
que puedan dañar
el cable.
ADVERTENCIA
Nunca toque el
cable ni el gancho
si hay alguien cerca
del interruptor
de control, o si el
cabrestante está en
funcionamiento.
AVISO
Nunca instale más
de 100(CTI)/80(XDC)
pies de cable
sintético de 3/8 pulg.
Puede dañar
el cabrestante.
Cable
Arandela del cable
Perno de
cabeza de
botón de 1/420 x ½ pulg.
WARN INDUSTRIES * WINCH
46
INSTALACIÓN DEL CABLE
mismo. Tensar el cable evita que se
hunda en capas inferiores cuando hay
carga.
10. Procure enrollar cada vuelta
parejamente para evitar daños
enelcable.
11. Pase el control remoto a través dela
ventanilla del conductor para que éste
pueda usarlo desde el vehículo. Pida a
su ayudante que se ubique en la parte
lateral del vehículo, alejado del cable
del cabrestante. Él deberá indicarle si el
cable se está enrollando correctamente
al verlo pasar por la guía. Arranque el
vehículo y ponga la transmisión en
punto muerto. Suelte el freno de mano
mientras presiona moderadamente
el pedal del freno. Conecte el control
remoto del cabrestante. Después de
enrollar aproximadamente 2 metros
(6 pies)
de cable, pare el enrollado. Lentamente,
deje de presionar el pedal del freno
para aplicar el freno de mano. Esto
asegurará que no haya carga en el
cable del cabrestante. A continuación,
ponga la transmisión en aparcado
(vehículos automáticos) o ponga una
velocidad con la palanca de cambios
y apague el vehículo. Salga del
vehículo y compruebe que el cable
del cabrestante esté enrollándose
de forma igualada en el tambor y no
hundiéndose en la capa inferior. Si el
cable se está hundiendo, desenróllelo y
repita este paso desde el principio con
más presión en el pedal del freno.
12. Una vez tenga la cer teza de
que el cable se enrol la y desenrolla
correctamente, vuelva al vehículo.
Pase el control remoto a través del a
ventanilla del conduc tor para que
éste pueda usarlo des de el vehículo.
Arranque el vehículo y ponga la
transmisión en punto mu erto.
Suelte el freno de man o mientras
presiona moderadamente el pedal
del freno. Conecte el control remoto
del cabrestante. Después de enrollar
aproximadamente 2 metros (6 pies) de
cable, pare el enrollado. Lentamente,
deje de presionar el p edal del freno
para aplicar el freno de mano. Esto
asegurará que no haya carga en el
cable del cabrestante. Acontinuación,
INSTALACIÓN DEL CABLE cont.
ponga la transmisión en aparcado
(vehículos automáticos) o ponga una
velocidad con la palanca de cambios
y apague el vehículo. Salga del
vehículo y compruebe que el cable
del cabrestante esté enrol lándose
de forma igualada en el tambor y no
hundiéndose en la ca pa inferior. Si el
cable se está hundiendo, desenróllelo
y repita este paso desde el principio
con más presión en el pedal del freno.
13. Repita el paso 12 hasta que el
vehículo se encuentre a 2 metros
(6 pies) del anclaje del cabrestante.
Una vez que esté a 2 metros (6pies),
deje de presionar el pedal del freno
lentamente para utilizar el freno de
mano. Esto asegurará que no haya
carga en el cable del cabrestante.
Acontinuación, ponga la transmisión
en aparcado (vehículos automáticos)
o ponga una velocidad con la palanca
de cambios y apague el vehículo.
Salga del vehículo. Desenganche el
gancho del punto de anclaje. Mientras
sostiene la correa del gancho (incluida
en el producto), mantenga la tensión
en el cable del cabrestante y enróllelo
lentamente pulsando el botón de
enrollado en el control remoto hasta
que el gancho se encuentre a 1 metro
(3pies) de la guía. Pare de enrollarlo
y enganche el gancho al punto de
anclaje apropiado en el vehículo. NO
PERMITA QUE EL GANCHO TOQUE
LA GUÍA. Esto podría causar daños
irreparables a la guía. Una vez que el
gancho esté bien acoplado alvehículo,
enrolle el resto del cable suelto
pulsando el botón de enrollado en el
control remoto hasta que haya una
holgura mínima en el cable.
Maniobrado
Para fundamentos aparejo
completo, Lea la Guía básica de
técnicas del cabrestante, que se
encuentran en línea en
http://
www.warn.com/corporate/
literaturerequest.shtml.
87970A2
87970A2
Page 26

WARN INDUSTRIES * WINCH
47
INSPECCIÓN DEL CABLE
Cuando se utilice el cable
por primera vez, los lamentos
exteriores del cable se deshilacharán
rápidamente. Esto es resultado
delrompimiento de estos lamentos,
pero la aspereza de esta super cie en
realidad protegerá las bras que están
debajo. Esta condición se estabilizará
y no seguirá progresando. Si aumenta
la aspereza de la super cie, esto
signi ca que hay demasiada abrasión
y que se está perdiendo resistencia.
Observe las bras tanto interiores
como exteriores. Si están desgastadas,
esto signi ca que el cable se ha
debilitado. Separe los hilos y vea si hay
bra convertida en polvo; de ser así, el
cable ha sufrido un desgaste interior.
El cable deberá reemplazarse enlos
siguientes casos:
• El volumen del cable se ha
reducido en algún tramo del
mismo en un 10% o más debido
a la abrasión.
• Dos o más hilos adyacentes
están cortados.
• Se observan áreas planas o
protuberancias que no se
eliminan exionando el cable.
• Se observa una excesiva
cantidad de bras fusionadas
o fundidas. Cualquier área de
este tipo estará rígida y el cable
tendrá una apariencia glaseada.
Almacenamiento y cuidado del cable
Para garantizar la seguridad y
un buen rendimiento, la inspección
y el mantenimiento del cable del
cabrestante deberá constituir uno
delos principales puntos de atención
del usuario.
1. Compruebe si el cable de su
cabrestante tiene alguna rotura,
corte, bras fusionadas o fundidas por
abrasión antes de cada uso que haga
del mismo.
2. Lave el cable periódicamente
para eliminar la suciedad y el polvo.
Aclare el cable con una manguera
convencional y deje que se seque
INSPECCIÓN DEL CABLE
al aire libre.
NO use disolventes, lejía o
detergentes agresivos cuando lave el
cable, y no aplique nunca una fuente
de calor para acelerar el secado.
3. Para guardar el cable, enróllelo
sin apretar, asegurándose de que
no se produzcan dobleces. Para
potenciar al máximo la vida útil del
cable, almacene siempre el cable
en un lugar oscuro y seco. Antes de
utilizar el cable, consulte el manual
siguiente. Si el cable está dañado,
deje de utilizarlo inmediatamente y
sustitúyalo por un cable nuevo, WARN.
Los hilos rotos o cortados reducen la
resistencia de todo el cable; no solo de
la zona dañada. Como regla general,
debe reemplazar el cable de 12 hilos
cuando vea que hay más de
3 hilos rotos o cortados, o cuando
haya dos hilos adyacentes afectados.
4. Sustituya el cable cada 12 meses
solo por el cable WARN.
Desgaste normal
Cuando se rompen las bras
deuna pequeña super cie de
uncable, dan lugar a una textura
rugosa. Esto se conoce como
“abrasión suave” y se considera un
desgaste benigno que no afectará al
rendimiento del cable. La super cie
tosca en realidad protege la bra
subyacente contra más desgaste.
Desgaste excesivo–REEMPLACE EL
CABLE
Cuando las bras se funden
o fusionan, generalmente la causa
es un mal uso del cable. Las bras
de poliéster fundidas o fusionadas
se originan cuando la super cie
del cable está expuesta a una
temperatura superior a los 430° F
(221° C). Estas bras dañadas debido
a pesos de carga o desenrollados
excesivos, puede comprometer la
resistencia del cable y suele ser un
aviso de que hay que cambiar el
cable.
WARN INDUSTRIES * WINCH
48
INSPECCIÓN DEL CABLE
Ataque químico–REEMPLACE
EL CABLE (NO ILUSTRADO)
Las decoloraciones localizadas
pueden representar la existencia de
un ataque químico producido por
sustancias como el aceite de engranaje
o el ácido de una pila. Cuando tenga
dudas, cambie el cable.
Ejemplos:
Cable con su volumen original.
Hilo de cable con un volumen
normal.
Cable que muestra una reducción
del volumen de los hilos de un
25% debido a la abrasión—El
cable deberá reemplazarse.
Hilo del cable reducido en un
25% debido
a la abrasión—El cable deberá
reemplazarse.
El cable muestra dos hilos
adyacentes cortados—El cable
deberá reemplazarse.
Aspecto de bras de cable
debido a compresión. Se puede
ver un cierto brillo. Ésta no es
una característica permanente y
puede eliminarse exionando el
cable.
INSPECCIÓN DEL CABLE cont.
87970A2
87970A2
Page 27

WARN INDUSTRIES * WINCH
49
Jeder Umgang mit einer Winde schließt die Möglichkeit ein, dass Personen verletzt werden.
Um dieses Risiko zu minimieren, ist es wichtig, diese Sie SÄMTLICHE Anweisungen und
Sicherheitsinformationen über Ihr Produkt lesen. Machen Sie sich vor der Nutzung mit dem
Betrieb der Winde vertraut und denken Sie stets an Sicherheit. Die vorliegende Anleitung
enthält wichtige Sicherheitsinformationen und Anweisungen zur Installation und zum Betrieb
Ihrer Winde.
Bei dieser Lieferung finden Sie die folgenden Texte:
• Windeninstallationsanleitung/Anleitung für den erstmaligen Betrieb
• Produktgewährleistung
HEBEN SIE DIESES HANDBUCH und sonstige Produktdokumentation auf, um künftig darin
nachlesen zu können und einen dauerhaft sicheren Betrieb zu gewährleisten.
Weisen Sie alle Benutzer dieses Produkts darauf hin, dass dieses Handbuch vor dem Betrieb
des Produkts zu lesen ist.
Zusätzliche, online verfügbare Produktdokumentation
:
• Grundlegenden Richtlinien zur Windentechnik
• Vermitteln ein grundlegendes Verständnis der Funktionsweise Ihrer Winde und
ordnungsgemäßer Windentechnik. Eine wertvolle Ressource für sicheren und
effizienten Windenbetrieb.
• Produktspezifikationen und Leistungsdaten
• Liefern Produktspezifikationen, Leistungsdaten und Ersatzteilinformationen.
• Sonstiges produktspezifisches Dokumentationsmaterial
Rufen Sie zum Anzeigen/Herunterladen von zusätzlichem Informationsmaterial über Produkte
oder Ersatzteile
www.warn.com/corporate/literaturerequest.shtml
auf.
WARN INDUSTRIES * WINCH
50
ORIGI NALANLEITU NG
WARN INDUSTRIES
50
Winde Installations- und
Bedienungsanleitung
INHALTSVERZEICHNIS:
SICHERHEIT
Symbolindex ......................................................................................................................................................51
Allgemeine Sicherheitsmaßnahmen .................................................................................................. 52-55
Sichere Arbeitsbedingungen .......................................................................................................................56
ANLEITUNG
Montage der Winde .........................................................................................................................................57
Elektrische Anschlüsse ....................................................................................................................................58
Bedienungsanleitung .............................................................................................................................. 59-60
Installation des Seils ................................................................................................................................. 61-62
Prüfen des Seils ......................................................................................................................................... 63-64
Warn Industries Inc.
12900 SE Capps Road
Clackamas, OR 97015
USA
Kundendienst: (800) 543-WARN
(9276)
International: (503) 722-1200
Fax: (503) 722-3000
www.warn.com
WARN® und das WARN -Logo sind einge tragene Warenze ichen von Warn Indust ries Inc.
© 2016 Warn Industries, Inc.
87970A2
87970A2
Page 28

WARN INDUSTRIES * WINCH
51
SYMBOLINDEX
SYMBOL ERKLÄRUNG
Lesen Sie die gesamte
Produktdokumentation
Einige L iteratur nur on line unter
ww w.warn.com/corporate/
literaturereq uest.shtml.
Immer Gehör- und
Augenschutz tragen
Winde niemals zum
Heben verwenden
Last ordnungsgemäß
im Hakenhals platzieren
Seil von unten auf die
Trommel aufspulen
Quetschgefahr für die
Finger in der Führung
Schnitt-/Stichgefahr
für die Hände
Explosionsgefahr
Gefahr durch
scharfe Kanten
Vermeiden Sie
Quetschpunkte und
scharfe Kanten bei
der Installation von
elektrischen Kabeln
SYMBOL ERKLÄRUNG
Immer Lederhandschuhe
tragen
Keine Personen
befördern
Immer mitgelieferten
Hakengurt verwenden
Hakenspitze oder Riegel
niemals belasten
Seil nie von oben auf die
Trommel aufspulen
Quetschgefahr
durch Führung
Gefahr durch
heiße Flächen
Brand- und
Verbrennungsgefahr
Gefahr durch bewegliche
Teile
Isolieren Sie freiliegende
Drähte
Niemals das Seil an sich
selbst einhaken
WARN INDUSTRIES * WINCH
52
ALLGEMEINE SICHERHEITSMASSNAHMEN
In diesem Handbuch be nden sich
WARNHINWEISE,
VORSICHTSMASSNAHMEN, WICHTIGE ANMERKUNGEN und HINWEISE.
Jeder dieser Punkte hat einen besonderen Zweck. WARNHINWEISE sind
Sicherheitshinweise, die auf eine möglicherweise gefährliche Situation
hinweisen, die zu schweren oder tödlichen Verletzungen führen kann, wenn
sie nicht vermieden wird. VORSICHTSMASSNAHMEN sind Sicherheitshinweise,
die auf eine möglicherweise gefährliche Situation hinweisen, die zu leichten
oder mäßigen Verletzungen führen kann, wenn sie nicht vermieden wird.
Eine VORSICHTSMASSNAHME kann auch auf unsichere Praktiken hinweisen.
VORSICHTSMASSNAHMEN und WARNHINWEISE kennzeichnen die Gefahr, weisen
auf Möglichkeiten zur Vermeidung der Gefahr hin und geben Aufschluss über
die möglichen Folgen, wenn diese Gefahr nicht vermieden wird. Das Signalwort
WICHTIG weist auf Anmerkungen mit Vorgehensweisen zur Vermeidung
von Sachschäden hin. HINWEISE liefern zusätzliche Informationen, die Ihnen
helfen, ein bestimmtes Verfahren durchzuführen.
BITTE UNBEDINGT ALLE
SICHERHEITSMASSNAHMEN BEACHTEN!
Warnhinweise und Vorsichtsmaßnahmen
ACHTUNG
GEFAHR DURCH BEWEGLICHE TEILE
Die Nichtbeachtung dieser Anweisungen kann zu
schweren oder tödlichen Verletzungen führen.
Allgemeine Sicherheitsmaßnahmen:
• Stets mit der Winde wissen. Nehmen Sie sich Zeit, um den
genauen Anweisungen und / oder Betriebshandbuch lesen
und / oder Richtlinien zur Windentechnik, um die Winde und
seine Operationen zu verstehen, nden Sie online bei http://
www.warn.com/corporate/literaturerequest.shtml.
•
Niemals
die Nennkapazität der Winde bzw. des Windenseils
überschreiten. Zur Reduzierung der Last sind eine Umlenkrolle
und ein zweifach geschertes Seilerforderlich.
•
Immer
schwere Lederhandschuhe bei der Handhabung des
Windenseils tragen.
•
Niemals
Winde oder Windenseil zum Abschleppen verwenden.
Schockbelastungen können das Seil beschädigen, überlasten und
zum Reißen bringen.
•
Niemals
eine Winde zum Sichern einer Last verwenden.
•
Niemals
eine Winde unter Alkohol-, Drogen- oder
Medikamentenein uss in Betrieb nehmen.
•
Niemals
die Winde von Personen unter 16 Jahren inBetrieb
nehmen lassen.
Sicherheitsmaßnahmen bei der Installation:
•
Immer
eine Befestigungsstelle wählen, die fest genug ist, um
der maximalen Nennleistung der Winde standhalten zu können.
•
Immer
Befestigungsteile verwenden, die mindestens
Festigkeitsgrad 5 (bzw. 8,8 bei metrischen Schrauben)
entsprechen.
•
Niemals
Befestigungsschrauben schweißen.
•
Immer
nur vom Hersteller zugelassene Befestigungsteile,
Komponenten und Zubehörteile verwenden.
•
Niemals
zu lange Schrauben verwenden.
•
Immer
die Windeninstallation und Hakenbefestigung
abschließen, bevor die Verkabelung installiert wird.
•
Immer
Kontakt mit dem Windenseil, der Öse, dem Haken und
der Seilführung während der Installation, des Betriebs und beim
Ab- und Aufspulen vermeiden.
•
Immer
die Seilführung so positionieren, dass der Warnhinweis
deutlich sichtbar nach oben zeigt.
•
Immer
vor Inbetriebnahme das Seil dehnen und unter Last neu
aufspulen. Ein fest aufgespultes Windenseil reduziert das Risiko,
dass sich die Seillagen lockern und hängen bleiben oder Schäden
verursachen.
GEFAHR DURCH BEWEGLICHE TEILE
Die Missachtung dieser Anweisungen kann zu
schweren oder tödlichen Verletzungen führen.
•
Immer
sicherstellen, dass der Riegel geschlossen ist und keine Last
trägt.
•
Niemals
Hakenspitze oder Riegel belasten. Nur die Hakenmitte
belasten.
•
Niemals
verworfene Haken bzw. Haken mit einer verbreiterten
Durchlassöff nung verwenden.
•
Immer
einen Haken mit Riegel verwenden.
•
Immer
gewährleisten, dass Bedienpersonal und in der Nähe
be ndliche Personen auf die Stabilität von Fahrzeug und Last während
des Windenbetriebs achten.
• Fernsteuerungs- und Stromversorgungskabel
immer
von der Trommel,
dem Seil und beim Abspannen fernhalten. Auf rissige, geknickte oder
ausgefranste Drähte oder lockere Anschlüsse achten. Beschädigte
Komponenten sind vor der Inbetriebnahme auszuwechseln.
• Fernsteuerungskabel bei Verwendung im Fahrzeug
immer
durch
Fenster verlegen.
•
Niemals
das Seil an sich selbst einhaken.
ACHTUNG
87970A2
87970A2
Page 29

WARN INDUSTRIES * WINCH
53
ALLGEMEINE SICHERHEITSMASSNAHMEN
ACHTUNG
GEFAHR DURCH BEWEGLICHE TEILE
Die Nichtbeachtung dies er Anweisungen kann zu
schweren oder tödlichen Verletzungen führen.
Sicherheitsmaßnahmen beim Windenbetrieb:
•
Immer
Windenseil, Haken und Schlingen vor Inbetriebnahme
der Winde prüfen. Ausgefranste, geknickte oder beschädigte
Windenseile müssen umgehend ausgetauscht werden.
Beschädigte Komponenten sind vor Inbetriebnahme
auszuwechseln. Alle Einzelteile sind vor Schäden zu schützen.
•
Immer
Gegenstände oder Hindernisse entfernen, die einen
sicheren Betrieb der Winde beeinträchtigen könnten.
•
Immer
sicherstellen, dass der gewählte Anker der Last
standhalten kann und dass weder der Riemen noch die Kette
verrutschen können.
•
Immer
beim Auf- und Abspulen des Windenseils, während
der Installation und während des Betriebs den mitgelieferten
Hakengurt verwenden.
•
Immer
dafür sorgen, dass sich Bedienpersonal und in der Nähe
be ndliche Personen des Fahrzeugs und der Last bewusst sind.
•
Immer
beim Windenbetrieb auf die Stabilität des Fahrzeugs
und der Last achten und andere Personen davon fernhalten. In
der Nähe be ndliche Personen müssen über instabile Zustände
informiert werden.
•
Immer
beim Abspannen möglichst viel Seil abspulen. Seil
zweifach scheren oder weit entfernten Ankerpunkt wählen.
•
Immer
Zeit für die Verwendung der richtigen Spultechnik bei
einem Windenvorgang nehmen.
•
Niemals
das Windenseil oder den Haken während des
Windenbetriebs berühren, oder wenn jemand anders die
Steuerung der Winde übernommen hat.
•
Niemals
die Kupplung bei belasteter Winde, gespanntem
Windenseil oder sich bewegender Seiltrommel ein- oder
ausrasten lassen.
•
Niemals
Windenseil oder Haken berühren, wenn diese unter
Spannung stehen.
•
Immer
Abstand zum Windenseil und zur Last halten und andere
Person während des Windenbetriebs fernhalten.
•
Niemals
ein Fahrzeug verwenden, um Last mit
dem Windenseil zu ziehen. Kombinierte Lasten oder
Schockbelastungen können das Seil beschädigen, überlasten
und zum Reißen bringen.
•
Niemals
das Windenseil um sich selbst aufwickeln. Verwenden
Sie eine Kette oder eine sonstige Schutzvorrichtung (für
Baumstämme) am Anker.
ACHTUNG
STURZ- ODER QUETSCHGEFAHR
Die Nichtbeachtung dieser Anweisungen kannzu
schweren oder tödlichen Verletzungen führen.
•
Immer
Abstand halten, Hände fernhalten, andere Personen
fernhalten.
•
Niemals
die Winde mit weniger als 5 Seilwicklungen um die
Trommel betreiben. Das Seil könnte sich von der Trommel lösen,
da die Seilbefestigung an der Trommel nicht für eine Belastung
konzipiert wurde.
•
Niemals
die Winde als Hebevorrichtung oder zum Anheben von
Lasten verwenden.
•
Immer
sicherstellen, dass der Anker der Last standhalten kann;
unbedingt auf ordnungsgemäßes Abspannen achten.
•
Niemals
eine Winde als Lift oder zur Beförderung von Personen
verwenden.
•
Niemals
übermäßige Kraft für den Freilauf des Windenseils
anwenden.
•
Immer
beim Handling und Installieren des Produkts auf richtige
Haltung/Hebetechnik achten oder Hebehilfe beschaff en.
•
Immer
das Seil in der auf dem Warnetikett der Winde und/
oder in den Unterlagen angegebenen Richtung auf die Trommel
spulen. Diese Maßnahme ist für die ordnungsgemäße Funktion der
Automatikbremse
(wenn vorhanden) unerlässlich.
•
Immer
das Windenseil entsprechend den Rotationsangaben auf dem
Trommelaufkleber aufspulen.
ACHTUNG
SCHNITTVERLETZUNGS- UND
VERBRENNUNGSGEFAHR
Die Nichtbeachtung dieser Anweisungen kann zu
schweren oder tödlichen Verletzungen führen.
So lassen sich Verletzungen an den Händen und
Fingern vermeiden:
• Immer schwere Lederhandschuhe bei der Handhabung des
Windenseils tragen.
• Immer während des Betriebs und nach Verwendung derWinde auf
möglicherweise heiße Flächen in der Nähe des Motors, der Trommel
oder des Seils achten.
WARN INDUSTRIES * WINCH
54
ALLGEMEINE SICHERHEITSMASSNAHMEN
ACHTUNG
GEFAHR DURCH STOSSVERLETZUNGEN
UNDBEWEGLICHE TEILE
Die Nichtbeachtung dieser Anweisungen kann zu
schweren oder tödlichen Verletzungen führen.
So lassen sich Verletzungen an den Händen und
Fingern vermeiden:
• Immer über die Tragfähigkeit (Working Load Limit, WLL) des
Seils informieren.
• Immer die Eignung eines Seils für eine bestimmte
Verwendung prüfen.
• Niemals das mitgelieferte Seil mit einer Winde verwenden,
die eine maximale Zugkraft von mehr als4.536 kg aufweist.
• Niemals ein Seil verwenden, dass verschlissen, beschädigt,
überlastet oder über ein Jahr alt ist oder das unsachgemäß
benutzt oder nicht ordnungsgemäß gewartet wurde.
• Niemals im Rückschlagbereich stehen.
• Niemals das Seil ohne Scheuerschutz über eine
raueOber ä che ziehen.
• Niemals das Seil um ungeschützte, scharfkantige Ecken
biegen.
• Niemals Kupplung ausgerastet lassen, wenn das Seil nicht
im Freilauf ist. Die automatische Bremse ist nicht in Betrieb,
wenn sich der Kupplungshebel inFreilaufstellung be ndet.
• Überschreiten Sie niemals die Ladekapazität von 4536 kg
(10.000 lbs).
• Ersetzen Sie das Seil alle 12 Monate durch ein neues.
• Benutzen Sie immer eine WARN-Führung, die für
Synthetikseile empfohlen wird.
• Ersetzen Sie eine beschädigte oder verschlissene WARNKlüsenführung immer durch eine WARN-Führung, die für
Synthetikseile empfohlen wird.
ACHTUNG
CHEMISCHE UND BRANDGEFAHR
Die Nichtbeachtung dieser Anweisungen kann zu
schweren oder tödlichen Verletzungen führen.
• Immer Schmuck entfernen und Augenschutz tragen.
• Niemals Elektrokabel über scharfe Kanten verlegen.
• Niemals Elektrokabel in der Nähe von Teilen verlegen, die
heiß werden.
• Niemals Elektrokabel durch bewegliche Teile oder inder
Nähe von beweglichen Teilen verlegen.
• Immer die mitgelieferten Schutzmanschetten an Kabeln
und Anschlüssen gemäß den Installationsanweisungen
anbringen.
• Niemals beim Anschließen von Kabeln über dieBatterie
lehnen.
• Niemals Elektrokabel über Batterieanschlüsse verlegen.
• Niemals Batterieanschlüsse mit Metallgegenständen
kurzschließen.
• Immer sicherstellen, dass ein Bereich, in dem gebohrt
werden soll, frei von Kraftstoffl eitungen, Kraftstoff tanks,
Bremsleitungen, elektrischen Kabeln usw. ist.
• Immer Einzelheiten über die richtige Verkabelung
derBedienungsanleitung entnehmen.
• Immer alle freiliegenden Drähte und elektrischen
Anschlüsse isolieren und schützen.
87970A2
87970A2
Page 30

WARN INDUSTRIES * WINCH
55
ALLGEMEINE SICHERHEITSMASSNAHMEN
SO VERMEIDEN SIE SCHÄDEN ANDER
WINDE UND AN GERÄTEN
• Immer vermeiden, dass das Seil von der Seite her
eingezogen wird, da sich das Seil sonst an einem Ende der
Trommel ansammeln kann. Bei Nichtbeachtung dieser
Anweisung können Schäden am Seil oder der Winde
entstehen.
• Immer darauf achten, dass die Kupplung vollkommen ein-
oder ausgerastet ist.
• Immer sicherstellen, dass das Chassis bei der Verankerung
des Fahrzeugs während desWindenbetriebs nicht
beschädigt wird.
• Niemals die Winde in Wasser eintauchen.
• Immer die Fernsteuerung an einem geschützten, sauberen,
trockenen Ort aufbewahren.
• Immer darauf achten, ein Dauerabspulen zu vermeiden.
Durch die Wärmeentwicklung beim Dauerabspulen kann das
Seil beschädigt werden.
• Niemals das Seil aggressiven Reinigungsmitteln,
Kraftstoff en, Ölen oder Frostschutzmitteln aussetzen.
• Immer einen Scheuerschutz an allen scharfen Kanten
verwenden, um das Seil zu schützen.
• Niemals das Seil mit scharfkantigen Gegenständen in
Berührung kommen lassen. Andernfalls können schwere
Schäden auftreten.
• Immer das Seil nach winkeligem Windenbetrieb
ingleichmäßigen Wicklungen neu aufspulen.
• Niemals vergessen, das Seil unter Last nur langsam
einzuziehen. Schocklasten können die Leistungsfähigkeit
des Seils und der Winde kurzzeitig überschreiten.
• Niemals mehr als 30(CTI)/24(XDC)Meter Synthetikseil mit
einem Durchmesser von 9,5 mm installieren. Andernfalls
können Schäden an der Winde auftreten.
HINWEIS
VORSICHT
GEFAHR DURCH BEWEGLICHE TEILE
Die Nichtbeachtung dieser Anweisungen kann zu
leichten oder mäßigen Verletzungen führen.
So lassen sich Verletzungen an den Händen und
Fingern vermeiden:
• Niemals die Fernsteuerung beim Freilauf, Abspannen oder
bei Nichtgebrauch der Winde an einem Ort lassen, wo sie
aktiviert werden kann.
• Niemals die Fernsteuerung beim Freilauf, Abspannen oder
bei Nichtgebrauch der Winde an einem Ort lassen, wo sie
aktiviert werden kann.
VORSICHT
SCHNITTVERLETZUNGS- UND
VERBRENNUNGSGEFAHR
Die Nichtbeachtung dieser Anweisungen kann zu
leichten oder mäßigen Verletzungen führen.
• Niemals das Windenseil durch die Hände gleiten lassen.
WARN INDUSTRIES * WINCH
56
SICHERE ARBEITSBEDINGUNGEN
SICHERE ARBEITSBEDINGUNGEN
Der Benutzer sollte die Winde
beim Ziehen von Lasten immer
von einer sicheren Position aus
betreiben. Sichere Positionen sind: (1)
senkrecht zum Seil stehend und (2)
im Fahrzeug, wobei die Motorhaube
off en sein sollte (bei frontmontierter
Fahrzeugwinde). Diese sicheren
Positionen verhindern, dass das
Seil in Richtung des Benutzers
zurückschnellt und ihn triff t, wenn es
unter Belastung reißt.
Nutzen Sie beim Betrieb
derWinde möglichst die gesamte
Reichweite der Fernsteuerung.
Der Benutzer muss beim
Windenbetrieb immer einen
Abstand von mindestens 2,44 m
zur Winde einhalten. Dadurch wird
verhindert, dass die Fernsteuerung
in die Seilführung gerät und der
Benutzer sich beim Betrieb im
Gefahrenbereich der Winde aufhält.
Niemals in der Nähe des Seils
arbeiten, solange dieses unter
Spannung steht.
Lärmemissionen
Die Winde ist so konzipiert,
dass Geräuschemissionen von 70dB
am Standort des Benutzers nicht
überschritten werden. Der Benutzer
muss beim Windenbetrieb einen
Abstand von mindestens 2,44 m
zur Winde einhalten. Übersteigen
die Emissionen 70 dB am Standort
des Benutzers, Winde von einem
quali zierten Wartungstechniker
überprüfen lassen.
Reinigung
Verwenden Sie zur Reinigung
von Synthetikseil Wasser mit
geringem Druck. Niemals Chemikalien
verwenden.
Unter hohem Druck
stehende Wasserstrahle
(aus Hochdruckreinigern,
Autowaschanlagen usw.) nicht
zwischen das Trommellager
undden Trommel ansch bzw.
denKupplungshebel richten.
Winde mit einem Tuch oder
Schwamm sowie Wasser und
Seifereinigen.
Chemische Stoff e, die den
Lacküberzug beschädigen könnten,
vermeiden.
Salzrückstände müssen sofort
gründlich von der Winde entfernt
werden, um Schäden durchKorrosion
zu vermeiden.
Wartung
Seil alle 12 Monate durch WARN
Seil.
Die Winde benötigt keinerlei
Schmierung, es sei denn, sie wurde
unter Wasser getaucht. War dies
der Fall, muss sie so schnell wie
möglich von einem quali zierten
Wartungstechniker gewartet werden,
um Schäden durch Korrosion zu
verhindern. Wenn die Steuerung
unter Wasser getaucht wird,
muss siebei Wartung der Winde
ausgetauscht werden.
Batteriekabel und elektrische
Anschlüsse sind alle 3 Monate zu
prüfen, damit sichergestellt ist, dass sie
sauber und die Anschlüsse fest sind.
Prüfen Sie das Seil vor und nach
dem Windenbetrieb. Ersetzen Sie
esbei Beschädigung durch eines der
in Ersatzteilliste angeführten Größe
oder besuchen Sie die Website von
Warn unter www.warn.com.
Das Seil muss immer
entsprechend den Rotationsangaben
auf dem Trommelaufkleber
aufgespult werden.
ACHTUNG
Immer Abstand
halten, Hände
fernhalten, andere
Personen fernhalten.
ACHTUNG
Immer dafür
sorgen, dass sich
Bedienpersona l
und in der Näh e
be ndliche
Personen des
Fahrzeugs und der
Last bewusst si nd.
HINWEIS
Niemals die
Winde in Wasser
eintauchen.
VORSICHT
Niemals die
Fernsteuerung
beim Freilauf,
Abspannen oder bei
Nichtgebrauch der
Winde an einem
Ort lassen, wo sie
aktiviert werden
kann.
87970A2
87970A2
Page 31

WARN INDUSTRIES * WINCH
57
MONTAGE DER WINDE
MONTAGE DER WINDE
Eine Befestigungsstelle wählen, die
fest genug ist, um den Lasten standzuhalten,
die mit der Winde bewegen werden sollen.
Nurdie angegebenen Ausrichtungen
gewährleisten den sicheren Betrieb der
Winde. Alle anderen Ausrichtungen
sind unsachgemäß und ungeeignet.
Die Verwendung der empfohlenen
Schrauben und Sicherungsscheiben
verhindert Vibrationen während des
Betriebs, wenn sie mit den empfohlenen
Drehmomenten festgezogen werden. In der
Montagebeschreibung sind die richtigen
Drehmomentwerte angegeben.
Denken Sie daran, dass dasDrahtse il
immer entsprechend den Rotationsangaben
auf dem Trommelaufkleber aufgespult
werdenmuss.
Für die richtige Montageausrichtung
die folgenden Skizzen beachten.
Installation der Steuerung
Befestigen Sie die Steuerung
gemäß den Anweisungen im
Installationsbausatz von WARN.
Verwenden Sie dazu die im Bausatz
enthaltene Halterung.
Blechdicke Schraubenlänge
1/4” (7 mm) 1,25” (32 mm)
3/8” (10 mm) 1,5” (40 mm)
1/2” (13 mm) 1,5” (40 mm)
Montagebeschreibung:
(1) Eben und ach, Stärke = 6,4 mm
(2) 9,525 mm - Sicherungsscheibe x 4
(3) Schraube 3/8-16 X 1 1/4 Zoll lang
(SAE Grad 5) x 4
Drehmoment 41 - 47 Nm
(4) 1/2-13 Gegenmutter
(5) 1/2 Unterlegscheibe
(6) 3/8-16 Vierkantmutter
(7) 1/2-13x2” Halbrundschraube
(8) Aluminium-Seilführung
Montageschablone:
ACHTUNG
Niemals zu
lange Schrauben
verwenden.
ACHTUNG
Immer eine
Befestigungsstelle
wählen, die fest
genug ist, um
der maximalen
Nennleistung der
Winde standhalten zu
können.
ACHTUNG
Immer die
Windeninstallation
abschließen
und den Haken
befestigen, bevor
die Verkabelung
installiert wird.
WARN INDUSTRIES * WINCH
58
ELEKTRISCHE ANSCHLÜSSE
Verkabelungspläne:
ELEKTRISCHE ANSCHLÜSSE
Verwenden Sie die mitgelieferten
Isolationsmanschetten an den
freiliegenden Anschlüssen,
damit elektrische Kurzschlüsse
vermieden werden. Verlegen Sie die
Batterieanschlusskabel an Stellen,
wo sie die Isolierung nicht aufreiben
oder durchschneiden und so einen
Kurzschluss verursachen können.
Nach der Installation muss die
Seilwinde auf ordnungsgemäße
Funktion überprüft werden.
Empfehlungen zur Batterie
Eine vollständig geladene
Batterie und gute Anschlüsse sind
für den ordnungsgemäßen Betrieb
der Winde unumgänglich. Die
Mindestanforderungen für eine
12-V-Batterie (Gleichspannung)
liegen bei 650 CCA.
Stift-Nr. Farbe
1 Braun
2 Weiß
3 Schwarz
4 Grün
5
6 Rot
Schwarz
Rot
Grün
Braun
Weiß
ACHTUNG
Niemals
Elektrokabel über
scharfe Kanten
verlegen.
ACHTUNG
Niemals
Elektrokabel in der
Nähe von Teilen
verlegen, die heiß
werden.
ACHTUNG
Niemals
Elektrokabel durch
bewegliche Teile
oder in der Nähe von
beweglichen Teilen
verlegen.
ACHTUNG
Immer die
mitgelieferten
Schutzmanschetten an Kabeln
und Anschlüssen
gemäß den
Installationsanweisungen
anbringen.
ACHTUNG
Immer alle
freiliegenden Drähte
und elektrischen
Anschlüsse isolieren
und schützen.
87970A2
87970A2
Page 32

WARN INDUSTRIES * WINCH
59
BEDIENUNGSANLEITUNG
Vertikale Fernsteuerung:
Ausgekuppelt:
Eingekuppelt:
Aufspulen unter Last
Die maximale Zugkraft der Winde
darf nie überschritten werden.
Das Seil gleichmäßig einziehen
und fest um die Trommel legen. Dadurch
wird verhindert, dass die äußeren
Wickelschichten die darunter liegenden
Schichten und Wicklungen und somit
das Seil beschädigen.
Vermeiden Sie Stoßbelastungen
beim Spulen, indem Sie regelmäßig
den Steuerschalter verwenden, um
lockere Seilabschnitte einzuziehen.
Stoßbelastungen können die
Nennwerte der Winde und des
Seilskurzzeitig weit überschreiten.
Aufspulen ohne Last
Spulen mit Hilfspersonal: Lassen Sie das
Hilfspersonal den Hakengurt halten,
wobei diese Person das Seil ohne
Unterbrechung und möglichst stark
spannt. Unter Aufrechterhaltung der
Spannung sollte diese Person nun
auf die Winde zugehen, während
Sie das Seil unter Verwendung des
Steuerschalters aufspulen. Schalter
loslassen, wenn der Haken mindestens
2 m von der Führungsöff nung entfernt
ist.
Das restliche Seil nun zu
Lagerzwecken wie folgt aufspulen.
Alleine spulen: Legen Sie das Seil
so, dass es beim Aufspulen weder
geknickt wird, noch hängen bleiben
kann. Vergewissern Sie sich, dass die
AUFSPULEN
ABSPULEN
Anleitung für den erstmaligen
Betrieb
IIn diesem Abschnitt werden wir Ihnen
das erste Mal Bedienungsanleitung für eine
effektive Grundwinden zeigen. Für eine
vollständige Windenbetrieb und Techniken
lesen Sie die Grundlagen bei
http://www.
warn.com/corporate/literaturerequest.
shtml
gefunden Techniken Online-Winden.
Die Fernbedienung
Die Winde wird von der Handfernbedienung gesteuert. Die Fernbedienung
ermöglicht die Steuerung des Leistungsout (vorwärts) oder Power-In (rückwärts)
Drehung des Spooling-Trommel.
Die Fernsteuerung sollte bei Nichtgebrauch nicht an die Winde angeschlossen
sein. Bei Nichtbeachtung dieser Anweisung
können Gefahrensituationen entstehen
und/oder die Batterie entladen werden.
Kupplungsbetrieb:
Bei eingerasteter Kupplung ist das
Getriebe mit der Windentrommel
verbunden. Unter Umständen wird jetzt
schon Kraft vom Windenmotor übertragen.
Wenn die Kupplung ausgekuppelt ist,
befindet sich die Trommel im Leerlauf
(Seilfreilauf), und es besteht keine
Verbindung zwischen dem Getriebe und
der Windentrommel. Die Trommel dreht
sich somit ungehindert.
Der Kupplungshebel, der sich auf
dem Windengehäuse auf der anderen
Seite des Motors befindet, steuert die
Kupplungstätigkeit. Die Kupplung sollte
über den Knauf immer nur voll eingerastet
sein oder sich ungehindert im Leerlauf
befinden. Nur so können Schäden
vermieden werden.
ACHTUNG
Niemals Kupplung
bei belasteter
Winde, gespanntem
Windenseil oder
sich bewegender
Seiltrommel einoder ausrasten
lassen.
ACHTUNG
Niemals die Winde
mit weniger als
5Seilwicklungen
um die Trommel
betreiben. Das Seil
könnte sich von der
Trommel lösen, da
die Seilbefestigung
an der Trommel
nicht für eine
Belastung konzipiert
wurde.
HINWEIS
Spulen Sie nicht
mehr als 10 m
Seil ab, ohne die
Winde 20 Minuten
abkühlen zu lassen,
bevor Sie das Seil
wieder aufspulen.
Schalten Sie
stattdessen die
Kupplung in den
Freilauf und ziehen
Sie das Seil manuell
ab.
WARN INDUSTRIES * WINCH
60
BEDIENUNGSANLEITUNG
Seillagen um die Trommel fest und
gleichmäßig angeordnet sind. So
viel Seil aufspulen, bis die nächste
Lage um die Trommel voll ist. Seillage
festziehen und gerade ausrichten.
Wiederholen Sie diesen Vorgang, bis
der Haken mindestens 2 m von der
Führungsöff nung entferntist.
Das restliche Seil nun zu
Lagerzwecken wie folgt aufspulen.
Aufspulen des Restseils
zuLagerzwecken
Den Haken vom Anker oder der
Last lösen, wenn er sich 2 m
vonder Führung entfernt be ndet.
Den mitgelieferten Hakengurt
festhalten und sicherstellen, dass
das Windenseil weiterhin unter
Spannung steht. Wickeln Sie das Seil
langsam durch mehrfaches kurzes
Einschalten der Wickelfunktion
an der Fernsteuerung so weit auf,
dass der Haken weniger als 1m
von der Seilführung entfernt ist.
Windenvorgang beenden und Sie
den Haken an einem geeigneten
Ankerpunkt am Fahrzeug befestigen.
NICHT DEN HAKEN IN DIE
SEILFÜHRUNG ZIEHEN. Dadurch
könnte die Seilführung beschädigt
werden. Sobald der Haken an einer
geeigneten Stelle am Fahrzeug
befestigt ist, wickeln Sie das
Windenseil durch mehrfaches
kurzes Einschalten der Winde an der
Fernsteuerung weiter auf, bis das Seil
fast gespannt ist.
Überlastung/Überhitzung
Die Winde ist für den
Aussetzbetrieb vorgesehen. Sinkt die
Drehzahl, so dass Gefahr besteht, dass
der Motor bald stehen bleibt, kann sich
die Winde sehr schnell aufheizen und
den Motor beschädigen.
Bei Verwendung einer
Umlenkrolle (siehe Grundlegende
Richtlinien zur Windentechnik)
werden die Stromaufnahme und
BEDIENUNGSANLEITUNG Forts. die Hitzebildung im Motor reduziert.
Dadurch verlängert sich die mögliche
Einsatzzeit der Winde.
ACHTUNG
Immer Kontakt mit
dem Windenseil,
der Öse, dem Haken
und der Seilführung
während der
Installation, des
Betriebs und beim
Ab- und Aufspulen
vermeiden.
ACHTUNG
Immer den
mitgelieferten
Hakengurt beim
Auf- undAbspulen,
während
derInstallation
oder während des
Betriebs verwenden,
umVerletzungen
an den Händen
und Fingern
zuvermeiden.
ACHTUNG
Immer schwere
Lederhandschuhe bei
der Handhabung des
Windenseils tragen.
ACHTUNG
Niemals das
Windenseil oder
den Haken während
des Windenbetriebs
berühren oder wenn
jemand anders die
Steuerung der Winde
übernommen hat.
87970A2
87970A2
Page 33

WARN INDUSTRIES * WINCH
61
INSTALLATION DES SEILS
Ab und Aufspulen
DIE FOLGENDEN SCH RITTE SIND
SEHR WICHTIG. WERDEN SIE NICHT
EXAKT BEFOLGT, KANN DIE S DIE
LEBENSDAUER DER WINDE UND DES SEILS
BEEINTRÄCHTIG EN.
1. Montieren Sie die Warn AluminiumKlüsenführung mit dem mitgelieferten
Montagematerial am Windenaufbau.
Montieren Sie die Seilführung immer
mit den Etiketten in der oberen
Position (Etiketten oben und deutlich
sichtbar). Führen Sie eine 7/16” x 1
1/4” Schraube durch jedes der beiden
Seilführungsmontagelöcher und
durch den Windenaufbau. An jeder
Schraube eine 7/16” Unterlegscheibe
anbringen. An jeder Schraube eine 7/16”
Sicherungsmutter anbringen und auf 47
Nm anziehen.
Stellen Sie den Kupplungshebel der
Winde in die eingerastete Position.
6. Nun ist es erforderlich, das restliche
Seil auf die Windentrommel zu
spulen. Wählen Sie einen FLACHEN
Standort mit ausreichend Platz, um die
gesamte Länge des Seils auszulegen.
Befestigen Sie das Hakenende des
Seils an einem geeigneten Ankerpunkt
und entfernen Sie das Fahrzeug so
weit vom Ankerpunkt, bis ungefähr 2
Meter loses Seil auf dem Boden liegen.
Vor dem Aussteigen Feststellbremse
anziehen, einen Gang einlegen bzw.
bei Automatikgetriebe die Parkstellung
wählen und den Motor abstellen.
7. Schließen Sie die Fernsteuerung an
die Winde an. Halten Sie ungefähr 2,5m
Abstand von der Winde und spulen Sie
das Seil auf die Winde auf, bis sich 10
Wicklungen auf der Windentrommel
be nden. Nehmen Sie die Fernsteuerung
von der Winde ab. Seil mit einer Hand
unter Spannung halten. Seil vorsichtig in
Richtung der Trommelseite drücken, an
der es befestigt ist, damit zwischen den
einzelnen Wicklungen keine Abstände
bleiben. Vergewissern Sie sich, dass
das Seil auf der Unterseite der Trommel
und nicht auf der Oberseite abläuft.
Anderenfalls kann die automatische
Lastbremse nicht ordnungsgemäß
funktionieren. (Wenn das Seil auf
der Oberseite abläuft, wurde der
Spulvorgang der Winde bei Verwendung
der Fernsteuerung in die falsche
Richtung aktiviert.)
8. Falls noch Seil auf dem Boden liegt,
das Fahrzeug zurücksetzen, bisdas Seil
in der Luft ist.
9. Aus Sicherheitsgründen sollten
diefolgenden Schritte immer von zwei
Personen ausgeführt werden. Falls
Sie beabsichtigen, das Seil ohne die
Unterstützung einer weiteren Person
unter Spannung zu setzen, müssen
Sie unbedingt darauf achten, dass die
Feststellbremse angezogen, ein Gang
eingelegt und der Fahrzeugmotor
abgeschaltet sind, wenn Sie zum
Überprüfen des Seils aus dem Fahrzeug
steigen. Steigen Sie niemals aus
dem Fahrzeug aus, während das Seil
unter Belastung steht. Das korrekte
Anspannen des Seils trägt entscheidend
dazu bei, dass es lange nutzbar bleibt.
2. Schieben Sie die Schutzhülle vomdem
Haken gegenüberliegenden Ende über
das Seil. Schieben Sie dieSchutzhülle bis
zum Hakenende des Seils.
3. Lock Tite 271 oder ein gleichwertiges
Produkt auf das mitgelieferte 1/4”-20 x
1/2” lange Halbrundbefestigungselement
auftragen.
4. Installieren Sie das neue Synthetikseil,
indem Sie das mitgelieferte
Halbrundbefestigungselement und die
gefräste Seilscheibe verwenden. Führen
Sie das Synthetikseil von unten durch
die Aluminium-Seilführung und um
die Windentrommel herum. Führen Sie
die Halbrundschraube in die gefräste
Seilscheibe ein und platzieren Sie das
Synthetikseil auf der gefrästen Seilscheibe.
Installieren Sie die Halbrundschraube
in dem 1/4-20 Loch an der Seite der
Windentrommel. Siehe Abbildung für
Einzelheiten.
5. Ziehen Sie die 1/4-20
Halbrundschraube auf 10,8 Nm an.
ACHTUNG
Immer vor
Inbetriebnahme
das Seil dehnen
und unter Last
neu aufspulen. Ein
fest aufgespultes
Windenseil reduziert
das Risiko, dass
sichdie Seillagen
lockern und
hängen bleiben
oder Schäden
verursachen.
ACHTUNG
Niemals das Seil
oder den Haken
während des
Windenbetriebs
berühren oder wenn
jemand anders die
Steuerung der Winde
übernommen hat.
HINWEIS
Niemals mehr als
30(CTI)/24(XDC)
Meter Synthetikseil
mit einem
Durchmesser von
9,5 mm installieren.
Andernfalls können
Schäden an der
Winde auftreten.
Seil
Seilscheibe
1/4-20 x 1/2”
Halbrundschraube
WARN INDUSTRIES * WINCH
62
INSTALLATION DES SEILS
Das Anspannen des Seils verhindert,
dassdas Seil unter Last in den unteren
Lagen eingeklemmt wird.
10. Achten Sie darauf, dass jede Lage
sauber aufgewickelt wird, um eine
Beschädigung des Seils zu verhindern.
11. Übergeben Sie dem Fahrzeugführer
die Fernsteuerung durch das Fenster
auf der Fahrerseite. Weisen Sie Ihren
Helfer an, sich neben das Fahrzeug zu
stellen undAbstand zum Seil zu halten.
IhrHelfer sollte das Seil beobachten
und Ihnen durch Signale mitteilen,
dass es korrekt über die Seilführung
aufgewickelt wird. Starten Sie den
Fahrzeugmotor und nehmen Sie den
Gang heraus. Feststellbremse lösen und
dabei mit mäßigem Druck auf die Bremse
treten. Mittels Fernsteuerung aufspulen.
Windenbetrieb beenden, sobald etwa
2m aufgespult wurden. Langsam den
Fuß von der Bremse nehmen und dann
die Feststellbremse anziehen. Dadurch
wird sichergestellt, dass das Windenseil
nicht unter Belastung steht. Schalten
Sie das Getriebe dann wieder in die
Parkposition oder legen Sie einen Gang
ein, und schalten Sie den Fahrzeugmotor
ab. Steigen Sie aus dem Fahrzeug aus
und überprüfen Sie, ob das Windenseil
gleichmäßig auf die Windentrommel
aufgewickelt und nicht in einer darunter
liegenden Lage eingeklemmt wird. Wenn
sich das Seil zu verklemmen droht, wieder
abspulen und den Vorgang wiederholen.
Diesmal jedoch etwas fester auf die
Bremse treten.
12. Kehren Sie zum Fahrzeug zurück,
wenn Sie sicher sind, dass das Seil
ordnungsgemäß auf die Winde
gewickelt wird. Übergeben Sie dem
Fahrzeugführer die Fernsteuerung durch
das Fenster auf der Fahrerseite. Fahrzeug
starten und Gang herausnehmen.
Feststellbremse lösen und dabei mit
mäßigem Druck auf die Bremse treten.
Mittels Fernsteuerung aufspulen.
Windenbetrieb beenden, sobald etwa
2m aufgespult wurden. Langsam den
Fuß von der Bremse nehmen und dann
die Feststellbremse anziehen. Dadurch
wird sichergestellt, dass das Windenseil
nicht unter Belastung steht. Schalten
Sie das Getriebe dann wieder in die
INSTALLATION DES SEILS,
Fortsetzung
Parkposition oder legen Sie einen Gang
ein, und schalten Sie den Fahrzeugmotor
ab. Steigen Sie aus dem Fahrzeug aus
und überprüfen Sie, ob das Windenseil
gleichmäßig auf die Windentrommel
aufgewickelt und nicht in einer darunter
liegenden Lage eingeklemmt wird.
Wenn sich das Seil zu verklemmen droht,
wieder abspulen und den Vorgang
wiederholen. Diesmal jedoch etwas
fester auf dieBremse treten.
13. Schritt 12 wiederholen, bis sich das
Fahrzeug in einem Abstand von weniger
als 2m zum Ankerpunkt be ndet.
Wenn der Abstand weniger als 2m
beträgt, nehmen Sie langsam den Fuß
von der Bremse, und ziehen Sie dann
die Feststellbremse an. Dadurch wird
sichergestellt, dass das Windenseil nicht
unter Belastung steht. Schalten Sie das
Getriebe dann wieder in die Parkposition
oder legen Sie einen Gang ein, und
schalten Sie den Fahrzeugmotor ab. Aus
dem Fahrzeug aussteigen. Den Haken
vom Ankerpunkt lösen. Halten Sie den
mitgelieferten Hakengurt fest und
stellen Sie sicher, dass das Windenseil
weiterhin unter Spannung steht. Wickeln
Sie das Seil langsam durch mehrfaches
kurzes Einschalten der Wickelfunktion
an der Fernsteuerung so weit auf, dass
der Haken weniger als 1m von der
Seilführung entfernt ist. Windenvorgang
beenden und Sie den Haken an einem
geeigneten Ankerpunkt am Fahrzeug
befestigen. NICHT DEN HAKEN IN DIE
SEILFÜHRUNG ZIEHEN. Andernfalls
entstehen irreparable Schäden an der
Seilführung. Sobald der Haken an einer
geeigneten Stelle am Fahrzeug befestigt
ist, wickeln Sie das Windenseil durch
mehrfaches kurzes Einschalten der
Winde an der Fernsteuerung weiter auf,
bis das Seil fast gespannt ist.
Abspannen
Für eine vollständige Takelage
Fundamentaldaten , Lesen Sie die
Richtlinien zur Windentechnik, nden
Sie online bei http://www.warn.com/
corporate/literaturerequest.shtml.
ACHTUNG
Niemals dieWinde
mitweniger als
5Seilwicklungen
um die Trommel
betreiben. Das
Seil könnte sich
von der Trommel
lösen, da die
Seilbefestigung an
der Trommel nicht
für eine Belastung
konzipiert wurde.
ACHTUNG
Immer das Seil
in der auf dem
Warnetikett
derWinde
und/oder in
den Unterlagen
angegebenen
Richtung auf die
Trommel spulen.
Diese Maßnahme
ist für die
ordnungsgemäße
Funktion der
Automatikbremse
(wenn vorhanden)
unerlässlich.
ACHTUNG
Immer beim
Auf- und Abspulen
des Windenseils,
während der
Installation und
während des
Betriebs den
mitgelieferten
Hakengurt
verwenden.
87970A2
87970A2
Page 34

WARN INDUSTRIES * WINCH
63
PRÜFEN DES SEILS
Bei erstmaliger Verwendung
des Seils fransen die äußeren Fäden
des Seils rasch aus. Das liegt daran,
dass diese Fäden brechen. Die so
entstehende, aufgeraute Ober äche
schützt die darunterliegenden
Fasern. Dieser Zustand sollte sich
stabilisieren und nicht fortschreiten.
Nimmt die Rauheit der Ober äche zu,
ndet übermäßiger Abrieb statt, der
zu einem Verlust der Tragkraft führt.
Betrachten Sie sowohl die inneren als
auch die äußeren Faserneingehend.
Bei Verschleiß der inneren oder
äußeren Fasern ist das Seil
geschwächt. Ziehen Sie die Stränge
auseinander und achten Sie auf
pulverartige Rückstände zwischen
den Fasern — das ist ein Anzeichen
für inneren Verschleiß.
Das Seil ist zu tauschen, wenn:
• Die Seilmasse an einer
beliebigen Stelle durch Abrieb
um 10% oder mehr verringert
ist.
• Zwei oder mehr
aneinandergrenzende Stränge
durchtrennt sind.
• Flache oder klumpige Bereiche
entdeckt werden, die sich
nicht durch Biegen des Seils
entfernen lassen.
• übermäßig stark ge- oder
verschmolzene Fasern entdeckt
werden. Solche Bereiche werden
steif, und das Seil weist ein
glasiertes Aussehen auf.
Lagerung und P ege des Seils
Die Überprüfung und Wartung
eines Windenseils ist von größter
Bedeutung, um die Sicherheit und
Leistung zu gewährleisten.
1. Windenseil vor jeder Verwendung
auf Bruchstellen, Schnitte, Abnutzung
und ge- oder verschmolzene Fasern
prüfen.
2. Seil regelmäßig waschen,
umSchmutz und Sand davon zu
entfernen. Seil einfach mit einem
PRÜFEN DES SEILS
Gartenschlauch abspritzen und
lufttrocknen lassen.
NIEMALS Lösungsmittel,
Bleichmittel oder aggressive
Reinigungsmittel beim Waschen des
Seils verwenden, und NIEMALS eine
Wärmequelle verwenden, um das
Trocknen zu beschleunigen.
3. Seil zur Lagerung lose aufwickeln
und darauf achten, übermäßige
Verwindungen zu entfernen. Zur
Optimierung der Seillebensdauer
das Seil immer an einem dunklen,
trockenen Ort verwahren. Lesen
Sie vor jeglicher Verwendung eines
Seils die folgende Anleitung. Das Seil
im Fall von Beschädigungen sofort
außer Betrieb nehmen und durch
ein unbeschädigtes Seil, WARN.
Beschädigte oder durchtrennte
Stränge verringern die Tragfähigkeit
des Seils über die gesamte Länge —
nicht nur im Bereich des Schadens.
Als Faustregel gilt, dass ein Seil
mit 12Strängen außer Betrieb
zu nehmen ist, wenn mehr als 3
beschädigte oder durchtrennte
Stränge erkennbar oder wenn zwei
aneinandergrenzende Stränge
beeinträchtigt sind.
4. Tauschen Sie das Seil alle
12Monate aus, und zwar
ausschließlich durch das WARN
Seil.
Normaler Verschleiß
Reißen kleine Ober ächenfasern
eines Seils, entsteht eine fransige
Textur. Dies wird als “milde
Abnutzung” bezeichnet und
als unbedenklicher Verschleiß
betrachtet, der die Leistungsfähigkeit
des Seils nicht beeinträchtigt.
Tatsächlich schützt die noppige
Ober äche die darunterliegenden
Fasern vor weiterem Verschleiß.
Übermäßiger Verschleiß – SEIL
AUSSER BETRIEB NEHMEN
Ge- oder verschmolzene
Fasern sind in der Regel die Folge
unsachgemäßer Verwendung
ACHTUNG
Niemals dieWinde
mit weniger als
5Seilwicklungen
um die Trommel
betreiben. Das Seil
könnte sich von der
Trommel lösen, da
die Seilbefestigung
an der Trommel
nicht für eine
Belastung konzipiert
wurde.
WARN INDUSTRIES * WINCH
64
PRÜFEN DES SEILS
des Seils. Ge- oder verschmolzene
Polyesterfasern entstehen, wenn
die Seilober äche einer Temperatur
von über 220° C ausgesetzt wird.
Dies kann durch übermäßige
Lastgewichte oder übermäßiges
Abspulen verursacht werden. Solche
beschädigten Fasern können die
Tragfähigkeit beeinträchtigen und
sind als Hinweis zum Tauschen des
Seils zu betrachten.
Chemische Einwirkung –
SEIL AUSSER BETRIEB NEHMEN
(NICHT ABGEBILDET)
Beispiele:
Seil mit Originalmasse.
Seilstrang mit vollem Volumen.
Seil mit durch Abrieb um 25%
verringertem Strangvolumen—
Seil ist zu tauschen.
Seilstrang durch Abnutzung
um 25% verringert—Seil ist zu
tauschen.
Seil mit zwei durchtrennten
Strängen nebeneinander—Seil
ist zu tauschen.
Seil mit Faserverhärtung durch
Druck. Ein leichter Glanz ist
sichtbar. Dies ist kein dauerhafter
Zustand, und er kann durch
Biegen des Seils beseitigt werden.
Verfärbte Stellen können unter
Umständen auf die chemische
Einwirkung verschiedenster
Stoff e von Getriebeöl bis hin zu
Batteriesäure hinweisen. Nehmen Sie
das Seil im Zweifelsfall außer Betrieb.
PRÜFEN DES SEILS, Fortsetzung
ACHTUNG
Immer schwere
Lederhandschuhe
bei der Handhabung
des Windenseils
tragen.
87970A2
87970A2
Page 35

WARN INDUSTRIES * WINCH
66
ORGINA LANVISNIN GAR
Vinsch
Installation och bruksanvisning
INNEHÅLLSFÖRTECKNING
SÄKERHET
Symbolindex ......................................................................................................................................................67
Allmänna säkerhetsföreskrifter ............................................................................................................ 68-71
Säkra arbetsförhållanden ..............................................................................................................................72
ANVISNINGAR
Montera vinschen .............................................................................................................................................73
Elektriska anslutningar ...................................................................................................................................74
Bruksanvisning ...........................................................................................................................................75-76
Installera linan ............................................................................................................................................ 77-78
Lininspektion ............................................................................................................................................. 79-80
Warn Industries, Inc.
12900 SE Capps Road
Clackamas, OR 97015
USA
Kundservice: (800) 543-WARN
(9276)
Utanför USA: (503) 722-1200
Fax: (503) 722-3000
www.warn.com
WARN® och WARNs lo go är registrerad e varumärken som ti llhör Warn Industr ies Inc.
© 2016 Warn Industries, Inc.
87970A2
87970A2
Page 36

WARN INDUSTRIES * WINCH
67
SYMBOLINDEX
SYMBOL FÖRKLARING
Läs all produktlitteratur
Del litteratur nns endas t online
på ww w.warn.com/corporate/
literaturerequest.sht ml.
Ha alltid på dig skydd för
öron och ögon
Använd aldrig vinschen
som lyftkran
Placera lasten rätt i
krokens hals
Linda linan runt
trummans botten
Risk för att du krossar
ngrar i linledaren
Risk för att genomborra
eller skära händerna
Risk för explosion eller
bristning
Risk för skarp kant
Undvik att installera
elektriska kablar nära
ställen där det nns risk
att kabeln kommer att
klämmas eller utsättas för
slitage
SYMBOL FÖRKLARING
Ha alltid på dig
läderhandskar
Flytta inte människor
Använd alltid
medföljande krokstropp
Belasta aldrig krokens
spets eller spärr
Linda aldrig lina över
trummans topp
Klämpunkt på linledare
Risk för het yta
Risk för brand och
brännskador
Risk för rörliga delar
Isolera exponerade
ledningar
Kroka aldrig tillbaka på
linan
WARN INDUSTRIES * WINCH
68
ALLMÄNNA SÄKERHETSFÖRESKRIFTER
När du läser dessa anvisningar ser du FARA, VARNINGAR,
OBSERVERA och ANM. Varje meddelande har ett speciellt
syfte. FARA är säkerhetsmeddelanden som identi erar en
situation som kan vara farlig och som, om du inte undviker
den, kan leda till allvarlig skada eller dödsfall. VARNING är ett
säkerhetsmeddelande som antyder att situationen kan vara
farlig. Om du inte undviker den kan det leda till lindriga eller
mindre allvarliga skador. En VARNING kan också användas för
att göra dig uppmärksam på en farlig arbetsmetod. VARNING
och FARA identi erar faran, anger hur faran kan undvikas och
varnar för vad som kan hända, om du inte undviker faran.
OBSERVERA är meddelanden att undvika skada på egendom.
ANMÄRKNINGAR innehåller ytterligare information
till hjälp för att genomföra proceduren. ARBETA PÅ ETT
SÄKERT SÄTT!
Fara och varningar
FARA
RISK FÖR ATT FASTNA
I RÖRLIGA DELAR
Risk för allvarlig skada eller dödsfall om dessa
anvisningar inte följs.
Allmänna säkerhetsföreskrifter:
• Vet alltid din vinsch. Ta tid att helt läsa bruksanvisningen
och / eller Operations Guide, och / eller Grundläggande
guide till Vinsch tekniker, för att förstå din vinsch och dess
verksamhet, nns online på http://www.warn.com/
corporate/literaturerequest.shtml.
• Överskrid aldrig vinschens eller linans angivna kapacitet. För
att minska belastningen på vinschen dubbleras vajern med
hjälp av ett brytblock.
• Ha alltid på dig kraftiga läderhandskar när du hanterar en
vinschlina.
• Använd aldrig vinschen eller vinschlinan för bogsering.
Stötbelastning kan skada, överbelasta och slita sönder linan.
• Använd aldrig vinschen till att säkra en last.
• Använd aldrig denna vinsch om du är påverkad
av droger, alkohol eller mediciner.
• Använd aldrig denna vinsch om du är under 16 år.
Installationssäkerhet:
• Använd alltid en monteringsplats som är tillräckligt stark för
att motstå vinschens maximala dragkraft.
• Använd alltid klass 5 (klass 8,8 metriskt) eller bättre
monteringsbeslag.
• Svetsa aldrig monteringsbultar.
• Använd alltid monteringsbeslag, komponenter och tillbehör
som godkänts av fabriken.
• Använd aldrig bultar som är för långa.
• Genomför alltid installationen av vinschen och krokfästet
innan du ansluter ledningarna.
• Håll alltid händerna borta från vinschlina, ögla, krok och
linledaröppning under installation, drift samt vid in- och
utspolning.
• Placera alltid linledaren med varningen tydligt synlig på
ovansidan.
• Dra alltid först ut linan och spola upp den med belastning
innan den används. Lina som är stramt lindad minskar
chansen av ”inlindning” som kan skada linan.
RISK FÖR ATT FASTNA I RÖRLIGA DELAR
Risk för allvarlig skada eller dödsfall om dessa
anvisningar inte följs.
• Säkerställ alltid att krokens spärr är stängd och inte stöder
en last.
• Belasta aldrig krokens spets eller spärr. Belasta bara krokens
centrum.
• Använd aldrig en krok vars öppning har blivit större eller
vars spets är böjd eller vriden.
• Använd alltid en krok med en spärr.
• Se alltid till att operatören och åskådare är medvetna om
fordonets och/eller lastens stabilitet.
• Se alltid till att den anslutna ärrkontrollens sladd går fritt
från trumman, lina och riggning. Kontrollera att det inte
nns några sprickor, något sitter fastklämt, fransade kablar
eller lösa anslutningar. Skadade komponenter måste bytas ut
innan vinschen används.
• Dra alltid in ärrkontrollens sladd genom fönstret när den
används i fordonet.
• Kroka aldrig tillbaka på linan
FARA
87970A2
87970A2
Page 37

WARN INDUSTRIES * WINCH
69
ALLMÄNNA SÄKERHETSFÖRESKRIFTER
FARA
RISK FÖR ATT FASTNA
I RÖRLIGA DELAR
Risk för allvarlig skada eller dödsfall omdessa
anvisningar inte följs.
Säkerhetsföreskrifter för vinschning:
• Titta alltid på vinschlina, krok och remmar innan du
använder vinschen. Uppsplitsad, trasslig eller skadad
vinschlina måste omedelbart bytas ut. Skadade
komponenter måste bytas ut innan vinschen används.
Skydda delar från skada.
• Avlägsna alltid ett element eller hinder som kan hindra att
vinschen körs säkert.
• Se alltid till att den utvalda förankringen klarar
belastningen och att stroppen eller kedjan inte kanglida.
• Använd alltid medföljande stropp när du spolar vinschlina in
eller ut, under installation och under drift.
• Se alltid till att den som sköter vinschen och de som står
bredvid är medvetna om fordon och/eller last.
• Var alltid medveten om hur stabilt fordonet och lasten är
under vinschning och håll alla andra borta. Varna alla som
står bredvid för eventuellt instabilt tillstånd.
• Spola alltid av så mycket lina som möjligt vid riggning.
Dubblera vajern eller välj en avlägsen förankringspunkt.
• Ta dig alltid tid att använda rätt riggningsteknik för
dragning med vinschen.
• Rör aldrig vinschlina eller krok då någon annan sköter
manövern eller då vinschen används.
• Koppla aldrig i eller ur kopplingen om vinschen ärbelastad,
vinschlinan är spänd eller trumman rör sig.
• Rör aldrig vinschlina eller krok som är spänd ellerbelastad.
• Stå alltid en bit ifrån vinschlina och last och håll andra
borta under vinschningen.
• Använd aldrig fordonet till att belasta vinschlinan. En
kombination av belastning eller stötbelastning kan skada,
överbelasta och slita sönder linan.
• Linda aldrig vinschlina runt sig själv. Använd löpkedja,
löpvajer eller trädstamsskydd på förankringsstället.
FARA
RISK FÖR FALL ELLER ATT BLI KROSSAD
Risk för allvarlig skada eller dödsfall omdessa
anvisningar inte följs.
• Håll dig
alltid
ur vägen, håll händerna borta och håll andra
borta.
• Kör
aldrig
vinschen med mindre än 10 varv lina runt trumman. Linan
kan lossa från trumman eftersom linans infästning i trumman inte är
utformad för att hålla en last.
• Använd
aldrig
vinschen som lyftkran eller för att hänga last.
• Se
alltid
till att förankringen kan klara belastningen, använd
lämplig riggning och ta dig tid att rigga pårätt sätt.
• Använd
aldrig
vinschen för att lyfta eller ytta påmänniskor.
• Använd
aldrig
överdriven kraft till att dra ut vinschlinan i
friläge.
• Använd
alltid
rätt hållning och lyftteknik eller skaff a hjälp när
du hanterar och installerar produkten.
• Spola
alltid
på linan på trumman i den riktning som speci ceras på
varningsetiketten på vinschen och/eller i dokumentationen. Detta
krävs för att den automatiska bromsen (om den nns) ska fungera
riktigt.
• Spola
alltid
upp vinschlinan på trumman i den riktning
som
framgår av riktningsvisaren på vinschen.
FARA
RISK FÖR SÅR OCH BRÄNNSKADOR
Risk för allvarlig skada eller dödsfall om dessa
anvisningar inte följs.
Undvik skador på händer och ngrar:
• Ha alltid på dig kraftiga läderhandskar när du hanterar en
vinschlina.
• Var alltid medveten om att ytor på vinschmotorn, trumman
eller linan kan vara varma under eller
efter användning.
WARN INDUSTRIES * WINCH
70
ALLMÄNNA SÄKERHETSFÖRESKRIFTER
FARA
RISK FÖR SLAG OCH ATT
FASTNA I RÖRLIGA DELAR
Risk för allvarlig skada eller dödsfall om dessa
anvisningar inte följs.
Undvik skador på händer och ngrar:
• Tag alltid reda på linans arbetskapacitet (WLL,Working Load
Limit).
• Förvissa dig alltid om att linan passar för ändamålet.
• Använd aldrig medföljande lina på en vinsch som är klassad
för att kunna dra mer än 4500 kg.
• Använd aldrig en lina om den är sliten, skadad, har blivit
misshandlad, överbelastad, felaktigt underhållen eller är mer
än 1 år.
• Stå aldrig inom vinschområdet, där linan kan slungas
tillbaka om den brister.
• Använd aldrig linan över skarpa ytor och kanter utan
avskavningsskydd.
• Böj aldrig linan runt oskyddade, vassa hörn.
• Lämna aldrig kopplingen urkopplad när du inte frispolar lina.
Den automatiska bromsen fungerar inte när kopplingsspaken
är i friläge.
• Överskrid aldrig lastklassi ceringen på 4 500 kg (10 000 lb.)
• Byt alltid ut linan en gång om året.
• Använd alltid en linledare från WARN som rekommenderas
för syntetisk lina.
• Byt alltid ut linledarpro len från WARN om den är skadad
eller sliten med en linledare från WARN som rekommenderas
för syntetisk lina.
FARA
RISK FÖR BRAND OCH
KEMISKA SKADOR
Risk för allvarlig skada eller dödsfall omdessa
anvisningar inte följs.
• Ta alltid av smycken och använd alltid skyddsglasögon.
• Drag aldrig elkablar över vassa kanter.
• Dra aldrig elektriska ledningar nära delar som blirheta.
• Drag aldrig elkablar genom eller i närheten av rörliga
delar.
• Placera alltid medföljande kabelskor på kablar och poler
som visas i installationsanvisningarna.
• Luta dig aldrig över batteriet när du kopplar.
• Dra aldrig elektriska ledningar över batteripoler.
• Kortslut aldrig batteripoler med metallföremål.
• Kontrollera alltid att bränsleslangar, bränsletank,
bromsledningar, elkablar etc. inte berörs av
borrningsarbete.
• Läs alltid bruksanvisningen beträff ande elektriska
kopplingar.
• Isolera och skydda alltid alla lösa ledningar
ochelterminaler.
87970A2
87970A2
Page 38

WARN INDUSTRIES * WINCH
71
ALLMÄNNA SÄKERHETSFÖRESKRIFTER
UNDVIK VINSCH OCH
SKADA PÅ UTRUSTNING
• Undvik alltid att dra i sidled eftersom linan då kan samlas
endast på trummans ena sida. Detta kan skada linan eller
vinschen.
• Se alltid till att kopplingen är helt i- eller urkopplad.
• Se alltid till att fordonsramen inte skadas då fordonet förankras
under vinschning.
• Sänk aldrig ner vinschen i vatten.
• Förvara alltid ärrkontrollen på en skyddad, ren och torr plats.
• Undvik alltid kontinuerlig utvinschning. Värmeutvecklingen
från kontinuerlig utvinschning kan skada linan.
• Utsätt aldrig linan för starka rengöringsmedel, drivmedel,
oljor eller kylarskyddsmedel.
• Använd alltid ett avskavningsskydd på alla skarpa kanter för
att skydda linan.
• Låt aldrig linan få kontakt med skarpa föremål. Allvarliga
skador kan uppstå.
• Spola alltid upp linan i jämna varv efter alla vinklade
vinscharbeten.
• Arbeta aldrig ryckvis med linan under belastning.
Chockbelastningar kan tillfälligt överskrida linans och
vinschens kapacitet.
• Installera aldrig mer än 30(CTI)/24(XDC)m 3/8 tum
syntetisk lina. Det kan skada vinschen.
OBSERVERA
VARNING
RISK FÖR ATT FASTNA
I RÖRLIGA DELAR
Om instruktionerna inte följs nns risk förmer
eller mindre allvarliga skador.
Undvik skador på händer och ngrar:
• Lämna aldrig ärrkontrollen där den k an aktiveras under
frispolande, ri ggning eller närvin schen inte används.
• Lämna aldrig vinschens ärrkontroll inkopplad närdu
installerar, frispolar, riggar, utför service ellernär vinschen
inte används.
VARNING
RISK FÖR SÅR OCH BRÄNNSKADOR
Om instruktionerna inte följs nns risk för mer eller
mindre allvarliga skador.
• Låt aldrig vinschlina glida genom händerna.
WARN INDUSTRIES * WINCH
72
SÄKRA ARBETSFÖRHÅLLANDEN
FARA
Håll dig alltid
ur vägen, håll
händerna borta och
håll andra borta.
FARA
Se alltid till att
den som sköter
vinschen och de
som står bredvid
är medvetna om
fordon och/eller
last.
OBSERVERA
Sänk aldrig ner
vinschen i vatten.
VARNING
Lämna aldrig
ärrkontrollen där
den kan aktiveras
under frispolande,
riggning eller
när vinschen
inte används.
SÄKRA ARBETSFÖRHÅLLANDEN
Den som vinschar skall alltid
arbeta från en säker plats då last dras.
De säkra områdena är: (1) Vinkelrätt
mot linan, (2)inuti fordonet med
huven uppfälld (om vinschen är
monterad framtill på fordonet). Dessa
säkra platser hindrar linan från att
träff a operatören om linan brister
underlast.
Använd vinschen med
ärrkontrollens sladd helt utdragen
där så är möjligt. Den som vinschar
måste alltid vara minst 2,5m från
vinschen. Detta förhindrar trassel
med linledaren och håller den som
vinschar borta från farlig närhet
medan lastens dras.
Arbeta aldrig i närheten avlinan
under belastning.
Ljudnivå
Vinschen är konstruerad så
att ljudnivåerna inte överskrider 70
dBa vid operatörens plats. Densom
vinschar måste vara minst 2,5 m från
vinschen. Om vinschen överskrider
70 dBa vid operatörens plats
skall vinschen undersökas av ett
auktoriserat serviceställe.
Rengöring
Använd vatten med lågt tryck
när du rengör syntetisk lina. Använd
inte några kemikalier.
Rikta inte högtrycksvatten
(högtrycksspruta, biltvätt osv.)
direkt mellan trummans fäste
och trummans änsar eller
kopplingsspaken.
Tvätta vinschen med vatten
under lågt tryck och en trasa eller
svamp med tvållösning.
Undvik att använda kemikalier
som kan skada nishen.
Minska korrosion genom att så
snart som möjligt grundligt tvätta av
saltavlagringar från vinschen.
Underhåll
Byt ut lina en gång om året med
WARN lina.
Vinschen behöver aldrig
smörjas, såvida den inte har varit
nedsänkt i vatten. Om detta
inträff ar måste en kvali cerad
serviceinrättning så snart som möjligt
serva den för att undvika korrosion.
Om kontrollpaketet varit nedsänkt
i vatten måste det ersättas när
vinschen servas.
Kontrollera batterikablarna och
elanslutningarna var tredje månad
och se till att de är rena och sitter fast
på alla anslutningsställen.
Undersök linan före och efter
varje vinschning. När den är skadad,
ersätt med den storlek som är
speci cerad i reservdelslistan eller gå
till Warns webbsajt, www.warn.com.
Linan måste alltid spolas upp på
trumman i den riktning som framgår
av märket på vinschen.
87970A2
87970A2
Page 39

WARN INDUSTRIES * WINCH
73
MONTERA VINSCHEN
MONTERA VINSCHEN
Välj en plats som är tillräckligt
stadig för att klara de laster
du tänker vinscha. Endast de
monteringsriktningar som visas är
möjliga för säker vinschning. Alla
andra sätt är fel och olämpliga.
Genom att använda rekommenderad
kombination av bult och låsbricka,
åtdragen till rekommenderade
värden, undviks vibrationer under
vinschningen. Monteringsdetaljerna
visar rätt åtdragningsmoment.
Kom ihåg att vinschlinan måste
alltid spolas upp på trumman i den
riktning som framgår av märket på
trumman.
Se följande diagram för rätt
monteringsriktning.
Installera kontrollenhet
Montera kontrollenheten enligt
instruktioner na som medföljer
WARNs monteringssystemsats.
Använd konsolen som medföljer
satsen.
Plåttjocklek Bultlängd
7 mm 32 mm
10 mm 40 mm
13 mm 40 mm
Monteringsdetaljer:
(1) Jämn och plan, tjocklek = 6,4 mm
(2) 4 st. 3/8" låsbrickor.
(3) 4 st 3/8-16 X 1 1/4” lång, klass 5 bult
Dra åt till 41-47 Nm
(4) 1/2-13 Låsmutter
(5) 1/2 Slät bricka
(6) 3/8-16 fyrkantig mutter
(7) 1/2-13 x 2 tums bult med runt huvud
(8) Linledare av aluminium
Mönster för monteringsbultar:
FARA
Använd aldrig bultar
som är förlånga.
FARA
Använd alltid en
monteringsplats som
är tillräckligt stark för
att motstå vinschens
maximala dragkraft.
FARA
Genomför alltid
installationen av
vinschen och fäst
kroken innan du
ansluter ledningarna.
WARN INDUSTRIES * WINCH
74
ELEKTRISKA ANSLUTNINGAR
Kopplingsscheman:
ELEKTRISKA ANSLUTNINGAR
Använd medföljande isolerande
hylsor på exponerade poler för
att förhindra kortslutning. Dra
batterianslutningarna på ställen där
de inte kan nötas eller skadas genom
isoleringen vilket kan ge upphov till
kortslutning.
Kontrollera att vinschen
fungerar ordentligt efter
installationen.
Batterirekommendationer
För korrekt användning av
vinschen är det viktigt att alltid ha ett
fulladdat batteri och bra anslutningar.
För ett 12 Volt batteri är minimikravet
650 amperetimmar kallstartström.
Stift nr Färg
1 Brun
2 Vit
3 Svart
4 Grön
5
6 Röd
Svart
Röd
Grön
Brun
Vit
FARA
Drag aldrig elkablar
över vassa kanter.
FARA
Dra aldrig elektriska
ledningar
nära delar som
blir heta.
FARA
Drag aldrig elkablar
genom eller i
närheten av rörliga
delar.
FARA
Placera alltid
medföljande
kabelskor på kablar
och poler som visas
i installationsanvisningarna.
FARA
Isolera och skydda
alltid alla lösa
ledningar
och elterminaler.
87970A2
87970A2
Page 40

WARN INDUSTRIES * WINCH
75
BEDIENUNGSANLEITUNG
Urkopplad:
Tillkopplad:
Inspolning med belastning
Överskrid aldrig vinschens
markerade linkraft.
Drag in linan jämnt och tätt på
trumman. Detta förhindrar att de
yttre lindningarna sjunker in i de inre
lindningarna, fastnar och skadar linan
.
Undvik chockbelastning
vid spolning genom att pulsa
kontrollenhetens kontakt för att ta
upp den slaka linan. Chockbelastning
kan tillfälligt vidaöverskrida
vinschens och linans kapacitet.
Inspolning utan belastning
Spolning med en medhjälpare: Låt
en medhjälpare hålla krokstroppen
med så mycket konstant spänning
på linan som möjligt. Med bibehållen
spänning skall medhjälparen sedan
gå mot vinschen medan du använder
kontrollenhetens kontakt för att spola
in linan. Släpp kontakten då kroken är
minst 2 m från linledarens öppning.
Spola in resten för förvaring som
anges nedan.
Spolning ensam: Arrangera så att linan
som skall spolas in inte kinkar eller
trasslar till sig under inspolningen.
Se till att all lina som redan nns på
trumman är fördelad i täta och jämna
lager. Spola in tillräckligt med lina
för att fullborda nästa hela lager på
trumman. Spänn och räta ut lagret.
Upprepa förfarandet tills kroken är
minst 2 m från linledarens öppning.
Spola in resten för förvaring som
anges nedan.
Vertikal ärrkontroll:
IN
UT
Driftinstruktioner inför uppstart
I det här avsnittet visar vi första
gången bru ksanvisningen för ef fektiv
grundläggand e vinschning . För
fullständig v insch drift och tek niker läsa
Grundläggand e guide till vinsc hning
tekniker som finns online på
http://www.
warn.com/corporate/literaturerequest.
shtml
.
Fjärrkontroll
Vinschen styrs av den han dhållna
fjärrkontrollen . Fjärrkontrollen ger kontroll
över krafte n ut (framåt) eller ström in
(bakåt) rota tion av buffring t rumman.
Lämna inte fjärrkontrollen inkoppla d
i vinschen då den inte använd s. Det kan
vara farligt att lämna fjärrkontroll en
inkopplad. Dessutom kan batteriet
tömmas
Använda kopplingen:
Då koppling en är inkopplad är
kugghjulet k opplat till vinschtrumm an
och kraft kan överföras från
vinschmotorn. Då kopplingen är
urkopplad st år den i friläge. Tr ansmission
och vinschtr umma är inte hopk opplade,
och trumma n kan rotera fritt.
K
opplingsspaken , som finns på
vinschkåpan mitt emot motorn,
kontrollerar kopplingens läge.
Undvik skad or genom att se ti ll att
kopplingsspake n alltid är ordentligt tilleller frånkop plad.
FARA
Koppla aldrig i eller
ur kopplingen om
vinschen är belastad,
vinschlinan är spänd
eller trumman rör sig.
FARA
Kör aldrig vinschen
med mindre än
10 varv lina runt
trumman. Linan
kan lossa från
trumman eftersom
linans infästning
i trumman inte
ärutformad för att
hålla en last.
OBSERVERA
Vinscha inte utlinan
mer än 10m utan
att låtavinschen
kallna under minst
20 minuter innan
du vinschar in linan
igen. Placera i stället
kopplingen i friläge
och dra ut linan för
hand.
WARN INDUSTRIES * WINCH
76
BRUKSANVISNING
Spola in resten för förvaring
När kroken är inom 2 m från
linledaren, lossa kroken från
förankringsstället eller lasten. Håll
i medföljande krokstropp och håll
spänning på vinschlinan. Vinscha
långsamt in vinschen genom
att "pulsa" drag-in-kontakten på
ärrkontrollen tills kroken är inom
1 m från linledaren. Sluta vinscha
in och fäst kroken på ett lämpligt
förankringsställe på fordonet.
KÖR INTE IN KROKEN
ILINLEDAREN. Detta kan skada
linledaren. När kroken är lämpligt
fäst på fordonet kör in återstående
slack i vinschlinan genom att "pulsa"
in resten med drag in-kontakten på
ärrkontrollen tills det är minimalt
slack kvar i vinschlinan.
Överbelastning/överhettning
Denna vinsch är klassad
förintermittent arbete. Då motorn
närmar sig en hastighet då den
stannar sker en mycket snabb
värmeuppbyggnad som kan
skadamotorn.
Riggning med dubbel vajer (se
Grundläggande guide för vinschteknik)
minskar ampereuttaget och minskar
värmeutvecklingen i motorn.
Detta medger längre kontinuerlig
användning.
BRUKSANVISNING Forts.
FARA
Håll alltid
händerna borta från
vinschlina, ögla, krok
och linledaröppning
under installation,
drift samt vid in- och
utspolning.
FARA
Använd alltid
bifogad stropp
då vinschlinan
spolas in eller ut,
vid montering
eller hantering, så
händer och ngrar
inteskadas.
FARA
Ha alltid på
dig kraftiga
läderhandskar när
du hanterar en
vinschlina.
FARA
Rör aldrig
vinschlina eller krok
då någon annan
sköter manövern
eller då vinschen
används.
87970A2
87970A2
Page 41

WARN INDUSTRIES * WINCH
77
INSTALLERA LINAN
Spolning
FÖLJANDE STEG ÄR MYCKET
VIKTIGA OCH OM DU INTE FÖLJER
ANVISNINGARNA PRECIS KAN
VINSCHENS OCH LINANS LIVSLÄNGD
ÄVENTYRAS.
1. Montera WARNs linledarpro l
av aluminium på vinschens
monteringsfäste med medföljande
beslag. Montera alltid linledaren med
etiketterna i upprätt läge (etiketter
ovanpå och tydligt synliga). Sätt i en
7/16 tum X 1 1/4 tum bult genom vart
och ett av de två monteringshålen
på linledaren och genom vinschens
monteringsfäste. Placera en 7/16 tum
platt bricka påvarje bult. Installera en
7/16 tum låsmutter på varje bult och
dra åt till47 NM.
sidan avvinschens trumma. Figuren
visardetaljerna.
5. Dra åt 1/4-20 bulten med runt
huvud till 11 NM. Vrid vinschens
kopplingsnivå till läget "Engaged
(ikopplad)".
6. Det är nu nödvändigt att spola
på återstående lina på vinschens
trumma. Använd en PLAN plats
som är tillräckligt lång för att kunna
dra ut linan i hela dess längd. Fäst
krokens ände av linan vid en lämplig
förankringspunkt och backa fordonet
bort från förankringspunkten och
lämna ungefär 2 m slak lina liggande
på marken. Innan fordonet sedan
lämnas skall man dra åt handbromsen
och lägga i en växel eller sätta den
i parkeringsläget och stänga av
motorn.
7) Koppla ärrkontrollen till vinschen.
Stå ungefär 2,5 m bort från vinschen,
vinscha in tills det nns 10 varv
på vinschens trumma. Koppla ur
ärrkontrollen från vinschen. Håll
spänning i linan med ena handen
och maka samtidigt linan försiktigt
till den sidan av trumman som linan
är fäst på så att det inte blir något
glapp mellan varven på trumman.
Kontrollera noga att linan spolas
från trummans undersida, inte
ovansida, för annars fungerar inte den
automatiska bromsen för att hålla
lasten ordentligt. (Om linan spolas av
från ovansidan har du använt "out" i
stället för "in" på ärrkontrollen.)
8. Om lina fortfarande ligger på
marken, backa bort fordonet tills linan
inte längre är på marken.
9. Följande steg skall genomföras
av två personer tillsammans för
att det skall vara säkert. Om du
försöker spänna linan ensam skall
du, innan du kliver ur fordonet för
att inspektera vinschlinan, alltid dra
åt handbromsen, lägga i en växel
och stänga av motorn. Kliv aldrig
2. Skjut slithöljet över linan från ändan
bort från kroken. Skjut hylsan tillbaka
till linans ända med kroken.
3. Applicera Lock Tite 271 eller en
liknande produkt på den medföljande
1/4 tum -20 X 1/2 tum långa bulten
med runt huvud.
4. Installera den nya syntetiska
linan med den medföljande
bulten med runt huvud och den
maskinbearbetade brickan för linan.
Sätt i den syntetiska linan genom
linledaren av aluminium ochrunt
vinschens trumma nedifrån. Sätt
i bulten med runt huvud i den
maskinbearbetade brickan för
linan och placera den syntetiska
linan på den maskinbearbetade
brickan för linan. Installera bulten
med runt huvud i 1/4-20 hålet i
FARA
Dra alltid först
utlinan och spola
upp den med
belastning innan
den används. Lina
som är stramt lindad
minskar chansen av
”inlindning” som kan
skada linan.
FARA
Rör aldrig lina eller
krok då någon annan
sköter manövern
eller då vinschen
används.
OBSERVERA
Installera
aldrig
mer
än 30(CTI)/24(XDC)
m 3/8 tum syntetisk
lina. Det kan skada
vinschen.
Lina
Linans bricka
1/4-20 X 1/2
tum Bult
med runt
huvud
WARN INDUSTRIES * WINCH
78
INSTALLERA LINAN
FARA
Kör aldrig vinschen
med mindre än
10 varv lina runt
trumman. Linan
kan lossa från
trumman eftersom
linans infästning
i trumman inte
ärutformad för att
hålla en last.
urfordonet med last på vinschlinan.
Det är absolut nödvändigt att spänna
linan för att den skall hålla länge. När
linan är spänd hindras den från att
sjunka in i de undre lagren under last.
10. Se till att varje lager byggs
uppjämnt så linan inte skadas.
11. Räck in ärrkontrollen genom
förarens fönster så att fordonets
förare kan sköta den. Säg till den som
hjälper till att stå vid sidan av fordonet
och hålla sig borta från vinschlinan.
Den som hjälper till skall signalera
om linan lindas upp ordentligt
genom att ytta sig utmed linledaren
medan linan körs in. Starta motorn
och lägg växeln i neutralläge. Släpp
handbromsen medan du trycker
nerbromspedalen med måttlig kraft.
Vinscha in med ärrkontrollen. Sluta
vinscha när du har vinschat in ungefär
2 meter. Lätta sakta på bromspedalen
och lägg i handbromsen. Detta
förfarande gör att det inte är någon
belastning på vinschlinan. Lägg sedan
in en växel eller iparkeringsläge och
stäng av motorn. Kliv ur fordonet och
kontrollera att vinschlinan lindas upp
jämnt på vinschtrumman och inte
sjunker in i lagret under. Omlinan
sjunker in, matas linan utoch man
upprepar det här steget från början
med högre tryck på bromspedalen.
12. När du är övertygad om att
linan lindas på vinschen på rätt
sätt, gå tillbaka till fordonet. Räck in
ärrkontrollen genom förarsidans
ruta så att fordonsföraren kan
sköta den. Starta fordonet och ställ
transmissionen i neutralläge. Släpp
handbromsen medan du trycker
nerbromspedalen med måttlig kraft.
Vinscha in med ärrkontrollen. Sluta
vinscha när du har vinschat in ungefär
2 meter. Lätta sakta på bromspedalen
och lägg i handbromsen. Detta
INSTALLERA LINAN forts.
förfarande gör att det inte är någon
belastning på vinschlinan. Lägg sedan
in en växel eller iparkeringsläge och
stäng av motorn. Kliv ur fordonet och
kontrollera att vinschlinan lindas upp
jämnt på vinschtrumman och inte
sjunker in i lagret under. Om linan
sjunker in, matas linan ut och man
upprepar det här steget från början
med högre tryck på bromspedalen.
13. Upprepa steg 12 tills fordonet
är inom 2 m av vinschens
förankringsställe. När man väl är
inom 1,8 m släpper man sakta på
bromspedalen och sedan drar åt
handbromsen. Detta förfarande gör
att det inte är någon belastning på
vinschlinan. Lägg sedan in en växel
eller i parkeringsläge och stäng av
motorn. Kliv ur fordonet. Tabort
kroken från förankringsstället. Genom
att hålla i stroppen som medföljer
kroken, håller man spänningen på
vinschlinan och vinschen matas
sakta in genom att"pulsera" med
ärrkontrollen tills kroken är inom
1 m från linledaren. Sluta vinscha
in och fäst kroken på ett lämpligt
förankringsställe på fordonet. KÖR
INTE IN KROKEN I LINLEDAREN. Detta
kan orsaka oreparabel skada på
linledaren. När kroken är lämpligt fäst
på fordonet kör man in återstående
slack i vinschlinan genom att
"pulsera" in resten med ärrkontrollen
tills det är minimalt slack kvar i
vinschlinan.
Riggning
För fullständiga rigg fundamenta
Läs Grundläggande guide till
Vinsch tekniker, som nns online på
http://www.warn.com/corporate/
literaturerequest.shtml.
FARA
Spola alltid på
linan på trumman
i den riktning
som speci ceras
på vinschens
varningsetikett på
vinschen och/eller i
dokumentationen.
Detta krävs för att
denautomatiska
bromsen (om den
nns) ska fungera
riktigt.
FARA
Alltid använd
alltid medföljande
krokstropp när du
spolar vinschlina
in eller ut, under
installation och
under drift.
87970A2
87970A2
Page 42

WARN INDUSTRIES * WINCH
79
LININSPEKTION
När linan används för
första gången kommer de yttre
bertrådarna att snabbt luddas ihop.
Det beror på att dessa bertrådar
bryts av, och denna uppruggade yta
kommer i själva verkat att skydda de
underliggande brerna. Förhållandet
kommer att stabiliseras, inte fortsätta.
Omytans skrovlighet ökar beror
det på att det förekommer för stort
slitage och dragkraften minskar.
Titta noga på både inre och yttre
brer. Om endera är slitna, är linan
uppenbarligen försvagad. Öppna upp
kardelerna och leta efter pulvriserade
brer — detta äretttecken på
invändigt slitage.
Linan skall bytas ut när:
• Linans tjocklek, någonstans
utmed hela längden, har
minskat med 10 % eller merpå
grund av slitage.
• två eller er närliggande parter
är av.
• Det nns platta områden eller
bulor som inte försvinner då
linan böjs fram och tillbaka.
• det nns för mycket
sammansmälta brer. Sådana
ytor blir stela och linan ser
glättad ut.
Förvaring och skötsel av lina
För att garantera säkerhet
och prestanda ska inspektion och
underhåll av vinschlina vara bland
varje användares främsta intressen.
1. Inspektera vinschlinan före varje
användning och se till att den inte
har brott, snitt, slitage och smälta
eller hopsmälta ber.
2. Tvätta linan med jämna mellanrum
och avlägsna smuts och grus. Skölj
linan med en trädgårdsslang och låt
den lufttork.
Använd INTE lösningsmedel,
blekmedel eller starka
rengöringsmedel när du tvättar linan
och använd aldrig en värmekälla för
LININSPEKTION
att påskynda torkningen.
3. Rulla upp linan löst för förvaring
och se till att få bort över ödiga
vridningar. Maximera linans livslängd
genom att alltid förvara linan
på en mörk, torr plats. Innan du
använder någon lina, läs följande
bruksanvisning. Om linan är skadad,
ta omedelbart bort den och byt ut
den mot oskadad lina, WARN. Trasiga
eller skadade kardeler minskar linans
styrka utefter hela dess längd, — inte
bara i de skadade områdena. Som
allmän regel, byt ut linan med 12
kardeler när er än 3 trasiga eller
skadade kardeler syns eller om två
intilliggande kardeler är slitna.
4. Byt ut linan en gång om året med
WARN lina.
Normalt slitage
När små yt brer går sönder på
en lina skapar de en luddig textur.
Känt som "milt slitage" anses detta
vara bra slitage och påverkar inte
linans prestanda. Den knottriga ytan
skyddar faktiskt den underliggande
bern mot ytterligare slitage.
Allt för stort slitage–BYT
UT LINAN
När brer har smält eller är
hopsmälta beror det i allmänhet på
att linan har misshandlats. Smälta
eller hopsmälta polyester ber beror
på att linans yta värmts upp till en
temperatur på över 220 °C. Det
kan orsakas av för tunga laster eller
utvinschning och dessa skadade
brer kan underminera linans styrka
och bör ses som en varning om att
linan ska bytas ut.
FARA
Kör aldrig vinschen
med mindre än
10 varv lina runt
trumman. Linan
kan lossa från
trumman eftersom
linans infästning
i trumman inte
ärutformad för att
hålla en last.
WARN INDUSTRIES * WINCH
80
LININSPEKTION
FARA
Ha alltid på
dig kraftiga
läderhandskar när
du hanterar en
vinschlinan.
Kemiska angrepp–BYT UT LINAN
(VISAS INTE)
Lokala missfärgningar kan
eventuellt betyda kemiska angrepp av
allt från växellådsolja till batterisyra. I
tveksamma fall,
byt ut linan.
Exampel:
Lina i orginalutförande.
Kardel som visar full volym.
Lina som slitits ner 25 %—linan
måste bytas ut.
Kardel som slitits ner 25 %—linan
måste bytas ut.
Linan har två intilliggande trasiga
kardeler—linan måste bytas ut.
Lina som visar tillplattade brer
från hoptryckning. En viss
glans märks. Detta är inte ett
permanent tillstånd utan kan tas
bort genom att böja linan fram
och tillbaka.
LININSPEKTION Forts.
87970A2
87970A2
 Loading...