

Page 1
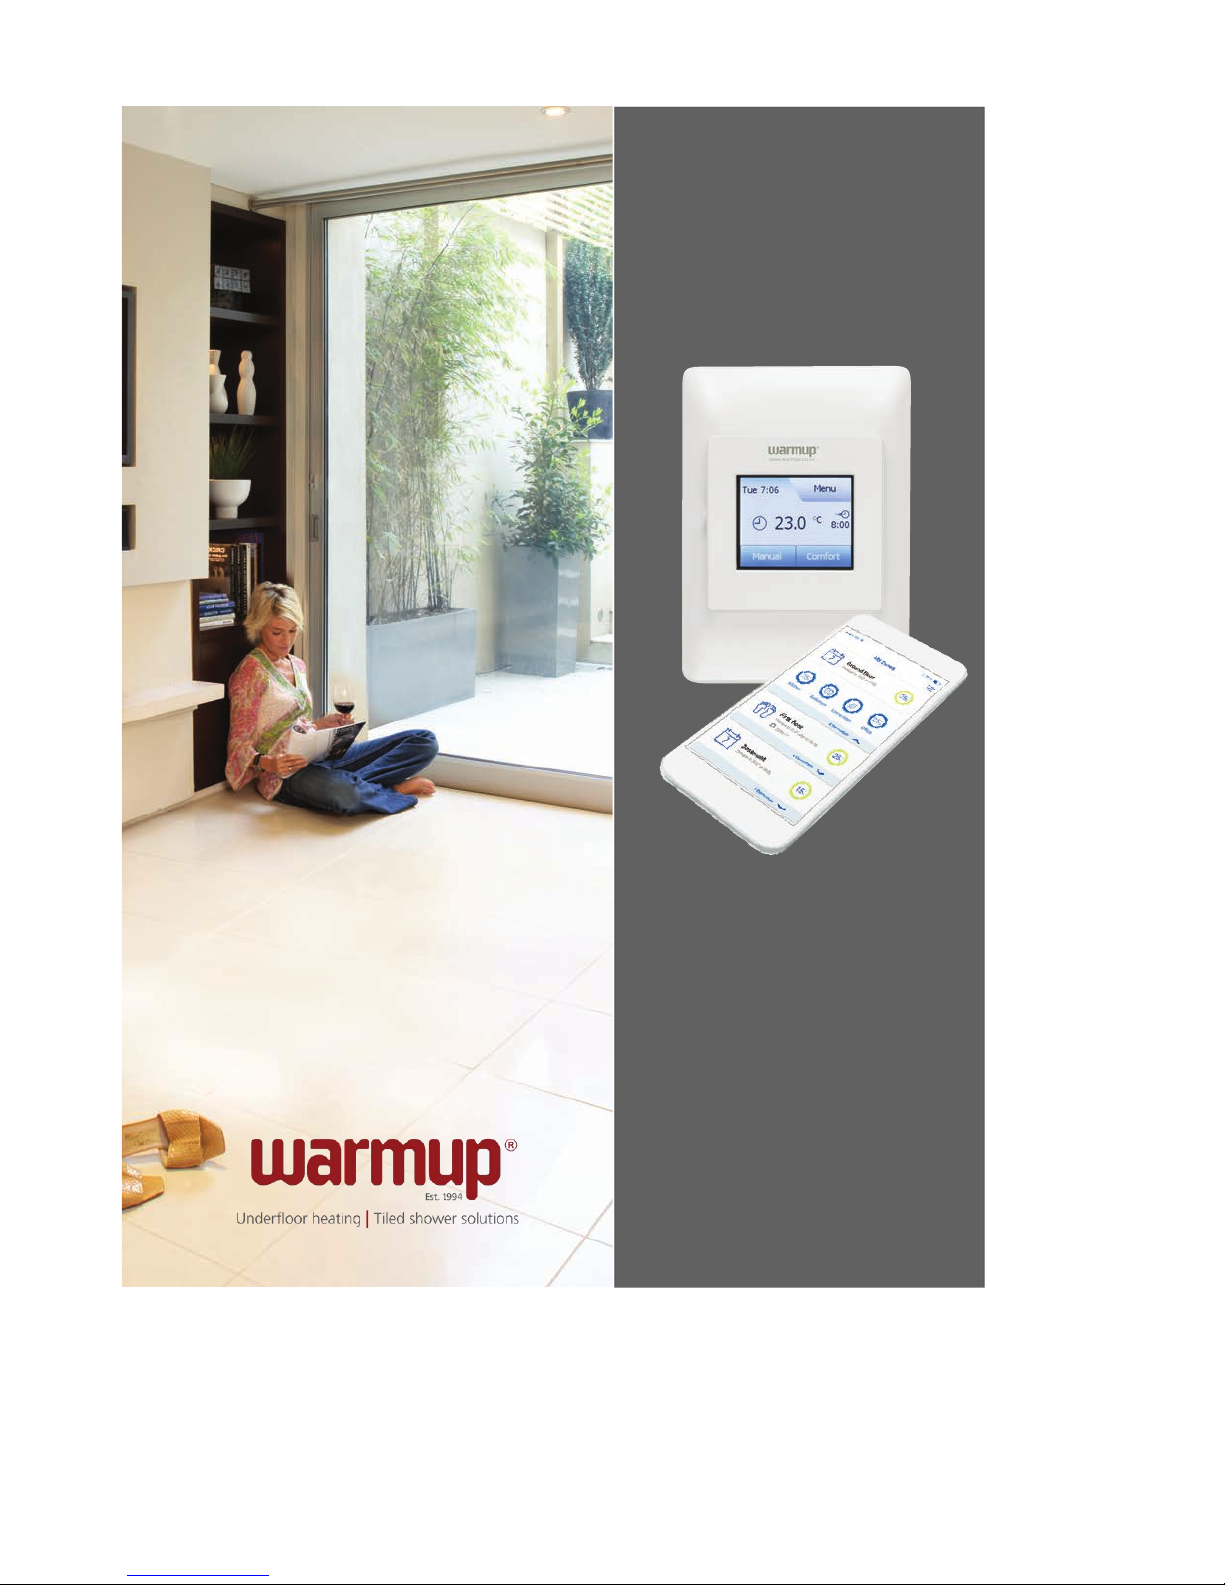
Colour Touch Thermostats
W3WT01 & W3WT02 (Wi-Fi)
Operating Instructions
Page 2
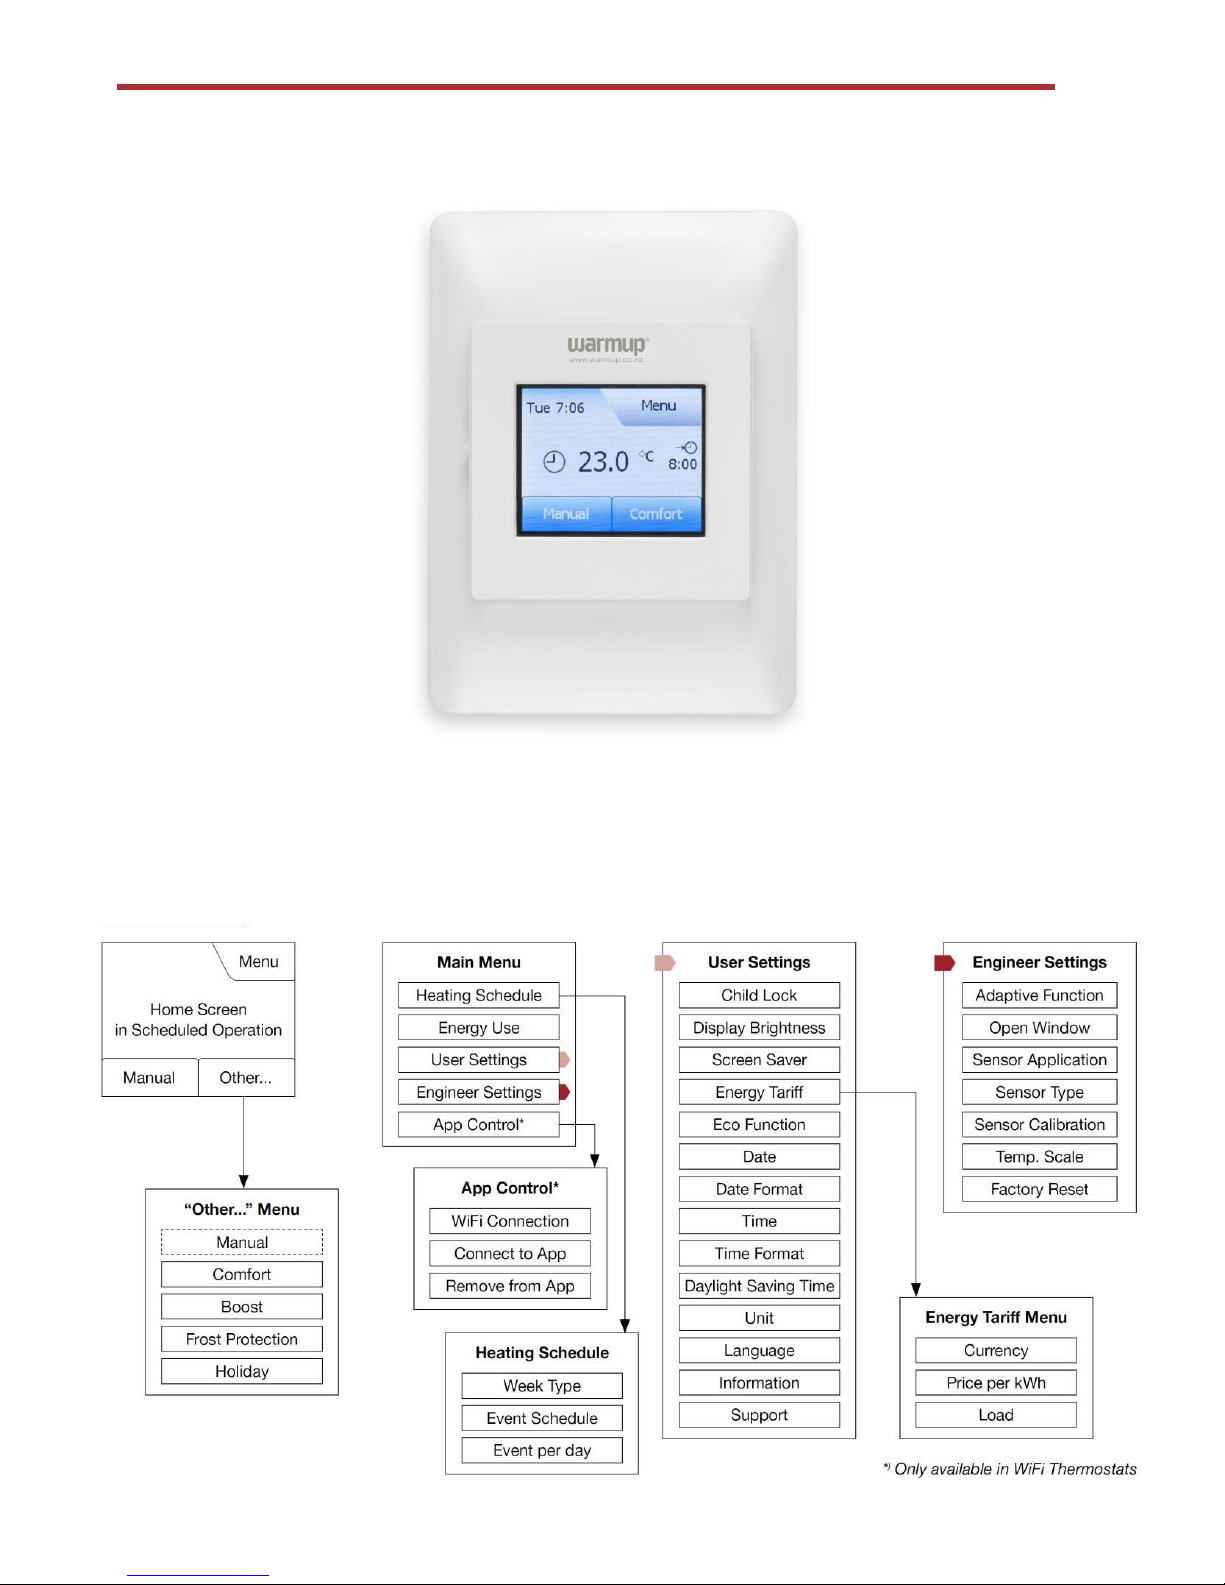
Models W3WT01 and W3WT02 (WiFi)
Menu Structure
Page 3
Turn on the thermostat (you will find
the switch on the left)
Use the easy navigation to set the date
using the buttons to toggle selections.
Confirm each setting with “ “
Use the easy navigation to set the
time using the buttons to toggle
selections. Confirm each setting with
“ “
Select your region and confirm with “ “
It should default to ‘New Zealand’
Startup Wizard
Select your language and confirm
with “ “
Select the type of floor covering –
Tile: floors made of tile or stone
Soft Floor: carpeted, wooden or other
engineered floors
1
2
3
4
5
6
Page 4
The thermostat comes with pre-programmed schedule for easy and economic heating control
of most homes. Below are the factory settings or the preset schedule.
This schedule can be changed in the Heating Schedule menu.
Wake Up Leave Home Come Home Go to Sleep
5:30 8:00 18:00 21:30
24°C 16°C 24°C 16°C
Pre-programmed schedule
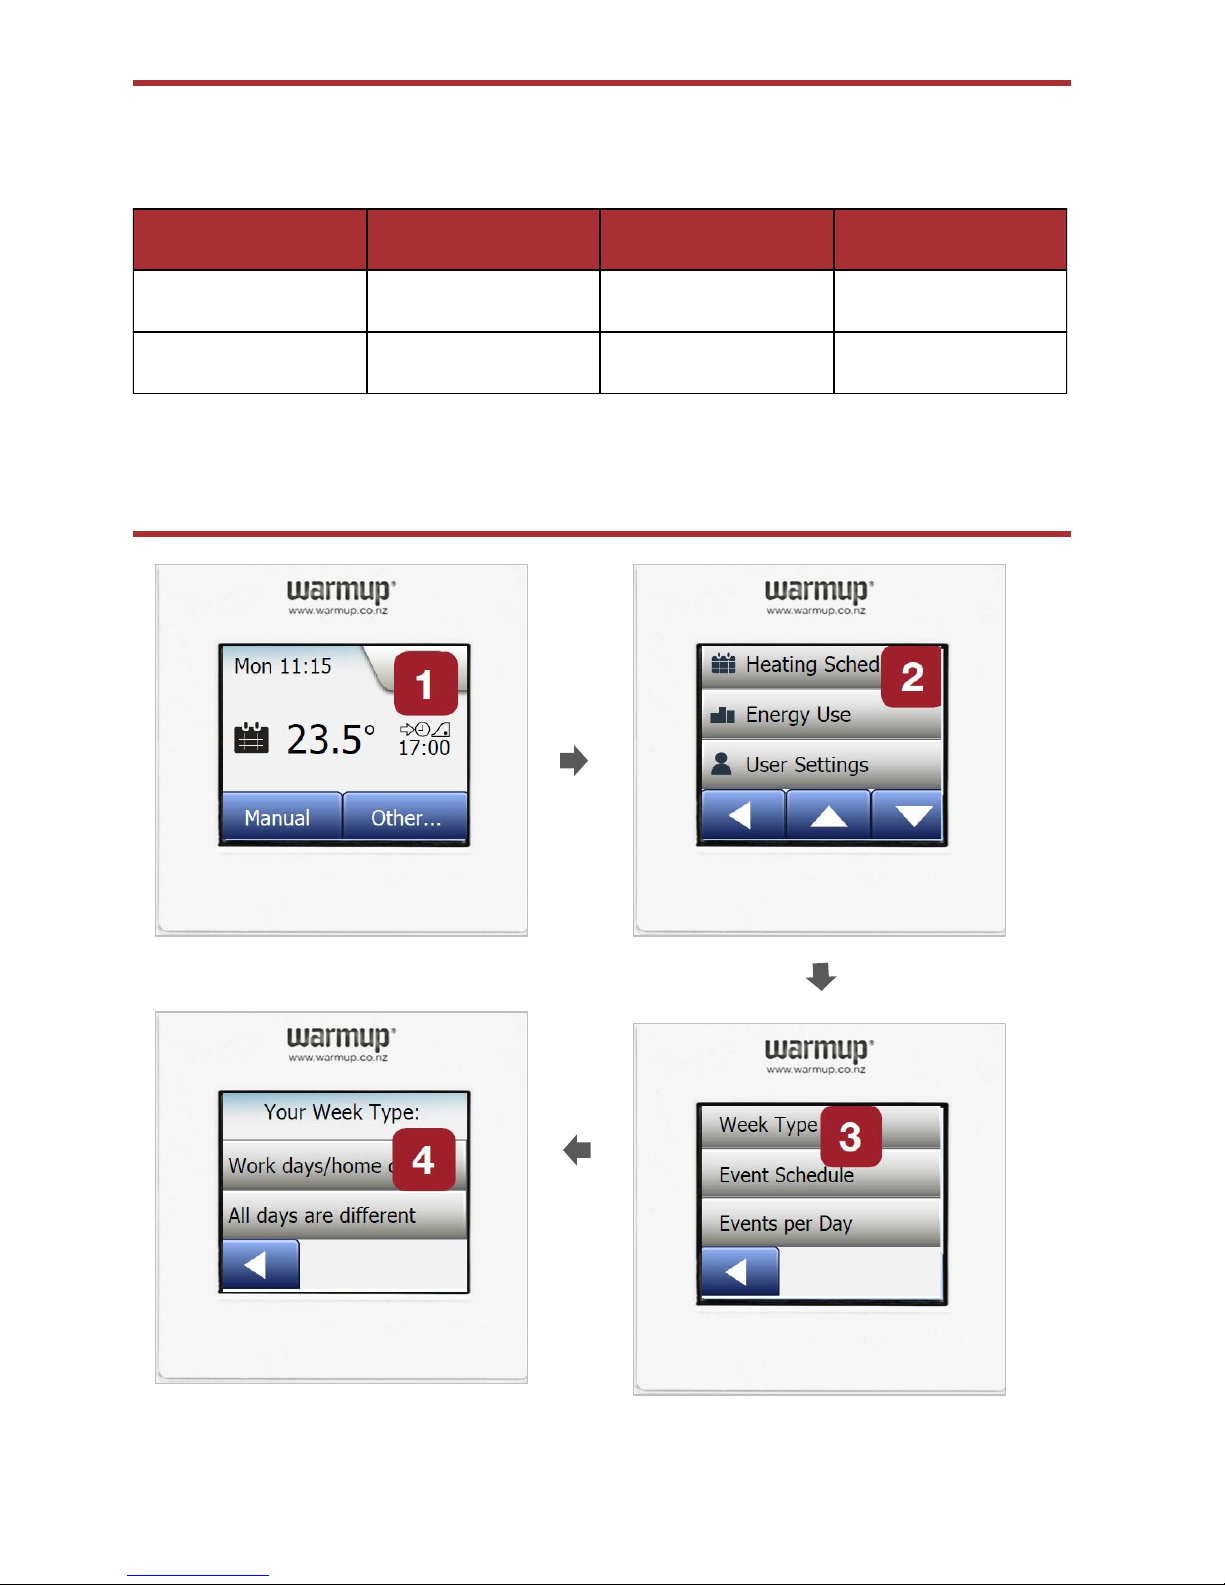
Personalise your settings -
Week Type
1. Select the Menu button on the top right to reveal the list of options
2. Start with selecting “Heating Schedule”
3. Then select “Week type”
4. Select “Work days/Home days. Select “ All days are different if your heating times are
different for all days of the week.
Page 5
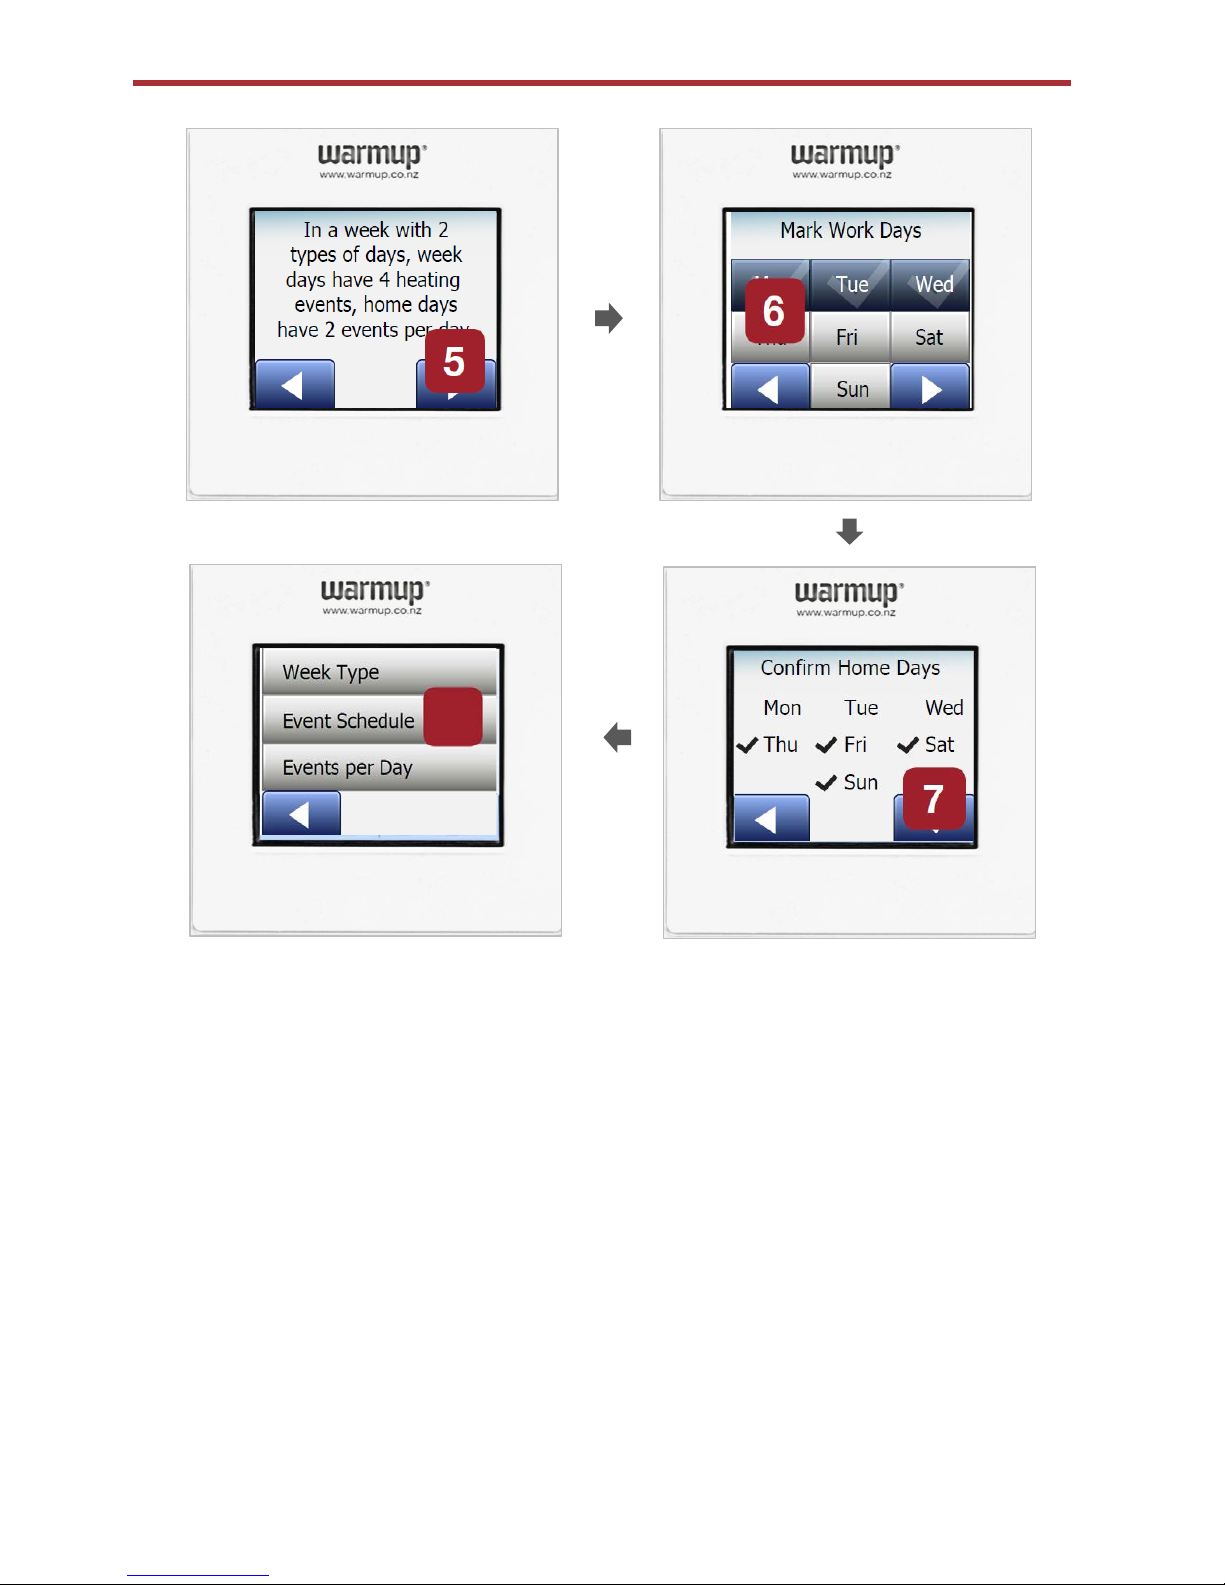
* In step 4 if you selected ‘All days are different’ – skip steps 5, 6 and 7 and go to Step 8 and
select ‘Event Schedule’
Personalise your settings -
Week Type (cntd)
8
5. Select the right arrow
6. Mark your “Work days” and confirm
7. Then confirm “Home days”.
8. You will now see the Heating Schedule menu
Page 6

Personalise your settings -
If you have selected ‘All days are different’ you
will have to enter the schedule separately for
each day of the week.
Should there be a break in your routine or you
find that there are days when it may be a little
colder or warmer than usual, you can adjust
these settings manually. When done, close the
screen and your display will update accordingly.
Remember that the temperature on the display is
your current room temperature. It will take some
time for your thermostat to heat up to the new
temperature.
Event Schedule
8
24°
05:30
9
Work Day: Wake up
16°
10
Work Day: Leave Home
24°
11
Work Day: Come home
16°
12
Work Day: Go to sleep
Page 7

Personalise your settings -
Events per day
13
14
15
Page 8

1. Menu
2. App Control
3. Wifi Connection
4. Manual
5. Select your network
6. Enter your password
7. Connect to App
8. Select QR code – you will now see
the QR code on the display screen
9. Now go to your mobile and
download the “SWATT” app
https://play.google.com/store/ap
ps/details?id=com.ojelectronics.
ow d5.r1099&hl=en
Open the app
Get started
Accept terms and conditions
Click on “Connect Thermostat”
Next
Scan the QR code on the thermostat
You will now be asked to name the
thermostat and the heating zone Eg
Thermostat : Smith home Heating
Zone – Ensuite
Next.
Create a user name and password
Create Account and then select next
Personalise your settings -
WiFi (for Model W3WT02 only)
3
2
Page 9

When there is a drop in temperature and you need to increase the heating temperature,
Select the ‘Other’ button on the bottom right – go to ‘Comfort’. Select the temperature and
duration.
This will temporarily override your programme settings for the period of time selected. Once
that time is up, the thermostat will default to your original setting.
Comfort Mode
Page 10

In boost mode the heating is activated for one hour. After one hour the thermostat returns
to Scheduled Operation.
Boost Mode
Page 11

Holiday mode allows you to set your heating to a minimum while you are away on holiday,
thus saving energy and money.
During an active holiday period a suitcase is displayed on the screen together with the
programmed leaving and return dates. You can cancel an active holiday period and return the
thermostat to Scheduled Operation by tapping the ‘X” button.
Holiday Mode
7
8
9
Page 12

The “Energy Tariff” button allows you to update the generic tariff with what you are paying
your specific power supplier for a more accurate report.
Auto Load Readout – will automatically detect the wattage installed. If you desire to load it
manually, click autoload off and then manually select your load
Select your required load – set the Kw load of your underfloor heating system manually. You
should ask your heating engineer for this information.
Warning on the Max Load [ 04:57] 10 Kw
When done, return to the main menu by clicking on the screen.
Energy Tariff
Page 13

The “Eco function” button reduces the energy spent on unnecessary heating if you leave the
room/house while the heating is on. We recommend that Eco function is left on.
With Eco function enabled, the Scheduled Operation home screen is altered. The lower left
button “Manual” is changed to “Eco”,
Tap the “Eco” button to activate the Eco function
Eco function
Page 14

The “Energy Use” button allows you to read out energy usage data for your underfloor heating
system.
You can scroll down using the down arrow for energy usage for the following periods.
• Last 7 days
• Last month
• Last year
• An overview of electricity consumption (KWh) and heating costs for the time periods
specified above.
Energy Use
Page 15

Internal failure
The thermostat is defective and must be replaced
Internal sensor defective or short-circuited. The thermostat must be
replaced.
External wired floor sensor disconnected, defective or short-circuited.
Contact your distributor for reconnection or replacement.
Internal overheating – arrange for the installation to be inspected.
The thermostat cannot be operated – the thermostat is in “Child Lock”
mode. Unlock it by following the steps below:
Draw an “L” on the screen in a single stroke joining the 3 dots without lifting
your finger from the screen. Start by touching the dot in the upper left
corner. You should now see the home screen.
The child lock will be reactivated when the thermostat returns to screen
saver mode – unless it is deactivated in the menu.
For more information please refer to the Warmup website :http://www.warmup.co.nz/thermostats.
Troubleshooting
Error messages – If a fault or error occurs, the thermostat will display one of the following error
messages:
Page 16

Warmup New Zealand Ltd
T 0800 927 687 E info@warmup.co.nz W www.warmup.co.nz
 Loading...