

Warmup W3115DT AU, W3115DT, W3115DT Black User Manual
Dual Touch Programmable Thermostat - User Guide
Models - W3115DT / W3115DT AU / W3115DT Black
F F
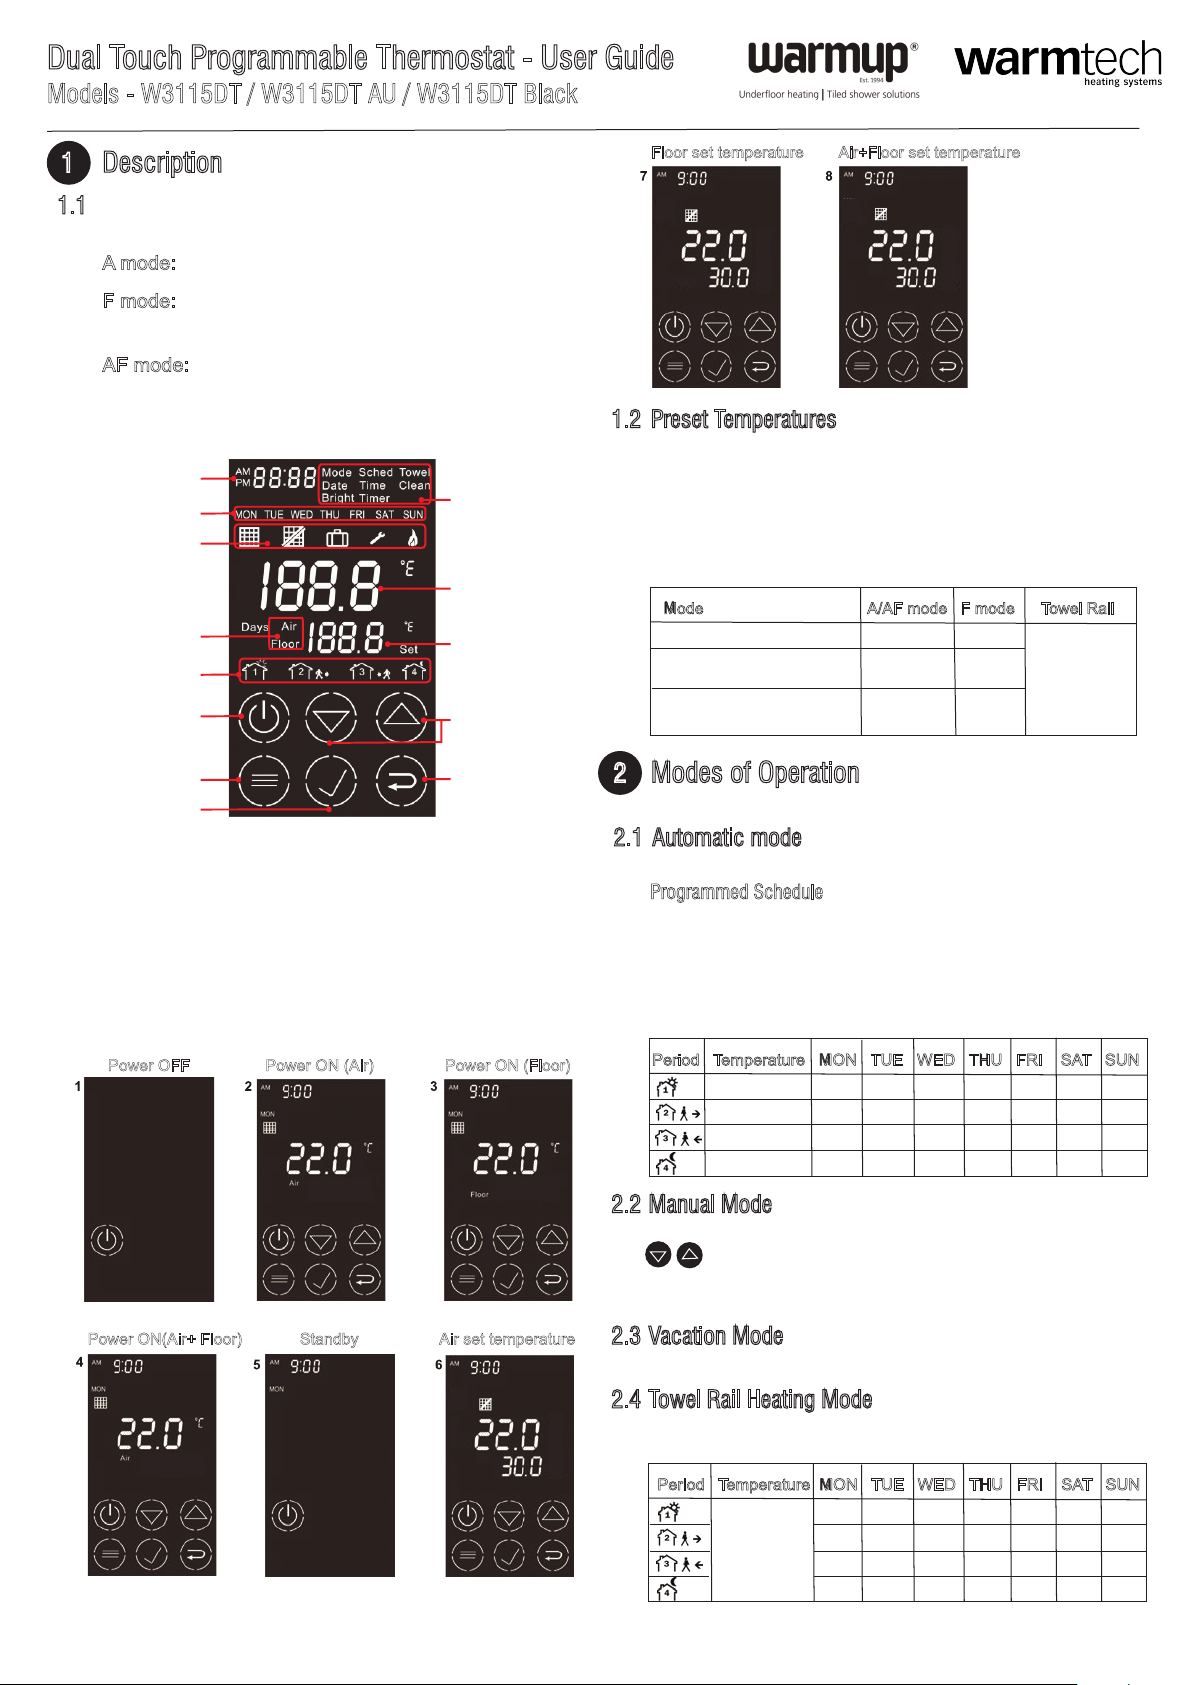
1 Description
1.1 The Dual touch programmable thermostat has three
temperature control modes:
controls the ambient air temperature
A mode:
F mode:
AF mode:
A/ F /AF mode
Period display
Power button
controls the floor temperature using an
external sensor
controls the ambient air temperature
maintains the floor temperature within
desired limits using an external
temperature sensor
Time
Day
Mode
Setting function
Temperature
Preset temperature
Adjustment buttons
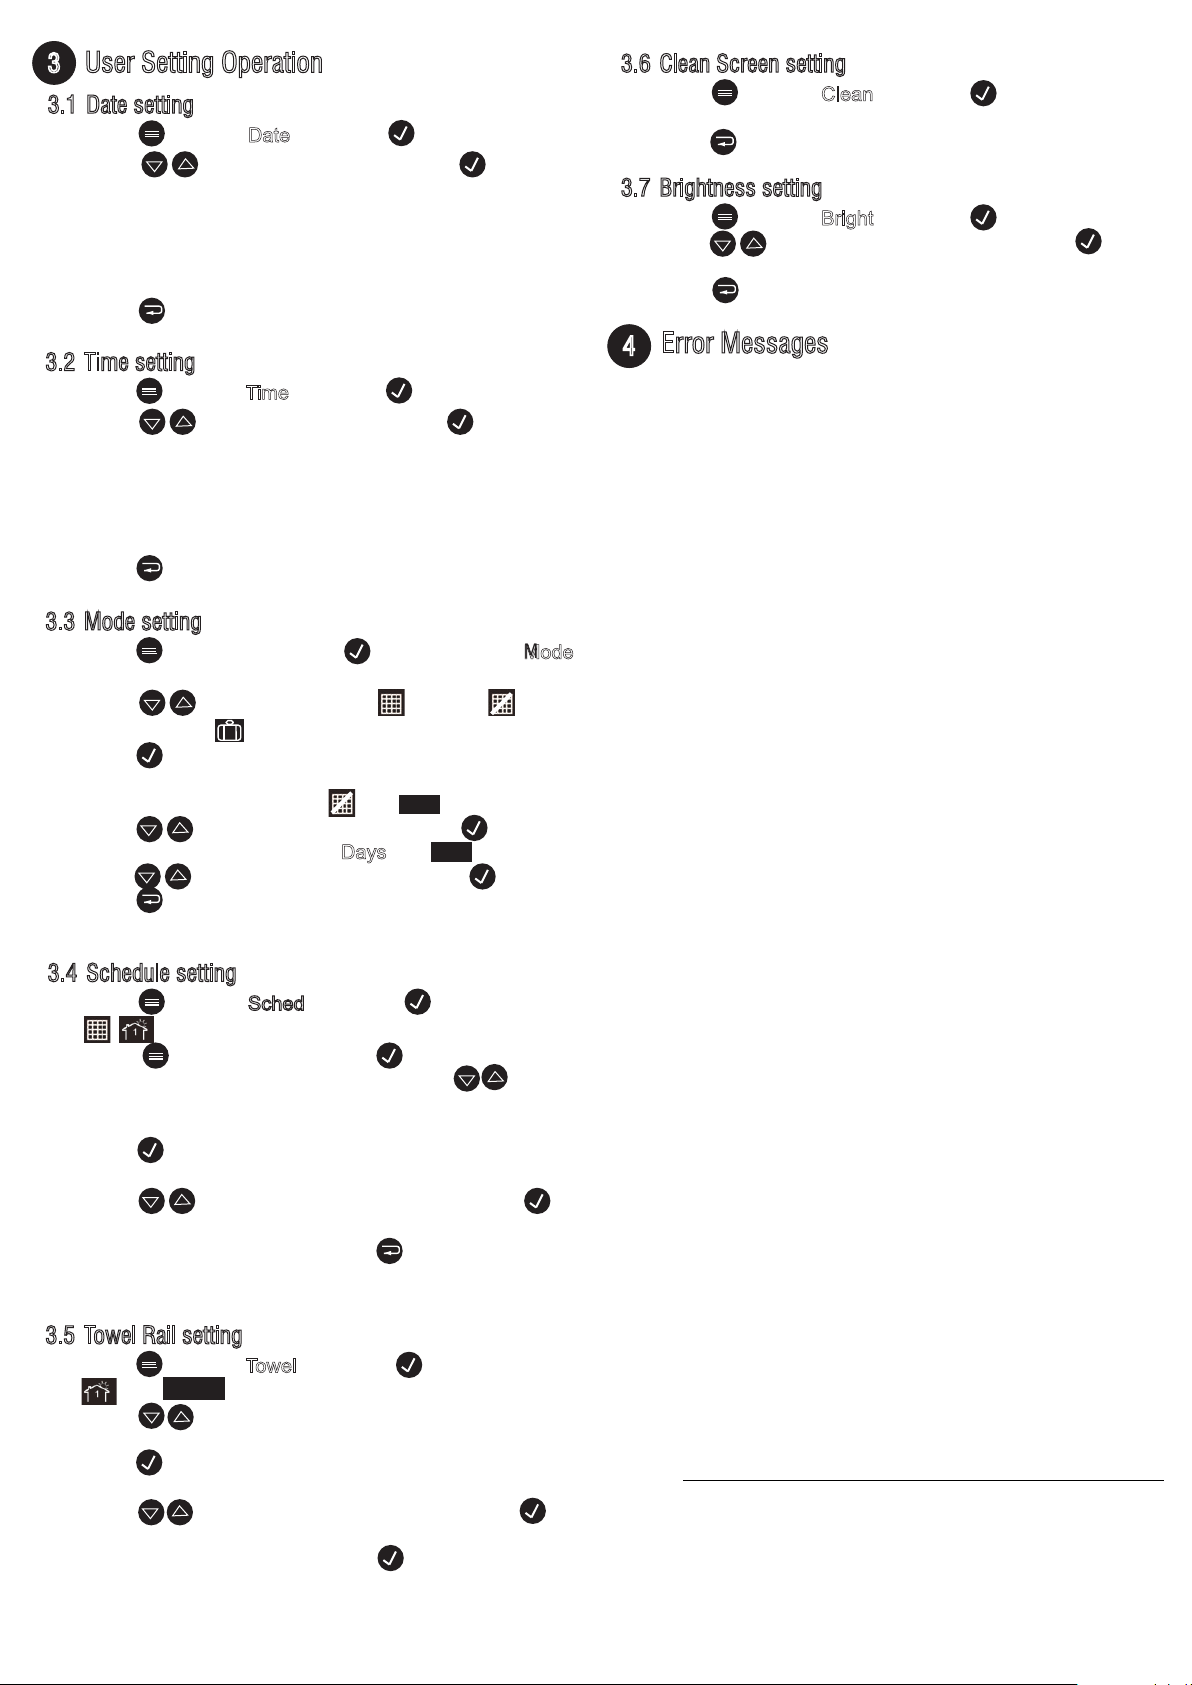
Floor set temperature Air+Floor set temperature
MON
1.2 Preset Temperatures
The thermostat has 3 modes of temperature operation:
Comfort temperature
E conomy temperature
Vacation temperature
The following table shows the intended use and the
default setting of each of the preset temperatures.
MON
C
C
�
C
Floor
Mode A/ AF mode F mode Towel Rail
Comfort (when at home) 21° C 24 ° C
E conomy (when asleep 17 ° C 16 ° C
or away from home
Vacation (during a 10° C 10° C
prolonged absence)
�
Set
Air
�
C
�
Set
As per heated
towel rail
specifications
Menu button
Check button
1
Power off the thermostat when not in use (eg summer).
Return button
This will not affect the time and temperature settings.
2
After Power-on, the shows the Power O F F
display (see image 1)
3
Press the Power button for the Standby screen
4
Press the Power button again for the Power O N screen.
5
Press the Power button for 3 seconds for the Power
(image 5)
O F F screen (this will stop the scheduling and the towel
rail mode).
Power O F F Power O N (Air) Power O N (F loor)
Power O N (Air+ F loor) Standby
Air set temperature
MON
Air
2
Modes of Operation
The thermostat has 4 modes of operation:
- U se the scheduling time to control
2.1 Automatic mode
temperature.
Programmed Schedule
The schedule consists of 4 periods per day, which
represents a typical week day. Y ou can program the
thermostat to skip the periods that do not apply to your
situation. F or example, you can skip periods 2 and 3 for
the weekend.
Period Temperature MO N TU E W E D THU F RI SAT SU N
Comfort
Economy
Comfort
Economy
- The temperature must be set manually.
2.2 Manual Mode
Y ou can modify the preset temperature by pressing
5:3 0 5:3 0 5:3 0 5:3 0 5:3 0 6 :00 6 :00
8 :00 8 :00 8 :00 8 :00 8 :00 9 :00 9 :00
18 :00 18 :00 18 :00 18 :00 18 :00 18 :00 18 :00
21.3 0 21.3 0 21:3 0 21:3 0 21:3 0 21:3 0 21:3 0
when the thermostat is in automatic
mode. The new temperature will be used until the
beginning of the next period.
2.3
- The thermstat uses the vacation
Vacation Mode
preset temperature to control this mode.
2.4
- The following table shows the
Towel Rail Heating Mode
C
�
C
�
Set
intended use and the default setting of each of the preset
times.
Period Temperature MO N TU E W E D THU F RI SAT SU N
As per heated
towel rail
specifications
5:3 0 5:3 0 5:3 0 5:3 0 5:3 0 6 :00 6 :00
8 :00 8 :00 8 :00 8 :00 8 :00 9 :00 9 :00
18 :00 18 :00 18 :00 18 :00 18 :00 18 :00 18 :00
21.3 0 21.3 0 21:3 0 21:3 0 21:3 0 21:3 0 21:3 0
3
User Setting Operation
3.1 Date setting
• Press to select Date and press to confirm.
Press to adjust the year and press
• to confirm
This will then switch to the month setting.
• Continue setting up the year, month, date and the day
(Monday to Sunday)
• Complete setting up the date and day, then switch to
the next setting.
• Press to exit.
3.2 Time setting
• Press to select Time and press to confirm.
• Press to adjust the hur and press to confirm
This will then switch to the minute setting.
• Continue setting up the hour and minute (the current
setting item will flicker).
• Complete setting the minutes, then switch to
the next setting.
• Press to exit.
3.3 Mode setting
• Press button and then the to confirm when Mode
flashes.
• Press to select Automatic , Manual or
Vacation mode
• Press for the setup.
• If Automatic mode is selected, it will stop flashing.
• If Manual mode is selected, and will flash.
188.8
Press to adjust the temperature and to confirm.
• If Vacation mode is selected, Days and will flash.
188.8
Press buttons to adjust the days and to confirm.
• Press to exit the mode setting and press it again
to exit the user setting.
3.4 Schedule setting
• Press to select Sched and press for the setup
, and the current day of the week will flash.
• Press to select the week and to confirm.
• It now switches to the hour setting. Press to
adjust the hour or adjust to blank and skip the hour
setting.
• Press to confirm and then set the minute setting. If
you adjust to blank, then it will skip periods 1 and 2.
• Press to adjust the temperature and press to
confirm and switch to the next period setting.
• After setting up all periods, press to exit the
scheduled setting and press it again to exit the user
setting.
3.5 Towel Rail setting
• Press to select Towel and press for the setup,
and will flash.
• Press to adjust the hour or adjust to blank and
skip the hour setting.
• Press to confirm and then set the minute setting.
If you adjust to blank, then it will skip to the next period.
• Press to adjust the temperature and press to
confirm and switch to the next period setting.
• After setting up all periods, press to exit the
scheduled setting and press it again to exit the user
setting.
am
88:88
Pm
3.6 Clean Screen setting
• Press to select Clean and press to confirm.
• All keys will lock in 10 seconds.
• Press to exit.
3.7 Brightness setting
• Press to select Bright and press to confirm.
• Press to adjust the brightness and press
to confirm [ Range:1- 5].
• Press to exit.
Error Messages
4
The measured air temperature is below the
Lo 1
thermostat’s display range. Heating is activated.
Lorem ipsum
The measured air temperature is above the
hi 1
thermostat’s display range. Heating is deactivated.
The measured floor temperature is below the
lo 2
thermostat’s display range. Heating is activated.
The measured floor temperature is above the
hi 2
thermostat’s display range. Heating is deactivated.
Technical Specifications
r
Power supply: 90/260 VAC, 50 Hz
Maximum load: 10A (Towel rail); 16A (Floor)
Display range: -5 °C to 50 °C
Ambient setpoint range (A/AF modes)
Floor setpoint range (F mode): 5 °C to 40 °C
Floor limit range (AF mode): 5 °C to 40 °C
Display resolution: 0.1 °C
Operating temperature: 0 °C to 50 °C
Storage temperature: -20 °C to 50 °C
Heating cycle length: Refer to the power base’s installation
guide Temperature sensor: NTC thermistor
Data backup: In the event of a power failure, most
settings are saved. Only the time must be re-adjusted if the
power failure lasts more than 6 hours. The thermostat will
return to the mode that was active prior to the power failure.
Warranty
- THREE (3) YEAR WARRANTY
This product is warranted against defects in material and
workmanship under normal conditions of use for a period of 3 years
from the date of purchase. During this period, WARMUP will repair
or replace the product, if it is defective in normal operating
conditions in terms of materials or workmanship, with a new product
of equivalent quality at WARMUP’s option.
The warranty does not cover costs of
transportation, removal, installation or damage caused by misuse or
accident. In no event will WARMUP be liable for consequential
loss resulting from the installation of the product. Any defective
product should be sent with the original invoice to the
original installer, or shipped prepaid, insured and sent to the
following address:
WARMUP New Zealand Ltd
483A Roseb
Avondale, Auckland
New Zealand
If you have any questions c
of this produ
Phone: 0800 WARMUP (927-687) NZ / 1300 138 126 AU
Email: info@warmup.co.nz / info@warmtech.com.au
For more information on our products, visit us at:
warmup.co.nz / warmtech.com.au
ank Road,
Customer Assistance
oncerning the installation or operati
t, call our technical support team on:
c
: 0 °C to 35 °C
Warmtech Heating Systems
20 Sunny Bank Road
Lisarow, NSW 2250
Australia
9.
11.
on
 Loading...