

Warmup TH115 A, TH115 AF, TH115 F User Manual
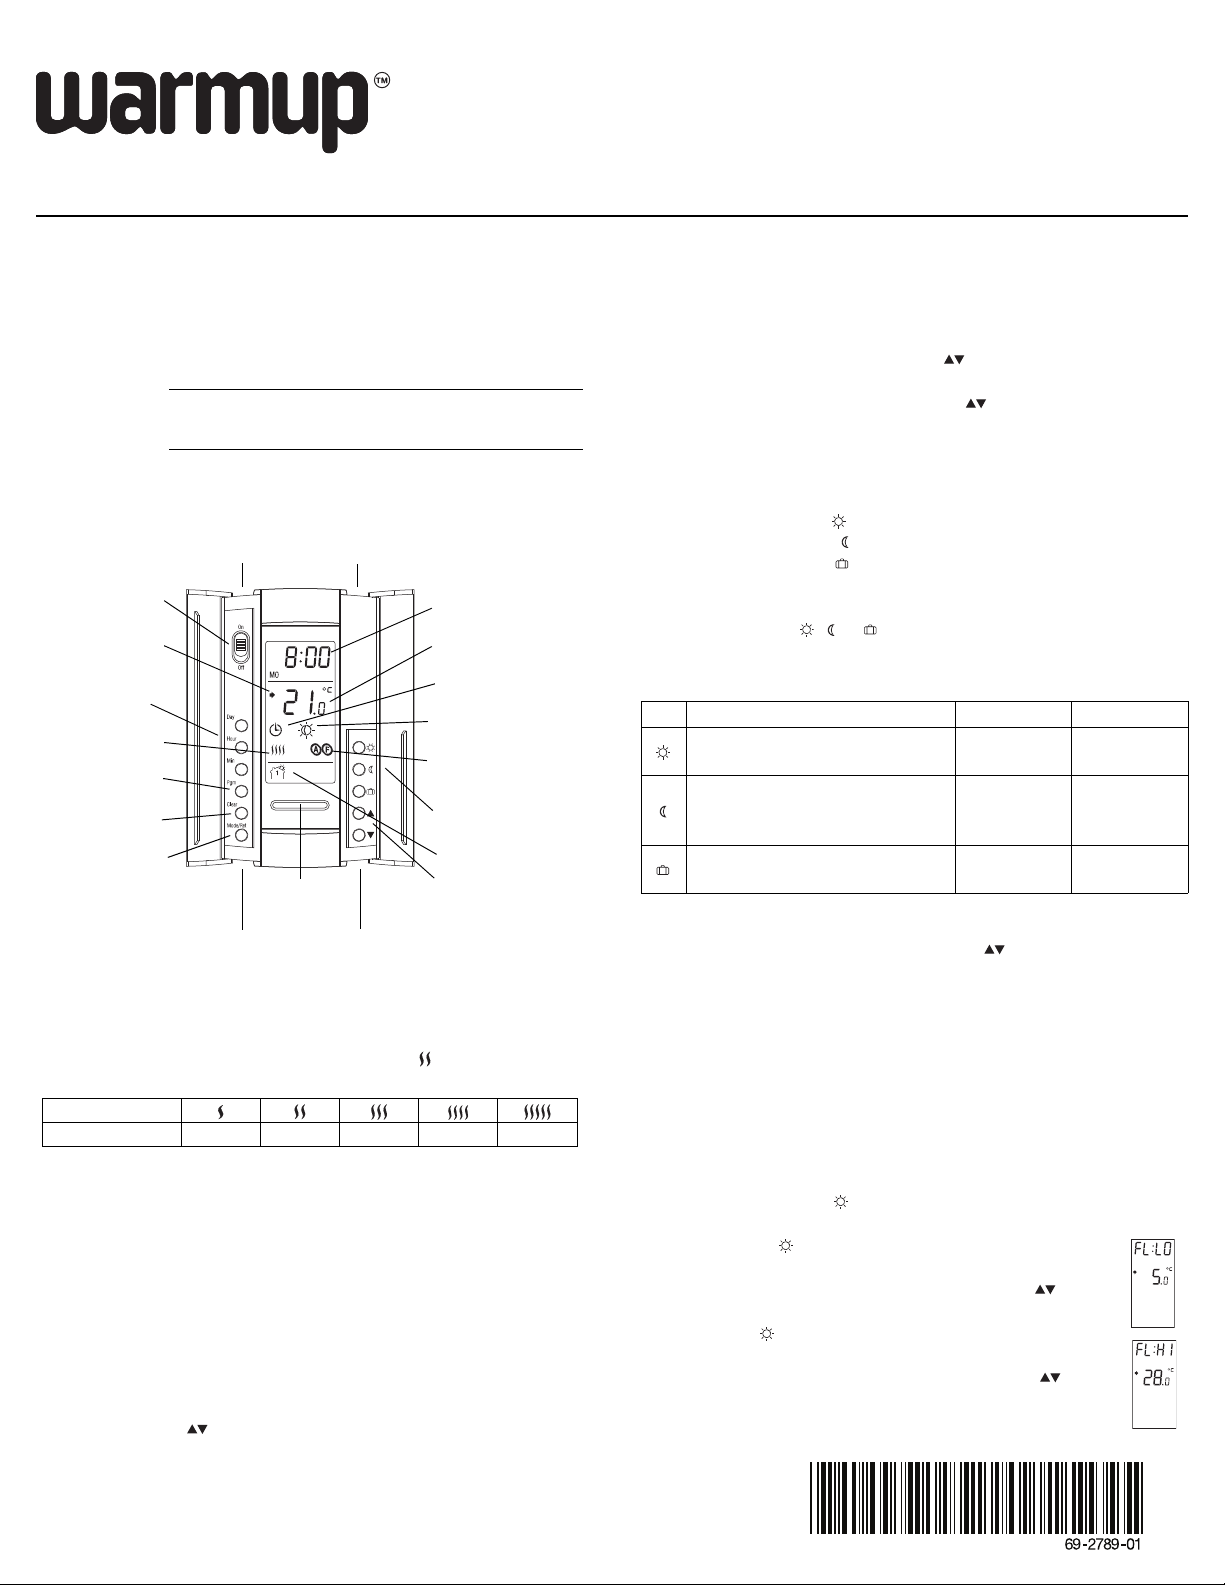
On/Off switch
1
Day and time
settings
Temperature
adjustment buttons
Program button
Mode selection /
program exit
Temperature display
Mode display
Period display
Temperature
preset buttons
Time and day display
Percentage of
heating time
2
Backlight button
Program clear
button
Preset temperature
indicator
Appears when the
setpoint is displayed
Temperature control
mode indicator
Keep the thermostat's air vents clean and unobstructed at all times.
Keep the thermostat's air vents clean and unobstructed at all times.
TH115 A/F/AF
User Guide
Programmable Thermostat
The TH115 programmable thermostat has three temperature control
modes:
A mode: controls the ambient air temperature
F mode:
AF mode:
Description
controls the floor temperature using an external
temperature sensor
controls the ambient air temperature
maintains the floor temperature within desired limits
using an external temperature sensor
Temperature Adjustment
Setpoint Temperature
The thermostat normally displays the actual (measured) temperature.
To view the setpoint, press one of the buttons once. The setpoint
will appear for the next 5 seconds.
To change the setpoint, press one of the buttons until the desired
temperature is displayed. To scroll faster, press and hold the button.
Preset Temperatures
The thermostat has 3 preset temperatures:
• Comfort temperature
• Economy temperature
• Vacation temperature
To use a preset temperature, press the corresponding button. The
corresponding icon , or will be displayed.
The following table shows the intended use and the default setting of
each of the preset temperatures.
Icon Intended use A/AF modes F mode
Comfort
(when at home)
Economy
(when asleep or away from
home)
Vacation
(during prolonged absence)
21 °C 24 °C
17 °C 16 °C
10 °C 10 °C
To store a preset temperature:
1
Place the switch to Off to cut power to the heater when not in use
(e.g., in the summer). This will not affect the time and temperature
settings.
2
The thermostat displays the percentage of heating time required to
maintain the desired temperature. For example, is displayed when
heating is activated 40 percent of the time.
Display
% of heating time 1 to 24% 25 to 49% 50 to 74% 75 to 99% 100%
1) Press the Hour button to set the hour.
2) Press the Min button to set the minutes.
3) Press the Day button to set the day.
4) Press the Mode/Ret button to exit.
The display illuminates for 12 seconds when the backlight button is
pressed.
When either of the buttons is pressed, the display also illuminates
for 12 seconds. The setpoint temperature appears for 5 seconds,
then the actual (measured) temperature is displayed.
TH115 A/F/AF 1/2
Clock and Day Setting
Backlight
1) Set the desired temperature using the buttons.
2) Press and hold the corresponding button until the corresponding
icon is displayed.
Floor Temperature Limits (AF mode only)
NOTE: To avoid damaging your floor, follow your floor supplier’s
recommendations regarding floor temperature limits.
The minimum and maximum floor temperature limits are 5 °C and
28 °C by default. To modify these limits, proceed as follows:
1) Switch the thermostat to Off.
2) Press and hold the button.
3) Switch the thermostat back to On.
4) Release the button when the minimum temperature
limit (FL:LO) appears.
5) Set the minimum temperature limit using the
buttons.
6) Press the button to display the maximum
temperature limit (FL:HI).
7) Set the maximum temperature limit using the
buttons.
8) Press Mode/Ret to exit.
The thermostat has 3 modes of operation.
Modes of Operation
Automatic Mode
The thermostat follows the programmed schedule. To place the
thermostat in this mode, press Mode/Ret until is displayed. The
data of the current schedule period are also displayed.
Temporary Bypass
If you modify the setpoint temperature (by pressing the , or
button) when the thermostat is in automatic mode, the new
temperature will be used until the beginning of the next period.
flashes during the bypass. You can cancel the bypass by pressing
Mode/Ret.
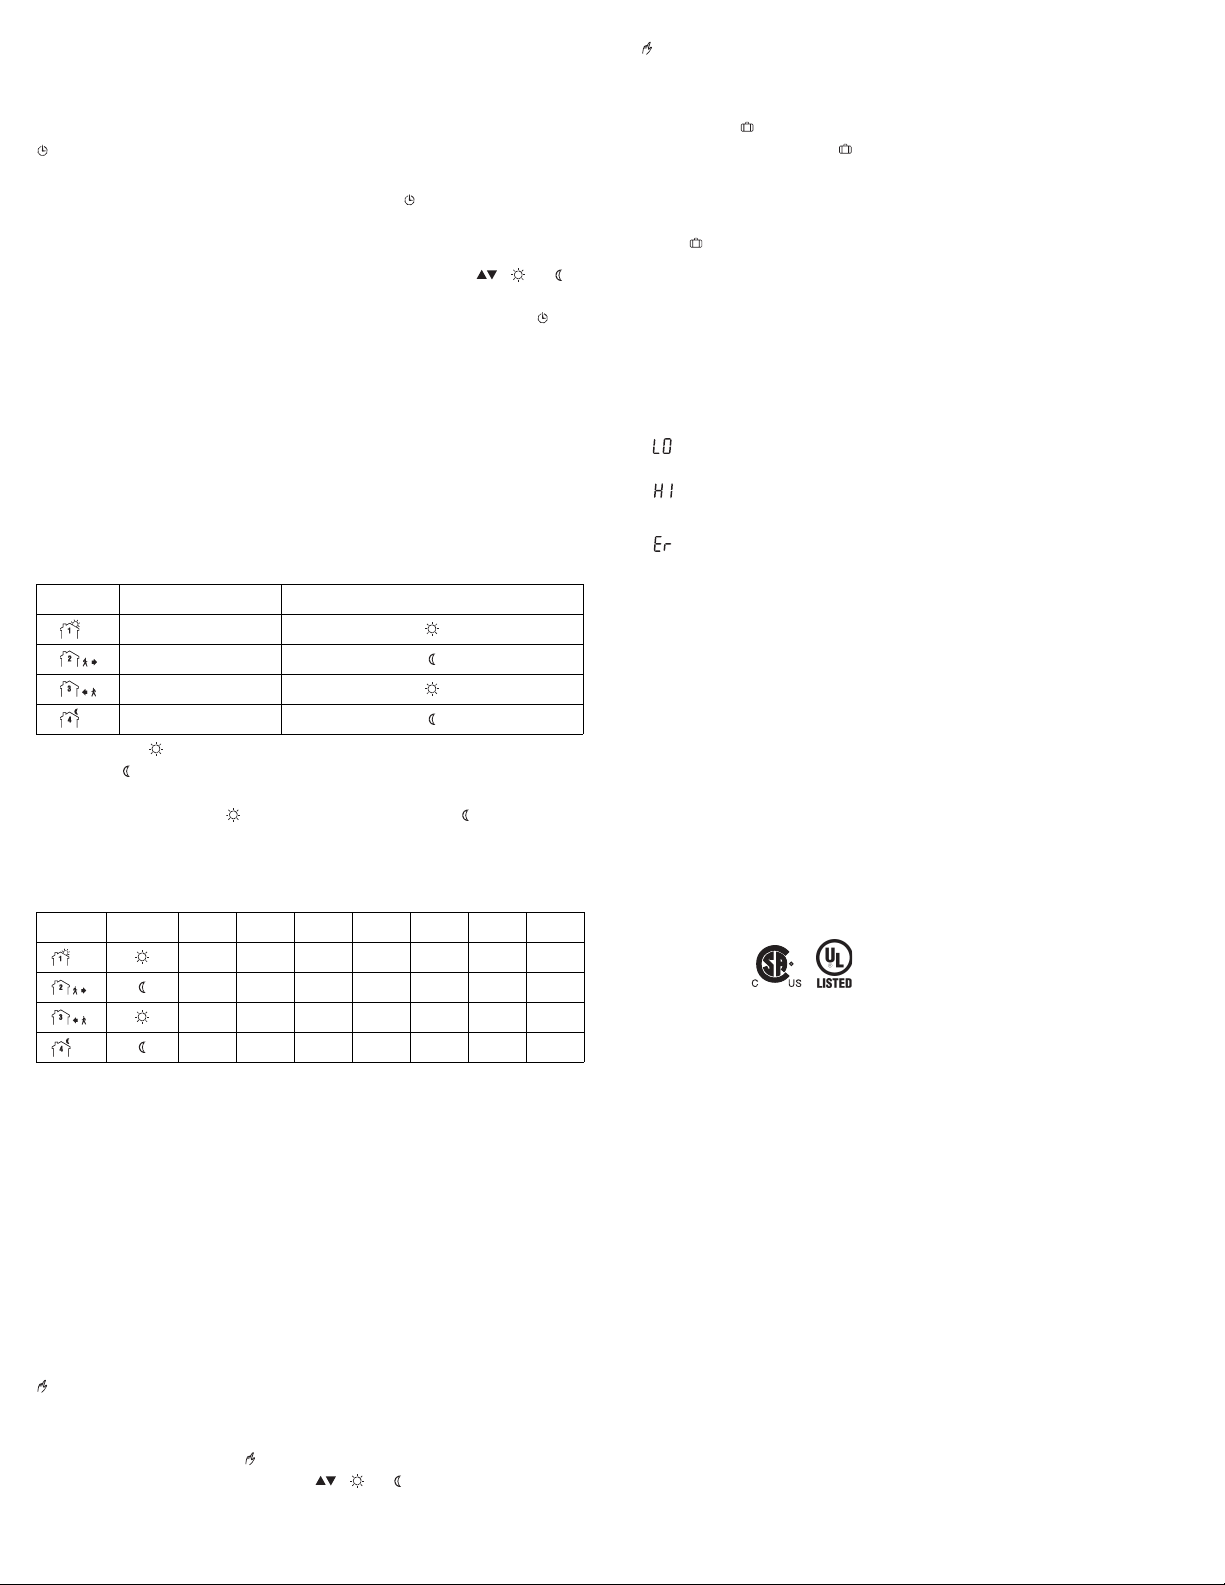
Programmed Schedule
The schedule consists of 4 periods per day which represents a
typical week day. You can program the thermostat to skip the periods
that do not apply to your situation. For example, you can skip periods
2 and 3 for the weekend.
NOTE: If you wish to use only 2 periods, set the periods “1 and 4” or
periods “2 and 3”. Early Start will not work if you set periods “1 and 2”
or periods “3 and 4” .
Period Description Associated temperature setting
Wake-up
Away from home
Return home
Sleep
The Comfort ( ) temperature is used in periods 1 and 3 and the
Economy ( ) temperature is used in periods 2 and 4. For example,
when the period changes from 1 to 2, the setpoint automatically
changes from Comfort ( ) temperature to Economy ( ) temperature.
You can have a different program for each day of the week; i.e., each
period can start at different time for each day of the week. The
thermostat has been programmed with the following schedule.
Period Setting MO TU WE TH FR SA SU
5:30 5:30 5:30 5:30 5:30 6:00 6:00
8:00 8:00 8:00 8:00 8:00 9:00 9:00
18:00 18:00 18:00 18:00 18:00 18:00 18:00
21:30 21:30 21:30 21:30 21:30 21:30 21:30
To modify the schedule:
1) Press Pgm to access the programming mode. Period 1 is
selected.
2) Press Day to select the day to program (hold for 3 seconds to
select the entire week).
3) Press Hour and Min to set the start time of the selected period,
or press Clear if you want to skip the period (--:-- is displayed).
4) Press Pgm to select another period, or press Day to select
another day. Then repeat step 3.
5) Press Mode/Ret to exit the programming mode.
NOTE: If no button is pressed for 60 seconds, the thermostat will
automatically exit the programming mode.
Manual Mode
The programmed schedule is not used. The temperature must be set
manually. To place the thermostat in this mode:
1) Press Mode/Ret until is displayed.
2) Set the temperature using the , or button.
Vacation Mode
In this mode, the thermostat uses the vacation preset temperature.
There are two ways to place the thermostat in Vacation mode:
• Press the button on the thermostat. When the Vacation mode is
activated this way, the icon appears on the screen without
flashing.
• From any remote control device (if connected at installation). When
the contact closes, the thermostat is placed in Vacation mode and
the icon flashes on the screen. All buttons on the thermostat are
locked. When the contact opens, the thermostat returns to the
preceding mode.
NOTE: When the Vacation mode is activated from a remote control
device, it can only be deactivated using the device
Supply: 208/240 VAC, 50/60 Hz
Maximum load: 15 A (resistive only)
Connection type: 4 wires, double pole
Display range: 0 °C to 70 °C
Ambient setpoint range (A/AF modes): 5 °C to 30 °C
Floor setpoint range (F mode): 5 °C to 40 °C
Floor limit range (AF mode): 5 °C to 40 °C
Display resolution: 0.5 °C
Operating temperature: 0 °C to 50 °C
Storage temperature: -20 °C to 50 °C
Heating cycle length: 15 minutes
Remote input: Dry contact
Size (H•W•D): 124 x 70 x 23 mm
Data backup: In the event of a power failure, most settings are saved. Only the
time must be re-adjusted if the power failure lasts more than 6 hours. The
thermostat will return to the mode that was active prior to the power failure.
Certifications:
This product is warranted against defects in material and workmanship under
normal conditions of use for a period of five years from the date of purchase.
During this period, WARMUP will repair or replace the product, if it is defective
in normal operating conditions in terms of materials or workmanship, with a
new product of equivalent quality at WARMUP’s option.
The warranty does not cover costs of transportation, removal, installation or
damage caused by misuse or accident. In no event will WARMUP be liable for
consequential loss resulting from the installation of the product. Any defective
product should be sent with the original invoice to the original installer, or
shipped prepaid, insured and sent to the following address:
WARMUP New Zealand Ltd
Copsey Business Park
20 Copsey Place,
Avondale, Auckland.
Phone: 0800 WARMUP (927-687)
Email: info@warmup.co.nz
Website: www.warmup.co.nz
Error Messages
The measured temperature is below the thermostat’s display
range. Heating is activated.
The measured temperature is above the thermostat’s display
range. Heating is deactivated.
Verify the thermostat and sensor connections.
:
Technical Specifications
Warranty
WARMUP HEATING SYSTEMS NZ LTD
FIVE (5) YEAR WARRANTY
Customer Assistance
.
TH115 A/F/AF 2013-01-10 2/2
 Loading...