

Warmup PVC Installation Instructions Manual
Installation Manual:
Underfloor
Heating Mat
- type PVC
TECHNICAL HELPLINE
0845 345 2288
IMPORTANT
Read this manual before attempting to
install the heater.
Incorrect installation could damage the
heater and will invalidate your warranty.
Complete and submit your warranty form
online at www.warmup.co.uk
®
®
The world’s best-selling oor heating brand™
2
Contents
Contents
Do’s and don’ts
Selecting the correct heater
What you need for installation
Floor coverings
Safety - electrical considerations
Subfloor preparation
About the mat
Testing the mat
Sizing guide
How you can modify the mat
Installation
Control card
Warranty
3
4
5
6
7
10
Your Warmup Underoor heating mat
has been designed so that installation
is quick and straight forward, but as
with all electrical systems, certain
procedures must be strictly followed.
Please ensure that you have the
correct heater(s) for the area you wish
to heat.
Warmup plc, the manufacturer of the
Warmup Undertile Heating System,
accepts no liability, expressed or
implied,
for any loss or consequential damage
suered as a result of installations
which in any way contravene the
instructions
that follow.
It is important that before, during and after installation that all requirements are
met and understood.
If the instructions are followed, you should have no problems. If you do require
help at any stage, contact our helpline:
0845 345 2288
You may also nd a copy of this manual, wiring instructions and other helpful
information on our website: www.warmup.co.uk
11
Carefully read this instruction manual before commencing
installation. Consult our helpline or a competent professional
if you are unsure how to proceed.
Ensure the system is tested before, during and after
installation.
Plan your mat layout and installation so that any drilling after
tiling (e.g. for sanitary ware) will not damage the wiring.
Maintain a minimum gap of 50mm between wire runs and
from conductive parts such as water pipes.
Check that the mat is working immediately before
commencing tiling.
Take particular care when tiling not to dislodge or damage the heating wire. Ensure that during the course of the
installation that no damage is caused by, for example, falling
objects, sharp objects etc.
Wear gloves to prevent irritation from the fibreglass mesh.
Ensure the end cap and manufactured joint are under a full
bed adhesive or levelling compound and covered with a tile.
Ensure that a heat loss calculation has been carried out and
heating requirements have been met if you are using the
underfloor heating system as a primary source of heating.
Ensure that the heaters are separated from other heat
sources such as luminaires and chimneys.
Ensure that the control card at the back of the manual is
completed and fixed at the main consumer unit along with
any plans and electrical test records. As per the current
BS7671:2008 17th Edition wiring regulations.
Cut or shorten the heating element at any time.
Commence installation on a concrete floor that has not
been fully cured.
Leave surplus matting rolled up under units or fixtures -
USE THE CORRECT SIZE MAT.
Install the mat on irregular surfaces such as stairs or up
walls.
Use staples to secure the the heating element to the
subfloor.
Run the floor sensor wire or power lead over or under the
heating element or close to other heat sources such as hot
water pipes.
Connect two mats in series, only connect mats in parallel.
Commence tiling before testing the mat.
Switch on the installed mat until 8 days after fitting to allow
the tile adhesive to dry completely.
Install the mat in temperatures less than +5°C.
Bend the heating cable under 25mm radius.
Use the heating system to dry out levelling compound or
adhesive.
Tape over the end cap or manufactured joint.
Attempt a DIY repair if you damage the heater. Contact
Warmup on 0845 345 2288. If you accidentally damage a
the heating mat BEFORE tiling,under the Warmup Safetynet
guarantee you may return the damaged heater to Warmup,
who will replace the heater FREE OF CHARGE. See details of
the safety net warranty at the back of the manual.
DO
DON’T
Do’s and Don’ts
3
150W/m2 - Standard rooms
Ideal for quick installations in regular-shaped rooms, these mats can be laid straight onto Plywood or concrete bases. They can
provide primary heating in well insulated areas and secondary heating in other circumstances. Warmup always recommend
overboarding concrete/wooden bases with insulation boards (10mm standard) to improve performance.
200W/m2 - High Heat Loss rooms e.g. conservatory
200W/m² system is best suited for installation in rooms with higher than normal heat-loss or areas e.g. a conservatory where rapid
heat-up is required. The 200W/m2 system is capable of providing primary heating in almost any situation providing the sub-floor
is reasonably *insulated.
*Always ensure that a heat loss calculation has been carried out and heating requirements have been met if you are using the
undertile heating system as a primary source of heating. Warmup always recommend overboarding concrete/wooden bases with
insulation boards (10mm standard) to improve performance.
How to select the correct heater or heater combination
Calculate the area of the floor to be heated. This is the total floor area minus any permanent fixtures.
Length x width = m2
Select the heating mat or combination of mats closest in size to the area you want to heat. See page 7 for the full range of
heater sizes.
Remember
• Heaters cannot overlap
• Heaters must be connected in parallel
• A single thermostat can control loads up to 16 Amps.
Selecting the Correct Heater
4
What you need for installation
Components included in your Warmup PVC kit :
• Warmup PVC Mat
• Installation Manual
Additional components needed as part of your Warmup
heating installation:
• A Warmup® Thermostat with floor sensor.
NOTE: Only Warmup® Thermostats should be used.
• 30mA Residual Current Device (RCD), required as part of
all installations
• Digital Multi-meter required for testing the resistance of
the mat and floor sensor
• Electrical housing, back boxes and junction boxes
(Back box for the thermostat must be at least 35mm
deep)
• Electrical trunking/conduit for housing the power leads
• Duct Tape (to secure the floor sensor and loose wires)
• Scissors for cutting the fibreglass mesh
• Gloves
• Warmup® Insulation Boards
If the Warmup® underfloor heating mat is to be used
as a primary source of heating you will need to ensure
that you have adequate thermal insulation. A heat loss
calculation MUST be carried out to determine whether or
not the heaters will provide enough heat for your room.
Floor Coverings
This installation manual gives instruction for installation of the Warmup underoor heating mat under ceramic, quarry or natural
stone tiles. The maximum thermal resistance of the oor must not exceed 0.15 [m²K / W].
Other Floor Coverings
It is possible to install the heating element under oor nishes such as wood or vinyl by applying a self levelling compound
over the heating mat .You must ensure that all heating cables are completely covered with a minimum of 10mm self levelling
compound. It is important that the levelling compound is suitable for use with underoor heating.
Note: Delicate oor nishes such as wood or vinyl have a maximum oor surface temperature of 27°C. This temperature must
NOT be exceeded.
Please contact Warmup for further advice if you wish to install the underoor heating mat under any oor nishes other than
ceramic, quarry or natural stone tiles.
As with all electrical projects all mains electrical connections must be
undertaken by a certified electrician. All work must conform to current
IEE Wiring Regulations. The Underfloor heating must be controlled via
a floor sensor thermostat at all times.
Installing a Residual Current Device (RCD)
The Heating Mats must be wired via an 30mA RCD. You must install
a dedicated RCD if one is not already present. You may wish to use a
fused spur/RCD. No more than 4.8kW of heating may be connected to
a single 30mA RCD.
NOTE: It is possible to run the heater from an existing circuit. Consult
a certified electrician to determine whether or not the circuit can
handle the load and if it is RCD protected.
Installing Electrical Boxes and Trunking
You will require a deep (35-40mm) back box for the thermostat. If you
are installing more than two heaters, a junction box will be required.
The wiring from the heater to the thermostat should be protected by
conduit or plastic trunking.
Connecting the Thermostat
The thermostat must be connected to the mains electrical supply via
a double pole isolator fused spur or RCD that has a contact separation
in all poles providing full disconnection under over-voltage category
III conditions . The thermostat should be installed within the room to be heated. In most bathroom installations the thermostat
cannot be located within the bathroom itself as the thermostat is IP20 rated and must be located outside of Zone 2. In such
cases the thermostat must be tted to the outside of an internal wall of the bathroom, as close to the under oor installation as
possible. Once the electrical connections have been made and the system has been tested, the electrician must complete the
control card at the back of this installation manual. As per BS7671:2008 this information must be displayed at or near to the
consumer unit.
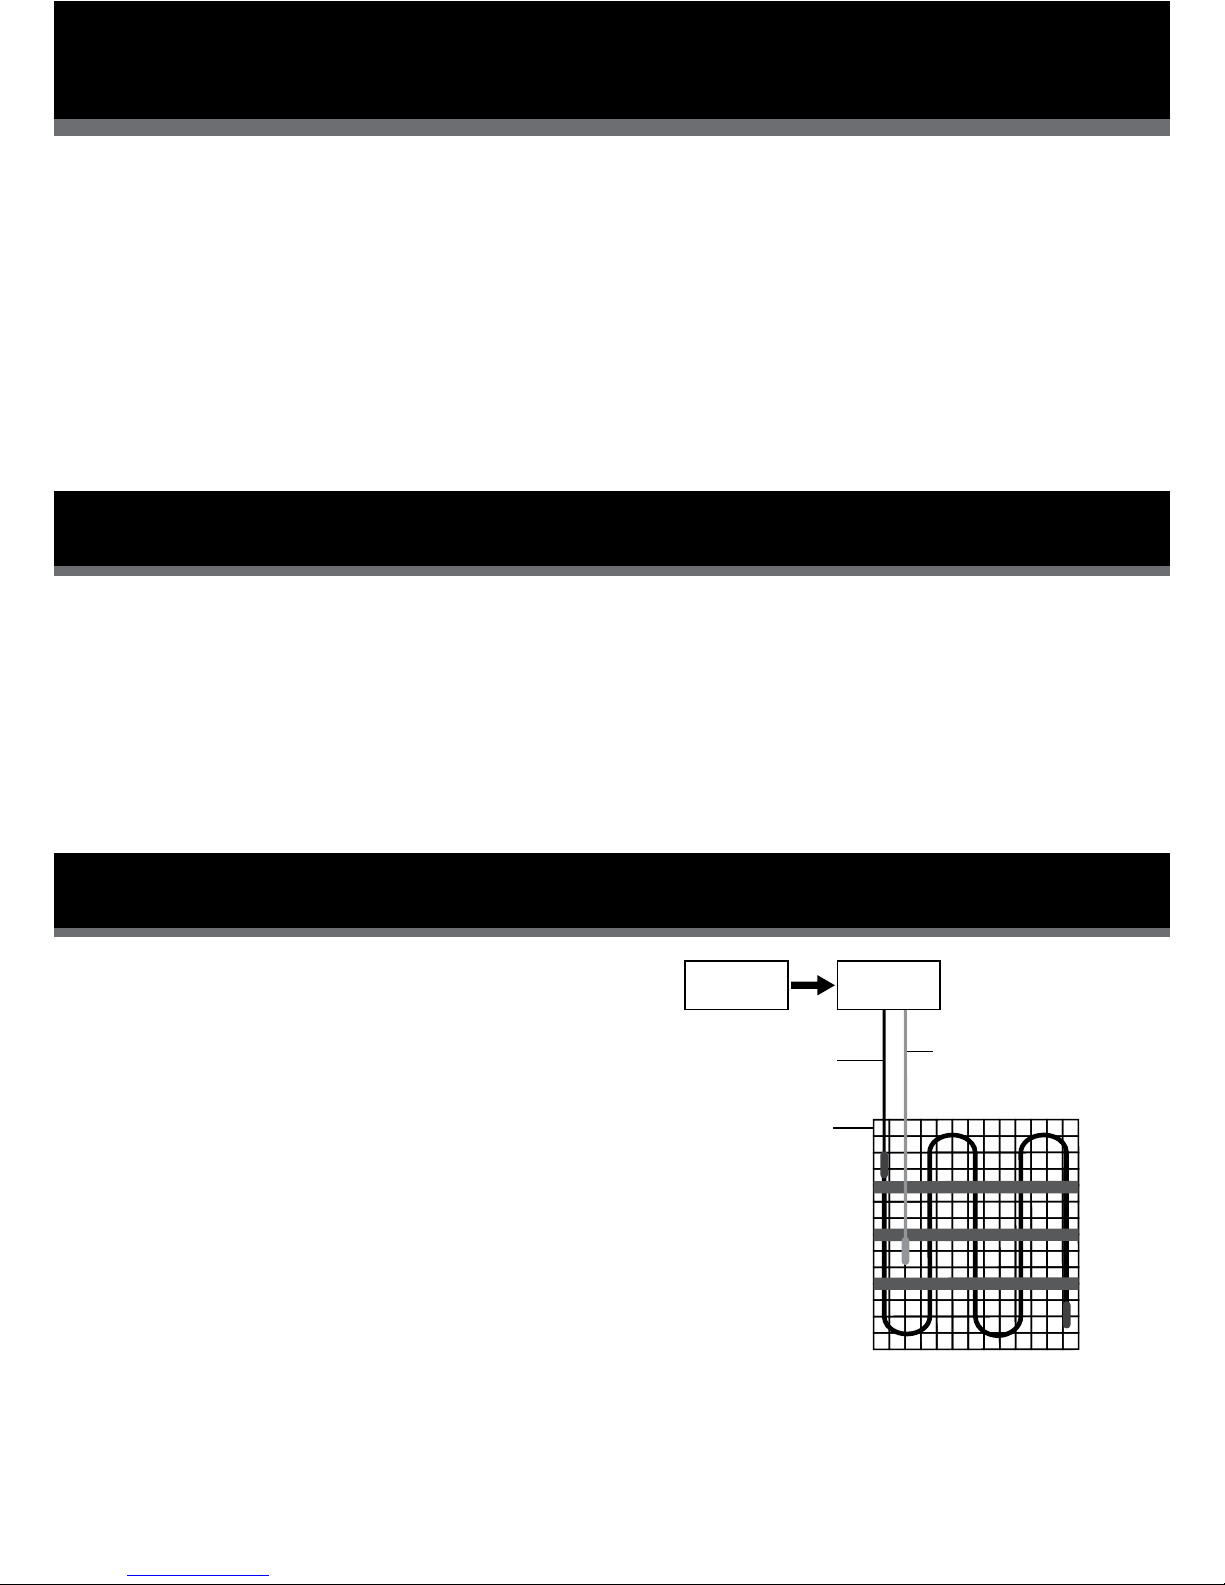
Safety - electrical considerations
Power supply via
fused spur /RCD
.
Warmup
Thermostat
Warmup
heating mat
Floor Sensor
Power Lead
(coldtail)
NOTE:
Always run the power
supply cable and oor
sensor cable in
separate conduit /trunking
 Loading...