

Warmup DS-8C Installation Instructions Manual
™
The w
orld’s best-selling electric floor heating brand
™
The w
orld’s best-selling electric floor heating brand
WARMUP INC.
USA: us@warmup.com
Tel.: 1-888-927-6333
www.warmup.com
CANADA: ca@warmup.com
Tel.: 1-888-592-7687
www.warmup.ca
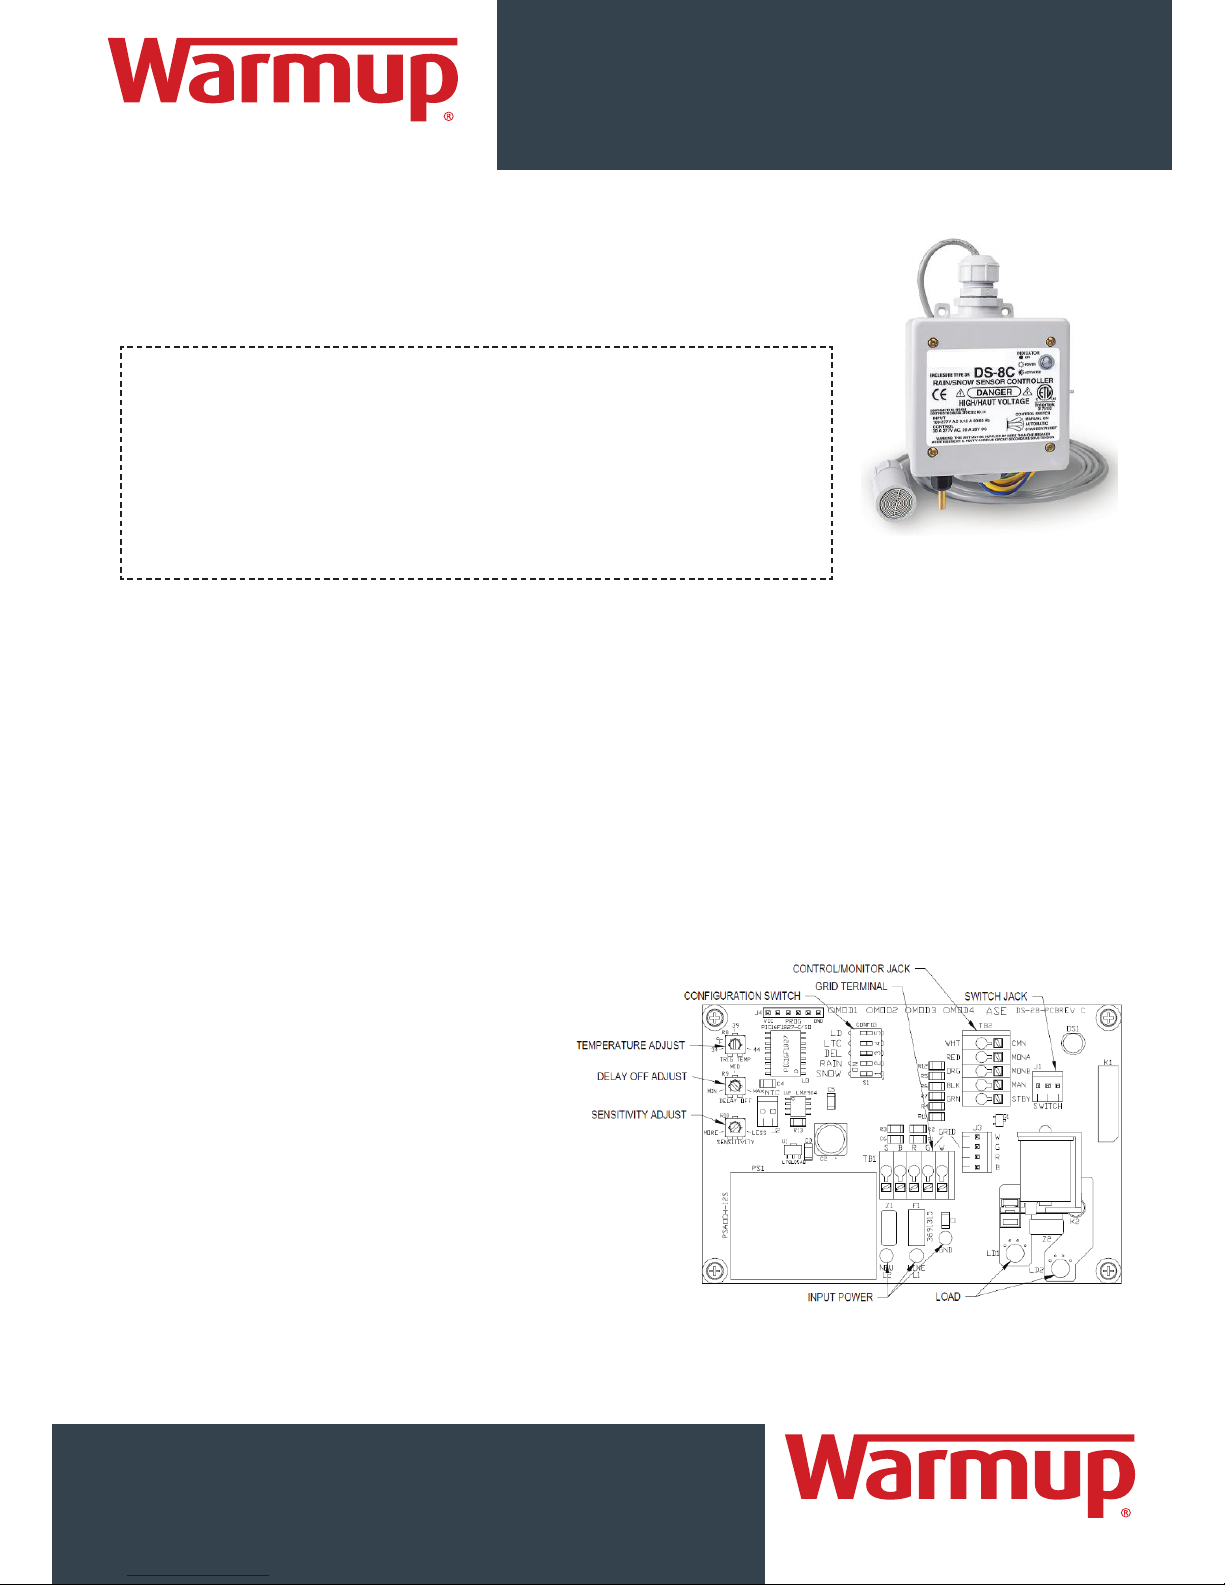
DS-8C RAIN/SNOW SENSOR CONTROLLER
INSTALLATION INSTRUCTIONS
CAUTION: Read all instructions carefully before installation.
Save this Installation Manual for future reference.
GENERAL SAFETY INSTRUCTIONS
1. THIS UNIT SHOULD BE INSTALLED, OPENED AND REPAIRED BY QUALIFIED
PERSONNEL ONLY!
2. To avoid shock hazard do not open the front cover with power
connected to the DS-8C or any controlled equipment.
SELECTING A MOUNTING LOCATION FOR THE DS-8C
The small corded device with the interleaved grid is the remote precipitation or "moisture" sensor.
The brass cylinder protruding from the bottom of the DS-8C enclosure is the temperature sensor.
For reliable rain and snow detection the moisture sensor must be exposed to a clear view of the sky.
Reference Page 7 "Moisture Sensor Mounting & Termination" for guidance in mounting the DS-8C moisture
sensor. For proper temperature detection the DS-8C enclosure must be mounted outdoors, away from furnace
vents, dryer vents, and other sources of heat. Note that, when powered, the DS-8C moisture grid will always
remain hot. This is normal. This allows the sensor to continuously melt/evaporate both rain and snow from
the grid. The DS-8C enclosure can be mounted by screwing the base conduit hub onto an appropriate size
free-standing conduit or by using the mounting holes in each corner of the enclosure.
DO NOT DRILL HOLES THROUGH THE ENCLOSURE FOR MOUNTING!
This can allow water into the enclosure causing
a potential shock hazard. It is recommended
that a weatherproof junction box be mounted
below the DS-8C for termination of the power
and load pigtails to the building wiring.
Use Care When Replacing the Front Cover.
Do Not Pinch the Gasket or Overtighten the
Screws.
ALWAYS FOLLOW LOCAL AND NATIONAL ELECTRICAL CODES.
™
The w
orld’s best-selling electric floor heating brand
WARMUP INC.
USA: us@warmup.com
Tel.: 1-888-927-6333
www.warmup.com
CANADA: ca@warmup.com
Tel.: 1-888-592-7687
www.warmup.ca
™
The w
orld’s best-selling electric floor heating brand
DS-8C RAIN/SNOW SENSOR CONTROLLER
INSTALLATION INSTRUCTIONS
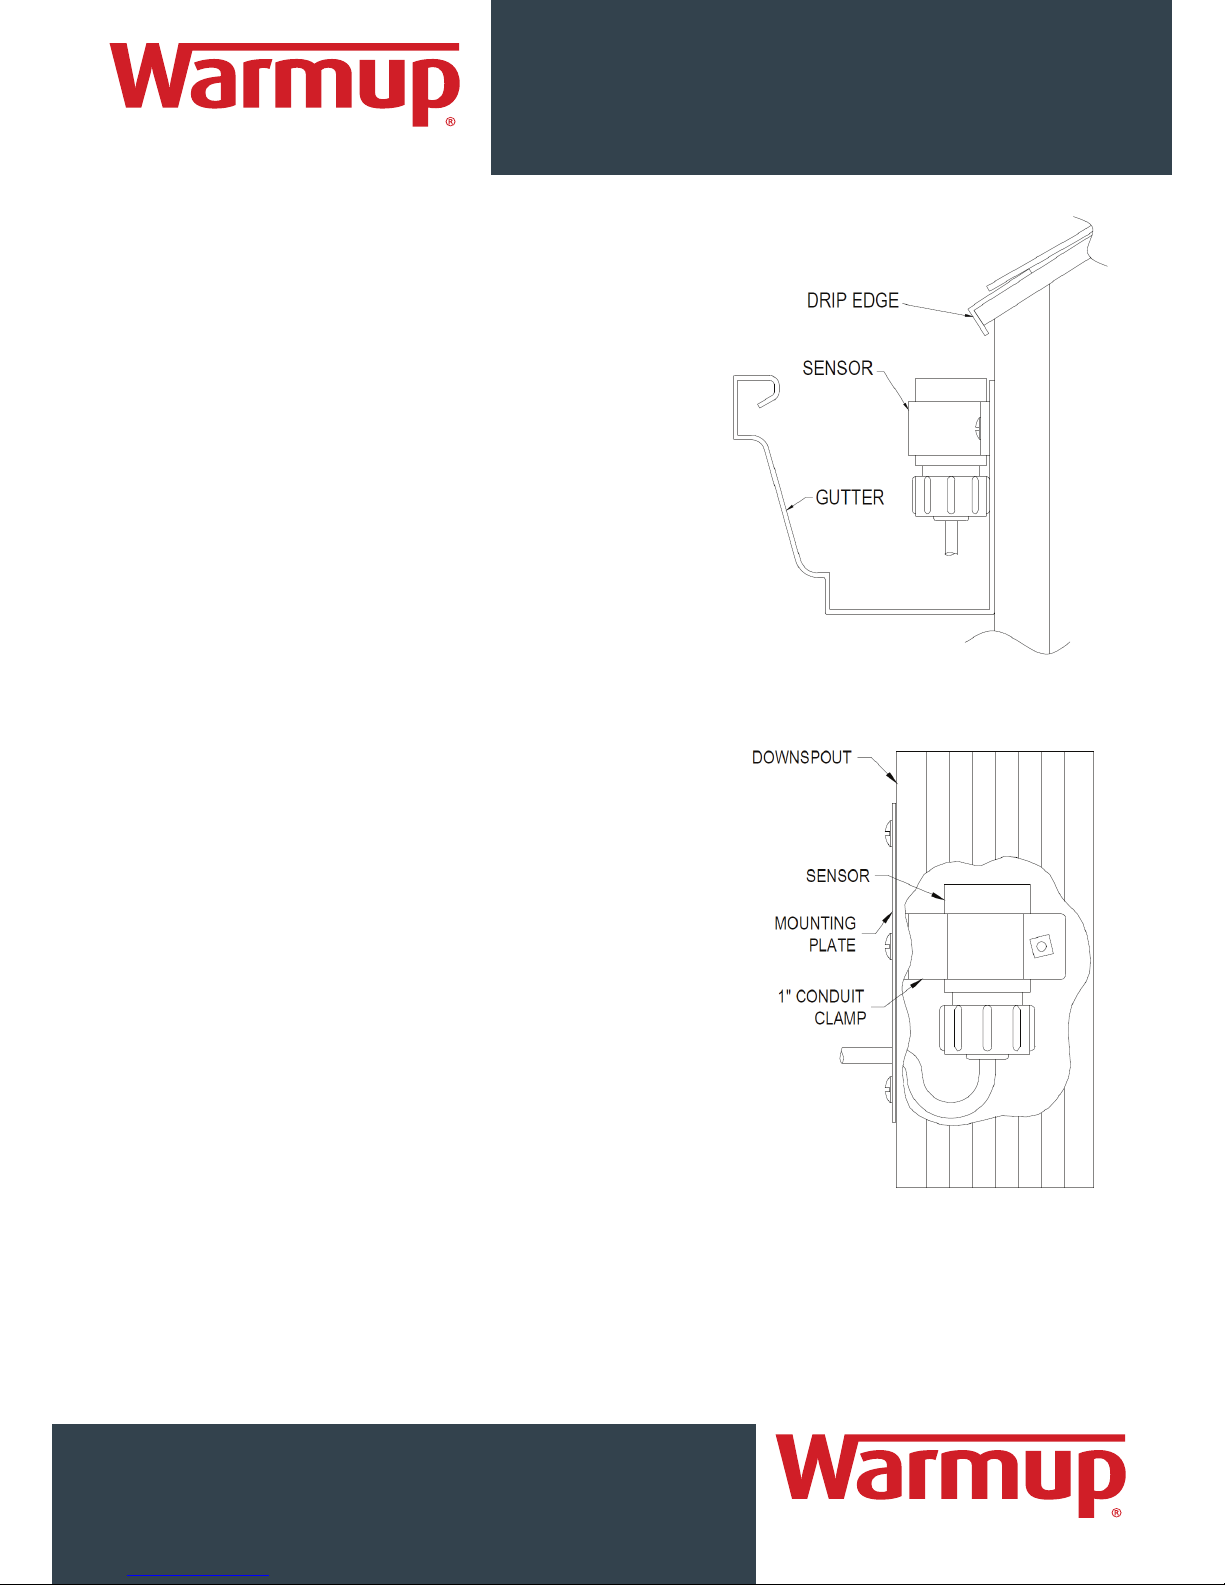
MOISTURE SENSOR MOUNTING & TERMINATION
The DS-8C enclosure and moisture sensor must be mounted
outdoors. The remote DS-8C moisture sensor may be mounted
in a number of ways depending on the application.
The unit operates at low voltage and can withstand immersion
in water. For roof and gutter deicing applications the sensor
head may be mounted in the gutter against the fascia board
with a 1” “C”-style conduit clamp. Allow part of the sensor grid
to be exposed to snowfall. This allows the sensor to initially
trigger when snow starts falling and remain triggered as long as
the roof/gutter heater continues to drip melted snow buildup
from the roof edge when temperatures are below freezing.
Detection can also be achieved by installing the sensor head
near the top of the downspout using a 1” conduit hanger and
mounting plate. As water is melted in the gutter it will run
down the downspout, hitting and retriggering the sensor.
Ten feet of cable is pre-terminated to the sensor head.
This cable may be shortened on the controller end as required.
Do not add additional cable to the interface. Erratic operation
may result.
Strip the outer insulation and shield from the cable and terminate
each conductor following the color code printed on the circuit
board. The bare drain wire should be installed into the terminal
marked “S” for Shield. Two cable ties are also included.
Wrap these ties securely around the cable in the enclosure to
provide additional strain relief between the flexible enclosure
gland and the free end of the cable.
™
The w
orld’s best-selling electric floor heating brand
™
The w
orld’s best-selling electric floor heating brand
WARMUP INC.
USA: us@warmup.com
Tel.: 1-888-927-6333
www.warmup.com
CANADA: ca@warmup.com
Tel.: 1-888-592-7687
www.warmup.ca
DS-8C RAIN/SNOW SENSOR CONTROLLER
INSTALLATION INSTRUCTIONS
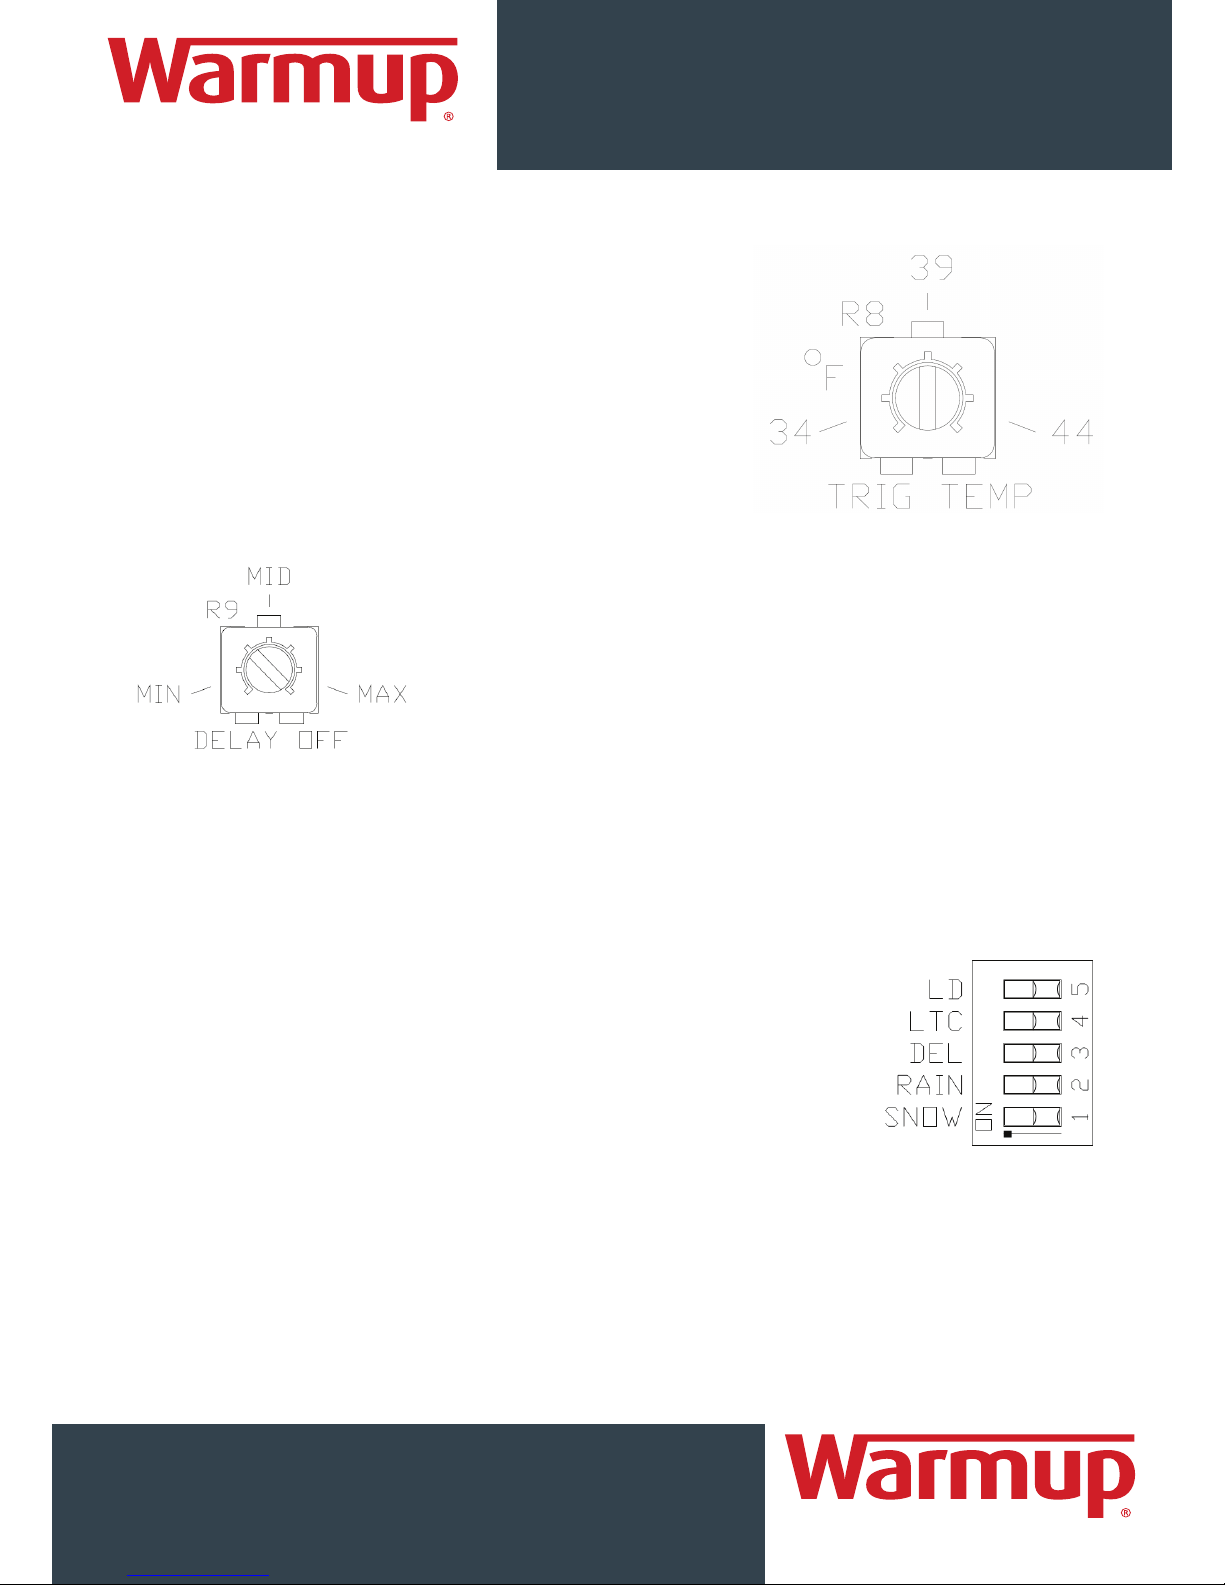
SETTING THE CONFIGURATION SWITCHES AND ADJUSTMENTS
The following paragraphs and table outline the operating modes
for the DS-8C and explain the functions of the adjustments. Trigger
temp (TT) is adjustable from 34°F-44°F (1°C-6°C) using the TRIG
TEMP control.
When ambient air temperature (AT) is below this setting precipitation
is assumed to be snow. When above this setting, precipitation is
assumed to be rain.
These are just some of the possible wiring schemes that can be
used to connect the DS-8C to your load for control.
Remember, these are only suggestions. You should always consult
a qualified electrician or inspector to assure conformance with
applicable local and national electrical codes!
The DEL configuration switch activates the Delay-Off drying cycle timer on
the DS- 8C. The timer allows the DS-8C to continue to operate and dry the
heated surface through evaporation once precipitation has stopped. The
drying cycle reduces the chance of moisture left behind refreezing into ice.
This timer is restarted by each sensor trigger. Therefore, the DS-8C will
continue to operate as long as it is triggered, then for the Delay-Off period
once the trigger clears.
All “sensor” modes (DEL Off) provide a 2 minute Delay-Off time. When
in “controller” mode (DEL On) the Long Delay (LD) configuration switch
determines the time span of the drying cycle. The Delay-Off time can be
adjusted from 30- 90 minutes (LD Off) or 2-6 hours (LD On) using the
The Low Temperature Cutoff (LTC) option is typically used on snow melting
systems with limited output capacity where melting cannot be maintained at
very low temperature. If selected, the snow sensor will clear a trigger below
5°F (-15°C) even if snow is still falling. It will resume normal operation above
9°F (-13°C). However, the sensor will remember if it was triggered before the
drop below 5°F or if snow was detected during the cold period. If so, the sensor
will execute one Delay-Off cycle when the temperature rises above 9°F in
order to melt any snow left behind during the cold period. This is referred to
as RECOVER mode.
Care should be exercised in using this mode as the potential exists for ice to be formed on the melting
surface.
 Loading...