

WarmPool DC55, DC75, DC95, DC115, EASYPAC EZ35 Installation & Operation Manual
...
~ 1 ~
Installation and operation manual DC

~ 2 ~
Installation and operation manual DC
1. Warning
First and foremost, check the condition of your heat pump as soon as you receive it,
write any reservations you have about its state on the delivery note if you have any
doubts or a problem and send a registered letter to your installer or directly to the
manufacturer within 48 hours. After this period, no claim will be accepted.
1.1 Important information
To properly install your heat pump, read this manual carefully. We will not be liable
for any injury to persons or damage to the machine due to any errors that might occur
during installation.
- The installation of this heat pump must be carried out by qualified personnel,
- This heat pump meets the manufacturing and communication standards defined
by FPP's DTP10 and NFPAC,
- The maintenance of this heat pump must be carried out as set out in this manual,
- Only use original spare parts supplied by the manufacturer,
- Failure to follow these instructions or the information in this manual will void the
heat pump's guarantee.
2. Your heat pump
2.1 Main features
Your heat pump must not be used for any purpose other than to HEAT your pool. Its
choice was determined following a personalized heat budget and it cannot be used for
other pools until a new heat budget has been carried out.
Your heat pump is one of the most efficient and environmentally friendly heaters,
using R32 gas.
~ 3 ~
Installation and operation manual DC
* Test carried out at an air temperature of 27°C, with the same temperature difference and water
as at 15°C.
** Test carried out at an air temperature of 15°C, with an inlet water temperature of 26°C and an
outlet water temperature of 28°C to define the water flow, heating capacity and power
consumption, according to FPP standards.
*** Test carried out at an air temperature of 35°C, with an inlet water temperature of 30°C and
an outlet water temperature of 29°C.
2.2 Technical characteristics
MODELE DC55
DC75
DC95
DC115
Pool size
Maxi
55m³
75m³
95m³
115m³
Heating capacity *
kW
1.3~ 7.93
1.75~ 10.90
3.21~15.81
3.21~ 17.05
Power consumption *
kW
0.12~ 1.37
0.16~ 1.96
0.31~ 3.03
0.32~ 3.98
COP * 11.24~5.79
10.88~ 5.56
10.3~5.22
10.01~4.82
Rated current
A
0.9~6.0
1.2~8.6
1.5~13.3
2.0~17.5
Heating capacity **
kW
0.96 ~ 6.46
1.52~ 8.21
2.3~ 12.14
2.07~ 15.20
Power consumption **
kW
0.19~ 1.32
0.25~ 1.84
0.37~ 2.80
0.38~ 3.60
Cooling capacity ***
kW
3.72
4.3
6.2
7.69
Cooling power
consumption ***
kW
1.45
1.78
3.3
2.66
EER *** 2.57
2.43
1.86
2.89
Casing material
ASA
ASA
ASA
ASA
Controller
Touch LCD display
Gas
R32
R32
R32
R32
Heat exchanger
Titanium twist
Titanium twist
Titanium twist
Titanium twist
Compressor
Rotary Mitsubishi
Rotary Mitsubishi
Rotary Mitsubishi
Rotary Mitsubishi
Number of fans
1 1 1
1
Fan rotation speed (PRM)
T/mn
400-750
400-800
300-750
400-750
Mode
Cooling / Heating /
Auto
Cooling / Heating /
Auto
Cooling / Heating /
Auto
Cooling / Heating /
Auto
Operating range
-5℃~43℃
-5℃~43℃
-5℃~43℃
-5℃~43℃
Noise level at 1 m
dB(A)
41~50
42~51
42~55
45~56
Power supply
Mono 220-
240V/50HZ
Mono 220-
240V/50HZ
Mono 220-
240V/50HZ
Mono 220-
240V/50HZ
Throttling EEV
EEV
EEV
EEV
Water volume
m3/H
2.7
3.5
5.2
5.6
Unit dimension
mm
1000/418/605
1000/418/605
1046/453/767
1160/490/862
Carton dimension (l/L/h)
mm
1030/435/615
1030/435/615
1130/480/780
1210/510/880
Net weight / Gross weight
kg
47/58
51/62
66/79
74/88
All parts guarantee
3 ans
3 ans
3 ans
3 ans
~ 4 ~
Installation and operation manual DC
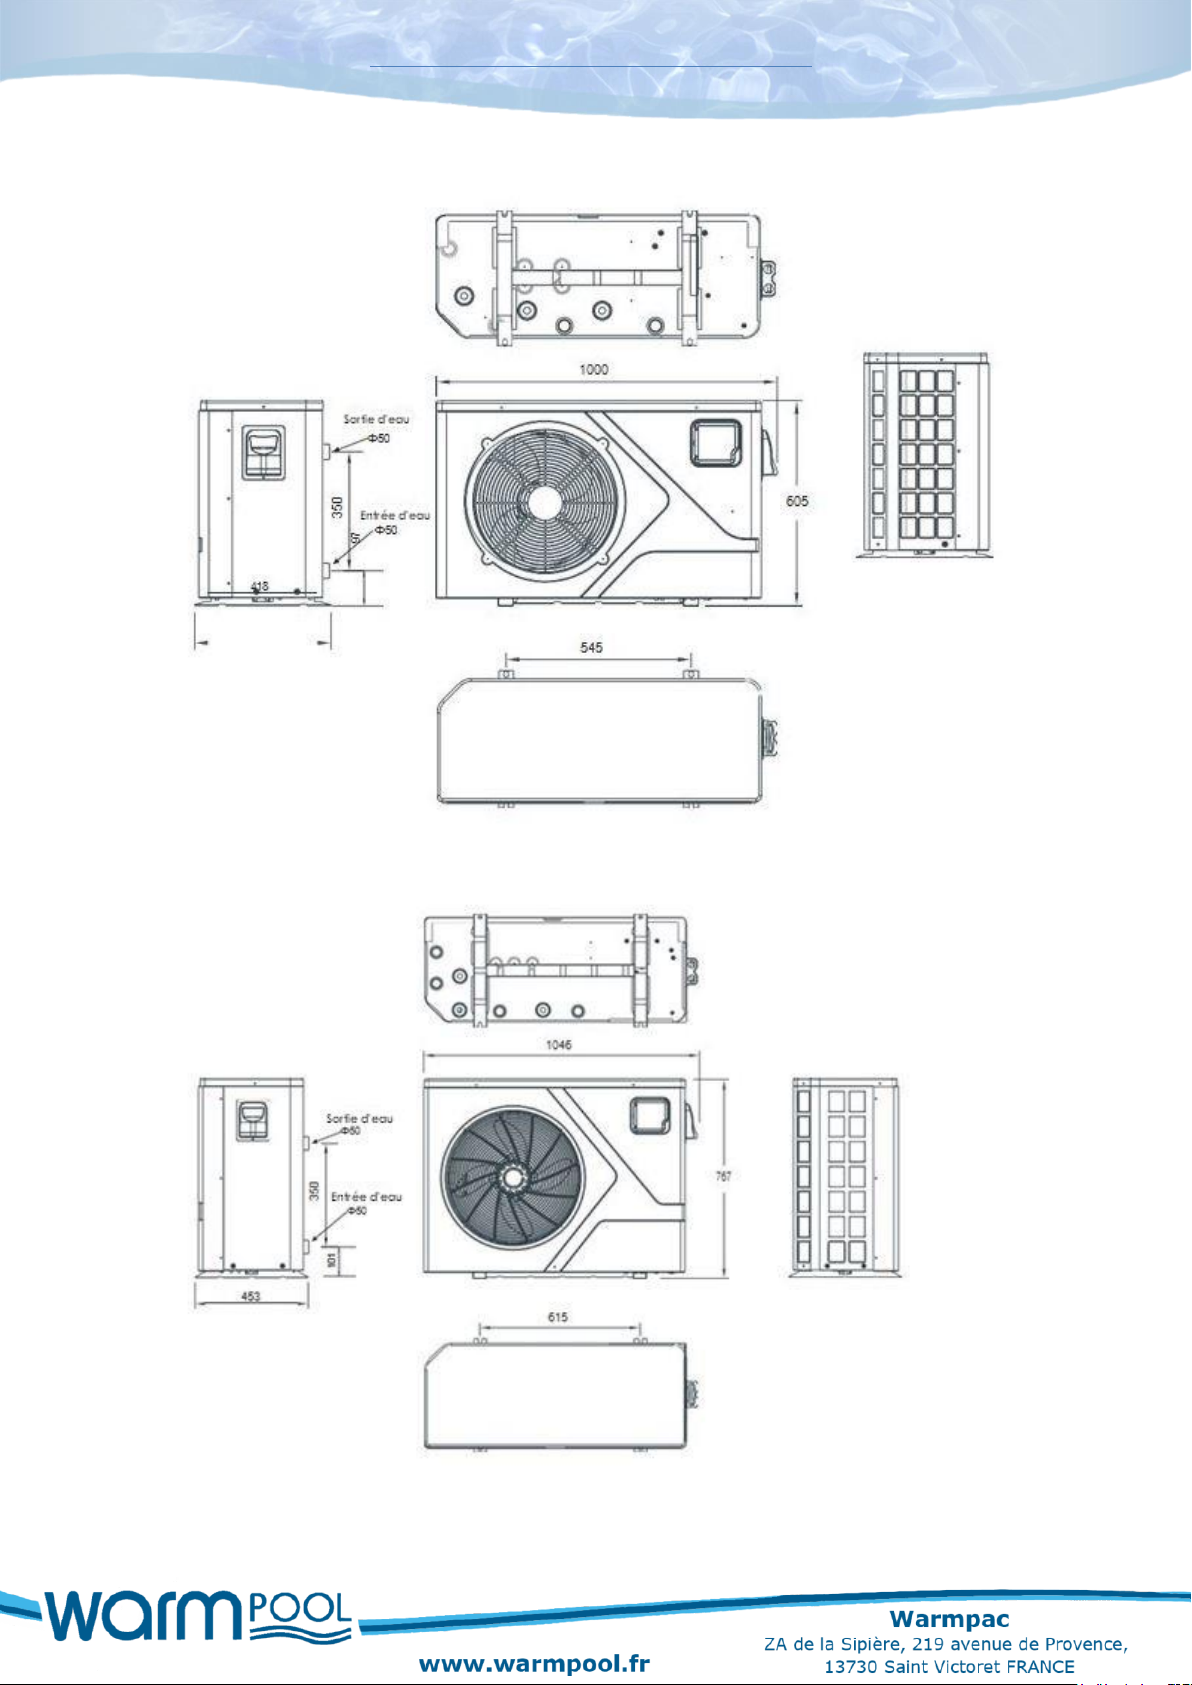
2.3 Dimension of swimming pool heat pump DC 55/75
2.4 Dimension of swimming pool heat pump DC 95
~ 5 ~
Installation and operation manual DC
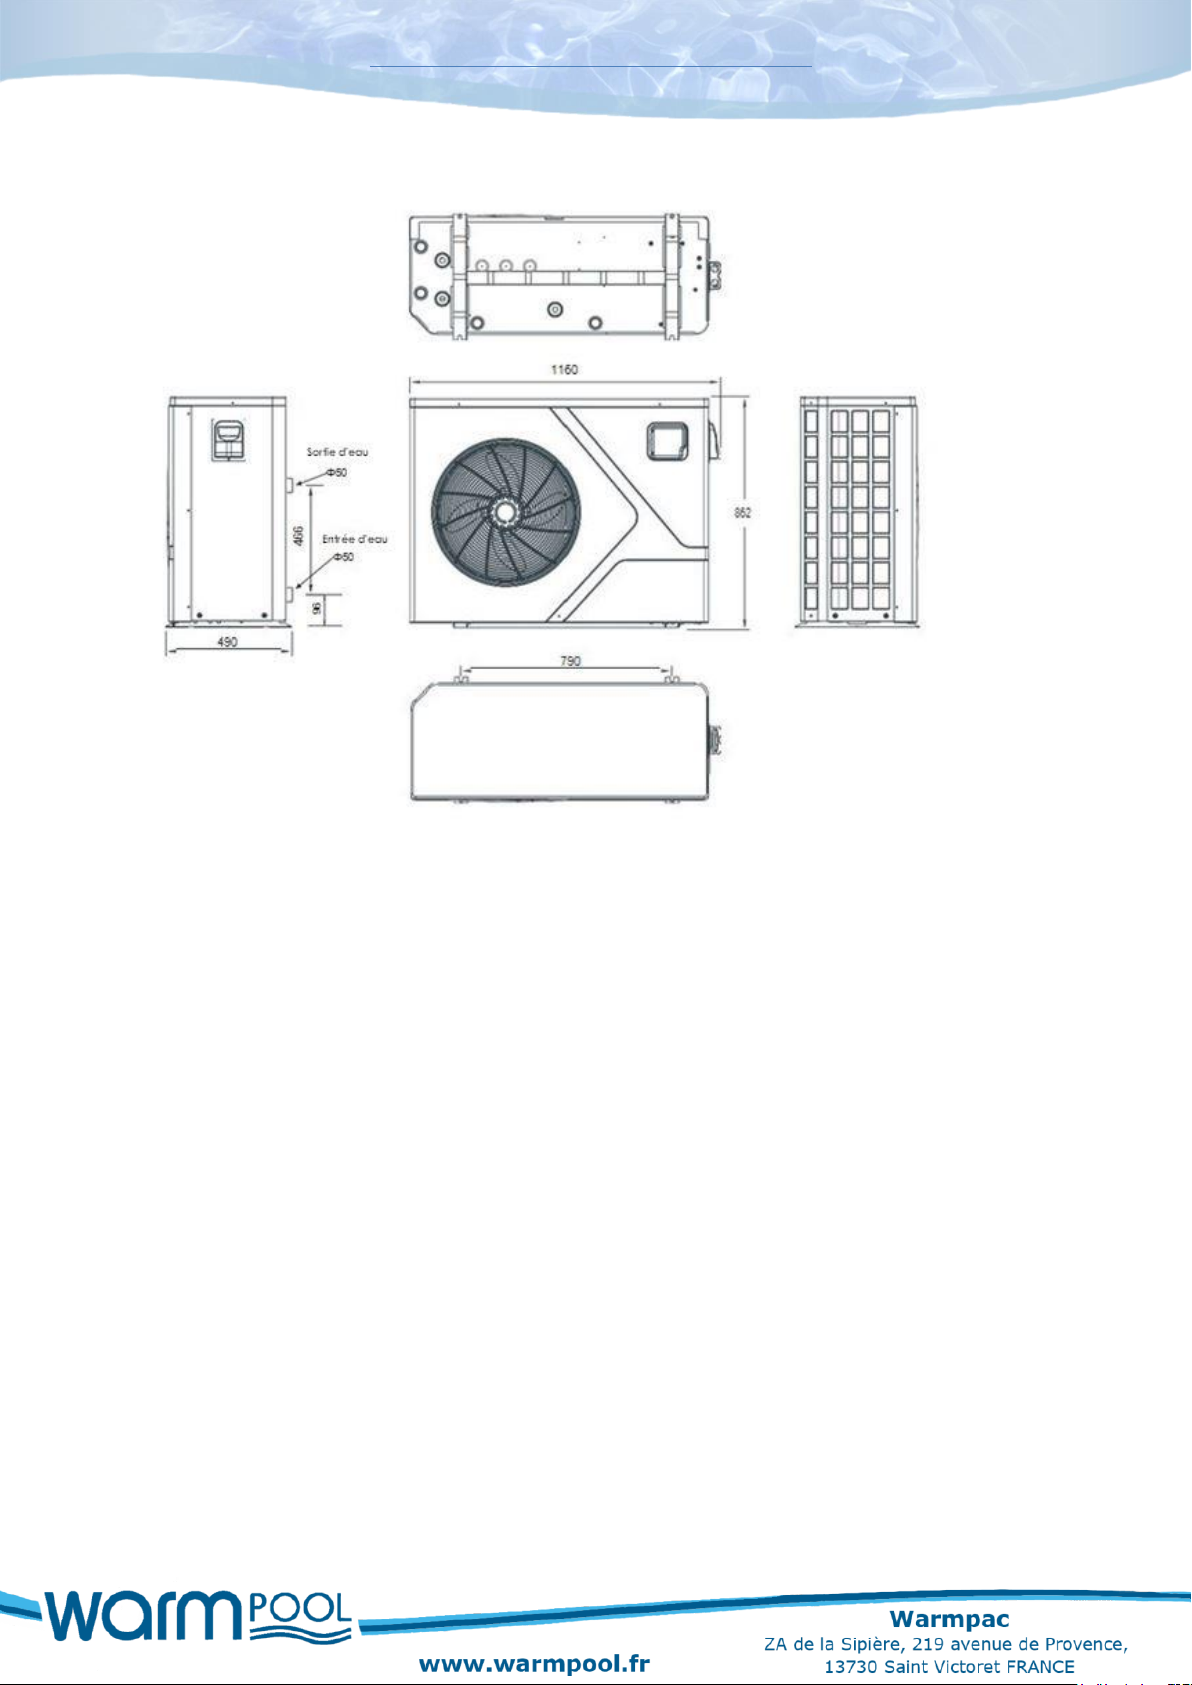
2.5 Dimension of swimming pool heat pump DC 115
3. Installation and connections
3.1 Installation
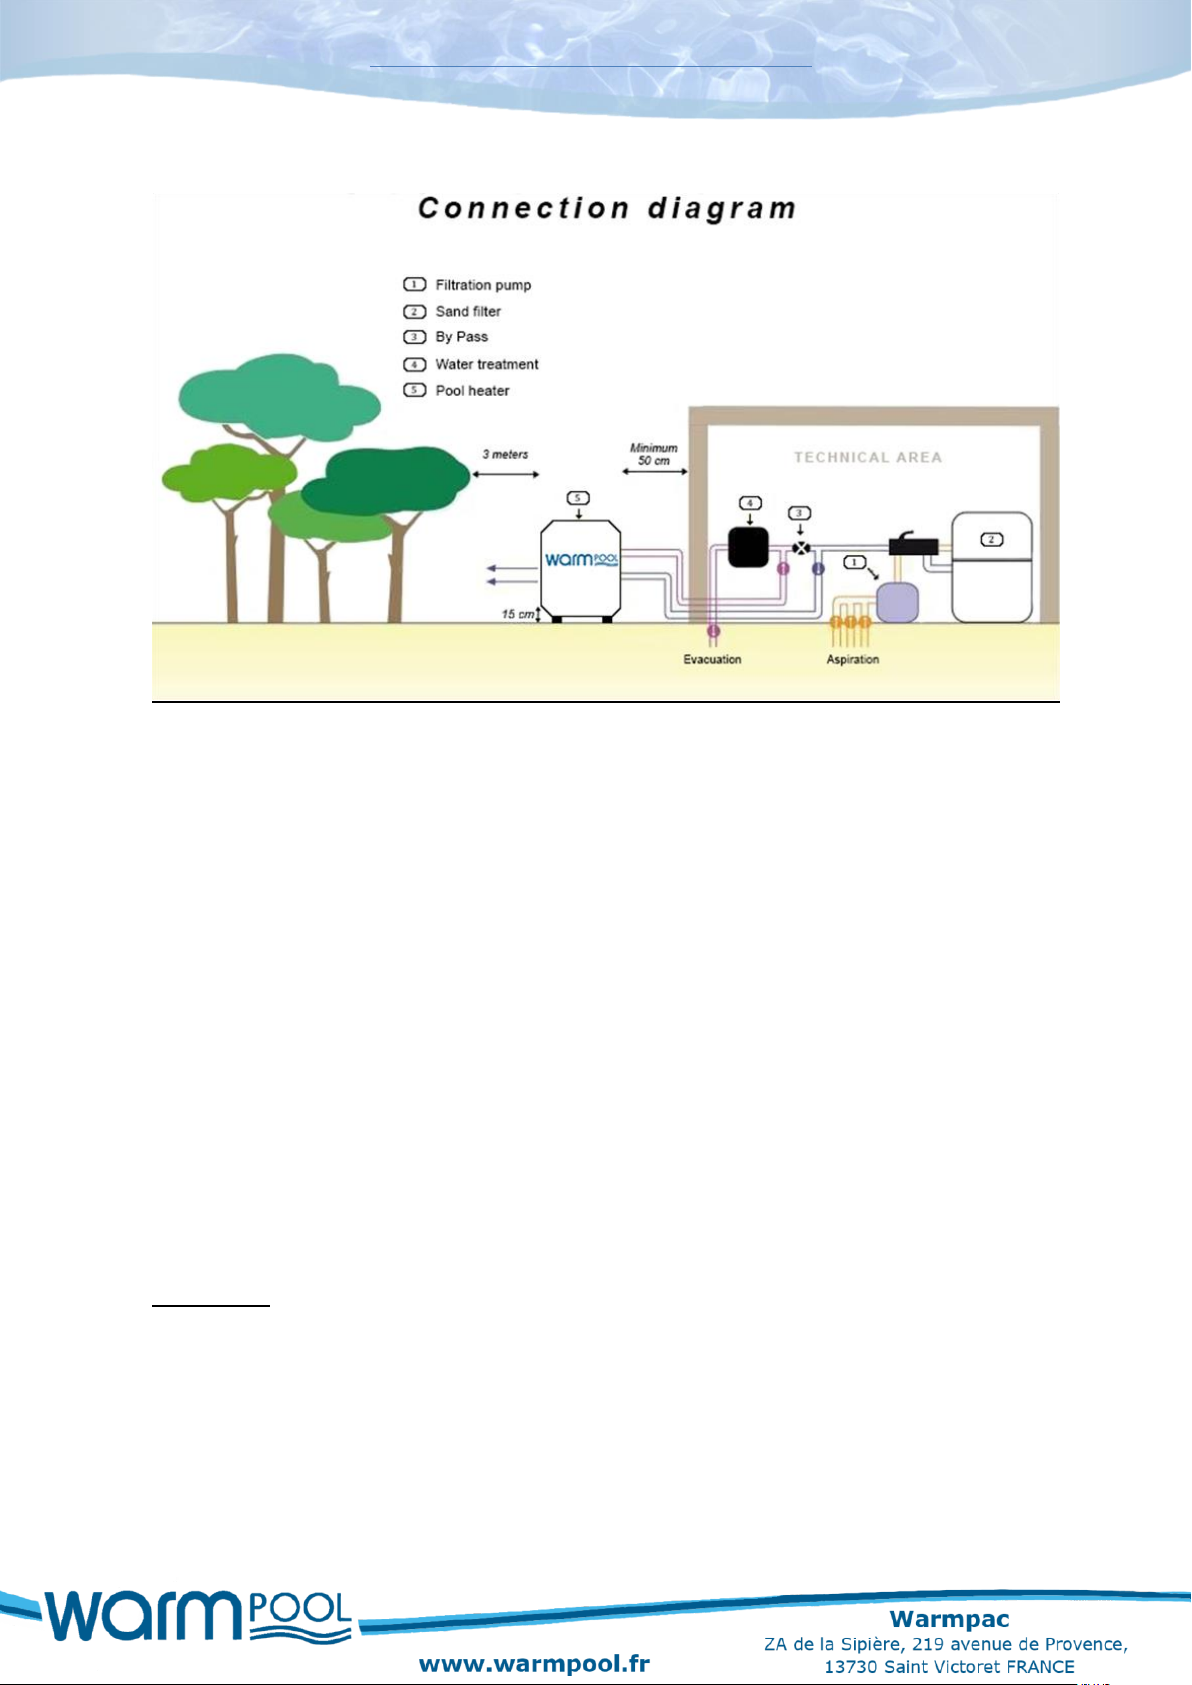
Your heat pump and your pool pump must be installed close to each other.
Your heat pump must be placed outdoors and must follow the minimum spacings shown on the connection diagram.
Your heat pump should be level and at least 15 cm above the ground. We recommend you use blocks and drain the condensation into a sump (which can be covered with gravel).
If any of these recommendations are not followed or are not applicable, please contact the manufacturer to make sure that the installation performed or to be performed will not affect the proper functioning of your heat pump.
Using your heat pump will necessarily create condensation (up to several liters of water per hour). This is not a leak.
~ 6 ~
Installation and operation manual DC
3.2 Hydraulic connection
Before carrying out any work, remember it is vital that all the valves are closed.
As you can see from the connection diagram, you need to install a BYPASS valve (if you do not already have one) between the filtration system and the water treatment system (or discharge).
Upstream of this BYPASS, an OUT pipe with a shut-off valve will be connected to the water inlet of the heat pump and a RETURN pipe with a shut-off valve will be connected to the water outlet of the heat pump.
Use the PVC connectors provided in the accessory kit to connect the hoses to the heat pump. On the pump side, fasten the supplied fittings using Teflon tape to ensure a good seal.
Important: Before filling the pump with water, we recommend washing/rinsing the filter.
 Loading...