

MCS400 WiFi/WLAN THERMOSTAT
1
2
3
4
°
C
MON TUE WED THU FRI SAT SUN
M
<
>
1
2
3
4
°
C
MON TUE WED THU FRI SAT SUN
M
<
>
1
2
3
4
°
C
MON TUE WED THU FRI SAT SUN
M
<
>
1
°
C
WED
M
<
>
AM PM
2
3
3
4
5
6
9
9
10
13
14
14
17
22
22
23
2
3
3
4
5
6
9
9
10
13
14
14
17
22
22
23
2
3
3
4
5
6
9
9
10
13
14
14
17
22
22
23
warm-on GmbH i-Park Tauberfranken 18 D-97922 Lauda-Königshofen, Germany
Tel.: +49 (0)9343-9809061 Email: info@warm-on.com
INHALT
BEDIENELEMENTE UND DISPLAYSTRUKTUR
VORSICHTSMASSNAHMEN
MONTAGE
THERMOSTAT-INSTALLATION BEI MEHREREN HEIZMATTEN
EINSTELLEN VON TAG UND UHRZEIT
PARAMETER-EINSTELLUNGEN
ANZEIGEN VON TEMPERATUREN
BESCHREIBUNG DES BETRIEBSMODUS
AUSWAHL BETRIEBSMODUS
WERKSEINSTELLUNGEN
ALARMHINWEISE
HANDY APP
SMARTPHONE „HAUPTMENÜ“ BILDSCHIRMAUFBAU
TECHNISCHE DATEN, BEANSTANDUNGEN
GARANTIE
GARANTIESCHEIN
INSTALLATIONSANLEITUNG
DE
INSTALLATION INSTRUCTIONS
EN
CONTENT
CONTROLS AND SETTINGS
SAFETY WARNINGS
INSTALLATION
THERMOSTAT INSTALLATION FOR TWO OR MORE
HEATING MATS
SET DAY AND TIME
PARAMETER SETTINGS
TEMPERATURE INDICATION
OPERATION MODE DESCRIPTION
OPERATION MODE SELECTION
DEFAULT SETTINGS
ALARM INDICATION
SMARTPHONE APP
SMARTPHONE “MAIN MENU“ OVERVIEW
TECHNICAL DATA, CLAIMS
WARRANTY
ACCEPTANCE TEST CERTIFICATE
COMMANDES ET RÉGLAGES
MESURES DE SÉCURITÉ
INSTALLATION
INSTALLATION DU THERMOSTAT POUR DEUX OU
PLUSIEURS NATTES CHAUFFANTES
RÉGLAGES DU JOUR ET DE L‘HEURE
RÉGLAGE DE PARAMÈTRE
TEMPÉRATUR MESURÉE
DESCRIPTION DU MODE DE FONCTIONNEMENT
SÉLECTION DU MODE DE FONCTIONNEMENT
PARAMÈTRES PAR DÉFAUT
INDICATEURS D‘ALARME
APPLICATION POUR SMARTPHONE
SMARTPHONE „MENU PRINCIPAL“ ECRAN
CARACTÉRISTIQUES TECHNIQUES, RÉCLAMATIONS,
GARANTIE
CERTIFICAT DE GARANTIE
CONTENU
FR
INSTRUCTIONS D‘INSTALLATION
1
2
3
4
°
C
MON TUE WED THU FRI SAT SUN
M
<
>
AM PM
1
2
3
4
5
6
7
8
9
10
11
12
13
14
M
1
2
3
4
<
>
°
C
AM PM
1
2
3
4
5
6
7
8
9
10
11
12
13
14
MON
TUE
WED
THU
FRI
SAT
SUN
M
1
2
3
4
<
>
°
C
AM PM
1
2
3
4
5
6
7
8
9
10
11
12
13
14
MON
TUE
WED
THU
FRI
SAT
SUN
M
1
2
3
4
<
>
°
C
AM PM
1
2
3
4
5
6
7
8
9
10
11
12
13
14
MON
TUE
WED
THU
FRI
SAT
SUN
2
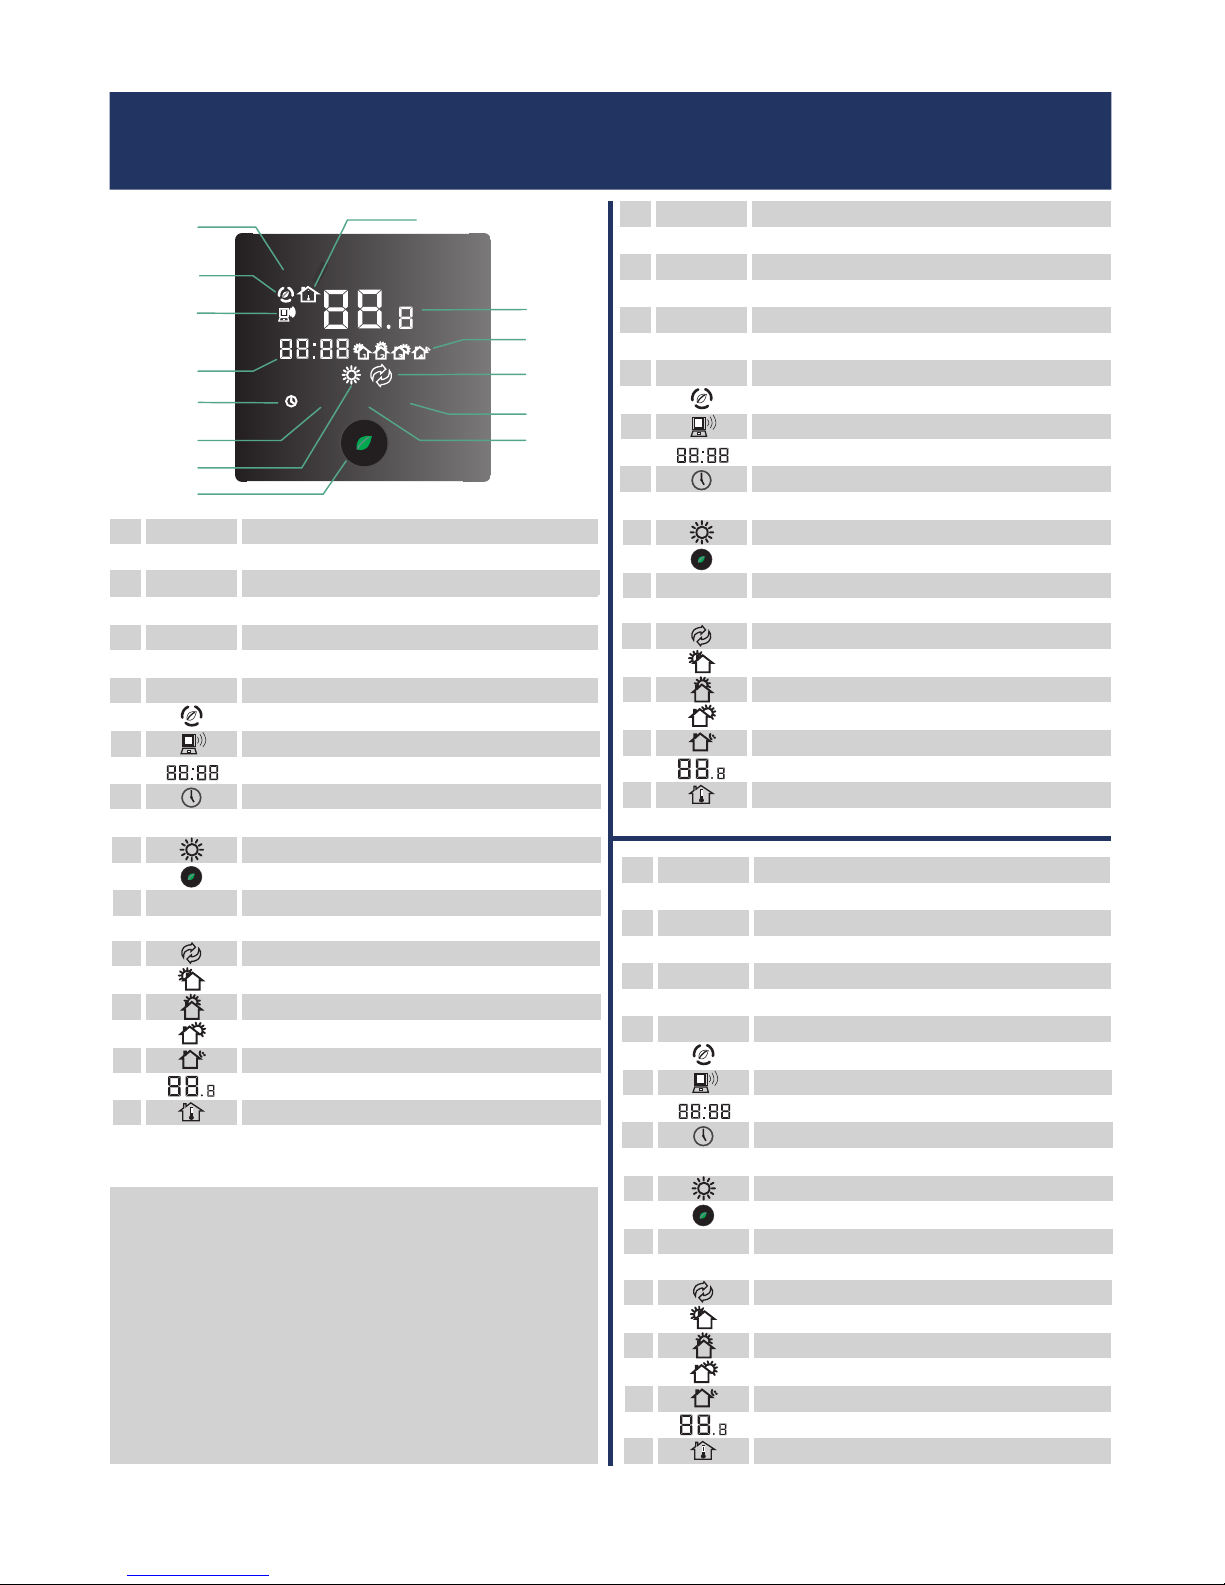
BEDIENELEMENTE UND DISPLAYSTRUKTUR
Montag
Dienstag
Mittwoch
Donnerstag
Freitag
Samstag
Sonntag
ECONOMY (+10...+21 °C)
WLAN Verbindung
Uhrzeit 12/24 Stunden
Programmbetrieb (+5...+35 °C)
zeigt Bodentemperatur / Parameter-Einstellung
Heizung AN
Thermostat und heizung EIN/AUS, Einstellungsmodus
verringert den entsprechenden Wert
erhöht den entsprechenden Wert
erscheint, wenn die Bodentemperatur angezeigt wird
Ereignis AUFWACHEN
Ereignis GEHEN
Ereignis KOMMEN
Ereignis SCHLAFEN GEHEN
Lu Temperatur
erscheint, wenn die Lutemperatur angezeigt wird
Infrarot-Annäherungssensor
Das Thermost erkennt ein menschliches Annähern in einem Abstand von
5 cm und schaltet dann automatisch die Hintergrundbeleuchtung ein.
Wenn sich der Mensch entfernt oder keine Änderung erfolgt ist, schaltet
das Display innerhalb von 20 Sekunden wieder in den Standby-Modus.
CONTROLS AND SETTINGS
Monday
Tuesday
Wednesday
Thursday
Friday
Saturday
Sunday
economy operation (+10...+21 °C)
WiFi connection
12/24 hour time
programm mode (+5...+35 °C)
show oor temperature / choose setting parameters
heating ON
thermostat and heating ON/OFF, parameter settings
decrease the values
increase the values
appears when oor temperature is shown
WAKE UP Event
LEAVING HOME Event
COMING HOME Event
GOING TO SLEEP Event
air temperature
appears when air temperature is shown
Infrared approaching sensor
The thermostat can detect a humans body approach when the distance
is within 5 cm and automatically turn on the display backlight. When
the human body leaves or no changes are made, the display will go into
standby within 20 seconds.
COMMANDES ET RÉGLAGES
Lundi
Mardi
Mercredi
Jeudi
Vendredi
Samedi
Dimanche
Mode économique
Connexion Wi
Systéme horaire sur 12/24 heures
Mode programmation (+5 °C à +35 °C)
Température du sol / réglages de paramètre
Chauage allumé
Thermostat et chauage marche/arrêt ; paramètre
diminue la valeur concernée
augmente la valeur concernée
Apparaît lorsque la température du sol est aichée
Évènement RÉVEIL
Évènement PARTIR
Évènement ARRIVER
Évènement COUCHER
Température de l‘air
Apparaît lorsque la température De l‘air est aichée
Infrarouge a la proche de la sonde
Le thermostat peut détecter un corps humain s‘approcher lorsque la
distance est à 5 cm et allume automatiquement le rétro-éclairage de
l‘écran. Lorsque le corps humain est parti ou aucun changement n‘est
eectué, l‘aichage se met en mode veille dans les 20 secondes.
1 2
MAC: F0FE6B922CAE
3
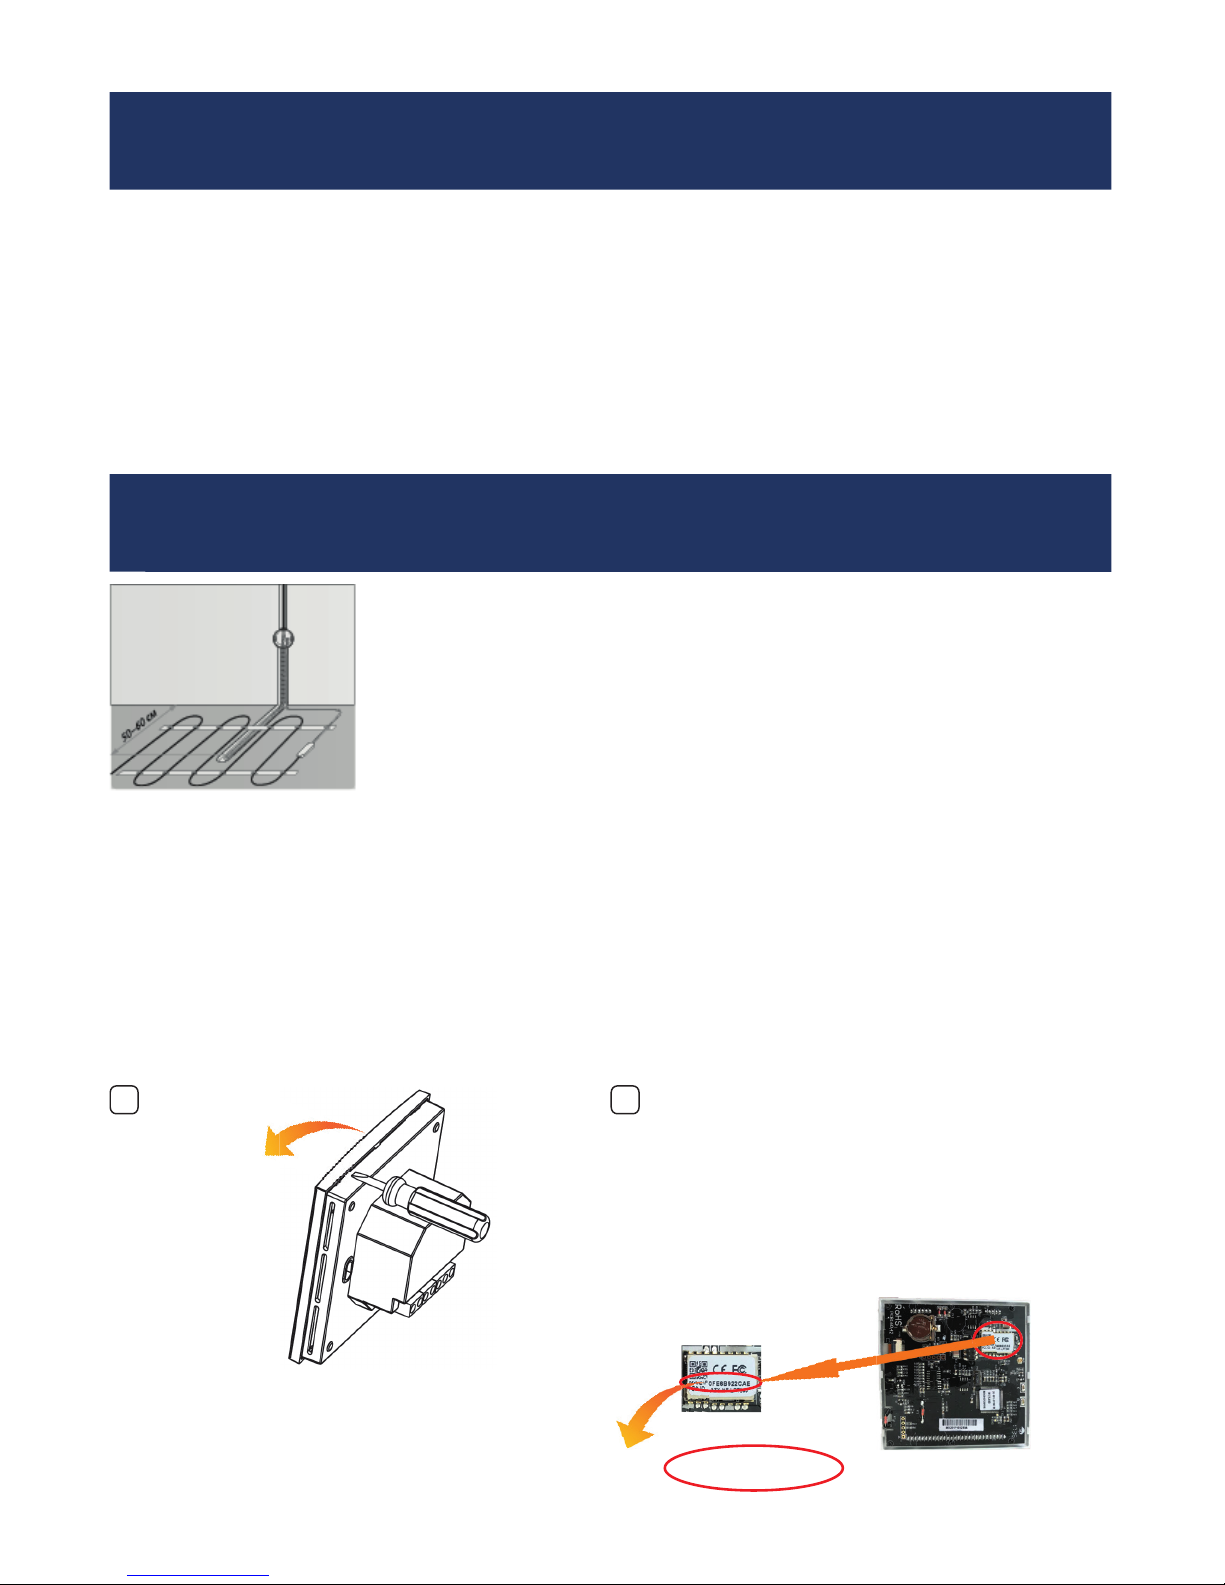
VORSICHTSMASSNAHMEN
Notieren Sie die MAC-Adresse des Thermostats auf dem
GARANTIESCHEIN. Diese nden Sie auf dem WiFi-Chip auf der
Rückseite des Displays.
MONTAGE
Bodenfühler fi xieren
Die Fühlerleitung des Thermostats muss in einem separaten Leerrohr nach EN 61386-1 verlegt werden.
Der Bodenfühler sollte in der Mitte von zwei Heizleitungen verlegt werden. Verlegen Sie den Kaltleiter
(Netzanschlussleitung) seitlich bis zur Anschlussdose und kreuzen Sie hierbei nicht den Heizleiter! Halten
Sie einen Mindestabstand von ca. 2 cm zu dem Heizleiter ein! Für das elektronische Thermostat sollte an der
ausgewählten Stelle eine handelsübliche Unterputzdose mit 230 V AC Netzanschlussleitung aus dem Hausnetz
vorhanden sein. Ein Fehlerstromschutzschalter (30 mA) ist vorzusehen. Stellen Sie während der Installation
des Wellrohrs (Ø16mm) und nochmals vor der Verlegung des Estrichs sicher, dass der Sensor im Wellrohr
verlegt und wieder herausgenommen werden kann!
Die Installation ist ausschließlich durch eine Elektrofachkra sorgfältig nach den Regeln DIN-VDE auszuführen. Andernfalls erlischt die Garantie. Trennen
Sie die Leitungen von der Spannung bevor Sie einen Thermostat installieren, überprüfen oder austauschen. Es dürfen nur Kunststo unterputzdosen für die
Installation des Thermostats eingesetzt werden. Stellen Sie während der Installation des Wellrohrs (Ø 16mm) und nochmals vor der Verlegung des
Estrichs sicher, dass der Sensor in einem Wellrohr verlegt ist und im Bedarfsfall wieder herausgenommen werden kann!
SAFETY WARNINGS
Write down the number of the MAC address of the thermostat(s) onto your ACCEPTANCE TEST CERTIFICATE. This can be
found on the WiFi chip on the back of the display.
INSTALLATION
Sensor installation
The oor temperature sensor cable has to be placed into a seperate corrugated tube according to EN 61386-1.
The sensor should be placed centrally between the heating conductor. Route the heating mat cold lead through the second corrugated tube. Do not cross
the cold lead over or place it closer than about 2 cm to the mat heating wires! A standard plastic round recessed electrical box with 230 VAC power supply
is preferred for installation at the chosen thermostat location. A ground fault circuit breaker (30 mA) should be used for the 230 VAC heating mat circuit.
Ensure that the sensor can be placed into and removed from the corrugated tube (Ø16mm); once during installation of the tubing and again before
installation of the oor fi nish!
Only quali ed electricians are allowed to work on electrical connections and the electric supply of the device according to national laws and regulations.
Otherwise the warranty invalidates. Switch o power from all wiring before installing, testing or replacing the thermostat. Only use electrical plastic wall
mounting boxes for the thermostat installation. Ensure that the sensor can be placed into and removed from the corrugated tube (Ø 16mm); once
during installation of the tubing and again before installation of the oor fi nish!
MESURES DE SÉCURITÉ
Notez le numéro de l‘adresse MAC du thermostat sur votre
CERTIFICATE DE GARANTIE. Vous trouverez ce numéro sur la puce
WIFI à l‘arrière de l‘écran.
INSTALLATION
Installation du capteur de sol
Le câble du capteur de température du sol doit être placé dans un tube ondulé séparé conformément à la norme NF EN 61386-1. Le capteur doit être
installé à équidistance de deux conducteurs chau ants. Posez la résistance CPT en parallèle jusqu‘à la boîte de jonction et ne la faites pas se croiser avec le
corps conducteur ! Conserver une distance minimale de 2 cm entre les deux ! Pour le thermostat électronique, une prise encastrée courante avec un câble
d‘alimentation de 230 V AC au réseau domestique doit être présente. Un disjoncteur à courant de défaut (30 mA) doit être prévu. Assurez-vous pendant
l‘installation de la tuyauterie puis avant l‘installation du revêtement de sol que le capteur peut être placé dans le tube ondulé (Ø16mm)
et également en être retiré !
Seuls des électriciens spécialisés sont autorisés à e ectuer l‘installation conformément aux normes DIN-VDE. Dans le cas contraire, la garantie ne sera plus
valable. Coupez l‘alimentation de tous les câbles avant d‘installer, de tester ou de remplacer le thermostat. Utilisez uniquement des prises encastrées en
plastique pour installer le thermostat. Assurez-vous pendant l‘installation de la tuyauterie puis avant d‘e ectuer le revêtement de sol que le capteur
peut être placé dans le tube ondulé (Ø 16mm) et également en être retiré!
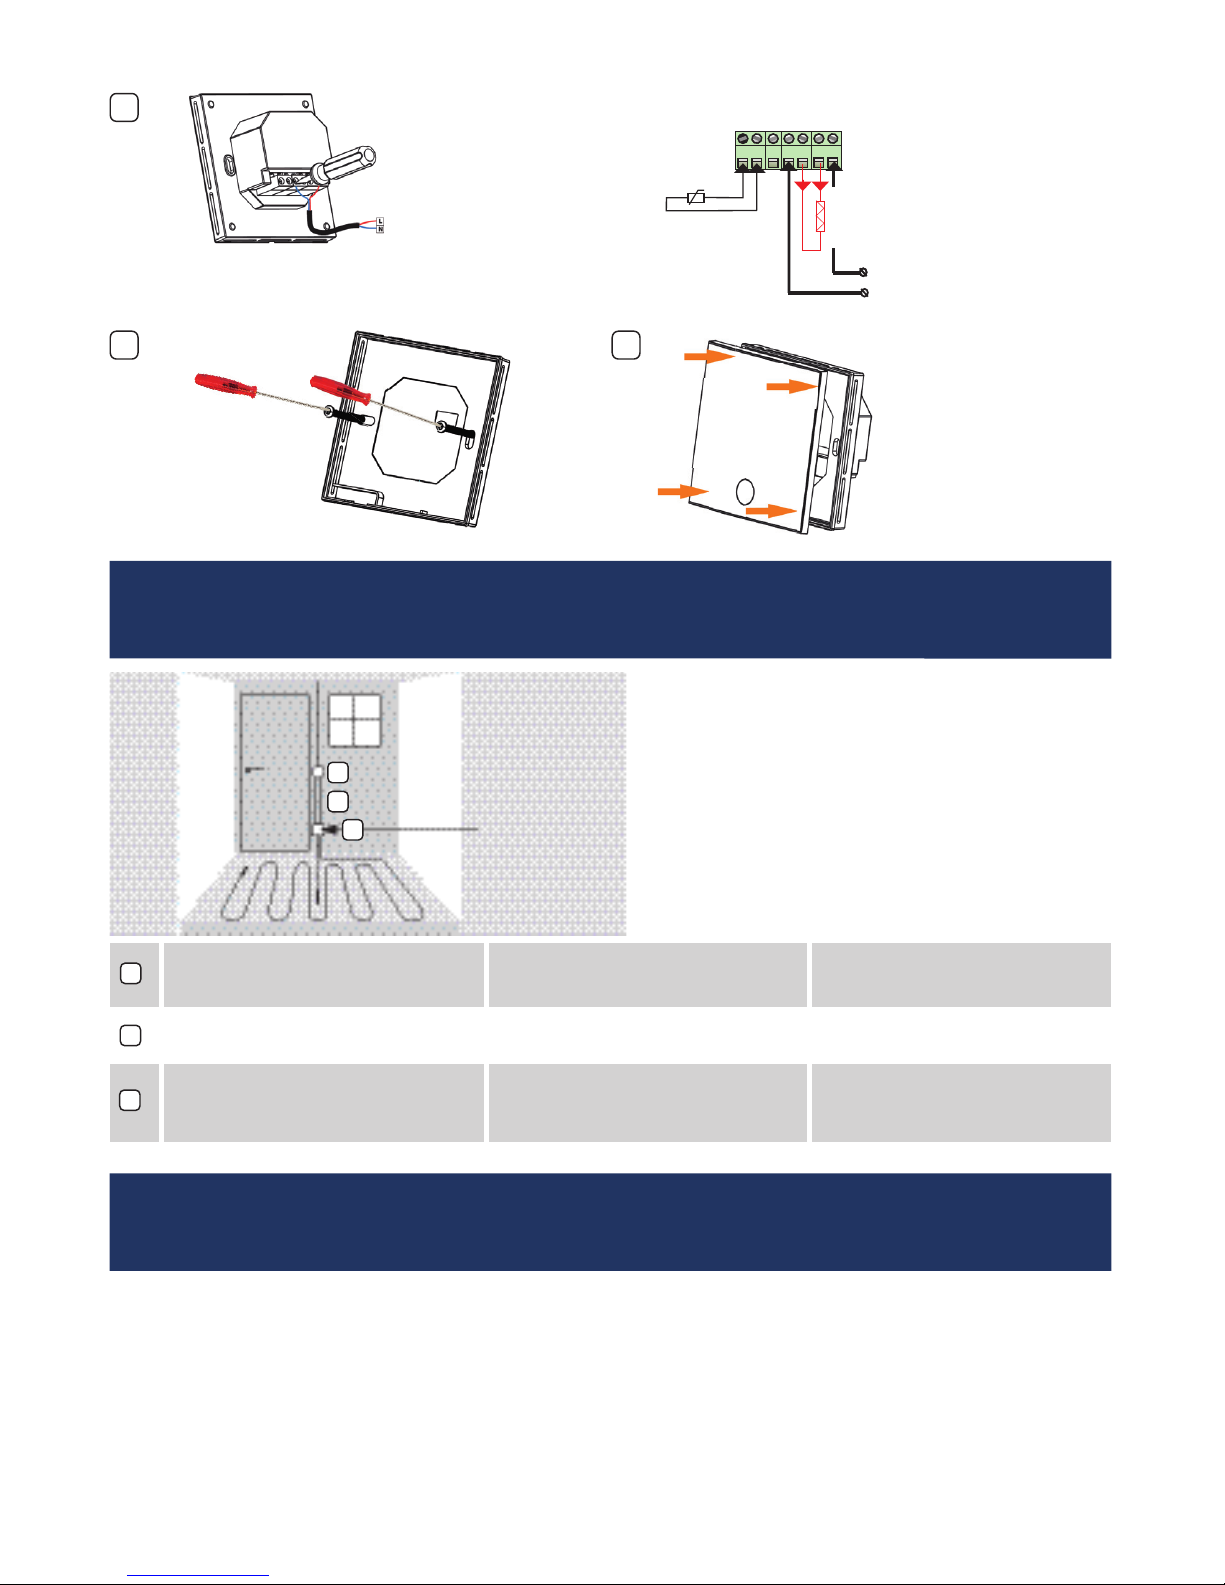
1
2
.
H = 30 cm
1
2
3
230 V AC
3
4
5
3
230 V AC
t
S1
LOAD
S2 N N L
N
L
4
Sensor
Last (Heizung)
THERMOSTAT-INSTALLATION BEI MEHREREN HEIZMATTEN
SELBSTOPTIMIERUNG
Bitte beachten:
Wenn Sie das Thermostat beispielsweise darauf programmiert haben, die Temperatur von 6:00 bis 8:00 bei 20 °C zu halten, aktiviert sich die Heizung
bereits im Vorfeld und passt sich kün ig automatisch entsprechend Ihren Heizgewohnheiten an.
Elektronisches Thermostat;
Zuleitung NYM 3 x 1,5 mm² zur Verteilung
Wellrohr für Temperaturfühler (Bodenfühler)
oder Kaltleiter (beide dürfen nicht zusammen in
einem Rohr verlegt werden)
Unterputzdose (bei mehreren Heizmatten, die
zu einem Thermostat führen, ist eine separate
Unterputzdose erforderlich)
Sensor
Load (heating)
THERMOSTAT INSTALLATION FOR TWO OR MORE HEATING MATS
SELF-LEARNING
Attention:
For example, if you programmed 20 °C from 6:00 to 8:00, the heating will open in advance to preheat and will change automatically depending on the
heating habit.
Electrical thermostat;
Power supply distribution cable
NYM 3 x 1,5 mm²
Corrugated tube for the temperature sensor or
the cold lead (both are not to be installed inside
the same tube)
Recessed electrical box
(only necessary for more than one heating mat)
Capteur
Charge (chau age)
INSTALLATION DU THERMOSTAT POUR PLUSIERS NATTES CHAUFFANTES
AUTO-APPRENTISSAGE
Attention :
Par exemple, si vous programmé 20 °C de 6:00 á 8:00, le chau age s‘allume à l‘avance pour préchau er et change automatiquement en fonction de
l‘habitude de chau age.
Tube ondulé pour le capteur (de sol) ou pour
le conducteur froid (il ne faut pas les poser
dans le même tube)
Prise encastrée (si plusieurs nattes
chau antes sont reliées au même
thermostat, une prise encastrée séparée est
requise)
Thermostat électronique;
câble d‘alimentation NYM 3 x 1,5 mm²
pour la répartition

2
°
C
MON
M
<
>
2
°
C
MON
M
<
>
2
°
C
MON
M
<
>
2
°
C
MON
M
<
>
2
°
C
MON
M
<
>
2
°
C
M
<
>
WED
2
°
C
M
<
>
WED
1
3
5
7
2
4
6
5
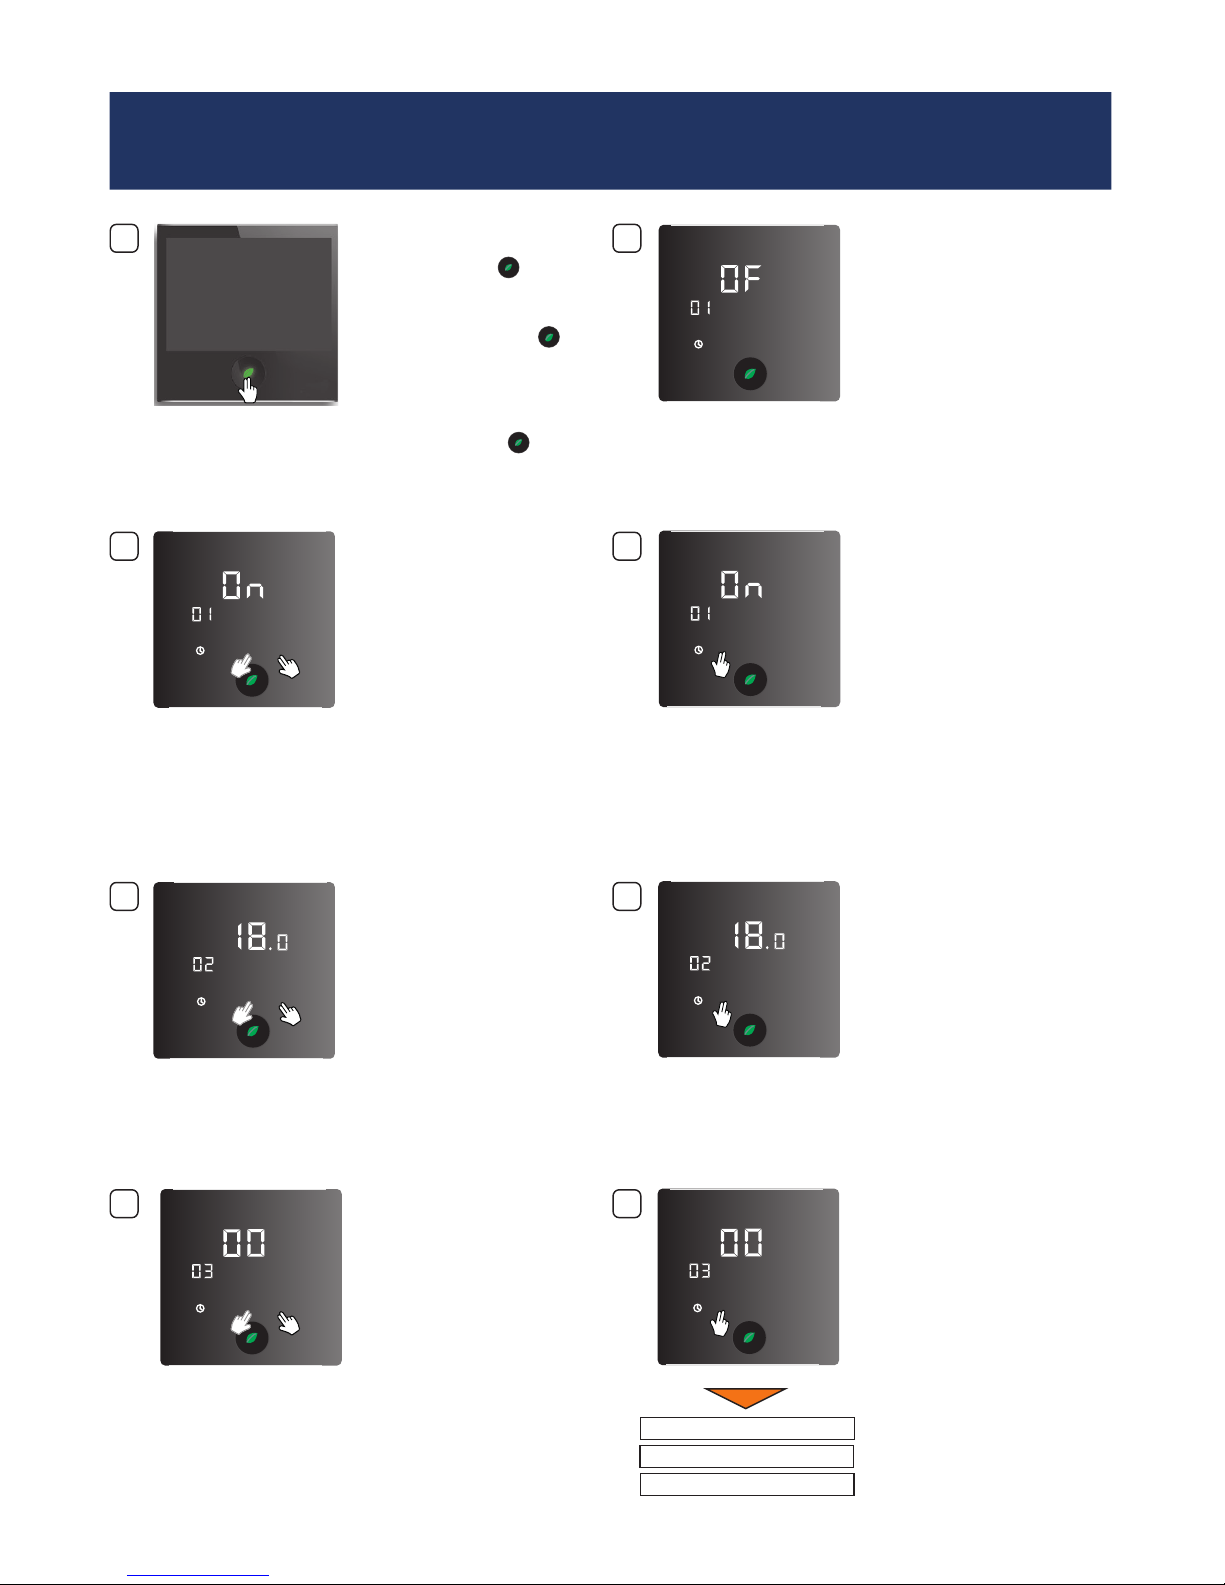
EINSTELLEN VON TAG UND UHRZEIT
Thermostat einschalten. Drücken Sie das „Uhr“-Symbol und
die Uhr fängt an zu blinken.
Stunden einstellen. Drücken Sie das „Uhr“-Symbol und
die Minuten starten zu blinken.
Minuten einstellen. Drücken Sie das „Uhr“-Symbol und
der Wochentag startet zu blinken.
Tag einstellen. Innerhalb von Sekunden sind die
Einstellungen gesichert und der Tag
hört auf zu blinken.
SET DAY AND TIME
Switch on the thermostat.
Tapp the clock symbol and the hour
will start blinking.
Set hour.
Tapp the clock symbol and the
minutes will start blinking.
Set minutes.
Tapp the clock symbol and the
weekday will start blinking.
Set day.
Within seconds the settings are saved
and the day stops blinking.
RÉGLAGES DU JOUR ET DE L‘HEURE
Allumer le thermostat
Appuyer sur le symbole de la montre
et l‘heure va commencer a clignoter.
Réglage des heures.
Appuyer sur le symbole de la montre
et les minutes vont commencer a
clignoter.
Réglage des minutes
Appuyer sur le symbole de la
montre et les jours de semaine vont
commencer a clignoter.
Réglage du jour.
En quelques secondes le réglage est
enregistré et les jours de semaine
arrête de clignoter.
M
<
>
3s
M
<
>
M
<
>
°
C
M
<
>
°
C
M
<
>
M
<
>
M
<
>
1
3
5
7
2
4
6
8
6
PARAMETER-EINSTELLUNGEN
Warten Sie bis das Display in
„Standby“ Modus geht. Dann
drücken Sie die Taste für 3
Sekunden.
Die Einstellung für Frostschutz (+5°C)
erscheint.
Ändern der Einstellung.
00 = Automatisches
Speichern
01 = Nicht verwenden
02 = Nicht verwenden
Ändern der Einstellung.
OFF = Frostschutz ist
ausgeschaltet
ON = Frostschutz ist
eingeschaltet
Seite 7
Drücken Sie das „M“-Symbol und die
Economy-Einstellung erscheint.
Ändern der EconomomyTemperatureinstellung
Drücken Sie das „M“-Symbol und die
Power ON Einstellungen erscheinen.
Drücken Sie das „M“-Symbol und die
12/24 Stunden-Auswahl erscheint.
PARAMETER SETTINGS
Wait for the display to go into
standby. With the display in
standby, press and hold the
button for 3 seconds.
The setting for frost protection (+5°C)
will appear.
Change the setting.
00 = auto recovery
01 = Do not use
02 = Do not use
Change the setting.
OFF = for low temperature
protection OFF
ON = low temperature
protection ON
Page 7
Tapp the “M” symbol and the
Economy settings will appear.
Change the Economy temperature
setting.
app the “M” symbol and the Power ON
settings will appear.
Tapp the “M” symbol and the 12/24
hour clock choice will appear.
RÉGLAGE DE PARAMÈTRE
Attendez que l‘ecran retourne
en mode veille. En mode veille
Appuyer sur le boutton
pendant 3 secondes.
Le réglage pour basse température
(+5°C) va apparaitre.
Changements de réglages.
00 = Récupération
automatique.
01 = á ne pas utiliser
02 = á ne pas utiliser
Changement de réglage.
OFF = l‘arrêt de
la protection de la
basse temperataure
ON = la protection de la
basse temperature
est activé
Page 7
Appuyer sur le symbole « M » et le
mode économique va apparaitre.
Changer le réglage de la
température economique.
Appuyer sur le symbole « M » et le
réglages de démarrage va apparaitre.
Appuyer sur le symbole « M » et vous
pouvez choisir le systéme horaire
12/24 heures.
M
<
>
M
<
>
M
<
>
M
<
>
M
<
>
M
<
>
M
<
>
9
11
13
10
12
14
15
7
Änderung der Einstellung.
OFF = Selbstoptimierung ist
ausgeschaltet
ON = Selbstoptimierung ist
eingeschaltet
Ändern der Einstellung.
12 = 12 Stunden System
24 = 24 Stunden System
ACHTUNG
Für die Paramater-Einstellung 06 muss „01: Programm“ ausgewählt
werden. Andernfalls wird das Thermostat nicht mit dem Router bzw.
Smartphone verbunden.
Änderung der Einstellung.
Zeiteinstellung: 1...12 Sekunden
bevor das Display in den StandbyModus geht.
Änderung der Einstellung auf 01.
01: Programm
02: Nicht verwenden
03: Nicht verwenden
04: Nicht verwenden
05: Nicht verwenden
Seite 8
Drücken Sie das „M“-Symbol und der
Selbstlern-Modus wird eingeschaltet.
Drücken Sie das „M“-Symbol und die
Display Standby-Betrieb-Einstellung
erscheint.
Drücken Sie das „M“-Symbol und die
Display Standby-Betrieb-Einstellung
erscheint
Change the setting.
OFF = self-learning OFF
ON = self-learning ON
Change the setting.
12 = twelve hour system
24 = twenty-four hour
system
ATTENTION
The setting 06 must be set to “01: Programm”. Otherwise, the thermostat
will not connect with your Router and Smartphone.
Change the setting.
Time range, 1...12 seconds, before
display will go into standby.
Change the setting to 01.
01: Programm
02: Do not use
03: Do not use
04: Do not use
05: Do not use
Page 8
Tapp the “M” symbol and the Selflerning settings will appear.
Tapp the “M” symbol and the
Programm choice settings will appear
Tapp the “M” symbol and the Display
standby timer settings will appear.
Changements de réglages.
OFF = l‘autoapprentissage
est éteint
ON = l‘autoapprentissage
est en marche
Changer le réglage.
12 = systéme horaire 12
heures
24 = systéme horaire 12
heures
ATTENTION
Pour le réglage du paramètre 06, il faut choisir « 01 : Programme ». Sinon
le thermostat ne sera pas relié au routeur ou au smartphone.
Page 8
Changements de réglages.
Intervalle de temps, 1...12
secondes, avant que l‘ecran
retourne en mode veille.
Changer le réglage à 01.
01 : Programme
02 : á ne pas utiliser
03 : á ne pas utiliser
04 : á ne pas utiliser
05 : á ne pas utilise
Taper sur le symbole « M » et
l‘autoapprentissage va apparaitre.
Appuyer sur le symbole « M » et le
choix des paramètres va apparaitre.
Taper sur le symbole « M » et l‘ecran
de veille ava aiché le réglage de
l‘heure.
M
<
>
M
<
>
M
<
>
M
<
>
M
<
>
M
<
>
M
<
>
M
<
>
M
<
>
2
M
<
>
WED
16
18
20
22
17
19
21
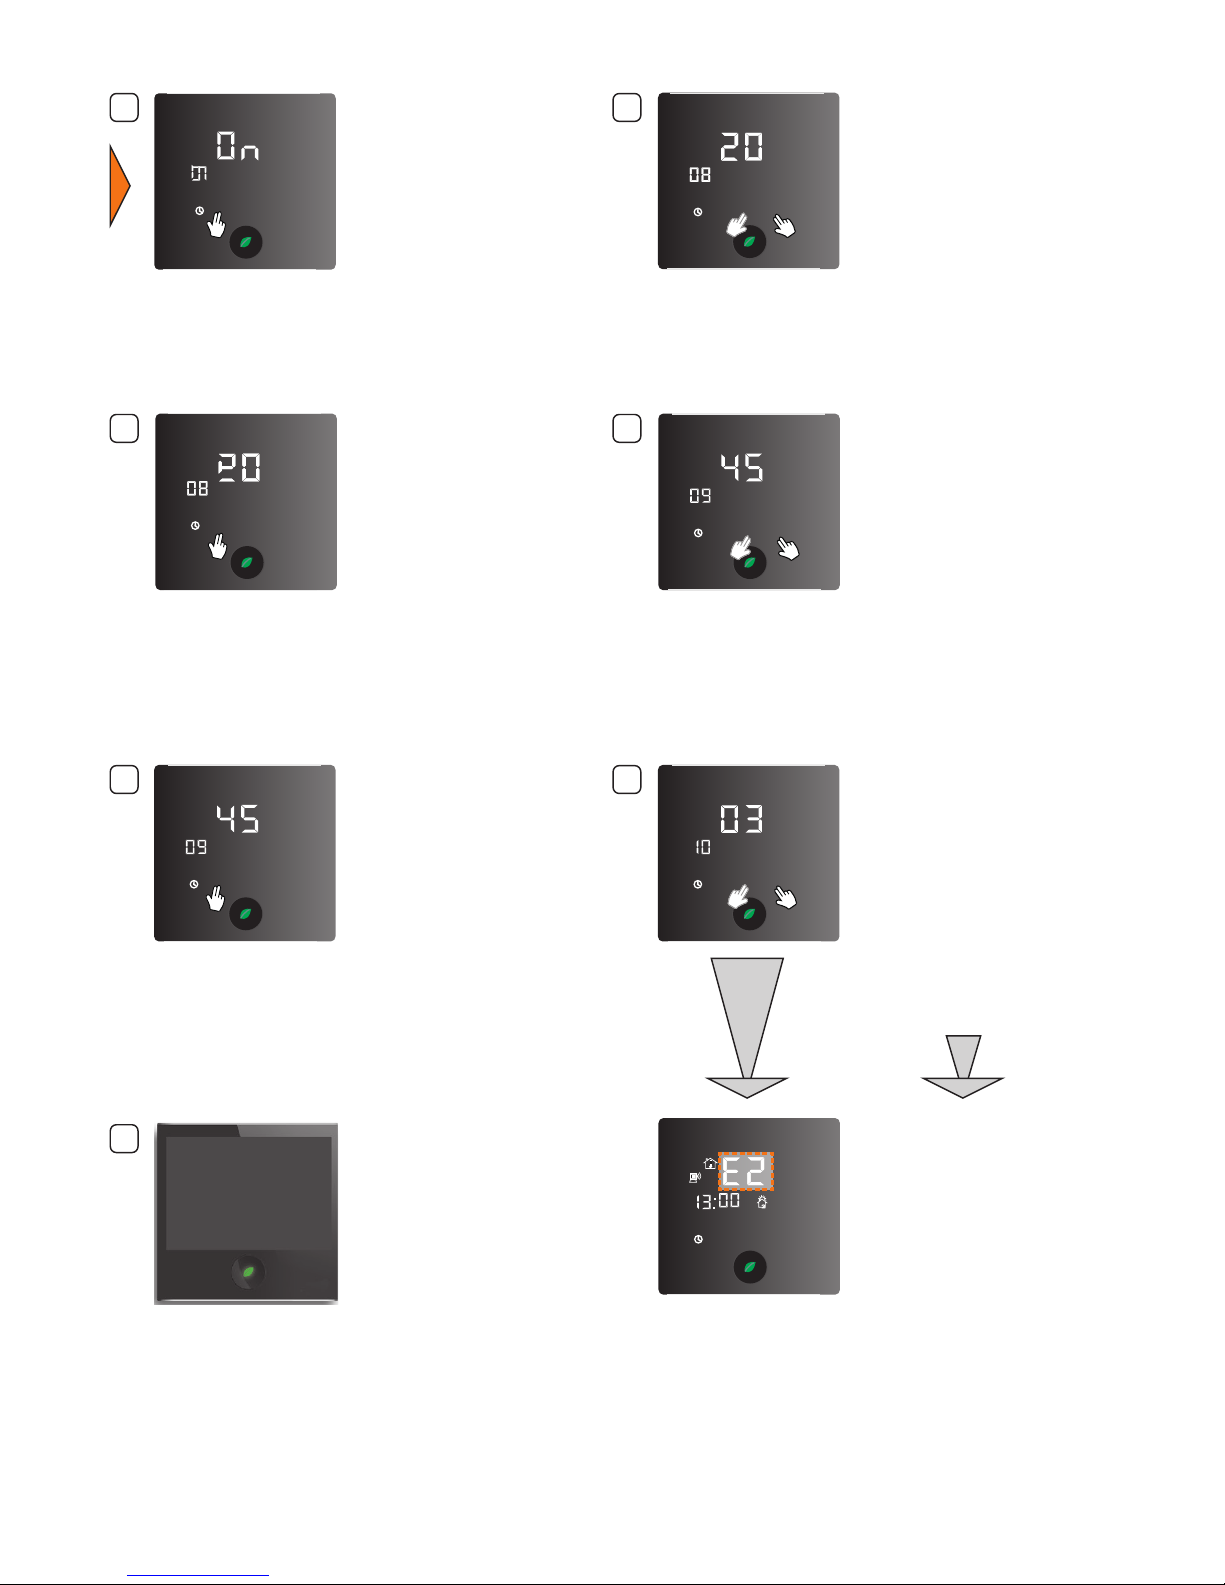
8
Ein Fehlercode E2 erscheint auf
dem Display, wenn ein Fehler des
Bodensensors vorliegt oder wenn kein
Bodensensor durch Einstellung 02
oder 03 verbunden ist.
Änderung der Einstellung.
01 = nur Lu sensor
02 = nur Boden sensor
03 = beide Sensoren
Das Display schaltet automatisch
ab und geht in die zuletzt bekannte
Betriebsart, wenn das Display
innerhalb der zuvor eingestellten
Display-Standby-Zeit keine Eingabe
erhält.
Änderung der Einstellung, maximale
Einstellung:
27 = für Beheizung unter Holz
45 = für Beheizung unter
Fliesen
Drücken Sie das „M“-Symbol und
die Sensorauswahl-Einstellung
erscheint.
Anzeige der Selbstoptimierungszeit
in Minuten für den Wechsel der
Raumtemperatur um +1 °C.
Drücken Sie das „M“-Symbol
und die GeräteschutzTemperatureinstellung erscheint.
Drücken Sie das „M“-Symbol
und die nächste Funktion wird
eingeschaltet.
An error code E2 on the main display
will appear if there is a oor sensor
failure or if there is no oor sensor
connected by settings 02 or 03.
Change the setting.
01 = only air sensor
02 = only oor sensor
03 = both sensors
The display will turn o
automatically and go into the last
known operation mode when the
display does not feel any input
within the previously set display
standby time range.
Change the setting, max. settings:
27 = for underwood heating
45 = for undertile heating
Tapp the “M” symbol and the
sensor selection setting will appear
This is the amount of time in minutes
that it takes the self-lerning to
change the room temperature
+1 °C higher.
Tapp the “M” symbol and the
Equipment protection temperature
setting will appear.
Tapp the “M” symbol and the next
function will appear.
Le code E2 s‘aiche sur l‘ecran
pour indiquer une erreur ou une
deconnection de sonde dans les
reglages 02 ou 03.
Changements de réglages.
01 = Aichage seulement
température ambiante
02 = Aichage seulement de
température du sol
03 = les deux
L‘aichage s‘éteint
automatiquement et passe dans le
dernier mode de fonctionnement
connu lorsque l‘aichage ne
ressent aucune entrée dans la serie
de temps d‘attente d‘aichage
précédemment dénie.
Changements de réglages. Réglage
maximum :
27 = pour les planchers
chauant éléctrique
sous-bois
45 = pour les planchers
chauant éléctrique
sous carrelage
Taper sur le symbole « M » est le
paramétre de la sonde thermique
va apparaître.
C‘est la durée Auto-apprentissage en
minutes pour changer la température
de la piéces +1 °C de plus.
Taper sur le symbole « M » et
l‘equipement de protection va
apparaître.
Taper sur le symbole « M » et
l‘autoapprentissage va apparaitre.
 Loading...