

Page 1
®
LAVA
Design Glass-Radiator
By WarmlyYours
Installation Manual
Read all instructions before installing or using this heater.
Page 2

Installation and Usage Instruction | LAVA® Design Glass Radiator
IMPORTANT INSTRUCTIONS
LAVA® glass heating radiators are very versatile. They
are an elegant design, featuring simple installation and
easy operation. LAVA® provides great reliability and great
performance.
This guide gives important information on safety,
installation, use and maintenance of the equipment. Please
read this information carefully.
The manufacturer is not liable if the instructions are not
followed.
The packaging of your LAVA® high-quality glass radiator
consists of recyclable materials.
ATTENTION: Operation of the heater causes high
temperature on the glass surfaces. Prolonged contact may
cause burns.
This heater is hot when in use. To avoid burns, do not let
bare skin touch hot surfaces. Keep combustible materials,
such as furniture, pillows, bedding, papers, clothes,
curtains, et cetera, at least 20” (0,5m) from the front of the
heater and keep them away from the sides and rear.
Extreme caution is necessary when any heater is used by
or near children and whenever the heater is left operating
while unattended.
This heater is not intended for use by persons (including
children) with reduced physical, sensory or mental
capabilities or lack of experience and knowledge of using
the radiator.
Children should be supervised to ensure that they do not
play with the device.
The heater must not be placed or mounted directly below a
wall socket.
WARNING: Covering the glass surface
causes overheating danger! May cause
damage to the heating element.
WARNING: The glass heater must not be
used if the front glass is broken.
Do not operate any heater after it malfunctions. Disconnect
power at service panel and contact WarmlyYours at (800)
875-5285.
Do not use the heater outdoors.
To disconnect heater, turn off power to heater circuit at
main breaker panel.
Do not insert or allow foreign objects to enter any
ventilation or exhaust opening as this may cause an electric
shock or re, or damage the heater.
To prevent a possible re, do not block air intakes or
exhaust in any manner.
Do not use unit in areas where gasoline, paint, or
ammable vapors or liquids are used or stored.
Use this heater only as described in this manual. Any other
use not recommended by the manufacturer may cause re,
electric shock, or injury.
OVERHEATING AND OVERLOAD PROTECTION
Each radiator has an overheating protection. The device
automatically starts again after a cooling down to under
113º F, or 45°C.
THESE INSTRUCTIONS MUST
• be passed to the owner/operator after the installation.
In addition, ensure that the operator is trained in the
operation of the glass-radiation heater.
• be stored in a secure location and transferred at change
of ownership to the new owner.
SAVE THESE INSTRUCTIONS!
1 2
Page 3
Installation and Usage Instruction | LAVA® Design Glass Radiator
DELIVERY | PACKAGING
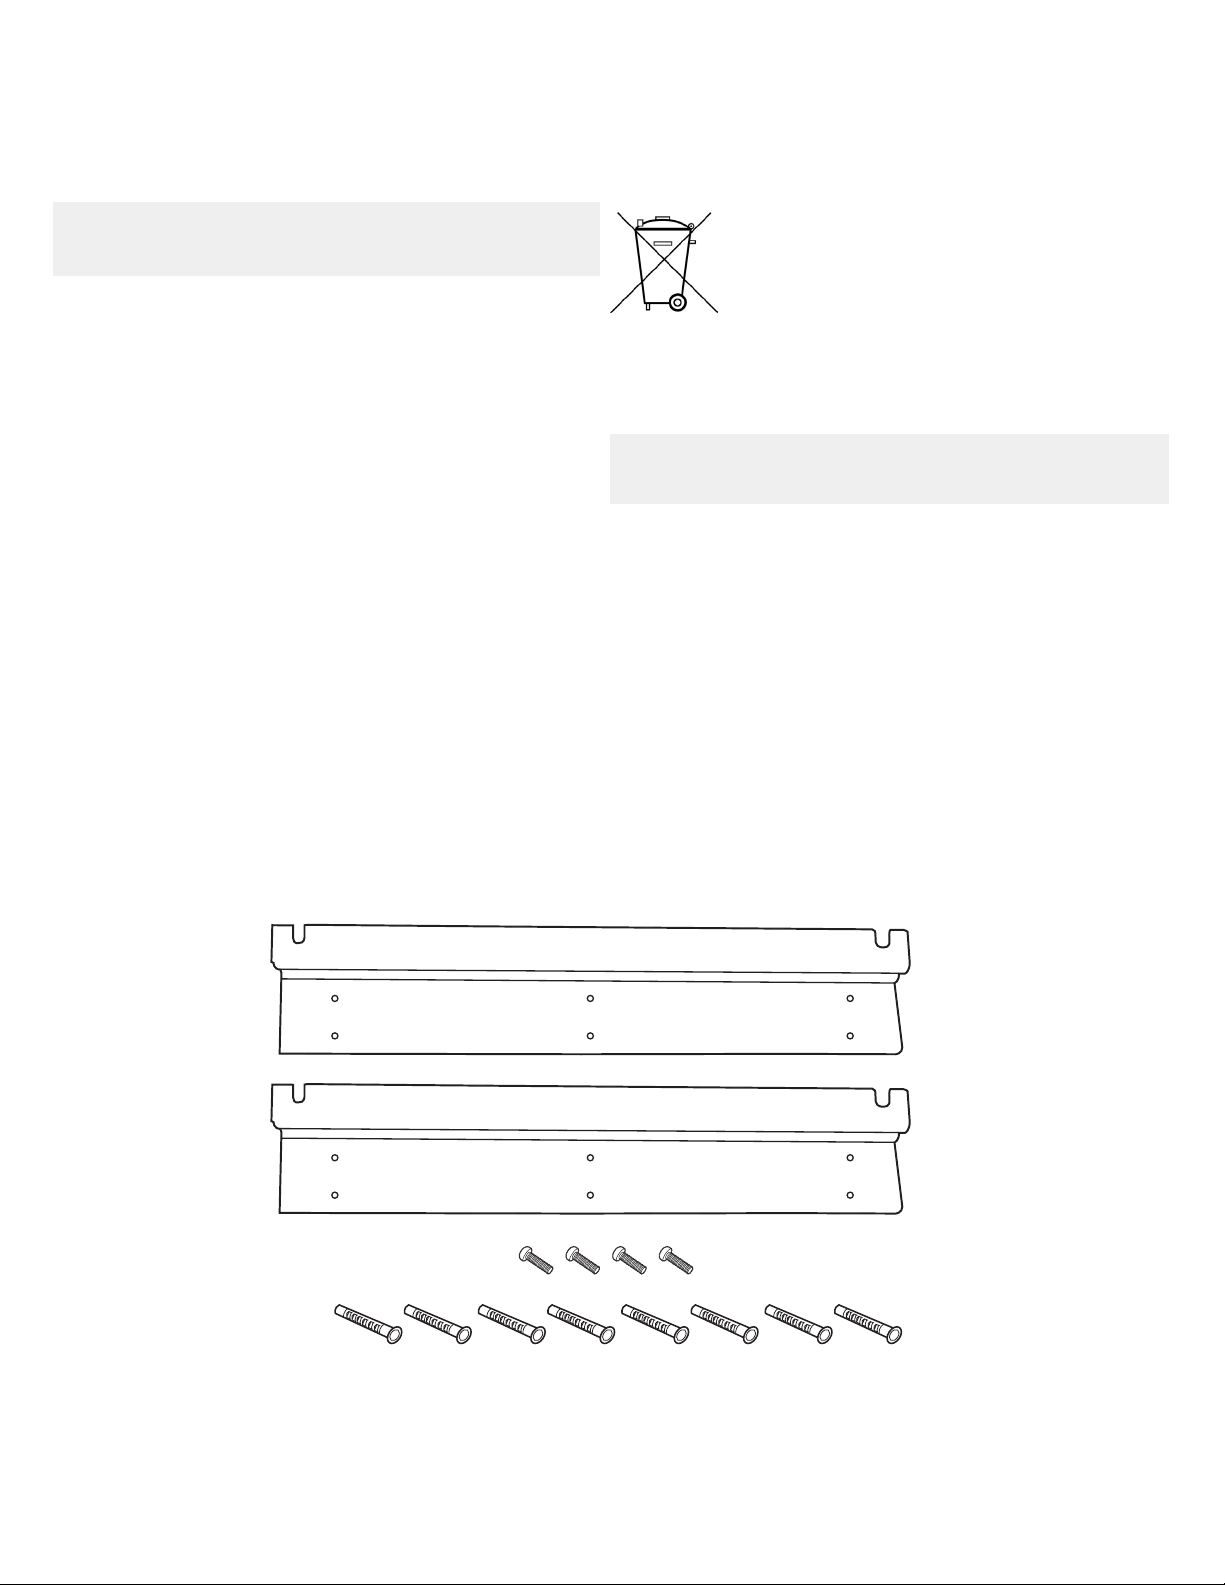
LAVA® 500W | 750W | 1000W
The LAVA® glass radiator has to be xed only with
the supplied mounting hardware. Screws and anchors
must correspond with the building material of the
wall (masonry, concrete, plasterboard, etc.). Drywall
anchors are included. The wall must have a at surface.
Wall mounting kit for
LAVA® 500W | 750W | 1000W:
• LAVA® Glass Radiator
• 1 x Wall mounting hardware:
A - 2 x mounting bracket
B - 4 x hex bolt M8 x 16
G - 8 x Anchors
After attaching hardware, do not tighten completely!
Only tighten hardware when unit is assured to mount by
test tting unit.
Electrical and electronic equipment frequently
contain valuable materials. They may also
contain harmful substances that were
necessary for their function and safety. The
residual waste or incorrect treatment can
harm the environment. Please help protect
our environment! Dispose your old unit
according to local regulations.
ATTENTION: Packaging materials, must be disposed of
properly.
G
A
B
Fig. 1 = Mounting Hardware
2
Page 4
Installation and Usage Instruction | LAVA® Design Glass Radiator
DELIVERY | PACKAGING
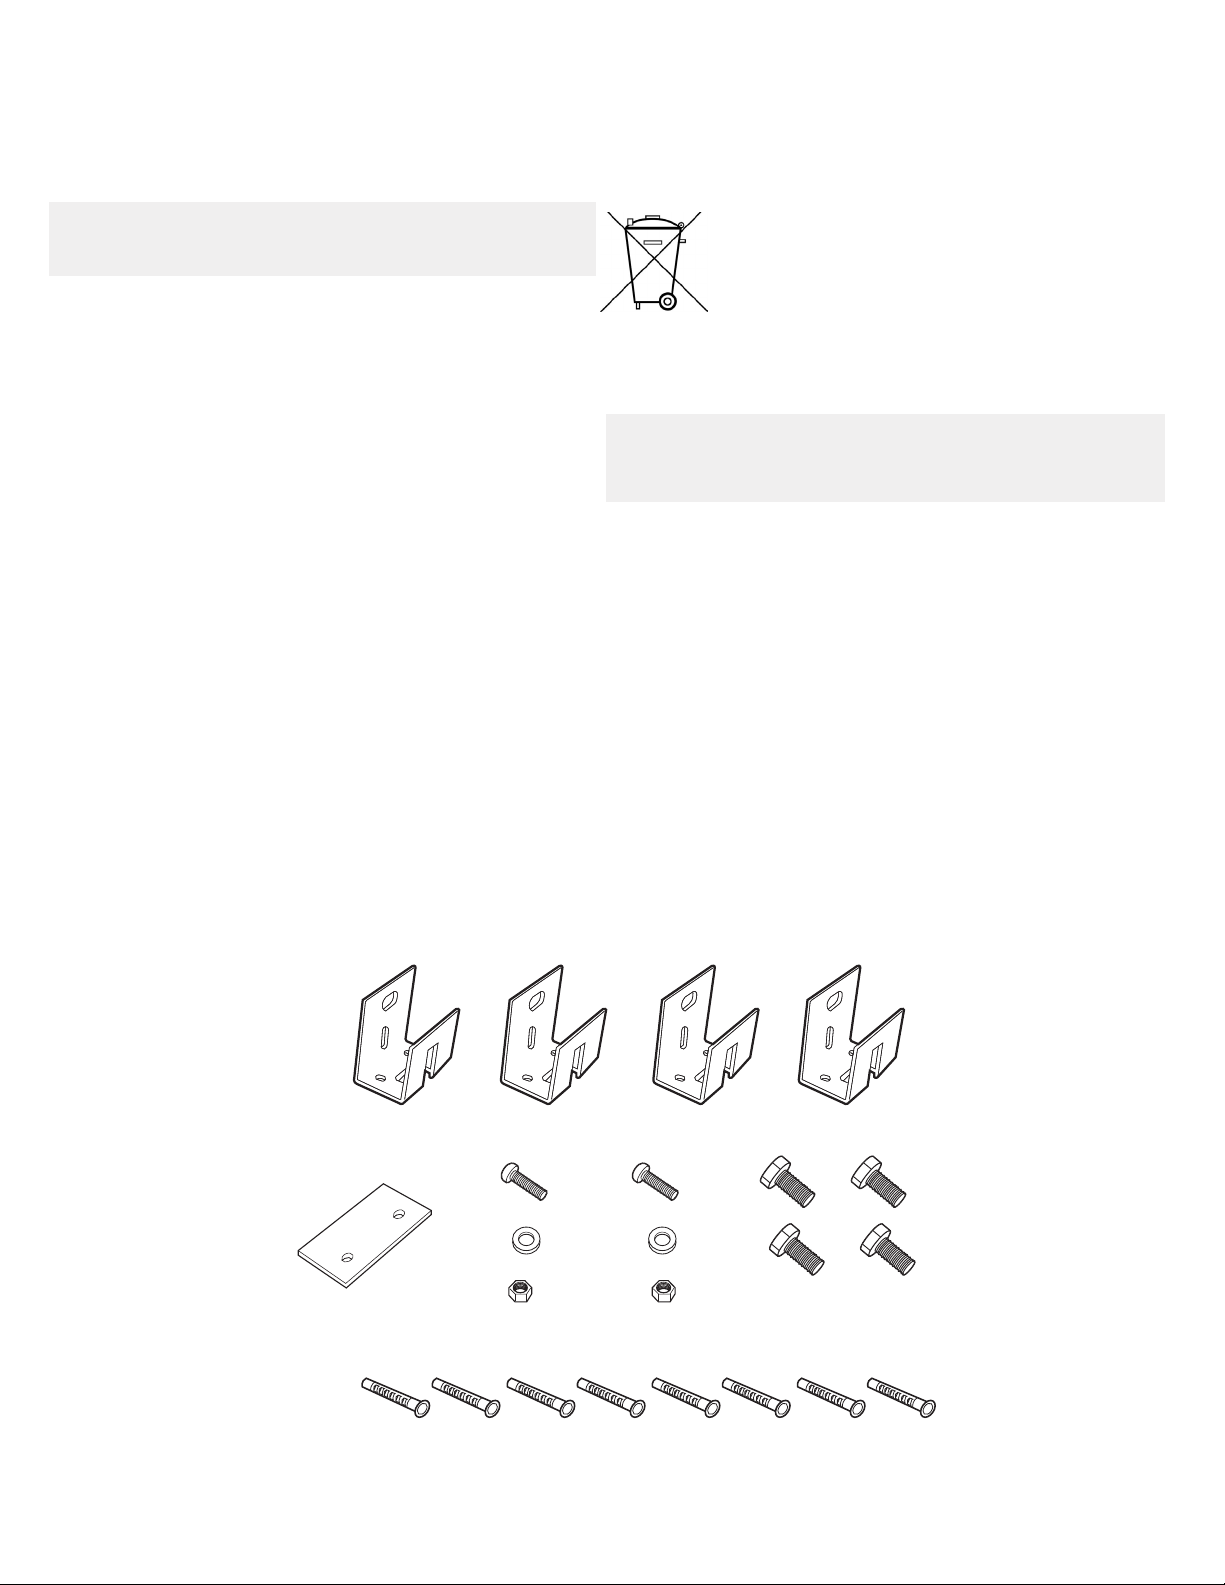
LAVA® 500W | 750W | 1000W
The LAVA® glass radiator must be xed only with the
supplied mounting hardware. Screws and anchors
must correspond with the building material of the wall
(masonry, concrete, plasterboard, etc.). Drywall anchors
are included. The wall must have a at surface.
Wall mounting kit for
LAVA® 250W:
• LAVA® Glass Radiator
• 1 x Wall mounting hardware:
A - 4 x mounting bracket
B - 2 x screw M5 x 16
C - 2 x washer
D - 2 x nut
E - 4 x hex bolt M8 x 16
- 1 x cable clamp (not pictured)
- 4 x wall anchor & screw (not pictured)
F - 1 x wall protection plate
K - 8 x Anchors
Electrical and electronic equipment
frequently contain valuable materials. They
may also contain harmful substances that
were necessary for their function and safety.
The residual waste or incorrect treatment
can harm the environment. Please help
protect our environment! Dispose your old
unit according to the local regulations.
ATTENTION: Packaging materials, must be disposed of
properly.
After attaching hardware, do not tighten completely!
Only tighten hardware when unit is assured to mount by
test tting unit.
A
F
K
B
E
C
D
3
Page 5

Installation and Usage Instruction | LAVA® Design Glass Radiator
INSTALLATION AND USAGE INSTRUCTION FOR
THE ELECTRICIAN
IMPORTANT NOTES:
• Installation and service work must be carried out by a
licensed professional or a qualied person. Verify that the
electrical installation complies with the applicable local
codes. The responsibility of the manufacturer is limited to
the supply of the device.
• The devices are designed for wall mounting (vertical or
horizontal)
• Wall mounting of the glass radiators corresponds IP24
Protection.
• When installing the unit in a bathroom, follow local
building and electric code regulations.
• Specied minimum distances must be respected.
INSTALLATION AND MINIMUM DISTANCES:
LAVA® glass heaters may be mounted horizontally or
vertically on the wall. They must be positioned so that
ammable items can not be ignited. Ensure that the
required minimum distances, particularly to ammable
objects like curtains, and upholstered furniture are correct.
Please make sure that the glass radiator can radiate freely
into open space. (See Fig. 2)
ATTENTION: Don’t lean items against the glass or lean the
radiator against other objects.
WALL MOUNTING:
The mounting brackets (supplied) have 3 groups of 2 holes
spaced at 8” on center. This spacing allows the installer
exibility when choosing a mounting location. Please note
the required minimum clearance distances from ammable
materials (SEE Fig 2) when choosing your mounting
location. Ideally, if the studs in the room are 16” on center,
this bracket will allow the unit to be attached to at least one
stud and optimally 2 studs. This bracket design also allows
for the Lava to be mounted horizontally or vertically.
At this time, gather any needed items including a pencil,
screw driver, screws, washers, hammer, tape measure,
stud nder, wall anchors, and an assistant. Verify correct
number of supplied parts are present.
Choose a location desired for mounting. Choose an area in
compliance with local building and electrical codes.
Use a stud nder to locate the studs present in the area. If
possible, choose a location where 4 screws on each bracket
will land in studs. If this is not possible, we suggest at
least 2 of the screws on each bracket land in a stud. Use
Heavy-duty anchors rated to 50 lbs. for this application. If
mounting into concrete or other materials, use appropriate
anchors suitable for that application. We require using
at least 4 (six is even better!) screws in each mounting
bracket. PLEASE VERIFY ACCESS TO ELECTRICAL BOX IS
NOT BLOCKED BY INSTALLED MOUNTING BRACKET.
ASSEMBLY OF THE RADIATOR:
Please verify that no shipping or handling damage occured
before installing the power cable to the radiator.
11.8” / 300mm
11.8” / 300mm 11.8” / 300mm
7.8” / 200mm
Fig. 2: Minimum mounting distances
Use a level and a pencil to mark the location of the rst
bracket on the wall. Using the bracket, mark the hole
locations. Drill and install the appropriate screws and/or
anchors. We recommend Cobra, TripleGrip #8, p/n: 178S
(available at Home Depot) or similar type anchors. We
recommend using a #8 screw with washer (if needed),
minimum, for mounting the mounting brackets.
Make corresponding marks 17 9/16” below the installed
bracket for the lower bracket. ALWAYS INSTALL 2
BRACKETS per LAVA unit! Follow above instructions for
this bracket.
Once the brackets are installed on the wall, install the 4, M8
x 16 hex mounting bolts loosely (at least 3 revolutions) into
the Lava.
With the assistance of a helper, lift the Lava and make
your electrical connections. Place the mounted bolts into
the slots of the mounting brackets. If the unit is placed
satisfactorily, use an open-ended wrench to fully snug the
bolts, securing the Lava to the mounting products.
4
Page 6

17.5”/ 44.4cm
15.9”/ 40.6cm
3”/ 7.62cm
3”/ 7.62cm
LAVA 250
LAVA 500/750/1000
15.9”/ 40.6cm
Installation and Usage Instruction | LAVA® Design Glass Radiator
LAVA 500/750/1000
15.9”/ 40.6cm
3”/ 7.62cm
17.5”/ 44.4cm
15.9”/ 40.6cm
3”/ 7.62cm
Graphic: LAVA® Glass radiators 250W | 500W | 750W | 1000W - Hole drilling pattern - Wall Mounting
ATTENTION: Verify minimum distances! Use required mounting holes!
5
Page 7

Installation and Usage Instruction | LAVA® Design Glass Radiator
MOUNTING BRACKET ASSEMBLY -500W | 750W | 1000W
ATTENTION: Verify minimum distances! Use required mounting holes!
Stud
Mounting Bracket
Drywall anchors and
screws must be used in
the remaining 2 holes
OR
Mounting
Bracket
Stud
Stud
Drywall anchors and
screws must be used in
the remaining 4 holes
6
Page 8
BACK
Stud
BACK
Stud
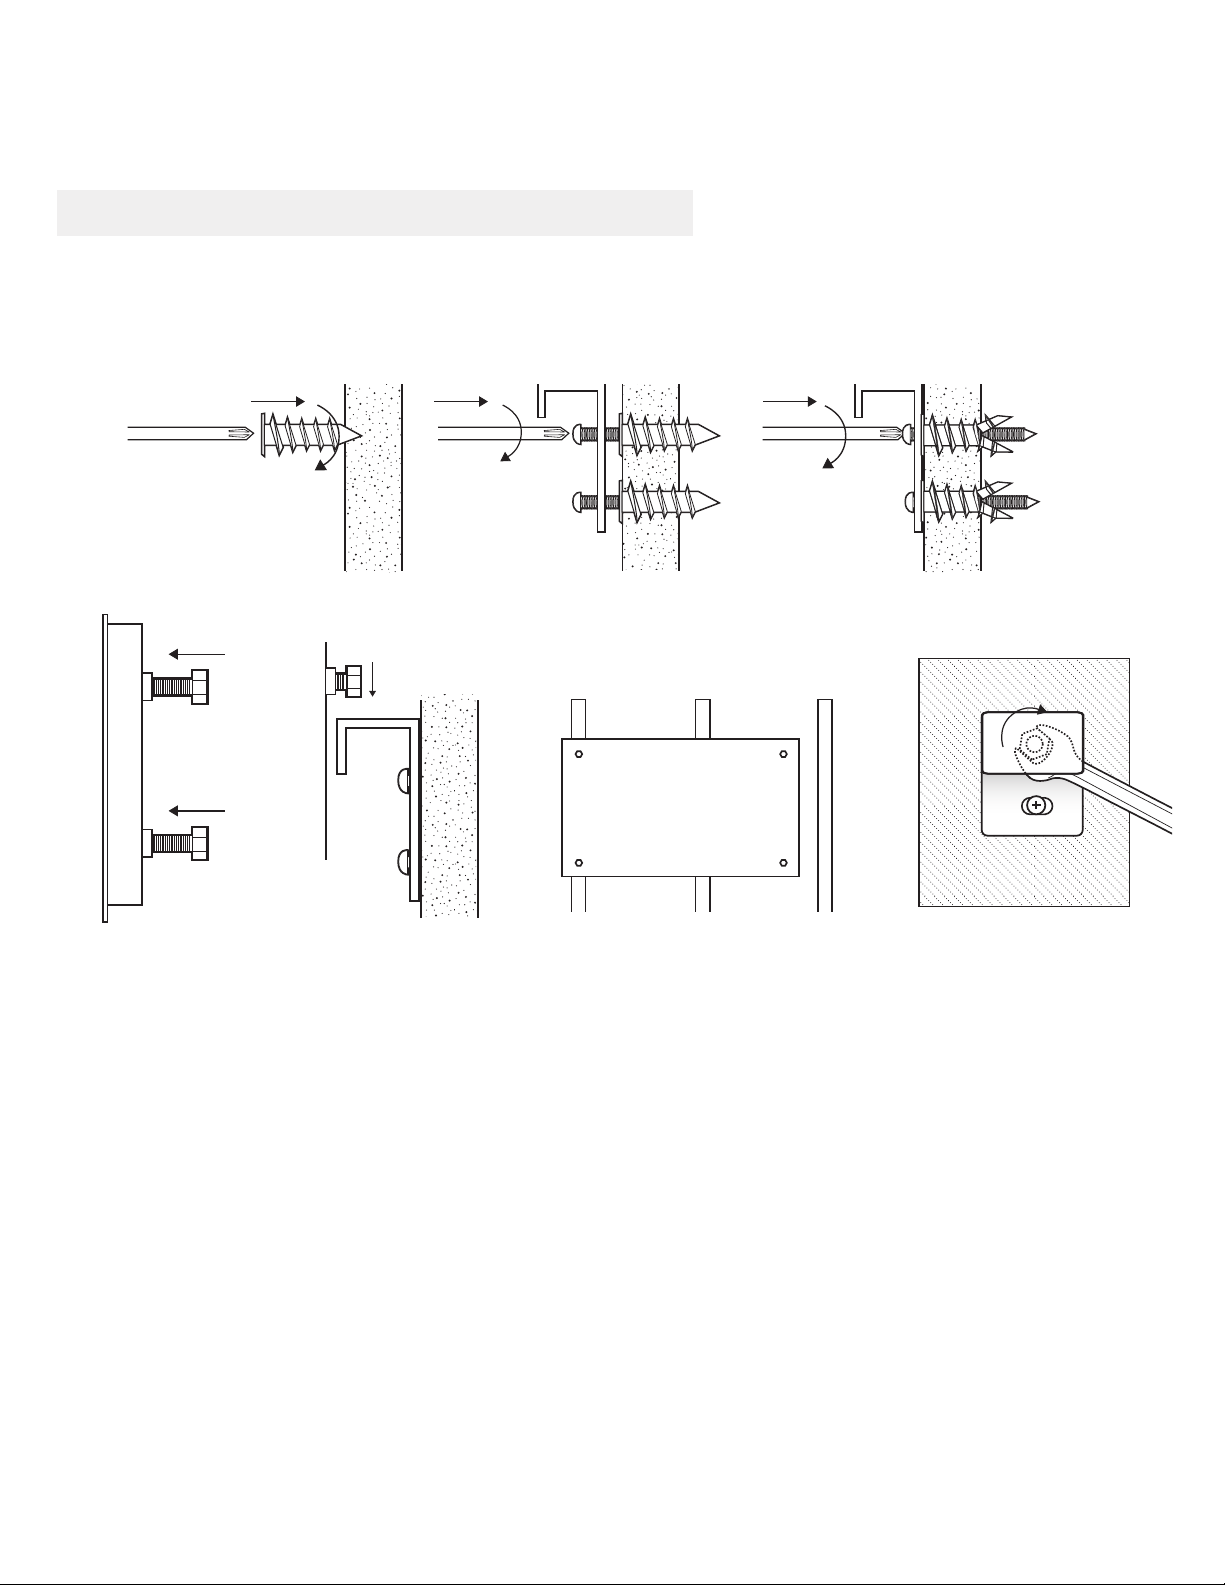
MOUNTING BRACKET ASSEMBLY -250W
ATTENTION: Verify minimum distances! Use required mounting holes and anchors!
Fig. 4
Stud
Fig. 6 = 4xFig. 5
BACK
Fig. 8Fig. 7
7
Page 9

Installation and Usage Instruction | LAVA® Design Glass Radiator
ELECTRICAL CONNECTION
The heater is designed for permanent connection to a
suitable room thermostat. Please refer to the instructions
of the room thermostat.
ATTENTION: If the power cord of the unit is damaged, it
must be replaced immediately.
Fix mounted thermostats should be mounted next to the
heated room’s entry door at 4’ or 1.3m height from oors.
An alternate location is on an interior wall, not subject to
direct sunlight. The thermostat should not be installed
within 3 feet of the LAVA. Power the thermostat with a
GFCI Protected Circuit.
ELECTRICAL BREAKER PANEL
THERMOSTAT
Hot
Black
GFCI
Protected
Circuit
Neutral
White
Load Line
The device is connected with the supplied connector to
a junction box supplying the AC power supply. If a longer
cable is required, it can be replaced by longer one, 18 AWG
or Larger.
HEATING
The heater is controlled by the externally mounted
thermostat.
GROUNDING
The heater is for use with 120 volts. The green-yellow
grounding of the cord must be connected to a permanent
ground inside the junction box.
2” x 4” ELECTRICAL BOX
Hot
Black
Neutral
White
LAVA Radiant Panel
Fig 9: Connection diagram
Ground
POWER
SWITCH
HOT
LOAD
(black or blue)
NEUTRAL LOAD
(white or brown)
BLACK
WHITE
GROUND
(green or yellow)
2” x 4” ELECTRICAL BOX
GREEN GROUND
8
Page 10

Installation and Usage Instruction | LAVA® Design Glass Radiator
ELECTRICAL CONNECTION FOR LED KIT
The heater is designed for permanent connection to a
suitable room thermostat. Please refer to the instructions
of the room thermostat.
ATTENTION: If the power cord of the unit is damaged, it
must be replaced immediately.
Optional: If you decide to purchase the optional LED kit,
you may want to install a recessed duplex outlet behind the
unit. One outlet in the duplex outlet will be controlled by
the thermostat, and the other will be controlled by a wall
switch. If your LAVA™ came with a plug, it will plug into
that outlet. If your LAVA™ did not come with a plug, one
can be easily installed. See instructions included in the
plug box.
OPTIONAL LED KIT WIRING
ELECTRICAL BREAKER PANEL
15 amp GFCI
circuit breakers
Hot
Black
Neutral
White
The device is connected with the supplied connector to
a junction box supplying the AC power supply. If a longer
cable is required, it can be replaced by longer one, 18 AWG
or Larger.
HEATING
The heater is controlled by the externally mounted
thermostat.
GROUNDING
The heater is for use with 120 volts. The green-yellow
grounding of the cord must be connected to a permanent
ground inside the junction box.
Fix mounted thermostats should be mounted next to the
heated room’s entry door at 4’ or 1.3m height from oors.
An alternate location is on an interior wall, not subject to
direct sunlight. The thermostat should not be installed
within 3 feet of the LAVA. Power the thermostat with a
GFCI Protected Circuit.
2” x 4” ELECTRICAL BOX
THERMOSTAT
Hot
Black
Load Line
Neutral
White
Follow wiring
instructions included
in receptical box
Leviton
Recessed Box
Leviton #689
LED Power Supply
Install Pass & Seymor ID: PS5965OCC15
Home Depot SKU: 144940 or similar
LAVA Radiant Panel
Plug
9
Ground
POWER
SWITCH
Page 11

USER INSTRUCTION
Installation and Usage Instruction | LAVA® Design Glass Radiator
HEATING
Do not power-on unit until it is installed.
Depending on the thermal insulation quality in your home,
the required heat output of the radiator will range from
3 to 20 W/ft² (30 to 200 W/m²). The LAVA® glass radiator
has a very high radiation fraction and a low proportion of
convective heat output. The surface temperature, for safety
reasons, is limited to appoximately 203ºF / 95 °C, thus
the overall performance of the device is limited. For this
reason, these devices are used as a sole heating solution
only in very well insulated houses.
ETHERMA LAVA® glass radiators warm predominantly
solid objects and only a small proportion of the air directly,
so these devices are ideal for supplementary heat. In order
to achieve the same feeling of comfort as with convection
heating, the indoor air temperature can be lowered by 2-3
°C/F. Each degree reduction can save about 6% in heating
costs, depending on the respective heating behavior and
thermal insulation in the room. The unit can be turned on
when a seldomly-used room is occupied, to provide a warm,
cozy feeling.
Fix mounted thermostats should be mounted next to the
heated room’s entry door at 4’ or 1.3m height from oors.
An alternate location is on an interior wall, not subject to
direct sunlight. The thermostat should not be installed
within 3 feet of the LAVA. Power the thermostat with a GFCI
Protected Circuit.
ATTENTION: Avoid any kind of load on the glass itself,
especially directly on the edges! Do not lean it against
anything, or lean anything against it!
Please refrain from placing any objects between the LAVA®
glass radiator and the persons to be heated. Objects
between the radiator and people will block the heat from
the people themselves.
MAINTENANCE AND CARE
The LAVA® glass radiator is designed to give its heat over
the glass surface in the form of far infrared radiation. There
are no moving parts located on the device that require
special maintenance. For care of your glass radiator, we
recommend commercial glass cleaner. Please do not use
abrasive cleaners, as these can cause scratches to the
glass as well as the painted surface. Clean the unit before
every heating season, at a minimium of once a year.
ATTENTION: Prior to cleaning, please ensure that the
LAVA® glass radiators are turned off at the circuit breaker
panel and that the unit is at room temperature!
SPARE PARTS
Please contact WarmlyYours for any replacement parts
required. Only use original spare parts.
Depending on the size of the unit, the LAVA® glass radiator
will require some time to reach its operating temperature.
The glass sheet consists of 1/4” (6mm) toughened safety
glass (ESG). This glass is much more durable than
conventional glass, and is designed for signicantly higher
impact forces. However, you should avoid excessive use. In
case of damage, ESG shatters into many small pieces with
blunt edges, to minimize the risk of injury.
Please note when choosing an installation location, that
a very small percentage of toughened glass products
can exhibit “spontaneous breakage”, i.e. when the glass
shatters. This can occur even when external inuence isn’t
indicated. Choose the installation location of the device so
that there is no danger to people or nearby objects.
10
Page 12

Installation and Usage Instruction | LAVA® Design Glass Radiator
TECHNICAL DATA AND ACCESSORIES
TECHNICAL DATA
• Voltage: ........................... 120 V
• Power:: ........................... 250-1000 Watt
• Body: ...............................steel case, white, powdercoated
• Surface: ........................... 6 mm safety glass (ESG)
• Protection: ...................... IP24
• Protection class: ............I
• Connection: ..................... hot, neutral, ground
•Approvals: ........................cULus to UL2021 & CSA c22,2 no46
•Colors: ............................. Pure White | Pale Green | Black | Red | Mirror
• Surface Temp.: ................ 203ºF / 95 °C (maximum)
• Depth: .............................. 1.9” / 50 mm
• Mounting: ........................ horizontal or vertical
• Serial Number..................Located near “Power”switch or on rear of unit. Verify location and number before mounting LAVA.
Type Watts L (mm) B (mm)T (mm) pnds/kg
LAVA-250
LAVA-500
LAVA-750
LAVA-1000
LAVA-500-Mirror
LAVA-750-Mirror
LAVA-1000-Mirror 1000 35.4“ x 63“ 900x1600mm 51 lbs / 23kg
250 24.8“ x 19.7“ 630x500mm 18 lbs / 8kg
500 24.8“ x 35.4“ 630x900mm 33 lbs / 15kg
750 24.8“ x 51.2“ 630x1300mm 51 lbs / 23kg
1000 24.8“ x 63“ 630x1600mm 73 lbs / 33kg
500 35.4“ x 47.2“ 900x1200mm 33 lbs / 15kg
750 35.4“ x 63“ 900x1600mm 51 lbs / 23kg
TROUBLESHOOTING
Device does not heat:
• Circuit beaker tripped?
• Is external supply switch turned on?
• Is the temperature of the external thermostat set lower than the actual room temperature?
Radiant heat oputput not to expectations:
• Is the distance between glass radiation heater and person too great?
• Is the glass radiation heater undersized for the space?
• Are there objects between the person and the glass-radiation heater?
EQUIPMENT MARKINGS
Data is included on the rating plate. The rating plate of the unit can be found on top or on the left (depending on the
vertical or horizontal orientation of the unit).
Fig 10: Nameplate Fig 11: Warning on front side
11 12
Page 13

Installation and Usage Instruction | LAVA® Design Glass Radiator
CONGRATULATIONS!
You have made a wise choice by choosing the ETHERMA LAVA® glass heating radiator. Thank you for your purchase. The
latest technologies and developments offer maximum comfort and safety. Each unit is tested several times during the
manufacturing process and tested before shipment to exacting quality control standards. If you follow these installation
and operating instructions, your LAVA® glass radiator will provide many years of trouble free enjoyment!
WARMLYYOURS USA
590 Telser Rd,
Lake Zurich, IL, 60047
Tel: (800) 875-5285
Fax: (800) 408-1100
WARMLYYOURS CANADA
300 Granton Drive, Unit 4A
Richmond Hill, L4B1H7
Tel: (800) 875-5285
Fax: (800) 408-1100
12
 Loading...