

Page 1
IMPORTANT INSTRUCTIONS & OPERATING MANUAL
Amazon – Decorative Electri c Fireplace
with On Screen Display
Item No: P50-1/0345
Read these instructions carefully before attempting to assemble, install, operate or maintain
the product described. Protect yourself and others by observing all safety information. Failure
to comply with instructions could result in personal injury and / or property damage. Retain
instructions for future reference.
1
Page 2

GENERAL SAFETY INFORMATION
When using this fireplace, basic precautions should always be taken to reduce the risk of fire, electric
shock and injury to persons, including the following:
CAUTION – Due to the high temperature, keep electrical cords, drapery and other furnishings at least 3
feet from the front, side and rear of the fireplace.
1. Carefully read all instructions before using the fireplace and retain for future reference.
2. Remove the unit from its packaging and check to make sure it is in good condition before use.
3. Do not let children play with any parts of the packing (such as plastic bags, etc.).
4. Check the household voltage to ensure that it matches the fireplace’s rated specification.
5. Before using the fireplace, carefully check the power cord and plug for any damage.
6. Be sure that the room is equipped with a working smoke detector.
7. Before unplugging the power cord, turn off the power. When touching the unit, keep your hands dry
to prevent electric shock.
8. Do not place the fireplace near curtains or other inflammable objects. Keep combustible materials,
such as pillows, bedding, papers, clothes, and curtains at least 3 feet away from the front, side and
rear of the fireplace.
9. Do not block air intakes or exhaust in any manner to prevent fire.
10. Do not use on soft or uneven surfaces, like a bed, where openings may become blocked.
11. Exhibit extreme caution when any fireplace is in the vicinity of children and infants.
12. Never leave children or infants unattended while the fireplace is on or plugged in.
13. When not in use, always unplug the fireplace.
14. Prevent water from entering the housing of the fireplace during operation or while in storage.
15. Always store the fireplace in a dry area free from any moisture. This fireplace is not intended for use
in bathrooms, laundry areas, or similar indoor locations. Never place the fireplace where it may fall
into a bath tub or get exposed to water in any way.
16. Do not use in places where gasoline, paint, or other inflammable liquids are used or stored.
17. Do not run the cord under carpets. Do not cover the cord with throw rugs, runners, or similar
products. Arrange the cord away from traffic areas such that it will not be tripped over by anyone.
18. Do not operate any fireplace with a damaged cord, a damaged plug, after the fireplace malfunctions,
or if it has been dropped or damaged in any manner. Return the fireplace to an authorized service
facility for examination, electrical or mechanical adjustment, or repair.
19. Do not insert fingers or allow foreign objects to enter any ventilation or exhaust opening as this may
lead to an electric shock or fire, or may even damage the fireplace.
20. This fireplace becomes hot during use. To avoid burns, do not let bare skin touch hot surfaces. If
necessary, use the handles when moving this fireplace.
21. Use this fireplace only as described in this manual. Any other uses not recommended by the
manufacture may cause fire, electric shock, or personal injure and may void warranty privileges.
22. Always plug fireplaces directly into a wall outlet. Never use an extension cord, power strip, surge
protector, multiple outlet adapter, cord reel or outlet-type air freshener. The use of such devices
creates a fire hazard.
23. Connect to properly grounded outlets only.
2
Page 3

24. Faulty wall outlet connections may cause the wall outlet to overheat. Be sure that the fireplace plug
properly fits into the outlet before each use. During use, make sure the fireplace plug does not
overheat. If necessary, have a qualified electrician check and / or replace the wall outlet.
25. Always plug the Fireplace directly into a wall outlet/receptacle. Never use with an extension cord or
re-locatable power tap (outlet/power strip).
26. Do not place the fireplace near a bed for objects such as pillows or blankets can fall off the bed
and
be ignited by the fireplace.
27. Never clean this fireplace while it is plugged in. To disconnect, turn control to OFF, then remove the
plug from the outlet. Never pull the cord. Always hold the plug firmly and then remove from the
outlet.
28. This fireplace is intended for supplemental heat and / or decorative purposes. Continuous use for
several hours can impact the performance and life of the fireplace.
29. This Fireplace has a safety device that makes it stop working once the inner temperature reaches
85°(± 2°F). To reset the appliance, turn it off and disconnect power, let it cool off for 10 minutes and
plug back in.
30. It is not intended to be used in commercial, industrial or agricultural settings.
31. Do not use outdoors.
Getting Started
• Remove the fireplace from the box.
• Please retain all packaging after you have checked and counted all the parts and the contents
against the list.
Package Contents
• Electric Fireplace
• Front Panel
• Wall Mount (Preassembled to the fireplace)
• 4 x Wall Plugs
• 4 x Screw 1
• 4 x Screw 2
• Decorative Crystals
• Remote Control
• Instruction Manual
Features
• Wall Mountable Electric Fireplace
• Heats rooms up to 1000 Sq. Ft.
• Decorative flame effect works independent of heat
• Great for use all year round
• Crystal pebbles with color changing bed
• LED Flame technology for realistic effects
• Multiple flame modes
• 1500 Watts
• Energy Efficient
• Built-in Thermostat (50°F - 86°F or 10°C - 30°C)
3
Page 4
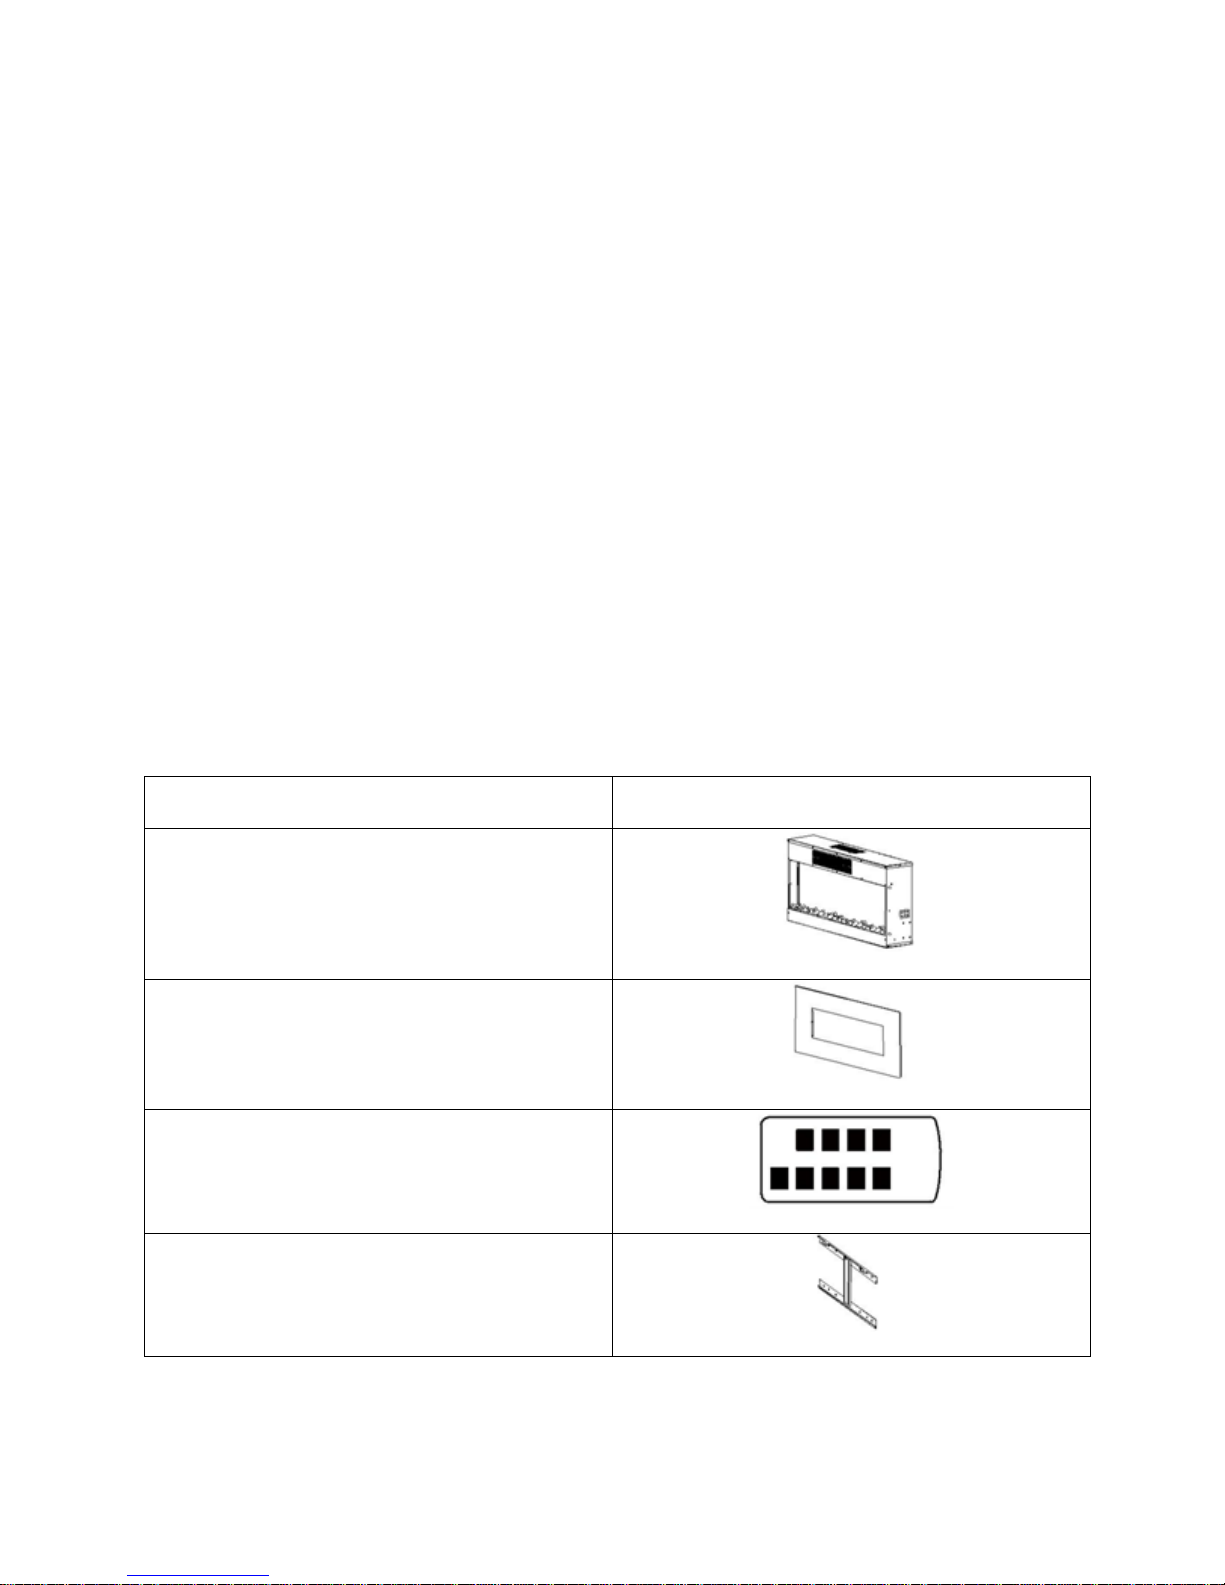
Name
Illustration
Fireplace
Glass Panel
Remote control
Wall Mount (preassembled to Fireplace)
• Automatically adjusts power to match the set temperature
• Built-in Timer (0.5 hours to 8 hours)
• Built-in overheat protection (auto safety shut-o-)
• Built-in child safety lock
• On-screen Display shows temperature, heat mode, flame mode, Flame brightness,
timer & child lock
• Heat Resistant Tempered Glass Panel
• Remote Control Included
• Wall Mount & Screws Included
• Product Dimensions: 48’’ (w) x 5.7’’ (d) x 22’’ (h)
Quick Reference Guide
• Prior to installation, please ensure that the voltage and capacity of your power outlet is
compatible with your fireplace.
• Your fireplace may emit a slight, harmless odor during its first use. This odor is a normal reaction
caused by the initial heating of internal fireplace parts and it will not occur again.
• It is normal for fireplace to make a rattling sound for a short duration of time during its first use.
• If your fireplace does not emit heat, please ensure the fireplace switch is on. For further
information, please refer to the Troubleshooting section of this manual.
Description of Parts
4
Page 5
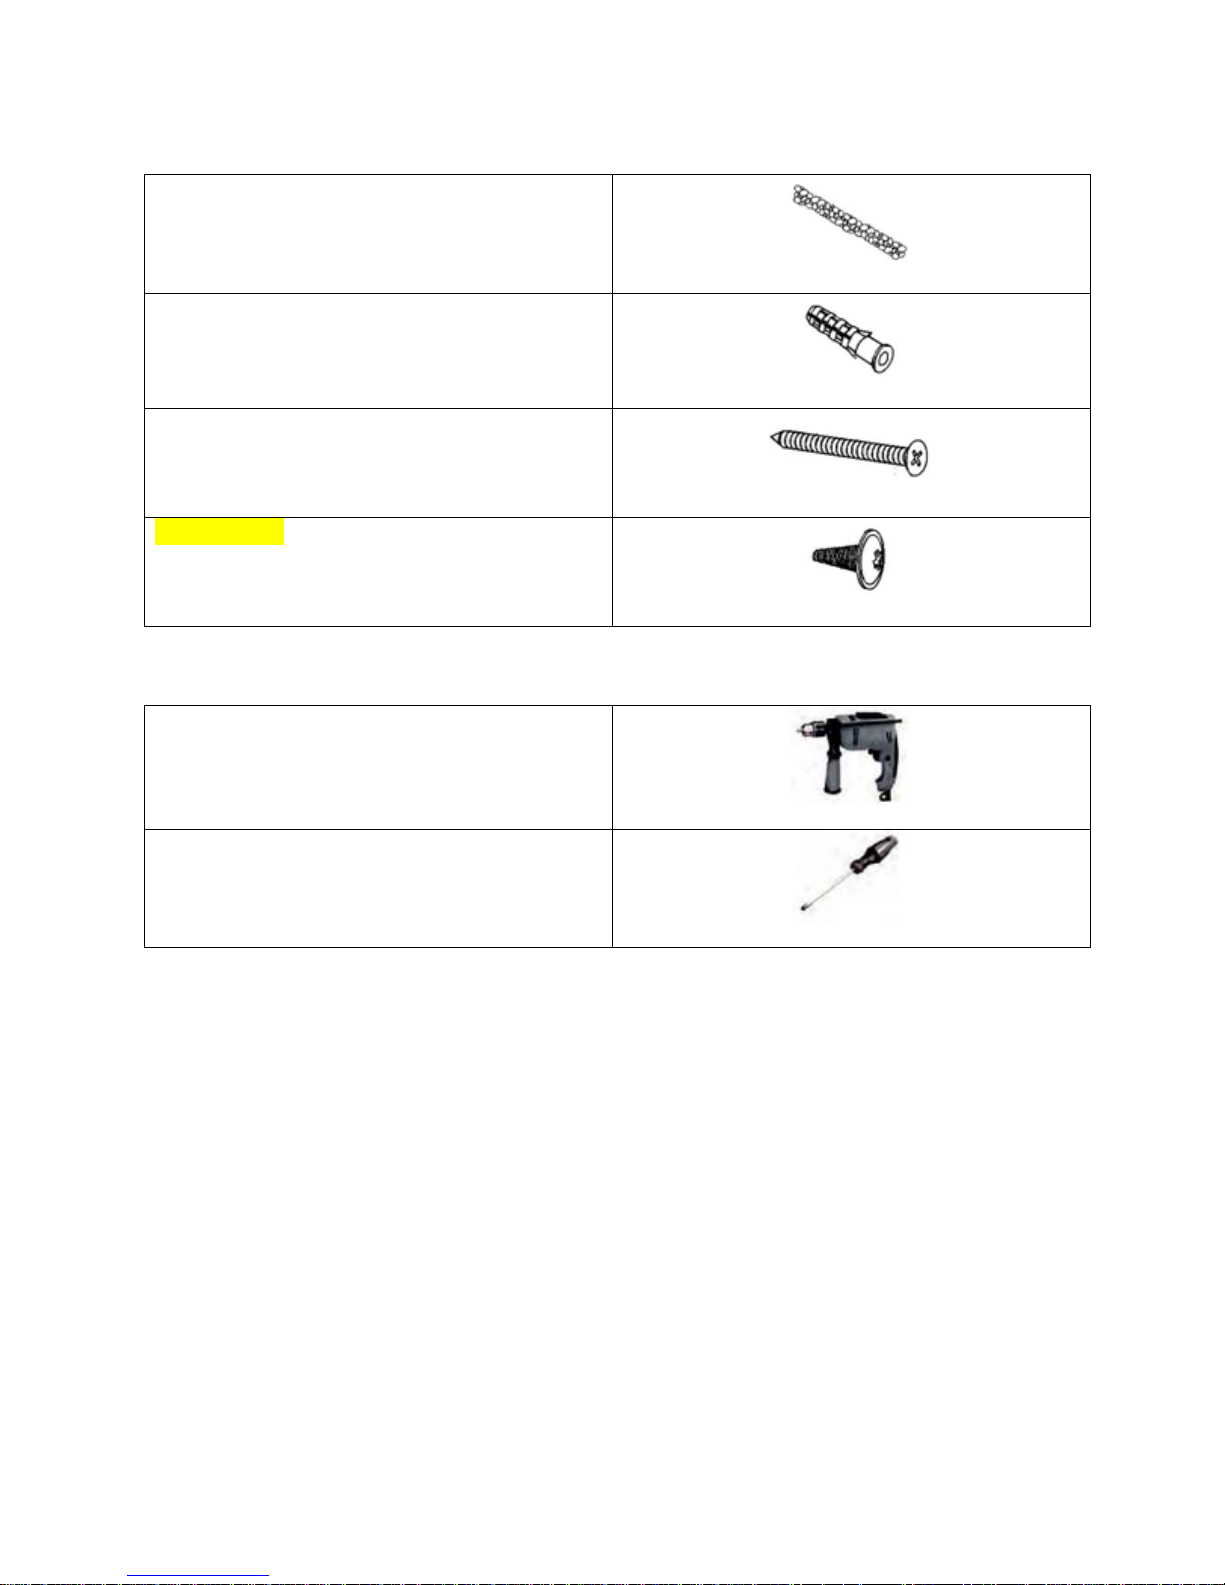
Decorative Crystals
Wall plug (4pcs)
Screw 1 (4pcs)
Screw 2 (4pcs)
Drill
Phillips screwdriver
Note: Tools Required (not included)
Helpful Tips before Installation
• Please retain all packaging until you have checked and counted all the parts and other package
contents.
• The package contains small apparatus which should be kept away from young children and
infants.
• We suggest that you move all the smaller parts into a container to reduce the risk of losing them.
• At least 2 people are required to install this fireplace.
• It is recommended to place your fireplace near an existing outlet, for ease of electric connection.
• Do not attempt to wire new outlets or circuits. To reduce the risk of fire, electric shock or injury
to persons, always have a licensed electrician perform maintenance and other repairs.
• Connect to properly grounded outlet only
• Do not connect the fireplace to the power supply until properly mounted on the wall and the
instructions are carefully read.
• The minimum distances must be observed as shown in the diagrams below.
• During installation of the fireplace, avoid any possible damage to concealed cables.
5
Page 6

• Please be careful when drilling holes.
Identifying Mounting Location
• When choosing a location for your electric Fireplace, ensure that the general instructions are
followed.
• This Fireplace must be mounted on a flat wall. Ideally, install the Fireplace directly on a brick
wall, masonry surface or the internal wooden frame of a plasterboard wall. If the wooden frame
behind the plasterboard is not accessible, use a minimum of four heavy-duty anchors (not
included) that are suitable for the weight of the Fireplace. If you are not sure if the wall is stable
enough,
consult a hardware expert.
• If the Fireplace is to be mounted on to a plasterboard wall with wooden studs, make sure the
wall is strong and stable enough to hold the weight of the appliance. The vapor control barrier
must not be damaged, and the structural members of the house must not be damaged. We
recommend minimum 12mm thick plasterboard.
• Do not recommend that the Fireplace be fitted to a wall covered in blown vinyl wallpaper,
polystyrene tiles or other flammable materials.
• It is important that the Fireplace be never installed under a shelf or flammable materials such as
curtains.
• For best results, install the Fireplace away from direct sunlight, moisture and dust.
• Before drilling into walls, always check that there are no hidden wires, water pipes, gas pipes etc.
Make sure that screws and wall plugs supplied are suitable for supporting the unit in your
surface. Consult a qualified person if you are not sure.
• For best view of the flame effect, it is recommended that there be a distance of 2 feet from the
bottom of the fireplace and the floor.
Unpacking & Handling
Before starting the installation of this Fireplace, please read the following:
1. Installation should be carried out by two adults to avoid injury or damage. If for any reason it is
considered too heavy, please obtain additional assistance.
2. When lifting the Fireplace, always keep your back straight. Bend your legs and not your back.
3. Avoid upper body / top heavy bending. Always bend from the knees rather than the waist. Do
not lean forward or sideways while handling the fireplace.
4. Always grip the Fireplace with the palm of the hand. Do not use the tips of fingers for support.
5. While mounting, always keep the Fireplace as close to the body as possible.
6. Use gloves to provide additional grip.
7. Unpack the package and lift the product gently out of the box, place it on a flat surface with the
front panel facing up.
6
Page 7
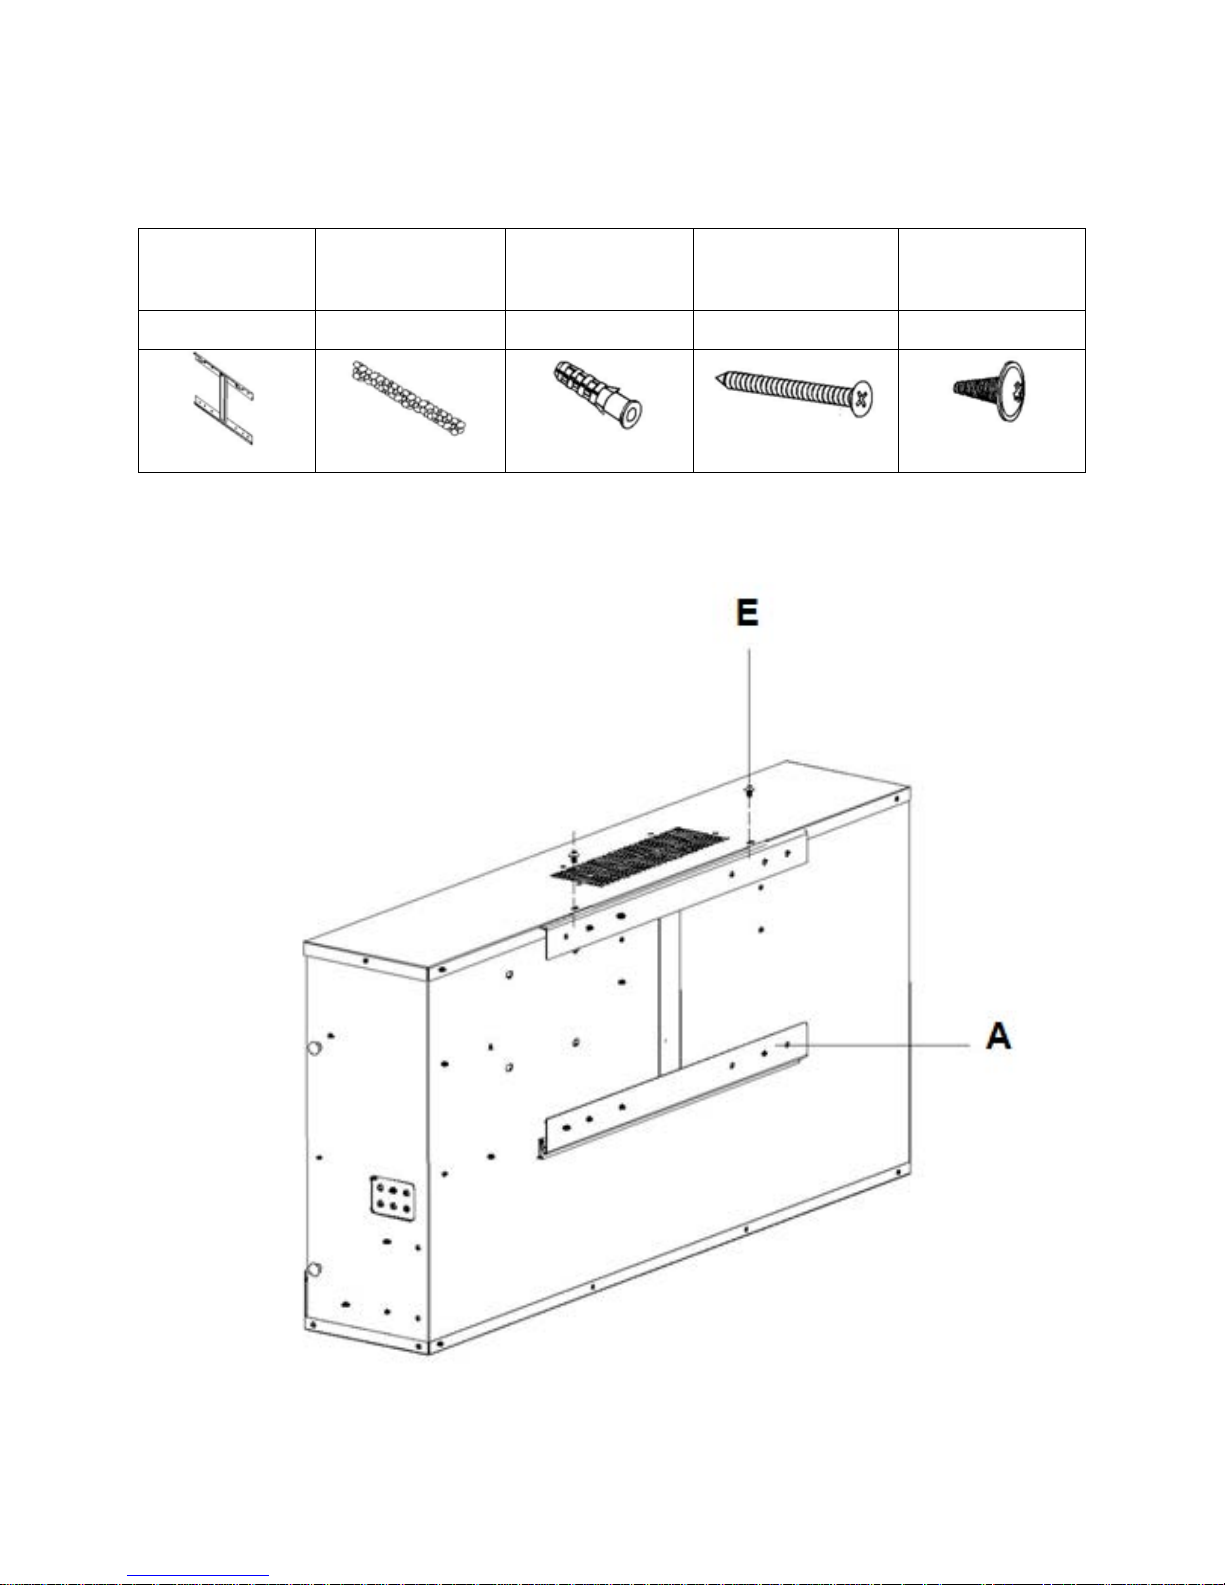
Wall Mount
Decorative
Wall plug
Screw 1
Screw 2
A B C D E
Hardware
(1PC)
Crystals
(4pcs)
(4pcs)
(4pcs)
Step 1 – Remove Wall Mount (A) from back of Fireplace by removing the two screws (E) at the top of
the fireplace.
7
Page 8
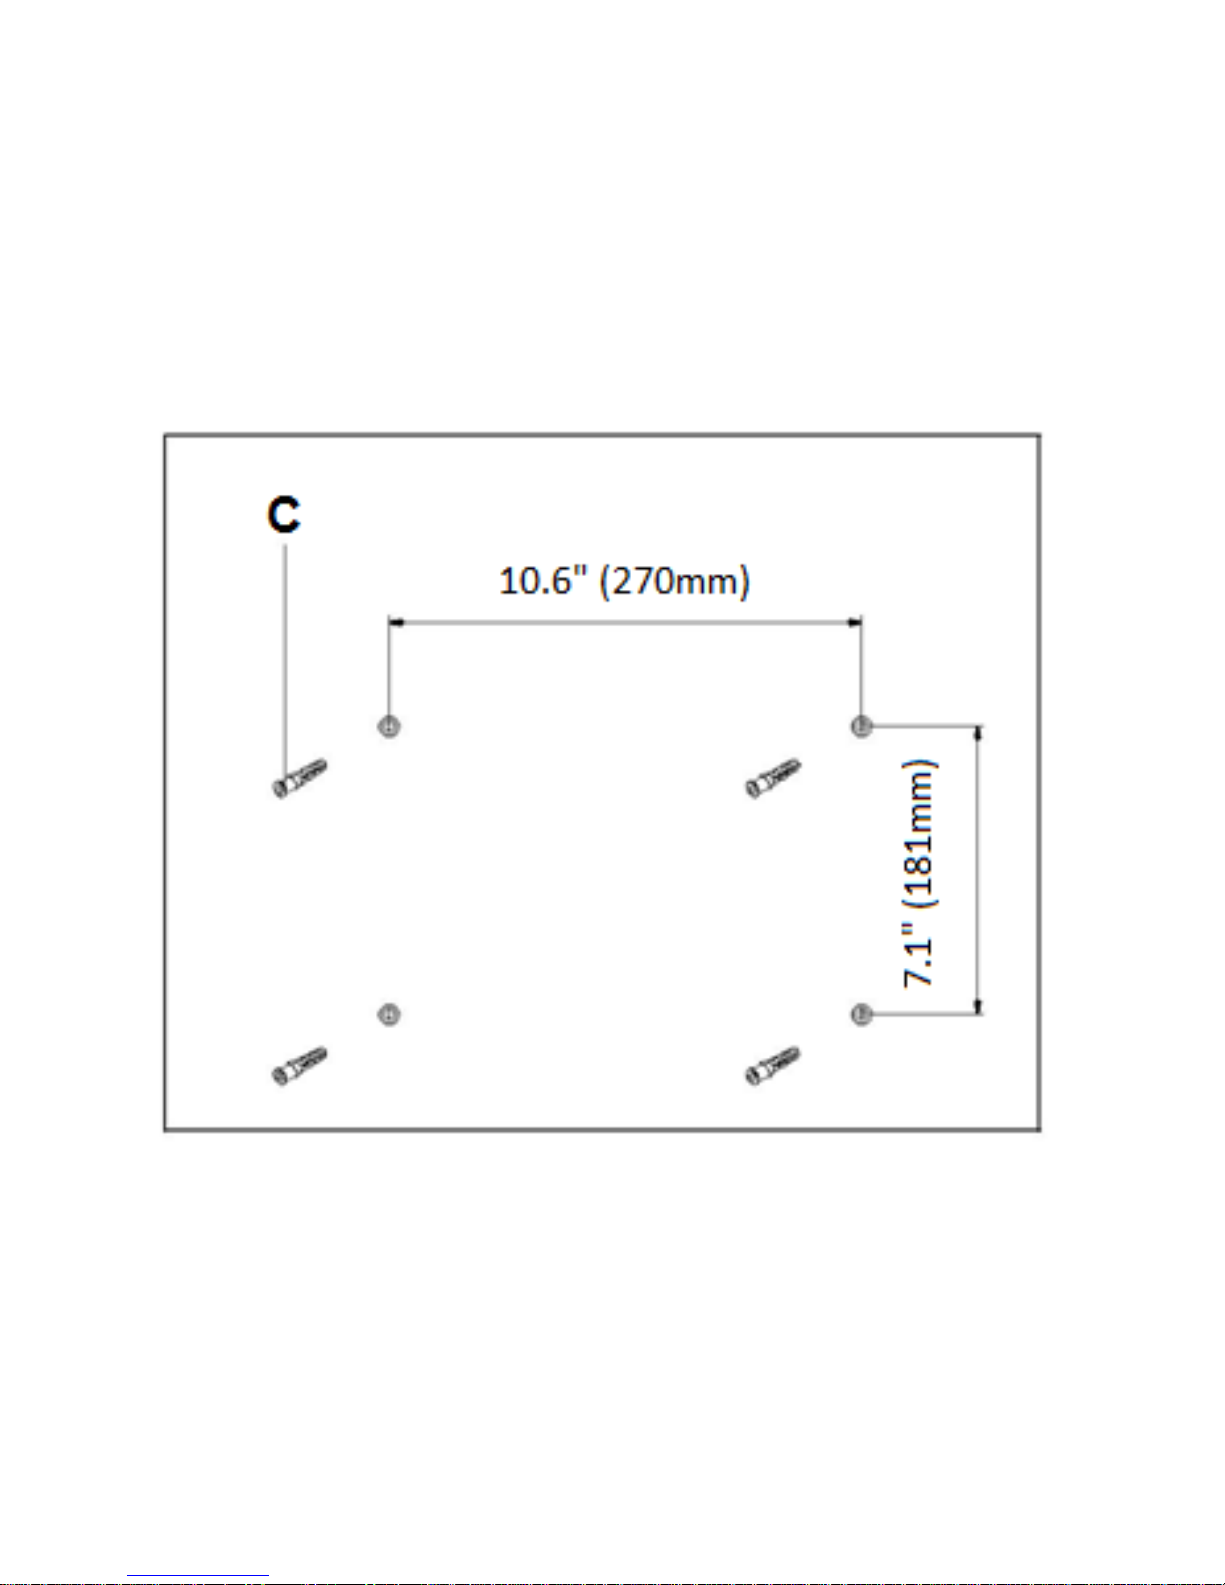
Step 2 – Install wall plugs (C) into wall.
1. Drill 4 holes [0.3” (8mm) diameter, 0.15” (4mm) deep] on the wall.
2. Insert wall plugs (C) into the drilled holes.
3. Please refer to the diagram for the locations of holes.
4. Both top holes should be located at least 16.5” (420mm) away from the ceiling.
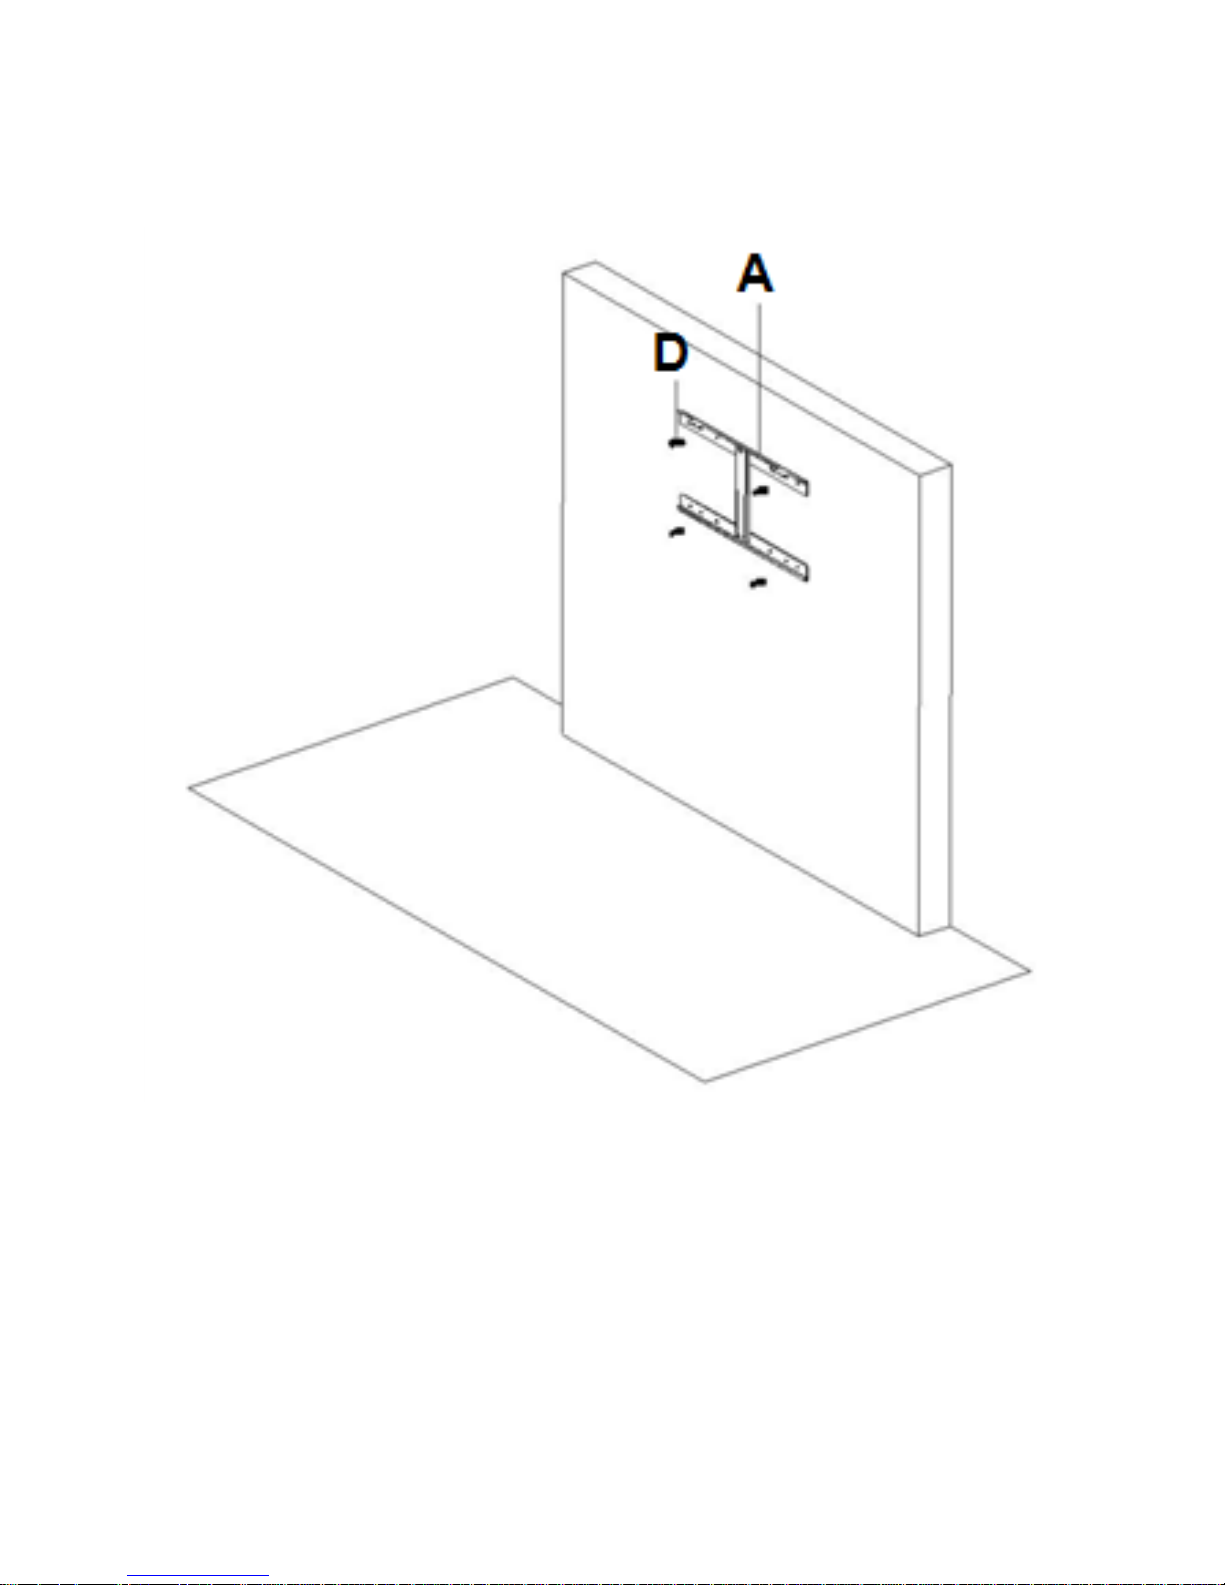
Step 3 – Attach Wall Mount (A) into wall.
1. Holding the Wall Mount (A) against the drilled holes, insert screws (D) through the second &
fifth holes on the upper and lower Wall Mount.
2. Mount the Wall Mount (A) in place with a Phillips screwdriver.
3. The screw should be fully inserted to the wall in order to avoid the screw head protruding over
the bracket.
4. Ensure the Wall Mount is securely mounted on the wall.
8
Page 9
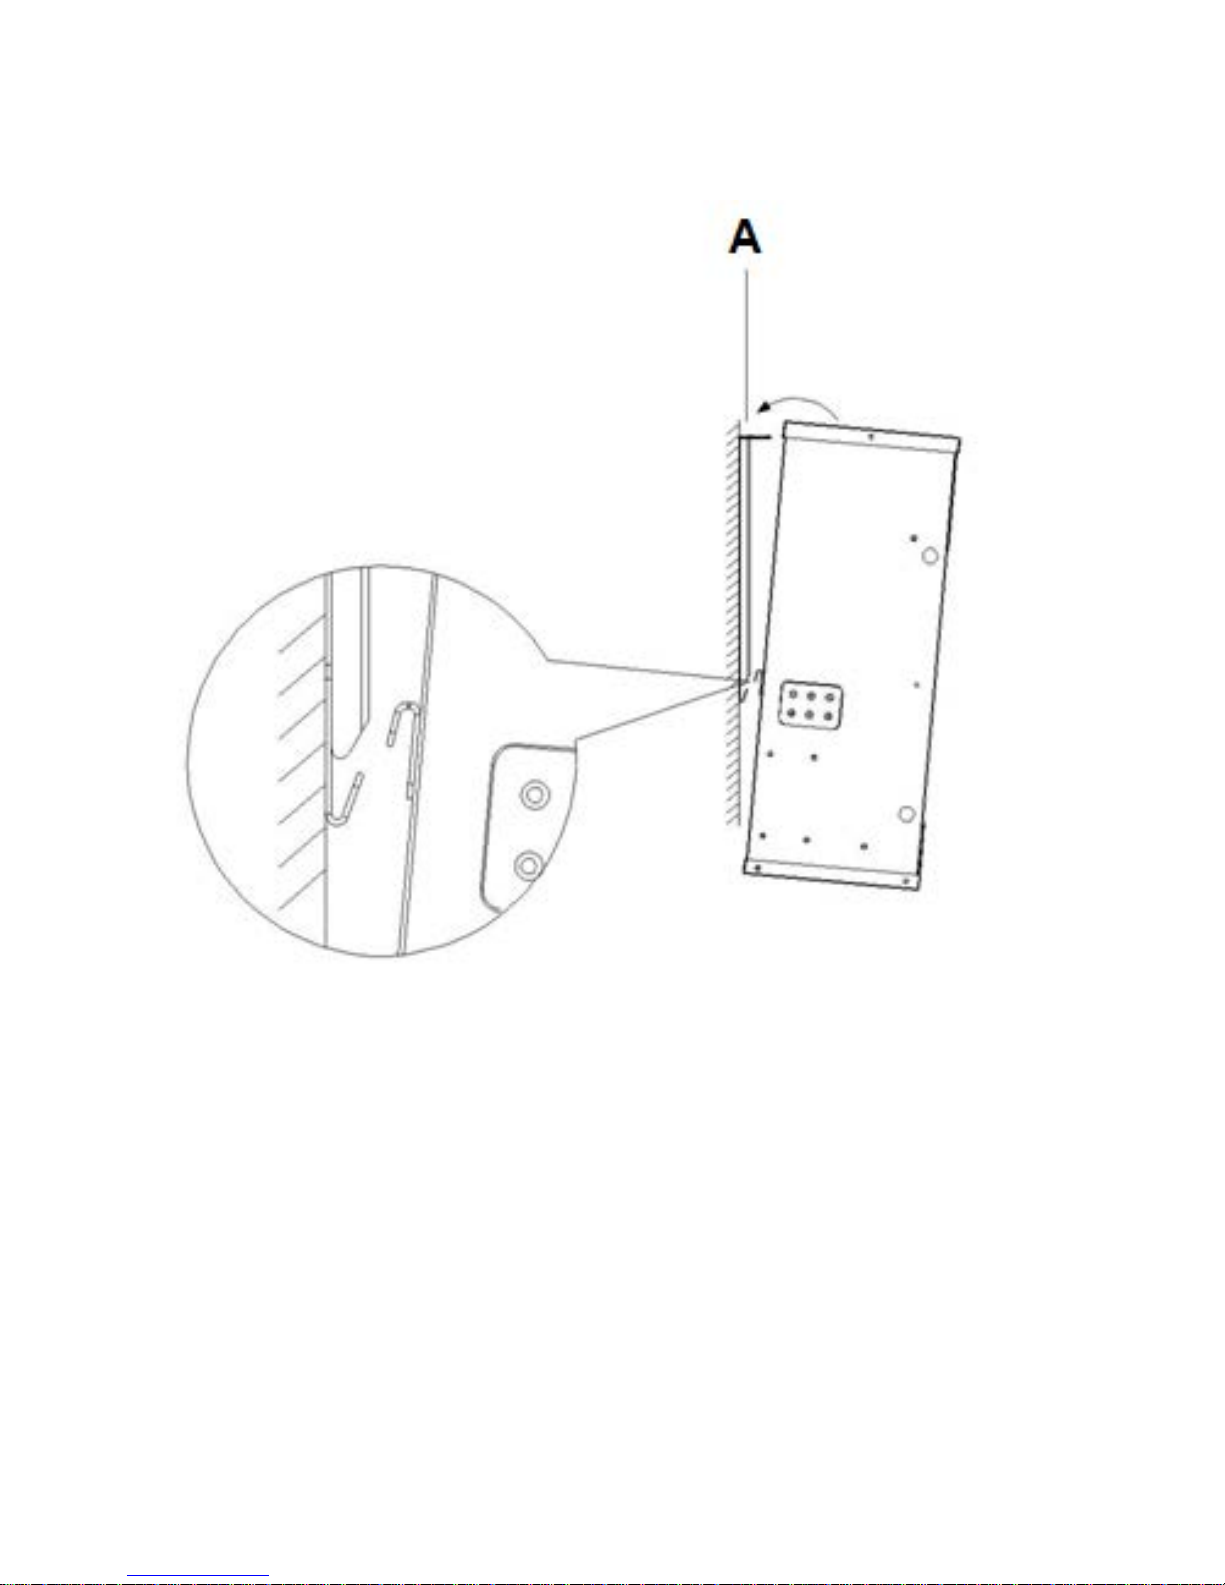
Step 4 – Hang the Fireplace onto the Wall Mount.
1. Check to make sure the Wall Mount (A) is securely attached to the wall.
2. Hang the Fireplace on the hooks at the bottom of the Wall Mount (A) and push the Fireplace
into the Wall Mount (A).
3. Re-fasten both the screws (E) that were removed during Step 1.
4. Check that the top of the Fireplace is at least 400 mm from the ceiling.
9
Page 10
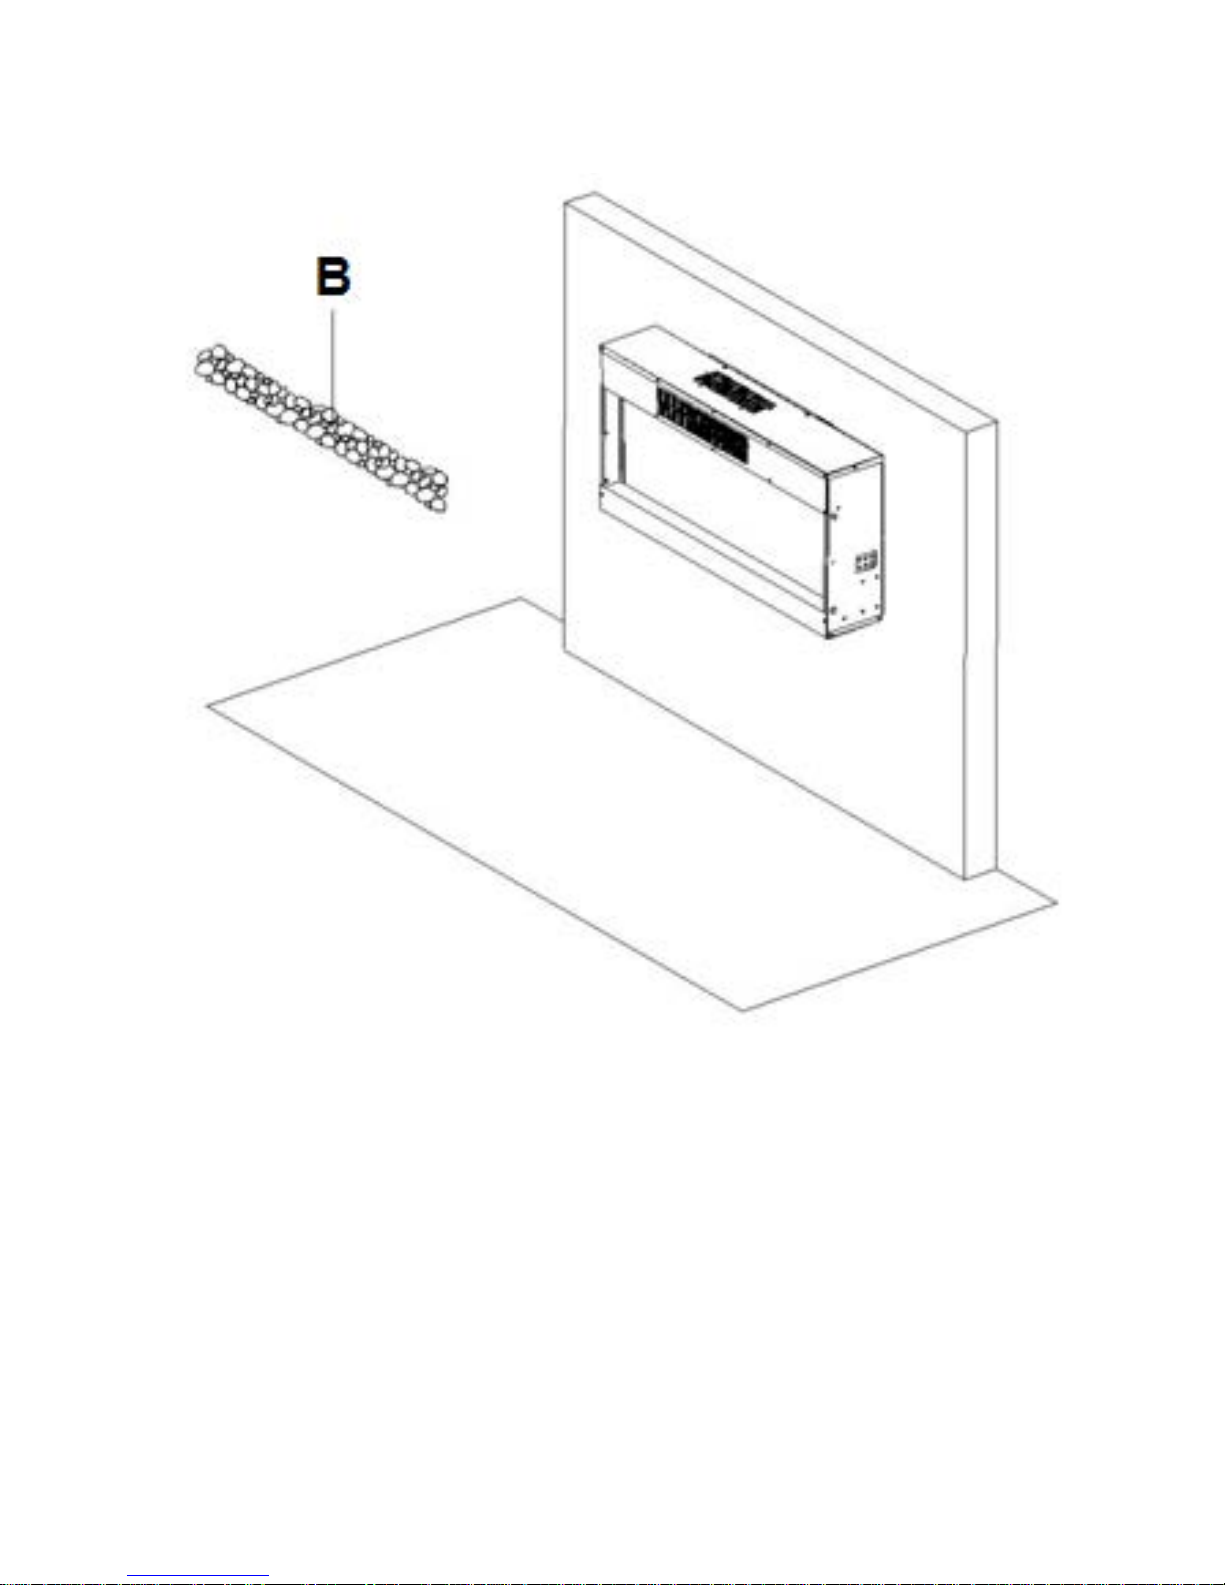
Step 5 - Place the decorative crystals on the front opening of the Fireplace.
1. Ensure the crystals are spread evenly in the Fireplace opening.
2. Check to make sure the crystal bed is securely in place.
10
Page 11
Step 6 - Install the glass panel.
1. Make sure the glass panel is free from debris and dirt.
2. Hold the panel securely and hang it onto the Fireplace hooks, located on both sides.
11
Page 12
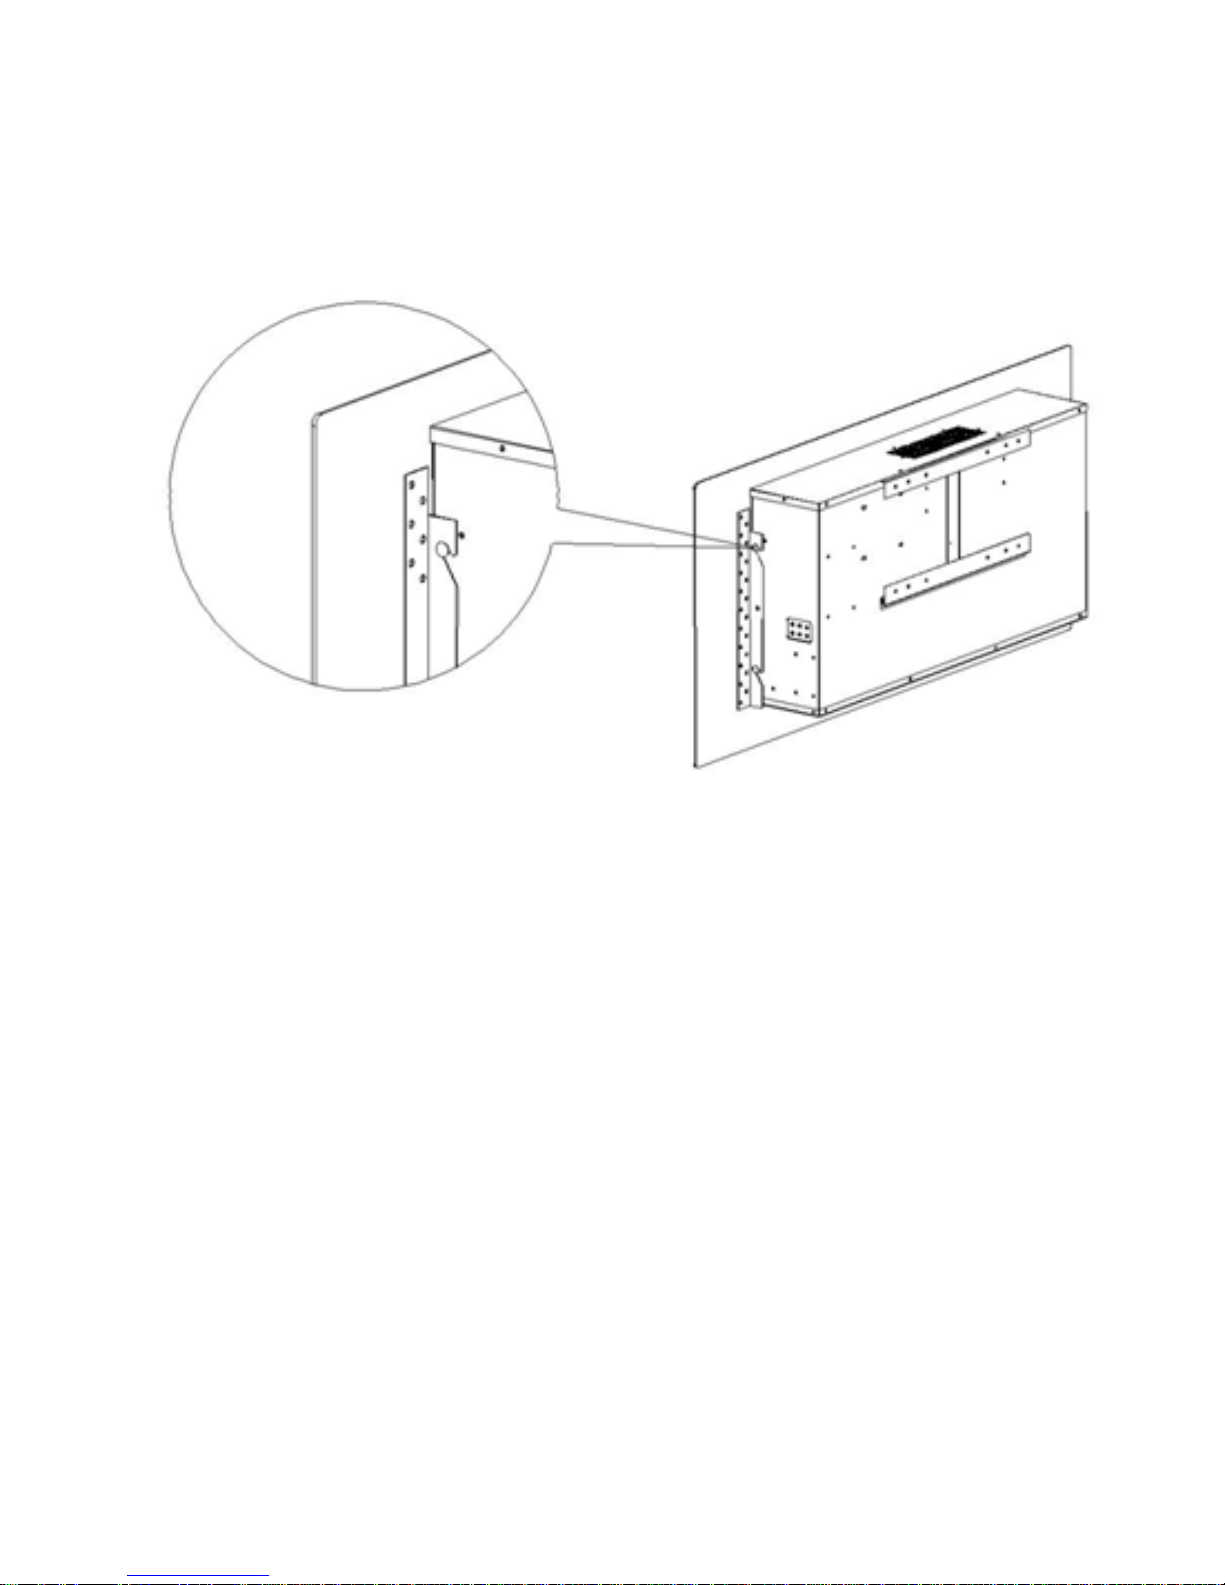
3. The panel should be secured on all four hooks on the Fireplace.
4. Check to make sure the panel is held securely in place.
Step 7 – Secure the glass panel onto the Fireplace.
1. Once you’ve mounted the glass panel onto the fireplace, locate the holes on both left and right
of the fireplace and insert screw (E) in each of the holes, through the hook, into the Fireplace.
12
Page 13
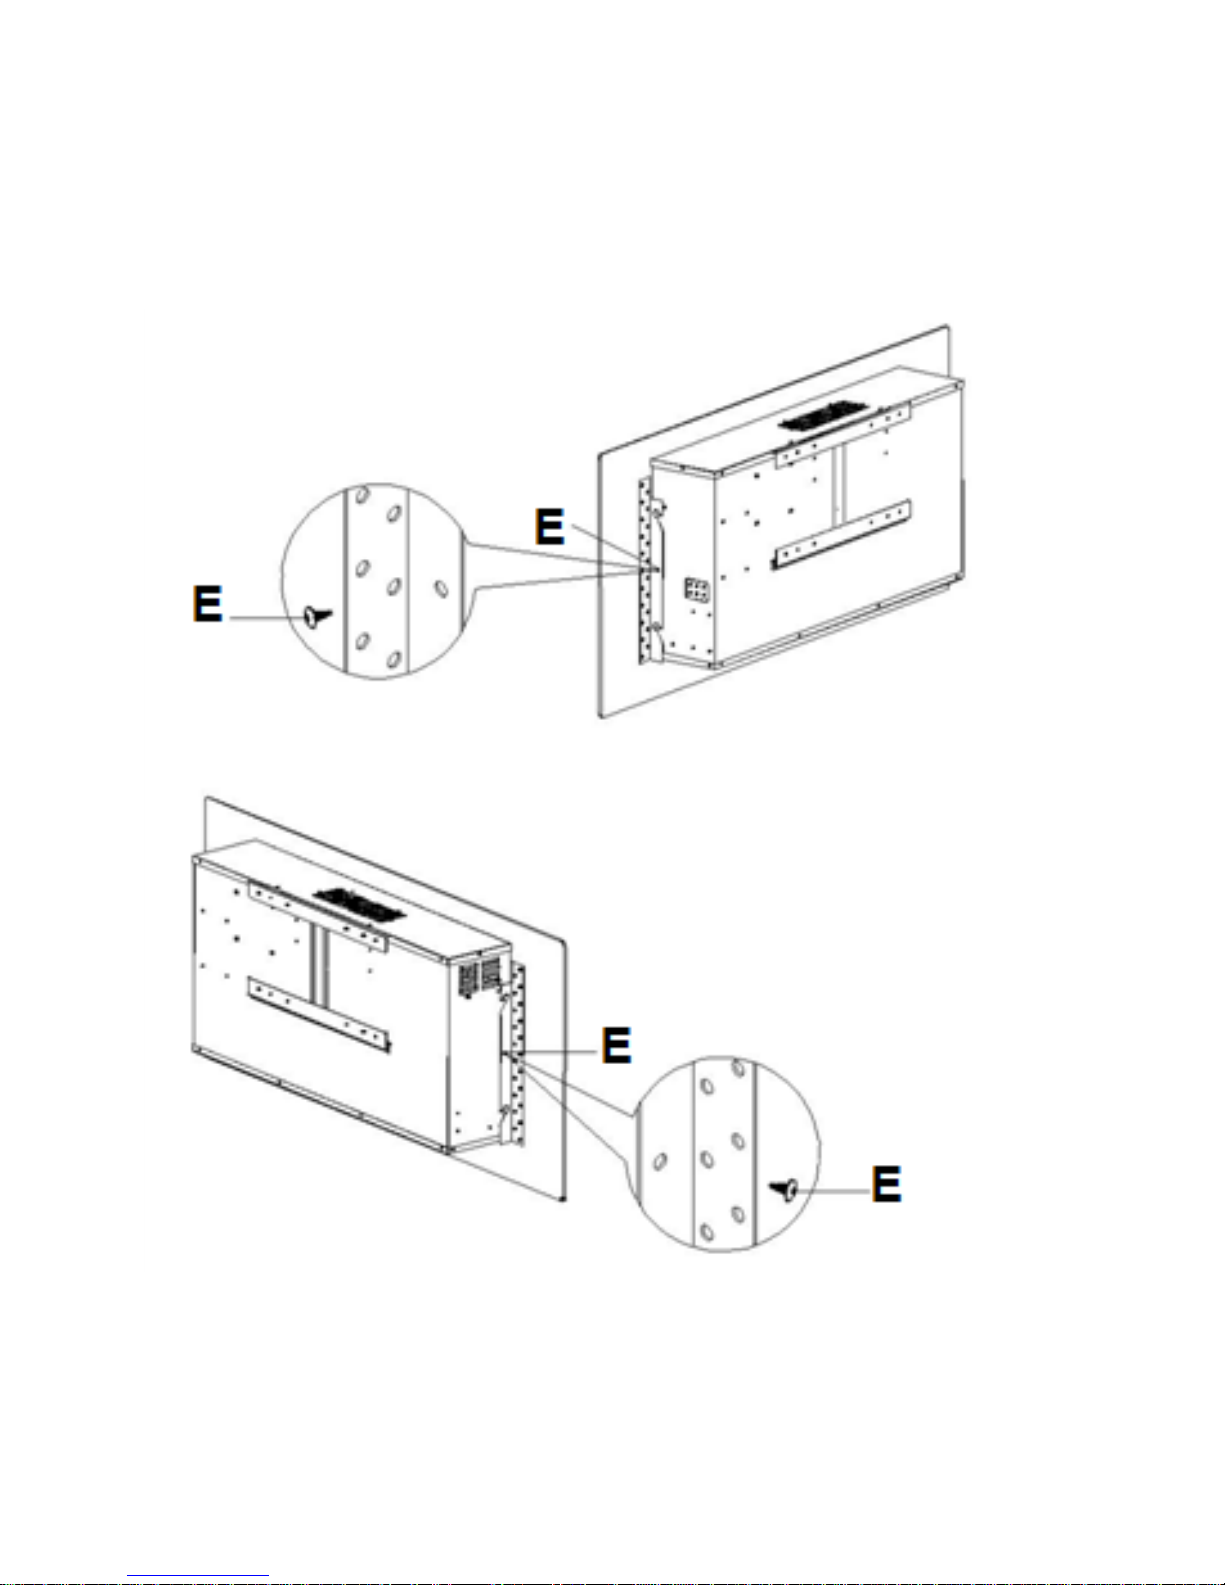
2. Tighten screw to pass it through the hook, on both sides.
3. Ensure the glass panel is secure.
Note: Tighten up the screw carefully, to avoid damage to the glass panel.
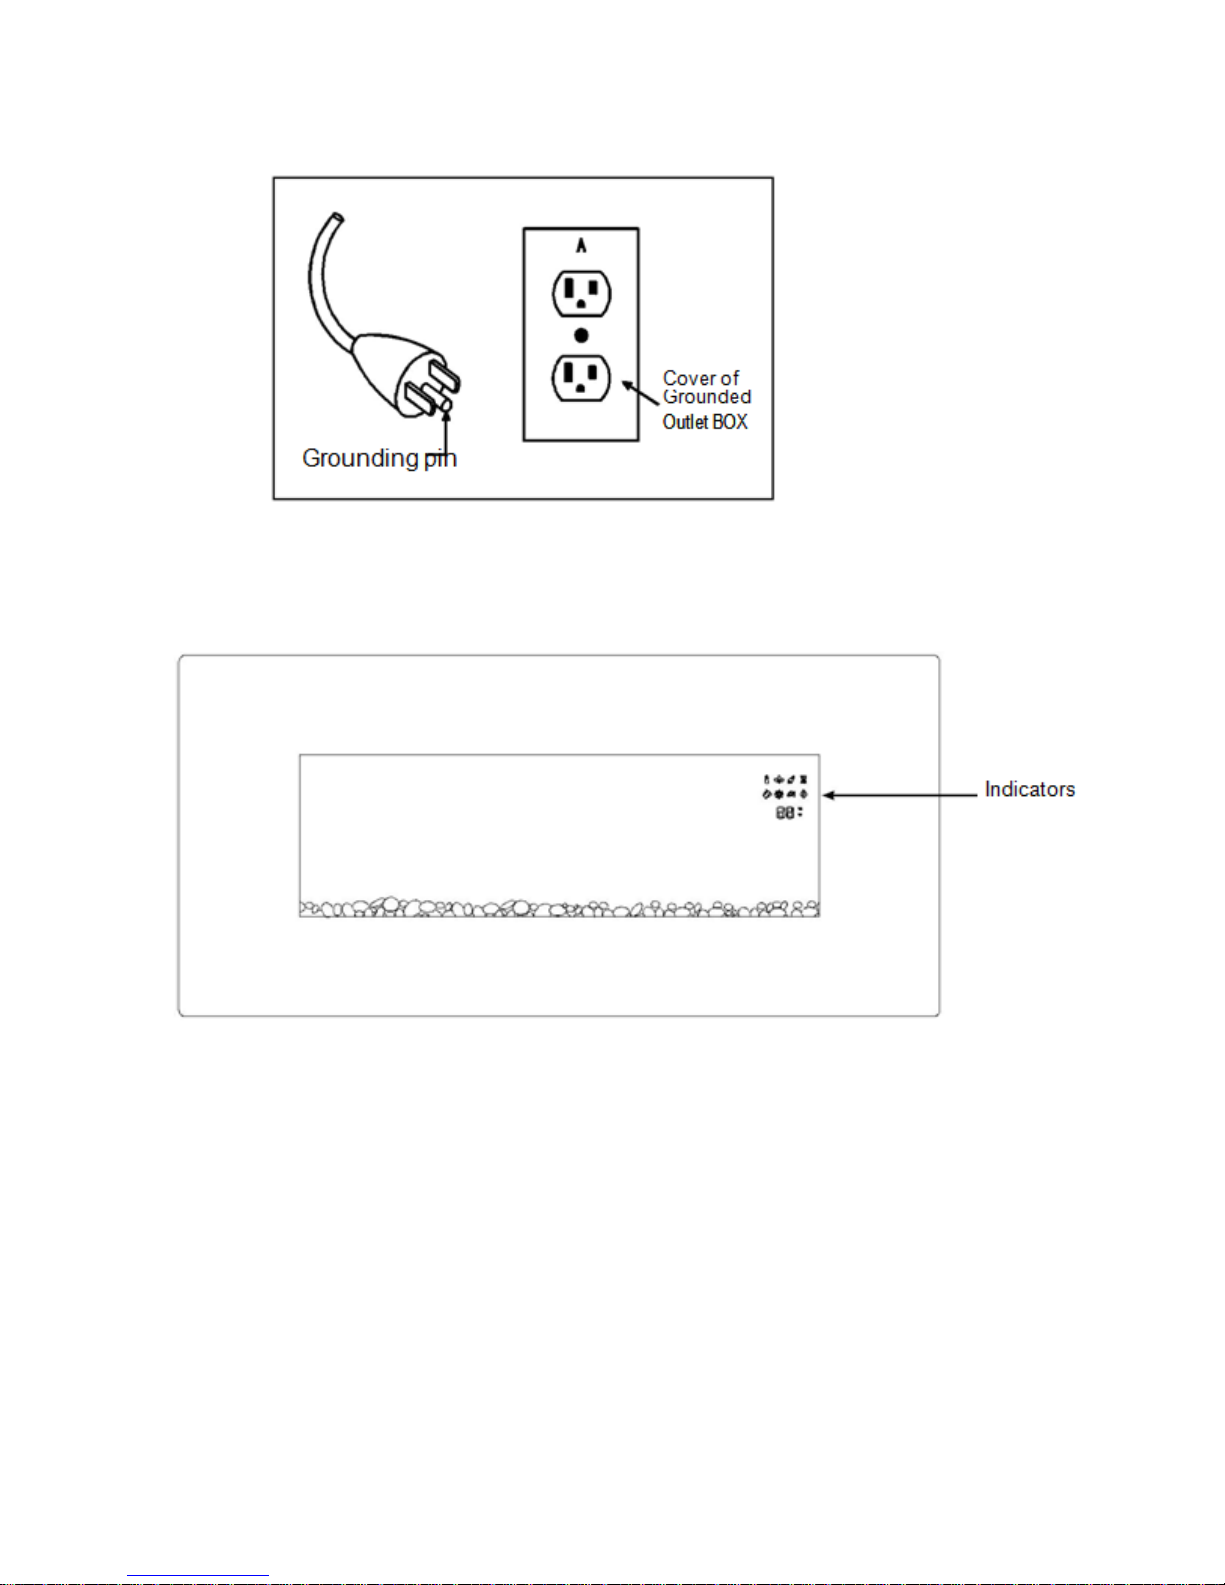
REMARK: This Fireplace uses 120 volts. The cord has a plug as shown below –
13
Page 14
INSTRUCTIONS FOR USE
When a function is changed from the control panel or remote control, there will be a corresponding
indicator displayed on the On-screen Display. The indicator shows the function changed and the level
selected. When the function is turned off, the corresponding indicator will turn off.
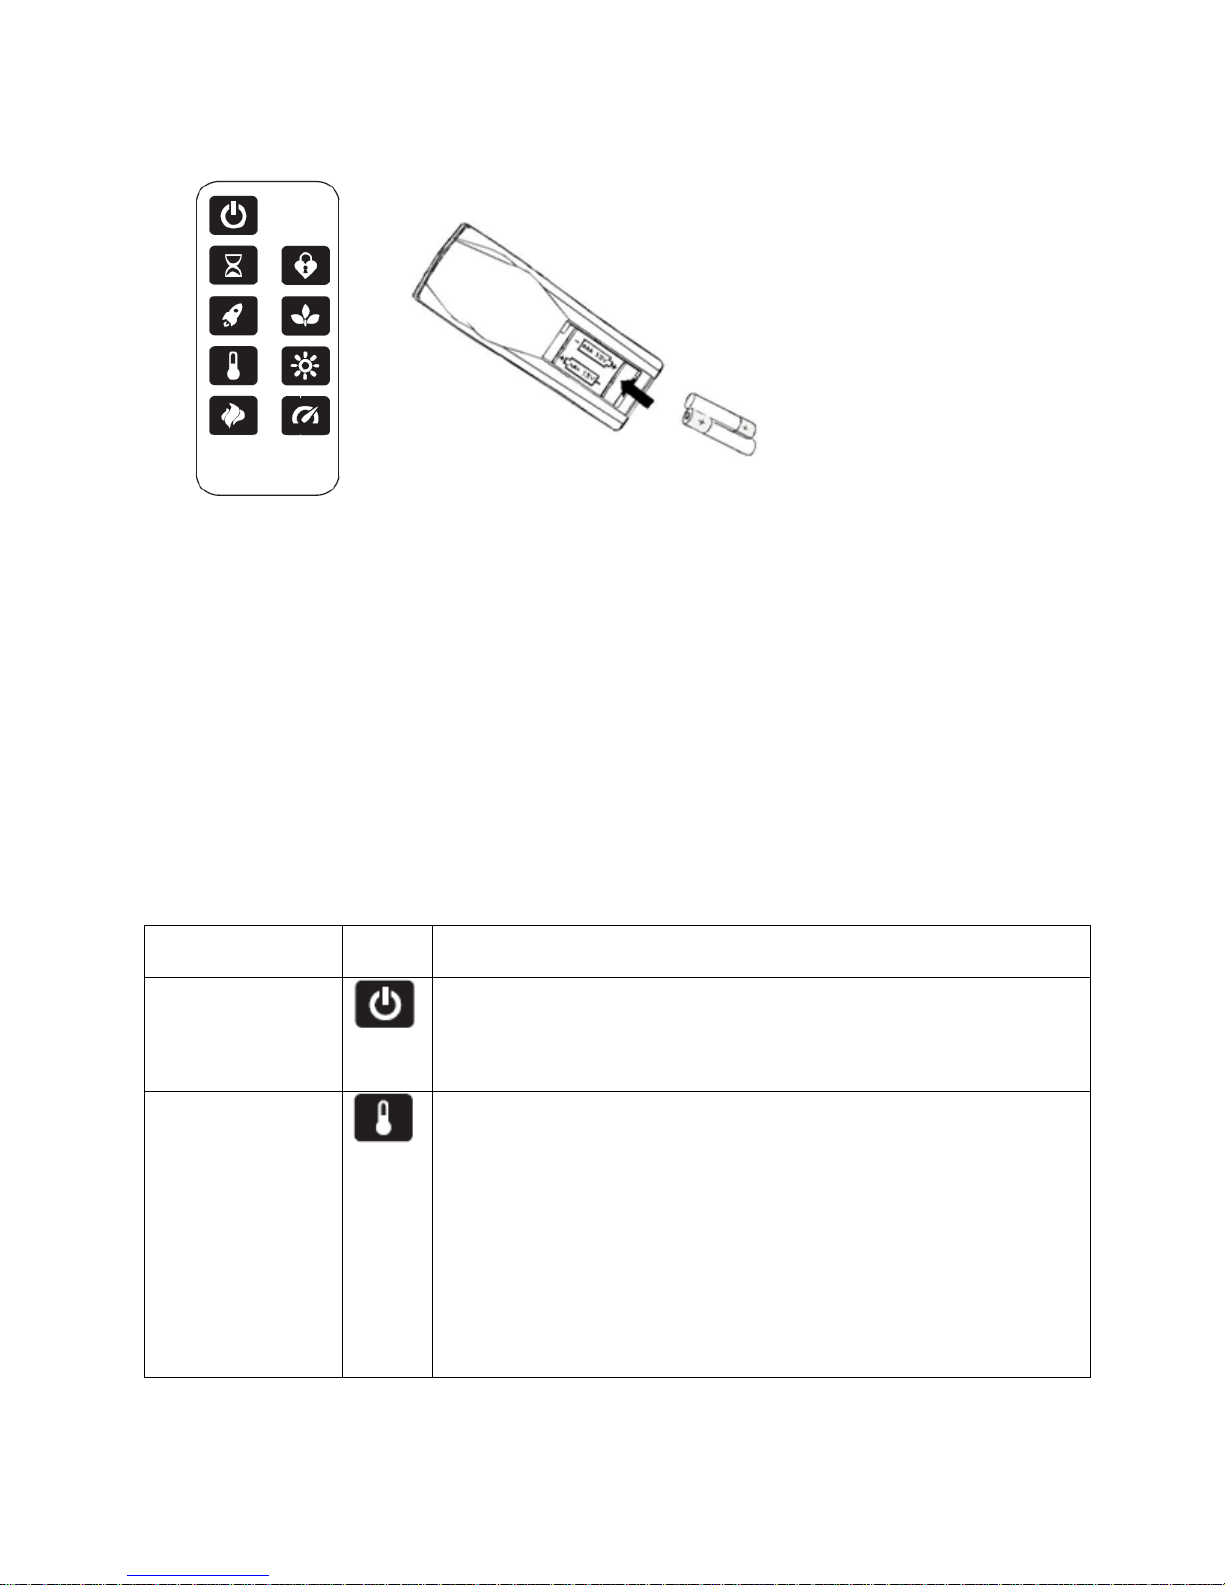
Remote control
14
Page 15
Function
Icon
Description
POWER
Press the button once, to put the fireplace in standby mode. It also turn
Heater
Press this button to turn on the heat function.
Replacing the remote control batteries
When the remote control stops operating or its range seems reduced, it is time to replace the batteries
with new ones.
1. On the back of the remote control, press and slide the battery cover open and remove the old
batteries.
2. Replace with two AAA batteries (not included), as per the indicated polarity.
3. Replace the battery compartment cover.
Note:
Batteries should be removed if the product is to be left unused for a long time.
Do not mix old and new batteries.
Do not mix alkaline, standard (carbon-zinc), or rechargeable (Ni-Cad, Ni-MH, etc) batteries.
Do not throw batteries in trash. Please follow local recycling laws for disposal of batteries.
on flame effect at the same time. Press one more time to turn off all
the functions at once.
The default setting temperature is 72°F (22°C).
The thermostat setting range is 50°-86°F or 10°-30°C.
The thermostat is adjustable in the increments of 2°F or 1°C.
To switch between °F and °C mode, press and hold the HEATER button
for 5 seconds.
15
Page 16
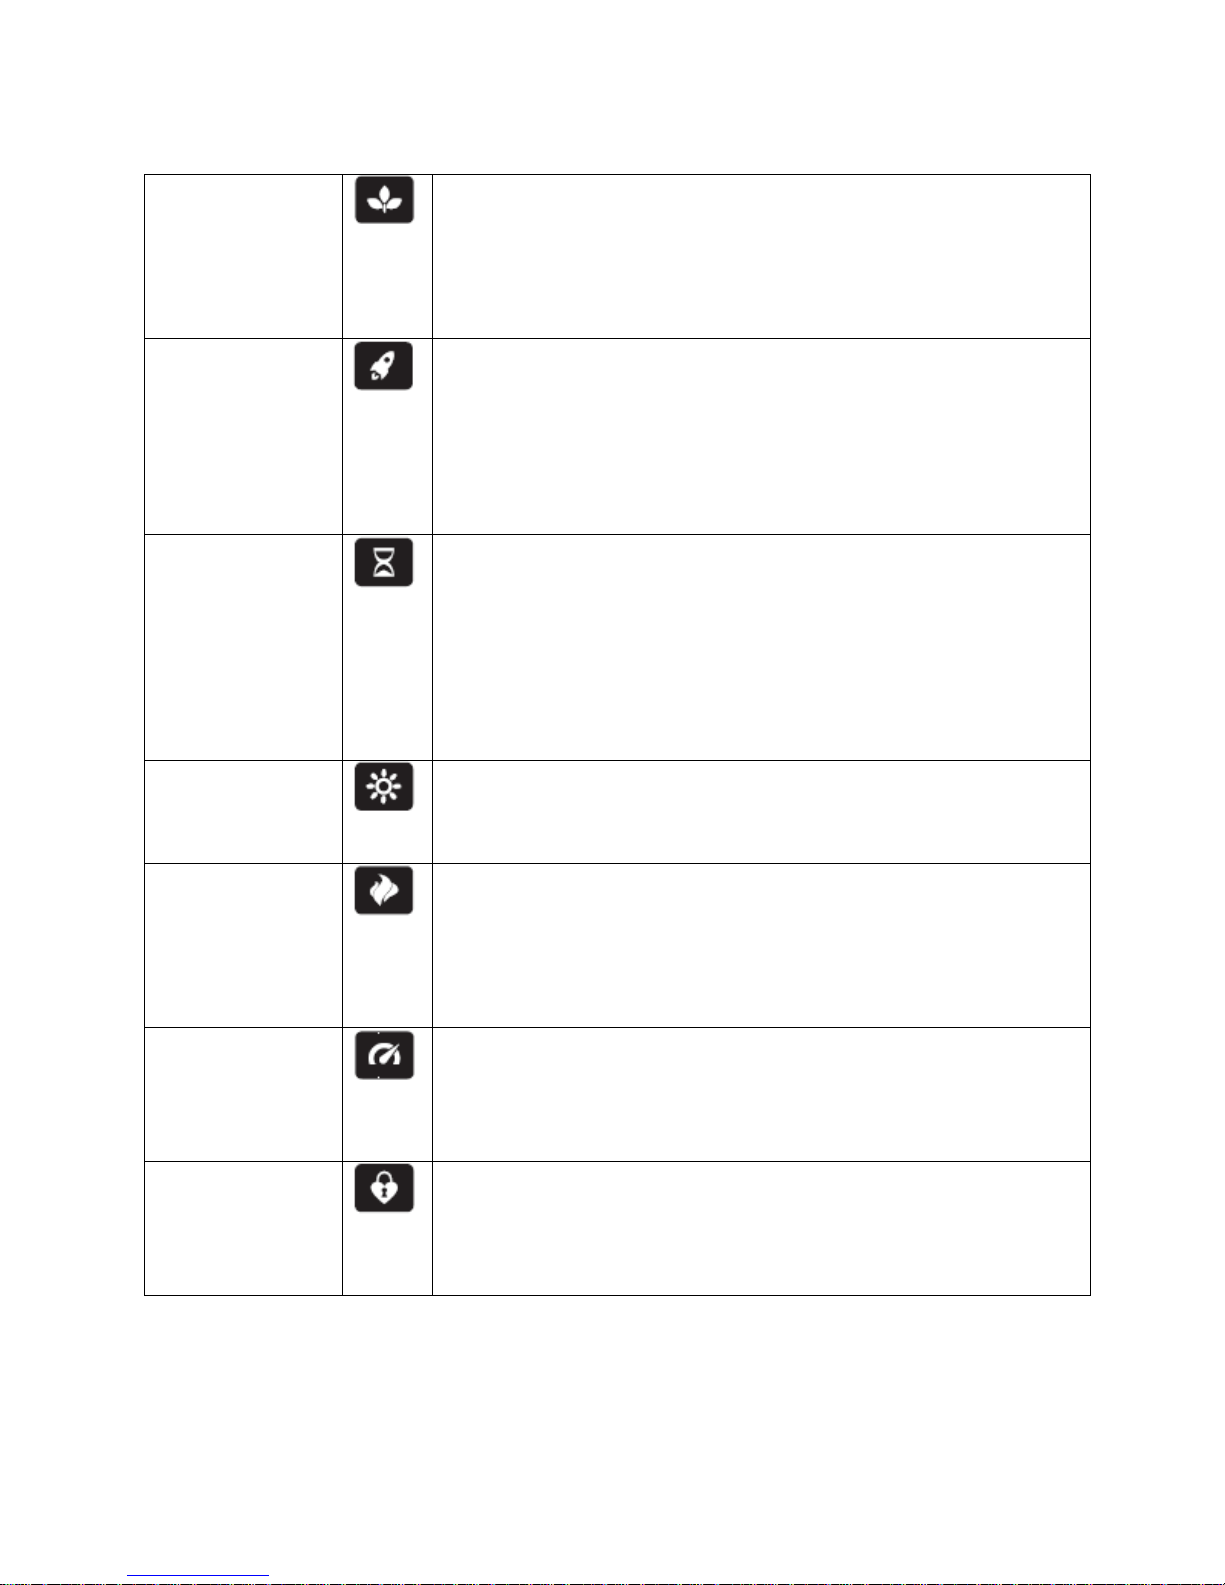
ECO
Press the ECO button when the heater is on, to run the heater in a
BOOST
To quickly heat up a cold room/space, press the BOOST button to run
TIMER
This function turns off the fireplace after the selected duration,
BRIGHTNESS
Brightness is adjustable from remote control only.
FLAME MODE
5 different flame effects are available: Snow White, Rubine, Ocean,
FLAME SPEED
The flame speed is adjustable from remote control only.
CHILD SAFETY LOCK
Child safety lock is adjustable from remote control only,
reduced wattage range.
NOTE: Hold the ECO button for 3 seconds to disable any Fireplace
functions.
the heater at maximum power.
Press the BOOST button repeatedly to cycle through the following
Boost settings: 5 minutes, 10 min, 15 min, 20 min, 25 min, 30 min and
off.
automatically. Press the Timer button repeatedly to cycle through the
following timer durations: 30 minutes, 1hr, 2hrs, 3hrs, 4hrs, 5hrs, 6hrs,
7hrs, 8hrs and off.
The Fireplace will automatically turn off when the timer reaches zero
minutes.
This button controls the brightness of the flame effect.
Provence & Party.
Party: In this mode, the unit will cycle automatically between all flame
effects automatically.
There’re 5 speed modes: setting 1 is the slowest; setting 5 is the
fastest.
Holding the child safety lock button for 3 seconds disables or enables
all functions on the control panel and remote control.
Troubleshooting
16
Page 17

Problem
Possible cause
Corrective action
Display shows “E1”.
Auto shut off due to
Inspect the Fireplace and check that the air inlets
Display shows “E2”.
The thermostat sensor is
Unplug and plug the fireplace. If it doesn’t fix the
No Power
There is no power to the
Check that unit is plugged into a standard 120V
The heater does not
Thermostat setting is
Adjust the temperature settings to ensure that
Power cord gets
Normal operation.
Check your heater cord and plug connections.
Remote control
There are no batteries or
Change the remote batteries.
blow warm air.
warm.
overheat has been
activated.
disconnected.
unit.
preventing the Fireplace
from turning on.
and outlets are not blocked as this may cause
overheating. Unplug the Fireplace for 10 minutes
and allow it to cool down. Plug it back in and
turn it on; This is will reset the fireplace. Check
the Fireplace for signs of overheating. If the
problem persists discontinue use of the Fireplace
and contact customer service.
error message, contact customer service.
outlet. Press the power button several times and
make sure the power is set to the “ON” position.
the thermostat is set higher than the current
room temperature.
Faulty wall outlet connections or loose plugs can
cause the outlet or plug to overheat. Be sure the
plug fits tight in the outlet. Fireplace draws more
current than small appliances, overheating of
the outlet may occur even if it has not occurred
with the use of other appliances. During use
check frequently to determine if your plug outlet
or faceplate is HOT! If so, discontinue use of the
Fireplace and have a qualified electrician check
and/or replace the faulty outlet(s).
doesn’t work.
the signal is poor.
Operate remote control at a slow measured
pace.
Press the remote control buttons with even and
gentle pressure. Repeatedly pressing buttons in
rapid succession may cause the remote to
17
Page 18

malfunction.
Loud noise from the
The air inlets are dirty or
Check the air inlets for obstructions or dust build
The blower/Fireplace
Contact Customer Service for troubleshooting. If
Fireplace.
obstructed.
assembly is defective.
up.
this doesn’t fix the problem, contact the retailer
you bought the product from, for replacement.
Cleaning & Maintenance
• Disconnect from the power supply before attempting any maintenance or cleaning in order to
reduce the risk of fire, electric shock to persons or damage to property.
• Warning - Always disconnect from the power supply before cleaning fireplace.
• For general cleaning, use a soft, clean duster. Never use abrasive cleaners. The glass viewing
screen should be cleaned thoroughly with a soft cloth. Do NOT use proprietary glass cleaners.
• Periodically check all fixings and tighten if necessary.
• Do not strike or slam the glass.
• Do not use abrasive cleaning solvents to clean the glass.
• Unplug this Fireplace when not in use.
• The LED bulbs inside can NOT be replaced.
Technical Specification
• Supply: 120V
60Hz
,
• Dimensions: 48”W x 5.7”D x 22”H
• Weight: 48.4 lbs
• Rated Power: 1500W
• Bulb: LED (cannot be replaced)
18
 Loading...