


Main Heating Relay: 16amp max.
Auxiliary Heating Relay: 3amp max.
IP21 rated.
Working temperature: 0-50°C.
Storage Temperature: -25-50°C
The accuracy of temperature control +
1% °C
Certification: EN60730-2-9/EN50081-1/EN50082-2 (EMC testing standard) and IEC-607-
60730-2-9
Declaration of Conformity may be downloaded from www.warmfloornz.com
Warranty:
Warmfloor warrants this product to be free from workmanship or material defects for a
period of two (2) years from the date of purchase by the consumer. Warmfloor reserves
the right to repair or provide a replacement unit at their discretion. This warranty does
not cover removal or reinstallation costs.
Please visit www.warmfloornz.com
for further information relating to common consumer
questions and answers.
3. Press CLEAR to reset Power Indicator
Run the heating system for the same time period again. View your power indicator to record
value again. Analyse the power differences.
Please Note: The power indicator is a feature to help best run your system cost effectively, but
is not designed for accurate power metering. This option is available for you to attain the most
economical running costs should you wish.
In some instances, depending on the climate zone, floor construction, and substrate, it may
be desirable to run your heating in the continuous manual mode with a lower temperature
set point.
More information may be available at www.warmfloornz.com
Auxiliary Heating Relay: 3amp max.
IP21 rated.
Working temperature: 0-50°C.
Storage Temperature: -25-50°C
The accuracy of temperature control ± 1°C
Certification: EN60730-2-9/EN50081-1/EN50082-2 (EMC testing standard)
and IEC-607-60730-2-9
Declaration of Conformity may be downloaded from www.warmfloornz.com
Warranty:
Warmfloor warrants this product to be free from workmanship or material defects for a period
of two (2) years from the date of purchase by the consumer. Warmfloor reserves the right to
repair or provide a replacement unit at their discretion. This warranty does not cover removal or
reinstallation costs.
Please visit www.warmfloornz.com for further information relating to common consumer
questions and answers.
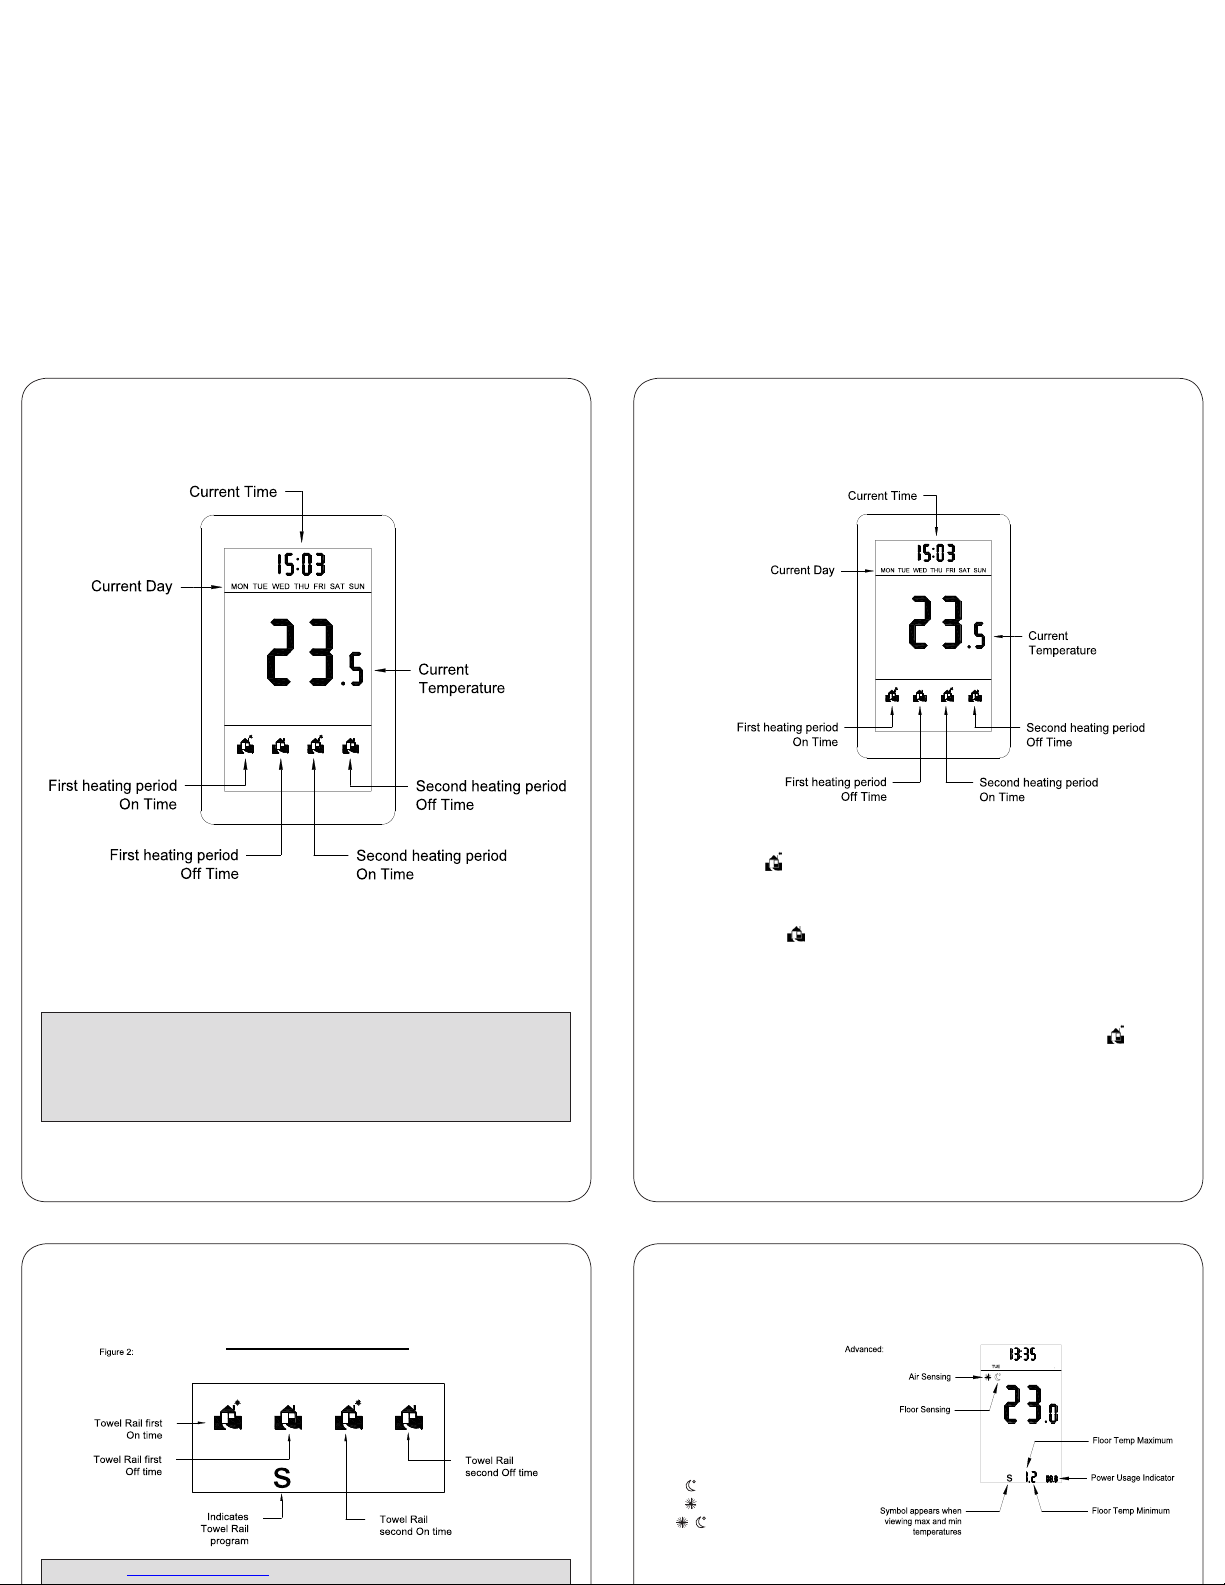
To customize time settings
1. Press PGM (first symbol appears) to set First heat up period ON time.
2. Press and hold DAY button until all seven days of the week are displayed.
3. Press HOUR button until first heat up hour is reached
4. Press MINUTE button until first heat up minute is reached
5. Press PGM (second symbol appears) to set First heat up period OFF time.
6. Press HOUR and then MINUTE buttons as above to set first heat up period OFF time.
7. Press PGM. Repeat steps 3 to 6 as above to set second heating period.
8. Press RET to exit programme
Note: If a key is not pressed when setting heat times within 20 seconds, you will need to press
programme button until you reach the heating period you wish to alter (indicated by symbol)
Programme Weekend Times
1. Press PGM.
2. Press DAY button until Saturday is displayed
3. Repeat the process (3 - 8 as above) to set 1st and 2nd heat up periods for Saturday
4. Once Saturday has been programmed press DAY to step to Sunday and set times as previous
5. Press RETURN to exit program.
Note: To remove a heating period press PGM until time is displayed then press CLR.
2. Installers Basic Programming Guide continued
4. Advanced Programming Options
Alter Sensor Type
(WITH THERMOSTAT TURNED OFF)
• Press TEMP until desired method
is indicated as below:
1. Floor Sensing
2. Air Sensing
3. Air Sensing with floor
limiting temperature
Setting Maximum and Minimum Temperatures
3. Additional Installers Options
Programming Automatic Operating Times
ADDITIONAL INSTALLERS OPTIONS
HEATED TOWEL RAIL
(To alter factory default on/off times)
Programme Day and Time
(WITH THERMOSTAT TURNED ON)
1. Press DAY and view displayed day. Press s or ▼ arrows to set the day
2. Press HOUR and view current hour. Press s or ▼ arrows to set the hour
3. Press MIN and view current minutes. Press s or ▼ arrows to set the minutes
Programming Automatic Operating Times
(Factory default – all seven days)
First heat period 0600 ON
0800 OFF
Second Heating Period 1800 ON
2130 OFF
1. Installers Basic Programming Guide
ADDITIONAL INSTALLERS OPTIONS
HEATED TOWEL RAIL
(To alter factory default on/off times)
 Loading...