

Page 1
R
For assistance call
1.877.338.5493
1
05.18
Warmboard-R
installation guide
Page 2

2
Table of Contents
Setup and preparation Hardwood and tile installation Carpet, other flooring, temperature
guide and R–values
10 important installation highlights Page 3
Approved tubing list Page 4
Necessary tools Page 5
Choosing the correct router Page 6
Custom routing Page 7
Panel types Page 8
Example of panel/tubing design Page 9
Installing over existing subfloor Page 10
Installing over concrete slab Page 11
Tubing installation Page 13
Installing solid wood flooring Page 16
Hardwood manufacturers Page 18
Installing traditional strip and Page 19
plank hardwood
Installing engineered, laminate, Page 21
and bamboo flooring
Installing tile Page 23
Tile resources Page 31
Installing carpet Page 32
Carpet and padding R-values Page 33
Installing cork flooring Page 34
Installing vinyl Page 35
Installing linoleum Page 36
Finish floor R-values Page 37
Required water temp chart Page 38
Page 3
For assistance call
1.877.338.5493
10 important installation
highlights
Read these highlights before proceeding. They will save you time and hassle in the long run.
3
1. We recommend the existing subfloor to
be reasonably smooth and flat prior to the
installation of Warmboard–R. Inspect for
squeaks and refasten to joists if necessary.
2. The existing subfloor needs to be dry prior to the
Warmboard–R installation. Warmboard–R cannot
be exposed to rain before or after installation.
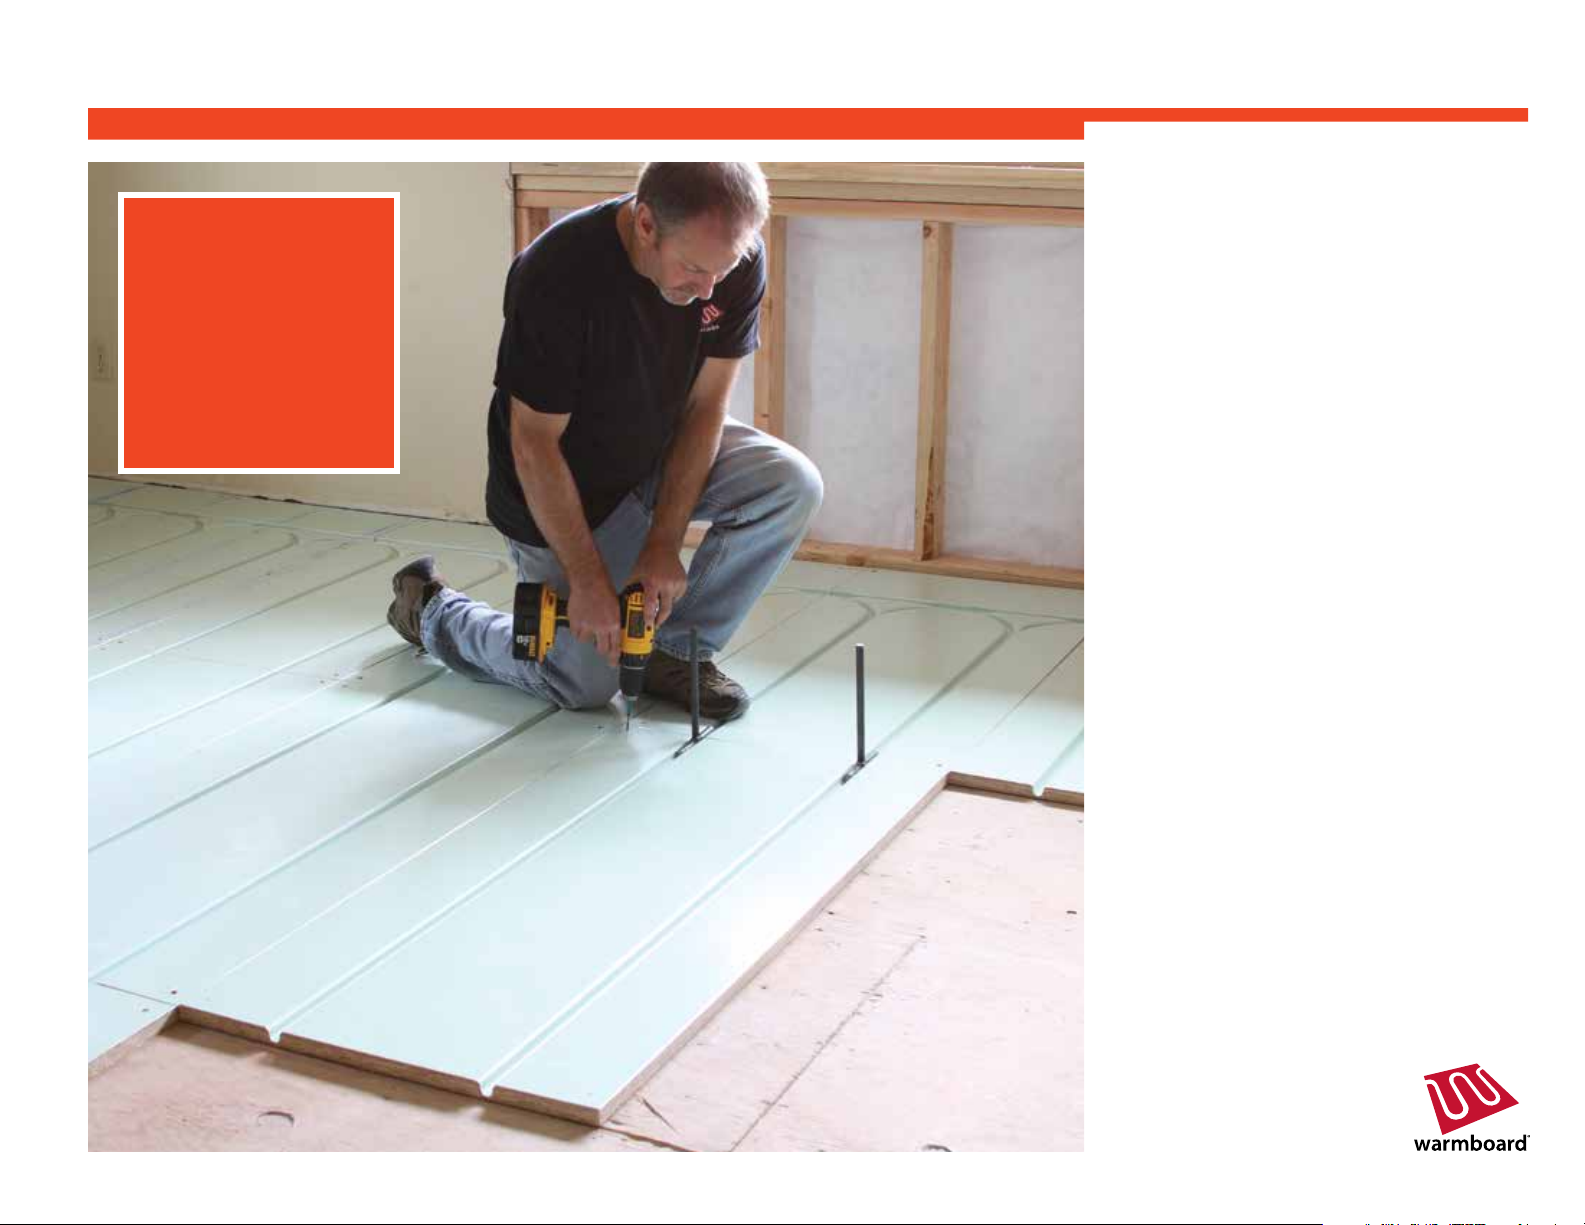
3. Use the provided alignment pins when fastening
the Warmboard–R panel.
4. ONLY use tubing approved by Warmboard, Inc.
Silicone or other types of adhesives should not
be used on tubing.
5. Tubing layouts for Warmboard–R can be quite
flexible. Make field revisions as needed. Do not
exceed 300 linear feet per loop.
6. Custom routes require a 1
router minimum. A Porter Cable router will
interface with the template guides provided by
Warmboard, Inc. Do not attempt a custom route
without the proper template guide attached to
the router (see page 6).
7. The Warmboard–R heating system (and the
entire radiant industry) requires the surface
temperature of the finished floors not to
exceed 85ºF.
8. When Warmboard–R is being installed over
a crawl space or existing subfloor, a minimum
of R-19 insulation is required underneath the
panels to prevent downward heat loss.
9. Review the installation manual before installing
finish floors
10. Call us if you have any questions:
1.877.338.5493
1
/
horsepower
2
CAUTION!
Warmboard–R panels must NOT be exposed
to water or excess moisture.
Page 4
Approved tubing list
These are the tubing types/brands approved for use with Warmboard products.
Select ONLY from the tubing listed below. This will ensure a silent interface between the pex tubing and the aluminum groove. Installing other types of tubing
may create a ticking noise as the tubing expands during operation. This noise is created by the outer layer of the EVOH barrier rubbing against the aluminum.
Warmboard Inc. can also supply tubing and manifolds for your project. Ask your Project Manager for details.
4
PEX Aluminum PEX tubing, 1/2" ID
u
AIM: PEX-AL-PEX
u
Allied Pipe Systems: PEX-AL-PEX
u
Aqua Therm: PEX-AL-PEX
u
Bluefin: PEX-AL-PEX
u
ComfortPro: PEX-AL-PEX
u
EHT (Efficient Heating Technology):
u
Everhot: PEX-AL-PEX
u
Excel: PEX-AL-PEX
u
Henco: PEX-AL-PEX
u
Hydro-flex: PEX-AL-PEX
u
HYDRONX: PEX-AL-PEX
u
Inferno: PEX-AL-PEX
u
Infloor Heating Systems: PEX-AL-PEX
u
Mr. Pex: PEX-AL-PEX
u
RHT: PEX-AL-PE X
u
Rifeng: PEX-AL-PEX
u
Roth: PEX-AL-PEX
PEX-AL-PEX
u
Uponor: Multi-Layer composite tubing (MLC)
PEX-AL-PEX
u
Warmboard PEX: PEX-AL-PEX
u
Watts: PEX-AL-PEX
u
Weil-McLain: PEX-AL-PEX
u
WSD (Willow Springs Distributing) PEX-AL-PEX
u
Zurn Alumicor: PEX-AL-PEX
Standard Barrier tubing, 1/2" ID
u
M r. Pex
u
Rehau Raupex Oxygen Barrier
(manufactured after 3/8/11)
u
ThermaPEX (LK PEX)
u
Uponor Helio PEX
u
Uponor Wirsbo hePEX
u
ViegaPEX Barrier
u
Watts RadiantPEX+
PERT tubing, 1/2" ID
u
Infloor Heating Systems: InfloorPERT
u
Oil Creek Plastics: HEATFLEX pipe
u
Roth: X-PERT S5, 5 layer
u
Watts: RadiantPERT
u
Zurn: hy-PE-RTube
Viega Fostapex is not approved, the diameter is too
large for the Warmboard groove.
CAUTION!
DO NOT USE silicone or other adhesives in the
tubing channels.
Page 5
Necessary tools
For assistance call
1.877.338.5493
5
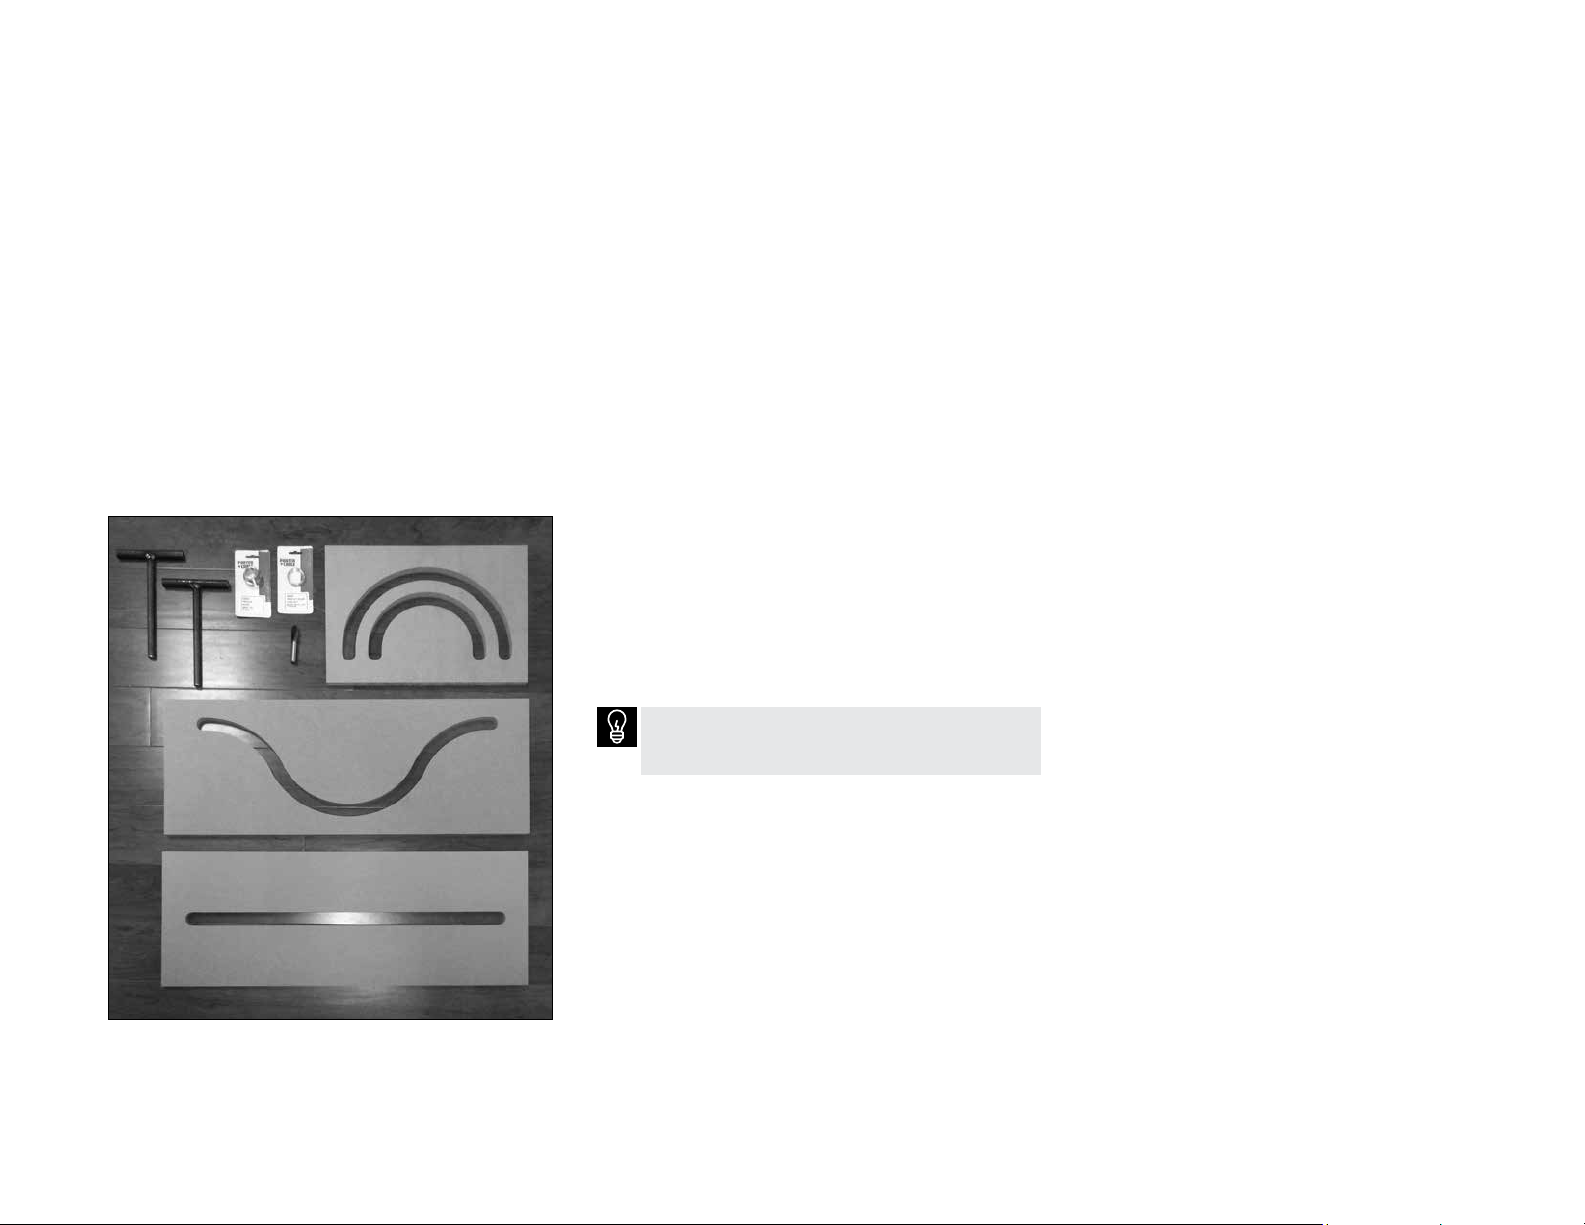
Installation kit includes
(supplied with each order)
u
3 Custom routing templates/guides (wood)
5
u
1 Router bit,
u
2 Alignment pins
u
1 Porter Cable template guide
u
1 Porter Cable guide lock nut
/
"
8
Additional materials and tools
(for on-site use)
u
Circular saw, carbide blade
1
u
Porter Cable router, 1
u
Electrician nailing plates
u
Heavy roller (typically a linoleum roller)
u
Warmboard approved tubing
u
Shop vacuum
u
Drill motor with a 1
u
PEX tubing cutter
u
Felt tip marking pen
u
Warmboard panel and tubing plans
u
Tubing un-coiler
u
4" grinder or dremel
Warmboard, Inc. can supply tubing and manifolds
at very competitive prices. Ask your Project Manager
for details.
/
horsepower minimum required
2
1
/
" drill bit
4
Page 6
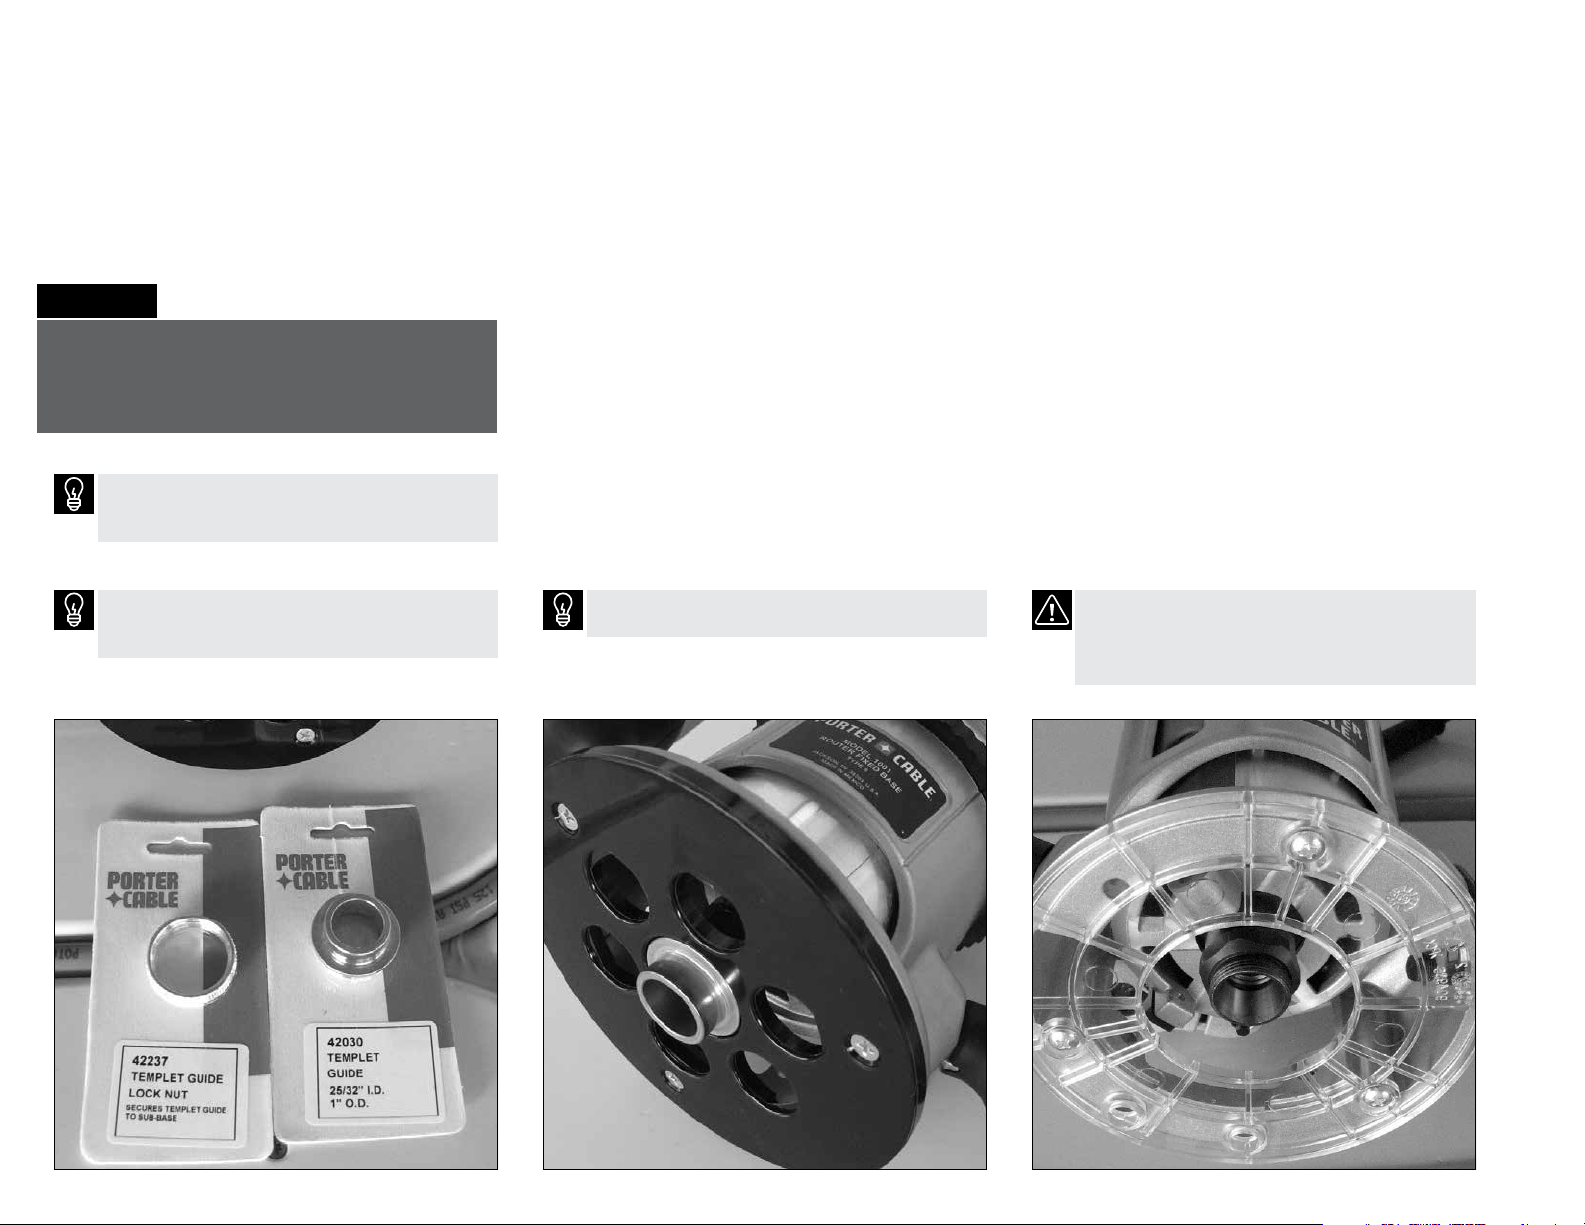
Choosing the correct router
NOTE
Not all Porter Cable sub-bases interface
properly with the Warmboard supplied
Porter Cable metal template guides.
1
A minimum 1
size of the metal template guide is 1" OD, designed
for Porter Cable routers and accessories only.
/
horsepower router is required. The
2
6
This photo shows the correct templet guides to use
with the Porter Cable router. These templet guides
are supplied by Warmboard.
This photo shows the correct sub-base and the
supplied metal templet guides installed.
CAUTION!
This Porter Cable router DOES NOT interface with
our supplied template guide and will not work to
create custom routes.
Page 7
Custom routing
Check list
u
Review all the tubing layout plans. Using a felt tip marker
and the provided wood templates, mark all areas on the
Warmboard–R panel that will require custom routing.
u
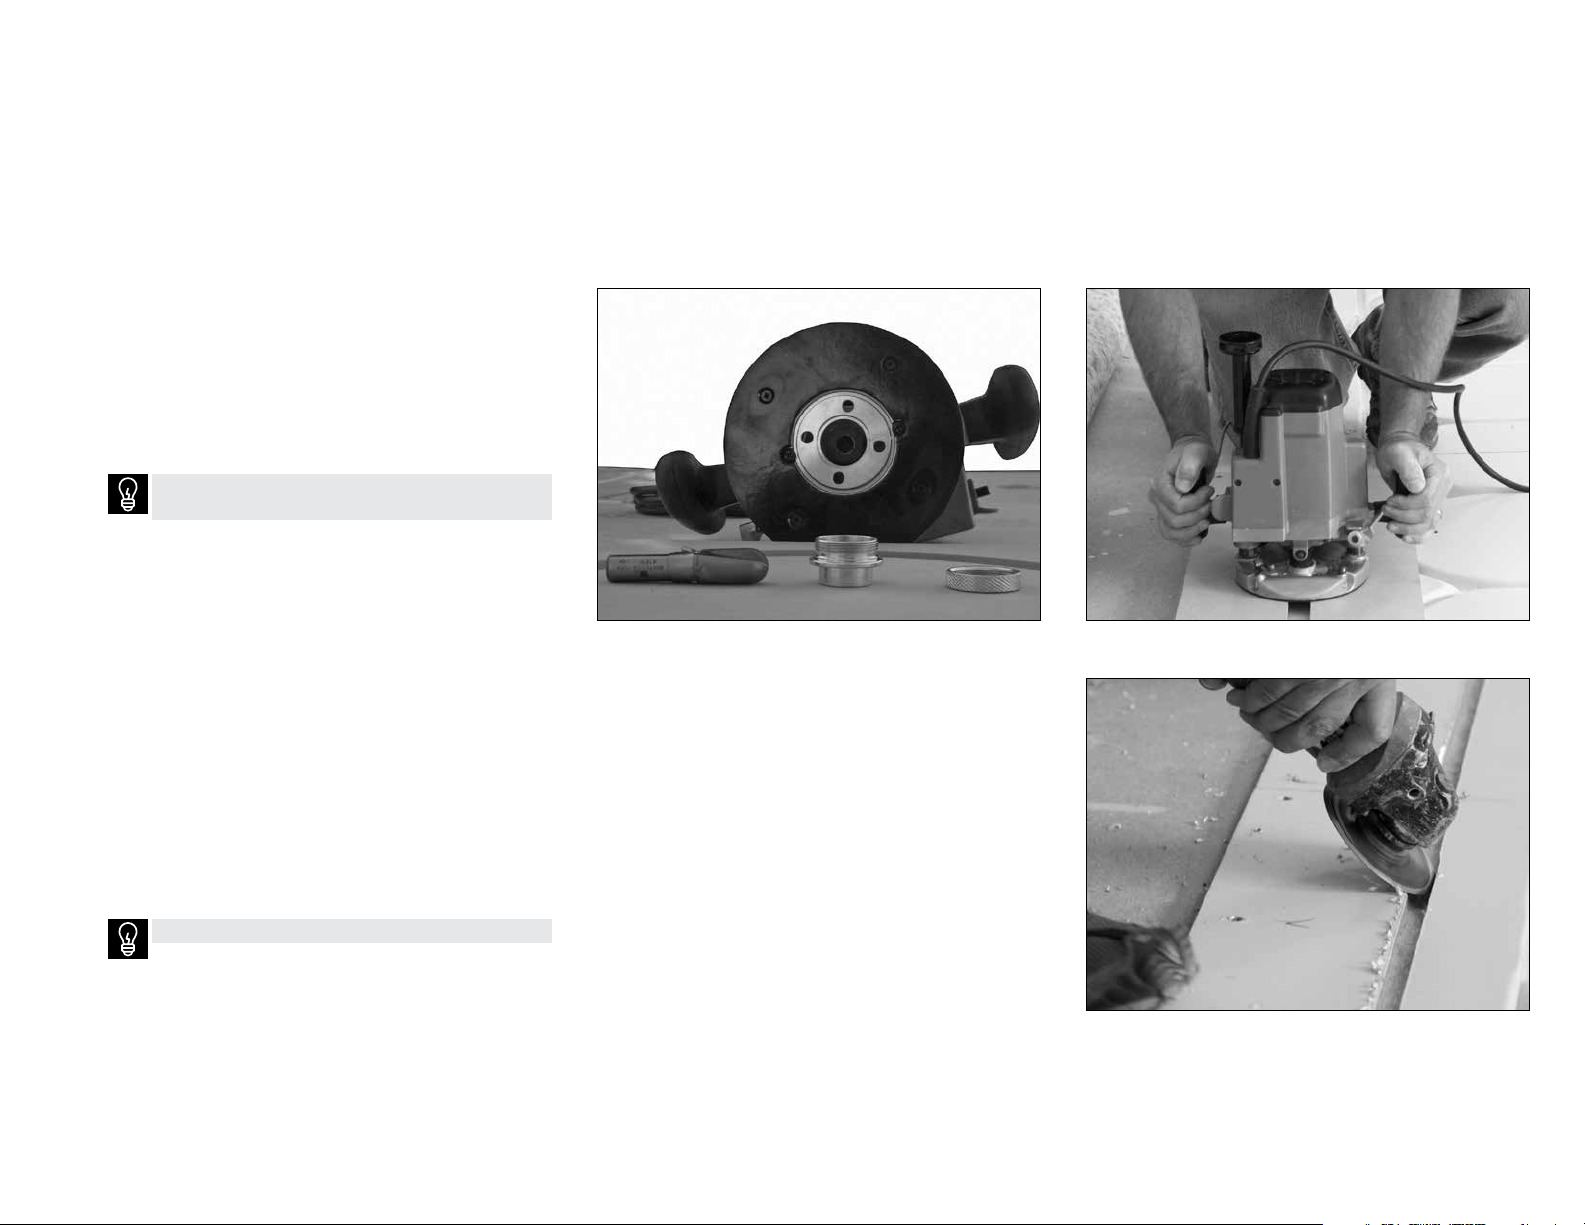
Prepare router with router bit, template guide and
template guide lock nut.
The Porter Cable router is not provided. A minimum
1
/
1
horsepower is required.
2
Procedure
For assistance call
1.877.338.5493
7
u
Place the appropriate custom routing template over the
area to be routed
u
Fasten with 3 screws to secure the wooden template
in position
u
Ensure that the router bit and metal template guide are
properly installed, then proceed with the router
u
When the route is complete, remove the template guide
and use 4" grinder or deburring tool to remove aluminum
burrs to ensure that entire area is smooth in preparation
for tubing installation
Visit warmboard.com/videos for further instructions.
5
/
" Router Bit
8
Temp l ate Guide GuideLock Nut
Page 8
Panel types
8
7
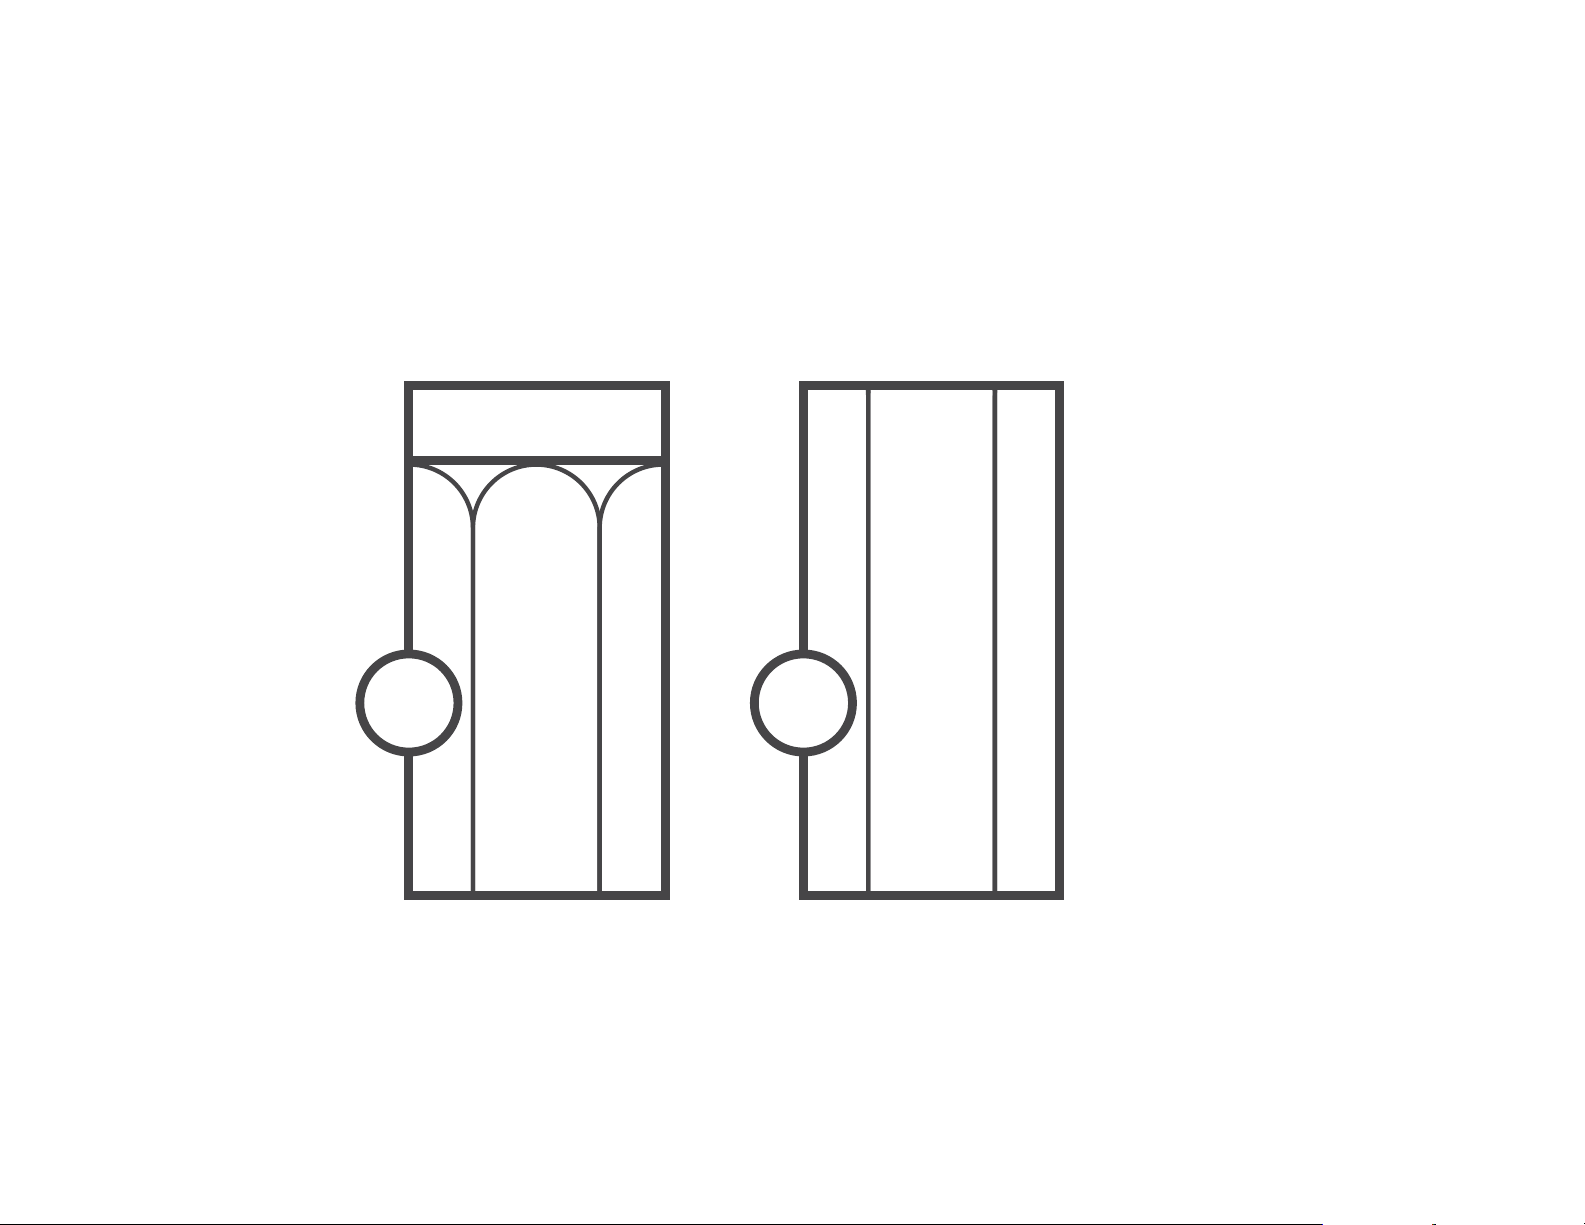
There 2 panel types of Warmboard–R panels. Each panel measures 23
Panels are made from OSB and are square-edged. Filler panels are also available.
/
" W x 47
8
RT RS
7
/
" L x
8
13
/
" H.
16
Turn Panel Straight Panel
NOTE Read all instructions before beginning the installation process.
Review supplied working drawings including floor plan dimensions, before installation.
Page 9
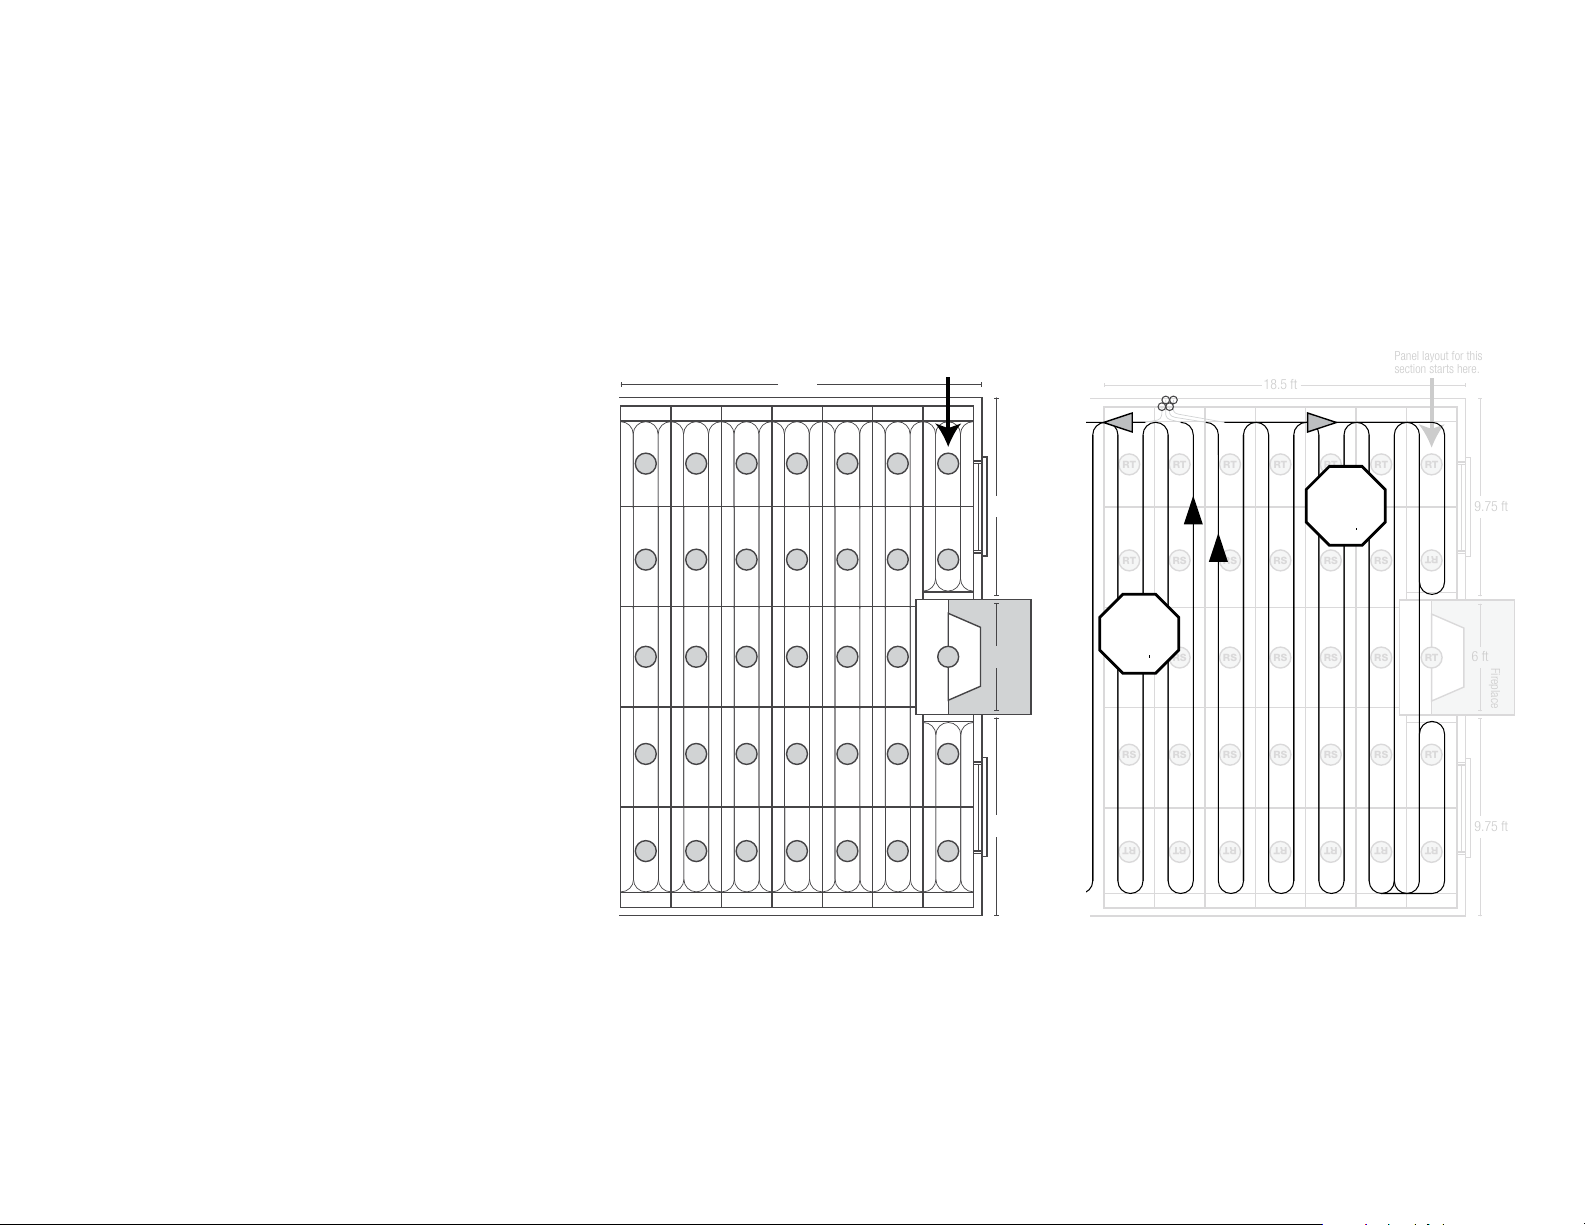
Example of panel and
tubing design
For assistance call
1.877.338.5493
9
Warmboard does encourage confident contractors
and homeowners to draw their own panel and tubing
shop drawings. We recommend loop lengths of 300
foot maximum, from supply to return manifold.
The modular design of the Warmboard–R panel
allows opportunity for little or no custom routing.
If the finish floor is a nail down hardwood,
Warmboard–R panel should install perpendicular
to the hardwood planks.
If this is not an endeavor you want to take on,
Warmboard, Inc. can provide the shop drawings.
Panel layout example Tubing layout example
Panel layout for this
18.5 ft
RT RT RT RT RT RT RT
RT RS RS RS RS RS
RS RS RS RS RS RS RT
RS RS RS RS RS RS RT
RTRTRTRTRTRTRT
section starts here.
RT
9.75 ft
6 ft
9.75 ft
Fireplace
18.5 ft
RT RT RT RT RT RT RT
RT RS RS RS RS RS
1.2
ZONE 1
RS RS RS RS RS RS RT
170
RS RS RS RS RS RS RT
RTRTRTRTRTRTRT
1.1
ZONE 1
210
Panel layout for this
section starts here.
RT
9.75 ft
6 ft
9.75 ft
Fireplace
Page 10
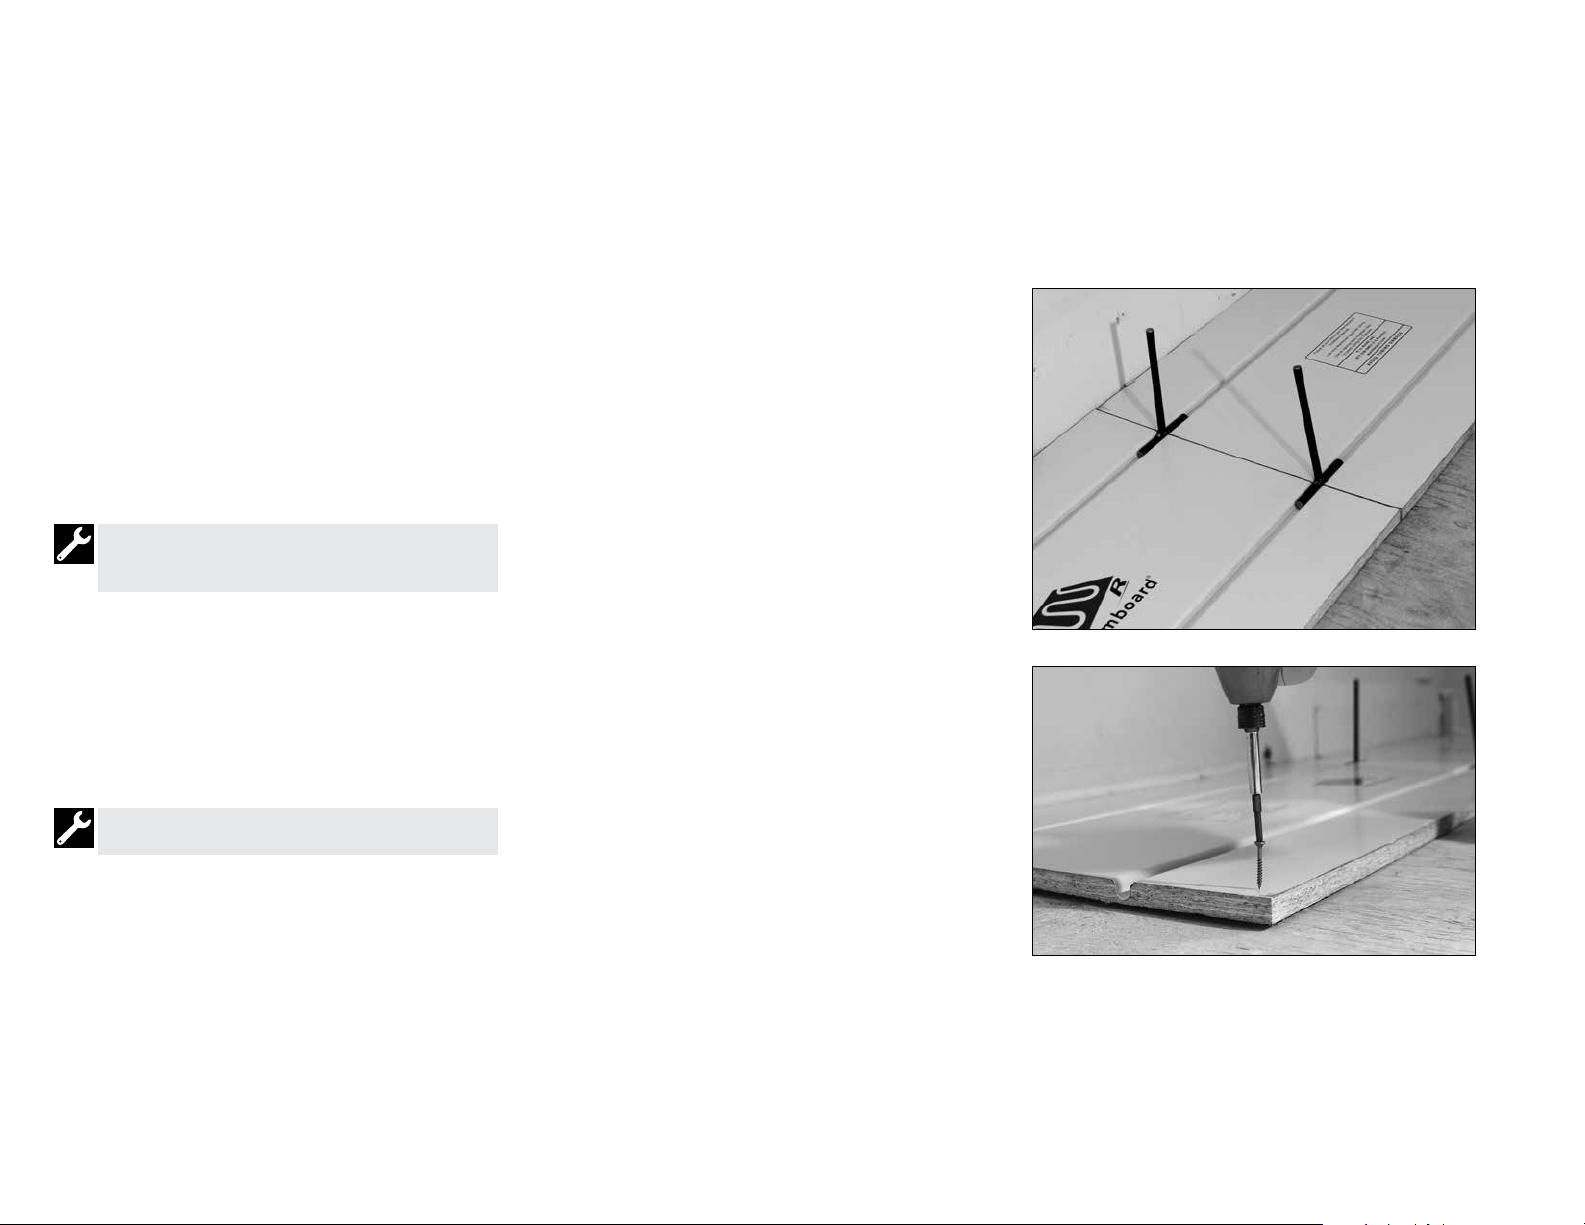
Installing over existing subfloor
10
It is essential that the existing subfloor is both
flat and smooth before the installation of
Warmboard–R. Inspect the subfloor for evenness
along the joists and flatness between the joists.
If necessary, sand the subfloor, install extra
blocking below the subfloor, and refasten the
subfloor to even areas. Also, inspect for squeaks
and refasten with decking screws as necessary.
The subfloor and Warmboard– R need to be dry. The
Warmboard–R cannot be exposed to any rain before
or after installation.
Cutting and installing Warmboard–R is very
straightforward. The panels can be trimmed with
a standard skill or table saw and will rip just like
ordinary OSB. It is best to cut the panels with the
aluminum side down. We recommend two different
options for attaching the panels to the subfloor.
It is crucial to use the provided alignment pins to line
up the channels from panel to panel.
Screw fasteners methods
1
Use a 8 x 1
R4 screw with a top
at Home Depot). Using an equivalent product is
acceptable. Fasten with in a pattern of 3 rows of 4.
u
No pre-drilling required
u
Self counter sinking
u
No adhesive needed
/
" “GRK Uber Grade” multi-purpose
2
1
/
" smooth shank (available
2
Nail and glue method
Using a construction adhesive designed for bonding
OSB and plywood, such as “Loctite PL Wood” is an
excellent choice. The use of an equal product is also
acceptable. Follow all directions as specified by the
adhesive manufacture.
For nailing, use a ring shank or a screw nail.
To determine the appropriate length of the nail to
use, evaluate existing thickness of subfloor and add
13
/
". This will be the minimum length required.
16
Fasten nails with a pattern of 3 rows of 4.
Page 11

Installing over concrete slab
For assistance call
1.877.338.5493
11
Benefits
Installing Warmboard–R over an existing concrete
slab can retrofit a basement or home remodel with a
state of the art radiant floor heating system. Finish
floor options include the broad range available with
a Warmboard system such as hardwood, tile, carpet,
vinyl and linoleum.
Concrete slab requirements
The existing slab must be level and flat. A newly
poured slab needs to be well cured which requires
a minimum of 30 days. A moisture test should be
conducted prior to installation to ensure the slab
is properly cured. The slab must have sufficient
drainage from rain and snow on a year round
basis. If the Warmboard–R panels are exposed
to any standing water or any moisture intrusion,
the wood will rot. Do not use Warmboard–R if
these environmental conditions are possible.
When Warmboard–R is being installed over an
existing slab, it is crucial for the panels never to
be exposed to weather. After installation, if the
Warmboard panels are exposed to rain or snow,
the moisture will be trapped in the panel and
wood rot will take place.
Testing for moisture
There are several possible methods by which to test
the moisture content of a newly poured slab, the
simplest being “The Plastic Sheet Method” (ASTM
D 4263-83). For this method, seal an 18" x 18"
square of clear plastic sheet to the slab with tape
on all 4 sides. If, after 16 hours, any condensation
is found on the underside of the plastic or if the
surface of the concrete is darkened, the concrete
is considered too wet for coating application.
Do not allow the sheet to come in contact with
direct sunlight or excessive heat.
It is possible for this particular method to yield a
false result, giving the impression that the slab is
fully cured, when in fact it still contains moisture.
For example, in cooler conditions, the concrete
may retain its moisture and fail to condense on
the plastic. However, an obvious appearance of
moisture in this method almost always indicates
excessive moisture.
With the Plastic Sheet Method, the best way to
ensure a reliable result is to make sure that the
surface temperatures and ambient conditions during
the test are very similar to those present after the
Warmboard panels are installed.
If no moisture test is conducted, we recommend
giving a newly poured slab 90 days to cure fully.
Installation method 1
Install a vapor retarder directly to the slab.
We recommend either a 6 or 10-mil polyethylene
overlapped two feet (2') at the seams. Continue with
Warmboard–R panel installation with the use of
Tapcon concrete fasteners or Split Drive Anchors.
We recommend a maximum of 9 fasteners for
each panel.
Installation method 2
Install a 6- or 10-mil polyethylene vapor retarder
directly to the slab, overlapping two feet (2') at the
seams. Next, install the
or Homasote 440 Soundbarrier over the entire slab
(adding a R-value of 1.2). Gap all Homasote panels
3
/
" from all adjoining panels and
16
Use fasteners to attach the entire assemble to slab.
We recommend 9 fasteners per panel. Review the
installation instructions of the Homasote Comfort
Base or the 440 Soundbarrier at homasote.com
Before installation of a Tapcon fastener, drill a pilot
1
/
hole
" deeper than the Tapcon will reach. Draw the
2
bit in and out of the pilot hole repeatedly to loosen
excess material. Then remove the excess using a
shop vacuum.
1
/
" Homasote Comfort Base
2
3
/
" from walls.
8
Page 12
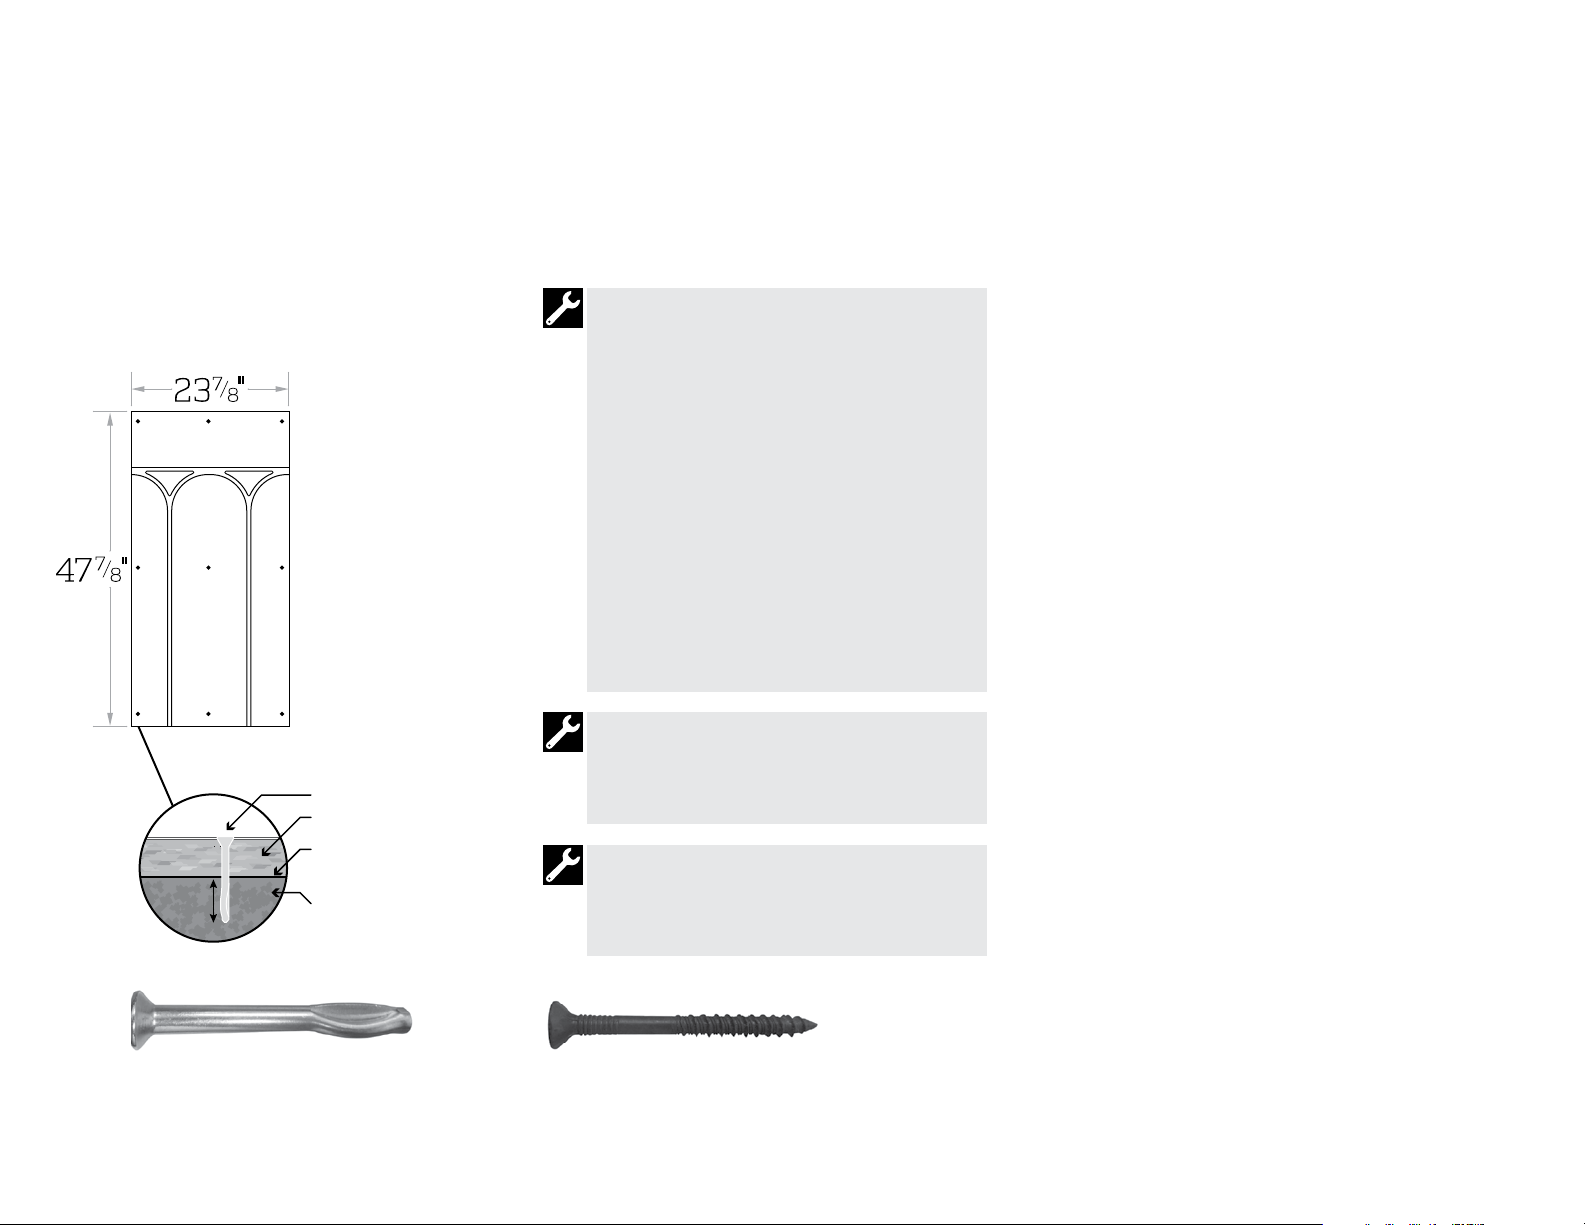
12
Fastening pattern for
Warmboard–R over concrete
Split drive anchor OR
Tapcon concrete screw
13
/
" Warmboard–R
16
6-mil polyethylene
vapor barrier
1" min
Concrete slab
We highly recommend flat head split drive anchors.
They will save many hours, or days, of labor by
comparison.
Concrete drilling should be done with panels in
place. Predrilling the panels prior to installation is
not recommended.
Concrete drilling should be done with a heavy duty
1
roto hammer drill and a high quality
/
" masonry
4
drill bit. Use a 3 lb. sledge hammer to drive the split
drive anchor through the predrilled panel and into the
concrete.
1
1
/
Use a
/
" x 2
" flat head split drive anchor.
4
2
Split drive anchors can be difficult to find in common
retail stores. We suggest visiting confast.com
or calling 888-498-5747.
Before installation of a Tapcon fastener, drill a pilot
hole 1/2" deeper than the Tapcon will reach. Draw
the bit in and out of the pilot hole repeatedly to
loosen excess material. Remove the excess using
a shop vacuum.
Predrill with Warmboard–R in place using a high-quality
1
masonr y bit. Drilling depth should be
/
" deeper than
2
the required specication without drilling through the
slab. All concrete drilling should be done with a heavy
duty rotary hammer drill.
Preferred method
1
1
/
/
2
" x
"Flat Head Split Drive Anchor
2
4
1
/
Use
" high-quality masonr y bit
4
1
1
/
/
" x
" Flat Head Tapcon Concrete Screw
2
4
4
3
/
Use
" high-quality masonr y bit
16
Page 13
Tubing installation
For assistance call
1.877.338.5493
13
1. Clean channels and entire panel
This simple, but important step of the process will
ensure the tubing sits ush and level.
u
Use a shop vac and leaf blower if available
u
Make sure channels are free of all debris
2. Lay tubing loops over panels
u
Layout the tubing path and clearly mark each loop to
avoid any future confusion
u
Mark manifold locations as well as supply and return lines
u
Mark the areas that require a custom route
The router base does require room to operate and
may be difficult to use near an existing wall. Plan
accordingly.
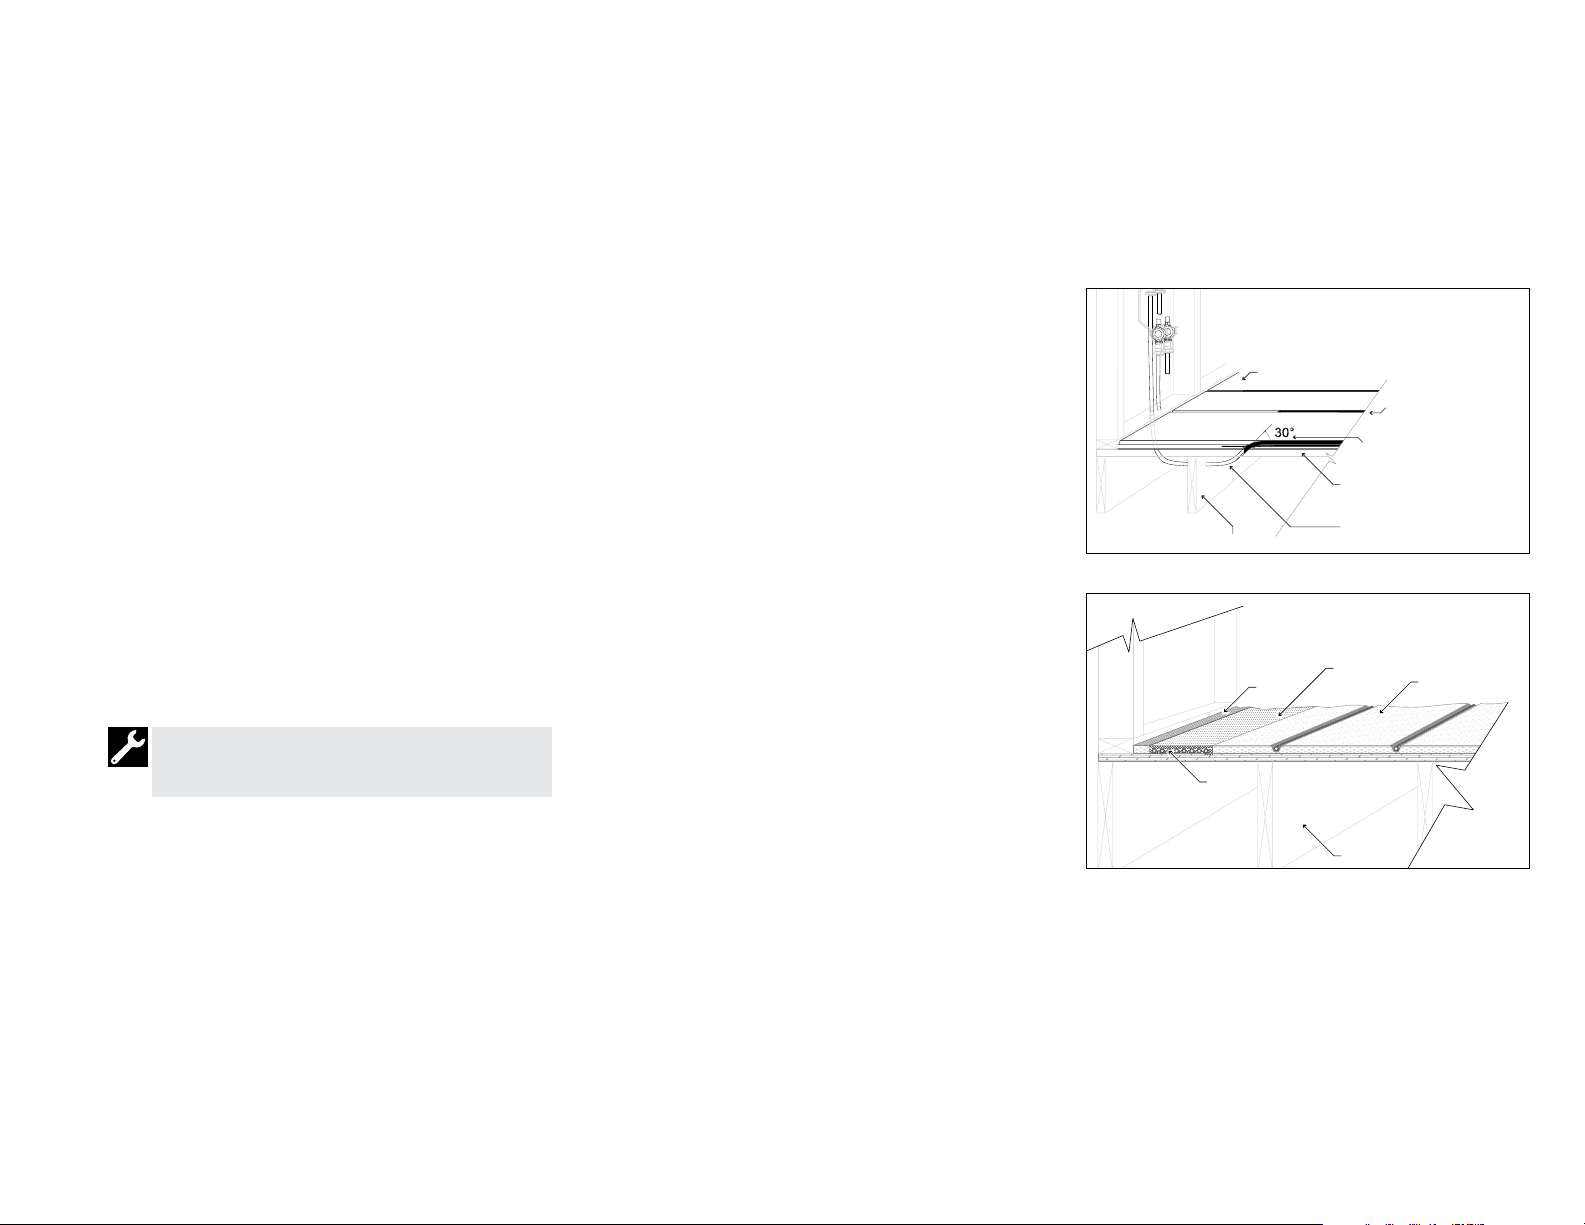
3. Return lines back to manifolds
(4 available methods)
Method 1
Use the pre-grooved channels in the panels to
return the tubing to the manifold location.
Method 2
Use the custom routes on the surface of the panel to
return the tubing back to the manifold location.
Method 3
Use a bury point, so that the tubing drops below the
suboor to return the tubing back to the manifold
(see example to the right).
Method 4
Use the “panel cut back” to create a tubing channel
above the suboor for the tubing to return back to
the manifold (see example to the right).
Method 3
Method 4
Top of Warmboard–R panel
Joist
13/16" nailing plate
1/2" PEX
Tubing channel
Drill bury point hole at a 3 0º
angle with 3/4" drill bit. Debur
all edges around bury p oints.
Existing subflo or
Insulate supply and return
leaders below subf loor in
unconditioned spac e
Fi x-It-A ll or
Portlan d
Cement
Joist
Warmboard –R over
existing subflo or
Page 14
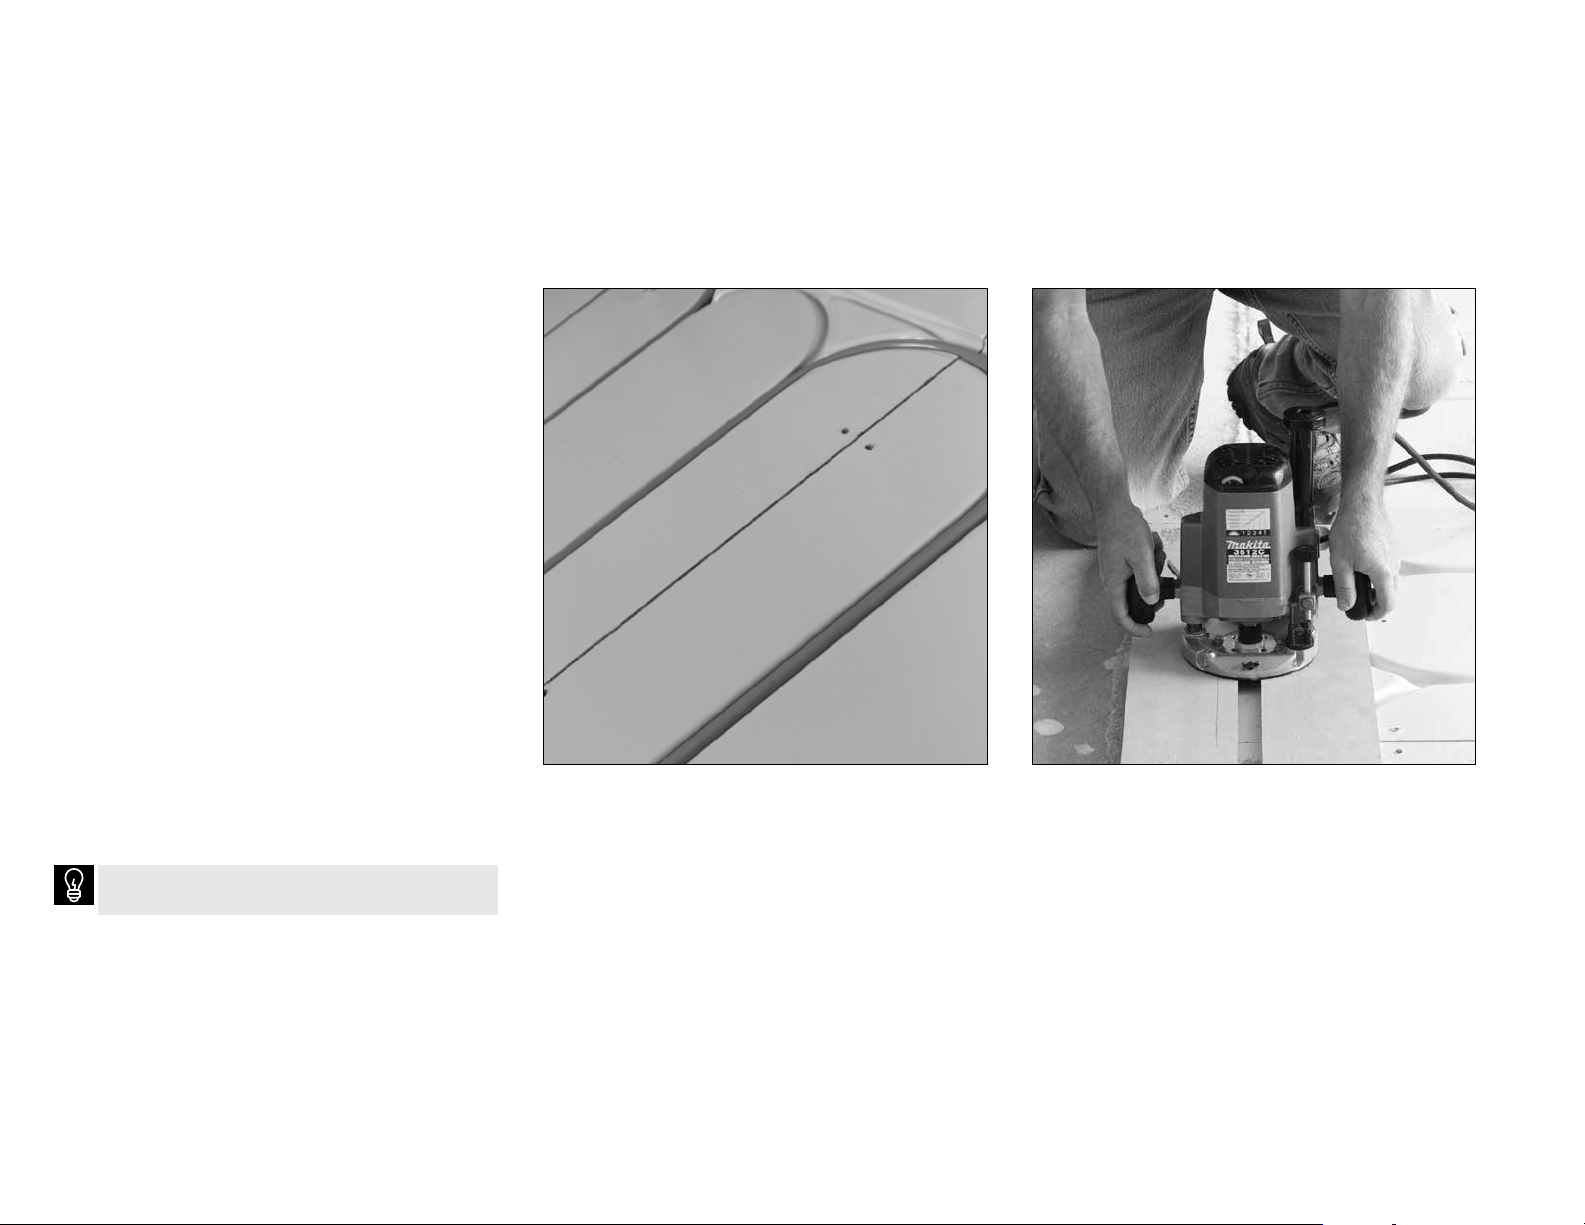
4. Perform the custom route
u
Use the templates supplied by Warmboard, Inc. to
complete process (see page 5)
u
Do not attempt a custom route without the proper metal
template guide attached to the router (see page 6)
5. Install tubing
u
Only use a tubing brand from our “Approved tubing list”
(see page 4)
u
Use a heavy roller or wooden block and hammer to
secure the tubing rmly in the channel
14
u
Do not use silicone or adhesive in the channels as this
will cause the tubing to sit too high
u
Tape the ends of the tubing to prevent any debris from
clogging the lines
u
For large jobs a tubing uncoiler can be an excellent
investment
Use nail plates to secure tubing as needed.
Remove plates before nish oors are installed.
Page 15
Tubing installation (cont'd)
For assistance call
1.877.338.5493
15
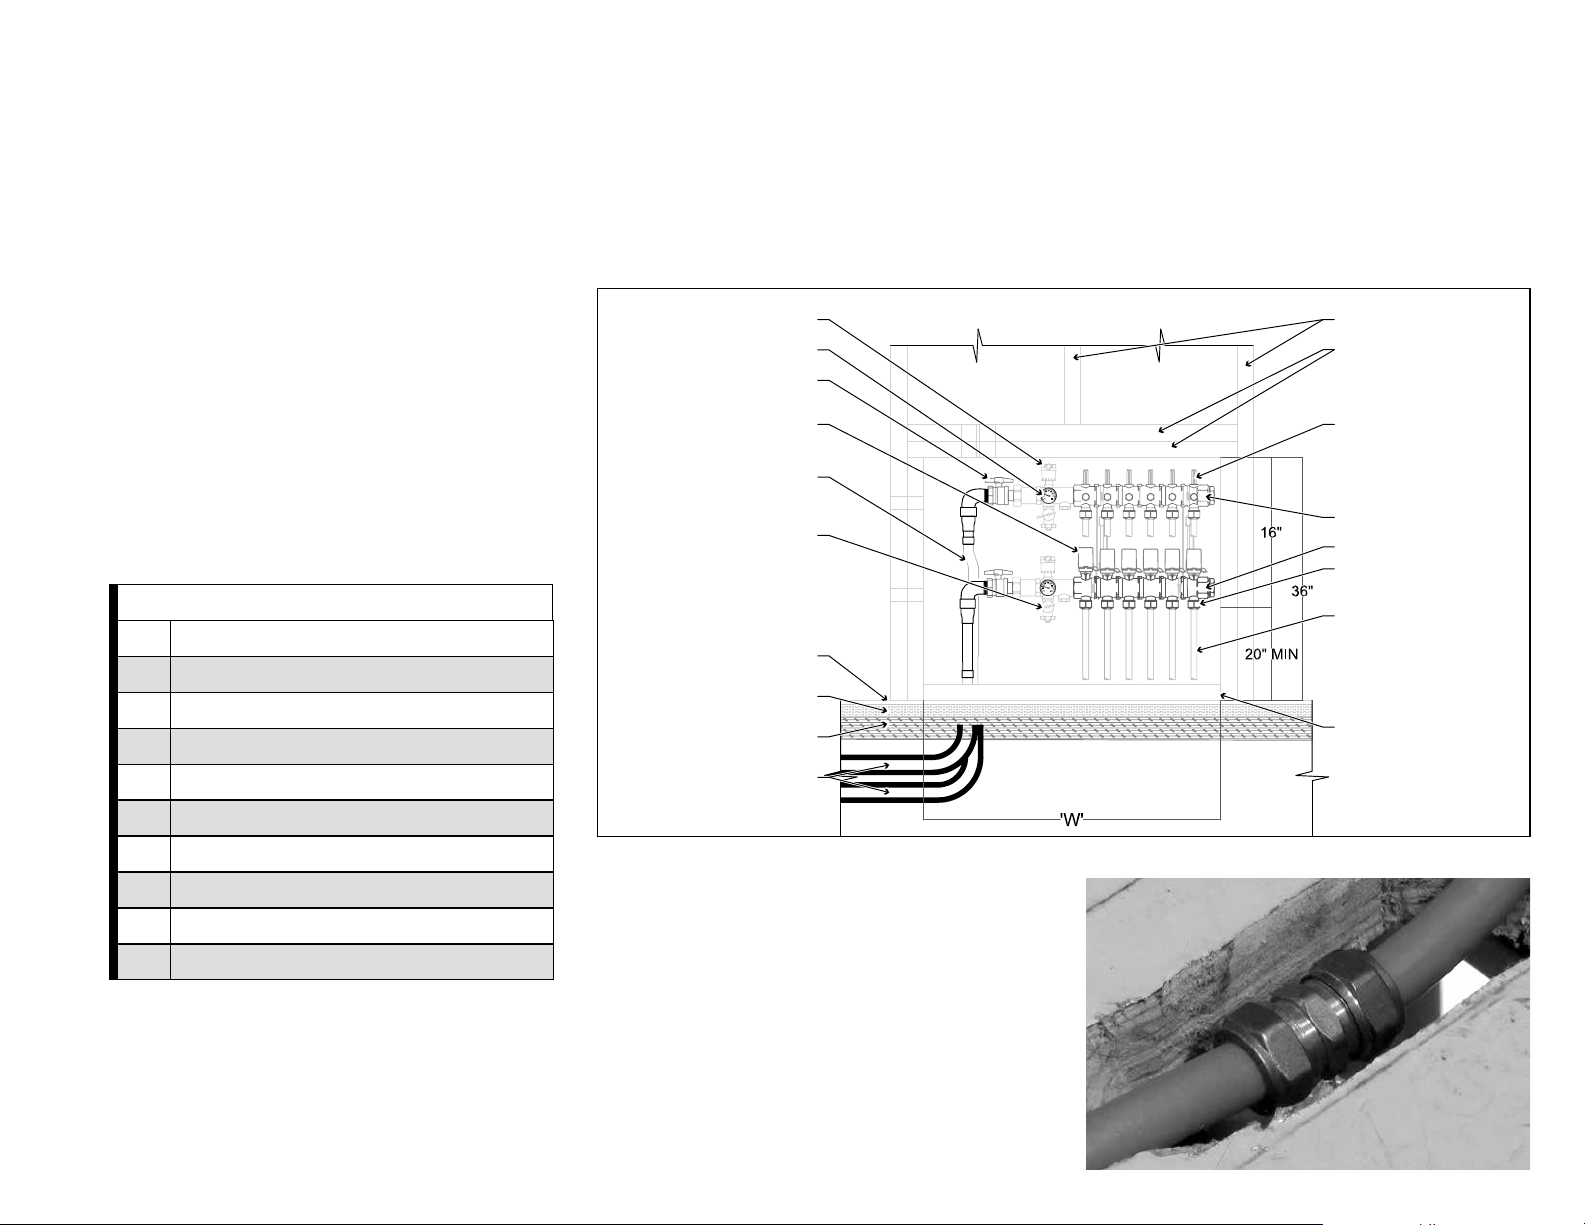
6. Install manifold
u
Follow all installation details and specifications
documented by the manufacturer. Manifolds are usually
placed in closets or between interior wall stud bays with
an access door
u
Pressure test all loops with air, at a minimum of 60 psi
u
Clearly mark all supply and return loops, documenting
rooms and zones on manifolds to avoid future confusion
Framing Dimensions for Manifold Box
Loops Width x Height
2 14" x 36" Clear
3 16" x 36" Clear
4 18" x 36" Clear
5 20" x 36" Clear
6 22" x 36" Clear
7 24" x 36" Clear
8 26" x 36" Clear
Temperature Gauge
Shuto Valve
Actuator Valve
Supply and Retur n
PEX or Copper Tubing
Hose Bib
Sill Plate
Warmbo ard–R Panel
Subfloor
Insulated Supply
and Return Piping to
Manifold
7. Tubing repair
Wall StudAir Vent
2x Header
Flow Meter, TYP
Supply Manifold
Return Manifold
Compression Fitting
1/2" PEX Tubing
Blocking
Joist Space
Manifold example
9 28" x 36" Clear
10 30" x 36" Clear
If tubing damage does occur it is an easy x.
Every tubing manufacturer makes repair couplers
to repair a punctured section of tubing. Simply pop
out the tube, cut out the damaged area and insert
a coupling. Because the couplings are larger in
diameter than the PEX tube, the installer will have
to chisel the groove slightly to accommodate the
coupler. Average time to x a punctured tube
is typically 10–15 minutes.
Page 16
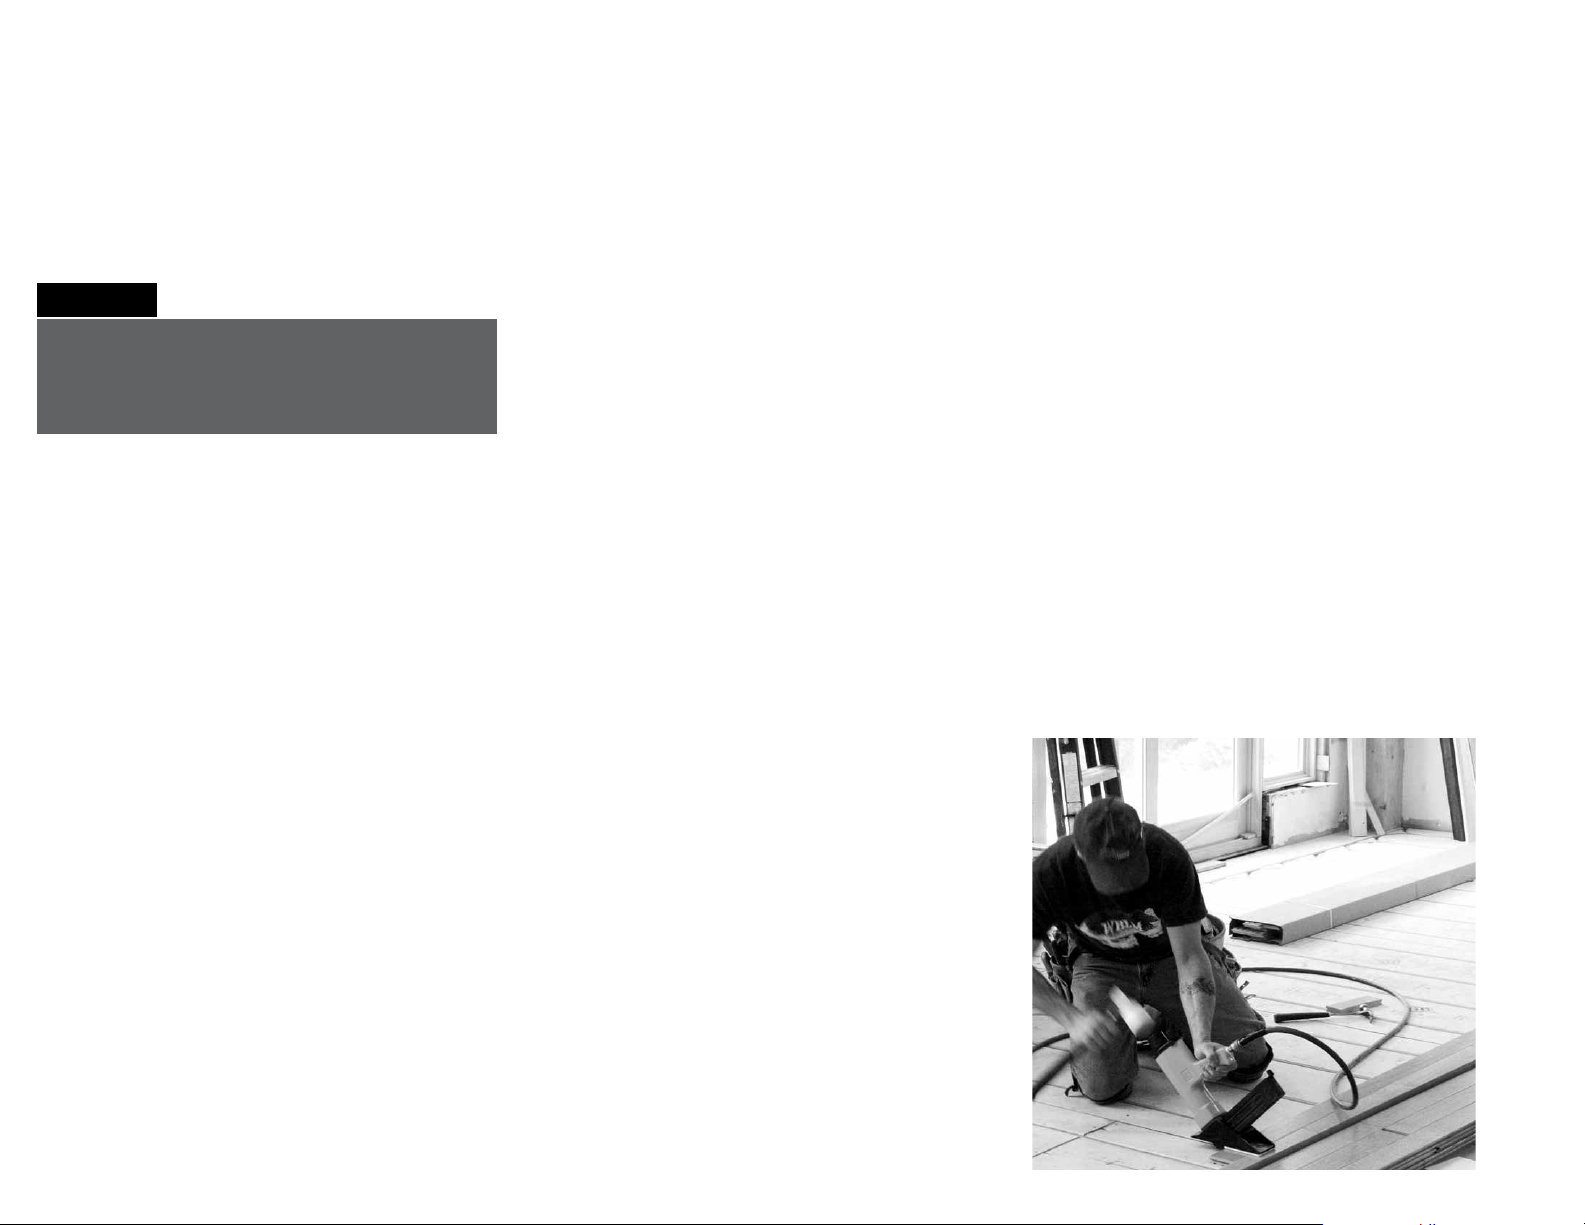
Installing solid wood flooring
16
NOTE
Follow the specification and installation
guidelines of the flooring manufacturer and
the National Wood Flooring Association.
u
Wood is a hygroscopic material; meaning it absorbs
moisture from the air
u
The changing atmosphere of humidity will cause the
hardwood to expand and contract
u
These changes that finish hardwood floors can
experience from humidity swings are referred to as
“gapping” and “cupping”
The application of solid hardwood floors installed
over a radiant heated floor is approved by many
hardwood manufacturers and trade organizations.
Warmboard–R installed with hardwood floors is a
proven successful technology.
Avoid gapping/cupping of
hardwood
Use a wood species that is dimensionally stable.
There are three types of cuts from the tree: Quarter
sawn, Rift sawn, and Plain sawn. Quarter sawn is
nearly all vertical grain lumber which is a better
quality cut and dimensionally stable. Rift sawn
is the next best choice. Anything wider than
1
3
/4" is referred to as plank flooring. Anything
narrower than this is called strip flooring. In
general, strip flooring is more dimensionally stable.
However, plank flooring has been installed over
Warmboard–R successfully in many projects with
widths of up to 22" on occasion.
Page 17

Acclimate wood
For assistance call
1.877.338.5493
17
Low moisture content of the wood flooring is an
important condition for stability. It is crucial to
acclimate the wood. Bring the wood strips to the
job site and sticker them. This means pull them out
of their boxes and set them up so air can circulate
around them. Acclimation time can vary, but two
weeks is recommended. The wood flooring should
not be delivered on the job site until the interior
plastering is completed and dry.
The radiant floor heating should be in good
operation also before the hardwood arrives. It is
best to operate the radiant floor system for a few
weeks to help bring down the moisture content
of Warmboard–R. This procedure should take
place no matter what time of year the hardwood
is being installed.
Humidity control on the job site is crucial in some
areas of the country. It may be required to operate
the air conditioner to control the indoor humidity a
few days before the wood is delivered. Keeping the
indoor humidity between 30%-50% will keep the
wood stable.
The hardwood should not experience any large
swings in humidity or temperature once it arrives
on the job site. It is best to keep the ambient
temperature in the house between 60°F and 80°F
and keep the indoor humidity between 30-50%
range. To meet these specifications, it will be
required to operate the radiant floor heating or
the air conditioner during wood acclimation and
after hardwood installation.
Hardwood floor installers will often test the
moisture content of the subfloor and the wood
finish floor prior to an installation. The moisture
content of Warmboard–R should be at 12% or less.
The moisture content of the finish hardwood should
read within 4% of the Warmboard reading. The
ideal reading of the hardwood would be between
6-9%, however, this reading can vary in your
climate zone.
It is difficult to get a proper moisture content
reading from the Warmboard–R due to the
aluminum skin. For an accurate moisture reading
from the top side of the Warmboard panel, use a
moisture meter with insulated contact pins that
have hammer probes. An example of this meter
is model J4 or J2000, available at delmhorst.com.
Be aware of any moisture or humidity intrusion
that may take place on a project. For example,
a crawl space under Warmboard–R that is dry in
the summer and experiences water intrusion in the
winter months could cause large humidity swings
and movement of the finished hardwood floor
(gapping and cupping).
Page 18
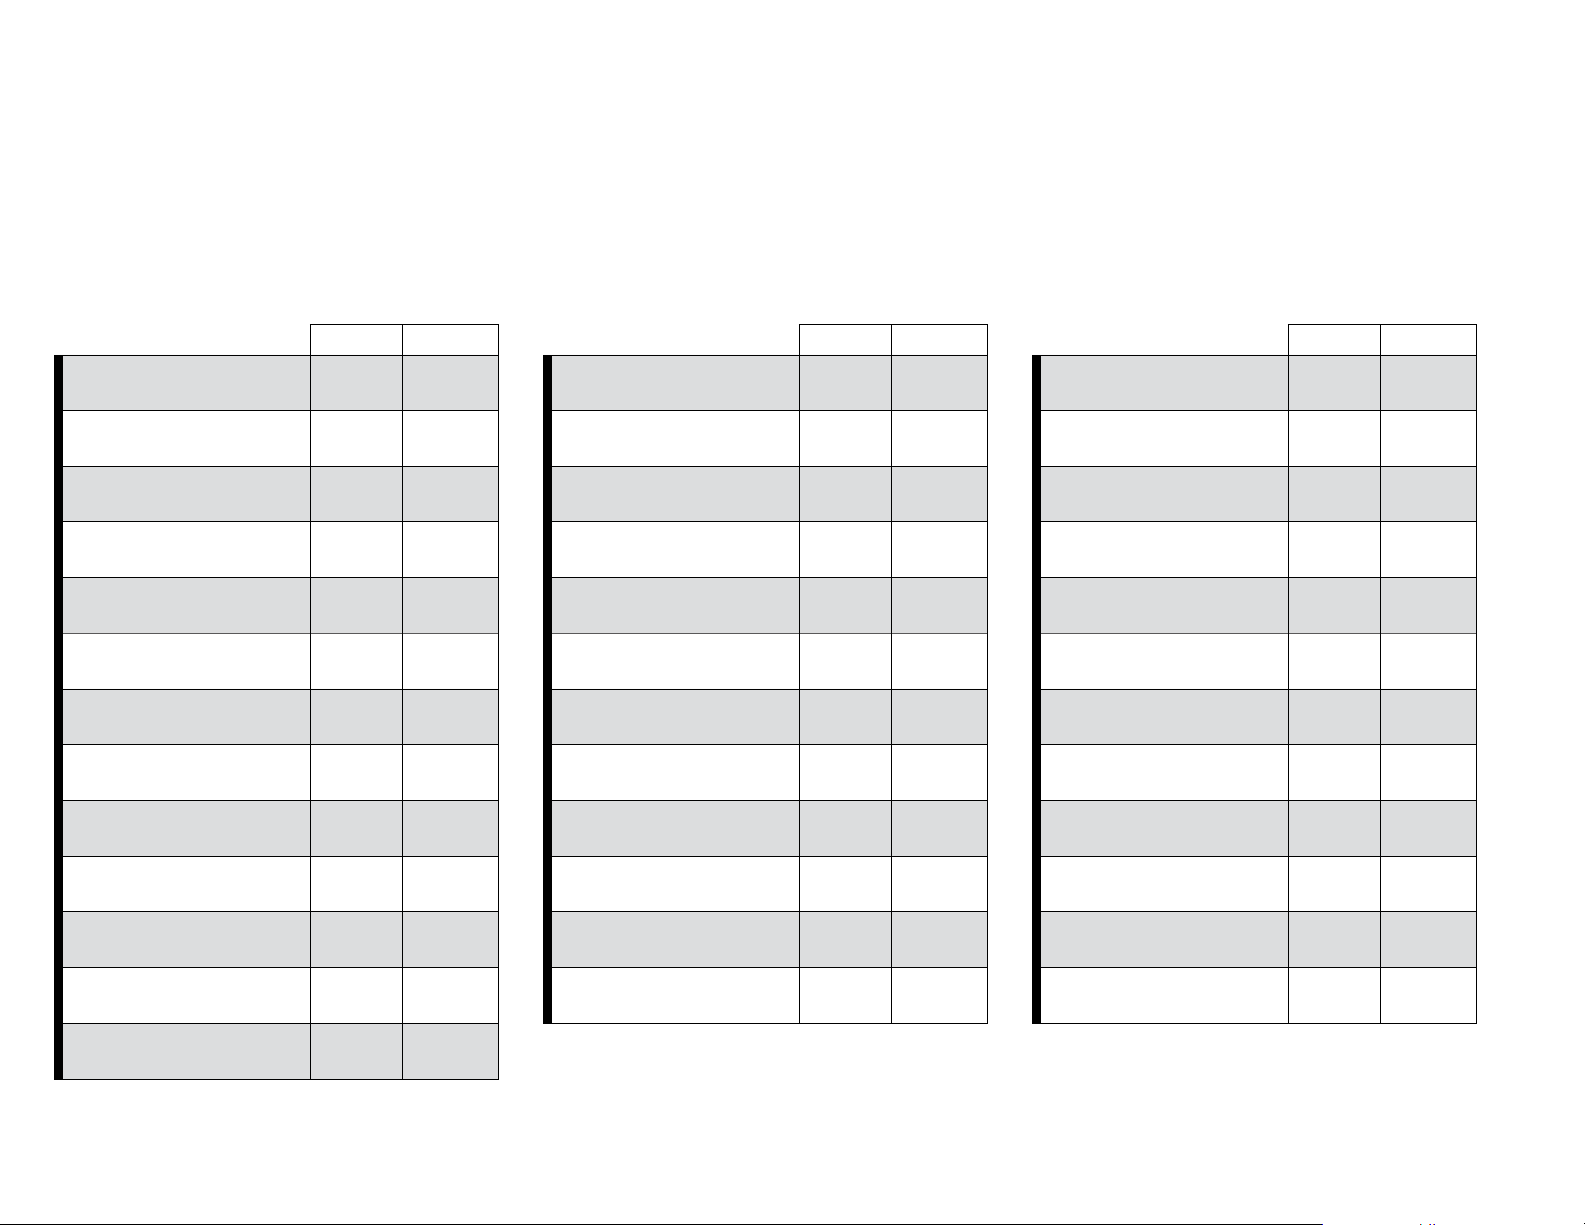
Hardwood manufacturers
A list of hardwood manufacturers who endorse their products for use with Warmboard. Other brands of hardwood can also be installed.
Engineered Engineered EngineeredSolid Solid Solid
Anderson Tuftex some n/a
800.441.7429 andersontuftex.com
The Heartpine Company yes yes
434.234.8199 heartpinecompany.com
Mohawk Hardwood Flooring yes no
800.266.4295 mohawk-flooring.com
18
Armstrong, Bruce, Robbins some no
800.2233.2823 armstrong.com
Arrigoni Woods yes yes
888.423.6668 arrigoniwood.com
Authentic Pine Floors yes yes,
800.283.6038 authenticpinefloors.com under 6"
Bellawood Hardwood Floors some, no
800.HARDWOOD bellawood.com floating only
Boen Hardwood Floors yes n/a
888.897.0800 boen.com
BR-111 Exotic Hardwood Floors yes no
800.525.2711 b r 111. c o m
Broad-Axe Flooring Company n/a yes
802.257.0064 broadaxeflooring.com
Carlisle Wide Plank yes yes
800.595.9663 wideplankflooring.com
Craft Artisan Hardwood Floors yes n/a
877.828.1888 craftfloor.com
Dinesen n/a yes
+45 7455 2140 dinesen.com
Goodwin Heart Pine Company yes yes
800.336.3118 heartpine.com
Heritage Wide Plank Flooring n/a yes
heritagewideplankflooring.com
Homerwood Hardwood Flooring yes no
814.827.3855 homerwood.com
Junckers Hardwood Floors most yes
800.878.9663 junckershardwood.com
Karelia Hardwood Floors n/a yes
888.840.3435 kareliafloors.com
Launstein Floors yes yes
888.339.4639 launstein.com
Lauzon Hardwood Flooring yes no
800.665.6765 lauzonflooring.com
LM Flooring some, n/a
972.417.9900 lmflooring.com floating only
mafi yes n/a
647.409.5984 mafi.com
Mannington Wood Floors yes yes
856.935.3000 mannington.com
Mirage Floors most no
800.463.1303 miragefloors.com
Mountain Lumber yes yes
800.445.2671 mountainlumber.com
Plyboo yes n/a
866.835.9859 plyboo.com
Quarter-Sawn Flooring yes n/a
quarter-sawnflooring.com
Schotten & Hansen yes yes
schotten-hansen.com
Shannon & Waterman yes yes
844.315.2520 shannonwaterman.com
Shaw Hardwood Floors some no
800.441.7429 shawfloors.com
Southern Wood Floors yes no
888.488.7463 southernwoodfloors.com
Tarkett Wood Floors some no
888.639.8275 home.tarkett.com
Thermory Flooring and Decking yes yes
585.591.2333 thermoryusa.com
Torlys yes n/a
800.461.2573 torlys.com
Vintage Flooring yes no
877.256.0231 vintageflooring.com
What It’s Worth n/a yes
512.328.8837 wiwpine.com
Hallmark Hardwood Floors yes yes
888.551.0888 hallmarkhardwoods.com
Page 19

Installing traditional strip and
plank hardwood
For assistance call
1.877.338.5493
19
NOTE
Follow the specification and installation
guidelines as provided by the hardwood/
bamboo manufacturer, the National Wood
Flooring Association and those of the
adhesive manufacturer.
Because Warmboard–R has a vapor retarder
built into the panel, no additional vapor retarder
is required. Wood can be installed directly over
Warmboard–R.
We recommend 3 installation
options (all common methods)
u
Nail hardwood directly to Warmboard–R
u
Nail and glue hardwood directly to Warmboard–R
u
Glue the hardwood directly to Warmboard–R
(no fasteners)
Warmboard approved adhesives
u
Bona R851, R859, R850T
u
Bostik’s Best, BST, EFA and Vapor Lock
u
Mapei Ultrabond Eco 975 and 980
u
Sikabond T-35 and T-55
u
Stauf Adhesives PUM-950 Power Mastic
u
Titebond 811, 821 and 771
u
Wakol MS 260, PU 225
Nail directly to Warmboard–R
Should you choose to nail plank ooring directly,
know that the aluminum coating on Warmboard–R
acts as the required vapor retarder. You do not
need to install additional material between the
Warmboard–R panel and the hardwood.
Installing the hardwood perpendicular to the tubing
pattern is the easiest method. It is important to see
the tubing as the hardwood is nailed to avoid tubing
damage. It is recommended to tongue nail at a 45
degree angle at 6" on centers and use 2" ooring
nails. Occasionally, plank ooring may need to
run the same direction as the tubing, and nailing
the plank could cause tubing damage. Should
this occur, DO NOT NAIL – either glue with an
approved adhesive or face nail the plank. While the
planks can be successfully nailed down parallel to
the tubing pattern, this method may require extra
labor. Strategic planning with the layout can avoid
face nailing and gluing in many locations.
Warranty letters from these companies are available
upon request.
Page 20

20
Nail and glue directly to
Warmboard–R
Should you choose to nail and glue the hardwood
directly, know that the aluminum coating on the
Warmboard–R panel acts as the required vapor
retarder. Aside from the glue itself, you do not
need to install additional material between the
Warmboard–R panel and the hardwood.
Installing the hardwood perpendicular to the tubing
pattern is the easiest method. It is important to see
the tubing as the planks are nailed to avoid tubing
damage. It is recommended to tongue nail at a 45
degree angle at 6" on centers and use 2" ooring
nails. Occasionally, plank ooring may need to run
the same direction as the tubing, and nailing the
plank could cause tubing damage. Should this
occur, DO NOT NAIL – the troweled on glue will
successfully bond the plank to the Warmboard–R
panel. Be sure to use only an adhesive approved
by Warmboard, Inc.
Glue directly to Warmboard–R
Should you choose to glue the hardwood
directly, know that the aluminum coating on the
Warmboard–R panel acts as the required vapor
retarder. Be sure to use one of the approved
adhesives listed on page 19 or 21.
Operating the radiant heating
system
We recommend circulating low water temperatures
for the first few days of operation under newly
installed wood floors. Then, gradually bring the
water temperature up to the designed set point.
For example, start with 90°F water and after a few
days, bring it up to 100°F. Then, finalize a set point
of 110°F.
It is ideal for the heating system to be designed with
a control strategy referred to as Outdoor Reset.
This technology sets up a heating curve that will
gradually change the delivered water temperature
based on the current heat loss of the house. This is
an excellent strategy for gradually heating
hardwood floors.
Surface temperatures of the installed hardwood
should not exceed 85°F.
Page 21

Installing engineered, laminate
and bamboo flooring
For assistance call
1.877.338.5493
21
NOTE
Follow the specification and installation
guidelines as provided by the hardwood/
bamboo manufacturer, the National Wood
Flooring Association and those of the
adhesive manufacturer.
Because Warmboard–R has a vapor retarder built
into the panel, an additional one is not required.
Wood can be installed directly over Warmboard–R.
To review an excellent line of bamboo products to
install over Warmboard–S, check out plyboo.com.
For information on their full warranty with Warmboard,
products visit warmboard.com. Be sure to review
their installation instructions.
We recommend 4 installation
options (all common methods)
u
Floating floor method
u
Glue only
u
Nail the planks directly to Warmboard–R
u
Nail and glue planks directly to Warmboard–R
Warmboard approved adhesives
u
Bona R851, R859, R850T
u
Bostik’s Best, BST, EFA and Vapor Lock
u
Mapei Ultrabond Eco 975 and 980
u
Sikabond T-35 and T-55
u
Stauf Adhesives PUM-950 Power Mastic
u
Titebond 811, 821 and 771
u
Wakol MS 260, PU 225
Floating floor method
This is a great option because the oorboards are
locked together at the joints of each board and not
nailed or adhered to the suboor. This allows the
whole oor to move as a single unit if a dimensional
change within the oor takes place. There is an
acoustic padding available that is placed between the
Warmboard–R and the planks. This padding is an
excellent upgrade for the system.
Warranty letters from these companies are available
upon request.
Page 22

22
Glue directly to Warmboard–R
Should you choose to glue the directly, know that
the aluminum coating on the Warmboard–R panel
acts as the required vapor retarder. Be sure to use
one of the approved adhesives listed on pages 19
and 21.
Nail directly to Warmboard–R
Should you choose to nail the ooring directly,
know that the aluminum coating on Warmboard–R
acts as the required vapor retarder. You do not
need to install additional material between the
Warmboard–R panel and the hardwood.
Installing the planks perpendicular to the tubing
pattern is the easiest method. It is important to see
the tubing as the planks are nailed to avoid tubing
damage. It is recommended to tongue nail at a 45
degree angle at 6
nails. Occasionally, plank ooring may need to run
the same direction as the tubing, and nailing the
plank could cause tubing damage. Should this occur,
DO NOT NAIL – either glue with an approved
adhesive or face nail the plank. While the planks
can be successfully nailed down parallel to the
tubing pattern, this method may require extra labor.
Strategic planning with the layout can avoid face
nailing and gluing in many locations.
" on centers and use 2" ooring
Nail and glue directly to
Warmboard–R
Should you choose to nail and glue the ooring
directly, know that the aluminum coating on
Warmboard–R acts as the required vapor retarder.
Aside from the glue itself, you do not need to install
additional material between the Warmboard–R
panel and the hardwood.
Installing the planks perpendicular to the tubing
pattern is the easiest method. It is important to see
the tubing as the planks are nailed to avoid tubing
damage. It is recommended to tongue nail at a 45
degree angle at 6
nails. Occasionally, plank ooring may need to run
the same direction as the tubing, and nailing the
plank could cause tubing damage. Should this
occur, DO NOT NAIL – the troweled on glue will
successfully bond the plank to the Warmboard–R
panel. Be sure to use only an adhesive approved
by Warmboard, Inc.
" on centers and use 2" ooring
Acclimate wood
See page 17.
Surface temperatures of the installed hardwood
should not exceed 85°F.
Page 23

Installing tile
For assistance call
1.877.338.5493
23
Warmboard–R is a
OSB (Oriented Strand Board) with a .025" thick
aluminum skin. Tile or stone set to Warmboard–R
is subject to all of the tile setting requirements of
any ordinary unheated wooden subfloor.
We recommend that the installation of all tile and
stone meet the standards set forth by the TCNA (Tile
Council of America). All materials and installation
practices should be referenced in the American
National Standards Institute (ANSI) as well.
There are currently no TCNA testing results for
Warmboard–R. We do however have test results for
our Warmboard–S structural subfloor panel. Due to
the nearly identical properties of these two products,
we are strongly convinced that Warmboard–R
would perform equally to Warmboard–S under the
established TCNA testing conditions.
13
/16" thick, 2' x 4' panel of
TCNA testing
The TCNA has successfully tested six different tile
methods over Warmboard–S. The purpose of this
testing was for an expert third party to endorse
best practices for installing tile and stone over
Warmboard. The testing method used was ASTM
C627 (The results of the Robinson Floor Test can be
made available upon request).
TCNA performance ratings and
description
Residential: Suitable for homes (tile survived 3
cycles of testing with no evidence of damage)
Light Commercial: Suitable for ofce spaces, etc.
(Tile survived 6 cycles of testing with no evidence
of damage)
Moderate: Suitable for hospitals, etc. (Tile survived
10 cycles of testing with no evidence of damage)
Warmboard recommended
assembly methods and test results
Method 1: Backer Board
u
Performance Rating: Extra Heavy
Pa ge 24
Method 2:
u
Performance Rating: Extra Heavy
Page 26
Method 3:
u
Performance Rating: Extra Heavy
Page 27
Method 4: RedGard Uncoupling Mat
u
Performance Rating: Light Commercial
Page 28
Method 5: Uncoupling Membrane Blanke•Permat
u
Performance Rating: Light Commercial
Page 29
Method 6: Uncoupling Membrane Schluter Ditra
u
Performance Rating: Light Commercial
Page 30
3
/4" Mapei Mud Bed
3
/8" Mapei Self-leveling Underlayment
Heavy: Suitable for shopping malls, etc. (Tile
survived 12 cycles of testing with no evidence
of damage)
Extra Heavy: Suitable for airports, etc. (Tile
survived 14 cycles of testing with no evidence
of damage)
Page 24
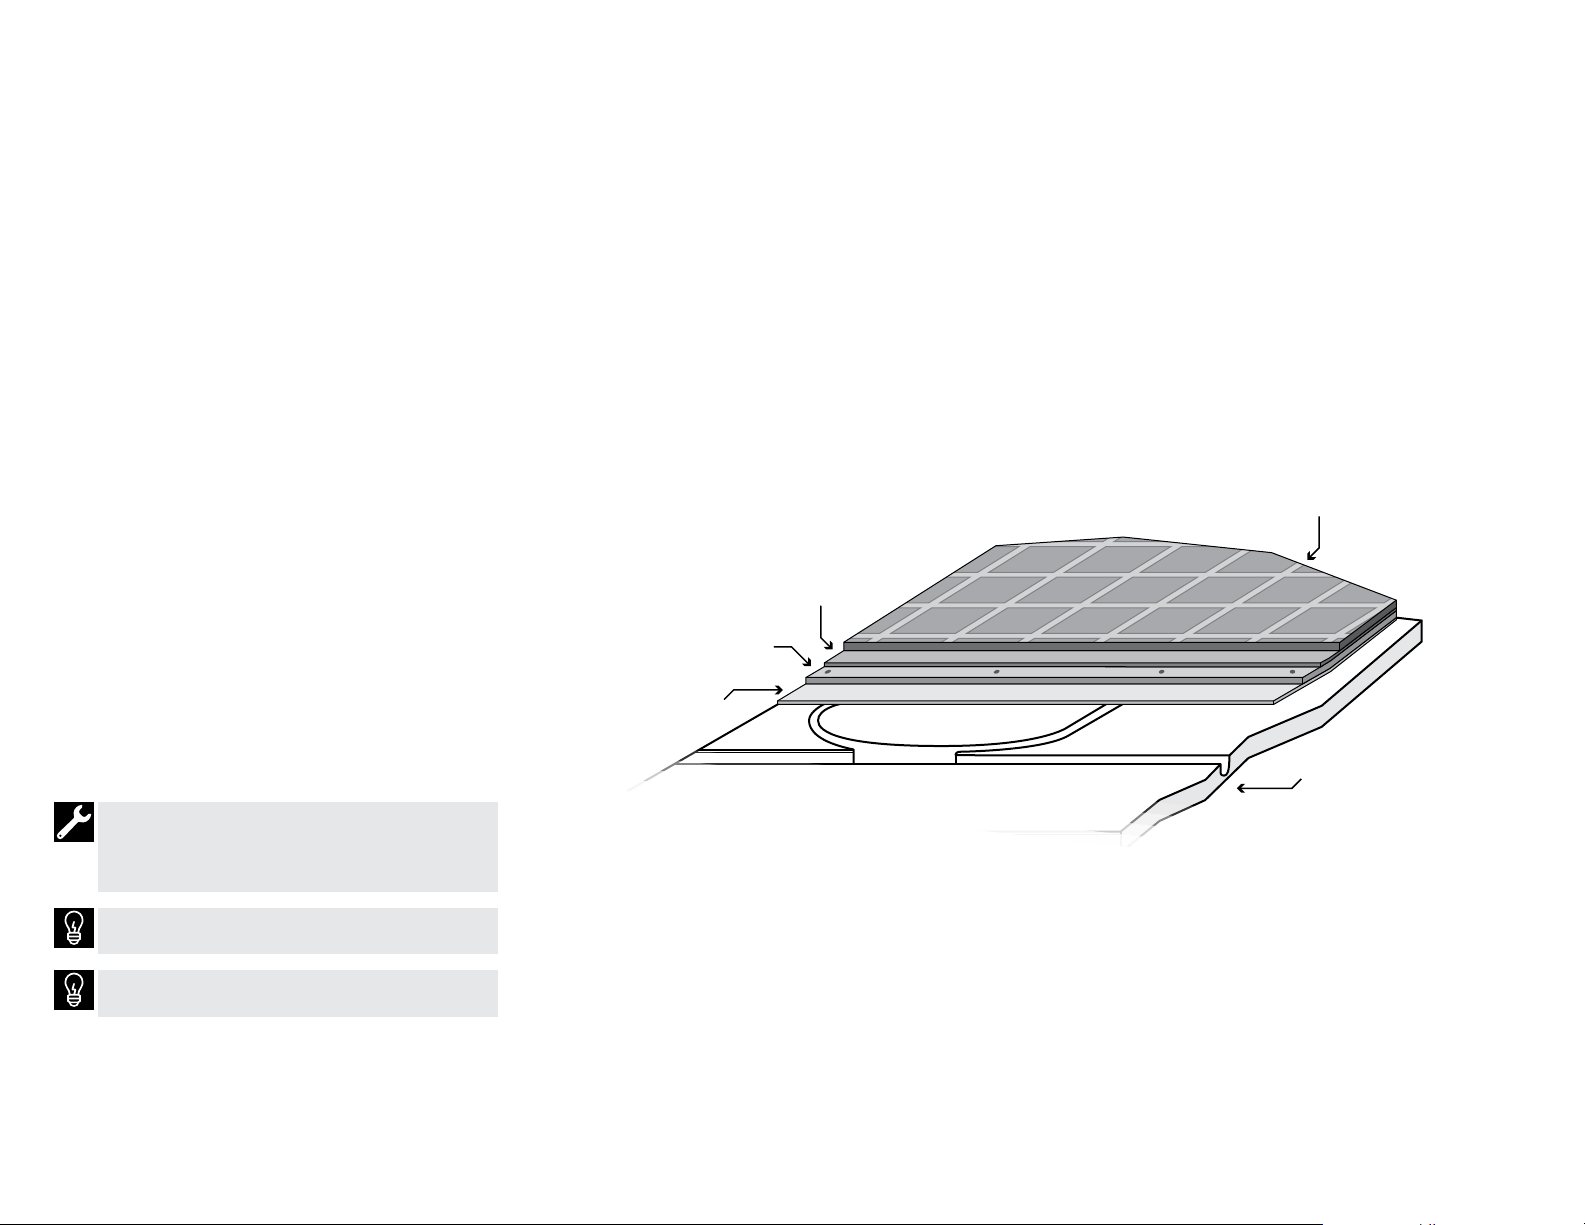
Method 1 Backer Board
There are a variety of Cementitious Backer Units,
or CBU’s available. Backer boards have the
advantage that they have low mass and are
relatively inexpensive to install. Also the available
thicknesses of
areas to match up well with adjacent nish oors.
Prior to each panel installation, apply thin-set
to the top surface of the Warmboard–R using a
1
/
" square-notched trowel. The purpose of this
4
butter coating of thin-set is to function as a leveling
compound. Immediately fasten the backer board
before the thin-set dries using “backer board
screws.” See details on next page for a tip on
avoiding tubing damage. Tape all seams with
backer board tape. Finish with tile or stone.
A warranty letter from Custom Building Products
for the use of WonderBoard
is available upon request.
1
/
" and
4
1
/
" provide a base for tiled
2
®
over Warmboard–R
Custom Building Products_
Custom Building Products_
Custom Building Products_
VersaBond Flex
Wond erBoard
®
FlexBond
®
24
Tile or stone flooring
®
Warmboard–R
®
Backer board must run perpendicular to the
Warmboard–R panels. Seams should also be
staggered. Take special care while fastening to
note, and avoid, tubing damage.
Substituting with other comparable brands that meet
ANSI standards is acceptable.
The surface temperatures of tile or stone must not
exc e e d 8 5° F.
Page 25
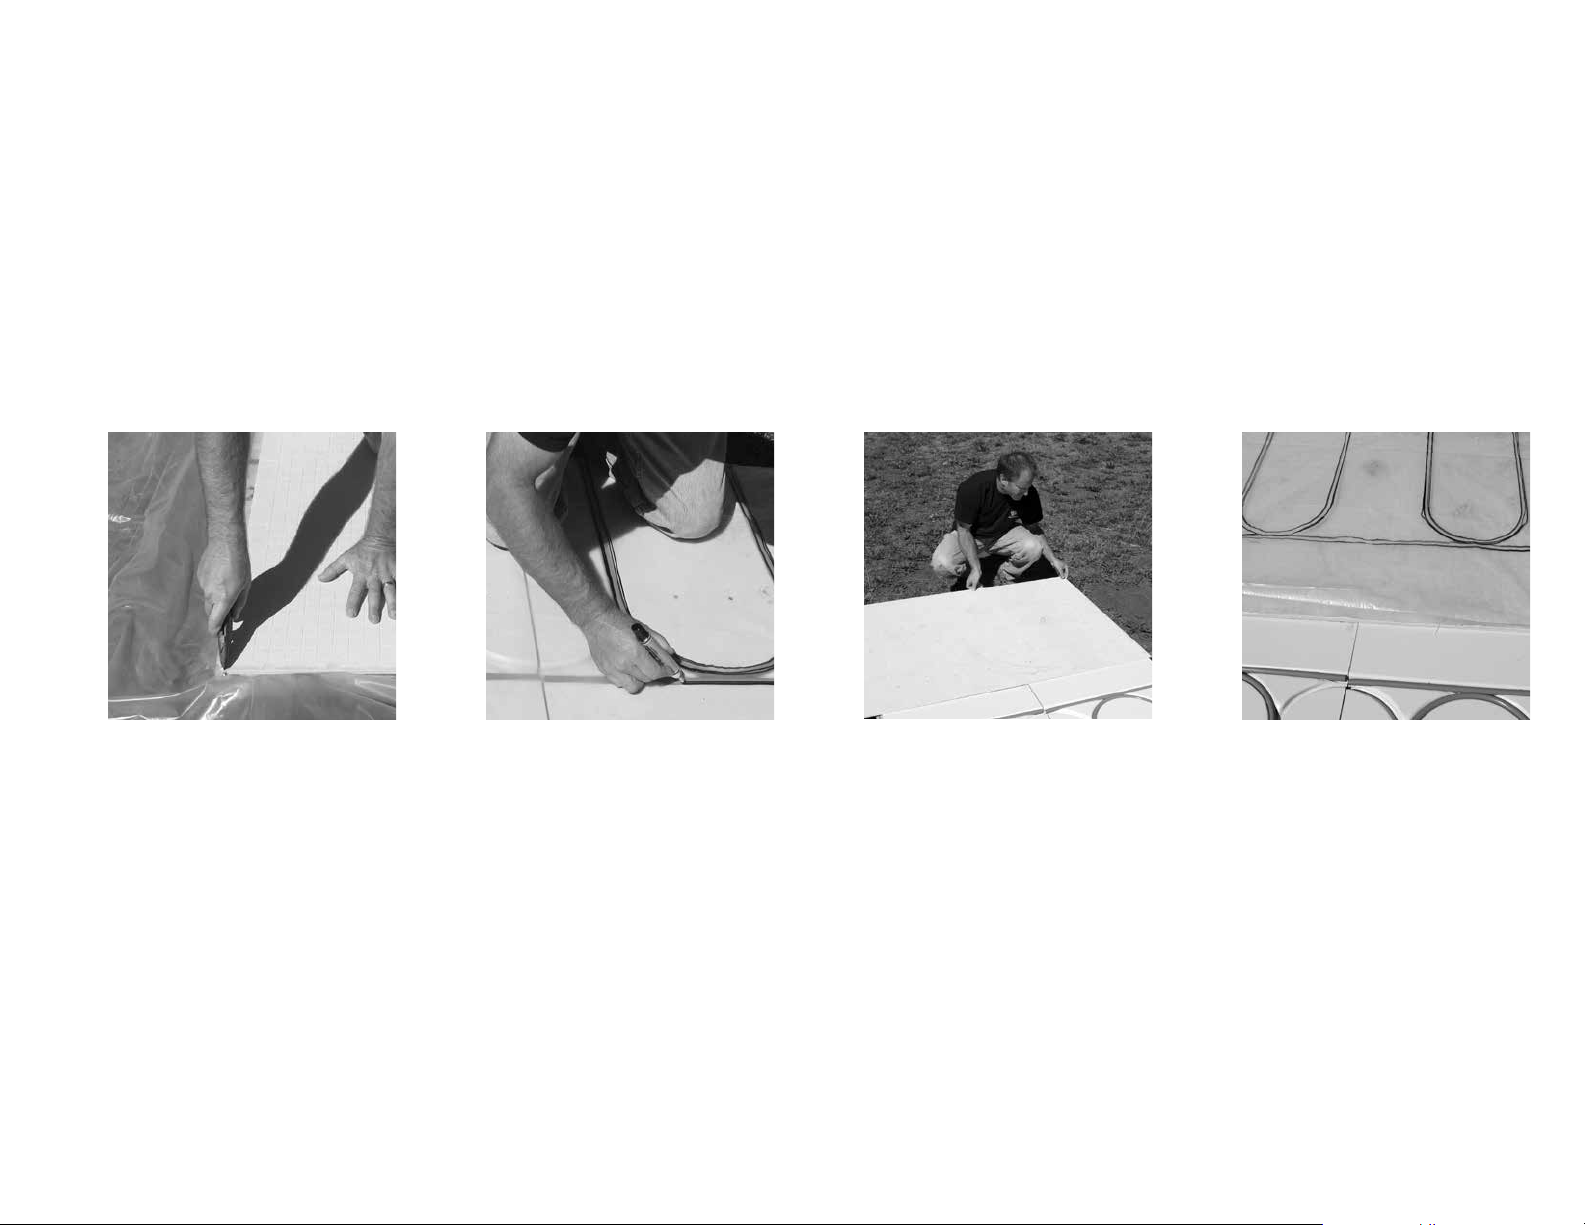
Installation tip Use a stencil
to avoid tubing damage with
Backer Board
With the use of a clear thin polyethylene plastic sheeting (3 or 4-mil) and a permanent marker, you can
quickly create a stencil of the actual tubing pattern. By placing this custom stencil over the backer board you
can safely install all of your fasteners and avoid tubing damage.
For assistance call
1.877.338.5493
25
1. 3.2. 4.
Cut the polyethylene plastic
to the size of backer board.
Save time by cutting all of your
full size 3' x 5' plastic stencils
at once. Caution: Do not cut
directly over the Warmboard
or the tubing.
Place the precut plastic over
the Warmboard–R panel and
tape down the corners. With a
permanent marker, trace the
tubing pattern onto the plastic.
Be sure to clearly mark the
top and bottom on the stencil.
Carefully remove plastic and lay
at next to work area.
Trowel a coat of Thin-Set over
the Warmboard–R panel and
place the backer board over the
appropriate Warmboard location
(review any information on
previous page as needed).
Align the stencil over the backer
board and tape down the corners.
Mark all safe fastening locations
with a drill bit, then remove
plastic stencil and fasten as
normal.
Page 26
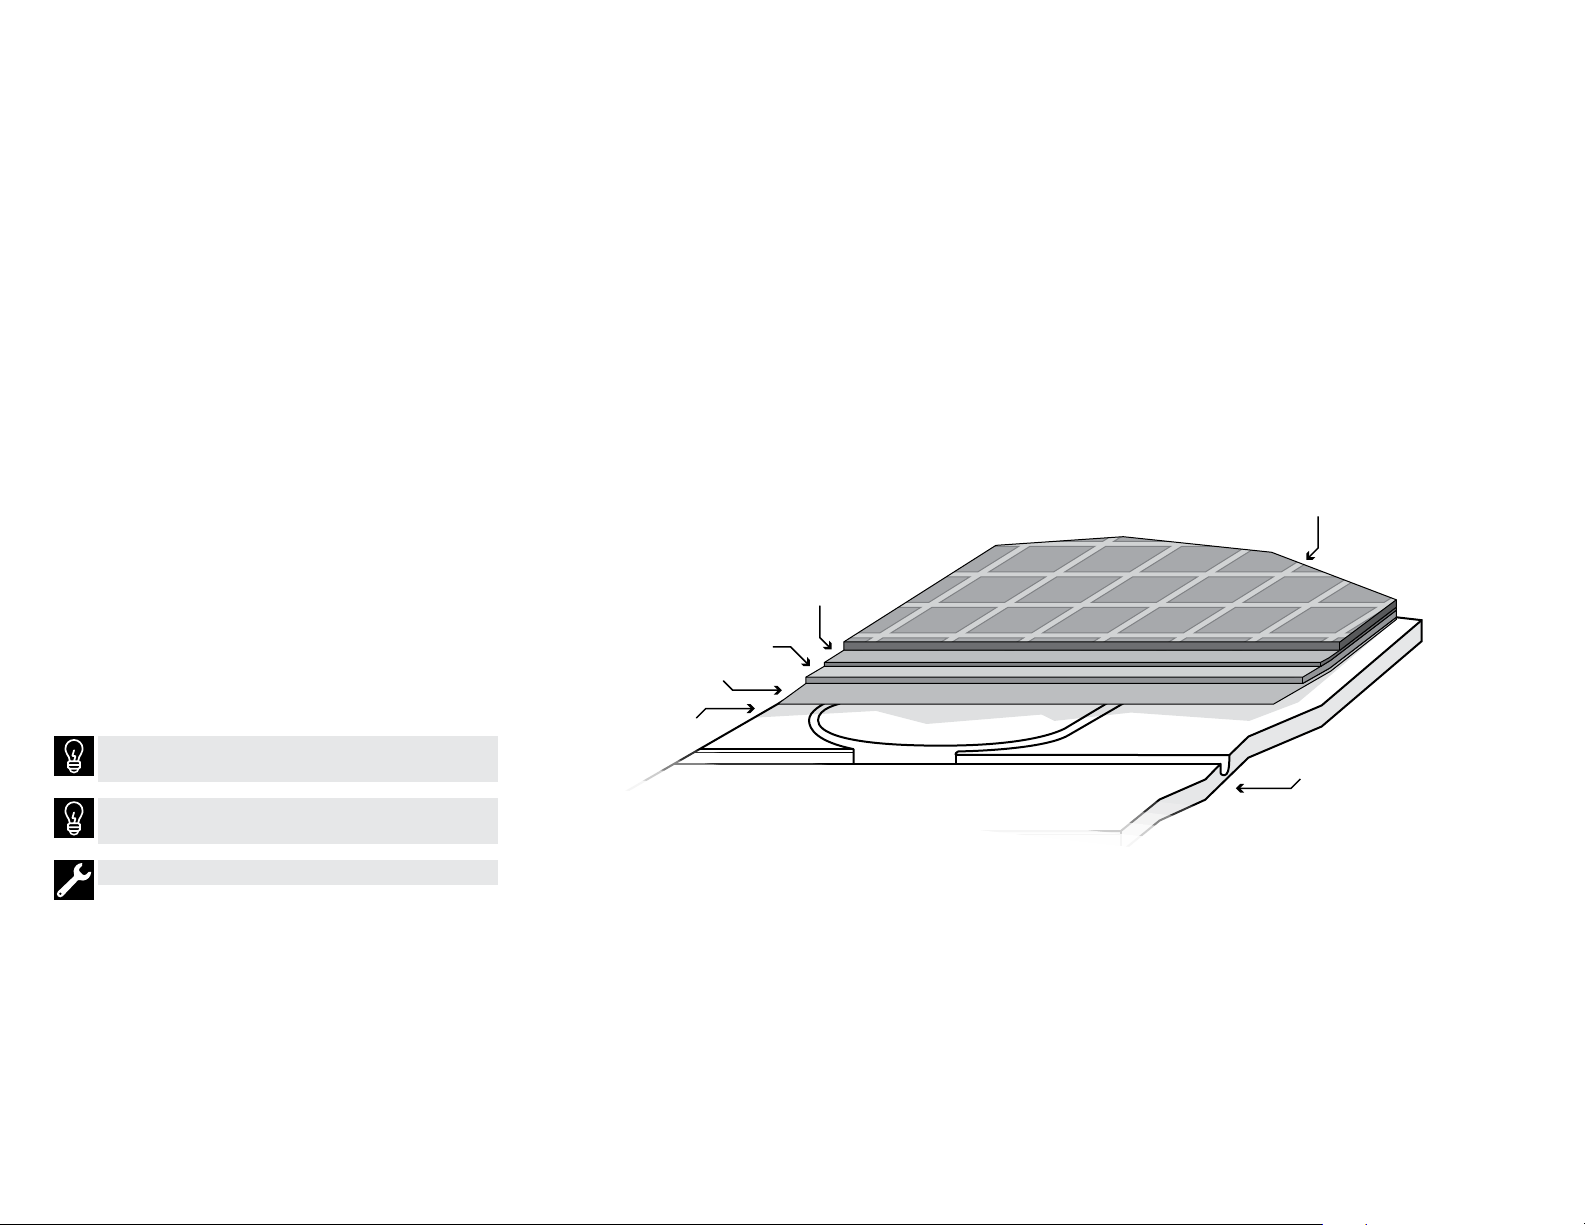
3
Method 2 Mortar Bed
/
" thick with
4
“4 To 1™ Mud Bed Mix” by Mapei®
Mortar beds have been the traditional method of
addressing the expansion, contraction and deection
properties of wooden suboors. They have the
advantage that by their very nature they provide a
thick, continuous, stable surface to which tile readily
adheres. They have the disadvantage that they tend
to be expensive, add signicant mass to a system,
and due to their thickness, often cause the elevation
of tile areas to not match up well with adjacent
carpeted or hardwood areas.
When applying mortar beds, install a 4 or 6-mil
polyethylene to serve as a cleavage membrane.
Fasten down a diamond wire mesh lath over the
membrane using crown staples and nish with a
minimum
Bed Mix or equal). After the mortar bed has cured,
thin-set and tile or stone may then be applied.
3
/
" mortar bed (Mapei
4
Substituting with other comparable brands that meet
ANSI standards is acceptable.
®
4 to 1™ Mud
4 to 1™ Mud Bed M ix
Diamond wire
mesh lath
4 mil polyet hylene
sheeting
UltraFlex
Mapei
Mapei
™
2
Tile or stone flooring
Warmboard–R
26
®
The surface temperatures of tile or stone must not
exc e e d 8 5° F.
Take care to avoid tubing damage.
Page 27
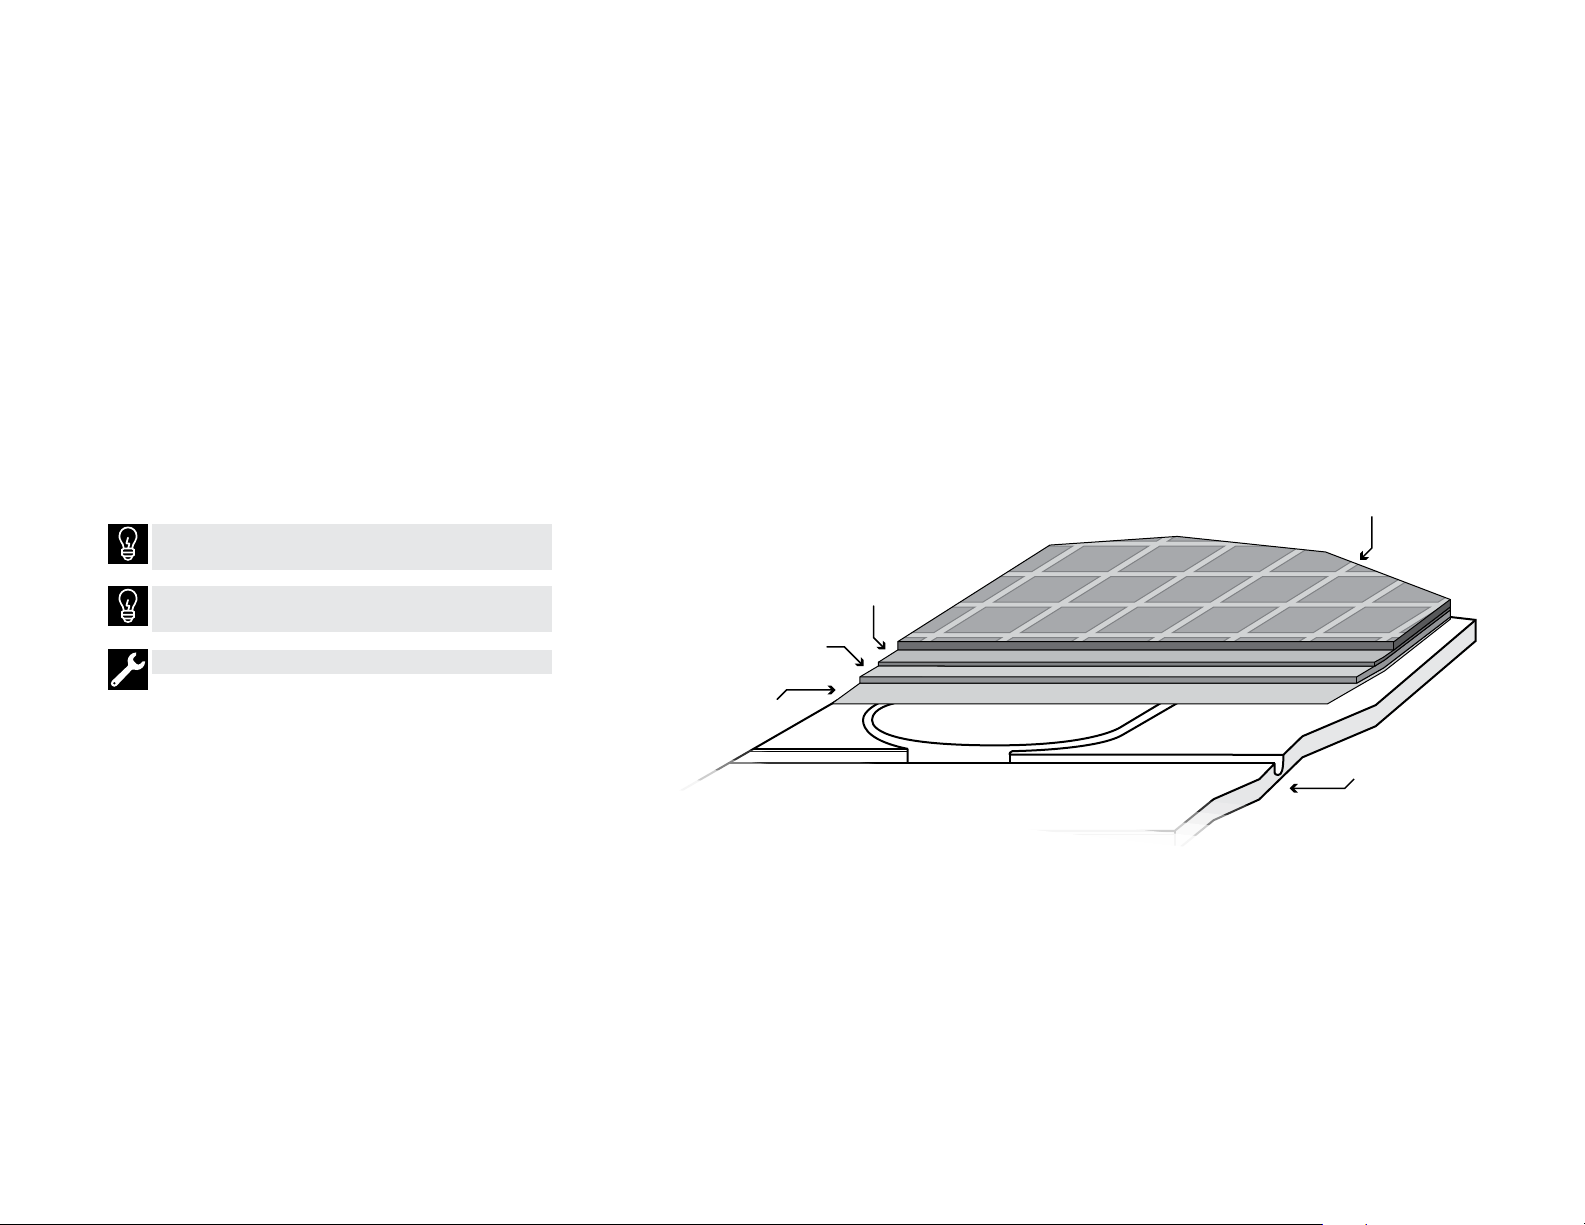
Method 3 Ultraplan® Easy,
3
/
" self-leveling underlayment by Mapei®
8
The main advantage of this product is the thin
prole with the great strength of a mortar bed.
To proceed with this underlayment, clean panels,
apply “Mapei Primer T” (per Mapei instructions)
then follow with diamond wire mesh lath and attach
with crown staples. Mix and apply (per Mapei
instructions) “Ultraplan
3
/
" or more. Finish with thin set and tile or stone.
8
Substituting with other brands in this assembly is
NOT recommended.
®
Easy” to a thickness of
For assistance call
1.877.338.5493
Tile or stone flooring
27
The surface temperatures of tile or stone must not
exc e e d 8 5° F.
Take care to avoid tubing damage.
3/8" UltraPlan
Diamond wire
mesh lath
UltraFlex
®
Easy
Mapei
™
Mapei
2
Warmboard–R
®
Page 28
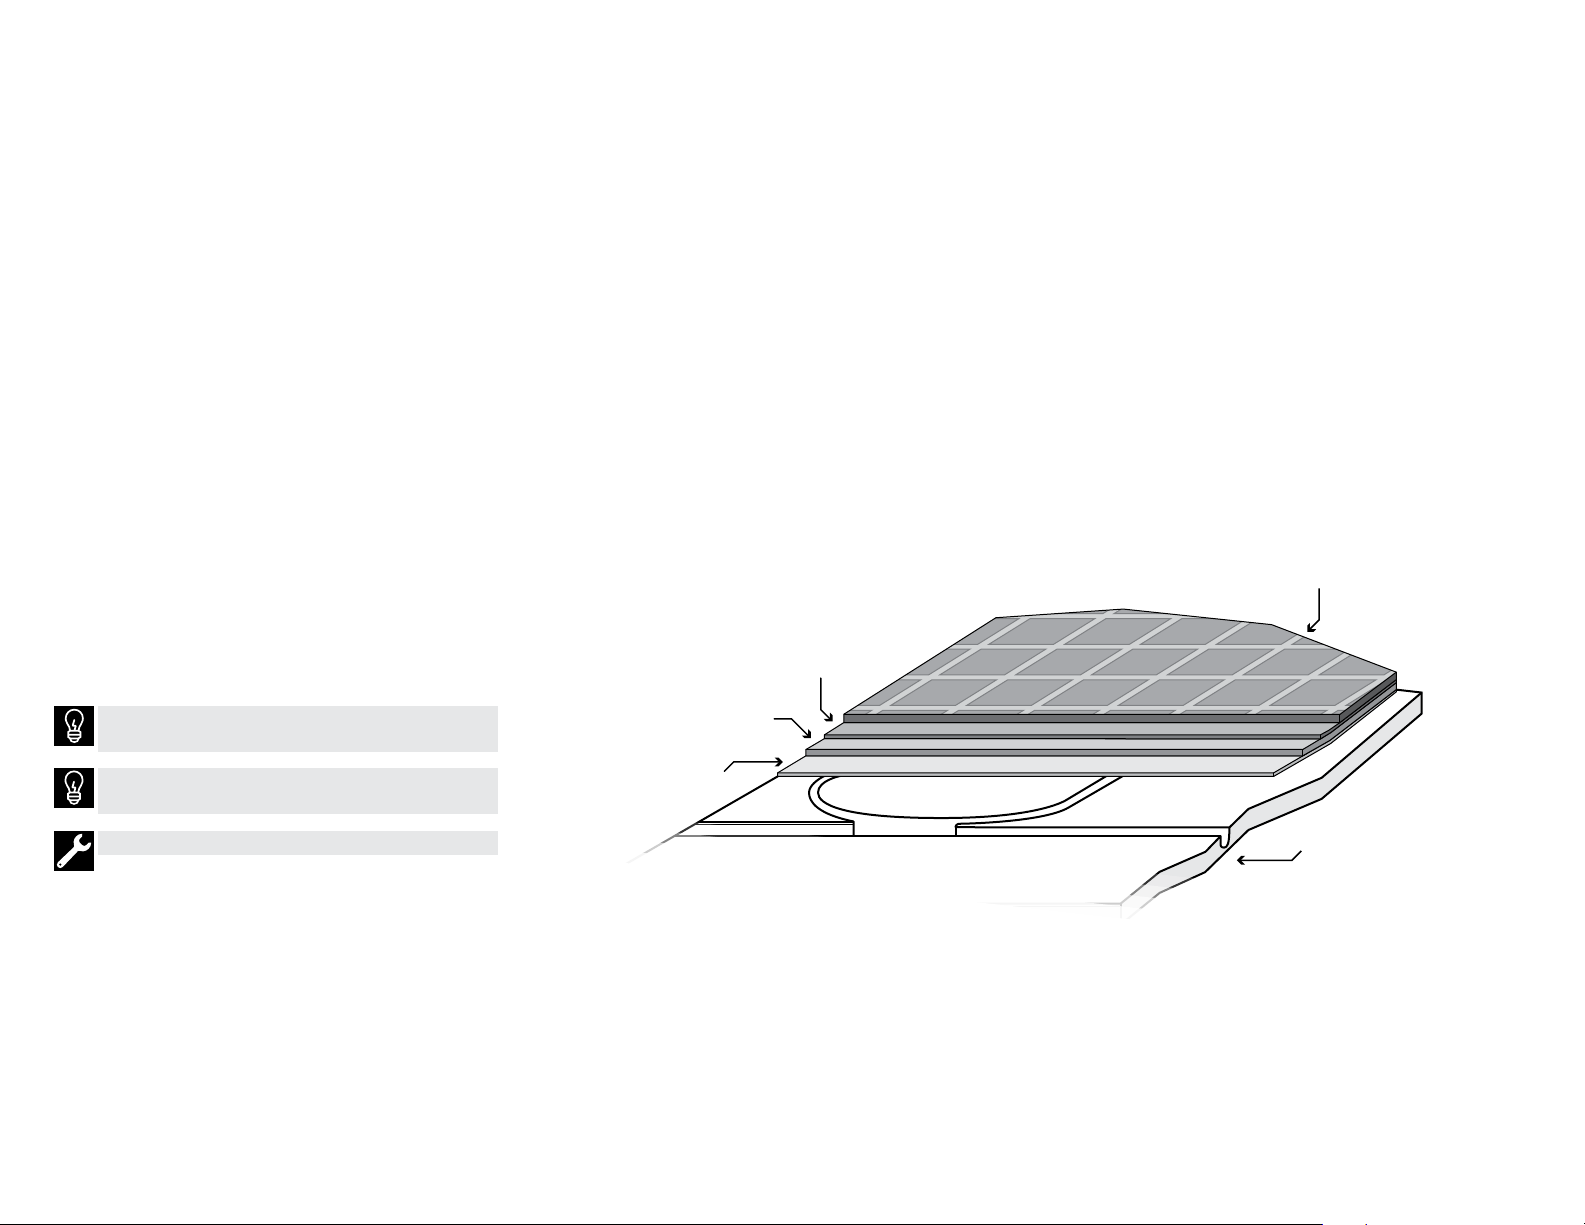
Method 4 RedGard® Uncoupling Mat
by Custom Building Products
28
RedGard® Uncoupling Mat is a water and vaporproof uncoupling membrane that can be used for
crack-isolation in most tile, porcelain or natural
stone installations. This product, when exposed
to excessive substrate movement, absorbs stress
and preserves the surface and integrity of the tile.
RedGard Uncoupling Mat’s bonding layers have
reinforced eece which locks mortar into the mat,
ensuring strong, reliable installations.
To install, clean panels, trowel on “Mapei
Granirapid
instructions) using a
®
Thin-Set mortar” (mix per Mapei’s
1
3
/
/
" x
" V-notched trowel.
4
16
Immediately install the RedGard Uncoupling Mat.
1
1
/
Follow next day with thin-set using
" x
4
/
" square
4
notch trowel. Finish with tile or stone.
Substituting with other brands in this assembly is
NOT recommended.
The surface temperatures of tile or stone must not
exc e e d 8 5° F.
Take care to avoid tubing damage.
A TCNA “Bond Strength Test” was performed with
Warmboard and Mapei Granirapid. Summary of
these test results are below:
u
Warmboard–S with Granirapid averaged 217 PSI
u
Plywood with Granirapid averaged 240 PSI
u
Minimum requirement is 50 PSI
The TCNA “Bond Strength Test” assembly results,
can be made available upon request.
UltraFlex
®
RedGard
Custom Bui ldi ng Products_
Uncoupling Mat
Mapei_
®
Granirapid
™
Mapei
2
Tile or stone flooring
Warmboard–R
®
Page 29
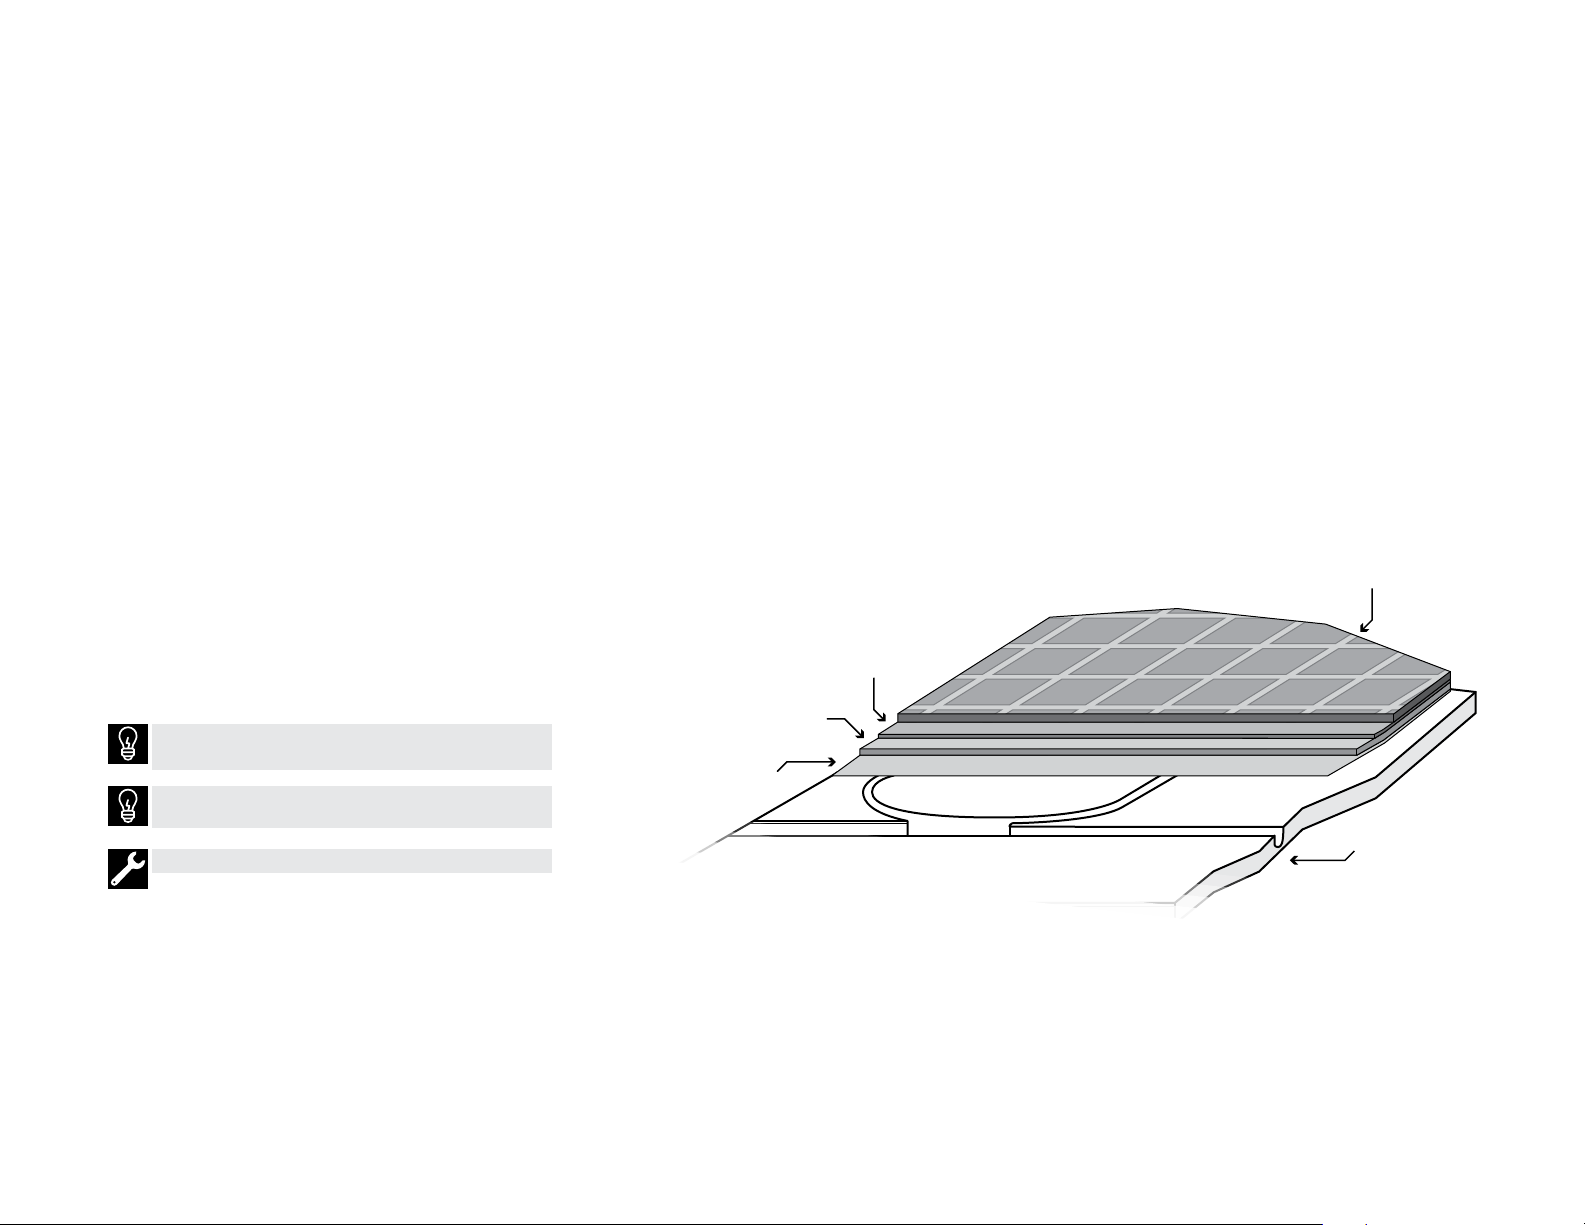
Method 5 Uncoupling membrane
“Permat” by Blanke
For assistance call
1.877.338.5493
29
For stone and tile installations, Blanke • PER MAT
offers amazing crack isolation protection and
superior compression and tensile strength. The
Blanke
• PERMAT reinforced mesh panel adds major
support to wood suboors, greatly reducing vertical
suboor movement (deection).
To proceed with this installation, clean panels,
trowel on the Mapei “Granirapid Thin-Set mortar”
1
3
/
(mix per Mapei’s instructions) using a
" x
4
/
"
16
V-notched trowel. Immediately install the Permat.
1
1
/
Follow next day with thin-set using
" x
4
/
" square
4
notch trowel. Finish with tile or stone.
A warranty letter from Blanke, Inc. for the use
of Permat over Warmboard–R is available upon
request.
Substituting with other brands in this assembly is
NOT recommended.
The surface temperatures of tile or stone must not
exc e e d 8 5° F.
Take care to avoid tubing damage.
A TCNA “Bond Strength Test” was performed with
Warmboard and Mapei Granirapid. Summary of
these test results are below:
u
Warmboard–S with Granirapid averaged 217 PSI
u
Plywood with Granirapid averaged 240 PSI
u
Minimum requirement is 50 PSI
The TCNA “Bond Strength Test” assembly results,
can be made available upon request.
™
Mapei
2
•
Blanke
Granirapid
Mapei_
UltraFlex
PERMAT
Blanke
®
Tile or stone flooring
Warmboard–R
®
Page 30
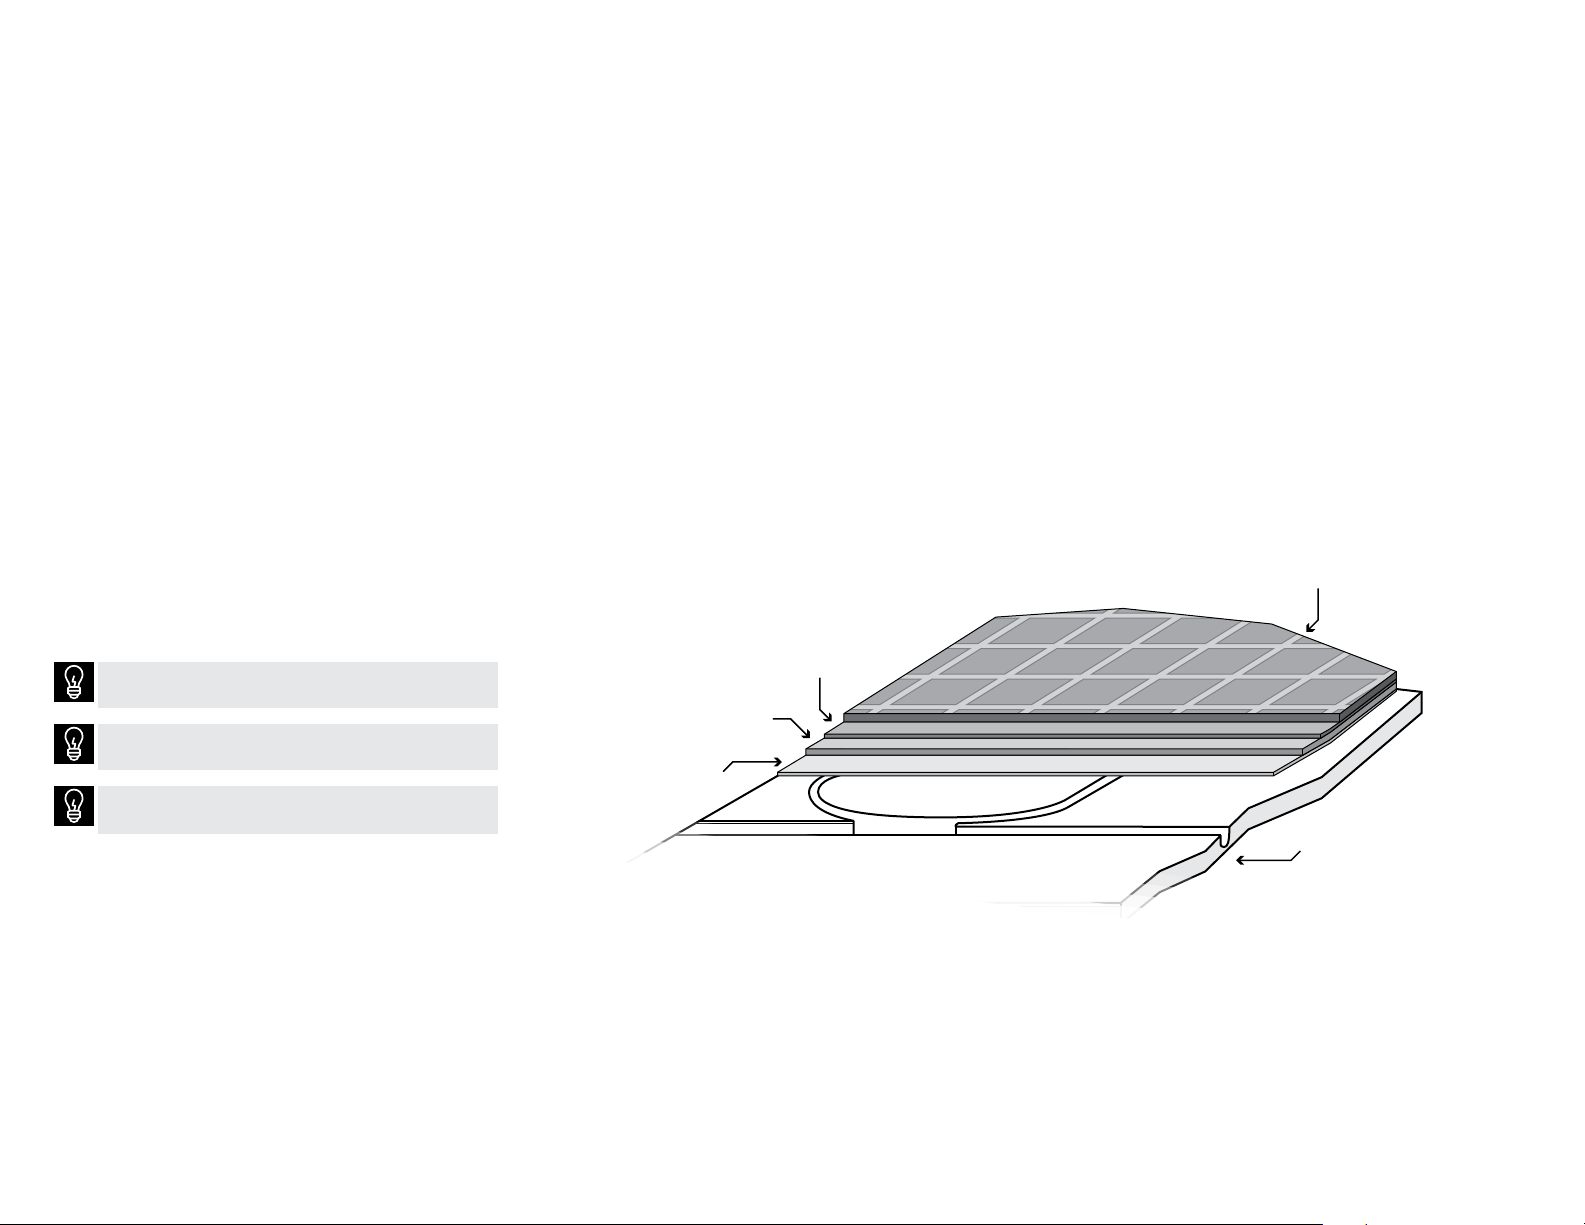
Method 6 Uncoupling membrane
“Ditra” by Schluter
®
DITRA
structure of square cut cavities and an anchoring
fleece laminated to its underside. Apply a layer of
Mapei’s “Granirapid Thin-Set mortar” (a premium
rapid-setting and flexible polymer-modified
mortar) directly to the Warmboard, using a
1
grid. Wait until the mortar is completely dry below
the
mortar that meets or exceeds ANSI A118.1 on the
topside of the
or stone. There have been hundreds of successful
tile installations installed by this method with no
reports of problems or failure.
is a polyethylene membrane with a grid
5
/
16
/
" V-not ched trowel, and then install the DITRA
4
DITRA, then trowel on an unmodified thin set
DITRA, and immediately install tile
" or
A TCNA “Bond Strength Test” was performed with
Warmboard and Mapei Granirapid. Summary of
these test results are below:
u
Warmboard–S with Granirapid averaged 217 PSI
u
Plywood with Granirapid averaged 240 PSI
u
Minimum requirement is 50 PSI
The TCNA “Bond Strength Test” assembly results,
can be made available upon request.
30
Tile or stone flooring
Schluter does not warranty the interface described
above (Warmboard–S and DITRA).
Substituting with other brands in this assembly is
NOT recommended.
The surface temperatures of tile or stone must not
exc e e d 8 5° F.
Schluter-DITRA
Schluter®
Mapei_
®
Granirapid
Kerabond
Mapei_
™
Warmboard–R
®
Page 31

Tile information resources
For assistance call
1.877.338.5493
31
The surface temperatures of tile or stone must not
exc e e d 8 5° F.
Warmboard, Inc. is not an agent for the
manufacturers listed here, and gives no actual or
implied warranty of fitness for any of these products
or manufacturers.
CAUTION!
Whatever method you use, make sure that the
product meets the standards set forth and accepted
by the TCNA, ANSI, and the ICC (formerly ICBO).
Be sure to follow each manufacturer’s specific
recommendations when using these products.
Ceramic tile backer board
resources
u
USG Durock and Fiberock
u
Georgia-Pacific
u
JamesHardie
u
Wonderboard
Uncoupling membrane resources
u
Blanke
u
Custom Building Products
u
Schluter
Additional resources
u
American National Standards Institute (ANSI)
ansi.org
u
Tile Council of North America (TCNA)
tileusa.com
u
Mapei
mapei.us
Page 32
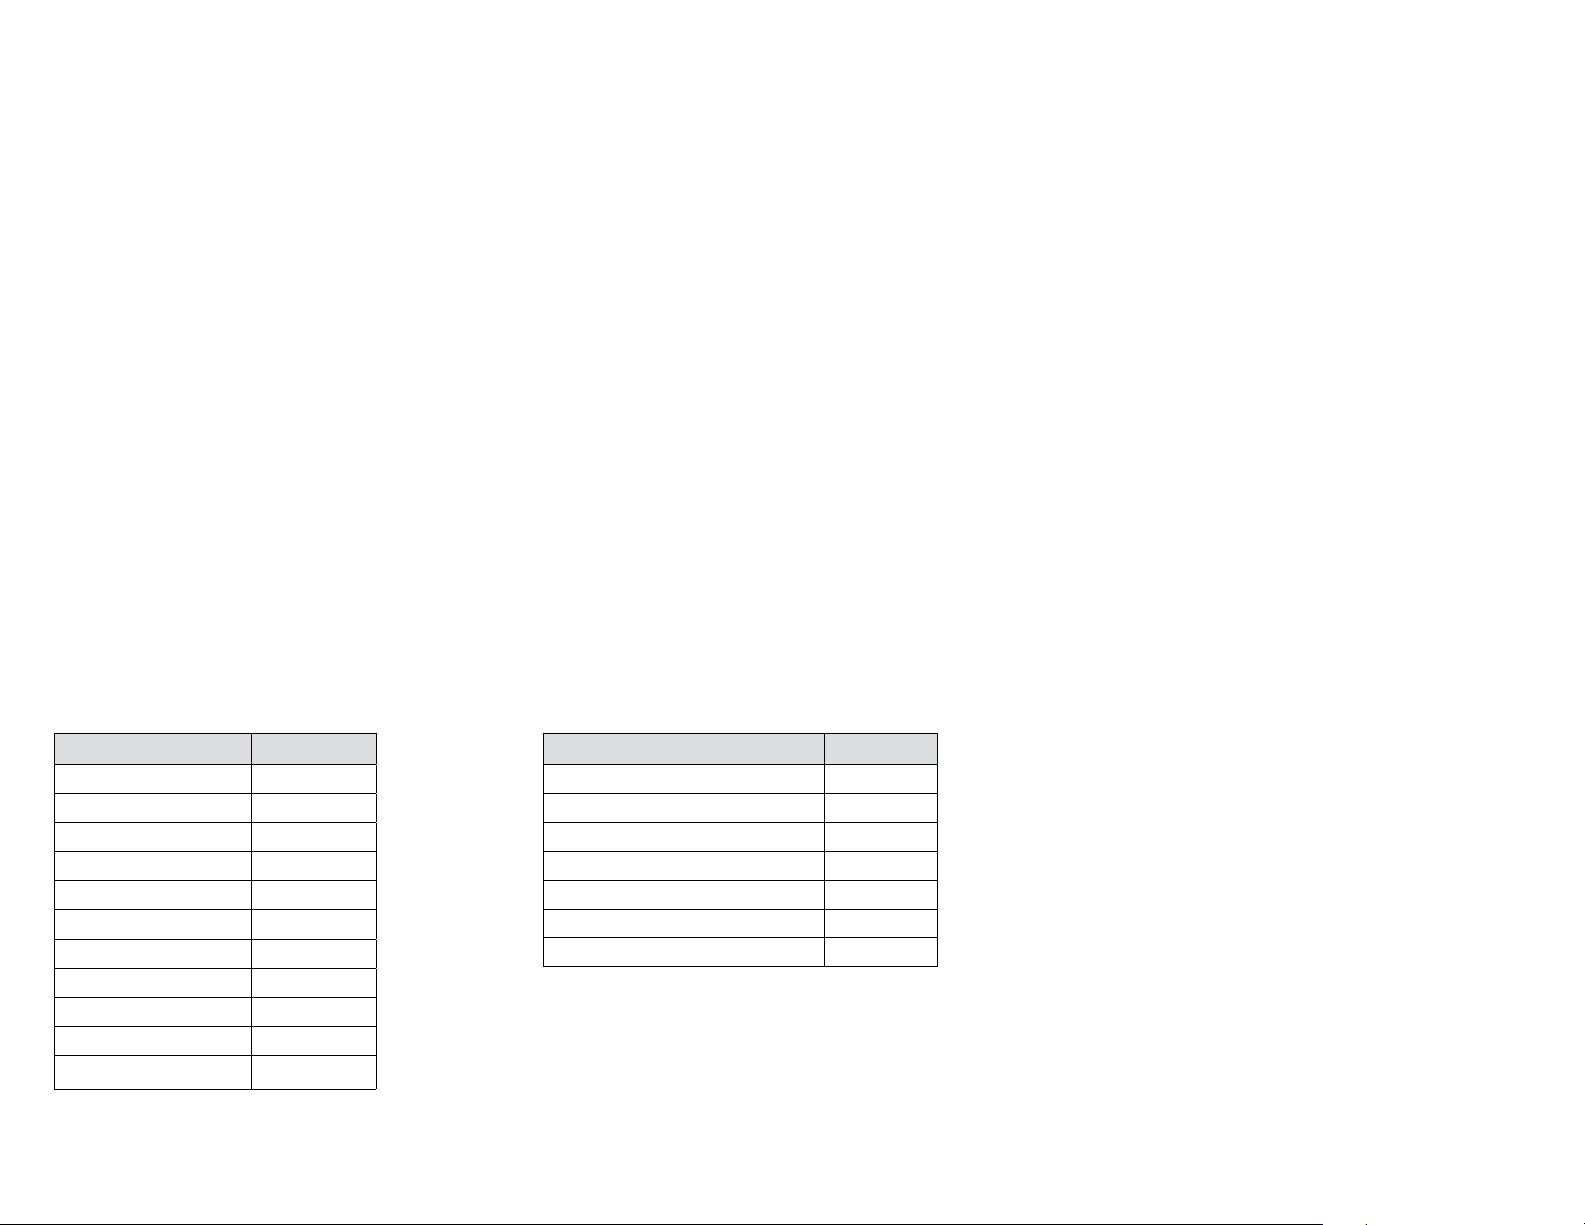
Installing carpet
32
Padding and carpet is a very common finish
floor to use over Warmboard–R. The carpet
cushion (padding) can be installed directly over
Warmboard–R. Before installing the carpet cushion
it is necessary to fill all of the empty grooves to
provide an even surface for installation. Empty
grooves can be filled with scrap PEX tubing.
Another option is to use a floor leveling compound
or Portland cement to fill the empty grooves
making them flush and level with the panel surface.
Do not install padding and carpet until all the
loops have been properly pressure tested.
Sponge Cushion, Inc.
1.800.435.4062
commercial-carpetcushion.com
Product R-values
Luxury Step .80
Full House .68
Berber Supreme .59
Berber Master .35
Silent Walk .46
SP 380 .66
Tred-MOR 1562 .27
Tred-MOR 2568 .46
Tred-MOR 2580 .48
Tred-MOR 2500 .34
Deci-BLOK .10
When choosing a carpet cushion/carpet assembly
we recommend a product that has a low R-value
rating. The advantage of using a product with a low
R-value is to keep the radiant floor system very
simple. Meaning the system can use the same water
temperatures for the tile, hardwood, and carpet
in a home. This type of system is referred to as a
one temperature system. To achieve a simple one
temperature system, it is best to purchase a carpet
and carpet cushion assembly that does not exceed
an R-value of 2. If the R-value assembly exceeds
R-2, a two temperature system may be required.
Leggett & Platt
1.800.866.9446
lpcarpetcushion.com
Product R-values
Arcadia .80
STAINMASTER® Plus .70
Laguna .70
Valencia .70
Aurora .70
Coronado .70
Solano .60
The Radiant Professionals Alliance (RPA) and
International Association of Plumbing and
Mechanical Officials (IAPMO) recommends that the
surface temperature of carpet does not exceed 85ºF.
Warmboard Inc. supports the recommendations of
the RPA and IAPMO.
For other carpet cushion options review Group Two
on on the following page.
Page 33
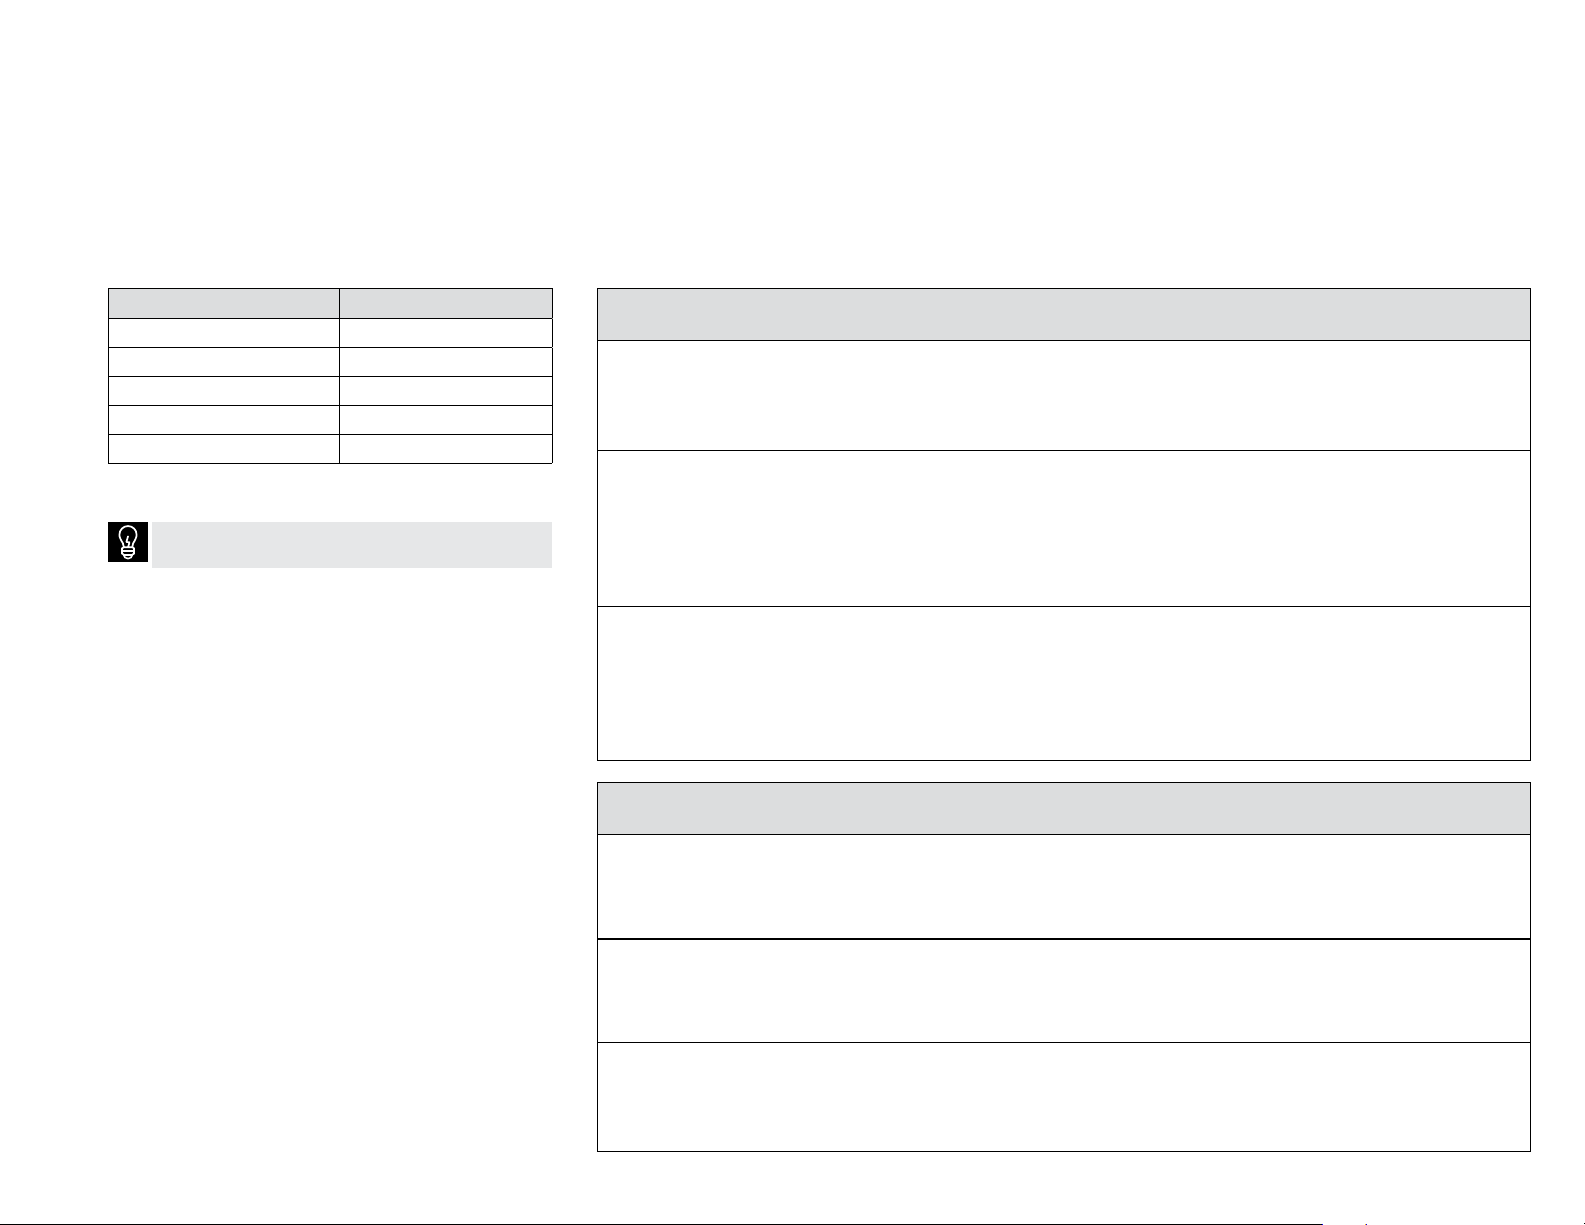
Carpet and padding
R-values
For assistance call
1.877.338.5493
33
Carpet Thickness R-value
1/8" R-0.6
1/4" R-1.0
1/2" R-1.4
3/4" R-1.8
1" R-2.2
R-values are approximate. Check with product
manufacturer for actual R-values.
GROUP 1
Prime Urethane 2.2 lb/cu ft 1/4" R-1.08 Not Recommended
3/8" R-1.62
1/2" R-2.15
Bonded Urethane 4-8 lb/cu ft 5/32" R-0.66 Not Recommended
1/4" R-1.05
3/8" R-1.57
7/16" R-1.84
1/2" R-2.09
Sunburst Family 10 lb/cu ft Not Recommended
SunBerber 3/8" R-1.16
Sunburst 15/32" R-1.43
BerberGuard 3/8" R-1.25
SunGuard 15/32" R-1.50
GROUP 2
Fiber/Hair/Jute 6-8 lb/cu ft 1/4" R-0.97 3rd Choice
3/8" R-1.46
1/2" R-1.94
Wafe Rubber 25 lb/cu ft 1/4" R-0.62 2nd Choice
3/8" R-1.00
1/2" R-1.33
Slab Foam Rubber 33 lb/cu ft 1/4" R-0.31 Best Choice
3/8" R-0.47
1/2" R-0.62
Density Thickness R-value
Density Thickness R-value
Page 34

Installing cork flooring
34
NOTE
Follow all installation specifications
provided by the cork manufacturer.
Cork flooring has a naturally high insulation value
so it is important to choose one that is
in thickness when working with radiant heat. This
will keep the R-value to 1.5 or less giving better
heating and response times, while simplifying the
mechanical design at the same time. A more simple
mechanical design means your cork floor will
operate in the same water temperature range as
tile, hardwood or carpet.
Established brands include Expanko Cork
(expanko.com), American Cork (amcork.com),
and Natural Cork (naturalcork.com).
3
/
" to
8
1
/
"
2
Installation of standard cork
flooring
The installation of an underlayment is required
over the Warmboard surface before standard cork
flooring is installed. Care should be taken when
fastening the underlayment to Warmboard–R
because the tubing is obscured during this step.
We recommend installing a
underlayment with a sanded face. For complete
installation details, refer to the “Engineered Wood
Construction Guide” at apawood.org. Complete
the installation of the cork by following all the
manufacturer guidelines and specifications.
Once the underlayment is installed, the cork is
adhered using a urethane adhesive made for cork
applications. A good product to use is Dri Tac 7500
(dritac.com, 1.800.726.7845).
1
/
" APA listed plywood
4
Installation of cork laminate
products
Cork laminate products also work well with
Warmboard–R. These products are manufactured
with cork on the top and bottom and an MDF
layer sandwiched in between. It is not necessary
to put any barrier between the cork flooring
and the Warmboard surface prior to installation.
The advantage of this type of cork floor is that it
installs as a floating floor and requires no adhesive
or nailing for proper installation. This allows the
homeowner more flexibility if they ever decide to
change the floor covering.
The surface temperature of cork flooring must not
exc e e d 8 5° F.
When using a plywood or OSB (or equivalent)
underlayment it is crucial to fully acclimate panels
before installation. If underlayment panels are too
high in moisture content, the panels will shrink from
the floor heating and create an installation failure.
Page 35

Installing vinyl
For assistance call
1.877.338.5493
35
NOTE
Follow all installation specifications
provided by the vinyl manufacturer.
There are several different types of vinyl flooring
available and all can be used with Warmboard–R.
Common vinyl finish floors include
u
Sheet vinyl
u
Luxury tile vinyl
u
Luxury plank vinyl
For all types of vinyl installations over Warmboard
we recommend a substrate underlayment be installed
between the Warmboard and the vinyl finish floor.
Suggested substrate
underlayments
u
1/4" or 1/2" interior plywood or OSB
u
1/4" or 1/2" tile backerboard
(ideal for bathrooms, kitchens)
Use the “stencil method” on page 25 to avoid
tubing damage.
If the vinyl flooring is being used in conjunction
with other types of flooring, consider the best
underlayment to keep floor heights consistent
between flooring types.
For tile backerboard installation, see page 24.
When using a plywood or OSB (or equivalent)
underlayment it is crucial to fully acclimate panels
before installation. If the underlayment panels are too
high in moisture content, the panels will shrink from
the floor heating and create an installation failure.
The surface temperature of vinyl flooring must not
exc e e d 8 5° F.
DO NOT use adhesive if using plywood, just staples
or screws.
Page 36

Installing linoleum
36
NOTE
Follow all installation specifications
provided by the linoleum manufacturer.
Linoleum is a floor covering made from solidified
linseed oil in combination with flour or cork dust
over a burlap or canvas backing. As an all natural
product, linoleum offers many advantages and
interfaces well with Warmboard–R.
The installation of underlayment is required over
Warmboard–R before the linoleum is installed. Care
should be taken when fastening the underlayment to
Warmboard because the tubing is obscured during
this step. We recommend installing a
APA listed plywood underlayment with a sanded
face. For complete installation details refer to
“Engineered Wood Construction Guide” at
apawood.org. Complete with installation of
linoleum, following manufacturer guidelines
and specifications.
The surface temperature of linoleum flooring must
not exceed 85°F.
When using a plywood or OSB (or equivalent)
underlayment it is crucial to fully acclimate panels
before installation. If the underlayment panels are too
high in moisture content, the panels will shrink from
the floor heating and create an installation failure.
1
/
4
" or
1
/
"
2
Page 37
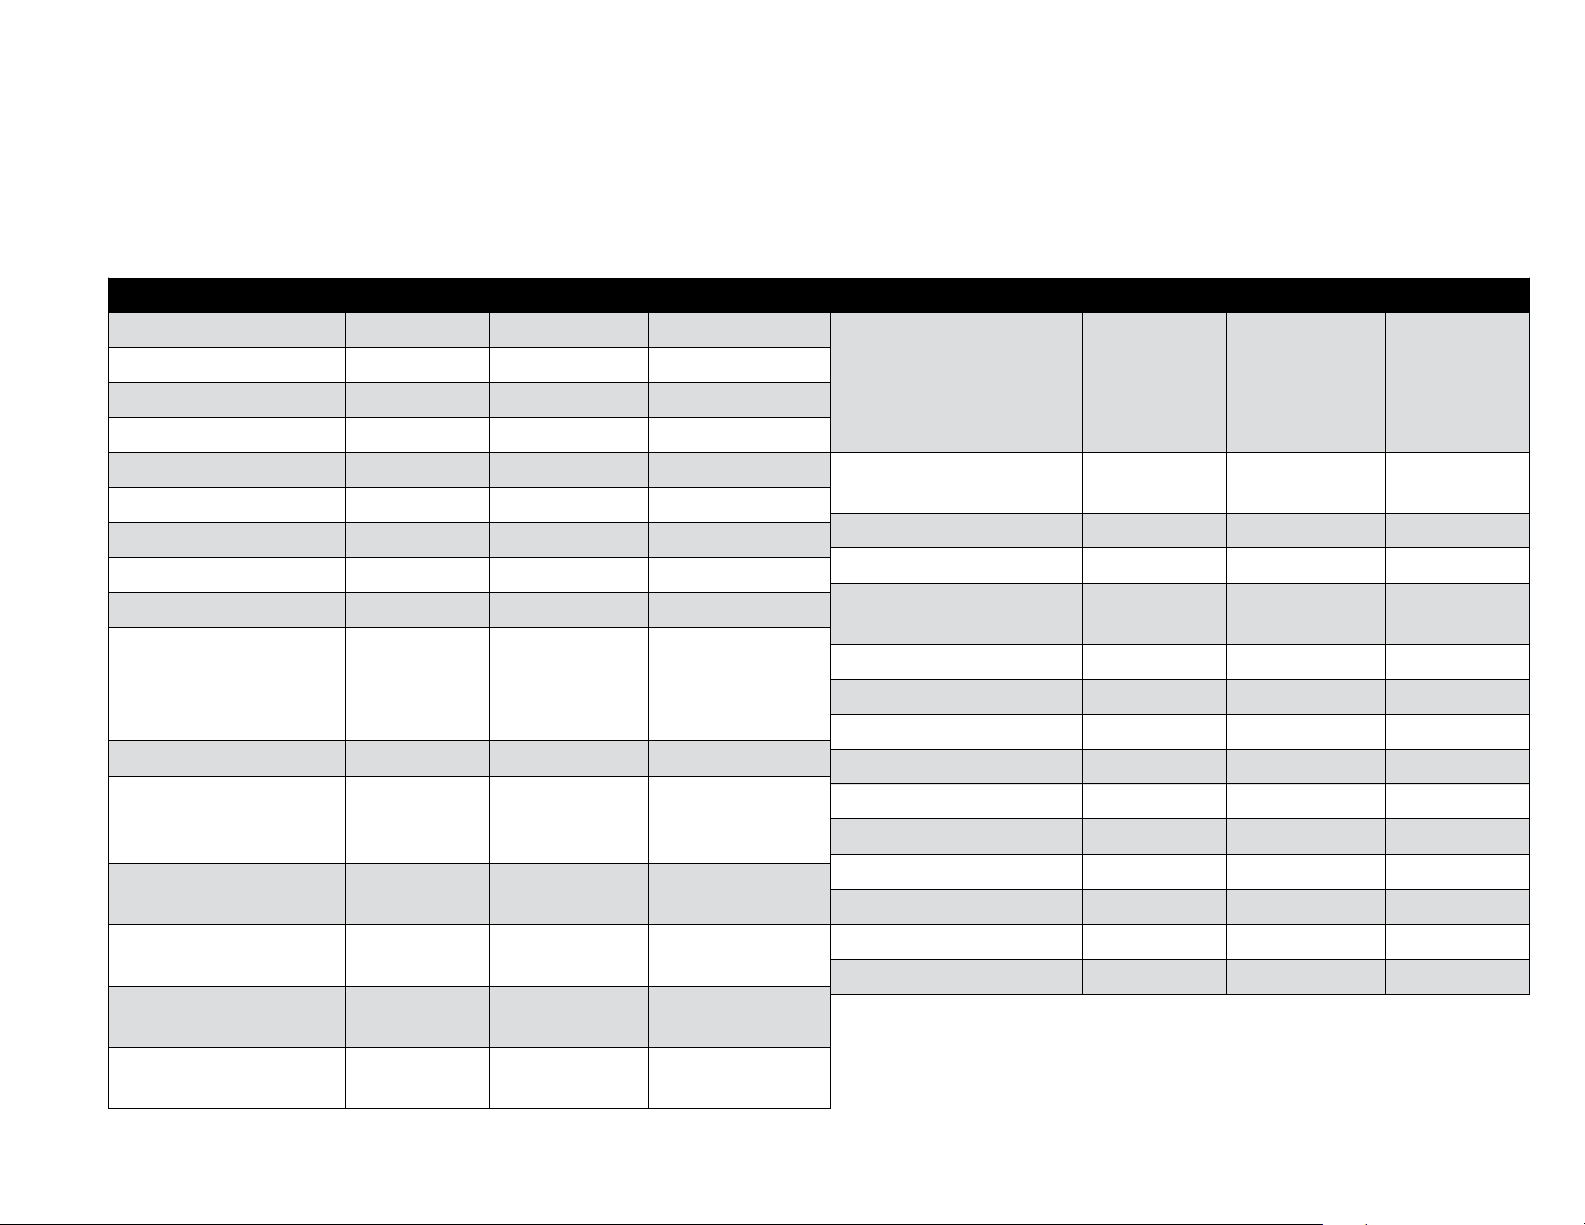
Finish floor R-values
For assistance call
1.877.338.5493
37
Material Typical R-value R-value per inch Typical thickness
Plywood 0.825 1.10 0.750
OSB 1.050 1.40 0.750
Softwood 0.825 1.10 0.750
Ash 0.750 1.00 0.750
Maple 0.750 1.00 0.750
Oak 0.638 0.85 0.750
Pine 0.975 1.30 0.750
Fir 0.900 1.20 0.750
Engineered Bamboo 0.720 0.96 0.750
Engineered Wood 0.250 1.00 0.250
0.375 1.00 0.375
0.625 1.00 0.625
0.750 1.00 0.750
Engineered Wood Flooring Pad 0.200 1.60 0.125
Carpet Pad/Slab Rubber 33 lb 0.320 1.28 0.250
0.480 1.28 0.375
0.640 1.28 0.500
Carpet Pad/Waffle Rubber 25 lb 0.620 2.48 0.250
1.240 2.48 0.500
Material Typical R-value R-value per inch Typical thickness
Carpet 0.700 2.80 0.250
1.050 2.80 0.375
1.400 2.80 0.500
1.750 2.80 0.625
2.100 2.80 0.750
Wool Carpet 1.575 4.20 0.375
2.100 4.20 0.500
Sheet Vinyl 0.200 1.60 0.125
Vinyl Composition Tile (VCT) 0.200 1.60 0.125
Linoleum 0.400 1.60 0.250
0.200 1.60 0.125
Dense Rubber Flooring 0.250 1.30 0.325
Recycled Rubber Flooring 1.100 2.20 0.500
Cork 1.125 3.00 0.375
Cork/MDF/Laminate 1.175 2.35 0.500
Brick 3.375 2.25 1.500
Marble 0.400 0.80 0.500
Ceramic Tile 0.250 1.00 0.250
Thin-set Mortar 0.050 0.40 0.125
Hair Jute 1.940 3.88 0.500
1.250 3.88 0.325
Prime Urethane 1.400 4.30 0.325
2.150 4.30 0.500
Bonded Urethane 1.350 4.20 0.325
2.100 4.20 0.500
MDF/Plastic Laminate 0.500 1.00 0.500
Laminate Floor Pad 0.300 1.92 0.160
Page 38
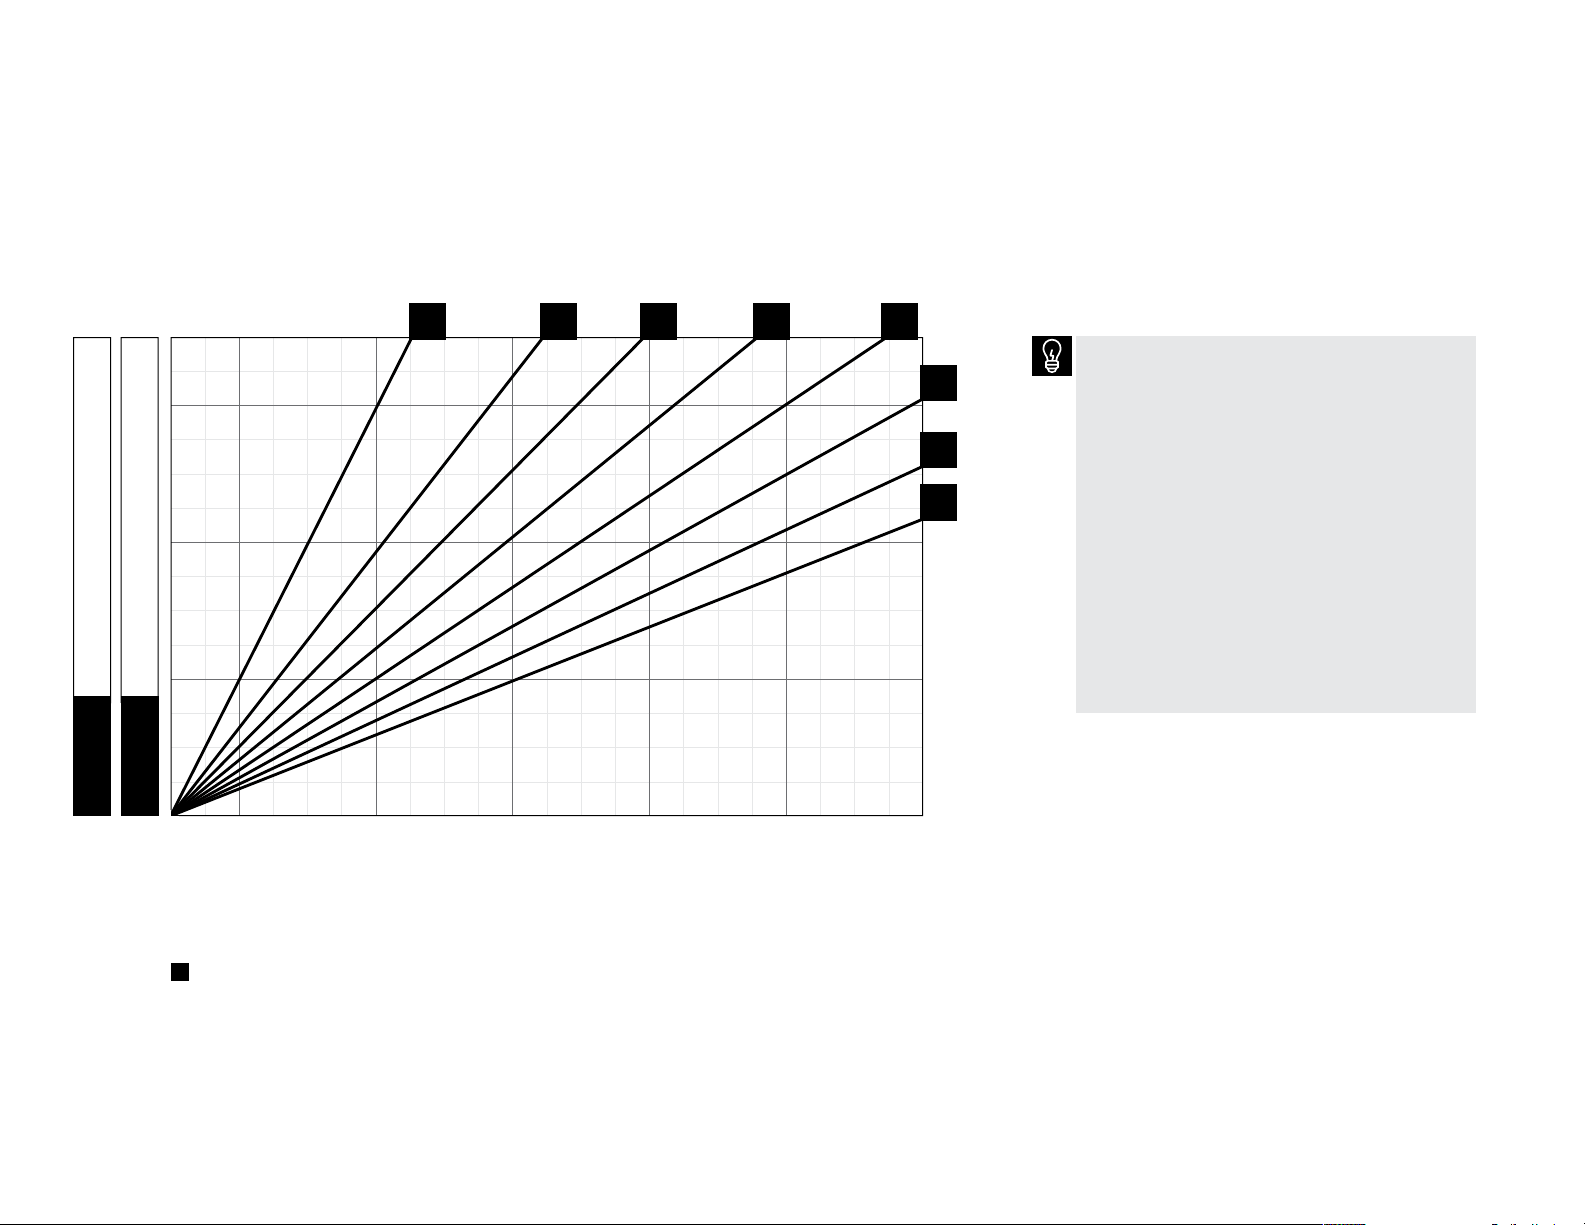
Required water
Ave. of Supply/Return Water Temperature at Manifold for Good Dynamic Performance
temperature chart
0.5 1.0 1.5 2.0 2.5
30
85
20
80
10
75
2
3.0
3.5
4.0
38
Steady State Per formance will require 10% lower
supply temperature.
R-value = Resistance value of floor covering
Warmboard, Inc. recommends a maximum floor
temperature of 85°F in accordance with industry
standard practices.
Assumes minimum R-19 insulation below
the floor.
Warmboard–R is one component of a complete
radiant system.
Complete system design shall be performed in
accordance with Radiant Professionals Alliance
(RPA) guidelines, manufacturers’ recommendations
for ancillary components, and is the responsibility
of the system designer.
Floor Temp.
Req. BTU/h/ft
80 100 120 14 0 160 180
Assumes a Designed Ambient Air Temperature of 70º Fahrenheit
= R-Value (thermal resistance)
Page 39

For assistance call
1.877.338.5493
39
warmboard.com
877.338.5493
8035 Soquel Dr., Ste. 41A
Aptos, CA. 95003
 Loading...