

WARIO ME13 User Manual
User guide for
IP Weather Station
WARIO ME13
(for rmware ME220005)
2
User guide for IP Weather Station WARIO ME13
Content
1. Important notes strana 6
Device specification strana 6
Safety instructions strana 6
2. Locating the Weather Station strana 6
Installing and using the weather station strana 6
Unsuitable places for installing the station strana 7
Installing the console and mounting pole strana 7
Connecting the station strana 7
3. Unpacking strana 7
Package contents: strana 7
Installation strana 8
Step 1 strana 8
Step 2 strana 8
Step 3 strana 8
Step 4 strana 8
Step 5 strana 9
Step 6 strana 9
Step 7 strana 9
Step 8 strana 9
Step 10 strana 10
Measured, calculated and additional parameters strana 10
Extensions strana 11
4. Conguration and settings strana 11
Status LED diode strana 11
Reset and default button strana 11
Function Restart by pressing button strana 11
Function Default configuration by pressing button strana 11
5. Sensor range and resolution strana 12
6. Device installation and conguration strana 12
7. Main features of the weather station web interface strana 13
8. Weather station conguration strana 13
Section – Settings strana 13
9. Section – Network strana 13
Tab LAN strana 13
DHCP strana 13
IP address strana 13
Subnet mask strana 13
NETBIOS name strana 13
Default gateway strana 13
Server DNS strana 13
Section Web server strana 14
Web server port strana 14
Internet web interface strana 14
Section ModBus strana 14
ModBus strana 14
ModBus address strana 14
Tab Http Proxy strana 14
Http proxy strana 14
Proxy server strana 14
Proxy port strana 14
10. Section – Users strana 14
User name strana 14
Password s trana 14

3
User guide for IP Weather Station WARIO ME13
11. Section – Security strana 14
Secured ModBus access strana 14
IP address strana 14
Require login upon start up strana 15
Shared key strana 15
12. Section – Sensors strana 15
Tab – sensor management strana 15
ModBus table strana 15
Add sensor strana 15
Ping strana 15
Label strana 15
IP address strana 15
Tab – measurement settings strana 15
Temperature and humidity measurement strana 15
Current values strana 15
Trend strana 15
Tab Units strana 15
Unit setings s trana 15
13. Section – Extensions strana 16
Tab – Weather station sensors strana 16
Update sensors strana 16
Tab – Heated rain gauge strana 16
Enable heated rain gauge strana 16
Tab - Device strana 16
Search devices strana 16
List of connected devices strana 16
14. Section – Location strana 16
Location strana 16
Elevation strana 16
Geographical coordinates (GPS) strana 16
Latitude (N) strana 17
Longitude (E) strana 17
15. Section – Display strana 17
Tab – Meteo strana 17
Default view configuration strana 17
Tab – View strana 17
Reset to default view strana 17
16. Section – Email strana 17
Sending emails strana 17
Server strana 17
Port strana 17
From strana 17
Server authorization required strana 17
User name strana 17
Password str ana 18
17. Section – Synchronization strana 18
Enable synchronization strana 18
Enable synchronization with ww w.meteo-pocasi.cz strana 18
Synchronization code strana 18
Synchronization with www.meteo-pocasi.cz - disabled strana 18
Server str ana 18
Port st rana 18
Address strana 18

4
User guide for IP Weather Station WARIO ME13
18. Section – Language strana 18
System language strana 18
Name day specification strana 18
19. Section – Date and Time strana 18
Time zone s trana 18
Automatic DST strana 18
Automatic date and time synchronization strana 19
Primary NTP ser ver strana 19
NTP port strana 19
Secondary NTP server strana 19
Date strana 19
Time strana 19
Use PC time strana 19
Time format strana 19
Date format str ana 19
20. Section – System strana 19
Serial Number strana 19
Model strana 19
Firmware strana 19
Runtime strana 19
DB creation date strana 19
Firmware update strana 19
Factory default strana 20
Control unit restart strana 20
Database reset strana 20
Technical support s trana 20
Status LED diode setting strana 20
Information s trana 20
21. Viewing measurements– section „Meteo“ strana 20
22. Description of the individual tabs in the „Meteo“ section strana 21
23. Viewing history data- section „Overviews“ strana 21
24. Section „Conditions“ s trana 22
25. Section „List of conditions“ strana 22
New condition strana 22
Field – Condition name strana 22
Field – Condition strana 22
Field – Editor mode strana 22
26. Creating conditions in Conditions editor strana 23
Creating a condition is divided into three parts. strana 23
27. Tab „ Eve nts “ strana 24
28. Section – Date and Time strana 24
Date strana 24
Day of the week strana 24
Month strana 24
Time strana 24
Day/night strana 24
29. Section events – Sensors strana 24
Ping strana 24
Temperature strana 24
Pressure s trana 24
Humidity st rana 24
Dew point strana 24
Solar Radiation strana 24
Wind direction str ana 24
Wind speed str ana 25

5
User guide for IP Weather Station WARIO ME13
Precipitation strana 25
Output strana 25
Wind gust strana 25
Apparent temperature strana 25
30. Section events – Mathematical functions strana 25
31. Section events – Condition met / not met strana 25
32. Section events – Action condition met / not met strana 25
Action – Output setting strana 25
Set output to: strana 25
Action – Output timing strana 25
Select output s trana 25
State: strana 25
Maintain a particular state for a defined time period: strana 26
Action – Email strana 26
To strana 26
Cc strana 26
Subject strana 26
Date strana 26
Sensor strana 26
Message strana 26
33. Weather station conguration for Internet display strana 26
6
User guide for IP Weather Station WARIO ME13
1
Important notes
It is important to read this user guide very carefully and follow all the instructions given
while installing the device. Then store it for future reference if necessary.
Device specication
The ME13 weather station consists of a control unit and a set of outdoor sensors. It can
be further extended with additional sensors and devices, with the possibility of controlling
the device based on integrated weather conditions. The measured values can easily be
displayed on a computer, smartphone, tablet or any other device with an Internet browser.
The weather station can also be integrated into higher-level systems. Communication is
then mediated via TCP/IP protocol and data can be read using the ModBus technology or
the XML format. More information about integration of the weather station into higherlevel systems can be found in a separate user guide available at www.meteo-pocasi.cz in the
“Download” section.
If you want to access your data in a clear and easily understandable way or if you want to
share it with other users, you can register your weather station at www.meteo-pocasi.cz and
you will get many additional features and extensions.
Safety instructions
Please read the following instructions very carefully before plugging in your device to
electricity or connecting it to your computer, in order to prevent any potential injuries and
minimize the risk of damaging the weather station and/or its accessories.
The manufacturer carries no responsibility for any damage resulting from incorrect installation
or non-compliance with this user guide or technical instructions. If these safety instructions
are not followed the device may not be safe to use and data might be inaccurate. Wanet Ltd.
offers warranty service conditions of which are specified in a document available at www.
meteo-pocasi.cz and warranty is performed based on this document or the legislation of
the Czech Republic. Installation and configuration of the weather station and computer
network should be performed by a person with the appropriate knowledge and skills.
Opening or removing the outer lid can result in electrical shock. Because the device is
exposed to outdoor weather conditions, all the installation steps must be followed carefully
to prevent water leaking into the control unit area. The supplied power supply can only
be used in electrical circuit with a voltage that corresponds to the label on the power
supply. Some parts of the sensors are fragile and therefore close attention must be paid
while handling them during installation or cleaning. Do not use the device in environments
with aggressive chemical compounds and gases and do not clean or soak the device
with chemical detergents. Do not place the weather station close to devices with strong
electromagnetic fields.
Do not use the device if it is malfunctioning or if it shows visible signs of damage. The
outdoor sensors for measuring wind speed and direction, solar radiation and precipitation,
should be kept clean during winter. Also keep in mind that even a thin layer of snow can
significantly influence the measured values, especially in case of the rain gauge if not heated
(heated rain gauge is optional).
2
Locating the Weather Station
Installing and using the weather station
The weather station is intended for outdoor use. Minimum distance from the ground is 1 m
and the maximum possible distance from the energy supply, data switch or router is 25 m.
The station must be placed in an open-space and the surrounding area must be free of any
devices that could potentially influence the measured values. In order to guarantee accurate
measurements, the station must also be unshaded and no obstacles should prevent normal
air flow. In the winter, the mechanical sensors must be kept clean.
7
User guide for IP Weather Station WARIO ME13
Unsuitable places for installing the station
z Installation underneath a roof or some other mechanical barrier
z Installation facing other direction than South on the Northern hemisphere or North
on the Southern hemisphere.
z Installation between two buildings close to each other.
z Installation on a chimney or heating/air conditioning exhaust
z Installation in a location that is hard to reach, making the station difficult to access.
z Installation in a place where there is a risk of damaging the sensors or the control unit.
z Installation in a place where the weather station sensors readily become dirty.
Installing the console and mounting pole
The weather station is only supplied with two basic telescopic sections of the mounting
pole, to which the actual sensors are attached using plastic or metal mounting arm. This
mounting pole must be attached to the console or a mast. Available is also an optional multifunctional console Meteo, which is intended for installation of the weather station itself and
various configurations of the sensors and additional accessories. The main advantage of this
system is flexibility in configuration options. Pay close attention to choosing the appropriate
console and its attachment, ensuring maintenance of stable position.
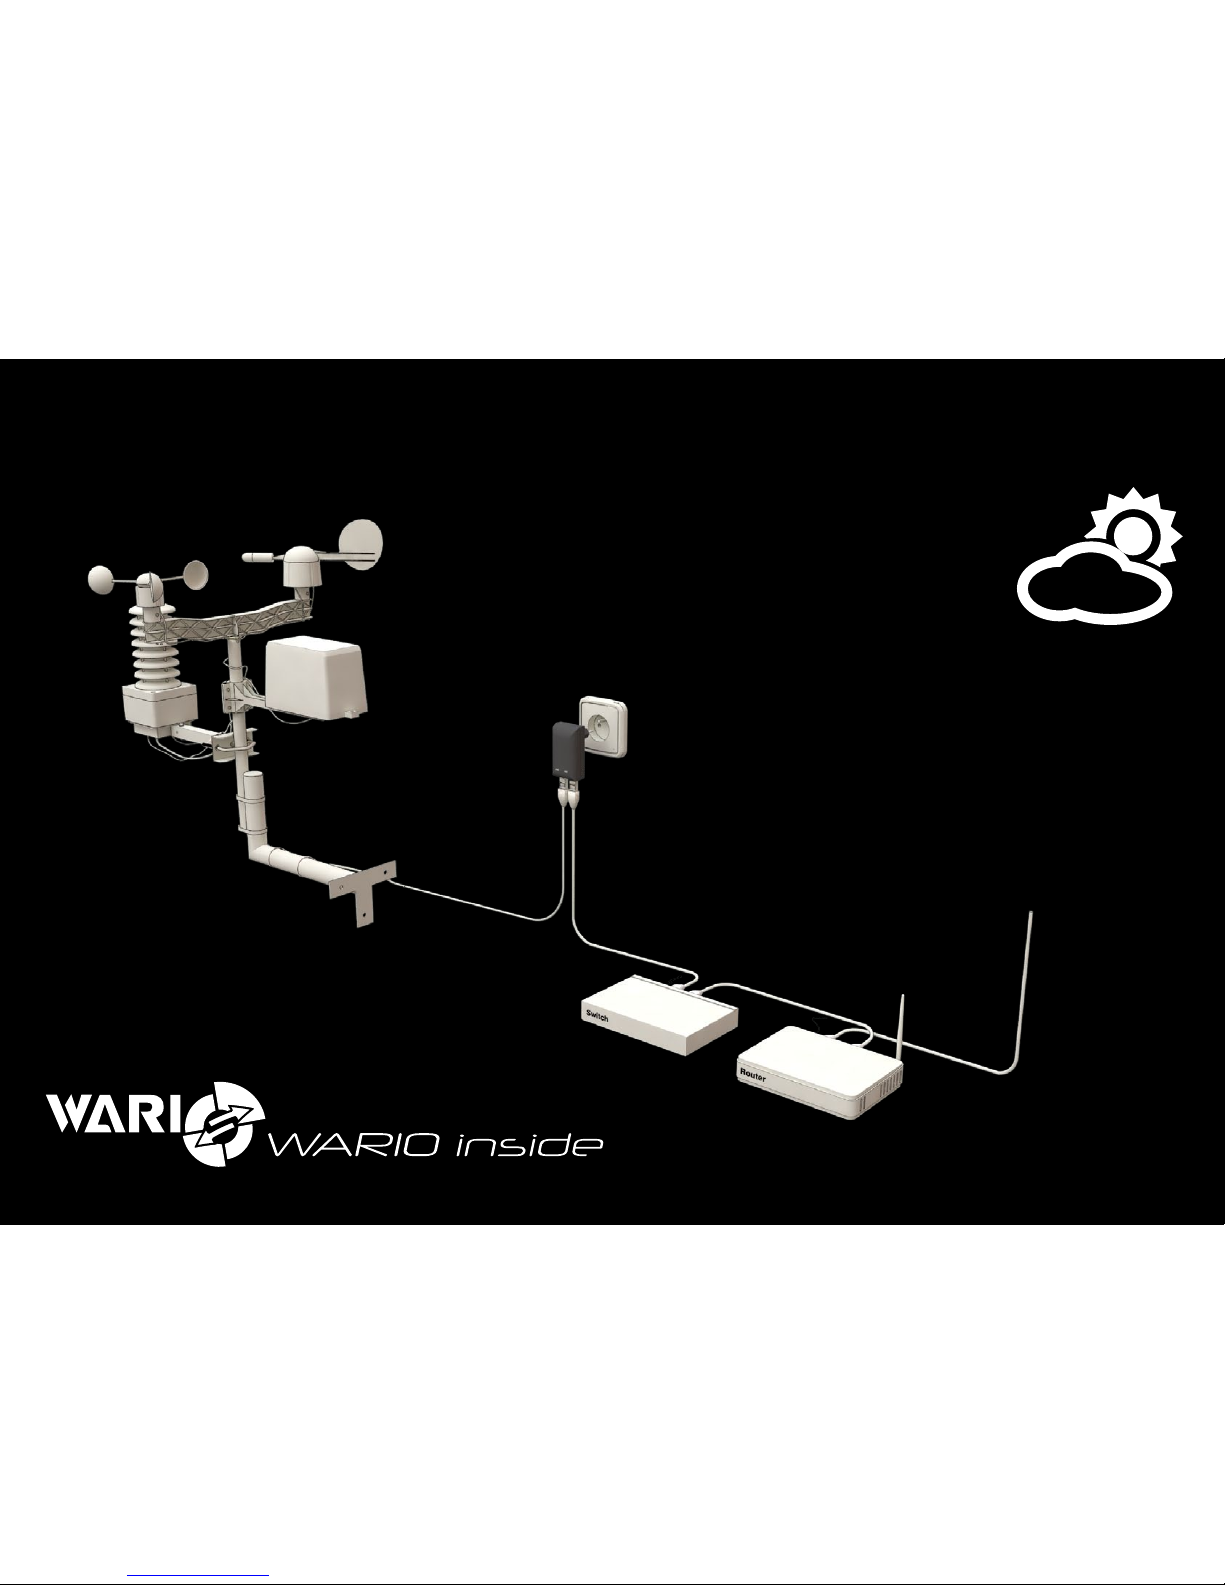
Connecting the station
The connectors are connected to the control unit at the bottom part and those that are
not used must be covered with rubber plugs, which are also supplied with the station.
The weather station is equipped with locking connectors RJ11 and RJ45 for connecting the
sensors and the data cable. OUT1 and OUT2 connectors use the RJ11 connector and close
attention must be paid to ensure it is connected properly using pliers.
3
Unpacking
Prior to the installation check that all components and hardware are included.
Package contents:
z 2pcs telescopic sections of the mounting pole
z 1pc plastic mounting arm for the wind speed and wind direction sensor
z 1pc wind direction sensor
z 1pc wind speed sensor
z 1pc rain gauge arm
z 1pc rain gauge
z 1pc box with the control unit, radiation shield for the combined
sensors and metal arm
z 1pc arm for attachment of the weather station to the console with a U screw
z 5pcs connection screws
z 2pcs installation clips for the console and telescopic part of the mounting pole
z 4pcs tightening belts
z 1pc power supply (PoE)
z 2pcs LAN data cables
Some of the components such as the install openings or the number of components
connecting the station may be slightly different from the ones depicted on the pictures or
specified in the user guide as there are several types of installation arms, screws and clips
used. Apart from the replacement of the combined sensor radiation shield as part of service,
it is not permitted to manipulate with the control electronics of the weather station in any
way. Non-compliance with this will void the warranty. All connectors and conductors must
be connected while the control unit of the station is turned off.
8
User guide for IP Weather Station WARIO ME13
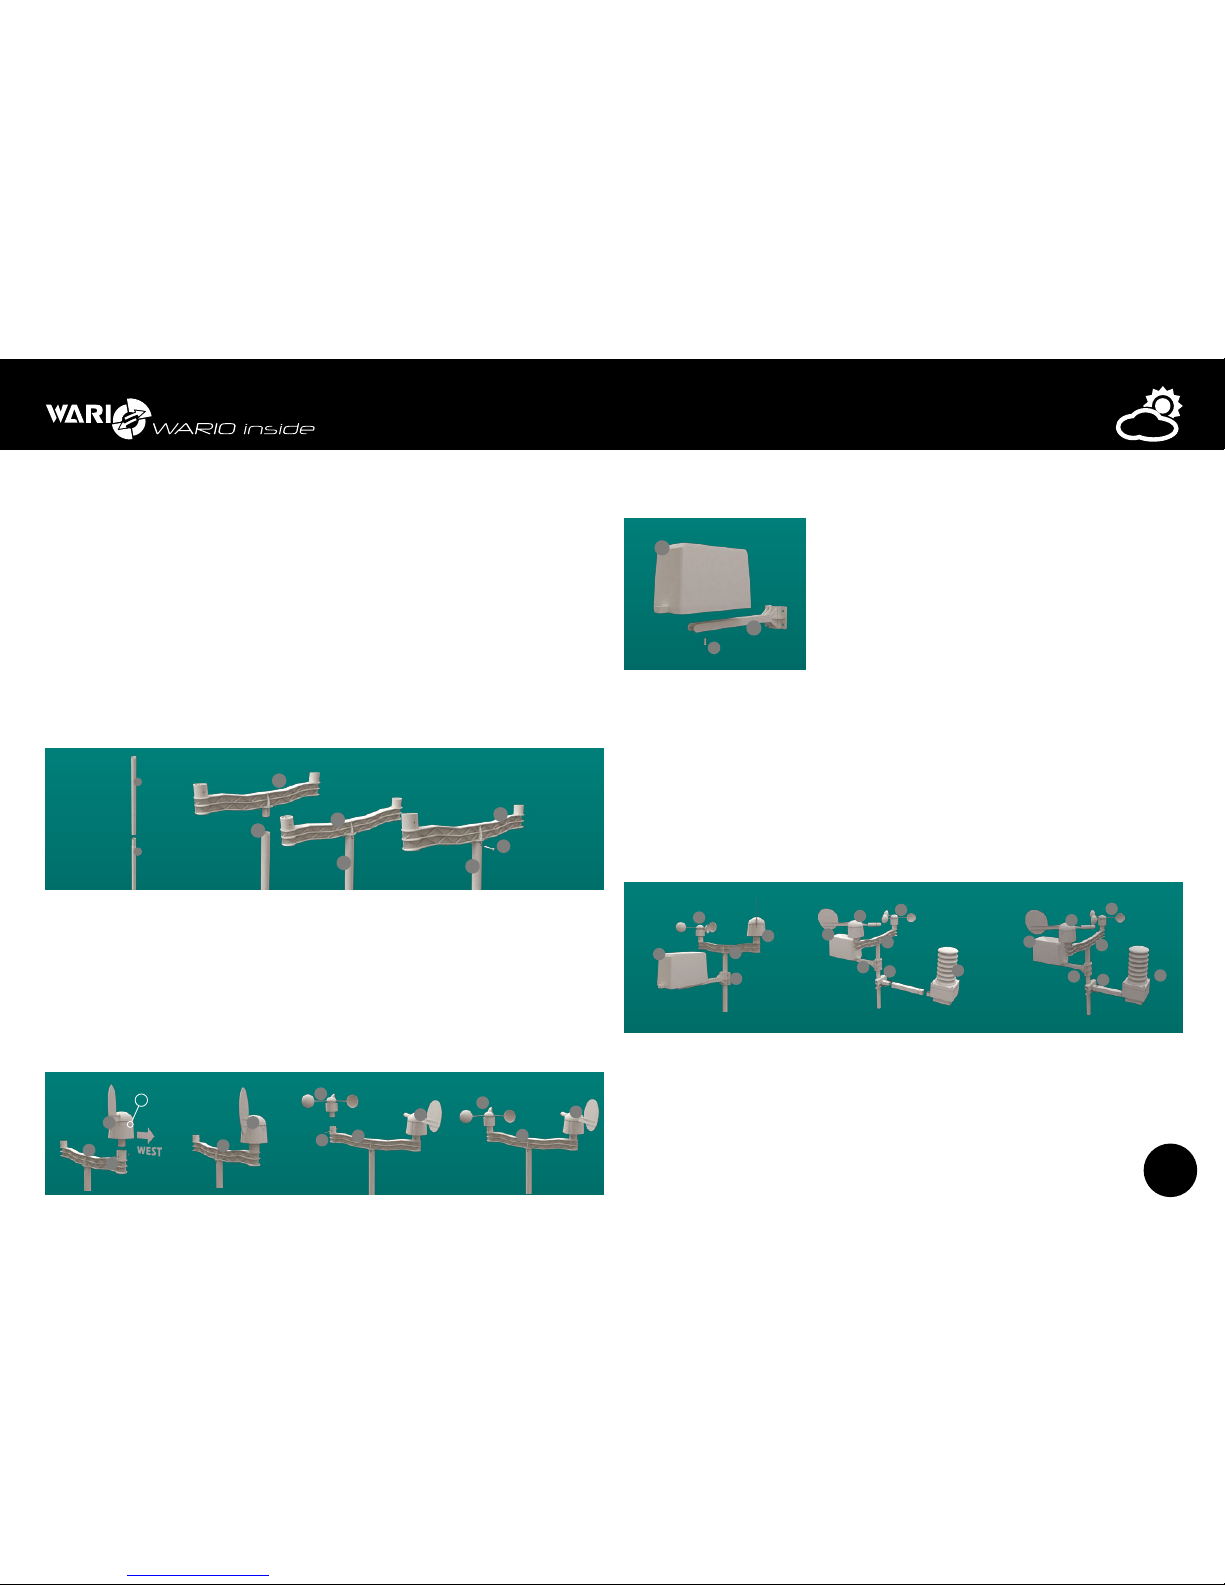
Installation
Step 1
It is recommended to begin the installation with the main telescopic mounting pole (part
1) and plastic wind speed and wind direction arm (part 2). Connect the first part of the
telescopic mounting pole with the plastic wind sensor arm using the locking mechanism
and making sure it is locked on both sides. Then fix the position of both parts using nuts and
bolts in order to make sure it is well fixed.
If you are using the multi-functional Meteo console, the procedure is the same as if using
the plastic wind sensor arm (part 2). This type of installation is recommended if you wish
to measure wind speed and wind direction at a different height than for example the air
temperature and humidity.
1
1
1
1
1
2
2
2
9
Step 2
Next install the wind direction (part 3) and wind speed sensor (part 4). It is necessary to
make sure that when installing the weather direction sensor, the label “W” on the actual
sensor is in the direction pointing outwards from the plastic mounting arm and connect
the sensor by the locking mechanism to it. Then use nuts and bolts to fix them permanently.
Next connect the wind speed sensor (part 4) with the plastic mounting arm. Just like with
the wind direction sensor, first use the locking mechanism and subsequently use nuts and
bolts for tight connection.
1
1
1
1
1
2
2
2
3
2
3
4
2
3
2
W
3
2
4
9
9
9
Step 3
1
1
1
2
2
2
3
3
4
2
3
2
4
5
9
6
9
9
Next step is to complete the plastic rain gauge arm (part 5)
and the rain gauge itself (part 6). Connect both parts
together using the locking mechanism and fix them tightly
by a small screw (part 9).
Step 4
Attach the entire plastic arm and rain gauge to the main telescoping mounting pole. Then
also attach the metal arm with the control unit and the combined sensor to the main
mounting pole, facing upwards. If you want to increase the overall height of the weather
station from the install console, extend the telescopic mounting pole with the other part of
it. Tighter attachment can be achieved by screwing the control unit arms together. It is not
always necessary to use both parts of the main mounting pole and installation can also be
performed using just one of them.
1
1
1
1
1
2
2
2
3
4
6
5
2
7
8
3
4
6
5
2
8
7
3
2
3
4
2
3
2
W
3
2
4
3
4
6
5
2
5
9
6
9
9
9
9
User guide for IP Weather Station WARIO ME13
Step 5
The actual installation of the weather station, i.e. the attachment of the main telescopic
mounting pole to the prepared console, is done by attaching it by clips to the console (part
10). Orientation of the whole weather station in space relative to geographical position and
the actual sensors is very important. Tight fixation in all directions is important and it should
also be placed perpendicularly in all directions. If the weather station is not fixed tightly or is
not placed perpendicularly, measurements might be inaccurate.
Step 6
Mechanically verify that the weather station is tightly fixed in its location and set its orientation
so that the label W of the wind direction sensor faces the West and the radiation shield
of the combined sensors is unshaded and facing South (Northern hemisphere) or North
(Southern hemisphere). Then use tightening belts (part 11) to attach the cables leading to
the control unit of the weather station. If the data cable goes over parts of the consoles or
other features in the interior, it must always be tightly attached. The data cable is resistant
against UV light and is intended for outdoor use. Make sure all parts are tightly fixed and that
the cables are well attached. Otherwise measurements might be inaccurate, errors arise or
it could even lead to the malfunctioning of the whole station.
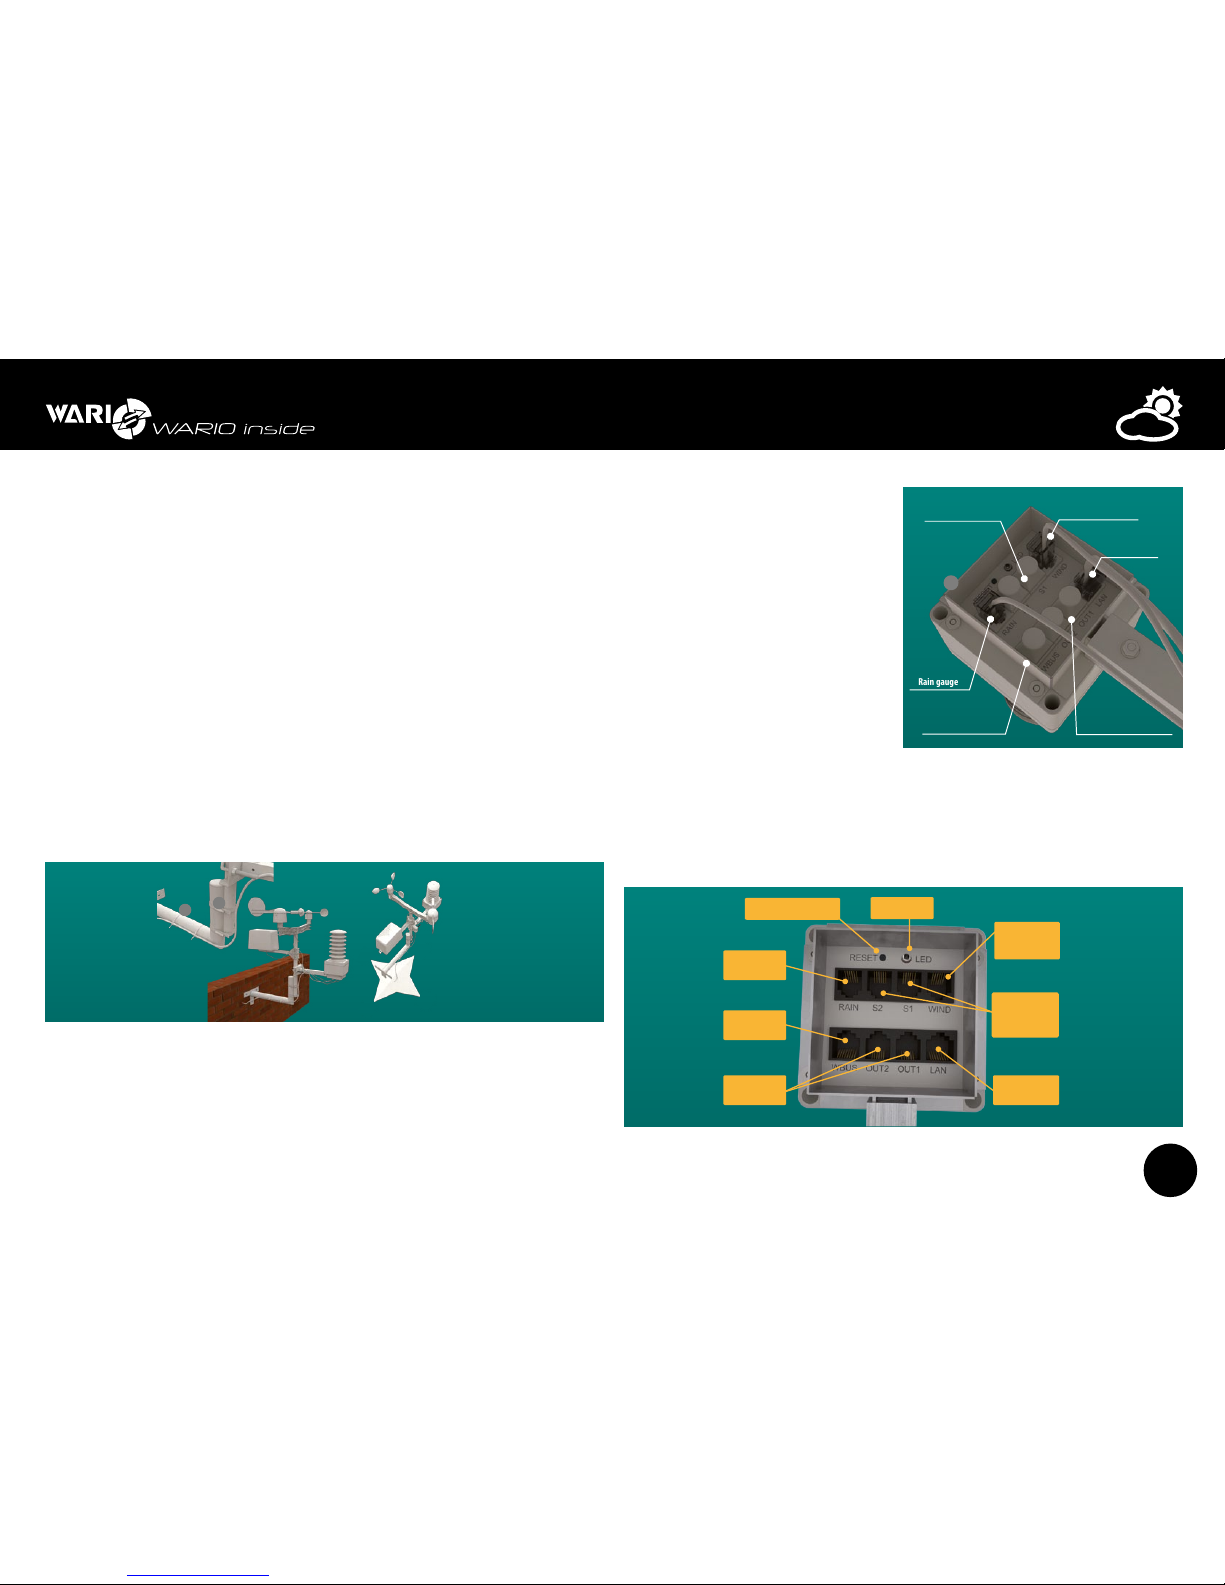
Step 7
Connect all the cables to the control unit. The weather station uses the RJ11 and RJ45
connectors for connection and communication between the control unit and the sensors.
Connectors for data communication and WBUS interface are different from these and must
not be interchanged.
z Connect the wind speed and wind
direction sensor to the receptacle
labeled as “WIND”
z connect the rain gauge to the
receptacle labeled as “RAIN”. This
connector also includes connection
for heated rain gauge, which is
optional.
z Data cable from the PoE adapter
connect to the receptacle labeled
“L AN”.
z Connect the optional temperature
or temperature/humidity sensors to
the receptacles labeled “S1 or S2”.
z Connect the relay outputs to receptacles “OUT1 or OUT2”.
z Connect the WBUS interface data cable to the receptacle labeled “WBUS”.
Step 8
3
4
6
5
2
7
8
3
4
6
5
2
8
7
10
11
3
2
3
4
2
3
W
3
2
4
3
4
6
5
2
5
9
6
Connector
for connecting
rain gauge
Signal LED diode
Reset button
Resets weather station to factory defaults
Connector
for connecting
additional devices
Connector
for connecting
relay outputs
Data and power
cable connector
Connector
for connecting
external temperature
and humidity sensors
Connector
for connecting
wind speed and wind
direction sensor
Rain gauge
7
Wind speed and
wind direction sensor
POE adapter
data cable
Optional temperature
and humidity sensors
WBUS interface data
cable connection
Control relay outputs
9
9
N
S
W
E
1
1
1
2
2
2
3
4
6
5
2
7
8
3
4
6
5
2
8
7
10
3
2
3
4
2
3
2
4
3
5
9
6
Rain gauge
7
Wind speed and
wind direction sensor
POE adapter
data cable
Optional temperature
and humidity sensors
WBUS interface data
cable connection
Control relay outputs
9
9
N
S
W
E
1
1
1
1
1
2
2
2
3
4
6
5
2
7
8
3
4
6
5
2
8
7
10
11
3
2
3
4
2
3
2
W
3
2
4
3
4
6
5
2
5
9
6
9
9
9
N
S
W
E
 Loading...