

Waring Xtreme MX1100XTP, Xtreme MX1050XTP, Xtreme MX1050XTS, MX1100XTXl, Xtreme MX1100XTS Operating Manual
...Page 1

Hi-Power Blenders
Licuadora de alta potencia
Mélangeurs/Bols mixeurs à haute puissance
MX1000XTX/MX1000XTP/MX1000XTS
MX1050XTX/MX1050XTP/MX1050XTS
MX1100XTX/MX1100XTP/MX1100XTS
OPERATING MANUAL
MANUAL DE INSTRUCCIONES
MANUEL D'UTILISATION
Page 2
2 3
IMPORTANT SAFEGUARDS
When using electrical appliances, basic safety precautions should
always be followed including the following:
1.
READ ALL INSTRUCTIONS.
2. To protect against risk of electrical shock, do not put appliance in
water or other liquid.
3. Always unplug from outlet prior to handling or cleaning.
4. This appliance is not intended for use by persons (including
children) with reduced physical, sensory or mental capabilities, or
lack of experience and knowledge, unless they have been given
supervision or instruction concerning use of the appliance by a
person responsible for their safety.
Children should be supervised to ensure that they do not play with
the appliance.
5. Unplug from outlet when not in use, before putting on or taking off
parts, and before cleaning.
6. Avoid contact with moving parts.
7. Do not operate any appliance with a damaged cord or plug or
after the appliance malfunctions or is dropped or damaged in any
manner. Return appliance to the nearest authorized service facility
for examination, repair, or electrical or mechanical adjustment.
8. The use of attachments, including canning jars, not recommended
by the appliance manufacturer may cause hazards.
9. Do not use outdoors.
10. Do not let cord hang over edge of table or counter, or touch hot
surfaces.
11. Keep hands and utensils out of container while blending, to prevent
the possibility of severe personal injury and/or damage to the
blender. A rubber scraper may be used, but must be used only
when the blender is not running.
12. CAUTION: Blades are sharp. Handle carefully.
13. Always operate blender with lid in place.
14. When blending hot liquids, remove center piece of two-piece cover.
See hot blending instructions, page 6.
15. The use of ear protection is recommended during extended
operating periods.
16. Do not leave blender unattended while it is running.
17. See cleaning and sanitizing instructions, pages 6-8.
NOT FOR WATERJET CLEANING.
SAVE THESE INSTRUCTIONS
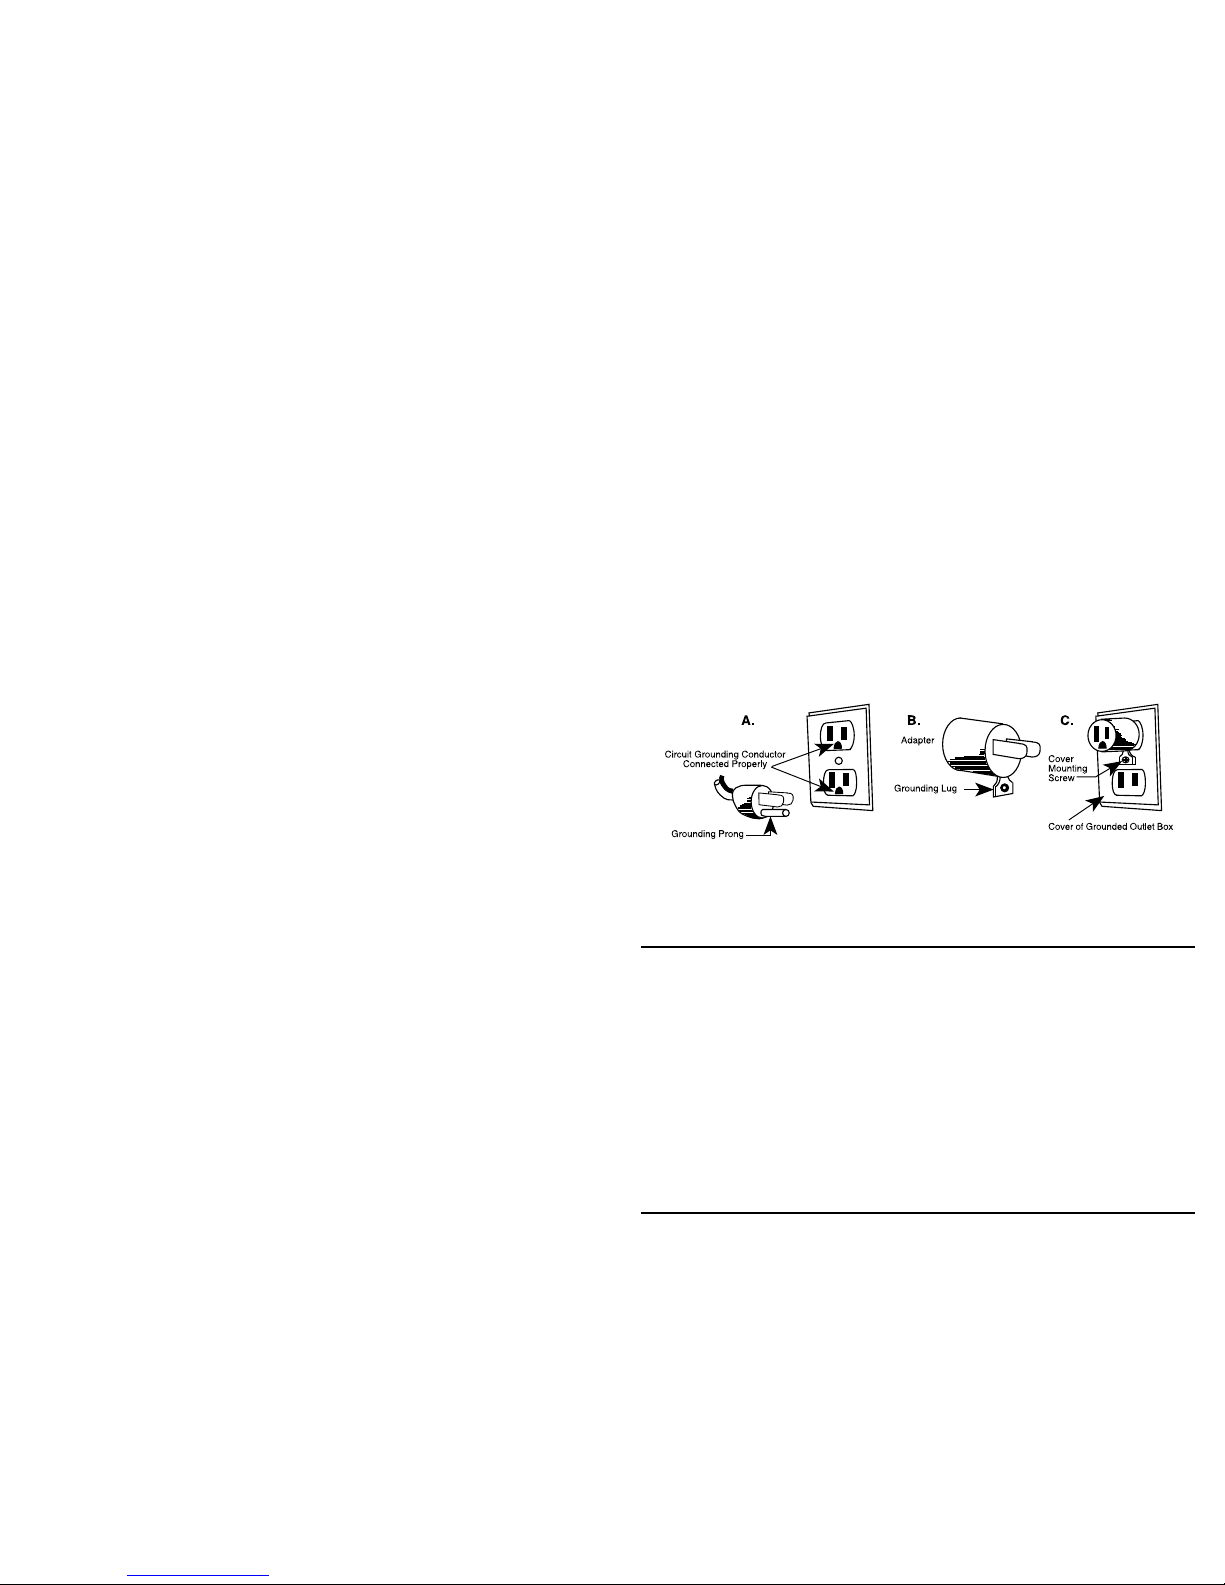
GROUNDING INSTRUCTIONS
• For your protection, this appliance is equipped with a 3-conductor cord set.
• 120 Volt units are supplied with a molded 3-prong grounding-type plug
(NEMA 5-15P) and should be used in combination with a properly connected
grounding-type outlet as shown in Figure A.
If a grounding-type outlet is not available, an adapter, as shown in Figure B,
may be used to enable a 2-slot wall outlet to be used with a 3-prong plug.*
As shown in Figure C, the adapter must be grounded by attaching its
grounding lug under the screw of the outlet cover plate.
CAUTION: Before using an adapter, it must be determined that the
outlet cover plate screw is properly grounded. If in doubt, consult a
licensed electrician.
Never use an adapter unless you are sure it is properly grounded.
*NOTE: Use of an adapter is not permitted in Canada and Europe.
Green/Yellow: Earth Ground. Blue: Neutral. Brown: Live.
NOTE: User-installed cord set plugs are not permitted in Europe.
MX1000XTX/MX1000XTP/MX1000XTS
MX1050XTX/MX1050XTP/MX1050XTS
MX1100XTX/MX1100XTP/MX1100XTS
BLENDER SPECIFICATIONS
• Capacity: 64 oz Working Capacity
(48 oz capacity – MX1000XTP, MX1050XTP, MX1100XTP)
• Switch Settings: (2 speeds) Hi Low Pulse
• Speed (RPMs) 30,000 26,000 30,000
• Rating: 120 Volts - 13.0 Amps
• Base Material: Polycarbonate
• Bearing: High Precision Ball Bearing
• Cord: 6-Foot Three-Conductor Ground Cord with Strain Relief in Base
• Overall Height: 19 Inches
• Weight: 15 lbs
• CETLUS, NSF listed
• Operating Cycle: 1 min. ON/3 min. OFF
• MX1100XT – 30-Second Countdown Timer
Page 3

4 5
MX1000XTX/MX1000XTP/MX1000XTS OPERATION
1. Before starting, make sure that the blender
is unplugged.
2. With the unit in Off position, place container on
blender base. Be sure container is fully seated and
that drive coupling is properly engaged. Plug
blender cord into outlet.
3. Put ingredients into container and cover it. Do not
fill above MAX line.
4. This blender has 2 speed settings: Hi and Low. Press paddle switch
to desired position. To crush ice quickly, use high speed setting.
5. When finished blending, set paddle switch to Off position.
6. This blender is equipped with a pulse option. Hold paddle switch in
down position to engage pulse function. Unit will run on high speed
until the paddle switch is released.
7. Allow motor to come to a complete stop before removing container
from blender base. Never place the container on the motor base or
remove it from the motor base while motor is running.
8. Always hold container with one hand when starting and while blending.
Never operate without jar lid.
9. Wash and dry container after each use. See cleaning and sanitizing
instructions, pages 6-8.
MX1050XTX/MX1050XTP/MX1050XTS OPERATION
Follow steps 1-3 above.
1. This blender is equipped with an electronic
membrane keypad. The keypad has a main power
On/Off button, and High and Low, Stop and
Pulse buttons.
2. Press the On/Off button to turn on the blender.
Green LED will illuminate. For continuous operation, press either Low or High button. When finished
blending, press Stop. For momentary operation, press the Pulse button;
motor will run on High speed until the button is released.
NOTE: Your MX1050XTX utilizes a Slow Start
™
feature. When pressing
High, the unit will start in the low speed for 2 seconds and then switch
to high speed. This allows for a more even blending of ingredients
in container.
3. Allow motor to come to a complete stop before removing container from
blender base. Never place the container on the motor base or remove it
from the motor base while motor is running.
4. Always hold container with one hand when starting and while blending.
Never operate without jar lid.
5. Wash and dry container after each use. See cleaning and sanitizing
instructions, pages 6-8.
6. To turn the unit off, press On/Off button. Green LED light will go off.
MX1100XTX/MX1100XTP/MX1100XTS OPERATION
Follow steps 1-3 in the MX1000XTX Operation section.
1. This blender is equipped with an electronic
membrane keypad. The keypad has a main power
On/Off button, plus High, Low, Stop and Pulse
buttons and a 30-second countdown timer with Up
and Down arrows to set time.
2. Press the On/Off button to turn on the blender.
Green LED will illuminate. The electronic timer will
indicate 10 seconds (default). Press the Up or Down arrow to set the
desired time. The electronic timer will indicate run time in 5-second intervals up to a maximum of 30 seconds. After the desired time is set, press
High or Low to start the blender. The timer will count down to
0 in 1-second intervals and blender will shut off. Pressing the Pulse
button, the Stop button or the On/Off button will override the timer and
the blender will stop regardless of time left on timer.
NOTE: If you want to increase or decrease time while timer is counting
down, press Up or Down arrows. Time will increase or decrease in
5-second intervals.
3. If the blender is not used for five seconds, the timer function will turn
off and return to manual mode. To reactivate timer, press Up or Down
arrows. When using the electronic timer again, the initial time will be the
last time set. Note: If unit has been turned off or unplugged, the timer will
default back to 10 seconds.
4. For continuous operation, press either Low or High button. When
finished blending, press Stop. For momentary operation, press the
Pulse button. Motor will run on high speed until the button is released.
NOTE: Your MX1100XTX utilizes a Slow Start
™
feature. When
pressing High, the unit will start in the low speed for 2 seconds
and then switch to high speed. This allows for a more even blending of
ingredients in container.
5. Allow motor to come to a complete stop before removing container from
blender base. Never place the container on the motor base or remove it
from the motor base while motor is running.
6. Wash and dry container after each use. See cleaning and sanitizing
instructions, pages 6-8.
7. To turn the unit off, press On/Off button. Green LED light will go off.
RESETTING THERMAL PROTECTION
• Your blender is equipped with an automatic reset function to protect the
motor from overheating.
• If your blender stops running under heavy use, turn the power switch to
Off and unplug the power cord. Empty the blender container of all
its contents and allow between 5 and 30 minutes for the motor to
cool down.
• Plug the power cord back into the outlet and continue blending.
• If your blender does not function properly following this procedure,
discontinue use and contact a certified Waring Customer Service Center.
Page 4

6 7
IMPORTANT – HOT BLENDING INSTRUCTIONS
To minimize the possibility of being scalded when blending hot materials,
the following precautions and procedure must be observed.
• Hot materials are those that are 100° F (38°C) or hotter.
• Limit the amount of materials processed to 1 pint.
• Completely remove the center portion of the two-piece container lid
before starting motor (this will allow venting of the rapidly heated and
expanding air inside the container when blender is running).
• Always start blending on lowest speed setting, and then progress to
desired speed.
• Never stand directly over blender when it is being started or while it
is running.
CLEANING AND SANITIZING INSTRUCTIONS
THE CONTAINER MUST BE CLEANED AND DRIED AFTER EACH USE
OF THE BLENDER ACCORDING TO THE FOLLOWING INSTRUCTIONS.
FAILURE TO DO SO MAY ALLOW RESIDUES OF PROCESSED MATERIAL
TO COLLECT ON THE INTERNAL SEALS OF THE BLADE ASSEMBLY,
RENDERING THEM INEFFECTIVE.
•
Wash, rinse, sanitize and dry container prior to initial use and whenever it
will not be used again within a period of 1 hour.
•
Wash and rinse container after each use.
•
Clean and sanitize motor base prior to initial use and after each use.
•
Washing solutions based on non-sudsing detergents and chlorine-based
sanitizing solutions having a minimum chlorine concentration of 100 PPM
are recommended.
The following washing, rinsing, and sanitizing solutions, or their equivalents,
may be used.
SOLUTION PRODUCT DILUTION IN WATER TEMPERATURE
Washing Diversey Wyandotte 4 tablespoons Hot 115˚F (46˚C)
Diversol BX/a or CX/A /gallon
Rinsing Plain Water Warm 95˚F (35˚C)
Sanitizing Clorox® 1 tablespoon/gallon Cold 50-70˚F
Institutional Bleach (10-21˚C)
•
In repetitive batch-processing applications, frequent cleaning of the
container will prolong the life of the blade assembly. In no case should
actual running time between cleanings exceed one-half hour.
•
Do not use container to store processed foods or beverages.
TO WASH AND RINSE CONTAINER
1. REMOVE CONTAINER FROM MOTOR BASE. Remove lid. Rinse
container interior and lid under running water. Add washing solution to
container. Scrub and flush out the container interior and lid to dislodge
and remove as much food residue as possible. Empty container.
2. Wipe down exterior of container with a soft cloth or sponge dampened
with washing solution. Wash lid and lid insert in fresh washing solution.
Fill container one-quarter full with fresh washing solution, cover (with lid
only), place on motor base and run on high speed for two (2) minutes.
Empty container.
3. Repeat step (2) using clean rinse water in place of washing solution.
IMPORTANT
NOTE: IN ORDER TO MINIMIZE POSSIBILITY OF SCALDING,
TEMPERATURE OF WASHING SOLUTION AND RINSE WATER MUST
NOT EXCEED 115˚F (46˚C), AND QUANTITY USED MUST NOT EXCEED
ONE-QUARTER CONTAINER FULL.
IF HIGHER TEMPERATURES OR LARGER QUANTITIES ARE USED,
OBSERVE ALL PRECAUTIONS GIVEN IN THE OPERATING MANUAL UNDER
“HOT BLENDING INSTRUCTIONS”, page 6.
TO SANITIZE AND DRY CONTAINER
1. Wipe down exterior of container with a soft cloth or sponge dampened
with sanitizing solution.
2. Fill container with sanitizing solution, cover, place on motor base, and
run on high speed for one (1) minute. Empty container. Dislodge any
residual moisture from blade assembly by placing empty container on
motor base and running on high speed for two (2) seconds.
3. Sanitize lid and lid insert by immersing in sanitizing solution for two
(2) minutes.
4. Do not rinse container, lid, or lid insert after sanitizing is completed.
Allow parts to air dry.
TO CLEAN AND SANITIZE MOTOR BASE
1. UNPLUG POWER CORD. Wipe down exterior surfaces of motor base
with soft cloths or sponges dampened with washing solution, rinse
water, and sanitizing solution. Prevent liquid from running into motor
base by wringing all excess moisture from cloths or sponges before
using them.
DO NOT IMMERSE MOTOR BASE IN WASHING SOLUTION, RINSE WATER
OR SANITIZING SOLUTION.
2. Allow motor base to air dry before using.
Any other servicing should be performed by an authorized
service representative.
SERVICE
Refer to the list of Authorized Service Centers enclosed with your Waring®
Commercial Blender for the name of the nearest Service Center, or
write to:
Waring Factory Service Center
314 Ella T. Grasso Avenue
Torrington, CT 06790
(800) 492-7464
Ship blenders for repair to the above address or to an Authorized Service
Center. Do not ship to a Waring Sales Office.
Note: If your application involves the processing of biologically active
material, we request that any items returned for service be sterilized
before being shipped. Such items must be clearly identified as having
Page 5

9
LIMITED THREE-YEAR MOTOR WARRANTY
LIMITED TWO-YEAR WARRANTY
Waring warrants every new Waring® Commercial Blender to be free from defects
in material and workmanship for a period of two years from the date of purchase
when used with foodstuffs, nonabrasive liquids (other than detergents) and
nonabrasive semi-liquids, providing it has not been subject to loads in excess of
the indicated rating. In addition, the motor in this appliance has a full three-year
warranty.
Under this warranty, Waring, during the warranty period, will repair or replace
any part which, upon our examination, is defective in materials or workmanship,
provided the product is delivered prepaid to the Waring Service Center at: 314 Ella
T. Grasso Ave. Torrington, CT 06790, or any Factory Approved Service Center.
This warranty does not: a) apply to any product which has become worn, defective,
damaged or broken due to misuse or due to repairs or servicing by other than the
Waring Service Center or a Factory Approved Service Center, or due to abuse,
misuse, overloading or tampering; or b) cover incidental or consequential
damages of any kind.
The two-year warranty is applicable only to appliances used in the United States
or Canada; this supersedes all other express product warranty or warranty
statements. For Waring products sold outside of the U.S. and Canada, the
warranty is the responsibility of the local importer or distributor. This warranty
may vary according to local regulations.
Warning: This warranty is void if appliance is used on Direct Current (D.C.)
WARING COMMERCIAL
314 Ella T. Grasso Ave.
Torrington, CT 06790
been sterilized, both by a tag on the item itself and by a statement in
the accompanying correspondence. Waring will not accept delivery of
any return unless it is so identified.
Replacement parts for your out of warranty repairs are obtainable at the
below address.
MEDIDAS DE SEGURIDAD
IMPORTANTES
Siempre que use aparatos eléctricos, debe tomar precauciones básicas
de seguridad, entre las cuales las siguientes:
1.
LEA TODAS LAS INSTRUCCIONES.
2. Para reducir el riesgo de electrocución, no coloque la base del
aparato en agua u otro líquido.
3. Desconecte el aparato antes de toda manipulación o limpieza.
4. Los niños o las personas que carezcan de los conocimientos o la
experiencia necesarios para manipular el aparato, o aquellas cuyas
capacidades físicas, sensoriales o mentales estén limitadas, no
deben utilizar el aparato sin la supervisión o la dirección de una
persona responsable por su seguridad.
Asegúrese de que los niños no jueguen con este aparato.
5. Desconecte el aparato cuando no esté en uso, antes de instalar o
remover piezas y antes de limpiarlo.
6. Evite el contacto con las piezas móviles.
7. No opere este aparato si el cordón o la clavija estuviesen dañados,
después de que hubiese funcionado mal o que se hubiese caído
o si estuviese dañado. Regrese el aparato a un centro de servicio
autorizado para su revisión, reparación o ajuste.
8. El uso de accesorios no recomendados por el fabricante, incluso
frascos para conservas, presenta un peligro.
9. No lo utilice en exteriores.
10. No permita que el cordón cuelgue del borde de la encimera o de la
mesa, ni que haga contacto con supercies calientes.
11. Para reducir el riesgo de herida seria o de daño al aparato,
mantenga las manos y los utensilios fuera del recipiente durante el
funcionamiento. Se podrá usar una espátula de goma, siempre en
cuando el aparato esté apagado.
12. PRECAUCIÓN: Las cuchillas son muy losas. Manipúlela con
sumo cuidado.
13. No encienda el aparato a menos que la tapa esté debidamente
puesta.
14. Cuando licue líquidos calientes, quite la parte central (el tapón) de
la tapa.
Consulte la sección "Líquidos calientes".
15. Se recomienda usar equipo de protección auditiva cuando se opere
el aparato por períodos largos.
16. Nunca deje el aparato desatendido mientras esté funcionando.
17. Siga las instrucciones de limpieza y desinfección.
NO LO LAVE A CHORRO.
Page 6

10 11
GUARDE ESTAS INSTRUCCIONES
INSTRUCCIONES DE PUESTA A TIERRA
• Para su protección, este aparato está equipado con un cable eléctrico con
conductor de tierra.
• Los aparatos de 120V están equipados con clavija tripolar de conexión con
tierra (NEMA5-15P), la cual debe ser conectada a una toma de corriente puesto
a tierra (Fig. A).
Si una toma de corriente puesta a tierra no está disponible, se podrá usar un
adaptador* para conectar el aparato a una toma de corriente polarizada (Fig. B).
El adaptador debe ser puesto a tierra mediante un tornillo de metal que conecte
la lengüeta del adaptador a la placa de la toma de corriente (Fig. C).
PRECAUCIÓN: Antes de conectar el adaptador, asegúrese de que la toma
de corriente esté puesta a tierra. Si no está seguro, comuníquese con un
electricista.
Nunca use un adaptador sin estar seguro de que la toma de corriente esté
puesta a tierra.
*NOTA: Está prohibido usar un adaptador en el Canadá y en Europa.
Verde/Amarillo: Tierra. Azul: Neutro. Marrón: Vivo.
NOTA: No se permite el uso de clavijas instaladas por el usuario en Europa.
MX1000XTX/MX1000XTP/MX1000XTS
MX1050XTX/MX1050XTP/MX1050XTS
MX1100XTX/MX1100XTP/MX1100XTS
ESPECIFICACIONES TÉCNICAS
• Capacidad: 2 L
(Modelos MX1000XTP, MX1050XTP, MX1100XTP: 1.5 L)
• Controles: (2 velocidades) Alta Baja Pulso
• Velocidad (RPM) 30.000 26.000 30.000
• Clasificación nominal: 120V - 13.0 Amp.
• Base: Policarbonato
• Accionamiento: Cojinete de bolas de alto rendimiento
• Cordón: Cable de 1.85 m (6 pies) con clavija de tierra reforzada
• Altura total: 43 cm (19 pulgadas)
• Peso: 6.8 kg (15 libras)
• Certificación CETLUS y NSF
• Ciclo de operación: 1 minuto encendido/3 minutos apagado
• MX1100XT – Temporizador de cuenta regresiva de 30 segundos
FUNCIONAMIENTO DE LOS MODELOS
MX1000XT/MX1000XTP/MX1000XTS
1. Asegúrese de que el aparato esté desenchufado.
2. Coloque la jarra sobre la base, tras haberse
asegurado que el interruptor está en la posición
de apagado (OFF). Asegúrese de que la jarra
esté debidamente asentada sobre la base y que
el acoplamiento de transmisión esté engranado
correctamente. Enchufe el aparato.
3. Ponga los ingredientes en la jarra y cierra la tapa. No sobrepase la línea
"MAX".
4. Esta licuadora tiene dos velocidades: alta (HI) y baja (LOW). Ponga
el interruptor en la posición deseada para encender el aparato. Nota:
Utilice la velocidad alta (HI) para picar hielo.
5. Para apagar el aparato, ponga el interruptor en la posición de apagado
(OFF).
6. Esta licuadora también cuenta con una función de pulso. Para utilizar
dicha función, accione el interruptor hacia abajo (PULSE). El aparato
funcionará a velocidad alta hasta que se suelte el interruptor.
7. Permita que el motor se detenga completamente antes de retirar la
jarra de la base. Nunca instale o quite la jarra mientras el motor esté
encendido.
8. Siempre sostenga la jarra con una mano durante el licuado.
Nunca haga funcionar la licuadora sin la tapa puesta.
9. Lave y seque la jarra después de cada uso. Siga las instrucciones de
limpieza y desinfección.
FUNCIONAMIENTO DE LOS MODELOS
MX1050XTX/MX1050XTP/MX1050XTS
Siga los pasos 1–3 de la sección arriba.
1. Esta licuadora cuenta con un control táctil
electrónico. El panel de control incluye los controles
siguientes: ON/OFF (encendido/apagado), HIGH
(alto), LOW (BAJO), STOP (pausa) y PULSE (pulso).
2. Oprima el botón ON/OFF para poner el aparato bajo
tensión. El indicador luminoso verde se encenderá.
Para encender el motor, oprima el botón de velocidad deseado, LOW
o HIGH. Para apagar el aparato, oprima el botón STOP. Para usar
la función de pulso, oprima el botón PULSE; el motor funcionará a
velocidad alta hasta que suelte el botón.
NOTA: Esta licuadora está equipada con el sistema de arranque lento
Slow Start™. Después de oprimir el botón HIGH, se pondrá en marcha a
velocidad baja durante 2 segundos antes de alcanzar la velocidad alta.
Este permite obtener resultados más homogéneos.
Page 7

12 13
3. Permita que el motor se detenga completamente antes de retirar la
jarra de la base. Nunca instale o quite la jarra mientras el motor esté
encendido.
4. Siempre sostenga la jarra con una mano durante el licuado. Nunca haga
funcionar la licuadora sin la tapa puesta.
5. Lave y seque la jarra después de cada uso. Siga las instrucciones de
limpieza y desinfección.
6. Para apagar el aparato, oprima el botón ON/OFF. La luz verde se
apagará.
FUNCIONAMIENTO DE LOS MODELOS
MX1100XTX/MX1100XTP/MX1100XTS
Siga los pasos 1–3 de la sección "Operación - Modelo MX1000XTX"
1. Esta licuadora cuenta con un control táctil
electrónico. El panel de control incluye los controles
siguientes: ON/OFF (encendido/apagado), HIGH
(alto), LOW (BAJO), STOP (pausa), PULSE (pulso) y
dos flechas para programar el temporizador.
2. Oprima el botón ON/OFF para poner el aparato bajo
tensión.
El indicador luminoso verde se encenderá. La
pantalla digital mostrará 10 segundos (el tiempo por defecto). Para fijar
el temporizador, oprima repetidamente el botón de flecha deseado. El
temporizador electrónico indicará el tiempo prefijado, en incremento
de 5 segundo, hasta 30 segundos. Después de fijar el temporizador,
oprima el botón LOW o HIGH para poner la licuadora en marcha.
El temporizador de cuenta regresiva se apagará al final del tiempo
prefijado. Para apagar el aparato, aun antes del tiempo prefijado, oprima
el botón PULSE, STOP o ON/OFF.
NOTA: Para reducir o incrementar el tiempo durante el funcionamiento,
simplemente oprima el botón de flecha deseado. El tiempo subirá o
bajará en incremento de 5 segundos.
3. Si no enciende el aparato dentro de 5 segundos, el temporizador se
reinicializará. Para volver a activar el temporizador, oprima uno de los
botones de flecha. El temporizador se pondrá en marcha otra vez, desde
el principio del tiempo prefijado. Nota: Si desconecta el aparato, el
temporizador regresará al tiempo por defecto: 10 segundos.
4. Para encender el motor, oprima el botón de velocidad deseado, LOW
o HIGH. Para apagar el aparato, oprima el botón STOP. Para usar
la función de pulso, oprima el botón PULSE. El aparato funcionará a
velocidad alta hasta que se suelte el botón.
NOTA: Esta licuadora está equipada con el sistema de arranque lento
Slow Start™. Después de oprimir el botón HIGH, se pondrá en marcha
a velocidad baja durante 2 segundos antes de alcanzar la velocidad alta.
Este permite obtener resultados más homogéneos.
5. Permita que el motor se detenga completamente antes de retirar la
jarra de la base. Nunca instale o quite la jarra mientras el motor esté
encendido.
6. Lave y seque la jarra después de cada uso. Siga las instrucciones de
limpieza y desinfección.
7. Para apagar el aparato, oprima el botón ON/OFF. La luz verde se
apagará.
DISPOSITIVO DE PROTECCIÓN DEL MOTOR
• Su aparato está dotado de un dispositivo de protección térmica que
apaga automáticamente el motor en caso de recalentamiento.
• Si esto ocurriera, apague y desenchufe el aparato. Vacíe la jarra y permita
que el aparato enfríe durante 5 a 30 minutos.
• Cuando el motor esté frío, vuelva a conectar el aparato y siga licuando.
• Si el aparato no funcionara debidamente después seguir estos pasos, deje
de usarlo y comuníquese con un centro de servicio autorizado.
IMPORTANTE – LÍQUIDOS CALIENTES
Para reducir el riesgo de quemaduras al licuar líquidos calientes, siga las
precauciones siguientes:
• Un líquido se considera como caliente a partir de 38 ˚C (100 °F).
• No procese más de 250 ml.
• Retire el tapón (pieza centra de la tapa) antes de encender el aparato.
Esto permitirá que el aire caliente se escape, previniendo los derrames.
• Siempre comience a procesar usando la velocidad más lenta, y luego
aumente la velocidad progresivamente hasta el nivel deseado.
• Nunca se pare por encima de la licuadora durante el funcionamiento.
INSTRUCCIONES DE LIMPIEZA Y DESINFECCIÓN
LIMPIE Y SEQUE LA JARRA DESPUÉS DE CADA USO, SEGÚN SE INDICA
A CONTINUACIÓN. EL NO RESPETO DE ESTAS INSTRUCCIONES
PUEDE CAUSAR UNA ACUMULACIÓN DE RESIDUOS SOBRE LOS
SELLOS INTERNOS DE LA CUCHILLA, LO QUE PERJUDICARÍA SU BUEN
FUNCIONAMIENTO.
•
Lave, enjuague, sanee y seque la jarra antes del primer uso y después de
cada uso, a menos que vuelva a utilizarlo dentro de la hora siguiente.
•
Lave y seque la jarra después de cada uso.
•
Limpie y sanee el bloque-motor antes del primer uso y después de cada
uso.
•
Le recomendamos que use soluciones limpiadoras a base de detergente
sin espuma y soluciones desinfectantes con una concentración mínima
de cloro de 100 ppm.
Se podrán usar las soluciones siguientes o sus equivalentes:
SOLUCIÓN PRODUCTO PROPORCIÓN TEMPERATURA
DE DILUCIÓN
Para limpiar Diversey 4 cucharadas/ Caliente 115 °F
Wyandotte 4 L de agua (46 °C)
Diversol BX/A
o CX/A
Para enjuagar Agua Tibia 95 °F (35 °C)
Para sanear Cloro ordinario 1 cucharada/ Fría 50–70 °F
o Clorox
®
4L de agua (10–21 °C)
Page 8

14 15
•
Limpiar la jarra frecuentemente incrementará la vida útil de las cuchillas.
Nunca debería transcurrir más de media hora entre dos limpiezas.
•
No utilice la jarra para guardar alimentos o líquidos procesados.
LIMPIEZA DE LA JARRA
1. RETIRE LA JARRA DE LA BASE. Quite la tapa. Enjuague el interior de la
jarra y la tapa. Llene la jarra con solución limpiadora. Lave la tapa y el
interior de la jarra con un cepillo para quitar los residuos de alimentos.
Vacíe el contenido.
2. Restriegue el exterior de la jarra con un paño suave o una esponja
empapada en solución limpiadora. Lave la tapa y el tapón en solución
limpiadora fresca. Llene la jarra hasta un cuarto de su capacidad con
solución limpiadora fresca, cierre la tapa (sin el tapón puesto) y ponga la
jarra sobre la base. Haga funcionar el aparato a velocidad alta durante 2
minutos. Vacíe el contenido.
3. Repita el paso 2 con agua en vez de solución limpiadora.
IMPORTANTE
NOTA: ASEGÚRESE DE QUE LA TEMPERATURA DE LA SOLUCIÓN
LIMPIADORA O DEL AGUA NO EXCEDA 115 °F (46 °C) Y NO LLENE LA
JARRA MÁS DE LO INDICADO.
EN EL CASO CONTRARIO, SIGA LAS PRECAUCIONES DETALLADAS EN LA
SECCIÓN "LÍQUIDOS CALIENTES".
DESINFECCIÓN Y SECADO DE LA JARRA
1. Restriegue el exterior de la jarra con un paño suave o una esponja
empapada en solución desinfectante.
2. Llene la jarra hasta un cuarto de su capacidad con solución
desinfectante, cierre la tapa y ponga la jarra sobre la base. Haga
funcionar el aparato a velocidad alta durante 1 minuto. Vacíe el
contenido. Regrese la jarra vacía sobre la base y haga funcionar el
aparato a velocidad alta durante 2 segundos para secar las cuchillas.
3. Nota: para desinfectar la tapa y el tapón, déjelos en solución
desinfectante durante 2 minutos.
4. No enjuague la jarra, la tapa ni el tapón después de sanearlos. Permita
que las piezas sequen al aire libre.
LIMPIEZA DEL BLOQUE-MOTOR
1. DESCONECTE EL APARATO. Restriegue sucesivamente el bloque-motor
con paños suaves o esponjas humedecidas en solución limpiadora, agua
y solución desinfectante. Estruje bien la esponja o el paño para evitar
que agua penetre adentro del aparato.
NO SUMERJA LA BASE EN SOLUCIÓN LIMPIADORA, AGUA O SOLUCIÓN
DESINFECTANTE.
2. Permita que la base seque antes de usar el aparato.
Cualquier otro servicio debe ser realizado por un técnico autorizado.
SERVICIO POSTVENTA
Consulte la lista de los centros de servicio autorizados, adjunta, o contacte:
Waring Factory Service Center
314 Ella T. Grasso Avenue
Torrington, CT 06790
(800) 492-7464
Si debe enviarnos un aparato defectuoso, regréselo a uno de los servicios
postventa autorizados o a la dirección más arriba. No envíe el aparato a
nuestras oficinas.
Nota: Si el aparato ha sido usado para procesar sustancias biológicamente
activas, se deberán esterilizar las piezas antes de enviarlas. Las
piezas esterilizadas deberán ser claramente identificadas, mediante
una etiqueta puesta en las mismas y una declaración adjunta. Waring
no aceptará la entrega de artículos esterilizados que no tengan
identificación adecuada.
Piezas de repuesto para reparaciones "fuera de garantía" están disponibles
en la misma dirección.
GARANTÍA LIMITADA DE TRES AÑOS (MOTOR)
GARANTÍA LIMITADA DE DOS AÑOS
Waring garantiza toda nueva licuadora Waring® Commercial contra todo defecto
de materiales o fabricación durante dos años a partir de la fecha de compra,
siempre en cuando haya sido usada con alimentos, líquidos no abrasivos (a
excepción de detergentes) y semi-líquidos no abrasivos, y que no haya sido
sujeta a cargas que excedan su máxima capacidad. Por otra parte, el motor de
este aparato tiene una garantía completa de tres años.
Bajo esta garantía, Waring reparará o reemplazará toda pieza que, tras estar
inspeccionada por nuestro servicio posventa, demuestre defectos de materiales
o fabricación, siempre que el producto se entregue con franqueo pagado a:
314 Ella T. Grasso Ave. Torrington, CT 06790, o a cualquier servicio postventa
aprobado.
Esta garantía: a) no se aplica a ningún producto desgastado, defectuoso,
dañado o roto debido a uso, reparaciones/servicio realizados por personas no
autorizadas, o abuso, mal uso, sobrecarga o daños intencionales; b) no cubre
daños incidentales o consecuentes de ningún tipo.
Esta garantía es válida solamente para los aparatos comprados en los Estados
Unidos y el Canadá y reemplaza todas las demás declaraciones expresas de
garantía. La garantía de los productos Waring adquiridos fuera de los Estados
Unidos y del Canadá es la responsabilidad del importador o distribuidor local.
Los derechos de garantía pueden variar según las regulaciones locales.
Advertencia: El utilizar este aparato con corriente directa (C.D.) invalidará la
garantía.
WARING COMMERCIAL
314 Ella T. Grasso Ave.
Torrington, CT 06790
Page 9
16 17
IMPORTANTES CONSIGNES
DE SÉCURITÉ
L'utilisation d'appareils électriques requiert la prise de précautions
élémentaires, parmi lesquelles les suivantes :
1.
LIRE TOUTES LES INSTRUCTIONS.
2. An de prévenir tout risque de choc électrique, ne jamais placer
l'appareil dans l’eau ou tout autre liquide.
3. Débrancher l'appareil avant toute manipulation ou nettoyage.
4. Cet appareil ne devrait pas être utilisé par des enfants ou des
personnes souffrant d’un handicap physique, mental ou sensoriel,
ou qui ne disposent pas des connaissances ou de l'expérience
nécessaires, à moins qu'une personne responsable de leur sécurité
leur en ait expliqué le fonctionnement ou les encadre.
Il convient de surveiller les enfants an de s'assurer qu'ils ne jouent
pas avec l'appareil.
5. Débrancher après usage et avant toute manipulation ou entretien.
6. Éviter tout contact avec les éléments en mouvement.
7. Ne pas utiliser l'appareil si le cordon d’alimentation ou la che sont
endommagés, s’il ne fonctionne pas correctement, s'il est abîmé ou
après qu'il soit tombé. Envoyer l'appareil à un service après-vente
autorisé an qu’il soit inspecté, réparé ou réglé au besoin.
8. L’utilisation d’accessoires non recommandés par le fabricant, y
compris de bocaux à conserves, peut entraîner des risques pour
l'utilisateur.
9. Ne pas l'utiliser à l'air libre.
10. Ne pas laisser le cordon pendre au bord d'une table ou d'un plan
de travail, ni entrer en contact avec des surfaces chaudes.
11. Garder les mains et les ustensiles éloignés du bol/récipient pendant
l'utilisation an d'éviter tout risque de blessure ou de dommages.
Vous pouvez utiliser une spatule en plastique une fois que l’appareil
est arrêté.
12. ATTENTION : Les lames sont très coupantes. Manipuler avec
précaution.
13. Toujours fermer le couvercle avant de mettre l'appareil en marche.
14. Lorsque vous mélangez des liquides chauds, enlever le bouchon
doseur pour laisser la vapeur s'échapper.
Voir la section "Liquides chaud".
15. En cas d'utilisation prolongée, il est conseillé d'utiliser une
protection antibruit.
16. Ne jamais laisser l’appareil sans surveillance pendant qu’il
fonctionne.
17. Suivre les instructions de nettoyage et de désinfection.
NE PAS LAVER AU JET HAUTE PRESSION
GARDER CES INSTRUCTIONS
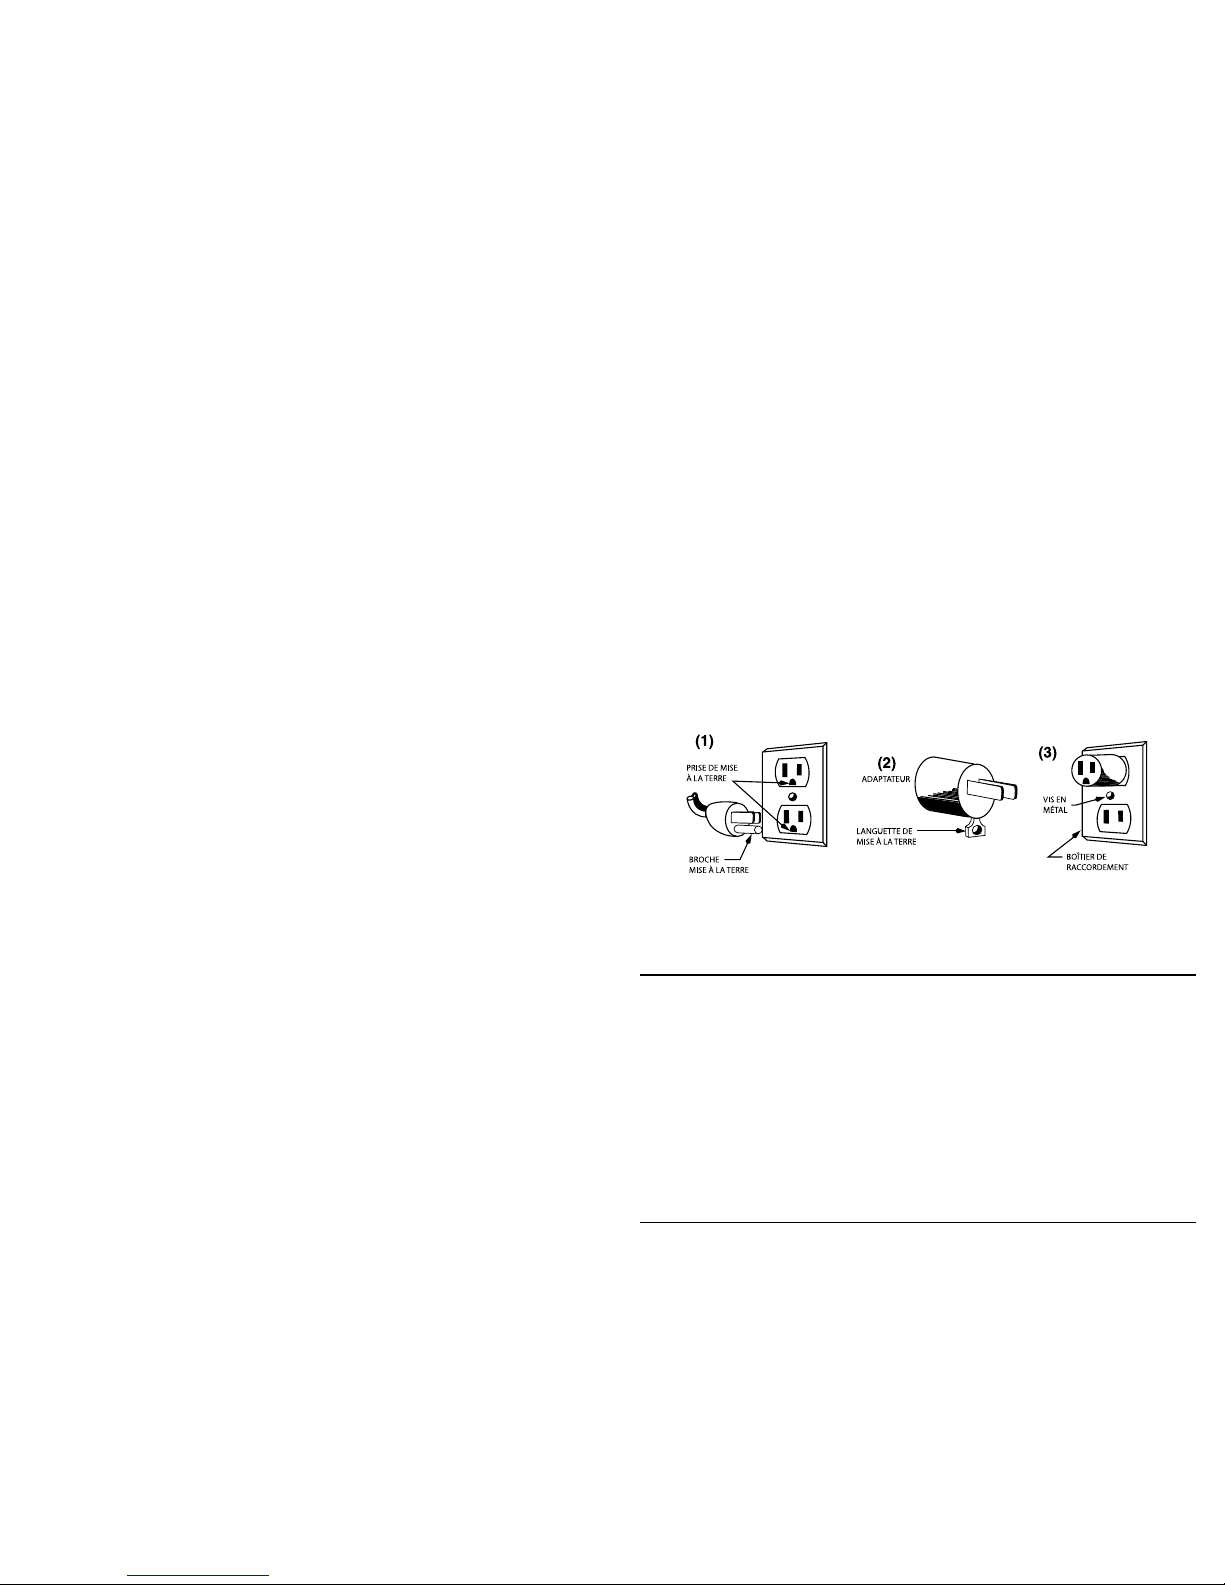
INSTRUCTIONS DE MISE À LA TERRE
• Pour votre protection, votre appareil est doté d'un cordon avec mise à la terre.
• Les appareils de 120V sont équipés d'une fiche NEMA 5-15P. La fiche doit être
branchée dans une prise de terre correctement configurée (Fig. A).
Vous pouvez utiliser un adaptateur temporaire* (Fig. B) pour brancher l’appareil
dans une prise polarisée jusqu’à ce que vous fassiez installer une prise de terre
par un électricien.
Afin d'assurer la mise à la terre, la languette de l’adaptateur doit être fixée au
boîtier par une vis en métal (Fig. C).
MISE EN GARDE : Vérifier que le boîtier est mis à la terre avant d'utiliser
l'adaptateur. En cas de doute, demander conseil à un électricien.
Ne jamais utiliser un adaptateur, à moins qu'il ne soit correctement mis à la
terre.
*REMARQUE : L’utilisation d’un adaptateur comme celui mentionné ci-dessus
est interdite au Canada et en Europe.
Vert et jaune : Mise à terre. Bleu : Neutre. Marron : Tension.
REMARQUE : En Europe, il est interdit d'installer soi-même les fiches
électriques.
MX1000XTX/MX1000XTP/MX1000XTS
MX1050XTX/MX1050XTP/MX1050XTS
MX1100XTX/MX1100XTP/MX1100XTS
SPÉCIFICATIONS TECHNIQUES :
• Capacité : 2 L
(Modèles MX1000XTP, MX1050XTP, MX1100XTP : 1,5 L)
• Contrôles : (2 vitesses) Haut Bas Pulse
• Vitesse (tours/minute) 30.000 26.000 30.000
• Spécifications électriques : 120 V - 13.0 Amp.
• Socle : Polycarbonate
• Palier : Palier à roulement à billes "haute performance"
• Cordon : 1,85 m (6 pieds), avec prise de terre et manchon renforcé
• Hauteur : 43 cm (19 po.)
• Poids : 6,8 kg (15 livres)
• Homologué CETLUS et NSF
• Cycle de fonctionnement : 1 minute de marche/3 minutes de repos
• MX1100XT – Minuteur de 30 secondes
Page 10

18 19
FONCTIONNEMENT DES MODÈLES
MX1000XTX/MX1000XTP/MX1000XTS
1. Vérifier que l'appareil est débranché.
2. Placer le bol/récipient sur le socle, après avoir vérifié que l'interrupteur
est à la position arrêt (OFF). S'assurer que le bol/récipient est
correctement installé et que l'accouplement avec l'arbre moteur est bien
engagé. Brancher l'appareil.
3. Mettre les ingrédients dans le bol/récipient et fermer
le couvercle. Ne pas remplir au-delà de la ligne
MAX.
4. L'appareil a deux vitesses : Rapide (HI) et lente
(LOW). Mettre l'interrupteur à la position voulue pour
mettre l'appareil en marche. Remarque : Utiliser la
vitesse rapide pour piler la glace.
5. Pour arrêter l'appareil, mettre l'interrupteur à la position arrêt (OFF).
6. Une fonction "pulse" est également disponible. Pour l'utiliser, actionner
l'interrupteur vers le bas (PULSE). L'appareil fonctionnera à vitesse
rapide jusqu'à ce que vous relâchiez l'interrupteur.
7. Attendre que le moteur se soit complètement arrêté avant de retirer le
bol/récipient. Ne jamais placer ou retirer le bol/récipient alors que le
moteur tourne.
8. Tenir le bol/récipient d'une main lors du démarrage et pendant le
fonctionnement.
Ne pas utiliser l'appareil sans le couvercle.
9. Laver et sécher le bol/récipient après usage. Suivre les instructions de
nettoyage et de désinfection.
FONCTIONNEMENT DES MODÈLES
MX1050XTX/MX1050XTP/MX1050XTS
Suivre les étapes 1–3 de la section ci-dessus.
1. L'appareil est équipé d'un contrôle électronique
tactile où figurent les touches ON/OFF (marche/
arrêt), LOW (vitesse lente), HIGH (vitesse rapide),
STOP (pause) et PULSE (fonction "pulse").
2. Appuyer sur le bouton ON/OFF pour mettre l'appareil
sous tension. Le voyant vert s'allumera. Pour allumer
l'appareil, appuyer sur le bouton HIGH ou LOW.
Pour arrêter, appuyer sur le bouton STOP. Pour faire
fonctionner en intermittence, appuyer sur le bouton PULSE ; le moteur
tournera à vitesse rapide jusqu'à ce que vous relâchiez le bouton.
REMARQUE : L'appareil est équipé du système de démarrage lent Slow
Start™. Lorsque vous appuyez sur la touche HIGH, l'appareil se met en
marche à basse vitesse, pour n'atteindre la vitesse voulue qu'au bout de
2 secondes. Cela produit des résultats plus homogènes.
3. Attendre que le moteur se soit complètement arrêté avant de retirer le
bol/récipient. Ne jamais placer ou retirer le bol/récipient alors que le
moteur tourne.
4. Tenir le bol/récipient d'une main lors du démarrage et pendant le
fonctionnement. Ne pas utiliser l'appareil sans le couvercle.
5. Laver et sécher le bol/récipient après usage. Suivre les instructions de
nettoyage et de désinfection.
6. Pour éteindre l'appareil complètement, appuyer sur le bouton ON/OFF.
Le voyant vert s'éteindra.
FONCTIONNEMENT DES MODÈLES
MX1100XTX/MX1100XTP/MX1100XTS
Suivre les étapes 1–3 de la section "Fonctionnement - Modèle MX1000XTX".
1. L'appareil est équipé d'un contrôle électronique tactile où figurent les
touches ON/OFF (marche/arrêt), LOW (vitesse lente), HIGH (vitesse
rapide), STOP (pause), PULSE (fonction "pulse") et les deux flèches de
réglage de la minuterie.
2. Appuyer sur le bouton ON/OFF pour mettre l'appareil sous tension.
Le voyant vert s'allumera. L'écran numérique indiquera 10 secondes (le
temps par défaut). Pour régler la minuterie, appuyer à plusieurs reprises
sur les flèches. L'écran numérique indiquera le temps programmé,
jusqu'à 30 secondes, en incréments de 5 secondes. Une fois la minuterie
réglée, appuyer sur le bouton HIGH ou LOW pour mettre l'appareil en
route. La minuterie s'arrêtera une fois le temps programmé écoulé. Pour
arrêter l'appareil, y compris avant la fin du temps programmé, appuyer
sur le bouton PULSE, STOP ou ON/OFF.
REMARQUE : Pour changer le temps programmé pendant le
fonctionnement, appuyer sur les flèches. Cela modifiera le temps restant,
en incréments de 5 secondes.
3. Si l'appareil n'est pas mis en route dans les cinq secondes qui suivent,
la minuterie s'éteindra. Pour la réactiver, appuyer sur une des flèches.
La minuterie se remettra en marche et affichera le temps programmé
total. Remarque: Après avoir éteint ou débranché l'appareil, la minuterie
affichera le temps par défaut, soit 10 secondes.
4. Pour allumer l'appareil, appuyer sur le bouton HIGH ou LOW. Pour
arrêter, appuyer sur le bouton STOP. Pour faire fonctionner l'appareil en
intermittence, appuyer sur le bouton PULSE. L'appareil fonctionnera à
vitesse rapide jusqu'à ce que vous relâchiez le bouton.
REMARQUE : L'appareil est équipé du système de démarrage lent
Slow Start™. Lorsque appuyez sur la touche HIGH, l'appareil se met en
marche à basse vitesse, pour n'atteindre la vitesse voulue qu'au bout de
2 secondes. Cela produit des résultats plus homogènes.
5. Attendre que le moteur se soit complètement arrêté avant de retirer le
bol/récipient. Ne jamais placer ou retirer le bol/récipient alors que le
moteur tourne.
6. Laver et sécher le bol/récipient après usage. Suivre les instructions de
nettoyage et de désinfection.
7. Pour éteindre l'appareil complètement, appuyer sur le bouton ON/OFF.
Le voyant vert s'éteindra.
Page 11

20 21
DISPOSITIF DE PROTECTION DU MOTEUR
• Votre appareil est équipé d’un dispositif de protection thermique qui arrête
le moteur automatiquement en cas de surchauffe.
• Si cela se produisait, arrêtez et débranchez l'appareil. Videz le bol/
récipient, puis laissez refroidir l'appareil pendant 5 à 30 minutes.
• Une fois le moteur refroidi, rebranchez l'appareil et continuez.
• Si l'appareil ne fonctionne pas comme il se doit, cessez l'utilisation et
contactez un service après-vente autorisé.
IMPORTANT – LIQUIDES CHAUDS
Suivre les précautions suivantes afin de réduire les risques de brûlure.
• Les matériaux chauds sont ceux dont la température dépasse 38˚C.
• Ne pas mixer plus de 250 ml d'ingrédients.
• Enlever le bouchon doseur du couvercle avant de mettre l'appareil en
marche. Cela permettra à l'air chaud de s'échapper, évitant ainsi un
débordement.
• Commencer à mixer à basse vitesse, puis accroître progressivement la
vitesse jusqu'au niveau voulu.
• Ne jamais se tenir directement au-dessus de l'appareil lors du démarrage
ou pendant le fonctionnement.
NETTOYAGE ET DÉSINFECTION
LAVER ET SÉCHER LE BOL/RÉCIPIENT APRÈS CHAQUE UTILISATION,
SELON LES INSTRUCTIONS SUIVANTES. LE NON-RESPECT DE CES
INSTRUCTIONS PEUT ENTRAÎNER UNE ACCUMULATION DE RÉSIDUS
SUR LE MÉCANISME INTERNE DU COUTEAU, NUISANT À SON BON
FONCTIONNEMENT.
•
Nettoyer, rincer, désinfecter et sécher le bol/récipient avant de l'utiliser
pour la première fois et après chaque utilisation, à moins que vous ne le
réutilisiez dans l'heure qui suit.
•
Laver et sécher le bol/récipient après usage.
•
Nettoyer et désinfecter le socle-moteur avant d’utiliser l’appareil pour la
première fois et après chaque utilisation.
•
Nous recommandons l'utilisation d'une solution de nettoyage à base de
détergent non moussant et d'une solution désinfectante à base de chlore,
avec une concentration minimum de 100 ppm.
Vous pouvez utiliser les solutions suivantes ou leur équivalent :
SOLUTION PRODUIT PROPORTION TEMPÉRATURE
DE DILUTION
Lavage Diversey 4 c. à soupe/ Chaude 115°F
Wyandotte d'eau (46°C)
Diversol BX/A
ou CX/A
Rinçage Eau claire Tiède 95°F (35°C)
Désinfection Eau de javel 1 c. à soupe/ Froide 50–70°F
ordinaire 4 L d'eau (10–21°C)
ou Clorox®
•
Le nettoyage régulier du bol/récipient augmentera la durée de vie du
couteau. Il ne devrait jamais s'écouler plus d'une-demi heure entre deux
nettoyages.
•
Ne pas garder d'aliments ou de liquides dans le bol/récipient.
LAVAGE ET RINÇAGE DU BOL/RÉCIPIENT
1. RETIRER LE BOL/RÉCIPIENT DU SOCLE. Enlever le couvercle. Rincer
l'intérieur du bol/récipient et le couvercle. Remplir le bol/récipient de
solution de nettoyage. Nettoyer l’intérieur du bol/récipient et le couvercle
à l’aide d’une brosse pour déloger les résidus. Vider.
2. Essuyer l'extérieur du bol/récipient à l’aide d’une éponge imprégnée
de solution de nettoyage. Laver le couvercle et le bouchon avec une
solution de nettoyage fraîche. Remplir le bol/récipient aux trois quart de
solution de nettoyage, fermer le couvercle (sans le bouchon) et placer
le bol/récipient sur le socle. Faire fonctionner l'appareil à haute vitesse
pendant 2 minutes. Vider.
3. Répéter l'étape 2 avec de l'eau claire.
IMPORTANT
REMARQUE: VÉRIFIER QUE TEMPÉRATURE DE LA SOLUTION DE
NETTOYAGE OU DE L'EAU NE DÉPASSE PAS 115˚F (46˚C) ET NE PAS
REMPLIR LE BOL/RÉCIPIENT AU-DELÀ DE LA QUANTITÉ INDIQUÉE.
DANS LE CAS CONTRAIRE, OBSERVEZ LES PRÉCAUTIONS ÉNUMÉRÉES
DANS LA SECTION "LIQUIDES CHAUDS".
DÉSINGECTION ET SÉCHAGE
1. Essuyer l'extérieur du bol/récipient à l’aide d’une éponge imprégnée de
solution désinfectante.
2. Remplir le bol/récipient aux trois quart de solution désinfectante, fermer
le couvercle (sans le bouchon) et placer le bol/récipient sur le socle.
Faire fonctionner l'appareil à haute vitesse pendant 1 minute. Vider.
Remettre le bol/récipient sur le socle et faire fonctionner l'appareil à
haute vitesse pendant 2 secondes pour sécher les lames.
3. Pour désinfecter le couvercle et le bouchon doseur, les faire tremper
dans la solution désinfectante pendant 2 minutes.
4. Ne pas rincer le bol/récipient, le couvercle ou le bouchon doseur après
les avoir désinfectés. Laisser sécher à l'air libre.
NETTOYAGE ET DÉSINFECTION DU SOCLE-MOTEUR
1. DÉBRANCHER L'APPAREIL. Nettoyer successivement le socle à l'aide
d'une éponge imbibée de solution de nettoyage, d'eau claire, puis de
solution désinfectante. Bien essorer l’éponge afin que le liquide ne
pénètre pas dans le boîtier.
NE PAS SUBMERGER LE SOCLE-MOTEUR DANS LA SOLUTION DE
NETTOYAGE, L'EAU OU LA SOLUTION DÉSINFECTANTE.
2. Laisser sécher le socle à l’air libre avant de l'utiliser à nouveau.
Toute autre réparation doit être effectuée par un service après-vente
autorisé.
Page 12

22 23
SERVICE APRÈS-VENTE
Consulter la liste des services après-vente autorisés ci-jointe, ou bien
contacter :
Waring Factory Service Center
314 Ella T. Grasso Avenue
Torrington, CT 06790
(800) 492-7464
Si vous devez expédier un appareil défectueux, faites-le à un service aprèsvente autorisé ou à l'adresse ci-dessus. Ne pas envoyer l'appareil à nos
bureaux.
Remarque: Si l'appareil est utilisé pour le traitement de matériaux
biologiquement actifs, assurez-vous de stériliser les pièces avant de
les expédier. Les pièces stérilisées doivent être identifiées clairement
au moyen d'une étiquette et d'une déclaration jointe. Waring se réserve
le droit de ne pas accepter les pièces, à moins qu'elles ne soient
identifiées de cette manière.
Les pièces détachées pour réparations "hors garantie" sont également
disponibles à l’adresse ci-dessus.
NOTES
GARANTIE LIMITÉE DE TROIS ANS (MOTEUR)
GARANTIE LIMITÉE DE DEUX ANS
Waring garantit tout nouveau mélangeur/bol mixeur Waring® Commercial contre
tout vice de matière ou de fabrication pendant une période de deux ans suivant
sa date d’achat, à condition qu’il ait été utilisé uniquement avec des produits
alimentaires, des liquides non-abrasifs (autres que des détergents) et des
semi-liquides non-abrasifs, à condition que l'appareil n'ait pas été soumis à
des charges excédant sa capacité maximale. Le moteur de l'appareil est sous
garantie totale pendant une période de trois ans.
Au titre de cette garantie, Waring réparera ou remplacera toute pièce nous
paraissant afficher un vice de matière ou de fabrication. Pour un service au
titre de cette garantie, envoyez l'appareil, port payé, au service après-vente
ci-dessous ou amenez-le à un centre de réparation agréé. 314 Ella T. Grasso
Ave. Torrington, CT 06790.
Cette garantie a) n’est pas valable si l’appareil est endommagé, cassé, détérioré
ou s’il affiche un vice ou défaut résultant de l’utilisation, de l’entretien ou de la
réparation par des personnes non autorisées, ou consécutif à l’usage abusif ou
inapproprié, à la surcharge ou à la modification de l’appareil. b) ne couvre aucun
dommage accessoire ou indirect.
Cette garantie n’est valable que sur les appareils utilisés aux États-Unis et au
Canada et abroge toute autre garantie formelle ou tout autre accord de garantie.
La garantie des produits Waring vendus en dehors des États-unis et du Canada
est à la charge de l’importateur ou du distributeur local. Les droits de garantie
peuvent varier d’un pays ou d’une région à l’autre.
Avertissement : Brancher cet appareil sur Courant Continu (C.C.) annulera la
garantie.
WARING COMMERCIAL
314 Ella T. Grasso Ave.
Torrington, CT 06790
Page 13

Any trademarks or service marks of third parties used herein are the
trademarks or service marks of their respective owners.
Todas marcas registradas o marcas de comercio mencionadas en ésta
pertenecen a sus titulares respectivos.
Toutes marques déposées ou marques de commerce ci-incluses
appartiennent à leurs propriétaires respectifs.
Waring Commercial
314 Ella T. Grasso Avenue
Torrington, CT 06790
1-800-4-WARING
www.waringproducts.com
Rev. 00
Part# 028489
IB-7157X
11WC120073
 Loading...