

Page 1

SINGLE AND DOUBLE
SERVICEABLE-PLATE WAFFLE MAKERS
WAFLERAS/GOFRERAS INDIVIDUALES Y
DOBLES CON PLACAS REEMPLAZABLES
GAUFRIERS INDIVIDUELS/DOUBLES
AVEC PLAQUES REMPLAÇABLES
X Series
For your safety and continued enjoyment of this product,
always read the instruction book carefully before using.
Para su seguridad y para disfrutar plenamente de este producto,
siempre lea las instrucciones cuidadosamente antes de usarlo.
An que cet appareil vous procure en toute sécurité beaucoup
de satisfaction, lire attentivement le mode d’emploi avant de l’utiliser.
Page 2

IMPORTANT SAFEGUARDS
When using electrical appliances, especially when children
are present, basic safety precautions should always be taken,
including the following:
1. READ ALL INSTRUCTIONS.
2. Unplug from outlet when not in use and before cleaning.
Allow to cool before putting on or taking off parts, and
before cleaning appliance.
3. Do not touch hot surfaces. Use handles and knobs.
4. To protect against re, electric shock, and injury to persons,
DO NOT IMMERSE CORD, PLUG, OR UNIT in water or other
liquids.
5. This appliance is not intended for use by persons (including
children) with reduced physical, sensory or mental capabilities,
or lack of experience and knowledge. Children should be
supervised to ensure that they do not play with the appliance.
6. Do not operate any appliance with a damaged cord or
plug, or after the appliance malfunctions or has been
damaged in any manner. Return appliance to the nearest
Waring Authorized Service Center for examination, repair,
or adjustment.
7. The use of accessory attachments not recommended by
Waring® Commercial may result in re, electric shock, or injury
to persons.
8. Do not use outdoors, or for other than its intended use.
9. Do not let power cord hang over edge of table or counter, or
touch hot surfaces.
10. Do not place on or near a hot gas or electric burner, or in a
heated oven.
11. Turn knob to setting #1, switch toggle to OFF position and
unplug the unit when nished baking wafes.
12. Extreme caution must be used when moving an appliance
containing hot oil or other hot liquids.
13. Always begin by plugging appliance into wall outlet. To
disconnect, turn control to setting #1, switch toggle to OFF
position, then remove plug from wall outlet.
14. WARNING: TO REDUCE THE RISK OF FIRE OR ELECTRIC
SHOCK, REPAIRS SHOULD BE MADE ONLY BY
AUTHORIZED PERSONNEL. DO NOT REMOVE THE BASE
PANEL. NO USER-SERVICEABLE PARTS ARE INSIDE.
15. To acquire another instruction manual, go to
www.waringcommercialproducts.com
SAVE THESE INSTRUCTIONS
APPROVED FOR COMMERCIAL USE
CONTENTS
Important Safeguards ...................................................................... 2
Grounding Instructions ..................................................................... 3
Special Cord Set Instructions .......................................................... 3
Special Features ............................................................................... 4
Instructions for Use .......................................................................... 5
Wafe Plate Cleaning & Maintenance .............................................. 6
Warranty ........................................................................................... 8
GROUNDING INSTRUCTIONS
For your protection, Waring® Commercial
Wafe Makers are supplied with a molded,
3-prong, grounding-type plug and should
be used in combination with a properly
connected, grounding-type outlet as shown
in the gure.
SPECIAL CORD SET INSTRUCTIONS
A short power-supply cord is provided to reduce the risks resulting
from becoming entangled in or tripping over a longer cord.
Extension cords may be used if care is exercised in their use.
If an extension cord is used, the marked electrical rating of the
extension cord should be at least as great as the electrical rating of
the appliance, and the longer cord should be arranged so that it will
not drape over the countertop or tabletop where it can be pulled on
by children or animals, or tripped over.
2 3
Page 3
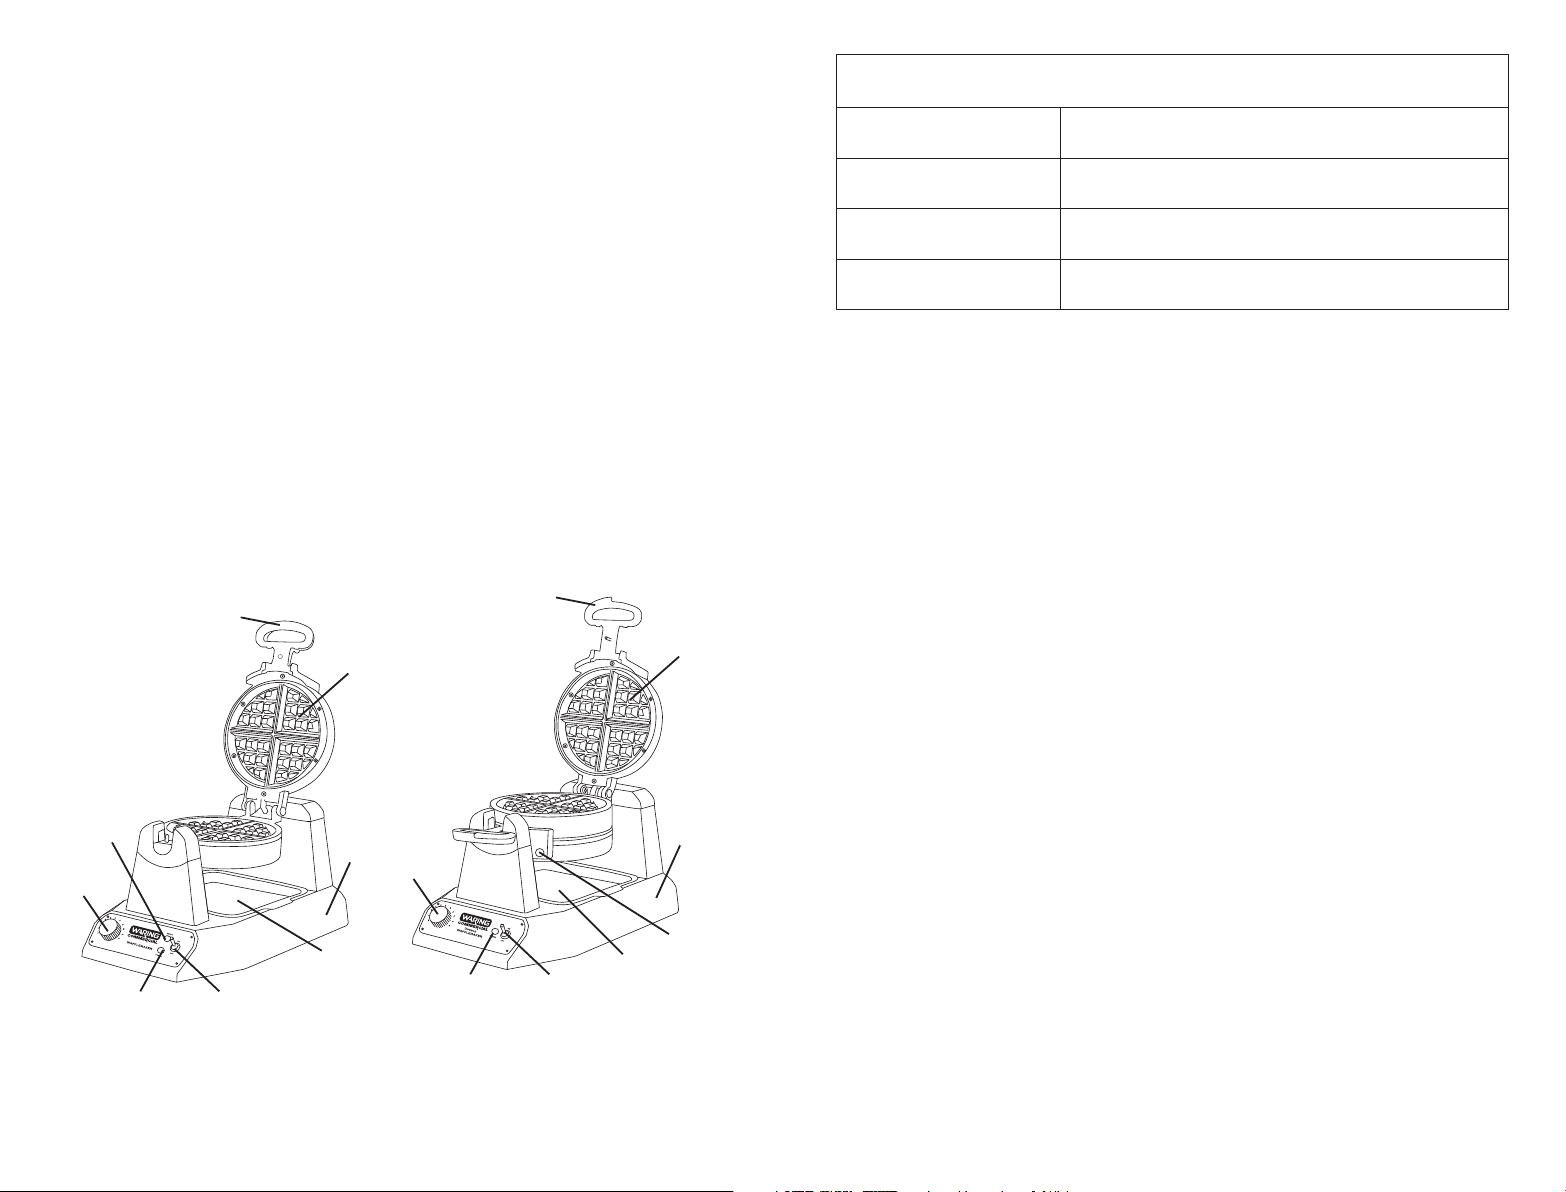
SPECIAL FEATURES
1. Waffle Grids – Belgian,
Mini Belgian, Classic
and Bubble
(Belgian wafe grids shown)
Wafe plates are triple coated
with Whitford® QuanTanium
nonstick coating.
2. Browning Control Adjustment
– Adjustable for different batters
and personal preference
3. Power Indicator Light
– Lights red when wafe maker
is on and heating up
4. Ready Indicator Light
– Lights green when wafe
maker is ready to bake
5. Power Switch
6. Indicator Beeps (not shown)
– Will beep 6 times when unit
is ready to bake for rst
wafe of every baking
session
– Will beep 3 times when
wafe is done
7. Base
8. Handle
9. 4 oz. Measuring Scoop
(not shown)
For the WMB400X unit, use
1 oz. of batter per mini Belgian
10. Removable Drip Tray
WARING® COMMERCIAL WAFFLE MAKERS
WWD180X/200X Classic Wafe, 5/8" thick
WW180X/200X Belgian Wafe, 1" thick
WMB400X/800X Mini-Belgian Wafe, four 1" thick
WBW300X Bubble Wafe
BEFORE FIRST USE
1. These Waring® Commercial Wafe Maker plates are
triple-coated with Whitford® nonstick coating.* Before the
rst use, we suggest you season the wafe grids by preheating
and then brushing them with cooking oil. Wipe with a paper
towel or pastry brush.
2. Remove any dust from shipping by wiping the plates with a
damp cloth. Remove all protective paper and wrapping.
8
1
4
7
2
10
3
5
2
3
WW180X
Whitford® QuanTanium nonstick coating is a registered trademark of Whitford.
8
5
WW200X
4 5
10
INSTRUCTIONS FOR USE
1
7
4
1. Plug cord into wall outlet.
2. Switch the toggle switch to the ON position. The RED light will
illuminate to signal power.
3. Preheat your Waring® Commercial Wafe Maker on setting #4
or preferred setting. It will now begin the preheating process.
This should take about 4 minutes. The machine will sound 6
beeps and the GREEN indicator light will go on to signal the
unit is ready for baking. Season the wafe grids by spraying
with cooking spray or brushing with a avorless oil.
For initial use, it is important that the wafe maker is
preheated before seasoning with cooking spray or oil.
NOTE: The rst time you use your wafe maker, it may have a slight
odor and may smoke a bit. This is normal, and common to heating
appliances.
4. Choose a setting on the browning control dial. For golden
brown wafes, we recommend using setting #4. When the
wafe is completely baked, the wafe maker will sound 3
beeps. Baking time is determined by browning level chosen.
Page 4

5. Fill measuring scoop with batter to ll line. Pour batter evenly
into the center of the wafe grid. For mini Belgian units, pour
1 oz. of batter in each wafe mold. Use a heatproof spatula to
spread the batter evenly over the grid. Close the lid and rotate
the unit 180°.
6. Once the wafe is ready and the wafe maker has beeped
3 times, rotate the wafe maker 180°, open the lid and remove
wafe by gently loosening the edges with a heatproof plastic
spatula. Never use metal utensils, as they may damage the
nonstick coating.
7. For double wafe makers, multiple wafes can be baked at
one time. For one wafe, simply follow previous instructions.
For more than one wafe at once, pour batter into top wafe
compartment, then rotate 180˚. You will now be able
to open the other wafe compartment. Pour the batter in
the grids and rotate another 180˚ in the other direction.
Both wafes will now cook. There are individual green READY
lights that will illuminate when each wafe is baked, and when
an empty compartment is ready to bake another wafe.
THERMAL PROTECTION
IF UNIT OVERHEATS, THE MACHINE WILL AUTOMATICALLY
TURN OFF. UNPLUG, LET MACHINE COOL FOR 10 MINUTES,
PLUG IN AND CONTINUE USE.
IF POWER IS LOST DURING OPERATION, UNPLUG AND LET
COOL 10 MINUTES. PLUG IN AND CONTINUE USE.
WAFFLE PLATE CLEANING & MAINTENANCE
Clean daily and diligently; doing so will ensure that your wafe
maker works properly and continues to work well over time.
How to Clean Waffle Plates
Once you have nished baking each day, turn the switch to the OFF
position and remove plug from electrical outlet. Leave top lid open
and allow plates to cool before cleaning. Be certain plates have
cooled completely before cleaning
To help remove oil buildup and batter residue, place a damp paper
towel in between the wafe plates and close the lid. Allow to sit for a
few minutes.
To clean exterior, wipe with a soft, dry cloth. Never use an abrasive
cleanser or harsh pad. NEVER IMMERSE CORD, PLUG OR UNIT IN
WATER OR OTHER LIQUIDS.
Serviceable Plates
To order replacement plates, call customer service at
1-800-4WARING, order online or find a local distributor
or service center.
Although removable, these plates are not intended to be removed
for routine cleaning. Plates are ONLY meant to be removed if there is
a scratch on the nonstick coating and you need to replace the plate.
If removed for cleaning, the plates are dishwasher safe.
How to Remove the Waffle Plates
PARTS
• 2 wafe plates
• 4 large screws (2 extra)
• 16 small screws (6 extra)
• Screwdriver
INSTRUCTIONS
1. Carefully unpack the replacement kit.
2. Using the provided screwdriver, carefully remove the screws
from the perimeter edge of wafe plate/s. Lift plates up and off
the housing. Slight force may be needed to release the plates
completely. Discard the old plate/s and screws.
3. Starting with the lower grid, place the new plate onto the housing
by aligning rear and front projections onto the base. The wider
projections will t into the rear.
Never take your wafe maker apart for cleaning. Brush crumbs
from grooves and absorb any excess cooking oil by wiping with a
dry cloth or paper towel. You may clean the plates by wiping with
a damp cloth to prevent staining and sticking from batter or oil
buildup. If batter adheres to plates, simply pour a little cooking oil
onto the baked batter and let stand approximately 5 minutes. This
will allow the batter to soften and will make it easier to remove.
6
4. Install 1 large screw into the slot located near the handle.
5. Install the smaller screws around the perimeter.
6. Repeat steps 2–5 for the upper grid replacement.
7
Page 5

LIMITED ONE YEAR WARRANTY
(U.S. and Canada only)
Waring® Commercial warrants every new Waring® Commercial Waffle
Maker to be free from defects in material and workmanship for a period
of one year from the date of purchase when used with foodstuffs,
nonabrasive liquids (other than detergents) and nonabrasive
semiliquids, providing it has not been subject to loads in excess
of the indicated rating.
Under this warranty, Waring® Commercial will repair or replace any part
which, upon our examination, is defective in materials or workmanship,
provided the product is delivered prepaid to the Waring Service Center at:
314 Ella T. Grasso Ave., Torrington, CT 06790, or any Factory Approved
Service Center.
This warranty does not: a) apply to any product that has become worn,
defective, damaged or broken due to use or due to repairs or servicing
by other than the Waring Service Center or a Factory Approved Service
Center, or due to abuse, misuse, overloading or tampering; or b) cover
incidental or consequential damages of any kind.
Warning: This warranty is void if appliance is used on Direct Current (DC).
WARING COMMERCIAL
314 Ella T. Grasso Ave.
Torrington, CT 06790
MEDIDAS DE SEGURIDAD
IMPORTANTES
Al usar aparatos eléctricos, especialmente en presencia de
niños, siempre debe tomar precauciones básicas de seguridad,
entre ellas las siguientes:
1. LEA TODAS LAS INSTRUCCIONES.
2. Desenchufe el aparato cuando no esté en uso y antes de
limpiarlo. Permita que se enfríe antes de instalar/sacar
piezas y antes de limpiarlo.
3. No toque las superficies calientes; utilice los mangos/asas o
los botones/perillas.
4. Para reducir el riesgo de incendio, descarga eléctrica o
heridas, NO SUMERJA EL CABLE, EL ENCHUFE, NI EL
APARATO EN AGUA NI EN NINGÚN OTRO LÍQUIDO.
5. Los niños o las personas que carezcan de la experiencia o
de los conocimientos necesarios para manipular el aparato,
o aquellas cuyas capacidades físicas, sensoriales o mentales
estén limitadas, no deben utilizar este aparato. No permita que
los niños jueguen con este aparato.
6. No utilice este aparato si el cable o el enchufe están
dañados, después de un mal funcionamiento, después
de que se haya caído o si está dañado; devuélvalo a un
centro de servicio autorizado para su revisión, reparación
o ajuste.
7. El uso de accesorios no recomendados por Waring
Commercial presenta un riesgo de incendio, descarga
eléctrica o heridas.
8. No lo utilice en exteriores, ni para ningún fin que no sea
el indicado.
9. No permita que el cable cuelgue del borde de la encimera o
de la mesa, ni que tenga contacto con superficies calientes.
10. No coloque el aparato sobre o cerca de un quemador a gas
o de una hornilla eléctrica caliente, ni en un horno caliente.
11. Ponga el control de temperatura en la posición “1” y el
interruptor en “OFF”, y desenchufe el aparato después
del uso.
12. Tenga sumo cuidado al mover un aparato que contenga aceite
u otro líquido caliente.
98
Page 6

13. Siempre enchufe el aparato antes de encenderlo. Siempre
ponga la perilla de control de temperatura en “1” y el
interruptor en “OFF” antes de desenchufar el aparato.
14. ADVERTENCIA: PARA REDUCIR EL RIESGO DE INCENDIO O
DESCARGA ELÉCTRICA, LAS REPARACIONES DEBEN SER
REALIZADAS POR UN TÉCNICO CALIFICADO. NO DESARME
EL APARATO. ESTE APARATO NO CONTIENE NINGUNA
PIEZA QUE PUEDA SER REPARADA/CAMBIADA POR EL
USUARIO.
15. Para conseguir una copia de este manual de instrucciones,
visite www.waringcommercialproducts.com
GUARDE ESTAS INSTRUCCIONES
APROBADO PARA USO COMERCIAL
ÍNDICE
Medidas de seguridad importantes ................................................. 9
Instrucciones de puesta a tierra ...................................................... 10
Uso de extensiones .........................................................................10
Características ................................................................................11
Instrucciones de uso .......................................................................12
Limpieza y mantenimiento de las placas ........................................13
Garantía ...........................................................................................15
INSTRUCCIONES DE PUESTA A TIERRA
Para su protección, el cable de este aparato Waring® Commercial
cuenta con un enchufe de puesta a tierra, el cual debe ser
conectado a una toma de corriente
debidamente puesta , a tierra.
USO DE EXTENSIONS
El cable provisto con este aparato es corto,
para reducir el riesgo de que alguien se
enganche o tropiece con un cable más
largo. Puede usarse una extensión
eléctrica/un cable alargador, pero con cuidado.
La clasificación nominal de la extensión debe ser por lo menos
igual a la del aparato. El cable más largo o la extensión deben ser
acomodados de tal manera que no cuelguen de la encimera/mesa,
donde pueden ser jalados por niños o causar tropiezos.
10 11
CARACTERÍSTICAS
1. Placas para waffles/gofres
belgas, mini waffles/gofres
belgas, waffles/gofres
clásicos y waffles/gofres
burbuja
(solamente las placas para
waffles/gofres belgas está
ilustradas)
Placas con triple revestimiento
antiadherente Whitford®
QuanTanium.
2. Temperatura variable
– Ajuste la temperatura según
la mezcla o al gusto
3. Luz de encendido (roja)
– Indica que la unidad se
está calentando
8
1
4
7
2
10
3
Whitford® es una marca registrada de Whitford.
5
WW180X
4. Luces de listo (verde)
– Indicar que la unidad está lista
5. Botón de encendido/apagado
6. Señal sonora (no ilustrada)
– El aparato emite 6 pitidos
cuando está listo para
cocinar (primer waffle/gofre
solamente).
– Emite 3 pitidos cuando el
waffle/gofre está listo
7. Base
8. Asa
9. Vaso medidor de 4 onzas
(120 ml) (no ilustrado)
Nota: con el modelo WMB400X,
use 1 onza (30 ml) de mezcla
por mini waffle/gofre belga.
10. Bandeja de goteo removible
8
1
7
2
4
10
3
5
WW200X
Page 7

WAFLERAS/GOFRERAS WARING® COMMERCIAL
WWD180X/200X
WW180X/200X
WMB400X/800X
WBW300X Waffles/gofres burbuja
Waffles/gofres clásicos de 5/8 in. (1.5 cm)
de espesor
Waffles/Gofres belgas de 1 in. (2.5 cm) de
espesor
Mini waffles/gofres belgas (4) de 1 in.
(2.5 cm) de espesor
ANTES DEL PRIMER USO
1. Las placas de esta waflera/gofrera Waring® Commercial
cuentan con un triple revestimiento antiadherente Whitford®.*
Sin embargo, le aconsejamos que “cure” las placas antes del
primer uso, calentándolas y luego engrasándolas con aceite.
Distribuya el aceite con una toallita de papel o una brocha.
2. Limpie las placas con un paño ligeramente humedecido para
eliminar el polvo acumulado durante el transporte. Retire el
material de embalaje y protección.
INSTRUCCIONES DE USO
1. Conecte el cable a una toma de corriente.
2. Ponga el interruptor en la posición “ON”; la luz ROJA se
encenderá.
3. Elija el ajuste de temperatura deseado (para waffles/gofres
dorados, le aconsejamos que utilice el nivel 4); el aparato
empezará a calentarse Nota: esto debería tomar aprox. 4
minutos. Cuando esté listo, el indicador luminoso VERDE se
encenderá y el aparato emitirá 6 pitidos. “Cure” las placas,
aplicando una generosa cantidad de spray vegetal o de aceite
vegetal sin sabor.
Antes del primer uso, es importante “curar” las placas,
calentándolas y luego engrasándolas.
NOTA: puede que el aparato produzca humo y un ligero olor a
quemado la primera vez que lo use; esto es normal.
4. Elija el nivel de temperatura deseado. Para preparar waffles/
gofres dorados, le aconsejamos que utilice el nivel 4. Cuando
el waffle/gofre esté listo, la waflera/gofrera emitirá 3 pitidos.
Nota: el ajuste de temperatura elegido determinará el tiempo
de cocción.
5. Llene el vaso medidor con mezcla hasta la línea. Vierta la
mezcla en el centro de las placas Nota: con la unidad para
mini waffles/gofres belgas, use 1 onza (30 ml) de mezcla
por gofre/waffle. Esparza la mezcla uniformemente con una
espátula resistente al calor. Cierre la waflera/gofrera y gírela
180°.
6. Cuando el waffle/gofre esté listo, gire la waflera/gofrera 180°
ábrala y retire el waffle/gofre, soltando los bordes con una
espátula de cocina resistente al calor. Nunca utilice utensilios
de metal; esto puede dañar el revestimiento antiadherente de
las placas.
7. Los modelos dobles pueden preparar uno o dos waffles/
gofres al mismo tiempo. Para preparar solamente un waffle/
gofre, siga las instrucciones más arriba. Para preparar dos
waffles/gofres al mismo tiempo, vierta la mezcla en una placa
superior, cierre y gire 180°. Abra el otro lado. Vierta la mezcla
en la otra placa, cierre y gire 180° en la dirección opuesta.
Los dos waffles/gofres se cocinarán simultáneamente. Los
indicadores luminosos verdes (“READY”) se encenderán
cuando los waffles/gofres estén cocinados, y también cuando
las placas estén listas para preparar los waffles/gofres
siguientes.
DISPOSITIVO DE PROTECCIÓN CONTRA EL
SOBRECALENTAMIENTO
ESTE APARATO CUENTA CON UN SISTEMA DE PROTECCIÓN
QUE APAGA AUTOMÁTICAMENTE LA UNIDAD EN CASO
DE RECALENTAMIENTO. EN CASO DE QUE ESTO SUCEDA,
DESENCHUFE EL APARATO Y PERMITA QUE SE ENFRÍE POR
10 MINUTOS ANTES DE CONTINUAR.
SI EL APARATO SE APAGA DURANTE EL USO, DESENCHUFE
EL APARATO Y PERMITA QUE SE ENFRÍE POR 10 MINUTOS
ANTES DE CONTINUAR.
LIMPIEZA Y MANTENIMIENTO DE LAS PLACAS
Limpie cuidadosamente las placas cada día; esto garantizará un
buen funcionamiento y alargará la vida útil de la unidad.
12 13
13
Page 8

Cómo limpiar las placas
Al fin de cada día, apague (“OFF”) y desenchufe la unidad. Abra
las placas y permita que se enfríen antes de limpiarlas. Importante:
compruebe que las placas están completamente frías antes de
limpiarlas
Nunca desarme el aparato para la limpieza. Quite los residuos
de las placas con una brocha y absorba el aceite con un papel
absorbente o un paño seco. De ser necesario, limpie las placas con
un paño ligeramente humedecido para evitar las manchas y que la
mezcla se adhiera a las placas por la acumulación de residuos de
mezcla o aceite. Si hay mezcla pegada a las placas, vierta un poco
de aceite encima y espere por aprox. 5 minutos; esto remojará la
mezcla seca para facilitar la limpieza.
Para ayudar a eliminar los residuos de aceite y mezcla, coloque un
papel absorbente humedecido entre las placas y cierre estas. Deje
reposar unos minutos.
INSTRUCCIONES
1. Desempaque cuidadosamente el kit de reemplazo.
2. Retire los tornillos alrededor de cada placa con el destornillador
provisto. Levante las placas para retirarlas. Nota: puede ser
necesaria una ligera fuerza para liberar completamente las
placas. Tire las viejas placas y los viejos tornillos.
3. Instale la nueva placa inferior en la carcasa, alineando las partes
sobresalientes de la placa con las muescas en la carcasa. Nota:
las partes sobresalientes anchas deben orientarse hacia atrás.
4. Atornille un tornillo grande en el agujero cerca del mango.
5. Atornille los tornillos pequeños alrededor de la placa.
6. Repita los pasos 2 a 5 para reemplazar la placa superior.
Limpie la carcasa del aparato con un paño suave seco. Nunca
utilice limpiadores ni estropajos abrasivos. NUNCA SUMERJA EL
CABLE, EL ENCHUFE, NI EL APARATO EN AGUA NI EN NINGÚN
OTRO LÍQUIDO.
Placas reemplazables
Para pedir placas de repuesto, llame a nuestro servicio de
atención al cliente al 1-800-4WARING, visite nuestro sitio Web,
o comuníquese con un centro de servicio o distribuidor local.
Aunque son removibles, no se aconseja quitar las placas para
limpiarlas. Quite las placas SOLAMENTE si están rayadas, con el
propósito de cambiarlas. Si decide sacar las placas para lavarlas,
note que son aptas para lavavajillas.
Cómo reemplazar las placas
PIEZAS
• 2 placas para waffles/gofres
• 4 tornillos grandes (2 adicionales)
• 16 tornillos pequeños (6 adicionales)
• Destornillador
GARANTÍA LIMITADA DE UN AÑO
(válida en los EE.UU. y en Canadá solamente)
Waring Commercial garantiza toda nueva waflera/gofrera Waring®
Commercial contra todo defecto de materiales o fabricación durante
un año a partir de la fecha de compra, siempre que haya sido usada
con alimentos, líquidos no abrasivos (a excepción de detergentes) y
semilíquidos no abrasivos, y que no haya sido sujeta a cargas que
excedan su máxima capacidad.
Bajo esta garantía, Waring Commercial reparará o reemplazará toda
pieza que, tras estar inspeccionada por nuestro servicio posventa,
demuestre defectos de fabricación o fallas de materiales, siempre que
el producto se entregue con franqueo pagado a: 314 Ella T. Grasso
Ave., Torrington, CT 06790, o a cualquier centro de servicio aprobado.
Esta garantía: a) no se aplica a ningún producto desgastado,
defectuoso, dañado o roto debido a uso, reparaciones/servicio
realizados por personas no autorizadas, o abuso, mal uso, sobrecarga
o daños intencionales; b) no cubre daños incidentales o consecuentes
de ningún tipo.
Advertencia: utilizar este aparato con corriente continua (C.C./DC)
invalidará la garantía.
WARING COMMERCIAL
314 Ella T. Grasso Ave.
Torrington, CT 06790
14
15
Page 9

IMPORTANTES CONSIGNES
DE SÉCURITÉ
L’utilisation d’appareils électriques, notamment en présence
d’enfants, requiert la prise de précautions élémentaires, parmi
lesquelles les suivantes :
1. LIRE TOUTES LES INSTRUCTIONS.
2. Débrancher l’appareil lorsque vous ne l’utilisez pas et
avant de le nettoyer. Le laisser refroidir avant d’installer/
de retirer des pièces et avant le nettoyage.
3. Ne pas toucher les surfaces chaudes; utiliser les poignées ou
les boutons.
4. An de réduire le risque d’incendie, de choc électrique ou de
blessures, NE PAS PLONGER LE CORDON, LA PRISE OU
L’APPAREIL dans l’eau ou tout autre liquide.
5. Cet appareil ne devrait pas être utilisé par des enfants ou
des personnes atteintes de certains handicaps physiques,
mentaux ou sensoriels, ou qui ne disposent pas des
connaissances ou de l’expérience nécessaires. Veiller à ce que
les enfants ne jouent pas avec l’appareil.
6. Ne pas utiliser l’appareil si le cordon d’alimentation
ou la fiche sont endommagés, s’il ne fonctionne pas
correctement, s’il est tombé ou s’il est abîmé ; le renvoyer
à un service après-vente autorisé afin qu’il soit inspecté,
réparé ou réglé au besoin.
7. L’utilisation d’accessoires non recommandés par Waring®
Commercial peut présenter un risque d’incendie, de choc
électrique ou de blessure.
8. Ne pas utiliser cet appareil à l’extérieur ou à des ns autres
que celles pour lesquelles il a été conçu.
9. Ne pas laisser le cordon pendre d’une table ou d’un plan de
travail, ni entrer en contact avec des surfaces chaudes.
10. Ne pas mettre l’appareil sur ou à proximité d’une plaque à gaz
ou électrique, ni dans un four chaud.
11. Ramener le cadran de réglage de température sur “1”,
l’interrupteur sur “OFF” et débrancher l’appareil après usage.
12. Faire particulièrement attention lorsque vous déplacez un
appareil qui contient de l’huile ou autre liquide chaud.
13. Toujours brancher l’appareil avant de l’allumer. Toujours
ramener le cadran de réglage de température sur “1” et
mettre l’interrupteur à bascule sur “OFF” avant de débrancher
l’appareil.
16 17
14. AVERTISSEMENT: AFIN DE PRÉVENIR LES RISQUES
D’INCENDIE OU DE CHOC ÉLECTRIQUE, TOUTE
RÉPARATION DOIT ÊTRE EFFECTUÉE PAR UN TECHNICIEN
AUTORISÉ. NE PAS DÉMONTER LE BOÎTIER. CET APPAREIL
NE CONTIENT AUCUNE PIÈCE POUVANT ÊTRE RÉPARÉE/
REMPLACÉE PAR L’UTILISATEUR.
15. Pour obtenir une copie de ce manuel d’instructions, visiter
www.waringcommercialproducts.com
CONSERVER CES INSTRUCTIONS
USAGE COMMERCIAL AUTORISÉ
TABLE DES MATIÈRES
Importantes consignes de sécurité .................................................16
Instructions de mise à la terre .........................................................17
Utilisation de rallonges électriques .................................................17
Caractéristiques ..............................................................................18
Mode d'emploi .................................................................................19
Nettoyage et entretien des plaques ............................................... 20
Garantie .......................................................................................... 22
INSTRUCTIONS DE MISE À LA TERRE
Pour votre protection, cet appareil Waring®
Commercial est équipé d’une che à trois
broches. Cette che doit être branchée
dans une prise de terre correctement
congurée (voir illustration ci-contre).
UTILISATION DE RALLONGES
ÉLECTRIQUES
Pour des raisons de sécurité, cet appareil est équipé d’un cordon
d’alimentation court. Une rallonge électrique pourra être utilisée au
besoin, pourvu que les précautions suivantes soient prises.
Veiller à ce que les spécications électriques de la rallonge soient
au moins égales à celles de l’appareil, ne pas la laisser pendre au
bord d’une table ou d’un plan de travail, et veiller à ce qu’elle soit
placée de telle manière qu’un enfant ou un animal ne puisse pas
trébucher dessus ou la tirer.
Page 10

CARACTÉRISTIQUES
1. Plaques à gaufres belges,
mini gaufres belges, gaufres
classiques et gaufres bulle
(seules les plaques à gaufres
belges sont illustrées)
Plaques avec triple revêtement
antiadhésif Whitford®
QuanTanium.
2. Réglage de température
– Variable selon le type de pâte
et les goûts personnels
3. Voyant d'alimentation (rouge)
– Indique que le gaufrier chauffe
8
4. Voyant de préchauffage (vert)
– Indique que le gaufrier est
prêt
5. Interrupteur
6. Signal sonore (non illustré)
– Sonne 6 fois pour indiquer
que le gaufrier est prêt pour la
première gaufre
– Sonne 3 fois pour indiquer
que la gaufre est cuite
7. Boîtier
8. Poignée
9. Verre mesureur (non illustré)
Remarque : avec le modèle
WMB400X, utiliser 1 oz (30 ml)
de pâte par mini gaufre belge.
10. Bac amovible
8
GAUFRIERS WARING® COMMERCIAL
WWD180X/200X
WW180X/200X
WMB400X/800X
Gaufres classiques de
(1,5 cm) d’épaisseur
Gaufres belges de 1 po. (2,5 cm)
d’épaisseur
Mini gaufres belges (4) de 1 po.
(2,5 cm) d’épaisseur
WBW300X Gaufres bulle
5
/8 po.
AVANT LA PREMIÈRE UTILISATION
1. Les plaques de ce gaufrier Waring® Commercial ont un triple
revêtement antiadhésif Whitford®.* Toutefois, il est conseillé de
les “culotter” avant la première utilisation, en les badigeonnant
d’huile alors qu’elles sont chaudes. Essuyer le surplus à l’aide
d’une serviette en papier ou d’un pinceau à pâtisserie.
2. Essuyer les plaques à l’aide d’un linge humide an d’éliminer la
poussière accumulée pendant le transport. Retirer le matériel
de protection et d’emballage.
1
4
7
2
10
3
5
WW180X
Whitford® est une marque déposée de Whitford.
1
7
2
4
10
3
5
WW200X
MODE D'EMPLOI
1. Brancher l’appareil dans une prise électrique.
2. Mettre l’interrupteur à bascule sur “ON” ; le voyant lumineux
ROUGE s’allumera.
3. Choisir le réglage de température désiré (pour des gaufres
bien dorées, nous vous conseillons d’utiliser le réglage n° 4) ;
l’appareil commencera à chauffer Remarque : le préchauffage
devrait prendre environ 4 minutes. Une fois prêt, le voyant
VERT s’allumera et l’appareil sonnera 6 fois. Graisser
généreusement les plaques à l’aide d’un spray de cuisson ou
d’une huile végétale sans goût.
Avant la première utilisation, il est important de “culotter”
les plaques, en les faisant chauffer puis en les graissant.
REMARQUE : il se peut que le gaufrier fume et émette une légère
odeur lors de la première utilisation ; cela est normal.
4. Préchauffer le gaufrier au réglage de température désiré. Pour
des gaufres bien dorées, nous vous conseillons d’utiliser le
18 19
Page 11

réglage n° 4. Lorsque la gaufre sera cuite, le gaufrier sonnera
3 fois. Remarque:le réglage de température choisi
déterminera le temps de cuisson.
5. Remplir le verre mesureur de pâte à gaufre jusqu’à la ligne.
Verser la pâte au centre de la plaque. Remarque : avec le
gaufrier pour mini gaufres belges, utiliser 1 oz (30 ml) de pâte
par gaufre. Étaler la pâte à l’aide d’une spatule résistante à la
chaleur. Fermer les plaques et les faire tourner de 180°.
6. Une fois que la gaufre est cuite, tourner le gaufrier 180° vers la
gauche, ouvrir les plaques et retirer la gaufre en décollant les
bords à l’aide d’une spatule de cuisson résistante à la chaleur.
Ne jamais utiliser d’ustensiles en métal ; cela pourrait abîmer
le revêtement antiadhésif des plaques.
7. Les modèles doubles permettent de préparer une ou deux
gaufres à la fois. Pour préparer une seule gaufre, suivre les
instructions ci-dessus. Pour préparer deux gaufres, verser
la pâte sur la plaque supérieure, fermer et faire tourner 180°.
Ouvrir l’autre côté, verser la pâte sur la plaque, fermer puis
faire tourner de 180° dans l’autre sens.
Les deux gaufres cuiront en même temps. Les voyants
individuels verts (“READY”) s’allumeront une fois que les
gaufres seront cuites, et lorsque les plaques seront prêtes
pour les gaufres suivantes.
DISPOSITIF DE PROTECTION ANTI-SURCHAUFFE
L’APPAREIL S’ÉTEINDRA AUTOMATIQUEMENT EN CAS DE
SURCHAUFFE. SI CELA SE PRODUISAIT, LE DÉBRANCHER
ET LE LAISSER REFROIDIR PENDANT 10 MINUTES AVANT
DE CONTINUER.
EN CAS D’ARRÊT SOUDAIN PENDANT L’UTILISATION,
DÉBRANCHER L’APPAREIL ET LE LAISSER REFROIDIR
PENDANT 10 MINUTES AVANT DE CONTINUER.
NETTOYAGE ET ENTRETIEN DES PLAQUES
Nettoyer soigneusement les plaques tous les jours ; cela assurera
un bon fonctionnement et prolongera la durée de vie de l’appareil.
Ne jamais démonter le gaufrier pour le nettoyer. Éliminer les miettes
à l’aide d’un pinceau à pâtisserie et essuyer les plaques avec une
serviette en papier ou un linge sec pour absorber l’huile. Au besoin,
nettoyer les plaques à l’aide d’un linge humide pour prévenir les
taches et les accumulations de résidus d’huile et éviter que la pâte
ne colle aux plaques. S’il reste de la pâte sur les plaques, verser un
peu d’huile dessus et attendre environ 5 minutes ; cela détrempera
la pâte et facilitera le nettoyage.
Pour aider à éliminer les résidus d’huile ou de pâte, placer un
essuie-tout humide entre les plaques et fermer le couvercle. Laisser
en place pendant quelques minutes.
Essuyer le boîtier de l’appareil à l’aide d’un linge doux et sec. Ne pas
utiliser de nettoyants abrasifs ou de tampons à récurer. NE JAMAIS
PLONGER LE CORDON, LA PRISE OU L’APPAREIL DANS L’EAU OU
TOUT AUTRE LIQUIDE.
Plaques remplaçables
Pour commander des plaques de rechange, appeler notre
service après-vente au 1-800-4WARING, visiter notre site
Internet ou vous adresser à un centre de réparation ou à un
distributeur local.
Remarque : bien que les plaques soient amovibles, il n’est pas
conseillé de les retirer pour les nettoyer. Ne les enlever QUE si le
revêtement antiadhésif est rayé, dans le but de les remplacer. Si
vous décidez de les retirer pour les laver, notez que plaques sont
lavables au lave-vaisselle.
Comment changer les plaques
PIÈCES
• 2 plaques à gaufres
• 4 grandes vis (2 supplémentaires)
• 16 petites vis (6 supplémentaires)
• Tournevis
INSTRUCTIONS
Comment nettoyer les plaques
À la n de la journée, éteindre (“OFF”), puis débrancher l’appareil.
Ouvrir les plaques et les laisser refroidir avant de les nettoyer.
Important: s’assurer que les plaques sont complètement froides
avant de les nettoyer.
2020
1. Déballer soigneusement le kit de remplacement.
2. Retirer les vis qui tiennent les plaques en place à l’aide du
tournevis inclus. Soulever les plaques du gaufrier et les retirer.
21
Page 12

Remarque : il se peut qu’une légère force soit nécessaire pour
libérer complètement les plaques. Jeter les vieilles plaques et les
vieilles vis.
3. Installer la nouvelle plaque inférieure sur le boîtier, en alignant les
parties saillantes de la plaque avec les encoches dans le boîtier.
Remarque : orienter les parties saillantes larges vers l’arrière.
4. Visser une grande vis dans l’orice situé près de la poignée.
5. Visser les petites vis autour de la plaque.
6. Répéter les étapes 2 à 5 pour remplacer la plaque supérieure.
GARANTIE LIMITÉE D'UN AN
(valable aux É.-U. Et au Canada uniquement)
Waring Commercial garantit tout nouveau gaufrier Waring® Commercial
contre tout vice de matière ou de fabrication pendant une période d'un
an suivant sa date d’achat, à condition qu’il ait été utilisé uniquement
avec des produits alimentaires, des liquides non-abrasifs (autres que
des détergents) et des semi-liquides non-abrasifs, à condition que
l'appareil n'ait pas été soumis à des charges excédant sa capacité
maximale.
Au titre de cette garantie, Waring Commercial réparera ou remplacera
toute pièce nous paraissant afficher un vice de matière ou de
fabrication. Pour un service au titre de cette garantie, envoyez
l'appareil, port payé à : 314 Ella T. Grasso Ave., Torrington, CT 06790
ou à n'importe quel centre de réparation agréé.
Cette garantie a) n’est pas valable si l’appareil est endommagé, cassé,
détérioré ou s’il affiche un vice ou défaut résultant de l’utilisation,
de l’entretien ou de la réparation par des personnes non autorisées,
ou consécutif à l’usage abusif ou inapproprié, à la surcharge ou à la
modification de l'appareil ; b) ne couvre aucun dommage accessoire ou
indirect.
Avertissement : brancher cet appareil sur courant continu (C.C./DC)
annulera la garantie.
WARING COMMERCIAL
314 Ella T. Grasso Ave.
Torrington, CT 06790
22
Page 13

Trademarks or service marks of third parties used herein are
the trademarks or service marks of their respective owners.
Todas las marcas registradas, comerciales o de servicio mencionadas
en este documento pertenecen a sus titulares respectivos.
Toutes les marques déposées, commerciales ou de service
ci-incluses appartiennent à leurs propriétaires respectifs.
©2019 Waring Commercial
314 Ella T. Grasso Ave.
Torrington, CT 06790
www.waringcommercialproducts.com
1-800-4-WARING
Printed in China
Impreso en China
Imprimé en Chine
X Series IB
19WC061861
IB -16313
 Loading...