

Page 1
7.0 Quart
Stand Mixer
WSM7Q
INSTRUCTION BOOKLET
For your safety and continued enjoyment of this product, always read the instruction book carefully before using.
Page 2

IMPORTANT
SAVE THESE
SAFEGUARDS
When using an electrical appliance, basic
safety precautions should always be
followed to reduce the risk of fire, electric
shock and/or injury, including the following:
1.
READ ALL INSTRUCTIONS
BEFORE USING.
2. Switch off and unplug before fitting or
removing tools and/or attachments,
after use and before cleaning.
3. Close supervision is necessary
when any appliance is used by or
near children or individuals with
certain disabilities. Waring does not
recommend the use of this appliance
by children.
4. Avoid contact with moving parts and
fitted attachments. Keep hands, hair,
clothing, as well as spatulas and other
utensils, away from beaters during
operation to reduce the risk of injury to
persons and/or damage to the mixer.
5. The use of attachments not recom
mended or sold by Waring may cause
fire, electric shock or injury.
6. Do not use more than one attachment
at a time.
7. Do not exceed the maximum capacities
listed in this use and care instruction
book.
8. Do not use the stand mixer if it is
damaged or if the cord is damaged.
Have the stand mixer checked and
serviced before resuming use.
9. When using an attachment make
sure that you have read the safety
instructions that come with the
particular attachment.
10. Do not use outdoors.
11. Keep stainless steel bowl away from
heat sources such as stovetops, ovens
or microwaves.
12. To protect against the risk of electric
shock do not put the power unit in
water or other liquid.
13. Remove all attachments and accesso
ries from stand mixer before washing.
14. Do not let cord hang over edge of table
or counter.
-
-
INSTRUCTIONS
FOR COMMERCIAL
USE ONLY
CONTENTS
Important Safeguards................................... 2
Features and Benefits .................................. 4
Assembly Instructions, Diagram ............... 4-5
Operating Instructions .................................. 5
Cleaning and Maintenance .......................... 5
Suggested Speed Control Guide ................. 6
Maximum Capacities .....................................7
Troubleshooting ............................................ 7
Warranty Information .................................... 8
NOTE: The maximum rating is based on
the attachment that draws the greatest
power. Other recommended attachments
may draw significantly less power.
WARNING: RISK OF FIRE
OR ELECTRIC SHOCK
The lightning flash with an
arrowhead symbol within an
equilateral triangle is intended to
alert the user to the presence of
un-insulated dangerous voltage
within the product’s enclosure
that may be of sufficient
magnitude to constitute a risk of
fire or electric shock to persons.
The exclamation point within
an equilateral triangle is
intended to alert the user to the
presence of important operating
and maintenance (servicing)
instructions in the literature
accompanying the appliance.
2
Page 3
SPECIAL CORD SET INSTRUCTIONS
A short power-supply cord is provided to reduce the risks resulting from becoming
entangled in or tripping over a longer cord.
Longer extension cords are available and may be used if care is exercised in their use.
If a long extension cord is used, the marked electrical rating of the extension cord must
be at least as great as the electrical rating of the appliance, and the longer cord should
be arranged so that it will not drape over the countertop or tabletop where it can be
pulled on by children or tripped over.
WARNING
RISK OF FIRE OR ELE CTRIC SHOCK
DO NOT OP EN
WARNING: TO REDUCE THE RISK OF FIRE OR ELECTRIC SHOCK,
DO NOT REMOVE COVER (OR BACK)
NO USER-SERVICEABLE PARTS INSIDE
REPAIR SHOULD BE DONE BY AUTHORIZED SERVICE PERSONNEL ONLY
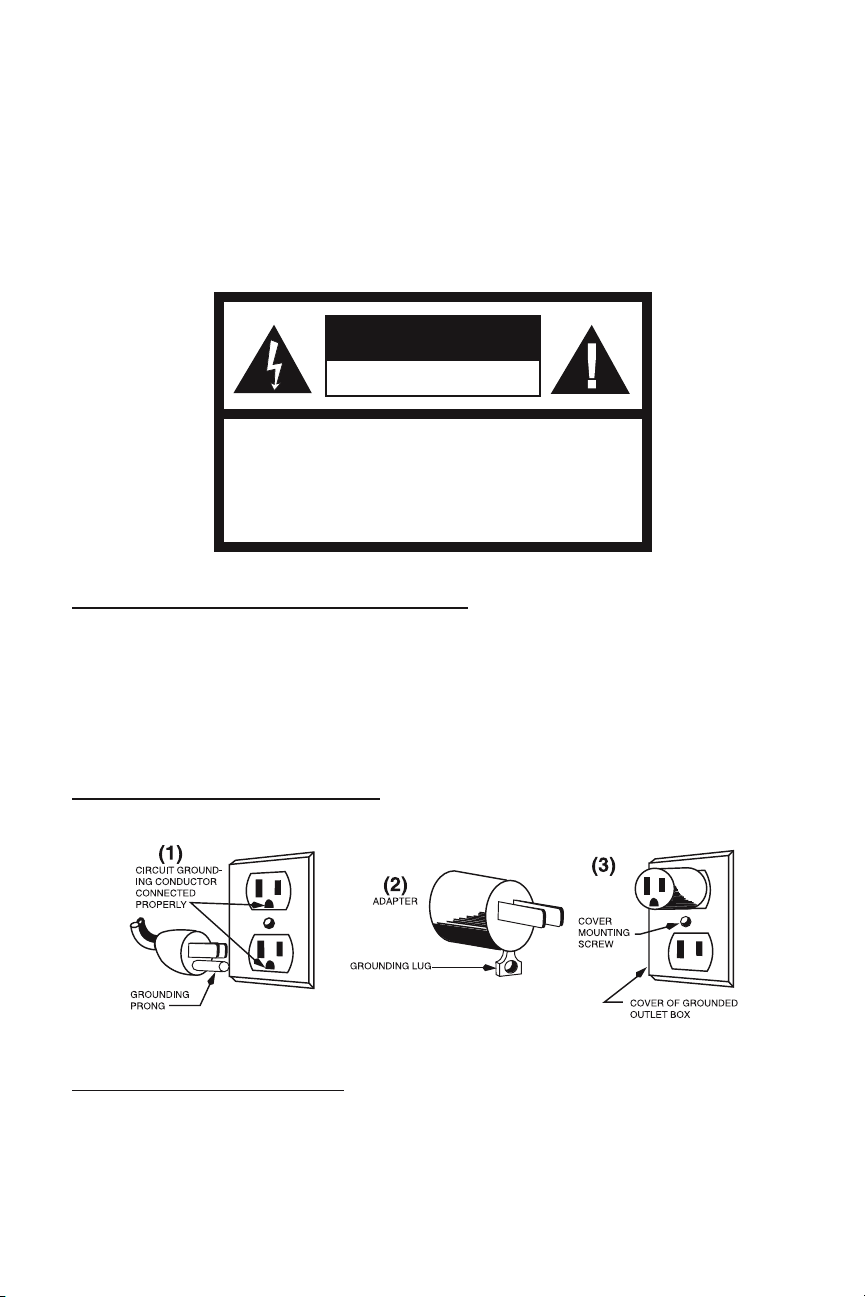
GROUNDING INSTRUCTIONS
This appliance must be grounded while in use to protect the operator from electrical
shock. The appliance is equipped with a 3-conductor cord and 3-prong grounding-type
plug to fit the proper grounding-type receptacle. The appliance has a plug that looks
like the plug in drawing (1). An adapter, as in drawing (2), should be used for connecting
the appliance plug to two-prong receptacles. The grounding tab which extends from the
adapter must be connected to a permanent ground such as a properly grounded outlet
box as shown in drawing (3) using a metal screw.
GROUNDING METHOD
EXTENSION CORDS
Use only 3-wire extension cords which have 3-prong grounding-type plugs and 3-pole
cord connectors that accept the plug from the appliance. Use only extension cords
which are intended for indoor use. Use only extension cords having an electrical rating not
less than the rating of the appliance. Do not use damaged extension cords. Examine
extension cord before using and replace if damaged. Do not abuse extension cord and
do not yank on any cord to disconnect. Keep cord away from heat and sharp edges.
3
Page 4

FEATURES AND BENEFITS
1. Tilt-back Head
Makes it easy to attach accessories
and scrape sides of bowl.
2. Top Cover
10. Splashguard with Feed Chute
Prevents spattering when mixing and
adding ingredients.
See diagram on next page.
3. Accessory Power Port
Chef’s whisk, flat mixing paddle, dough
hook and splashguard connect to
this port.
4. 7 Quart Stainless Steel Bowl
with Handles
Handles make the bowl easy to hold,
scrape and remove. Oversized bowl
lets you mix larger quantities.
5. Head-lift Release Lever
Securely locks stand mixer head into
raised tilt-back position.
6. On/Off, Pulse and Speed Control Dial
12 speeds for precision mixing.
7. Chef’s Whisk
Used for incorporating air into
ingredients/mixtures. Most frequently
used for whipping eggs, egg whites or
heavy cream. The chef’s whisk would
be used in recipes for angel food cake,
chiffon cake, meringue or dacquoise,
and for whipping potatoes after they
have been mashed using the flat
mixing paddle.
ASSEMBLY
INSTRUCTIONS
1. Raise Mixer Head – Pull up the head-lift
release lever and raise the stand mixer
head until it locks into place.
2. Attach Accessory –
paddle, chef’s whisk or dough hook
into the accessory power port. Turn
counterclockwise until it locks. Turn
clockwise to remove.
3. Place Bowl on Base –
to secure.
4. Lower Mixer Head –
lever again and fully lower the mixer
head.
5. To Attach Splashguard –
attaching an accessory, raise stand mixer
head and push the splashguard onto the
rim above the accessory power port until
it fully snaps into place.
Place flat mixing
Turn clockwise
Pull up head-lift
Before
8. Flat Mixing Paddle
Used for stirring, mixing, beating
ingredients/mixtures. Most frequently
used for mixing cookies, cakes, batters
(use flat mixing paddle to start the
batter for yeast breads, then switch to
dough hook for a more evenly mixed
dough), and frostings. It is also used
for making piecrusts, biscuits and
shortcakes, dough for pasta,
combining ingredients for meatloaf or
meatballs, and mashing potatoes.
9. Dough Hook
Used for the final mixing and kneading
of yeast doughs for breads, rolls, pizza/
focaccia, and yeast-raised coffee
cakes.
To remove: Raise the stand mixer head
and slide shield off rim.
Note: You do not need to remove
splashguard to change accessories.
4
Page 5

10
2
3
7
4
9
8
1
6
5
OPERATING
INSTRUCTIONS
To Turn Stand Mixer On
1. Turn control dial to desired speed –
1 through 12 (see speed control
section on page 7).
2. Press the On/Off button in the center
of the dial.
To Turn Stand Mixer Off
1. Press the On/Off button – mixing
process stops and unit shuts off.
To Use Pulse Function
The pulse operation allows you to mix in
bursts at high speed.
The pulse button is located in the center
of the dial and runs at Speed 12.
Press the pulse button repeatedly as
needed to combine and mix ingredients.
CLEANING AND
MAINTENANCE
Unplug your Waring Commercial® Stand
Mixer before cleaning.
Power Unit: Wipe with a damp cloth and
dry. Never use abrasives or immerse in
water.
Bowl: Wash by hand and dry thoroughly or
put in dishwasher. Never use a wire brush,
steel wool or bleach.
Tools: Wash all attachments in warm (at
least 120˚ F) water with approved detergent. Rinse in clean water. Allow to air dry
before assembling.
Splashguard with Feed Chute: Top rack
dishwasher-safe; can also wash by hand
and dry thoroughly.
5
Page 6

SUGGESTED SPEED CONTROL GUIDE
PULSE
1
2
3
• High speed bursts for whisking or
blending
• Has the gentle start – use for stirring
and starting all mixing/whipping tasks
• Use to add dry ingredients (flour) to
batters and liquids to dry ingredients
or batters
• Begin creaming fats with sugars
• Rubbing fat into flour for piecrusts,
biscuits, scones
• Begin to whip eggs or cream
• Stirring ingredients to blend without
adding air
• Making crumb toppings
• Stirring
• Adding dry ingredients such as nuts,
chocolate morsels, dried fruits
• Kneading yeast doughs
• Creaming batters without adding air
– such as cheesecake
• Begin mashing potatoes
• Mixing some pastry doughs
• Mixing muffins
• Creaming
• Mixing batters, cookie doughs
• Adding eggs to batter/dough
• Mixing heavy ground meat mixtures
(meatloaf, meatballs, pâté)
• Mixing frostings
• Whipping potatoes
• Whipping cream, cream cheese, or
7
8
9
butter for easy spreading
• Whipping cream
• Whipping potatoes
• Whipping egg whites – add sugar to
whipped egg whites
• Whipping egg whites
• Whipping cream
• Mixing packaged cake mixes
• Mixing batters, cookie doughs
• Creaming to make light and fluffy
4
• Adding eggs to batter/dough
• Mixing frostings
• Creaming to make light and fluffy
• Adding eggs to creamed mixtures
5
• Mixing frostings
• Adding eggs to creamed mixtures
• Mashing potatoes
• Whipping egg whites until frothy
6
• Beat whole egg yolks until ribbons
form
• Whipping cream – using gradual
increase from Speed 1
• Whipping egg whites
10
11
12
6
• Whipping butter to make compound
or whipped butters
• Mixing egg/sugars mixtures until
light and fluffy
• Whipping egg whites
• Whipping frostings until fluffy
• Whipping egg whites – using gradual
increase from Speed 1
• Whipping frostings until fluffy
Page 7

MAXIMUM CAPACITIES
FOR THE
WARING COMMERCIAL®
STAND MIXER
7 Quart Stand Mixer
Yeast dough
(most breads, pizza)
Soft yeast doughs
(brioche)
Cookie dough
Whipping cream
Egg whites
3½ pounds flour –
about 11 cups
3 pounds 4 ounces –
about 10 cups flour
6 pounds
8 cups
16
• Reduce the load by removing some of
the ingredients, and allow the stand
mixer to stand for a few minutes.
• Plug in and reset the speed. If the
stand mixer does not start when you
press the on button, allow the unit to
stand for additional time.
TROUBLESHOOTING
1. Problem: The accessories knock
against the bottom of the bowl or are not
reaching the ingredients at the bottom of
the bowl.
Solution:
following:
• Detach the accessory.
• Hold and loosen the nut as shown.
• For ideal operation, the chef’s whisk
and flat mixing paddle should be
almost touching the bottom of
the bowl.
• Raise the stand mixer head, hold the
accessory in place, and tighten.
2. Problem:
overload protection device and if
overloaded, it will shut down to protect
the motor.
Solution: In the unlikely event that this
happens:
• Turn off and unplug the unit.
Adjust the height by doing the
Your stand mixer has an
7
Page 8

SERVICE
Refer to the list of Authorized Service Centers enclosed with your Waring® Commercial
Blender for the name of the nearest Service Center, or write to:
Waring Factory Service Center
P.O Box 3201
314 Ella T. Grasso Avenue, Torrington, CT 06790
(800) 492-7464
Ship blenders for repair to the above address or to an Authorized Service Center. Do not
ship to a Waring Sales Office.
Note: If your application involves the processing of biologically active material, we
request that any items returned for service be sterilized before being shipped.
Such items must be clearly identified as having been sterilized, both by a tag on
the item itself and by a statement in the accompanying correspondence. Waring
will not accept delivery of any return unless it is so identified.
Replacement parts for your out of warranty repairs are obtainable at the below address.
LIMITED TWO YEAR WARRANTY
Waring warrants every new Waring® Commercial Stand Mixer to be free from defects
in material and workmanship for a period of two years from the date of purchase when
used with foodstuffs, nonabrasive liquids (other than detergents) and nonabrasive
semi-liquids, providing it has not been subject to loads in excess of the indicated rating.
In addition, the motor in this appliance has a full three year warranty.
Under this warranty, Waring will repair or replace any part which, upon our examination,
is defective in materials or workmanship, provided the product is delivered prepaid to the
Waring Service Center at: 314 Ella T. Grasso Ave. Torrington, CT 06790, or any Factory
Approved Service Center.
This warranty does not: a) apply to any product which has become worn, defective,
damaged or broken due to misuse or due to repairs or servicing by other than the
Waring Service Center or a Factory Approved Service Center, or due to abuse, misuse,
overloading or tampering; or b) cover incidental or consequential damages of any kind.
The two year warranty is applicable only to appliances used in the United States or
Canada; this supersedes all other express product warranty or warranty statements. For
Waring products sold outside of the U.S. and Canada, the warranty is the responsibility of
the local importer or distributor. This warranty may vary according to local regulations.
Warning: This warranty is void if appliance is used on Direct Current (D.C.)
WARING COMMERCIAL
314 Ella T. Grasso Ave.
Torrington, CT 06790
©2007 Waring Commercial
Waring® is a registered trademark of Waring
314 Ella T. Grasso Avenue, Torringtton, CT 06790
Printed in China
Any trademarks or service marks of third parties used herein
are the trademarks or service marks of their respective owners.
07WC30073
IB-7777
 Loading...