

Page 1
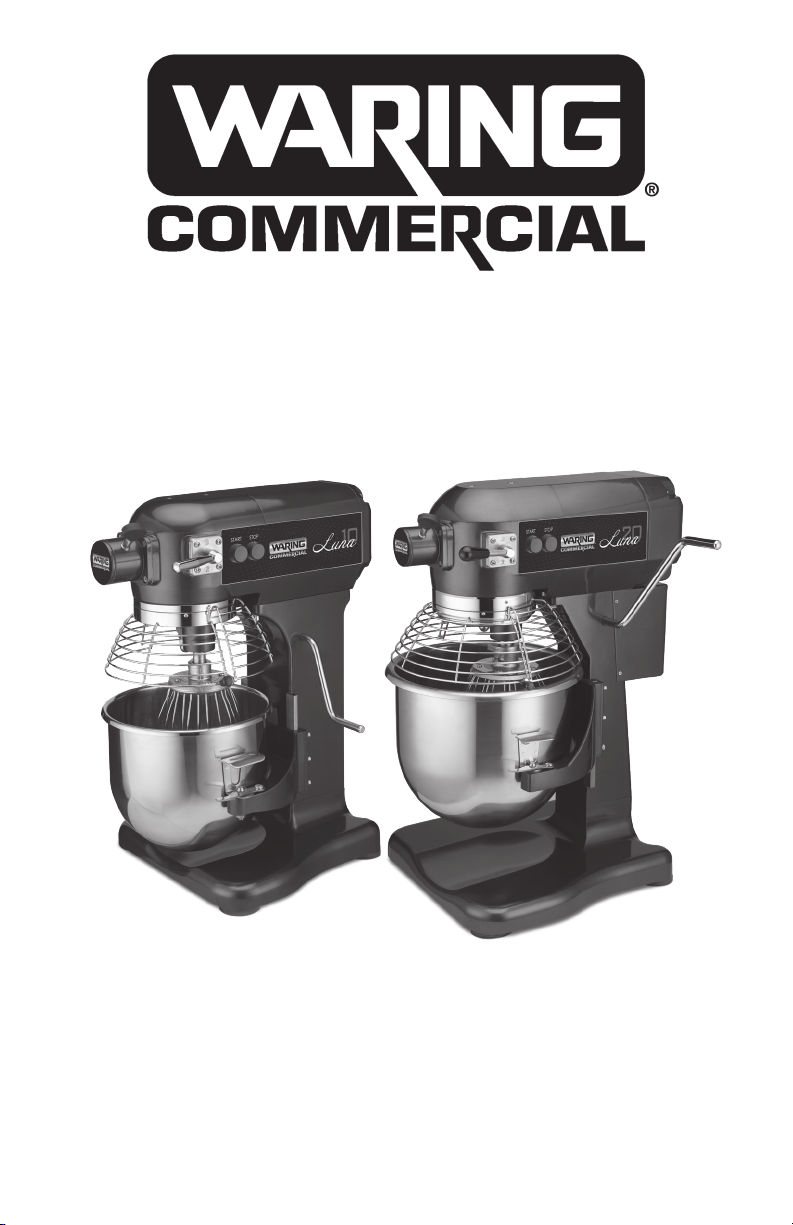
10.0-QUART/20.0-QUART STAND MIXERS
BATIDORAS DE PIE DE 10 L Y 20 L
BATTEUR SUR SOCLE DE 10 L ET 20 L
WSM10L/ WSM20L
For your safety and continued enjoyment of this product,
always read the instruction book carefully before using.
Para su seguridad y para disfrutar plenamente de este producto,
siempre lea cuidadosamente las instrucciones antes de usarlo.
An que cet appareil vous procure en toute sécurité beaucoup
de satisfaction, lire attentivement le mode d’emploi avant de l’utiliser.
Page 2

IMPORTANT SAFEGUARDS
When using an electrical appliance, especially when children are
present, basic safety precautions should always be taken to reduce
the risk of re, electric shock and/or injury, including the following:
1. READ ALL INSTRUCTIONS.
2. Switch off and unplug before tting or removing tools and/or
attachments, after use and before cleaning.
3. Close supervision is necessary when any appliance is used by
or near children or individuals with certain disabilities. Waring
does not recommend the use of this appliance by children.
4. Avoid contact with moving parts and tted attachments. Keep
hands, hair, clothing, as well as spatulas and other utensils away
from beaters during operation to reduce the risk of injury to
persons and/or damage to the mixer.
5. The use of attachments not recommended or sold by Waring
may cause re, electric shock or injury.
6. Do not use more than one attachment at a time.
7. Do not exceed the maximum capacities listed in this use and
care instruction book.
8. Do not use the stand mixer if it is damaged or if the cord is
damaged. Have the stand mixer checked and serviced before
resuming use.
9. When using an attachment, make sure that you have read the
safety instructions that come with the particular attachment.
10. Do not use outdoors.
11. Keep stainless steel bowl away from heat sources, such as
stovetops, ovens or microwaves.
12. To protect against the risk of electric shock, do not put the
power unit in water or other liquids.
13. Remove all attachments and accessories from stand mixer
before washing.
14. Do not let cord hang over edge of table or counter.
15. Do not put hands into the bowl during operation.
16. The mixer should be mounted on a stable and clean surface.
Keep it away from overheated or very wet places, and away
from equipment that has strong electromagnetism or can
produce a strong electromagnetic eld.
2
Page 3

17. Keep machine clean.
18. Disconnect power supply before performing maintenance.
SAVE THESE INSTRUCTIONS
FOR COMMERCIAL USE ONLY
CONTENTS
Important Safeguards ........................................................................2
Grounding Instructions ...................................................................4–5
Extension Cords ................................................................................. 5
Parts & Accessories ..........................................................................6
Installation ..........................................................................................7
Operating Instructions ........................................................................8
Attaching Bowl to Mixer .....................................................................9
Mixing Ingredients ............................................................................ 10
Setting and Changing Speed ........................................................... 11
Cleaning Instructions ...................................................................12–13
Recommended Maintenance ........................................................... 14
Mixer Capacity Chart ................................................................. 14–15
Warranty ........................................................................................... 16
Troubleshooting ...........................................................................17–18
3
Page 4
NOTE: The maximum rating is based on the attachment that draws
the greatest power. Other recommended attachments may draw
signicantly less power.
WARNING: RISK OF FIRE OR ELECTRIC SHOCK
The lightning ash with an arrowhead symbol within an
equilateral triangle is intended to alert the user to the
presence of uninsulated, dangerous voltage within the
product’s enclosure that may be of sufcient magnitude to
constitute a risk of re or electric shock to persons.
The exclamation point within an equilateral triangle is
intended to alert the user to the presence of important
operating and maintenance (servicing) instructions in the
literature accompanying the appliance.
WARNING
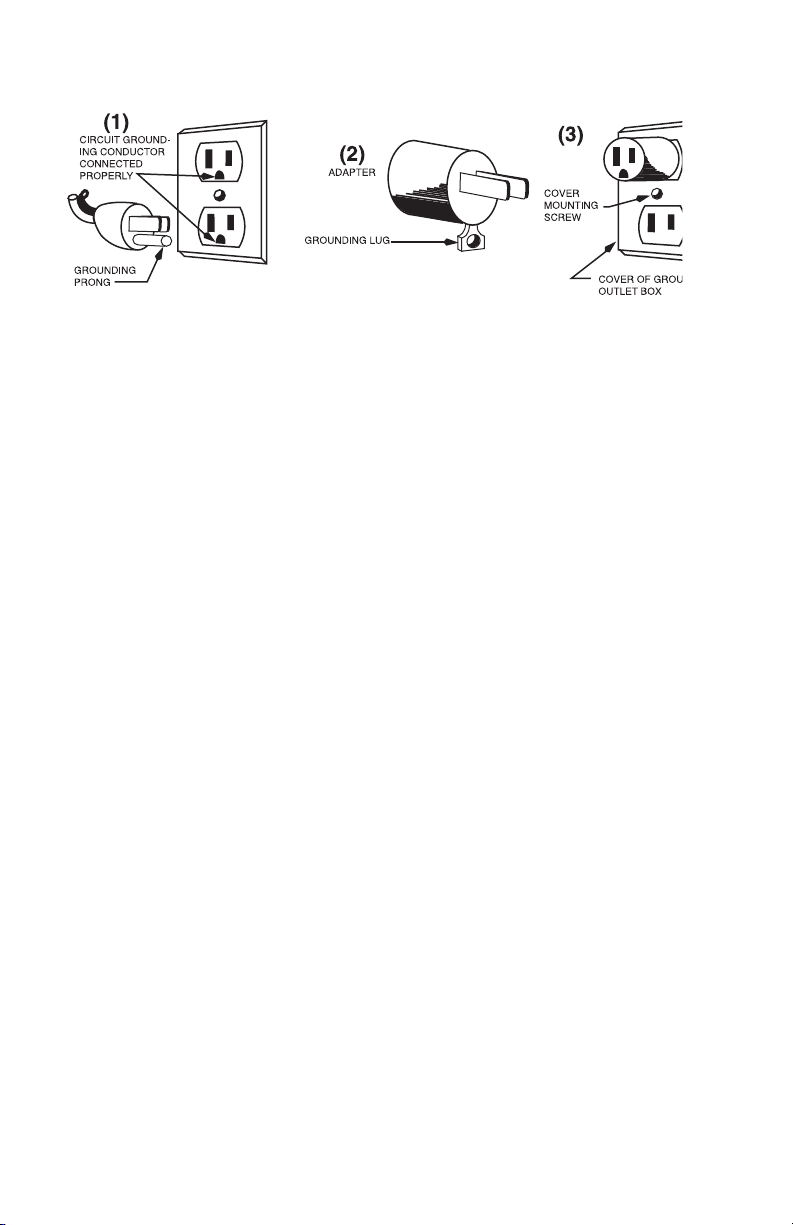
GROUNDING INSTRUCTIONS
This appliance must be grounded while in use to protect the
operator from electric shock. The appliance is equipped with a
3-conductor cord and a 3-prong, grounding-type plug to t the
proper grounding-type receptacle. The appliance has a plug that
looks like the plug in drawing (1). An adapter, as in drawing (2), should
be used for connecting the appliance plug to two-prong receptacles.
The grounding lug, which extends from the adapter, must be
connected to a permanent ground, such as a properly grounded
outlet box as shown in drawing (3), using a metal screw. If the unit
needs to be hardwired, have a licensed electrician connect the unit
to a power supply.
4
Page 5
GROUNDING METHOD
SPECIAL CORD SET INSTRUCTIONS
A short power-supply cord is provided to reduce the risks resulting
from becoming entangled in or tripping over a longer cord.
Longer extension cords are available and may be used if care is
exercised in their use.
If a long extension cord is used, the marked electrical rating of the
extension cord must be at least as great as the electrical rating of the
appliance, and the longer cord should be arranged so that it will not
drape over the countertop or tabletop where it can be pulled on by
children or tripped over.
EXTENSION CORDS
Use only 3-wire extension cords that have 3-prong, grounding-type
plugs and 3-pole cord connectors that accept the plug from the
appliance. Use only extension cords that are intended for indoor
use. Use only extension cords having an electrical rating not less
than the rating of the appliance. Do not use damaged extension
cords. Examine extension cord before using and replace if damaged.
Do not abuse extension cord and do not yank on any cord to
disconnect. Keep cord away from heat and sharp edges.
5
Page 6
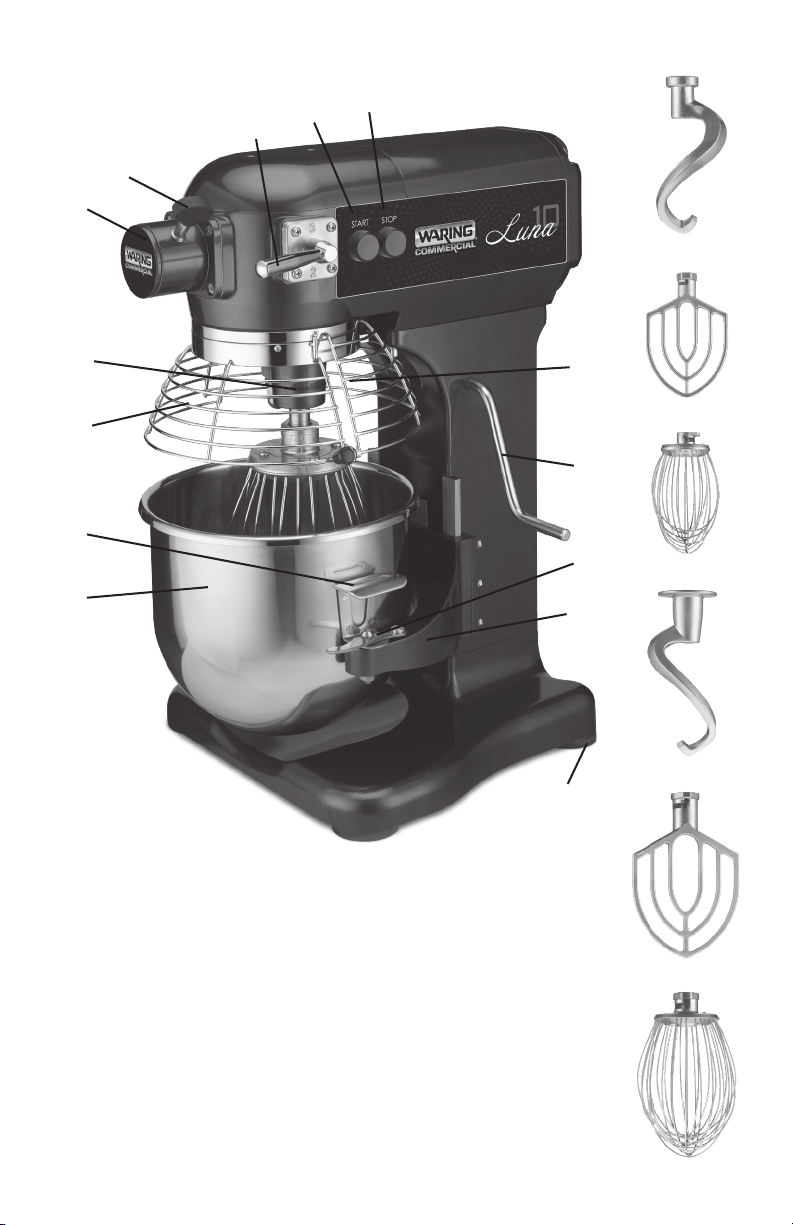
PARTS & ACCESSORIES
2
10
4
3
1
WSM10LDH
WSM10LMP
7
11
8
12
1. START Button
2. STOP Button
9. Bowl Clamp
10. Speed Control
13
14
6
WSM10LW
5
9
WSM20LDH
WSM20LMP
3. Attachment Hub
4. Attachment Hub
Screws
5. Bowl-Lift Lever
6. Bowl Guard Handle
7. Planetary Shaft
8. Bowl Handle
11. Bowl Guard
12. Bowl
13. Rubber Feet
14. Bowl Cradle
15. Power Cord
(NOT SHOWN)
6
WSM20LW
Page 7

INSTALLATION
UNPACKING
Unpack the mixer immediately after receipt. If the machine is found to
be damaged, save the packaging material and immediately contact
your source of the equipment.
WARNING
TO AVOID SERIOUS PERSONAL INJURY:
• ALWAYS install equipment in work area with adequate light
and space.
• ONLY operate mixer on a solid, LEVEL, nonskid surface that
is nonammable.
• NEVER bypass, alter, or modify this equipment in any way from
its original condition. Doing so can create hazards and will void
the warranty.
• NEVER operate mixer without all warnings attached.
• DO NOT attempt to lift mixer alone.
INSTALLATION
1. Read this manual thoroughly before installation and operation.
DO NOT proceed with installation and operation if you have
questions or do not understand everything in this manual.
Contact your local representative rst.
2. Remove the corrugated box from the skid by removing the
bands on the box. NOTE: The WSM10L and WSM20L are
shipped in a wooden crate; only the bolts at the bottom of the
crate on all four sides need to be removed.
3. Carefully unbolt the mixer from the skid using an 11/16"
or 3/4" wrench.
4. Select a location for the mixer, keeping these points in mind:
• Floor or counter must be level.
• Easy access for maintenance and service.
• Clearance for operating controls, installing and removing
agitators, bowl or attachments.
• Sufcient space for adding ingredients during mixing
periods.
• Make sure rear ventilation outlet of mixer is not blocked.
7
Page 8

5. Use at least two other people to tilt the unit and install
rubber feet.
6. Inspect mixer to make sure all parts have been provided
(i.e., bowl, paddle, whisk, and dough hook).
7. Read the electrical information found on the data plate located
at the rear of the machine. The incoming power must match the
rating on the data plate.
WARNING
OPERATING INSTRUCTIONS
TO AVOID SERIOUS PERSONAL INJURY:
• Before use clean the mixer. Refer to Cleaning Instructions section
of this manual.
• NOTE: It is normal for the factory to apply a generous amount of
grease in and on the machine. Excess grease (brown in color)
will be on all metal surfaces (e.g., top portion of bowl guard,
speed control, bowl clamps, bowl-lift lever, and attachment hub
thumbscrew). Excess high-pressured grease (brownish-black) can
also be found on the planetary shaft, and some drippings can be
found in the bowl.
• DO NOT operate mixer before reading the instruction manual rst.
• ALWAYS disconnect or unplug electric power before cleaning,
servicing, or adjusting parts or attachments.
• ALWAYS keep hands, hair and clothing away from moving parts.
• Turn off mixer before changing speeds.
• Follow the Capacity Chart for mixing dough. Refer to Capacity
Chart section.
• Use only rst (1) speed for mixing dough. 2nd speed must never
be used on 50% AR or lower.
• If the unit shuts off during mixing (overload protection trips),
reduce the batch size.
8
Page 9
ABOUT THE REMOVABLE BOWL GUARD
(Models WSM10L and WSM20L)
The interlocking bowl guard is easy to remove and reattach for easy
cleaning in a sink or dishwasher.
NOTE: When bowl guard is open or not properly installed, mixer will
not operate.
NOTE: Rotate bowl guard clockwise (open) and counterclockwise
(closed) to attach agitators to mixer.
Opening/Rotating Bowl Guard:
Rotating bowl guard clockwise (open) and counterclockwise (closed),
allows the operator to easily add ingredients to, and to properly
remove the agitator and bowl from mixer.
Removing and Attaching the Bowl Guard:
NOTE: Before removing or attaching the bowl
guard, make sure the bowl is in the down/
lowered position and the agitator tool is off
the shaft.
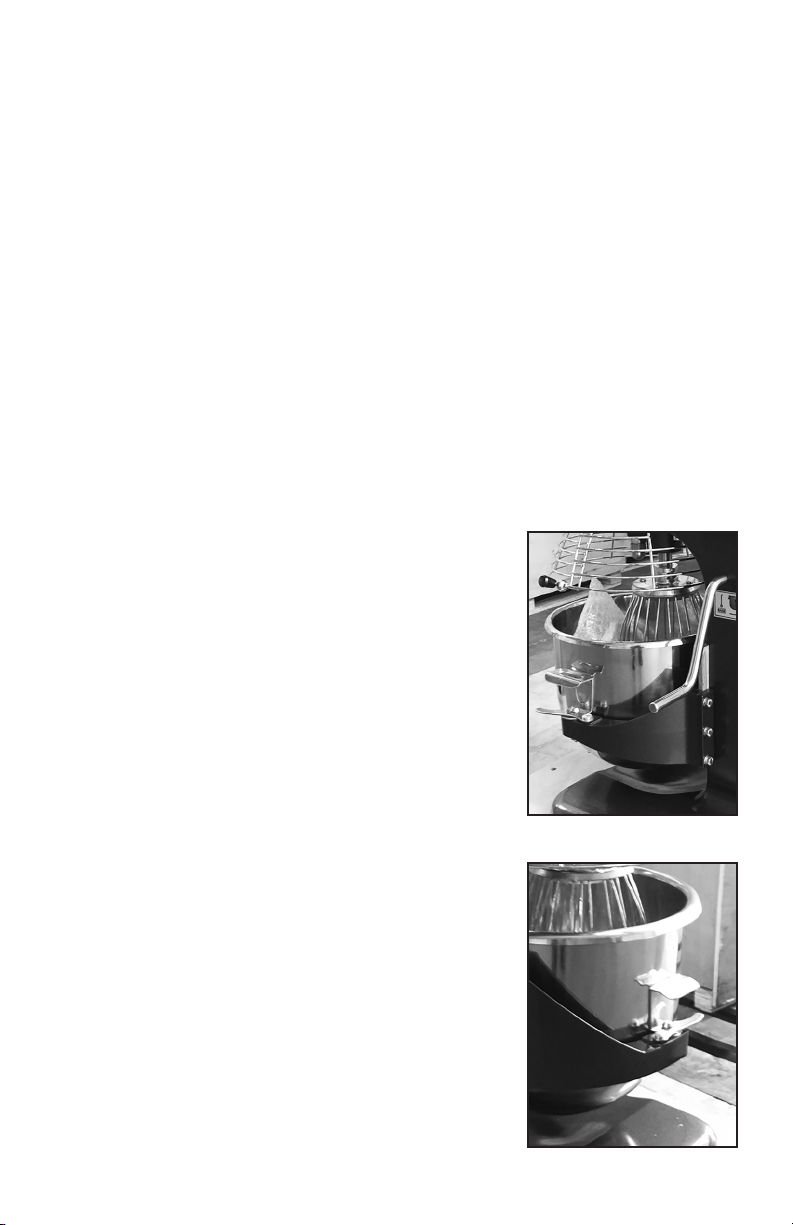
ATTACHING BOWL TO MIXER
1. Lower cradle by pulling lift lever forward
and down to its resting position.
2. Lift bowl by bowl handles and:
a) Slowly position locking pin (located
on the rear of bowl) into the hole in
middle rear of cradle (Fig. 1).
b) Lower bowl onto pins located on
either side of bowl cradle.
3. Once bowl is positioned on cradle,
secure bowl by pulling each bowl
clamp forward until bowl is locked
tight (Fig. 2).
9
FIG. 1
FIG. 2
Page 10
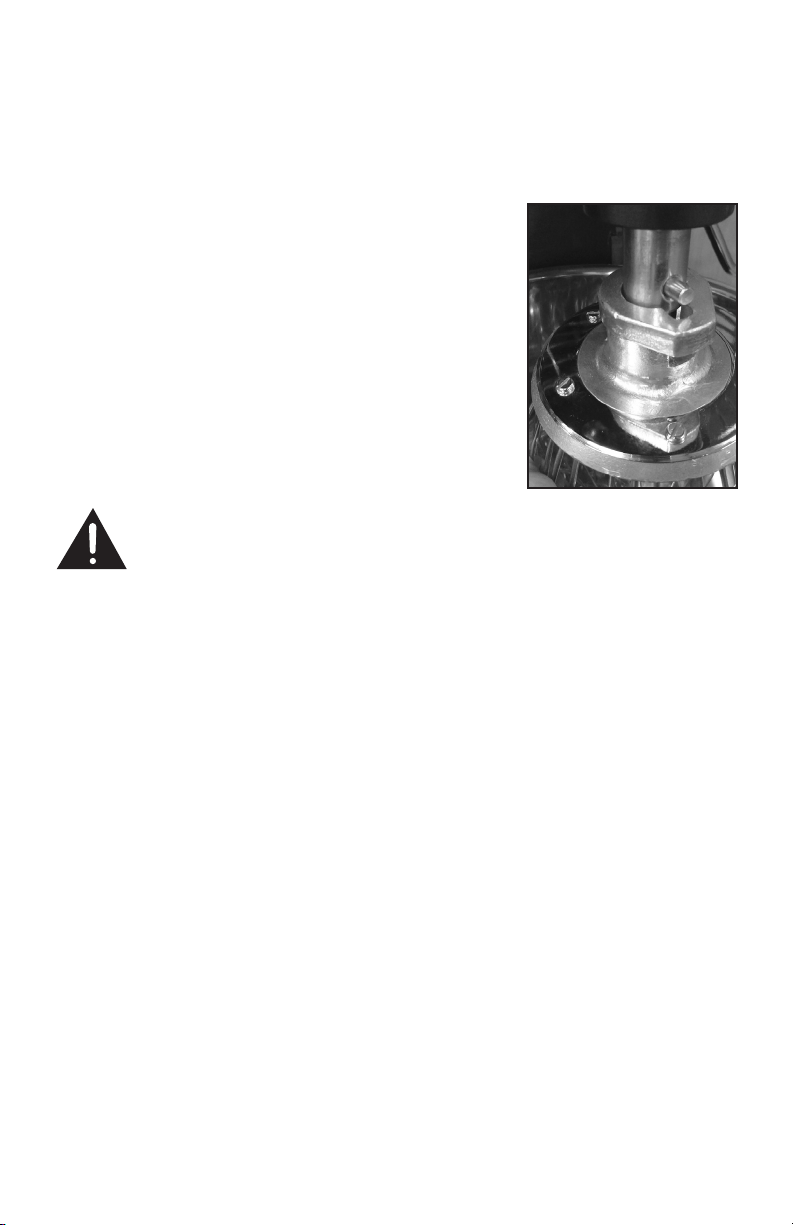
ATTACH AGITATOR TO MIXER
(i.e., Beater, Mixing Paddle, Dough Hook, Whisk)
Install bowl BEFORE attaching agitator.
NOTE: It is easier to install the agitator before adding the ingredients
into the bowl.
1. Rotate bowl guard to the left, so it
rests in the open position.
Using excessive force to open and close
bowl guard can damage the spring lock
and bowl guard microswitch, and
WILL VOID the warranty.
2. Slide the agitator slowly upward onto
the planetary shaft, tting the shaft pin
through the slot in the agitator (Fig 3).
3. Rotate agitator clockwise to secure
it onto the planetary shaft.
CAUTION
FIG. 3
MIXING INGREDIENTS
Overloading or not following the capacity chart will damage the mixer
and void the warranty. Refer to Capacity Chart section.
Before starting the mixer: Always change to the desired speed
BEFORE starting the mixer. Failure to do so can damage the gears or
other parts and WILL VOID the warranty.
Agitators must always rotate in a counterclockwise direction around
the bowl. If the agitator moves clockwise, contact a licensed
electrician immediately to remedy incorrect wiring.
IMPORTANT: It is recommend to always start with Speed 1
when starting the mixer. Failure to do so can damage the gears
or other parts.
1. Add the appropriate mixing ingredients to the bowl.
2. Rotate bowl-lift lever up, until the bowl locks into position.
3. Rotate bowl guard to the right, until it locks into the closed
position. You will hear it click into place.
NOTE: Mixer will not start if bowl guard is open or bowl is in the
lowered position.
10
Page 11

CAUTION
SETTING AND CHANGING SPEED
Three xed speeds are available for use: rst (1), second (2)
and third (3).
IMPORTANT: When mixing product, it is recommended to follow the
Capacity Chart on page 15.
Select the appropriate speed setting by lifting or lowering the speed
control lever.
IMPORTANT: When mixing product, always follow the
recommended agitator and speed setting according to the
Capacity Chart. Refer to Capacity Chart section.
Press the green START button to begin mixing.
CAUTION
Always STOP mixer BEFORE changing speeds. Failure to do so
can damage the gears or other parts and WILL VOID the warranty!
To change the speed while mixing:
a. Press the red STOP button, then wait for the agitator
to come to a complete stop.
b. Change the speed by raising or lowering the speed
control lever.
c. Press the green START button to restart the mixer.
NOTE: Mixer is equipped with motor overload protection. If mixer
shuts off during operation: Press the STOP button, unplug unit from
wall, wait two minutes and plug unit back into the wall. Press the
overload reset button located on the back of mixer.
NOTE: Reduce batch size by 10% if using chilled our, water below
70˚F, ice, or high-gluten our.
When the ingredients have been thoroughly mixed, press the red
STOP button to stop the mixer.
Lower bowl by pulling bowl-lift lever forward and down to its
resting position.
Rotate bowl guard to the left, so it is in the open position.
11
Page 12

Remove the agitator from the planetary shaft by lifting it upward,
then rotating it counterclockwise until it is unlocked. Lower the
agitator and remove from the planetary shaft.
Push each bowl clamp backward to unlock the bowl from the
bowl cradle.
Lift up slightly on bowl, so it clears pins on the bowl cradle.
CAUTION
Most batches are heavy. Always use two people to remove and
transport the loaded bowl after mixing is complete.
CLEANING INSTRUCTIONS
• Dilute detergent per supplier’s instructions.
• DO NOT hose down or pressure-wash mixer.
• NEVER use a scrubber pad, steel wool, or abrasive material to
clean mixer.
• NEVER use bleach (sodium hypochlorite) or bleach-based cleaner.
• ALWAYS remove the agitator after each batch, as the agitator can
become stuck on the shaft and will be difcult to remove.
12
Page 13
CAUTION
The entire mixer, including removable parts, must be
thoroughly cleaned and sanitized using the procedures
identified by your local health department and the
ServSafe Essentials, published by the National
Restaurant Association Educational Foundation
(NRAEF). Visit www.servsafe.com for more details.
ALWAYS DISCONNECT OR UNPLUG ELECTRICAL
POWER FROM THE MIXER BEFORE CLEANING.
CLEANING INSTRUCTIONS
PART REQUIRED ACTION FREQUENCY
Agitators Hand-wash using mild soap and water; rinse, dry
Removable Bowl
Guard
Bowl Using a sponge or cloth, mild soap and water, apply
Rear Splash Guard Hand-wash using mild soap and water; rinse, dry
Bowl Cradle Hand-wash using mild soap and water; rinse, dry
Planetary Shaft Wipe with clean damp cloth; dry and sanitize.
Exterior Hand-wash using mild soap and water; rinse, dry,
and sanitize.
Hand-wash using mild soap and water; rinse, dry
and sanitize or place in dishwasher.
pressure to make sure the bowl is clean; rinse,
dry, and sanitize. The bowl can also be placed in a
dishwasher.
and sanitize.
and sanitize.
Apply a light quantity of Waring oil (mineral oil)
to the planetary shaft after cleaning.
and sanitize. DO NOT use a water hose.
Clean after each use.
Clean after each use.
Clean after each use.
Clean after each use.
Daily
Clean after each use.
Daily
13
Page 14

IMPORTANT POINTS
Waring mixer will provide years of uninterrupted service if you
do the following:
RECOMMENDED MAINTENANCE
PART REQUIRED ACTION FREQUENCY
Bowl Slide Apply Waring oil (mineral oil) on bowl
slide. Raise and lower bowl to distribute
the oil onto the rods.
If bowl becomes difficult to
raise or lower.
NOTE: Any other servicing should be performed by an authorized
service representative.
MIXER CAPACITY CHART
The following maximum capacities are intended as a guideline only.
Varying factors, such as the type of our used, temperature of water
used and other conditions may require the batch to be reduced.
When mixing dough (pizza, bread or bagels) check your
“AR”– absorption ratio – water weight divided by our weight.
Below capacities based on 12% our moisture at 70˚F water
temperature.
If high-gluten our is used, reduce dough batch size by 10%.
2nd speed should never be used on mixtures with less than 50% AR.
Do not use attachments on hub while mixing.
When calculating the correct size mixer for your application, some
helpful weights and measures to follow: 8.3 lb. = 1 gallon water
& 2.0 lb. = 1 quart.
14
Page 15

CAPACITY CHART & SUGGESTED SPEED CONTROL
PRODUCT DESCRIPTION ATTACHMENT AGITATOR SPEED 10-QUART 20-QUART
Final bread and roll
dough weight
Final pizza
dough weight
Pie crust Flat beater 1 9 lb. 20 lb.
Mashed potatoes* Flat beater 1 10 lb. 17 lb.
Cake batter Flat beater 1 8 lb. 20 lb.
Waffle or
hotcake batter
Dough hook
Dough hook
Flat beater 1 8 lb. 20 lb.
1st Speed
only
1st Speed
only
10 lb. 25 lb.
9 lb. 25 lb.
Pound cake batter Flat beater All speeds 8 lb. 20 lb.
Egg whites Wire whisk 3 2 doz. 3 doz.
Meringue Wire whisk All speeds 2 doz. 3 doz.
Whipped cream Wire whisk 2
* With butter and cream
3 qt.
15
6 qt.
Page 16

NOTE: The mixer capacity depends on the moisture content of the dough.
When mixing doughs (pizza, bread, or bagel) check your AR%(% Absorption
Ratio) = Water weight divided by our weight.
The capacities listed on page 15 are based on our at room temperature
and 70°F water temperature. (1 gallon of water weighs 8.33 lb.)
LIMITED ONE YEAR WARRANTY
(U.S. & Canada Only)
Waring warrants every new Waring® Commercial Stand Mixer to
be free from defects in materials and workmanship for a period
of one year from the date of purchase when used with foodstuffs,
nonabrasive liquids (other than detergents) and nonabrasive semiliquids, providing it has not been subject to loads in excess of the
indicated rating. Under this warranty, Waring will repair or replace
any part which, upon our examination, is defective in materials
or workmanship, provided the product is delivered prepaid to the
Waring Service Center at 314 Ella T. Grasso Ave., Torrington, CT
06790, or any Factory Approved Service Center. This warranty
does not: a) apply to any product that has become worn, defective,
damaged or broken due to use or due to repairs or servicing by
other than the Waring Service Center or a Factory Approved Service
Center, or due to abuse, misuse, overloading or tampering; or b)
cover incidental or consequential damages of any kind.
Warning: This warranty is void if appliance is used on
Direct Current (DC).
WARING COMMERCIAL
314 Ella T. Grasso Ave.
Torrington, CT 06790
16
Page 17

TROUBLESHOOTING
PROBLEM POSSIBLE CAUSES ACTION REQUIRED
Mixer will not
operate
Mixer stops
during mixing
cycle
Mixer is noisy Mixer is not installed on
Safety guard
seized (will
not move
freely)
Agitators
won’t go onto
the planetary
shaft easily
Bowl lift
sticking or not
operational
One or more
gears not
working
Mixer will not
mix medium
or heavy loads
Bowl guard not in closed position. Rotate guard to the right until fully
Bowl not raised. Raise bowl to highest position.
Power not connected properly. Check all power connections. Plug into
Building circuit breaker is off. Check breaker box.
Internal overload tripped. Press STOP button, then press reset button
Gear not engaged. Switch gear fully into position. (Mixer will
Internal overload tripped. Press STOP button, then press reset button
level surface.
Bowl not seated correctly or
clamps not in place.
Agitator not fitted properly. Remove and attach agitator into position
Overloading bowl. Reduce batch size.
Lack of lubrication and/or
cleaning of the planetary shaft.
Lack of lubrication on bowl slides. Lubricate bowl slides with mineral oil or
Damaged or broken gear. Technician to replace gear.
Incorrect or low voltage. Contact electrician.
closed.
a live socket. (Do not use extension cord!)
Test socket with another item.
located on the back of mixer. Wait two
minutes. Then press START to restart mixer.
(If overload continues to trip, reduce batch
size and/or adjust recipe!)
not operate if the speed control lever is
positioned in between speeds.)
located on the back of the mixer. Wait two
minutes. Then press START to restart the
mixer. (If overload continues to trip, reduce
batch size and/or adjust recipe!)
Adjust surface or relocate mixer.
Make sure rubber feet are installed.
Make sure bowl is seated into bowl
cradle correctly, and bowl clamps are
locked into place.
properly.
Refer to Capacity Chart section.
Clean & lubricate slide sheath.
Wipe planetary shaft with a clean, damp
cloth and lubricate the shaft with mineral
oil or food-quality grease.
food-quality grease. If still sticking,
technician must clean bowl-lift mechanism
Always stop mixer before shifting gears!
17
Page 18

Residue
leaking from
hub
Agitators
touching
bottom or
sides of bowl
Broken whip
wires
Broken flat
beater
Broken dough
hook
Discoloration
of mixed
product
Contaminated hub due to buildup
of meat and/or vegetable juices
(especially tomatoes).
Defective or dented bowl. Remove dents or replace bowl.
Defective agitator. Replace agitator.
Batch size too large for mixer.
Adjust recipe.
Hand utensil dropped into bowl
while mixing.
Ingredients too cold or too large
(e.g., frozen butter, cream cheese
cut in chunks).
Batch size too large for mixer. Reduce batch size. Refer to Capacity Chart
Ingredients too cold or too large. Wait for ingredients to reach room
Bowl has not been thoroughly
cleaned.
Technician to remove hub and clean interior.
To avoid problem, wipe hub and dry after
each use. *Note: Acid from tomato juices will
corrode/contaminate interior parts!
Reduce batch size.
Refer to Capacity Chart section. Mixture too
firm, speed too high. Reduce speed.
Stop mixer.
Wait for ingredients to reach room
temperature before mixing.
Reduce chunk size.
section. Adjust recipe.
temperature before mixing. Reduce
chunk size.
Clean bowl again.
Refer to Cleaning Instructions section.
18
Page 19

MEDIDAS DE SEGURIDAD
IMPORTANTES
Al usar aparatos eléctricos, especialmente en presencia de niños,
siempre debe tomar precauciones básicas de seguridad para reducir
el riesgo de incendio, descarga eléctrica o heridas, entre ellas
las siguientes:
1. LEA TODAS LAS INSTRUCCIONES.
2. Apague y desenchufe el aparato antes de instalar/retirar
accesorios o aditamentos, después del uso y antes de l
a limpieza.
3. Supervise el uso de este aparato cuidadosamente cuando
sea usado por o cerca de niños o personas con ciertas
discapacidades. Waring no recomienda que los niños usen
este aparato.
4. Evite el contacto con las piezas móviles y los accesorios/
aditamentos. Para evitar el riesgo de heridas o daños al
aparato, mantenga los dedos, cabello, ropa, espátulas y otros
utensilios lejos de los batidores durante el funcionamiento.
5. El uso de accesorios/aditamentos no recomendados o
provistos por Waring presenta un riesgo de incendio, descarga
eléctrica o heridas.
6. No use más de un accesorio/aditamento a la vez.
7. No exceda las capacidades máximas indicadas en este manual
de instrucciones.
8. No utilice el aparato si el cable está dañado; hágalo chequear
y reparar antes de volver a usarlo.
9. Lea todas las instrucciones de seguridad de cada accesorio/
aditamento antes de usarlo.
10. No lo utilice en exteriores.
11. Mantenga el bol de acero inoxidable alejado de las
fuentes de calor tales como las estufas, los hornos o los
hornos de microondas.
12. Para reducir el riesgo de descarga eléctrica, no coloque la
base del aparato en agua ni en ningún otro líquido.
13. Quite todos los accesorios/aditamentos del aparato antes
de limpiarlo.
19
Page 20

14. No permita que el cable cuelgue del borde de la mesa o de
la encimera.
15. No introduzca las manos en el bol durante el funcionamiento.
16. Coloque el aparato sobre una superficie estable y limpia.
Manténgalo alejado de áreas sobrecalentadas o muy húmedas,
y de equipos que sean altamente electromagnéticos o que
puedan producir un fuerte campo electromagnético.
17. Mantenga el aparato limpio.
18. Desenchufe el aparato antes de realizar cualquier trabajo
de mantenimiento.
GUARDE ESTAS INSTRUCCIONES
PARA USO COMERCIAL
SOLAMENTE
ÍNDICE
Medidas de seguridad importantes .................................................19
Instrucciones de puesta a tierra ....................................................... 21
Uso de extensiones .......................................................................... 22
Piezas y accesorios ..........................................................................23
Instalación ........................................................................................24
Instrucciones de operación .............................................................. 25
Instalación del bol ............................................................................26
Mezcla ..............................................................................................27
Fijación/Cambio de la velocidad ......................................................28
Instrucciones de limpieza ................................................................ 29
Mantenimiento recomendado ......................................................... 31
Tabla de capacidades ...................................................................... 31
Garantía ............................................................................................ 33
Resolución de problemas ................................................................34
20
Page 21

NOTA: la potencia nominal máxima está basada en el accesorio/
aditamento que consume más electricidad. Otros accesorios/
aditamentos pueden utilizar menos electricidad.
ADVERTENCIA: RIESGO DE INCENDIO O
DESCARGA ELÉCTRICA
El símbolo de relámpago con punta de flecha dentro de un
triángulo equilátero tiene como fin alertar al usuario de la
presencia de voltajes peligrosos no aislados en el interior
del aparato, los cuales pueden ser de suficiente magnitud
para constituir un riesgo de incendio o descarga eléctrica.
El signo de exclamación dentro de un triángulo equilátero
tiene como fin alertar al usuario de la presencia de
instrucciones importantes de operación y mantenimiento
(servicio) en la documentación que acompaña al equipo.
ADVERTENCIA
INSTRUCCIONES DE PUESTA A TIERRA
Para su protección, este aparato debe estar puesto a tierra. Este
aparato está equipado con un cable/enchufe con puesta a tierra,
el cual debe ser conectado a una toma de corriente debidamente
puesta a tierra (1). Si una toma de corriente puesta a tierra no está
disponible, se podrá usar un adaptador para conectar el aparato a
una toma de corriente polarizada (2). El adaptador debe ser puesto
a tierra mediante un tornillo de metal que conecte la lengüeta del
mismo a la caja eléctrica (3). Si la unidad se va a conectar a un
circuito eléctrico, pida a un electricista cualificado que realice
la conexión.
21
Page 22

MÉTODO DE PUESTA A TIERRA
USO DE EXTENSIONS
El cable provisto con este aparato es corto, para reducir el riesgo
de que alguien se enganche o tropiece con un cable más largo.
Se podrá usar una extensión eléctrica, pero con cuidado.
La clasificación nominal de la extensión debe ser por lo menos
igual a la del aparato. El cable más largo o la extensión deben ser
acomodados de tal manera que no cuelguen de la encimera/mesa,
donde pueden ser jalados por niños o causar tropiezos.
TIPO DE EXTENSIONES
Use solamente extensiones/cables alargadores con puesta a tierra.
Utilice solamente extensiones para uso en interiores La clasificación
nominal de la extensión debe ser por lo menos igual a la del aparato.
No utilice extensiones dañadas. Examine la extensión antes de usarla
y reemplácela si está dañada. No jale el cable para desconectar la
extensión; agárrela por el enchufe. Mantenga el cable alejado de las
fuentes de calor y de los objetos cortantes.
22
Page 23

PIEZAS Y ACCESORIOS
1
10
4
3
WSM10LDH
2
WSM10LMP
7
11
8
12
1. Botón START
2. Botón STOP
3. Puerto de conexión de los aditamentos
4. Tornillo de sujeción de los aditamentos
5. Palanca elevadora del bol
6. Asa de la tapa antisalpicaduras
7. Eje planetario
8. Asas del bol
9. Abrazadera del bol
10. Control de velocidad
11. Tapa antisalpicaduras
12. Bol
13. Pies de goma
14. Soporte del bol
15. Cable
(NO ILUSTRADO)
23
13
14
6
WSM10LW
5
9
WSM20LDH
WSM20LMP
WSM20LW
Page 24

INSTALACIÓN
DESEMBALAJE
Desembale la unidad inmediatamente después de recibirla.
Si está dañada, guarde el material de embalaje y comuníquese con
el proveedor.
ADVERTENCIA
PARA EVITAR EL RIESGO DE LESIONES GRAVES:
• SIEMPRE instale la unidad en un área de trabajo con luz y espacio
adecuado.
• SOLAMENTE opere la unidad en una superficie sólida, nivelada
y antideslizante que no sea inflamable.
• NUNCA altere ni modifique esta unidad de ninguna manera; esto
puede originar riesgos y cancelará la garantía.
• NUNCA use la unidad a menos que las etiquetas de advertencia
estén pegadas al mismo.
• NO intente levantar la unidad solo.
INSTALACIÓN
1. Lea atentamente este manual antes de la instalación y el
uso. NO lo instale ni lo utilice si tiene alguna pregunta o si no
entiende todas las instrucciones en este manual. Póngase en
contacto con su representante local.
2. Retire del palé la caja de cartón que contiene la unidad,
quitando las bandas de fijación. NOTA: los modelos WSM10L y
WSM20L se envían en una caja de madera. Para quitar la caja
del palé, se deben quitar los pernos ubicados en los cuatros
lados de la parte inferior de la caja.
3. Desenrosque cuidadosamente la caja del palé con una llave
de 11/16 in. o 3/4 in.
4. Elija una ubicación, teniendo en cuenta los siguientes puntos:
• El piso o la superficie de trabajo deben ser planos.
• El lugar debe ser de fácil acceso para el mantenimiento
y la reparación.
• Debe haber suficiente espacio alrededor de la unidad para
activar los controles e instalar o quitar los agitadores, el bol o
los accesorios/aditamentos.
• Debe haber suficiente espacio alrededor de la unidad para
añadir ingredientes durante la mezcla.
24
Page 25

• Debe haber suficiente espacio detrás de la unidad para no
bloquear la salida de ventilación trasera.
5. Pida ayuda a por lo menos otras dos personas para inclinar la
unidad e instalar los pies de goma.
6. Inspeccione el aparato para asegurarse de que incluye todas
las piezas (bol, batidor plano, batidor de alambre y gancho
amasador).
7. Lea la información eléctrica en la placa de especificaciones
técnicas que se encuentra en la parte posterior de la unidad.
La fuente de alimentación debe corresponder a la indicada
en la placa de especificaciones técnicas.
ADVERTENCIA
INSTRUCCIONES DE OPERACIÓN
PARA EVITAR EL RIESGO DE LESIONES GRAVES:
• Limpie la unidad antes del primer uso (véase la sección
“instrucciones de limpieza”).
• NOTA: durante el proceso de fabricación se aplica una cantidad
generosa de grasa en el aparato. Es normal encontrar grasa
(marrón) en todas las superficies metálicas de la unidad (p. ej.,
en la parte superior de la tapa antisalpicaduras, en el control de
velocidad, en las abrazaderas del bol, en la palanca elevadora
del bol y en el tornillo del puerto para aditamentos). También es
normal encontrar grasa de alta presión (marrón-negra) en el eje
planetario, y se pueden encontrar algunas gotas en el bol.
• NO opere la unidad antes de haber leído todas las instrucciones.
• SIEMPRE desenchufe la unidad antes de limpiar, mantener,
reparar o ajustar partes o accesorios/aditamentos.
• SIEMPRE mantenga las manos, el cabello y la ropa alejados
de las partes móviles.
• SIEMPRE apague la unidad antes de cambiar la velocidad.
• Respeta las capacidades máximas recomendadas (véase la
sección “Tabla de capacidades”).
• Amase solamente a baja velocidad (velocidad 1). Nunca utilice la
velocidad media (velocidad 2) para amasar masa con un contenido
de humedad del 50 % o menos.
• Si la unidad se detiene durante la mezcla (debido a la protección
contra el sobrecalentamiento), reduzca la carga.
25
Page 26

TAPA ANTISALPICADURAS REMOVIBLE
(modelos WSM10L y WSM20L)
La tapa antisalpicaduras es fácil de instalar y quitar, y puede lavarse
a mano o en el lavavajillas.
NOTA: la unidad no se encenderá si la tapa antisalpicaduras está
abierta o mal instalada.
NOTA: para instalar o quitar los agitadores, gire la tapa
antisalpicaduras en sentido horario (para abrir) o antihorario
(para cerrar).
Cómo girar la tapa antisalpicaduras:
Para instalar/retirar los agitadores o añadir ingredientes, gire
la tapa antisalpicaduras en sentido horario (para abrir) o antihorario
(para cerrar).
Cómo instalar y quitar la tapa antisalpicaduras:
NOTA: antes de colocar/retirar la tapa
antisalpicaduras, cerciórese de que el bol
está en posición inferior y de que el agitador
no está en el eje.
INSTALACIÓN DEL BOL
1. Baje el bol, empujando la palanca
elevadora del bol hacia adelante y hacia
abajo hasta llegar a su posición de
reposo.
2. Levante el bol por sus asas y haga lo
siguiente:
a) Introduzca lentamente el pasador
de seguridad (situado en la parte
trasera del bol) en el orificio que se
encuentra en el centro de la parte
trasera del soporte (Fig. 1).
b) Baje el bol sobre los pasadores
ubicados
en ambos lados del soporte del bol.
3. Una vez que el bol esté colocado en el
soporte, asegúrelo tirando de las dos
abrazaderas hacia adelante hasta que
el bol se bloquee (Fig. 2).
26
FIG. 1
FIG. 2
Page 27

CONEXIÓN DEL AGITADOR
(batidor, batidor plano, gancho amasador,
batidor de alambre)
Instale el bol ANTES de conectar el agitador.
NOTA: es más fácil instalar el agitador antes de colocar los
ingredientes en el bol.
1. Gire la tapa antisalpicaduras hacia la
izquierda para abrirla.
Nota: el uso de fuerza excesiva para
abrir/cerrar la tapa antisalpicaduras
puede dañar el bloqueo con resorte
y el microinterruptor de la tapa
antisalpicaduras, y ANULARÁ la garantía.
2. Deslice lentamente el agitador hacia
arriba sobre el eje planetario, colocando
el perno del eje a través de la ranura del
agitador (Fig. 3).
3. Gire el agitador en sentido horario
para fijarlo al eje planetario.
PRECAUCIÓN
FIG. 3
MEZCLA
Sobrecargar el BOL o no seguir las recomendaciones de la tabla de
capacidades puede dañar el aparato y anulará la garantía (véase la
sección “Tabla de capacidades”).
Antes de empezar: siempre ajuste la velocidad al nivel deseado
ANTES de encender la unidad. El incumplimiento de esta instrucción
puede dañar los engranajes de velocidad u otras piezas y ANULARÁ
la garantía.
Los agitadores deben girar en el bol en sentido antihorario.
Si el agitador gira en sentido horario, póngase en contacto
inmediatamente con un electricista certificado para que corrija el
cableado incorrecto.
IMPORTANTE: se aconseja siempre empezar a mezclar a baja
velocidad (velocidad 1). El incumplimiento de esta instrucción puede
dañar los engranajes de velocidad u otras piezas, y anulará la
garantía.
1. Coloque los ingredientes que desea mezclar en el bol.
27
Page 28

2. Levante la palanca elevadora del bol hasta que el bol
se bloquee.
3. Gire la tapa antisalpicaduras hacia la derecha para cerrarla
(escuchará un “clic”).
NOTA: la unidad no se pondrá en marcha si la tapa antisalpicaduras
está abierta o si el bol está bajado.
PRECAUCIÓN
FIJACIÓN/CAMBIO DE LA VELOCIDAD
Hay tres velocidades fijas disponibles: baja (1), media (2) y alta (3).
IMPORTANTE: siempre siga las recomendaciones de la tabla de
capacidades en la página 32.
Para ajustar/cambiar la velocidad, coloque la palanca de control de
velocidad al nivel deseado.
IMPORTANTE: siempre use el agitador y la velocidad
recomendados en la tabla de capacidades (véase la sección
“Tabla de capacidades”).
Presione el botón verde START para comenzar a mezclar.
PRECAUCIÓN
Siempre apague (STOP) la unidad antes de cambiar la velocidad.
¡El incumplimiento de esta instrucción puede hacer
que se dañen los engranajes de velocidad u otras piezas, y
ANULARÁ la garantía!
Para cambiar la velocidad durante la mezcla:
a. Presione el botón rojo STOP y espere hasta que el agitador
esté completamente parado.
b. Cambie la velocidad subiendo/bajando la palanca de control
de velocidad.
c. Presione el botón verde START para volver a encender
la unidad.
NOTA: esta unidad está equipada con una protección contra
el sobrecalentamiento. Si la unidad se apaga durante la mezcla:
presione el botón STOP y desenchufe la unidad. Déjela reposar
por dos minutos, y luego vuelva a enchufarla. Presione el botón
de reinicio RESET situado en la parte trasera de la unidad.
28
Page 29

NOTA: reduzca la carga en un 10 % si la harina está refrigerada,
si la temperatura del agua es inferior a 21 °C (70 °F) o si la mezcla
contiene hielo o harina con un alto contenido de gluten.
Una vez que los ingredientes estén bien mezclados, presione el
botón rojo STOP para apagar la unidad.
Baje el bol, jalando la palanca elevadora hacia adelante y hacia abajo
hasta que llegue a su posición de reposo.
Gire la tapa antisalpicaduras hacia la izquierda para abrirla.
Retire el agitador del eje planetario, levantando este hacia arriba y
luego girándolo en sentido antihorario para soltarlo. Jale el agitador
hacia abajo para sacarlo del eje planetario.
Empuje las abrazaderas del bol hacia atrás para desbloquearlo
del soporte.
Levante ligeramente el bol por encima de los pasadores del soporte.
PRECAUCIÓN
El bol es muy pesado cuando está cargado. Siempre use una
segunda persona para retirar y transportar el bol al final de la mezcla.
INSTRUCCIONES DE LIMPIEZA
• Diluya el detergente según las instrucciones del fabricante.
• NO lave la unidad a chorro o a presión.
• NUNCA use un estropajo, lana de acero u otro material abrasivo
para limpiar la unidad.
• NUNCA use blanqueador/cloro (hipoclorito de sodio) o productos
a base de cloro para limpiar la unidad.
• SIEMPRE retire el agitador al final de la mezcla; de lo contrario,
podría atascarse en el eje y ser difícil de quitar.
29
Page 30

PRECAUCIÓN
Todo aparato, incluidos sus accesorios, debe
limpiarse y desinfectarse a fondo de acuerdo con los
procedimientos definidos por su departamento de salud
local y la guía “ServSafe Essentials” publicada por la
National Restaurant Association Educational Foundation
(NRAEF). Visite www.servsafe.com para más detalles.
SIEMPRE APAGUE Y DESENCHUFE LA UNIDAD ANTES
DE LIMPIARLA.
INSTRUCCIONES DE LIMPIEZA
PIEZA MEDIDA NECESARIA FRECUENCIA
Agitadores Lavar a mano (con un detergente suave y agua),
Tapa
antisalpicaduras
removible
Bol Lavar a mano (con una esponja o un paño, un
Parte trasera
del panel
antisalpicaduras
Soporte del bol Lavar a mano (con un detergente suave y agua),
Eje planetario Limpiar con un paño limpio y húmedo, secar y
Exterior Lavar a mano (con un detergente suave y agua),
enjuagar, secar y desinfectar.
Lavar a mano (con un detergente suave y agua),
enjuagar, secar y desinfectar. También se puede
poner en el lavavajillas.
detergente suave y agua), ejerciendo presión
para asegurarse de que el recipiente esté limpio,
enjuagar, secar y desinfectar. El bol también se
puede poner en el lavavajillas.
Lavar a mano (con un detergente suave y agua),
enjuagar, secar y desinfectar.
enjuagar, secar y desinfectar.
desinfectar.
Aplicar una pequeña cantidad de aceite Waring
(aceite mineral)
en el eje planetario después de la limpieza.
enjuagar, secar y desinfectar. NO lavar a chorro.
Después de cada uso.
Después de cada uso.
Después de cada uso.
Después de cada uso.
Todos los días.
Después de cada uso.
Todos los días.
30
Page 31

PUNTOS IMPORTANTES
Esta unidad le proporcionará años de servicio continuo, siempre
y cuando cumpla con las siguientes instrucciones:
MANTENIMIENTO RECOMENDADO
PIEZA MEDIDA NECESARIA FRECUENCIA
Barras de
deslizamiento del bol
Aplique aceite Waring (aceite mineral)
en las barras de deslizamiento del bol.
Levante y baje el bol para distribuir el
aceite uniformemente en las barras.
Si el bol llega a ser difícil de
levantar o de bajar.
NOTA: cualquier otro servicio debe ser realizado por un técnico
autorizado.
TABLA DE CAPACIDADES
Las siguientes capacidades máximas se facilitan a título informativo.
Dependiendo de factores tales como el tipo de harina utilizada, la
temperatura del agua utilizada y otras condiciones, es posible que
sea necesario reducir la carga.
Al amasar masa (pizza, pan, panecillos), compruebe la tasa de
humedad de la masa, dividiendo el peso del agua por el peso de la
harina y multiplicando por 100.
Las capacidades indicadas a continuación se basan en una tasa de
humedad del 12 % y una temperatura del agua de 21 °C (70 °F).
Si utiliza harina con alto contenido de gluten, reduzca las cantidades
en un 10 %.
Nunca utilice la velocidad media (velocidad 2) para amasar una masa
con una tasa de humedad inferior al 50 %.
No instale aditamentos en el puerto para aditamentos durante la
mezcla.
Utilice la unidad adecuada para sus necesidades, teniendo en cuenta
la siguiente información: 1 L de agua = 1 kg
31
Page 32

TABLA DE CAPACIDADES/VELOCIDADES
PRODUCTO ACCESORIO AGITADOR VELOCIDAD
Masa de pan
Masa de pizza
Masa de tarta
Puré de papas*
Mezcla de pastel
Gancho
amasador
Gancho
amasador
Batidor
plano
Batidor
plano
Batidor
plano
1 (solamente)
1 (solamente)
10
CUARTOS
DE GALÓN
(9.5 L)
10lb
(4.55 kg)
9lb
(4 kg)
1
1
1
9lb
(4 kg)
10lb
(4.55 kg)
8lb
(3.65 kg)
20
CUARTOS
DE GALÓN
(19 L)
25lb
(12.75
kg)
25lb
(11.35
kg)
20lb
(9 kg)
17lb
(7.75 kg)
20lb
(9 kg)
Mezcla para waffles/
gofre o panqueque
Mezcla para ponqué/
bizcocho
Claras de huevo
Claras de huevo
(merengue)
Crema batida
* con mantequilla y crema
Batidor
plano
Batidor
plano
Batidor de
alambre
Batidor de
alambre
Batidor de
alambre
32
1
Todas
3
Todas
2
8lb
(3.65 kg)
8lb
(3.65 kg)
2
docenas3 docenas
2
docenas3 docenas
3 cuartos
de galón
(2.85 L)
20lb
(9 kg)
20lb
(9 kg)
6 cuartos
de galón
(5.65 L)
Page 33

NOTA: la capacidad del bol depende de la tasa de humedad de la masa.
Al amasar masa (pizza, pan, panecillos), compruebe la tasa de humedad de la
masa, dividiendo el peso del agua por el peso de la harina y multiplicando por 100.
Las capacidades indicadas en la página 15 están basadas en harina a temperatura
ambiente y agua a 70 °F (21 °C). Nota: 1 L de agua pesa 1 kg.
GARANTÍA LIMITADA DE UN AÑO
(válida en los EE.UU. y en Canadá solamente)
Waring garantiza este producto Waring® Commercial contra todo
defecto de materiales o fabricación durante un año a partir de la
fecha de compra, siempre que haya sido usada con alimentos,
líquidos no abrasivos (a excepción de detergentes) y semilíquidos
no abrasivos, y que no haya sido sujeta a cargas que excedan
su máxima capacidad. Bajo esta garantía, Waring reparará o
reemplazará toda pieza que, tras estar inspeccionada por nuestro
servicio posventa, demuestre defectos de fabricación o fallas de
materiales, siempre que el producto se regrese a un centro de
servicio autorizado o se entregue con franqueo pagado a: 314 Ella
T. Grasso Ave., Torrington, CT 06790. Esta garantía: a) no se aplica
a ningún producto desgastado, defectuoso, dañado o roto debido a
uso, reparaciones/servicio realizados por personas no autorizadas,
o abuso, mal uso, sobrecarga o daños intencionales; b) no cubre
daños incidentales o consecuentes de ningún tipo.
Advertencia: utilizar este aparato con corriente continua (C.C.)
invalidará la garantía.
WARING COMMERCIAL
314 Ella T. Grasso Ave.
Torrington, CT 06790
33
Page 34

RESOLUCIÓN DE PROBLEMAS
PROBLEMA POSIBLE CAUSA MEDIDA NECESARIA
La máquina
no se pone en
marcha
La unidad se
detiene durante
la mezcla
La unidad hace
demasiado ruido
La tapa
antisalpicaduras
está bloqueada
Los agitadores
son difíciles de
instalar en el eje
planetario.
La tapa antisalpicaduras no
está cerrada
El bol no está en su puesto. Levante el bol y bloquéelo en su posición.
Problema de alimentación. Compruebe todas las conexiones eléctricas.
El interruptor del edificio se ha
disparado.
El dispositivo de protección
contra el sobrecalentamiento
se ha disparado.
El engranaje de velocidad no
está engranado.
El dispositivo de protección
contra el sobrecalentamiento
se ha disparado.
La superficie en la que está
instalada la unidad no es plana.
El bol no está instalado
correctamente o las
abrazaderas no están
bloqueadas.
El agitador no está instalado
correctamente.
El bol está sobrecargado. Reduzca la carga (véase la tabla
El eje planetario está sucio
o carece de lubricación.
Gire la tapa antisalpicaduras hacia la derecha
hasta que esté completamente cerrada.
Enchufe la unidad en una toma de corriente
que funcione. (¡No utilice la unidad con un
cable de extensión!) Pruebe el enchufe con
otro dispositivo.
Chequee la caja de fusibles.
Presione el botón STOP, y luego presione
el botón de reinicio RESET situado en la
parte trasera de la unidad. Permita que la
unidad se enfríe por dos minutos. Presione
el botón START para volver a encender la
unidad. Si el dispositivo de protección contra
el sobrecalentamiento se dispara de nuevo,
reduzca la carga o ajuste la receta.
Asegúrese de que la palanca de control
de velocidad esté en posición. Nota: La
unidad no funcionará si la palanca está
entre dos velocidades.
Presione el botón STOP, y luego presione
el botón de reinicio RESET situado en la
parte trasera de la unidad. Permita que la
unidad se enfríe por dos minutos. Presione
el botón START para volver a encender la
unidad. Si el dispositivo de protección contra
el sobrecalentamiento se dispara de nuevo,
reduzca la carga o ajuste la receta.
Ajuste la superficie o mueva la unidad.
Compruebe que los pies de goma están
instalados.
Compruebe que el bol está bien instalado
y que las abrazaderas están bloqueadas.
Quite el agitador y vuelva a instalarlo
correctamente.
de capacidades).
Limpie y lubrique las barras de deslizamiento
del bol.
Limpie el eje planetario con un paño limpio
y húmedo, y lubríquelo con aceite mineral
o una grasa de grado alimenticio.
34
Page 35

La palanca
elevadora
del bol está
atascada o no
funciona
Una o más
velocidades no
funcionan
La unidad no
mezcla cargas
medias o
pesadas.
Residuos caen
del puerto de
conexión de los
aditamentos
Los agitadores
tocan el fondo
o las paredes
del bol
Los alambres
del batidor de
alambre se
rompen
El batidor plano
se rompe
El gancho
amasador se
rompe
Mezcla sucia
(decoloración)
Las barras de deslizamiento del
bol carecen de lubricación.
Engranajes de velocidad
dañados o rotos.
Voltaje incorrecto o bajo. Póngase en contacto con un electricista.
Residuos de carne o de jugo
de vegetales (p. ej. tomate)
han penetrado en el puerto
de conexión.
Bol defectuoso o abollado. Aplane las abolladuras o sustituya el bol.
Agitador defectuoso. Sustituya el agitador.
Carga demasiado pesada.
Ajuste la receta.
Se cayó un utensilio de mano
en el bol durante la mezcla.
Ingredientes demasiado fríos
o demasiado grandes (p. ej.,
mantequilla congelada, queso
crema cortado en pedazos
grandes).
Carga demasiado pesada. Reduzca la carga (véase la sección “Tabla de
Ingredientes demasiado fríos o
demasiado grandes.
Bol mal
limpiado.
Lubrique las barras de deslizamiento del
bol con aceite mineral o grasa de calidad
alimentaria. Si la palanca se sigue atascando,
pida a un técnico que limpie el mecanismo
de subida/bajada del bol.
Haga reemplazar el engranaje por un técnico.
¡Siempre apague la unidad antes de cambiar
de velocidad!
Solicite a un técnico que retire y limpie el
puerto de conexión de los aditamentos.
Para evitar el problema, limpie el puerto
de conexión de los aditamentos después
de cada uso. *Nota: ¡el ácido en el jugo de
tomate corroerá/contaminará las partes
internas!
Reduzca la carga (véase la sección “Tabla
de capacidades”). Mezcla demasiado firme
o velocidad demasiado rápida. Reduzca la
velocidad.
Apague la unidad inmediatamente.
Use ingredientes a temperatura ambiente.
Corte los ingredientes en pedazos más
pequeños.
capacidades”). Ajuste la receta.
Use ingredientes a temperatura ambiente.
Corte los ingredientes en pedazos más
pequeños.
Limpie el bol otra vez (véase la sección
“Instrucciones de limpieza”).
35
Page 36

IMPORTANTES CONSIGNES
DE SÉCURITÉ
L'utilisation d'appareils électriques, notamment en présence
d’enfants, requiert la prise de précautions élémentaires an de
réduire le risque de brûlures, de choc électrique, d’incendie ou
de blessures, parmi lesquelles les suivantes :
1. LIRE TOUTES LES INSTRUCTIONS.
2. Éteindre et débrancher l'appareil avant d’installer ou de retirer
des accessoires, après l’utilisation et avant le nettoyage.
3. Il convient d'exercer une surveillance étroite lorsque l'appareil
est utilisé par ou près d’enfants ou de personnes atteintes
de certains handicaps. Waring déconseille l’utilisation de cet
appareil par des enfants.
4. Éviter tout contact avec les éléments en mouvement ou
les accessoires. An d'éviter tout risque de blessure ou de
dommage, garder les mains, les cheveux, les vêtements et les
ustensiles éloignés des batteurs pendant l'utilisation.
5. L’utilisation d’accessoires non recommandés ou vendus par
Waring peut présenter un risque d'incendie, de choc électrique
ou de blessure.
6. Remarque : ne pas utiliser plus d’un accessoire à la fois.
7. Ne pas dépasser les capacités maximales indiquées dans ce
manuel d'utilisation.
8. Ne pas utiliser le batteur su socle si l’appareil ou le cordon est
endommagé ; le faire réparer avant de le remettre en service.
9. Lire les consignes de sécurité qui accompagnent les
accessoires avant de les utiliser.
10. Ne pas utiliser l'appareil à l’extérieur.
11. Tenir le bol en acier inoxydable à l'écart des sources de chaleur,
comme les plaques de cuisson, les fours ou les micro-ondes.
12. An de réduire les risques de choc électrique, ne jamais placer
le socle-moteur dans l’eau ou tout autre liquide.
13. Retirer tous les accessoires de l’appareil avant de le nettoyer.
14. Ne pas laisser le cordon pendre d'une table ou d'un plan
de travail.
15. Ne pas mettre les mains dans le bol pendant le fonctionnement.
36
Page 37

16. Placer l’appareil sur une surface stable et propre. Le tenir
à l'écart des endroits surchauffés ou très humides, et des
équipements hautement électromagnétiques ou pouvant
produire un fort champ électromagnétique.
17. Garder l’appareil propre.
18. Débrancher l’appareil avant toute opération d’entretien.
CONSERVER CES INSTRUCTIONS
POUR USAGE COMMERCIAL
UNIQUEMENT
TABLE DES MATIÈRES
Importantes consignes de sécurité ..................................................36
Instructions de mise à la terre ..........................................................38
Utilisation de rallonges électriques ..................................................39
Pièces et accessoires ......................................................................40
Installation ........................................................................................ 41
Directives d'utilisation ......................................................................42
Installation du bol .............................................................................43
Mélange des ingrédients .................................................................. 44
Réglage de la vitesse .......................................................................45
Instructions de nettoyage ................................................................. 47
Nettoyage recommandé ...................................................................48
Tableau de capacités .......................................................................49
Garantie ............................................................................................50
Résolution de problèmes .................................................................51
37
Page 38

REMARQUE : la puissance nominale maximale est basée sur
l'accessoire qui consomme le plus d'électricité. D'autres accessoires
peuvent consommer beaucoup moins de puissance.
AVERTISSEMENT: RISQUE D'INCENDIE
OU DE CHOC ÉLECTRIQUE
Le symbole composé d’une èche en forme d’éclair à
l'intérieur d'un triangle équilatéral, a pour objet d'alerter
l'utilisateur de la présence d'une tension dangereuse
non-isolée à l'intérieur du boîtier, qui peut être d'une
ampleur sufsante pour constituer un risque d'incendie
ou de choc électrique.
Le point d'exclamation à l'intérieur d'un triangle équilatéral
a pour objet de prévenir l'utilisateur de l'importance des
instructions de fonctionnement et de maintenance, jointes
à l'appareil.
AVERTISSEMENT
INSTRUCTIONS DE MISE À LA TERRE
Pour votre protection, cet appareil est équipé d'une che à trois
broches. Cette che doit être branchée dans une prise de terre
correctement congurée (1). Un adaptateur temporaire (2) peut être
utilisé pour brancher l’appareil dans une prise polarisée jusqu’à
ce que vous fassiez installer une prise de terre adéquate par un
électricien. La languette de l’adaptateur doit être mise à la terre, en
la xant à un boîtier de raccordement (3) à l'aide d'une vis en métal.
Si l'appareil doit être raccordé à un circuit électrique, faire appel
à un électricien qualié pour effectuer le branchement.
38
Page 39

MÉTHODE DE MISE À LA TERRE
UTILISATION DE RALLONGES ÉLECTRIQUES
Pour des raisons de sécurité, cet appareil est équipé d’un cordon
d’alimentation court.
Une rallonge pourra être utilisée au besoin, à condition que les
précautions nécessaires soient prises.
Veillez à ce que les spécications électriques de la rallonge soient au
moins égales à celles de l'appareil, ne la laissez pas pendre au bord
d’une table ou d’un plan de travail et veillez à ce qu’elle soit placée
de telle manière qu’un enfant ou un animal ne puisse pas trébucher
dessus ou la tirer.
TYPE DE RALLONGES ÉLECTRIQUES
S’il est nécessaire d’utiliser une rallonge électrique, utiliser une
rallonge munie d’une che de terre à trois broches compatible avec
la che du cordon. Utiliser une rallonge d’intérieur uniquement. Veiller
à ce que la tension nominale de la rallonge soit égale ou supérieure
à celle de l’appareil. Ne pas utiliser une rallonge si elle est abîmée.
Vérier l’état de la rallonge avant de l’utiliser; la remplacer en cas
de dommage. Ne pas tirailler la rallonge ou le cordon pour les
débrancher. Maintenir la rallonge éloignée des surfaces chaudes
ou coupantes.
39
Page 40

PIÈCES ET ACCESSOIRES
2
1
10
4
3
WSM10LDH
WSM10LMP
7
11
8
12
1. Bouton START (marche)
2. Bouton STOP (arrêt)
3. Moyeu de xation des accessoires
4. Vis de xation des accessoires
5. Levier de montée/descente du bol
6. Poignée du pare-éclaboussures
7. Arbre planétaire
8. Poignée du bol
9. Pince de verrouillage du bol
10. Contrôle de vitesse
11. Pare-éclaboussures
12. Bol
13. Pieds en caoutchouc
14. Support du bol
15. Cordon d'alimentation
(NON ILLUSTRÉ)
40
13
14
6
5
9
WSM10LW
WSM20LDH
WSM20LMP
WSM20LW
Page 41

INSTALLATION
DÉBALLAGE
Déballer l’appareil immédiatement après réception. Si l’appareil
est endommagé, conserver le matériel d'emballage et contacter
immédiatement le fournisseur.
AVERTISSEMENT
POUR ÉVITER LES RISQUES DE BLESSURE GRAVE:
• TOUJOURS installer l'appareil dans une zone de travail disposant
d’un éclairage et d’un espace sufsants.
• Utiliser l’appareil UNIQUEMENT sur une surface solide, plate,
antidérapante et non inammable.
• NE JAMAIS modier ou altérer cet appareil de quelque façon que
ce soit ; cela peut être dangereux et annulera la garantie.
• NE JAMAIS utiliser l’appareil à moins que les étiquettes
d’avertissement y soient xées.
• NE PAS essayer de soulever l’appareil seul.
INSTALLATION
1. Lire attentivement ce manuel avant l'installation et l'utilisation.
NE PAS procéder à l'installation et à l'utilisation si vous avez
des questions ou si vous ne comprenez pas l’intégralité des
instructions contenues dans ce manuel. Contacter votre
représentant local.
2. Retirer de la caisse/palette la boîte en carton contenant
l’appareil en enlevant les bandes de xation. REMARQUE : les
modèles WSM10L et WSM20L sont expédiés dans une caisse
en bois. Pour retirer la caisse, les boulons au fond de la caisse,
des quatre côtés, doivent être enlevés.
3. Dévisser soigneusement la caisse de la palette à l'aide d'une clé
de 11/16 po. ou 3/4 po.
4.
Choisir un emplacement, en tenant compte des points suivants :
• Le sol ou le plan de travail doit être plat.
• L’emplacement doit être facilement accessible pour
l'entretien et la maintenance.
• Il doit y avoir sufsamment d’espace autour de l'appareil
pour pouvoir activer les commandes et installer/retirer les
agitateurs, le bol ou les accessoires.
41
Page 42

• Il doit y avoir sufsamment d’espace autour de l'appareil
pour pouvoir ajouter des ingrédients pendant le mélange.
• Il doit y avoir sufsamment d’espace derrière l'appareil pour
ne pas bloquer la sortie de ventilation arrière.
5. Demander de l’aide à au moins deux autres personnes pour
incliner l'appareil et installer des pieds en caoutchouc.
6. Inspecter l’appareil pour vous assurer qu’il inclut toutes les
pièces (bol, batteur plat, fouet et crochet pétrisseur).
7. Lire les informations électriques qui se trouvent sur la plaque
signalétique située à l'arrière de l’appareil. L'alimentation
électrique doit correspondre à celle indiquée sur la plaque
signalétique.
AVERTISSEMENT
DIRECTIVES D’UTILISATION
POUR ÉVITER LES RISQUES DE BLESSURE GRAVE:
• Nettoyer l'appareil avant la première utilisation (voir la section
“Instructions de nettoyage”).
• REMARQUE : une généreuse quantité de graisse est appliquée
sur et dans l’appareil pendant le processus de fabrication. Il est
normal de retrouver de la graisse (marron) sur toutes les surfaces
métalliques de l’appareil (p. ex. le dessus du pare-éclaboussure,
le contrôle de vitesse, les pinces de serrage du bol, le levier
de montée/descente du bol et la vis du moyeu de xation des
accessoires). Il est aussi normal de retrouver de la graisse à haute
pression (marron-noire) sur l'arbre planétaire, et quelques gouttes
peuvent être retrouvées dans le bol.
• NE PAS utiliser l’appareil avant d’avoir lu le manuel d’utilisation.
• TOUJOURS débrancher l’appareil avant toute opération de
nettoyage, d’entretien, de réparation ou de réglage des pièces
ou accessoires.
• TOUJOURS tenir les mains, les cheveux et les vêtements éloignés
des éléments en mouvement.
• TOUJOURS éteindre l’appareil avant de changer la vitesse.
• Respecter les capacités maximales recommandées (voir la section
“Tableau de capacités”).
42
Page 43

• Pétrir à basse vitesse (vitesse 1) uniquement. Ne jamais utiliser
la vitesse moyenne (vitesse 2) pour pétrir de la pâte dont le taux
d'hydratation est de 50% ou moins.
• Si l'appareil s'arrête pendant le mélange (dû à la protection anti-
surchauffe), diminuer la charge.
PARE-ÉCLABOUSSURES AMOVIBLE
(modèles WSM10L et WSM20L)
Le pare-éclaboussures est facile à installer et à enlever, et peut être
lavé à la main ou au lave-vaisselle.
REMARQUE : l’appareil ne se mettra pas en marche si le pareéclaboussures est ouvert ou mal installé.
REMARQUE : pour installer/retirer les agitateurs, tourner le pareéclaboussures dans le sens des aiguilles d'une montre (pour ouvrir)
ou dans le sens inverse des aiguilles d'une montre (pour fermer).
Comment faire tourner le pare-éclaboussures :
pour installer/retirer les agitateurs ou ajouter des ingrédients,
tourner le pare-éclaboussures dans le sens des aiguilles d'une
montre (pour ouvrir) ou dans le sens inverse des aiguilles d'une
montre (pour fermer).
Comment installer/retirer le pare-éclaboussures :
REMARQUE : avant d’installer ou de retirer le pare-éclaboussures,
s'assurer que le bol est en position abaissée et que l’agitateur n'est
pas sur l'arbre.
INSTALLATION DU BOL
1. Abaisser le bol en tirant le levier de
montée/descente du bol vers l'avant et
vers le bas jusqu'à sa position de repos.
2. Soulever le bol par ses poignées et :
a) Introduire lentement la goupille de
verrouillage (située à l'arrière du bol)
dans
le trou situé au milieu de la partie
postérieure du support (Fig. 1).
b) Abaisser le bol sur les goupilles
situées de part et d’autre du support
du bol.
43
FIG. 1
Page 44

3. Une fois le bol positionné sur le support,
le xer en tirant les deux pinces de
serrage vers l'avant jusqu'à ce que le
bol soit bien verrouillé (Fig. 2).
CONNEXION DE L’AGITATEUR
(batteur, batteur plat, crochet
pétrisseur, fouet)
Installer le bol AVANT de connecter l’agitateur.
REMARQUE : il est plus facile d’installer
l’agitateur avant d’ajouter les ingrédients
dans le bol.
1. Faire tourner le pare-éclaboussures vers la gauche pour l’ouvrir.
Remarque : l'utilisation d'une force excessive pour ouvrir/fermer
le pare-éclaboussures peut endommager le verrou à ressort et
le micro-interrupteur du pare-éclaboussures,
et ANNULERA la garantie.
2. Faire glisser l’agitateur lentement vers
le haut sur l'arbre planétaire, en
positionnant la goupille de l'arbre à
travers la fente de l'agitateur (Fig.3).
3. Faire tourner l'agitateur dans le sens des
aiguilles d'une montre pour le xer sur
l'arbre planétaire.
FIG. 2
MISE EN GARDE
MÉLANGE DES INGRÉDIENTS
Surcharger le bol ou ne pas respecter les indications du tableau
de capacités peut endommager l’appareil et annulera la garantie
(voir la section “Tableau de capacités”).
Avant de commencer : toujours régler la vitesse au niveau voulu
AVANT d'allumer l’appareil. Le non-respect de cette consigne peut
endommager les engrenages de vitesse ou d'autres pièces et
ANNULERA la garantie.
Les agitateurs sont supposés tourner dans le bol dans le sens
inverse des aiguilles d'une montre. Si l'agitateur tourne dans le sens
des aiguilles d'une montre, contacter immédiatement un électricien
agréé pour remédier au câblage incorrect.
44
FIG. 3
Page 45

IMPORTANT: il est conseillé de toujours démarrer l'appareil à
basse vitesse (vitesse 1). Le non-respect de cette consigne peut
endommager les engrenages de vitesse ou d'autres pièces.
1. Ajouter les ingrédients à mélanger dans le bol.
2. Soulever le levier de montée/descente du bol jusqu’à ce que le
bol se bloque.
3. Tourner le pare-éclaboussures vers la gauche pour le fermer
(vous entendrez un déclic).
REMARQUE : l’appareil ne se mettra pas en marche si le
pare-éclaboussures est ouvert, ou si le bol est abaissé.
MISE EN GARDE
RÉGLAGE DE LA VITESSE
Trois vitesses xes sont disponibles : basse (1), moyenne (2) et
haute (3).
IMPORTANT: toujours suivre les recommandations du tableau
de capacités en page 49.
Pour régler/changer la vitesse, placer le levier de contrôle de vitesse
au niveau voulu.
IMPORTANT: toujours utiliser la vitesse et l’agitateur
recommandé dans le tableau de capacités (voir la section
“Tableau de capacités”).
Appuyer sur le bouton vert START pour commencer à mélanger.
MISE EN GARDE
Toujours éteindre (STOP) l’appareil avant de changer la vitesse.
Le non-respect de cette consigne peut
endommager les engrenages de vitesse ou d'autres pièces et
ANNULERA la garantie !
Pour changer la vitesse en cours de mélange :
a. Appuyer sur le bouton rouge STOP, et attendre que
l'agitateur soit complètement immobile.
b. Changer la vitesse en élevant/abaissant le levier de contrôle
de vitesse.
c. Appuyer sur le bouton vert START pour redémarrer l’appareil.
45
Page 46

REMARQUE : cet appareil est équipé d’une protection antisurchauffe. Si l’appareil s’éteint pendant le mélange : appuyer sur le
bouton STOP, débrancher l’appareil, le laisser reposer pendant deux
minutes, puis le rebrancher. Appuyer sur le bouton de réinitialisation
(RESET) situé au dos de l’appareil.
REMARQUE : diminuer la charge de 10 % si la farine est réfrigérée,
si la température de l'eau est inférieure à 70°F (21 °C) ou si le
mélange contient de la glace ou de la farine à haute teneur en gluten.
Une fois que les ingrédients sont bien mélangés, appuyer sur le
bouton rouge STOP pour arrêter l’appareil.
Abaisser le bol en tirant le levier de montée/descente du bol vers
l'avant et vers le bas jusqu'à sa position de repos.
Tourner le pare-éclaboussures vers la gauche pour l’ouvrir.
Retirer l’agitateur de l’arbre planétaire en le soulevant vers le haut,
puis en le faisant tourner dans le sens inverse des aiguilles d’une
montre pour le déverrouiller. Tirer l’agitateur vers le bas pour le retirer
de l’arbre planétaire.
Pousser les pinces de serrage du bol vers l’arrière pour déverrouiller
le bol de son support.
Soulever légèrement le bol par-dessus les goupilles du support.
MISE EN GARDE
Le bol est très lourd lorsqu’il est chargé. Toujours faire appel à
une deuxième personne pour retirer et transporter le bol à la n
du mélange.
NETTOYAGE ET ENTRETIEN
• Diluer le détergent selon les instructions du fabricant.
• NE PAS laver l’appareil au jet ou à pression.
• NE JAMAIS utiliser de tampon à récurer, laine d’acier ou autre
matériau abrasif pour nettoyer l’appareil.
• NE JAMAIS utiliser de l'eau de Javel (hypochlorite de sodium) ou
de produit à base d’eau de Javel pour nettoyer l’appareil.
• TOUJOURS retirer l’agitateur à la n du mélange. Sinon, il pourrait
rester coincé sur l’arbre et être difcile à retirer.
46
Page 47

MISE EN GARDE
La totalité de l’appareil, y compris ses pièces
amovibles, doit être soigneusement nettoyée et
désinfectée conformément aux procédures définie
par votre département de la santé local et par le guide
“ServSafe Essentials” publié par la National Restaurant
Association Educational Foundation (NRAEF). Visiter
www.servsafe.com pour plus de détails.
TOUJOURS ÉTEINDRE ET DÉBRANCHER L’APPAREIL
AVANT DE LE NETTOYER.
INSTRUCTIONS DE NETTOYAGE
PIÈCE ACTION REQUISE FRÉQUENCE
Agitateurs Laver à la main (avec un détergent doux et de l’eau),
Pareéclaboussures
amovibles
Bol Laver à la main (à l'aide d'une éponge ou d'un
Partie postérieure
du pareéclaboussures
Support du bol Laver à la main (avec un détergent doux et de l’eau),
Arbre planétaire Essuyer avec un chiffon propre et humide, sécher
Extérieur Laver à la main (avec un détergent doux et de l’eau),
rincer, sécher et désinfecter.
Laver à la main (avec un détergent doux et de l’eau),
rincer, sécher et désinfecter. Peut aussi être mis au
lave-vaisselle.
chiffon, d'eau et de détergent doux), en faisant
pression pour vous assurer que le bol est propre,
rincer, sécher et désinfecter. Le bol peut aussi être
mis au lave-vaisselle.
Laver à la main (avec un détergent doux et de l’eau),
rincer, sécher et désinfecter.
rincer, sécher et désinfecter.
et désinfecter. Appliquer une petite quantité d'huile
Waring (huile minérale)
sur l'arbre planétaire après le nettoyage.
rincer, sécher et désinfecter. NE PAS laver au jet.
Après chaque
utilisation.
Après chaque
utilisation.
Après chaque
utilisation.
Après chaque
utilisation.
Tous les jours.
Après chaque
utilisation.
Tous les jours.
47
Page 48

IMPORTANT
Cet appareil vous offrira des années de service continu, à condition
que vous respectiez les consignes suivantes :
NETTOYAGE RECOMMANDÉ
PIÈCE ACTION REQUISE FRÉQUENCE
Glissières du bol Appliquer de l’huile Waring (huile
minérale) sur les glissières du bol.
Soulever et abaisser le bol pour répartir
l'huile uniformément sur les glissières.
Si le bol devient difficile à
soulever ou à abaisser.
REMARQUE : toute autre opération d'entretien ou de réparation doit
être effectuée par un technicien autorisé.
TABLEAU DE CAPACITÉS
Les capacités maximales suivantes sont fournies à titre indicatif
uniquement. Selon certains facteurs tels que le type de farine
utilisée, la température de l’eau utilisée et d’autres conditions, il se
peut qu’il vous faille diminuer la charge.
Lorsque vous pétrissez de la pâte (pizza, pain, bagels), vérier le taux
d’hydratation de cette-dernière, obtenu en divisant le poids de l’eau
par le poids de la farine et en multipliant par cent.
Les capacités énumérées ci-dessous sont basées sur un taux
d’hydratation de 12 % et une température d’eau de 70 °F (21 °C).
Si vous utilisez une farine à haute teneur en gluten, réduire les
quantités de 10 %.
Ne jamais utiliser la vitesse moyenne (vitesse 2) pour pétrir de la pâte
dont le taux d'hydratation est inférieur à 50%.
Ne pas installer d’accessoires sur le moyeu de xation des
accessoires pendant le mélange.
Utiliser l’appareil approprié à vos besoins, en tenant compte de
l’information suivante : 1 L d’eau = 1 kg
48
Page 49

TABLEAU DE CAPACITÉS/VITESSES
PRODUIT ACCESSOIRE AGITATEUR VITESSE
10
QUARTS
(9,5 L)
20 QUARTS
(19 L)
Pâte à pain
Pâte à pizza
Pâte à tarte Batteur plat 1
Purée de pommes de
terre*
Pâte à gâteaux Batteur plat 1
Pâte à gaufres/crêpes
Crochet
pétrisseur
Crochet
pétrisseur
Batteur plat 1
Batteur
plat
1 (seulement)
1 (seulement)
1
10lb
(4,55 kg)
9lb
(4 kg)
9lb
(4 kg)
10lb
(4,55 kg)
8lb
(3,65 kg)
8lb
(3,65 kg)
25lb
(12,75
kg)
25lb
(11,35
kg)
20lb
(9 kg)
17lb
(7,75 kg)
20lb
(9 kg)
20lb
(9 kg)
Pâte à quatre-quarts Batteur plat Toutes
Blancs d'œuf Fouet 3 24 36
Blancs d’œuf
(meringue)
Crème fouettée Fouet 2
* avec du beurre et de la crème
Fouet
Toutes les
vitesses
8lb
(3,65 kg)
24 36
3 quarts
(2,85 L)
49
20lb
(9 kg)
6 quarts
(5,65 L)
Page 50

REMARQUE : la capacité du bol dépend du taux d’hydratation de la pâte.
Lorsque vous pétrissez (pizza, pain, bagels), vérier le taux d’hydratation de
cette-dernière, obtenu en divisant le poids de l’eau par le poids de la farine et en
multipliant par cent.
Les capacités indiquées en page 15 sont basées sur de la farine à température
ambiante et de l’eau à 70 °F (21 °C). Remarque : 1 L d’eau pèse 1 kg.
GARANTIE LIMITÉE D’UN AN
(valable aux É.-U. et au Canada uniquement)
Waring garantit ce produit Waring® Commercial contre tout vice
de matière ou de fabrication pendant une période d'un an suivant
sa date d’achat, à condition qu’il ait été utilisé uniquement avec
des produits alimentaires, des liquides non-abrasifs (autres que
des détergents) et des semi-liquides non-abrasifs, à condition
que l'appareil n'ait pas été soumis à des charges excédant sa
capacité maximale. Au titre de cette garantie, Waring réparera ou
remplacera toute pièce nous paraissant afcher un vice de matière
ou de fabrication. Pour un service au titre de cette garantie, envoyez
l'appareil, port payé, à l'adresse suivante ou amenez-le à un centre
de réparation agréé : Waring Service Center, 314 Ella T. Grasso
Ave., Torrington, CT 06790. Cette garantie a) n’est pas valable si
l’appareil est endommagé, cassé, détérioré ou s’il afche un vice ou
défaut résultant de l’utilisation, de l’entretien ou de la réparation par
des personnes non autorisées, ou consécutif à l’usage abusif ou
inapproprié, à la surcharge ou à la modication de l'appareil ; b) ne
couvre aucun dommage accessoire ou indirect.
Avertissement : brancher cet appareil sur courant continu (C.C./DC)
annulera la garantie.
WARING COMMERCIAL
314 Ella T. Grasso Ave.
Torrington, CT 06790
50
Page 51

RÉSOLUTION DE PROBLÈMES
PROBLÈME CAUSES POSSIBLES MESURES À PRENDRE
L’appareil ne
se met pas en
marche
L’appareil
s’arrête
pendant le
mélange
L’appareil est
bruyant
Pareéclaboussures
bloqué
Le pare-éclaboussures n’est
pas fermé.
Le bol n’est pas en position. Lever et verrouiller le bol à la position la
Problème d’alimentation
électrique.
Le disjoncteur du bâtiment s’est
déclenché.
Le dispositif de protection
anti-surchauffe s’est déclenché.
La vitesse n’est pas enclenchée. S'assurer que le levier de contrôle de
Le dispositif de protection
anti-surchauffe s’est déclenché.
La surface sur laquelle l’appareil
est installé n’est pas plate.
Le bol est mal installé, ou les
pinces de serrage ne sont pas
verrouillées.
L’agitateur est mal installé. Retirer l’agitateur et le remettre en place,
Le bol est surchargé. Réduire la charge (voir le tableau
Faire tourner le pare-éclaboussures vers la
droite jusqu’à ce qu’il soit complètement
fermé.
plus haute.
Vérifier tous les branchements électriques.
Brancher l’appareil dans une prise de courant
qui fonctionne. (Ne pas utiliser l’appareil
avec une rallonge !) Tester la prise avec un
autre appareil.
Vérifier le boîtier de disjoncteur.
Appuyer sur le bouton STOP, puis sur le
bouton de réinitialisation (RESET) situé au
dos de l’appareil. Laisser refroidir l’appareil
pendant deux minutes. Appuyer sur le bouton
START pour remettre l’appareil en route. Si
le dispositif de protection anti-surchauffe se
déclenche à nouveau, réduire la charge ou
ajuster la recette !
vitesse est en position. Remarque :
l’appareil ne fonctionnera pas si le levier
est entre deux vitesses.
Appuyer sur le bouton STOP, puis sur le
bouton de réinitialisation (RESET) situé au
dos de l’appareil. Laisser refroidir l’appareil
pendant deux minutes. Appuyer sur le
bouton START pour remettre l’appareil en
route. Si le dispositif de protection antisurchauffe continue à se déclencher, réduire
la charge ou ajuster la recette !
Adapter la surface ou déplacer l’appareil.
Vérifier que les pieds en caoutchouc sont
installés.
Vérifier que le bol est bien installé et que les
pinces de verrouillage sont verrouillées.
correctement.
de capacités).
Nettoyer et lubrifier les glissières.
51
Page 52

Les agitateurs
sont difficiles
à installer
sur l’arbre
planétaire
Le levier
de montée/
descente
du bol est
bloqué ou ne
fonctionne
pas
Une ou
plusieurs
vitesses ne
fonctionnent
pas
L’appareil ne
mélange pas
les charges
moyennes ou
lourdes.
Des résidus
tombent du
moyeu de
fixation des
accessoires
Les agitateurs
touchent le
fond ou les
parois du bol
Fils de fouet
cassés
Batteur plat
cassé
Crochet
pétrisseur
cassé
Mélange sale
(décoloration)
L’arbre planétaire est sale ou
manque de lubrification.
Les glissières su bol manquent
de lubrification.
Engrenage de vitesse abîmé
ou cassé.
Tension incorrecte ou basse. Contacter un électricien.
Des résidus de viande ou de jus
de légume (par ex., de tomate) ont
pénétré dans le moyeu.
Bol défectueux ou bosselé. Aplanir les bosses ou remplacer le bol.
Agitateur défectueux. Remplacer l’agitateur.
Charge trop lourde. Ajuster la
recette.
Ustensile à main tombé dans un
bol pendant le mélange.
Ingrédients trop froids ou trop
grands (par ex., beurre congelé,
fromage frais à tartiner coupé en
gros morceaux)
Charge trop lourde. Réduire la charge. (voir la section “Tableau
Ingrédients trop froids ou trop
grands.
Bol mal
nettoyé.
Nettoyer l’arbre planétaire à l’aide d’un
linge propre et humide et le lubrifier avec
de l’huile minérale ou une graisse de qualité
alimentaire.
Lubrifiez les glissières du bol avec de
l’huile minérale ou une graisse de qualité
alimentaire. Si le levier continue de coller,
faire appel à un technicien pour nettoyer le
mécanisme de montée/descente du bol.
Faire changer l’engrenage par un technicien.
Toujours arrêter l’appareil avant de changer
de vitesse !
Faire démonter et nettoyer le moyeu de
fixation des accessoires par un technicien.
Pour éviter le problème, essuyer le moyeu
de fixation après chaque utilisation. *
Remarque: l'acide du jus de tomate
corrodera/contaminera les pièces internes !
Réduire la charge. (voir la section “Tableau
de capacités”). Mélange trop ferme, ou
vitesse trop élevée pour le mélange. Réduire
la vitesse.
Arrêter immédiatement l’appareil.
Utiliser des ingrédients à température
ambiante. Couper les ingrédients en
morceaux plus petits.
de capacités”). Ajuster la recette.
Utiliser des ingrédients à température
ambiante. Couper les ingrédients en
morceaux plus petits.
Nettoyer le bol (voir les instructions de
nettoyage).
52
Page 53

535455
Page 54

Page 55

Page 56

Trademarks or service marks of third parties used herein are
the trademarks or service marks of their respective owners.
Todas marcas registradas o marcas de comercio mencionadas
en ésta pertenecen a sus titulares respectivos.
Toutes marques déposées ou marques de commerce ci-incluses
appartiennent à leurs propriétaires respectifs.
©2019 Waring Commercial
314 Ella T. Grasso Ave.
Torrington, CT 06790
www.waringcommercialproducts.com
Printed in China
Impreso en China
Imprimé en Chine
WSM10L/WSM20L IB
19WC0 60025
IB -16 212
 Loading...