

Page 1
1 Litre Blender
Operating Manual
Blender 1 Litre - 230 volt
Manual de operación
Licuadora de 1 litro - 230 voltios
Mode d’emploi
Mixer 1 Litre 230 volt
Bedienungsanleitung
Mixer 1 Liter 230 V
Istruzioni per l’uso
Frullatore da 1 litro 230 volt
Gebruiksaanwijzingen
1 Liter Blender 230 volt
Page 2

IMPORTANT SAFEGUARDS
When using electrical appliances, basic safety precautions should always be followed
including the following:
11.
READ ALL INSTRUCTIONS.
12. To protect against electrical hazards, do not immerse the Blender Base in water or other
liquid.
13. Close supervision is necessary when any appliance is used by or near children.
14. Unplug from outlet when not in use, before putting on or taking off parts, and before
cleaning.
15. Avoid contacting moving parts.
16. Do not operate any appliance with a damaged cord or plug, or after the appliance
malfunctions or is dropped or damaged in any manner. Return appliance to the nearest
authorized service facility for examination, repair or electrical or mechanical adjustment.
17. The use of attachments, including canning jars, not recommended by the appliance
manufacturer may cause hazards.
18. Do not use outdoors.
19. Do not let cord hang over edge of table or counter, or touch hot surfaces.
10. Keep hands and utensils out of container while blending to prevent the possibility of
severe personal injury and/or damage to the blender. A rubber scraper may be used but
must be used only when the blender is not running.
11. Blades are sharp. Handle carefully.
12. If your blender utilizes a removable Jar Base and Blade Assembly – to avoid injury, never
place cutting assembly cutting blades on base without container properly attached.
13. Always operate blender with cover in place.
14. When blending hot liquids, remove center piece of two-piece cover on those units
supplied with this construction. See Hot Blending Instructions.
SAVE THESE INSTRUCTIONS
SPECIFICATIONS
❍ RATINGS 230 VAC – 50 Hz – SINGLE PHASE
❍ MOTORS PERMANENTLY LUBRICATED SERIES – WOUND
❍ TIMER SOME MODELS HAVE A TIMER, ADJUSTABLE FROM 1 TO
❍ BASES ZINC DIE-CASTING WITH EPOXY ENAMEL FINISH OR
❍ CONTAINERS STAINLESS STEEL, BOROSILICATE GLASS,
❍ CORD THREE CONDUCTOR GROUNDED CORD.
❍ CE LISTED
❍ OPERATING
CYCLE: 3 min ON / 1 min OFF
UNIVERSAL TYPE
60 SECONDS FOR AUTOMATIC BLENDING, WITH A
MANUAL SETTING FOR CONTINUOUS BLENDING.
POLISHED STAINLESS STEEL.
YCARBONATE OR ACRYLIC PLASTIC.
POL
1
Page 3
OPERATION
1. Before starting, make sure that the blender cord is unplugged and that the switch is set to the
OFF (O) position.
2. Place container assembly on motor base so that it is firmly seated and not tilted to one side.
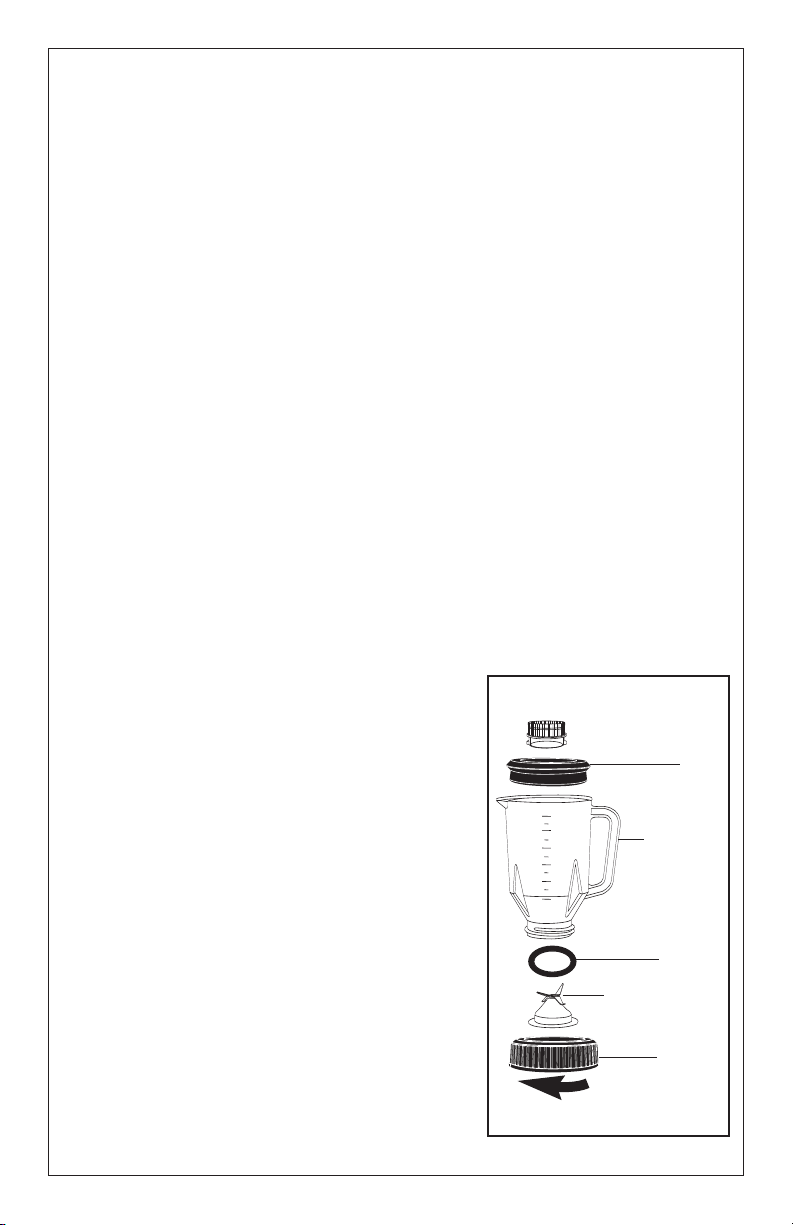
NOTE: If your blender has a container with a removable base and blade, the following points
must be observed when assembling the container. Refer to Fig. 1:
• Container gasket must be between the blade assembly and the container.
• Container bottom must not be misthreaded onto the container.
• Container bottom must be securely tightened to the container before placing food or liquid in
the container.
• Tighten the container bottom by holding the container upside down and rotating the container
• Never place the container bottom or the blade assembly on the motor base unless they are
3. Be sure the switch is still in the OFF (O) position, and plug the power cord into a convenient
outlet.
4. Put ingredients into container and cover it. Always add liquid ingredients first, unless otherwise
specified in recipe. Do not fill above MAX line.
5. Set switch to the ON (I), LOW (1) or HIGH (2) POSITION. Always hold container with one hand
when starting, and while blending. Never operate without jar lid in place.
When finished blending, set switch to OFF (O) position.
NOTE: For blenders with timers, turn the timer control knob clockwise to the desired time setting
before starting the motor. If time setting is less than 10 seconds, turn knob past “10”, then back
to desired setting.
When switch is set to the desired speed, motor will run. Motor will automatically stop at the end
of the set time, and indicator lamp will light.
When switch is set to OFF (O) position, indicator lamp will
go out.
Turning timer knob counterclockwise to the MANUAL
position disables timer and indicator lamp, allowing
blender to be turned on and off manually.
6. Allow motor to come to a complete stop before removing
container. Never place the container on the motor base or
remove it from the motor base while the motor is running.
7. Remove the container from the motor base and empty the
contents.
8. Wash and dry container after each use. Containers with
removable bottoms should be disassembled before
washing.
• The following parts are dishwasher safe: glass
containers, stainless steel containers, removable
container bottoms, blade assemblies, and gaskets.
The following parts are not dishwasher safe and must
•
be hand washed: plastic containers, container lids,
and measuring cup lid inserts.
After cleaning and drying, reassemble containers with
removable bottoms.
Be sure gasket is between blade assembly and container
as shown in Fig. 1.
counterclockwise, in the direction of the molded arrow on the underside of the
bottom
container bottom.
completely attached to the container and securely tightened.
Measuring Cup Lid Insert
(1 & 2 oz., 30 & 60 ml
ighten Counter
T
Fig. 1
Lid
Container
Gasket
Blade Assembly
Container
Bottom
clockwise
2
Page 4

Tighten container bottom securely before washing.
9. Not for waterjet cleaning.
HOT BLENDING INSTRUCTIONS: IMPORTANT!
To minimize the possibility of scalding when blending hot materials, the following
precautions and procedures must be observed:
1. Limit the amount of material processed to 1/2 pint (235 ml).
2. Completely remove the measuring cup lid insert before turning on blender. This will allow
venting of the rapidly heated and expanding air present inside container when blender is
running.
3. Always start blending on lowest speed setting, then progress to desired speed.
4. Never stand directly over blender when it is being started or while it is running.
CIRCUIT BREAKER OPERATION
You will find a small, square, red plastic button located on the underside of the motor base of
some models.
This is the reset button for a circuit breaker which prevents the motor from overheating in
case of an overload.
If an overload occurs, the circuit breaker will shut off the motor and cause the button to
protrude slightly from its normal position.
To reset the circuit breaker and resume operation, do the following:
1) SET THE POWER SWITCH TO ITS OFF (0) POSITION.
2) UNPLUG THE POWER CORD FROM ELECTRICAL OUTLET.
3) DETERMINE THE REASON FOR THE OVERLOAD, AND ELIMINATE THE CAUSE (FOR
EXAMPLE: REDUCE THE AMOUNT OF MATERIAL BEING PROCESSED).
4) PUSH THE RED RESET BUTTON BACK INTO ITS NORMAL POSITION.
5) PLUG THE POWER CORD BACK INTO ELECTRICAL OUTLET.
6) RESUME NORMAL OPERATION.
MAINTENANCE
• MOTOR
Not for waterjet cleaning.
The motor requires no greasing or oiling. Sealed-in lubrication gives the unit lifetime
smooth operation.
• POWER SUPPLY CORD
The power supply cord should not be replaced by the end user.
The power supply cord should only be replaced by the manufacturer’s authorized importer
(or, in the United States and Canada, by an authorized service center).
For repairs or further questions, please contact the manufacturer’s authorized importer (or,
in the United States and Canada, an authorized service center).
WARRANTY
For Waring products sold outside of the U.S. and Canada, the warranty is the responsibility
of the local importer or distributor
WARING: This warranty is VOID if appliance is used on Direct Current (D.C.)
. This warranty may vary according to local regulations.
3
Page 5

IMPORTANTES MEDIDAS DE PROTECCIÓN
Al usarse aparatos electrodomésticos, siempre deben seguirse precauciones básicas de
seguridad, entre ellas las siguientes:
11.
LEA TODAS LAS INSTRUCCIONES.
12. Para protección contra peligros eléctricos, no sumerja la base de la licuadora en agua u
otro líquido.
13. Se requiere estrecha supervisión al ser usado cualquier aparato electrodoméstico por o
cerca de los niños.
14. Desenchufe el aparato cuando no está en uso, al añadir o quitar piezas y antes de limpiarlo.
15. Evite el contacto con las piezas móviles
16. No opere ningún aparato con un cordón o enchufe dañado ni después de un
malfuncionamiento, caída o daño de cualquier naturaleza del equipo. Devuelva el aparato
al centro de servicio autorizado más cercano para inspección, reparación o ajuste
eléctrico o mecánico.
17. El uso de accesorios, incluso frascos de enlatado no recomendados por el fabricante del
aparato podrá ocasionar peligros.
18. No debe usarse a la intemperie.
19. No deje que el cordón cuelgue por el borde de una mesa o mostrador, ni que toque una
superficie caliente.
10. Mantenga las manos y los utensilios fuera del recipiente durante el mezclado, para evitar
la posibilidad de grave lesión personal y/o daños a la licuadora. Puede usarse una
espátula de goma, pero sólo cuando la licuadora no está en operación..
11. Las cuchillas están muy afiladas. Manéjelas con cuidado.
12. Si su licuadora utiliza una Base de Frasco y Conjunto de Cuchillas removibles, para evitar
lesiones nunca sitúe las cuchillas de corte del conjunto de corte en la base sin que el
recipiente esté correctamente instalado.
13. Siempre opere la licuadora con la tapa puesta.
14. Para mezclar líquidos calientes, quite el centro de la tapa de dos piezas en las unidades
suministradas con esta configuración. Véase Instrucciones para Mezclado en Caliente.
GUARDE ESTAS INSTRUCCIONES
ESPECIFICACIONES
❍ CLASIFICACIONES 230 VCA - 50 Hz - MONOFÁSICA
NOMINALES
❍ MOTORES TIPO UNIVERSAL DE LUBRICACIÓN PERMANENTE DE
INDUCCIÓN EN SERIE
❍ CRONÓMETRO ALGUNOS MODELOS TIENEN UN CRONÓMETRO AJUSTABLE
ENTRE 1 Y 60 SEGUNDOS PARA MEZCLADO AUTOMÁTICO
CON UN AJUSTE MANUAL PARA MEZCLADO CONTINUO
❍ BASES PIEZA FUNDIDA TROQUELADA DE CINC CON ACABADO DE
EPOXIESMAL
T
❍ RECIPIENTES ACERO INOXIDABLE, VIDRIO DE BOROSILICATO, PLÁSTICO DE
POLICARBONATO O ACRÍLICO
❍ CORDÓN CORDÓN DE PUESTAA TIERRA DE TRES CONDUCTORES
❍ CLASIFICACIÓN CE
❍ CICLO DE
OPERACIÓN 3 MIN. ENCENDIDO [ON] - 1 MIN. APAGADO [OFF]
ACERO INOXIDABLE PULIDO
ADO O
4
Page 6
OPERACIÓN
1. Antes de empezar, cerciórese de que el cordón de la licuadora esté desenchufado y que el
conmutador está en la posición “OFF”, APAGADO (0).
2. Coloque el conjunto del recipiente en la base del motor para que se asiente firmemente y no se
incline hacia un lado.
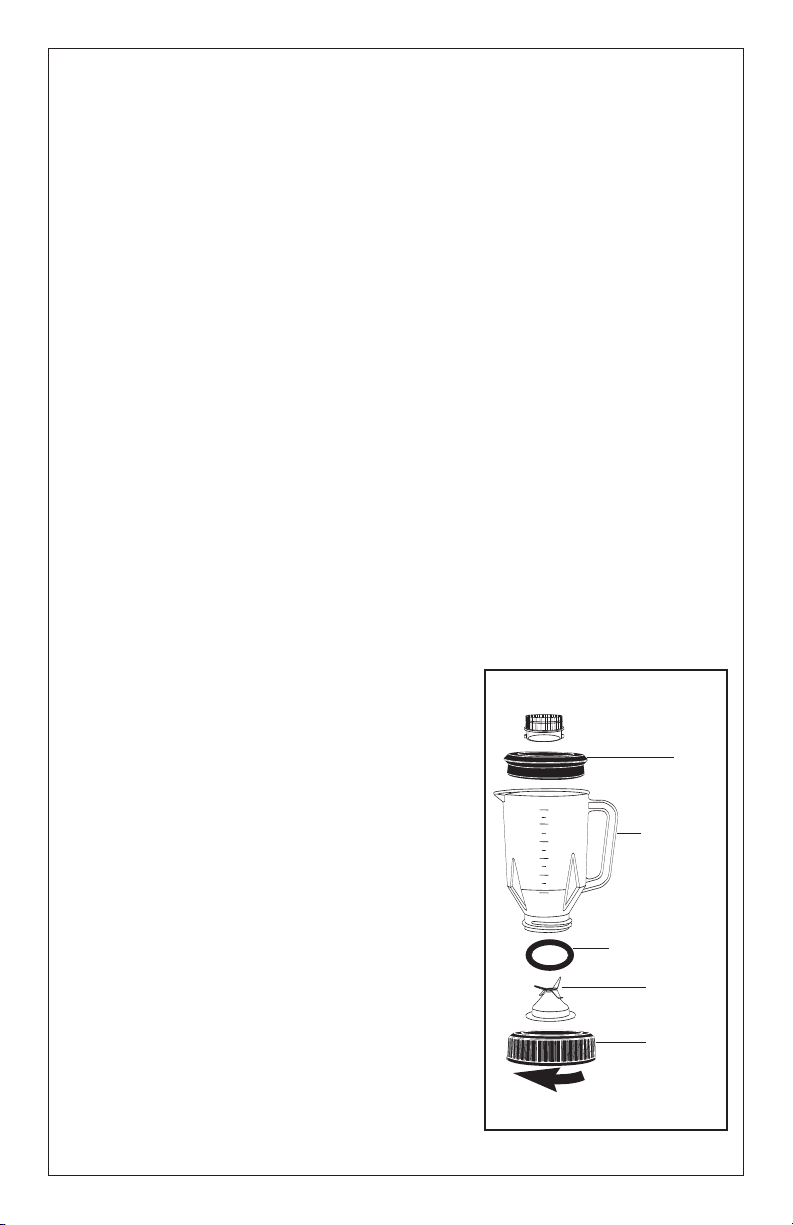
NOTA: Si su licuadora tiene un recipiente con base y cuchillas removibles, observe los siguientes
puntos para montar el recipiente. Refiérase a la Figura 1:
• La empaquetadura del recipiente debe situarse entre el conjunto de cuchillas y el
recipiente.
• La base del recipiente debe enroscarse correctamente en el recipiente.
• La base del recipiente debe apretarse firmemente en el recipiente antes de colocar
alimentos o líquidos en el recipiente.
• Apriete la base del recipiente, sosteniendo el recipiente hacia abajo y girando la base
la izquierda
, en la dirección de la fecha estampada en la parte de abajo de la base del
recipiente.
• Nunca coloque la base del recipiente ni el conjunto de cuchillas en la base del motor salvo
que estén totalmente ensamblados en el recipiente y firmemente apretados.
3. Cerciórese de que el conmutador siga en la posición “OFF”, APAGADO (O), y enchufe el
cordón eléctrico en un tomacorriente conveniente.
4. Ponga los ingredientes en el recipiente y tápelo. Siempre añada los ingredientes líquidos
primero, salvo que la receta especifique lo contrario. No se debe llenar por encima de la
línea MÁXIMA (MAX).
5. Ponga el conmutador en la posición “ON”, ENCENDIDO (I), “LOW”, BAJO (1) o “HIGH”,
ALTO (2). Siempre sostenga el recipiente con una mano al encender el aparato y durante el
mezclado. Nunca opere el aparato sin la tapa puesta en el recipiente.
Cuando haya terminado de mezclar, ponga el conmutador en la posición “OFF”, APAGADO
(O).
NOTA: Para licuadoras con cronómetros, gire la perilla
de control del cronómetro hacia la derecha hasta el
ajuste de tiempo deseado antes de encender el motor.
Si el ajuste de tiempo es inferior a 10 segundos, gire la
Taza medidora/tapón
(1 y 2 oz, 30 y 60 ml)
perilla hasta después de "10" y luego dé vuelta hasta el
ajuste deseado.
Cuando el conmutador se ajuste en la velocidad
deseada, el motor se encenderá. El motor se apagará
automáticamente al final del tiempo fijado, y se
encenderá la luz indicadora.
Ponga el conmutador en la posición “OFF”, APAGADO
(O), la luz indicadora se apagará.
Al girar la perilla del cronómetro hacia la izquierda
hasta la posición “MANUAL”, el cronómetro y la luz
indicadora se deshabilitan, permitiendo que la
licuadora se encienda y apague manualmente.
Empaquetadura
6. Deje que el motor se detenga totalmente antes de
quitar el recipiente. Nunca debe colocar el r
ecipiente
sobre la base del motor ni quitarlo de la base del motor
mientras el motor esté en operación.
7. Quite el recipiente de la base del motor y vacíe el
contenido.
8. Lave y seque el recipiente después de cada uso. Los
recipientes con bases removibles deben desmontarse
antes de ser lavados.
etar hacia la izquier
Apr
Figura 1
hacia
Tapa
Recipiente
Conjunto
de cuchillas
Base del
recipiente
da
5
Page 7

• Las siguientes piezas pueden lavarse en el lavaplatos: recipientes de vidrio, recipientes de
acero inoxidable, bases removibles de recipientes, conjuntos de cuchillas y
empaquetaduras.
Las siguientes piezas no pueden lavarse en el lavaplatos y deben lavarse a mano:
•
recipientes plásticos, tapas de recipientes y tazas de medición/tapones.
Después de limpiar y secar el aparato, reensamble los recipientes con bases removibles.
Cerciórese de que la empaquetadura se sitúe entre el conjunto de cuchillas y el recipiente,
según se muestra en la Figura 1.
Apriete firmemente la base del recipiente antes de cada uso.
9. No se debe lavar a chorro.
INSTRUCCIONES DE MEZCLADO EN CALIENTE
¡IMPORTANTE!
Para minimizar la posibilidad de quemaduras durante el mezclado de materiales calientes,
deben observarse los siguientes procedimientos y precauciones:
1. Limite la cantidad de material procesado a 1/2 pinta (235 ml).
2. Quite totalmente la taza de medición/tapón antes de encender la licuadora. Esto permitirá el
escape del aire que se calienta y expande rápidamente dentro del recipiente cuando la
licuadora está en operación.
3. Siempre empiece el mezclado en el ajuste de velocidad más bajo y aumente lentamente a la
velocidad deseada.
4. Nunca debe pararse directamente sobre la licuadora al encenderla o mientras está en
operación.
OPERACIÓN DE INTERRUPTORES
Hay un pequeño botón cuadrado de plástico rojo situado en la parte de abajo de la base
del motor.
Este es el botón de reajuste del interruptor, que impide que el motor se sobrecaliente en
caso de sobrecarga.
En caso de ocurrir una sobrecarga, el interruptor apagará el motor y hará que el botón rojo
sobresalga ligeramente de su posición normal.
Para reajustar el interruptor y reanudar la operación, haga lo siguiente:
1) PONGA EL CONMUTADOR EN LA POSICIÓN “OFF”, APAGADO (0).
2) DESCONECTE EL CORDÓN ELÉCTRICO DEL TOMACORRIENTE.
3) DETERMINE EL MOTIVO DE LA SOBRECARGA Y ELIMINE LA CAUSA (POR EJEMPLO:
REDUZCA LA CANTIDAD DE MATERIAL QUE SE PROCESA).
4) PRESIONE EL BOTÓN ROJO DE REAJUSTE HASTA SU POSICIÓN NORMAL.
5) ENCHUFE EL CORDÓN ELÉCTRICO EN EL TOMACORRIENTE.
6) REANUDE LA OPERACIÓN NORMAL.
MANTENIMIENTO
• MOTOR
No se debe lavar a chor
El motor no necesita engrasado ni lubricación. La lubricación sellada permite que la unidad
opere sin problema de por vida.
• CORDÓN ELÉCTRICO
El cordón eléctrico no debe ser r
El cordón eléctrico sólo debe ser reemplazado por el importador autorizado del fabricante (o,
o.
r
eemplazado por el usuario final.
6
Page 8

en Estados Unidos y Canadá, por un centro de servicio autorizado).
Para reparaciones o en caso de otras preguntas, por favor, comuníquese con el importador
autorizado del fabricante (o, en Estados Unidos o Canadá, con un centro de servicio
autorizado).
GARANTÍA
Para los productos vendidos fuera de los EE.UU. y Canadá, la garantía es responsabilidad del
importador o distribuidor local. Esta garantía puede variar de acuerdo a regulaciones locales.
Atención: Esta garantía es inválida si el aparato es usado en Corriente Continua (D.C.)
7
Page 9

IMPORTANTES CONSIGNES DE SÉCURITÉ
Lorsque vous utilisez des appareils électroménagers, vous devriez toujours observer les
précautions de sécurité de base suivantes:
11.
LISEZ TOUTES LES INSTRUCTIONS.
12. Pour vous protéger contre les dangers électriques, ne submergez pas le socle du mixer
dans l'eau ou tout autre liquide.
13. Une surveillance minutieuse est nécessaire lorsqu'un appareil électroménager est utilisé
par des enfants ou à proximité des enfants.
14. Débranchez l'appareil s'il n'est pas utilisé, avant d'installer ou d'enlever des pièces ou
avant son nettoyage.
15. Evitez le contact avec les pièces mobiles.
16. Ne vous servez pas d'un appareil électroménager ayant un cordon ou une fiche
endommagée ou après un mauvais fonctionnement de l'appareil ou après une chute ou
des dégâts de n'importe quelle nature. Renvoyez l'appareil au centre de service agréé le
plus proche pour examen, réparation ou réglage électrique ou mécanique.
17. L'emploi d'accessoires, y compris des bocaux de mise en conserve n'ayant pas été
recommandés par le fabricant, peut causer des dangers.
18. N'utilisez pas l'appareil à l'extérieur.
19. Ne laissez pas le cordon pendre au delà du bord de la table ou du comptoir, ou toucher
des surfaces chaudes.
10. Ne mettez pas les mains ou des ustensiles ménagers dans le récipient durant la marche
afin d'éviter toute possibilité de graves blessures et/ou d’endommager l'appareil.
L'emploi d’une spatule en caoutchouc est permis mais seulement lorsque le mixer est
à l'arrêt.
11. Les lames sont effilées. Manipulez-les avec soin.
12. Si votre mixer utilise un ensemble amovible de socle pour bocal et de lames, ne posez
jamais les lames sur la base sans avoir convenablement fixé le récipient, afin d'éviter des
blessures.
13. Servez-vous toujours du mixer avec le couvercle en place.
14. Lorsque vous mélangez des liquides chauds, enlevez la pièce centrale du couvercle en
deux parties pour les appareils munis de ce type de couvercle. Voir les instructions pour
le mélange à chaud.
GARDEZ CES INSTRUCTIONS
CARACTERISTIQUES TECHNIQUES
❍ CARACTERISTIQUES 230 VCA - 50 Hz - MONOPHASE
ELECTRIQUES
❍ MOTEURS TYPE UNIVERSEL, LUBRIFIE A VIE ET BOBINAGE
SERIE
AINS MODELES SONT MUNIS D’UNE MINUTERIE
T
❍ MINUTERIE
❍ BASES
CER
60 SECONDES POUR LE
ABLE DE 1
AJUST
MELANGE AUTOMATIQUE, AVEC UN REGLAGE
MANUEL PERMETTANT LE FONCTIONNEMENT EN
CONTINU
ZINC MOULE
INOXYDABLE POLI
A
VEC FINI EN EMAIL GRIS OU ACIER
A
8
Page 10

❍ RECIPIENTS ACIER INOXYDABLE, VERRE DE BOROSILICATE,
PLASTIQUE DE POLYCARBONATE OU ACRYLIQUE
❍ CORDON CORDON A TROIS CONDUCTEURS MIS A LA MASSE
❍ HOMOLOGATION CE
❍ CYCLE DE
FONCTIONNEMENT: 3 MIN. EN MARCHE (ON)/1 MIN. ÀL’ARRÊT (OFF)
FONCTIONNEMENT
1. Avant la mise en marche, assurez-vous que le cordon du mixer est débranché et que
l'interrupteur occupe la position ARRÊT, "OFF" (O).
2. Disposez le récipient sur la base moteur de façon à ce qu’il soit fermement engagé et non incliné.
NOTE : Si le fond et les lames du recipient de votre mixer sont amovibles, il est essentiel de
suivre les instructions ci-dessous lors de l'assemblage du recipient (voir figure 1) :
• Le joint du récipient doit se situer entre l'ensemble de lames et le récipient.
• Le fond du récipient doit être correctement vissé au récipient.
• Le serrage entre le fond du récipient et le récipient doit être bien solide avant de placer des
denrées ou du liquide dans le récipient.
• Serrez le fond du récipient en tenant ce dernier sens dessus dessous et en tournant le fond
dans le sens
• Ne mettez jamais le fond du récipient ou l'ensemble de lames sur la base moteur à moins
qu'ils ne soient entièrement assemblés au récipient et bien serrés.
3. Assurez-vous que l'interrupteur occupe toujours la position ARRÊT, "OFF" (O) et branchez le
cordon électrique sur une prise.
4. Mettez les ingrédients dans le récipient et recouvrez-le. Ajoutez toujours les ingrédients liquides
en premier à moins qu'il ne soit indiqué autrement dans
la recette. Ne pas remplir au-delà de la ligne max.
5. Mettez l'interrupteur sur la position MARCHE, "ON" (I),
LENT, "LOW" (1) ou RAPIDE, "HIGH" (2). Tenez toujours le
récipient avec une main lors de la mise en marche et au
cours du mélange. N'utilisez jamais l'appareil sans le
couvercle en place.
Une fois le mélange terminé, mettez l'interrupteur sur la
position ARRÊT, "OFF" (O).
NOTE: Pour les mixers munis de minuterie, tournez le
bouton de celle-ci dans le sens horaire sur le réglage de
temps désiré avant de mettre le moteur en marche. Si le
réglage est inférieur à 10 secondes, tournez le bouton audelà de "10", puis, revenez au réglage désiré.
Lorsque l'interrupteur est réglé à la vitesse désirée, le
moteur tournera. Le moteur s'arrêtera automatiquement à
la fin du délai réglé et le voyant lumineux s'allumera.
Mettez l'interrupteur sur la position ARRÊT, "OFF" (O); le
voyant lumineux s'éteindra.
Si vous tournez le bouton de la minuterie dans le sens
antihoraire vers la position MANUEL (“MANUAL”), la
minuterie sera désactivée et le voyant lumineux s'éteindra
ce qui permettra l'activation et la désactivation manuelle
du mixer.
antihoraire, dans le sens de la flèche moulée sur le côté inférieur du fond.
Verre doseur insérable
dans le couvercle
(30 et 60 ml; 1 et 2 oz.)
Couvercle
Récipient
Joint
Ensemble de
couteaux
Fond du
récipient
Serrer dans le sens
antihoraire
Fig. 1
9
Page 11

6. Laissez le moteur s'arrêter complètement avant d'enlever le récipient. Ne mettez jamais le
récipient sur la base moteur ou ne l'enlevez jamais de la base moteur pendant que le moteur
tourne.
7. Enlevez le récipient de la base moteur et videz-le de son contenu.
8. Lavez et séchez le récipient après chaque emploi. Démontez les récipients à fond démontable
avant de les laver.
• Les pièces suivantes conviennent au lavage dans un lave-vaisselle: récipients en verre,
récipients en acier inoxydable, les fonds amovibles, les ensembles de lames et les joints.
•
Les pièces suivantes ne conviennent pas au lavage dans un lave-vaisselle et doivent être
lavées à la main: récipients en plastique, couvercles de récipients, et cuvettes de mesure
insérables.
Après lavage et séchage, réassemblez les récipients à fond amovible. Assurez-vous que le joint
se situe entre l'ensemble de lames et le récipient, voir Figure 1.
Serrez bien le fond du récipient avant chaque emploi.
9. Non destiné au nettoyage à jet d’eau.
INSTRUCTIONS IMPORTANTES POUR
LE MÉLANGE À CHAUD!
Afin de minimiser les possibilités de brûlures lors du mélange d’ingrédients chauds, les
précautions et procédures suivantes doivent être suivies.
1. Limitez la quantité de matière à mélanger à 235 ml (1/2 pint).
2. Enlevez complètement le verre doseur du couvercle avant de mettre l'appareil en marche. Cela
permet à l'air chaud en expansion de pouvoir s'échapper du récipient lorsque l'appareil est en
marche.
3. Commencez toujours à mélanger en utilisant la plus basse vitesse, puis augmenter
progressivement jusqu'à la vitesse désirée.
4. Ne vous tenez jamais juste au-dessus de l'appareil au moment de la mise en marche ni quand
il fonctionne.
FONCTIONNEMENT DU DISJONCTEUR
Vous trouverez un petit bouton rouge carré en plastique sur le côté inférieur de la base moteur.
Il s'agit du bouton de réarmement d'un disjoncteur qui empêche la surchauffe du moteur en
cas de surcharge.
En cas de surcharge, le disjoncteur coupera le moteur et fera légèrement ressortir le bouton
rouge.
Pour le réarmement du disjoncteur, et pour reprendre le fonctionnement, faites comme suit:
1) METTEZ L'INTERRUPTEUR SUR LA POSITION ARRÊT, "OFF" (O).
2) DÉBRANCHEZ LE CORDON ÉLECTRIQUE DE SA PRISE.
3) DÉTERMINEZ LA CAUSE DE LA SURCHARGE ET SUPPRIMEZ-LA. (P
RÉDUISEZ LE VOLUME D’INGRÉDIENTS À MÉLANGER).
4) PRESSEZ DE NOUVEAU LE BOUTON ROUGE DANS SA POSITION NORMALE.
5) REBRANCHEZ LE CORDON ÉLECTRIQUE SUR SA PRISE.
6) REPRENEZ L'EMPLOI NORMAL DE L'APPAREIL.
10
AR EXEMPLE:
Page 12

ENTRETIEN
• MOTEUR
Non destiné au nettoyage à jet d’eau.
Le moteur n'exige aucun graissage ou huilage. La lubrification scellée assure un fonctionnement
sans problème pour la vie utile de l'appareil.
• CORDON ÉLECTRIQUE
L'utilisateur ne doit pas remplacer le cordon électrique.
Le cordon électrique ne devrait être remplacé que par l'importateur agréé du fabricant (ou, aux
Etats-Unis et au Canada, par un centre de service agréé).
Pour des réparations ou d'autres questions, veuillez contacter l'importateur agréé du fabricant
(ou, aux Etats-Unis et au Canada, un centre de service agréé).
GARANTIE
En ce qui concerne les produits Waring commercialisés à l'extérieur des Etats-Unis et du Canada,
la responsabilité de la garantie incombe à l'importateur ou au distributeur local. Cette garantie
peut varier en fonction de la réglementation locale.
AVERTISSEMENT : Toutes les garanties sont NULLES si l'appareil est utilisé sur le courant
continu (c.c.).
11
Page 13

WICHTIGE VORSICHTSMASSNAHMEN
Beim Umgang mit elektrischen Geräten sind stets grundlegende Sicherheitsmaßnahmen
einzuhalten, hierin eingeschlossen die folgenden Sicherheitsvorkehrungen:
11.
LESEN SIE DIE GESAMTE BEDIENUNGSANLEITUNG SORGFÄLTIG.
12. Zum Schutz vor elektrischen Schocks darf das Mixergehäuse weder in Wasser noch
andere Flüssigkeiten getaucht werden.
13. Werden elektrische Geräte von Kindern oder in deren Nähe benutzt, ist besondere Sorgfalt
anzuwenden.
14. Nehmen Sie stets den Netzstecker aus der Steckdose, wenn das Gerät nicht in Benutzung
ist, vor dem Zerlegen bzw. dem Befestigen von Aufsätzen sowie zum Reinigen des
Gerätes.
15. Vermeiden Sie den Kontakt mit sich bewegenden Teilen.
16. Elektrische Geräte dürfen nicht benutzt werden, wenn Netzkabel oder Netzstecker
beschädigt sind, wenn das Gerät nicht voll funktionstüchtig ist, fallengelassen oder auf
etwaige andere Art beschädigt wurde. Bringen Sie in einem solchen Fall das Gerät zur
Reparatur oder zur elektrischen bzw. mechanischen Einstellung zur nächsten
entsprechend autorisierten Kundendienststelle.
17. Der Gebrauch von Zusätzen, die vom Gerätehersteller nicht empfohlen wurden,
einschließlich Einmachgläsern u.ä., stellt eine Gefahr dar.
18. Nicht im Fr
19. Lassen Sie das Netzkabel nicht über den Tisch- bzw. Arbeitsflächenrand hängen. Kabel
nicht mit heißen Flächen in Berührung kommen lassen.
10. Um schwere Verletzungen und/oder Beschädigungen des Mixers zu vermeiden, während
des Mixvorgangs Hände und Arbeitsutensilien nicht in den Behälter bringen. Die
Benutzung eines Gummischabers ist möglich, jedoch nur, wenn der Mixer nicht läuft.
11. Vorsicht im Umgang mit den scharfen Messern.
12. Bei Mixermodellen mit abnehmbarem Behälteraufbau und Messereinsatz ist stets nur der
vorschriftsmäßig zusammengesetzte, komplette Behälter auf das Gehäuse aufzusetzen.
Zur Vermeidung von Verletzungen niemals die Schneidemesser alleine auf dem Gehäuse
befestigen.
13. Mixer stets mit Deckel verwenden.
14. Beim Mixen heißer Flüssigkeiten ist bei Mixermodellen mit zweiteiligem Deckel das
Mittelstück zu entfernen. Beachten Sie hierzu bitte die Anleitung zum Mixen heißer
Substanzen.
eien verwenden.
SICHERHEITSHINWEISE BITTE GUT
AUFBEWAHREN
TECHNISCHE DATEN
❍
STROMVERSORGUNG 230 V - 50 Hz - WECHSELSTROM/EINPHASIG
❍
MOTOR DAUERGESCHMIERTER, IN SERIE GEWICKELTER UNIVERSALTYP
❍
ZEITUHR EINIGE MODELLE HABEN EINE ZEITUHR, DIE FÜR AUTOMATISCHES
❍
GEHÄUSE ZINKGUSS - MIT EPOXIDEINBRENNLACKIERUNG ODER POLIERTER
❍
BEHÄLTER ROSTFREIER STAHL, BORSILIKATGLAS, POLYCARBONAT- ODER
MIXEN VON 1 BIS 60 SEKUNDEN EINGESTELL
ODER EINSTELLUNG PER HAND FÜR DAUERBETRIEB
EDELSTAHL
YL-KUNSTST
ACR
OFF
12
WERDEN KANN,
T
Page 14

❍
ANSCHLUSSKABEL DREIPOLIGES KABEL MIT ERDUNGSANSCHLUSS
❍
CE Listed NUR GERÄTE FÜR 120 V
❍
Kurzzeitbatrieb: 3 min AN (ON)/ 1 min AUS (OFF)
BETRIEB
1. Vergewissern Sie sich vor Inbetriebnahme, daß das Anschlußkabel nicht an das Stromnetz
angeschlossen ist, und daß der Ein/Aus-Schalter auf AUS, "OFF" (0) steht.
2. Plazieren Sie den fertig zusammengesetzten Behälter festsitzend und ohne Schräglage auf das
Motorengehäuse.
ZUR BEACHTUNG: Wenn Ihr Mixer einen Behälter mit abnehmbarem Unterteil und
Schneidemessern hat, sind die folgenden Punkte beim Zusammensetzen des Behälters zu
beachten. Siehe bitte Abb. 1.
• Der Dichtungsring muß sich zwischen Messereinsatz und Behälter befinden.
• Das Schraubgewinde darf nicht fehlerhaft oder verkantet auf den Behälter aufgeschraubt
werden.
• Das Schraubgewinde muß fest mit dem Behälter verbunden sein, bevor Lebensmittel oder
Flüssigkeiten in den Behälter gefüllt werden.
• Drehen Sie das Schraubgewinde fest, indem Sie den Behälter umdrehen und das
Schraubgewinde
Unterseite des Schraubgewindes festdrehen.
• Plazieren Sie niemals das Schraubgewinde oder den Messereinsatz auf das Motorengehäuse,
wenn diese nicht vollständig und sicher mit dem Behälter verbunden sind.
3. Vergewissern Sie sich, daß sich der Ein/Aus-Schalter noch in der AUS “OFF”-Stellung (O)
befindet, und stecken Sie das Anschlußkabel in die
Steckdose ein.
4. Füllen Sie die Zutaten in den Behälter und verschließen
Sie ihn mit dem Deckel. Zutaten in flüssiger Form sind
stets zuerst in den Behälter zu füllen, sofern nicht im
Rezept anderweitig angegeben. Nict über die Füllmarke
MAX auffullen!
5. Stellen Sie den EIN/AUS-Schalter auf EIN, "ON" (I),
Schalterstellung NIEDRIG, "LOW" (1), bzw. HOCH, "HIGH"
(2). Halten Sie den Behälter in der Anlaufphase und
während des Mixvorgangs stets mit einer Hand. Während
des Betriebs muß sich der Deckel stets auf dem Behälter
befinden.
Ist der Mixvorgang beendet, stellen Sie den EIN/AUS-
Schalter auf AUS, "OFF" (O).
ZUR BEACHTUNG: Bei Mixermodellen mit einem Zeituhr
vor der Einschalten des Motors den Zeituhrknopf im
Uhrzeigersinn auf die gewünschte Zeit einstellen. Liegt
die gewünschte Zeiteinstellung unter 10 Sekunden, den
Knopf zuerst über die Marke "10" hinausbewegen, dann
auf die gewünschte Zeiteinstellung zurückdr
Ist die gewünschte Laufgeschwindigkeit eingestellt,
beginnt der Motor zu laufen. Nach Ablauf der
eingestellten Zeit kommt der Motor automatisch zum
entgegen dem Uhrzeigersinn, in Richtung der Pfeilprägung auf der
Meßbecher-Deckeleinsatz
(30 & 60 ml; 1 & 2 oz.)
Deckel
Behälter
Dichtungsring
Messereinsatz
Schraubgewinde
ehen.
Entgegen dem Uhr
zeigersinn
festdrehen
Abb. 1
13
Page 15

Stillstand, und die Anzeigelampe leuchtet auf.
Die Anzeigelampe erlöscht, wenn der EIN/AUS-Schalter auf AUS, "OFF" (O) gestellt wird.
Das Einstellen des Zeituhrknopfes entgegen dem Uhrzeigersinn auf die "MANUAL"-Position (d.h.
AUTOMATIK-AUS-Position) bewirkt, daß sowohl Zeituhr als auch Anzeigelampe
funktionsunfähig sind; der Mixer läßt sich somit von Hand ein- und ausschalten.
6. Der Mixerbehälter darf erst herausgenommen werden, wenn der Motor völlig zum Stillstand
gekommen ist. Den Behälter niemals auf das Motorengehäuse stellen oder herausnehmen,
wenn der Motor noch läuft.
7. Mixerbehälter vom Motorengehäuse abnehmen und entleeren.
8. Mixerbehälter nach jedem Gebrauch reinigen und trocknen. Behälter mit abnehmbarem Unterteil
sind vor dem Reinigen zu zerlegen.
• Folgende Teile sind spülmaschinenfest: Glasbehälter, Edelstahlbehälter, abnehmbare
Schraubgewinde, Messereinsätze und Dichtungsringe.
•
Folgende Teile sind nicht spülmaschinenfest und müssen von Hand gereinigt werden:
Plastikbehälter, Behälterdeckel und Meßbecher-Deckeleinsätze.
Nach dem Reinigen und Trocknen Behälter mit abnehmbarem Unterteil wieder
zusammensetzen. Achten Sie darauf, daß sich der Dichtungsring zwischen Messereinsatz und
Behälter befindet (vgl. Abb.1).
Vor jedem Gebrauch das Schraubgewinde gut festdrehen.
WICHTIG! ANLEITUNG ZUM MIXEN HEISSER SUBSTANZEN
Um die Gefahr von Verbrennungen beim Mixen heißer Flüssigkeiten auf ein Minimum zu
beschränken, sind folgende Vorsichtsmaßnahmen und Vorgehensweisen unbedingt einzuhalten:
1. Die Menge des zu verarbeitenden Materials ist auf 235 ml (1/2 pint) zu beschränken.
2. Entfernen Sie den Meßbecher-Deckeleinsatz vollständig, bevor Sie das Gerät einschalten. Dies
gewährleistet ein sicheres Ausströmen der Luft, die sich im Behälter befindet und sich im
laufenden Gerät sehr rasch erhitzt und ausdehnt.
3. Beginnen Sie den Mixvorgang stets auf der niedrigsten Geschwindigkeitsstufe und schalten sie
erst dann zur gewünschten Geschwindigkeit hinauf.
4. Beugen sie sich niemals direkt über das Gerät, wenn es gerade eingeschaltet wird oder während
es läuft.
STROMUNTERBRECHERKONTAKT
Auf der Unterseite des Motorengehäuses befindet sich ein kleiner quadratischer roter
Plastikknopf.
Dies ist der Rückstellknopf des Stromunterbrechers, mit dem ein Überhitzen des Motors für
den Fall einer Überlastung vermieden wird.
Beim Auftreten einer Überlastung wird der Motor durch den Stromunterbrecher abgeschaltet
und der rote Knopf tritt leicht aus seiner normalen Position hervor.
Zum Wiedereinschalten des Stromunterbrechers und zur Wiederaufnahme des Betriebs ist
folgendermaßen vorzugehen:
1) STELLEN SIE DEN EIN/AUS-SCHALTER AUF AUS "OFF" (0).
2) NEHMEN SIE DEN NETZSTECKER AUS DER STECKDOSE.
3) STELLEN SIE DEN GRUND FÜR DIE ÜBERLASTUNG FEST UND SCHAFFEN SIE
ENTSPRECHEND ABHILFE (ZUM BEISPIEL: VERRINGERN SIE DIE MENGE DES IM
MIXER BEFINDLICHEN ARBEITSGUTES).
4) DRÜCKEN SIE DEN ROTEN RÜCKSTELLKNOPF ZURÜCK IN SEINE AUSGANGSLAGE.
5) STECKEN SIE DEN NETZSTECKER WIEDER IN DIE STECKDOSE EIN.
6) NEHMEN SIE DEN BETRIEB WIEDER AUF.
14
Page 16

WARTUNG
• MOTOR
Nicht mit dem wasserstrahl reinigen und nur, wie in der Gebreauchsanweisung beschrieben
säubernl.
Der Motor muß weder geschmiert noch geölt werden. Abgedichtete Lager mit eingebauter
Schmierung garantieren problemlosen Betrieb auf Lebenszeit.
• NETZKABEL
Das Netzkabel sollte keinesfalls vom Endverbraucher ausgetauscht werden.
Das Netzkabel sollte nur von einem vom Hersteller hierfür autorisierten Importeur ausgetauscht
werden (oder, in den USA und Kanada, von einer autorisierten Kundendienststelle).
Bitte wenden Sie sich bei Reparaturen oder Anfragen an den vom Hersteller autorisierten
Importeur (oder, in den USA und Kanada, an eine autorisierte Kundendienststelle).
GARANTIE
Bei Waring-Produkten, die außerhalb der Vereinigten Staaten vertrieben werden, ist der örtliche
Importeur oder Distributor für die Garantie verantwortlich. Diese Garantie
unterliegt den dort geltenden Gesetzen und ist in verschiedenen Ländern unterschiedlich.
ACHTUNG: Diese Garantie ist NICHTIG, wenn das Gerät mit Gleichstrom betrieben wird.
15
Page 17

PRECAUZIONI IMPORTANTI
All’atto di usare apparecchi elettrodomestici occorre sempre seguire alcune basilari
precauzioni di sicurezza, incluse le seguenti:
1. LEGGERE INTERAMENTE LE ISTRUZIONI
2. Per proteggersi da infortuni causati dall’elettricità, non immergere la base del frullatore
in acqua od altri liquidi.
3. E’ necessario esercitare un’attenta vigilanza quando un elettrodomestico viene usato
da bambini, o in loro vicinanza.
4. Staccare la spina dalla presa di corrente quando l’apparecchio non è in uso, prima
di montare o smontare delle parti, e prima di pulirlo.
5. Evitare il contatto con parti in movimento.
6. Non usare un apparecchio il cui cavo di alimentazione o la spina sono lesionati, o dopo
un guasto, oppure dopo che l’apparecchio è caduto o è stato danneggiato. Riportare
l’apparecchio al più vicino servizio autorizzato di assistenza tecnica per essere
esaminato, riparato, o per una messa a punto elettrica o meccanica.
7. L’uso di accessori - inclusi i contenitori per conserve - non raccomandati dal produttore
dell’apparecchio può essere pericoloso.
8. Non usare in luoghi aperti.
9. Non lasciar pendere il cavo di alimentazione dal bordo del tavolo o dal banco di lavoro,
ed evitare che venga in contatto con superfici molto calde.
10. Non tenere mani od utensili nel recipiente quando il frullatore è in movimento, per
evitare la possibilità di serie lesioni personali e/o danni al frullatore. E’ possibile
adoperare una spatola di gomma, ma questa deve essere usata solo quando il frullatore
non è in funzione.
11. Fare attenzione: le lame sono taglienti.
12. Se il vostro frullatore usa un “Assieme Base del Recipiente e Lame” amovibile, allo
scopo di evitare lesioni non porre mai le lame dell’assieme di taglio sulla base se il
recipiente non è montato correttamente.
13. Usare il frullatore sempre con il suo coperchio inserito.
14. Quando vengono frullati liquidi molto caldi, togliere l’elemento al centro dei coperchi a
due elementi (sulle unità così dotate). Vedere le istruzioni per il frullaggio di sostanze
calde.
CONSERVATE QUESTE ISTRUZIONI
CARATTERISTICHE TECNICHE
❍ LIMITI D’IMPIEGO 230 V CA - 50 HZ - MONOFASE
❍ MOTORI A LUBRIFICAZIONE PERMANENTE
❍ CONTASECONDI ALCUNI MODELLI SONO DOTATI DI UN CONTASECONDI
❍ BASI PRESSOFUSE IN ZINCO CON FINITURA A SMALTO
❍ RECIPIENTE ACCIAIO INOSSIDABILE, VETRO AL BOROSILICATO,
❍ CAVO
DI ALIMENTAZIONE CAVO A TRE CONDUTTORI CON PRESA DI TERRA
❍ CE LISTED
AVVOLGIMENTO IN SERIE TIPO
UNIVERSALE
REGOLABILE DA 1 A 60 SECONDI PER IL FRULLAGGIO
AUTOMATICO, CON UNA IMPOSTAZIONE MANUALE PER
IL FUNZIONAMENTO CONTINUO.
EPOSSIDICO O IN ACCIAIO INOSSIDABILE LUCIDA
TO.
PLASTICA DI POLICARBONATO O ACRILICA.
SOLO I MODELLI A 120 V
16
Page 18

❍ CICLO DE
OPERACIÓN 3 MIN. ENCENDIDO [ON] - 1 MIN. APAGADO [OFF]
❍ CICLO OPERATIVO 3 min ON / 1 min OFF
FUNZIONAMENTO
1. Prima di iniziare accertarsi che il cavo di alimentazione del frullatore non è inserito nella
presa, e che l’interruttore è in posizione OFF (O).
2. Porre l’assemblaggio del recipiente sulla base motrice in modo che sia saldamente
insediato e non sia inclinato su un lato.
NOTA: Se il vostro frullatore ha un recipiente con base e lame amovibili, occorre osservare
i seguenti punti per installare il recipiente. Fare riferimento alla fig.1:
• La guarnizione del recipiente deve stare tra l’assieme delle lame ed il recipiente.
• Il fondo del recipiente deve essere correttamente avvitato al recipiente stesso.
• Prima di versare cibi o liquidi nel recipiente accertarsi che il fondo è sicuramente
avvitato.
• Stringere il fondo del recipiente tenendo il recipiente sotto sopra e avvitando il fondo del
recipiente in senso
recipiente.
• Non porre mai il fondo del recipiente o l’assieme delle lame sulla base motrice, a meno
che non siano completamente montate sul recipiente ed avvitate in modo sicuro.
3. Accertarsi che l’interruttore è ancora in posizione OFF (O), quindi inserire la spina in
una adeguata presa di corrente.
4. Porre gli ingredienti nel recipiente e coprirlo. Gli ingredienti liquidi debbono sempre
essere aggiunti per primi, a meno che la ricetta non indichi diversamente. Non riempire
sopra la linea MAX.
5. Portare l’interruttore sulla POSIZIONE ON (I), LOW
(1), o HIGH (2). Il recipiente deve sempre essere
retto con una mano all’inizio e durante il
funzionamento. L’unità non va mai usata se il
coperchio non copre il recipiente.
Quando il frullaggio è finito portare l’interruttore sulla
posizione OFF (O).
NOTA: Per i frullatori dotati di un contasecondi,
impostare il tempo voluto ruotando la manopola di
controllo del contasecondi in senso orario. Se il tempo
voluto è meno di dieci secondi ruotare la manopola
oltre “10”, e poi riportarla indietro alla impostazione
desiderata.
Il motore parte quando l’interruttore viene impostato
alla velocità voluta. Il motore si ferma
automaticamente quando il tempo è trascorso, e la
spia luminosa si accende.
Quando l’interruttore viene riportato in posizione OFF
(O) la spia luminosa si spegne.
Se la manopola di controllo del contasecondi viene
portata - girando in senso antiorario - sulla posizione
MANUALE, il contasecondi e la spia luminosa
vengono disattivati. Questo permette l’avvio e l’arresto
antiorario, in direzione della freccia stampata sul fondo del
Dosatore inserito nel coperchio
(capacité le 2 once)
Coperchio
Recipiente
Guarnizione
Assieme lame
Fondo del
recipiente
Avvitare in senso antiorario
Figura 1
17
Page 19

manuale del frullatore.
6. Lasciare che il motore si arresti completamente prima di rimuovere il recipiente. Il
recipiente no va mai inserito sulla base motrice, o rimosso dalla base motrice, quando
il motore è funzionante.
7. Estrarre il recipiente dalla base motrice e vuotarne il contenuto.
8. Lavare ed asciugare il recipiente dopo ogni uso. Le parti componenti dei recipienti con
fondo amovibile debbono essere separate e lavate separatamente.
• Le seguenti parti possono essere pulite in un lavastoviglie: i recipienti di vetro, i
recipienti di acciaio inossidabile, i fondi amovibili dei recipienti, l’assieme delle lame, e
le guarnizioni.
• Le seguenti parti non possono essere pulite in un lavastoviglie e vanno lavate a
mano: i recipienti di plastica, i coperchi dei recipienti, ed i dosatori inseriti nei
coperchi.
Dopo essere state lavate ed asciugate, le diverse parti dei recipienti con fondo amovibile
debbono essere nuovamente montate assieme.
Accertarsi che la guarnizione del recipiente sia inserita tra l’assieme delle lame ed il
recipiente, come mostra la Fig.1.
Dopo il lavaggio avvitare il fondo del recipiente in modo sicuro.
9. Non adatto per il lavaggio mediante getti d’acqua.
IMPORTANTI ISTRUZIONI PER IL
FRULLAGGIO DI CIBI CALDI!
Le seguenti precauzioni e procedure debbono essere osservate per ridurre al massimo la
possibilità di bruciature durante la preparazione di materiali molto caldi:
1. Limitare la quantità di materiale trattato a 1/2 pinta (235 ml).
2. Rimuovere completamente il dosatore inserito nel coperchio prima di avviare il
frullatore. Ciò permetterà la rapida fuoruscita dell’aria calda ed in espansione all’interno
del recipiente quando il frullatore è in funzione.
3. Iniziare sempre alla velocità più bassa, poi progredire alla velocità desiderata.
4. Non chinarsi mai direttamente sopra il frullatore quando viene avviato, o durante il
funzionamento.
FUNZIONAMENTO DELL’INTERRUTTORE AUTOMATICO
Sulla parte inferiore della base motrice di alcuni modelli si trova un piccolo tasto, rosso
e quadrato.
Si tratta del tasto di ripristino di un interruttore automatico che evita il surriscaldamento
del motore in caso di sovraccarico.
Nel caso di un sovraccarico, l’interruttore automatico toglie corrente al motore e provoca
la fuoruscita del tasto, e lo fa sporgere leggermente oltre la sua normale posizione.
Per ripristinare l’interruttore automatico, fare quanto segue:
1) METTERE L’INTERRUTTORE IN POSIZIONE OFF (O).
2) STACCARE IL CAVO D’ALIMENTAZIONE DALLA PRESA DI CORRENTE.
3) DETERMINARE LA CAUSA DEL SOVRACCARICO ED ELIMINARLA
’ DI MATERIALE IN PREPARAZIONE).
(AD ES. RIDURRE LA QUANTIT
4) SPINGERE IL TASTO DI RIPRISTINO RIPORTANDOLO ALLA SUA POSIZIONE
NORMALE.
5) ATTACCARE IL CAVO DI ALIMENTAZIONE ALLA PRESA DI CORRENTE.
6) PROCEDERE CON LA NORMALE OPERAZIONE.
A
18
Page 20

MANUTENZIONE
• MOTORE
Non deve essere pulito con getti d’acqua. Il motore non richiede né grasso né olio.
La sua lubrificazione incorporata ne consente il corretto funzionamento per la durata
del prodotto.
• CAVO DI ALIMENTAZIONE ELETTRICA
Il cavo d’alimentazione elettrica non deve essere sostituito dall’utente finale.
Il cavo d’alimentazione elettrica può essere sostituito solo dall’importatore autorizzato
dal fabbricante (oppure, negli Stati Uniti e Canada, da un centro autorizzato di
assistenza tecnica).
Per riparazioni od ulteriori informazioni, pregasi contattare l’importatore autorizzato
dal fabbricante (oppure, negli Stati Uniti e Canada, da un centro autorizzato di
assistenza tecnica).
GARANZIA
Per i prodotti Waring venduti fuori degli Stati Uniti e del Canada, la garanzia è
responsabilità dell'importatore o del distributore locale. Questa garanzia potrà variare in
funzione delle norme locali.
AVVERTENZA: Questa garanzia è nulla se l'apparecchio viene usato con Corrente Continua
(CC).
19
Page 21

BELANGRIJKE VOORZORGSMAATREGELEN
Bij het gebruik van elektrische apparaten, moeten fundamentele veiligheidsmaatregelen
altijd gevolgd worden, waaronder ook de volgende:
1. EERST ALLE INSTRUCTIES LEZEN.
2. Om zich tegen elektrische gevaren te beschermen, het Blender voetstuk niet in water
of andere vloeistof dompelen.
3. Scherp toezicht is noodzakelijk wanneer het apparaat door of vlakbij kinderen
gebruikt wordt.
4. Stekker uit het stopcontact nemen wanneer het apparaat niet in gebruik is, voor of na
het toevoegen of afhalen van onderdelen, en voor het reinigen.
5. Het aanraken van bewegende onderdelen vermijden.
6. Nooit apparaten met beschadigd snoer of stekker aanzetten, of wanneer het apparaat
defect is, gevallen is of op andere manier beschadigd. Het apparaat voor onderzoek,
reparatie of mechanische bijstelling naar de dichtsbijzijnde gemachtigde reparatie
zaak terugbrengen.
7. Het gebruik van niet door de fabrikant aanbevolen hulpstukken, inclusief
inmaakpotten, kan gevaar oorzaken.
8. Niet buitenshuis gebruiken.
9. Het snoer niet over de rand van tafel of keukenblok laten hangen noch met hete
oppervlaktes in contact laten komen.
10. Handen en keukengerei gedurende het mengen buiten het vat houden om de
mogelijkheid van persoonlijke verwonding of beschadiging van de Blender te
voorkomen. Een rubbere flesselikker mag gebruikt worden maar alleen als de Blender
niet aanstaat.
11. De snijbladen zijn scherp. Voorzichtig mee omgaan.
12. Indien uw Blender een verwijderbaar Vat Voetstuk en Voetstuk Assemblage heeft-om
verwonding te voorkomen, nooit het snijblad assemblage op het voetstuk plaatsen
zonder dat het vat op de juiste manier bevestigd is.
13. Blender altijd met het deksel erop aanzetten.
14. Wanneer hete vloeistoffen worden gemengd het middenstuk van tweedelig dekselmocht het apparaat deze constructie bezitten-verwijderen. Zie instructies voor Heet
Mengen.
DEZE INSTRUCTIES BEWAREN
SPECIFICATIES
❍ KLASSE 230 VAC - 50 Hz - enkele fase
❍ MOTOREN PERMANENT GESMEERDE SERIE - UNIVERSEEL
GEWONDEN STIJL
❍ TIJDKLOK SOMMIGE MODELLEN HEBBEN EEN TIJDKLOK,
REGELBAAR VAN 1 TOT 60 SECONDEN VOOR AUTOMATISCH
MENGEN, MET EEN HANDINSTELLING VOOR
ONONDERBROKEN MENGEN.
❍ VOETSTUKKEN ZINKEN GIETSEL MET EPOXY GLAZUREN AFWERKING, OF
GLANZEND ROESTVRIJ ST
AAL.
20
Page 22

❍ VATEN ROESTVRIJ STAAL, BOROSILICAAT GLAS,
POLYCARBONAAT OF ACRYLVEZEL PLASTIC.
❍ SNOER VAN DRIE GEAARDE GELEIDERS VOORZIEN
❍ CE LISTED
❍ WERKINGSPERIODE 3 min. AAN/ 1 min. UIT
GEBRUIKSAANWIJZING
1. Voordat u begint, vaststellen dat het snoer van de Blender uitgeschakeld is en dat de
knop op OFF/UIT (O) staat.
2. Het vat assemblage op het motor voetstuk plaatsen zodat het stevig vastzit en niet aan
één kant scheef staat.
N.B.: Indien uw Blender een vat heeft met demonteerbaar voetstuk en snijblad moeten de
volgende punten in aanmerking worden genomen bij het monteren van het vat. Zie
afbeelding 1:
• Rubber ring moet tussen het snijblad assemblage en het vat liggen.
• Bodem van het vat moet niet verkeerd gedraaid aan het vat vastzitten.
• Bodem van het vat stevig aan het vat vastzetten voordat voedsel of vloeistof in het vat
geplaatst wordt.
• Bodem van het vat vastmaken door het vat ondersteboven te houden en de bodem
linksdraaiend te roteren in de richting van de gegoten pijl op de onderkant van de bodem
van het vat.
• Bodem van het vat of snijblad assemblage nooit op het motor voetstuk plaatsen tenzij
deze veilig en geheel aan het vat zelf vastzitten.
3. Zeker weten dat de knop nog altijd op OFF/UIT (O) staat, daarna het snoer in het
stopcontact steken.
4. Ingrediënten in het vat plaatsen en deksel
dichtdoen. Vloeistoffen altijd eerst in het vat
plaatsen, tenzij recept dit op andere wijze aangeeft.
Niet boven de MAX lijn vullen.
5. Zet knop op ON/AAN (I), LOW/LAAG (1) of
HIGH/HOOG (2). Altijd het vat met één hand
vasthouden wanneer u begint en gedurende het
mengen. Nooit zonder deksel laten lopen.
Wanneer ingrediënten gemengd zijn, knop op OFF/UIT
(O) zetten.
N.B.: Met Blenders die een tijdklok hebben, de tijdklok
rechtsdraaiend op gewenste tijd instellen voordat de
motor wordt aangezet. Indien tijd instelling minder
dan 10 seconden is, de knop verder dan 10 seconden
draaien en dan terug naar gewenste tijd.
Wanneer de knop op gewenst tempo staat slaat de
motor aan. Motor stopt automatisch aan het einde
van tijd instelling en controle lichtje gaat aan.
Wanneer de knop op OFF/UIT (O) gezet wordt zal het
controle lichtje uitgaan.
Door de knop van de tijdklok linksdraaiend op
MANUAL (handbediening) te zetten worden tijdklok en
dans
Deksel maatbekertje inzetstuk
(1 & 2 oz., 30 & 80 ml)
Deksel
Vat
Rubberen ring
Snijblad
assemblage
Bodem van vat
Linksdraaiend vastzetten]
Afb. 1:
21
Page 23

controle lichtje onbruikbaar gemaakt zodat Blender met de hand aan en uit gezet kan
worden.
NOTE: Pour les mixers munis de minuterie, tournez le bouton de celle-ci dans le sens
horaire sur le réglage de temps désiré avant de mettre le moteur en marche. Si le réglage est
inférieur à 10 secondes, tournez le bouton au-delà de "10", puis, revenez au réglage désiré.
Lorsque l'interrupteur est réglé à la vitesse désirée, le moteur tournera. Le moteur s'arrêtera
automatiquement à la fin du délai réglé et le voyant lumineux s'allumera.
Mettez l'interrupteur sur la position ARRÊT, "OFF" (O); le voyant lumineux s'éteindra.
Si vous tournez le bouton de la minuterie dans le sens antihoraire vers la position MANUEL
(“MANUAL”), la minuterie sera désactivée et le voyant lumineux s'éteindra ce qui permettra
l'activation et la désactivation manuelle du mixer.
6. Motor volkomen tot stilstand laten komen vóór het vat te verwijderen. Vat nooit op
motor voetstuk plaatsen of van voetstuk verwijderen met motor in beweging.
7. Vat van het voetstuk afhalen en inhoud legen.
8. Vat na ieder gebruik wassen en afdrogen. Vaten met verwijderbare bodems moeten
vóór het wassen gedemonteerd worden.
• De volgende onderdelen mogen in vaatwasmachine: glazen vaten, roestvrije vaten,
verwijderbare bodems van vaten, snijblad assemblages en rubberen ringen.
De volgende onderdelen mogen NIET in vaatwasmachine en moeten met de hand
•
gewassen worden: plastic vaten, deksels en deksel inzetstukken.
Na het wassen en afdrogen, vaten met verwijderbare bodems weer monteren.
Vaststellen dat rubberen ring tussen snijblad assemblage en vat ligt, zie Afb. 1.
Na het wassen bodem van vat stevig vastdraaien.
9. Niet onder hoge druk waterstraal (waterjet) wassen.
INSTRUCTIES VOOR HEET MENGEN: BELANGRIJK!
Om de mogelijkheid van het zich branden te minimaliseren wanneer hete stoffen
gemengd worden, moeten de volgende maatregelen en methodes waargenomen worden:
1. De hoeveelheid van te mengen ingrediënten tot 1/2 pint (235 ml) beperken.
2. Het deksel inzetstuk volkomen verwijderen voordat de Blender wordt aangezet. Dit zal,
terwijl de motor in werking is, het wegtrekken van snel verhitte en zich uitbreidende
lucht binnen het vat toestaan.
3. Mengen altijd op laagste tempo beginnen en dan, zo gewenst, hoger zetten.
4. Nooit vlak boven de Blender staan wanneer het wordt aangezet of terwijl het in werking
is.
GEBRUIK VAN STROOMONDERBREKER
Bij sommige modellen zult u aan de onderkant van het motor voetstuk een kleine,
vierkante, rode plastic knop zien.
Dit is de terugstelinrichting (reset) knop, te gebruiken met een stroomonderbreker die de
motor ervan weerhoudt over
Mocht overbelasting zich voordoen, dan zal de stroomonderbreker de motor doen
stoppen en de knop enigszins doen uitpuilen vergeleken bij zijn normale stand.
Om stroomonderbreker terug te stellen en gebruik opnieuw te beginnen, moet het
volgende gedaan worden:
1. DE STROOMSCHAKELAAR OP OFF/UIT (O) ZETTEN.
2. HET SNOER UIT HET STOPCONTACT NEMEN.
3. DE REDEN VAN OVERBELASTING VASTSTELLEN EN DE OORZAAK ELIMINEREN (B.V.
verhit te raken in geval van overbelasting.
22
Page 24

HOEVEELHEID TE MENGEN STOF REDUCEREN).
4. DE RODE TERUGSTELINRICHTING KNOP INDRUKKEN TOT NORMALE STAND.
5. HET SNOER WEER IN HET STOPCONTACT INSCHAKELEN.
6. NORMAAL GEBRUIK HERVATTEN.
ONDERHOUD
* MOTOR
Niet met hoge druk waterstraal (waterjet) reinigen.
De motor niet met vet of olie smeren. Ingesloten smering geeft het onderdeel een
levenslange soepele werking.
* STROOMLEVERINGSSNOER
Het stroomleveringssnoer mag niet door de gebruiker vervangen worden.
Het stroomleveringssnoer mag alleen vervangen worden door een door de fabrikant
gemachtigde importeur (of wel, in de Verenigde Staten en Canada, door een gemachtigde
reparatie dienst).
Voor reparaties of andere vragen, graag contact opnemen met de door de fabrikant
gemachtigde importeur (of wel, in de Verenigde Staten en Canada, door een gemachtigde
reparatie dienst).
GARANTIE
Voor Waring producten die buiten de Verenigde Staten of Canada verkocht worden, is de
garantie de verantwoordelijkheid van de plaatselijke importeur of distributeur. Deze garantie
kan dan afhankelijk van plaatselijke regels variëren.
WAARSCHUWING: Deze garantie is van nul en gener waarde wanneer het product gebruikt
wordt met Direct Current (DC).
23
Page 25

Waring Commercial
314 Ella T. Grasso Ave.
Torrington, CT 06790
Printed in USA
www.waringproducts.com
018370 R
V008 0409
 Loading...