


Operating and installation instructions
WAREMA Mobile System
WMS Hand-held transmitter basic
Keep for future use!
Valid from 01 September 2014
890667_c•en•01.09.2014
We reserve the right to carry out improvements
1
Safety instructions
AUTIONC
The hand-held transmitter basic is for indoor
use only. It is not water-proof. Do not leave
the hand-held transmitter basic outdoors.
AUTIONC
Never activate buttons on your WMS Handheld transmitter basic arbitrarily without
visual contact to the sun shading product.
Children must not play with this product –
remote controls or transmitters must not get
into the hands of children!
Carry out the following steps in the sequence given to
ensure problem-free operation:
Please read these instructions carefully.
Insert the batteries.
Learn the WMS Hand-held transmitter basic into the
receivers.
Check that the system is functioning correctly.
Operating elements and displays
A
Fig. 2 Operating panel of the WMS Hand-held transmitter basic
General information
Fig. 1 WMS Hand-held transmitter basic
The WAREMA Mobile System (WMS) Hand-held transmitter
basic is used for the remote control of WAREMA WMS
receivers. The receivers send a confirmation of the
received commands, and the hand-held transmitter basic
indicates that it received the confirmation.
The WMS Hand-held transmitter basic supports five
different product types (awning, roller shutter, external
venetian blind, window, light).
Only one receiver or one group with multiple receivers of
the same product type can be actuated at any one time.
The comfort control functions can be switched on and off
via the WMS Hand-held transmitter basic.
If a control function is preventing operation of the product
(e.g. a wind alarm), this is also displayed on the WMS
Hand-held transmitter basic.
Intended use
This device was developed to control WAREMA Mobile
System (WMS) receivers. The approval of the manufacturer
must be obtained for uses outside of the purposes listed
in these instructions.
890667_c•en•01.09.2014
We reserve the right to carry out improvements
2
Pos. Fig. Function
A
Control on/off button
Switch on and off the control functions of the
receivers that were learned in.
Control function LED with two functions
When you press the control button , the
LED indicates whether the comfort control
functions are active or inactive.
If operation is blocked on your hand-held
transmitter, for example due to a wind alarm,
this LED flashes red. (The wind alarm keeps
your sun shading systems safe. When the set
wind speed limit is exceeded, the blinds are
retracted and manual operation is blocked
during this time.)
+
The control function LED and transmission
LED flash
ORANGE: Hand-held transmitter basic is in its
factory state (does not belong to a network, still
needs to be learned in).
OTEN If the two buttons flash red, you
pressed the button for too long
and you are now in the factory
mode. To leave this mode, press
the learn button briefly
.
4
Transmission LED flashes
GREEN: The hand-held transmitter basic is
transmitting.
RED: The hand-held transmitter basic did not
receive a response from the receiver
ORANGE: Change the batteries
5
UP/STOP/DOWN buttons
Send move or switch commands to the selected
receiver. If the hand-held transmitter basic is in the
info or learn mode, the buttons can be used to
change or store settings.
6
Comfort button
This button can be used to store and call up
comfort positions.
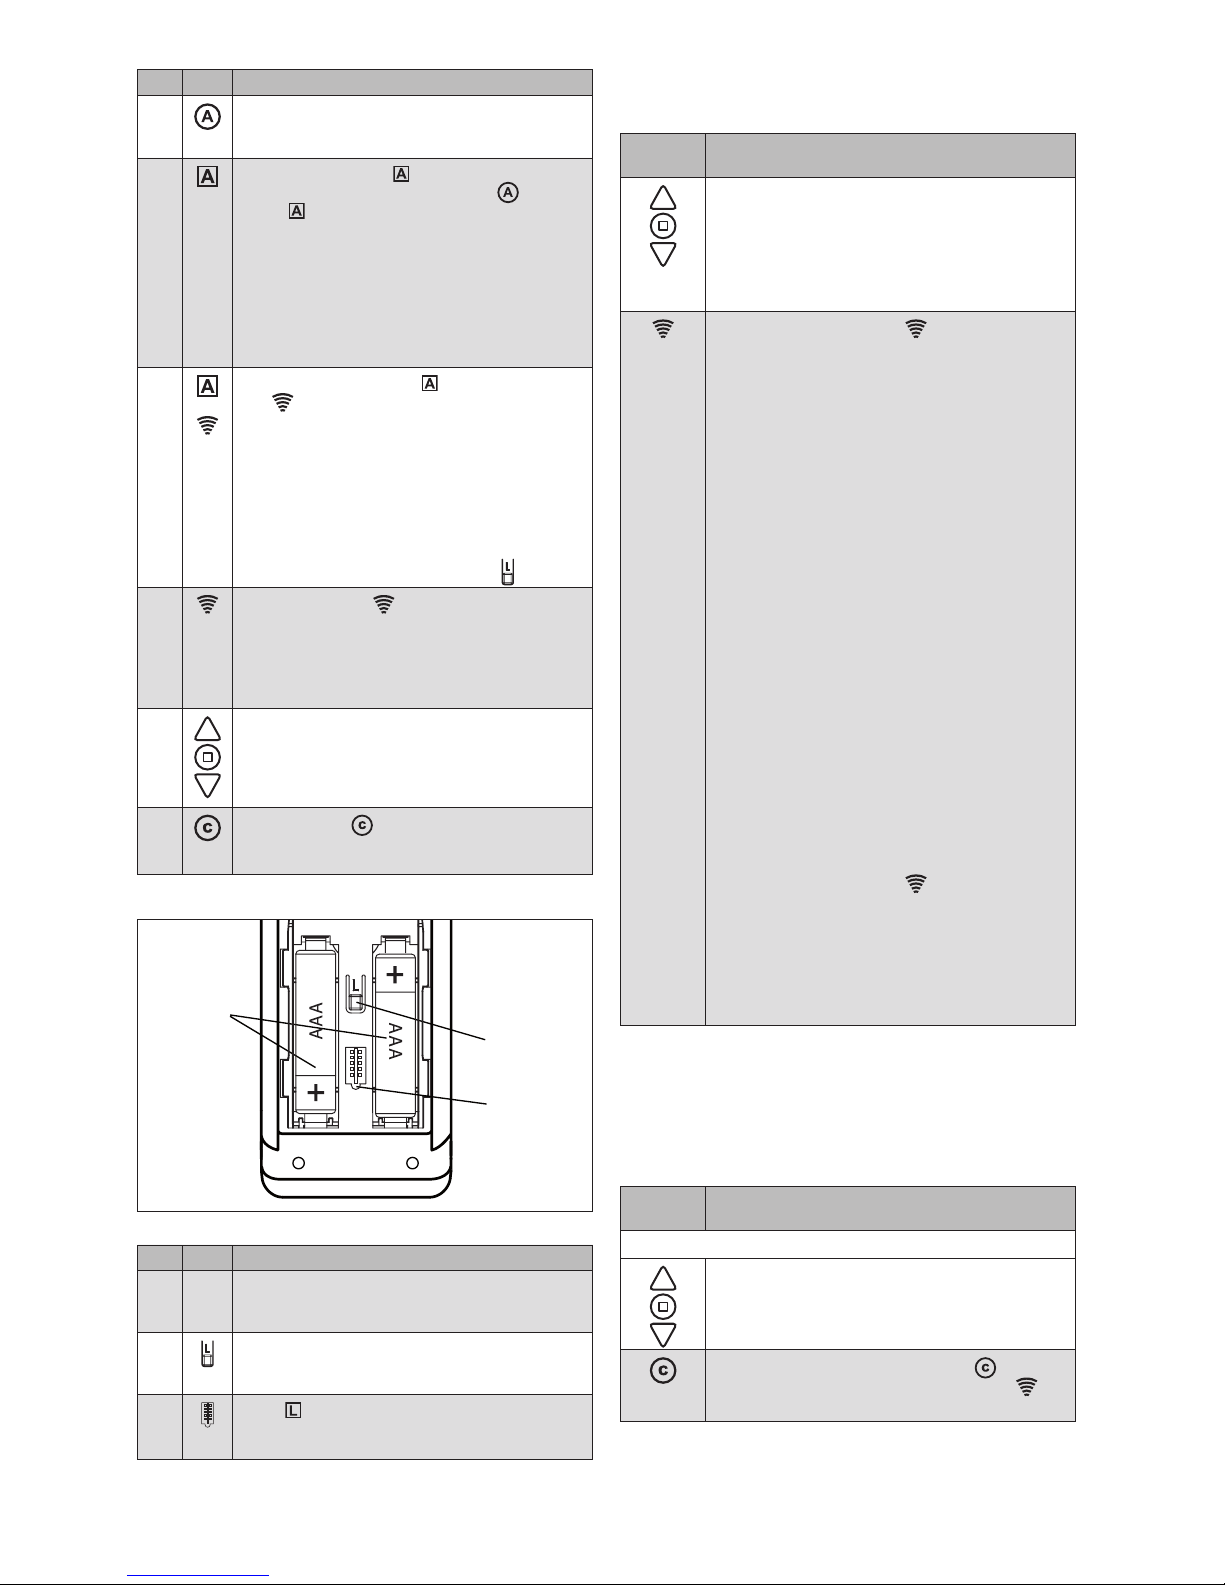
Operating elements on the back
Fig. 3 Back of the WMS hand-held transmitter basic
Pos. Fig. Function
7
Batteries
The hand-held transmitter basic requires two
batteries of type AAA (IEC LR03, "Micro")
8
Learn button
Activates or closes the learn mode of the handheld transmitter basic
9
L LED
Indicates that the hand-held transmitter is in learn
mode (lights up green)
Operation
Operating the products
Button/
display
Action/result
Operate the selected product using the
UP/STOP/DOWN buttons.
The operating instructions of the respective
receiver describe which operating options are
available to you (e.g. UP=ON, DOWN=OFF,
STOP=switch).
The transmission LED indicates that
transmission is occurring:
Flashes GREEN: The hand-held
transmitter is transmitting, then:
Lights up GREEN
for 2s: The receiver has
confirmed the command
Lights up RED
for 2s: The command has not been
confirmed (e.g. receiver is
outside of the transmission
range), or
the hand-held transmitter
was added to the network
but a channel has not yet
been copied onto the handheld transmitter.
Lights up GREEN
for 2s + control symbol is red:
The receiver confirms the
command, but does not
execute it because of the
displayed control function
(e.g. the awning is not
extended because the wind
alarm is active).
The transmission LED indicates that
transmission is occurring:
Lights up RED
for 2s: The hand-held transmitter
was added to the network
but a receiver has not yet
been assigned.
Learning/recalling the comfort positions
A comfort position can be stored for the receivers in the
network (e.g. awning half extended). The awning can be
automatically moved to this comfort position at the press
of a button.
Button/
display
Action/result
To learn in the comfort position:
"Move your product to the position that is
to be stored as the comfort position (see
"Operating the products").
Hold down the comfort button for 5
seconds until the transmission LED
lights up.

3
890667_c•en•01.09.2014
We reserve the right to carry out improvements
Button/
display
Action/result
To learn in the comfort position:
The transmission LED indicates that
transmission is occurring:
2s GREEN: The comfort position is
stored
2s RED: The command was not
confirmed (e.g. receiver
outside of transmission
range); repeat the procedure
To recall a comfort position:
Briefly press the comfort button .
The transmission LED flashes green.
The comfort position for the selected
product is restored automatically.
OTEN If a product is already in the comfort position or
if a comfort position has not been stored, the
selected product does not respond to pressing
of the comfort button :
OTEN When the comfort position is not moved to
correctly, the run time in the receiver must be
adjusted with a WMS Central transmitter or a
WMS Hand-held transmitter (please see the
operating instructions of the respective receiver).
Switching on/off the comfort control functions
Button/
display
Action/result
Press the control button .
The transmission LED flashes green.
The transmission LED lights up:
GREEN: The control
functions are
switched on in all
receivers
RED: Not all receivers could be
reached; switch the control
functions OFF and ON again
(or ON and OFF).
The A LED lights up:
GREEN: Switch on the control
functions
RED: Switch off the control functions
The hand-held transmitter basic always remembers the
command last sent. When the control button is pressed
again, the hand-held transmitter basic sends the opposite
command (ON - OFF - ON -...).
Commissioning
Films on commissioning can be found at:
http://www.warema.de/inbetriebnahme funksysteme
We recommend commissioning using the
WMS studio PC software.
Insert the supplied batteries into the battery
compartment as described in the "Maintenance and
cleaning" section. The device is ready to operate.
OTEN Before WMS receivers can be operated via a
hand-held transmitter, the hand-held transmitter
or the receiver must be included as a device in
a radio network.
The application examples below are intended to make it
easier for you to perform the procedures you require.
Example 1:
The existing system with a WMS Hand-held
transmitter is expanded to include a WMS Handheld transmitter basic
Step 1
Add the WMS Hand-held transmitter basic to the existing
network
Button/
display
Action/result
Wake up the WMS Hand-held transmitter
basic with the STOP button
Wake up the (large) WMS Hand-held
transmitter with any product button
Press the learn button on the large WMS
Hand-held transmitter for approx. 5s
+ lights up green; the transmission LED
flashes. For several seconds, the
hand-held transmitter scans the range for
devices.
E.g.
When the scanning procedure is
completed, the located devices are
displayed in the upper row of LEDs (here,
for example, 2 receivers).
RED: New device
GREEN: The device already belongs to
the network
Devices that already belong to a different
network are not located during scanning.
Select the desired device using the arrow
buttons.
(Briefly press to check which device is
currently selected. The product waves.)
E.g.
The LED of the selected device flashes on
the large WMS Hand-held transmitter.
Press the STOP button on the large
WMS Hand-held transmitter to add the
WMS Hand-held transmitter basic to the
network.
E.g.
The LED of the selected device flashes
green. The WMS Hand-held transmitter
basic has been successfully learned into
the network.
You can now add additional scanned products in the
same manner.
Briefly press the learn button to leave the
learn mode.

890667_c•en•01.09.2014
We reserve the right to carry out improvements
4
Step 2
Copy a channel from one WMS Hand-held transmitter
or a WMS Central transmitter to a WMS Hand-held
transmitter basic.
Button/
display
Action/result
Wake up the large WMS Hand-held
transmitter with any product button
Select the channel of the hand-held
transmitter that you wish to copy
Briefly press the learn button on the large
WMS Hand-held transmitter
L-LED lights up green
Briefly press the learn button on the
TARGET TRANSMITTER, the
hand-held
transmitter basic
in this case
L-LED lights up green
The transmission LED on the hand-held
transmitter basic flashes
GREEN During the transmission of data
from the WMS Hand-held
transmitter/Central transmitter
to the target transmitter (WMS
Hand-held transmitter basic);
this ends with
GREEN Lights up continuously for 2
seconds,
transmission successful
RED Light up continuously for 2
seconds,
error during transmission
L-LED on the hand-held transmitter
basic goes out
Example 2:
The existing system with a WMS Central
transmitter is expanded to include a WMS Handheld transmitter basic
Step 1:
Add the WMS hand-held transmitter basic to the existing
network with a WMS Central transmitter
Wake up the hand-held transmitter basic
Select the "Learn in/out hand-held transmitter/
central transmitter" menu item on your WMS Central
transmitter under:
Main menu
System
Commissioning (logged in as specialist partner)
Learn in/out hand-held transmitter/central transmitter
Confirm the selected menu item with
The control function LED and transmission LED
light up on the hand-held transmitter basic (red and
green).
The hand-held transmitter was added to the network.
Step 2:
Copy a channel from a WMS Central transmitter to a
WMS Hand-held transmitter basic
Select the "Allocate channel to another control panel"
menu item on your WMS Central transmitter under:
Main menu
Products
Product type
Context menu
Allocate
Allocate channel to another channel
Briefly press the learn button on the WMS Hand-held
transmitter basic.
The transmission LED on the hand-held transmitter
basic flashes green.
The channel was copied.
The exact description of these procedures can be
found in the instructions of the WMS Central transmitter
(art.no.890405).
Example 3:
An existing system with a WMS hand-held
transmitter basic is expanded to include another
WMS Hand-held transmitter basic
Step 1:
Add a WMS Hand-held transmitter basic (2) to the
existing network with a WMS hand-held transmitter
basic (1)
Button/
display
Action/result
Wake up the WMS Hand-held transmitter
basic (1) with the STOP button
Wake up the WMS Hand-held transmitter
basic (2) with the STOP button
Press the learn button on the WMS Hand-
held transmitter (1) for approx. 5seconds
+ lights up green; the transmission LED
flashes. For several seconds, the WMS
Hand-held transmitter basic (1) scans the
range for devices.
The hand-held transmitter basic (1) does not
find any device during scanning:
The transmission LED lights up
ORANGE: No receiver found.
If the hand-held transmitter basic (1) finds a
receiver, transmitter or sensor that has not
yet been learned in, scanning is stopped. It is
indicated as follows:
The transmission LED lights up
RED: New receiver
When you press the control button ,
you can check WHICH target device was
just found.
The product then waves and the control
function LED flashes
RED: The target device
(transmitter or sensor) can
be added to the network.

5
890667_c•en•01.09.2014
We reserve the right to carry out improvements
Button/
display
Action/result
Press the STOP button .
The found target device (transmitter or
sensor) is added to the network.
The target device waves in confirmation.
Briefly press the learn button to leave
the learn mode.
Step 2:
Copy channels from one hand-held transmitter basic (1)
to another hand-held transmitter basic (2)
Button/
display
Action/result
Briefly press the learn button on the hand-
held transmitter basic (1)
L-LED lights up green
Briefly press the learn button on the TARGET
TRANSMITTER
(hand-held transmitter basic 2)
L-LED lights up green
The transmission LED on the hand-held
transmitter basic (1) flashes
GREEN During the transmission of data
from the hand-held transmitter basic (1) to the
hand-held transmitter basic (2); this ends with
GREEN Lights up continuously
for 2 seconds,
transmission successful
RED Light up continuously
for 2 seconds,
error during transmission
L-LED on the hand-held transmitter
basic (1) and (2) goes out.
Example 4:
The existing system with a WMS Hand-held
transmitter basic is expanded to include a WMS
Hand-held transmitter
Step 1:
Add the WMS Hand-held transmitter to the existing
network with a WMS Hand-held transmitter basic
Button/
display
Action/result
Wake up the WMS Hand-held transmitter
basic with the STOP button
Wake up the (large) WMS hand-held
transmitter with any product button
Press the learn button on the WMS Hand-
held transmitter basic for approx. 5s
+ lights up green; the transmission LED
flashes. For several seconds, the
(large) WMS hand-held transmitter scans
the range for devices.
The hand-held transmitter basic does not find
any device during scanning:
The transmission LED lights up
ORANGE: No receiver found.
Button/
display
Action/result
If the hand-held transmitter basic finds a
receiver, transmitter or sensor that has not
yet been learned in, scanning is stopped. It is
indicated as follows:
The transmission LED lights up
RED: New device
When you press the control button ,
you can check WHICH target device was
just found.
The product then waves and the control
function LED flashes
RED: The target device (transmitter
or sensor) can be added to the
network.
Press the STOP button .
The found target device (transmitter or
sensor) is added to the network.
The target device waves in confirmation.
Briefly press the learn button to leave
the learn mode.
You can now add additional scanned products in the
same manner.
Briefly press the learn button to leave the
learn mode.
OTEN If the large WMS Hand-held transmitter is still in its
factory state (no products have been learned in
yet), the lights up in red after the transmitter
wakes up.
Step 2:
Copy the channel from a hand-held transmitter basic to
a WMS Hand-held transmitter
Button/
display
Action/result
Press the learn button briefly
L-LED lights up green
Wake up the large WMS Hand-held
transmitter with any product button
Select the desired channel on the target
transmitter by pressing and holding the
button of the desired product.
Briefly press the learn button on the TARGET
TRANSMITTER
L-LED lights up green
The transmission LED on the hand-held
transmitter basic flashes
GREEN During the transmission of data
from the hand-held transmitter
basic to the target transmitter;
this ends with
GREEN Lights up continuously
for 2 seconds,
transmission successful
RED Light up continuously for 2
seconds,
error during transmission
L-LED on the hand-held transmitter
basic goes out

890667_c•en•01.09.2014
We reserve the right to carry out improvements
6
Example 5
Learn the WMS Hand-held transmitter basic into
a new receiver (plug receiver, actuator, etc.)
OTEN The system can be comfortably commissioned
using our PC software WMS Studio, a WMS
Central transmitter or the WMS Hand-held
transmitter.
OTEN Devices that do not belong to a network yet,
and are not intended to be learned in, must be
de-energised.
Button/
display
Action/result
Press the learn button on the WMS Hand-
held transmitter basic for approx. 5s
+ L-LED lights up green; the transmission
LED flashes. For several seconds, the
hand-held transmitter scans the range for
receivers.
By pressing the learn button again, the
process can be aborted.
The L LED goes out.
If, while scanning, the hand-held transmitter
basic finds a target device (receiver,
transmitter, sensor) that has already been
learned in:
The transmission LED lights up
GREEN: Lights up continuously for 2
seconds
Then scanning continues.
The hand-held transmitter basic does not find
any device during scanning:
The transmission LED lights up
ORANGE: No receiver found.
If the hand-held transmitter basic finds a
receiver, transmitter or sensor that has not
yet been learned in, scanning is stopped. It is
indicated as follows:
The transmission LED lights up
RED: New receiver
When you press the control button ,
you can check WHICH target device was
just found.
The product then waves and the control
function LED flashes
GREEN: The target device is a receiver
for which the product type can
be adjusted.
By pressing the UP and DOWN arrow buttons,
you can select the desired receiver/product
type:
Press UP
Flashing increases by one
Press DOWN
Flashing decreases by one
Button/
display
Action/result
Depending on the frequency with which
the control function LED
flashes, the
corresponding product type is displayed:
1 x GREEN: Awning
2 x GREEN: Roller shutter
3 x GREEN: External venetian blind
4 x GREEN: Light
5 x GREEN: Window
To check which product type was set,
press the control button
The flashing of the control function LED
indicates which product type was
selected.
Press the STOP button .
The appropriate product type is now
assigned to the receiver.
The transmission LED lights up for 2
seconds
GREEN This confirms the assignment.
OTEN The first receiver that is learned into the hand-held
transmitter defines the channel type.
If an external venetian blind is learned in as
the receiver first, the channel type is defined
as an external venetian blind channel and
only external venetian blinds can be learned
in.
Transmission LED flashes
GREEN: The scan process is now
repeated automatically until no
more new devices are found.
The transmission LED lights up
ORANGE: The scan is ended.
Briefly press the learn button to leave the
learn mode.

7
890667_c•en•01.09.2014
We reserve the right to carry out improvements
Example 6:
Delete learned-in products from the hand-held
transmitter basic and the network
You can remove the learned-in products completely from
the hand-held transmitter basic and the network.
First, scanning is repeated (see example 5 on page 6)
to identify the learned-in devices.
OTEN Devices that do not need to be deleted must be
de-energised.
As soon as the transmission LED lights up orange, you
can start the deletion process.
Button/
display
Action/result
Press the learn button on the WMS Hand-
held transmitter basic for approx. 5s
+ L-LED lights up green; the transmission
LED
flashes. For several seconds, the
hand-held transmitter scans the range for
receivers.
By pressing the learn button again, the
process can be aborted.
The L LED goes out.
If, while scanning, the hand-held transmitter
basic finds a target device (receiver,
transmitter, sensor) that has already been
learned in:
The transmission LED lights up
GREEN: Lights up continuously for 2
seconds
Then scanning continues.
The transmission LED lights up for 2
seconds
ORANGE Scanning stops.
+
Press the STOP button and
simultaneously.
The delete command is sent to all learned-
in receivers.
Those receivers that are still learned-in wave
when they are deleted from the hand-held
transmitter basic and the network.
The transmission LED indicates the result
of the deletion process:
Transmission LED flashes
GREEN: The devices are deleted.
Transmission LED flashes
RED: Not all target devices have
been deleted.
Press the STOP button .
The deletion command is sent repeatedly
to find receivers that were not within
the radio range during the first deletion
command and to delete them as well.
Briefly press the learn button to leave the
learn mode.
OTEN When you delete a receiver from the network,
it can no longer be operated via other
transmitters. It must be relearned into a
network.
OTEN It only makes sense to delete products via the
hand-held transmitter basic in smaller networks
(two to three awnings or roller shutters). In
more complex networks and when routing
tables are used, a normal hand-held transmitter
or a central control unit should be using for
deletion.

890667_c•en•01.09.2014
We reserve the right to carry out improvements
8
Maintenance and cleaning
Replacing the batteries
Replace the batteries if the transmission LED lights up
orange after the hand-held transmitter basic is activated. If
the batteries are fully depleted, the hand-held transmitter
basic can no longer be activated.
In order to replace the batteries (type AAA, IEC LR03,
"Micro"), open the battery compartment (Fig. 3) and
insert the new batteries. Ensure the correct polarity:
The plus (+) and minus (-) poles of the batteries must
agree with the marks in the battery compartment.
Only use new batteries of the same type and always
replace both batteries. Use high-quality batteries
– inexpensive batteries may leak and damage the
device. If the device will not be used for an extended
period, please remove the batteries. Do not use
rechargeable batteries.
Cleaning
Clean the housing with a microfibre cloth or a soft
damp cloth. Do not use detergents or cleaners, abrasive
substances or steam cleaners.
Liability
Failure to comply with the product information in
these instructions and use of the unit in a manner that
contravenes its intended use and purpose may result in
the manufacturer refusing to honour warranty claims for
product damage. In this case, liability for secondary harm
to persons or damage to property will also be excluded.
Follow the instructions in the operating instructions of your
sun shading system. Liability is also excluded for damage
to the sun shading system resulting from operation under
icy conditions.
Disposal
After use, the device and the batteries must be disposed
of according to legal regulations or brought to your local
recycling centre.
Technical data
WAREMA Mobile System
WMS Hand-held transmitter
basic
min. Typ. max. Unit
Supply
Battery type 2 x AAA (IEC LR03, "Micro")
Operating voltage 2.4 3.0 3.2 V DC
RF transceiver
Transmission frequency 2.40 2.48 GHz
Transmission power 0 dBm
Reception sensitivity -95 dBm
Range
(environment without
interference)
30 m
Housing
Dimensions (L×W×H in mm) 132 × 50 × 20
Degree of protection IP30
Safety class III
Miscellaneous
Test standards
DIN EN 60950-1:2003-03
DIN EN 61000-6-2:2006-03
DIN EN 61000-6-3:2005-06
(Corr.2005-11)
DIN EN 300328 V1.7.1.
(2006-10)
Automatic operation Type 1
Software class A
Location of use Clean environment
Conformity
Viewable under
www.warema.de
Ambient conditions
Operating temperature -20 20 50 °C
Storage temperature -25 70 °C
Rel. humidity
(non-condensing)
10 40 85 %RH
Article numbers
WMS Hand-held transmitter
basic
1002 953
WMS Hand-held transmitter
basic and
WMS Plug receiver
(not learned into each other)
1002 965
WAREMA Renkhoff SE
Hans-Wilhelm-Renkhoff Strasse 2
97828 Marktheidenfeld
 Loading...