

WAREMA Quatronic dialog
®
Operating instructions
(Keep for future use)
Sun. Light. WAREMA.Valid from 21 March 2011
890362_b•en
Photo: Habermaass GmbH

890362_b•en•21.03.2011
2
General information / Imprint
General information
The publication of this catalogue supersedes all previous corresponding
documentation. We reserve the right
to make alterations in the interest
of technical progress. Considerable
care was taken in producing the text
and graphics in this documentation.
No liability is accepted for any errors
which may nevertheless exist in this
documentation, nor for the consequences of any such errors.
Safety instructions
For detailed information, please refer
to the respective installation and operating instructions.
Head office
WAREMA Renkhoff SE
Hans-Wilhelm-Renkhoff-Strasse 2
97828 Marktheidenfeld
Germany
P.O. Box 13 55
97822 Marktheidenfeld/Main, Germany
Phone: +49 (93 91) 20-0
Fax: +49 (93 91) 20-42 99
http://www.warema.de
info@warema.de
Imprint
WAREMA Renkhoff SE
Hans-Wilhelm-Renkhoff-Strasse 2
97828 Marktheidenfeld
Germany
Customer Center
Control systems
Export department
Phone: +49 (93 91) 20-37 40;
Fax: +49 (93 91) 20-37 49
Hotline control systems
Phone: +49 (93 91) 20-67 60;
Fax: +49 (93 91) 20-67 69
WAREMA and the WAREMA logo are
trade marks of WAREMA Renkhoff SE.
All other brand or product names
included in this document are trade
marks or registered trade marks of
their respective owners.
© 2009, WAREMA Renkhoff SE

890362_b•en•21.03.2011 We reserve the right to carry out improvements
3
Table of contents
1 Legal notes ....................................................................................................... 5
2 Safety instructions ........................................................................................... 6
2.1 Meanings of symbols and pictographs ...........................................................6
2.2 Intended use .........................................................................................................7
2.3 Target group .........................................................................................................7
2.4 Retrofitting and modifications .............................................................................7
2.5 Working safely .......................................................................................................8
2.6 System faults ..........................................................................................................9
2.7 Additional documents ..........................................................................................9
3 Commissioning .............................................................................................. 10
3.1 Operational readiness ........................................................................................10
3.2 Languages............................................................................................................10
3.3 Reference .............................................................................................................10
4 Basics ...............................................................................................................11
4.1 Control unit ...........................................................................................................11
4.2 Display and operating elements ......................................................................12
4.3 Manual operation ................................................................................................13
4.3.1 Awnings, pleated blinds, roller shutters ...................................................13
4.3.2 External venetian blinds ...............................................................................14
4.3.3 Stopping a movement ..................................................................................14
4.4 Manually switching on and off the comfort control ......................................15
5 Menus .............................................................................................................. 16
5.1 Display menus .....................................................................................................17
5.1.1 Wind speed and time ...................................................................................18
5.1.2 Brightness, dawn/dusk ................................................................................19
5.1.3 Position and Cause ..................................................................................... 20
5.1.4 Outside temperature and relative humidity ..............................................21
5.1.5 Inside temperature ........................................................................................21
5.1.6 Comfort functions on/off .............................................................................21
5.1.7 Display mode................................................................................................ 22
5.2 Selection menus................................................................................................. 23
5.3 Parameter and setting menus ..........................................................................24
6 Safety functions ............................................................................................. 26
6.1 Wind monitor....................................................................................................... 26
6.1.1 Adjusting the wind monitor ........................................................................ 27
6.1.2 Limit values, delay times ............................................................................ 28
6.1.3 Wind sensor allocation ............................................................................... 29
6.1.4 Wind test ...................................................................................................... 30
6.2 Rain monitor .........................................................................................................31
6.2.1 Switching on/off the rain monitor ............................................................. 32
6.3 Ice monitor .......................................................................................................... 33
6.3.1 Switching on/off the ice monitor ............................................................... 33
6.3.2 Ice alarm........................................................................................................ 34
6.3.3 Emergency stop ........................................................................................... 35
6.3.4 Automatically reset an ice alarm? ............................................................ 36
7 Comfort functions ......................................................................................... 37
7.1 Sun control .......................................................................................................... 37
7.1.1 Setting the sun control ................................................................................ 39
7.1.2 Limit values, delay times ............................................................................ 40
7.1.3 Photo sensor allocation ...............................................................................41
7.2 Dawn/dusk control ............................................................................................ 42
7.2.1 Setting the dawn/dusk control .................................................................. 43
Table of contents

890362_b•en•21.03.2011
We reserve the right to carry out improvements
4
Table of contents WAREMA Quatronic dialog®
Operating instructions
7.2.2 Dusk, dawn ................................................................................................... 44
7.3 Temperature control .......................................................................................... 45
7.3.1 Setting the temperature control................................................................. 45
7.3.2 The temperature control triggers a move command .............................47
7.3.3 The temperature control switches on/off the sun control .....................47
7.3.4 Outside settings up/down, inside settings up/down ............................ 48
7.3.5 InOM, OutOM, Alloc settings ..................................................................... 48
7.4 Humidity control ................................................................................................. 49
7.4.1 Setting the humidity control ....................................................................... 49
7.4.2 UP/DOWN limit value, allocation .............................................................. 50
7.5 Time switch control .............................................................................................51
7.5.1 Switching on the time switch control ....................................................... 52
7.6 Comfort timer ...................................................................................................... 53
7.6.1 Setting the comfort timer ............................................................................ 54
7.6.2 MoFrE, MoFrD, SaSuE, SaSuD ................................................................. 55
7.6.3 Manual operation ......................................................................................... 56
8 General parameters ....................................................................................... 57
8.1 Product ................................................................................................................. 57
8.2 Run time and turn time ..................................................................................... 59
8.2.1 Changing the run time and turn time ....................................................... 59
8.2.2 Run time UP/DOWN ................................................................................... 60
8.2.3 Turn time .........................................................................................................61
8.2.4 Turn mode ......................................................................................................61
8.3 Setting the time .................................................................................................. 62
8.4 Password ............................................................................................................. 63
8.4.1 Defining the password ................................................................................ 63
8.4.2 Opening the programming level with the password ............................. 64
8.4.3 Changing the password ............................................................................. 65
8.4.4 Deleting the password ................................................................................ 65
9 Help ................................................................................................................. 66
10 Maintenance ................................................................................................... 67
11 Cleaning .......................................................................................................... 67
12 Disposal .......................................................................................................... 67
13 Liability ............................................................................................................ 67
14 Information for the user ................................................................................. 67
15 Troubleshooting ............................................................................................. 68
16 Factory presets .............................................................................................. 70
17 Custom settings ............................................................................................. 71

890362_b•en•21.03.2011 We reserve the right to carry out improvements
5
Congratulations on choosing WAREMA Quatronic dialog®!
You now own an advanced control system for comfortably controlling and
operating up to 4facades with different products (external venetian blinds,
awnings, roller shutters, etc.).
You can operate your sun shading product manually or leave operation entirely to the automatic control of the Quatronic dialog.
The Quatronic dialog protects your sun shading product against damage due
to the weather conditions and supports you in operating the sun shading system on a daily basis.
Safety functions and
comfort functions
The Quatronic dialog controls your sun shading product on the basis of the
following variables:
Wind
Precipitation
Brightness
Inside and outside temperature
Humidity
Time
Because many aspects of sun shading systems will be new to you, we designed the Quatronic dialog to guide you through the settings.
The name "dialog" stands for a high degree of user-friendliness: the Quatronic dialog not only shows you the current measurements and move commands, but also provides you with a guide and help text at all times.
1 Legal notes
Operating instructions, manuals and software are protected by copyright.
WAREMA Quatronic dialog® is a registered trademark of WAREMA Renkhoff SE.
Usage of the ® symbol has been dispensed with in the following text.
Introduction
890362_b•en•21.03.2011
We reserve the right to carry out improvements
6
WAREMA Quatronic dialog®
Operating instructions
2 Safety instructions
We have developed and tested the WAREMA Quatronic dialog in compliance
with the basic safety requirements.
Nonetheless, some risks remain.
For this reason, please read these instructions before commissioning and
operating the control.
It is very important to adhere to the safety information listed here and the
warning information in these instructions. Otherwise, any warranty claims
on the part of the manufacturer become void.
Keep these instructions for future use.
2.1 Meanings of symbols
and pictographs
The safety information in these instructions is marked with warning symbols.
It is categorised into different warning types depending on the level of potential danger:
DANGER
warns of an imminently dangerous situation.
Possible consequences may include serious or fatal injury (personal
injury), and property or environmental damage.
WARNING
warns of a potentially dangerous situation.
Possible consequences may include light, serious or fatal injury (personal
injury), property or environmental damage.
CAUTION
Reminder to be careful.
Possible consequences may include property damage.
The following pictograms and symbols may be affixed to the control unit itself
or to the connected devices, alerting you to potential danger:
WARNING
Warning against dangerous electrical voltage!
NOTE The term NOTE marks important notes and helpful tips.
Example The term Example marks an example.
The square marks an instruction or a prompt for action. Perform this step.
The triangle marks an event or the result of a preceding action.
The black triangle is the bullet point for lists or selections.
Safety instructions
890362_b•en•21.03.2011 We reserve the right to carry out improvements
7
2.2 Intended use
The WAREMA Quatronic dialog is used for the control of motorised sun
shading products. A variety of sun shading products and sensors can be
connected to the control.
WARNING
Please obtain the approval of the manufacturer if you have questions
regarding the connection of devices not listed in these instructions.
All control devices are intended to be installed indoors unless otherwise
specified.
WARNING
The approval of the manufacturer must be obtained for uses outside of the
purposes listed here. The consequences of unintended use may include
personal injuries of the operator or of third parties as well as property
damage to the control panel itself, to connected devices or to moveable
mechanical parts of the entire system.
Therefore use our product only as intended.
2.3 Target group
These instructions are addressed to persons operating, adjusting or commissioning the control. The installation instructions (art. no. 890178) are available for persons installing, wiring or establishing a mains connection for the
WAREMA Quatronic dialog, including all necessary parts.
WARNING
Commissioning or operation by insufficiently qualified and knowledgeable
persons may cause serious damage to the system or even personal
injuries!
Commissioning may therefore only be performed by properly trained quali-
fied technicians. These technicians must be able to recognize sources of
danger that may be caused by the mechanical, electrical or electronic equipment.
These qualified technicians must know and understand the content of these
instructions.
2.4 Retrofitting and
modifications
We have designed and built the WAREMA Quatronic dialog with reliability
and safety in mind. All required settings are made at initial commissioning.
Modification of the unit parameters is therefore only required when the characteristics of the control need to be adjusted, changes are made to the sensor equipment or the control itself is replaced.
WARNING
Retrofitting and modifications may impact the safety of the system or
reduce its effectiveness! Possible consequences may include death,
serious or light injuries, property or environmental damages.
Therefore, contact us or your specialist dealer before retrofitting or changing
the system or the unit parameters if you cannot find any information on the
corresponding topic in the control unit documentation. This is the only way to
ensure trouble-free retrofitting/modification.
Safety instructions
890362_b•en•21.03.2011
We reserve the right to carry out improvements
8
WAREMA Quatronic dialog®
Operating instructions
Exercise special care when components of different versions are combined
or when existing components are replaced by older/newer products with a
different scope of functions or a different software version.
2.5 Working safely
WARNING
The electrical installation must be performed by a certified electrician in
accordance with the electrical installation regulations published by the
Association of German Electrical Engineers (VDE 0100) or the standards
and regulations of the country in which the device is being installed. The
specialist must observe the installation instructions included with the
electrical device.
Whenever you intend to carry out work on building facades on which motoroperated sun shading products are installed, carry out the following steps
first:
Switch the system to a de-energized state.
Make sure that the unit has been sufficiently secured against unauthorized or
unintentional reactivation.
In any case, use suitable safety devices for personal protection.
Never place or store any items in the motion area of automatically operated
mechanisms (e.g. ladder against a house wall with an articulated arm awning).
WARNING
States of danger, malfunctions and material damage to the system are
possible due to improperly executed mounting, connection, repair or
maintenance work.
Such work may only be carried out by the service department or by author-
ized qualified personnel.
Only use such spare/replacement parts for maintenance or repair work as
have been approved by the manufacturer of the system.
WARNING
Dangerous situations, malfunctions and property damages to the unit
are possible by cutting connections during operation! All connection are
required for proper operation of the control.
Therefore, switch off the entire system before attaching or detaching connect-
ing lines.
WARNING
Danger to life and risk of property damage through sudden movement of
the mechanism!
Safety instructions
890362_b•en•21.03.2011 We reserve the right to carry out improvements
9
2.6 System faults
WARNING
Malfunctions may lead to dangerous situations or to property damage
on the product. During a malfunction, your sun protection/visual privacy
may no longer be adequately protected due to the safety functions of the
Quatronic dialog. The Quatronic dialog does not acoustically or visually
signal a malfunction.
If possible, raise your sun protection/visual privacy unit.
Switch the Quatronic dialog off at the main switch (e.g. circuit breaker) and
immediately notify your dealer's service department of the malfunction.
CAUTION
The entire unit becomes non-functional if power fails. In this case, your sun
protection/visual privacy unit can no longer be protected against the weather.
If thunder showers or storms have been forecast, raise your sun protection/
visual privacy unit using the "Up" button and switch off the automatic system
using the "Automatic" button as a precaution. If the sun protection/visual privacy unit is raised, a power failure generally does not present a risk.
2.7 Additional documents
The following documents are available in addition to these instructions:
Document Number
WAREMA Quatronic dialog Installation Instructions 890352
Wiring diagrams for WAREMA Quatronic dialog 890177
Safety instructions
890362_b•en•21.03.2011
We reserve the right to carry out improvements
10
WAREMA Quatronic dialog®
Operating instructions
3 Commissioning
Commissioning of the Quatronic dialog is described in detail in the Installation Instructions. The device will only function correctly if the settings are
adjusted during commissioning to the products being controlled.
NOTE If your specialist for sun shading products had the Quatronic dialog installed
by a certified electrician, all device parameters have been set.
The comfort functions are adjusted to your requirements during commissioning.
CAUTION
Do not make changes to the safety settings that may result in damage to
your sun shading products.
The safety functions of the Quatronic dialog protect the controlled sun shading products against damage due to the weather conditions. All parameters
were set correctly during commissioning.
3.1 Operational readiness
Approx. 5 minutes after the supply voltage is switched on, the current time,
day of the week and date are automatically read in via the radio clock aerial
connected to the wind/photo/radio clock sensor. (The question mark behind
the time disappears. If reception is disturbed, the question mark behind the
time does not disappear. See Chapter 8.3 on page 62).
When the time on the Quatronic dialog is set correctly, the device is ready for
operation.
3.2 Languages
The Quatronic dialog supports multiple languages. The display language can
only be selected with the supply voltage switched off. This procedure is described in the installation instructions and should be carried out by an expert
during commissioning.
3.3 Reference
All factory settings are listed in Chapter 16 on page 70. A table for entering the
individual settings can be found in Chapter 17 on page 71.
Commissioning
890362_b•en•21.03.2011 We reserve the right to carry out improvements
11
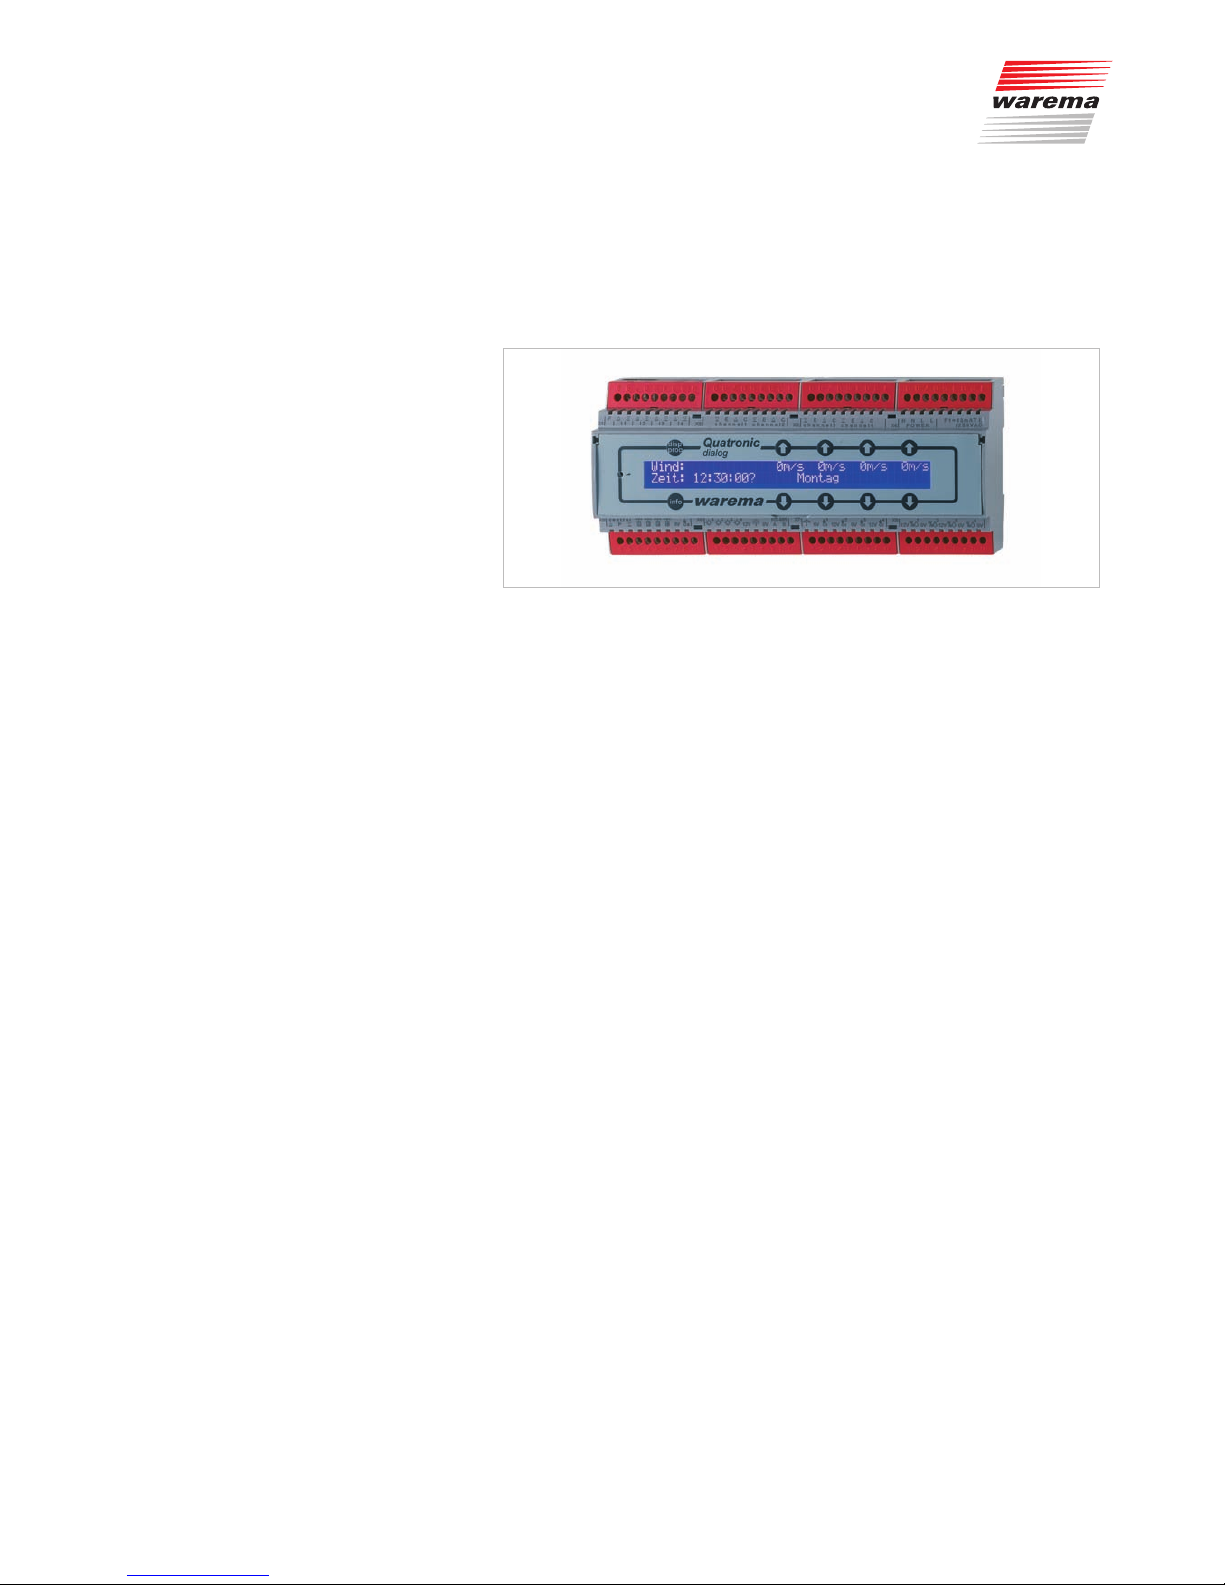
4 Basics
When developing the Quatronic dialog, we placed great importance in creating a product that is easy to operate and adjust. An additional feature is that
the device can be rapidly commissioned by means of automatic presettings
and pre-stored factory settings. Furthermore, the display language can be set
in a matter of seconds during commissioning.
Fig. 1 The WAREMA Quatronic dialog in the rail-mounted housing
4.1 Control unit
The many different functions of the WAREMA Quatronic dialog can be differentiated into safety and comfort functions:
Safety functions:
Wind monitor
Rain monitor
Ice monitor
Comfort functions:
Sun control
Dawn/dusk control
Temperature control
Humidity control
Time switch control
Comfort timer
The safety functions protect your sun shading products against damage due
to the weather conditions.
The comfort functions permit the intelligent and comfortable control of all
connected sun shading products.
The Quatronic evaluates the information from the connected sensors and
controls the sun shading products on this basis.
At any time, you can also use the
/ arrow buttons to raise and lower the
products and switch the comfort functions on or off.
Basics
890362_b•en•21.03.2011
We reserve the right to carry out improvements
12
WAREMA Quatronic dialog®
Operating instructions
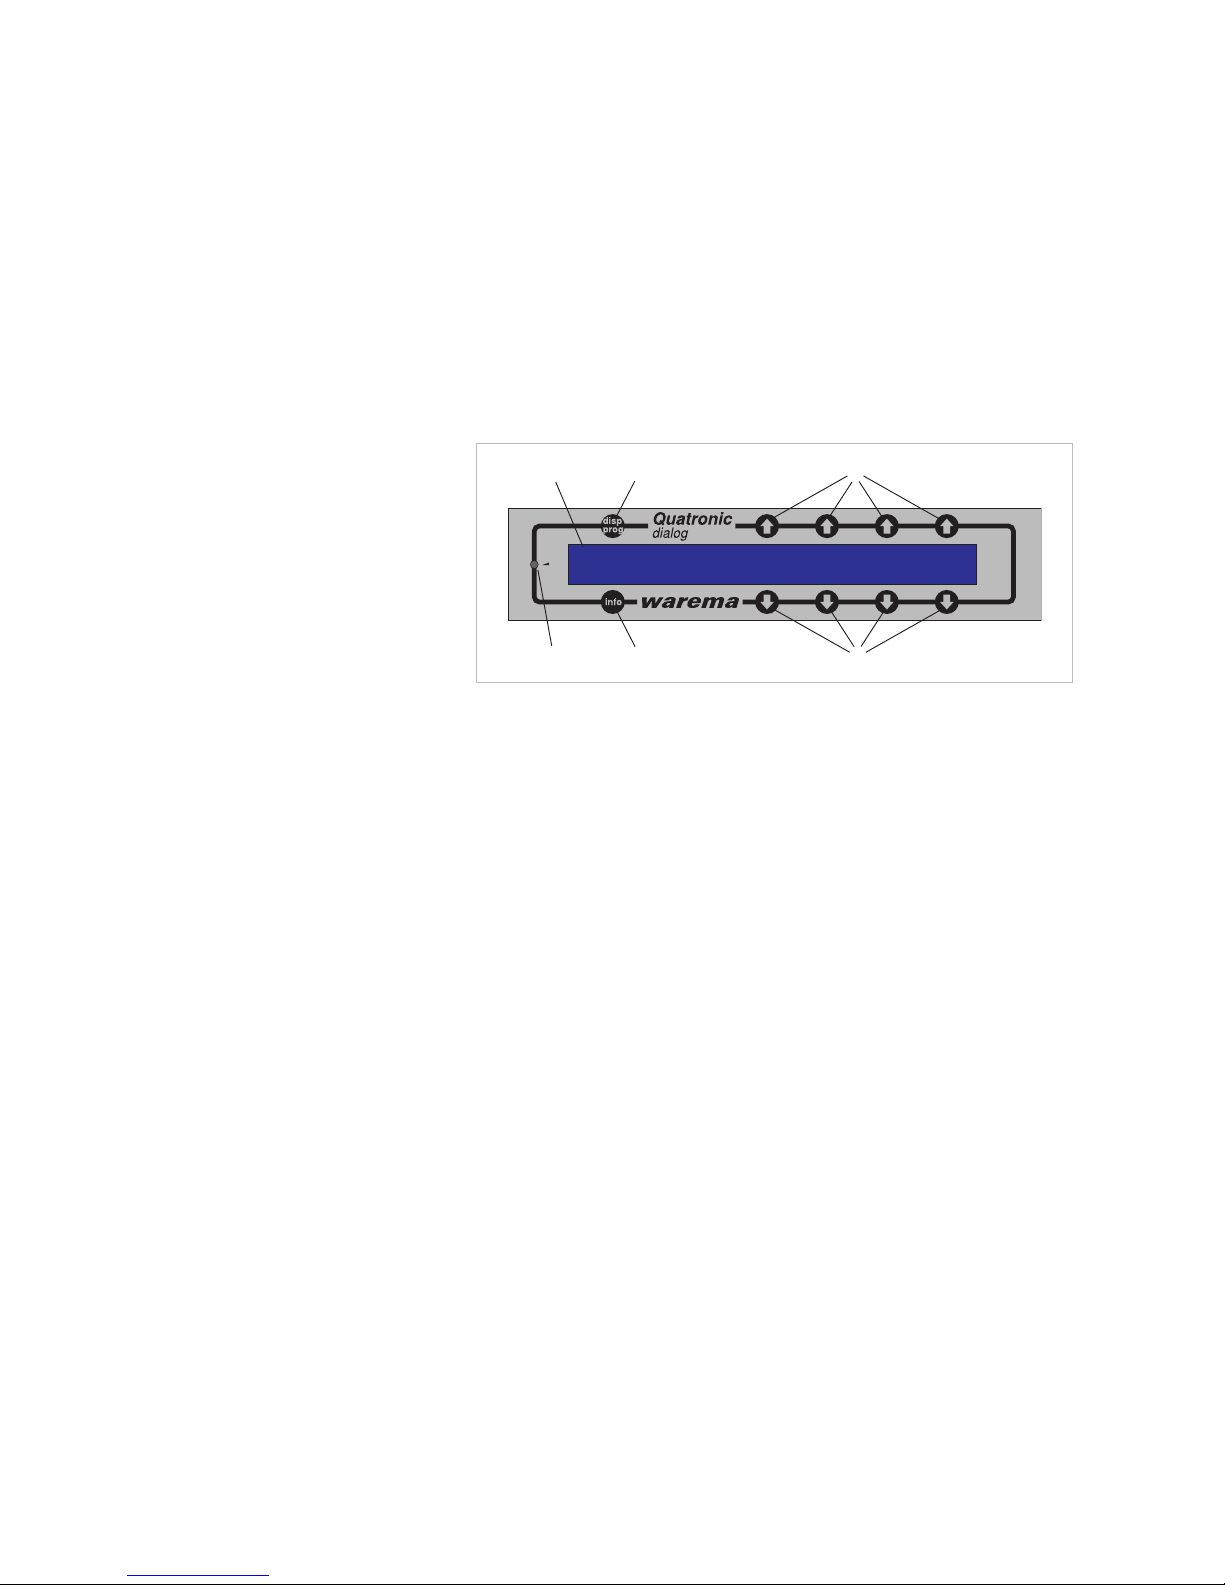
4.2 Display and operating
elements
The WAREMA Quatronic dialog is characterised by its elegant design and
its particularly user-friendly user interface. The presentation of all parameters
and readings is provided in plain text in a clearly arranged display window,
referred to simply as Display below. The resolution is two times 40 charac-
ters and the illumination ensures good readability through a high-contrast
display.
The function of the operating buttons is menu-dependent and is shown on
the display directly above each button.
1234567890123456789012345678901234567890
1234567890123456789012345678901234567890
Fig. 2 The operating elements and interfaces of the WAREMA Quatronic dialog
a
Display:
The illuminated display informs you on everything you can read and set on
the WAREMA Quatronic dialog. For example, you can read current measured
values of outside brightness, outside temperature, the current time and much
more.
b
disp/prog button:
Display/programming: By pressing this button you can change between the
menus of the Quatronic dialog. If the button is pressed for at least 5 seconds, the Quatronic dialog changes to the programming mode.
c
arrow buttons:
Raises the sun shading products at facades 1-4.
In the programming mode, these buttons can be used to navigate to submenus or adjust the settings.
d
arrow buttons:
Lowers the sun shading products at facades 1-4.
In the programming mode, these buttons can be used to navigate to the submenus or adjust the settings.
e
info button:
Opens the available help texts (see Chapter 9 on page 66).
f
Contrast setting:
The Quatronic dialog display contrast is adjusted to the optimal setting at the
factory. However, you can later adjust the contrast to your personal requirements. Adjust the potentiometer behind the opening using a cross-head
screwdriver (size 0) to the desired contrast.
Basics

890362_b•en•21.03.2011 We reserve the right to carry out improvements
13
4.3 Manual operation
In addition to the installed safety and comfort functions, you can also operate
all sun shading products at the Quatronic dialog by hand.
If, after this, a comfort function such as the sun control becomes active, you
can always intervene by hand.
Exception:
In the case of safety functions (e.g. wind alarm), manual operation is blocked
for the duration of the alarm.
NOTE Your manual move commands are not stored, which means that the sun
shading product does not return to the position you adjusted manually after a
comfort function (e.g. sun control) becomes active.
Manual operation is performed using the
/ arrow buttons on the corre-
sponding facade. The display then changes to Position and Cause.
The cause is displayed as ManOp. See also Chapter 5.1.3 on page 20.
4.3.1 Awnings, pleated blinds,
roller shutters
Example Lowering the sun shading products on facade 4:
Briefly press the
button on the far right under the display (facade 4).
Facade: 1 2 3 4
Wind: 8m/s 8m/s 8m/s 8m/s
Time: 10:26:47 Wednesday, 20.11.2008
The Position and Cause menu is displayed.
Position: Upper Upper Lower
Cause: Rain Wind Sun ManOp
The symbolises the movement. The "Manual" cause flashes for the duration
of the set run time.
At the end of the run time, the display changes as follows:
Position: Upper Upper Lower Lower
Cause: Rain Wind Sun ManOp
Briefly press the button above the display to raise the product again.
Position: Upper Upper Lower
Cause: Rain Wind Sun ManOp
Basics
890362_b•en•21.03.2011
We reserve the right to carry out improvements
14
WAREMA Quatronic dialog®
Operating instructions
4.3.2 External venetian blinds
Closing the slats
Press the
button briefly.
Position: Upper Upper Lower
Cause: Rain Wind Sun ManOp
Opening the slats
Press the button briefly.
Position: Upper Upper Lower
Cause: Rain Wind Sun ManOp
Lowering the sun shading products to the lower limit position
Press the
button for approx. 2seconds.
Position: Upper Upper Lower
Cause: Rain Wind Sun ManOp
After the DOWN run time elapses, the slats are adjusted to the preselected
slat angle (see Chapter 8.2 on page 59).
Raising the sun shading products to the upper limit position
Press the
button for approx. 2seconds.
Position: Upper Upper Lower
Cause: Rain Wind Sun ManOp
4.3.3 Stopping a movement
During a downward movement
Press the
button briefly.
Position: Upper Upper Lower
Cause: Rain Wind Sun ManOp
During an upward movement
Press the
button briefly.
Position: Upper Upper Lower
Cause: Rain Wind Sun ManOp
Basics

890362_b•en•21.03.2011 We reserve the right to carry out improvements
15
4.4 Manually switching on
and off the comfort
control
In situations in which the integrated comfort functions are not desirable (e.g.
when cleaning the sun shading product or window, while you are on holiday,
etc.), you can switch off the comfort functions individually for each facade.
The safety functions (wind monitor, rain monitor, ice monitor) still remain active to ensure that your sun shading system is protected against damage due
to the weather conditions at all times.
Comfort functions are:
Sun control
Dawn/dusk control
Temperature control
Humidity control
Time switch control
Comfort timer
The comfort control can be switched on and off individually for each facade.
Example Facade 1:
Press the disp/prog button repeatedly until the
Comfort functions (ON/OFF) menu is displayed.
Comfort functions OFF OFF ON ON
(ON/OFF): CH1 CH2 CH3 CH4
By pressing the button, you can switch the comfort functions on and off for
the desired facade.
NOTE Switching on and off the comfort functions by hand is not protected by the
password (see Chapter 8.4 on page 63).
Basics
890362_b•en•21.03.2011
We reserve the right to carry out improvements
16
WAREMA Quatronic dialog®
Operating instructions
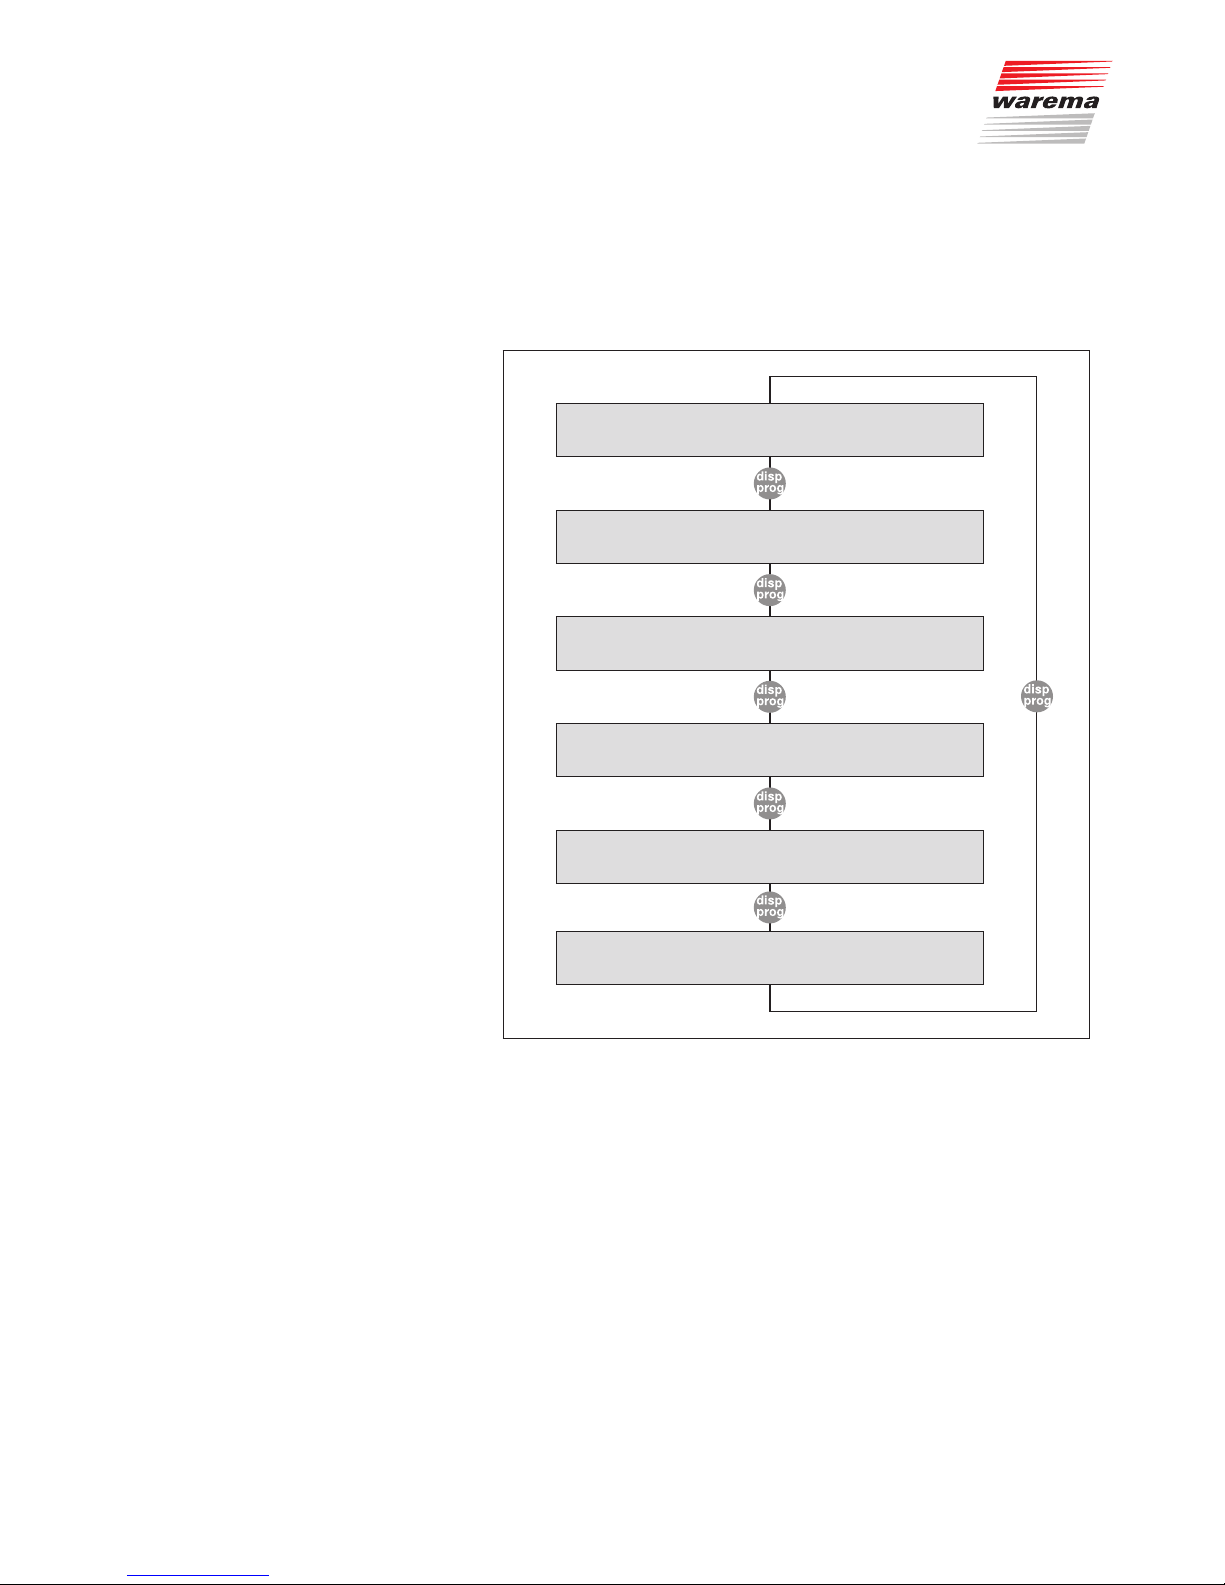
5 Menus
The menus guide you through the operation of your sun shading system. You
can easily adjust to your personal needs the functions that your Quatronic
dialog is to execute by using only a few buttons.
-------- Display mode --------
Display menus
The Quatronic dialog has six display menus. They contain all of the
important operating parameters.
Press the disp/prog button to change between menu.
- Wind speed and time
- Brightness, dawn/dusk
- Position and cause
- Outside temperature and relative humidity
- Inside temperature
- Comfort functions on/off
(see Chapter 5.1 on page 17)
Press for approx. 5 seconds
to change to the programming mode
--------------------------------- Programming mode ----------------------------
-----
Selection menus
The Quatronic dialog has two selection menus. Here you can select
the functions of the Quatronic dialog that you wish to set.
Select a function group using the / buttons.
Press the button under --> to change between the two menus.
- Wind monitor - Display
- Run time - Ice monitor
- Time switch control - Comfort timer
- Sun control - Time and weekday
- Rain monitor - Password
- Temperature control - Dawn/dusk control
- Product - Humidity control
(see Chapter 5.2 on page 23)
Select the function group
using the
/ buttons
Parameter menu
The parameter menus display the individual parameters of the func-
tion group previously selected.
Select the desired parameter using the
/ buttons.
Select a parameter using
the
/ buttons
Setting menu
In the setting menus, you can independently change the settings for
all four facades using the
/ buttons.
Press the disp/prog button to return to the parameter menu. The
changes are saved automatically.
Fig. 3
NOTE Use the disp/prog button to return to the next higher menu level.
Menus
890362_b•en•21.03.2011 We reserve the right to carry out improvements
17
5.1 Display menus
The Quatronic dialog makes information available to you in six different display menus.
One of these six menus is displayed continuously.
Press the disp/prog button to change to the next menu.
Wind speed and time (m/s, h, min)
Brightness (kLx), dawn/dusk (Lx)
Position and cause
Outside temperature and relative humidity (°C, %F
rel
)
Inside temperature (°C)
Comfort functions on/off
NOTE Use the info button to call up a specific help text to every display.
NOTE You can have the displays change automatically every 4 seconds
(see Chapter 5.1.7 on page 22).
Menus
Display menus

890362_b•en•21.03.2011
We reserve the right to carry out improvements
18
WAREMA Quatronic dialog®
Operating instructions
5.1.1 Wind speed and time
Wind: 8m/s 8m/s 8m/s 8m/s
Time: 10:26:47 Wednesday, 20.11.2008
Upper line: Current wind speed in meters per second (1m/s = 3.6 km/h).
Speed in m/s
Wind force
in Beaufort
Effects
0 - 0.2 0
Calm, smoke rises vertically
0.3 - 1.5 1
Light draft, wind direction can only be detected
by smoke
1.6 - 3.3 2
Soft breeze, wind can be felt in the face
3.4 - 5.4 3
Slight breeze, thin twigs and leaves move
5.5 - 7.9 4
Moderate breeze, twigs and thin branches move,
dust is disturbed
8.0 - 10.7 5
Brisk breeze, small branches sway
10.8 - 13.8 6
Strong wind, whistling noise on wires
13.9 - 17.1 7
Stiff wind, perceivable hindrance when walking
17.2 - 20.7 8
Stormy wind, twigs break off trees, walking is
quite difficult
20.8 - 24.4 9
Storm, minor damage to houses and roofs
24.5 - 28.4 10
Heavy storm, trees are uprooted
28.5 - 32.6 11
Gale-force storm, heavy storm damage
Over 32.6 12
Hurricane, destruction
Lower line: Time, weekday and date.
If a question mark appears behind the time, radio clock reception is disturbed. The question mark disappears after the time is entered manually or
after it is read in later during better radio clock reception.
The weekday and time continue running independently of radio clock reception. Thus, the time-switched functions will continue to operate properly.
The date is not relevant to the function of the Quatronic dialog.
Menus
Display menus
890362_b•en•21.03.2011 We reserve the right to carry out improvements
19
5.1.2 Brightness, dawn/dusk
Brightness: 18kLx 31kLx 20Lx 50Lx
Status: Cloud Sun Dusk Dawn
Upper line: Current brightness in Lux or kLux (1000 Lux = 1 kLux)
Lower line: Brightness conditions, where the following displays are pos-
sible:
Display Meaning
Cloud
Reading dropped below UP sun limit value
Sun
Reading exceeded DOWN sun limit value
Dusk
Dawn/dusk - Reading dropped below DOWN limit value
Dawn
Dawn/dusk - Reading exceeded UP limit value
Night
Dawn/dusk - Reading dropped below DOWN limit value and
UP limit value
Without display Neither of the two limit values are defined
Limit value Dusk
Brightness in Lux (Lx)
Limit value sun
Limit value cloud
Limit value Dawn
15000
30
80
99
1000
35000
99000
Dusk NightDay
Cloud
Sun
Down command
Down command
Up command
Night Dawn
Night
Dawn/Dusk
Up command
Sun control
Dawn/dusk control
Fig. 4
Menus
Display menus

890362_b•en•21.03.2011
We reserve the right to carry out improvements
20
WAREMA Quatronic dialog®
Operating instructions
5.1.3 Position and Cause
Position: Lower Upper
Cause: ManOp Wind Rain Sun
Upper line:
Current position of the sun shading product or move command
for the respective facade:
Display Meaning
Upper
Sun shading product is located in the upper limit position
Lower
Sun shading product is located in the lower limit position
?
Sun shading product in an unknown position, e.g. the unit was
stopped while it was moving
Move command: sun shading product moves up
Move command: sun shading product moves down
WARNING
This display does not indicate that the sun shading products are actually
at the upper and lower limit positions. It merely displays the move
command that was last issued.
Lower line:
Indicates what triggered the last move command. Possible
causes are:
Display Meaning
Wind
Wind monitoring safety function
Ice
Ice monitoring safety function
Rain
Rain monitoring safety function
ManOp
Manual operation
Timer
Time switch comfort function
Rel.H
Relative humidity comfort function
Temp
Inside/outside temperature comfort function
Sun
Sun/cloud comfort function
Da/Du
Dawn/dusk comfort function
Cause flashes Sun shading product is moving
Cause is displayed
continuously
Sun shading product is in limit position
NOTE If a move command is triggered, the display automatically changes to this
menu and continues to be displayed.
Exceptions:
The "Position and Cause" display does not appear during programming.
If the display mode is set to change automatically
(see
Chapter 5.1.7 on page 22), the display changes 8 seconds after a move
command is triggered.
Menus
Display menus
890362_b•en•21.03.2011 We reserve the right to carry out improvements
21
5.1.4 Outside temperature and
relative humidity
Temperature out: ******** 18°C ********
Rel. humidity: 0% 20% 60% 38%
Upper line: Current outside temperature in °C. (Only one sensor can be
connected since the outside temperature is fairly constant on
all facades.)
Lower line:
Current relative humidity at each facade in percent.
5.1.5 Inside temperature
Temperature in: 18°C 19°C 22°C 25°C
Status: Cold Cold Warm Warm
Upper line: Current inside temperature at each facade in °C.
NOTE To display the humidity at each facade, a sensor must be connected for each
facade.
Lower line:
Associated conditions, where the following displays are pos-
sible:
Display Meaning
Cold
Reading dropped below lower limit value
Warm
Reading exceeded upper limit value
OFF
Temperature control is switched off
No display Neither of the two limit values are defined
5.1.6 Comfort functions on/off
Comfort functions OFF OFF ON ON
(ON/OFF): CH1 CH2 CH3 CH4
Upper line: Indicates whether the automatic control at the respective fa-
cade is switched on or off.
Press the
arrow button to switch the preselected comfort functions on and
off.
NOTE Switching on and off the comfort functions by hand is not protected by the
password.
Menus
Display menus
890362_b•en•21.03.2011
We reserve the right to carry out improvements
22
WAREMA Quatronic dialog®
Operating instructions
5.1.7 Display mode
In the Displ menu, you can specify whether the displays of the Quatronic
dialog should change every 4 seconds, or if they should only change when
the disp/prog button is pressed.
Keep the disp/prog button pressed for approx. 5 seconds.
Wind: 8m/s 8m/s 8m/s 8m/s
Time: 10:26:47 Wednesday, 20.11.2008
The selection menu is displayed:
Select the Wind RunT Timer Sun
settings: Rain Temp Product -->
Press the button under --> to open the second page of the selection
menu.
Select the Displ Ice ComfT Time
settings: Passw Da/Du Rel.H. -->
Press the button above the word Displ.
The Display switching mode menu is displayed.
Display switching mode:
1. By pressing button "disp/prog"
Press the or arrow button to change the display mode.
The currently selected mode is displayed in each case.
Display switching mode:
2. Automatically every 4 seconds.
Leave the menu after completing the entries using the disp/prog button.
This saves the changes you made.
Menus
Display menus

890362_b•en•21.03.2011 We reserve the right to carry out improvements
23
5.2 Selection menus
When you change to the selection menus, you enter the programming mode.
Here you can adjust the behaviour of the control unit to your requirements. A
detailed description of the functions and parameters can be found here:
Safety functions Chapter 6 on page 26
Comfort functions Chapter 7 on page 37
General parameters Chapter 8 on page 57
CAUTION
Do not make changes to the safety settings that may result in damage to
your sun shading products.
The safety functions of the Quatronic dialog protect the controlled sun shading products against damage due to the weather conditions. All parameters
were set correctly during commissioning.
Keep the disp/prog button pressed for approx. 5 seconds.
Wind: 8m/s 8m/s 8m/s 8m/s
Time: 10:26:47 Wednesday, 20.11.2008
The selection menu is displayed:
Select the Wind RunT Timer Sun
settings: Rain Temp Product -->
Press the button under --> to open the second page of the selection
menu.
Select the Displ Ice ComfT Time
settings: Passw Da/Du Rel.H. -->
Press the button under --> again to return to the first page of the selection
menu.
In the selection menu, you can now use the
/ arrow buttons to open the
individual parameter menus for wind, sun, etc.
NOTE Use the disp/prog button to return to the display menus. This saves the
changes you made.
Menus
Selection menus

890362_b•en•21.03.2011
We reserve the right to carry out improvements
24
WAREMA Quatronic dialog®
Operating instructions
5.3 Parameter and setting
menus
Each parameter menu contains the settings (limit values, run times, switching
times, sensor allocations, etc.) of a function group. The following parameter
menus are available:
Safety functions (see Chapter 6 on page 26)
Wind Wind monitoring
Rain Rain monitoring *
Ice Ice monitoring
Comfort functions (see Chapter 7 on page 37)
Sun Sun control
Da/Du Dawn/dusk control
Temp Temperature control
Humidity Humidity control
Clock Time switch control
Auto Comfort timer
General parameters (see Chapter 8 on page 57)
Product Set the type of connected product*
Run time Run time and turn time
Time Time and weekday *
Password Password *
Display Display mode * (see Chapter 5.1.7 on page 22)
* When you select the functions marked with an asterisk, you enter the respec-
tive setting menu directly.
Example Parameter menu for temperature control
Keep the disp/prog button pressed for approx. 5 seconds.
Wind: 8m/s 8m/s 8m/s 8m/s
Time: 10:26:47 Wednesday, 20.11.2008
The selection menu is displayed:
Select the Wind RunT Timer Sun
settings: Rain Temp Product -->
Press the button below the word Temp.
Menus
Setting menus

890362_b•en•21.03.2011 We reserve the right to carry out improvements
25
The Temperature parameter menu opens.
Temperature Out In InOM
control settings: Out
In OutOM Alloc
Select the desired parameter by pressing the or button.
Example Outside temperature limit value for the UP command
Select the parameter by pressing the
button above the Outside menu
item.
In this menu, you can change the settings for each facade (F1 - F4) using the
/ buttons.
Temp. outside OFF OFF OFF OFF
Limit
: CH1 CH2 CH3 CH4
Leave the menu after completing the entries using the disp/prog button.
This saves the changes you made.
CAUTION
If you do not press a button for at least 3 minutes, the setting menu is closed
automatically. Any changes that may have been made are stored but only for
as long as the Quatronic dialog is supplied with power. If the power supply is
interrupted (e.g. due to a power failure), the changes are lost.
Therefore, always finish your entries with the disp/prog button.
Menus
Setting menus

890362_b•en•21.03.2011
We reserve the right to carry out improvements
26
WAREMA Quatronic dialog®
Operating instructions
6 Safety functions
CAUTION
Do not make changes to the safety settings that may result in damage to
your sun shading products.
The safety functions of the Quatronic dialog protect the controlled sun shading products against damage due to the weather conditions. All parameters
were set correctly during commissioning.
6.1 Wind monitor
Strong winds can cause severe damage the sun shading products. Therefore, the Quatronic dialog contains a permanent wind monitor as a safety
function that protects your awnings and external venetian blinds against
storm damage.
In a windstorm, the sun shading products are automatically raised, and can
be lowered neither by hand not by the comfort functions (sun control, time
switch, ...). Whether or not there is a windstorm is decided by the Quatronic
dialogue on the basis of limit values (settings).
The Quatronic dialog immediately shows you when the wind UP command is
executed:
Position:
Cause: Wind Wind Wind Wind
When the storm dies down, the following display appears:
Position: Upper Upper Upper Upper
Cause: Wind Wind Wind Wind
The comfort functions (sun control, time switch,...) and manual operation become available again.
To prevent every gust of wind from immediately triggering a "wind alarm" or
a brief pause in a windstorm from disabling the "wind alarm", the Quatronic
dialog works with on and off delay periods.
Safety functions
Wind monitor

890362_b•en•21.03.2011 We reserve the right to carry out improvements
27
6.1.1 Adjusting the wind
monitor
The following parameters can be set for the wind monitor:
Lim. = Wind speed limit (0-20 m/s)
Dely = On delay, wind (0-20 s)
DelyE = Off delay, wind (0-99 min)
Alloc = Wind sensor allocation (1, 2, 3, 4, 1-4)
Test = Wind test (on/off)
Keep the disp/prog button pressed for approx. 5 seconds.
Wind: 8m/s 8m/s 8m/s 8m/s
Time: 10:26:47 Wednesday, 20.11.2008
The selection menu is displayed:
Select the Wind RunT Timer Sun
settings: Rain Temp Product -->
Press the button above the word Wind.
The Wind menu is displayed:
Wind Lim. Dely Dely Alloc
settings: Test
Select the desired parameter by pressing the or button.
Example Wind speed limit (Lim.)
In this menu, you can change the settings for each facade (F1 - F4) using the
/ buttons.
Wind limit UP: OFF OFF 12m/s 8m/s
CH1 CH2 CH3 CH4
Leave the menu after completing the entries using the disp/prog button.
This saves the changes you made.
Safety functions
Wind monitor

890362_b•en•21.03.2011
We reserve the right to carry out improvements
28
WAREMA Quatronic dialog®
Operating instructions
6.1.2 Limit values, delay times
The effects of the settings are addressed below in more detail.
Wind in m/s
Move
command:
Up
No Move
command
Down
“Wind” limit value
set
20
<10 s
On delay = 10 sOff delay = 3 min
10 s
Measuring value
Wind
<10 s
3 min
t
Up
Off delay
WIND ALARM
WIND ALARM
On delay
On delay
On delay
Up
cancelled
before expiry
If the wind reading exceeds the set wind speed limit, the on delay begins running.
WARNING
The wind speed limit must be set according to the specifications provided
by the manufacturer of the controlled products.
If the wind speed drops below the set limit value before the on delay expires,
the on delay stops running.
The next time the limit value is exceeded, the on delay begins running again
from zero. If the wind speed remains above the limit value until the on delay
expires, the wind monitor is activated, which means that the sun shading
products are raised and the comfort functions and manual operation are
blocked.
If the wind reading drops below the set wind speed limit, the off delay begins
running.
NOTE If the wind speed remains below the limit value until the off delay expires, the
preselected comfort functions, including manual operation, are enabled and
new measurements are started for the comfort functions (e.g. sun control).
NOTE If a wind speed of 20 m/s is exceeded, the sun shading product moves to
the upper limit position without delay for safety reasons.
Safety functions
Wind monitor

890362_b•en•21.03.2011 We reserve the right to carry out improvements
29
6.1.3 Wind sensor allocation
The Quatronic dialog is able to control your sun shading products on the basis of four wind readings, i.e. 1 to 4 wind sensors can be connected.
The Quatronic dialog is delivered with a wind/photo/radio clock sensor. If
you connect it as a "Wind sensor 1", all facades must be set to wind sensor1.
Example Below is an example in which an additional wind sensor is connected:
Sensor Wind 1 Sensor Wind 2
Facade 1 Facade 2 Facade 4 Facade 3
You connect an additional wind sensor (see the installation instructions, as
sensor 2) that you would like to allocate to facade 3:
You now change the settings of the Quatronic dialog as shown in the
Wind sensor allocation submenu that you open via the selection menu by
pressing the button.
Wind sensor 1 1 2 1
allocation: CH1 CH2 CH3 CH4
If several sensors are connected, for example, and you would like the maximum wind speed to always be used for control at facade 2, set facade 2
(F 2) to 1-4.
NOTE At vacant wind sensor inputs, the readings are interpreted as 0 m/s.
Safety functions
Wind monitor

890362_b•en•21.03.2011
We reserve the right to carry out improvements
30
WAREMA Quatronic dialog®
Operating instructions
6.1.4 Wind test
If the wind sensor or a line is damaged, the Quatronic dialog cannot evaluate wind readings and the wind monitoring function is not active. To prevent
damage to your sun shading products in this situation, you can activate the
"wind test".
If the Quatronic dialog does not receive a signal from the wind sensor in 99
hours, it is assumed that the sensor is defective. All sun shading products for
which the wind test is active are raised. The following message appears in
the display of the Quatronic dialog:
ATTENTION: No signal from wind sensors
in last 99h. Please check it!
WARNING
During this display, the comfort functions are not activated. The local
operating elements are not functional. The unit becomes functional again
after an up or down button is pressed at the central control unit.
WARNING Note that if this occurs in your absence (on holiday,...), the sun
shading products will no longer be moved automatically.
Safety functions
Wind monitor

890362_b•en•21.03.2011 We reserve the right to carry out improvements
31
6.2 Rain monitor
While external venetian blinds and roller shutters are relatively resistant to
precipitation, all fabric products such as articulated arm awnings and conservatory awnings must be protected against precipitation. If you have set
any of these awnings in your Quatronic dialog as a product, the precipitation
monitor is automatically set for these as a safety function. If you wish, you
can also enable the precipitation monitor for your external venetian blinds
and roller shutters.
When precipitation (rain, snow, drizzle) falls on the precipitation sensor, the
sun shading products are raised.
The preselected comfort functions and manual operation are locked.
When there is precipitation, the display changes to Position and Cause. The
following message appears for the corresponding facade:
Position: Lower Upper
Cause: ManOp Rain Rain Rain
Rain in the display stands for rain monitoring.
Once the rain sensor has dried again and the delay set in the sensor has
expired, the preselected comfort functions and manual operation are enabled
again, as indicated by Position = Upper.
The following display appears:
Position: Lower Upper Upper Upper
Cause: ManOp Rain Rain Rain
Safety functions
Rain monitor

890362_b•en•21.03.2011
We reserve the right to carry out improvements
32
WAREMA Quatronic dialog®
Operating instructions
6.2.1 Switching on/off the rain
monitor
Keep the disp/prog button pressed for approx. 5 seconds.
Wind speed: 8m/s 8m/s 8m/s 8m/s
Time: 10:26:47 Wednesday, 20.11.2008
The selection menu is displayed:
Select the Wind RunT Timer Sun
settings: Rain Temp Product -->
Press the button below the word Rain.
The Rain monitoring (ON/OFF) menu is displayed.
Rain monitoring OFF OFF OFF OFF
(ON/OFF): CH1 CH2 CH3 CH4
You can use the buttons to switch the rain monitor on and off at the indi-
vidual facades (F1 - F4).
Leave the menu after completing the entries using the disp/prog button.
This saves the changes you made.
Safety functions
Rain monitor

890362_b•en•21.03.2011 We reserve the right to carry out improvements
33
6.3 Ice monitor
The ice monitor is another safety function of the Quatronic dialog. It prevents
your sun shading products from being damaged when they are raised and
lowered while the products are frozen. The Quatronic dialog raises the products in cold weather with precipitation before ice is formed in the guide rails.
WARNING
Ice monitoring is deactivated by default.
6.3.1 Switching on/off the ice
monitor
Keep the disp/prog button pressed for approx. 5 seconds.
Wind speed: 8m/s 8m/s 8m/s 8m/s
Time: 10:26:47 Wednesday, 20.11.2008
The selection menu is displayed:
Select the Wind RunT Timer Sun
settings: Rain Temp Product -->
Press the button under --> to open the second page of the selection
menu.
Select the Displ Ice ComfT Time
settings: Passw Da/Du Rel.H. -->
Press the button above the word Ice.
The Ice monitoring (ON/OFF) menu is displayed:
Ice monitoring ON OFF OFF OFF
(ON/OFF) CH1 CH2 CH3 CH4
You can use the buttons to switch the ice monitor on and off at the indi-
vidual facades (F1 - F4).
Leave the menu after completing the entries using the disp/prog button.
This saves the changes you made.
Safety functions
Ice monitor

890362_b•en•21.03.2011
We reserve the right to carry out improvements
34
WAREMA Quatronic dialog®
Operating instructions
6.3.2 Ice alarm
The ice monitor combines the precipitation and temperature readings. If the
outside temperature drops below +3°C and precipitation falls onto the precipitation sensor, all sun shading products are raised.
During the UP command, the Quatronic dialog switches to the Position and
Cause display. If the run time for raising the sun shading product has expired,
Ice appears on the display for the facades with ice monitoring to indicate the
trigger, and Menu appears as a reference to the "Ice menu".
Position: Menu Menu Upper Upper
Cause: Ice Ice Rain Sun
On the facades with ice monitoring, all comfort functions are blocked during
an ice alarm.
However, you can use the
/ buttons to open the "Ice menu" on these
facades:
ICE ALERT: Reset the ice alert until
next ice alert trigger? YES NO
WARNING
You now have the option of disabling the ice warning until the next
ice alarm occurs at your own risk, and you can re-enable the comfort
functions and manual operation. It is important that you first make sure
that none of the sun shading products are already frozen. If a product is
frozen, do not start a manual operation.
The following confirmation prompt appears after pressing Yes:
ATTENTION! Resetting ice alert enables
local operation at MCU and comfort...-->
... functions! Reset ice alert?
YES NO
To disable the ice monitor, press the Yes button.
The following menu is displayed:
Reset active YES NO YES YES
ice alert? F 1 F 2 F 3 F 4
Safety functions
Ice monitor

890362_b•en•21.03.2011 We reserve the right to carry out improvements
35
You can use the buttons to switch the ice monitor on and off at the indi-
vidual facades (F1 - F4).
Leave the menu after completing the entries using the disp/prog button.
This saves the changes you made.
6.3.3 Emergency stop
If the sun shading products are raised due to an ice alarm, the following information appears in the Position and Cause display at the facades with ice
monitoring:
Position: EMERG EMERG Upper Lower
Cause: STOP STOP Rain Sun
While the UP command is active, you can execute an emergency stop for all
4 facades.
This feature is provided for use if you discover that the sun shading products
are already frozen after you previously switched off the ice monitor.
To execute an emergency stop, press one of the arrow buttons on the fa-
cade that is executing an UP command due to an ice warning.
This stops all sun shading products that are moving up due to an ice warn-
ing. The following display appears:
Ice alert! Reset ice alert?
YES NO
If you press No, the ice warning continues to remain active
If you press Yes, the following confirmation prompt appears:
ATTENTION! Resetting ice alert enables
local operation at MCU and comfort...-->
...functions! Reset ice alert?
YES NO
WARNING
You now have the option of disabling the ice warning and thus to also
switch off all functions of the Quatronic dialog.
Safety functions
Ice monitor

890362_b•en•21.03.2011
We reserve the right to carry out improvements
36
WAREMA Quatronic dialog®
Operating instructions
If you are sure that you wish to disable the ice monitor, press the "Yes" button
now.
This re-enables operation using the local switches and the following display
appears:
Please switch off Quatronic dialog and
motor control units! Because of... -->
...Emergency stop the local operation of
sunblinds at MCU is now enabled! -->
Now disconnect the Quatronic dialog and the motor control units from the
230 V voltage using the in-series circuit breaker to prevent the sun shading
products from being operated locally. After you are sure that damage can no
longer occur due to ice, you can reconnect the Quatronic dialog and motor
control units to the power supply.
6.3.4 Automatically reset an ice
alarm?
The control can automatically reset an ice alarm. If the outside temperature
exceeds the ice alarm limit value of +3°C (see 6.3.2) and has reached +4°C,
the ice alarm is reset automatically and operation is enabled again.
Safety functions
Ice monitor

890362_b•en•21.03.2011 We reserve the right to carry out improvements
37
7 Comfort functions
The comfort functions are for the automatic control of your sun shading
products or other connected products. They can be set separately for each
channel. Experienced users can adjust the control here to suit their particular
preferences.
CAUTION Changing operator settings may impact the safety of the unit
or reduce its effectiveness! Please consult a specialist if you are not sure
about the effects of a modification.
7.1 Sun control
The sun control is one of the chief comfort functions of the
WAREMA Quatronic dialog, as controlling the sun shading products on the
basis of brightness is a fundamental requirement.
The function works to shade your rooms when the sunlight becomes too
strong and later lets more light in as the sunlight becomes weaker. The
strength of the sunlight is measured by the Quatronic dialog using four photo
sensors that are integrated in the wind sensor.
If the photo reading exceeds the set DOWN limit, the on delay begins running.
The following display appears:
Brightness display: The upper line shows the brightness in kLux. Sun flashes
in the lower line:
Brightness: 18kLx 31kLx 20Lx 50Lx
Status: Cloud Sun Dusk Dawn
When the on delay expires, the sun shading products are lowered.
For the External venetian blind or Roller shutter setting:
After the DOWN run time expires, the slats are adjusted to the preselected
slat angle (see Chapter 8.2 on page 59)
The display then automatically changes to Position and Cause:
Position: Lower Upper Upper
Cause: ManOp Sun Rain ManOp
If the photo reading drops below the UP limit value, the off delay begins
running.
Brightness display: The upper line shows the brightness in kLux. Cloud flashes in the status line:
Brightness: 10kLx 18kLx 20Lx 50Lx
Status: Cloud Cloud Dusk Dawn
When the off delay expires, the sun shading products are raised.
Comfort functions
Sun control

890362_b•en•21.03.2011
We reserve the right to carry out improvements
38
WAREMA Quatronic dialog®
Operating instructions
The display then automatically changes to Position and Cause:
Position: Lower Upper Upper
Cause: ManOp Sun Rain ManOp
If the sun shading products are raised or lowered by hand, there is no reaction from the sun control until the next change in the light conditions.
NOTE The sun control can be switched on and off manually. Also, it can be
switched on and off automatically by the temperature control or the comfort
timer (see Chapter 17, "Comfort timer").
Comfort functions
Sun control

890362_b•en•21.03.2011 We reserve the right to carry out improvements
39
7.1.1 Setting the sun control
The following parameters can be set for the sun control:
Lim. = "Up" sun limit value (1 - 99 kLx)
Lim. = "Down" sun limit value (1 - 99 kLx)
Dely = On delay (0 - 99 min)
Dely = Off delay (0 - 99 min)
Alloc = Photo sensor allocation (1, 2, 3, 4, 1-4)
Keep the disp/prog button pressed for approx. 5 seconds.
Wind speed: 8m/s 8m/s 8m/s 8m/s
Time: 10:26:47 Wednesday, 20.11.2008
The selection menu is displayed:
Select the Wind RunT Timer Sun
settings: Rain Temp Product -->
Press the button above the word Sun.
The Sun menu is displayed.
Sun Lim. Dely
setting: Lim.
Dely Alloc
Select the desired parameter by pressing the or button.
Example UP sun limit value (lim.)
In this menu, you can change the settings for each facade (F1 - F4) using the
/ buttons.
Limit UP: 30kLx 30kLx 30kLx OFF
CH1 CH2 CH3 CH4
Leave the menu after completing the entries using the disp/prog button.
This saves the changes you made.
Comfort functions
Sun control

890362_b•en•21.03.2011
We reserve the right to carry out improvements
40
WAREMA Quatronic dialog®
Operating instructions
7.1.2 Limit values, delay times
The effects of the settings are addressed below in more detail.
Measured value Photo
“Raise” set limit value
Brightness in Lux
5 min
2 min
t
2 min
<2 min
On delay = 2 min Off delay = 5 min
Runtime Up = Runtime Down
Move command:
Up
No move command
Down
Off delay
Down
Up
Down
On delay
On delay
On delay
cancelled
before expiry
“Down” set limit value
If the photo reading exceeds the DOWN limit value, the on delay begins running.
If the DOWN limit value is exceeded, the sun shading product is lowered after the on delay expires.
If the reading drops below the DOWN limit value during the on delay period,
the on delay stops running.
If the photo reading drops below the UP limit value, the off delay begins running.
If the reading continues to lie below the UP limit value, the sun shading product is raised after the off delay expires.
If the reading exceeds the UP limit value during the off delay, the off delay
stops and does not begin running again until the reading drops back down
below the limit value.
NOTE The UP and DOWN move commands triggered by the sun control are only
executed after a change in the light conditions. After a wind alarm, the sun
control starts the evaluation process anew.
This has the advantage that the sun control is unable to trigger a series of
consecutive DOWN move commands whenever the sunlight changes and
thus meets your requirements for personal comfort (e.g. Chapter 6, "Manual
operation").
NOTE For sun shading products, it is recommended that you always set the DOWN
limit value (lim.) higher than the UP limit value (lim.).
Comfort functions
Sun control

890362_b•en•21.03.2011 We reserve the right to carry out improvements
41
7.1.3 Photo sensor allocation
The wind/photo/radio clock sensor contains 4 photo sensors for the evaluation of 4 different building corners (facades). These sensors are allocated according to their connection to the corresponding terminals (see "Installation
Instructions"). You can now assign one or all photo sensors to each of your
facades.
Photo sensor 1-4 2 3 4
allocation: CH1 CH2 CH3 CH4
When shading the roof of a conservatory, it is recommended to assign sensors 1-4 to this "facade".
In this case, the maximum readings from each of the connected sensors are
evaluated.
Facade 4
West
Facade 3
South
Facade 2
East
Facade 1
North
Sensor
Wind
43
21
Sensor
Photo
You connect an additional wind sensor (see the installation instructions, as
sensor 2) that you would like to allocate to facade 3:
Comfort functions
Sun control

890362_b•en•21.03.2011
We reserve the right to carry out improvements
42
WAREMA Quatronic dialog®
Operating instructions
7.2 Dawn/dusk control
The dawn/dusk control comfort function gives you the option of raising the
sun shading products on your building at dawn and lowering them at dusk,
and to program this behaviour individually for spring, summer, autumn and
winter days. The Quatronic dialog can determine, on the basis of changes in
brightness and intensity, whether the sun is rising or setting, without being
deceived by a cloud that temporarily obscures the sun. The dawn/dusk control and the sun control both use the daytime or nighttime brightness values
via the connected photo sensor. The dawn/dusk control only uses the light
values between 0 and 99 Lux, while the sun control relies on the values between 1,000 and 99,999 Lux.
Limit value Dusk
Brightness in Lux (Lx)
Limit value sun
Limit value cloud
Limit value Dawn
15000
30
80
99
1000
35000
99000
Dusk NightDay
Cloud
Sun
Down command
Down command
Up command
Night Dawn
Night
Dawn/Dusk
Up command
Sun control
Dawn/dusk control
If the reading at dusk falls below the dusk limit value, a fixed on delay of five
minutes is triggered.
Brightness display: The upper line shows the brightness in Lux. Dusk flashes
in the status line:
Brightness: 10kLx 20Lx 20Lx 50Lx
Status: Cloud Dusk Dusk Dawn
When the on delay expires, the sun shading products are lowered. A "dusk
DOWN phase" is then active for the entire night. A turning procedure is never
performed. (Reason: roller shutters should not have spaces between the
slats.)
The display automatically changes to Position and Cause:
Position: Lower Upper Upper
Cause: ManOp Sun Rain ManOp
If Dusk is set for the MoFrD (= Monday to Friday, off) or SaSuD (= Saturday
and Sunday, off) comfort timer, the sun, temperature and humidity controls
are switched off as well.
If the photo sensor exceeds the set Dawn limit value, a fixed off delay of five
minutes is triggered.
Brightness display: The upper line shows the brightness in Lux. Dawn flashes in the status line:
Brightness: 10kLx 50Lx 20Lx 50Lx
Status: Cloud Dawn Dusk Dawn
When the off delay expires, the sun shading products are raised. A "dawn UP
phase" is then active.
Comfort functions
Dawn/Dusk control

890362_b•en•21.03.2011 We reserve the right to carry out improvements
43
The display automatically changes to Position and Cause:
Position: Lower Upper Upper
Cause: ManOp Sun Rain ManOp
If MoFrD (= Monday to Friday, on) or SaSuD (= Saturday and Sunday, on) in
the comfort timer is set to Dawn, the sun, temperature and humidity controls
are switched on as well.
NOTE If the dawn/dusk control is switched on (e.g. after the wind, ice or rain moni-
tor is switched off), the sun shading products are lowered during the "dusk
DOWN phase" (e.g. at night).
7.2.1 Setting the dawn/dusk
control
To open the menu for the dawn/dusk control, keep the disp/prog button
pressed for approx. 5 seconds.
Keep the disp/prog button pressed for approx. 5 seconds.
Wind speed: 8m/s 8m/s 8m/s 8m/s
Time: 10:26:47 Wednesday, 20.11.2008
The selection menu is displayed:
Select the Wind RunT Timer Sun
settings: Rain Temp Product -->
Press the button under --> to open the second page of the selection
menu.
Select the Displ Ice ComfT Time
settings: Passw Da/Du Rel.H. -->
Press the button below the word DaDu.
The Dawn/Dusk menu is displayed.
Dawn/Dusk Dawn
control settings: Dusk
Comfort functions
Dawn/Dusk control

890362_b•en•21.03.2011
We reserve the right to carry out improvements
44
WAREMA Quatronic dialog®
Operating instructions
Select the desired parameter by pressing the or button.
Example Dawn/dusk Dawn
In this menu, you can change the settings for each facade (F1 - F4) using the
/ buttons.
Dawn limit UP: 30Lx OFF OFF OFF
(Dawn) CH1 CH2 CH3 CH4
The OFF setting is achieved by setting the value to 0. The word OFF appears
instead of 0. This switches off the dawn/dusk control at the respective facade.
Leave the menu after completing the entries using the disp/prog button.
This saves the changes you made.
7.2.2 Dusk, dawn
The effects of the settings are addressed below in more detail.
The Dusk, Dawn limit values can be set to between 0 and 99 Lux.
Dusk: If the readings drop below the Dusk limit value, the sun shading products are lowered.
Dawn: If the readings exceed the Dawn limit value, the sun shading products
are raised
NOTE The brightness measured at photo sensor 1 is critical for the dawn/dusk con-
trol.
For the dawn/dusk control, the delays are fixed and cannot be individually
adjusted:
Dusk delay: 5 minutes
Dawn delay: 5 minutes
Comfort functions
Dawn/Dusk control

890362_b•en•21.03.2011 We reserve the right to carry out improvements
45
7.3 Temperature control
The temperature control of the Quatronic dialog is equipped with inside and
outside thermometers - also referred to as temperature sensors - and can
control your sun shading products according to the current temperature. This
lets you use your sun shading products to influence the temperature in your
rooms. The temperature control makes two operating modes available. One
mode lets you raise or lower the sun shading products on the basis of a
certain temperature. The second mode lets you use the temperature control
to switch on and off the sun control. This lets you independently control the
effects of the light and heat produced by the sun's radiation.
The two operating modes of the temperature control are:
The temperature control triggers an UP/DOWN move command.
The temperature control switches the sun control on or off.
7.3.1 Setting the temperature
control
The following parameters can be set for the temperature control:
Out = Outside temperature below limit value triggers an "Up"
move command.
Out = Outside temperature above limit value triggers a "Down"
move command.
In = Inside temperature below limit value triggers an "Up" move
command.
In
= Inside temperature above limit value triggers a "Down"
move command.
InOM = Inside temperature switches sun control on/off or triggers a
direct move command
OutOM = Outside temperature switches sun control on/off or triggers
a direct move command
Alloc = Inside temperature sensor allocation
Comfort functions
Temperature control

890362_b•en•21.03.2011
We reserve the right to carry out improvements
46
WAREMA Quatronic dialog®
Operating instructions
Keep the disp/prog button pressed for approx. 5 seconds.
Wind speed: 8m/s 8m/s 8m/s 8m/s
Time: 10:26:47 Wednesday, 20.11.2008
The selection menu is displayed:
Select the Wind RunT Timer Sun
settings: Rain Temp Product -->
Press the button below the word Temp.
The Temperature menu opens.
Temperature Out In InOM
control settings: Out
In OutOM Alloc
Select the desired parameter by pressing the or button.
Example Outside temperature limit value for the up command
In this menu, you can change the settings for each facade (F1 - F4) using the
/ buttons.
Temp. outside OFF OFF OFF OFF
Limit
: CH1 CH2 CH3 CH4
The OFF setting is achieved by setting the value to -25°C or to 75°C. The
word OFF appears instead of these numbers. This switches off the temperature control at the respective facade.
Leave the menu after completing the entries using the disp/prog button.
This saves the changes you made.
Comfort functions
Temperature control

890362_b•en•21.03.2011 We reserve the right to carry out improvements
47
7.3.2 The temperature control
triggers a move command
By triggering a direct move command using the temperature control, you can
control your sun shading products according to certain temperatures (inside
or outside) and thus influence the temperature in your rooms.
Under the InOM and OutOM menu items, you can switch on the direct control
for the respective facade, separately for the inside and outside temperatures.
Subsequently, your sun shading products will move according to the temperature limit values you define.
If the inside or outside temperature exceeds the DOWN limit value, the temperature control triggers a DOWN move command.
The display then changes to Position and Cause.
Position: Upper Upper
Cause: Temp Rain Rain Temp
The following display appears after the move command is completed:
Position: Lower Upper Upper Lower
Cause: Temp Rain Rain Temp
If the inside or outside temperature drops below the UP limit value, the temperature control triggers an UP move command.
The display then changes to Position and Cause.
Position: Upper Upper
Cause: Temp Rain Rain Temp
The following display appears after the move command is completed:
Position: Upper Upper Upper Upper
Cause: Temp Rain Rain Temp
7.3.3 The temperature control
switches on/off the sun
control
The sun is the most economical heat source we have. It is not always to
your best advantage to block out the sun as soon as the first rays of sunlight
enter the rooms in your building or in your conservatory, and to compensate
this with higher heating costs. Therefore, you can optionally equip your Quatronic dialog with an inside and outside thermometer and use the temperature
control in combination with the sun control.
WARNING
With this setup, your sun shading products are not lowered in the
presence of strong sunlight until the desired inside temperature has been
reached.
Under the InOM and OutOM menu items, you can use the temperature control
to switch on the sun control for the respective facade, separately for the inside and outside temperatures. Subsequently, the sun control acts according
to the temperature limit values you define.
Comfort functions
Temperature control

890362_b•en•21.03.2011
We reserve the right to carry out improvements
48
WAREMA Quatronic dialog®
Operating instructions
7.3.4 Outside settings up/down,
inside settings up/down
The effects of the settings are addressed below in more detail.
A temperature control command can have a variety of effects, which you can
select in the Temp menu.
Limit values:
Normally, the DOWN limit value (Out or In) must be larger than the UP
limit value (Out or In): If the temperature reading exceeds the DOWN limit
value, the DOWN move command is triggered or the sun control is switched
on.
If the temperature reading drops below the UP limit value, an UP move command is triggered or the sun control is switched off and an UP move command is triggered.
NOTE The temperature control has no delays since temperatures change slowly.
7.3.5 InOM, OutOM, Alloc
settings
Operating modes:
If the inside/outside temperature control is to execute a move command, select the Move setting in the InOM, OutOM menus.
If the inside/outside temperature control is to enable the sun control, select
the Sun setting in the InOM, OutOM menus.
Allocation:
One outside temperature sensor and/or up to 4 inside temperature sensors
can be connected to the Quatronic dialog. These sensors are allocated to
the 4 facades in the Alloc menu.
Comfort functions
Temperature control

890362_b•en•21.03.2011 We reserve the right to carry out improvements
49
7.4 Humidity control
If you wish to control the humidity in your building or conservatory, for example to create an appropriate climate for your plants, the Quatronic dialogue
provides a humidity sensor and connectivity for this purpose. For example,
you can use it to connect a roof window or fan. On the basis of the limit
value, the Quatronic dialog can then open and close the window or switch
the fan on and off. To connect devices that are unrelated to sun shading
products, contact your specialist for sun shading products.
If the humidity exceeds the DOWN limit value, the humidity control triggers a
DOWN move command.
The display then changes to Position and Cause.
Position: Upper Upper
Cause: rel.H Rain Rain rel.H
The following display appears after the move command is completed:
Position: Lower Upper Upper Lower
Cause: rel.H Rain Rain rel.H
If the humidity drops below the UP limit value, the humidity control triggers
an UP move command.
An appears in the display for the duration of the UP run time and Upper appears after the run time has expired.
7.4.1 Setting the humidity
control
The following parameters can be set for the humidity control:
Lim. = Limit value for the "Up" move command
Lim. = Limit value for the "Down" move command
Alloc = Humidity sensor allocation for each facade
Keep the disp/prog button pressed for approx. 5 seconds.
Wind speed: 8m/s 8m/s 8m/s 8m/s
Time: 10:26:47 Wednesday, 20.11.2008
The selection menu is displayed:
Select the Wind RunT Timer Sun
settings: Rain Temp Product -->
Press the button under --> to open the second page of the selection
menu.
Comfort functions
Humidity control

890362_b•en•21.03.2011
We reserve the right to carry out improvements
50
WAREMA Quatronic dialog®
Operating instructions
Select the Displ Ice ComfT Time
settings: Passw Da/Du Rel.H. -->
Press the button below the word Rel.H.
The Rel. Humidity menu is displayed:
Rel. Humidity Lim. Alloc
control settings:Lim.
Select the desired parameter by pressing the or button.
Example UP limit value Lim.
In this menu, you can change the settings for each facade (F1 - F4) using the
/ buttons.
Rel. humidity OFF OFF OFF OFF
Limit UP
: CH1 CH2 CH3 CH4
The OFF setting is achieved by setting the value to 0%. The word OFF appears
instead of 0%. This switches off the humidity control at the respective facade.
Leave the menu after completing the entries using the disp/prog button.
This saves the changes you made.
7.4.2 UP/DOWN limit value,
allocation
The effects of the settings are addressed below in more detail.
If the relative humidity reading exceeds the DOWN limit value, the sun shading product moves to the lower limit position.
If the relative humidity reading drops below the UP limit value, the sun shading product moves to the upper limit position.
Up to 4 humidity sensors can be connected to the Quatronic dialog. These
sensors are allocated to the 4 facades in the Alloc menu.
Comfort functions
Humidity control

890362_b•en•21.03.2011 We reserve the right to carry out improvements
51
7.5 Time switch control
The time switch control of the Quatronic dialog lets you raise your sun shading products at a certain time (e.g. at dawn) and lower them at another time
(e.g. at dusk). Separately for Monday to Friday and for the weekends, you
can set 1 switch time for lowering the products and 1 switch time for raising
the products.
The time switch control only triggers UP/DOWN move commands.
NOTE Time switch control is deactivated by default.
When the time set under MoFr
or SaSu is reached, the sun shading prod-
ucts move up. The "timer UP phase” is then active.
The following display appears:
Position: Lower Upper
Cause: ManOp Clock Rain Clock
When the time set under MoFr or SaSu is reached, the sun shading products move down. The "timer DOWN phase” is then active.
The following display appears:
Position: Lower Upper
Cause: ManOp Clock Rain Clock
NOTE If the time switch control is switched on (e.g. after the wind, ice or rain moni-
tor is switched off), the sun shading products are lowered during the "timer
DOWN phase".
Comfort functions
Time switch control

890362_b•en•21.03.2011
We reserve the right to carry out improvements
52
WAREMA Quatronic dialog®
Operating instructions
7.5.1 Switching on the time
switch control
Keep the disp/prog button pressed for approx. 5 seconds.
Wind speed: 8m/s 8m/s 8m/s 8m/s
Time: 10:26:47 Wednesday, 20.11.2008
The selection menu is displayed:
Select the Wind RunT Timer Sun
settings: Rain Temp Product -->
Press the button above the word Timer.
The Timer switch menu is displayed.
"Timer switch" stands for time switch control.
Timer switch MoFr SaSu
settings: MoFr
SaSu
Select the desired parameter by pressing the or button.
Example UP command on a weekday (MoFr):
In this menu, you can change the settings for each facade (F1 - F4) using the
/ buttons.
Timer switch UP 6:30 OFF OFF OFF
Limit UP
: CH1 CH2 CH3 CH4
The OFF setting is achieved by setting the value to 00:00. The word OFF appears instead of 00:00. This switches off the time switch control at the respective facade.
Leave the menu after completing the entries using the disp/prog button.
This saves the changes you made.
Comfort functions
Time switch control

890362_b•en•21.03.2011 We reserve the right to carry out improvements
53
7.6 Comfort timer
In some cases, the comfort functions are not ideal for your particular requirements. This usually occurs in non-standard applications.
Example
On one of the facades of your building, normal lighting, as it occurs on the
other facades, only takes place between 11:00 and 15:00; otherwise, this
"problem facade" is shaded by trees or a neighbouring building.
The sun shading products should not be moved on weekends.
The sun shading products should only be controlled on the basis of the in-
side temperature or sunlight in the mornings because the room is not used
in the afternoon.
And so on...
To be able to solve these types of problems with the Quatronic dialog, it
provides a comfort timer feature. This feature lets you control all comfort
functions on the basis of the time of day. You can also differentiate between
weekdays and weekends.
If you need to switch off the comfort functions temporarily, such as during a
garden party, while you are on holiday, when cleaning, etc., you can also globally switch off the automatic functions by hand.
Function of the comfort timer
Humidity
control
Sun
control control
Dawn/dusk
Comfort function
On
Off
Inside temperature
control
Outside temperature
control
7:15
16:38
Switches all
comfort functions
off manually
Time switch
Works
independently
of the
comfort timer
On
Off
Switches the automatic functions on and off via the limit value setting
Switches the automatic functions on and off via a confirmation in the menu
Control timer
Switches the
comfort functions
on and off as a
function of time.
On
Off
On
Off
On
Off
On
Off
On
Off
On
Off
Comfort functions
Comfort timer

890362_b•en•21.03.2011
We reserve the right to carry out improvements
54
WAREMA Quatronic dialog®
Operating instructions
7.6.1 Setting the comfort timer
The following parameters can be set for the comfort timer:
MoFrE = On time from Monday to Friday
MoFrD = Off time from Monday to Friday
SaSuE = On time on Saturday and Sunday
SaSuD = Off time on Saturday and Sunday
Manual = Manually switch comfort functions on/off
Keep the disp/prog button pressed for approx. 5 seconds.
Wind speed: 8m/s 8m/s 8m/s 8m/s
Time: 10:26:47 Wednesday, 20.11.2008
The selection menu is displayed:
Select the Wind RunT Timer Sun
settings: Rain Temp Product -->
Press the button under --> to open the second page of the selection
menu.
Select the Displ Ice ComfT Time
settings: Passw Da/Du Rel.H. -->
Press the
button above the word ComfT.
The Comfort timer menu is displayed.
Comfort timer MoFrE SaSuE Manual
settings: MoFrD SaSuD
Select the desired parameter by pressing the or button.
Example On function on weekdays (MoFrE)
In this menu, you can change the settings for each facade (F1 - F4) using the
/ buttons.
Comfort functions
Comfort timer

890362_b•en•21.03.2011 We reserve the right to carry out improvements
55
Comfort timer 6:30 OFF OFF OFF
ENABLE Mon-Fri: CH1 CH2 CH3 CH4
The OFF setting is achieved by setting the value to 00:00. The word OFF appears instead of 00:00. This switches off the comfort timer at the respective
facade.
Leave the menu after completing the entries using the disp/prog button.
This saves the changes you made.
7.6.2 MoFrE, MoFrD, SaSuE,
SaSuD
The sun control, humidity control and temperature control comfort functions
operate independently of the time of day. Thus, they also operate at night.
Using the comfort timer, you can deactivate these functions at any time by
entering the required time period.
(MoFrE, SaSuE)
Using the "Comfort functions ON on a weekday” (MoFrE) and "Comfort functions ON on a weekend” (SaSuE) limit values, you can enter the times during
which the comfort timer should enable the comfort functions.
(MoFrD, SaSuD)
Using the "Comfort functions OFF on a weekday” (MoFrD) and "Comfort functions OFF on a weekend” (SaSuD limit values, you can enter the times during
which the comfort timer should disable the comfort functions.
Dynamic function: dawn,
dusk
The control of the comfort timer via time is rigid. However, you can also control the comfort timer "dynamically", i.e. using dawn/dusk.
Instead of a time, you can enter Dawn or Dusk. With this setting, the comfort
timer enables the comfort functions at dawn and disables them again at
dusk. This occurs earlier in the summer and later in the winter.
Setting the Dawn value
You obtain the Dawn setting by setting a time of 23:59 in the MoFrE and
SaSuE menu items. Dawn appears instead of the time.
Setting the "Dusk" value
You obtain the Dusk setting by setting a time of 23:59 in the MoFrDand SaSuD
menu items. Dusk appears instead of this time.
Comfort functions
Comfort timer

890362_b•en•21.03.2011
We reserve the right to carry out improvements
56
WAREMA Quatronic dialog®
Operating instructions
7.6.3 Manual operation
Switching the comfort functions on/off manually
In some cases, such as in the following, you may only want to temporarily
switch off the comfort functions:
You do not want the sun shading products to move while you are away on
holiday.
You do not want the articulated arm awning to move up at dusk during a gar-
den party.
You do not want the sun shading products to move down while you are
cleaning the windows.
etc.
In these cases, you can comfortably switch off all comfort functions globally
at the Quatronic dialogue without having to change your other settings. You
have two possibilities:
1.
Switch off the comfort functions in the
Comfort timer settings: Manual menu item.
Select (as described in Chapter 7.6.1 on page 54) the Manual menu item in
the Comfort timer menu.
Comfort timer MoFrE SaSuE Manual
settings: MoFrD SaSuD
The Comfort functions menu opens.
Comfort functions ON OFF OFF OFF
ENABLE Mon-Fri: CH1 CH2 CH3 CH4
Using the buttons, you can now switch on or off the comfort functions on
the respective facade.
2.
Switch off the comfort functions in the Comfort timer display (see the "Dis-
plays" chapter). (Can be reached without a password)
NOTE The safety functions cannot be switched off by the comfort timer nor manu-
ally via "Comfort functions OFF".
Comfort functions
Comfort timer

890362_b•en•21.03.2011 We reserve the right to carry out improvements
57
8 General parameters
8.1 Product
The various product types that can be controlled with the
WAREMA Quatronic dialog are pre-parameterised. The factory settings can
be found in Chapter 16 on page 70. An overview of the controllable products
is provided here:
Product type Conceptual drawing Information in display
Articulated arm awning
Articulated
Conservatory awning
Conservatory
External venetian blind
External
venetianblind
Roller shutter
Rollershutter
Pleated blind
Pleatedblind
Fig. 5 Sun shading products
When the Quatronic dialog went through the automatic commissioning routine, it set the products on all facades to the articulated arm awning for safety
reasons. To adapt the Quatronic dialog to your needs, you can now set up
the products (roller shutters, external venetian blinds, pleated blinds, awnings) you have on the individual facades.
Each of these products has different properties. Therefore, they respond differently to wind, require different turn or run times, or may be located indoors,
thus not requiring rain or wind protection. To save you from having to enter
all of the individual product-specific settings and limit values in the Quatronic
dialog, the Quatronic dialog performs these tasks for you. The necessary
values have already been stored in the Quatronic dialog for many products.
All of the product-specific settings can be globally programmed at the touch
of a button.
General parameters
Product

890362_b•en•21.03.2011
We reserve the right to carry out improvements
58
WAREMA Quatronic dialog®
Operating instructions
CAUTION Do not make changes later to the product settings that may result
in damage to your sun shading products.
All products were set correctly by the expert technician during commissioning.
NOTE When storing, all settings for the changed facades are overwritten with the
factory settings. Personal settings must be created again for new products.
Keep the disp/prog button pressed for approx. 5 seconds.
Wind speed: 8m/s 8m/s 8m/s 8m/s
Time: 10:26:47 Wednesday, 20.11.2008
The selection menu is displayed:
Select the Wind RunT Timer Sun
settings: Rain Temp Product -->
Press the
button below the word Product.
The Product menu is displayed.
Please select Cass. Cass. Cass. Cass.
product: awng. awng. awng. awng.
Select the desired product by pressing the / buttons.
NOTE Facade 1 is displayed at the far left, and facade 4 is shown at the far right
Leave the menu after completing the entries using the disp/prog button.
This saves the changes you made. The following message appears:
New settings are saved.
General parameters
Product

890362_b•en•21.03.2011 We reserve the right to carry out improvements
59
8.2 Run time and turn time
When you lower your sun shading products, there is no need to sit in the
dark. You can, for example, automatically lower the sun shading products
half way or leave only a narrow opening (light band). When using external
venetian blinds, you can set the slats to an angle that will still allow a sufficient amount of light to enter so that you do not need to use artificial light.
These settings are controlled via run times and turn times in the Quatronic
dialog. You can set run times to the nearest second at each facade and also
set any technically possible slat angle via a time entry.
NOTE The run time of the sun shading product is set to an average value at the fac-
tory. It can be adjusted to the run time of the product actually in use (see the
"Factory settings" chapter in the installation instructions).
8.2.1 Changing the run time and
turn time
The following parameters can be set in the Runtime menu:
UP = Runtime UP (OFF, 00:01 to 99:58', DURATION)
DOWN = Runtime DOWN (OFF, 00:01 to 99:58', DURATION)
TurnTime = OFF, 0.1 to 9.9 s, DURATION)
TurnMode = Manual, sun control, manual/sun control, time switch con-
trol, manual/time switch control, sun control/time switch
control, manual/sun control/time switch control, OFF
Keep the disp/prog button pressed for approx. 5 seconds.
Wind speed: 8m/s 8m/s 8m/s 8m/s
Time: 10:26:47 Wednesday, 20.11.2008
The selection menu is displayed:
Select the Wind RunT Timer Sun
settings: Rain Temp Product -->
Press the button above the word RunT.
The Runtime menu is displayed.
General parameters
Run time and turn time

890362_b•en•21.03.2011
We reserve the right to carry out improvements
60
WAREMA Quatronic dialog®
Operating instructions
Runtime UP TurnTime
Setting: DOWN
TurnTime
Select the desired parameter by pressing the or button.
Example Run time for the UP command (UP)
In this menu, you can change the settings for each facade (F1 - F4) using the
/ buttons.
Runtime UP 2:30 2:30 2:20 1:00
(Min:Sec) CH1 CH2 CH3 CH4
The OFF setting is achieved by setting the value to 00:00. The word OFF appears instead of 00:00. This switches off the time switch control at the respective facade.
Leave the menu after completing the entries using the disp/prog button.
This saves the changes you made.
8.2.2 Run time UP/DOWN
The move command is active for the set run time, which means that if the run
time is too short, the sun shading product does not move all the way to the
limit position.
By setting the DOWN run time accordingly, you can obtain a light band (i.e.
the sun shading product does not move all the way down to the lower limit
position).
Ideally, the set run time is identical to the actual run time of the sun shading
product.
A run time of 99:59 minutes is equivalent to a continuous command.
CONTINUOUS appears in the display instead.
A run time of 00:00 is equivalent to a jog mode, i.e. when a move command
is triggered, the sun shading product only moves as long as the arrow key is
activated. OFF appears in the display.
NOTE If the run time is set to OFF, the comfort functions do not take effect.
General parameters
Run time and turn time

890362_b•en•21.03.2011 We reserve the right to carry out improvements
61
8.2.3 Turn time
The automatic turning control activates a brief (0.1 - 9.9 s) UP command (=
turn time) after the sun shading products have reached the lower limit position. Whether or not the turning is actually executed depends on what caused
the DOWN command. See Chapter 8.2.4.
NOTE If the set DOWN run time is longer than the actual product run time, the sun
shading products remain in the lower limit position until the turning takes
place.
When using the External venetian blind or Pleated blind product setting, the turn setting can be used to set a slat angle of your choice. The turn
time can also be used to open roller shutters being used as a sun shading
system by a crack after they are lowered.
8.2.4 Turn mode
Whether or not the turning is actually executed depends what caused the
DOWN command. The causes that can be programmed are manual, sun and
time switch control.
These causes can also be combined:
M
Manual
S Sun
T Time search control
M/S Manual/sun
M/T Manual/time switch control
S/T Sun/time switch control
M/S/T Manual/sun/time switch control
OFF OFF
General parameters
Run time and turn time

890362_b•en•21.03.2011
We reserve the right to carry out improvements
62
WAREMA Quatronic dialog®
Operating instructions
8.3 Setting the time
A DCF77 radio clock receiver is integrated in the wind sensor of the Quatronic dialog. The date and time are set automatically when the radio signal is
received. The change between daylight saving time and standard time takes
place automatically. In some locations, reception may not be possible. In this
case, the time and day of the week can be entered by hand.
NOTE If a DCF77 radio signal is not received, a question mark appears behind the
time. The ? continues to be displayed for approx. 5 minutes even after the
supply voltage is switched off
Keep the disp/prog button pressed for approx. 5 seconds.
Wind speed: 8m/s 8m/s 8m/s 8m/s
Time: 10:26:47 Wednesday, 20.11.2008
The selection menu is displayed:
Select the Wind RunT Timer Sun
settings: Rain Temp Product -->
Press the button under --> to open the second page of the selection
menu.
Select the Displ Ice ComfT Time
settings: Passw Da/Du Rel.H. -->
Press the
button above the word Time.
The Weekday and time settings menu is displayed.
Weekday and W-Day Hrs Min Sec
time settings Mon 10 : 26 : 47
Set the day and time by pressing the / buttons.
Leave the menu after completing the entries using the disp/prog button.
This saves the changes you made.
Pressing the disp/prog again takes you back to the display mode.
General parameters
Time

890362_b•en•21.03.2011 We reserve the right to carry out improvements
63
8.4 Password
Access to changing the settings (programmed limit values, safety functions,
run times, etc.) should not be available to everyone. You can protect the
programming level against unauthorised access with an access code (password) consisting of four digits of your choice. Keep this password in a safe
place. You yourself will not be able to change the settings later if you do not
have this number.
NOTE Because a password is not set at the factory, the programming level is ini-
tially accessible to everyone. Switching on and off of the comfort functions by
hand (in the 6th display, see Chapter "Displays") is generally not protected by
the password.
8.4.1 Defining the password
Keep the disp/prog button pressed for approx. 5 seconds.
Wind speed: 8m/s 8m/s 8m/s 8m/s
Time: 10:26:47 Wednesday, 20.11.2008
The selection menu is displayed:
Select the Wind RunT Timer Sun
settings: Rain Temp Product -->
Press the button under --> to open the second page of the selection
menu.
Select the Displ Ice ComfT Time
settings: Passw Da/Du Rel.H. -->
Press the button below the word Passw.
The Password menu is displayed.
Please enter password:
0 0 0 0
Define a password by pressing the / buttons.
Leave the menu after completing the entries using the disp/prog button.
General parameters
Password

890362_b•en•21.03.2011
We reserve the right to carry out improvements
64
WAREMA Quatronic dialog®
Operating instructions
Confirm your entries in the following menu.
New password: 1234
Please confirm. Yes No
Press the button below the word Yes to confirm your entry.
A confirmation appears:
New settings are saved.
Leave the menu after completing the entries using the disp/prog button.
This saves the changes you made.
Pressing the disp/prog again takes you back to the display mode.
8.4.2 Opening the programming
level with the password
If the Quatronic dialog is protected by a password, you can only enter the
programming level if you know the password.
Perform the following steps:
Select the setting level for the password as described in Chapter 8.4.1.
Please enter password:
0 0 0 0
Enter the correct password using the / buttons.
After you enter the correct password, the Quatronic dialog opens the selec-
tion menu. You can now change the settings.
You can protect your settings against being changed by using a self-defined
password.
Defined password:
NOTE If the password is lost, the Quatronic dialog must be sent in.
General parameters
Password

890362_b•en•21.03.2011 We reserve the right to carry out improvements
65
8.4.3 Changing the password
To change an existing password, you must first enter the programming level
using the old password as described in Chapter 8.4.1.
Select the Password menu item as described.
You are now asked for the old password.
Please enter old password:
0 0 0 0
Enter the old password using the / buttons.
After you have fully entered the old password, you are asked for the new
password.
Please enter new password:
0 0 0 0
Enter the new password using the / buttons.
Leave the menu after completing the entries using the disp/prog button.
Confirm your entries in the following menu.
New password: 1234
Please confirm. Yes No
Leave the menu after completing the entries using the disp/prog button.
This saves the changes you made.
8.4.4 Deleting the password
To disable the password lock, enter the password 0000 as described
in Chapter 8.4.3. After this, a password is not requested when entering the
programming level.
General parameters
Password

890362_b•en•21.03.2011
We reserve the right to carry out improvements
66
WAREMA Quatronic dialog®
Operating instructions
9 Help
For most Quatronic dialog displays, there is an integrated help that can be
opened at the touch of a button.
Press the info button.
The first page of the help text appears.
Example Wind ... Dely
Selection of the wind delay UP in
seconds for each channel.
Press the info button again to leaf through the help text.
This delay is required so that brief
exceeding of the wind limit does not
If there are no additional pages, the following message appears:
End of info.
Please press button "disp/prog".
Press the disp/prog button to leave the help.
If you would like to read the text again, press the info button again. The first
page of the help text appears.
NOTE If you stop leafing through the help system for approx. 3 minutes, the help
closes automatically. You will then be located in the display mode.
Help

890362_b•en•21.03.2011 We reserve the right to carry out improvements
67
10 Maintenance
There are no parts within the device that require maintenance.
Also follow the specifications in the operating manual of your sun shading
product and the other controlled devices.
11 Cleaning
Clean the device with a soft damp cloth.
Steam or high-pressure cleaners, abrasive sponges, abrasive agents, and
solvents such as alcohol or benzine may not be used.
WARNING
When cleaning activities on the WAREMA Quatronic dialog, on the sun
shading product itself or in the immediate vicinity of the sun shading
product are required, first de-energise the unit and secure it against
reactivation.
12 Disposal
After its use, the unit must be disposed of according to legal stipulations or
returned to your local recycling centre.
13 Liability
Failure to comply with the product information in these instructions and use
of the unit in a manner that contravenes its intended use and purpose may
result in the manufacture refusing to honour warranty claims for product damage. In this case, liability for consequential harm to persons or damage to
property will also be excluded.
Follow the instructions in the operating manual of your sun shading product.
Liability cannot be accepted for damage to the sun shading system either
due to operation in icy conditions.
The device meets the requirements on interference resistance and interference emission for use in residential and commercial areas.
14 Information for the
user
Approved for use in the following countries:
A, B, D, DK, E, F, FIN, GB, GR, I, IRL, L, NL, P, S, CH, IS, N.
Device for the control of sun shading products
When used as intended, the device meets the basic requirements stipulated
in the following EU guidelines and harmonized standards:
Directive on radio and telecommunications terminal equipment and the mu-
tual recognition of their conformity 1999/5/EC(R&TTE)
EMC directive 89/336/EEC
Low voltage directive 73/23/EEC
The declaration of conformity can be reviewed at:
http://www.warema.de
Maintenance

890362_b•en•21.03.2011
We reserve the right to carry out improvements
68
WAREMA Quatronic dialog®
Operating instructions
15 Troubleshooting
Problem Possible cause Remedy
No display Power failure Wait until voltage is back
Connection fault (short circuit) Connection, see installation instruc-
tions
Connection terminals too tight and
therefore damaged
Send device in for repairs
The following message appears:
Attention: Overload at +12V.
Switch off the system and eliminate the cause.
A short circuit at +12V at the sensor
terminals
Switch off the unit. Connect the sensor
supply lines one after the other until
the fault message appears again. Correct the fault at the sensor or line.
Disturbance in radio clock reception Radio clock signal too weak Change the position of wind/photo/
radio clock sensor. Check for question
mark behind date.
Comfort functions (sun, inside temperature, outside temperature, humidity)
do not move the sun shading product
up or down
OFF is selected for the run time setting Set the RunT... UP
or
RunT ... DOWN menu
Comfort functions are switched off Switch the comfort functions on
Limit values are set incorrectly Set the limit values: For sun control -
the DOWN limit value should be higher
than the UP limit value.
The sun shading product is in the upper limit position and cannot be lowered manually
Wind monitor If the wind alarm is unfounded, in-
crease the limit value
Ice monitor The ice monitor can be disabled at
your own risk (Chapter 6.3 on page 33)
Rain monitor In the event of a rain alarm, set the
rain monitor to OFF in the Rain submenu (Chapter 6.2 on page 31)
The slats cannot be turned manually;
the sun shading product immediately
moves to the limit position
Manual is not set as the cause for
the corresponding facade in the
RunT ... Turn operat. mode menu.
RunT ... Turn operat. mode menu
set the cause H
(Chapter 8.2 on page 59)
Sun shading product does not move
up in a storm
Wind/photo/radio clock sensor is not
mounted correctly
Check the mounting and connection
Wind speed limit too high Reduce the wind speed limit
(Chapter 6.1 on page 26)
Sun shading product does not move
up in rain
Rain sensor not mounted Check the mounting and connection
Sensor surface is soiled Clean carefully with a cloth
Rain monitoring is switched off Switch on rain monitoring
(Chapter 6.2.1 on page 32)
Sun shading product does not move
down in sun or moves too late
Sensor is incorrectly mounted or in the
shade
Check the mounting and connection
Sun control is switched off
Comfort timer ... Manual menu
Switch on the sun control
(Chapter 7.6.3 on page 56)
DOWN sun limit value (Lim.
) too high Sun control ... Lim. menu:
Reduce the DOWN sun limit value
(Chapter 7.1 on page 37)
DOWN on delay (Dely) too high Sun control ... Dely menu:
Reduce the on delay
(Chapter 7.1 on page 37)
Troubleshooting

890362_b•en•21.03.2011 We reserve the right to carry out improvements
69
Problem Possible cause Remedy
In sun, the sun shading product moves
down to early
DOWN sun limit value (Lim.
) too low Sun control ... Lim. menu:
Increase the DOWN sun limit value
(Chapter 7.1 on page 37)
On delay (Dely) in sun too low Sun control ... Dely menu:
Increase the on delay
(Chapter 7.1 on page 37)
Sun shading product moves up too
late when cloudy
UP sun limit value (Lim.
) too high Sun control ... Lim. menu:
Reduce the UP sun limit value
(Chapter 7.1 on page 37)
Off delay when cloudy too high
Sun control ... Dely menu:
Reduce the off delay
(Chapter 7.1 on page 37)
Sun shading product moves up too
early when cloudy
UP sun limit value (Lim.
) too low Sun control ... Lim. menu:
Increase the UP sun limit value
(Chapter 7.1 on page 37)
Off delay when cloudy too low
Sun control ... Dely menu:
Increase the off delay
(Chapter 7.1 on page 37)
Sun shading product does not move
up automatically at dusk
The sun control was switched off during the day.
Comfort timer ... Manual menu
Switch on the sun control
(Chapter 7.6.3 on page 56)
Sun shading product was lowered
manually and the reading did not drop
below the cloud limit value
Move up manually
Ice warning is issued during precipitation
An "Outside temperature" sensor was
not connected
Ice menu:
Switch off ice monitoring
(Chapter 6.3.1 on page 33)
Troubleshooting

890362_b•en•21.03.2011
We reserve the right to carry out improvements
70
WAREMA Quatronic dialog®
Operating instructions
16 Factory presets
Parameter Unit
Articulated
arm awning
Conservatory/
facade awning
External vene-
tian blind
Roller shutter Pleated blind
Wind
Limit value m/s 08 10 12 OFF OFF
Delay Sec 01 01 05 OFF OFF
Off delay Min 10 10 10 OFF OFF
Wind test On/off Off Off Of f Off Off
Run time
Up Min:Sec 1:00 2:00 2:30 2:30 2:30
Down Min:Sec 1:00 2:00 2:30 2:30 2:30
Turn time Sec OFF OFF 0.5 1.0 OFF
Turn mode M/S/T OFF OFF M/S S OFF
Timer switch
Up Mo-Fr Hr:Min OFF OFF OFF OFF OFF
Down Mo-Fr Hr:Min OFF OFF OFF OFF OFF
Down Sa+Su Hr:Min OFF OFF OFF OFF OFF
Down Sa+Su Hr:Min OFF OFF OFF OFF OFF
Sun
Limit value, clouds, up kLux 30 30 15 OFF 30
Limit value, sun, down kLux 50 50 35 OFF 50
On delay Min 5 5 2 OFF 5
Off delay Min 10 10 20 OFF 10
Dawn/dusk
Dusk, down Lux OFF OFF OFF 80
OFF
Dawn, up Lux OFF OFF OFF 30 OFF
Rain monitor
On/off On On Off Off Off
Temperature
Outside limit value, up °C OFF OFF OFF OFF OFF
Outside limit value, down °C OFF OFF OFF OFF OFF
Outside move command/sun control Move/sun Move Move Move Move Move
Inside limit value, up °C OFF OFF OFF OFF OFF
Inside limit value, down °C OFF OFF OFF OFF OFF
Inside move command/sun control Move/sun Move Move Move Move Move
Humidity limit
Limit value, up % H
rel
OFF OFF OFF OFF OFF
Limit value, down % H
rel
OFF OFF OFF OFF OFF
Ice warning
On/off Off Off Off Off Off
Comfort timer
Switch-on Mo-Fr Hr:Min OFF 6:00 6:00 6:00 6:00
Switch-off Mo-Fr Hr:Min OFF OFF OFF OFF OFF
Switch-on Sa+Su Hr:Min OFF 6:00 6:00 6:00 6:00
Switch-off Sa+Su Hr:Min OFF OFF OFF OFF OFF
Manual on/off On/off On On On On On
Reference

890362_b•en•21.03.2011 We reserve the right to carry out improvements
71
17 Custom settings
Parameter Unit Facade 1 Facade 2 Facade 3 Facade 4
Product -
Wind
Limit value m/s
On delay Sec
Off delay Min
Wind test On/off
Run time
Up Min:Sec
Down Min:Sec
Turn time Sec
Turn mode M/S/T
Timer switch
Up Mo-Fr Hr:Min
Down Mo-Fr Hr:Min
Down Sa+Su Hr:Min
Down Sa+Su Hr:Min
Sun
Limit value, clouds, up kLux
Limit value, sun, down kLux
On delay Min
Off delay Min
Dawn/dusk
Dusk, down Lux
Dawn, up Lux
Rain monitor
On/off
Temperature
Outside limit value, up °C
Outside limit value, down °C
Outside move command/sun control Move/sun
Inside limit value, up °C
Inside limit value, down °C
Inside move command/sun control Move/sun
Relative humidity
Limit value, up % H
rel
Limit value, down % H
rel
Ice warning
On/off
Comfort timer
Switch-on Mo-Fr Hr:Min
Switch-off Mo-Fr Hr:Min
Switch-on Sa+Su Hr:Min
Switch-off Sa+Su Hr:Min
Manual on/off On/off
Reference

WAREMA Renkhoff SE
Hans-Wilhelm-Renkhoff-Strasse 2
97828 Marktheidenfeld, Germany
http://www.warema.de info@warema.de
 Loading...