

Page 1
WyPLUG User Manual
Please read carefully before using the product.
The picture of User’s manual might be upgraded without any notice.
You can find the latest User Manual in WAPEUL web site (www.wapeul.com)
Page 2

CONTENTS
WyPLUG Overview
Features
3
Starting WyPLUG
Before starting using the product
4
1. Power Connection
5
2. Application Installation
6
How-to
Group
13
Share Device
17
Device Setting and information
19
Scheduling
21
Specification
23
Q&A
22
3. Setting WIFI
7
4. User’s Registration and Login
10
5. Register product
12
02
Quality Assurance
24
Notice
25
Page 3
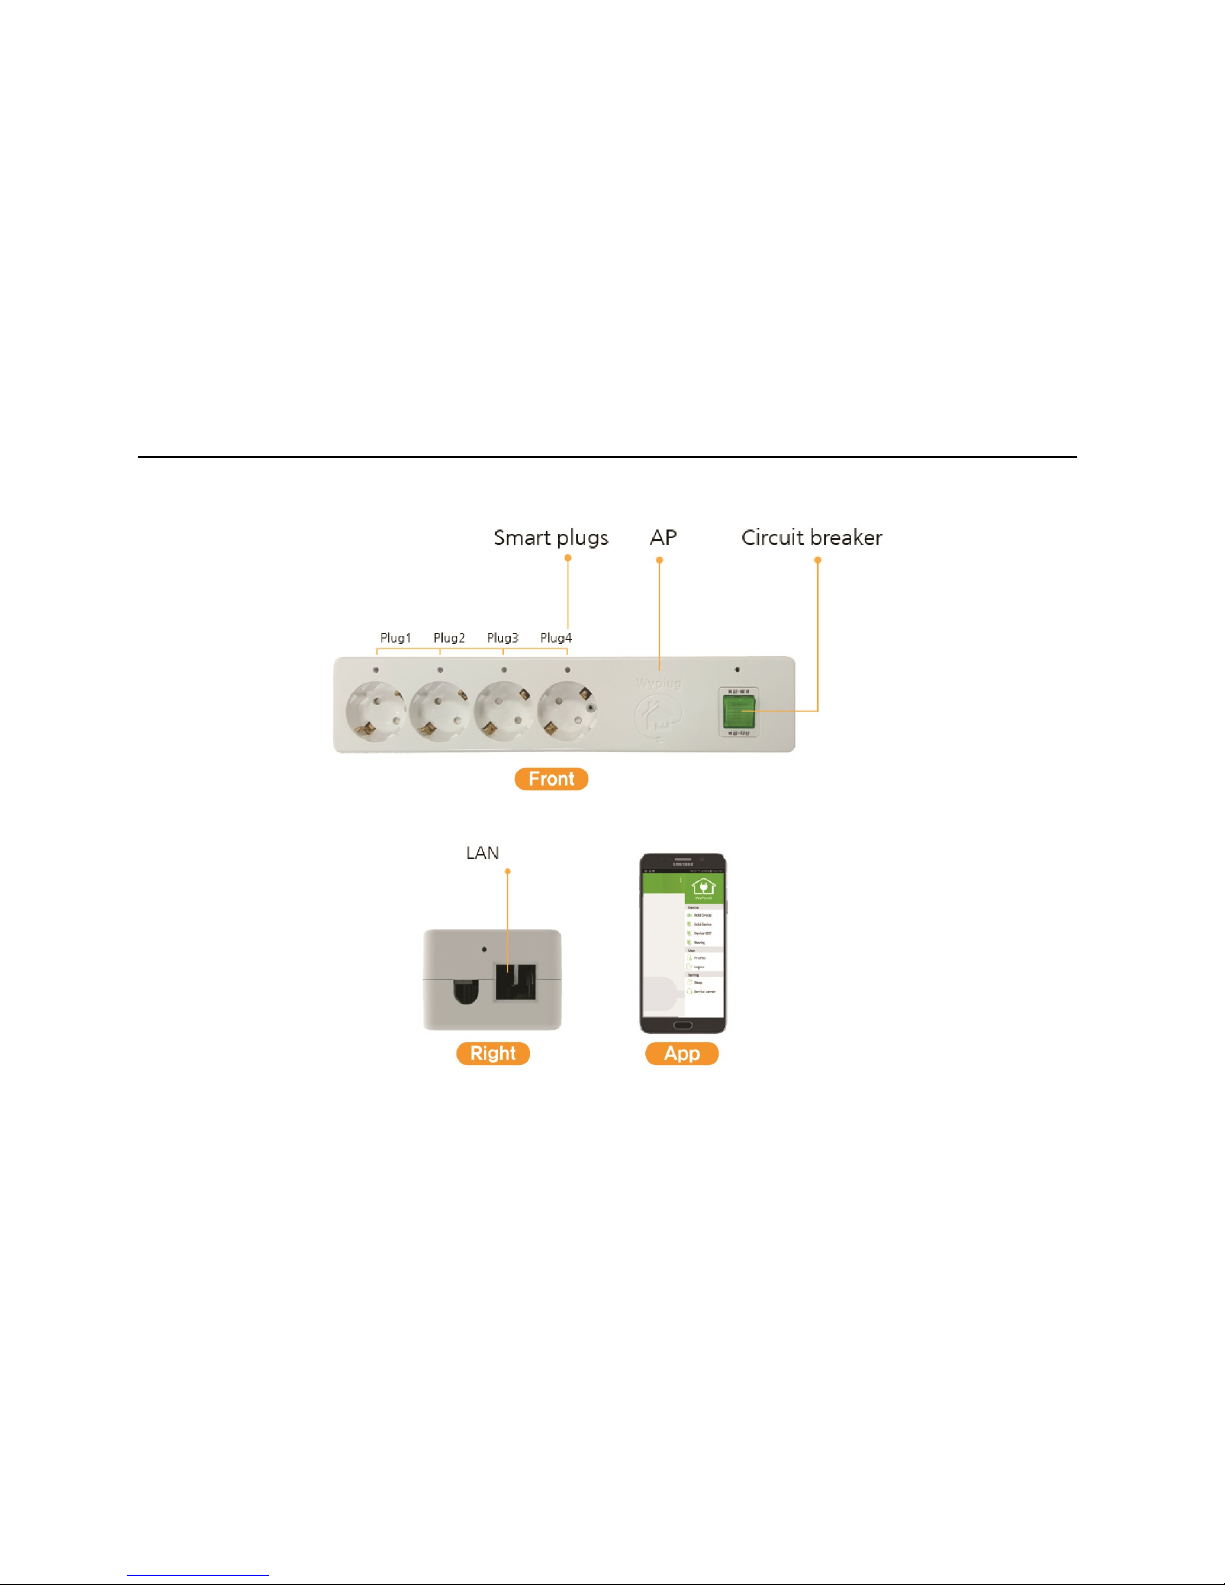
Features
03
Page 4
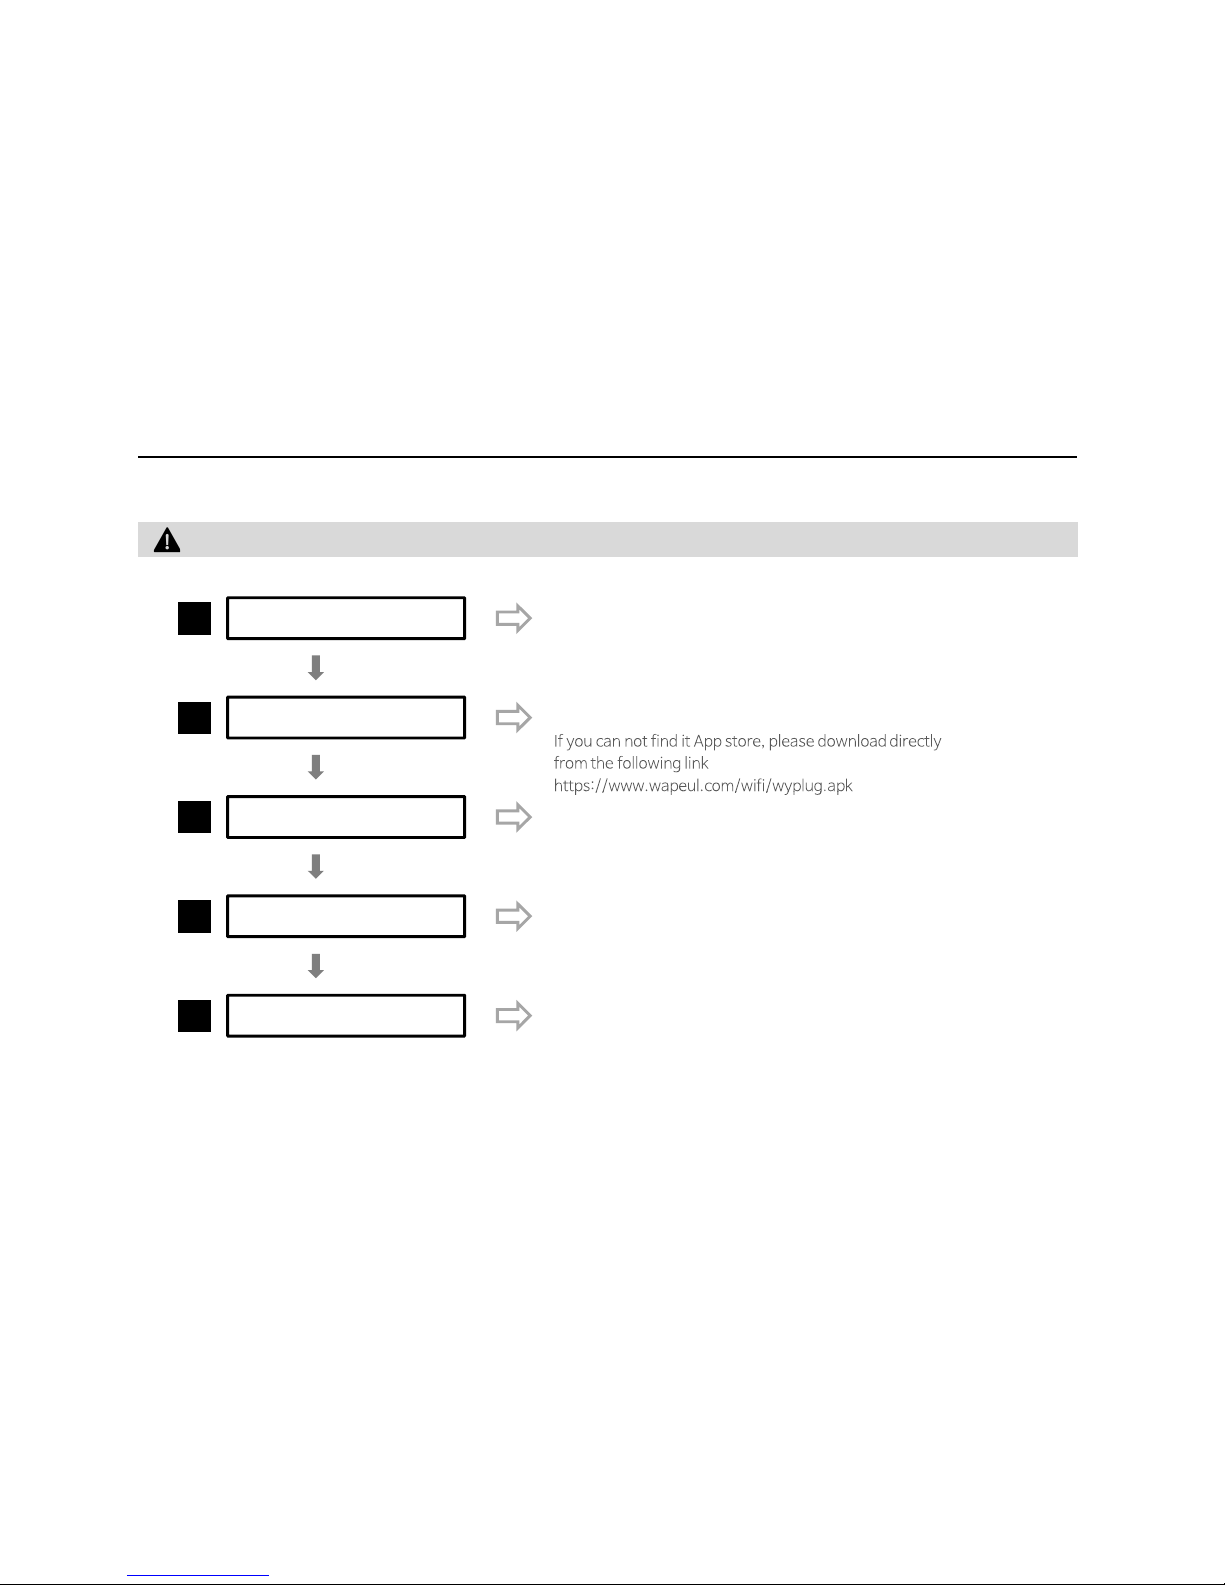
Before start it
Before using WyPLUG Service, please follow the procedures
1
Connect Power
Power up WyPLUG
2
App. Installation
Install WyPLUG
Yes
Yes
04
3
Setting WIFI
Set your own WIFI
4
Registration & Login
After user registration, please login
5
Register WyPLUG
Register your WyPLUG on your App.
Yes
Yes
Page 5
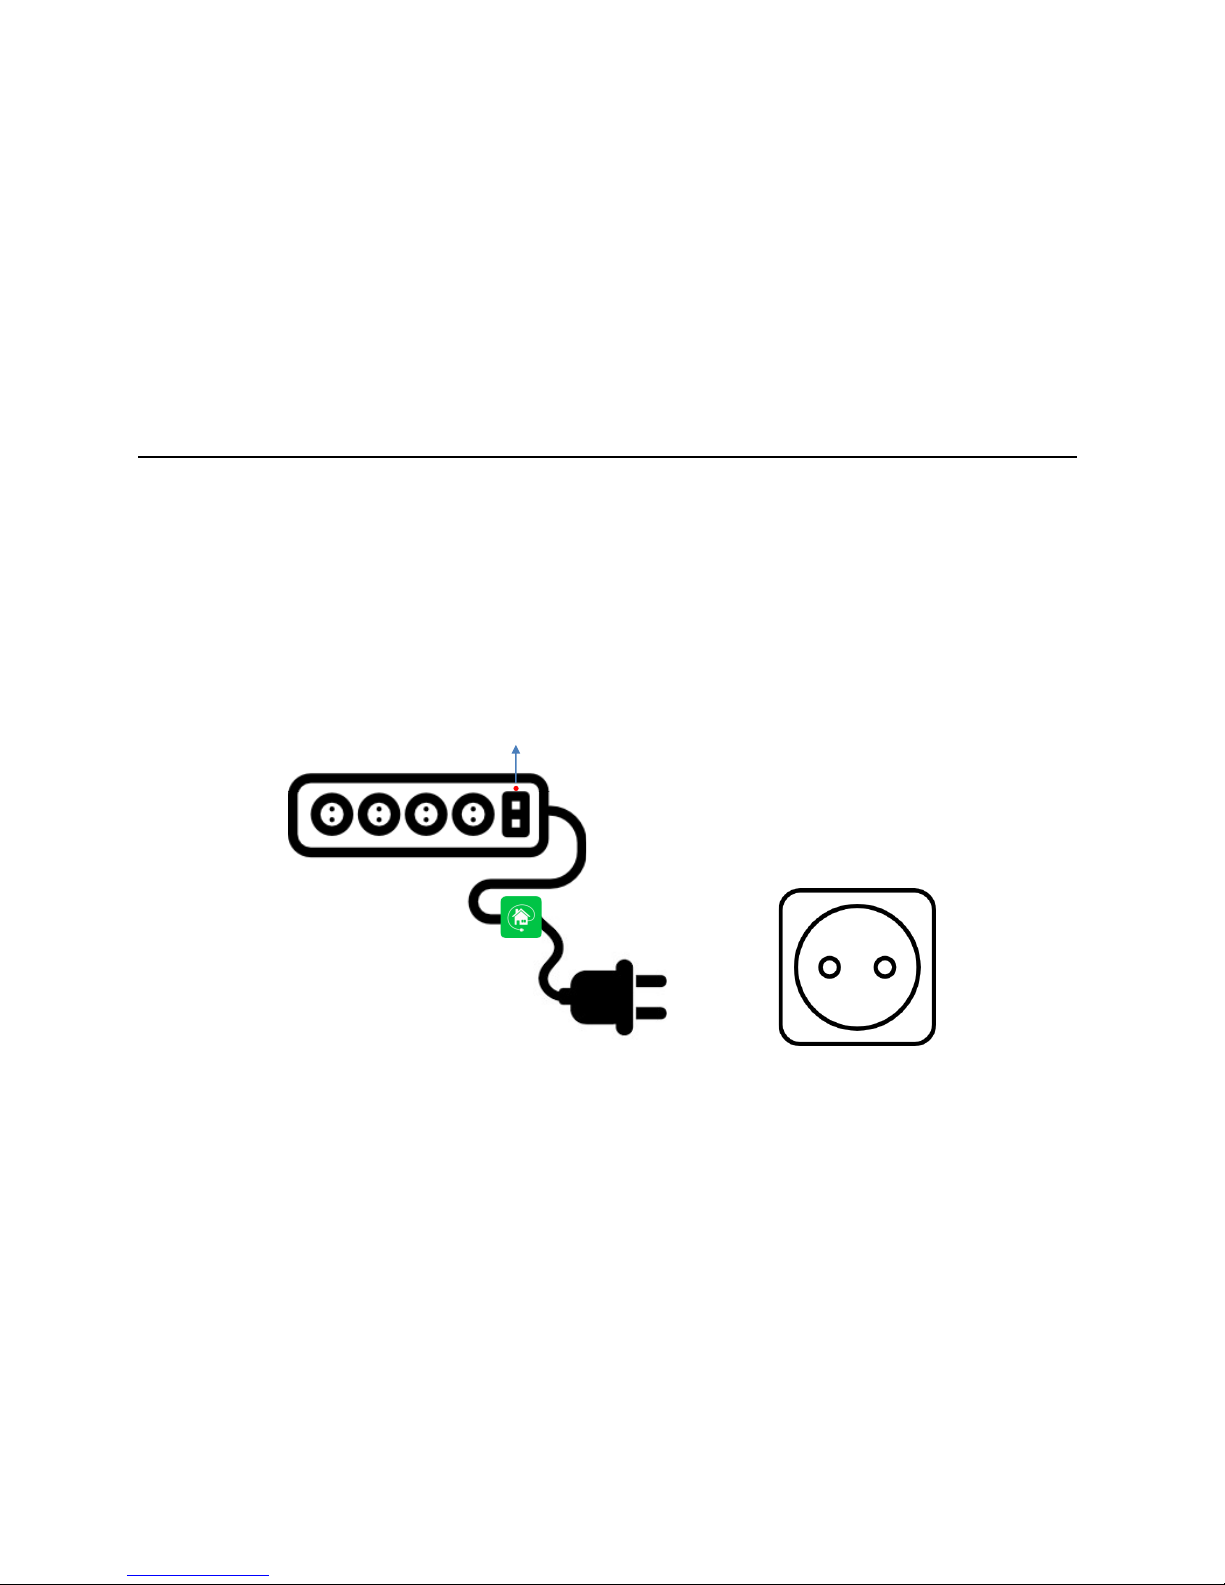
1. How to Connect Power
Connect Power
Connect WyPLUG socket into Power Plug.
After pressing ON button, please check WIFI LED is on and off periodically.
WiFi LED
05
Page 6
2. How to install App.
App. Installation
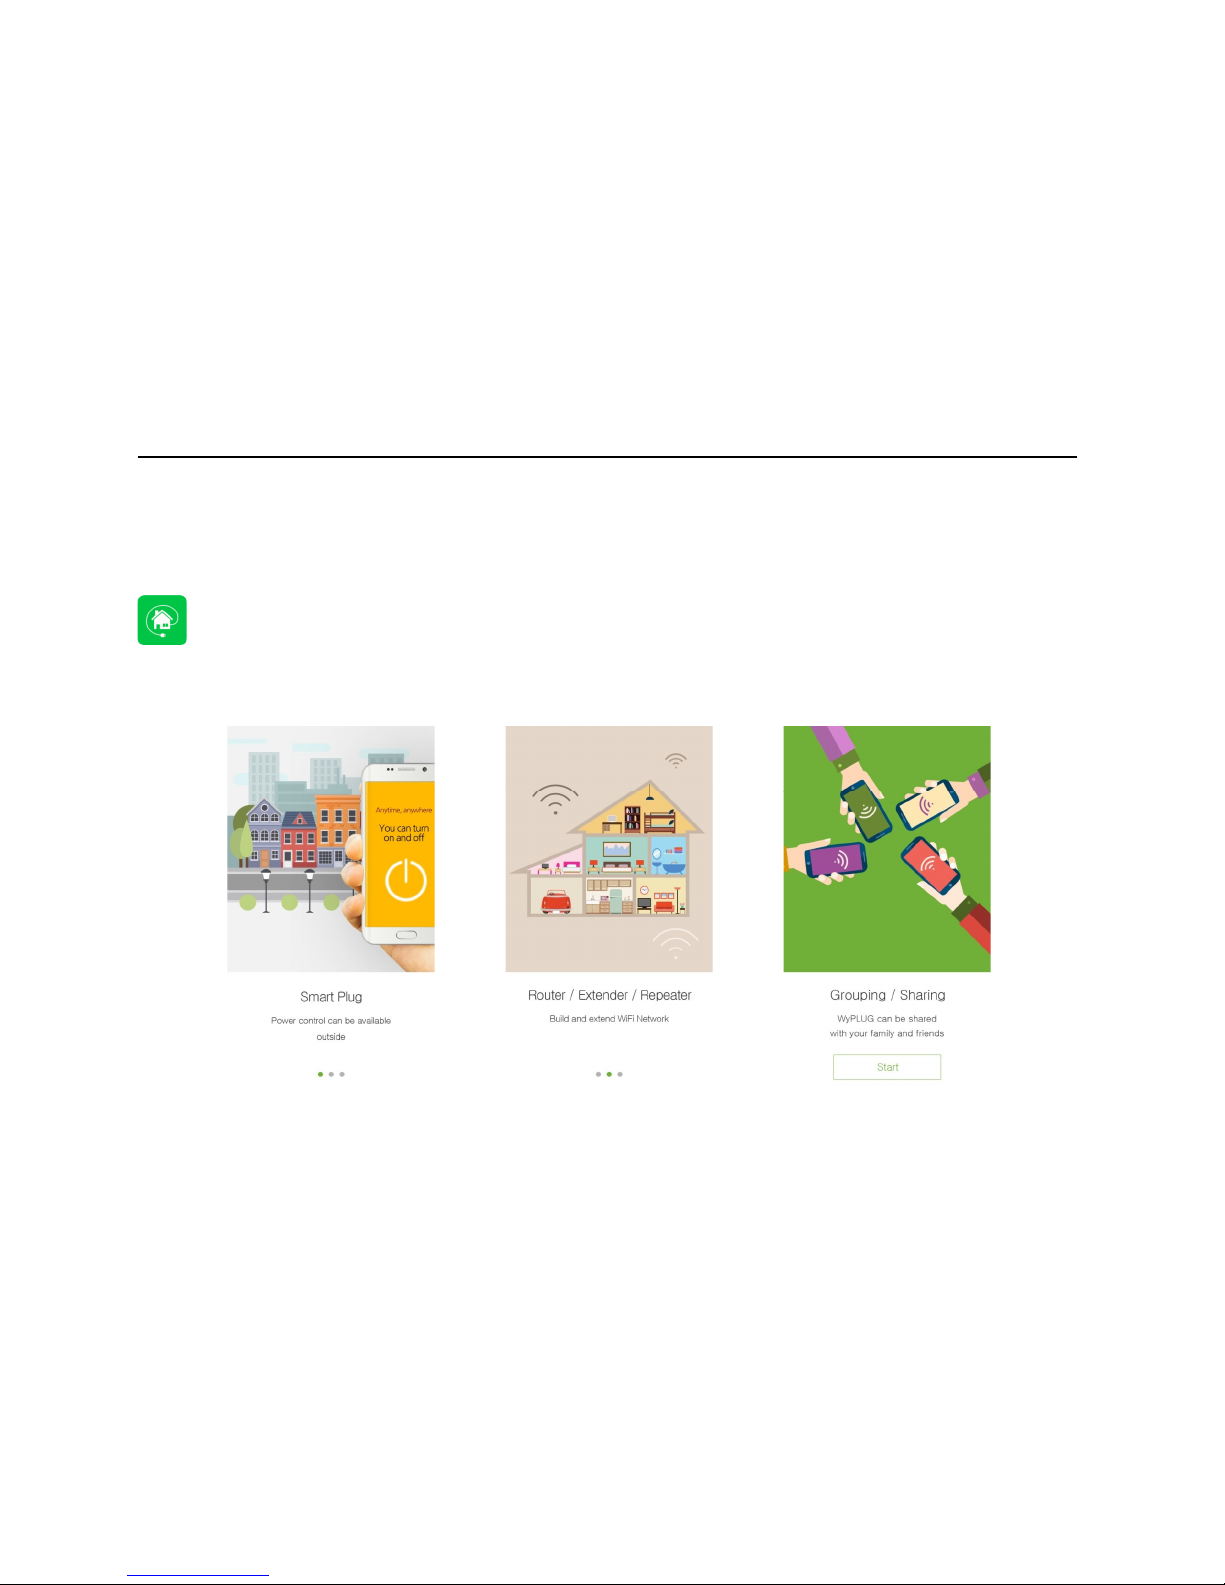
You can download with keyword search “WyPLUG” in Playstore or AppStore and install it
For Android, you can directly download App in wapeul.com/wifi/android.apk
06
Page 7
3. WIFI Setting -android
WIFI Setting
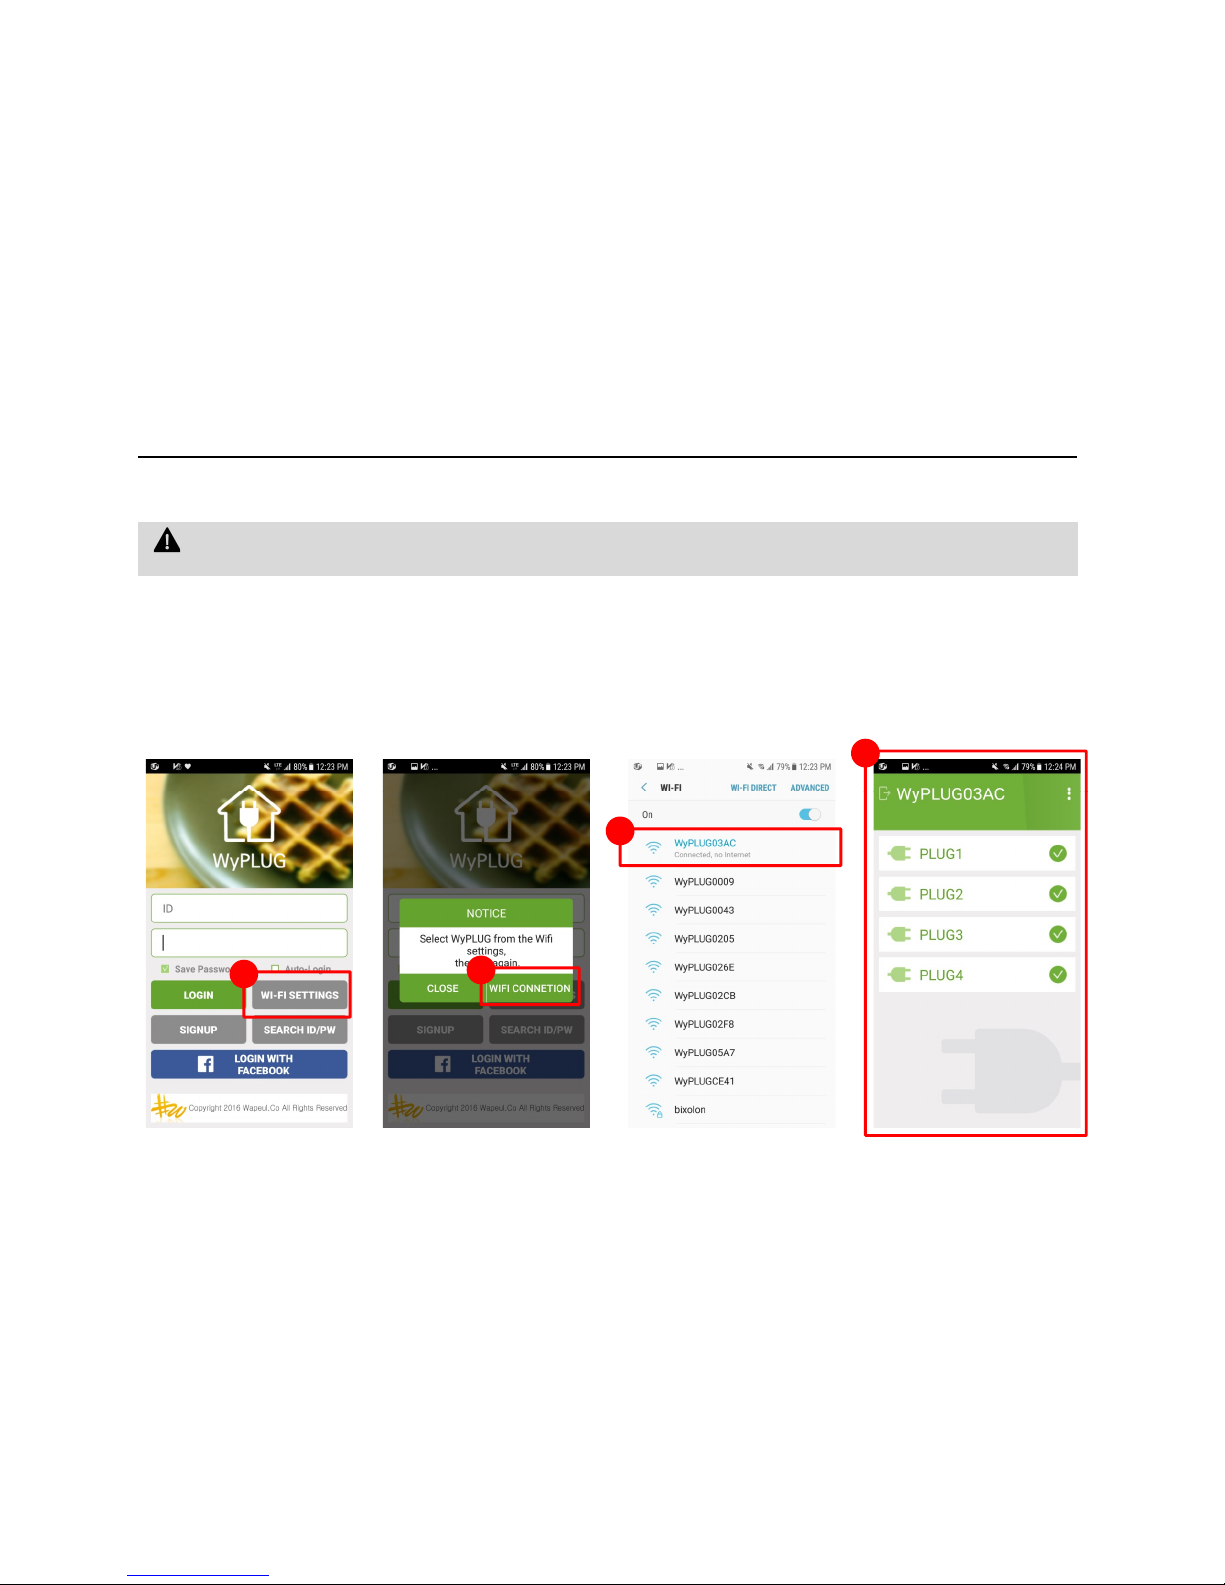
1. Start Application in your Smart Phone and set WIFI settings’ button.
2. In Notice Popup, click WiFi CONNECTION.
3. In WiFi Scan list window, click SSID in the list. SSID starts with WyPLUG followed by 4 digits.
4. Again go back to WyPLUG App, and click again WIFI SETTINGS button.)
WyPLUG can be set any mode in Factory.(Repeater or LAN Card Mode). After accessing through WIFI scan, please set
repeater mode to use your old AP.
4
07
1
2
3
Page 8
3. WIFI Setting -android
How to set WIFI
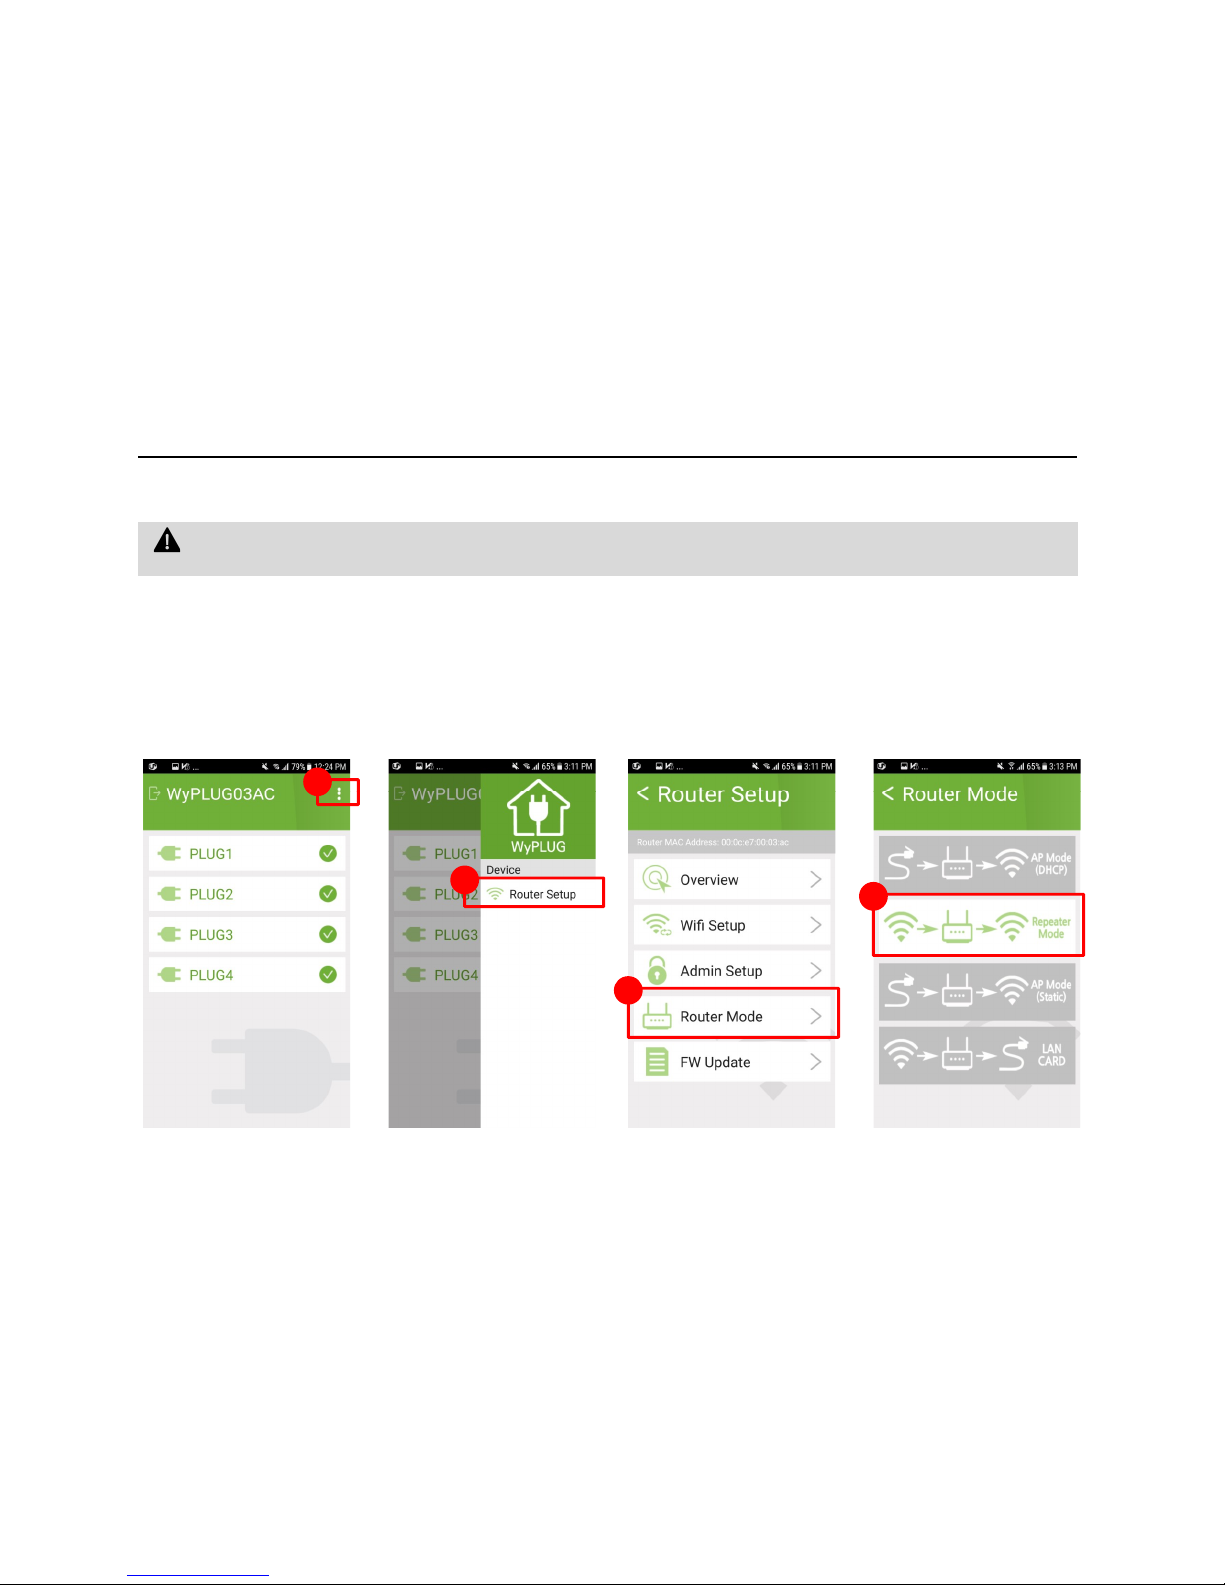
5. Click right top Menu Icon
6. Click Router Setup
7. Click Router Mode
8. To use your existing active AP, click Repeater Mode. If you don’t have WiFi AP, click AP to use wired LAN.
5
WyPLUG can be set any mode in Factory.(Repeater or LAN Card Mode). After accessing through WIFI scan, please set
repeater mode to use your old AP.
8
08
5
6
7
Page 9
3. WIFI Setting -android
How to set WiFi
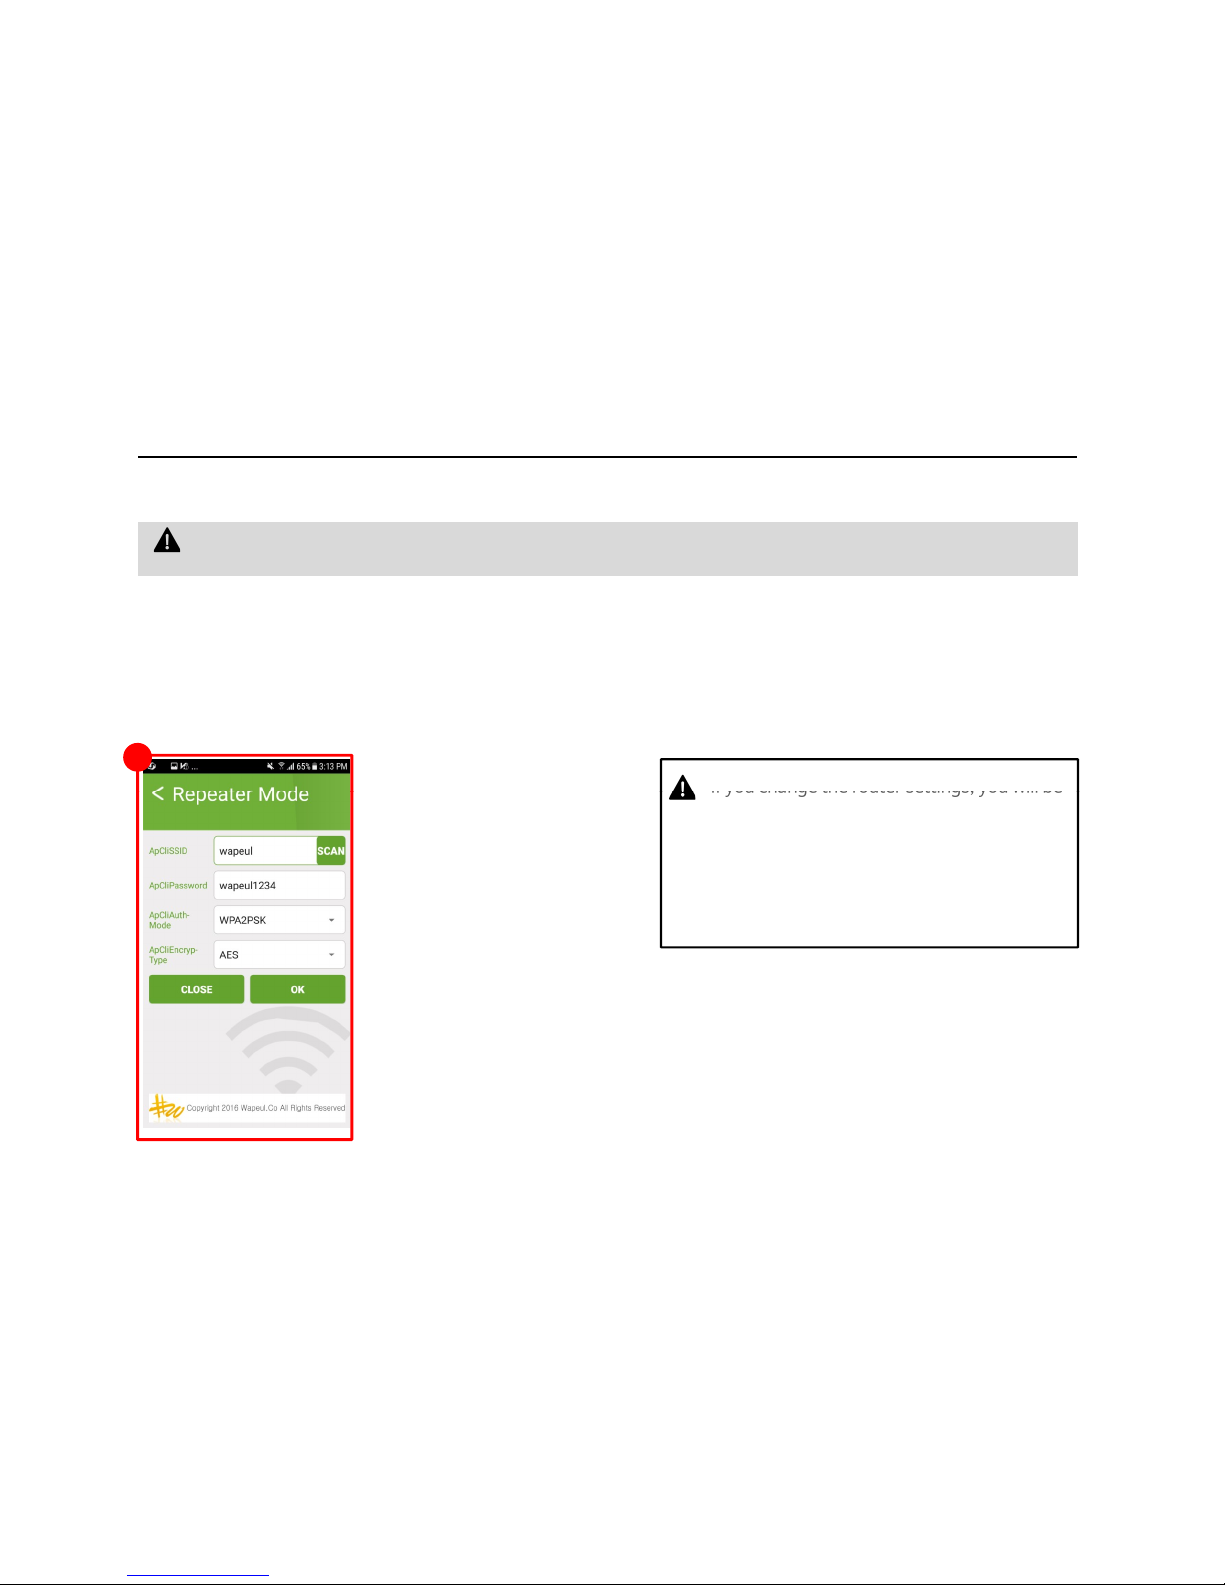
9. SSID, Network Security, Authentication Method, Encryption Type should be selected to allow secure Internet Access.
In the following picture, user’s WiFi AP SSID is “wapeul” and its password is “wapeul1234”.
(WPA2PSK, AES is recommended by default App. Setting)
WyPLUG can be set any mode in Factory.(Repeater or LAN Card Mode). After accessing through WIFI scan, please set
repeater mode to use your existing active AP.
9
If you change the router settings, you will be
taken to the initial screen and the WIFI
connection will be disconnected to reflect the
changes.
Wait for a while, go back to the WIFI settings
window and find the correct
WyPlug SSID.
09
Page 10
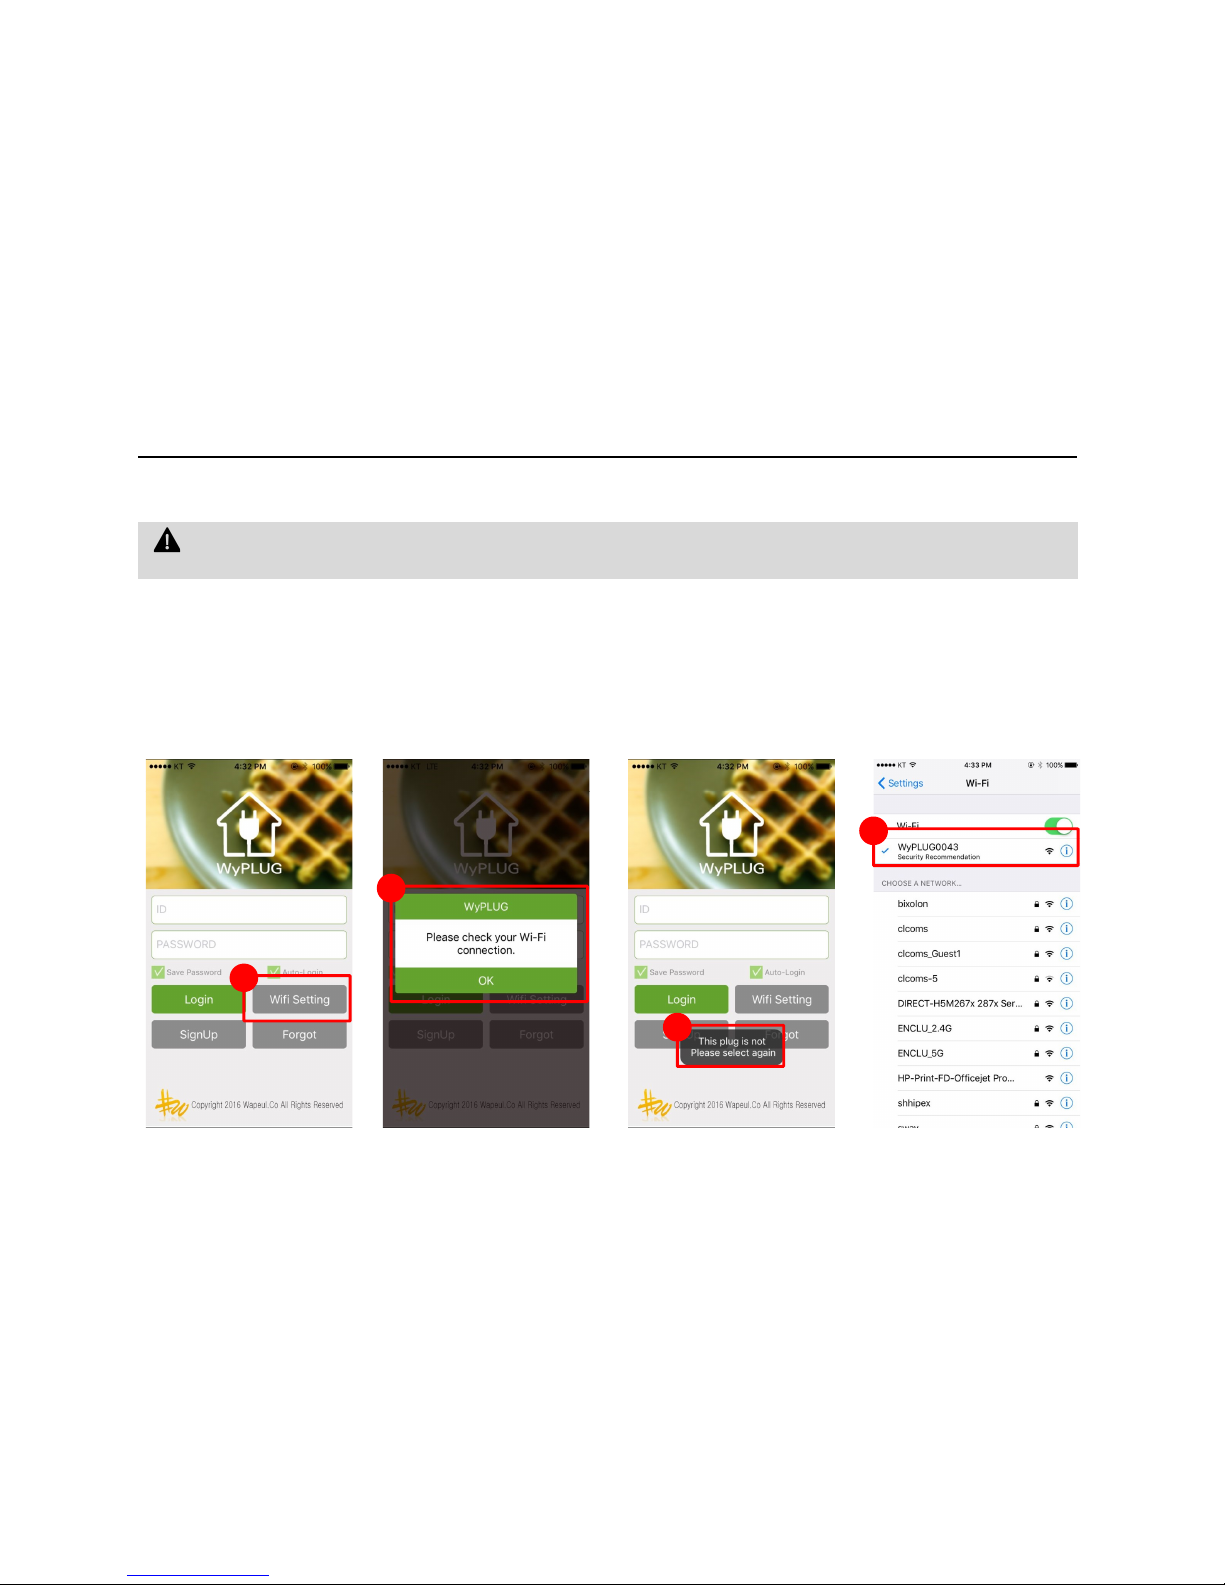
3. WIFI Setting -iOS
WIFI Setting
1. Start Application in your Smart Phone and set WIFI settings’ button.
2. If WIFI is off, the message “Please check your WiFi connection” will be shown. Accordingly turn on WIFI and connect
SSID starting with WyPLUG, followed by 4 digits.
WyPLUG can be set any mode in Factory.(Repeater or LAN Card Mode). After accessing through WIFI scan, please set
repeater mode to use your existing active AP.
10
1
2
3
4
Page 11
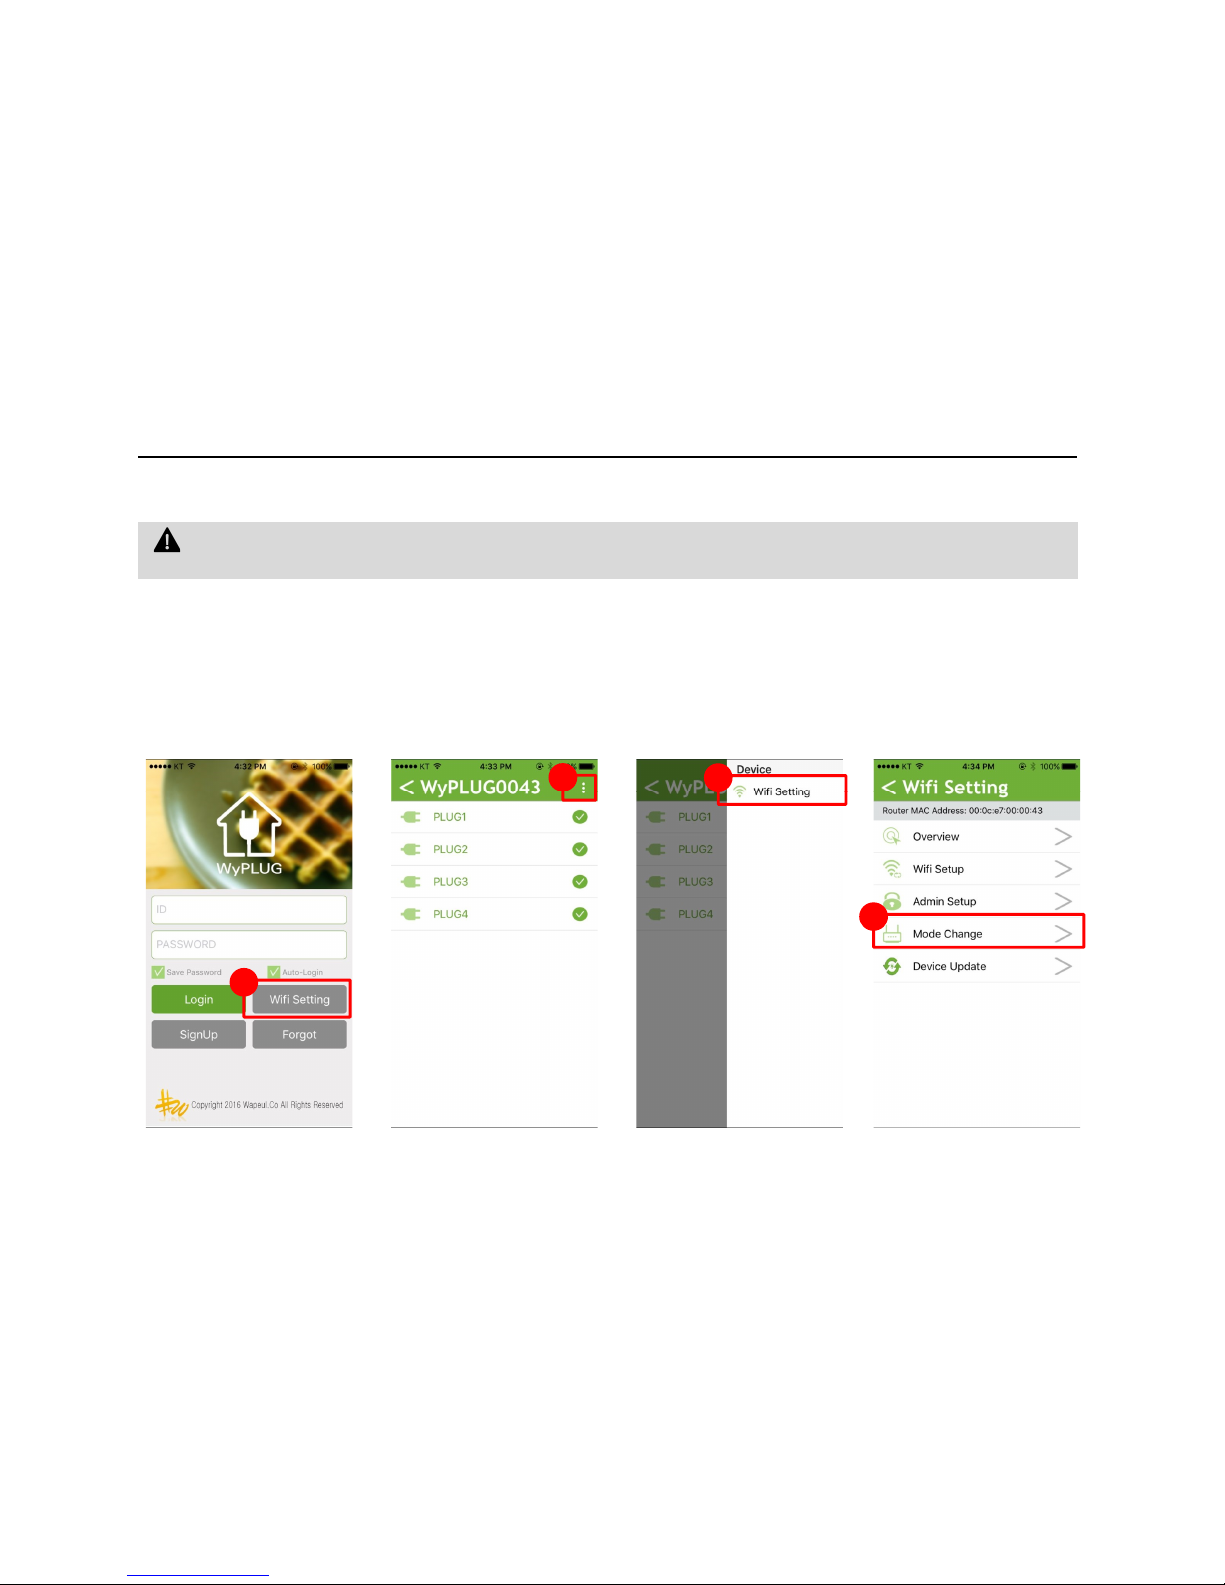
3. WIFI Setting-iOS
WIFI Setting
5. To be connected with WyPLUG SSID, you will see the following pictures.
6. Click right top Menu Icon.
7. Click Router Setup
8. Click Router Mode
6
7
WyPLUG can be set any mode in Factory.(Repeater or LAN Card Mode). After accessing through WIFI scan, please set
repeater mode to use your existing active AP.
8
11
5
8
Page 12
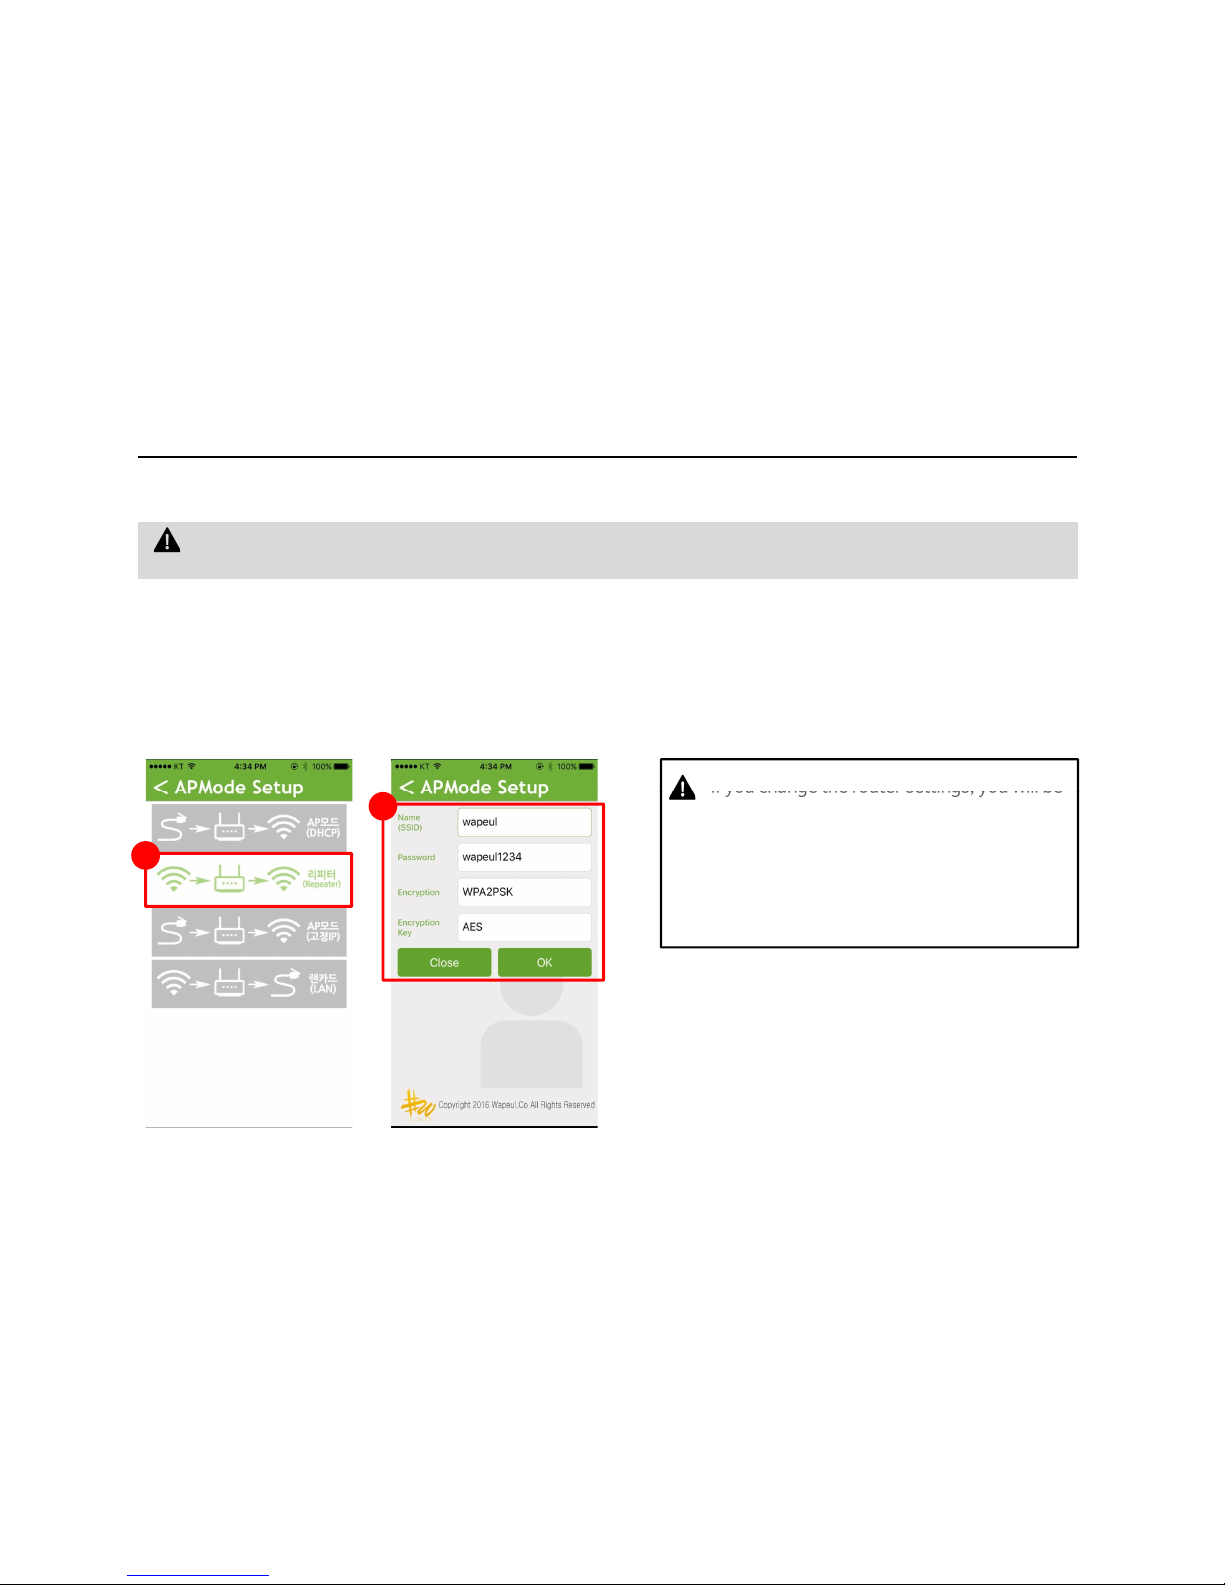
3. WIFI Setting-iOS
WIFI 설정하기
9. To use your existing active AP, click Repeater Mode. If you don’t have WiFi AP, click AP to use wired LAN.
10.SSID, Network Security, Authentication Method, Encryption Type should be selected to allow secure Internet Access.
In the following picture, user’s WiFi AP SSID is “wapeul” and its password is “wapeul1234”.
(WPA2PSK, AES is recommended by default App. Setting)
WyPLUG can be set any mode in Factory.(Repeater or LAN Card Mode). After accessing through WIFI scan, please set
repeater mode to use your existing active AP.
9
10
12
If you change the router settings, you will be
taken to the initial screen and the WIFI
connection will be disconnected to reflect the
changes.
Wait for a while, go back to the WIFI settings
window and find the correct
WyPlug SSID.
Page 13
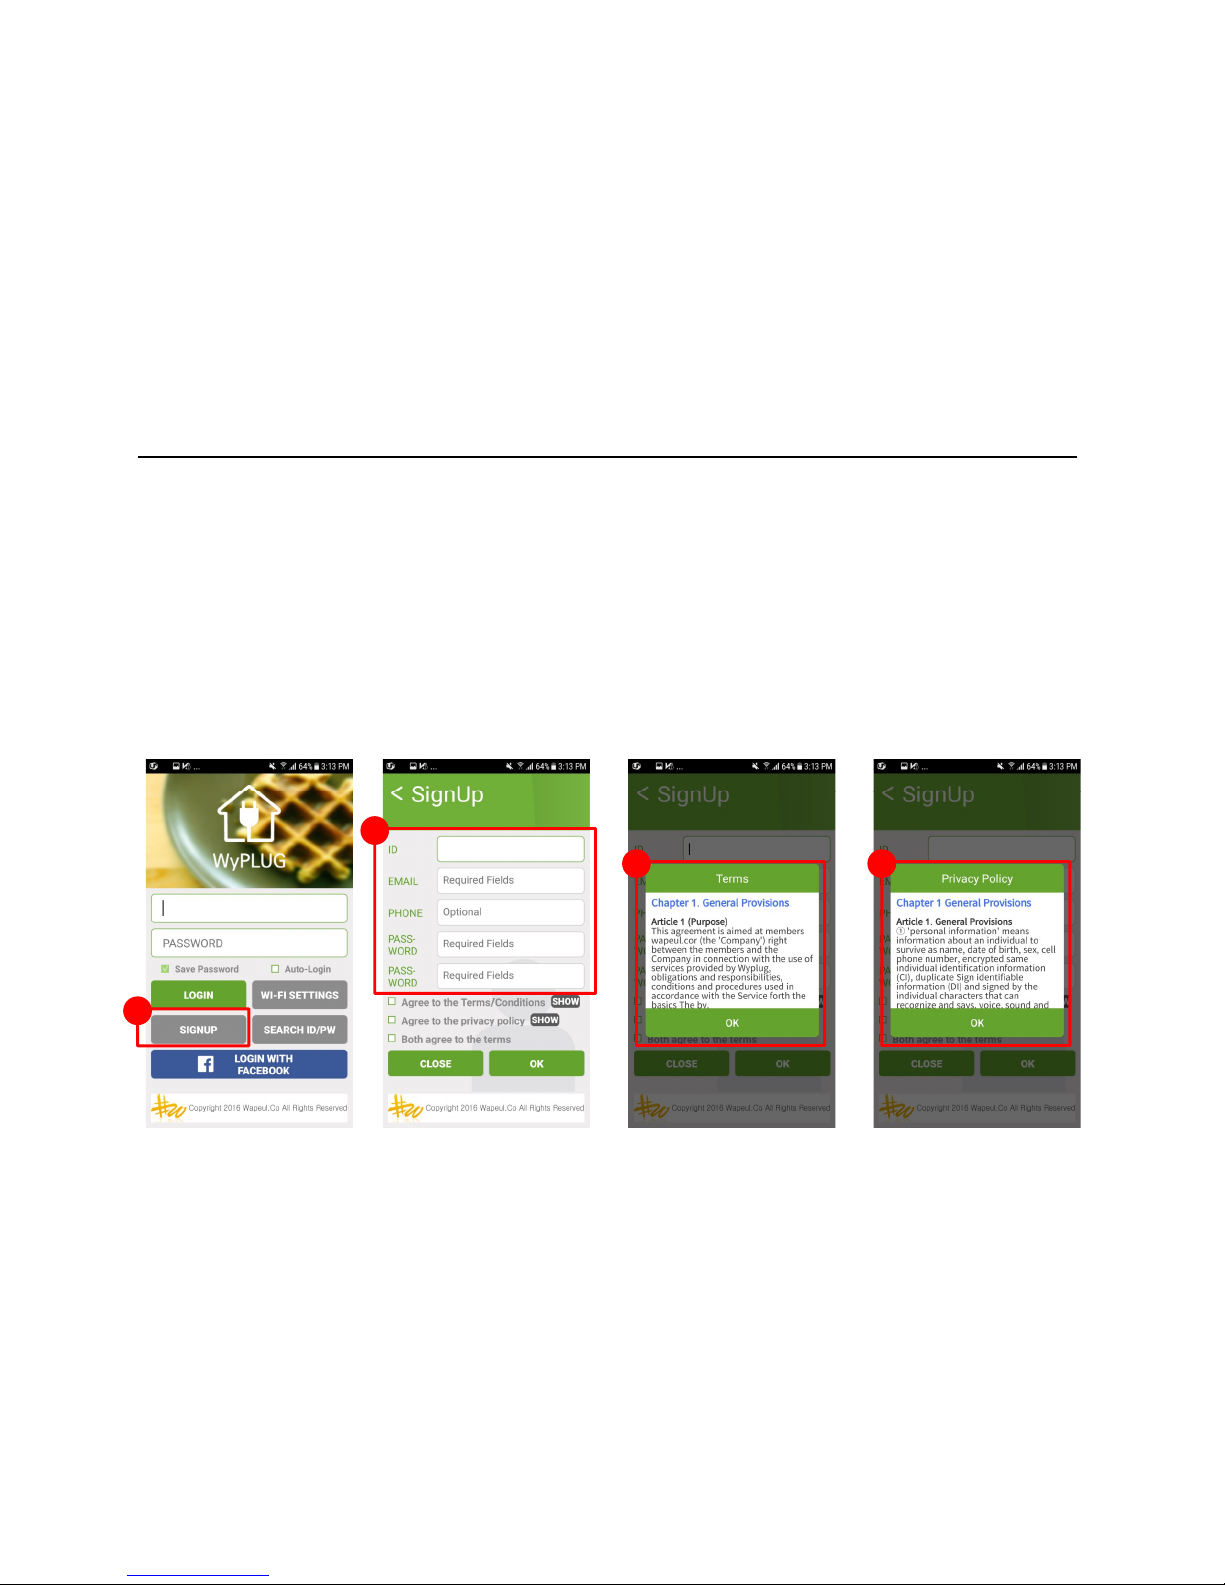
4. Registration of User’s membership and login
1. Click SIGNUP button
2. Fill all the required information into Required Fields
3. Make sure of clicking “SHOW” to read all the required agreements
4. Make sure of clicking “SHOW” to read all the privacy policy
Registration and Login
13
1
2
3 4
Page 14
4. Registration of User’s membership and login
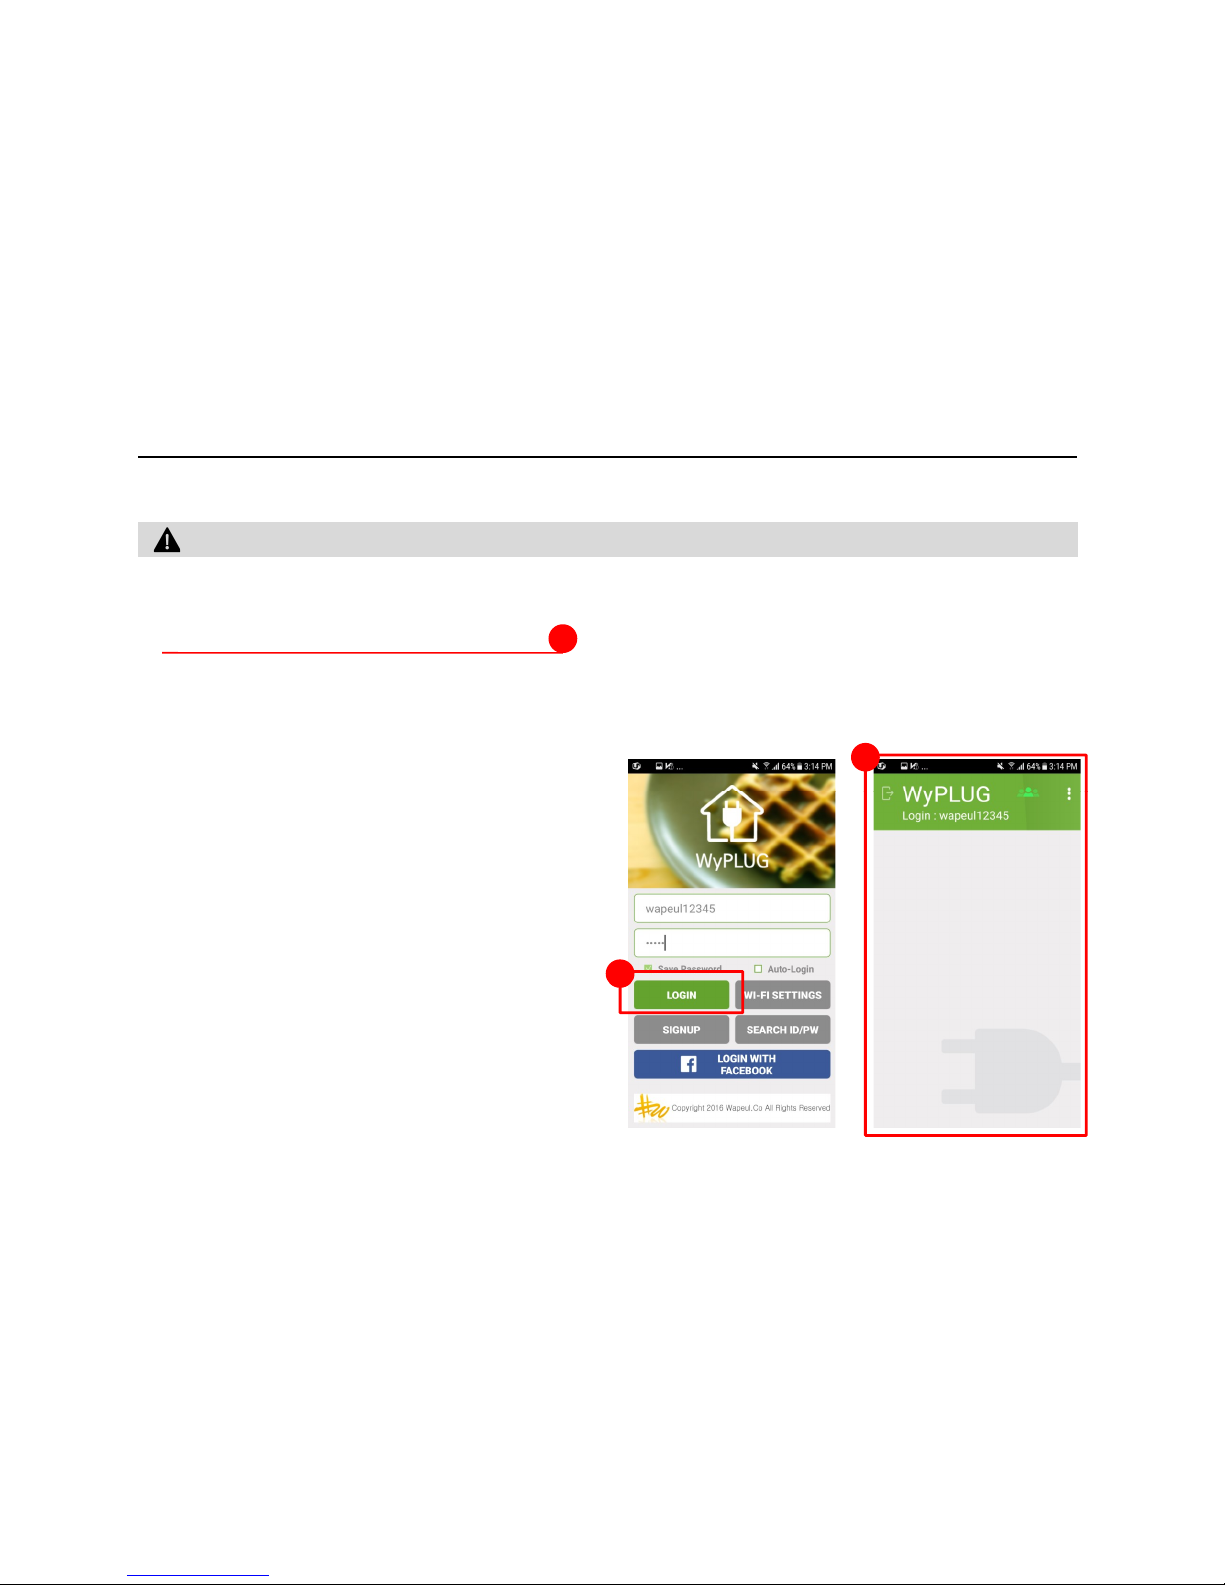
Register Membership
5. Check your email and please click the hyperlink
6. After verifying your email, please login in App.
7. It shows “nothing” in the list in the first login.
If you have to verify your email address before using this App.
7
5
14
6
Page 15
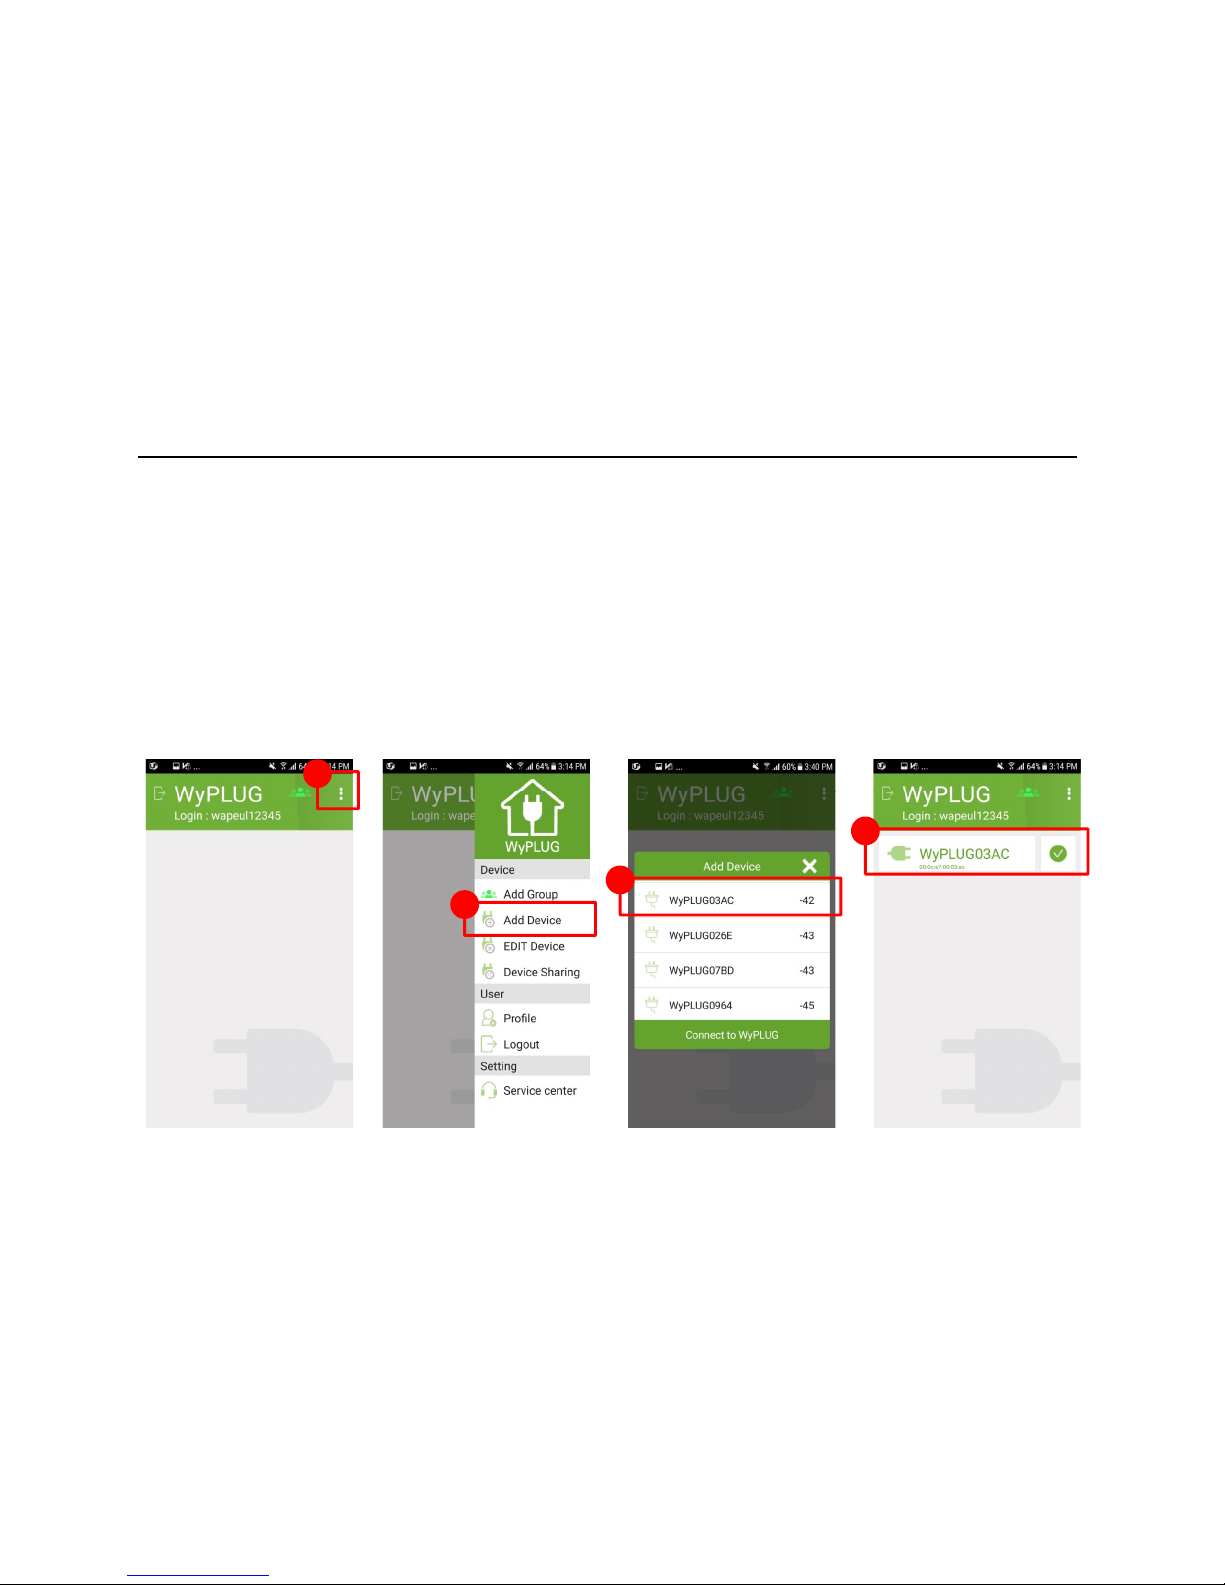
How to add WyPLUG Device
5. Add Device
1. In the main screen, click Menu Icon.
2. Click Add Device
3. Choose one SSID which user wants to add (WyPLUG03AC in the following example)
4. Added Device can be checked in the main screen
1
15
3
4
2
Page 16
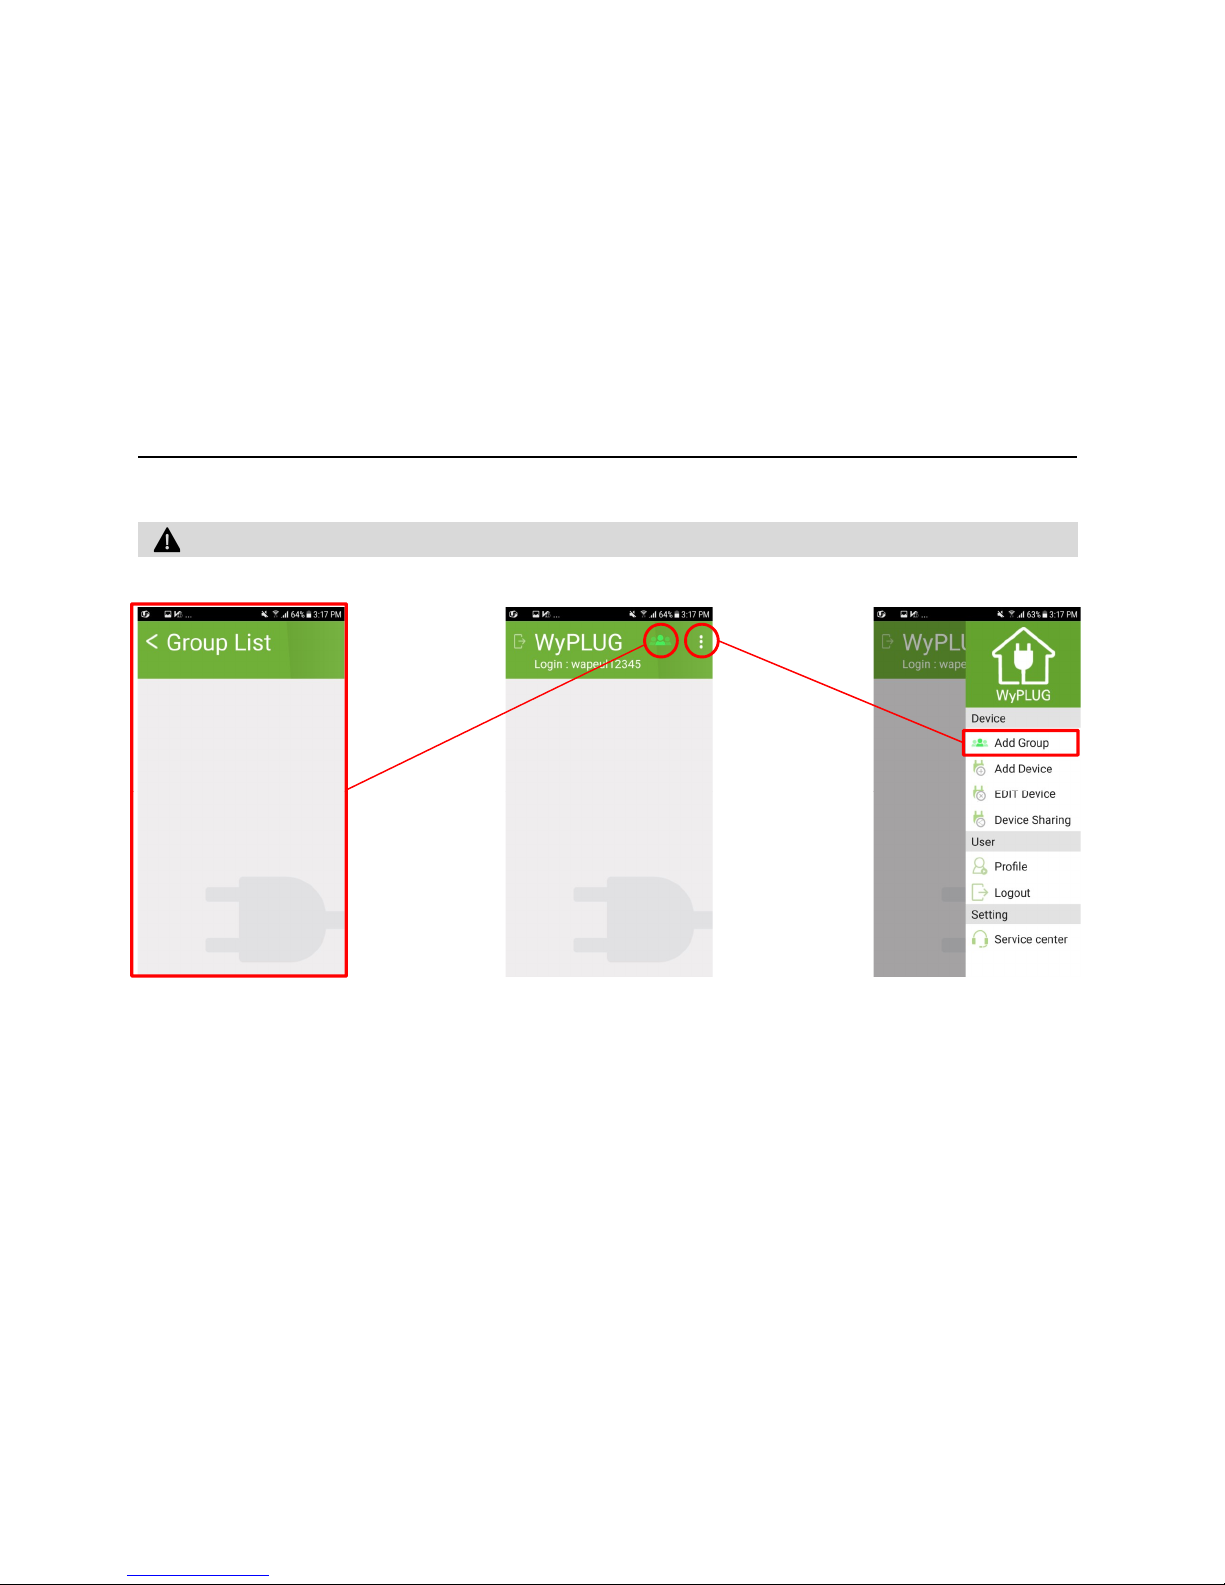
Click People Icon right second icon to see all groups you made.
GROUP
Maximum 200 numbers of WyPLUG can be added.
16
· You can add Group by clicking “Add Group” sub Menu.
Page 17
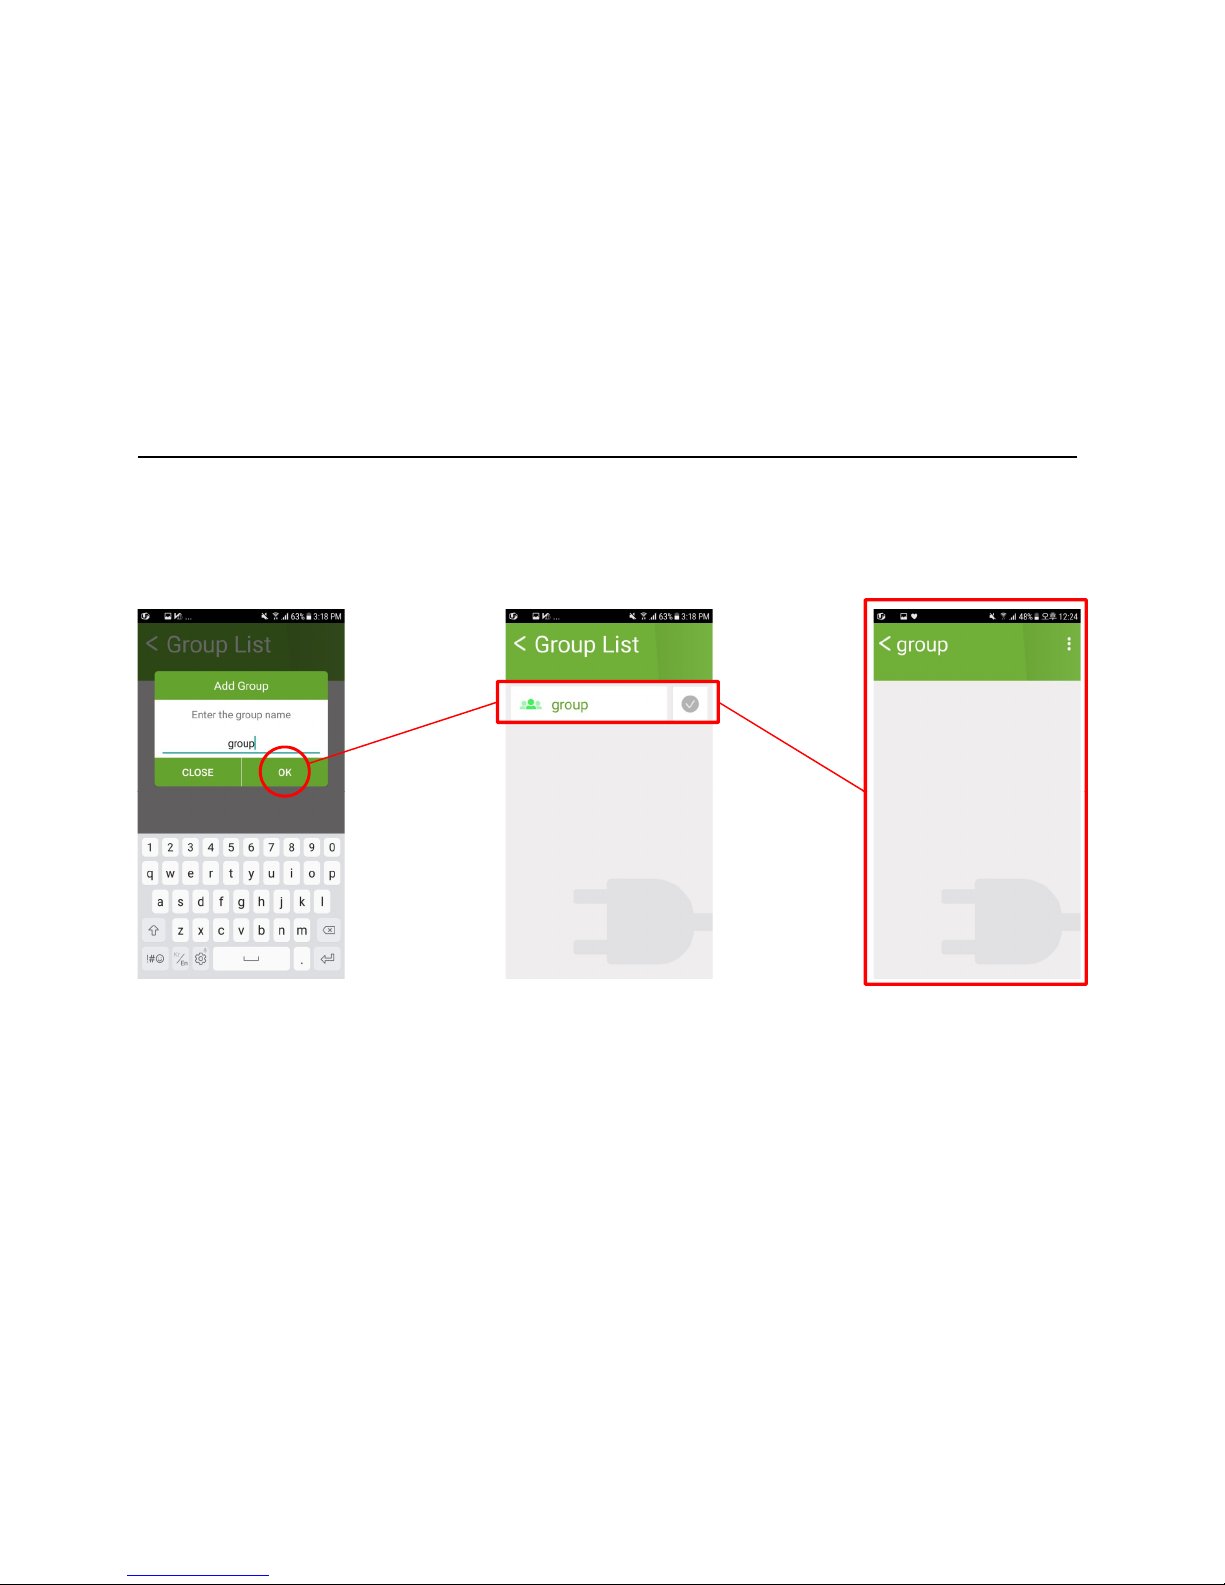
GROUP
How to add Group
17
· Enter the group name that you want to add in text box.
· If you created a Group named “group”, you can click the Group list to see device list in the Group
Page 18
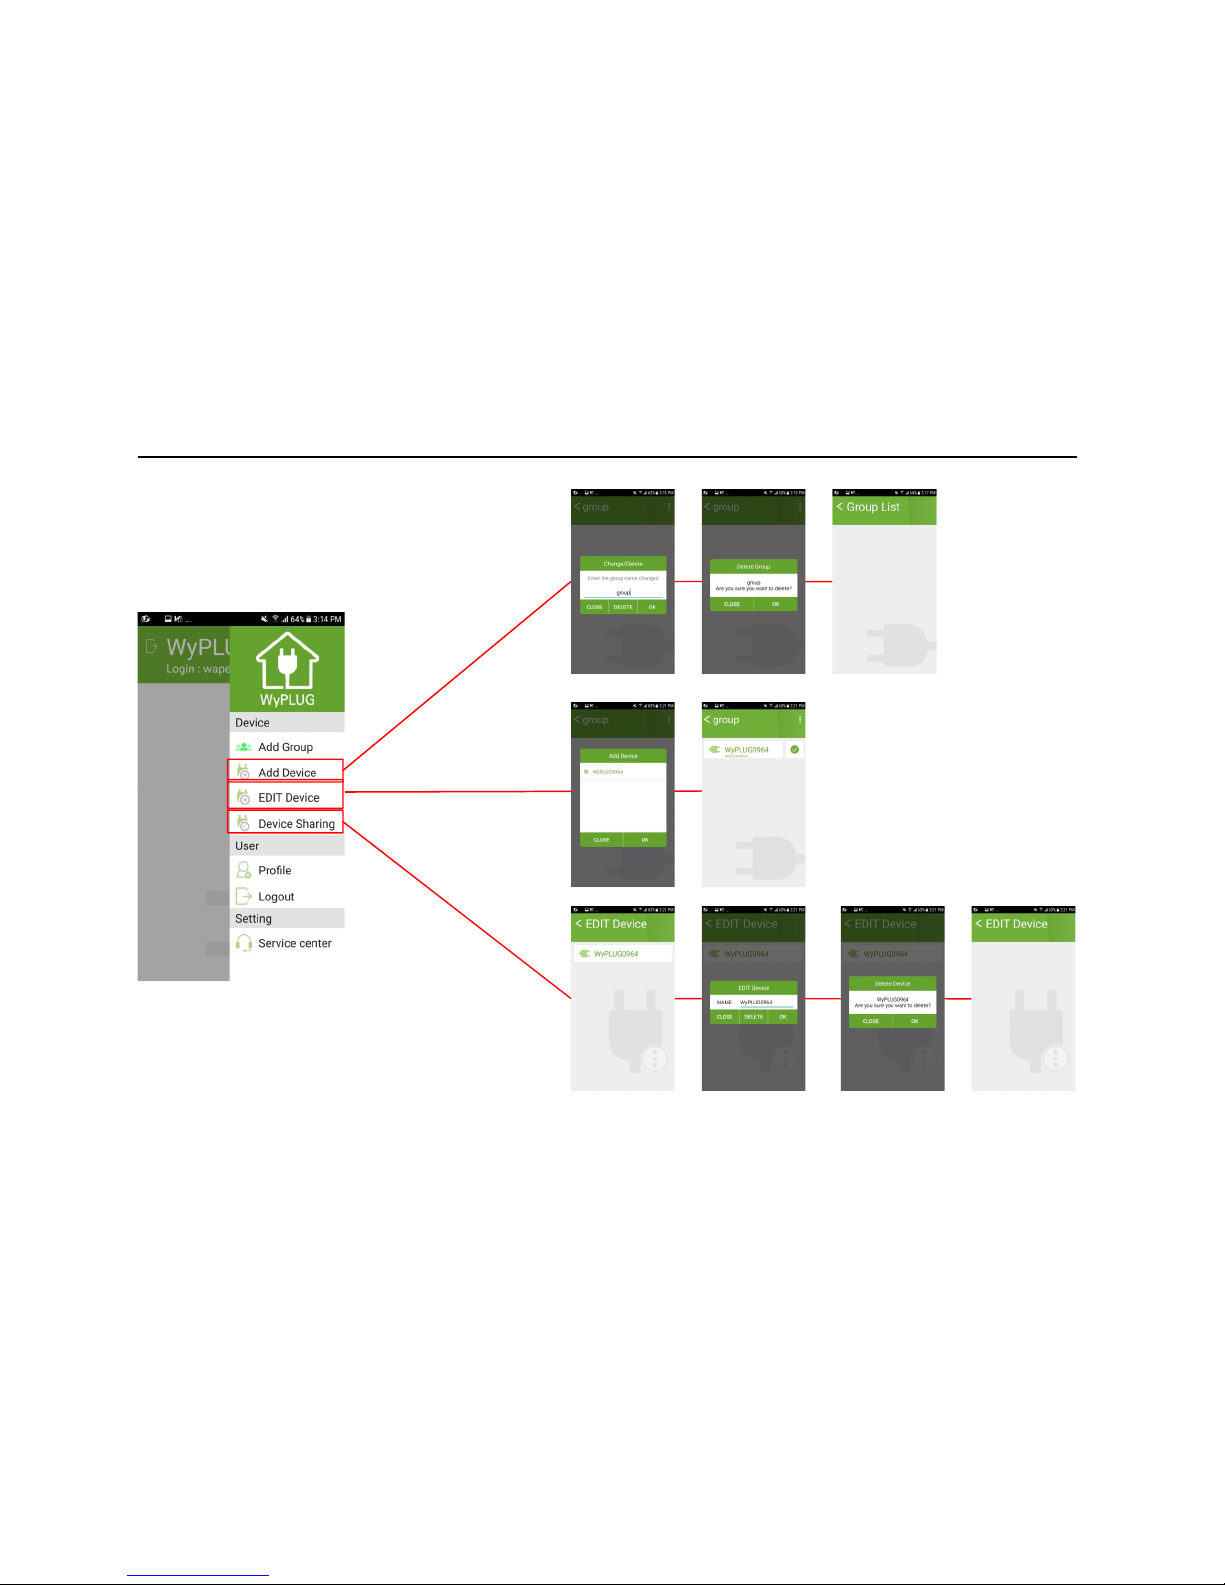
GROUP
Add/Edit/Share Device
18
Page 19
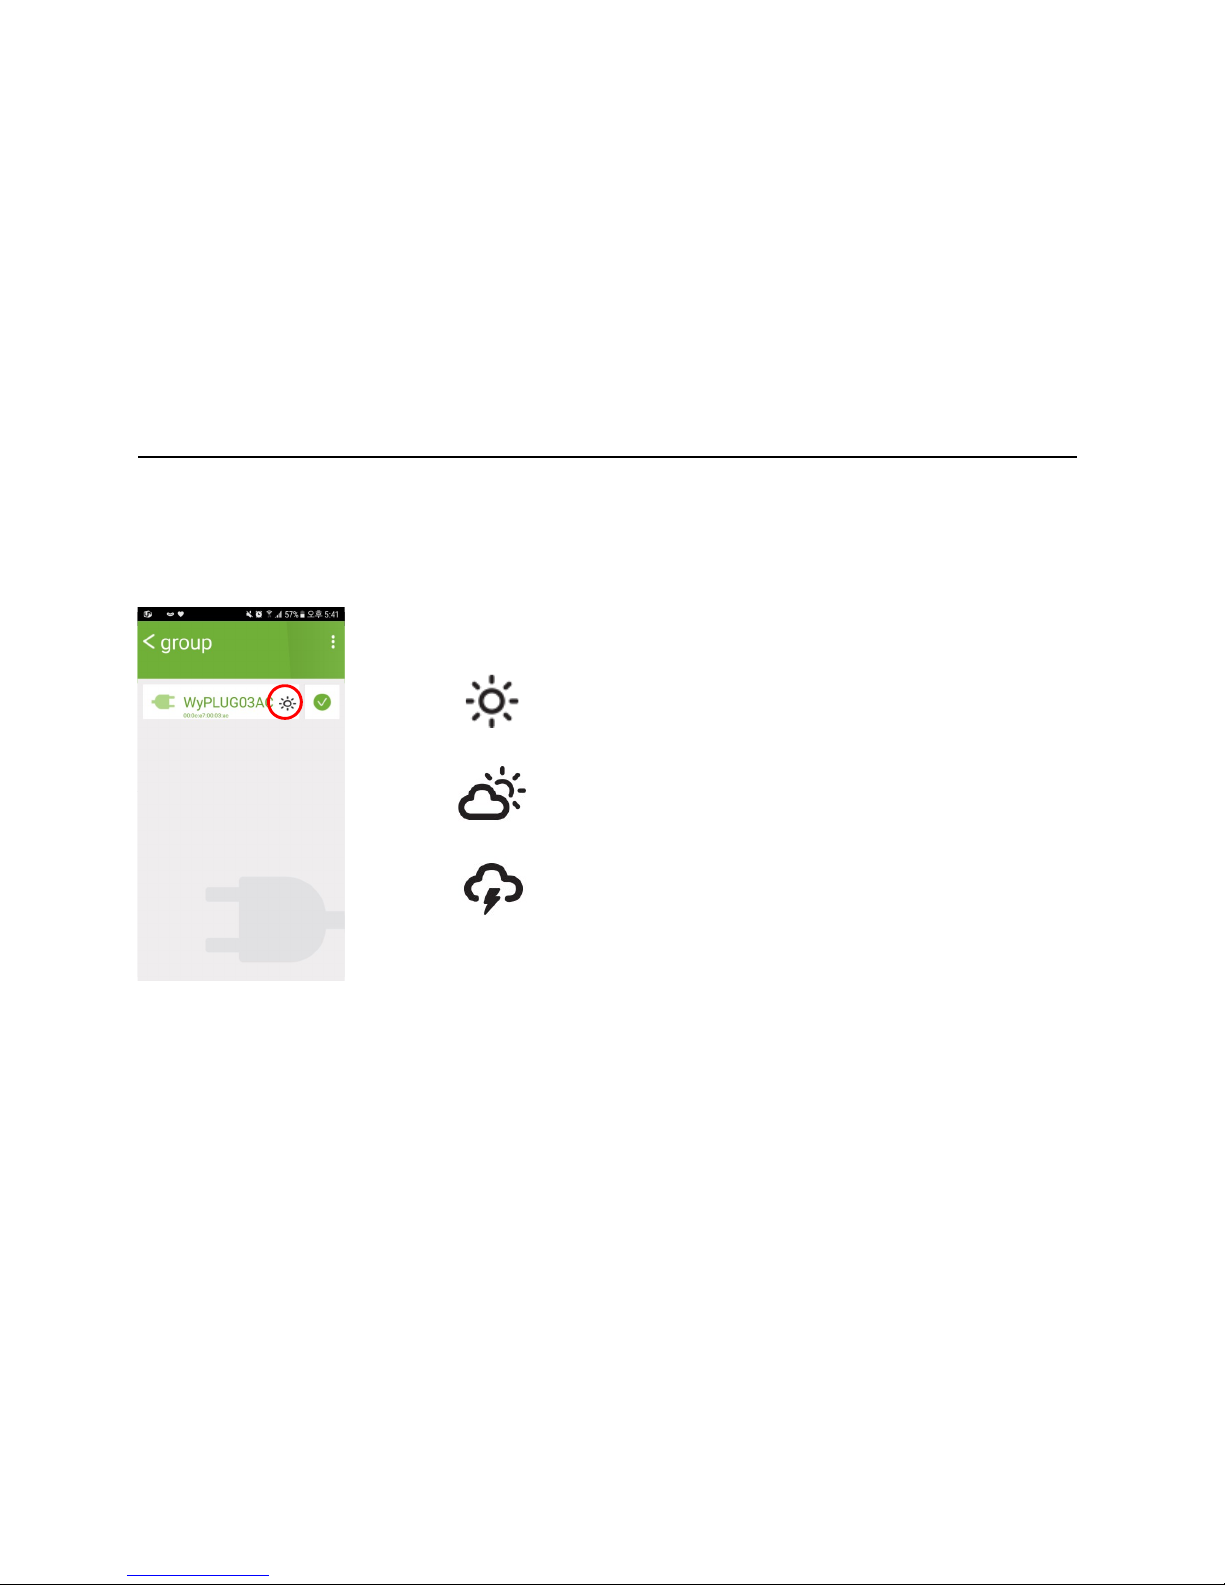
GROUP
Group Device will show “Power saving“ icon depending upon your power On/Off control
Activity.
Active : Within 24 hours, WyPLUG socket has been
controlled to save Standby Power consumption
19
· This Power Saving Icon only can be shown in Group list
Normal
: WyPLUG socket has not been controlled
over 24 hours
Need to control your WyPLUG sockets: WyPLUG
socket has not been controlled over 72 hours
Page 20
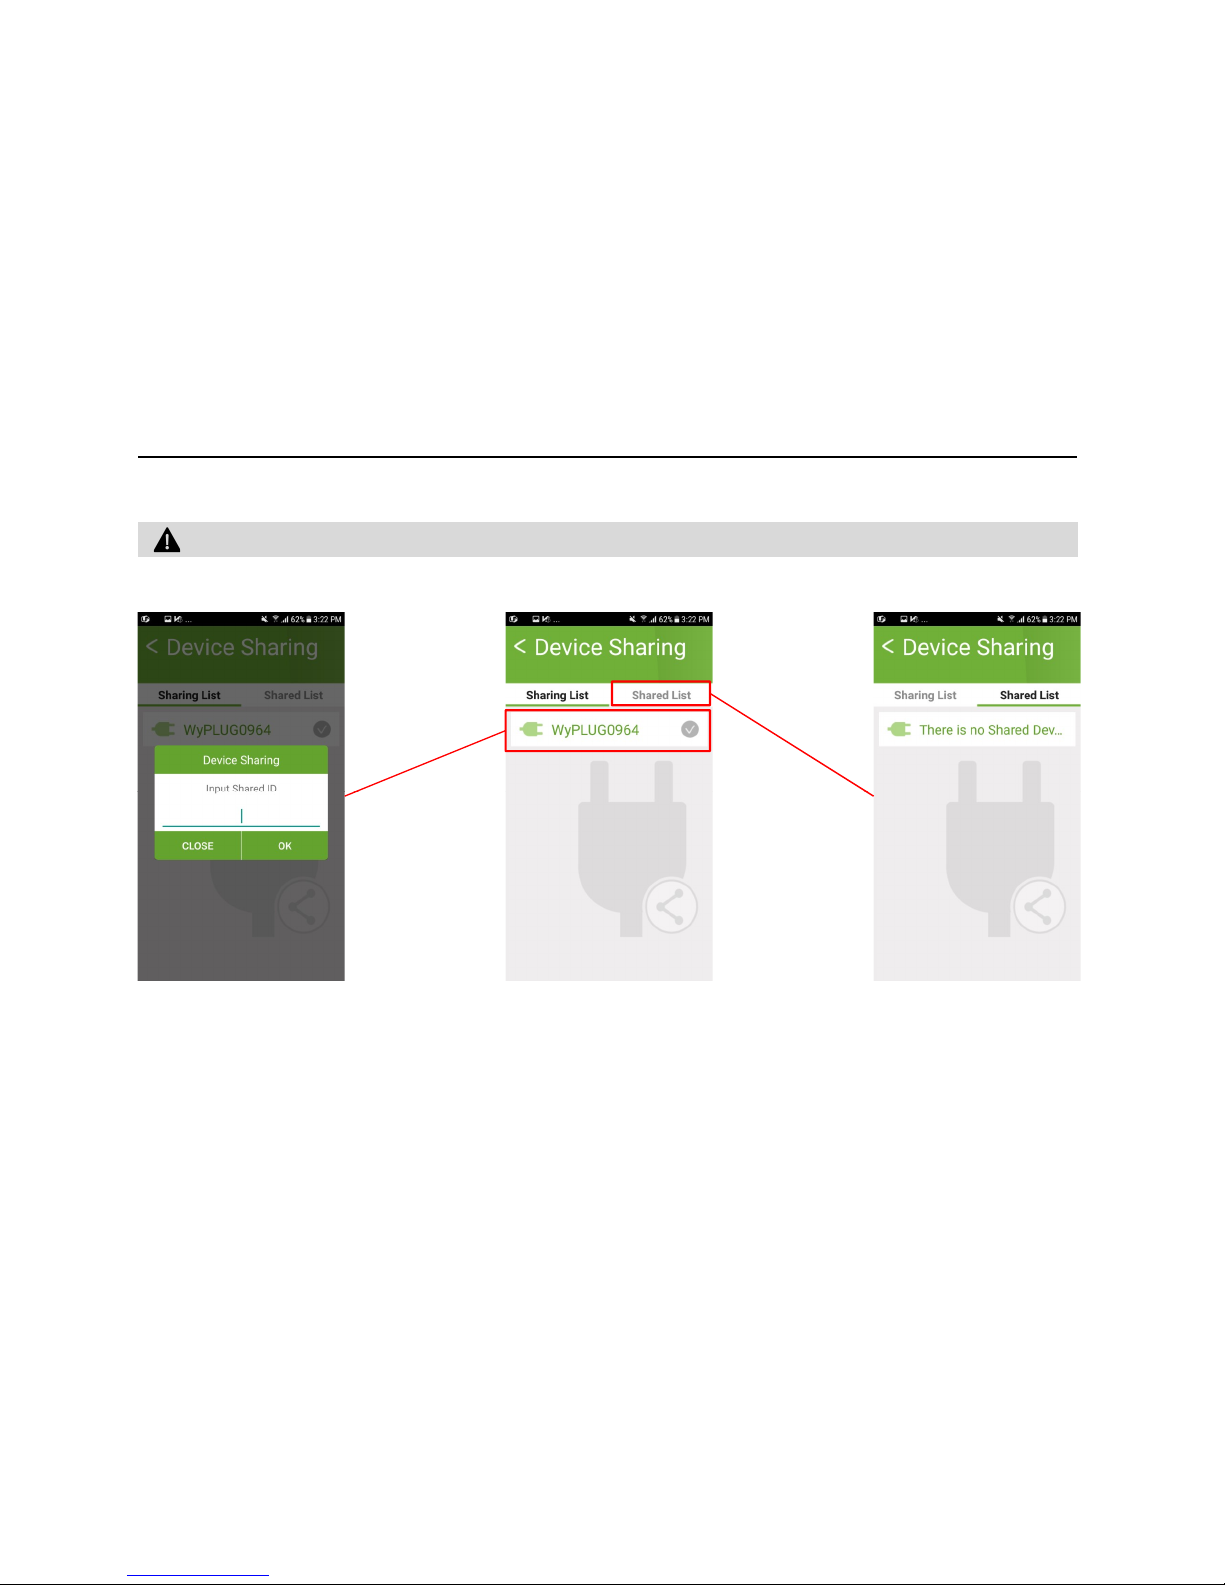
Device Sharing
WyPLUG can be controlled by many shared people
Try sharing your WyPLUG socket controls
20
· Click “Device Sharing” > input shared ID which you want to share with.
Shared ID User will be get notified through Application Notice
Page 21
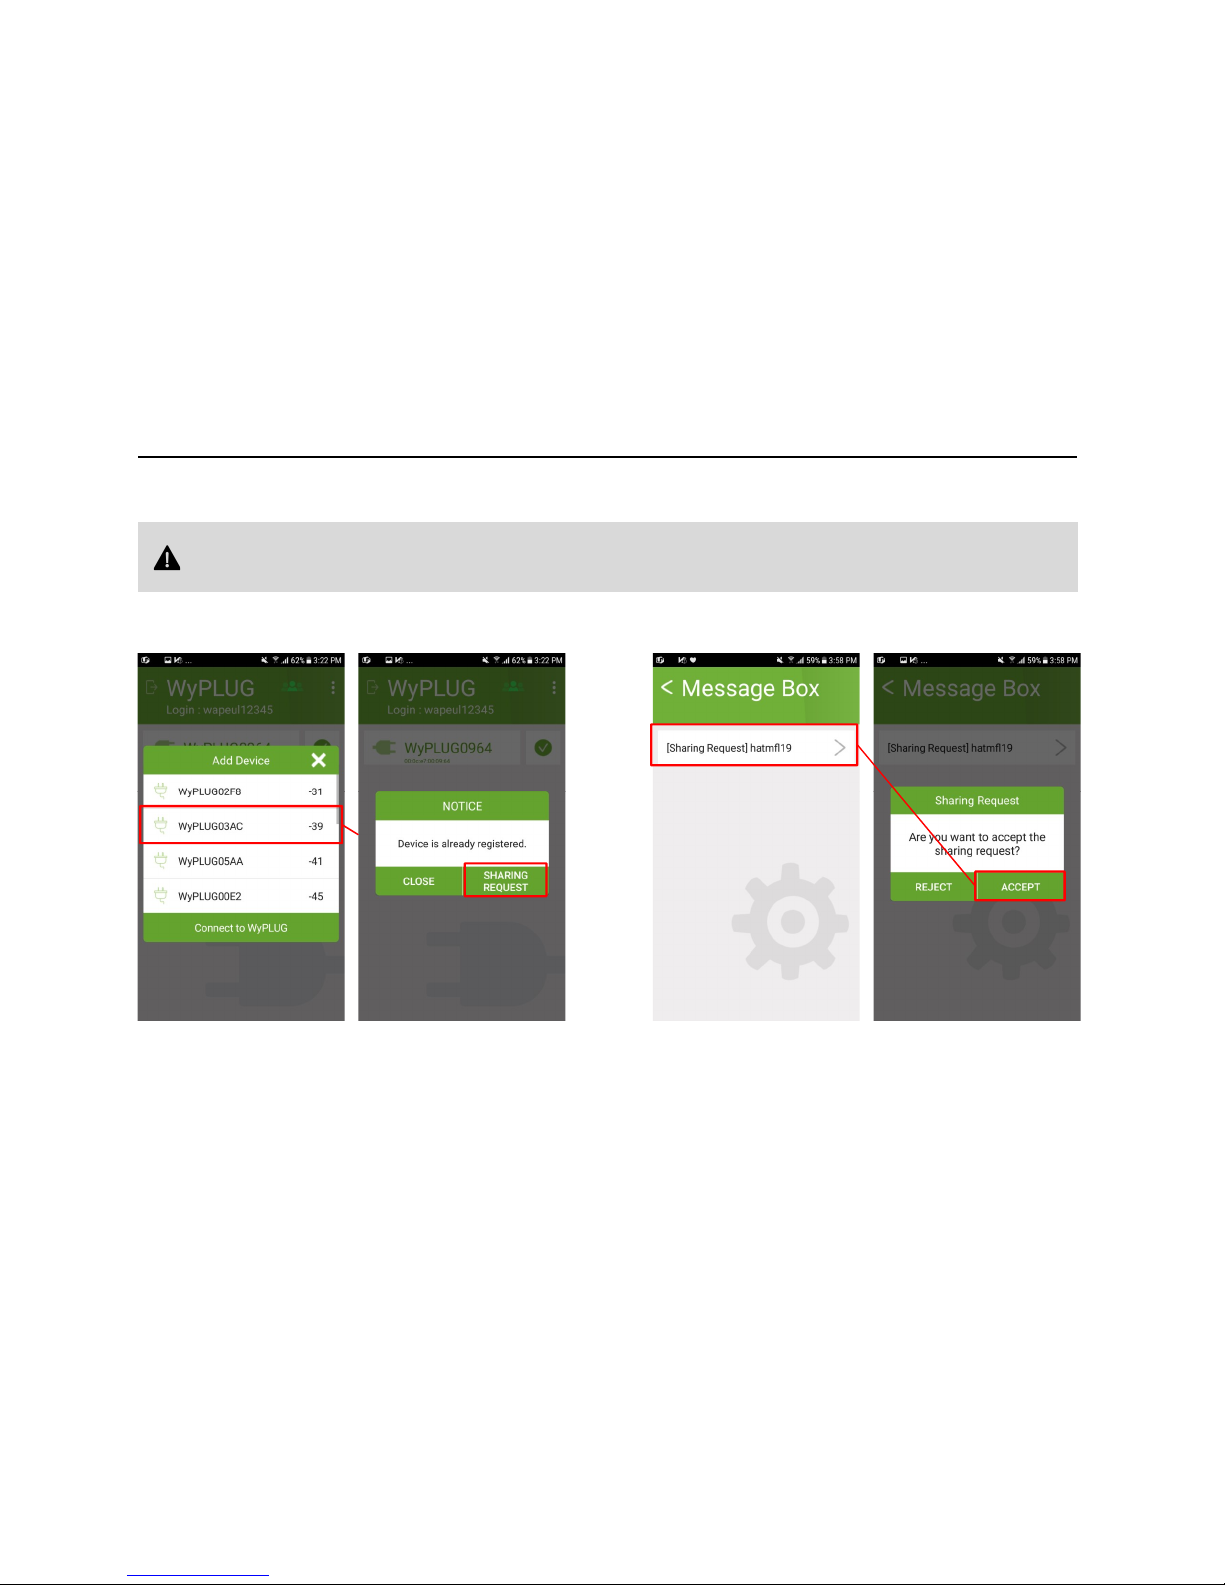
Device Sharing
If a User want the WyPLUG to be shared, she/he can send Sharing request message which will be shown in Message Box
(Note: if the Push alarm is off, Popup will be snoozed.)
Requesting Device Sharing Request
· A User requiring “Sharing Device” – Requesting
“Sharing Device”
21
▶ A User requiring “Sharing Device” ▶ A User got requested message by other user.
· Requested User’s App– Get Requesting “Sharing
Device” Message
Page 22
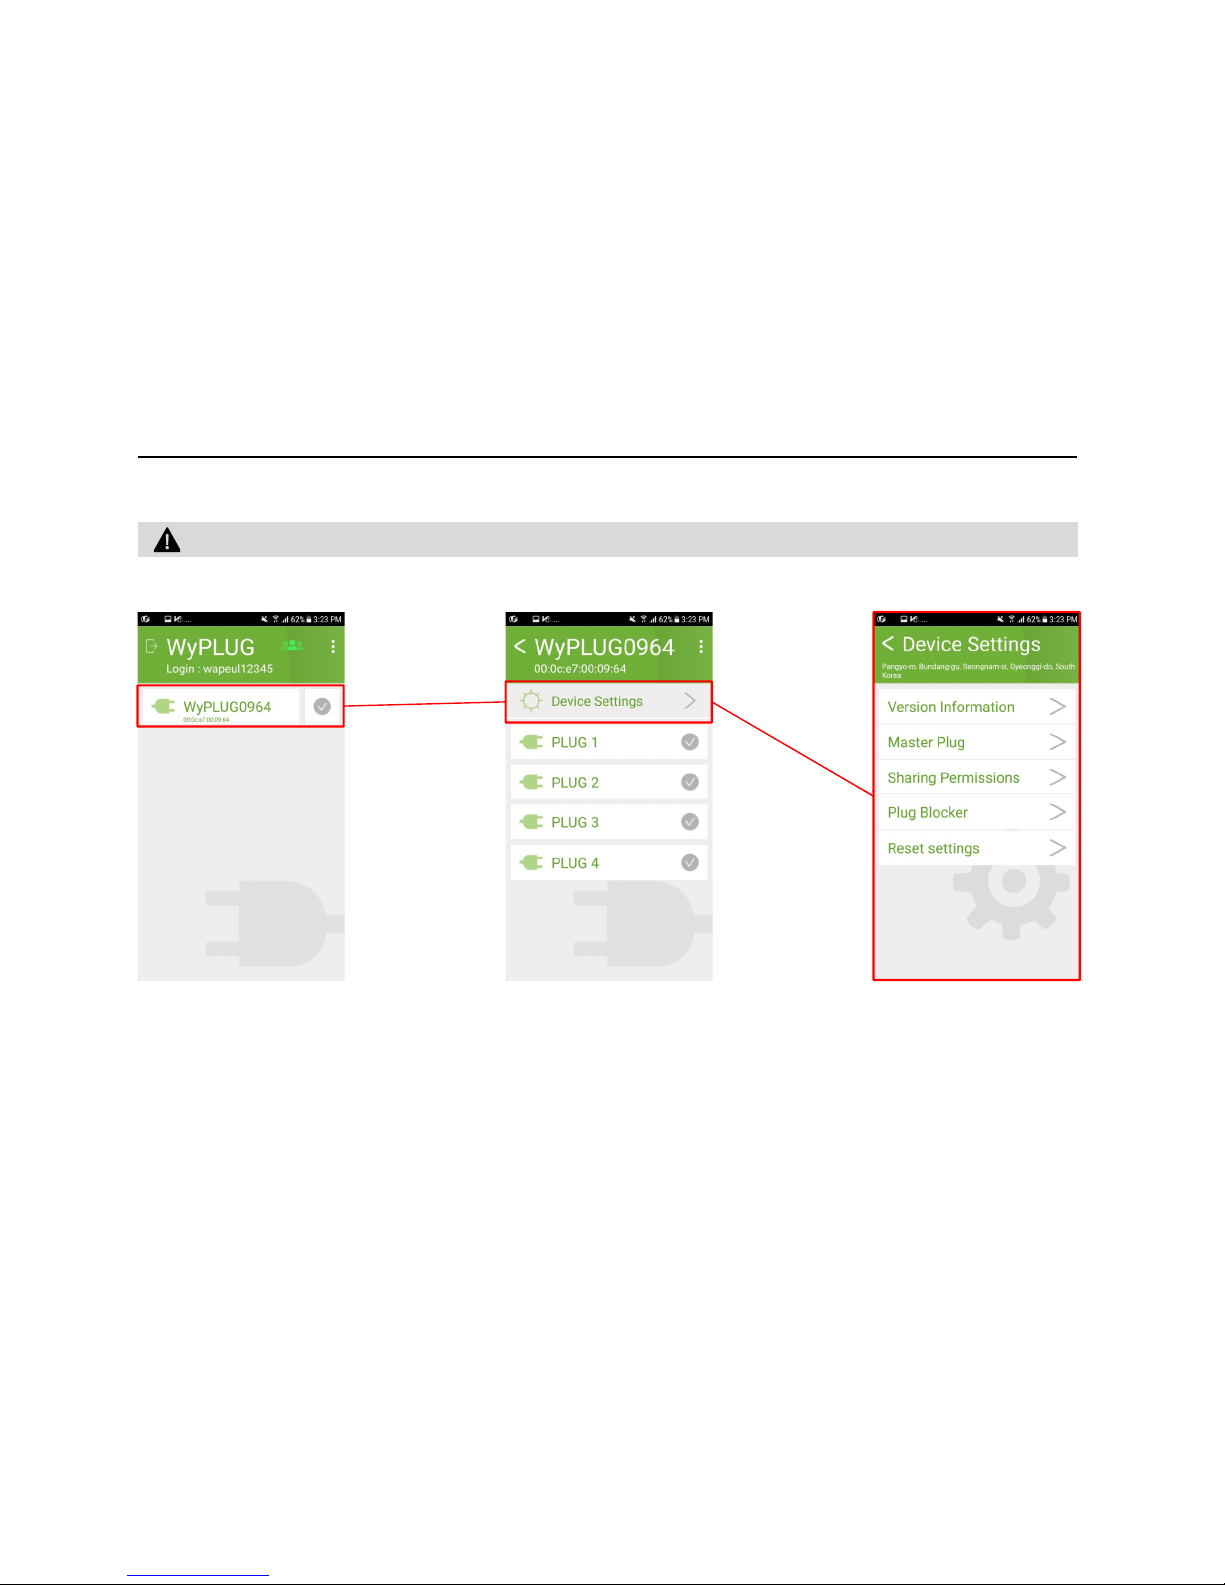
Device Setting and Information
In main screen, you can click a device in device list. In Device, Device Settings will be shown
Please Check Device setting and information
22
Page 23
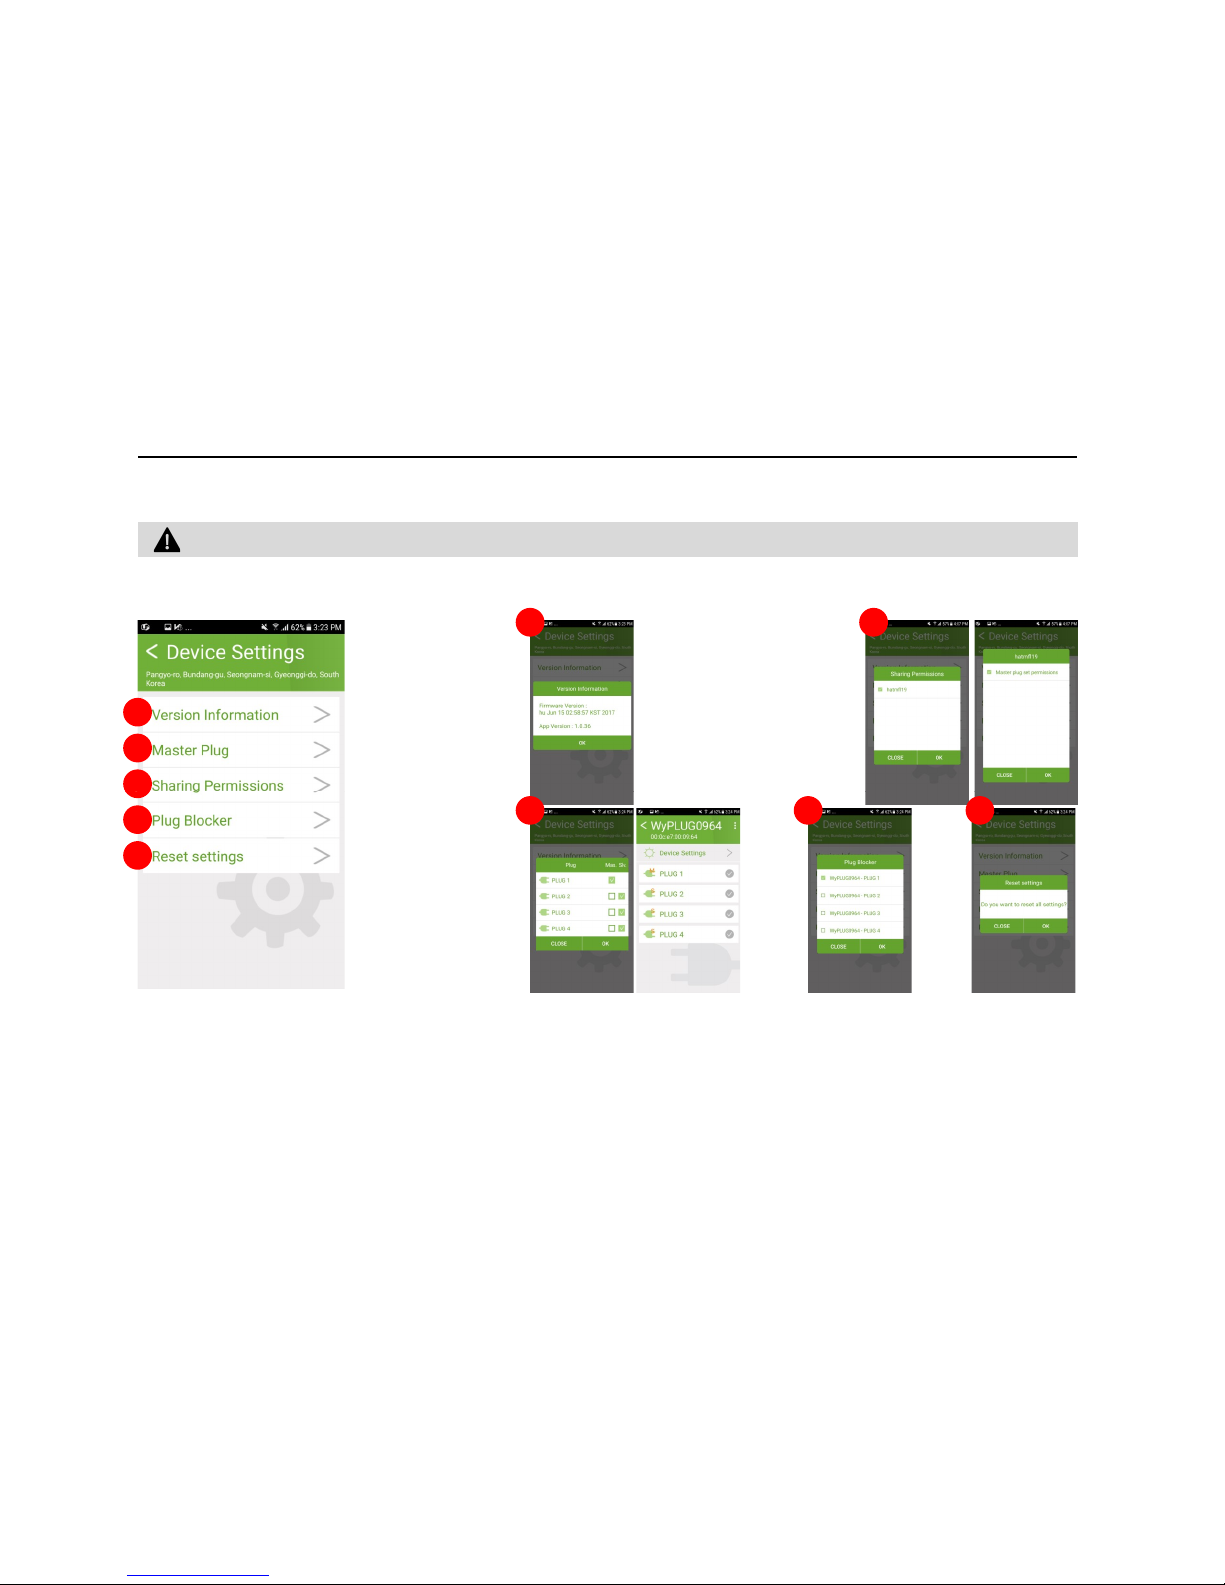
Device Setting and Information
Device Setting and information
1 3
1
2
3
In main screen, you can click a device in device list. In Device, Device Settings will be shown
23
· Version information/Master Plug setting/ Sharing permission setting/ Setting initialization will be shown
· Master Plug will set one Master socket and multiple other socket to be slave. If Master plug socket is on, then accordingly
slave sockets will be on and vice versa.
2 4 5
3
4
5
Page 24
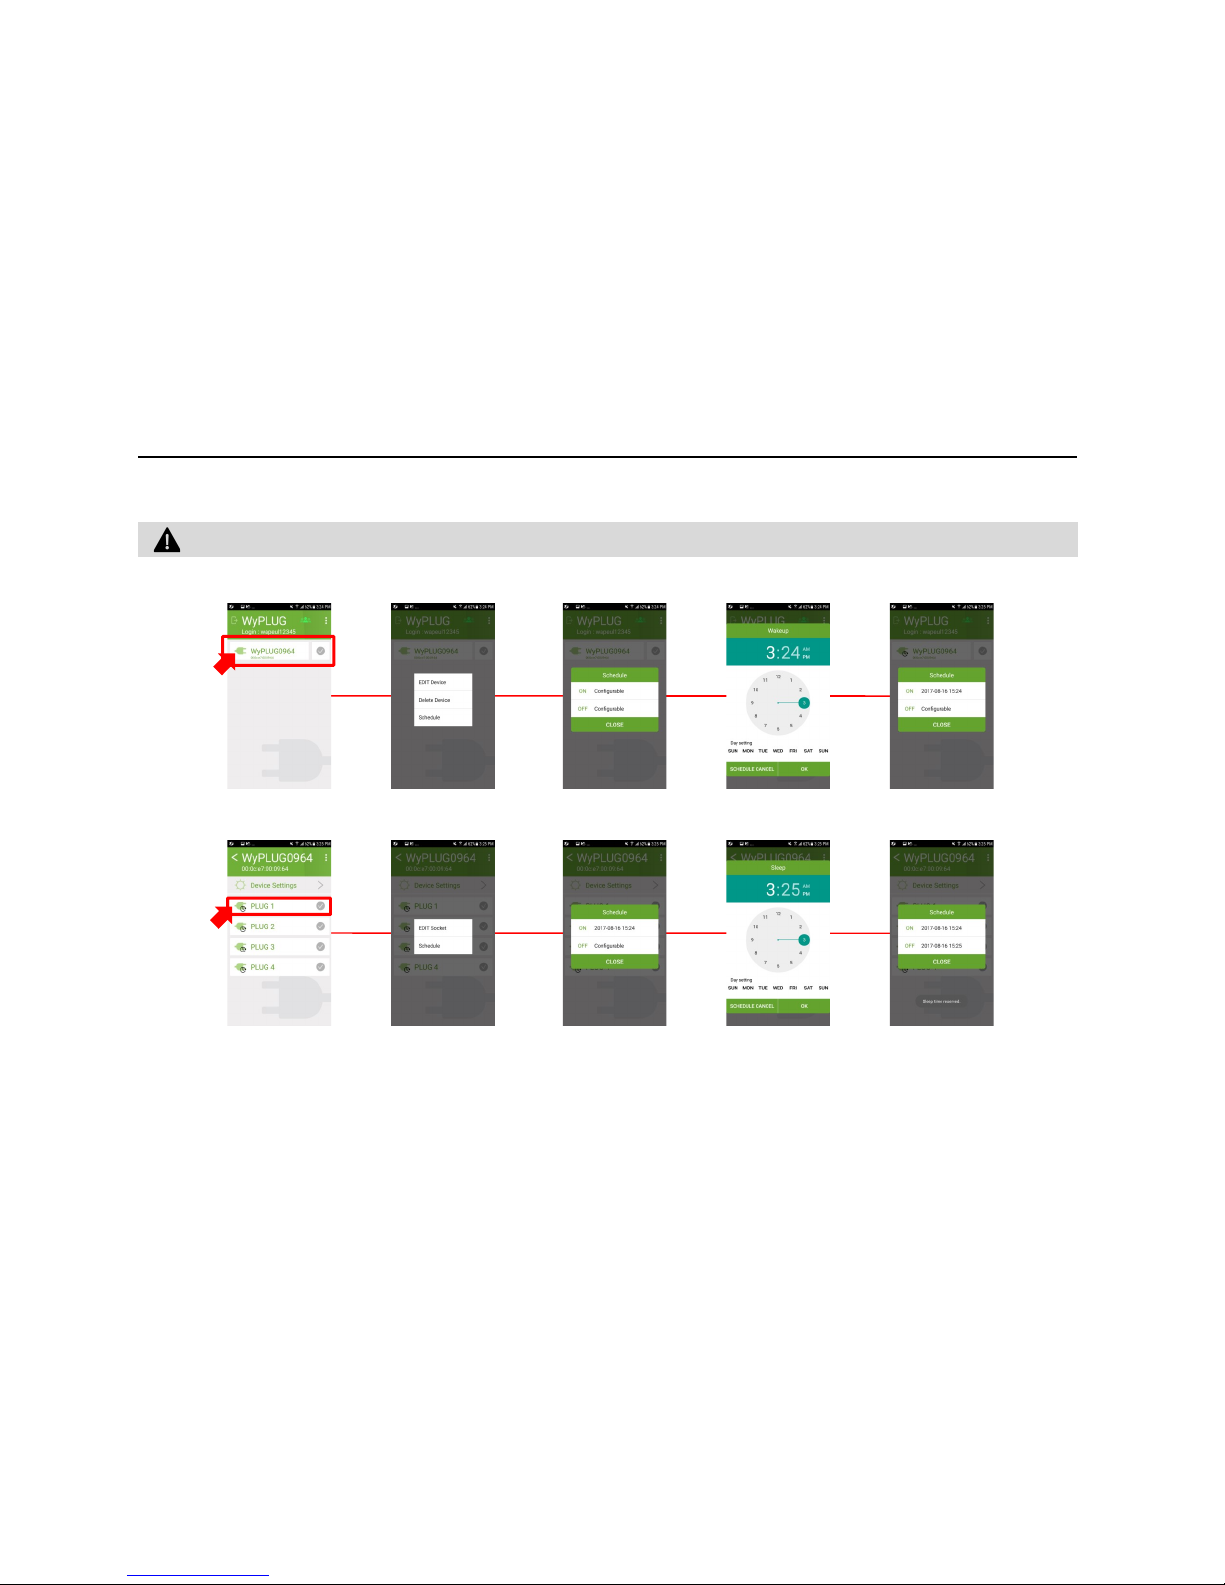
Try Scheduling
Schedule
WyPLUG can schedule on/off time with repetition or without repetition.
Long Click
2seconds
24
1. On the main screen, press and hold the WIPE button for a certain period of time
(approximately 2 seconds) to display the menu with the reservation settings.
2. This is the same as the entire reservation method, and pressing and holding the respective button
for a certain period of time (approximately 2 seconds) will display a menu with reservation settings.
1. All reservation function
2. Individual plug reservation function
Long Click
2seconds
Page 25
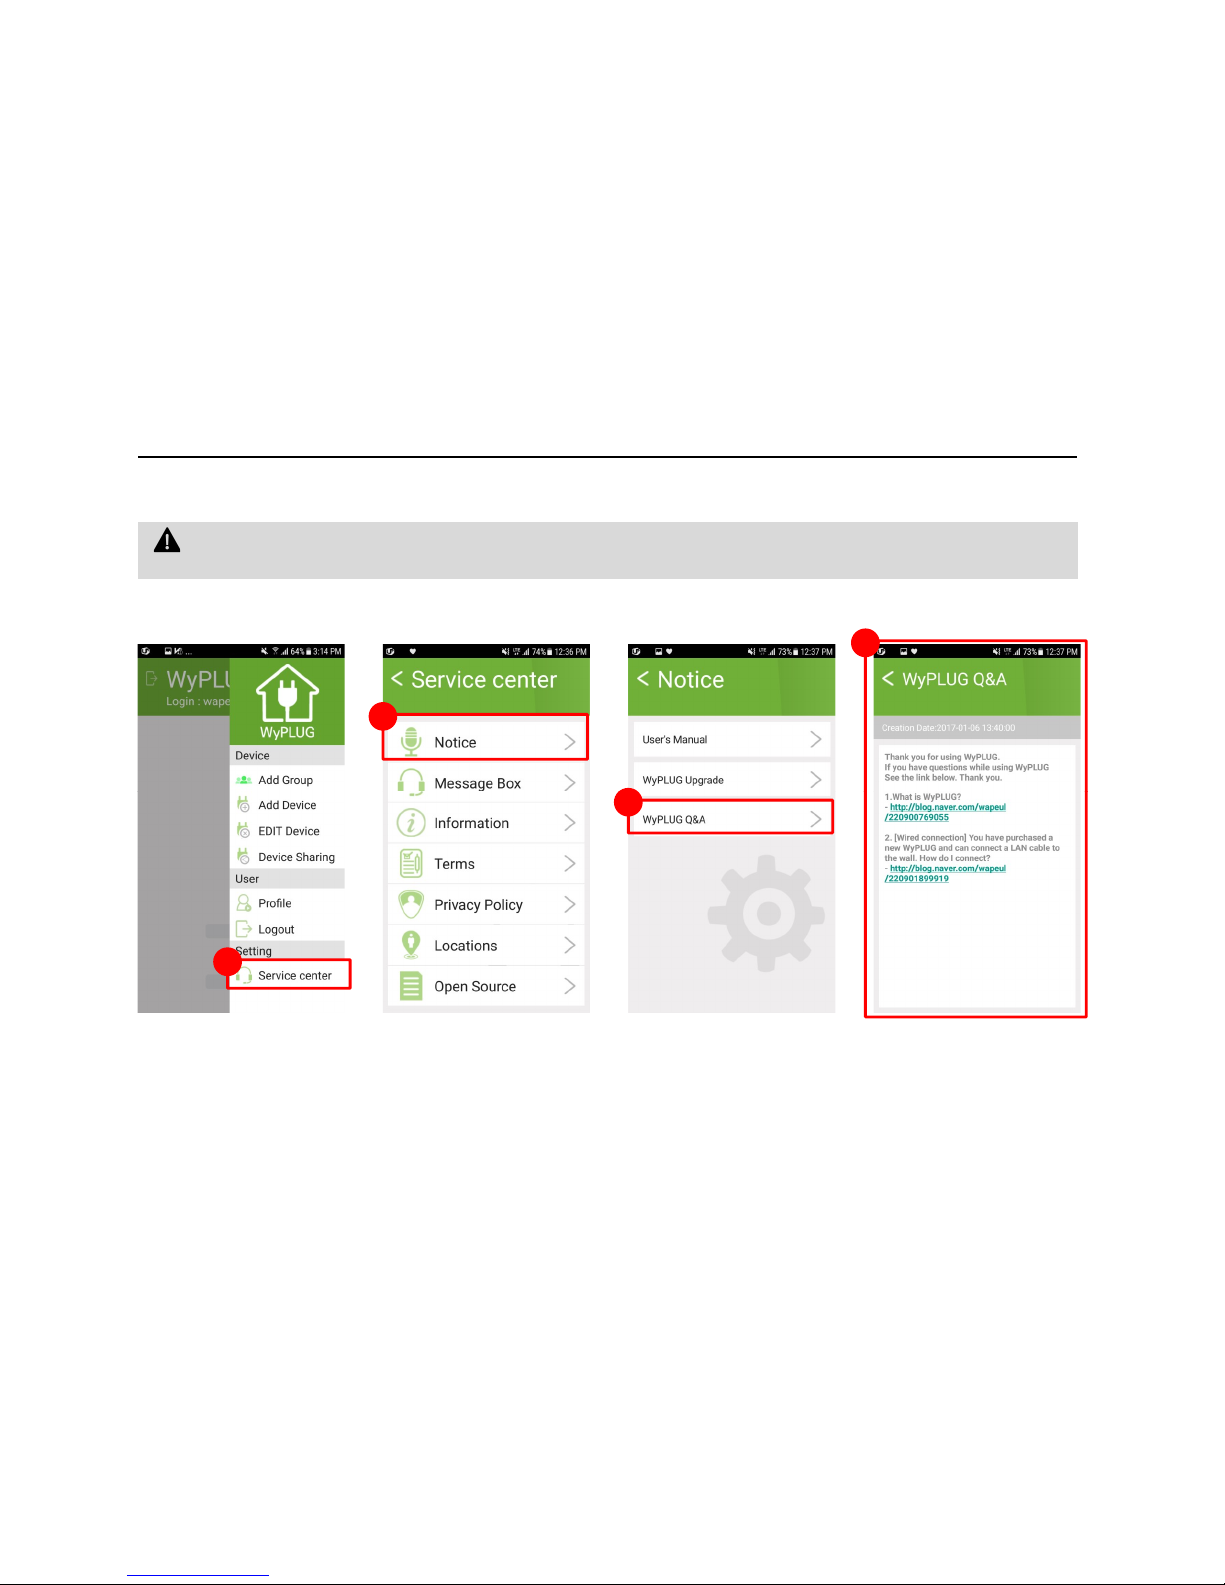
Please refer to the item-specific links in the Q & A!
Q&A
If you have any questions about setting up and using the WyPLUG, please refer to the app's Customer Center - Notice Q & A
2
4
25
1
3
Please use the service of the customers on the WyPLUG blog and refer to the link in the Q & A format for the most
frequently asked questions.
Page 26

Specification
Category
Role Function
CPU CPU MIPS24KEc(580MHZ)
DRAM Controller 16bit
Package DRQFN148-12mm x 12mm
RAM DDR 512Mbit, 193MHZ
Flash SPI Flash 128Mbit
WIFI Wireless frequency 2.4GHz
Wireless Interface
802.11b/g/n
26
Wireless Interface
802.11b/g/n
Transmission rate 300Mbps(2T2R)
Antenna Built-in-PCB Antenna x 2
Ethernet Interface 1 x 10/100Mbps
LED 1 x WIFI / 4 x Socket
ETC 1 x Reset Button / 1 x Power Switch
Rated Voltage/Current 250V / 10A
Recommended Usage 2,200W (By socket 2,200VA)
SMPS Input : 110-220 VAC Output : 5V / 1.5A
Product Size 304 X 60 X 40 (mm)
Page 27

• We guarantee the product with defects during normal use from the date of first purchase for 1 year.
• Changes to the owner of the product may limit its warranty.
• Damage caused by natural disasters or customer negligence is not guaranteed.
• We do not guarantee any disassembly or modification of the product.
Quality assurance
27
Page 28

Guidelines for product usage
• Use wall outlets or dedicated outlets for air conditioners / heaters / steam appliances / dedicated kerosene
• Do not use high capacity such as air conditioner, electric heater and so on. (Cause of overload)
• Please use less than 10A (2,000W) where the overload cut-off / earth leakage breaker is installed.
• This product is for indoor use only. Never use it in a place with high temperature and high humidity.
• Do not loosen wires, use them, and do not damage (press, scratch, peel, etc.).
• Never plug anything other than a plug (chopsticks, nails, screwdrivers, etc.) into the outlet opening.
28
•
Do not disassemble or modify the product.
• Replace plugs that are fully plugged and loose.
• Because the radio equipment is capable of radio interference, services related to personal safety can not be performed.
• This equipment is intended for home use (Class B) and is suitable for home use as an electromagnetic compatibility
device and can be used in all areas.
Model User manual
Class B devices (Home
Broadcasting
Communication Equipment)
This equipment is intended for home use (Class B) electromagnetic compatibility
equipment, and can be used in all areas.
Page 29

FCC Warning:
This equipment has been tested and found to comply with the limits for a Class B digital device, pursuant to part 15 of the FCC Rules. These limits are designed to
provide reasonable protection against harmful nterference in a residential installation. This equipment generates, uses and can radiate radio frequency energy and, if not
installed and used in accordance with the instructions, may cause harmful interference to radio communications. However, there is no guarantee that interference will
not occur in a particular nstallation. If this equipment does cause harmful interference to radio or television reception, which can be determined by turning the
equipment off and on, the user is encouraged to try to correct the interference by one or more of the following measures:
o Reorient or relocate the receiving antenna.
o Increase the separation between the equipment and receiver.
o Connect the equipment into an outlet on a circuit different from that to which the receiver is connected.
o Consult the dealer or an experienced radio/TV technician for help.
Caution: Any changes or modi?cations to this device not explicitly approved by manufacturer could void our authority to operate this equipment.
This device complies with part 15 of the FCC Rules. Operation is subject to the following two conditions:
1)
This device may not cause harmful interference, and (2) this device must accept any interference
2) Received, including interference that may cause undesired operation.
This equipment complies with FCC radiation exposure limits set forth for an uncontrolled environment. This equipment should be installed and operated with
minimum distance 20cm between the
radiator & your body.
 Loading...