

Page 1
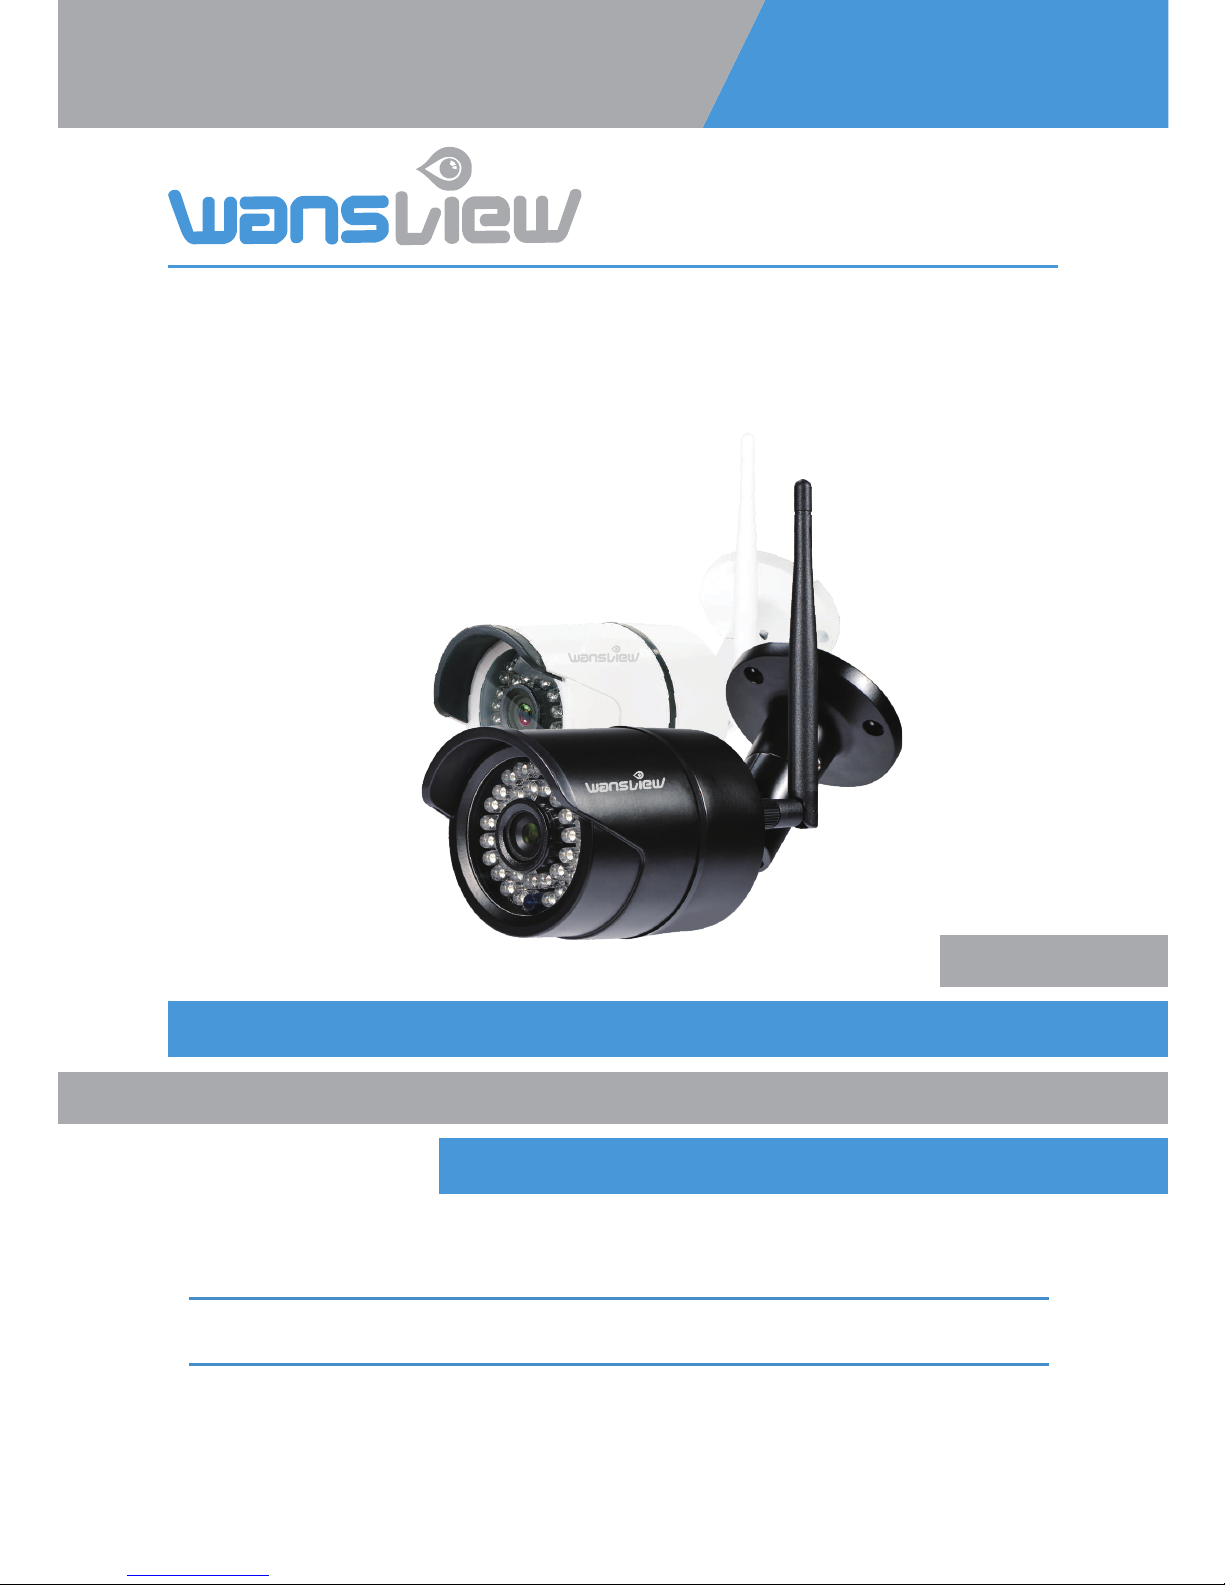
Wansview HD Outdoor
IP Camera W2(1080P)/W3(720P)
User Manual
Revised on 1st January 2018
www.wansview.com
We keep improving the app, if the app interface is not accordance with the instructions,
please go to wansview website: http://www.wansview.com for the latest instructions.
Page 2

Page 3

IP Camera W2(1080P)/W3(720P)
3
Welcome ···························································································································· 5
Important Security Warning ······························································································ 5
Important Safeguards and Warnings················································································· 5
1. Features and Specificaons ···························································································· 7
1.1 Product Profile ·········································································································· 7
1.2 Features ···················································································································· 7
1.3 Uses··························································································································· 7
1.4 Specificaons ············································································································ 8
1.5 System Requirements································································································ 9
2. Camera Management with Smartphones/Tablets·························································· 9
2.1 Wansview App for iOS and Android ·········································································· 9
2.2 WiFi Seng ·············································································································· 11
2.3 Live Streaming·········································································································· 12
2.4 Local Picture and Record·························································································· 14
2.5 Alarm Seng············································································································ 15
2.6 Advanced Sengs···································································································· 17
2.6.1 WiFi Seng······································································································ 17
2.6.2 User Seng/Management ·············································································· 18
2.6.3 Time Seng ····································································································· 19
2.6.4 Misc Seng ····································································································· 20
2.6.5 Maintenance···································································································· 22
2.6.6 About Camera·································································································· 22
2.7 Start Video ··············································································································· 23
2.8 Delete device············································································································ 23
2.9 Message ··················································································································· 24
2.10 More······················································································································· 24
3. PC Client Soware ········································································································· 25
3.1 Add Camera·············································································································· 25
3.1.1 Add camera in Lan ··························································································· 25
3.1.2 Manually add camera (suitable for outside network)······································ 26
3.2 Play/Stop Video········································································································ 26
3.2.1 Play Video ········································································································ 26
3.2.2 Stop Video ······································································································· 27
3.2.3 Video Interface ································································································ 28
CONTENT
Page 4

IP Camera W2(1080P)/W3(720P)
4
3.3 Camera Sengs ········································································································ 28
3.3.1 Edit Device········································································································ 28
3.3.2 Advanced Sengs ···························································································· 29
3.3.2.1 Device Info···························································································· 29
3.3.2.2 Time Seng·························································································· 29
3.3.2.3 User Seng ·························································································· 30
3.3.2.4 Unavailable for W2/W3········································································ 31
3.3.2.5 SD/TF Seng ························································································ 31
3.3.2.6 Other Seng ························································································ 32
3.3.3 Alarm Seng ···································································································· 33
3.3.3.1 Moon Detecon ················································································· 34
3.3.3.2 Audio Detecon···················································································· 34
3.3.3.3 Linkage Alarm······················································································· 35
3.3.3.4 Alarm Time ··························································································· 37
3.4 Mul-View ················································································································ 38
3.5 Local Seng·············································································································· 38
3.6 Scheduled Recording ································································································ 39
3.7 Playback···················································································································· 40
3.7.1 Playback Local Record ······················································································ 40
3.7.2 Unavailable for W2/W3···················································································· 41
3.8 Lock··························································································································· 42
4. Manage Camera with other Apps and Soware
Add Camera to iSpy Connect ·························································································· 42
5. Web Access····················································································································· 44
5.1 Sengs ····················································································································· 44
5.1.1 Plugin installaon······························································································ 44
5.1.2 View Video-Mode 1 - Complete Camera Management ···································· 45
5.1.3 View Video- Mode 2 – Limited Camera Management ······································ 45
5.2 Live Streaming and Recording on PC ········································································ 45
5.3 Playback Video(funcon disabled in this model)······················································ 46
5.4 Set Up ······················································································································· 47
5.4.1 System··············································································································· 47
5.4.2 Network············································································································· 49
5.4.3 Video and Audio································································································ 53
5.4.4 Security·············································································································· 55
5.4.5 Alarm - Moon and Audio Detecon ································································ 56
5.4.6 Storage(funcon disabled in this model) ·························································· 59
5.4.7 Log····················································································································· 60
Page 5

IP Camera W2(1080P)/W3(720P)
5
Welcome
Thank you for purchasing Wansview W2(720P)/W3(1080P) Full HD IP Camera.
For any queson and product updates please contact us:
1: By email:
US/CA: [email protected]
UK: [email protected]
2: By Skype:
US/CA:[email protected]
UK:[email protected]
check the FAQ's on wansview website: hp://www.wansview.com/Service/faq/
3: Contact us by Facebook
www.facebook.com/WansviewClub/
4: Contact us by hps://www.youtube.com/channel/UCPRXQcIkLsMAWQtpGxVx_jw
Or scanning the QR code to enter our Youtube channel.
Important Security Warning
In order to keep your Wansview camera secure and prevent unauthorized access, please make sure
to follow the steps below:
1. The camera has always the latest firmware installed. If we update the firmware, we upload it on
www.wansview.com/Service/download/
2. Change the default password for your camera. We suggest that your password is more than 8-10
characters and contains a combinaon of lowercase characters, uppercase characters and
numbers.
Important Safeguards and Warnings
1. Electrical Safety
All installaon and operaon should conform to your local electrical safety codes.
We assume no liability or responsibility for any fires or electrical shock caused by improper
handling or installaon.
2. Transportaon Safety
Heavy stress, violent vibraons, and excess moisture should not occur during transportaon,
storage, and installaon of the device.
3. Installaon
Handle the device with care. Keep the device right side up.
Do not apply power to the camera before compleng installaon.
Do not place objects on top of the camera.
4. Repair Professionals
All inspecon and repair work should be done by qualified service engineers.
We are not liable for any problems caused by unauthorized modificaons or user-aempted repair.
Page 6

IP Camera W2(1080P)/W3(720P)
6
6. Operaon and Maintenance
Do not touch the camera sensor or lens directly.
To clean dust or dirt off of the lens, use an air blower or a microfiber cloth.
7. Accessories
Be sure to use only the accessories recommended by the manufacturer.
Before installaon, please open the package and check to ensure that all of the components are
included.
Contact us if anything is broken or missing in the package.
8. Baery Drainage and Data Consumpon
Please remember to exit the app aer use, to prevent baery drainage and data consumpon.
9. Compliance
FCC, CE, ROHS
Page 7

IP Camera W2(1080P)/W3(720P)
7
1. Features and Specificaons
1.1 Product Profile
1.2 Features
1.3 Uses
The Wansview Full HD IP Camera is an integrated outdoor IP Camera developed specifically
for network video applicaons.
•Full HD Video
•Live Streaming
•Pan and Tilt, 4x digital zoom
•Night Vision distance up to 25 feet
•Support Wi-Fi connecon
•Mul-App/Soware Compability
•Mountable on walls and ceilings
•Home Security
•Business Security
•Entryway Monitoring
•Baby Monitoring
•Pet Monitoring
•Elderly Parents
1 Antenna:2.4G 3dBi WiFiAntenna
2 infrared LEDS
3 1/2.7” Full HD sensor
4 Photoresistor
5 RJ45 Port
6 Power Port
7 WPS/Reset
8 Mounng
Page 8
IP Camera W2(1080P)/W3(720P)
8
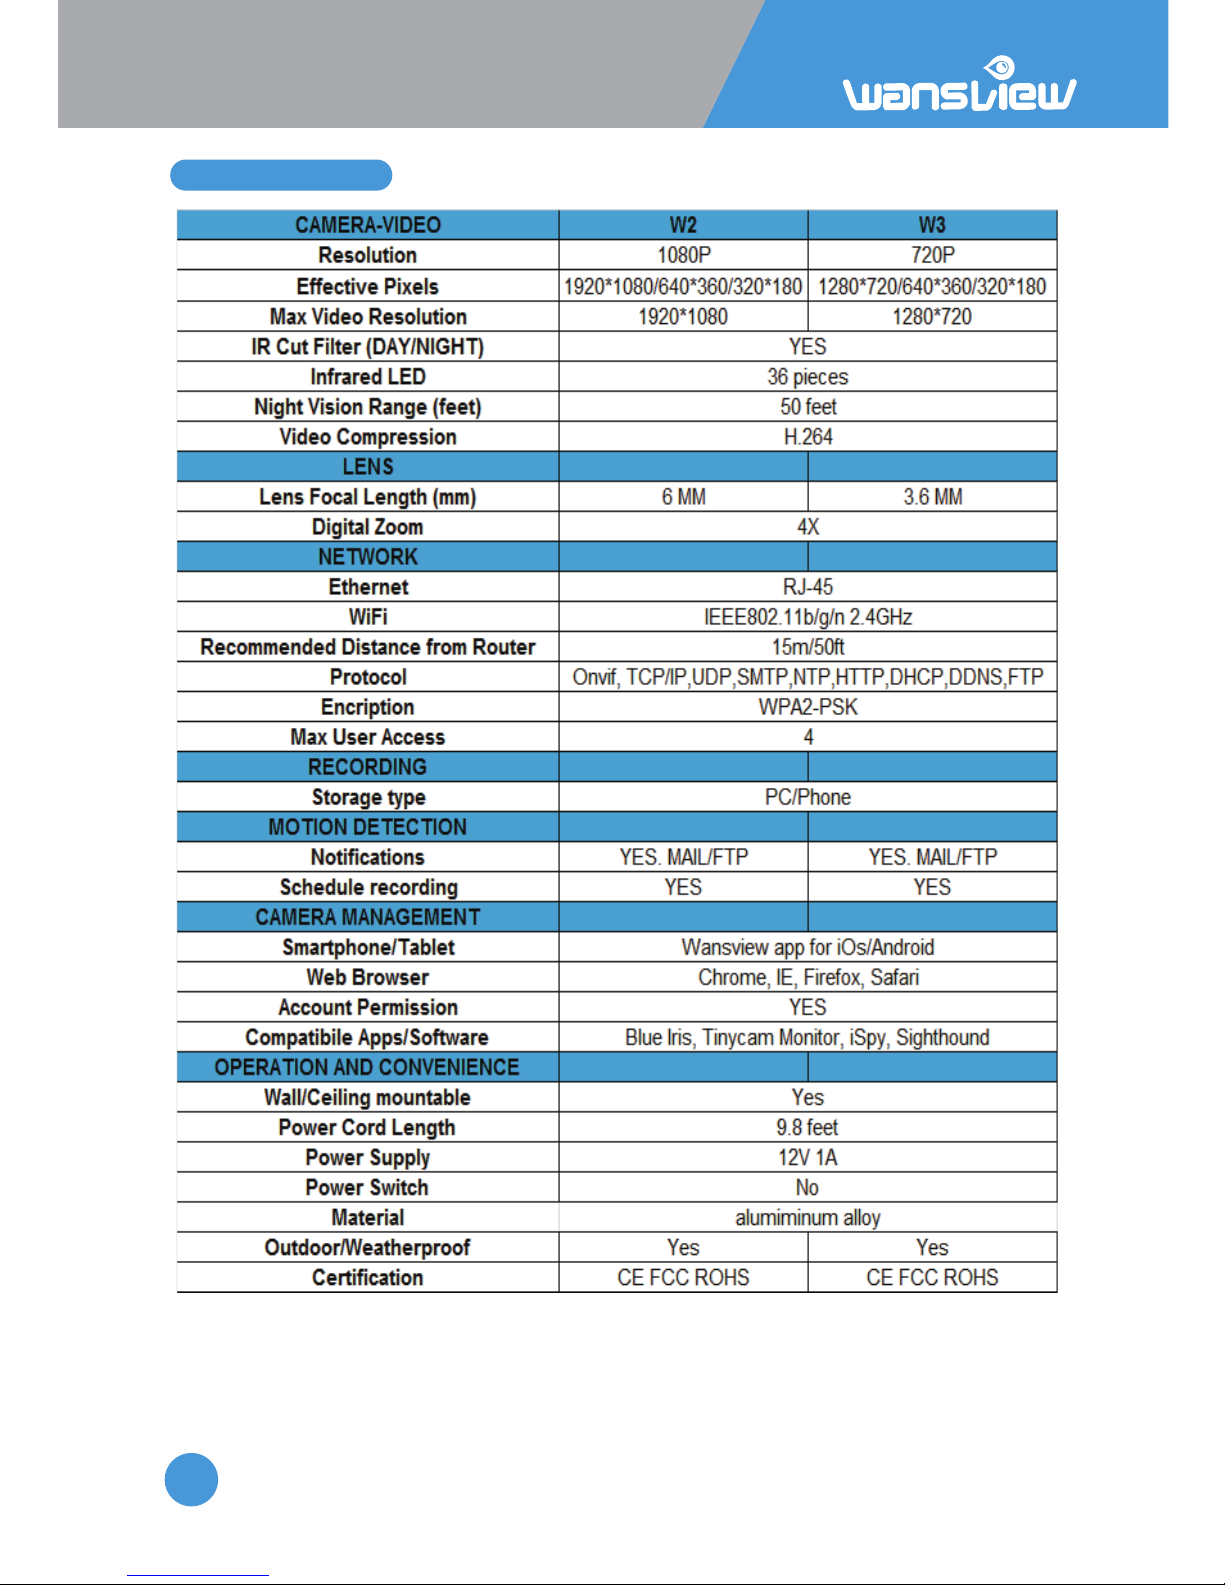
1.4 Specificaons
Page 9
IP Camera W2(1080P)/W3(720P)
9
2. Camera Management with Smartphones/Tablets
2.1 Wansview App for iOS and Android
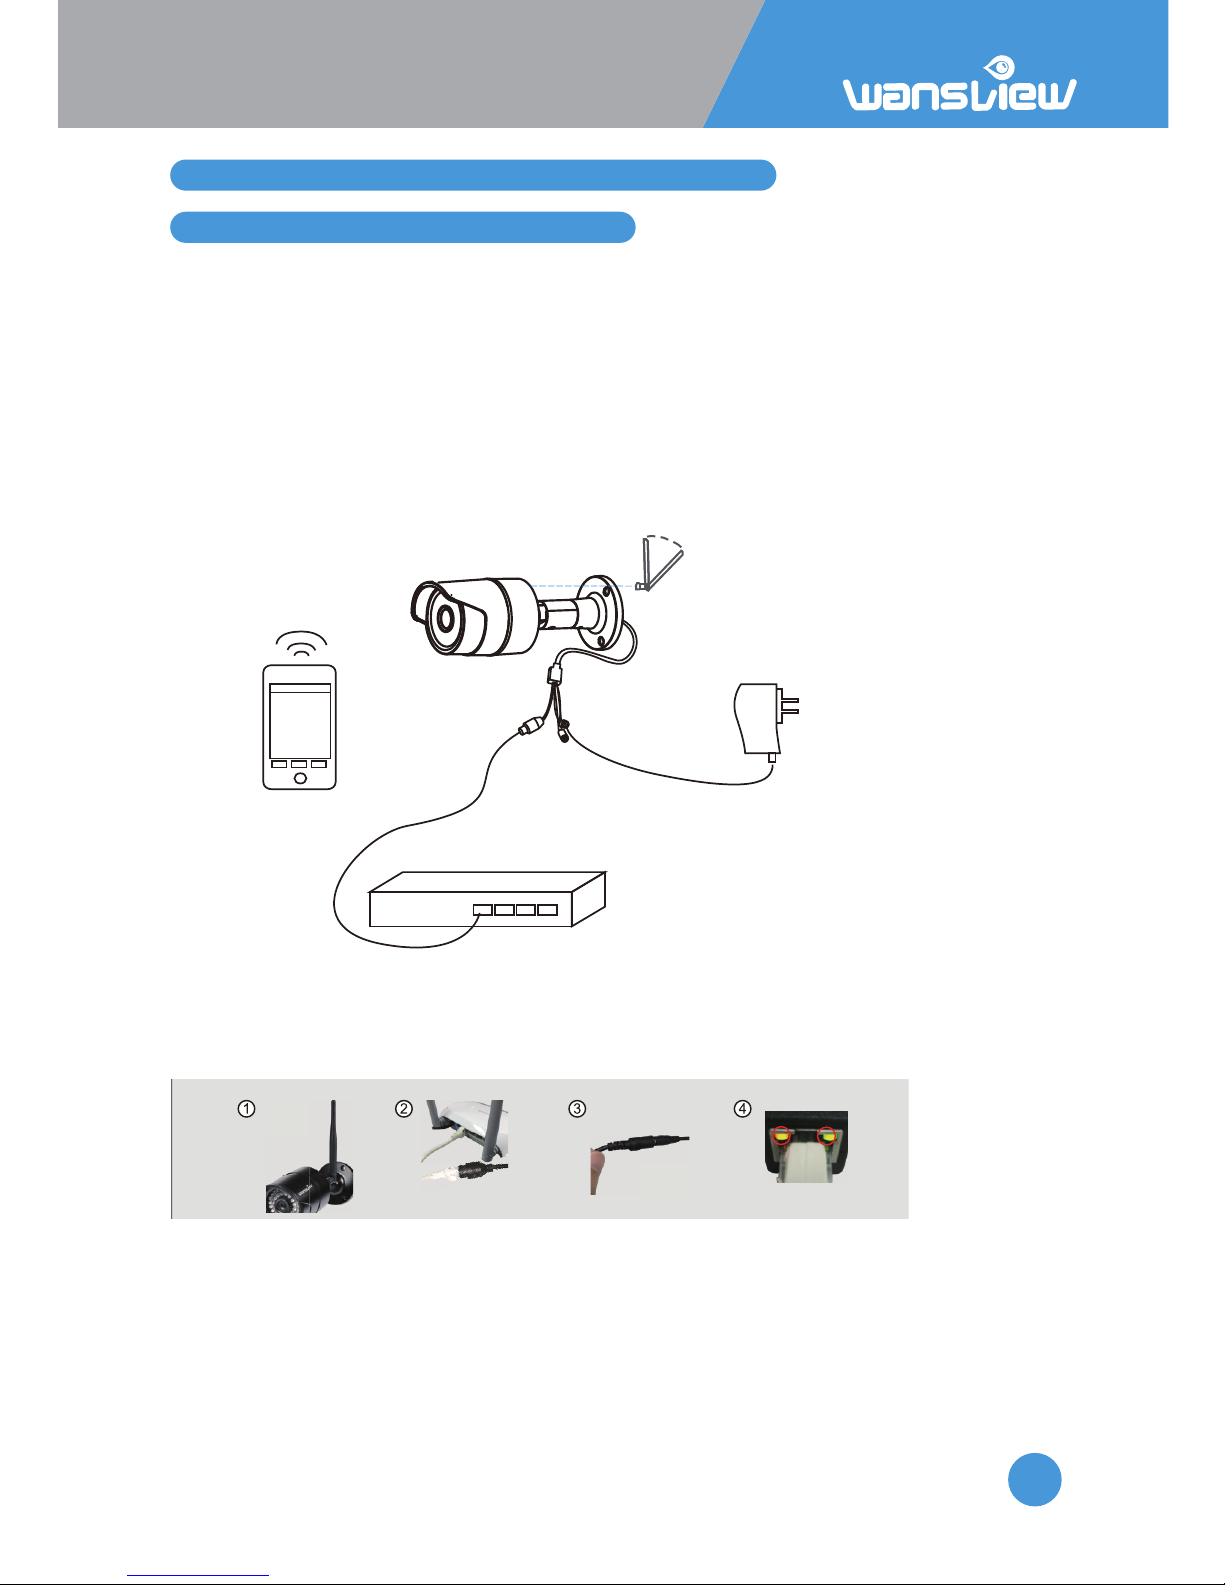
Go to the App Store and install the “Wansview” app. Install the antenna and connect the camera to
the power source with the provided adapter. Users can connect cameras by Ethernet RJ-45 cables or
through Wi-Fi network. In general, cable connecon offers beer video quality.
Note: Wansview App Pictures are taken on the iOS Version. Android and iOS App have the same
structure but a lile different design.
Cable Setup
Steps for product connecon:
1. Install antenna for IP camera.
2. Connect the IP camera and router with the network cable.
3. Power on the camera with the provided adapter (please verify voltage).
3. Launch the Wansview app and click on . Scan the QR Code and input default user name (admin)
and password (123456).
4. Camera is online
Your smart device
(not included)
Network cable
Modem/router
(not included)
Power adapter
Camera
Ant enna
(up right p os ition)
Page 10
IP Camera W2(1080P)/W3(720P)
10
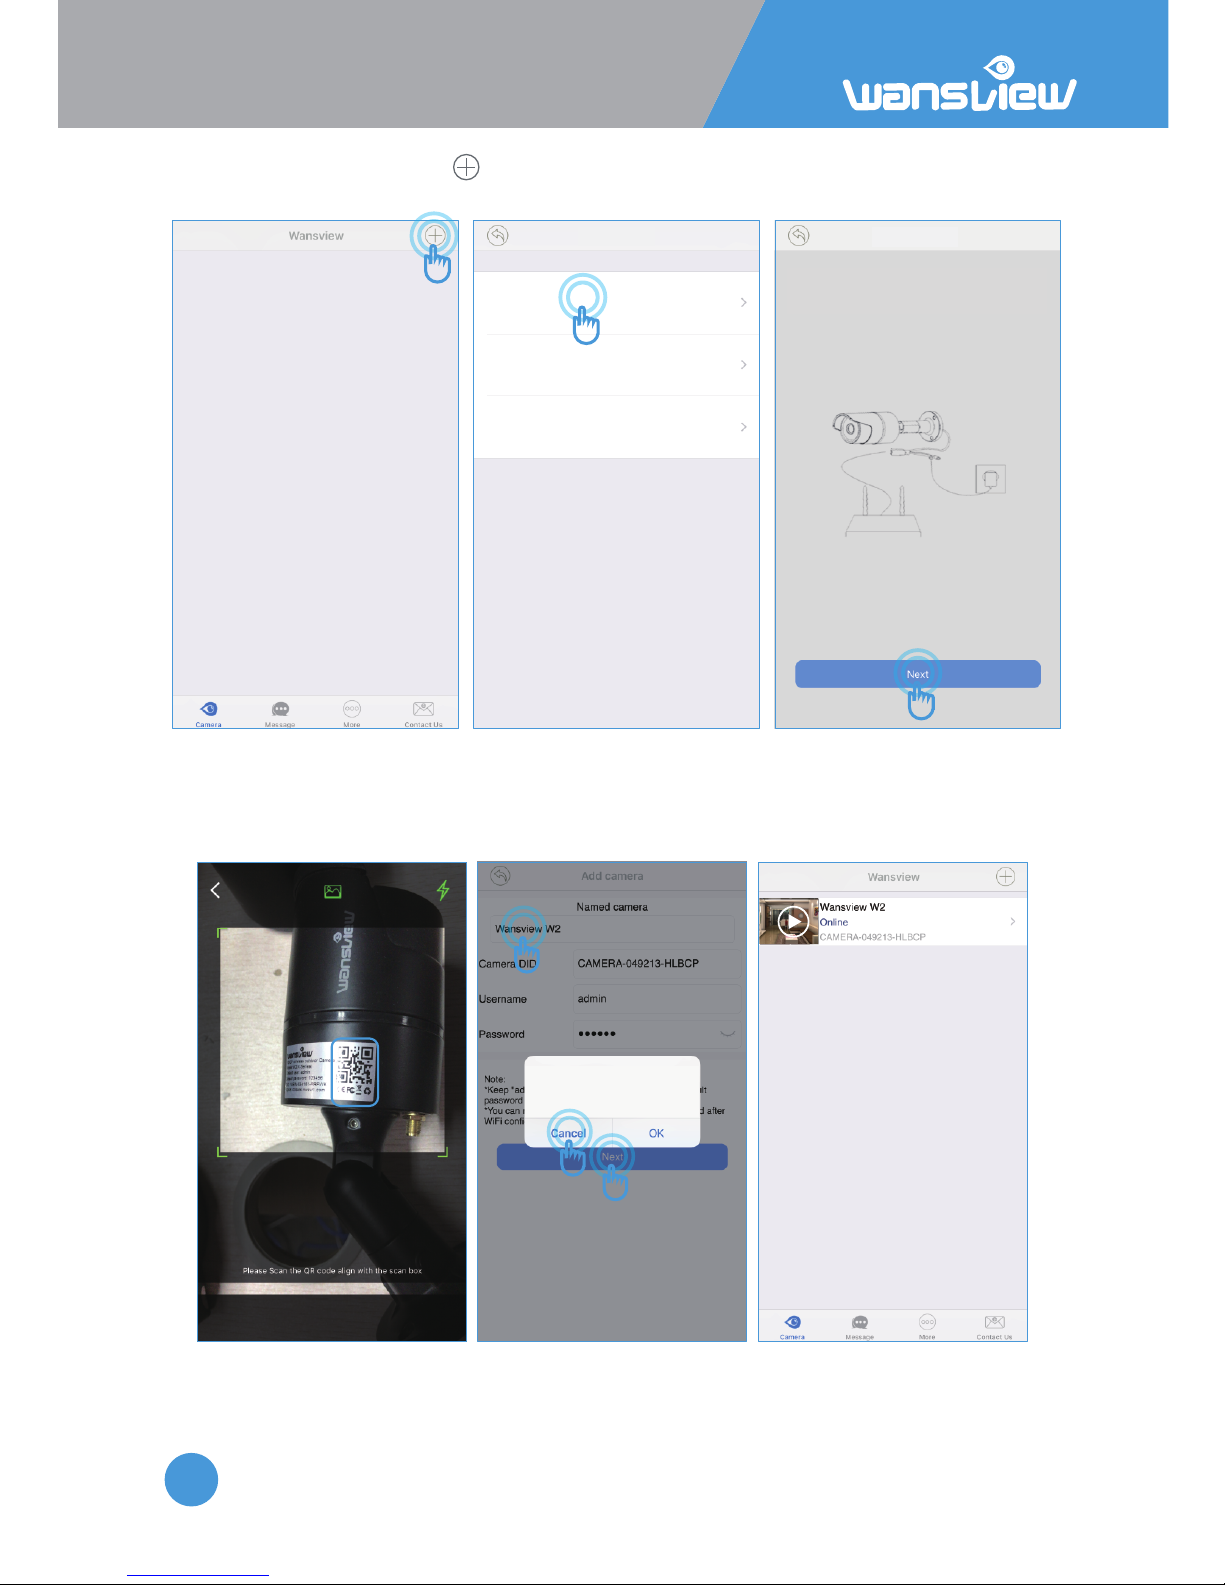
·Launch the Wansview app, click to access Add Camera page and select “Add camera via wired
method”, then follow the wizard step by step.
Add camera
Set up camera
Add camera via wired method
Power camera on and connect it to router using
Ethernet cable
Connect ethernet cable to set up WiFi
Add camera via WiFi mode
WiFi configuration to add cameras
Add already connrected network camera
·Scan the QR code on the camera’s scker, then “name camera” , keep “admin” as login name and
“123456” as the default password, then “Next”.
“Connect Success, do you want to Set up WiFi” will appear, if you do not need to set up WiFi, click
“Cancel”, then you will get camera “online”
QR Code
Tips
Connect success,do you want to set
up WiFi?
If it says "connect fail", please check whether you scanned the correct QR code and if
Camera's Ethernet cable Port has flashing lights.
Page 11
IP Camera W2(1080P)/W3(720P)
11
2.2 WiFi Setting
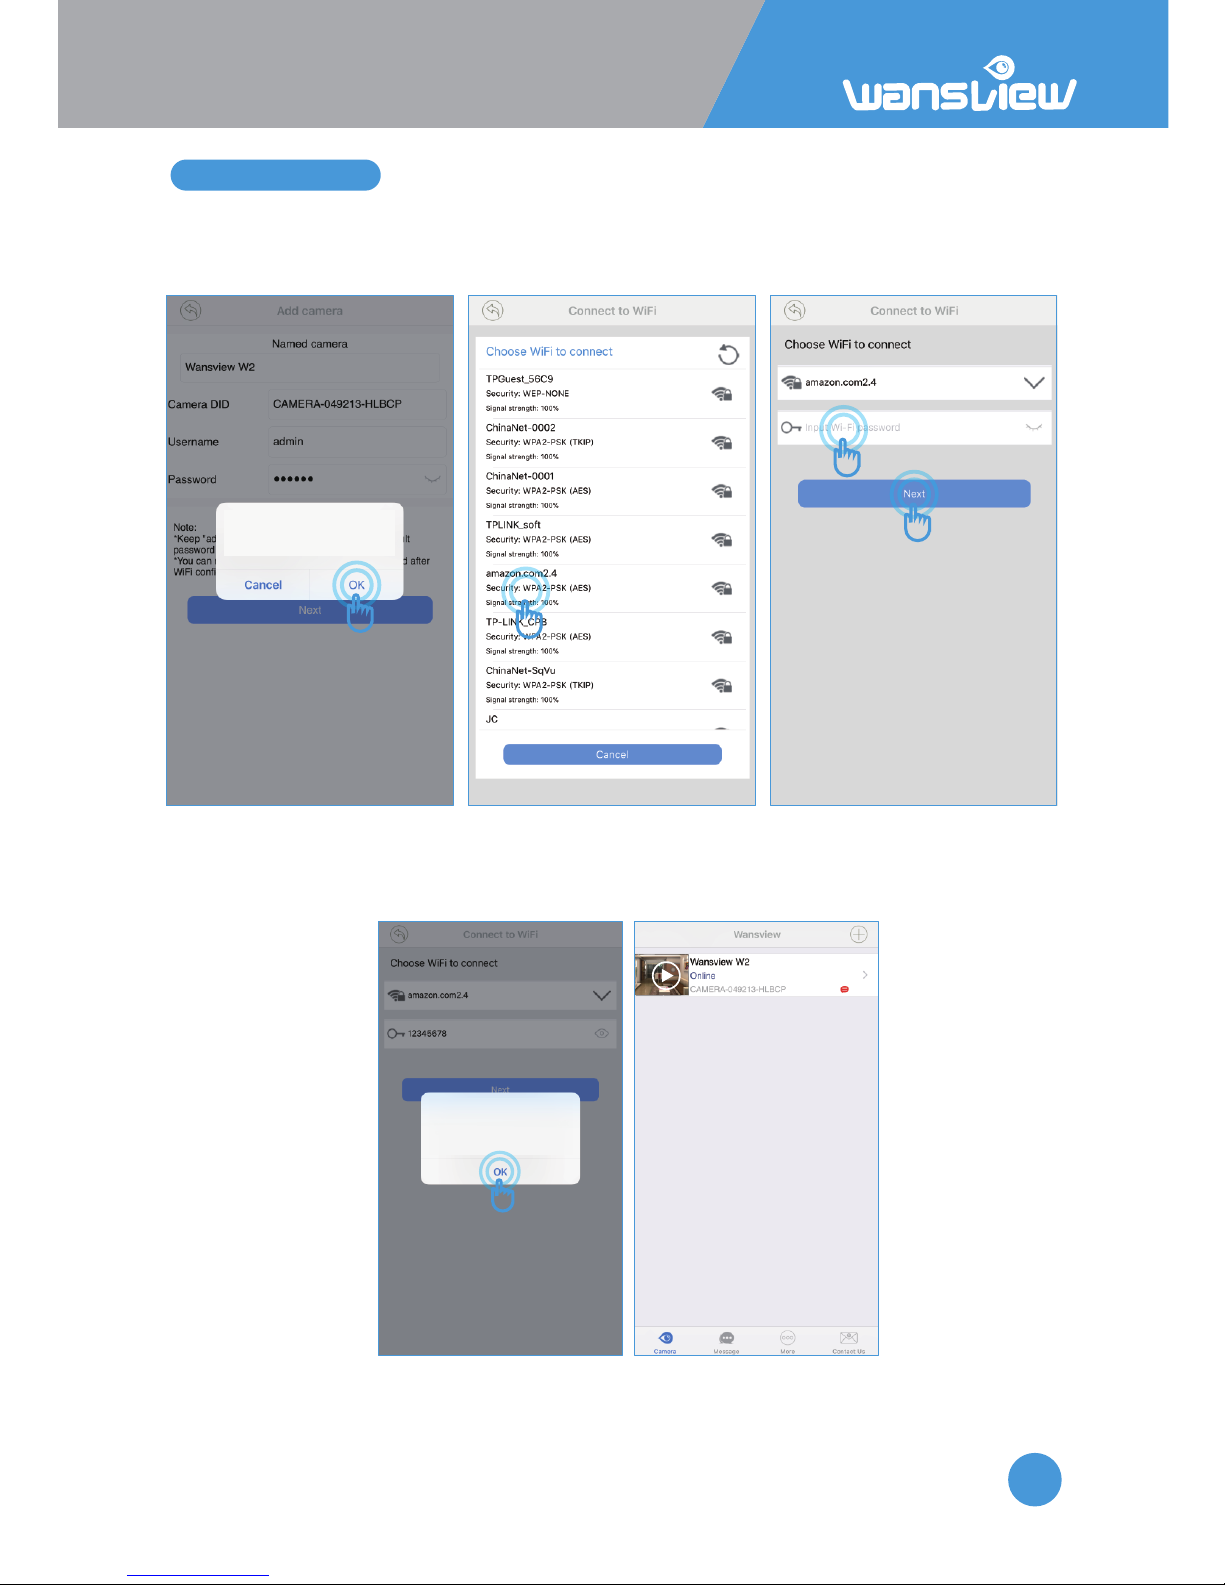
If want to set up WiFi, tap the “OK” , then app will search the available WiFi, choose your router’s 2.4G
WiFi(Aenon: Special characters “ &” and “ , ” cannot be contained in the WiFi name and password),
and input correct WiFi password (Case sensive), then “Next”.
Tips
Connect success,do you want to set
up WiFi?
“Set WiFi success” will appear, then tap “OK”, camera will be “online”, and ethernet cable can be
unplugged and move to other locaon, where has a good WiFi signal.
If failed, please check WiFi informaon again.
Set WiFi success
You can choose to unplug the network
cable,choose to connect the camera
via WiFi.
Aenon: The camera is not baery operated, to make it to work, camera must be
plugged into the power socket all the me.
Page 12
IP Camera W2(1080P)/W3(720P)
12
2.3 Live Streaming
Each camera can be accessed by up to 4 users at the same me.
The administrator can setup 3 different levels of access: administator, operator and
viewer.Please refer to Page 22.
Viewing Camera on a Single Window
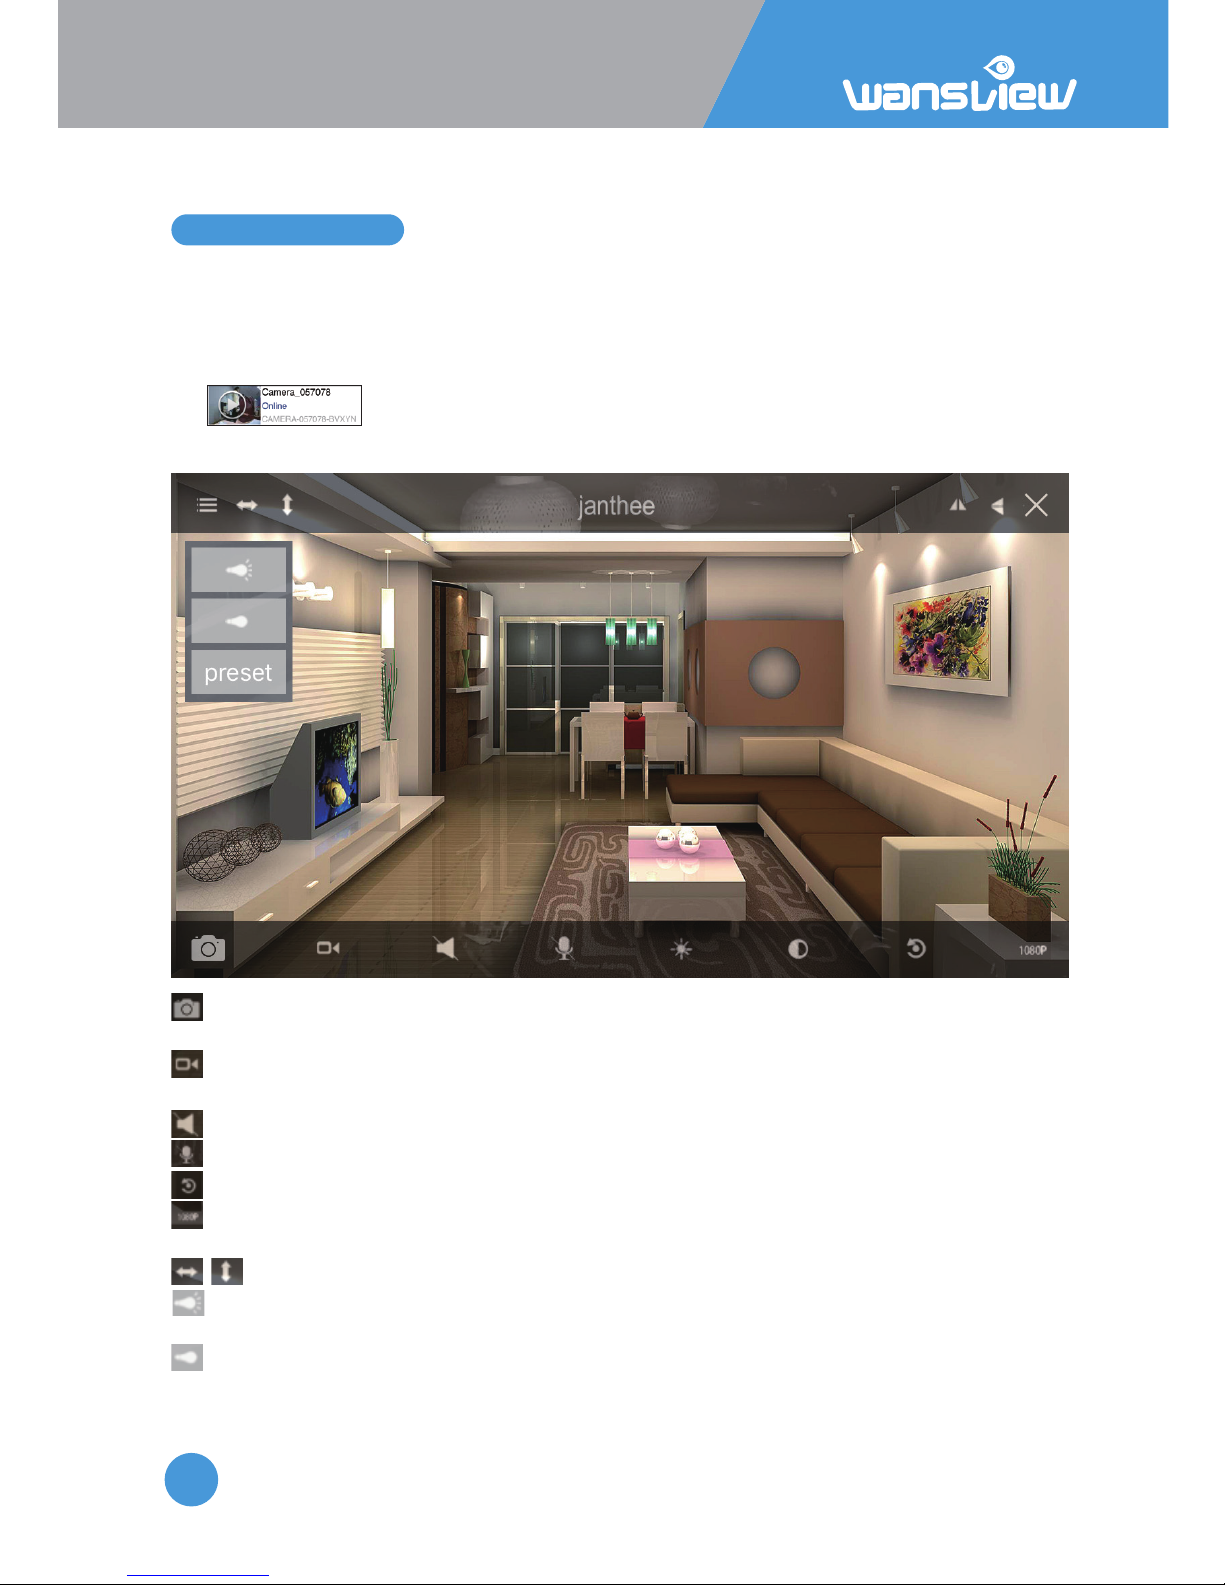
Tap to enter the live feed and do more operaons.
Tap the monitoring screen to see the video menu.
Snapshot: User can save snapshot picture to the mobile phone storage, and can check
the snapshot from More-Pictures or from Local Picture/Record.
Record: User can record video to the mobile phone, and check it from More-Records
or Local Picture/Record.The record will stop if you leave the live video screen.
Listen: unavailable
Talk: unavailable
Restore: To restore the Contrast and Brightness to default value.
Resoluon: Switch between 1080P and 480P. When the network is not good, try
lower down the resoluon to 480P to get a smooth video feed.
Cruise Vercally/Horizontally : unavailable
IR Auto: IR Led switches on at night when the luminosity is under 5 lux, if the camera
has no night vision, tap here to enable the IR led.
IR OFF: Tap here to turn off the IR light, if disabled, camera has no night vision.
Preset: unavailable
1080P
When the camera shows “Online”, tap “>” to Advanced Sengs > User Seng to change
the default User name and Password. This process is outlined in 2.6.2 User Seng.
Page 13
IP Camera W2(1080P)/W3(720P)
13
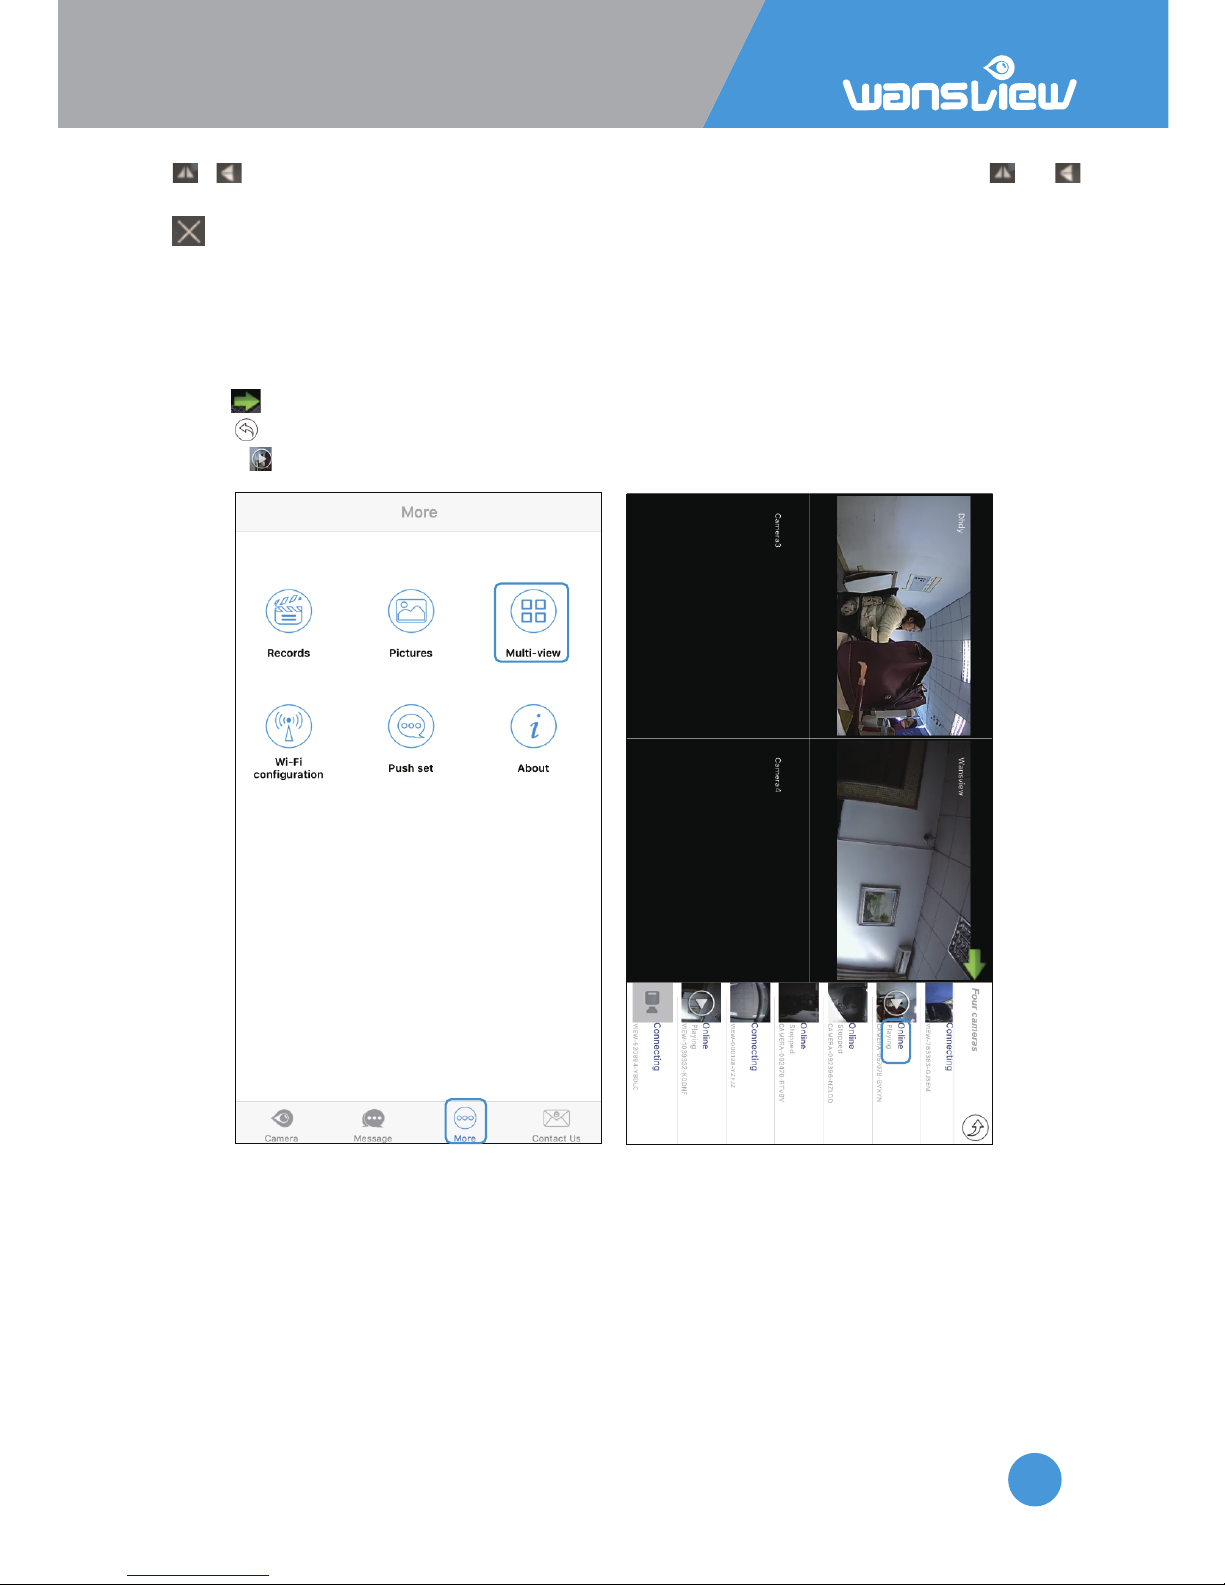
/ Flip/Mirror: If the live video is upside down because of the installaon, tap and
to make it right.
Exit: Turn off the live feed screen.
Viewing Camera on Mul-View
User can monitor several cameras (Max. 4 )at the same me on Mul-View.
1: Tap “More” and select “Mul-View” Click on cameras on the list to add the view on the
main screen.
2: Tap to hide the camera’s list
3: Tap to exit mul-view mode
4: Press to play camera, Tap again to stop the video.
Page 14
IP Camera W2(1080P)/W3(720P)
14
2.4 Local Picture and Record
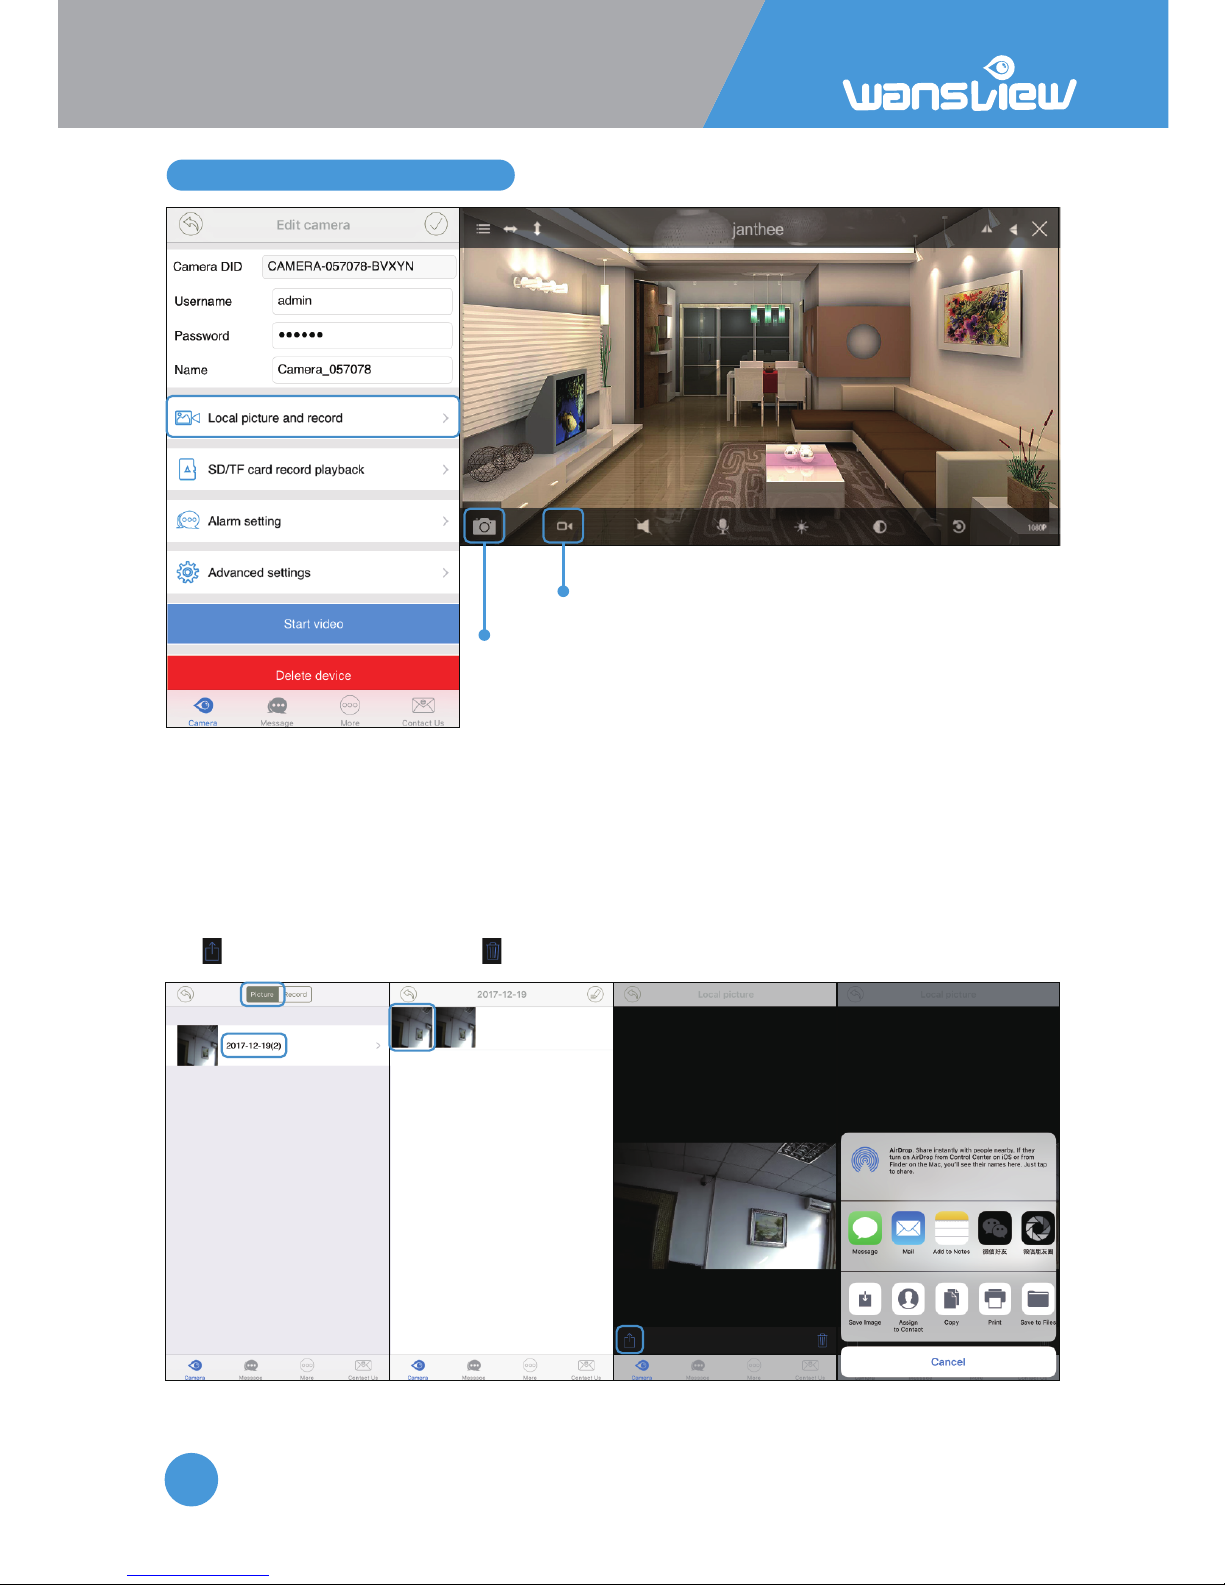
snap
record
During live streaming, user can take snapshots by tapping on Snapshot to phone and
Record to phone. To stop recording, tap again or exit from the live streaming.
In Local Picture and Record, User can find all the pictures and videos taken manually.
Share pictures and records
To share pictures and records, follow the steps indicated in the screenshots.
Tap to share the pictures, and to delete pictures.
Page 15
IP Camera W2(1080P)/W3(720P)
15
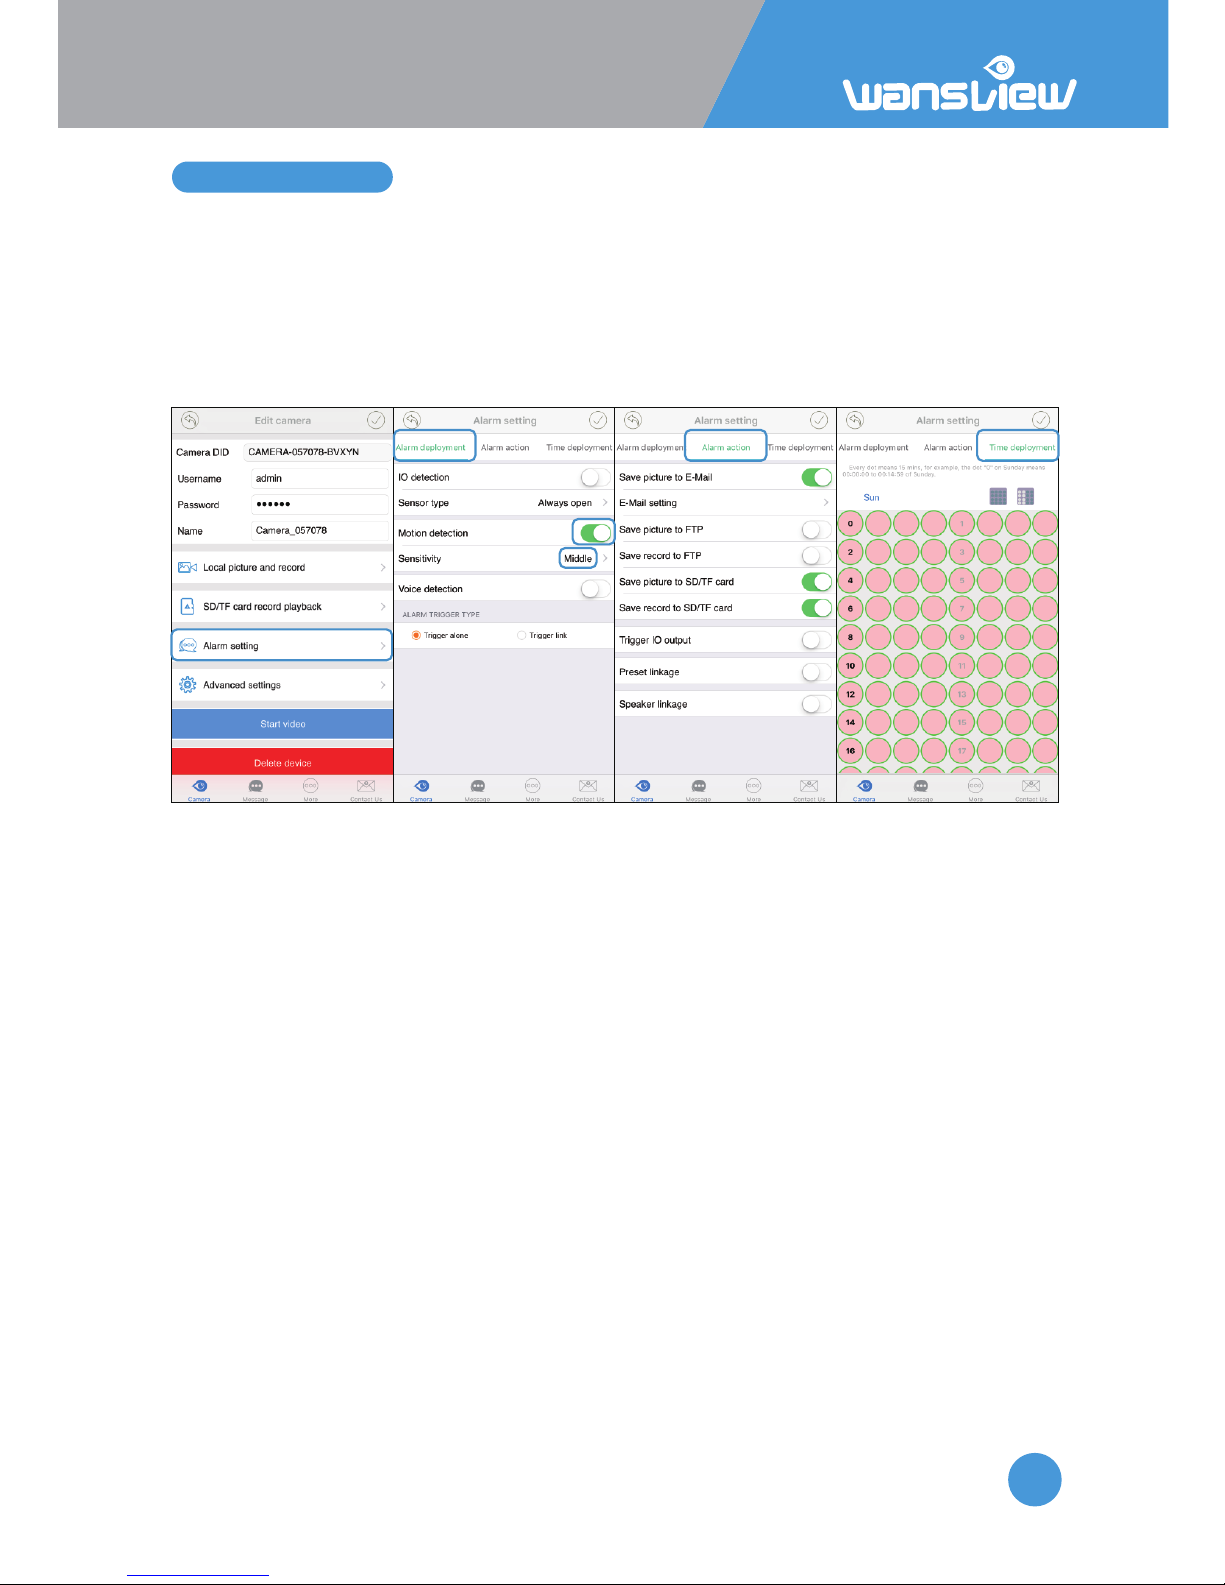
2.5 Alarm Seng
The camera is mostly for live video, what we achieve is to make the video more clear and
easy set up. it is not a professional security camera, the moon detecon is only an
add-on feature. So the alarm noficaon will not be very accurate.
But if you want the moon detecon works accurately, you may connect the camera to
some professional security soware like: Blue Iris, iSpy or Sighthound, the camera alert
works great on them.
Follow the below steps to set up alarm.
Alarm Deployment
IO Detecon: this is for camera that can connect external source of alert device. The
W2/W3 is not available.
Sensor Type: For external source of alert device. The external sensor can be always open
or always close.
Moon Detecon: Enable Moon Detecon, user can set up camera with moon alarm
Moon Detecon Sensivity: User can choose Low/Middle/High sensivity according to
needs.
Voice Detecon: Enable Voice Detecon, user can set up camera with voice alarm
Voice Detecon Sensivity: User can choose Low/Middle/High sensivity according to
needs.
Trigger Alone: The alarm will be triggered for any kind of acve alarm
event(Moon/Voice/IO)
Trigger Link: The alarm will be triggered for mulple detecon at the same
me(Moon/Voice/IO).
Alarm Acon:
Save Picture to Email: When an alarm is detected, the camera will send pictures to the
email box. Users can set up to 2 recipients.
Click Mail Seng to setup the email. Check your email provider for SMTP Server and
Port.
Page 16

IP Camera W2(1080P)/W3(720P)
16
Save Picture to FTP: When an alarm is detected, the camera will send pictures to your FTP
server. Click on FTP Seng to setup FTP.
Save Record to FTP: When an alarm is detected, the camera will send a video to your FTP
server.
For FTP paramters, please refer to Page 40
Save Picture to SD/TF: unavailable(W2/W3 cannot support SD card)
Save Record to SD/TF: unavailable(W2/W3 cannot support SD card)
Trigger IO Output: Not available for W2/W3.
Preset Linkage: When an alarm is detected, the camera will focus on one of the 8 Preset
spots (see above).
Speaker Linkage: When an alarm is detected the speaker will act as a siren for the chosen
length (5-30sec).
Sender: your email address
Smtp Server: such as smtp.mail.yahoo.com etc.
Smtp port: 465
SSL: SSL
User name: your email address, the same with
sender
Password: your email password, if you are using
Yahoo and Gmail, please generate an app
password, and using the app password. Check the
FAQ document on website to generate app
password.
Receiver: any email address
Aer you fill in the chart of the email seng
page, please Save and Test E-Mail.
For Email Seng, please follow the below parameters:
Page 17
IP Camera W2(1080P)/W3(720P)
17
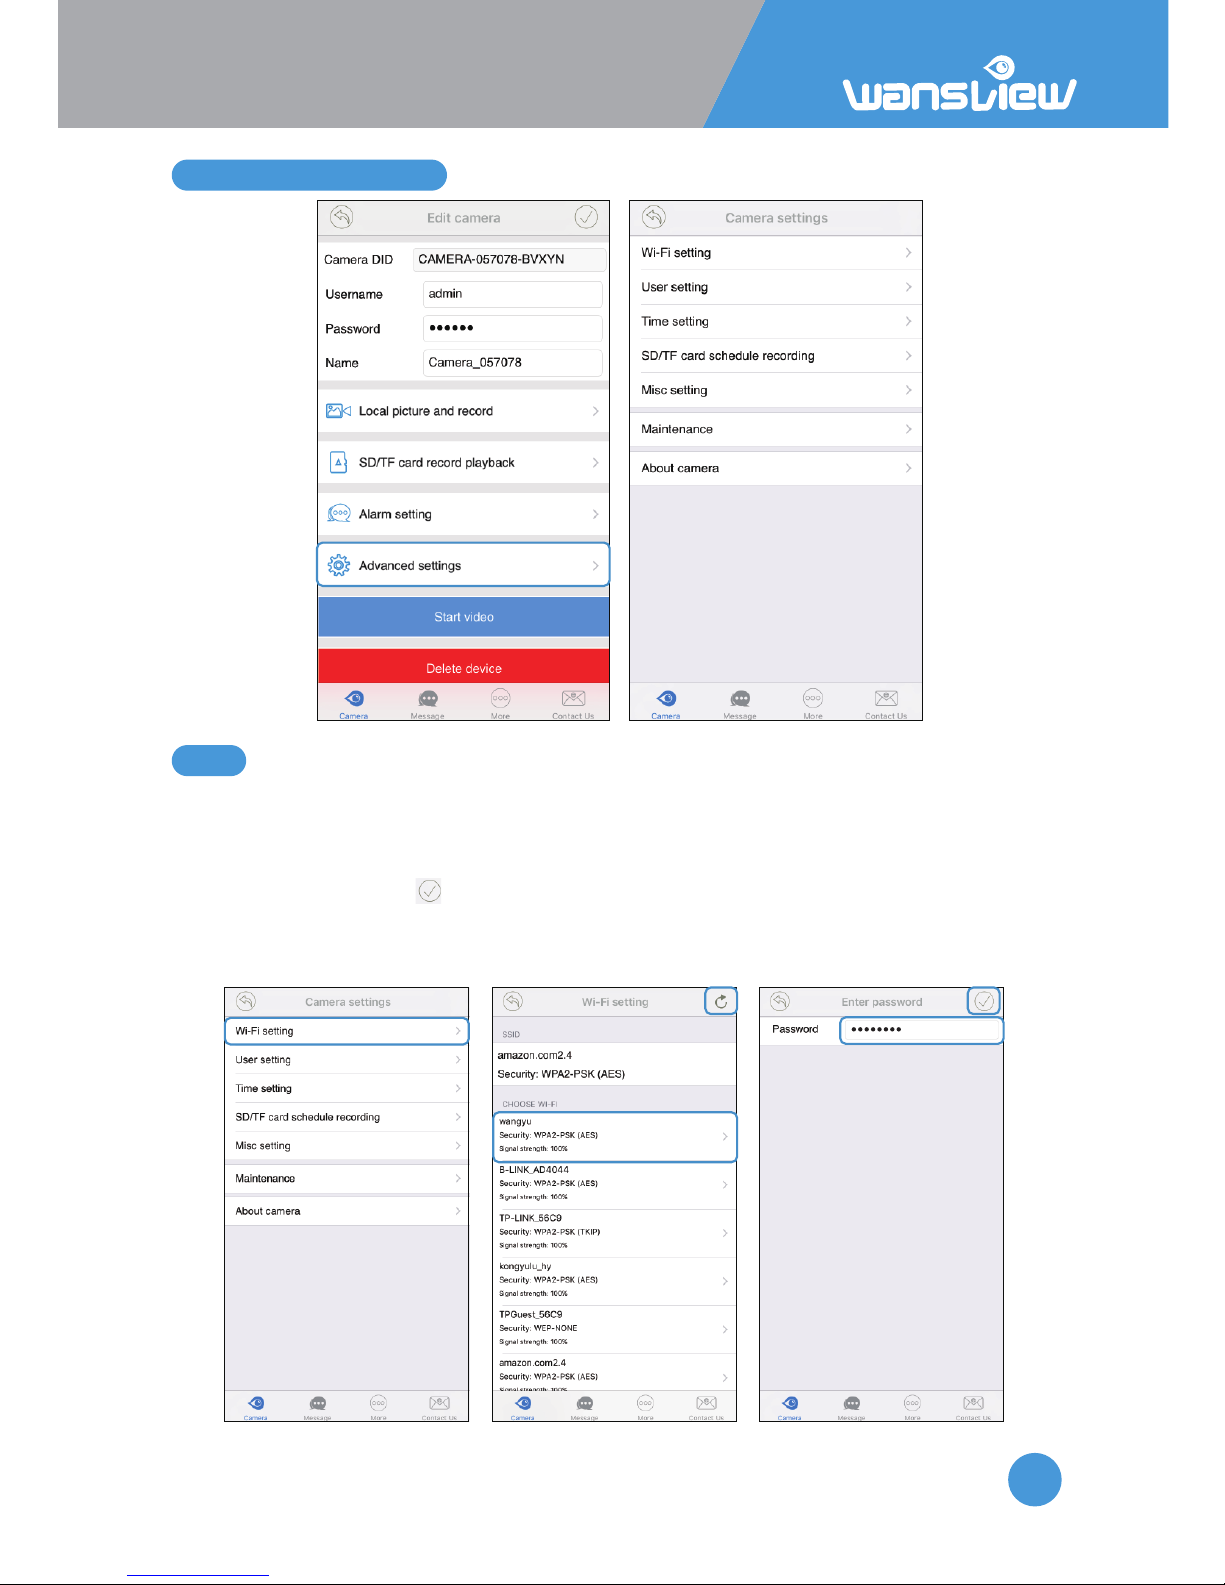
2.6 Advanced Sengs
2.6.1
WiFi Seng
If camera is connected with ethernet cable, and want to set up WiFi, or change another
WiFi network, user can set up WiFi on WiFi Seng.
Tap WiFi Seng, and search the available WiFi, choose the WiFi and manually input the
WiFi Password, then tap to save the WiFi informaon.
User can unplug the ethernet cable when the app appears “WiFi Set Succeed”.
Note: Wansview camera only supports 2.4Ghz WiFi, and wifi password should be no
longer than 31 characters.
Page 18
IP Camera W2(1080P)/W3(720P)
18
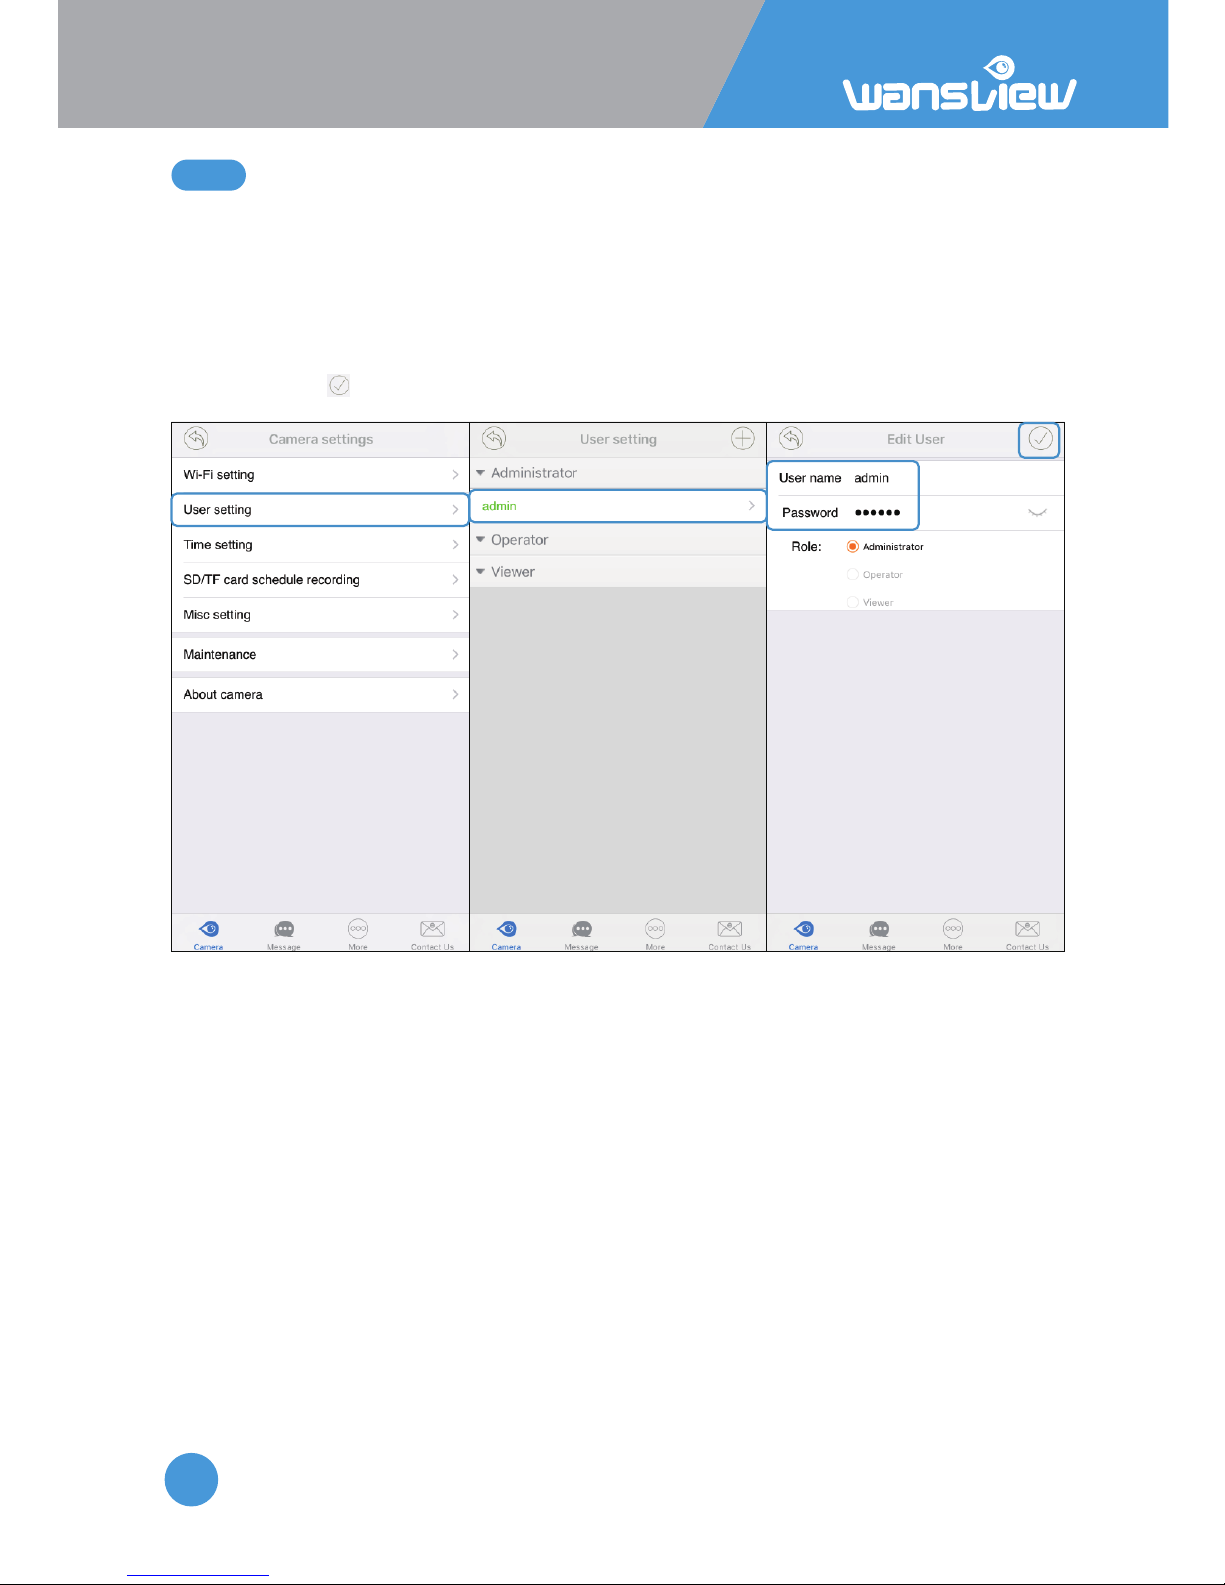
2.6.2
User Seng/Management
Under the User Seng/Management, user can change the default username(admin) and
password (123456), or create another user account with certain access rights, such as an
Operator or Viewer account for other person to view the camera.
Change Username and password:
Tap User Seng, and choose Administrator>Admin, user can change the username and
password, then .
Page 19
IP Camera W2(1080P)/W3(720P)
19
2.6.3
Time Seng
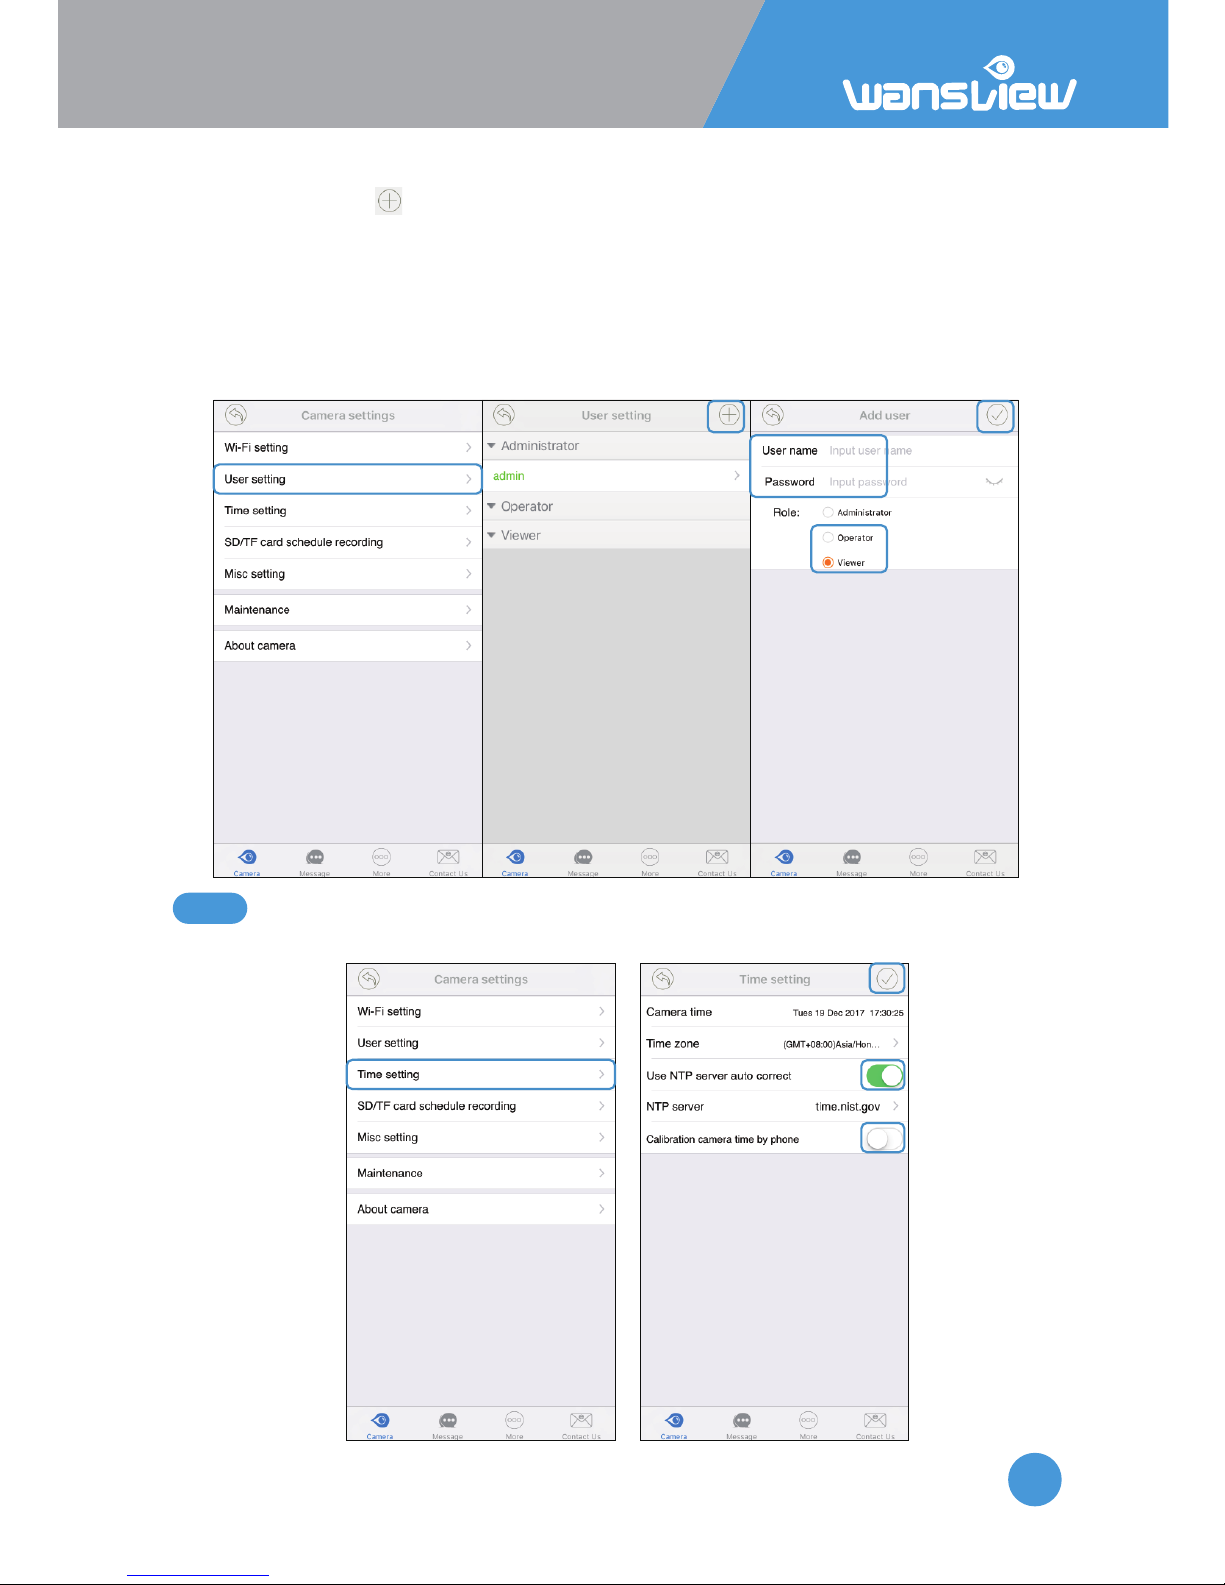
Add another user account
On User Seng, tap to add user, manually add the username and password, then
choose the Role(Operator or Viewer).
Administrator: Full access rights
Operator: Can operate on the camera live video screen, but not access to other sengs
like Alarm seng, Advanced Sengs etc.
Viewer: only can view camera, no more operaons on the camera video screen.
Note: Password shall be no longer than 20 characters.
Click Time Seng, user can calibrate the me.
Page 20
IP Camera W2(1080P)/W3(720P)
20
2.6.4
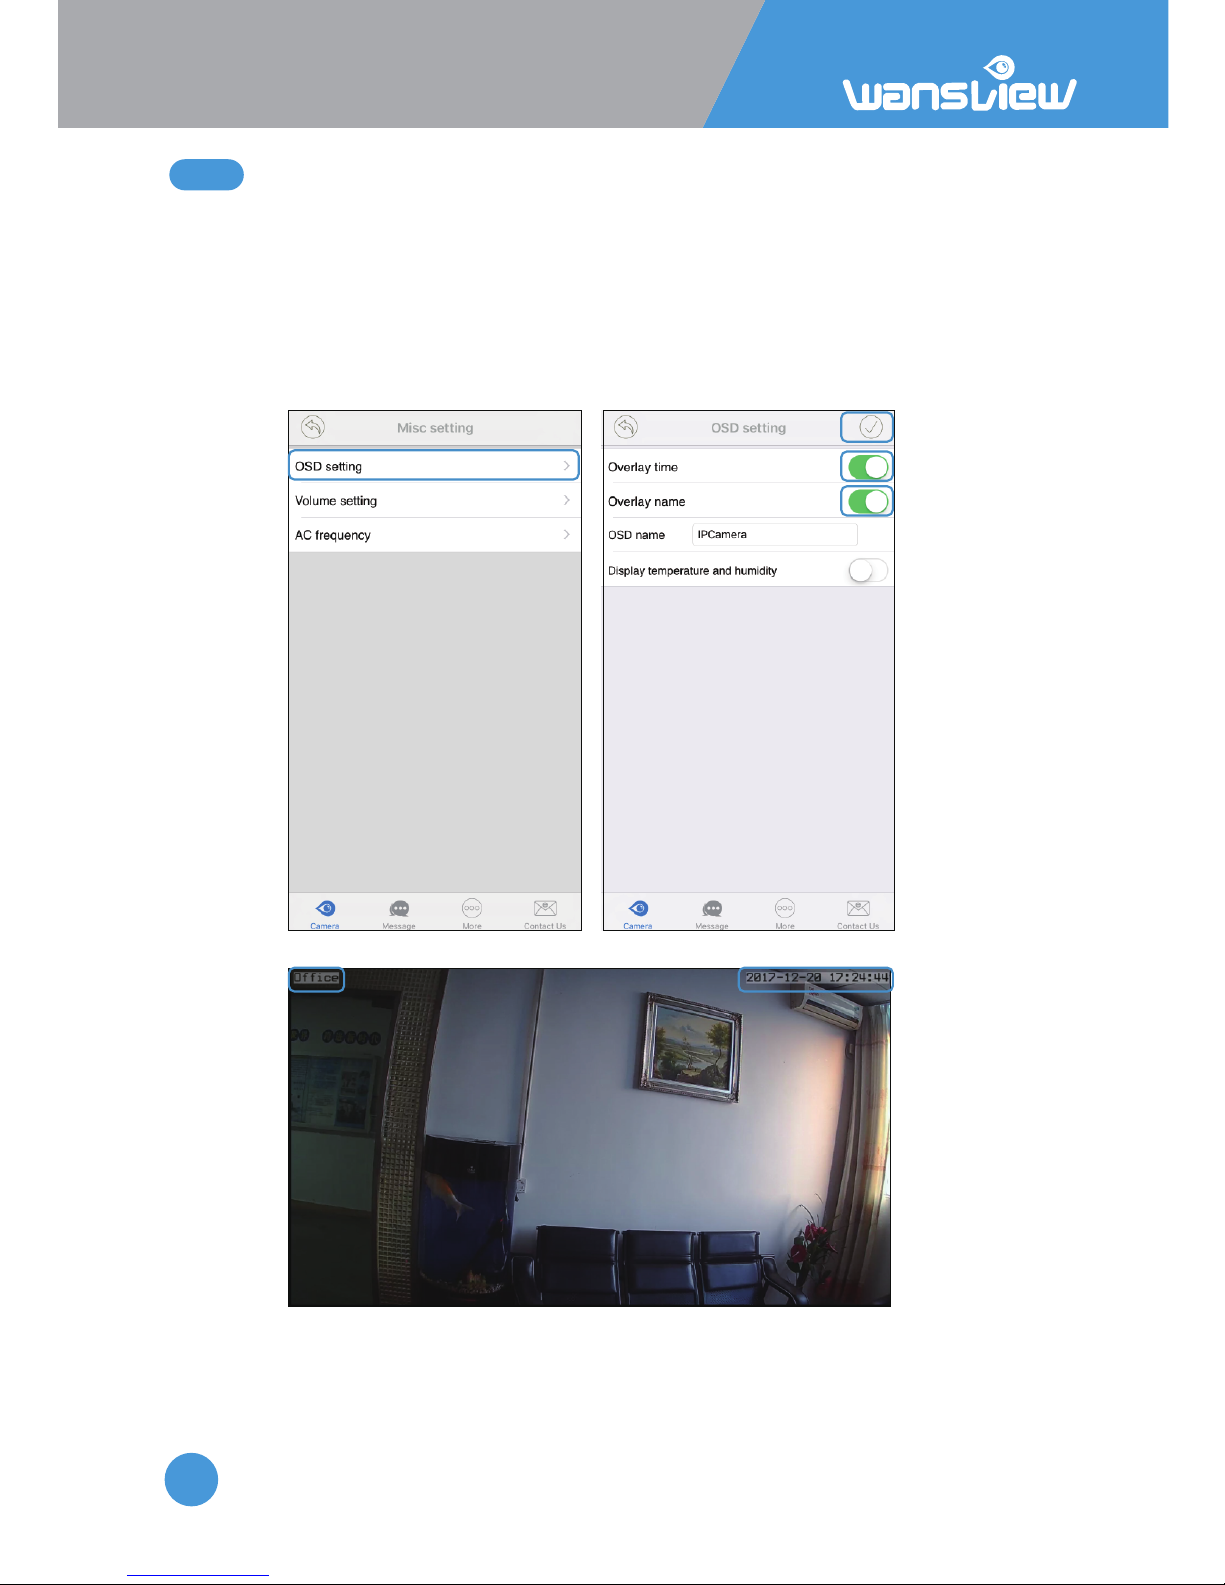
Misc Seng
On Misc Seng, user can set up OSD (On Screen Display), Microphone/ Speaker Volume
and AC Frequency.
OSD Seng
Click “OSD Seng” to set:
Overlay me: Camera me in live streaming, recording and pictures
Temp and humidity is not available for Q3/Q3S
overlay name overlay me
Page 21
IP Camera W2(1080P)/W3(720P)
21
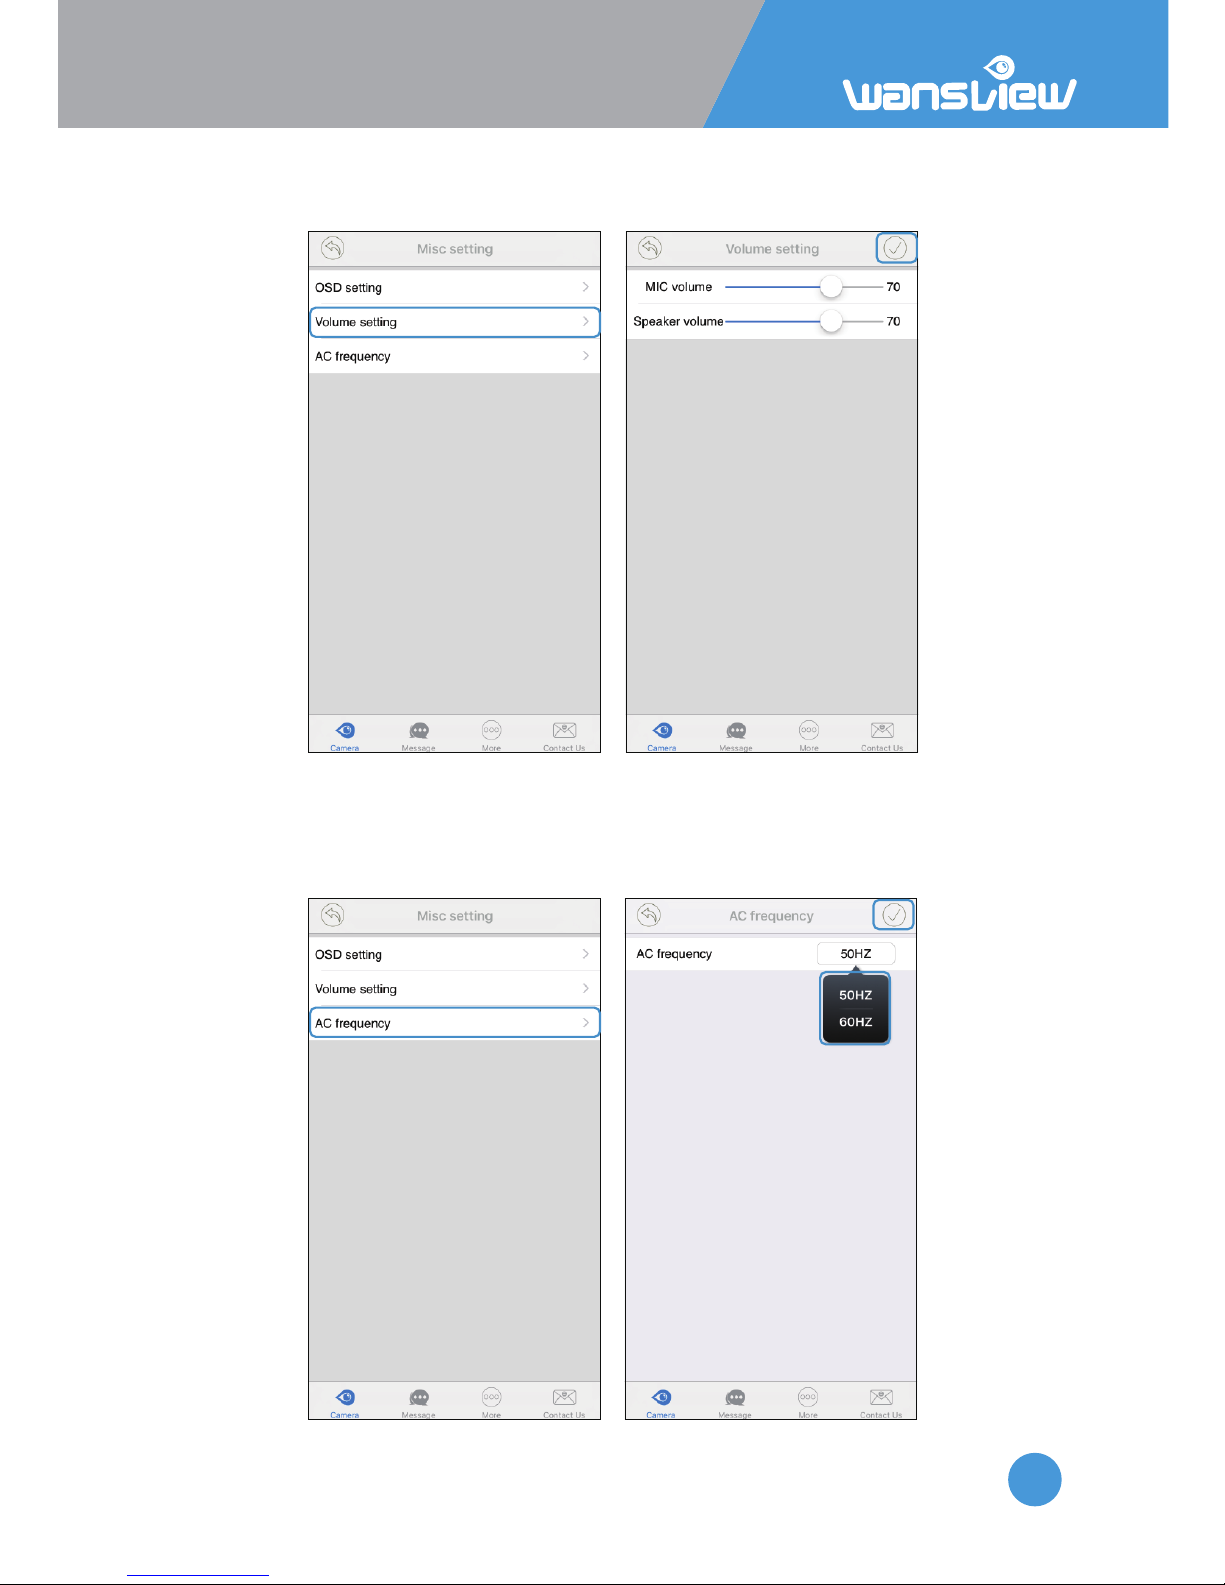
Volume Seng
If volume of the “Talk” and “Listen” is too low, user can adjust it from Volume Seng
AC Frequency
User can adjust the power frequency, power frequencies include:50HZ(220V voltage
selects 50HZ), 60HZ(110V Voltage selects 60HZ).
For 60HZ, the highest frame rate can be 30fps, and 50HZ is 25fps.
Page 22
IP Camera W2(1080P)/W3(720P)
22
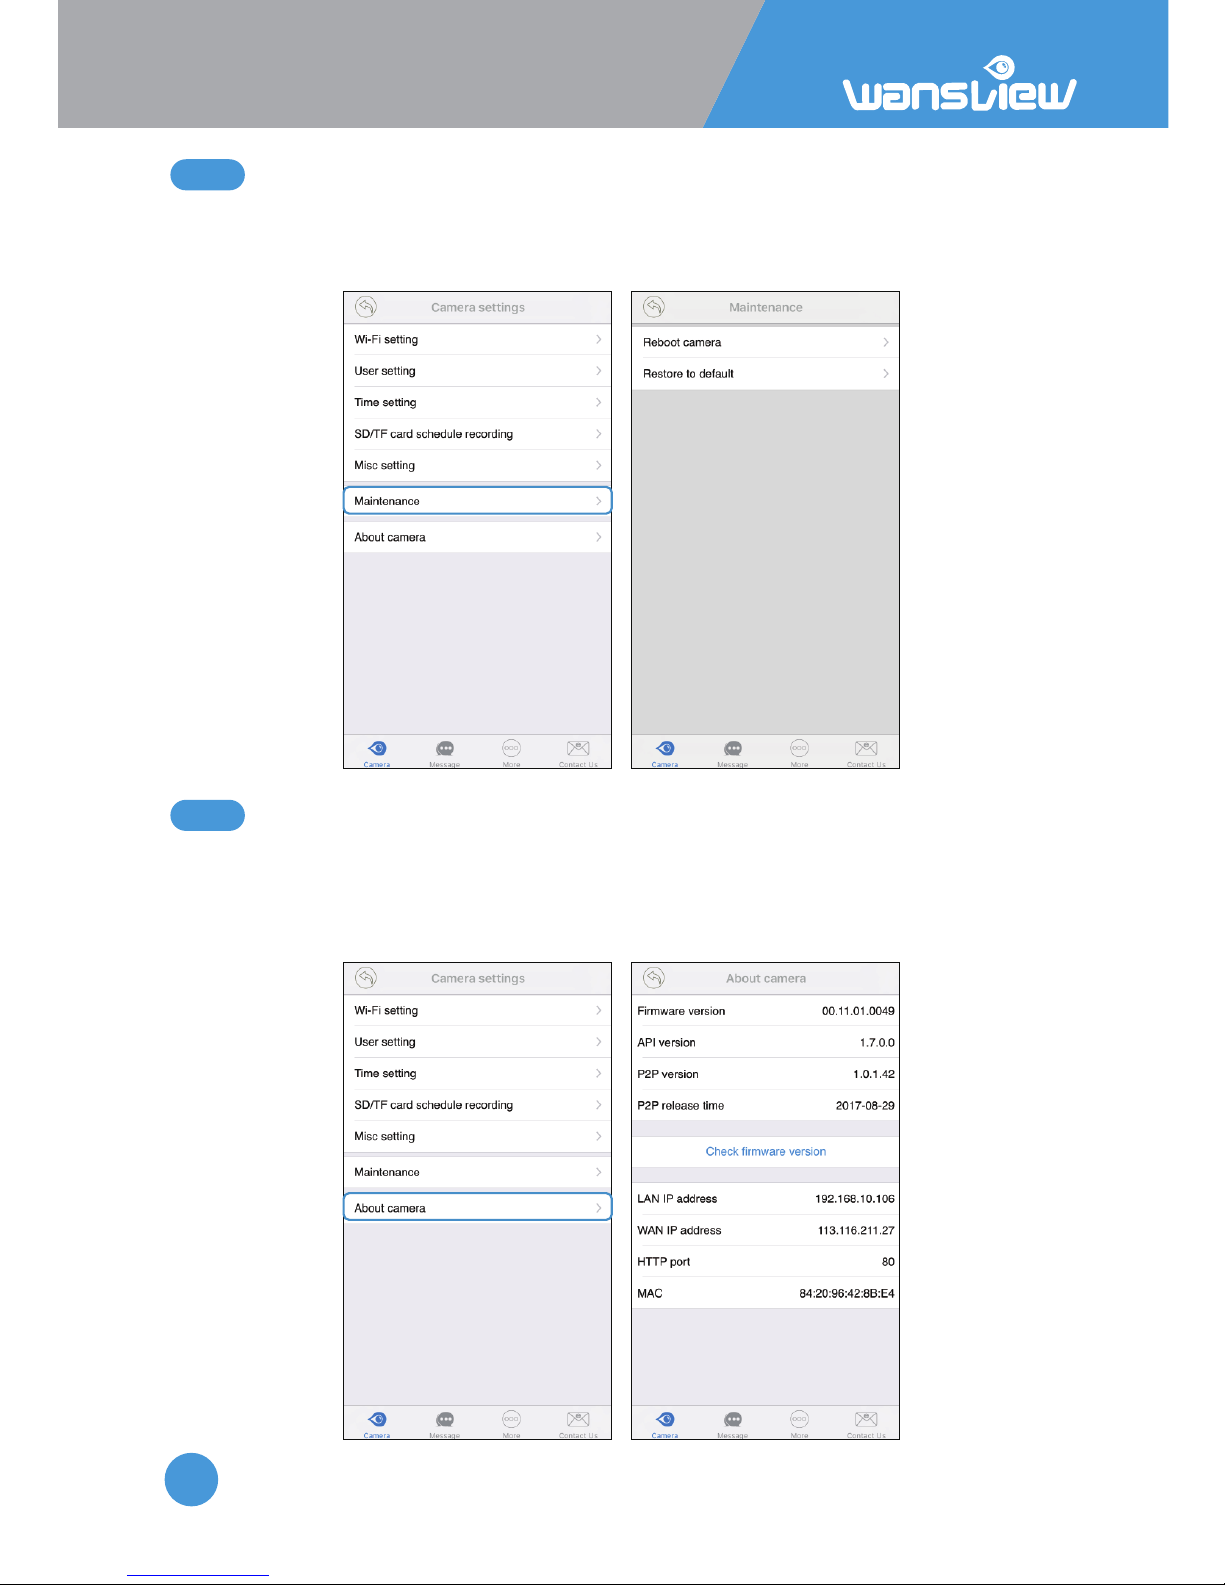
2.6.5
Maintenance
2.6.6
About Camera
Reboot camera if camera is always loading or if the camera/app is frozen. No need to set
up again. If camera restores to factory default, the set up procedure needs to be repeated
again aer reboots.
Here user can check the camera informaon, such as Firmware, P2P version, IP Address
and Mac Address.
For Wan IP address, if the Lan ip address is not port forwarded in router(the camera
connected with), it cannot be accessed from outside network.
Page 23
IP Camera W2(1080P)/W3(720P)
23
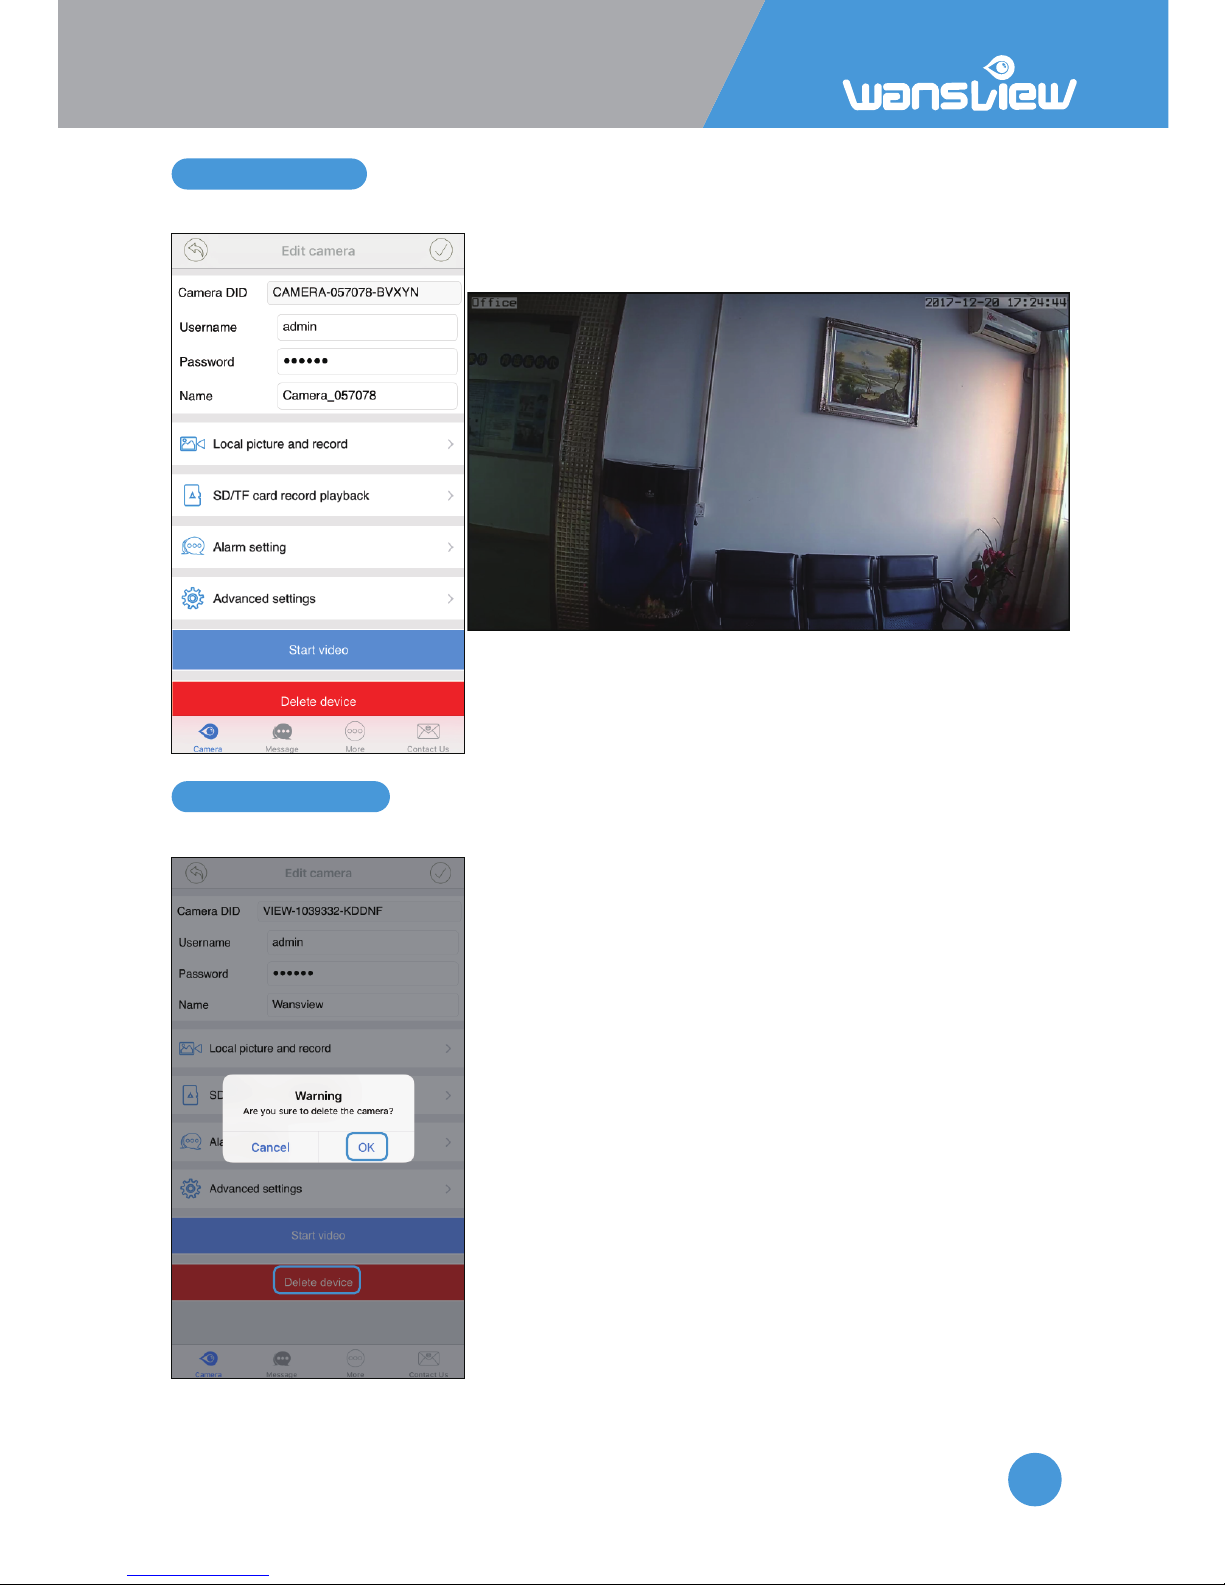
2.7 Start Video
2.8 Delete device
Tap “Start Video” to broadcast the camera live streaming.
Tap “Delete device”, user can delete the camera from the app.
Page 24
IP Camera W2(1080P)/W3(720P)
24
2.9 Message
2.10 More
On the Message, user can check the alarm message.
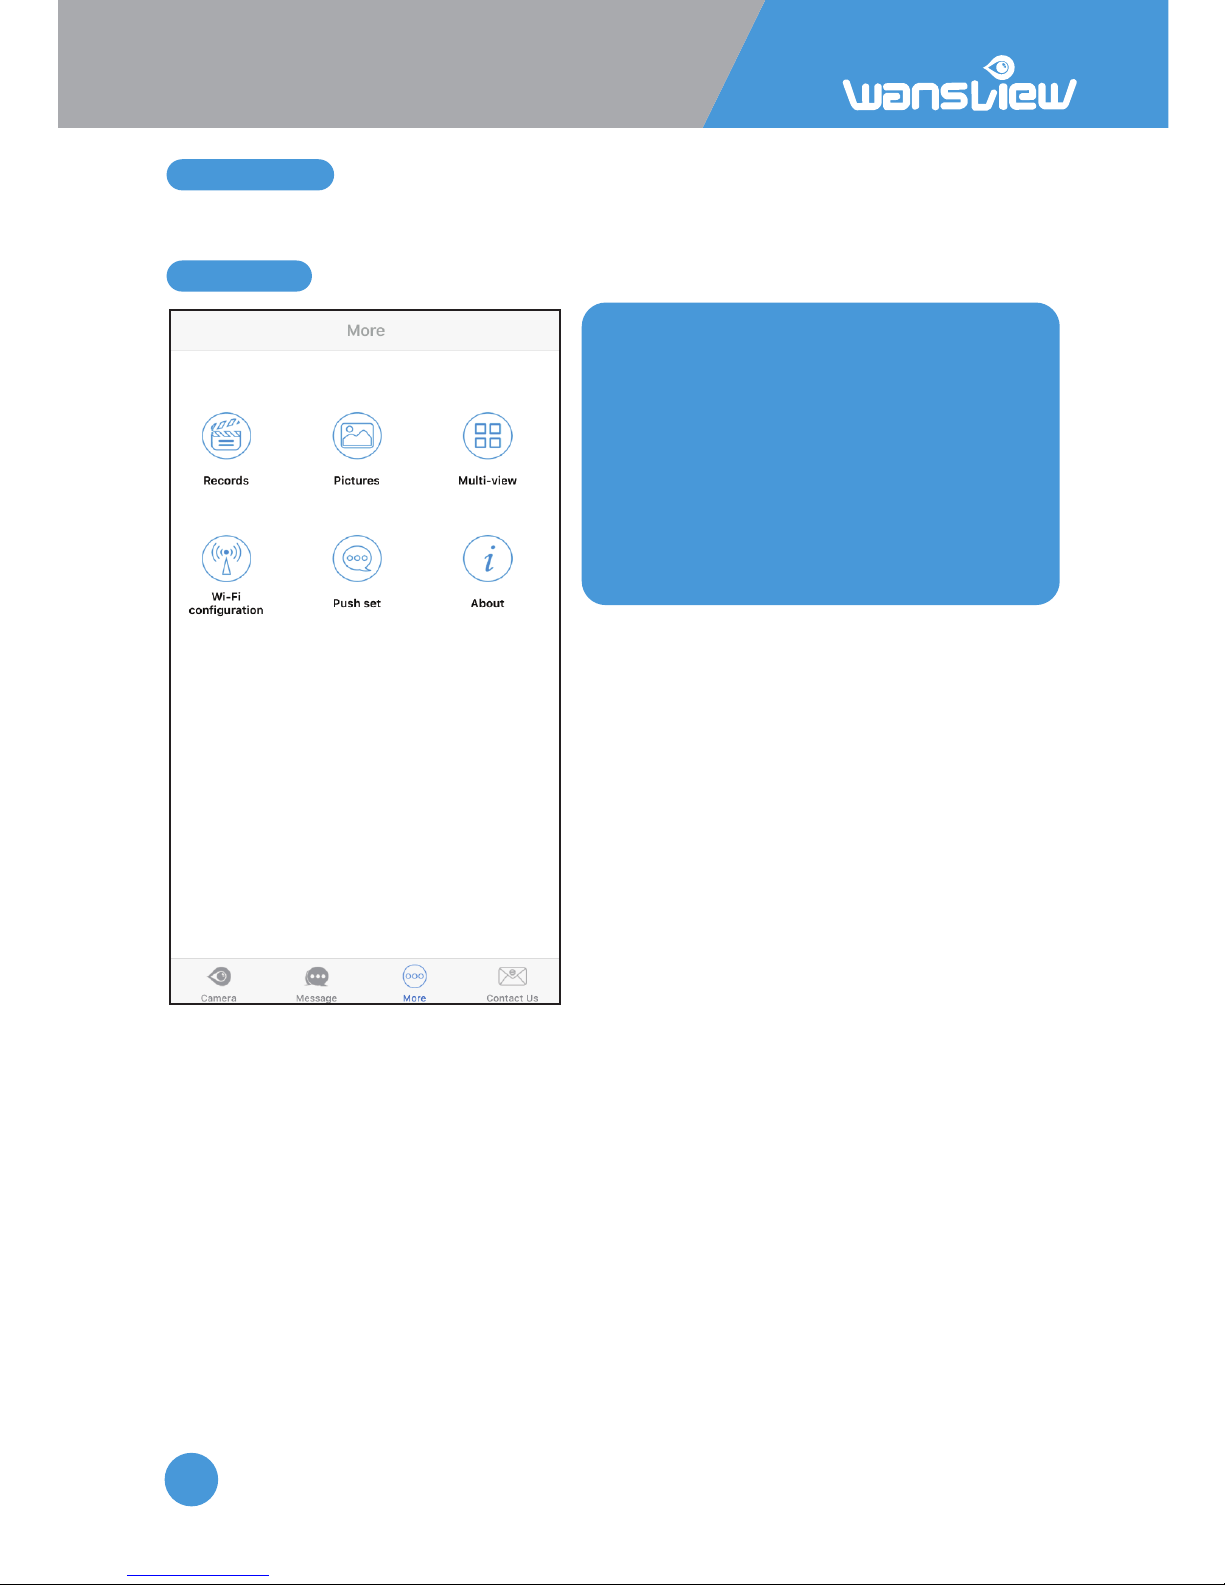
Record and pictures are the local files
recorded from the wansview app.
Mul-View: Please refer to P 14
Push Set:Currently not available
About:Can check the wansview app
version
Page 25
IP Camera W2(1080P)/W3(720P)
25
3.1.1
Add camera in Lan
3. PC Client Soware
3.1 Add Camera
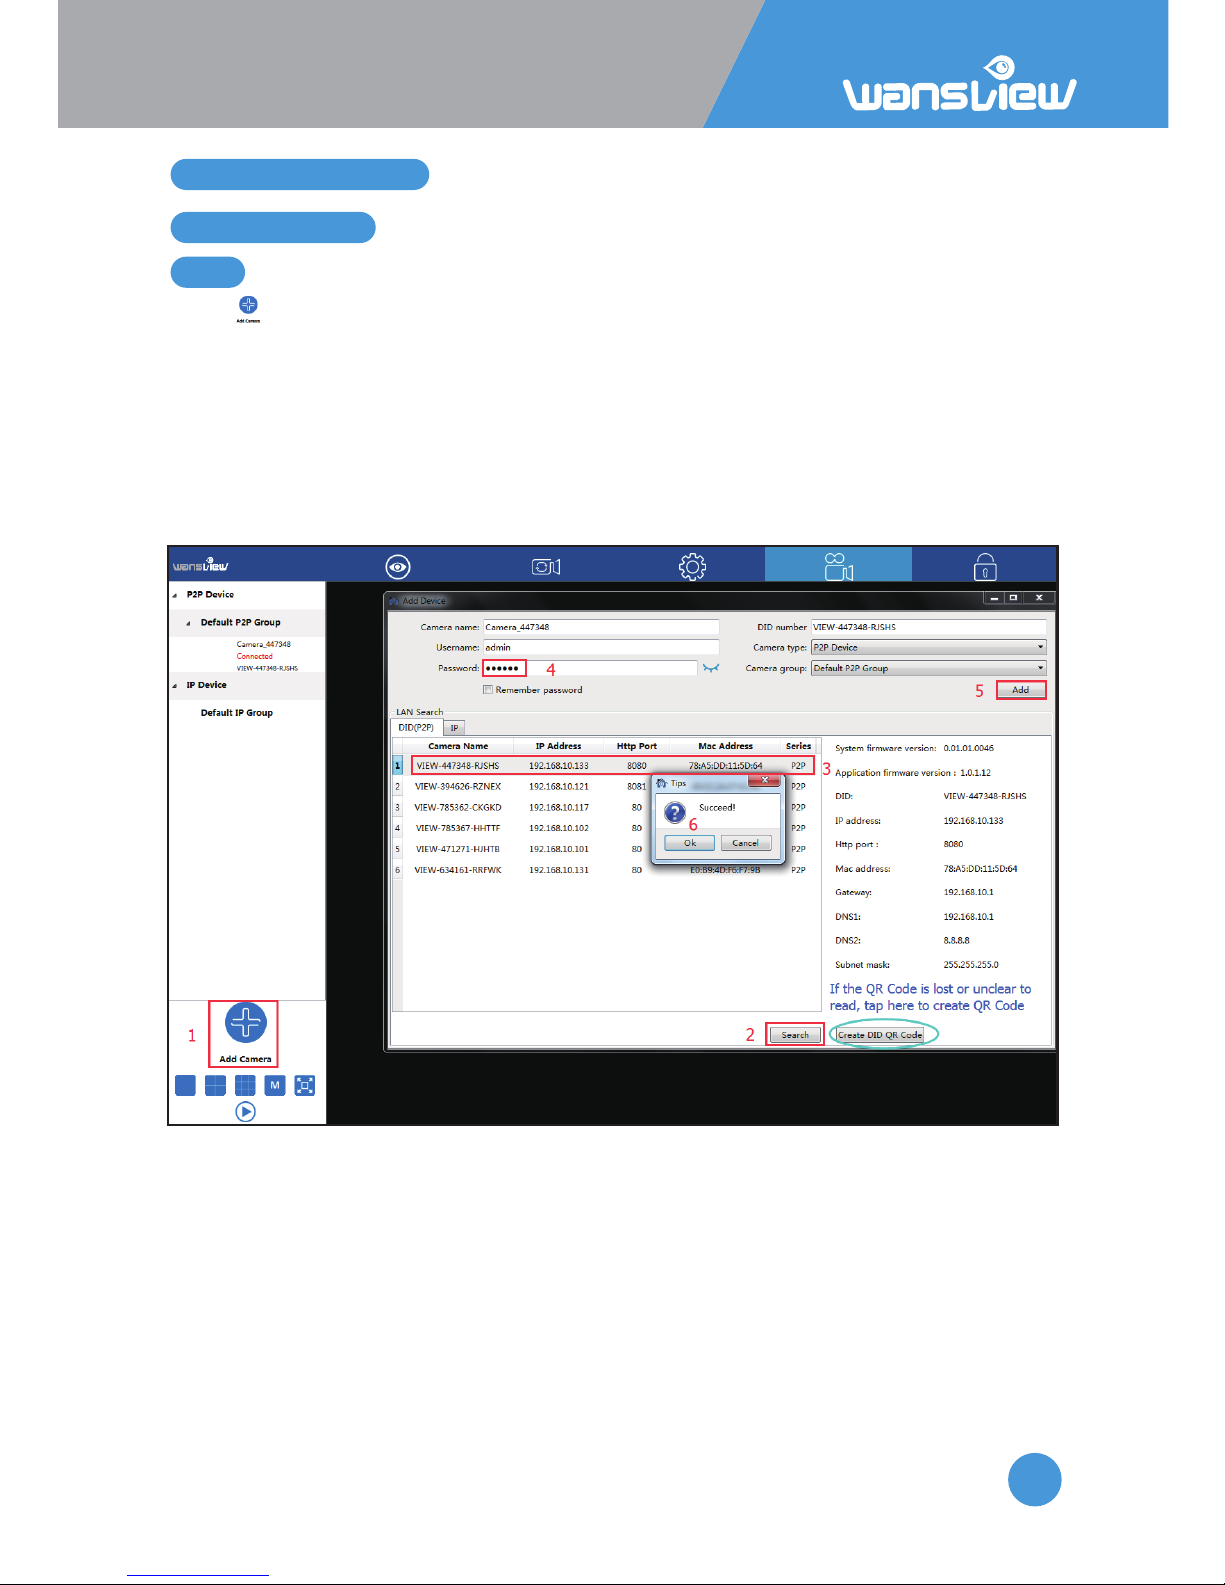
1) Tap to add camera
2) Search the camera in Lan, DID number will be searched if use DID(P2P) to search, while
Search IP will get IP Address
3) Click the searched camera, and the camera informaon will be filled automacally.
4) Input the camera’s password (default is 123456).
5) Hit “Add”.
6) “Save Success” will appear, click “OK” to close the dialog.
Page 26
IP Camera W2(1080P)/W3(720P)
26
3.1.2
Manually add camera (suitable for outside network)
3.2.1
Play Video
3.2 Play/Stop Video
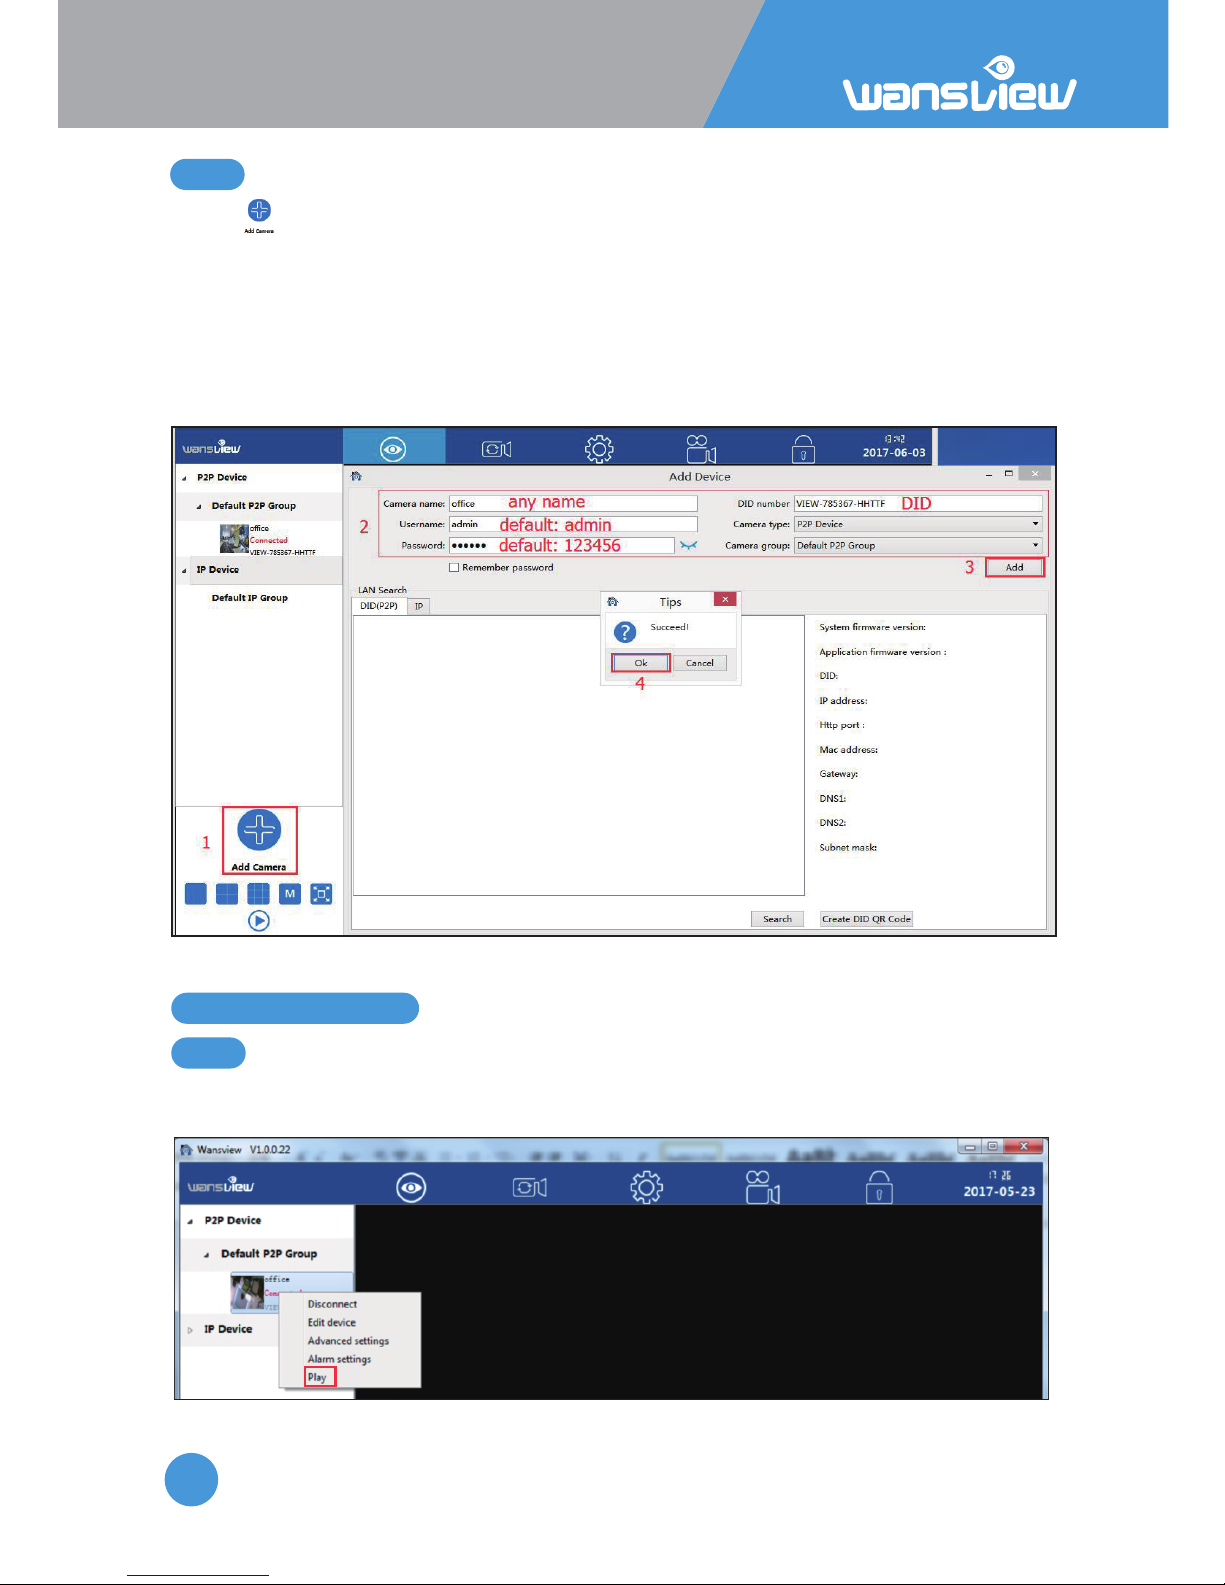
1) Tap to add camera
2) Manually input the camera informaon.
Tips: DID number can be checked from sckers on the back of the camera. You can
check the DID from Wansview app If you have already added the camera on the
mobile phone “wansview” app.
3) Hit “Add”.
4) “Save Success” will appear, click “OK” to close the dialog.
When the camera is connected, double-click the camera or right-click and choose “Play”
to play the video.
Page 27
IP Camera W2(1080P)/W3(720P)
27
3.2.2
Stop Video
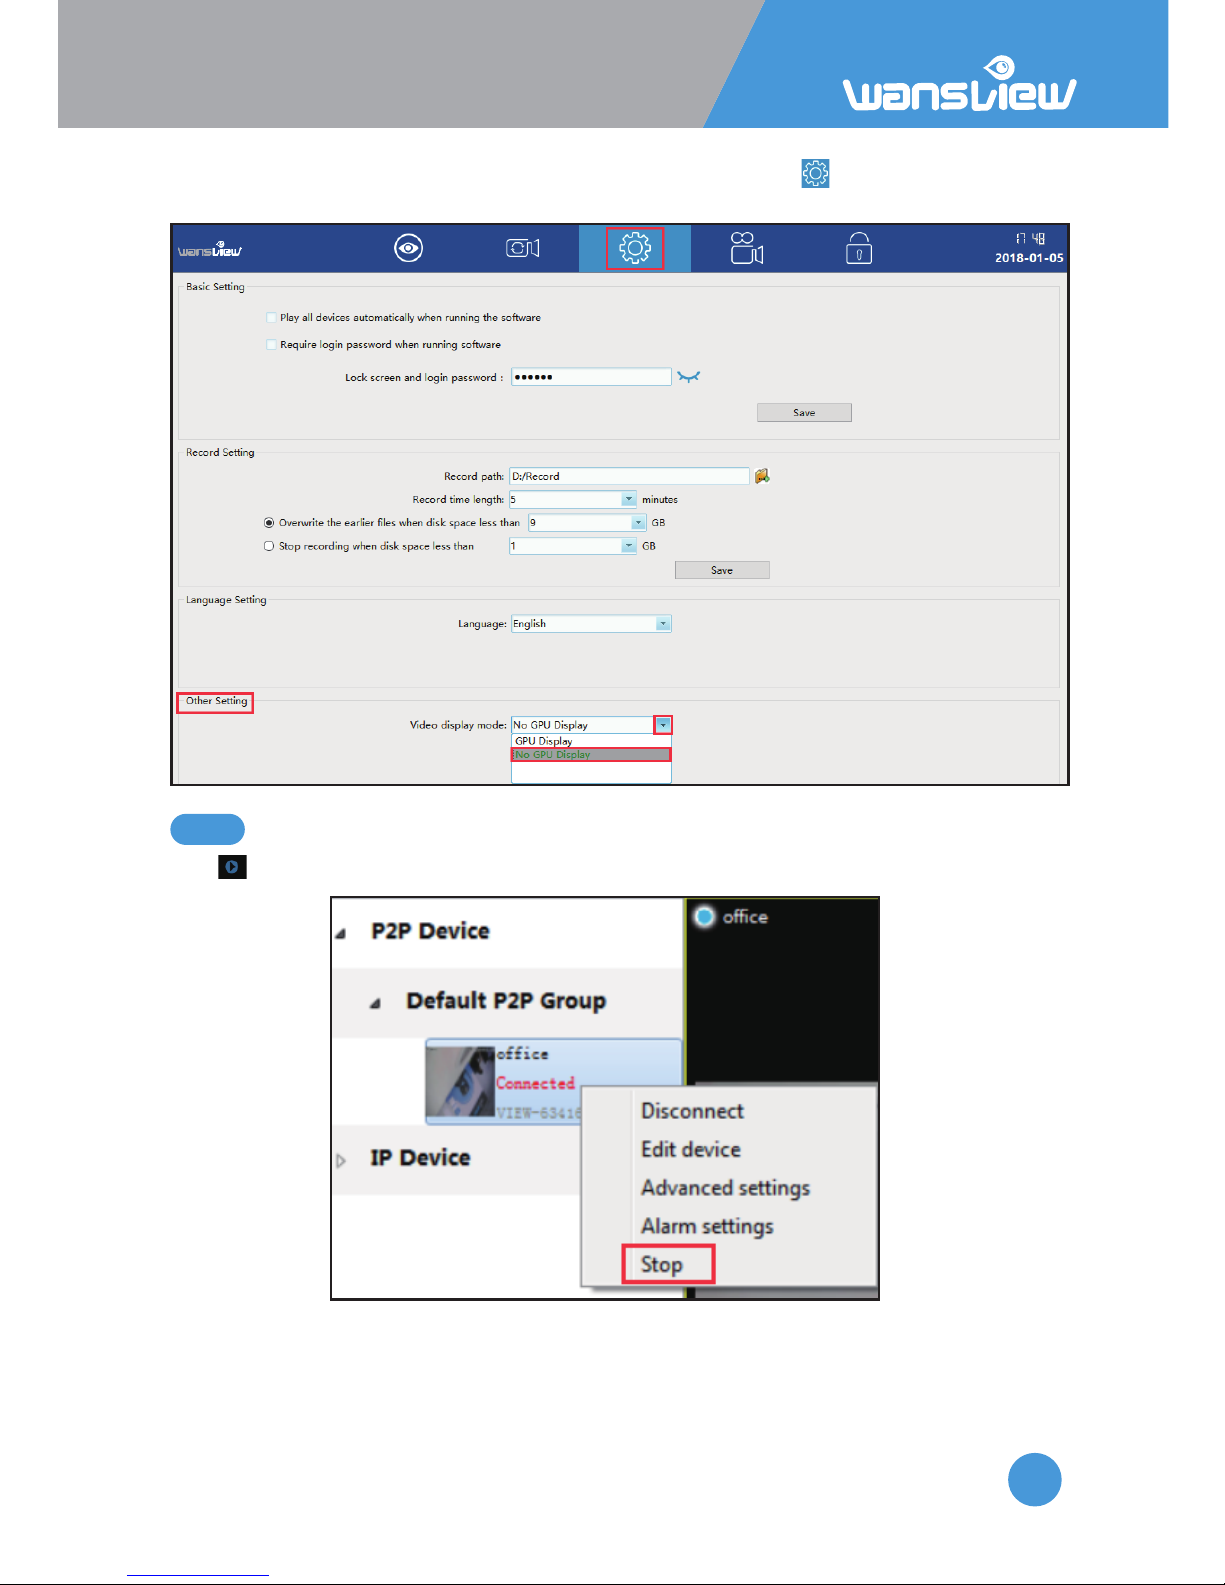
Click to stop the video or right-click the camera and choose “Stop”
When play the video, but only shows black, please go to Seng --Other Seng to choose
the No GPU Display in the Video Display mode.
Page 28
IP Camera W2(1080P)/W3(720P)
28
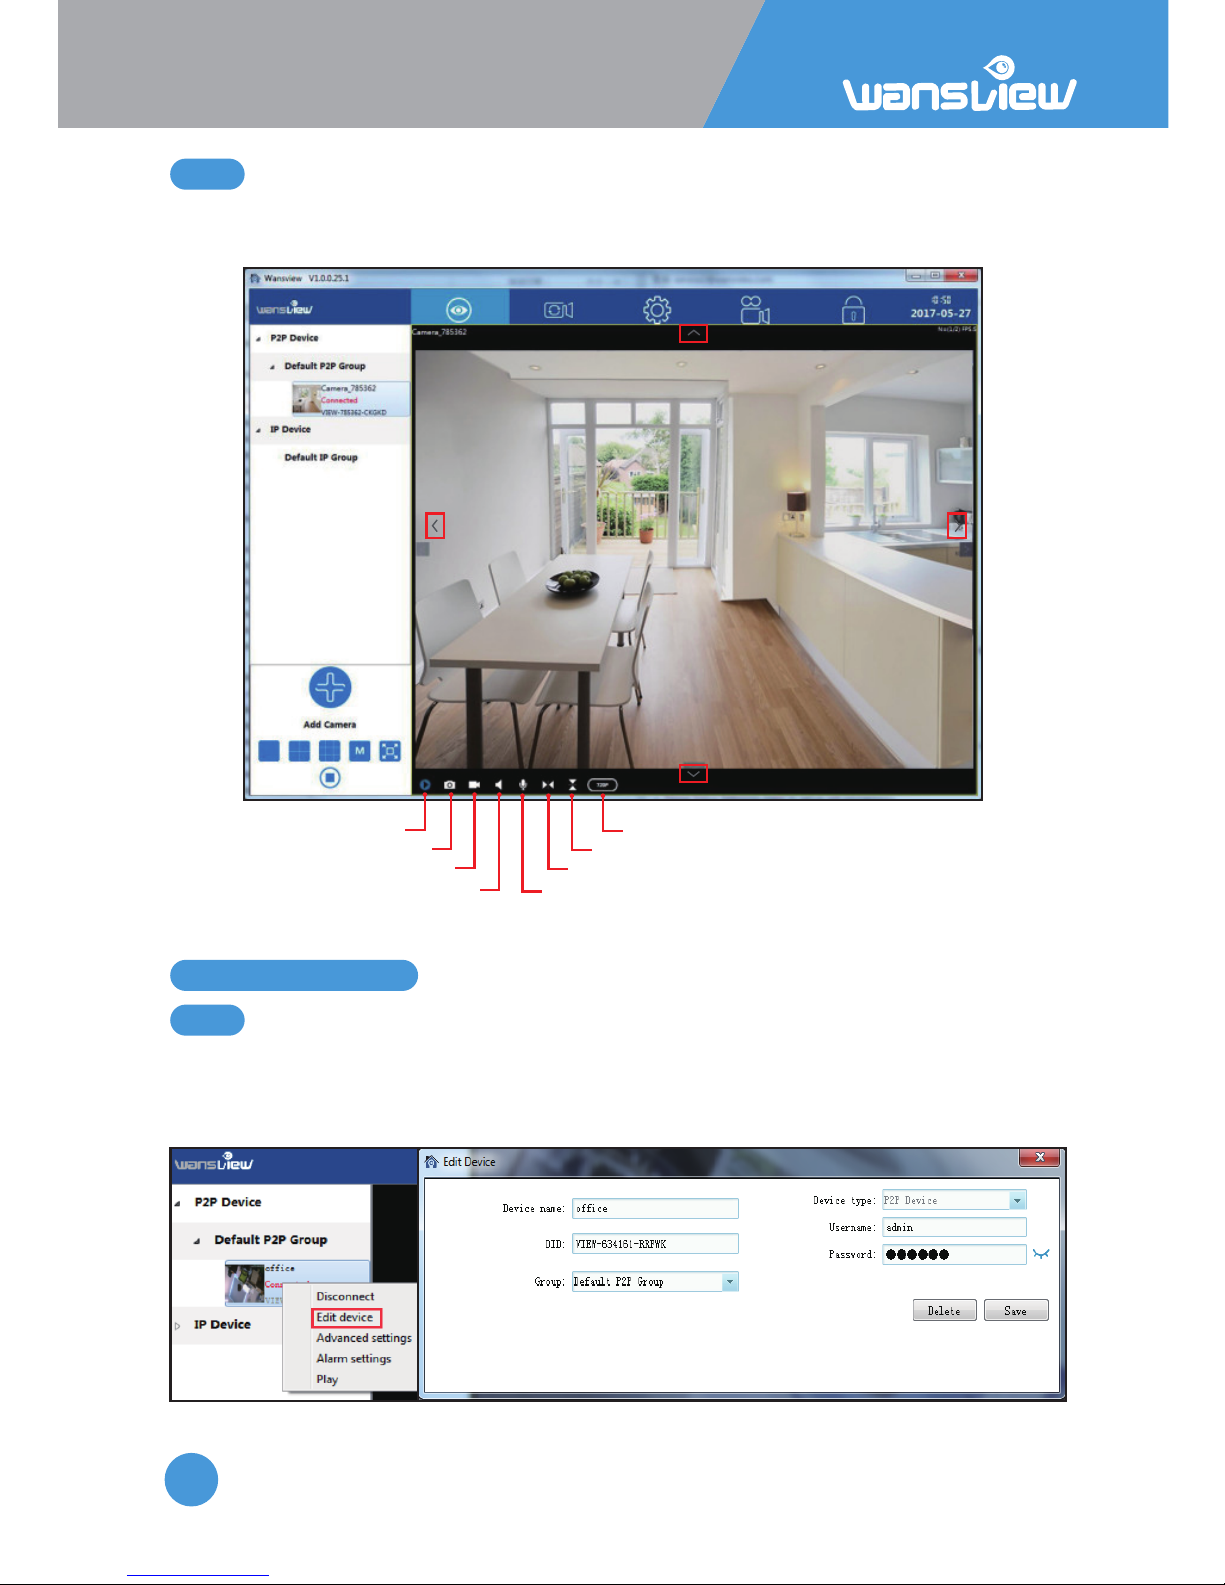
3.2.3
Video Interface
3.3.1
Edit Device
3.3 Camera Sengs
Right-click the camera info and select”Edit Device”, here can change the Device Name and
Group; and edit the username and password if input wrong or changed; delete the device
or Save the parameters you have edited.
Aenon: Resoluon cannot be adjusted during recording, user needs to stop the
recording, then switch the resoluon.
Play/stop
Snap
Record
Listen Talk
Mirror
Flip
Resoluon
up
down
le right
Page 29
IP Camera W2(1080P)/W3(720P)
29
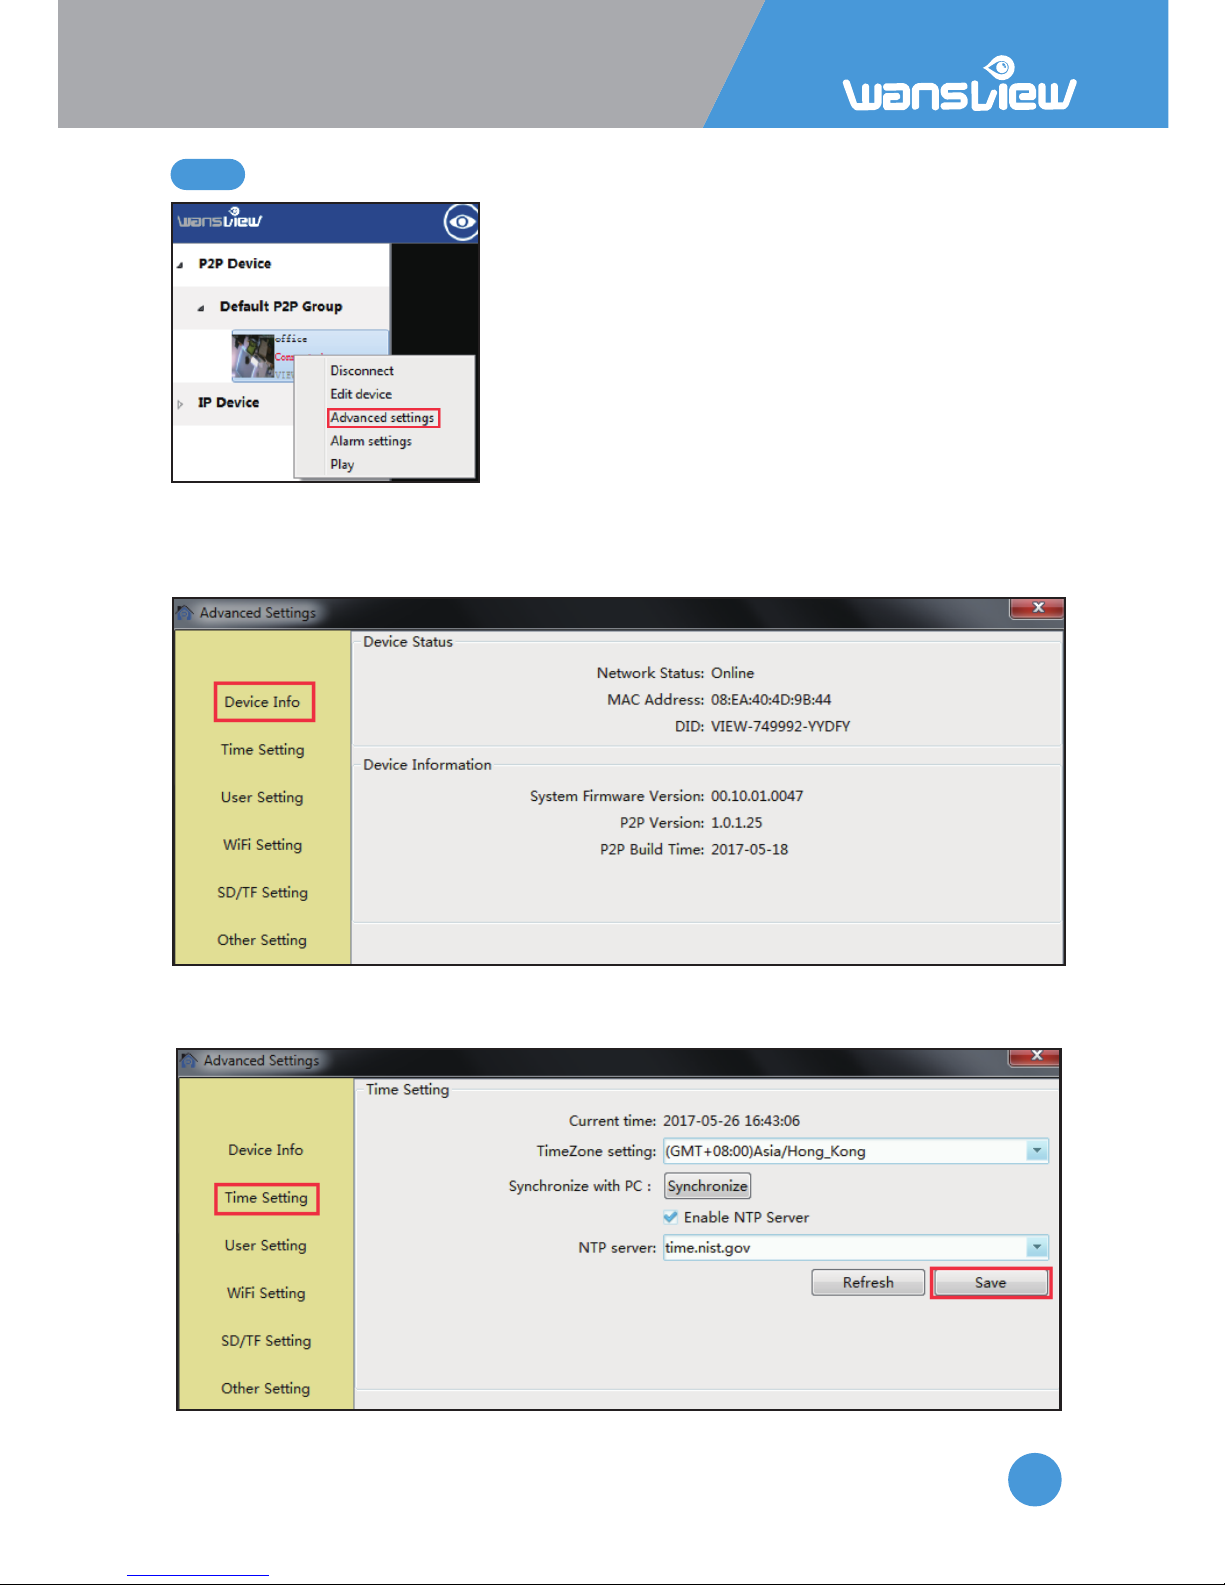
3.3.2
Advanced Sengs
3.3.2.1 Device Info
3.3.2.2 Time Seng
On the Advanced Sengs, user can check camera
firmware version, set up me, create other account for
operater or Visitor, set up WiFi and SD card recording
etc.
User can check the camera status and Mac address, and check the camera’s firmware
version.
User can select a specific me zone, or sync the me to PC or to a NTP Server
Page 30
IP Camera W2(1080P)/W3(720P)
30
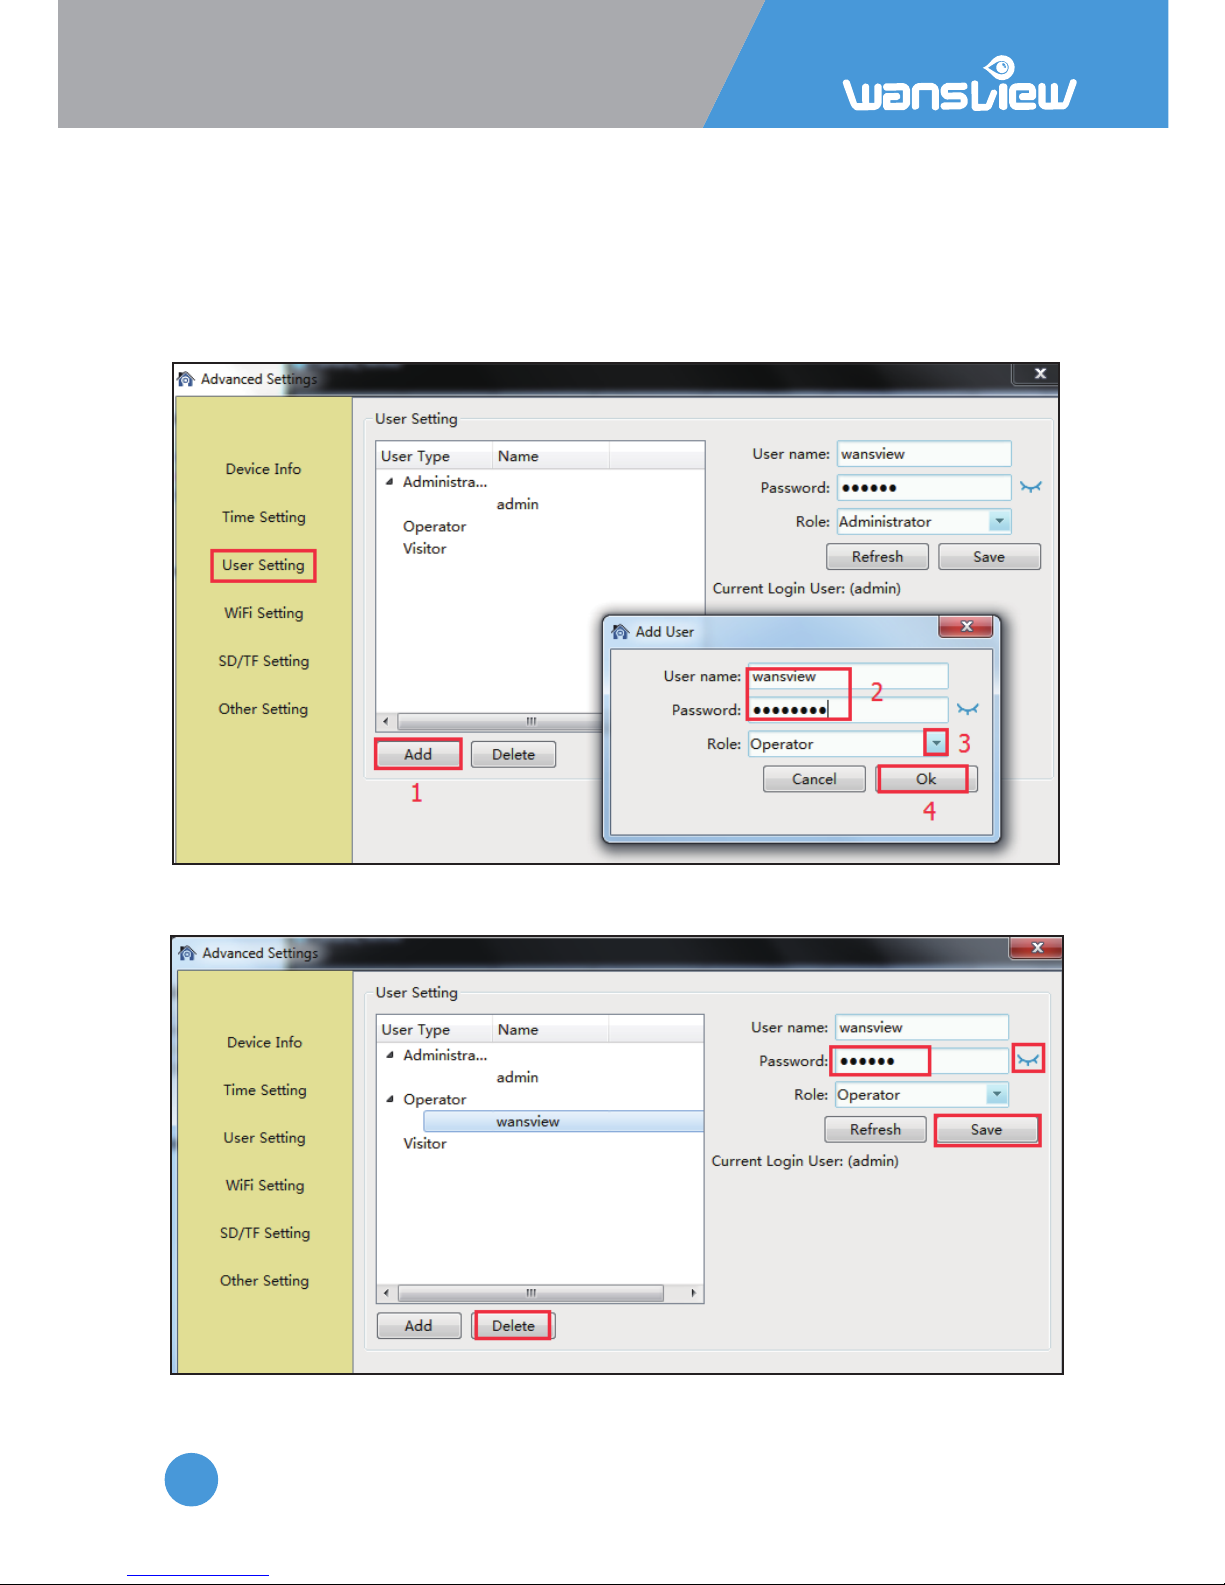
3.3.2.3 User Seng
User can create other accounts for family member or friends in User Seng.
Add an account with user name and password, and give a right to this account.
Tips:
Administrator: All sengs can be edited
Operator: Can operate all the icons (such as listen, talk, flip/mirror) on the live video page.
Visitor: Can only watch live video.
User can also edit the account informaon, such as change the user name and password
and change the role for each account, then Save. And Delete some accounts if you need.
Page 31
IP Camera W2(1080P)/W3(720P)
31
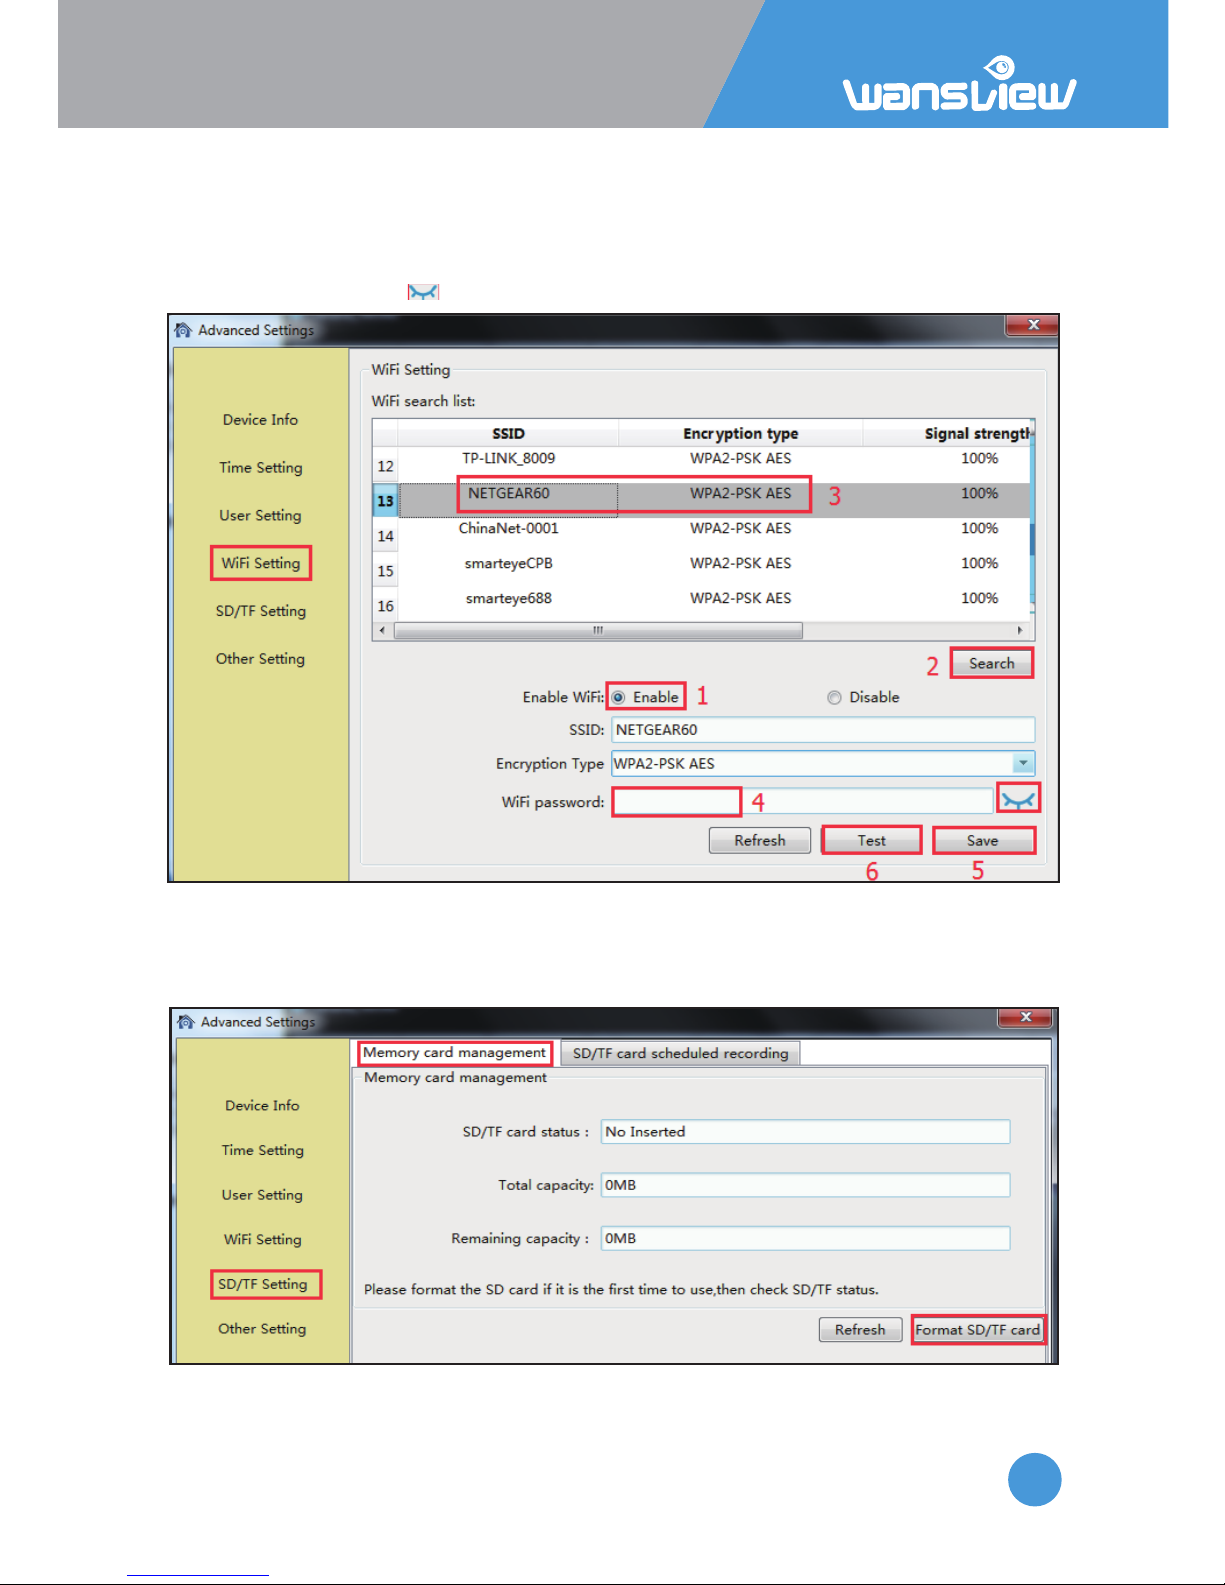
3.3.2.4 Unavailable for W2/W3
User can set up WiFi for the camera is connected Ethernet cable, or change to other
available WiFi.
Search the available WiFi, and choose the one you want to connect, then input the WiFi
password (click the icon behind to confirm if the password is correct). Save then Test.
3.3.2.5 SD/TF Seng
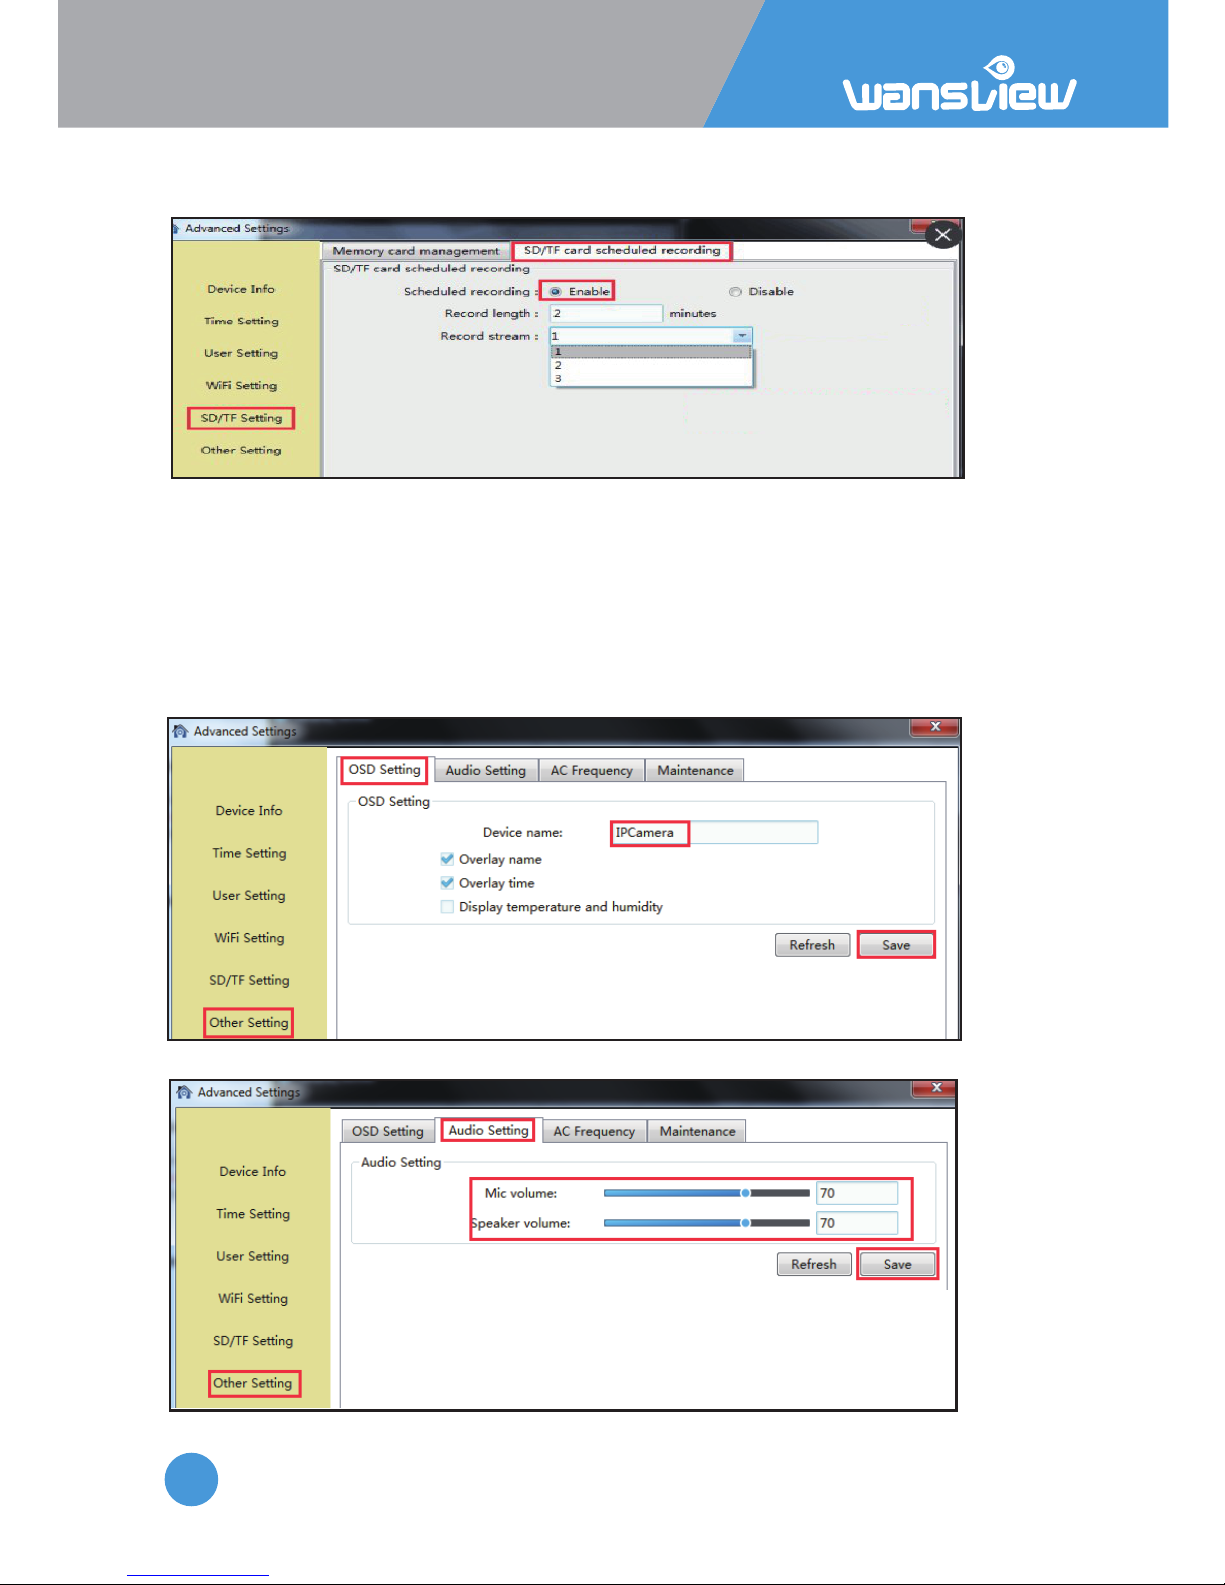
Open the Plan Record, it will record connuously to SD card, each record length can be set between
2-15 minutes. The video stream can be recorded at 1080p(720p), 480p and 240p.
Page 32
IP Camera W2(1080P)/W3(720P)
32
the record length can be set 2-15 minutes
User can record video to SD card.
Before recording, please kindly make sure you have inserted a SD card, and format it.
3.3.2.6 Other Seng
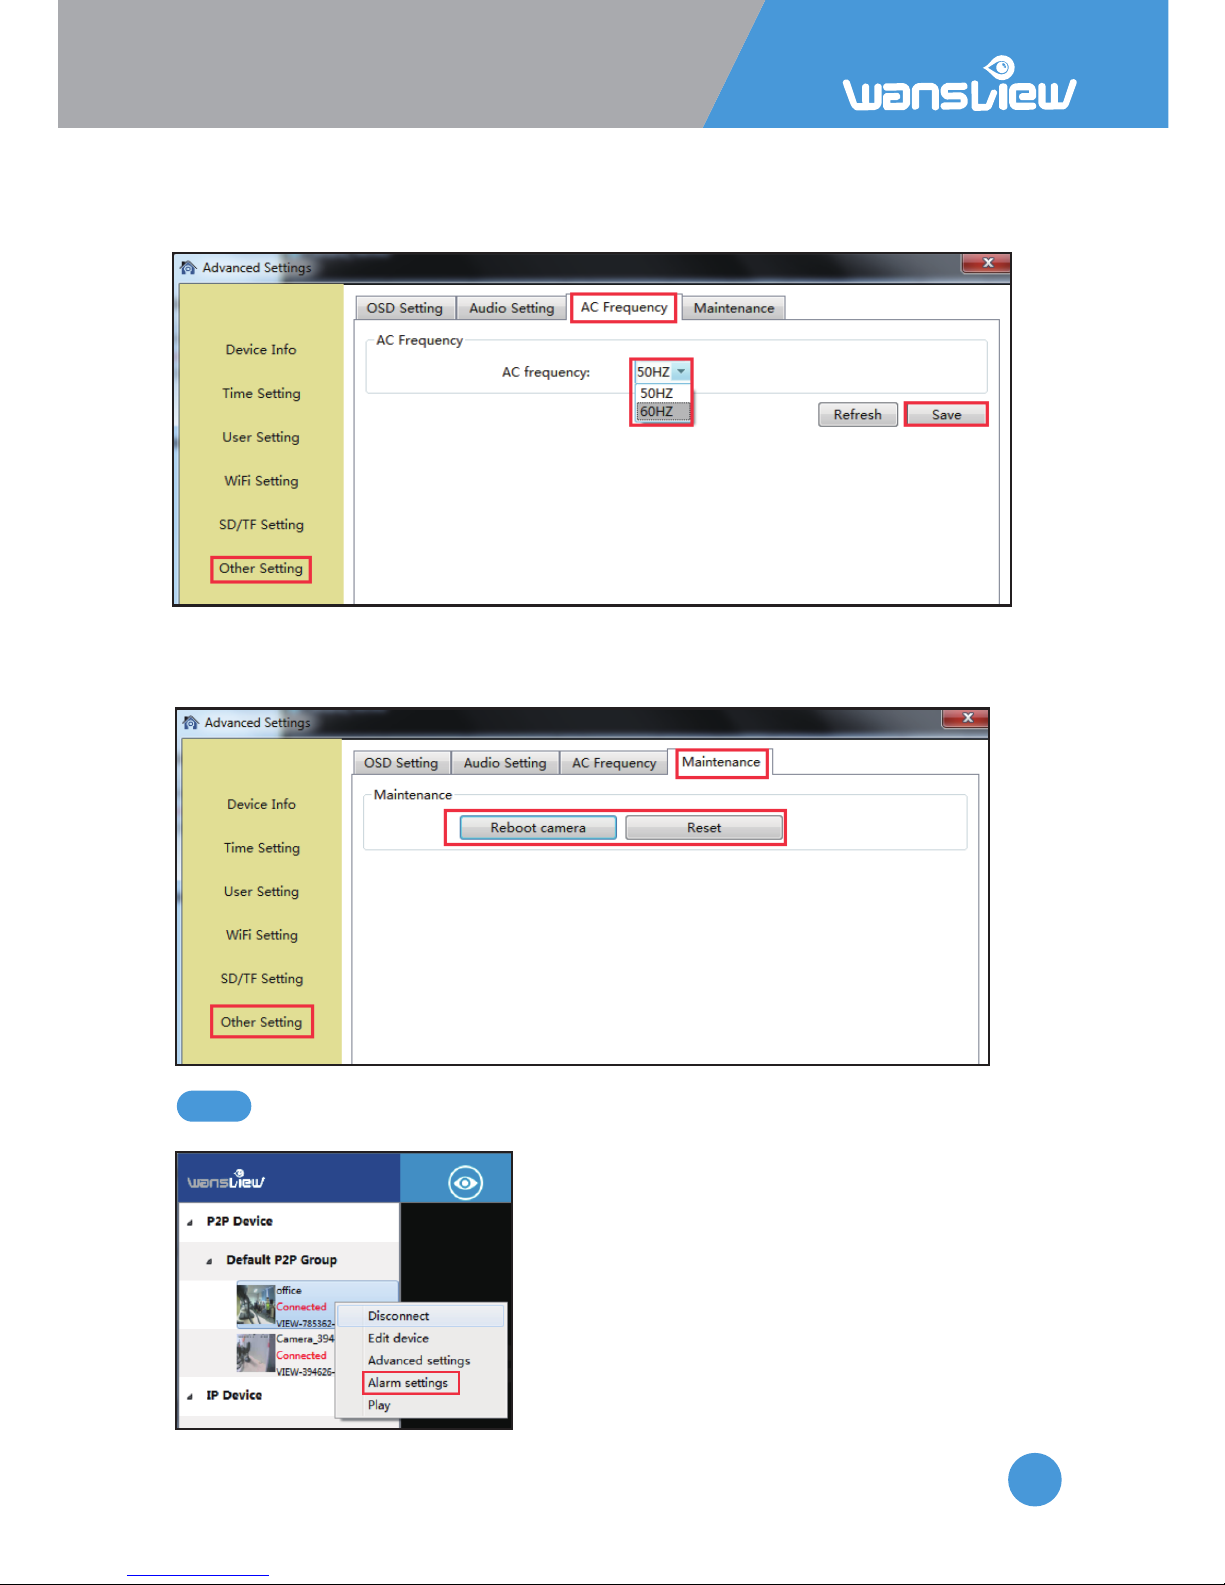
1) OSD seng
On the OSD seng, users can set up the Overlay name and Overlay me, so user can
check name and me on the video screen.
If Overlay name and Overlay me and Display temperature and humidity are checked at
the same, the Device name will show Temperature and Humidity.
Note: The temperature and humidity are unavailable on this model.
2) Audio
User can adjust the power frequency, Power frequencies
include: 50HZ(220V voltage selects 50HZ), 60HZ(110V
voltage selects 60HZ), 60HZ used in Japan, Canada etc
Page 33
IP Camera W2(1080P)/W3(720P)
33
3.3.3
Alarm Seng
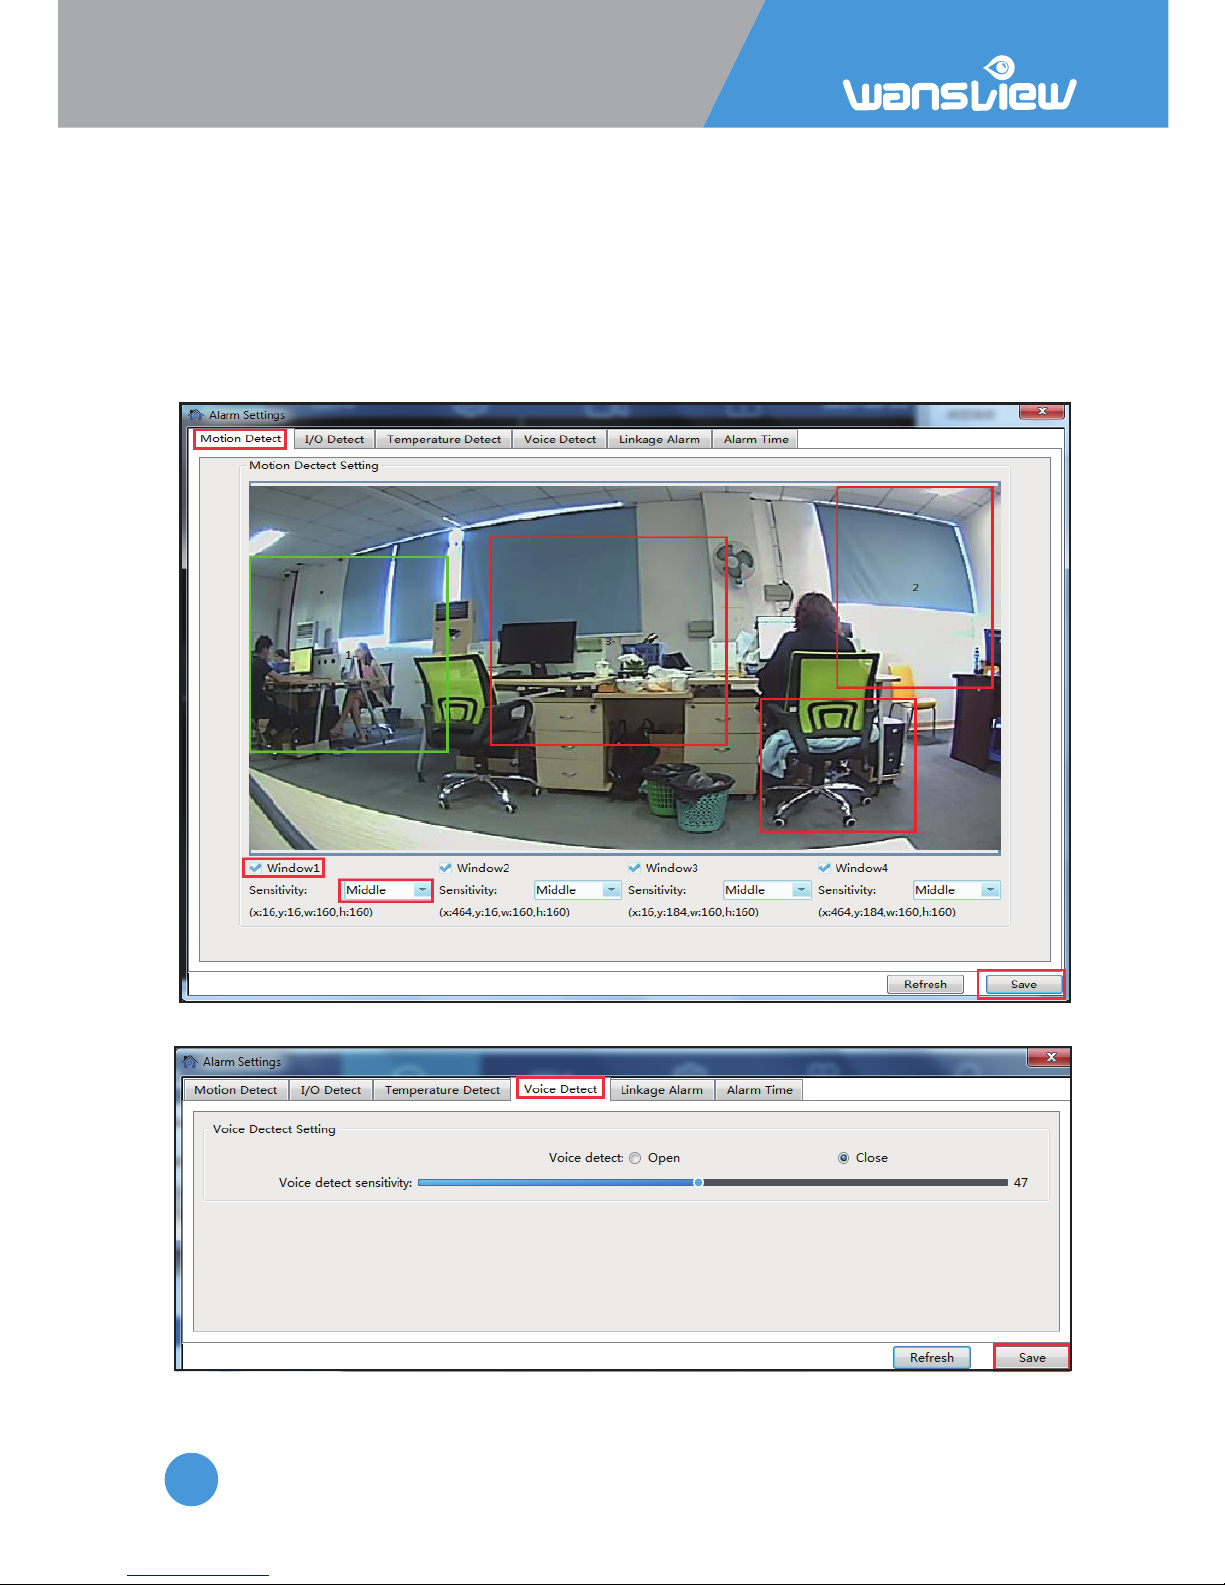
3) AC Frequency
User can adjust the power frequency, Power frequencies include: 50HZ(220V voltage
selects 50HZ), 60HZ(110V voltage selects 60HZ), 60HZ used in Japan, Canada etc.
4) Maintenance
User can reboot and reset (restore) the camera.
Tips: To reset the camera, the camera will restore to factory seng.
In the Alarm Seng, use can set up the Alarm alert.
Page 34
IP Camera W2(1080P)/W3(720P)
34
3.3.3.1 Moon Detecon
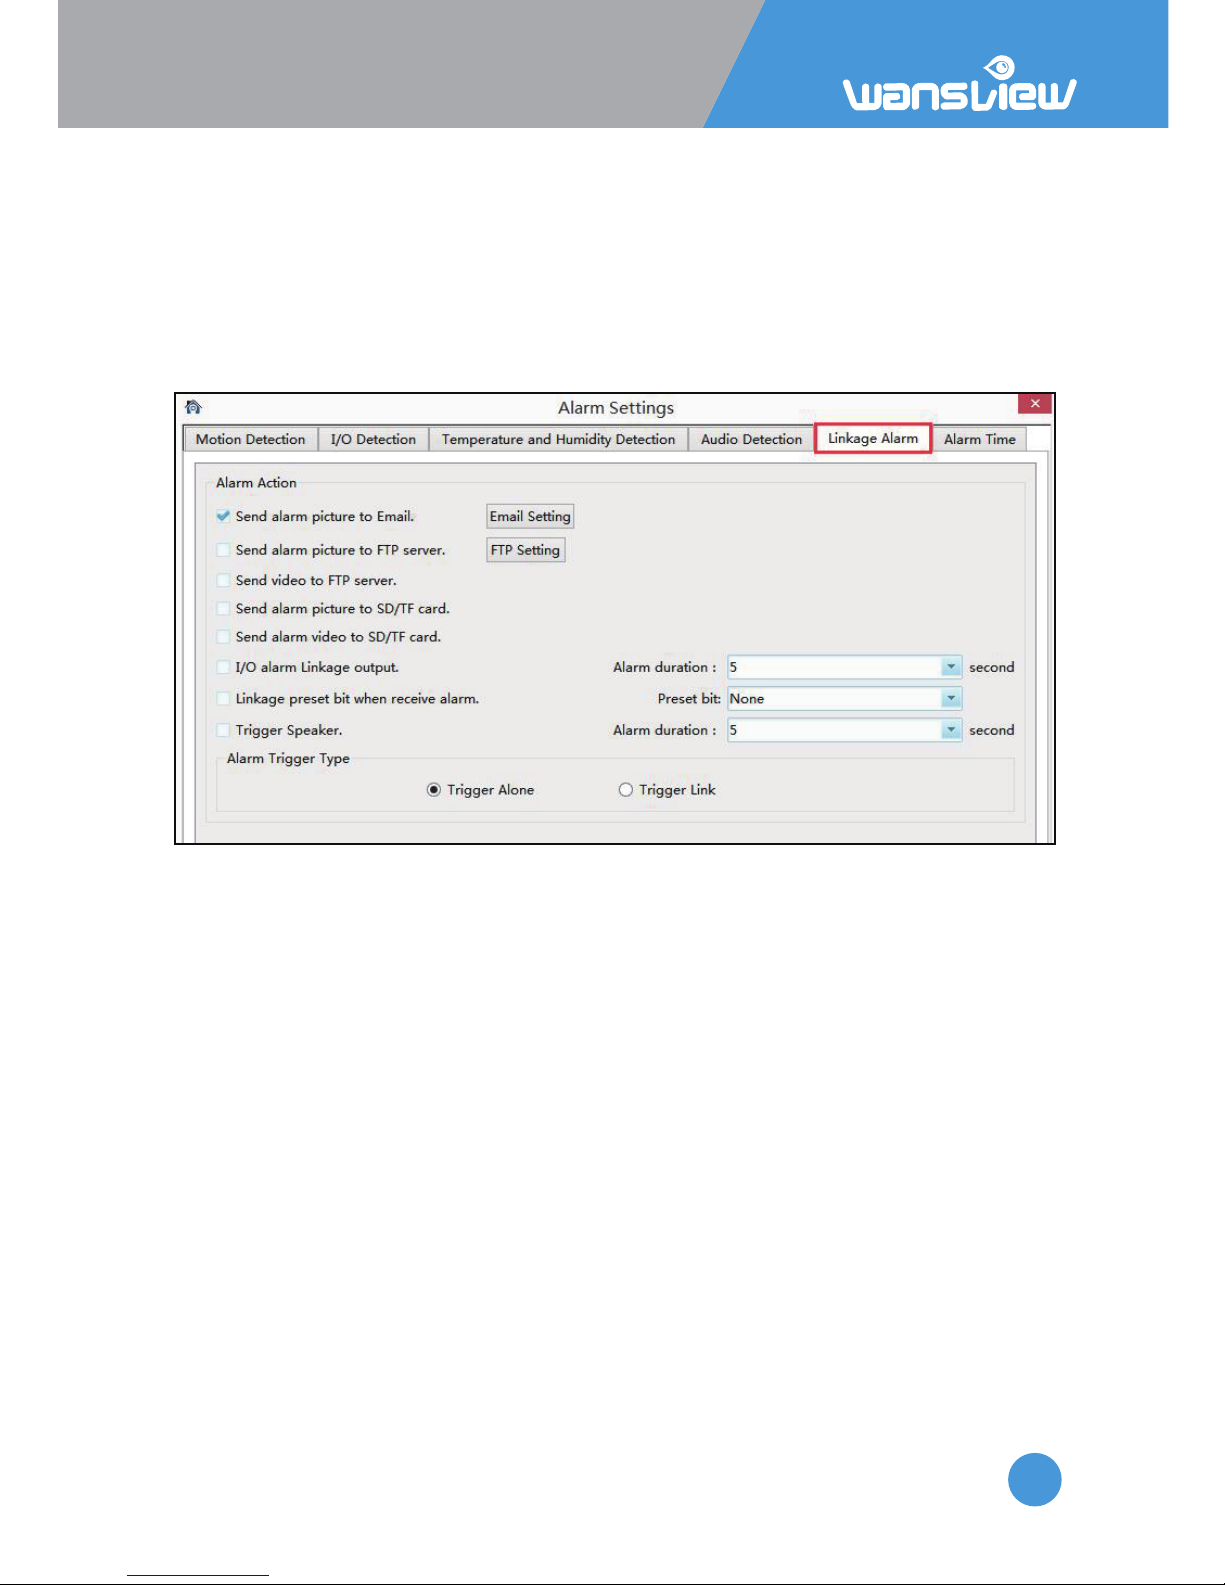
User can set up moon detecon area here to narrow the moon detected area to some
important places, ck each window, move your mouse to the lower right corner and drag
it can adjust the size of the window, and can move it to the needed area.
User can choose the sensivity from low, middle and high. The high sensivity will be easy
to get alarm.
I/O Detecon and Temperature Detecon are disabled in this model.
3.3.3.2 Audio Detecon
Page 35
IP Camera W2(1080P)/W3(720P)
35
3.3.3.3 Linkage Alarm
If user set up alarm, the camera will execute a variety of alarm acons at linkage: snap to
email, snapshot and video to FTP, snap and video to SD card.
And if you connect external I/O alarm device, it can trigger alarm too.
Tips: The method of”Trigger Alone” and “Combinaon Trigger”, if the user starts up an
audio detecon and moon detecon, the “Combinaon Trigger” will be started up. Only
when any abnormality is detected simultaneously by the audio detecon and moon
detecon will the alarm acon be triggered.
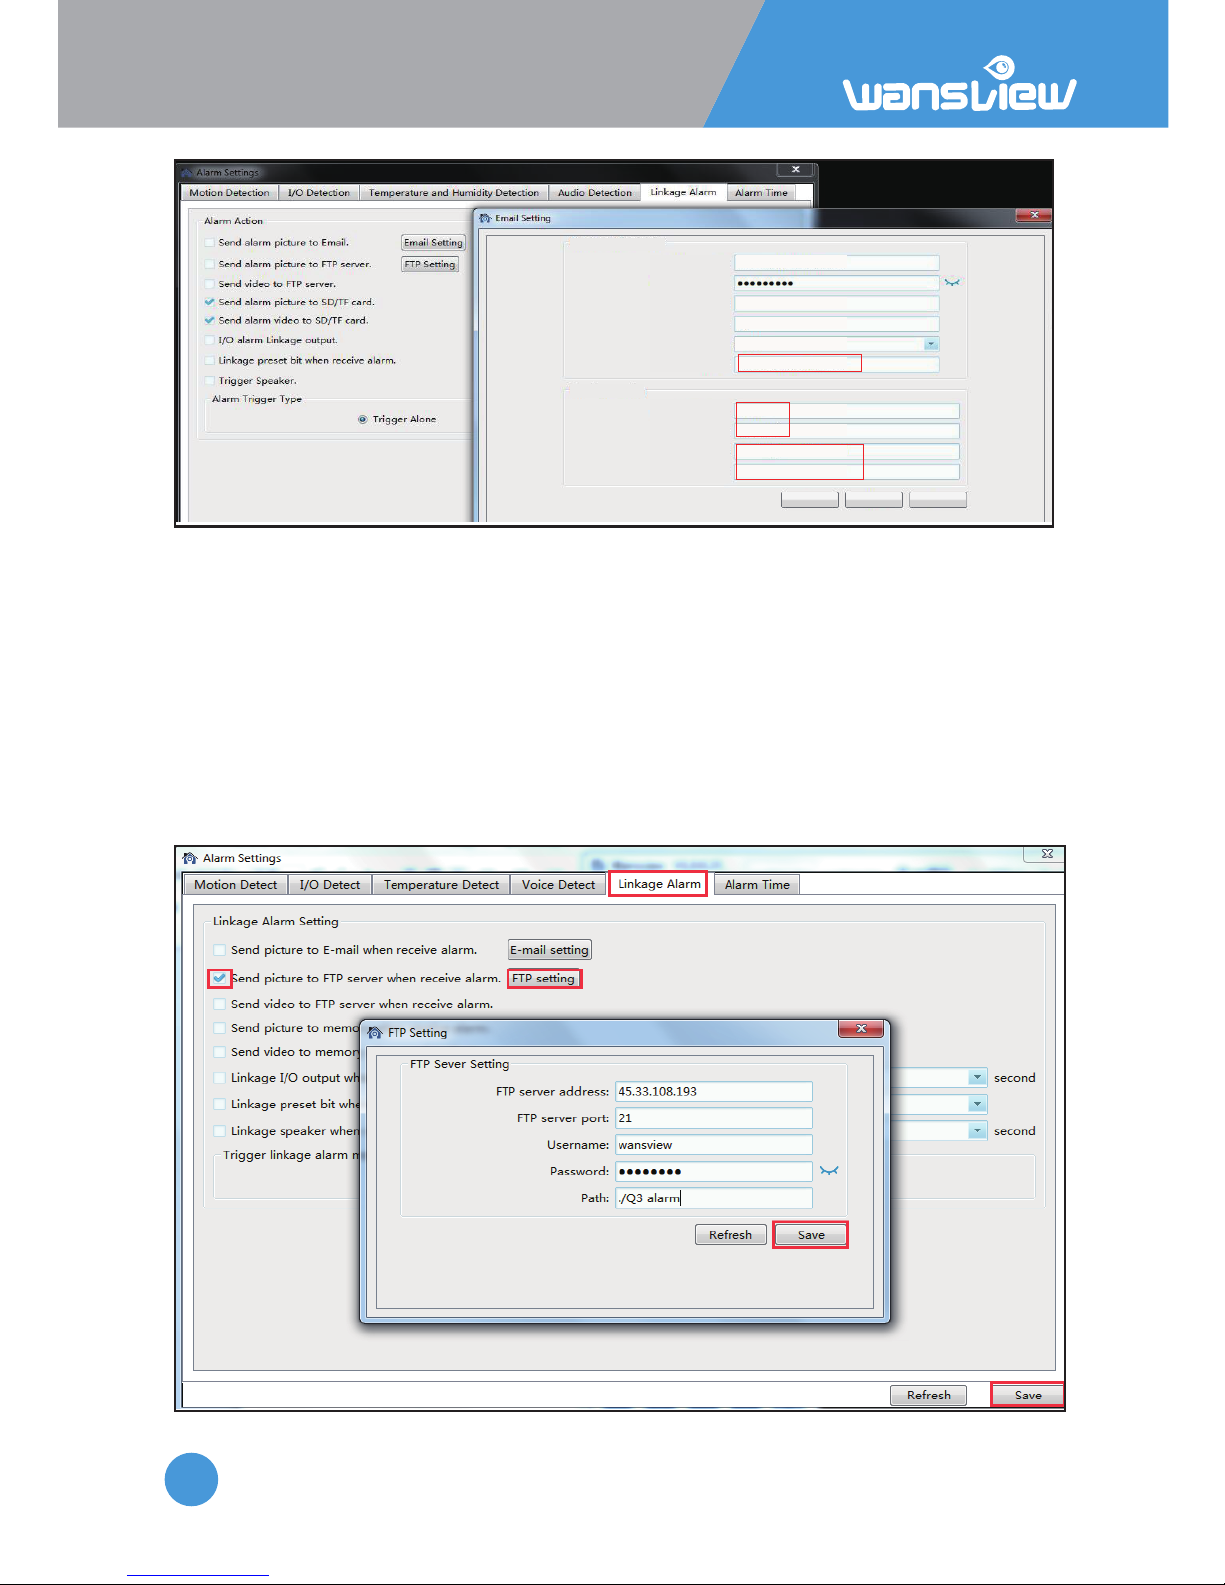
1)Email seng
Email address: your email address.
Email Password: your email password, if you are using Gmail, please generate an app
password, and using the app password. Download a document from our website on
how to set up app password.
Smtp Server: such as smtp.gmail.com etc.
Smtp port: 465 or 587
Security Type: SSL
Sender: your email address, the same with sender
E-mail subject and content can be any informaon
Receiver: any email address
Aer all the informaon are filled in, click “Save” and “Test” the email to see if the
email seng is successful or not.
Page 36
IP Camera W2(1080P)/W3(720P)
36
2)FTP Seng
Email address:
Email Sender setting
Receiver Setting
Email Password:
SMTP Server:
SMTP Port:
Security Type:
Sender:
E-mail subject:
E-mail content:
Receiver 1:
Receiver 2:
Test Refresh Save
smtp.qiye.163.com
25
NONE
alarm
Q3 alarm
any information
any email
email, it should be the same
with "Email address"
2)FTP Seng
FTP Server Address: This field allows the user to designate an IP address or DDNS address
for the FTP server.
Server Port: This field allows the user to designate the port number for the FTP server.
User Name: Input FTP user name.
Password: Input FTP password.
Path: Specify a folder for storing video and pictures, for example: ./Q3 alarm
Note: If you want to save the alarm picture and video to FTP, you must build an FTP sever,
then create an FTP account with a password (not an anonymous account) on your FTP
server and FTP account must have create and delete file rights.
Page 37
IP Camera W2(1080P)/W3(720P)
37
3.3.4
Web Access
3.3.3.4 Alarm Time
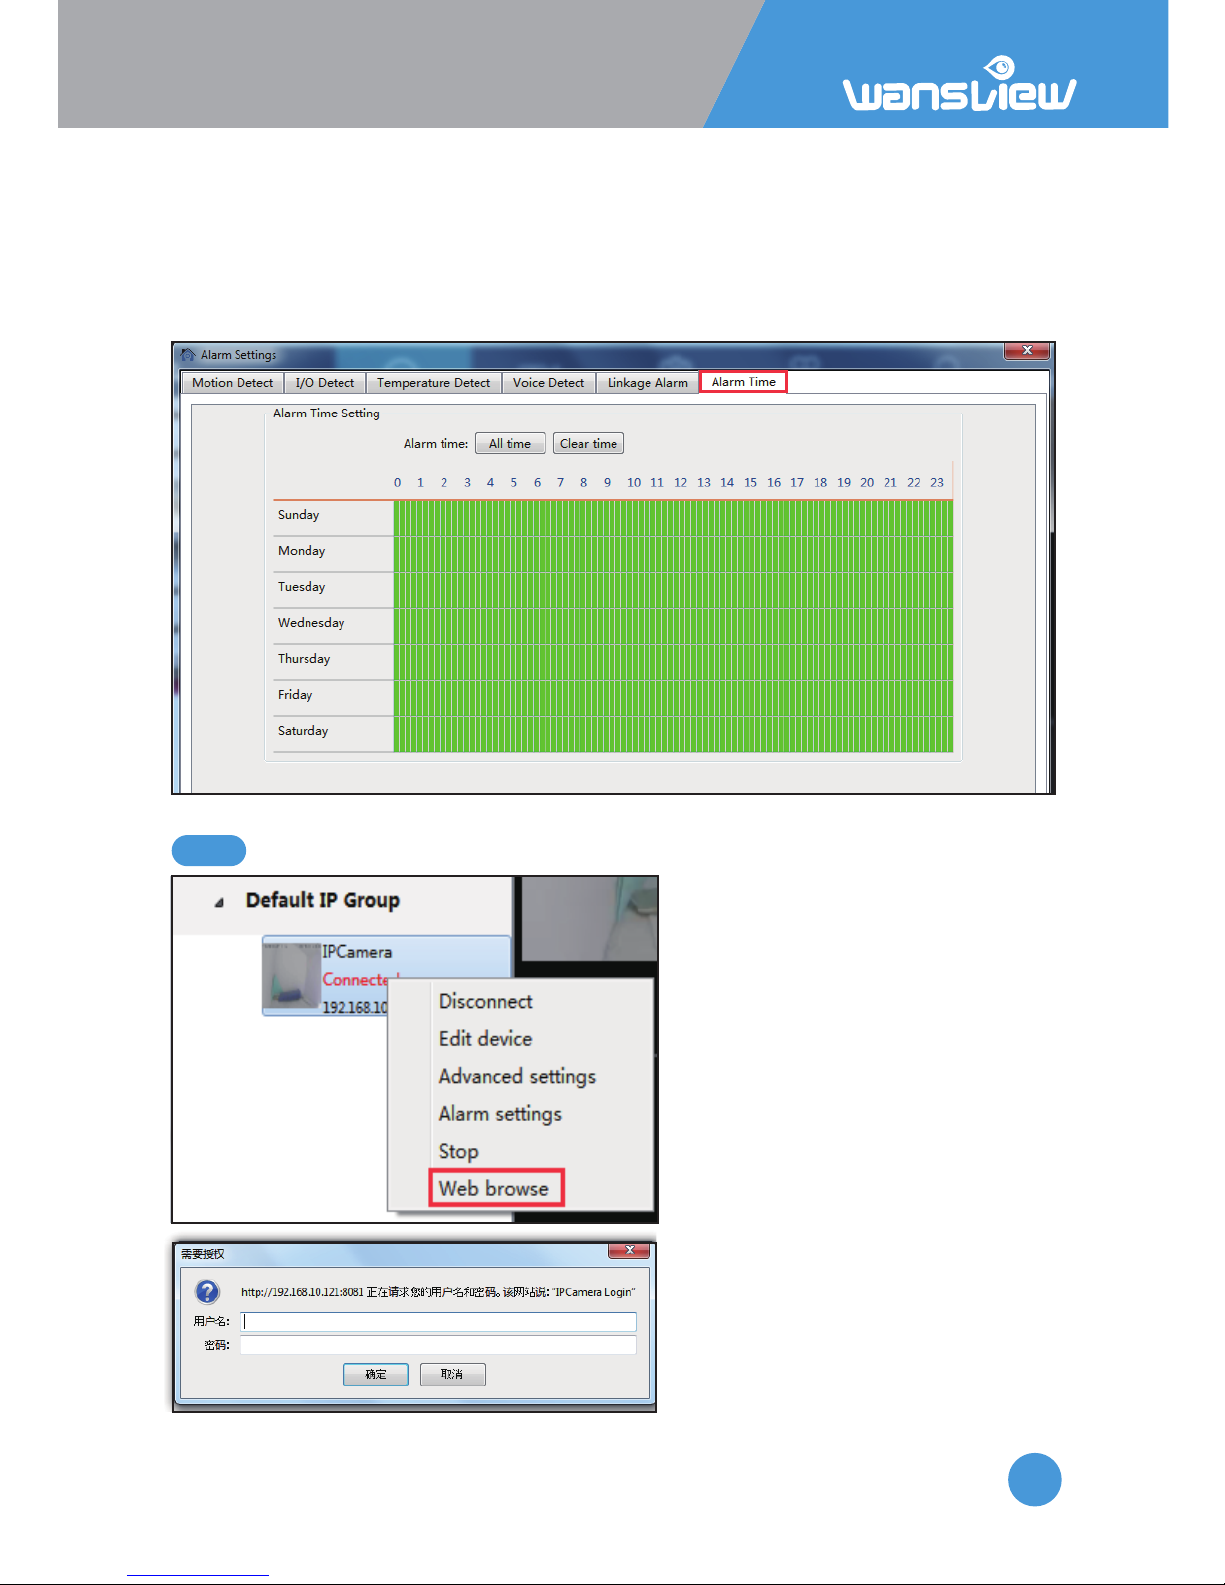
Aer seng the type of alarm and alarm acon, please set up the alarm me, the alarm
acon can only be triggered when armed. The Green color means the me is armed. User
can choose “All Time” or “Clear Time”, and can also choose a specific me. 15 mintues for
a interval. The user can drag the mouse to perform connuous selecon of the arming
me.
If the camera is added via IP Address,
right click and select web access can
access the camera with default
browser.
Tips: The Edge is not supported,
please use Internet Explorer or
Firefox or Chrome.
Page 38
IP Camera W2(1080P)/W3(720P)
38
3.4 Mul-View
3.5 Local Seng
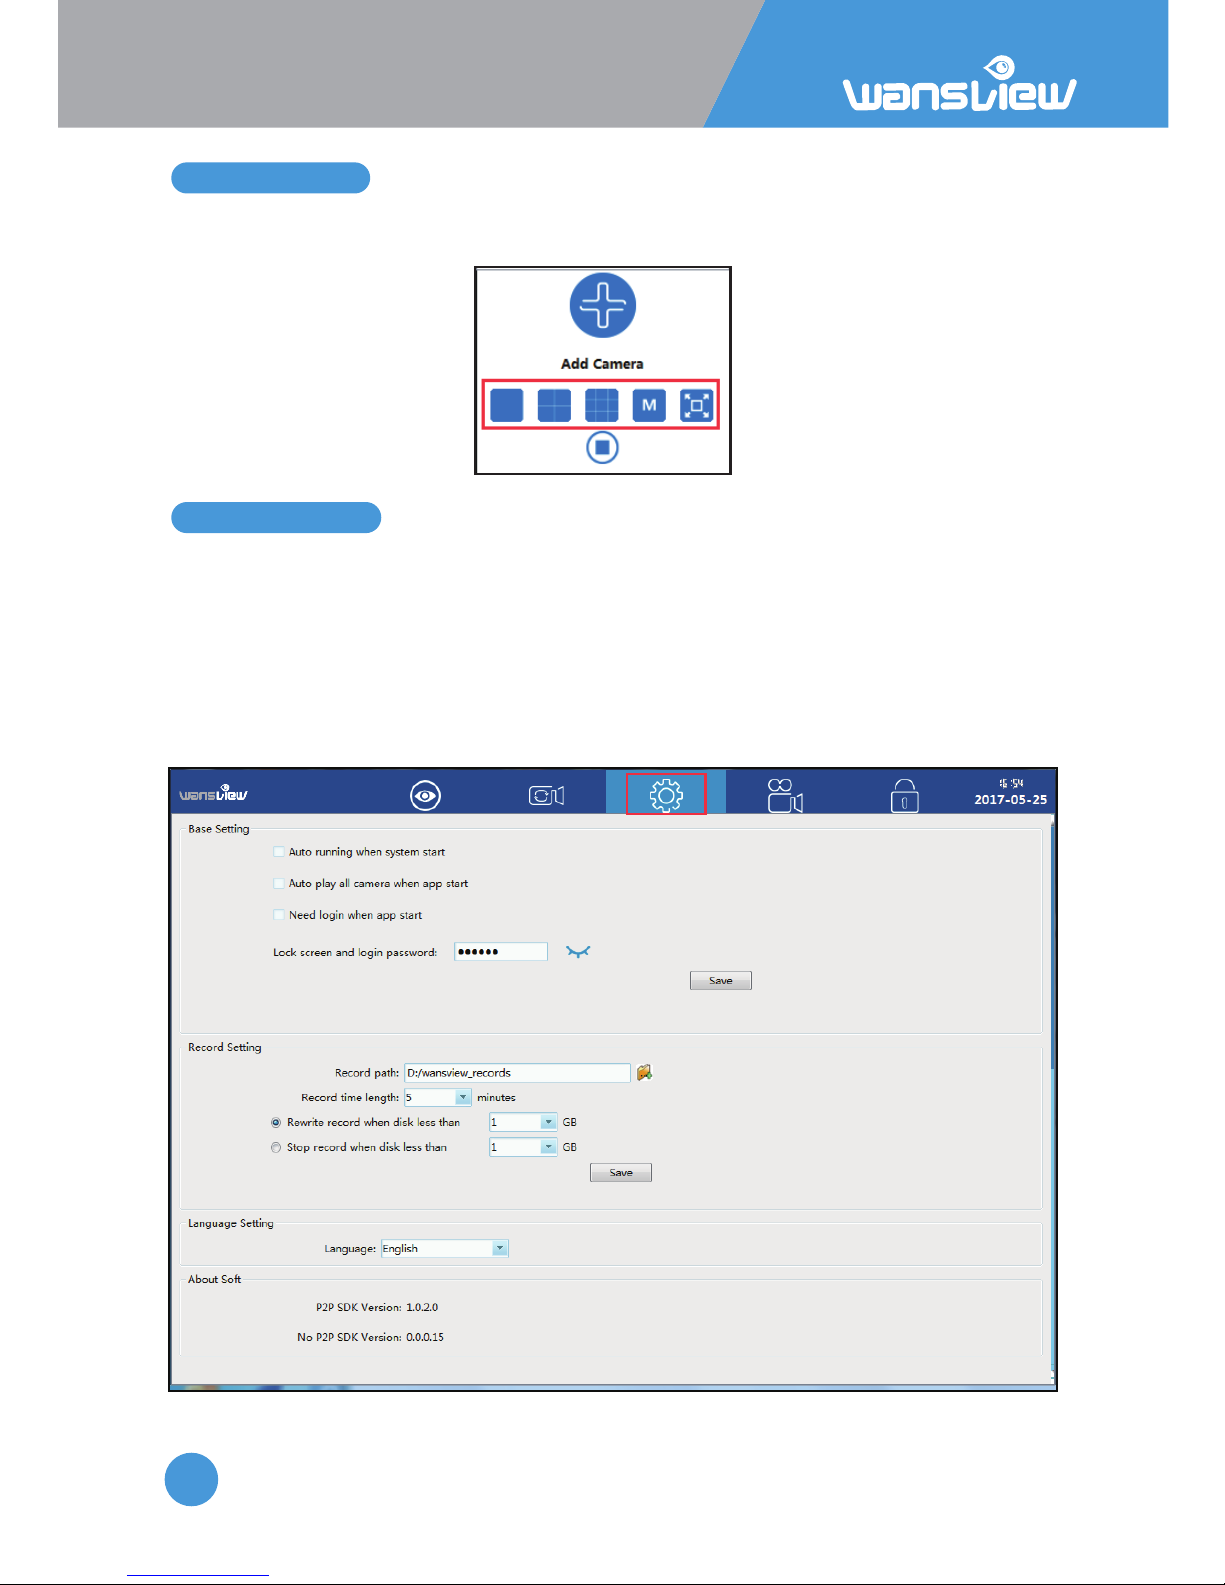
User can monitor mulple cameras at the same me, 4-screen, 9-screen, M(6, 8,16, 25,
36) and full screen can be set up according to different demands
About soware:
Basic seng:
User can set up lock screen password in case you won’t let others to see the video.
Record seng:
User can set the Record path, and each recorded video can be set from 5-60 minutes.
Recorded video can be overwrited or stopped if the computer disk storage is not enough.
Language seng:
The language can be switched from English and Chinese.
More Languages will be added very soon.
Page 39
IP Camera W2(1080P)/W3(720P)
39
3.6 Scheduled Recording
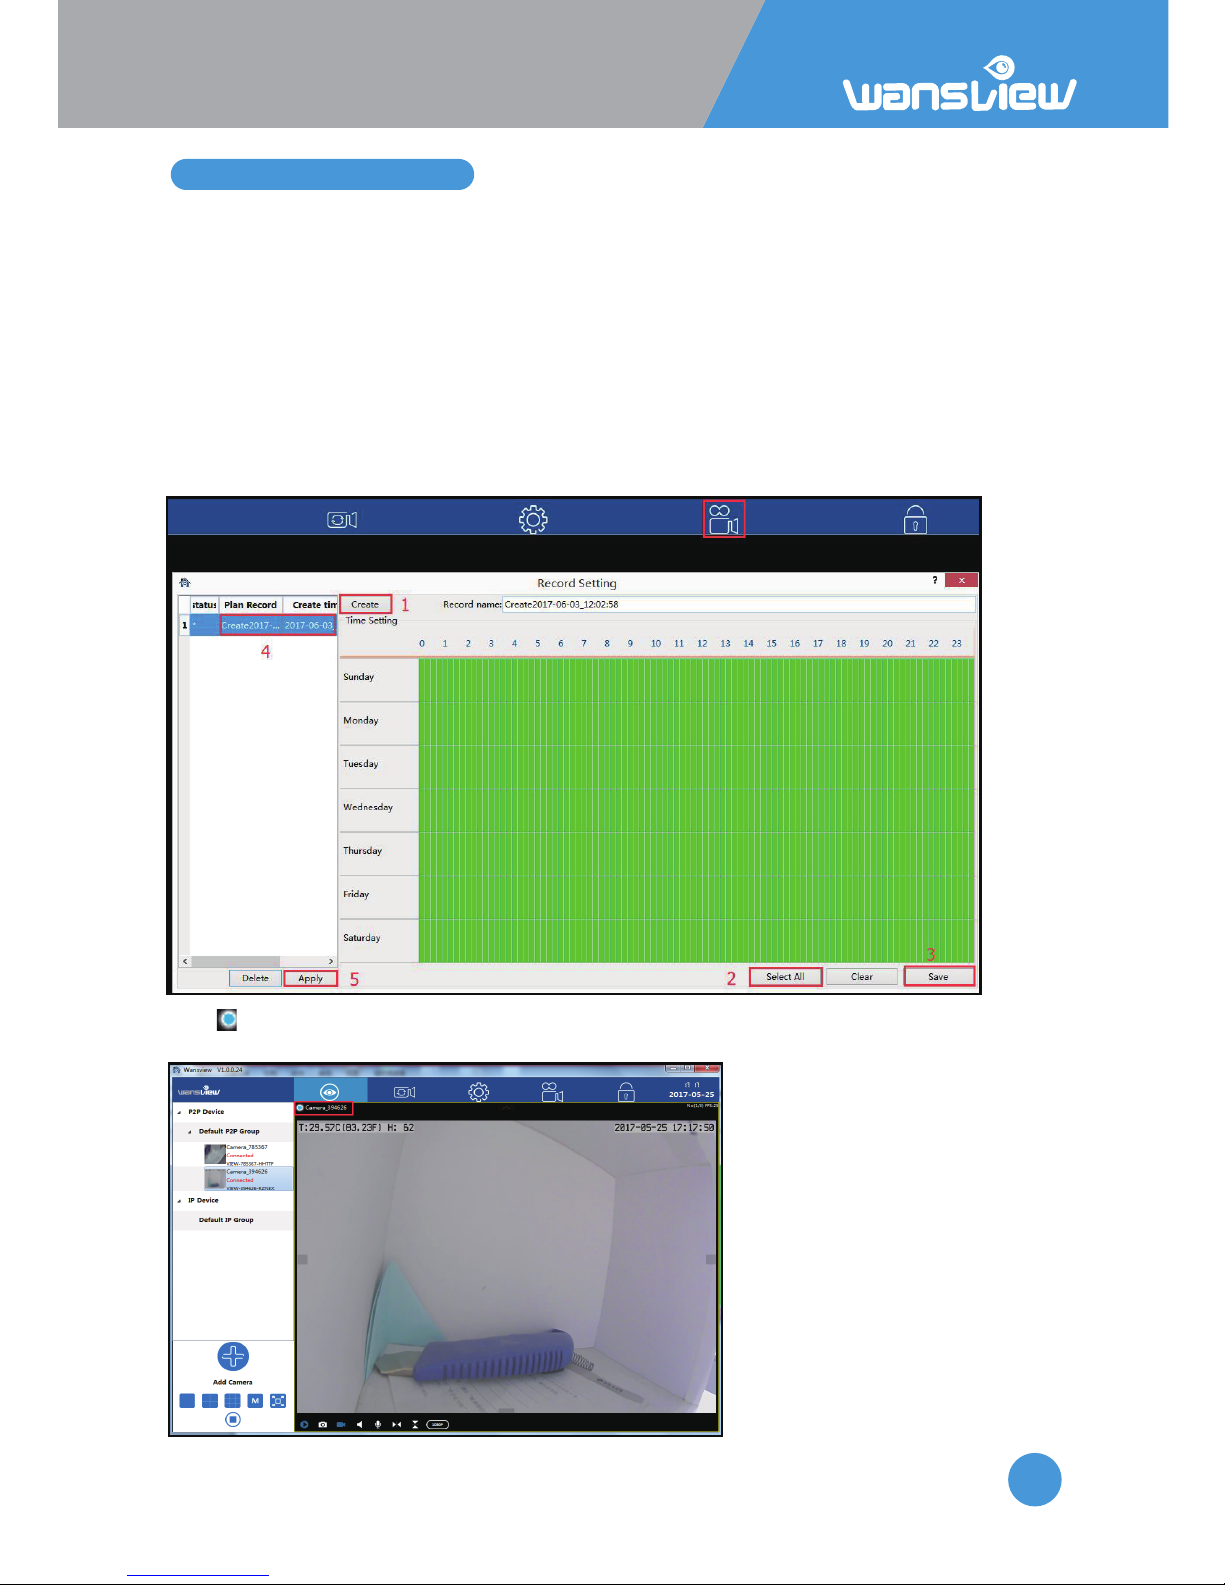
Before recording to your local computer, please make sure you set up the Record Path on
the “Local Seng”. Then follow the below steps to set up the recording:
1: Click “Create” to create a Record name, it will give you a name
automacally(combinaon of date and me), user can edit the name.
2: Select me: User can “select all” if want to record 24/7, and clear it to choose a specific
me by dragging or single-click the me interval.
3: Save: Save the record name and me interval you set up.
4: Double-click the Record name to choose it as the record plan.
5: Apply: Click “Apply”, a * will appear in front of the Record plan, it means the scheduled
recording is working.
The icon will be shown on live video screen, it means the camera is recording
automacally)
Page 40
IP Camera W2(1080P)/W3(720P)
40
3.7 Playback
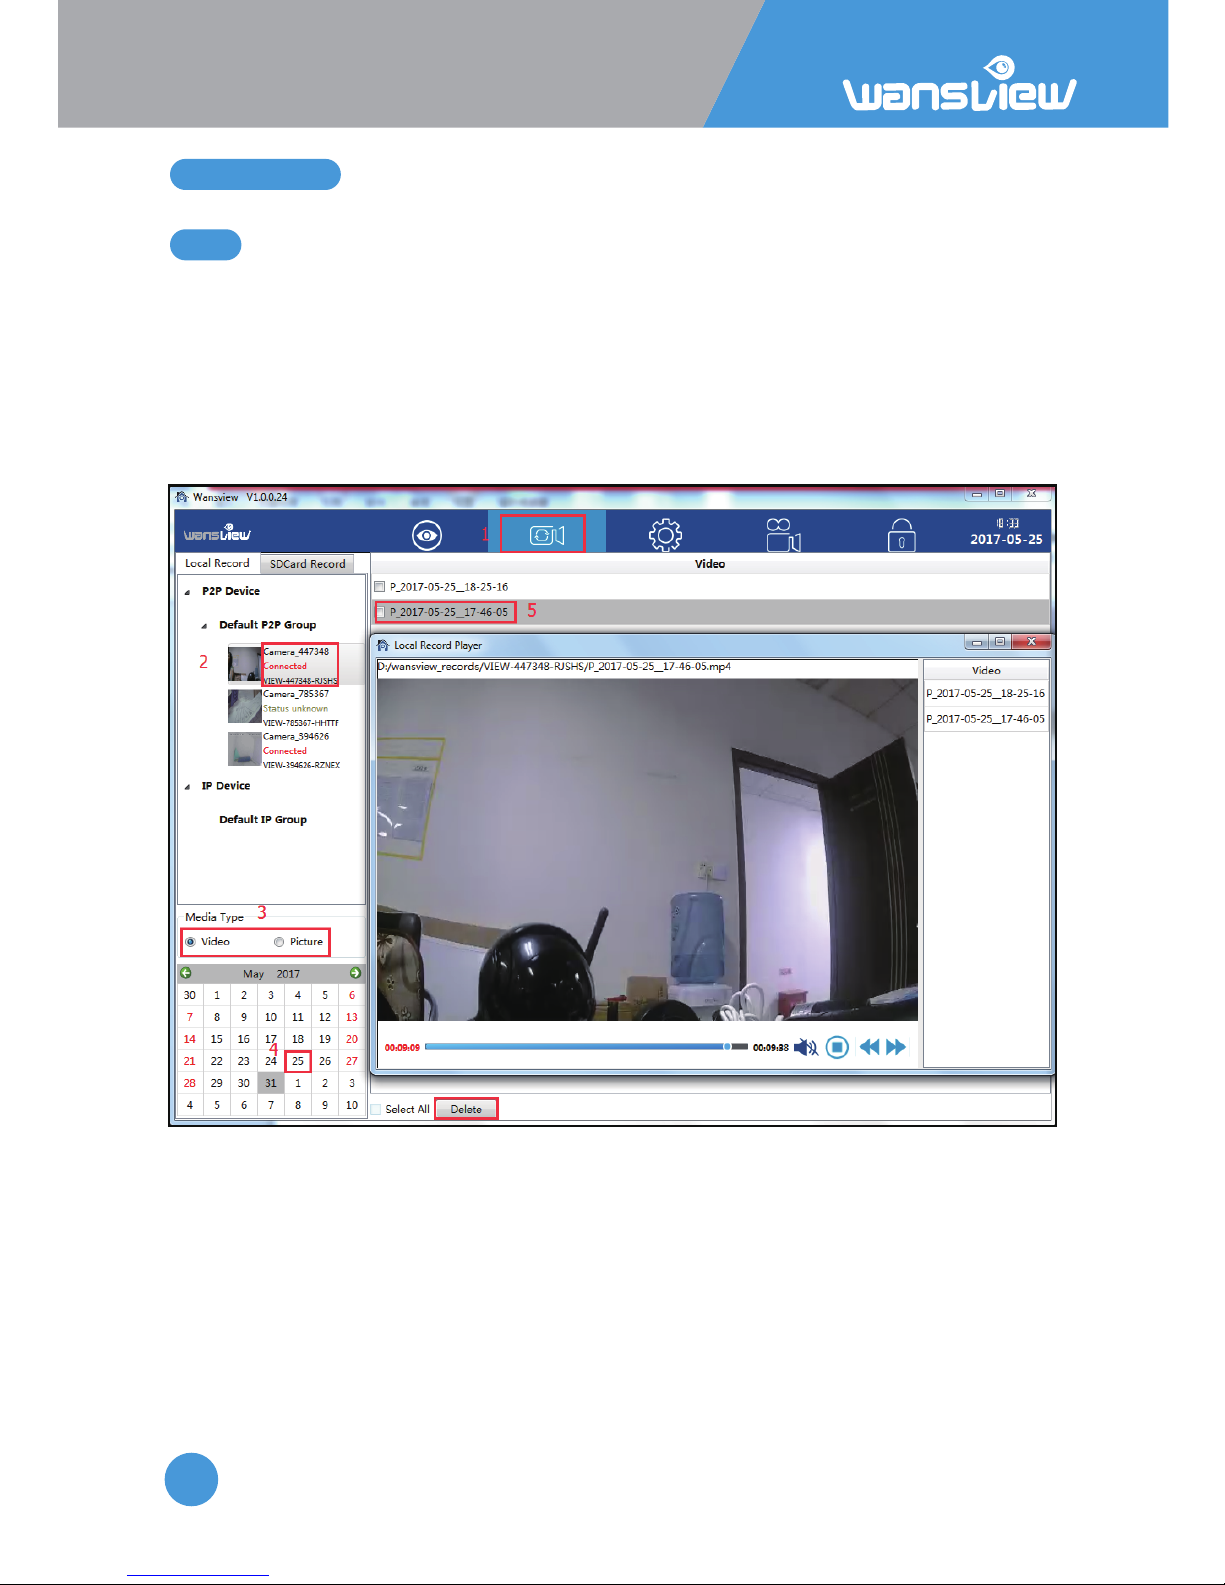
3.7.1 Playback Local Record
On “Playback” page, user can playback the recorded videos on the local disk and SD card.
1) Choose Local Record and selected the camera you want to check.
2) Select the Media Type(Video or Image)
3) Select the video in an exact date you want to playback
4) Recorded video list will be shown (Video starts with “P” for Scheduled Recording, and
“H” for Manually Recording)
5) Double-click the recorded video name, video will be broadcast.
User can select a certain or all the video and delete it from the list and the record path.
Page 41
IP Camera W2(1080P)/W3(720P)
41
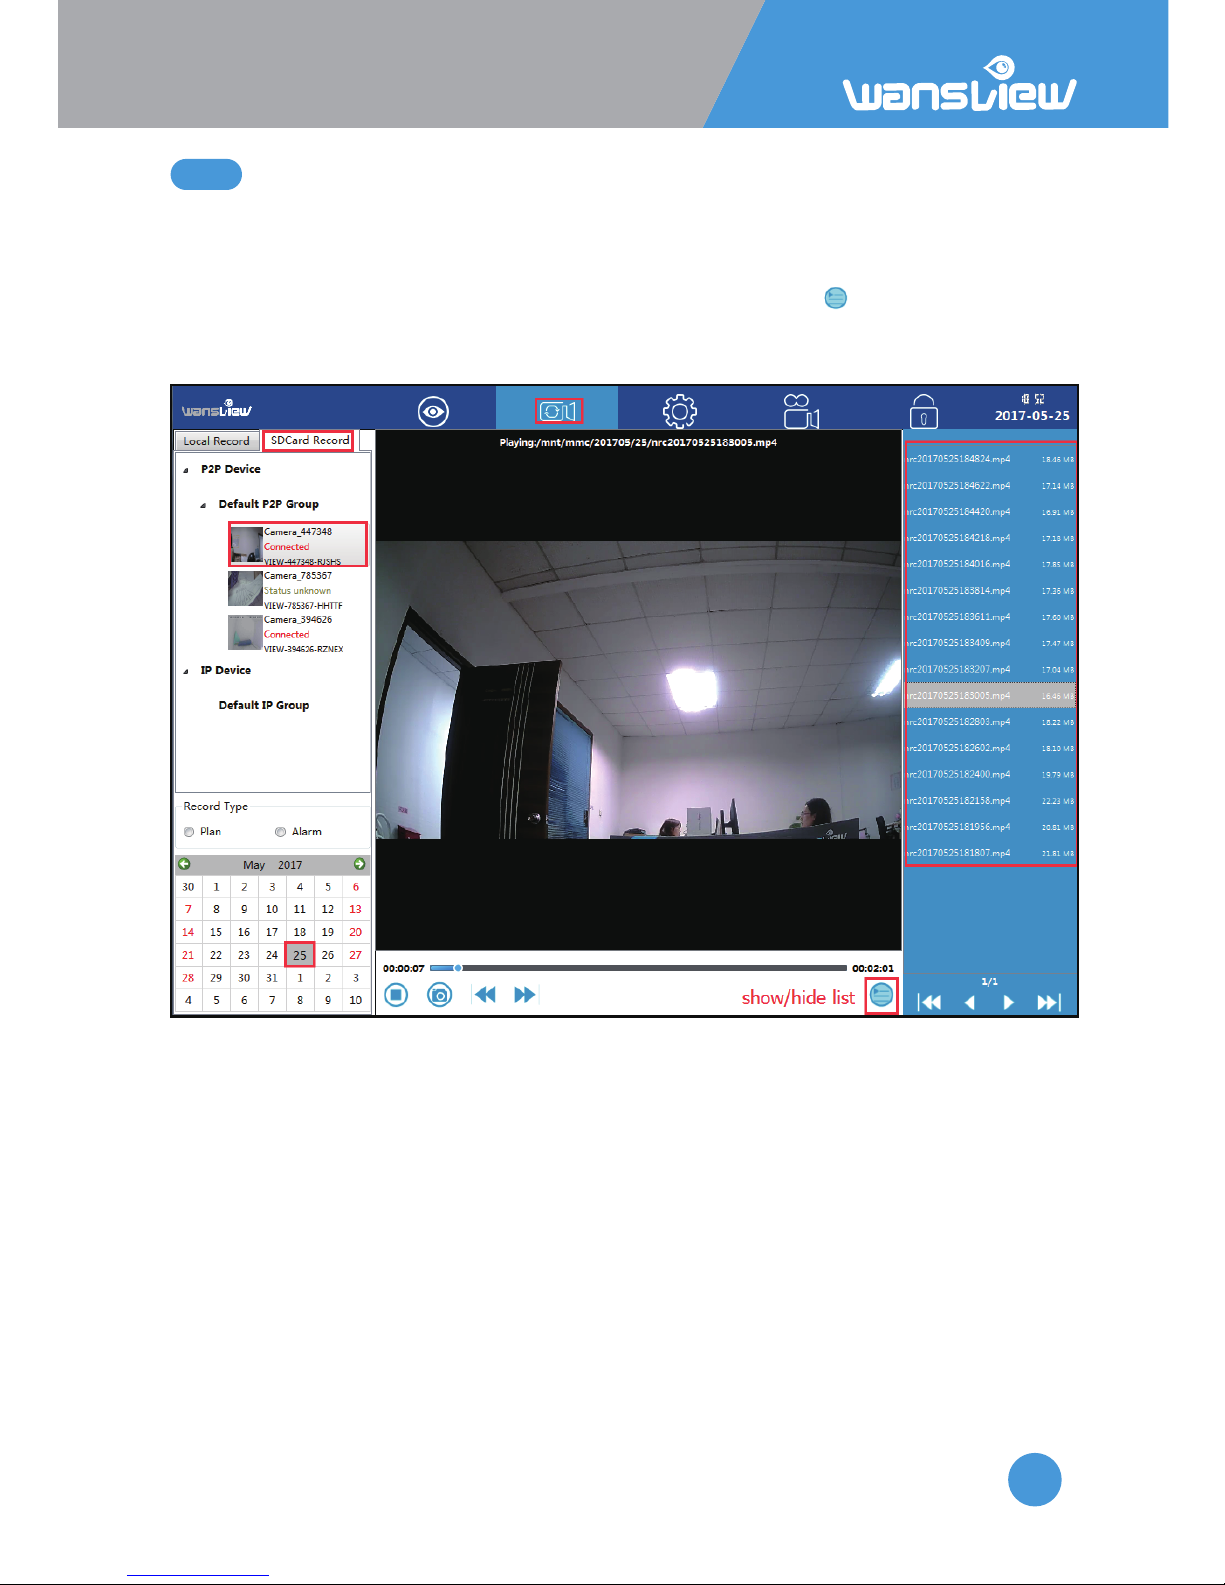
3.7.2 Unavailable for W2/W3
1) Choose SD/TF record and selected the camera you want to check.
2) Select the Media Type(Plan or Alarm)
3) Select the video in an exact date you want to playback
4) Recorded video list will be shown, if it is not shown, please tap to show the list
(Video starts with “nrc” for Scheduled Recording, and “arc” for alarm Recording)
5) Double-click the recorded video name, video will be broadcast.
Page 42
IP Camera W2(1080P)/W3(720P)
42
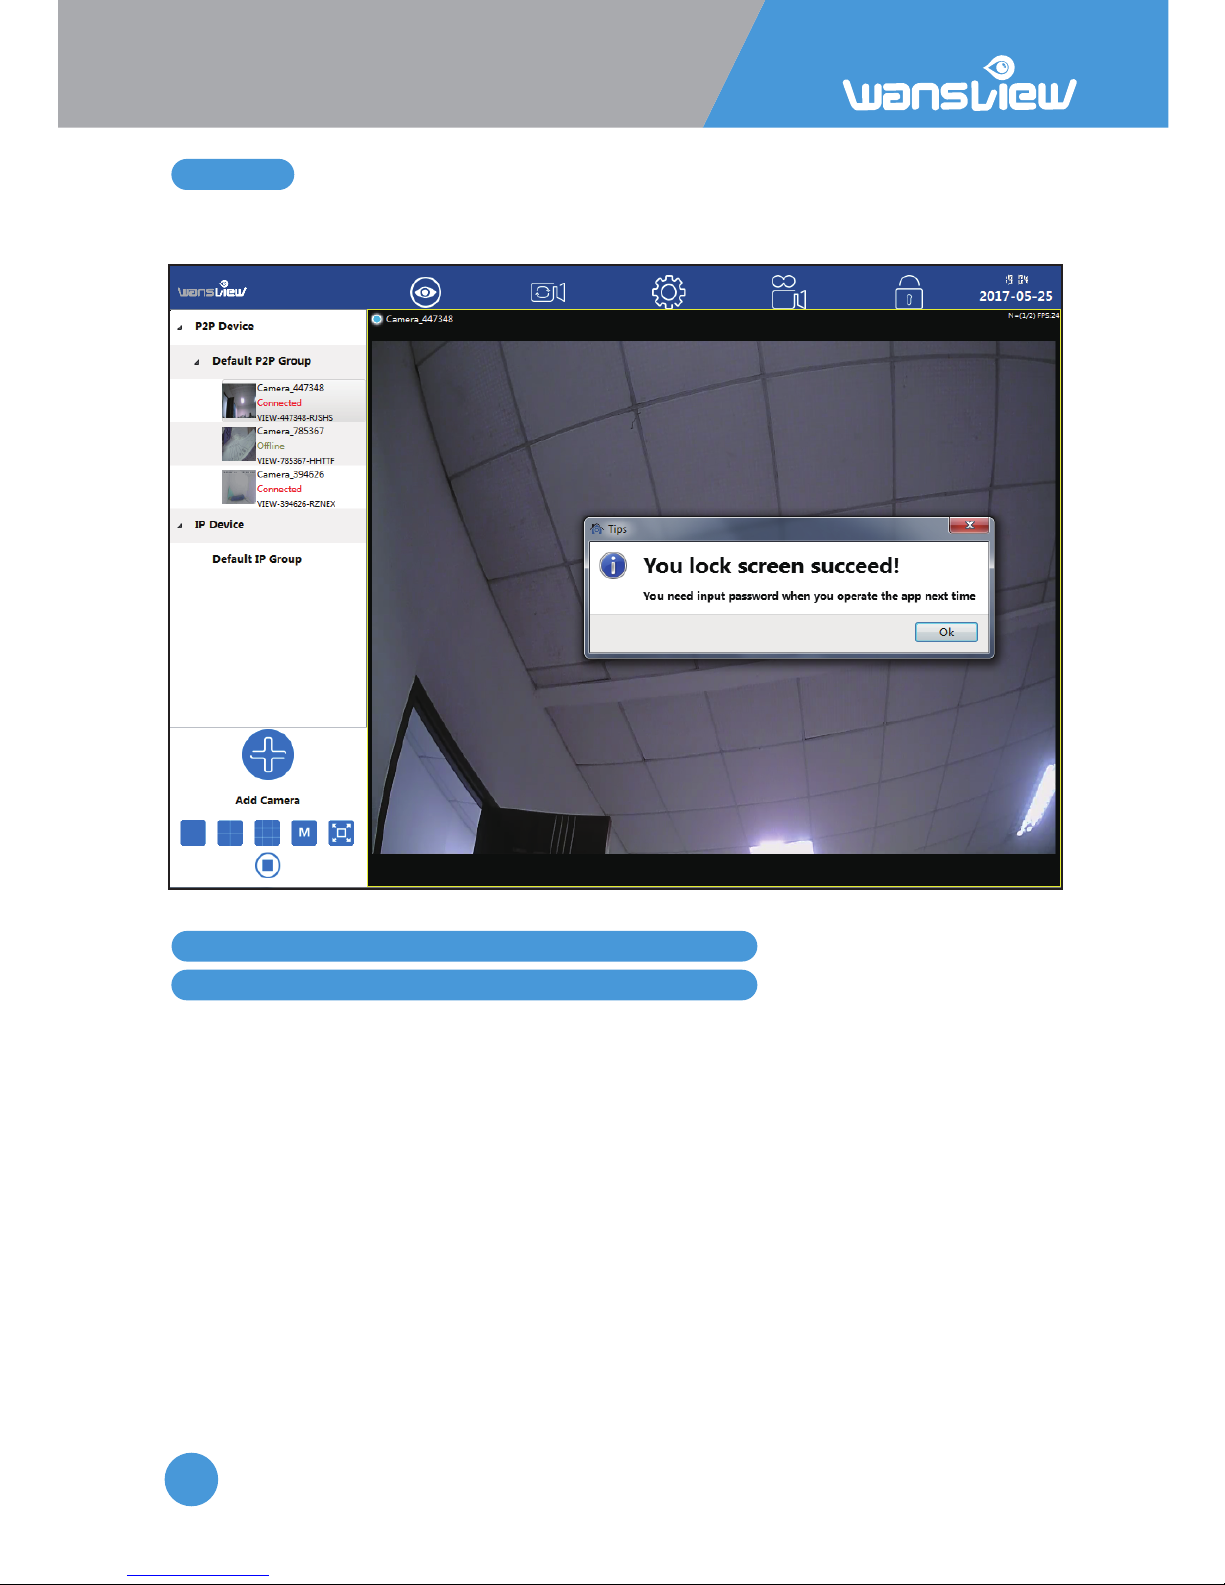
3.8 Lock
4. Manage Camera with other Apps and Soware
Add Camera to iSpy Connect
Lock the screen if you don’t want to operate it or prevent others to operate the camera.
The default lock password is 123456.
Steps
1.Add IP Camera
2.In the Video Source mask, select the FFMPEG(H2.264) tab
3.In the URL field type: rtsp://user:password@IP:port/live/ch0 or ch1 or ch2
4.RTSP Mode: select TCP
5.Test
6.Click OK
7.In the following mask, click finish
8.The camera is online
User: your user
Password: your password
IP: your camera’s IP (get it from the app)
Port: your camera’s port (get it from the app
Page 43

IP Camera W2(1080P)/W3(720P)
43
Add the Camera on Blue Iris
In IP camera configuraon, input:
-IP: the camera’s IP address
-HTTP port: camera’s port
-RSTP port: default 554
-User
-Password
-Make: Wansview
-Model: K1/K2, NCM GA/GB/630W, Q3S RTSP
-Path: ch0, or ch1 or ch2
Click OK
Add the Camera to Sighthound Video
Set-up with Ethernet Cable - Add Camera by wizard
In camera setup, choose:
Camera Type: network IP Camera
Manufacturer: Other
Click Next
Choose: setup Sighthound video with a network camera that is already working
Click Next
Select your camera by the IP
Click next
Input User and Password
Follow the wizard
Add Camera by RSTP
In camera setup, choose:
Camera Type: network IP Camera
Manufacturer: Wansview
Click Next
Select Camera Type: other IP camera
Protocol: RSTP
IP address:
RSTP port: 554
Stream Path: live/ch0
Input user and password
Click Next.
Page 44
IP Camera W2(1080P)/W3(720P)
44
5. Web Access
5.1 Sengs
To view your camera in any web browser you’ll need the camera’s IP address and camera’s
Port.
If your computer is in the same network, just type the address in browser address bar:
hp://IP:PORT for example hp://113.116.100.223:80. Users can get these data from the
app > advanced sengs > about camera.
If your computer is located outside the network where the camera is installed, users need
to input manually the camera’s IP in the router in the Port Forwarding Secon (please
consult your router user guide or search on line) to view the camera.
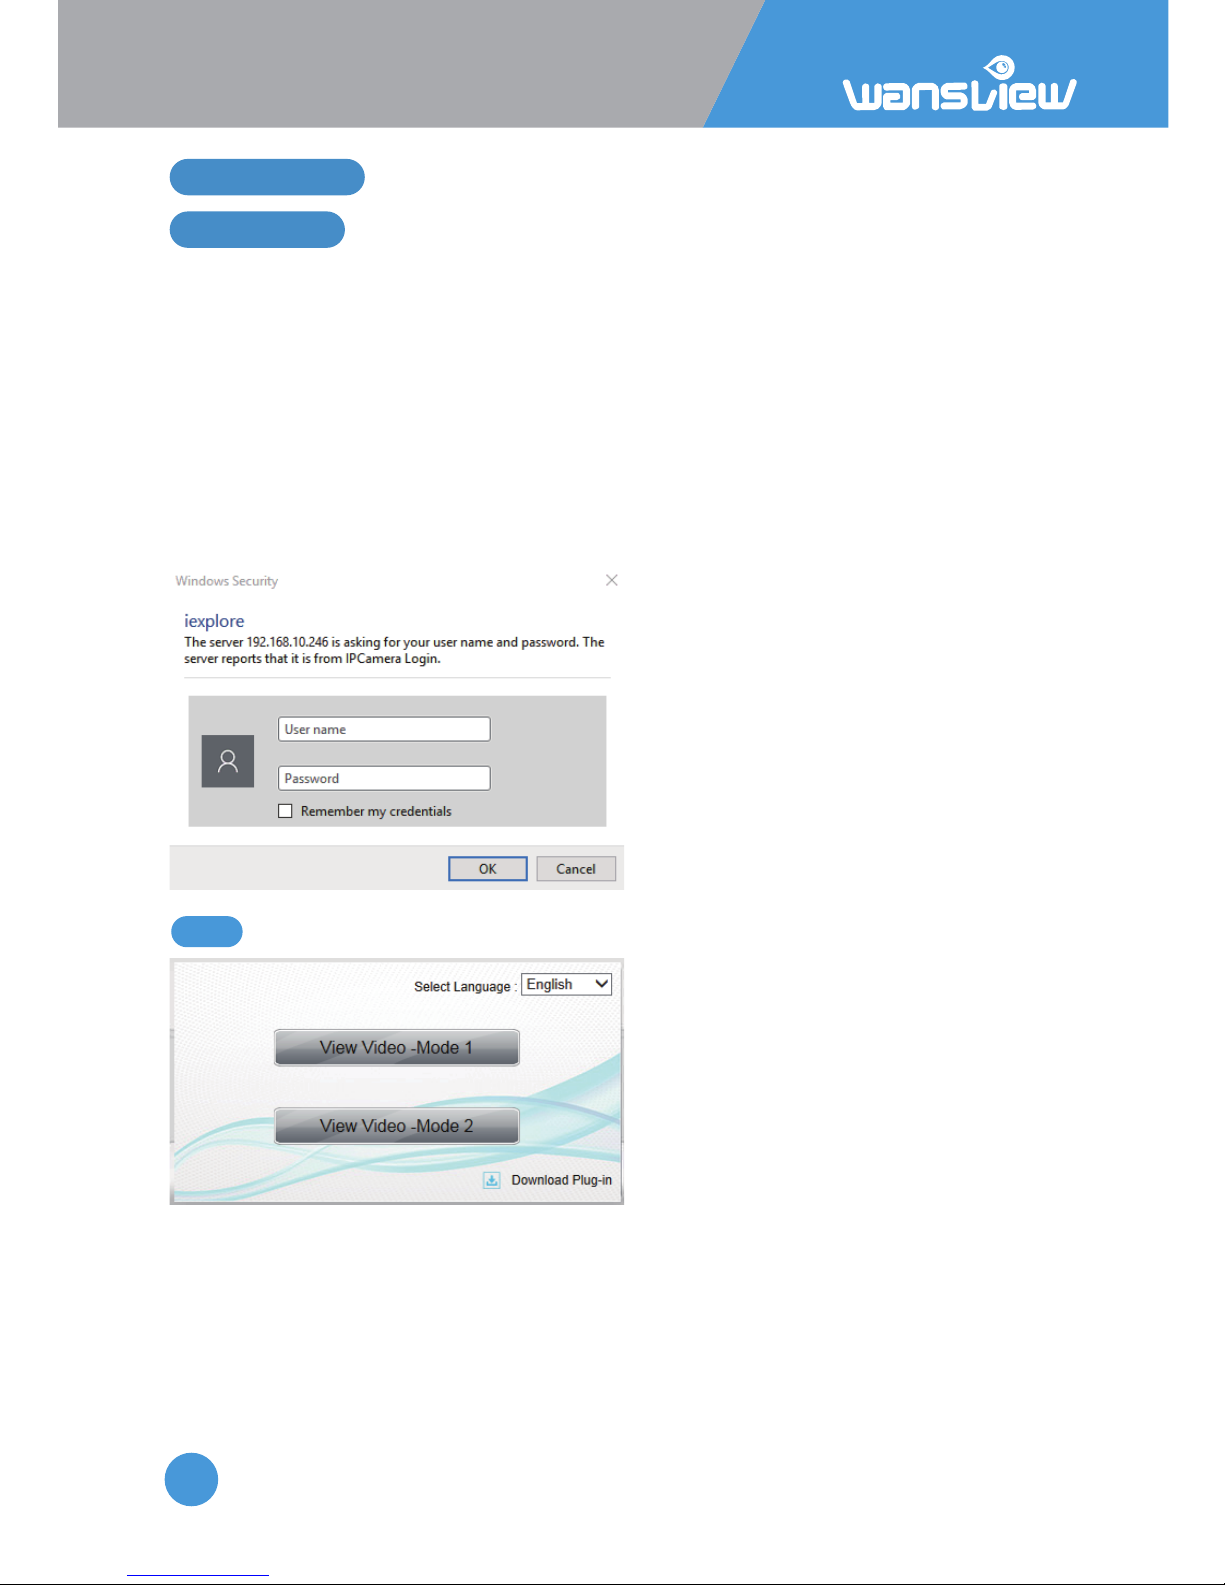
The Camera has 2 view mode:
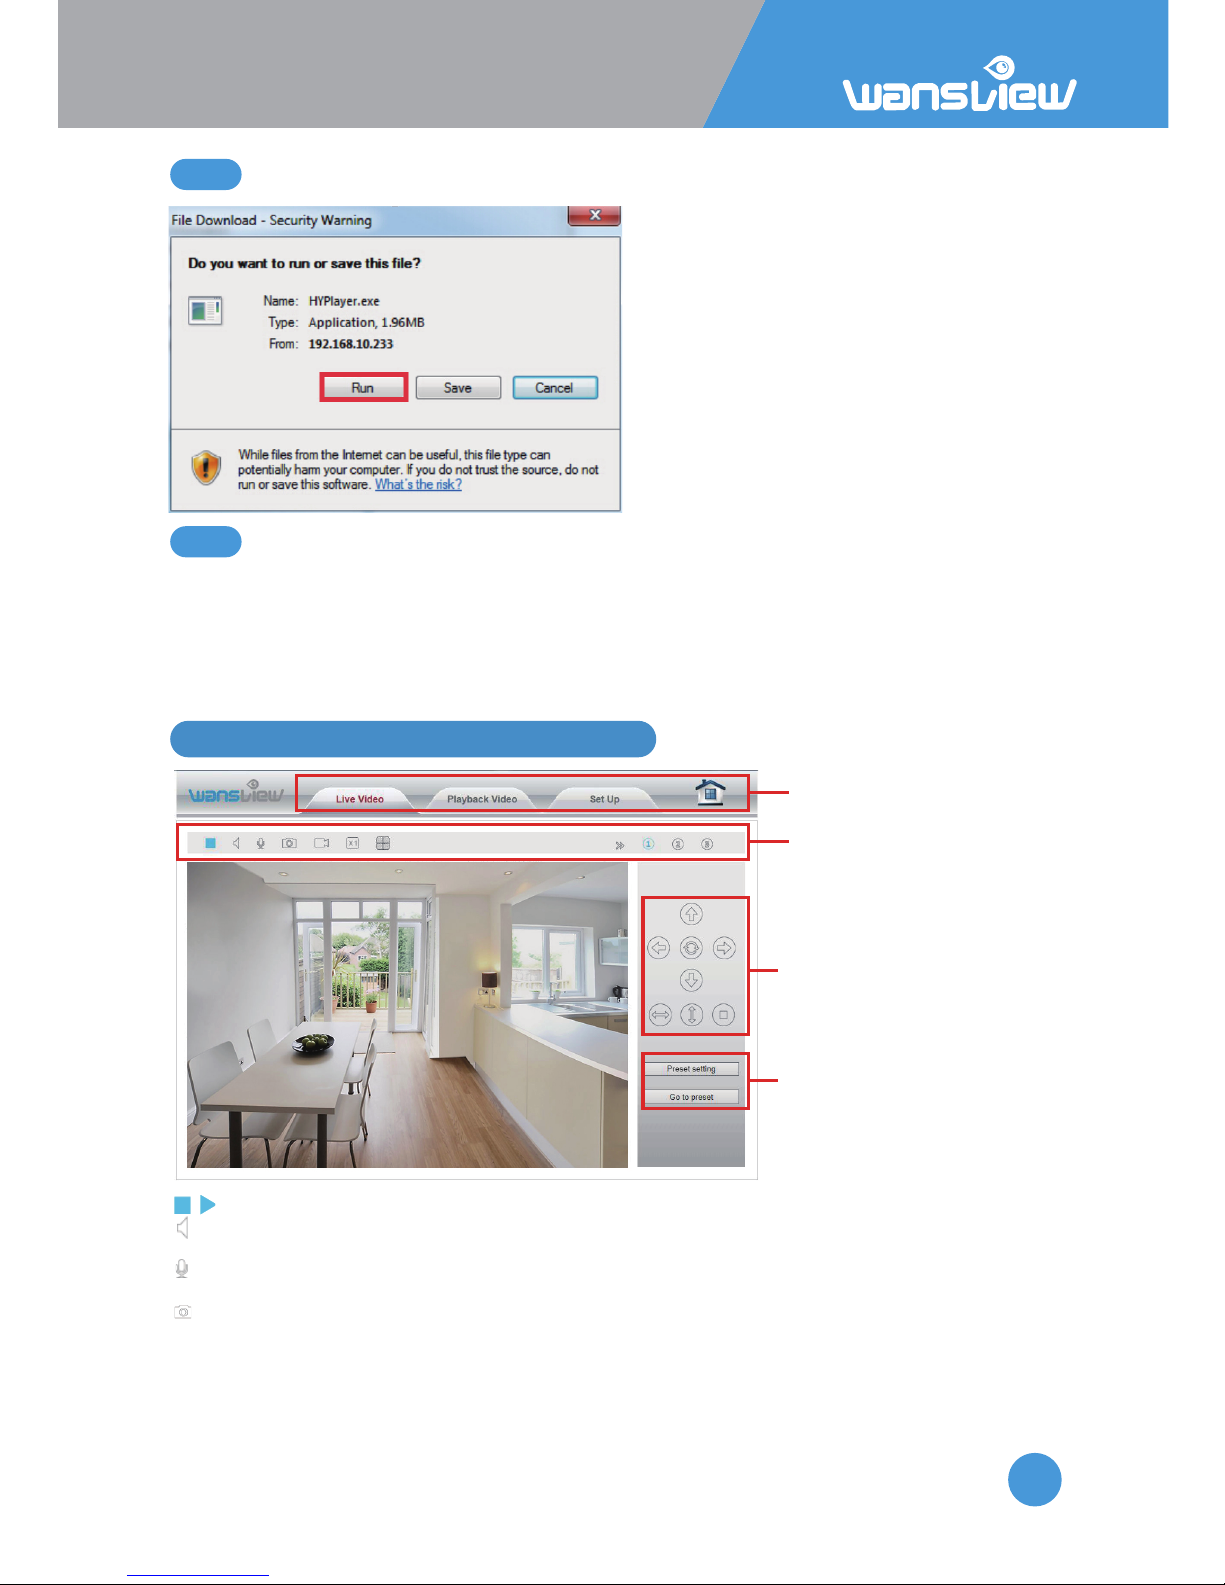
View Mode 1 supported by an OCX Plugin (HYPlayer.exe)
View Mode 2 supported by an Adobe Flash Player Plugin
5.1.1 Plugin installaon
Page 45
IP Camera W2(1080P)/W3(720P)
45
Click on Download Plugin to download
and install the OCX Plugin-HYPlayer
plugin.
Note: If you use Google Chrome or
Firefox you need to install the IE tab:
-Firefox > Add-ons > Extensions. Search
for IE Tab and install.
-Chrome > More Tools > Extensions.
Search for IE Tab and install.
5.1.2 View Video-Mode 1 - Complete Camera Management
5.1.3 View Video- Mode 2 – Limited Camera Management
This view is supported by the Adobe Flash Player plugin and if is not installed, the browser
will prompt to download and install the plugin.
In the Flash Player mode, users have less funcons. Microso Edge is not supported.
5.2 Live Streaming and Recording on PC
Menu Bar
Video Menu Bar
Pan/Tilt Control
Set Preset
/ Play/ Stop: Play and stop video.
Listen: If your PC is equipped with speakers, click here to listen from your camera.(funcon disabled
in this model)
Talk: Acvate the Talk funcon. A microphone is needed in your PC. Adjust volume under Set up >
Video&Audio >Audio.(funcon disabled in this model)
Snapshot: Capture live images and save to PC. Set folder for the snapshots in Setup > Local
Configuraon.
Snapshots format is JPG.
Page 46
IP Camera W2(1080P)/W3(720P)
46
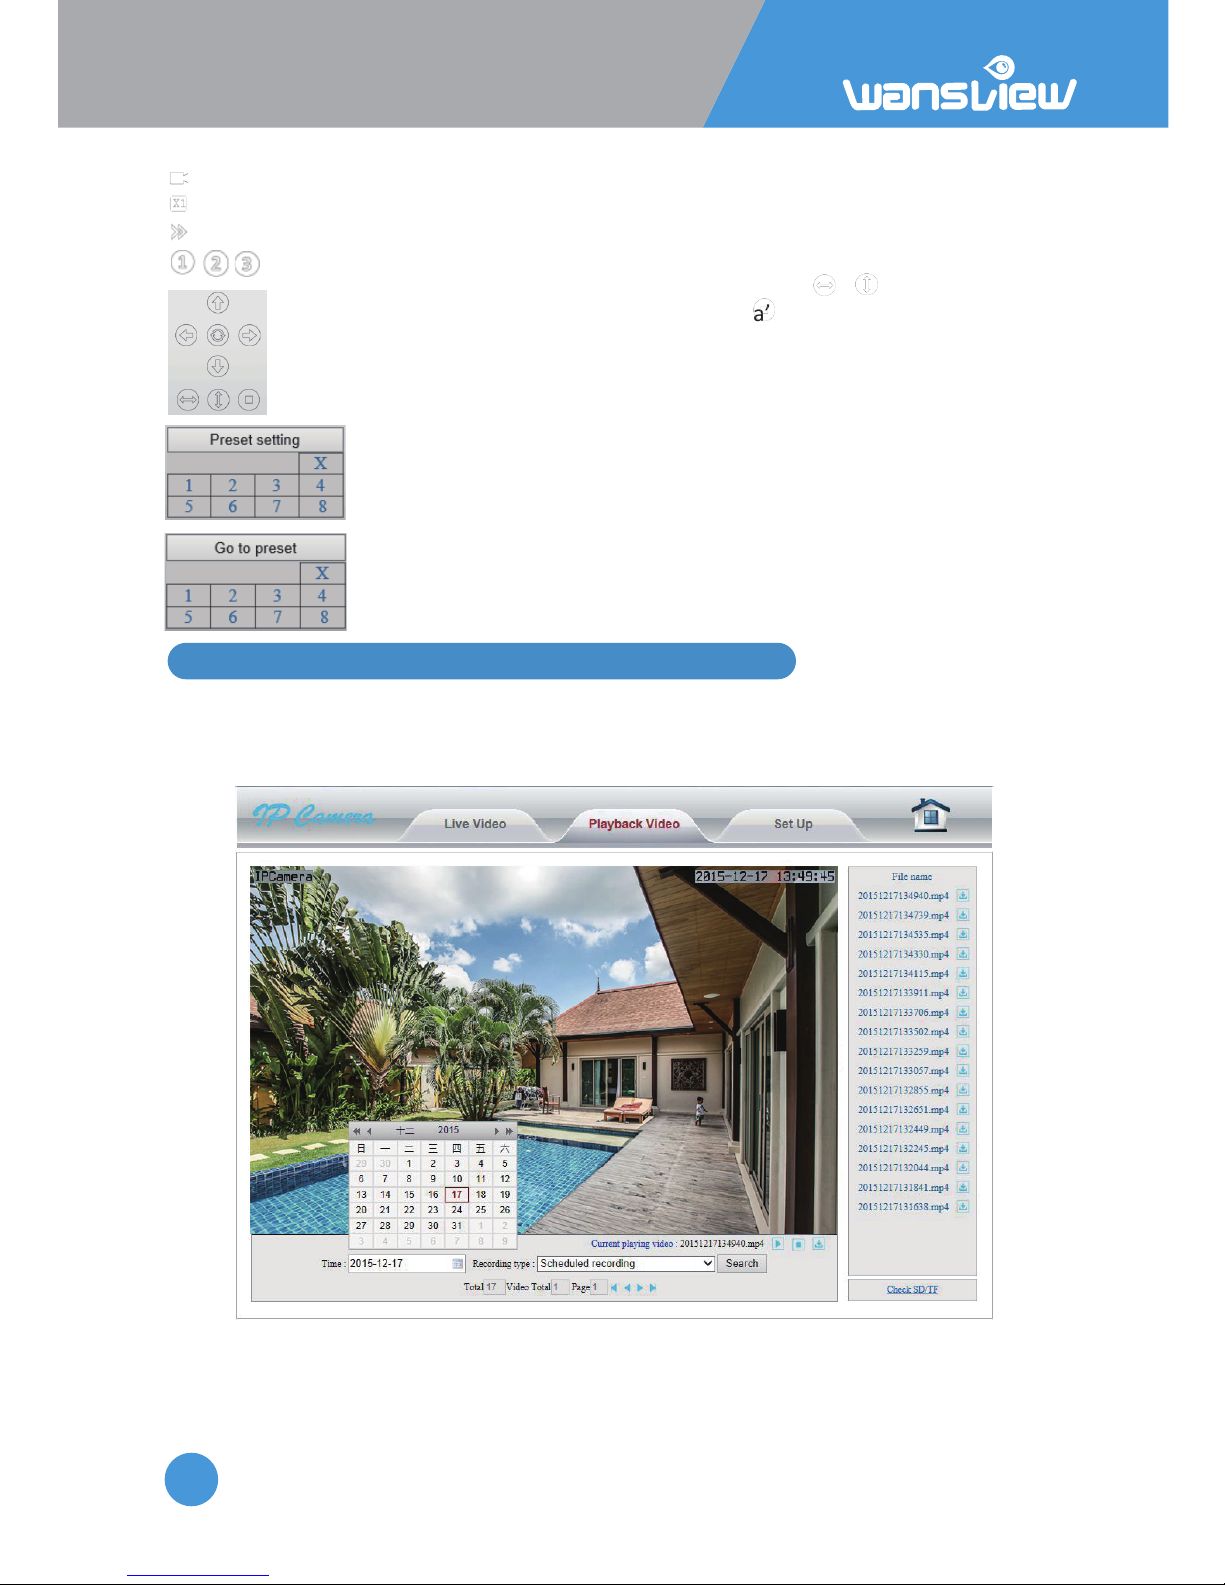
Record: Record and save to PC.
Digital Zoom
Show/Hide Control Panel.
Resoluon: Choose 3 resoluons 1920x1080 / 640x360 / 320x180
Use the control panel to pan and lt your camera’s head. Click or to move
camera’s head horizontally or vercally. Stop camera movement and it will
go to the inial posion.(funcon disabled in this model)
Set up to 8 camera preset spots, as explained above in the App
Secon.(funcon disabled in this model)
5.3 Playback Video(funcon disabled in this model)
Click "Playback Video" to enter the SD card video file playback page. Click the video date
to inquire. Click "Search" to list the video files of the selected day. Click listed files to play
back. Download files on PC with the download buon.
Page 47
IP Camera W2(1080P)/W3(720P)
47
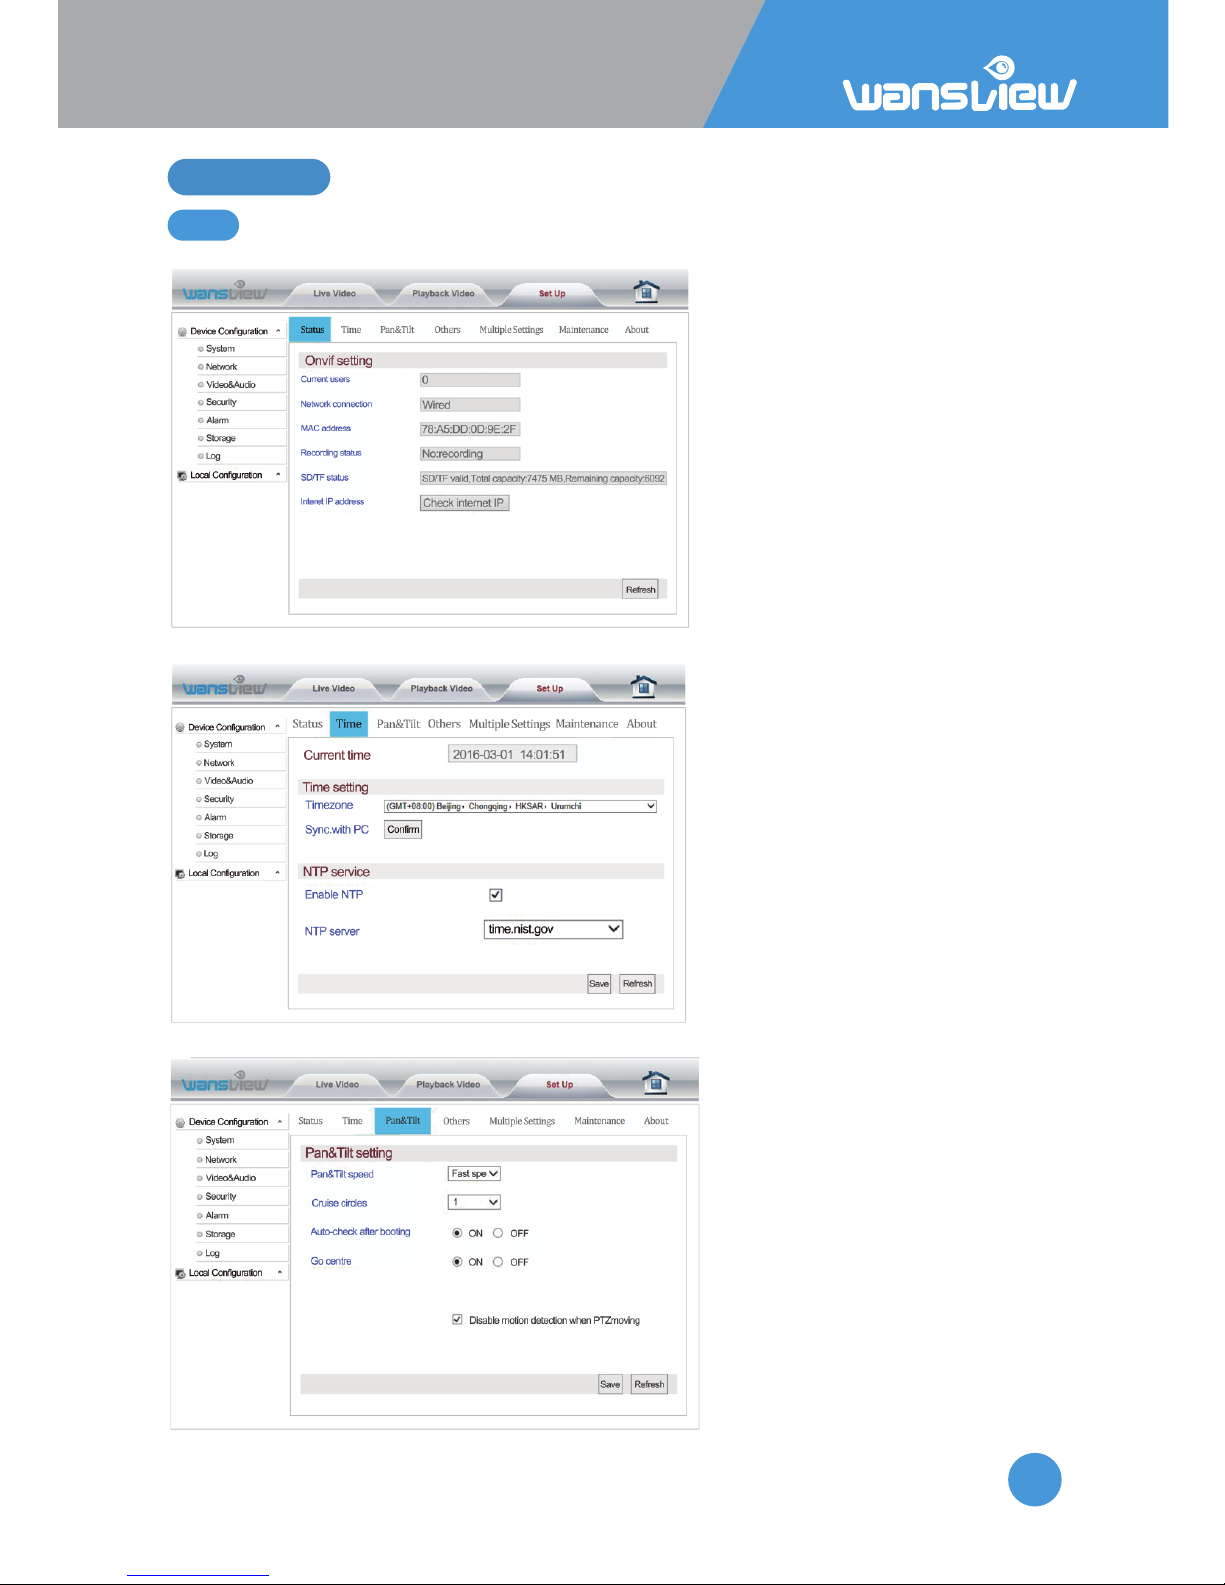
5.4.1 System
5.4 Set Up
System > Status
System > Time Seng
Data about the current
Camera Status
Users can choose to sync me to
the PC or to a NTP server.
System > Pan & Tilt
Users can set the pan/lt speed
(fast/medium/slow) and cruise
circles.
Users can disable moon
detecon when the camera pan
or lt.
Page 48
IP Camera W2(1080P)/W3(720P)
48
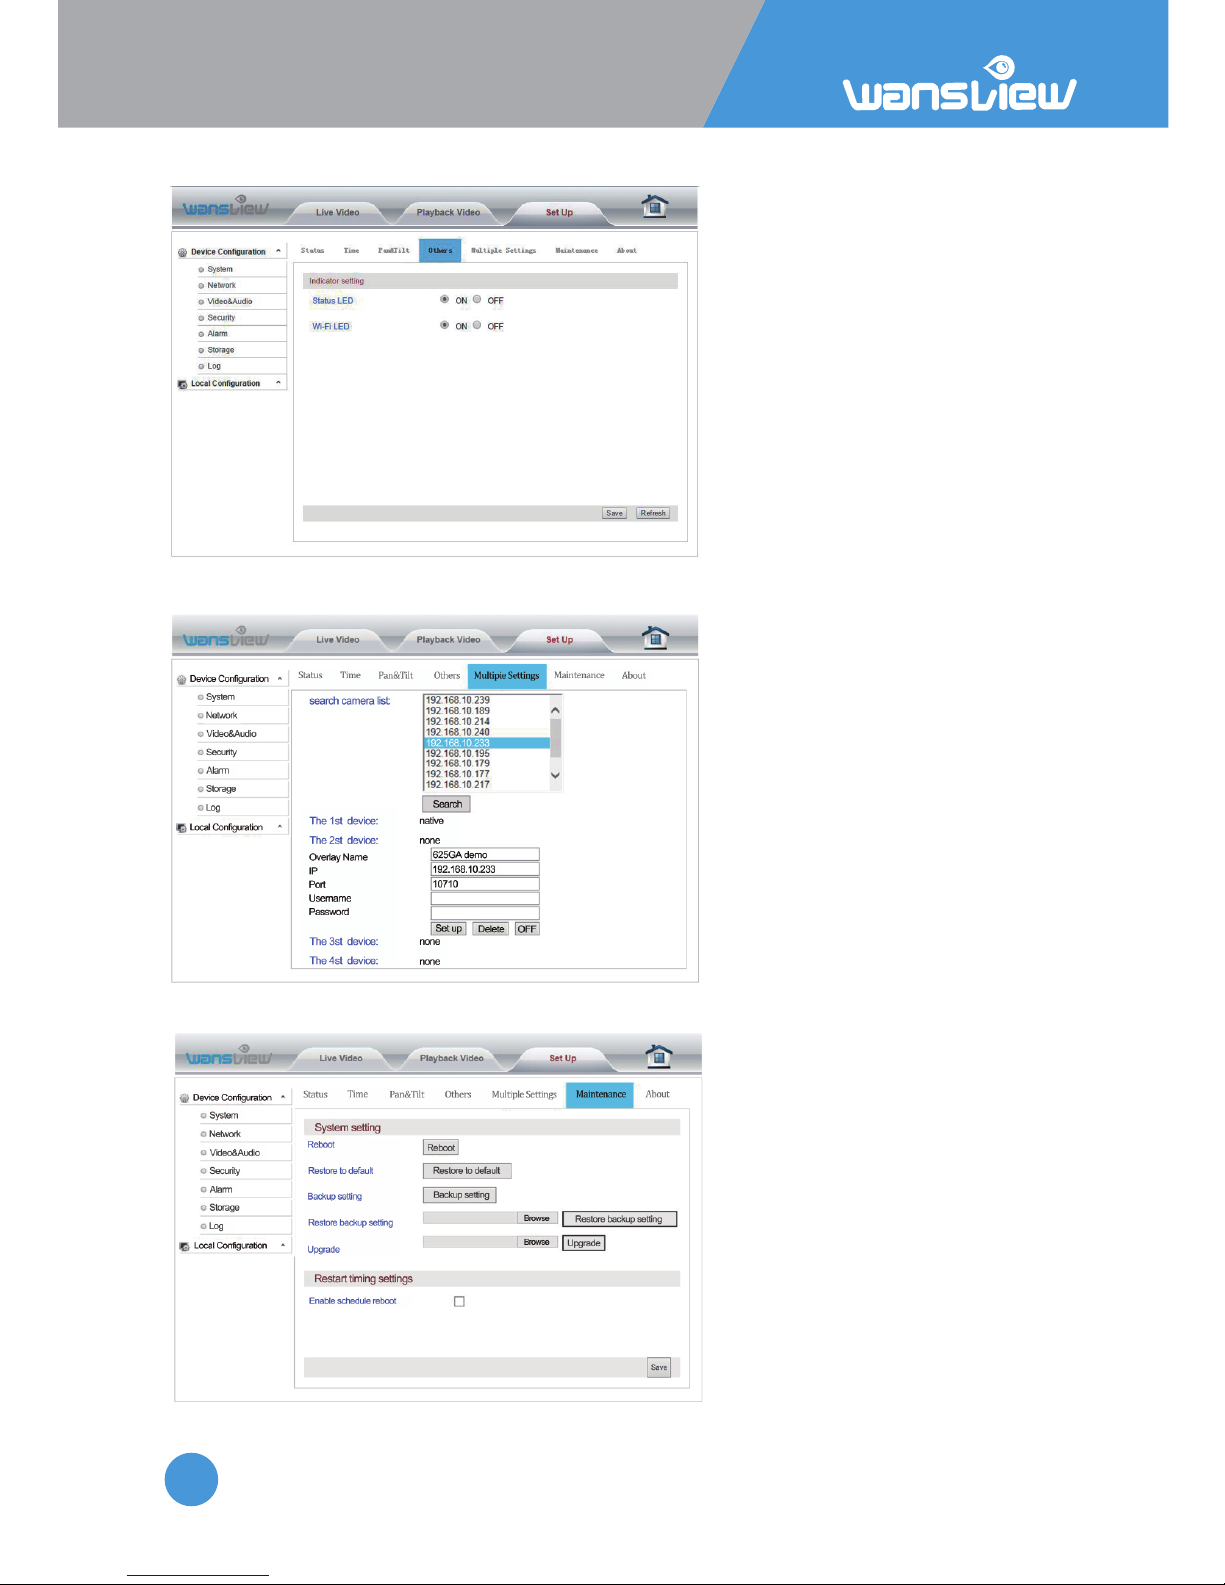
System > Other Sengs
System > Mulple Sengs
Turn off Led indicators
at your choice.
Add up Cameras for mulple 4
view. Get their IP and Port,
Input User and Password. Name
them.
System > Maintenance
In System Maintenance
users can reboot /restore to
default /backup/upgrade
camera.
Page 49
IP Camera W2(1080P)/W3(720P)
49
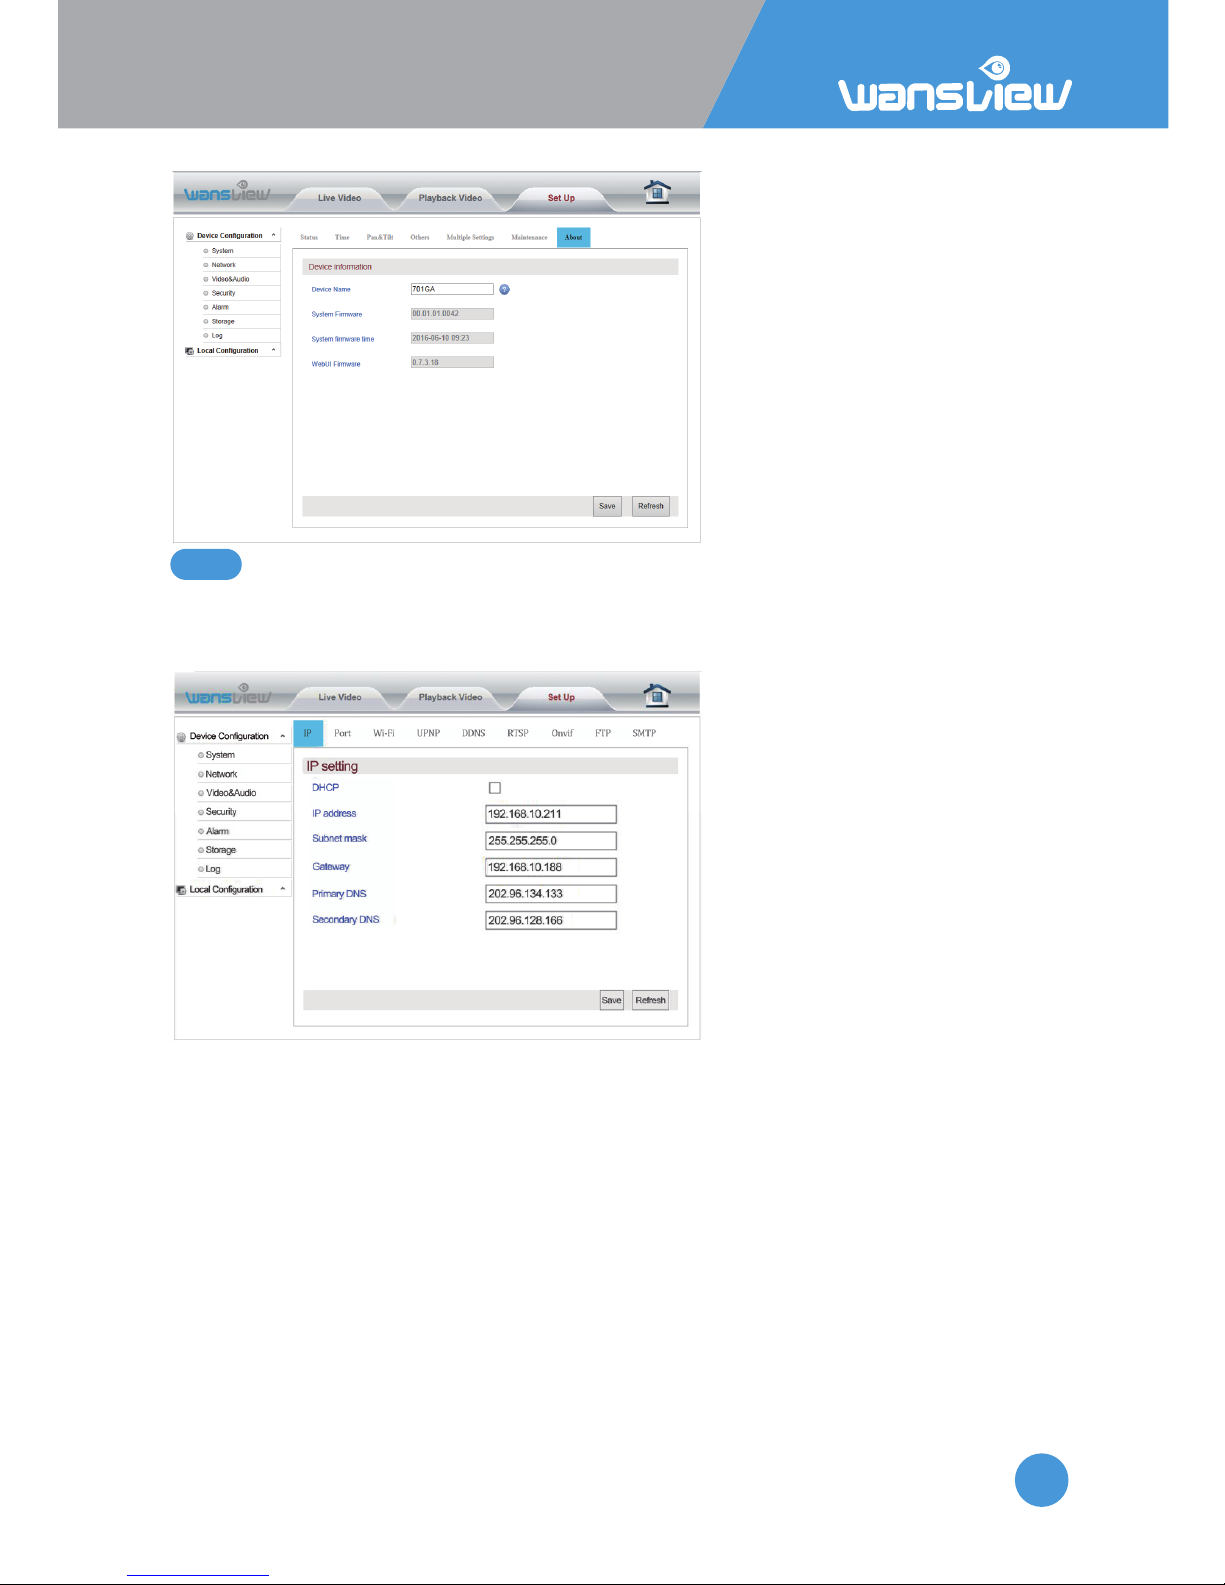
System > About
In System About users can
check the latest camera’s
firmware which can be
downloaded at
www.wansview.com.
These funcons are meant to be managed by technical specialist except for FTP Server
Sengs and SMTP Sengs. Contact our friendly customer service for specific technical
Network > IP seng
You can set the camera IP address
by your router(DHCP) or you can
manually set a fixed address.
-IP address (for example
192.168.x.x)
-Subnet mask(for example
255.255.255.0)
-Gateway(IP address of your
router; for example 192.168.x.1)
-Primary DNS(IP address of your
router; for
example192.168.x.1)
-Secondary DNS(IP address of your router; for example192.168.x.1)
5.4.2 Network
Page 50
IP Camera W2(1080P)/W3(720P)
50
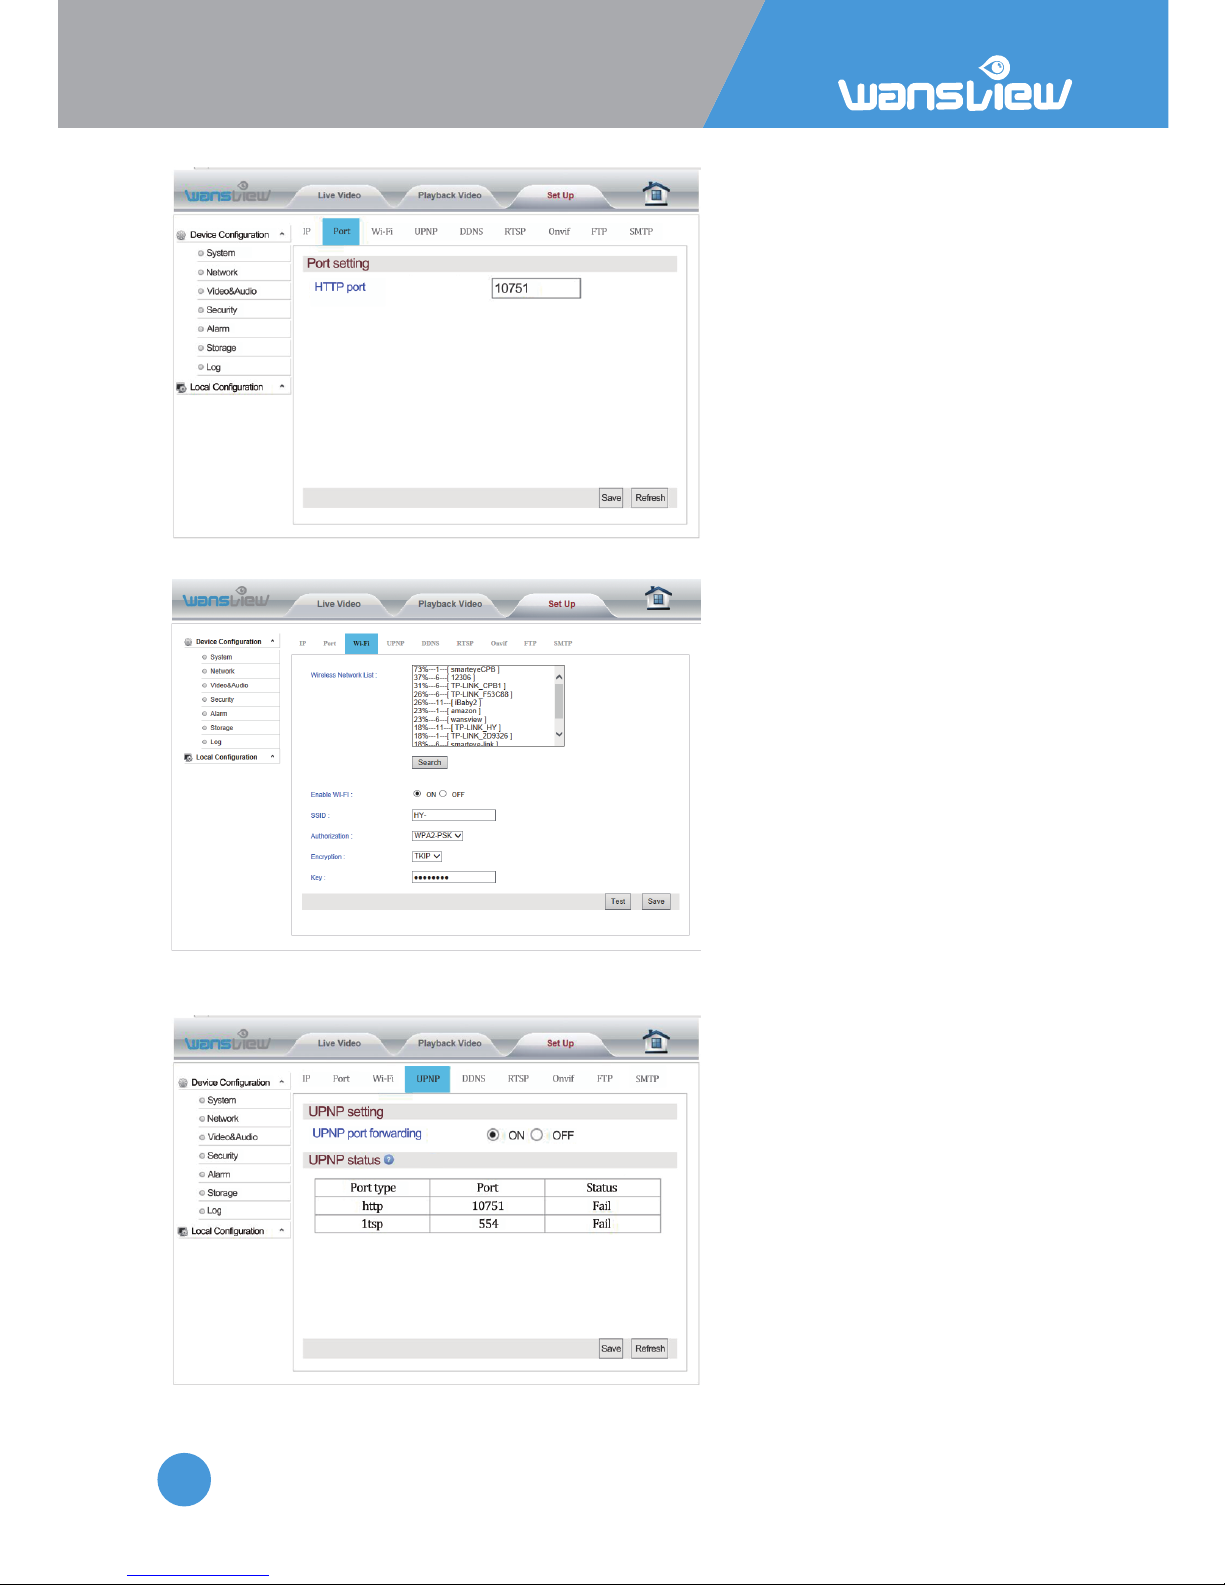
Network > Port seng
At "Port Seng", the user can
change web access port (hp
port). Port seng range:
80-65535. Pay aenon not to
conflict with other port values.
Network > Wi-Fi seng
At "Wi-Fi Set Up", click "Search"
and start up "Wi-Fi". Choose the
wireless router to be connected.
Input the password to connect to
the router. Click Save to complete
Wi-Fi Configuraon. Aer
compleng the configuraon,
click Test to confirm whether it is
connected to the wireless router.
Network > UPNP seng
If the user wants to view the
camera through the internet, the
router and camera UPNP port
forwarding funcon need to be
turned on.
Before auto port mapping, please
ensure your router supports UPNP
and has been enabled.
Page 51
IP Camera W2(1080P)/W3(720P)
51
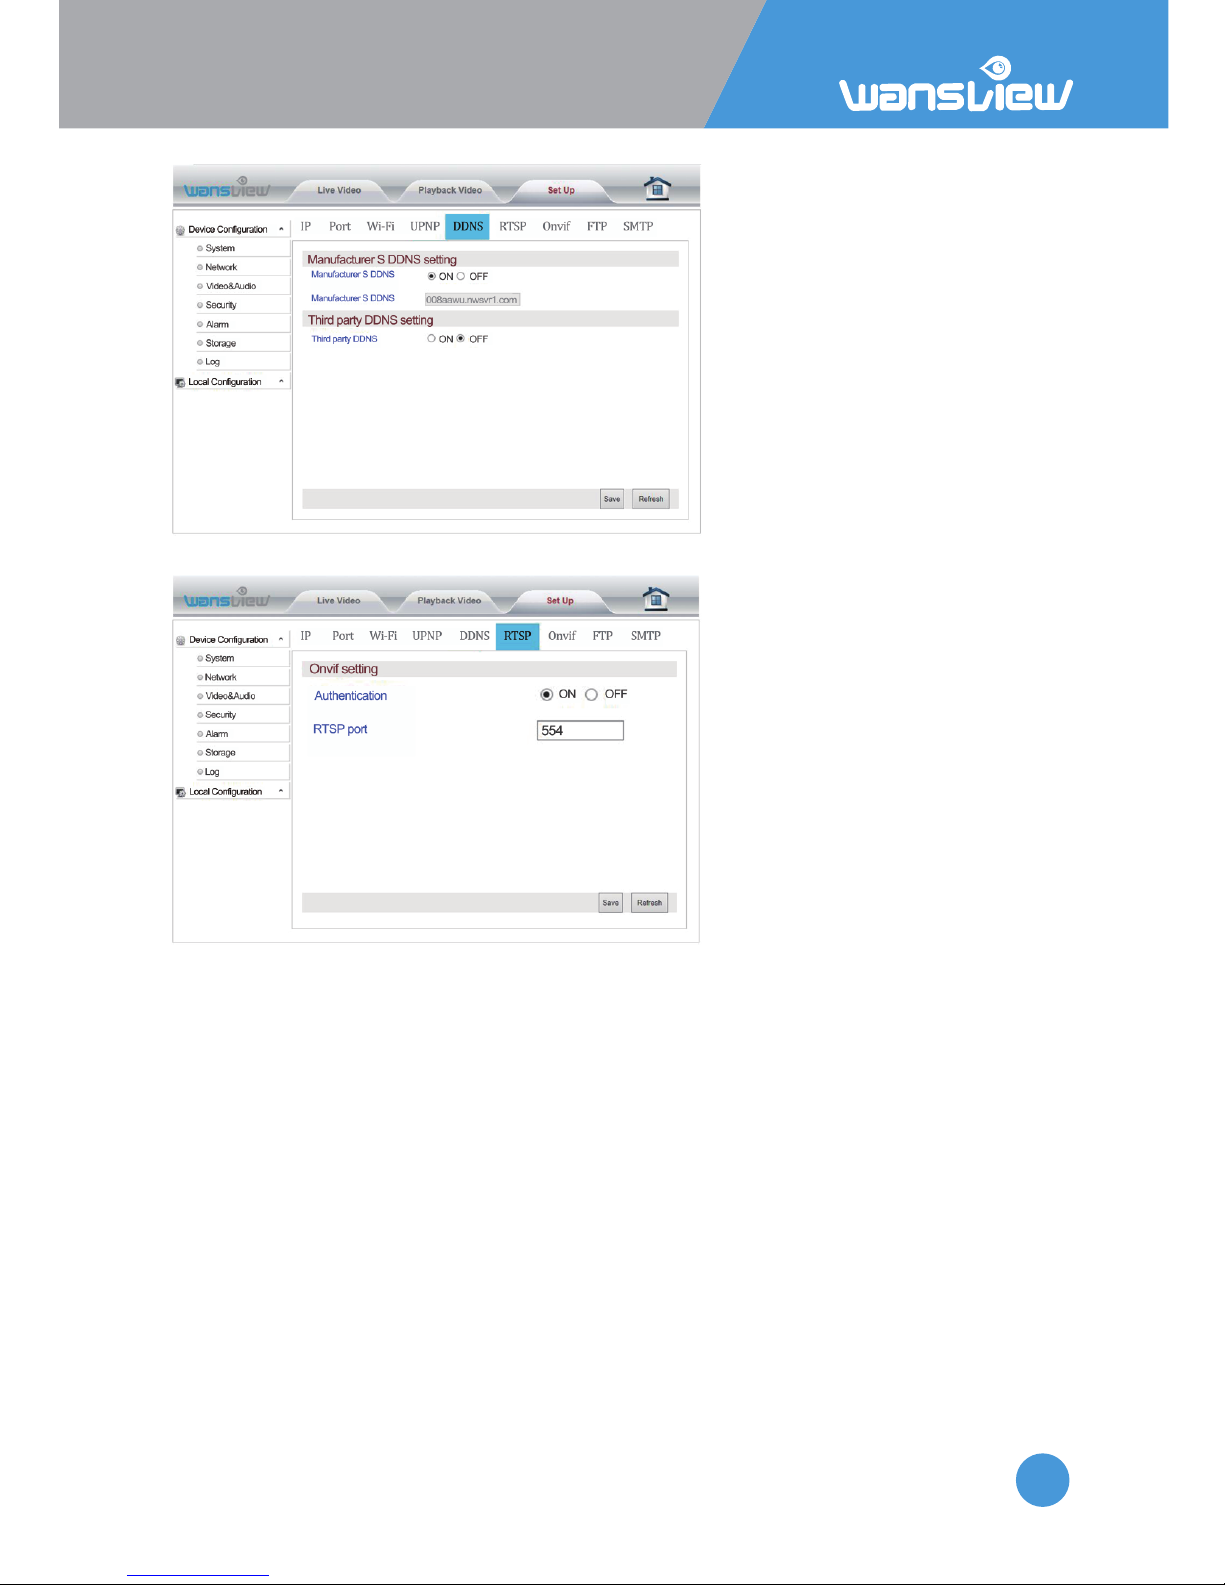
Network > DDNS seng
The user can access the camera
via DDNS domain name provided
by the manufacturer for free or a
third party domain name. Port
mapping is required while using
domain name to access. The third
party domain name supports
3322.org/dyndns.org/No-iP.com.
Network > RTSP seng
The user can set the RTSP port
aer entering RTSP Seng bar. In
addion, the RTSP Authencaon
funcon can be closed. Default
value of RTSP port is: 554 Selecon
range: 554-65535
Some general RTSP streaming
media soware can be adopted to
access video on the device, such as
VLC. Access links are as shown
below:
The first bit stream: rtsp://user: password @IP:rtsp port /live/ch0
The second bit stream: rtsp://user: password @IP:rtsp port /live/ ch1
The third bit stream: rtsp://user: password @IP:rtsp port /live/ ch2
Page 52
IP Camera W2(1080P)/W3(720P)
52
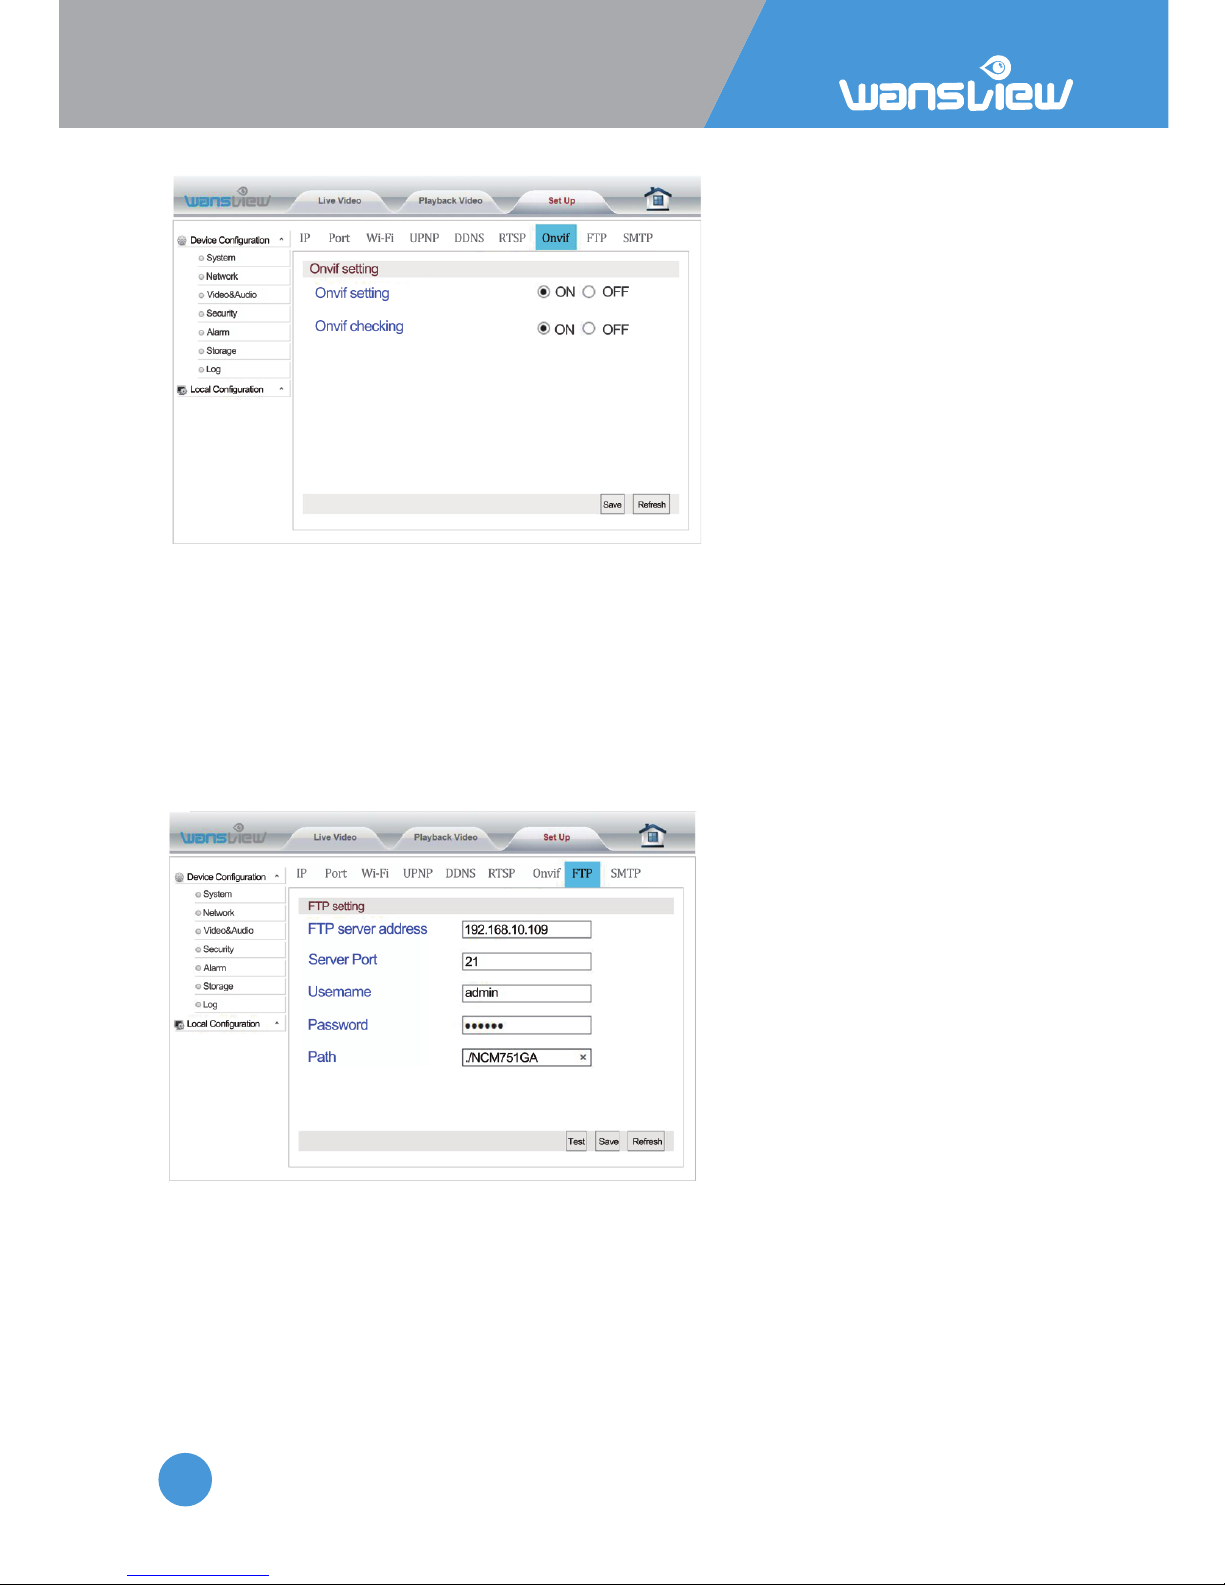
Network > Onvif seng
Onvif is a global standard for the interface of IP-based security products. The ONVIF
protocol ensures interoperability between products regardless of manufacturer, allowing
you to integrate your IP camera as a generic ONVIF camera into exisng security systems.
Enter Onvif Seng. The user can start up and calibrate Onvif funcons. The default
seng for Onvif calibraon is on.
Note:NVR devices of some manufacturers do not support camera access with Onvif
calibraon. Our device supports Onvif versions 2.5 and below.
Network >FTP Sengs
FTP Server Address: This field
allows the user to designate an IP
address or DDNS address for the
FTP server.
Server Port: This field allows the
user to designate the port number
for the FTP server.
User Name: Input FTP user name.
Password: Input FTP password.
Path: Specify a folder for storing
video and pictures, for example:
/NCM751GA
Note: If you want to save the alarm picture and video to FTP, you must build an FTP sever,
then create an FTP account with a password (not an anonymous account) on your FTP
server and FTP account must have create and delete file rights.
Page 53
IP Camera W2(1080P)/W3(720P)
53
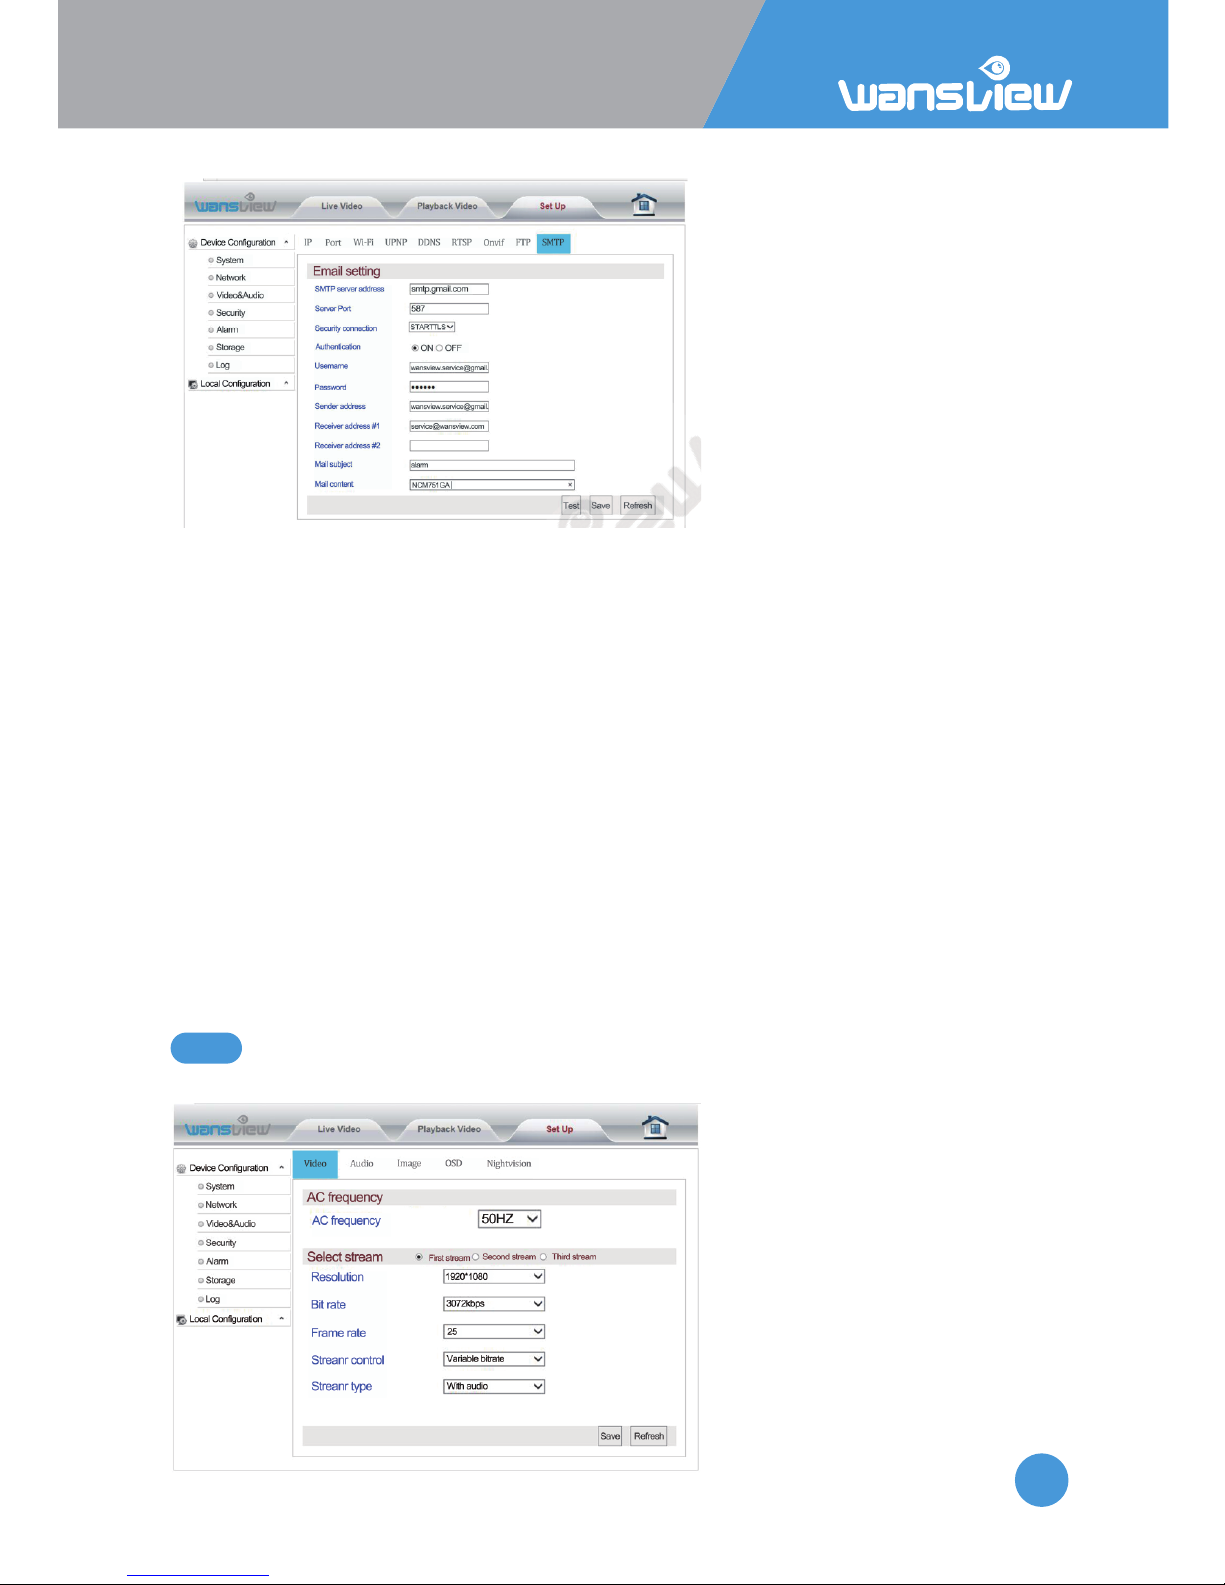
Network >SMTP (E-mail) Seng
To get started, make sure that your
e-mail provider supports SMTP.
Then input required parameters.
Mainstream E-mail suffixes
supported by SMTP include:
smtp.gmail.com, mail.yahoo.com,
smtp.gmx.com,
smtp-mail.outlook.com. Take gmail
seng as an example.
Server address: SMTP stands for
Simple Mail Transfer Protocol.
This field allows the user to enter
the SMTP server used by the email service.
Server Port: This field allows the user to enter the port that corresponds to the selected
SMTP server. The SMTP port is usually set at 25 if there is no security. Some SMTP servers
have their own ports, such as 587 or 465. Specific port number is determined by mail
service provider.
Security connecon: This dropdown box allows the user to select an encrypon type.
User name: Input email address.
Password: Input APP password. APP password allows 2 steps verificaon in your Gmail
account. Click Profile>Account>Sign-in &Security to create App password.
Sender Address: This field allows the user to enter the email address to which alarms are
sent. This email address should be consistent with the above Email address for the User
name.
Receiver Address #1: These fields allow the user to enter the receiver email address
which will receive any emails pertaining to alert and alarm emails.
Mail subject: This field allows the user to define the subject line of the email.
Mail content: This field allows the user to define the mail content.
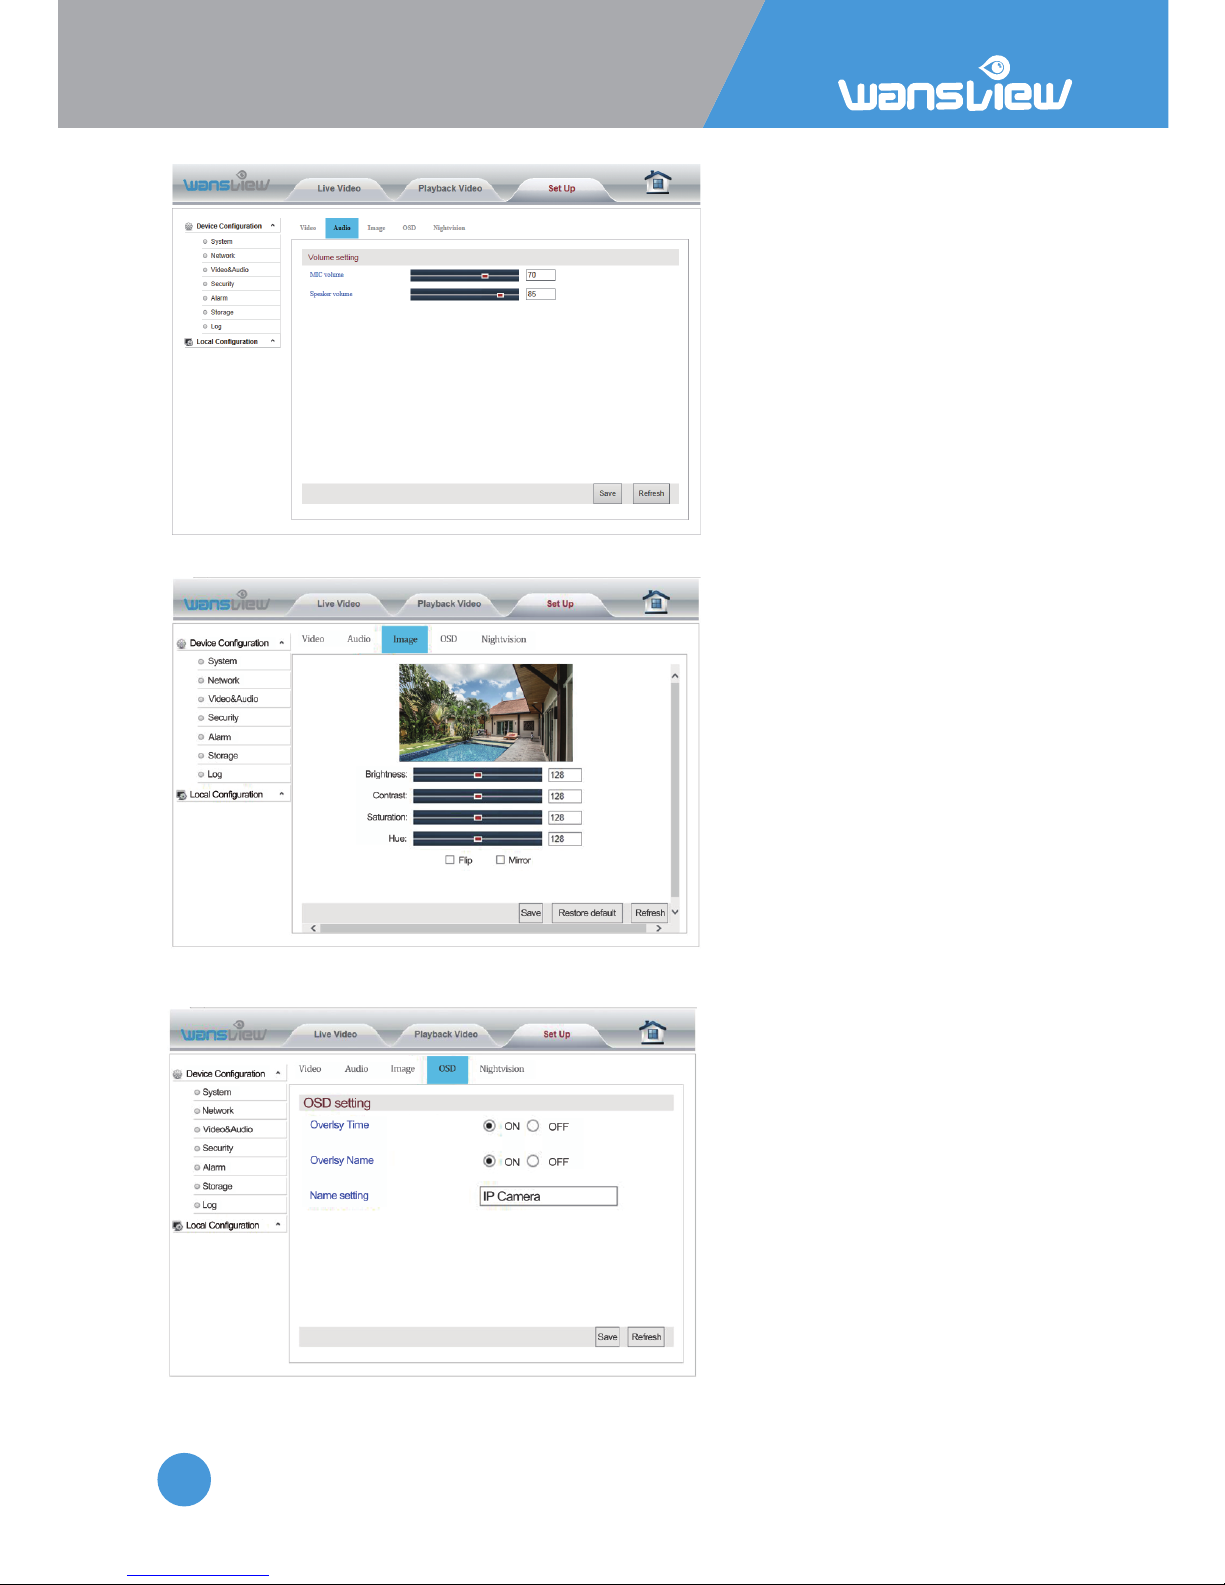
Video and Audio > Video
Users can set the exact AC
Frequency.
Bit stream sengs include:
Resoluon(1920*1080 or
1280*720), Bit rate
(256~4096kbps), Frame rate
(1~30fps)
5.4.3 Video and Audio
Page 54
IP Camera W2(1080P)/W3(720P)
54
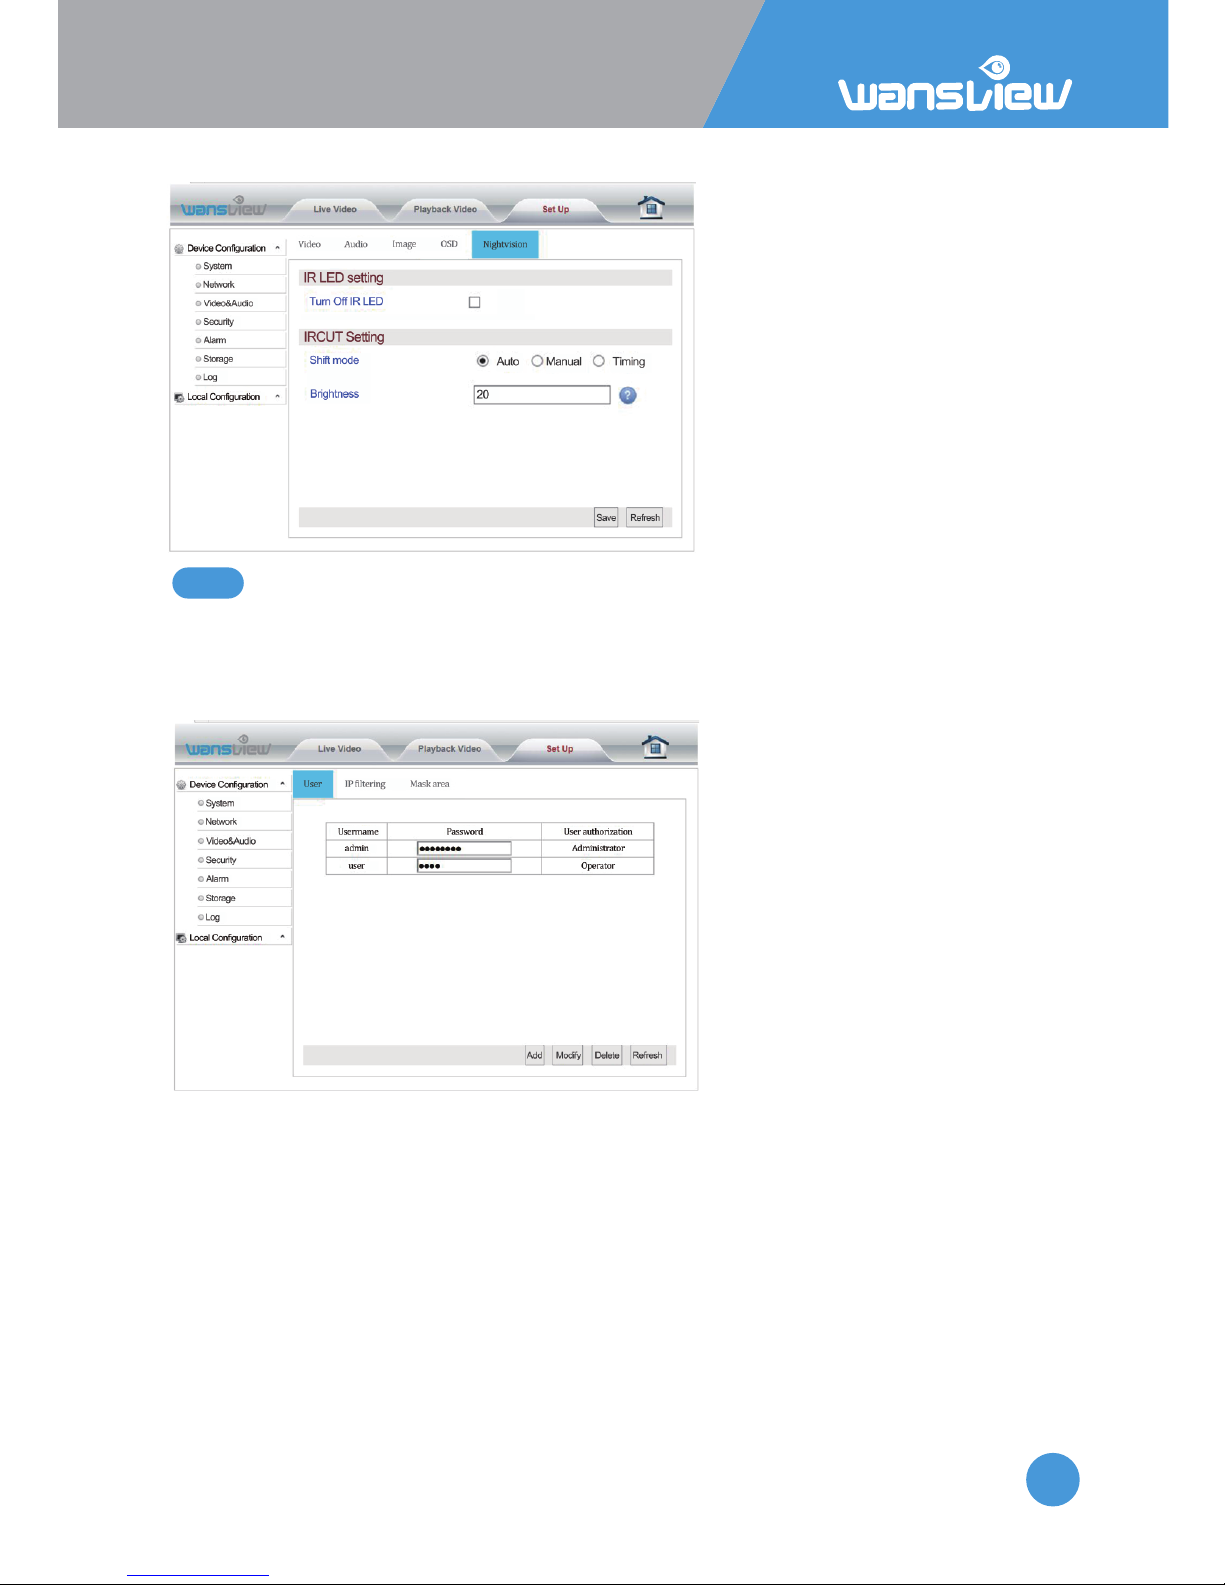
Video and Audio > Audio Seng (funcon disabled in this model)
Video and Audio > Image Seng
Here you can adjust
Microphone and
Speaker volume
Here you can adjust the image
parameters brightness, contrast,
saturaon and hue. You can also
flip and mirror the video image
when ck the opons.
Video and Audio > On Screen Display Time and Camera Name
Enter "OSD Seng" to overlay the
me and name on the video
image.
Page 55
IP Camera W2(1080P)/W3(720P)
55
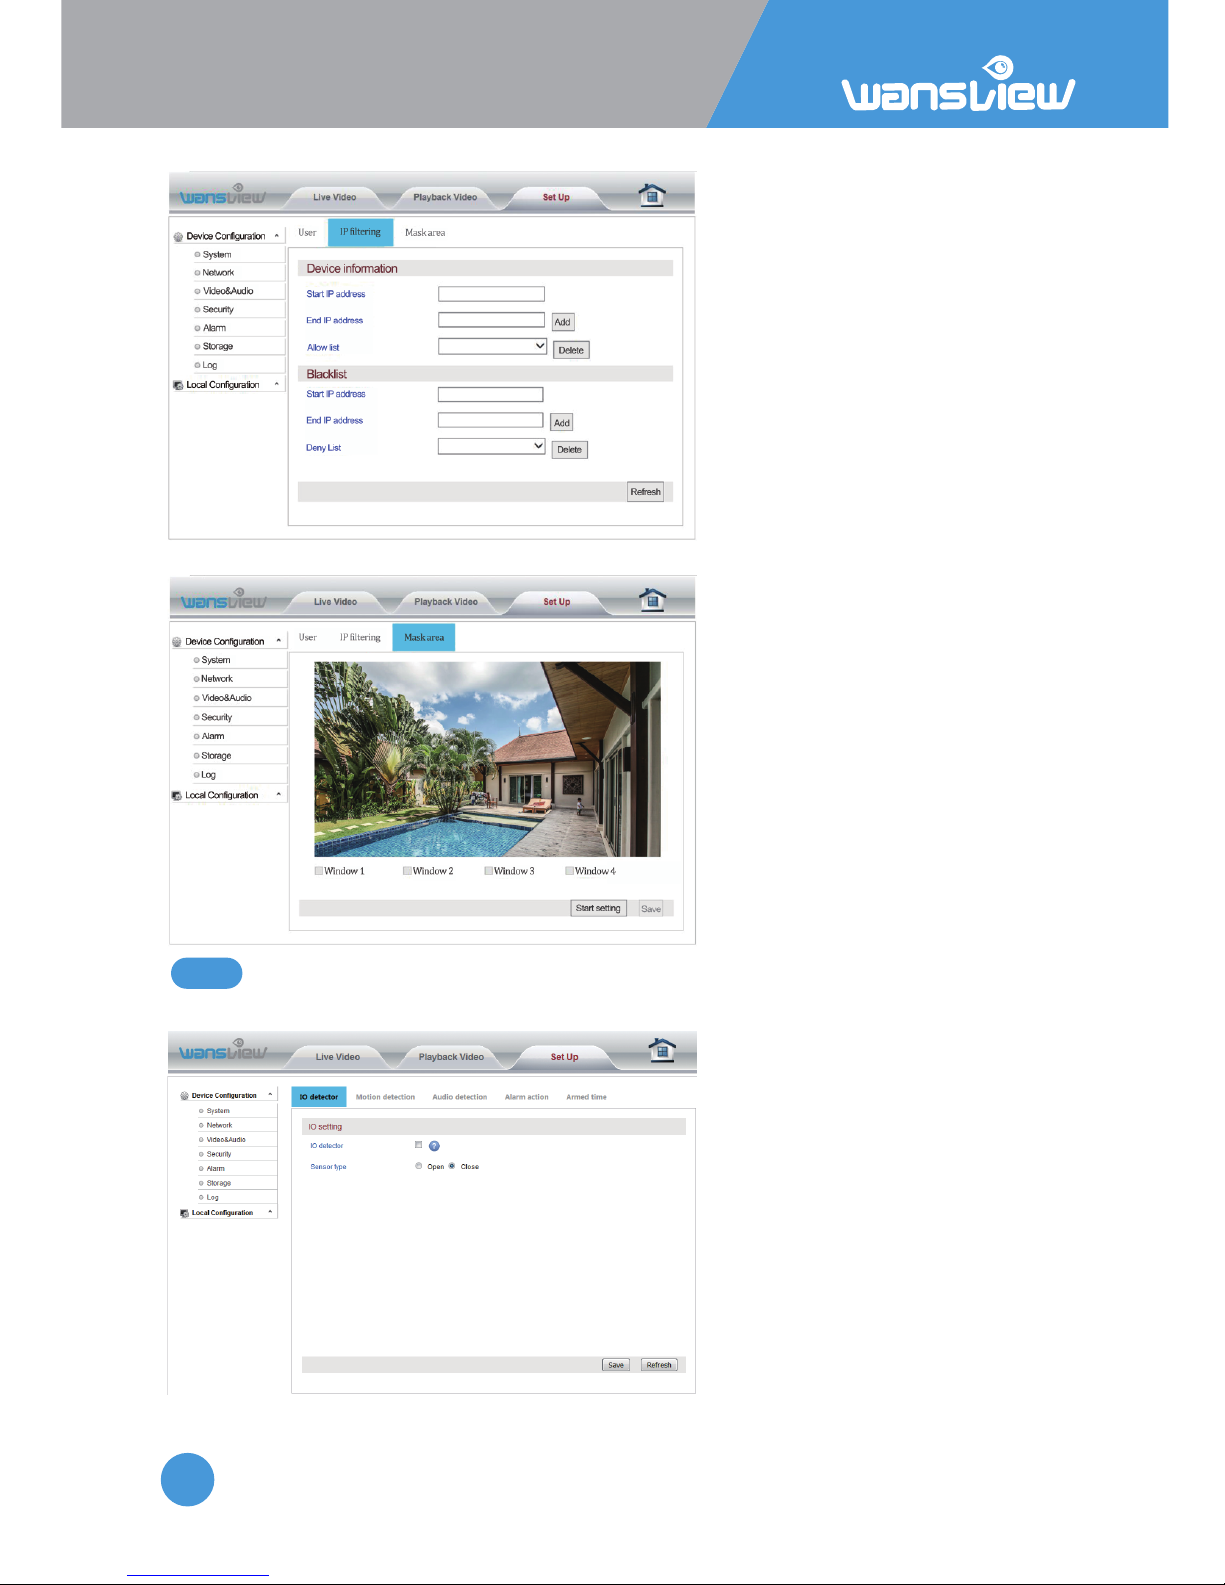
Video and Audio > Night Vision
Enter "Night Vision Seng" to set
IR LED and IRCUT. Once IR LED is
off, the IR LED IR cut will not work
any longer.
To modify /add /delete administrator operator and viewer can be set in
this page. (add up to 8 viewers and set rights in total).
Reminder: Aer the operaon, click Save. Then click Refresh so that the
edited content will be displayed on the web page.
5.4.4 Security
Page 56
IP Camera W2(1080P)/W3(720P)
56
5.4.5 Alarm - Moon and Audio Detecon
Security > IP Filtering
This screen allows for the filtering
of IP addresses, either blocking
them or granng them access to
the camera.
This feature helps make the
camera more secure by liming
remote access only to approved
users. Below is a Screen shot of the
IP Filtering screen.
Security > Mask Area (not available for MAC users)
Users exclude up to 4 areas from
monitoring.
Click Start Seng and check the
windows.
Alarm > IO Detector (disabled in this model)
Camera allows user to add an
external source of alert (moon
sensor or push buon). We
recommend the Instar IN-500 PIR
Sensor as external moon sensor.
The external sensor can be always
open or always close. Please check
your alarm device seng in the
user guide.
Page 57
IP Camera W2(1080P)/W3(720P)
57
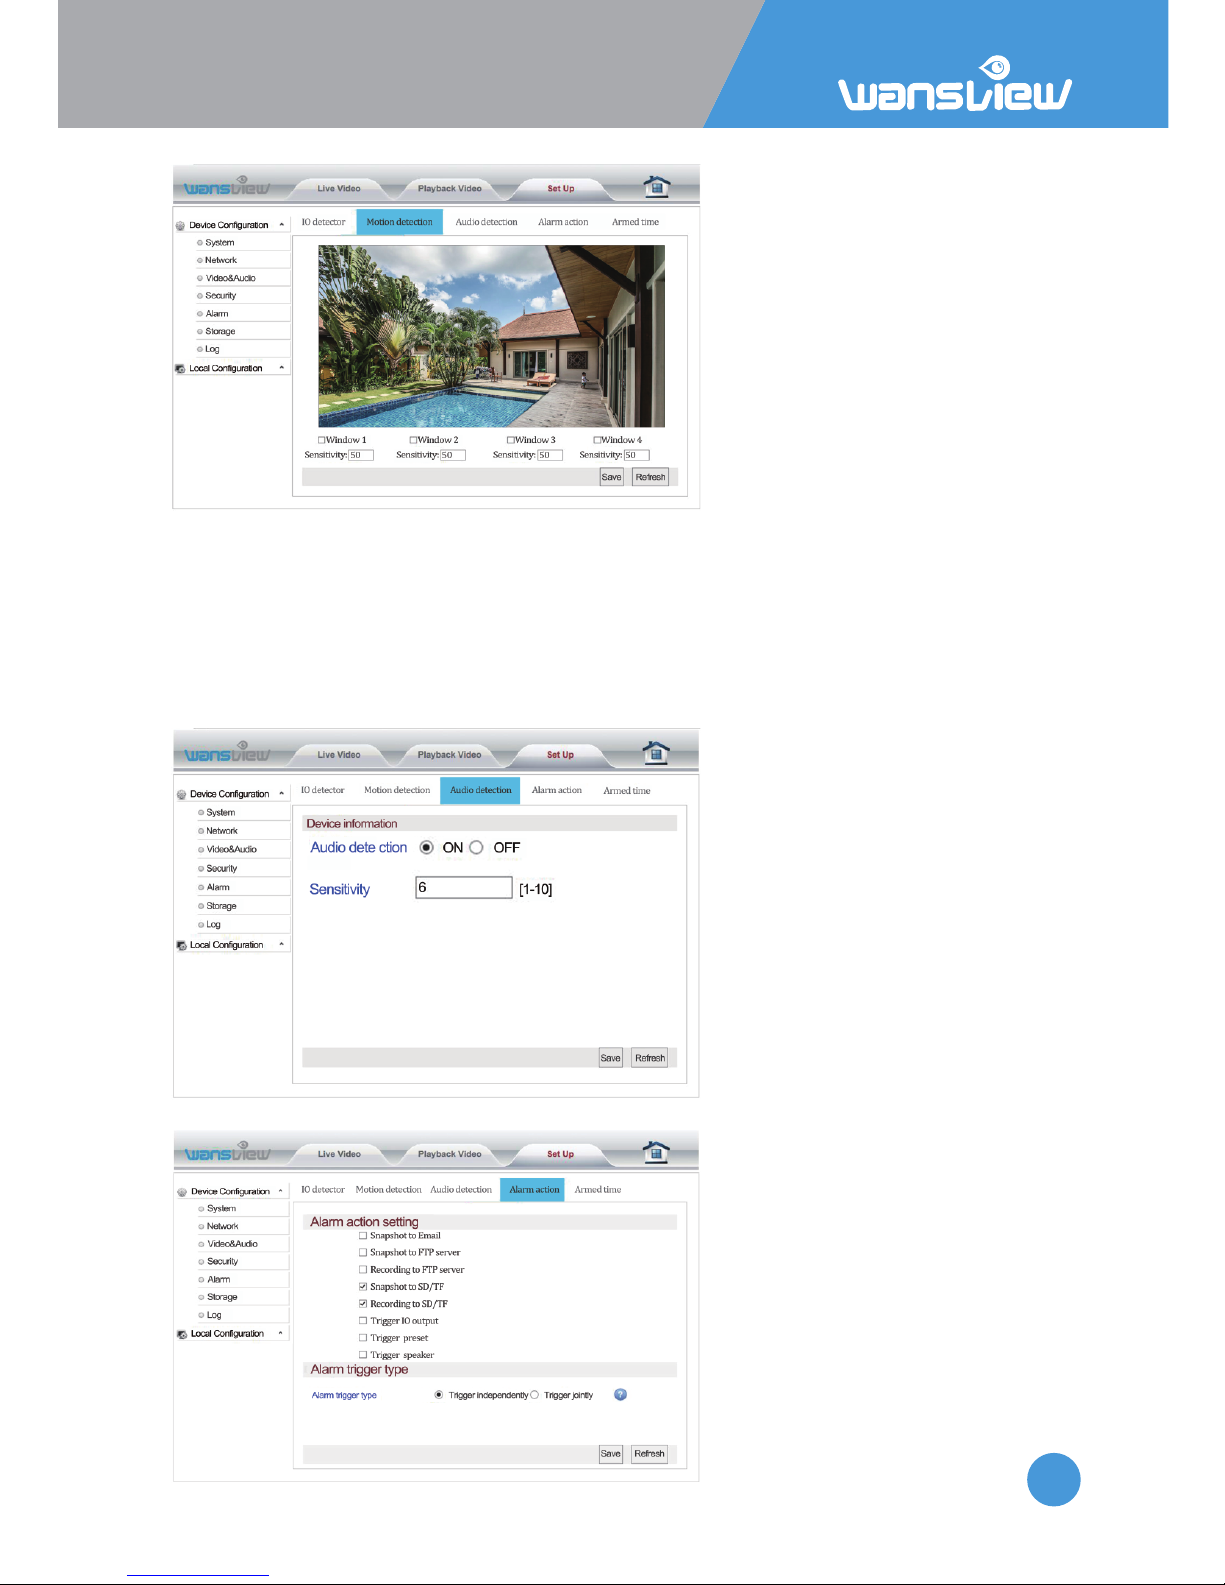
Alarm > Moon Detecon (Intruder Monitor)
The Moon Detecon in the Web
Interface is more advanced than in
the App. User can set up to 4
detecon areas and different
sensivity. 15 corresponds to the
lower level and 55 to the mid-level.
The IP Camera begins recording
when it detects movement/audio
and stops recording in 30 sec. In this
secon, users can customize the
moon detecon feature. This
feature can be set on the app or in
the web interface. Moon is
detected by changes in the pixels of
Alarm > Audio Detecon (Baby Monitor)(funcon disabled in this model)
Alarm > Alarm Acon
the images.
Please note that moon detecon doesn’t work through windows. In this case we recommend to
connect an external moon sensor out of the window using the IO alarm port.
Page 58
IP Camera W2(1080P)/W3(720P)
58
Once the alarm is set, users will receive a noficaon on the smartphone (only Android) if
the app is running on the background and can choose to get:
Snapshot to Email: When an alarm is detected, the camera will send three pictures to the
email box. Users can set up to 2 recipients.
Click Mail Seng to setup the email. Check your email provider for SMTP Server and Port.
Snapshot to FTP server: When an alarm is detected, the camera will send 2 pictures to
your FTP server. Click on FTP Seng to setup FTP.
Recording to FTP server: When an alarm is detected, the camera will send a 15 sec video
to your FTP server.
Snapshot to SD/TF: When an alarm is detected, the camera will send 2 pictures to the SD
card (funcon disabled in this model).
Recording to SD/TF: When an alarm is detected, the camera will send a 30 sec video to
the SD card (funcon disabled in this model).
Trigger IO Output: User can add a siren or another alarm device to the camera (wired).
When an alarm is detected, the external IO output will work. Users can choose alarm
duraon from 5 to 30 sec (funcon disabled in this model).
Trigger Preset: When an alarm is detected, the camera will focus on one of the 8 Preset
spots (see above) (funcon disabled in this model).
Trigger Speaker: When an alarm is detected the speaker will act as a siren for the chosen
length (5-30sec) (funcon disabled in this model).
Trigger indipendently: The alarm will be triggered for any kind of acve alarm event
(Moon/ Voice/IO).
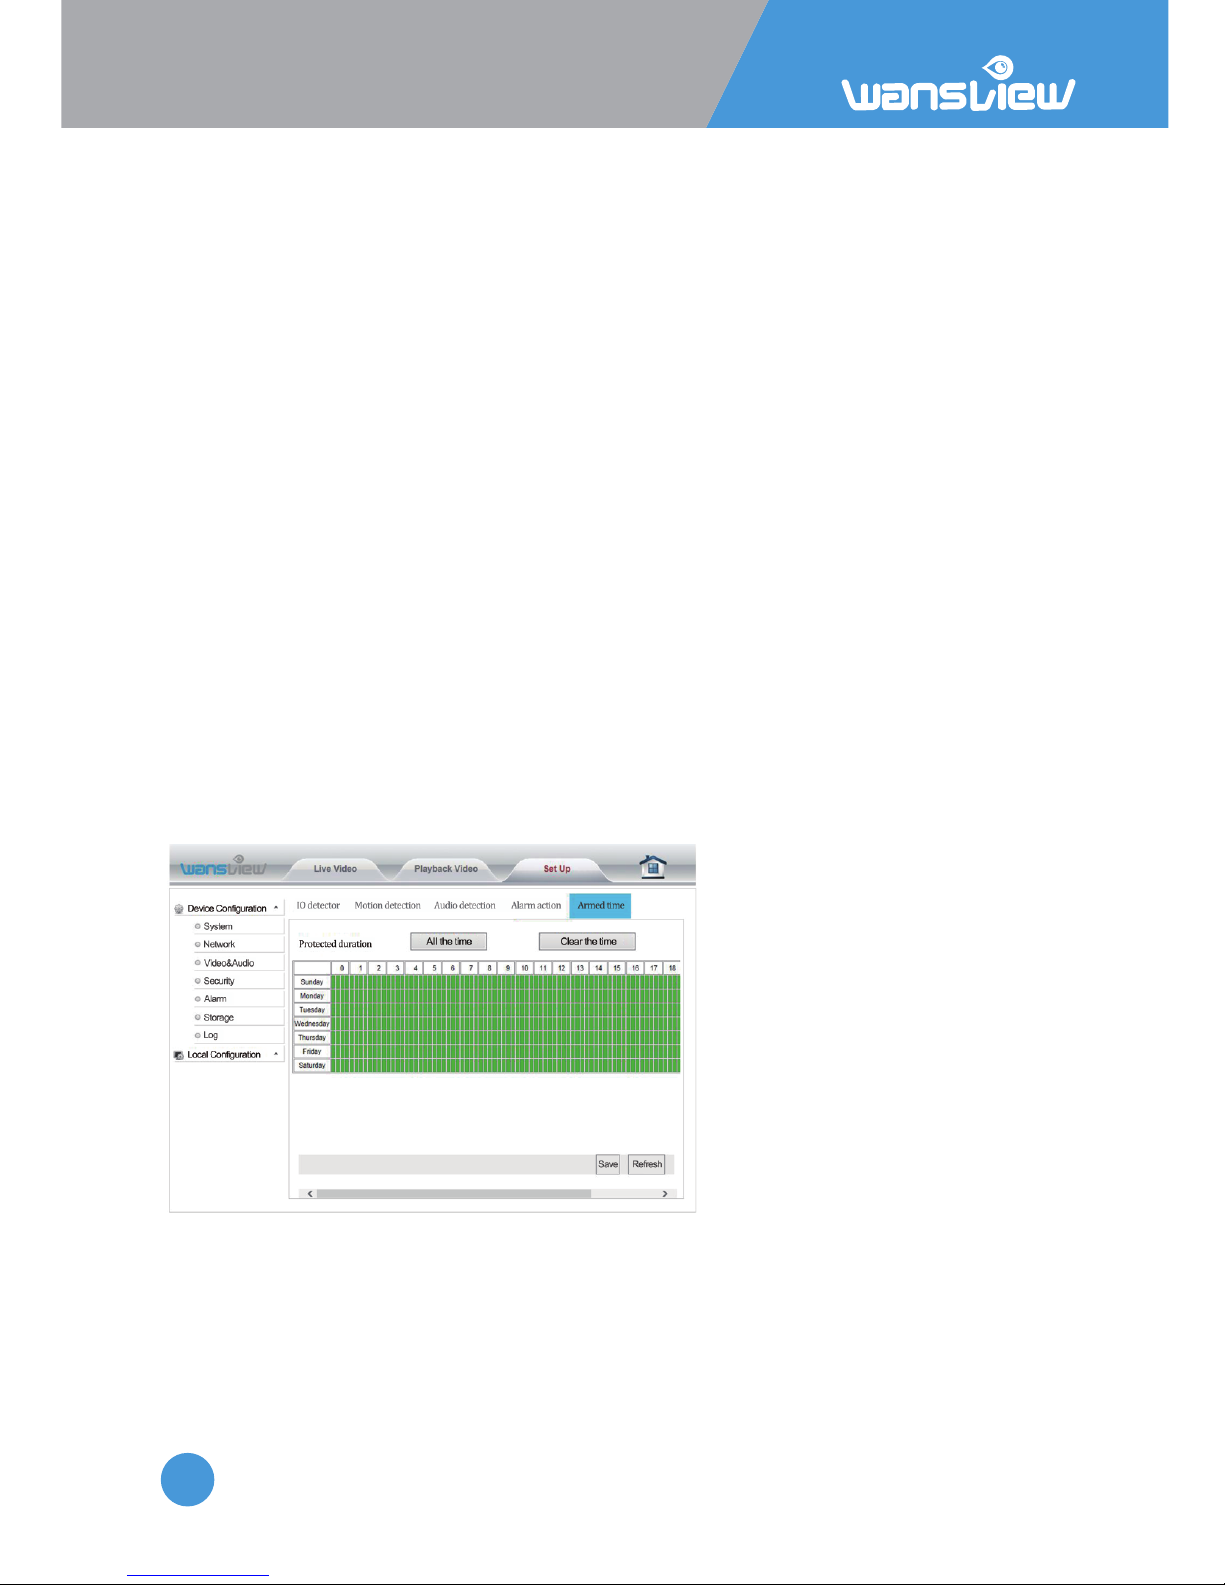
Alarm > Armed Time
By default alarm is armed 24h/7
days. Users can choose specific
days and me ranges.
Page 59
IP Camera W2(1080P)/W3(720P)
59
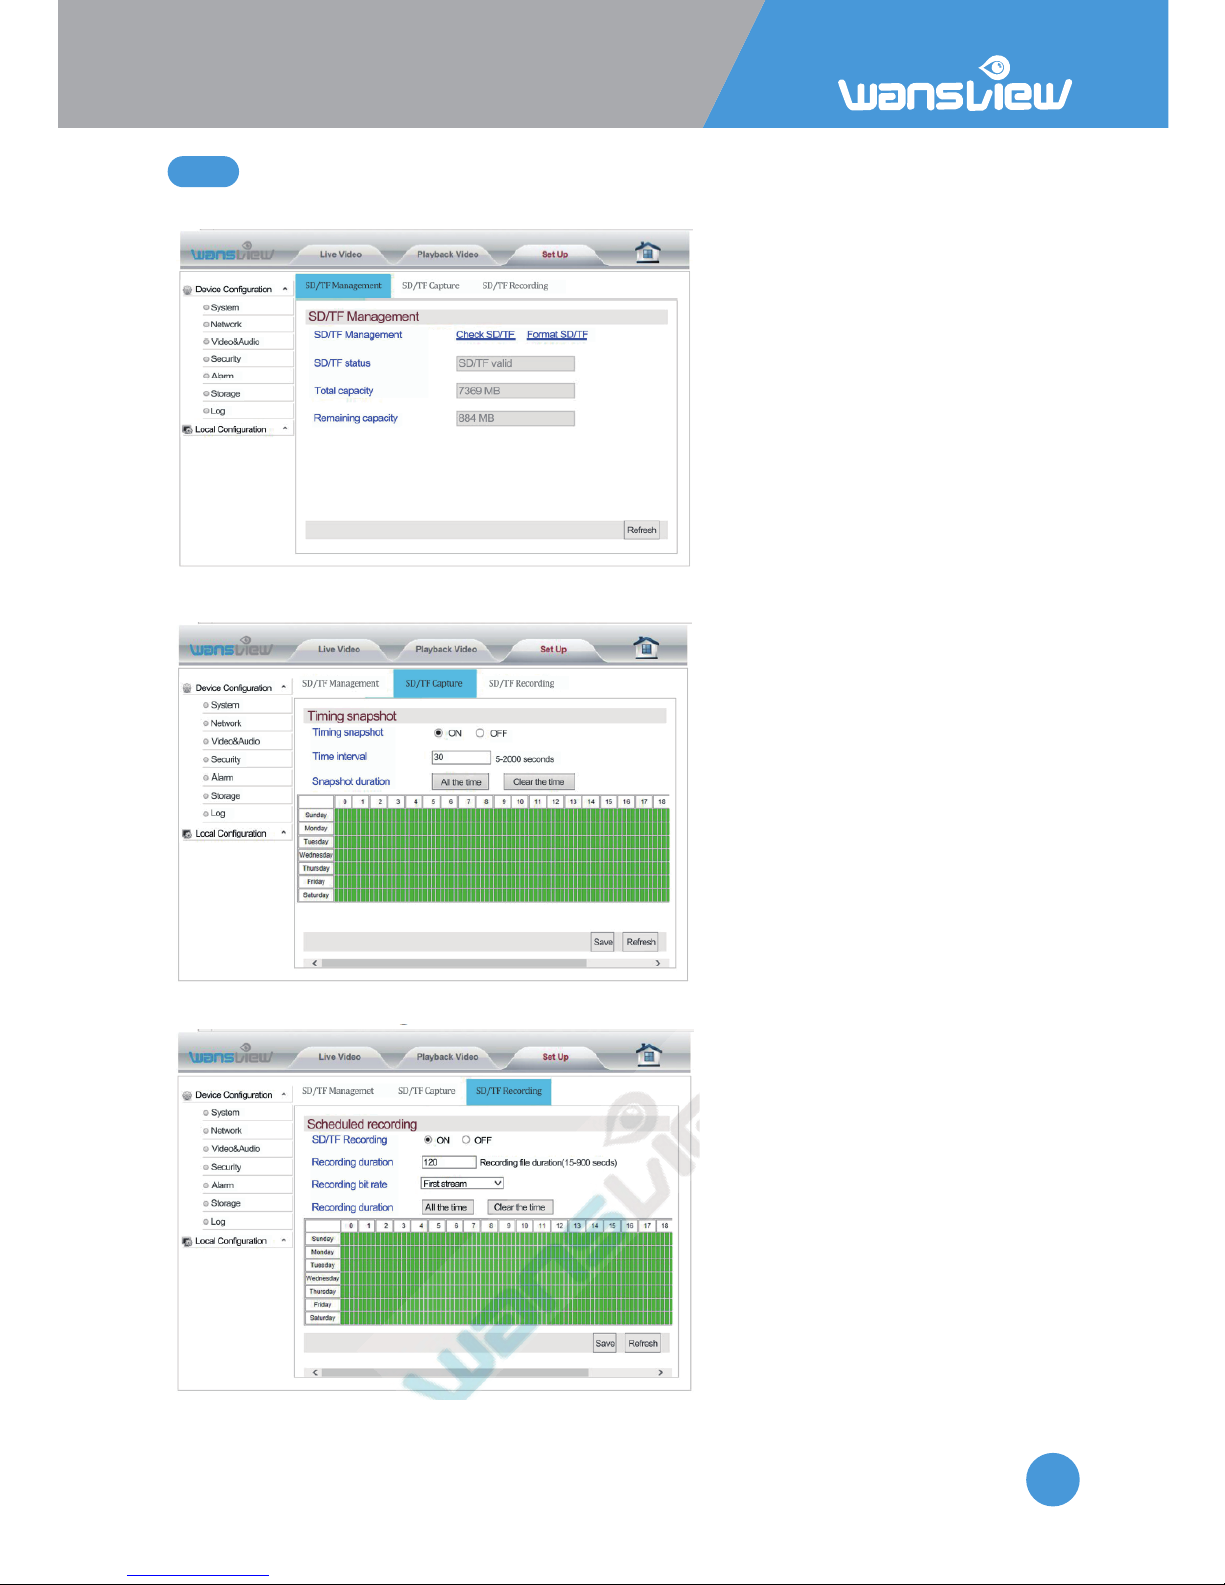
SD Card Management
Storage > SD card Capture (Timed Snapshots)
Storage > SD Card Scheduled Recording
Schedule recording and store them
on SD card. Set the me span of
each recording.
Choose the resoluon/bit rate.
Reminder: The system default is
automac overwring for the SD
card video. If the storage space is
full, the new video will
automacally overwrite the earliest
video file.
If the card is not readable,
please kindly Format the
SD card.
Take Timed snapshots
and save them on the
SD card
5.4.6 Storage(funcon disabled in this model)
Page 60
IP Camera W2(1080P)/W3(720P)
60
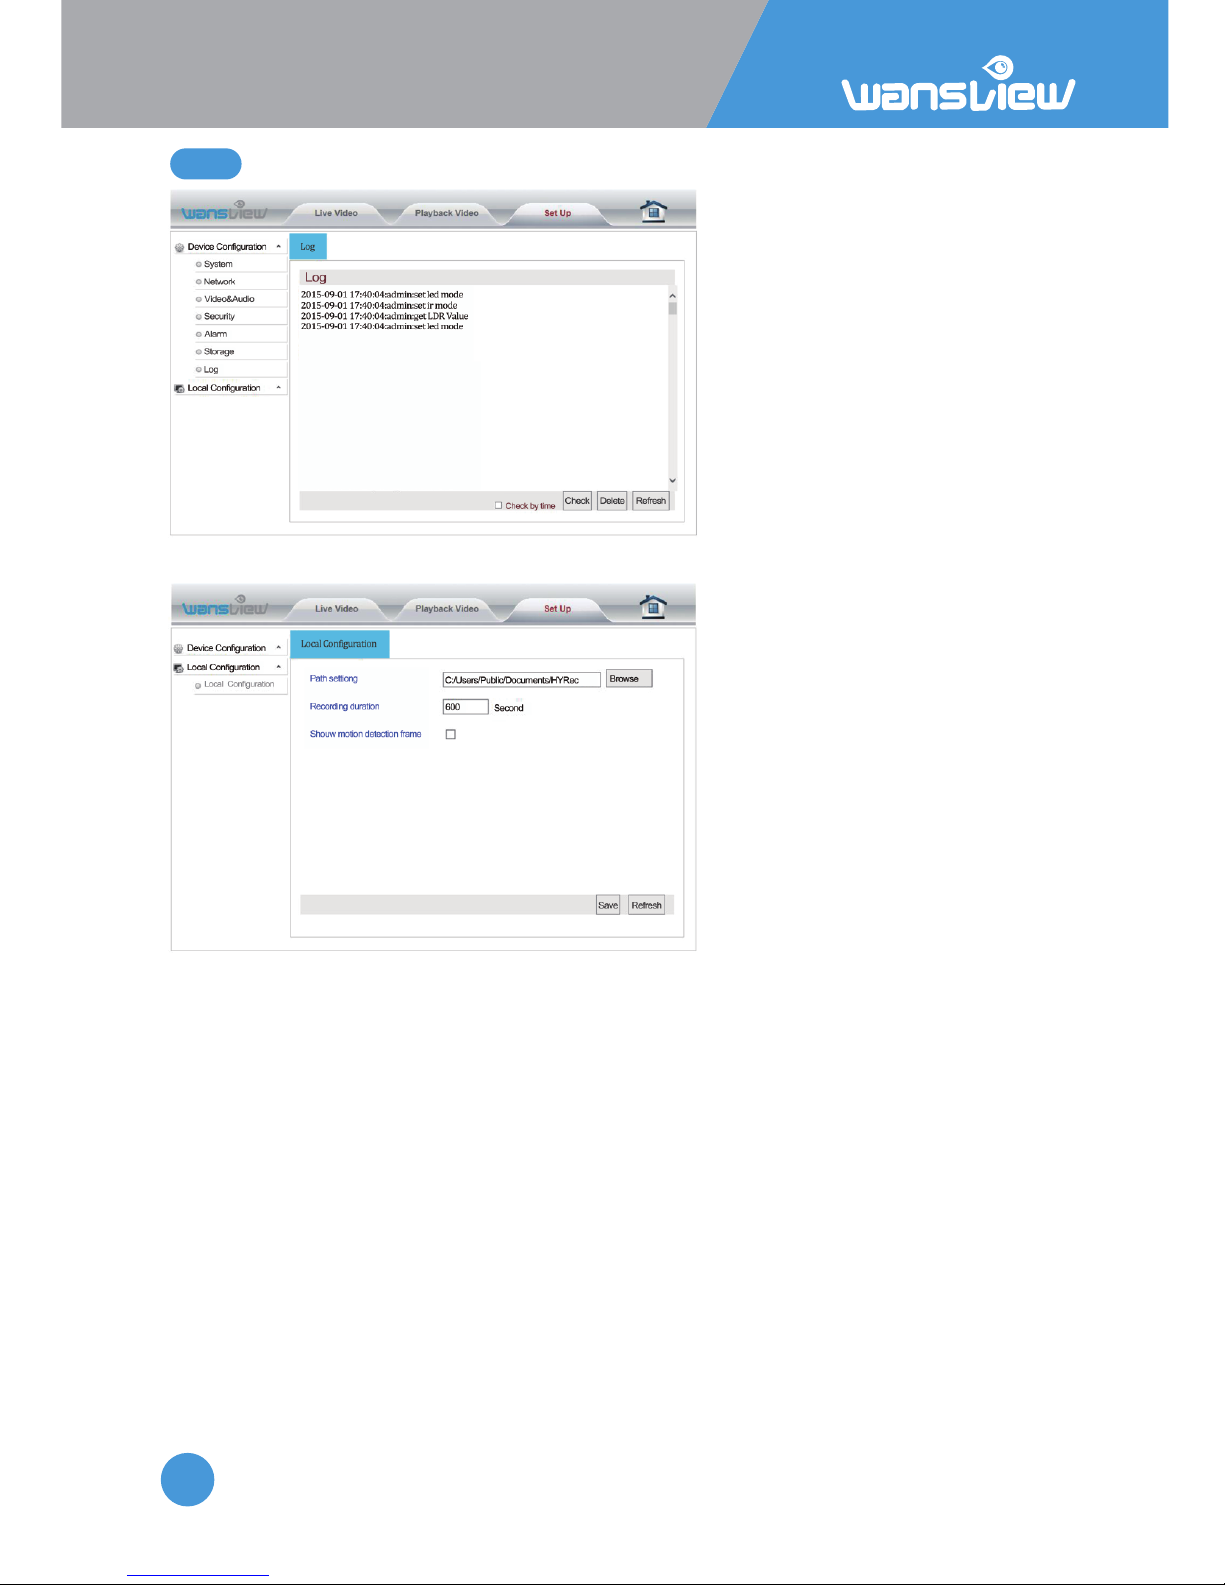
Log > Local Configuraon (not available for MAC users)
Enter "Local Configuraon". You can set the save path for videos and pictures on your PC
as well as the recording duraon.
Reminders:
1: When using IE9 or higher, please run the browser video path and picture path as
"administrator" so that you can save the files successfully. The default video path is
"HYRec" on disk C. The default picture path is “HYSnap” on disk C.
2: The user can start up the Moon Detecon Alarm and view the flashing box on the
screen.
5.4.7 Log
Page 61

www.wansview.com
 Loading...