

Wansview W1 User Manual
Support Email/ Skype: service2@wansview.com 1
Wansview Pro HD
1080P Pro IP Camera W1
User Manual
Revised 18thApril 2016

Support Email/ Skype: service2@wansview.com 2
Contents
Contents...............................................................................................................................................................................................................2
Welcome..............................................................................................................................................................................................................6
Important Security Warning...............................................................................................................................................................................6
Important Safeguards and Warnings................................................................................................................................................................. 6
1.Features and Specifications.........................................................................................................................................................................8
1.1 Product Overview................................................................................................................................................................................ 8
1.2 Product Profile..................................................................................................................................................................................... 8
1.3 Packing List..........................................................................................................................................................................................8
1.4 Features.................................................................................................................................................................................................8
2. Device Connection......................................................................................................................................................................................... 9
2.1 Connection Diagram............................................................................................................................................................................9
2.2 Wi-Fi Set Up.......................................................................................................................................................................................10
2.2.1 Wi-Fi Set Up Via Network Cable..........................................................................................................................................10
2.2.2 WPS/QSS One Key Wi-Fi Set Up.........................................................................................................................................10
2.2.3 Wi-Fi Set Up Via Advanced Settings....................................................................................................................................10
3. iPhone/iPad Access.......................................................................................................................................................................................11
3.1 Software Installation..........................................................................................................................................................................11
3.2 App Interface Introduction................................................................................................................................................................ 11
3.2.1 Interface...................................................................................................................................................................................11
3.2.2 Add Camera............................................................................................................................................................................ 13
3.3 Live View and Setting....................................................................................................................................................................... 14
3.3.1 Viewing Camera on a Single Window.................................................................................................................................. 14
3.3.2 Viewing Camera on Multi-View........................................................................................................................................... 15
3.4 Edit Camera........................................................................................................................................................................................16
3.4.1 Local Picture and Record.......................................................................................................................................................16
3.4.2 SD/TF Record Playback........................................................................................................................................................ 16
3.4.3 Alarm Setting..........................................................................................................................................................................17
3.4.4 Advanced Setting....................................................................................................................................................................18
3.4.4.1 WiFi Setting.................................................................................................................................................................18
3.4.4.2 User Settings............................................................................................................................................................... 18
3.4.4.3 Time Setting................................................................................................................................................................ 19
3.4.4.4 FTP Setting..................................................................................................................................................................19
3.4.4.5 E-Mail Setting............................................................................................................................................................. 19
3.4.4.6 SD/TF Card Setting.................................................................................................................................................... 20
3.4.4.7 Reboot camera.............................................................................................................................................................20
3.4.4.8 About Camera..............................................................................................................................................................20
3.4.5 Start Video.............................................................................................................................................................................. 21
3.4.6 Delete Device......................................................................................................................................................................... 21
4. Android Access.............................................................................................................................................................................................21
4.1 Software Installation..........................................................................................................................................................................22
4.2 App Interface Introduction................................................................................................................................................................ 22
4.2.1 Interface.................................................................................................................................................................................. 22

Support Email/ Skype: service2@wansview.com 3
4.2.2 Add Camera............................................................................................................................................................................ 23
4.3 Live View and Setting....................................................................................................................................................................... 25
4.3.1 Viewing Camera on a Single Window.................................................................................................................................. 25
4.3.2. Viewing Camera on Multi-View.......................................................................................................................................... 26
4.4 Edit Camera........................................................................................................................................................................................26
4.4.1 Edit camera Alias....................................................................................................................................................................26
4.4.2 Local Picture and Record.......................................................................................................................................................27
4.4.3 SD/TF Record Playback........................................................................................................................................................ 28
4.4.4 Alarm Setting..........................................................................................................................................................................28
4.4.5 Advanced Setting....................................................................................................................................................................29
4.4.5.1 Wi-Fi Setting...............................................................................................................................................................29
4.4.5.2 User Settings............................................................................................................................................................... 29
4.4.5.3 Time Setting................................................................................................................................................................ 30
4.4.5.4 FTP Setting..................................................................................................................................................................30
4.4.5.5 Mail Setting.................................................................................................................................................................30
4.4.5.6 SD/TF Setting............................................................................................................................................................. 31
4.4.5.7 Reboot Device.............................................................................................................................................................31
4.4.5.8 About Camera..............................................................................................................................................................31
5. Web Access................................................................................................................................................................................................... 32
5.1 Start up................................................................................................................................................................................................32
5.1.1 Network Installation...............................................................................................................................................................32
5.1.2 Login....................................................................................................................................................................................... 32
5.1.3 Plugin installation...................................................................................................................................................................32
5.2 Playback Video...................................................................................................................................................................................34
5.3 Set Up................................................................................................................................................................................................. 35
5.3.1 System.....................................................................................................................................................................................35
5.3.1.1 Device Status...............................................................................................................................................................35
5.3.1.2 Time Setting................................................................................................................................................................ 35
5.3.1.4 Other Settings..............................................................................................................................................................35
5.3.1.5 Multiple Settings.........................................................................................................................................................36
5.3.1.6 Maintenance................................................................................................................................................................ 36
5.3.1.7 Device Information.....................................................................................................................................................36
5.3.2 Network...................................................................................................................................................................................37
5.3.2.1 IP Address Setting.......................................................................................................................................................37
5.3.2.2 Port Setting..................................................................................................................................................................37
5.3.2.3 Wi-Fi Set Up............................................................................................................................................................... 37
5.3.2.4 UPNP...........................................................................................................................................................................38
5.3.2.5 DDNS Setting............................................................................................................................................................. 38
5.3.2.6 RTSP Setting............................................................................................................................................................... 38
5.3.2.7 Onvif Setting............................................................................................................................................................... 39
5.3.2.8 FTP Setting..................................................................................................................................................................39
5.3.2.9 SMTP (E-mail) Setting...............................................................................................................................................39
5.3.3 Video and Audio.....................................................................................................................................................................40
5.3.3.1 Video............................................................................................................................................................................40

Support Email/ Skype: service2@wansview.com 4
5.3.3.2 Image Setting.............................................................................................................................................................. 40
5.3.3.3 On Screen Display Setting......................................................................................................................................... 40
5.3.3.4 Night Vision Setting................................................................................................................................................... 41
5.3.4 Safety.......................................................................................................................................................................................41
5.3.4.1 User Setting.................................................................................................................................................................41
5.3.4.2 IP Filtering...................................................................................................................................................................42
5.3.4.3 Mask Area....................................................................................................................................................................42
5.3.5 Alarm.......................................................................................................................................................................................43
5.3.5.1 IO Detector..................................................................................................................................................................43
5.3.5.2 Motion Detection........................................................................................................................................................ 43
5.3.5.3 Audio Detection.......................................................................................................................................................... 43
5.3.5.4 Alarm Action............................................................................................................................................................... 44
5.3.5.5Armed Time..................................................................................................................................................................44
5.3.7 Log...........................................................................................................................................................................................44
5.3.8 Local Configuration...............................................................................................................................................................45
5.4 Mac Web Access................................................................................................................................................................................ 45
6. Windows PC Software Access.................................................................................................................................................................... 46
6.1 About iSmartViewPro........................................................................................................................................................................46
6.2 Operational Requirements.................................................................................................................................................................46
6.3 iSmartViewPro Installation............................................................................................................................................................... 46
6.4 iSmartViewPro Operation................................................................................................................................................................. 46
6.4.1 CMS Interface.........................................................................................................................................................................46
6.4.2 Access to camera.................................................................................................................................................................... 47
6.4.2.1 Add Camera.................................................................................................................................................................47
6.4.2.2 Edit / Delete Device....................................................................................................................................................48
6.5 Play Video.......................................................................................................................................................................................... 48
6.6 System Settings..................................................................................................................................................................................49
6.7 Local menu bar...................................................................................................................................................................................50
7. Mac Software Access...................................................................................................................................................................................51
7.1 About iSmartViewPro........................................................................................................................................................................51
7.2 Operational Requirements.................................................................................................................................................................51
7.3 Installation..........................................................................................................................................................................................51
7.4 iSmartViewPro 2.0 Operation...........................................................................................................................................................52
7.4.1 Interface.................................................................................................................................................................................. 52
7.4.2 Device Library........................................................................................................................................................................52
Add........................................................................................................................................................................................... 52
Delete....................................................................................................................................................................................... 53
Set.............................................................................................................................................................................................53
Device Edit.............................................................................................................................................................................. 53
Device information..................................................................................................................................................................53
User Setting..............................................................................................................................................................................53
WiFi Setting.............................................................................................................................................................................54
7.4.3 System Settings...................................................................................................................................................................... 54
7.4.4 Video Library..........................................................................................................................................................................54

Support Email/ Skype: service2@wansview.com 5
7.4.5 Camera Log.............................................................................................................................................................................55
8. FAQs/Troubleshooting.................................................................................................................................................................................56
8.1 Compatibility Settings for Internet Explorer................................................................................................................................... 56
8.2 Plugin Issues.......................................................................................................................................................................................56
8.3 Install IE Tab for Chrome 43............................................................................................................................................................ 57
8.4 Install IE Tab for Firefox 42..............................................................................................................................................................58
8.5 Port Forwarding................................................................................................................................................................................. 58
8.6 iSmartViewPro Exit Abruptly on Windows XP...............................................................................................................................60
Support Email/ Skype: service2@wansview.com 6
Welcome
Thank you for purchasing Wansview W1 1080P Pro HD IP Camera!
The user manual is designed to be a reference tool for the installation and operation of your W1 camera.
Here you can find information about the camera's features and functions, as well as information to aid in troubleshooting.
For quick access to the start-up guide and other support information, go to www.wansview.com/Service/download/
Many of the setup and installation sections below have corresponding videos on YouTube. Scan the QR Code to enter our Youtube
channel
To contact Wansview support, please do one of the following:
1: Contact us by Email: service2@wansview.com / service@wansview.com
2: Contact us by Skype: service2@wansview.com
3: Contact us by Facebook
www.facebook.com/WansviewClub/
Important Security Warning
In order to keep your Wansview camera secure and prevent unauthorized access, please make sure to follow the steps below:
1. Always make sure that your camera has the latest firmware as listed on www.wansview.com/Service/download/
2. Never use the default password for your camera. Always ensure that your password is 8-10 characters and contains a combination
of lowercase characters, uppercase characters and numbers.
Important Safeguards and Warnings.
1. Electrical Safety
All installation and operation should conform to your local electrical safety codes.
The product must be grounded to reduce the risk of electric shock.
We assume no liability or responsibility for any fires or electrical shock caused by improper handling or installation.
2. Transportation Safety
Heavy stress, violent vibrations, and excess moisture should not occur during transportation, storage, and installation of the device.
3. Installation
Handle the device with care. Keep the device right side up.
Do not apply power to the camera before completing installation.
Do not place objects on top of the camera.
4. Repair Professionals
All inspection and repair work should be done by qualified service engineers.
We are not liable for any problems caused by unauthorized modifications or user-attempted repair.
5. Environment
The camera should be kept in a cool, dry place away from direct sunlight, flammable materials, explosive substances, etc.
This product should be transported, stored, and used only in the specified environments as stated above.
Do not aim the camera at a strong light source, as it may cause overexposure of the picture, and may affect the longevity of the

Support Email/ Skype: service2@wansview.com 7
camera's sensors.
Ensure that the camera is in a well ventilated area to prevent overheating.
6. Operation and Maintenance
Do not touch the camera sensor or lens directly.
To clean dust or dirt off of the lens, use an air blower or a microfiber cloth.
7. Accessories
Be sure to use only the accessories recommended by the manufacturer.
Before installation, please open the package and check to ensure that all of the components are present.
Contact the retailer where you purchased from the camera, or Wansview directly, if anything is broken or missing in the package.
Support Email/ Skype: service2@wansview.com 8
1.Features and Specifications
1.1 Product Overview
Thank you for purchasing a Wansview K1 Pro HD IP Camera! The product is an integrated indoor/ outdoor IP Camera developed
specifically for network video applications. It is suitable for families, shops, chain stores, supermarkets, office buildings and other
uses.
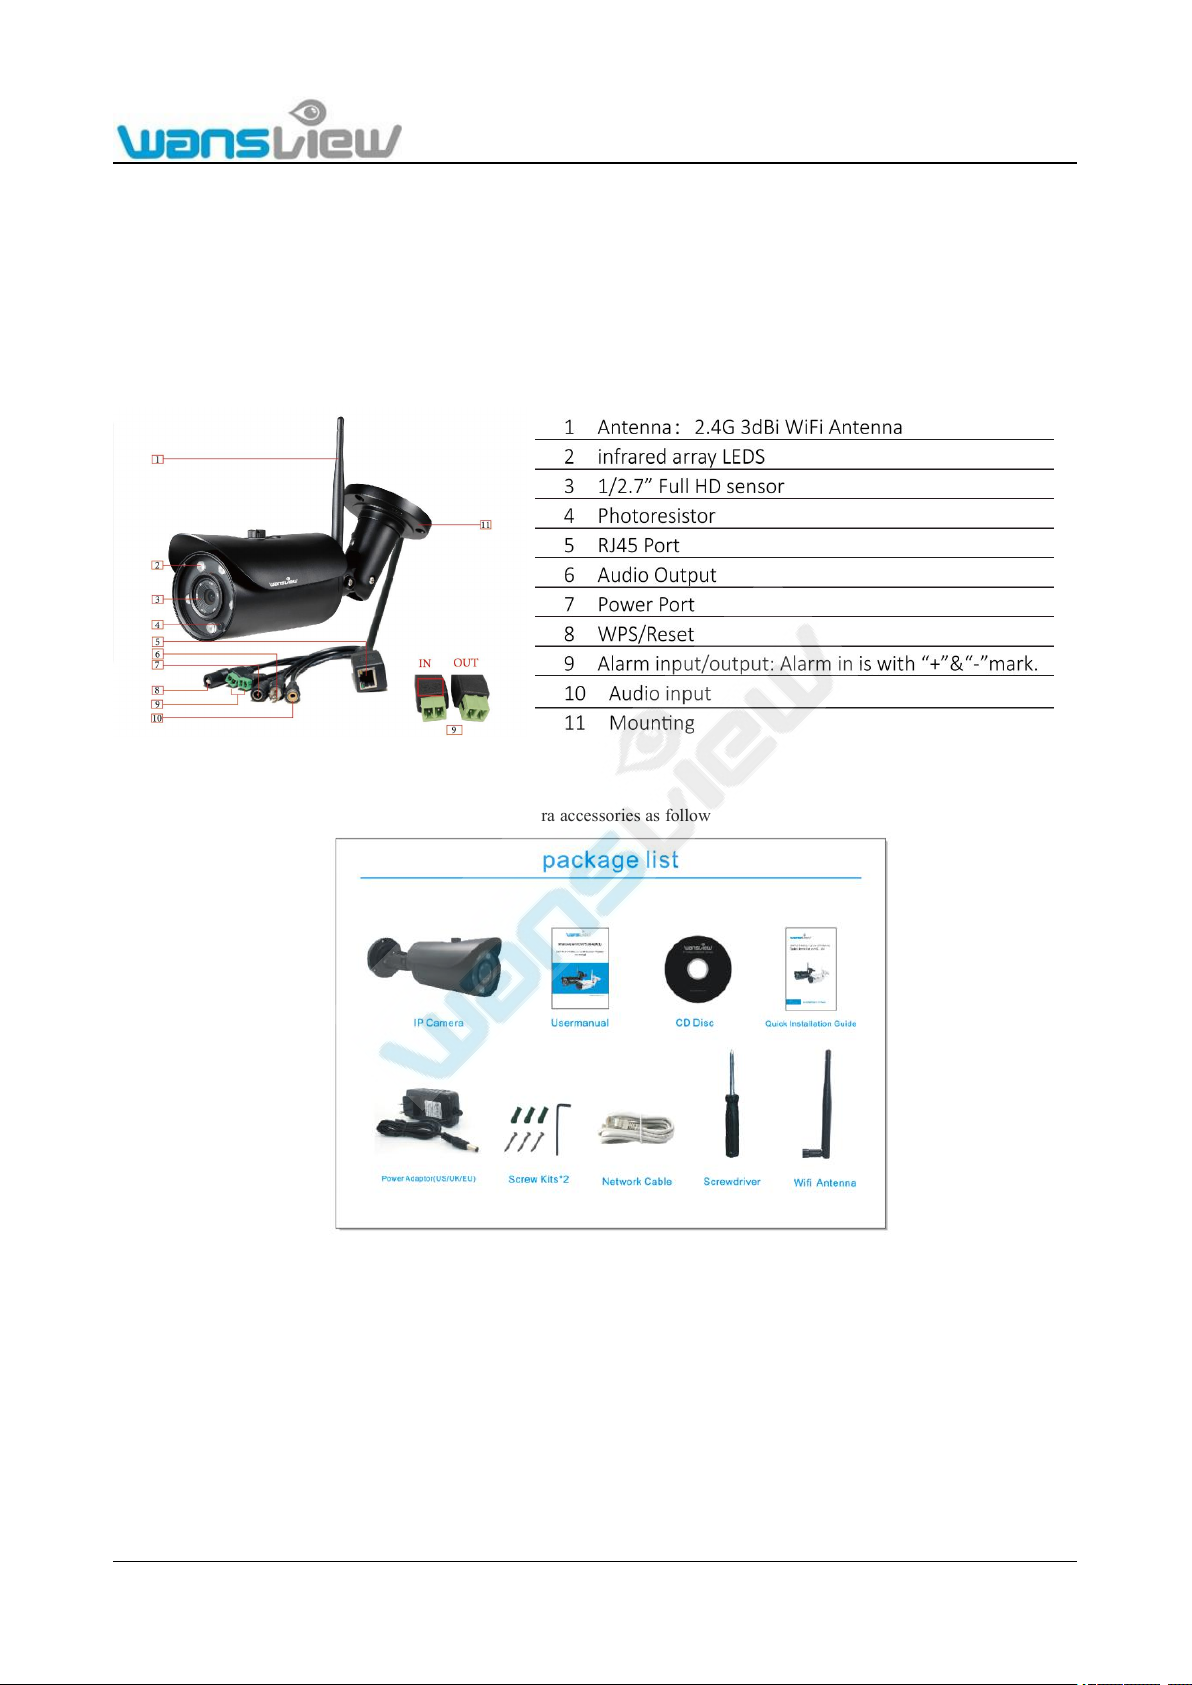
1.2 Product Profile
1.3 Packing List
Please make sure you received all items including the camera accessories as follows:
Figure 1.3.1
Note: Please contact us immediately if there are any damaged items or if the package is short of any of the accessories listed
above.
1.4 Features
● 2.0 Mega pixel Full HD Outdoor Wireless IP Camera
● Dual Stream, H.264/MJPEG video Compression
● 2.0 Mega Pixel lens f=6mm,F=1.2, 1/2.7” Full HD sensor
● Day/Night Surveillance, 36 PCS infrared LEDS On/Off Auto Switch
● Supports DDNS connection
Support Email/ Skype: service2@wansview.com 9
● Motion Detection alarm via E-Mail, FTP, SD card
● Free DDNS Service Embedded
● Compatible with free PC Central Management Software
● Compatible with free iOS and Android APP
● Supports WPS - One Button Push Secure Wireless Connection
● Supports IEEE 802.11n Wireless Connection
● Supports WEP, WPA and WPA2 Encryption
● Waterproof IP66 for outdoor use
● Support ONVIF and RTSP protocol
● Plug and Play is optional
2. Device Connection
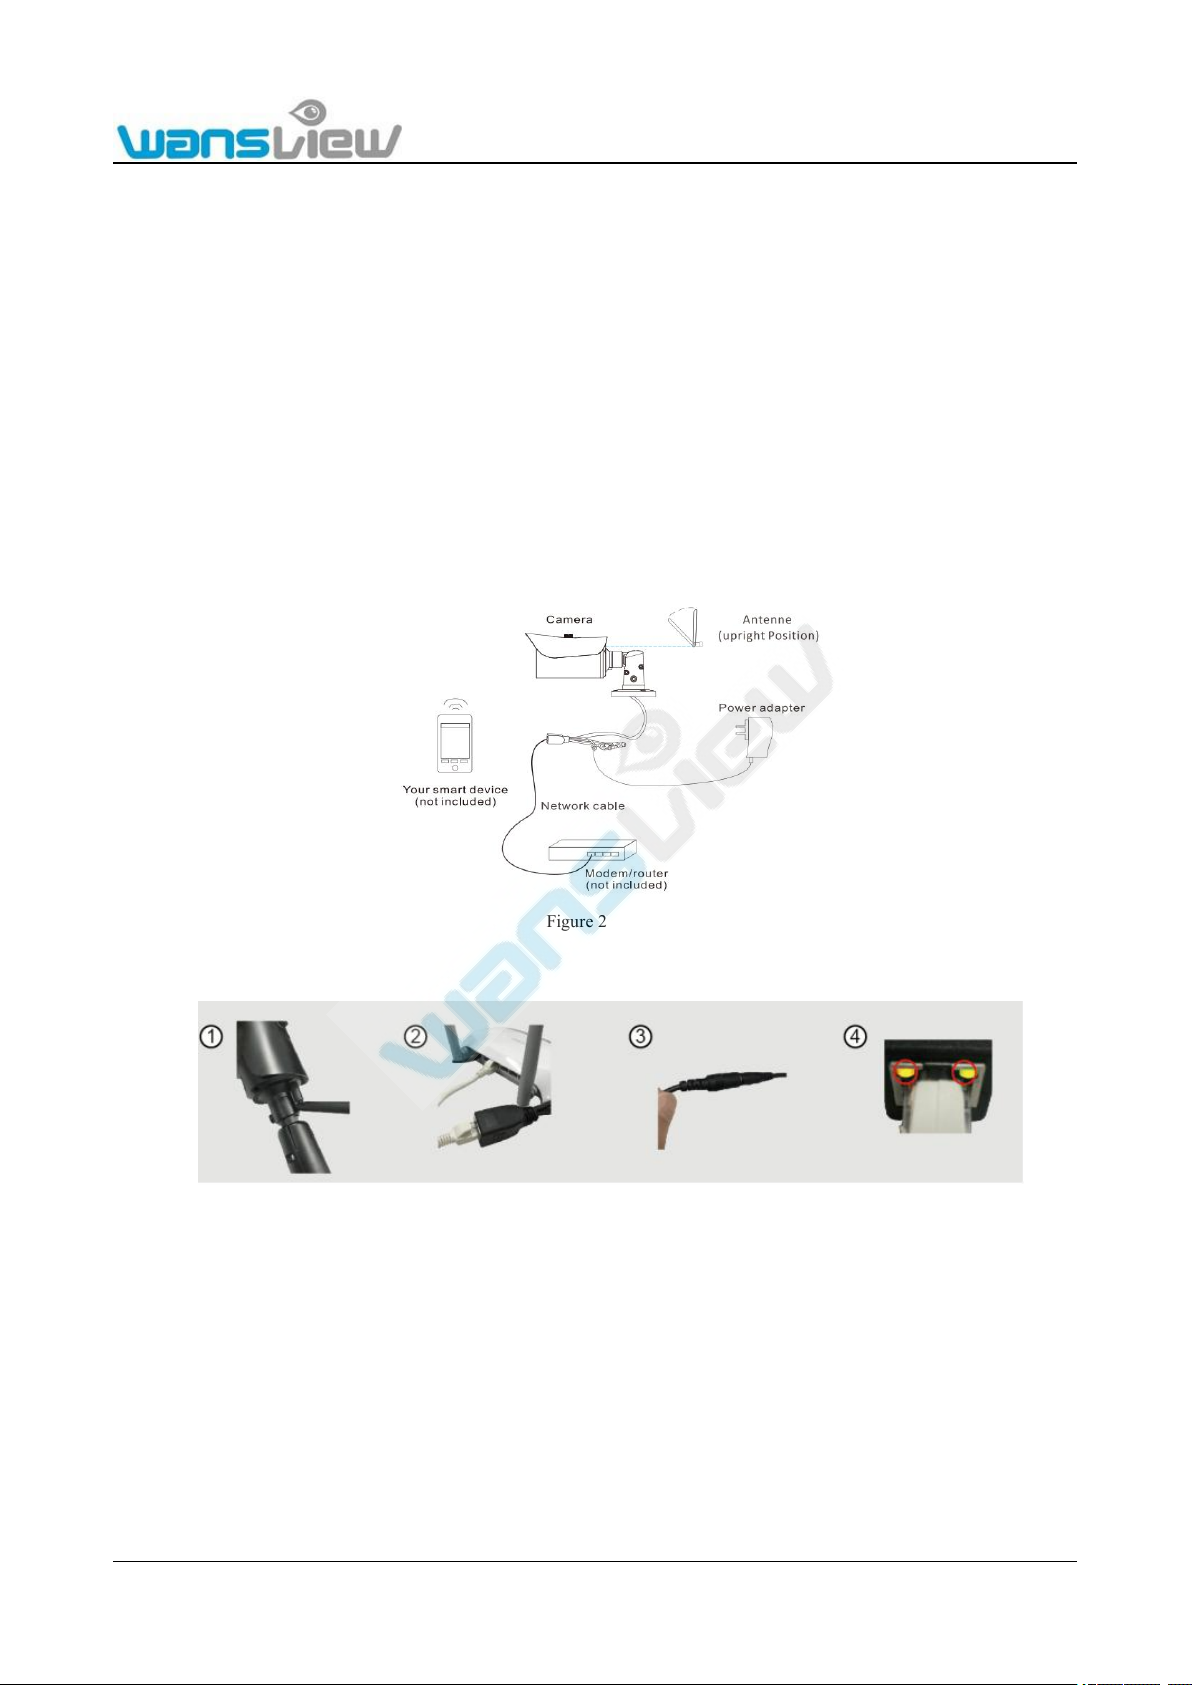
2.1 Connection Diagram
Figure 2.1.1
Steps for product connection:
Figure 2.1.2
1. Please install and tightly screw in the accessory Wi-Fi antenna into the antenna aperture on the back of the camera.
2. Connect the IP camera and router via network cable.
3. Use the accessory power adapter to power up the camera (Please verify the output voltage of the adapter and the allowable
voltage value of the camera).
4. Observe the two lights at the network interface. When the orange light on the left side is ON, it indicates that someone is
accessing the camera. When the green light on the right side is ON, it indicates that the network is connected.
You can access the IP camera following the four steps above via a computer by using the power adapter to power up the camera and
connecting the IP camera and router via network cable, or via Wi-Fi. However, before the connection, camera Wi-Fi configuration is
required (under such circumstances, camera Wi-Fi should be configured for the Wi-Fi of the current router so that the camera can be
detected by the LAN computer). For detailed information, please refer to section 2.2 Wi-Fi Set Up.
Support Email/ Skype: service2@wansview.com 10
2.2 Wi-Fi Set Up
2.2.1 Wi-Fi Set Up Via Network Cable
Connect the IP camera and router via a network cable as shown in Figure 2.1.2. Log into the camera and access the system
configuration page following the steps in section 5. Web Access. Complete the set up and unplug the network cable referring to
section 5.3.2.3 to connect the camera via Wi-Fi.
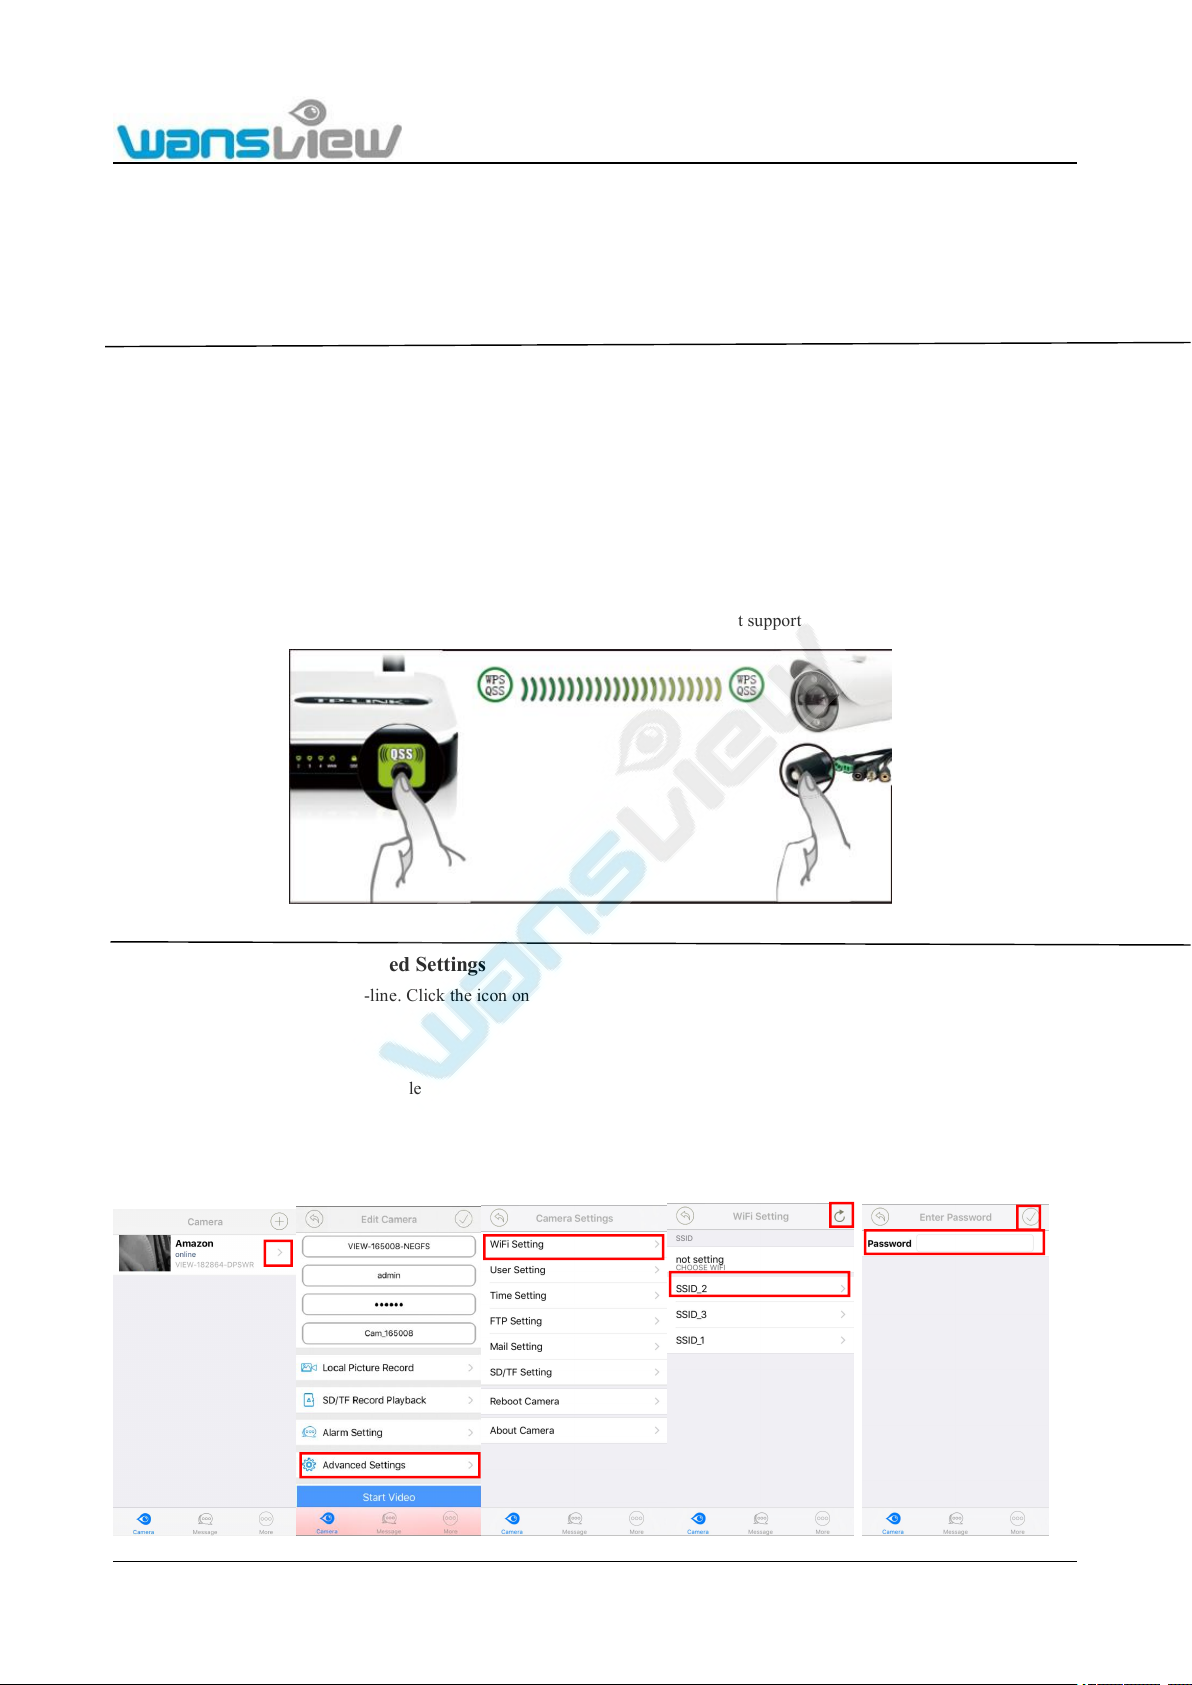
2.2.2 WPS/QSS One Key Wi-Fi Set Up
Since the camera supports WPS/QSS function, Wi-Fi connection set up can be done in a simple way:
1) Please confirm whether the wireless router that the camera will be connected to supports WPS/QSS function (by reviewing the
router manual or getting support from the manufacturer of the router);
2) Connect to the power supply of the camera, and wait for 1 minute. After the camera starts-up, hold the "WPS" button of the
camera for 3s. Then click the “WPS/QSS” button of the Router. The camera and router will perform Wi-Fi configuration based on
the WPS/QSS protocol. (It may need to wait for 1-2 minutes. If not succeed, please enter to your router to check whether the
WPS/QSS function).
Attention: The configuration method is not applicable to some routers since they do not support WPS/QSS.
2.2.3 Wi-Fi Set Up Via Advanced Settings
1) Please keep the camera on-line. Click the icon on the right side of the camera.
2) Enter advanced Settings
3) Select Wi-Fi Setting
4) Automatically search for available Wi-Fi SSID
5) Select WiFi hot spots to connect to
6) Input the password
7) Click Done to complete WiFi set up.
Support Email/ Skype: service2@wansview.com 11
3. iPhone/iPad Access
Wansview APP (iPhone version) is an application developed by our company based on the iOS system. It is applicable to iPad/iPod
of iPhone4s or higher. It supports iOS 6.0 or 9.2. The functional characteristics of this software:
Supports Alarm Notification
Temperature and Humidity Alarm
Supports rapid mobile phone acoustic configuration of camera Wi-Fi;
Supports PnP products of the Smart P2P cloud;
Supports viewing on multiple screens (Supports simultaneous viewing of up to 4 cameras);
Supports Playback SD Card Recording at mobile phone terminal;
Supports video control, video parameter setting, audio monitoring, intercom, pan/tilt control, snapshot and other
functions;
Supports searching for and adding LAN equipment;
Supports editing and management of the equipment (Wi-Fi/Email/Alarm/FTP and other advanced functions);
Supports photo sharing
3.1 Software Installation
3.2 App Interface Introduction
3.2.1 Interface
“Wansview” can be searched for and downloaded from the App Store.
Or scan QR code to download and install App “Wansview” to your
mobile phone.
After installation, the icon will appear on your phone
Support Email/ Skype: service2@wansview.com 12
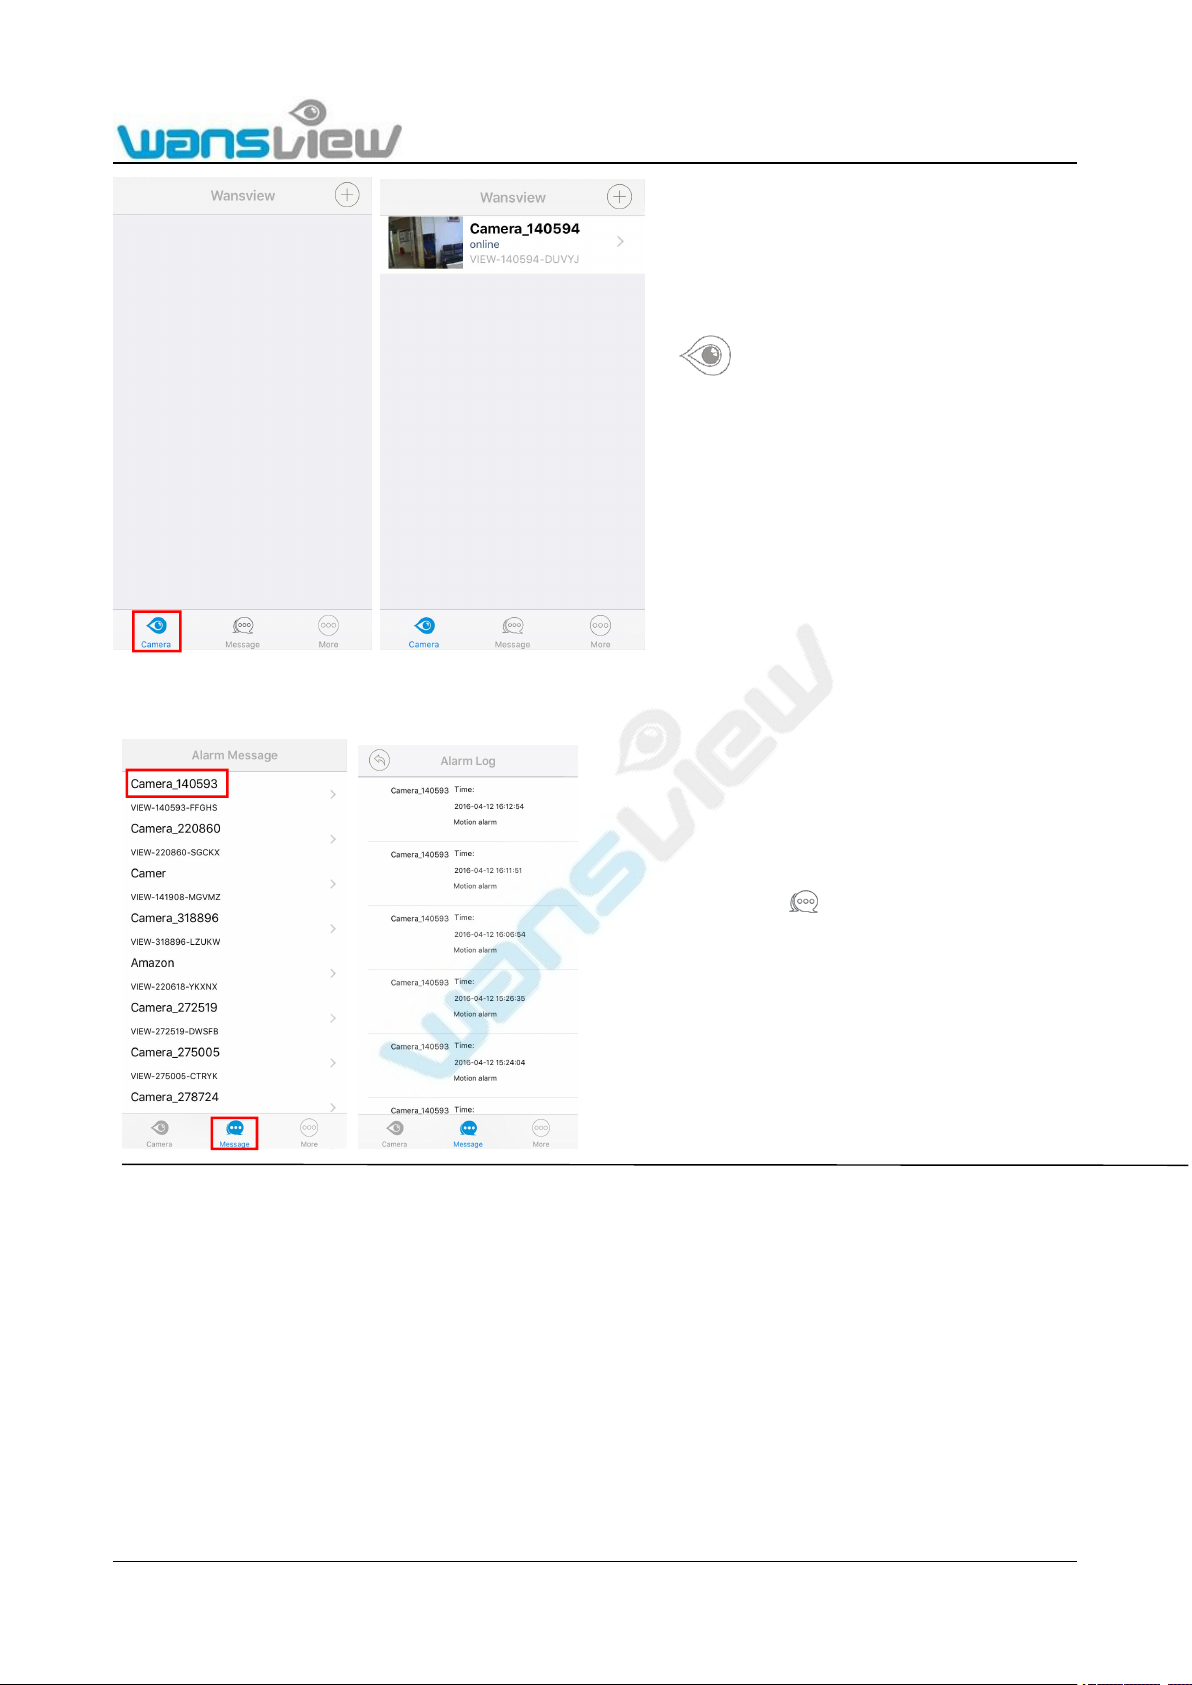
Message
More
By tapping icon to check alarm
message, tap the camera you added
you can check the alarm type.
Camera: On this page, user can add camera,
check camera list and can enter to Edit Camera page.
Support Email/ Skype: service2@wansview.com 13
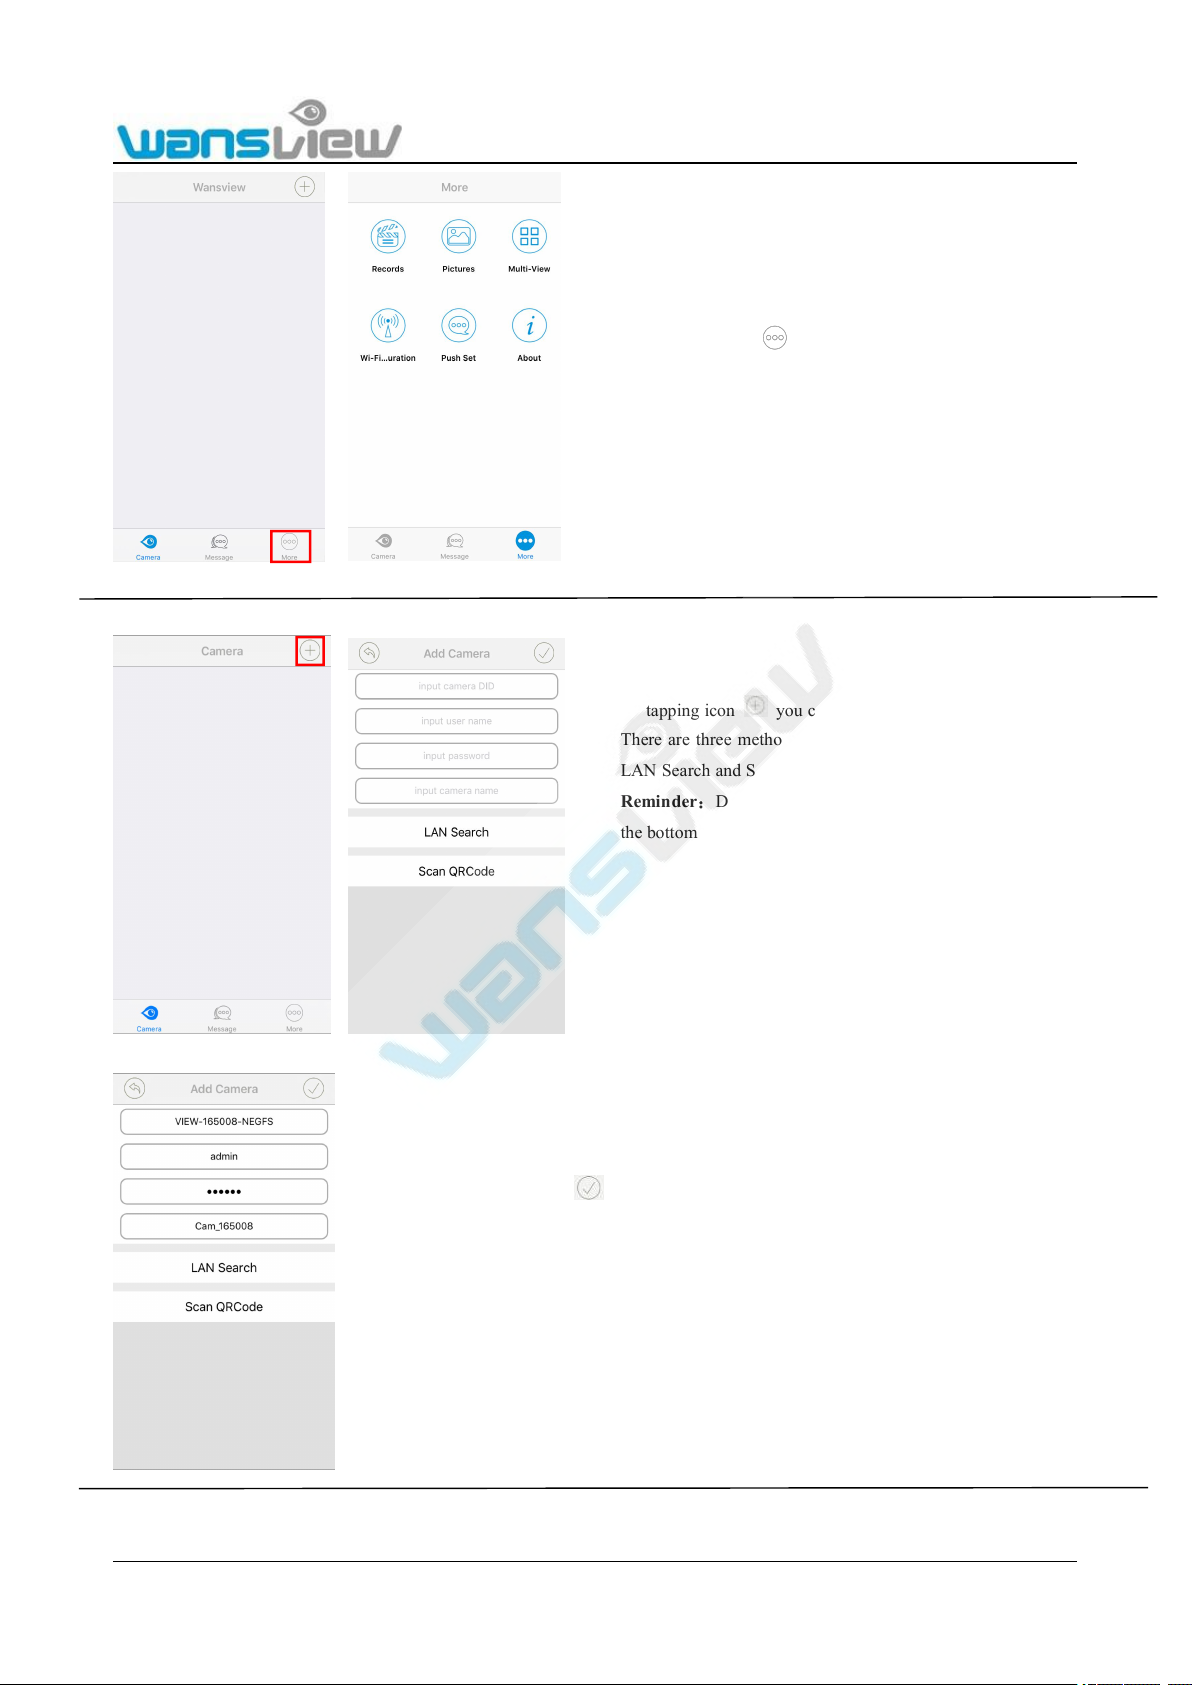
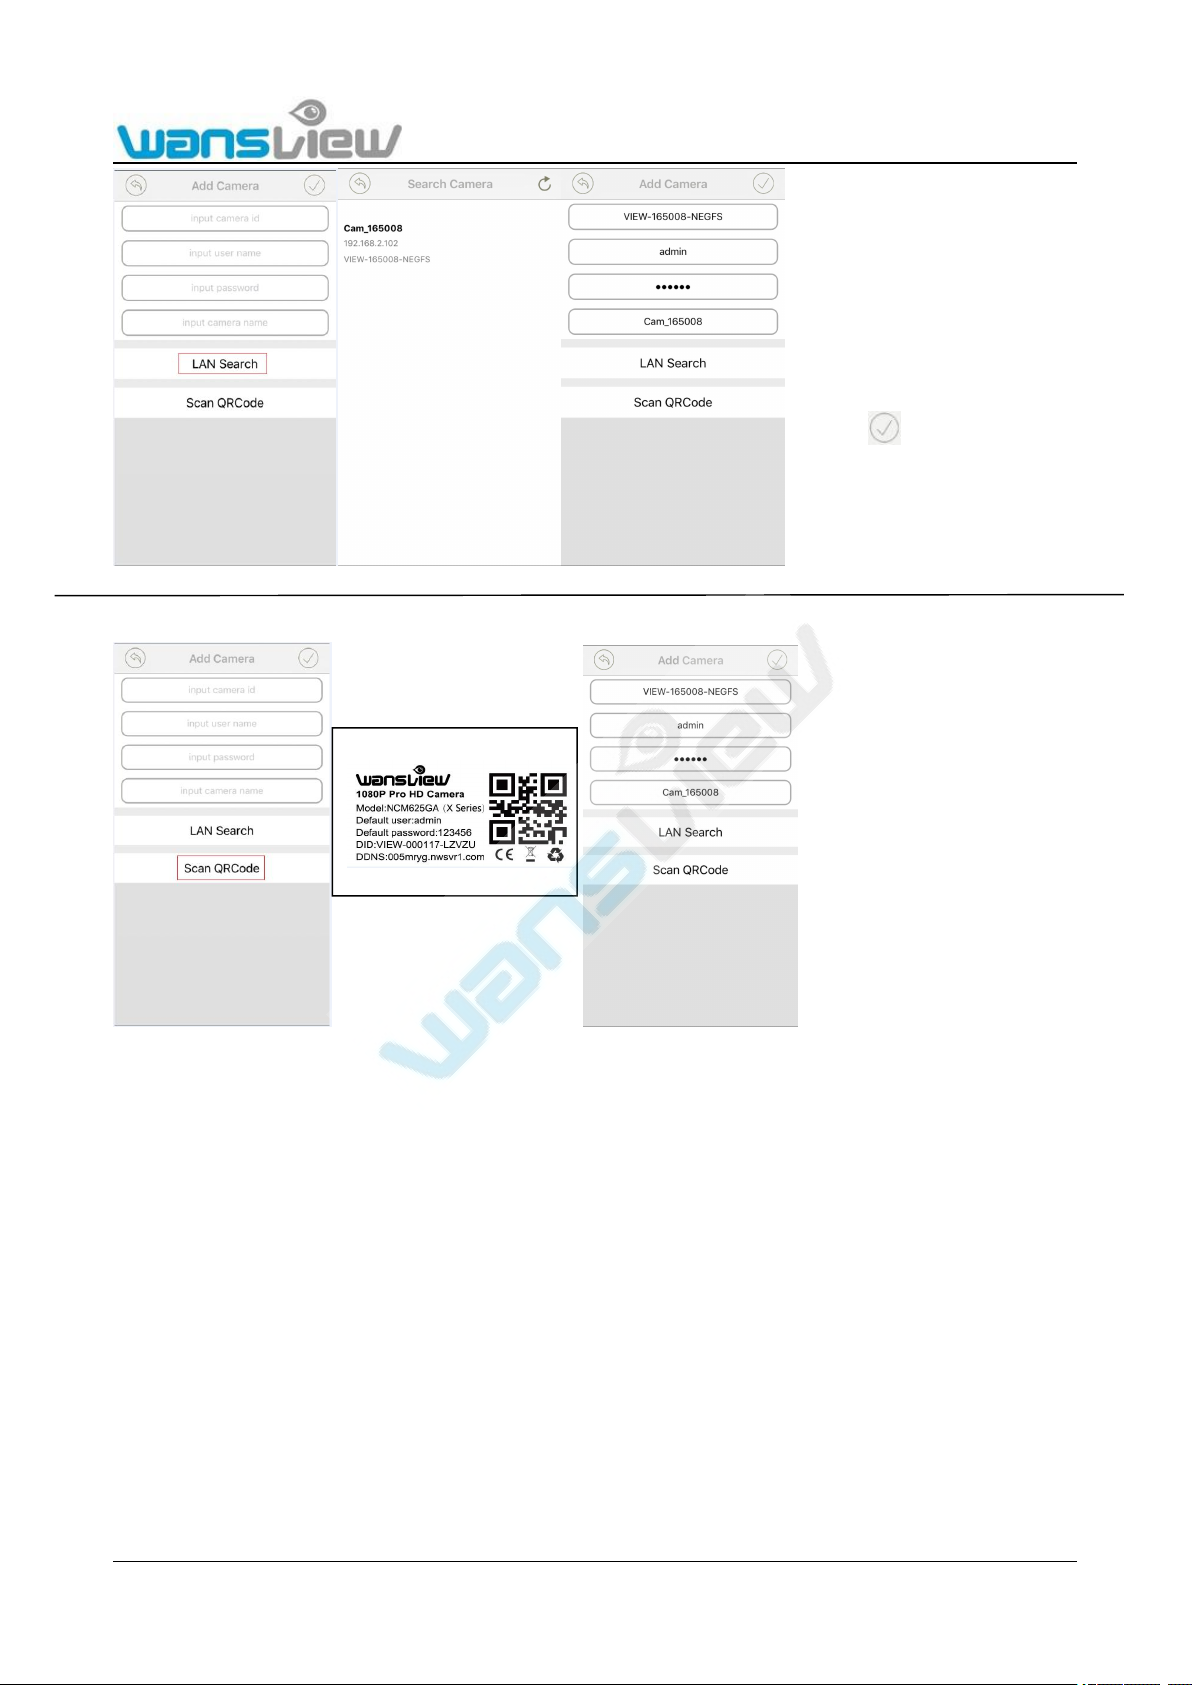
3.2.2 Add Camera
1. Manually add the camera
2. LAN search:
By tapping icon you can check the Local
Records/Photo, Multi-View for the cameras, do Wi-Fi
Configuration, do Push Set and check App version.
By tapping icon you can add camera as your P2P camera.
There are three methods available to add camera: add manually,
LAN Search and Scan QRCode on the bottom of the camera.
Reminder:DID number is showed on the sticker which is on
the bottom of the camera.
Please input the info: Camera DID, Username and Password, then
click .
Default user name:admin
Default password: 123456
Support Email/ Skype: service2@wansview.com 14
3. Scan QRCode
3.3 Live View and Setting
3.3.1 Viewing Camera on a Single Window
Tap “Lan Search”, then the
camera info will appear, click
camera and access to another
page to input password, then
click .
Click 【Scan QRCode】, then scan
the Sticker’s Barcode on the
bottom of the camera.
Support Email/ Skype: service2@wansview.com 15
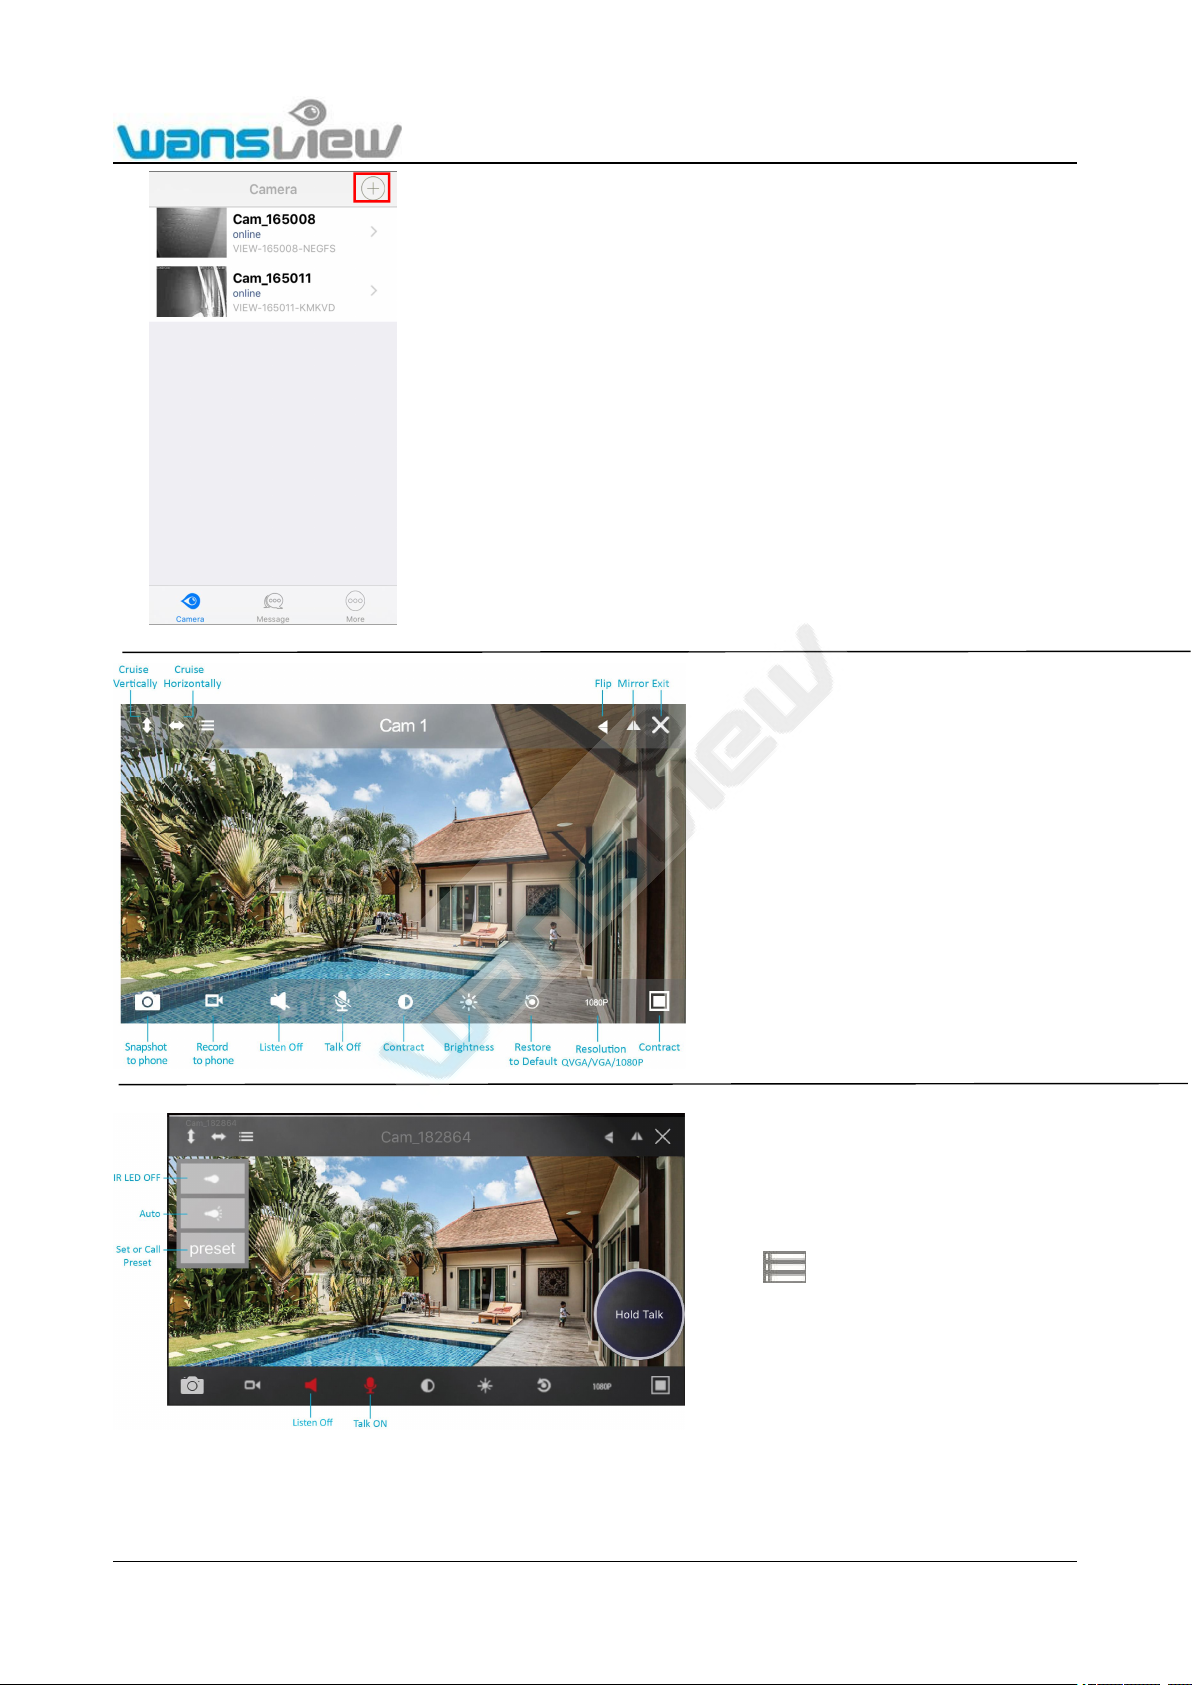
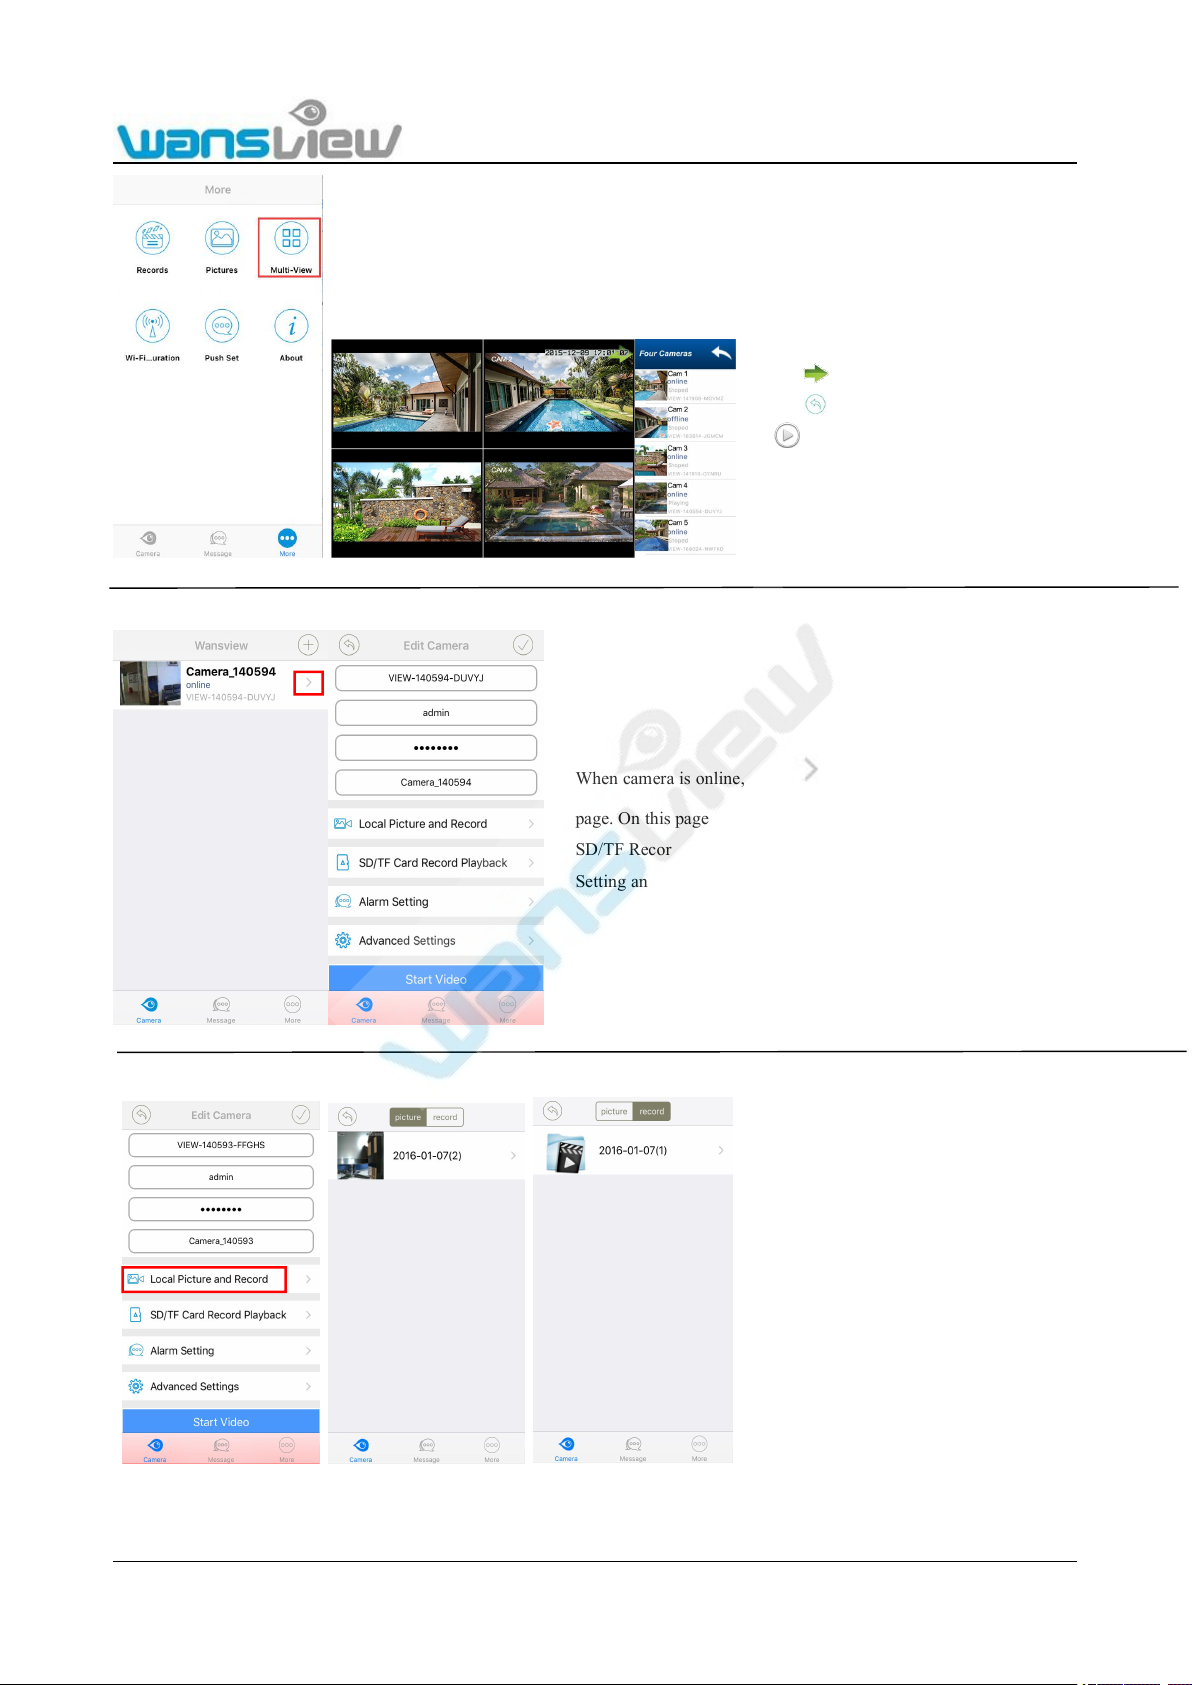
3.3.2 Viewing Camera on Multi-View
Tap the camera successfully added and displayed online,
tap the camera, then it will start to view the camera.
Or you can Tap > to access to Edit Camera page, choose
Start video.
Tap the monitoring screen. The video menu action
bar will appear.
1: For two-way audio, make the Listen/Talk ON, When
talk, please press Hold Talk, then talk.(need install
external Mic and Speaker)
2: Tap , you can turn ON/OFF the IR LED and
Set or Call Preset(For PTZ camera).
Support Email/ Skype: service2@wansview.com 16
3.4 Edit Camera
3.4.1 Local Picture and Record
3.4.2 SD/TF Record Playback
1.Tap “More” and select Multi-View, there are
Max. 4 cameras can be viewed at the same
time.
2. Tap to hide the equipment list button
3. Tap to exit multiple windows mode
4. which means the camera is playing, tap
it you can stop playing..
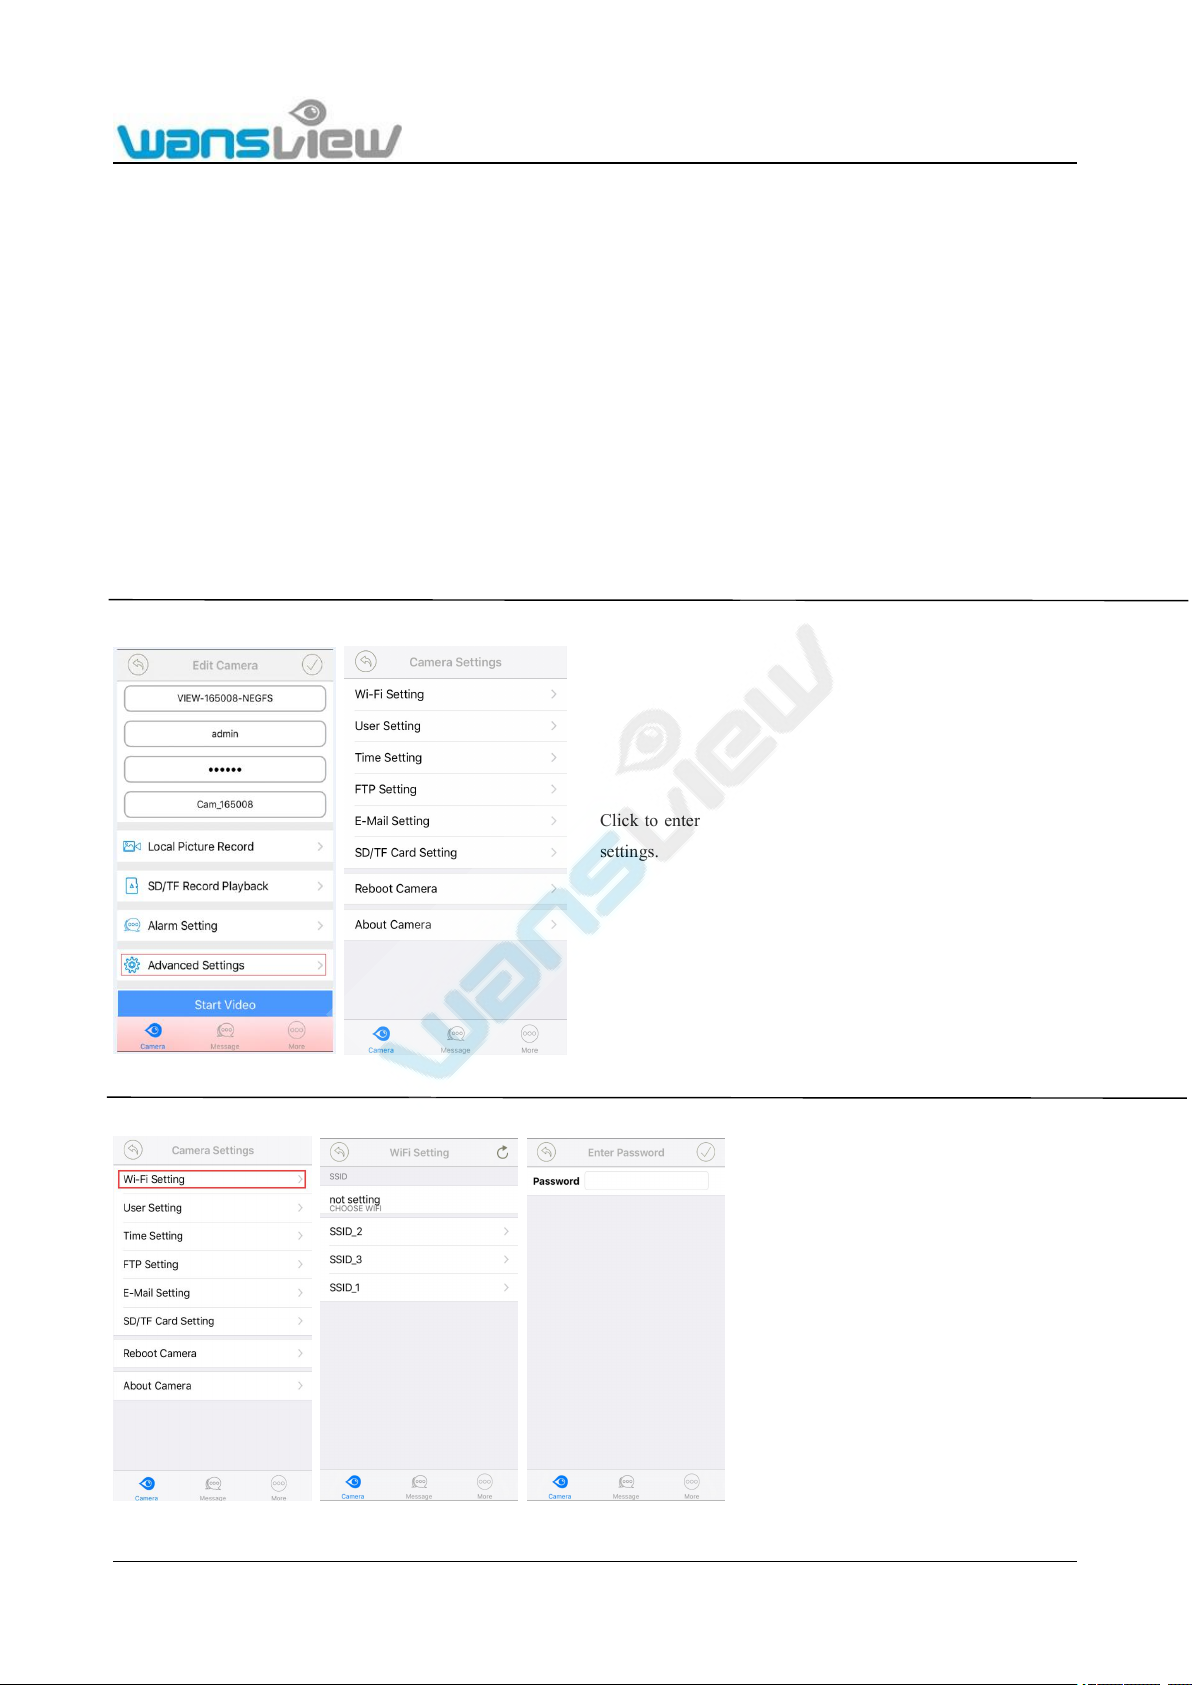
When camera is online, click to enter “Edit Camera”
page. On this page, user can check Local Picture and Record,
SD/TF Record Playback, Alarm Setting and Advanced
Setting and Start Video and Delete device.
Tap Local Picture and Record you
check pictures and records on Mobile.
Support Email/ Skype: service2@wansview.com 17
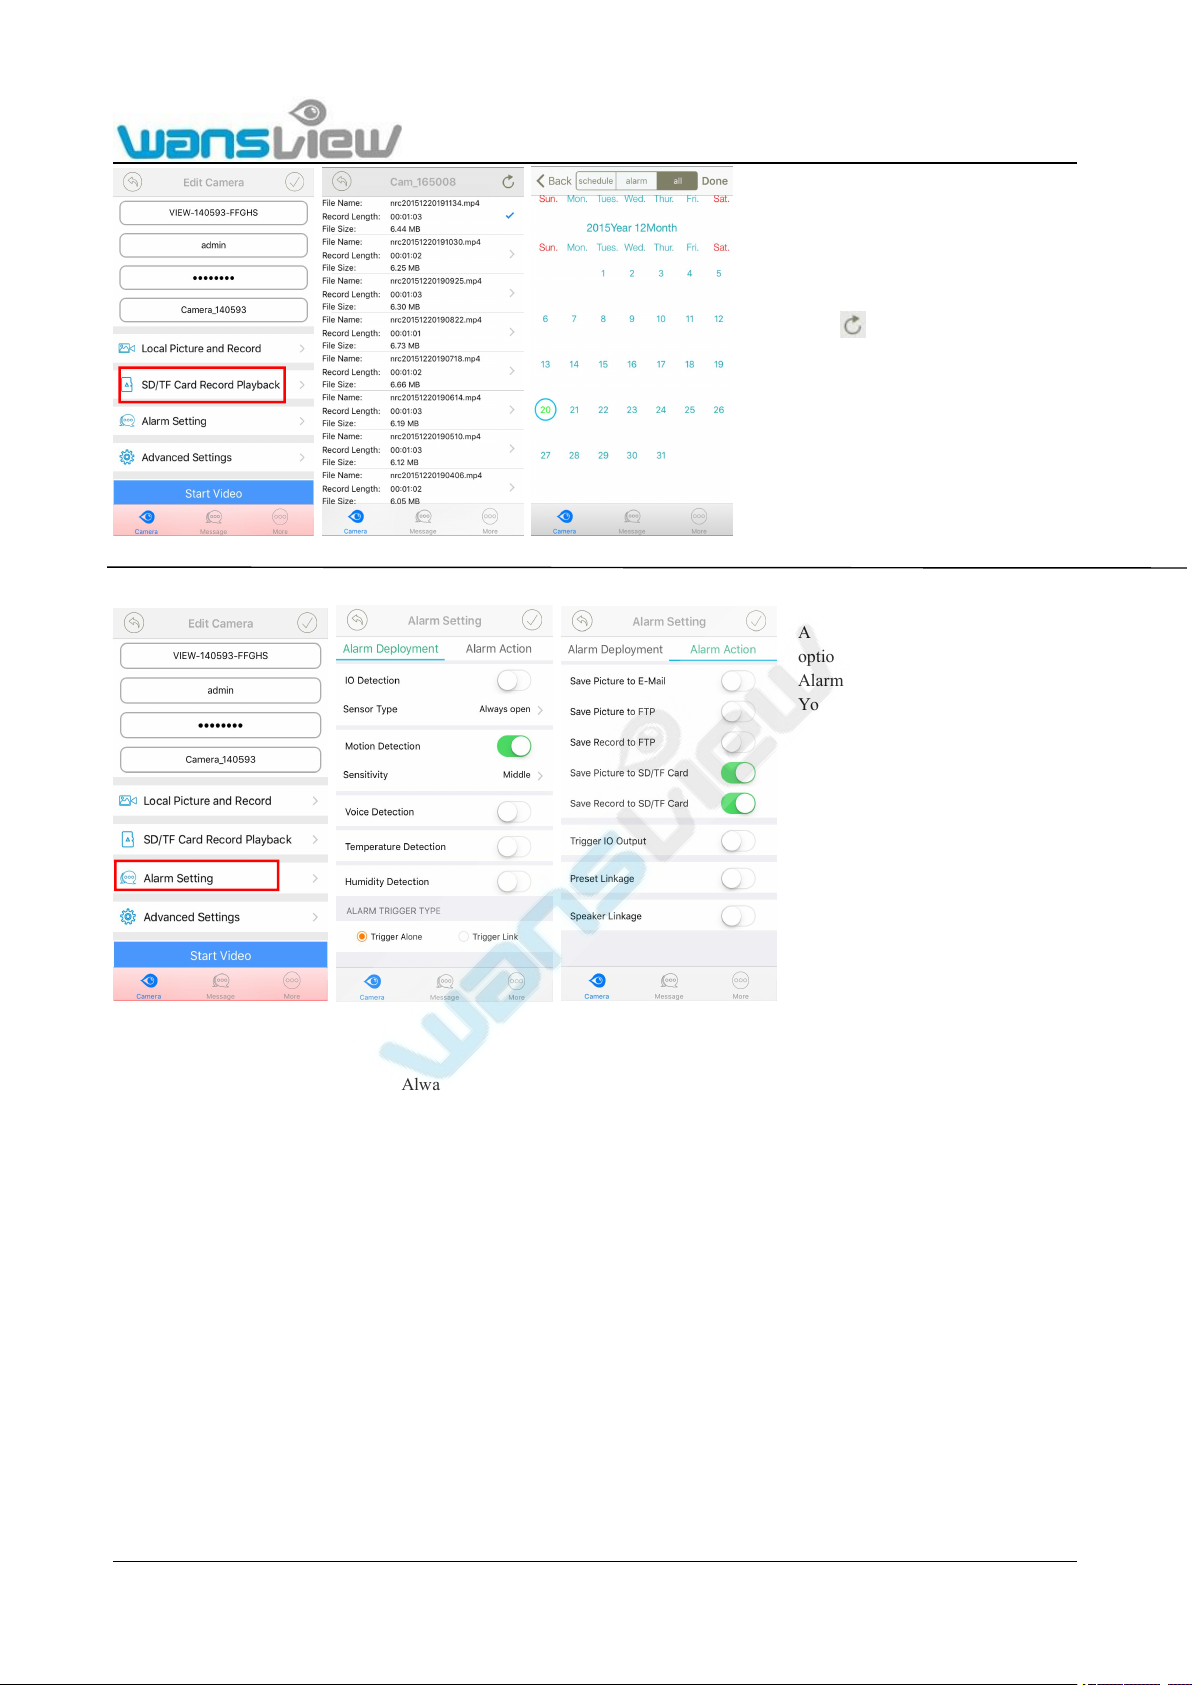
3.4.3 Alarm Setting
Alarm Deployment
IO Detection:Sensor type can choose Always open or Always close. When using IO Check, user should enable IO detection,
Always open means external alarm device is needed, and only with alarm trigger, alarm will be valid. If choose Always close, the
camera will be alarm continuously per 30 second.
Motion Detection: Sensitivity can choose Low/ Middle/ High according to needs.
Voice Detection: Sensitivity can choose Low/ Middle/ High according to needs.
Temperature detection: the temperature range can be set from -100℃ to 100℃.( not for this camera)
“<”means the temperature below the set value, the camera will send alarm notification.
“>”Means the temperature above the set value, the camera will send alarm notification.
Humidity detection: the humidity range can be set from 0% to 100%. ( not for this camera)
“<”means the humidity below the set value, the camera will send alarm notification.
“>”Means the humidity above the set value, the camera will send alarm notification.
Trigger Alone : The alarm will be triggered for any kind of alarm condition.
Trigger Linkage: If set two or more kinds of alarm methods, only met all alarm conditions, the alarm can be triggered.
Alarm Action:
Enter SD/TF Record Playback, record
file will be automatically displayed.
User can also search needed files by
clicking icon to enter calendar to
check schedule or alarm record on an
exact date.
Notice: The date in red means there are
recorded files on that day.
Access to “Alarm Setting”, there are
options for Alarm Deployment and
Alarm action.
You can use a motion detector to
improve the detection rate of your
camera. Simply connect the sensor to
the alarm input and activate the
external input. An alarm will be
triggered once the circuit is broken by
replay inside the detector or if the wire
is disconnected. The state you have to
choose depends on your sensor(the
wrong choice will give a continuous
alert once the detector is connected).
Support Email/ Skype: service2@wansview.com 18
Save Picture to Email: When an alarm is detected, the camera will send two alarm pictures to the email you set. We support Gmail,
Hotmail, Yahoo, Gmx etc.
Save Picture to FTP: When an alarm is detected, the camera will send 2 alarm pictures to the FTP server you set, 3-4 pictures will
be sent if the motion is too frequent.
Save Record to FTP: When an alarm is detected, the camera will send alarm video to the FTP server you set. The video length is
about 15 seconds for each alarm video, for constant recording, the alarm will be upload to FTP every 30seconds.
Save Picture to SD/TF: When an alarm is detected, the camera will send 2 alarm pictures to SD card, 3-4 pictures will be sent if
the motion is too frequent.
Save Record to SD/TF: When an alarm is detected, the camera will send alarm video to the FTP server you set. The video length is
about 15 seconds for each alarm video, for constant recording, the alarm will be upload to FTP every 30seconds.
Trigger IO Output:When an alarm is detected, the external IO output device will be linked then send alarm; it doesn't support PoE.
Preset Linkage: When an alarm is detected, it will be linked to the camera to Pan/Tilt the camera to the Preset you set.
Speaker Linkage:Link the speaker to send alarm when a alarm is detected.
3.4.4 Advanced Setting
3.4.4.1 WiFi Setting
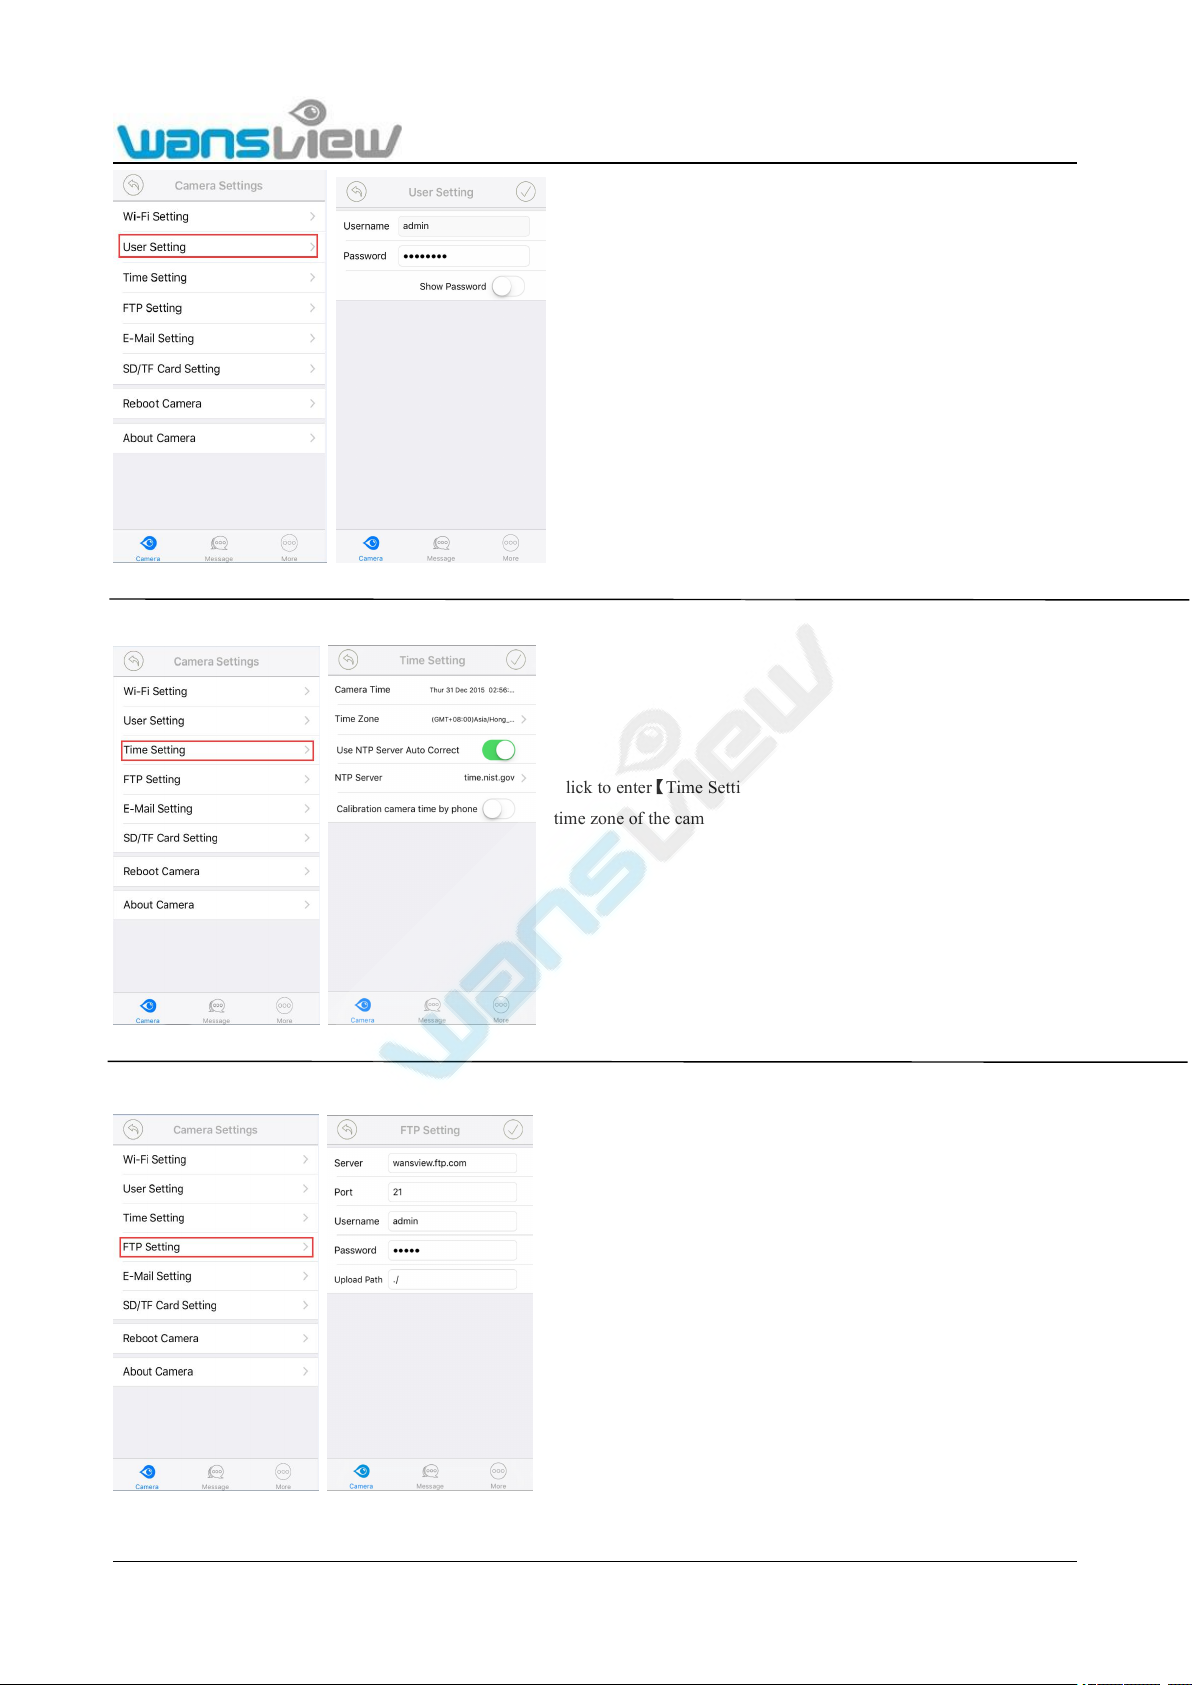
3.4.4.2 User Settings
Click to enter “Advanced Settings”, user can edit camera’s advanced
settings.
Tap【WiFi Setting】, User can manually set
WiFi.
Note:
1. It only accept 2.4GHz WiFi signal.
2. The password shall be not longer than 31
characters. The following special characters
are not be supportted in SSID and
password: ‘ and &
Support Email/ Skype: service2@wansview.com 19
3.4.4.3 Time Setting
3.4.4.4 FTP Setting
3.4.4.5 E-Mail Setting
Click to enter【User Setting】, the password of the camera
can be modified and Username cannot be modified at
present
Note: the password shall be not longer than 20 characters
Click to enter【Time Setting】,The user can auto correct the local
time zone of the camera to set the camera in the correct time zone.
Click to enter【FTP Setting】, when the user is using the FTP
alarm, user parameters of FTP servers can be set. It is
recommended to fill in “./” for Upload Path. Please refer to
5.2.3.8 for settings.
 Loading...