

BB SSeerriieess————WWaatteerrpprrooooff MMooddeell
BB SSeerriieess————WWaatteerrpprrooooff MMooddeell
NNCC554433 NNCC554433WW
N
N
UUsseerr M
Maannuuaall
U
V1.0 V1.0
CC554433 NNCC554433WW
Usseerr
M
Maannuuaall

http://www.wansview.com
2
Index
1 INTRODUCTION...........................................................................................................................4
2 FUNCTION AND FEATURES.....................................................................................................4
3 APPEARANCE AND INTERFACE.............................................................................................5
3.1 APPEARANCE............................................................................................................................5
3.2 INTERFACE OF EQUIPMENT .......................................................................................................5
4 NETWORK CONNECTING.........................................................................................................6
4.1 CONNECTION INSTRUCTION......................................................................................................6
4.2 VISIT INSTRUCTION ..................................................................................................................6
5 VISIT IP CAMERA FROM LAN..................................................................................................7
5.1 SET IP ADDRESS.......................................................................................................................7
5.2 VISIT IP CAMERA .....................................................................................................................9
6 VISIT IP CAMERA FROM WAN...............................................................................................11
6.1 PORT FORWARDING ................................................................................................................ 11
6.2 DDNS ....................................................................................................................................12
6.2.1 Manufacturer’s DDNS .......................................................................................................12
6.2.2 Third Party DDNS.............................................................................................................12
7 OTHER SETTINGS.....................................................................................................................13
7.1 NETWORK SETTING ................................................................................................................13
7.1.1 Basic Network Setting........................................................................................................13
7.1.2 WIFI Setting.......................................................................................................................13
7.1.3 ADSL Setting......................................................................................................................14
7.1.4 UPnP Setting .....................................................................................................................14
7.1.5 DDNS Setting.....................................................................................................................15
7.2 ALARM SETTINGS...................................................................................................................15
7.2.1 Alarm Setting .....................................................................................................................15
7.2.2 Mail Service Setting...........................................................................................................16
7.2.3 FTP Service Setting ...........................................................................................................17
7.2.4 Alarm Server......................................................................................................................17
7.3 ADVANCED .............................................................................................................................18
7.3.1 User Setting .......................................................................................................................18
7.3.2 Multi Device Setting ..........................................................................................................19
7.4 MAINTAIN...............................................................................................................................20
7.4.1 Device Information............................................................................................................20
7.4.2 Time Setting.......................................................................................................................20
7.4.3 Firmware upgrade.............................................................................................................21

http://www.wansview.com
3
7.4.4 Restore Factory Default.....................................................................................................21
7.4.5 User browsing Log.............................................................................................................21
8 CENTRALIZATION CONTROL................................................................................................22
9 TECHNICAL PARAMETERS....................................................................................................22
10 FAQ ...........................................................................................................................................23
11 FCC STATEMENT ..................................................................................................................25
http://www.wansview.com
1 Introduction
The IP Camera combines a high quality digital video camera with network connectivity
and a powerful web server to bring clear video to your desktop from anywhere on your
local network or over the Internet.
Your IP Camera package should contain the following items, If any of the listed
items are missing, please contact your reseller from where you purchased the
camera for assistance.
The package includes:
9 IP Camera * 1
9 IP Camera Utility CD *1
9 5V Power Adapter *1
9 Stand of plastic * 1
9 Cable * 1
2 Function and Features
9 The video is compressed by M-JPEG. There are VGA/QVGA/QQVGA three video
resolutions optional. User can change some parameters according to their demands
to satisfy his own visual prefer.
9 It adopts the TCP/IP network protocols and has inner web server. Users can browse
video through IE and other browsers. Data is transferred through one port; it is easy
for user to do the network setting.
9 Infrared LED for night vision covers 25m area, to realize 24 hours monitoring.
9 Provide IP66 waterproof grade, more suitable for outdoors application.
9 Support 802.11b/g protocol, can build up wireless monitoring.
9 Supports UPNP,
port forwarding automatically on the router.
9 Motion detection can find alarm.
4
http://www.wansview.com
9 Alarming record can be sent by email, FTP server. It also sends alarm info to the
alarm server.
9 Support three level of user authority.
9 Support upgrading online.
9 A free DDNS provided by manufacturer, and written in the device.
9 Manufacture provides free software, support Multi-view, Long time recording, video
replay etc.
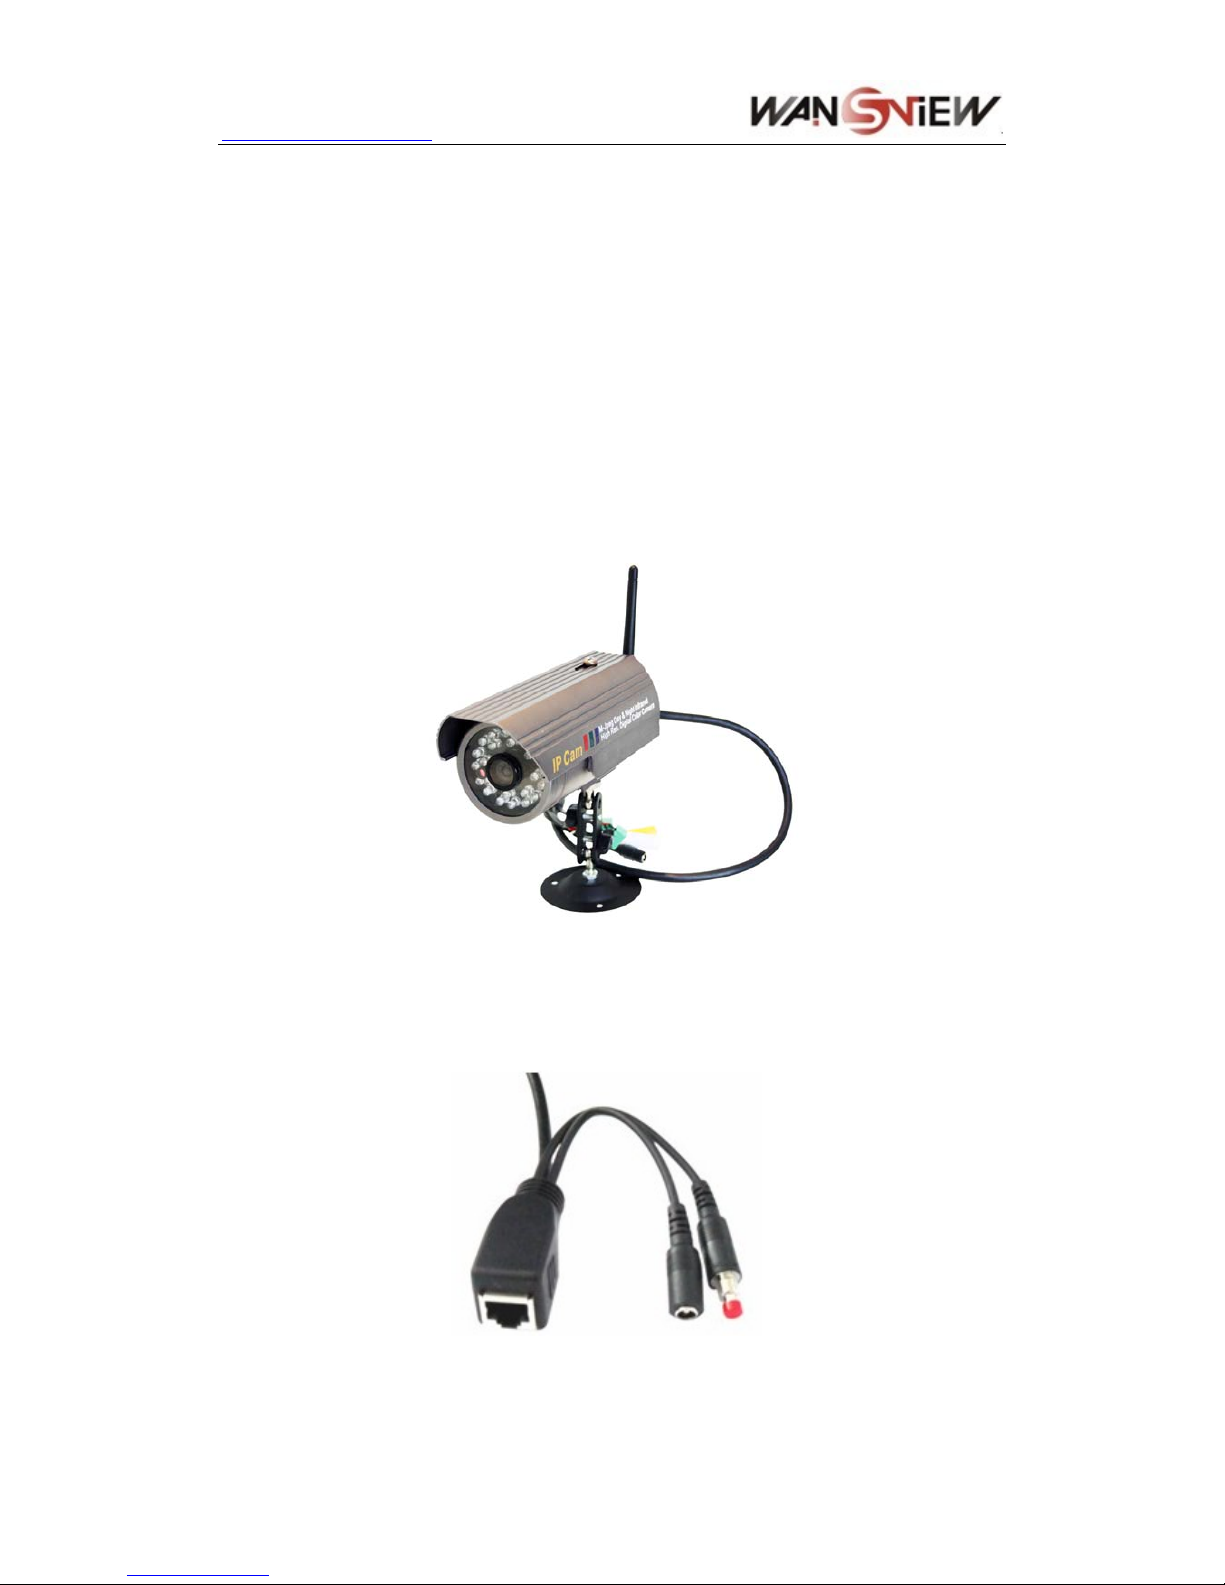
3 Appearance and interface
3.1 Appearance
Figure 1
3.2 Interface of Equipment
Figure 2
1) Power Input Socket: Connect DC adaptor, its output should be 5V power
5
http://www.wansview.com
specification.
2) RJ45 Ethernet Socket: RJ45 Ethernet socket is 10/100M self-adjust. The
equipment can connect to all kinds of network equipments, such as hub, router,
switch, etc.
NOTE: Factory setting IP is 192.168.0.178, the http port is 80, the username is
admin, the password is 123456.
3) RESET Button: Press it and hold on more than 10 seconds, the equipment will
restart and recover to the factory default settings.
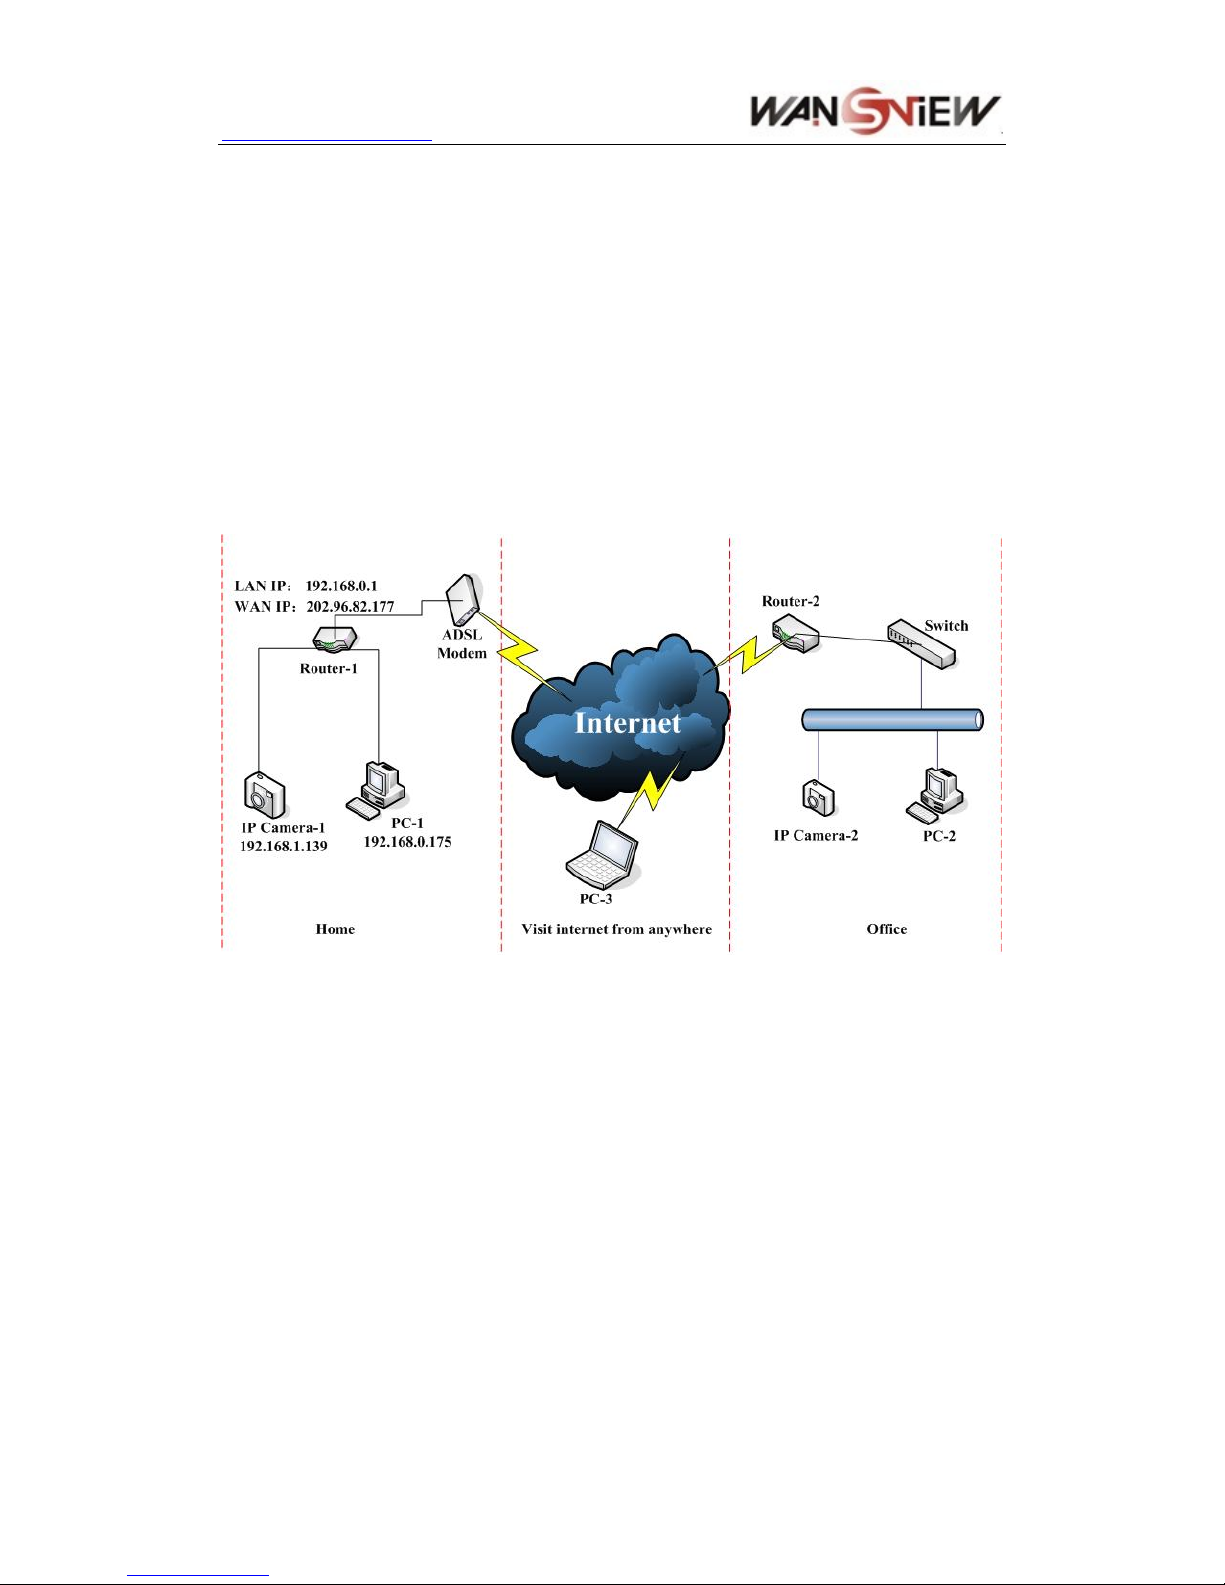
4 Network Connecting
Figure 3
4.1 Connection Instruction
Before visit the IP Camera, you should firstly connect it to the Network, supply the power
to it, and check if the light of RJ45 Socket is normal to make sure all of the
communication links are fluent. The connection method is like as Figure 3.
1) IP Camera-1 and IP Camera-2 are connected separately to 2 different LANs.
2) And these 2 LANs are already connected to the Internet. In order to get the LANs to
be connected to the Internet, they are required to be equipped with router and to
apply for the communication link from the local Internet Service Provider (ISP) and
connect to it by ADSL or optical fiber, etc.
3) PC-3 is connected to the Internet.
4.2 Visit Instruction
To visit the IP Camera, you should do some settings of IP Camera and Internet besides
6

http://www.wansview.com
7
getting the communication link fluency.
1) The PC and IP Camera are in the same LAN. If you want to use this PC to visit the
IP Camera, you need to make sure their IP address is at the same segment.
Otherwise you need to do the reset of the IP Camera’s IP address. For example, the
IP Camera-1’s IP address in Figure 3 is 192.168.1.139 (at the segment of 192.168.1),
while the PC-1’s IP address is 192.168.0.175 (at the segment of 192.168.0), then
you will be not able to visit the IP Camera through the PC-1. You need to change the
IP Camera-1’s IP address to 192.168.0.139 firstly.
2) The PC and IP Camera are in different LANs, but they are all connected to
Internet. For the IP Camera-1 and PC-2 in Figure 3, if you want to visit IP Camera-1
by PC-2, you should firstly do the setting as 1) to make sure that you can visit IP
Camera-1 through PC-1 and then do the setting of router-1 (do the port forwarding
from the router). The PC-2’s visit application could be sent through router-1 to IP
Camera-1. Normally , PC-2 could only send the information to router-1, if you don’t do
the setting of router-1, then PC-2 could not visit IP Camera-1.
5 Visit IP Camera from LAN
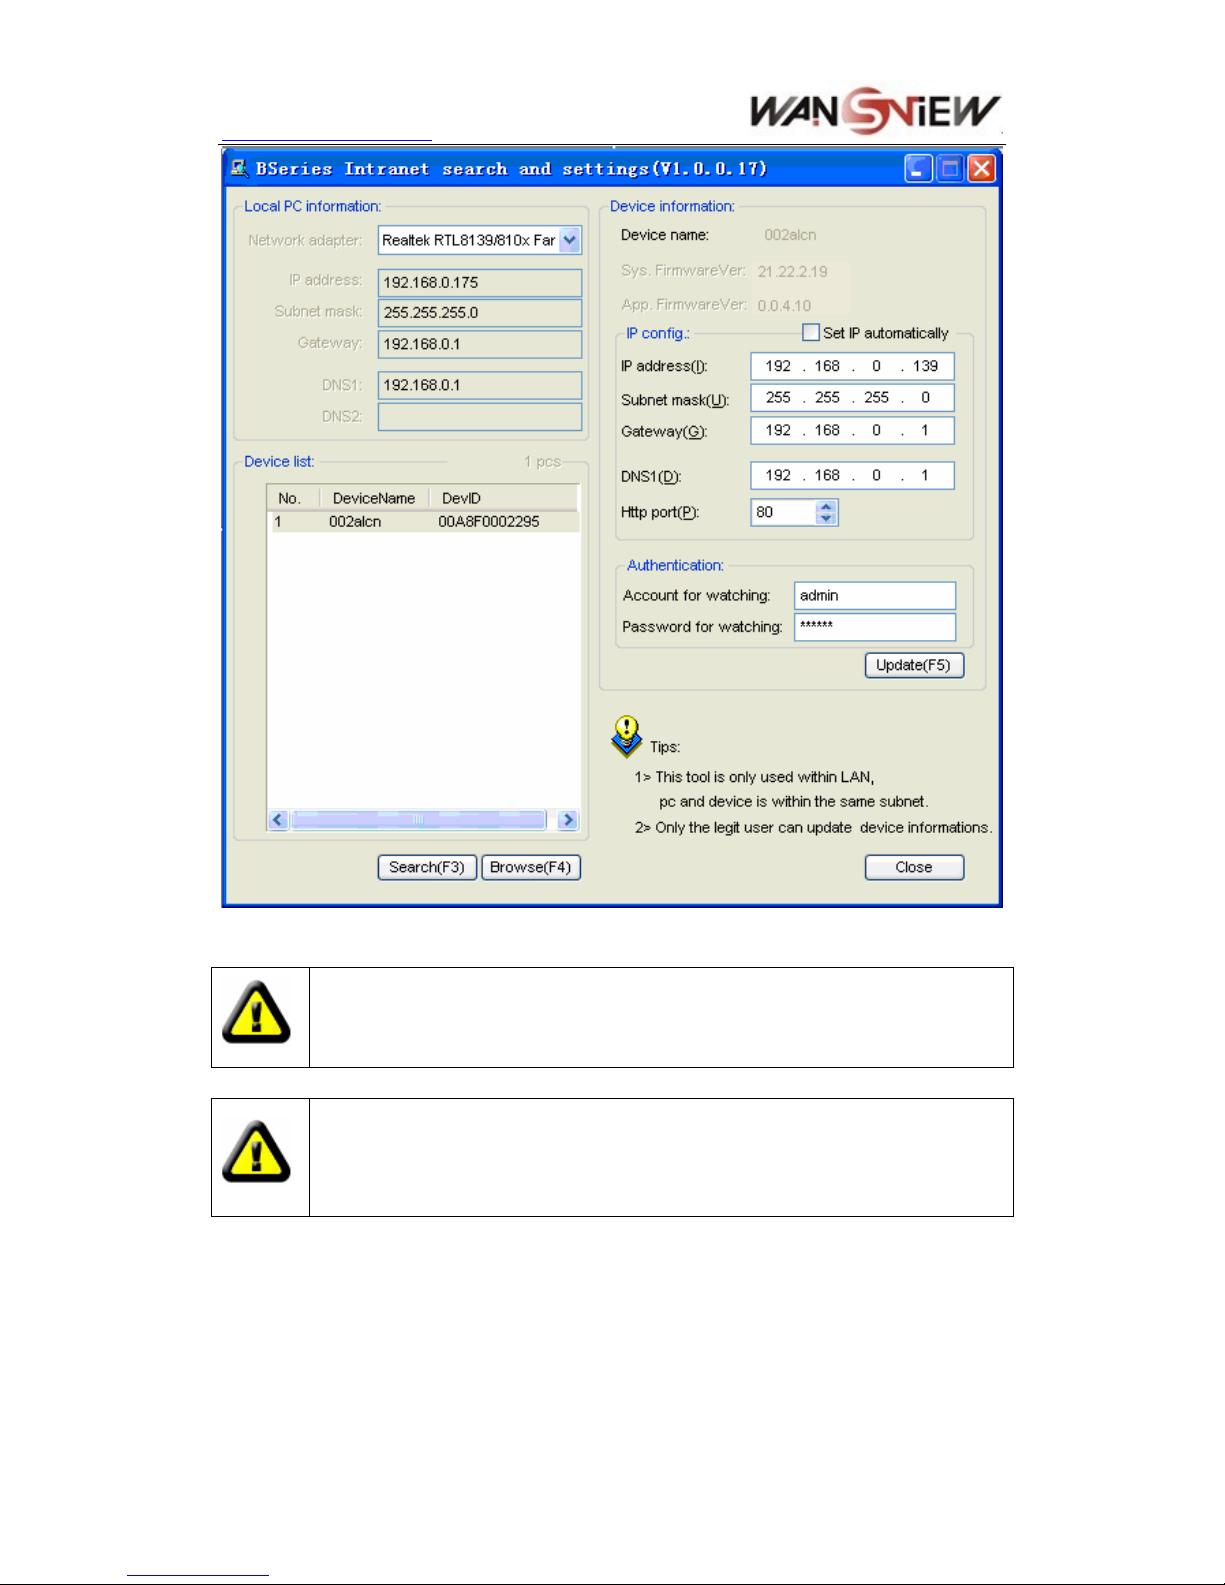
5.1 Set IP Address
The IP addresses of IP Camera and PC should be at the same segment, for Figure 3, the
IP Camera-1 can’t be visited. Run the BSearch_en.exe in the CD, click Search button,
and then select the IP Camera-1 to reset the IP address, as the Figure 4.
Setting Instruction:
9 Please carefully check the “Local PC information” on the top le ft corner which lists
the PC configuration. If there are several network adapters in the PC, please select
the one you are using and make sure the IP address of IP Camera is as the same
segment of the PC.
9 Change the content of “IP config” on the right to make sure the content is the same
as “Local PC information”. Only the last section of the IP address which needs
setting by yourself, you can set it as 139 just like Figure 4.
9 If you don’t know how to fill out the content of “IP config”, you could also tick
the “Set IP automatically” to get the IP address from the router automatically.
9 Put the user name and password into “Authentication” (By default, the user name
is: admin, password is: 123456). Click “Update”. The setting will take effect now.
Select the device in list box, click “Browse” button, it will open the Browser
automatically and pop up a window at the same time which requires to inputting the
user name and password. Then you see the home page of the IP Camera-1, click
“English” on the right-top corner, just as below Figure 5. On the right corner of the
interface, user can choose the language.
http://www.wansview.com
8
Figure 4
If you have the firewall software in your PC, when you run the
HSearch_en.exe, it may pop up a window to say if you want to block this
program or not, then you should choose not to block.
IP Camera by default use fixed IP address 192.168.0.178 and fixed http port
80. If you don’t have this software, you could also press down the reset button
to go back the factory setting. Then you could use this defaulted IP address to
visit the IP Camera.
 Loading...