

Wansview K2, K3 User Manual

Wansview HD
IP Camera K2(720P)/K3(1080P)
User Manual
Revised on 12thSept. 2018


CONTENT
Welcome ....................................................................................................................................5
Important Security Warning..........................................................................................
5
Important Safeguards and Warnings...........................................................................
5
1. Features and Specifications................................................................................................7
1.1 Product Profile...............................................................................................................7
1.2 Features........................................................................................................................
.8
1.3 Uses...............................................................................................................................8
1.4 Specifications ................................................................................................................
8
1.5 System Requirements.....................................................................................................
9
2. Camera Management with Smartphones/Tablets............................................................10
2.1 Wansview App for iOS and Android ............................................................................10
2.2 Live Streaming..............................................................................................................
13
2.3 Local Picture and Record...............................................................................................15
2.4 SD/TF record and Playback.................................................................................................16
2.5 Alarm Setting................................................................................................................18
2.6 Advanced Settings.........................................................................................................20
2.6.1 WiFi Setting............................................................................................................20
2.6.2 User Setting/Management .....................................................................................
21
2.6.3 Time Setting...........................................................................................................22
2.6.4 SD/TF Setting................................................................................................................23
2.6.5 Misc Setting............................................................................................................23
2.6.6 Maintenance..........................................................................................................25
2.6.7 About Camera........................................................................................................
25
2.7 Start Video....................................................................................................................
26
2.8 Delete device................................................................................................................26
2.9 Message.......................................................................................................................
27
2.10 More...........................................................................................................................27
3. PC Client Software ........................................................................................................... 29
3.1 Add Camera..................................................................................................................29
3.1.1 Add camera in Lan..................................................................................................29
3.1.2 Manually add camera (suitable for outside network)...............................................30
3.2 Play/Stop Video............................................................................................................
30
3.2.1 Play Video..............................................................................................................30
3.2.2 Stop Video..............................................................................................................31
3.2.3 Video Interface ......................................................................................................
32
3.3CameraSettings.............................................................................................................
32
3
.3.1 Edit Device............................................................................................................
32
3.3.2 Advanced Settings..................................................................................................33
3.3.2.1 Device Info......................................................................................................
33
3.3.2.2 Time Setting....................................................................................................
33
3.3.2.3 User Setting....................................................................................................
34
3.3.2.4 WiFi Setting.....................................................................................................35
3.3.2.5 SD/TF Setting(not available for K2)...................................................................35
3.3.2.6 Other Setting...................................................................................................36

3.3.3 Alarm Setting.........................................................................................................37
3.3.3.1 Motion Detection............................................................................................
38
3.3.3.2 Audio Detection..............................................................................................
38
3.3.3.3 Linkage Alarm.................................................................................................39
3.3.3.4 Alarm Time.....................................................................................................41
3.4 Multi-View...................................................................................................................
42
3.5 Local Setting.................................................................................................................42
3.6 Scheduled Recording....................................................................................................
43
3.7 Playback.......................................................................................................................
44
3.7.1 Playback Local Record............................................................................................44
3.7.2 SD Card Record......................................................................................................45
3.8 Lock..............................................................................................................................
46
4.
Manage Camera with other Apps and Software
Add Camera to iSpy Connect...............................................................................................
46
5. Web Access...................................................................................................................... 48
5.1 Settings .......................................................................................................................48
5.1.1 Plugin installation..................................................................................................
48
5.1.2 View Video-Mode 1 - Complete Camera Management ...........................................49
5.1.3 View Video- Mode 2–Limited Camera Management..............................................
49
5.2 Live Streaming and Recording on PC..............................................................................49
5.3 Playback Video(function disabled in this model)............................................................
50
5.4 Set Up .........................................................................................................................51
5.4.1 System..................................................................................................................51
5.4.2 Network................................................................................................................
53
5.4.3 Video and Audio....................................................................................................
57
5.4.4 Security.................................................................................................................
59
5.4.5 Alarm - Motion and Audio Detection Alarm............................................................60
5.4.6 Storage(function disabled for K2) ...........................................................................
63
5.4.7 Log........................................................................................................................
64


Welcome
Thank you for purchasing Wansview HD IP CameraK2(720P)/K3(1080P).
For any question and product updates please contact us:
1: By email:
US/CA: service@wansview.com
service2@wansview.com
UK: service3@wansview.com
2: By Skype:
US/CA:service2@wansview.com
UK:service3@wansview.com
check the FAQ's on wansview website: http://www.wansview.com/Service/faq/
3: Contact us by Facebook
https://www.facebook.com/WansviewOfficial
4: Contact us by https://www.youtube.com/WansviewOfficial Or scanning the QR code to
enter our Youtube channel.
Important Security Warning
In order to keep your Wansview camera secure and prevent unauthorized access, please make sure
to follow the steps below:
1. The camera has always the latest firmware installed. If we update the firmware, we upload it on
www.wansview.com/Service/download/
2. Change the default password for your camera. We suggest that your password is more than 8-10
characters and contains a combination of lowercase characters, uppercase characters and numbers.
Important Safeguards and Warnings
1. Electrical Safety
All installation and operation should conform to your local electrical safety codes.
We assume no liability or responsibility for any fires or electrical shock caused by
improper handling or installation.
2. Transportation Safety
Heavy stress, violent vibrations, and excess moisture should not occur during transportation,
storage, and installation of the device.
3. Installation
Handle the device with care. Keep the device right side up.
Do not apply power to the camera before completing installation.
Do not place objects on top of the camera.
4. Repair Professionals
All inspection and repair work should be done by qualified service engineers.
We are not liable for any problems caused by unauthorized modifications or user-attempted repair.
www.wansview.com 5

5. Environment
The camera should be kept in a cool, dry place away from direct sunlight, flammable materials,
explosive substances, etc.
This product should be transported, stored, and used only in the specified environments as stated
above.
Do not aim the camera at a strong light source, as it may cause overexposure of pictures, and may
affect the longevity of the camera's sensors.
Ensure that the camera is placed in a ventilated area to prevent overheating.
6. Operation and Maintenance
Do not touch the camera sensor or lens directly.
To clean dust or dirt off of the lens, use an air blower or a microfiber cloth.
7. Accessories
Be sure to use only the accessories recommended by the manufacturer.
Before installation, please open the package and check to ensure that all of the components are
included.
Contact us if anything is broken or missing in the package.
8. Battery Drainage and Data Consumption
Please remember to exit the app after use, to prevent battery drainage and data consumption.
9. Compliance
FCC, CE, ROHS
www.wansview.com 6
1. Features and Specifications
The Wansview Full HD IP Camera is an integrated indoor IP Camera developed
specifically for network video applications.
1.1 Product Profile
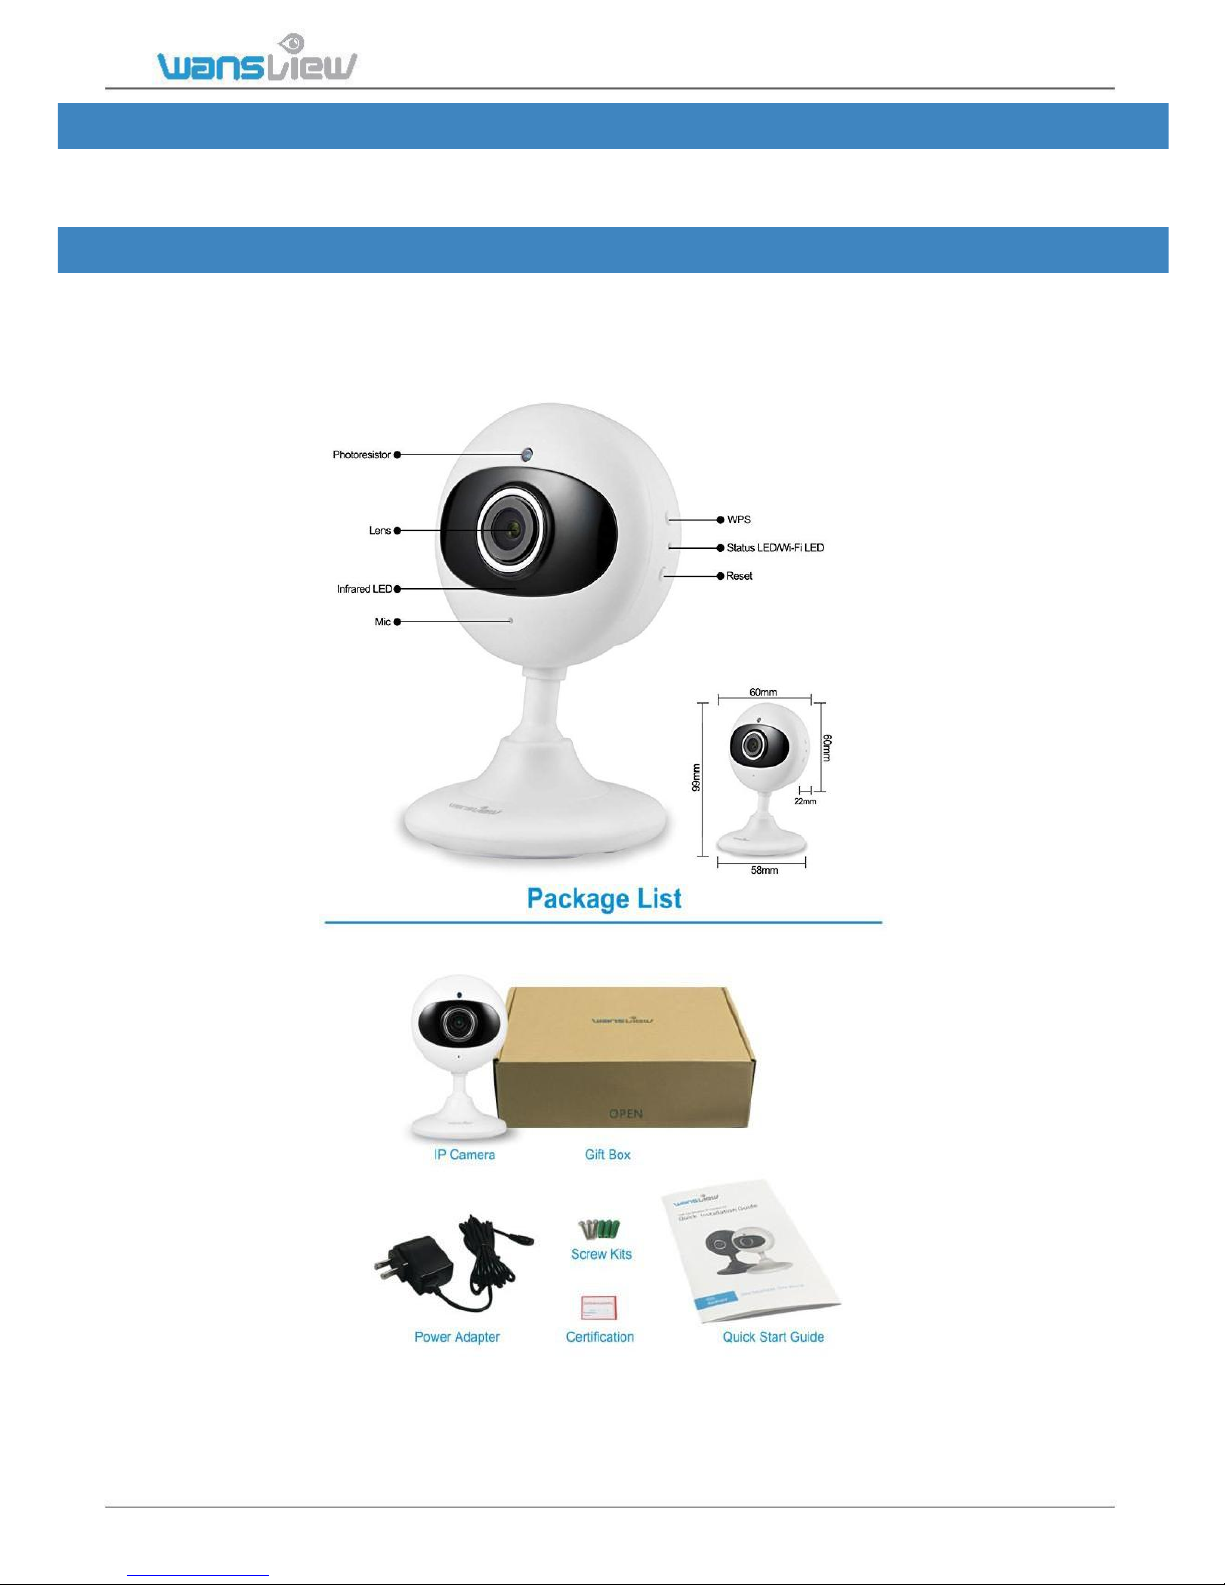
The Wansview Full HD IP Camera comes with 4 PCS IR LED, a CMOS Sensor, and built-in Speaker
and Microphone. K3(1080p) supports up to 128 GB SD cards for recording.
Front View
7
7
www.wansview.com 7
1.2 Features
•Full HD Video
•Support Wi-Fi connection
•Live Streaming
•Multi-App/Software Compatibility
• K2 (720P) without SD card slot
• K3 (1080P) with SD card slot(no SD card)
•Night Vision distance up to 25 feet
•Mountable on walls and ceilings
•2 Way Audio with built-in microphone
and speaker
1.3 Uses
•Home Security
•Baby Monitoring
•Business Security
•Pet Monitoring
•Entryway Monitoring
•Elderly Parents
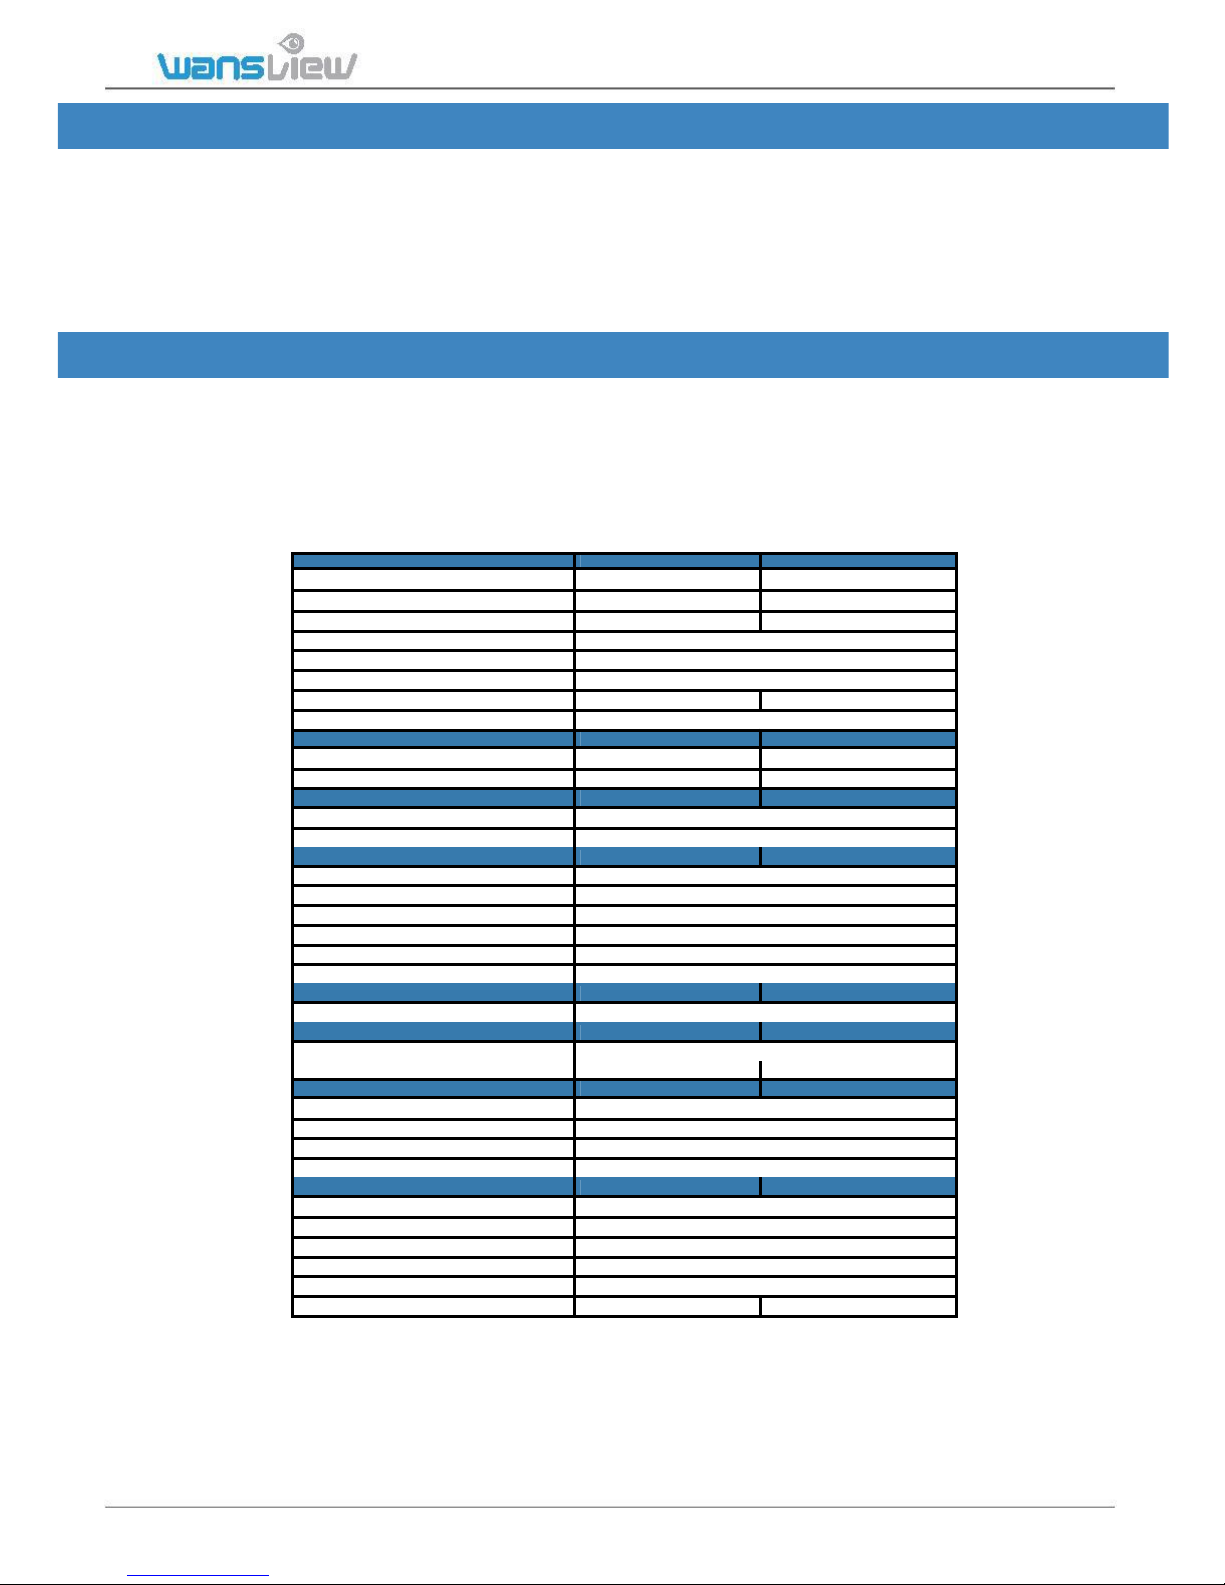
1.4 Specifications
CAMERA-VIDEO
K2
K3
Resolution
720
1080
Effective Pixels
1280*720/640*360/320*180
1920*1080/640*360/320*180
Max Video Resolution
1280*720
1920*1080
Maximum Frame Rate(FPS)
25
IR Cut Filter (DAY/NIGHT)
YES
Infrared LED
4 pieces
Night Vision Range (feet)
25 feet
25 feet
Video Compression
H.264/MJPEG
LENS
Lens Focal Length (mm)
2.5 MM
2.5 MM
Filed of View
120°
120°
AUDIO
Interface
Built-in Microphone and Speaker
Two Way Audio
YES
NETWORK
WiFi
IEEE802.11b/g/n 2.4GHz
Recommended Distance from Router
10m/30ft
Protocol
Onvif, TCP/IP,UDP,SMTP,NTP,HTTP,DHCP,DDNS,FTP
WPS
WPS Push wireless connection
Encription
64/128-bit W EP, WPA/W PA2-PSK
Max User Access
4 users at the same time
RECORDING
Storage type
PC/Phone
AUXILIARY INTERFACE
Micro SD card Slot
K2 does not support SD card. Max 128GB
Schedule recording
YES
YES
CAMERA MANAGEMENT
Smartphone/Tablet
Wansview app for iOs/Android
Web Browser
IE
Account Permission
YES
Compatibile Apps/Software
Blue Iris, Tinycam Monitor, iSpy, Sighthound
OPERATION AND CONVENIENCE
Wall/Ceiling mountable
Yes
Power Cord Length
8 feet
Power Supply
5V 1A
Power Switch
No
Mate rial
Plastic
Certification
CE FCC ROHS
CE FCC R OH S
www.wansview.com 8

1.5 System Requirements
Position your camera in 50ft/15m distance from the router and close to an DC Plug. The
included power cord is 8 ft long. If you need a longer power cord, it should be within 16
ft, if longer, the voltage will not be stable. Users can extend Wi-Fi signal with Wi-Fi
extenders and get a longer power cord, if needed. Check the quality of the video before
final mounting. In indoor installations, the range might be less if metal objects or thick
walls and ceilings are between the camera and the router. Quality is affected also by the
number of devices connected to the network and by interferences from other
networks/devices. If video quality is not good, we advise to position the camera closer to
the router or reduce resolution and the frame rate (fps).
Users can place indoor cameras in protected outdoor areas (such as a covered porch) as
long as it remains dry and within its operating temperature range of -10 to 50 degrees C.
The camera is not waterproof and any exposure to moisture and/or temperatures outside
the operating range will void our one-year limited warranty. Users can guard outdoors by
placing the camera behind a window, making sure to disable IR Leds and open the
outdoor lights.
The Wansview Camera is a P2P camera as long as the camera is connected to the internet. Users
can view the camera from smartphones/tablets or PC, wherever they are using cellular data or
Wi-Fi connections. If users don’t want to use the internet to access the camera, and choose to
access only in their own private network/LAN, we can supply a tool which can disable P2P and
DDNS functionalities. Please contact our customer service.
www.wansview.com 9
2. Camera Management with Smartphones/Tablets
2.1 Wansview App for iOS and Android
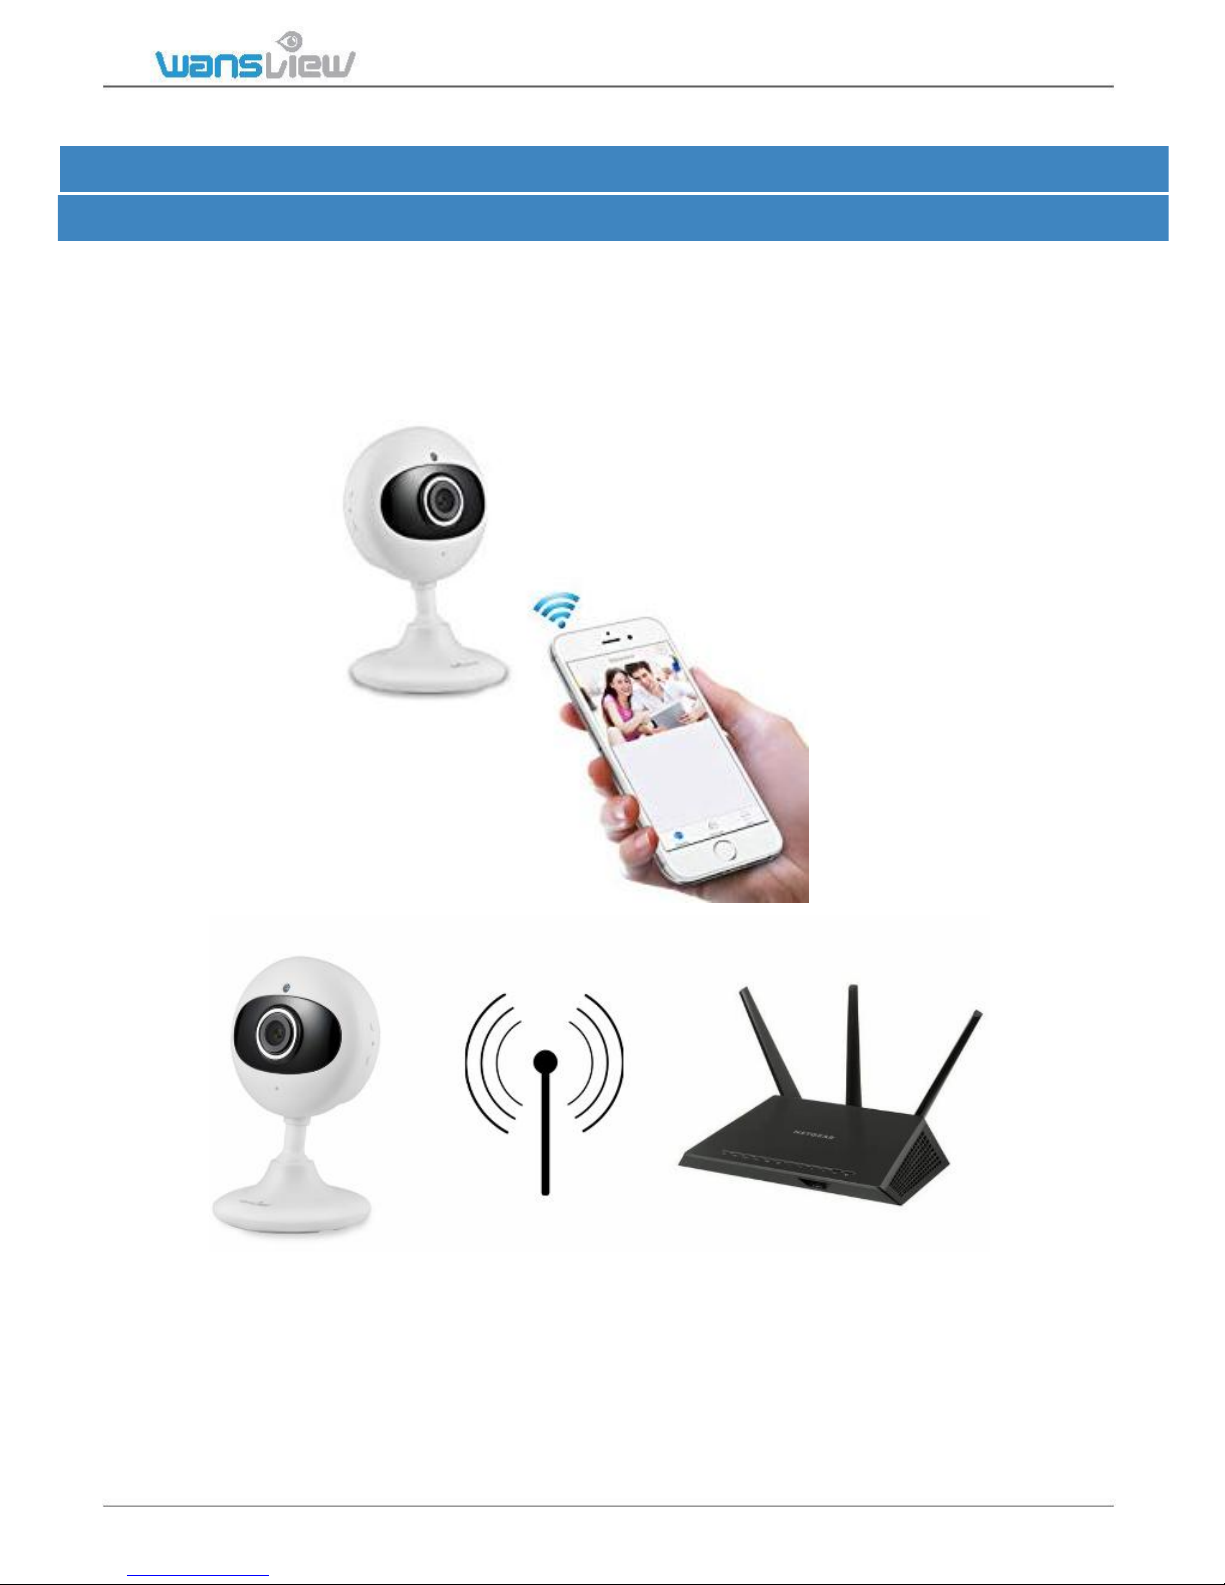
Before set up, please put your phone near to camera, and camera
is near to router. (After connected successfully, you can move
the camera)
www.wansview.com 10
Download Wansview App
Go to App store or Google Play and install the “Wansview” app to your supported device.
Power on Camera
Power for the camera with the included power supply and place it near your router.
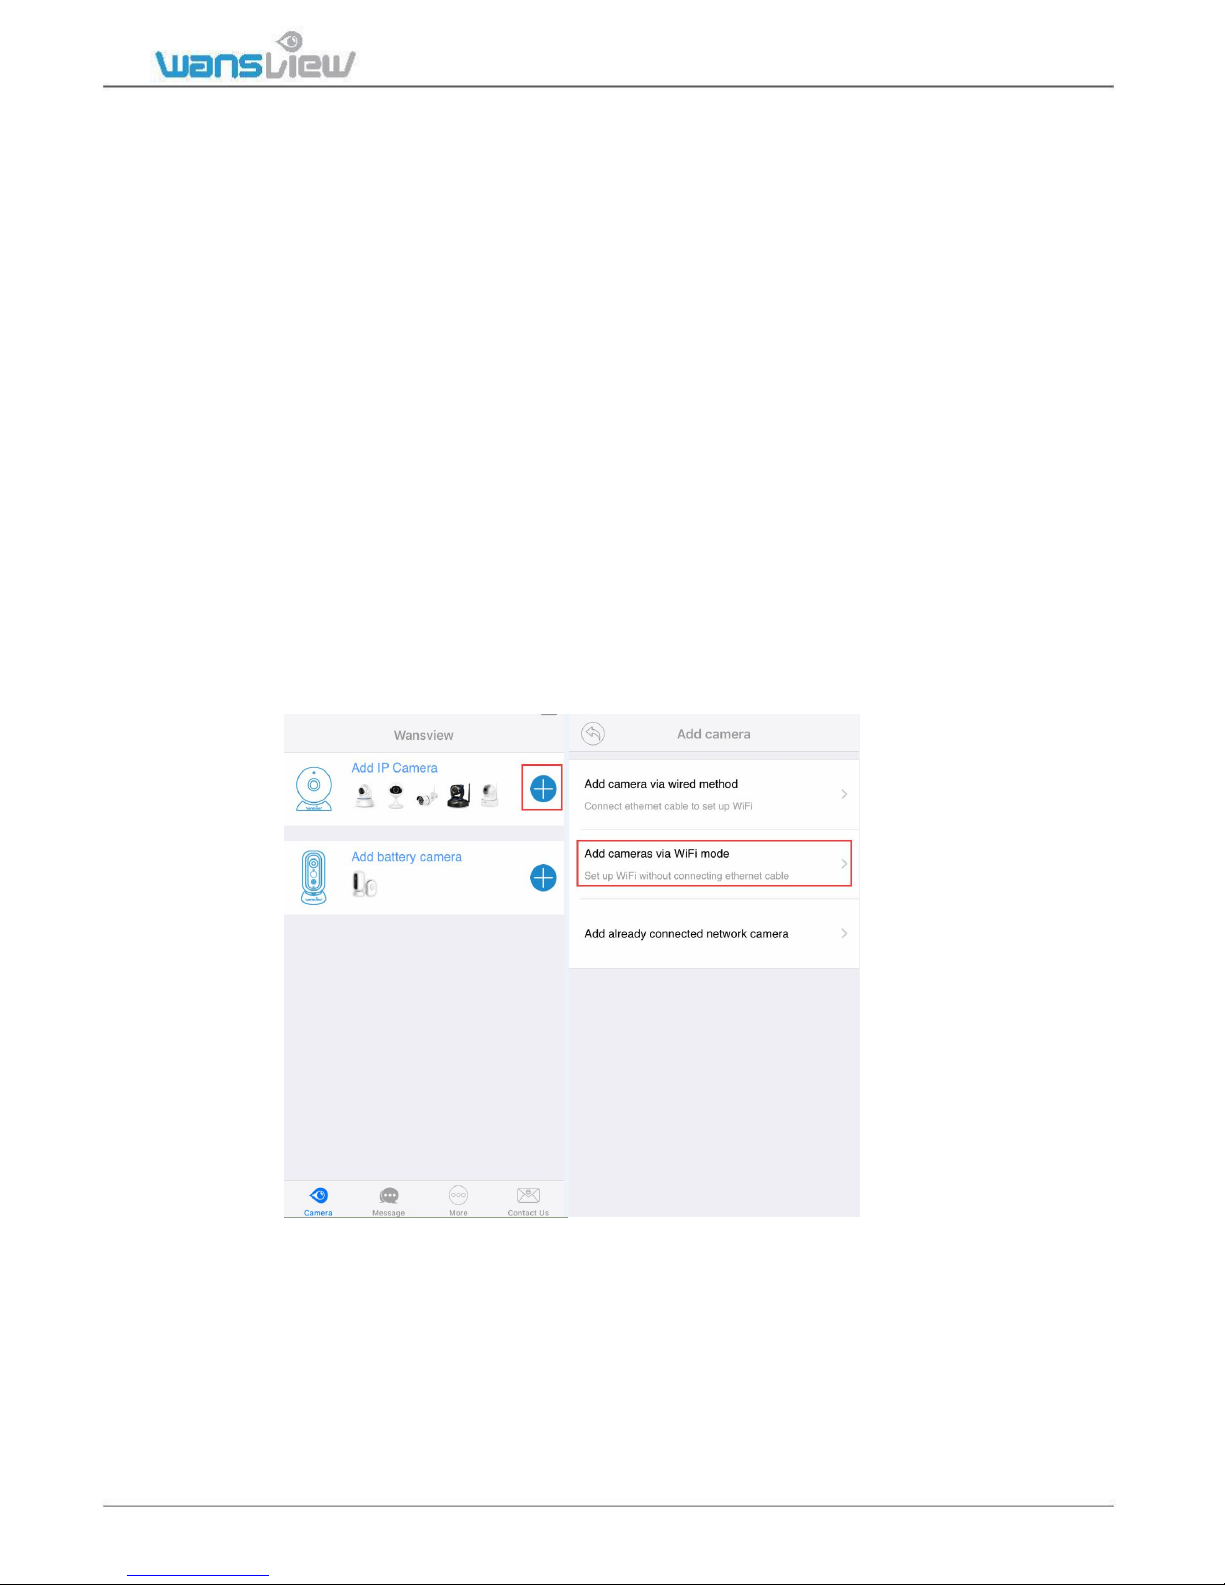
Connect to Network
Launch the Wansview app, click “+” to access Add Camera page.
There are three methods to add the camera and connect camera to internet.
Note: Before set up WiFi, make sure your WiFi is 2.4G, wansview camera cannot
work with 5Ghz WiFi.
1: “Add camera via wired method” (Unavailable for K2/K3 )
User can add connect the camera to router with an Ethernet cable directly. Then follow
the wizard on app to connect the camera to WiFi.
2: “Add camera via WiFi Mode”
Using this method, user can set up the camera with WiFi by scanning the QR code on the
phone. Follow the wizard on app step by step to connect.
www.wansview.com 11
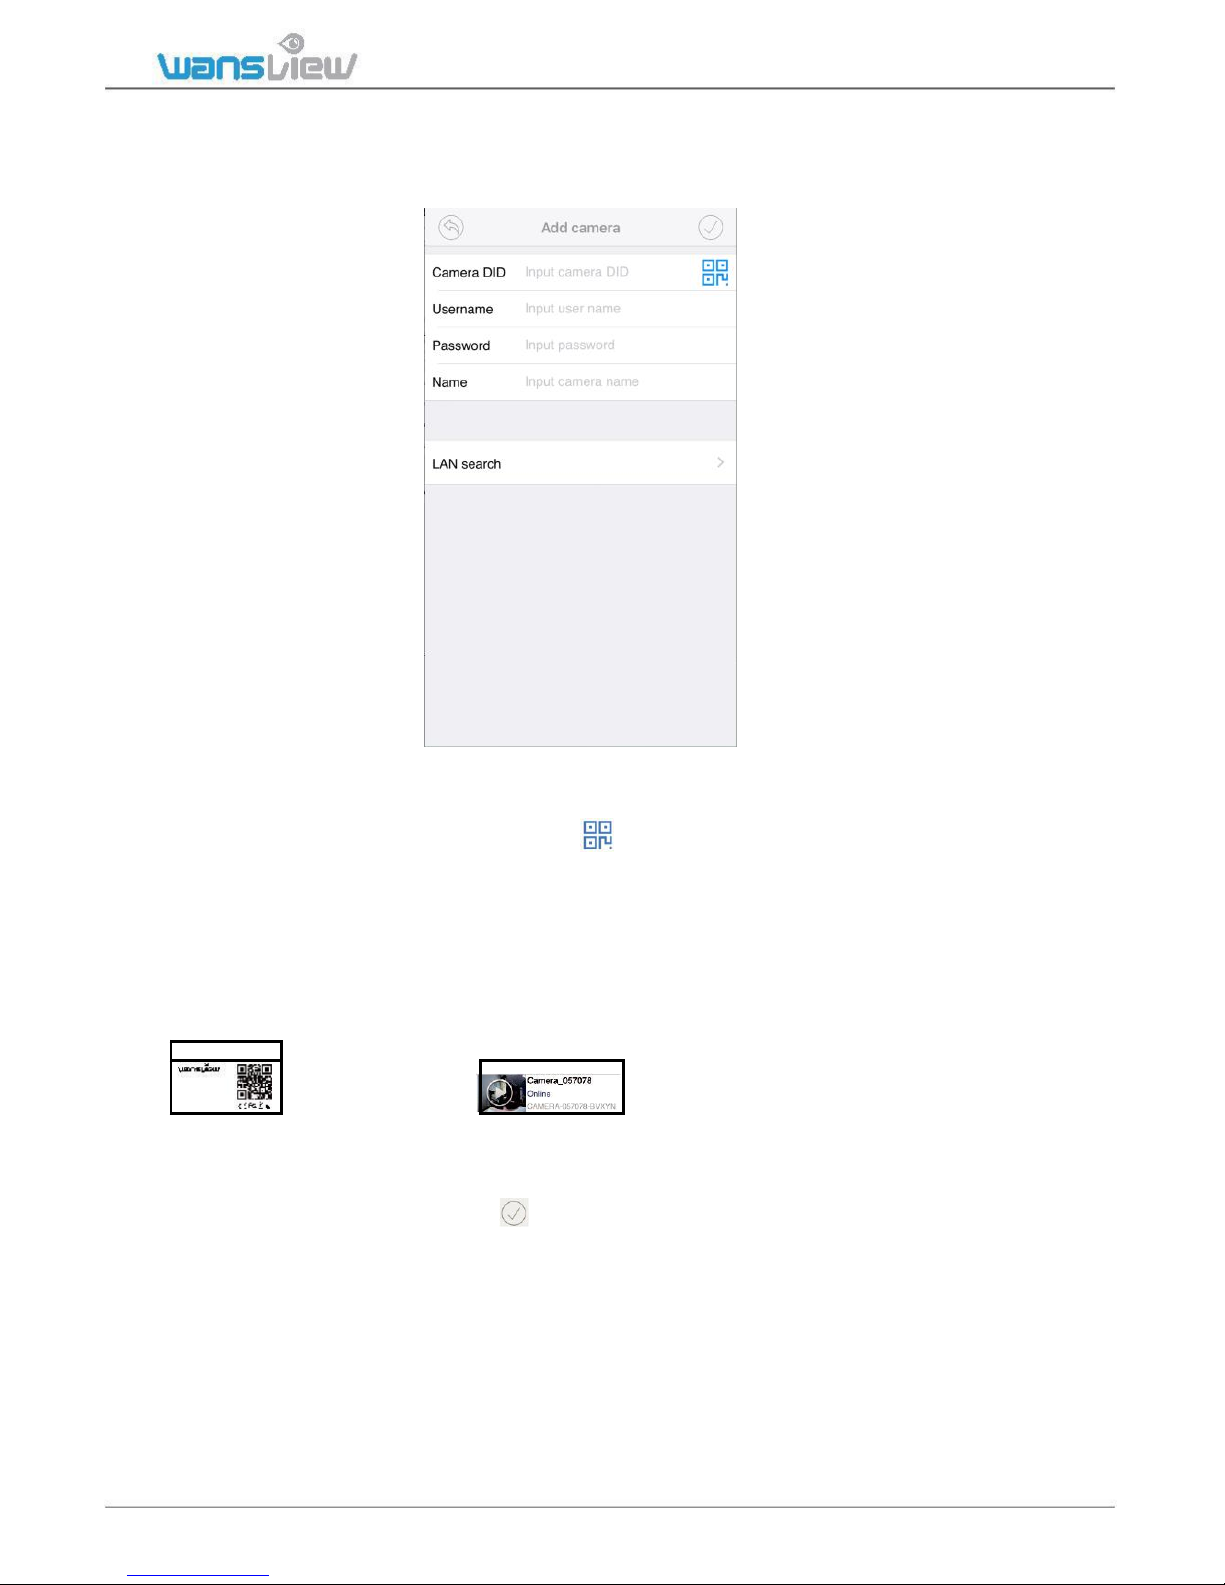
3: “Add Already Connected Network camera”
This is suitable for camera that is already connected with internet. Such as add the
camera to a second phone, or share the camera to other person.
User can use the below ways to add the camera:
1: If camera is on your hand , you can tap to scan the Camera’s QR code to
get the camera information.
2: If the mobile device and the camera are in the same WiFi network, user can use “Lan
Search” to search the connected camera.
3: Manually input camera information:
Camera DID can be found from the camera’s stickers
720Pwireless PTZ Camera
Model: Q3 (X Series)
Default user: admin
or Wan sview ap p ,
default Usern ame/Password is
Default password: 123456
DID: CAMERA-354584-CEO WH
DDNS: 010mryg.nwsvr1.com
admin/123456; Name can be any information.
Attention: Please remember tap to save all the settings.
When the camera shows “Online”, tap “>” to Advanced Settings > User Setting to change the
default User name and Password. This process is outlined in 2.6.2 User Setting.
www.wansview.com 12
2.2 Live Streaming
Each camera can be accessed by up to 4 users at the same time.
The administrator can setup 3 different levels of access: administrator, operator and
viewer.Please refer to Page 22.
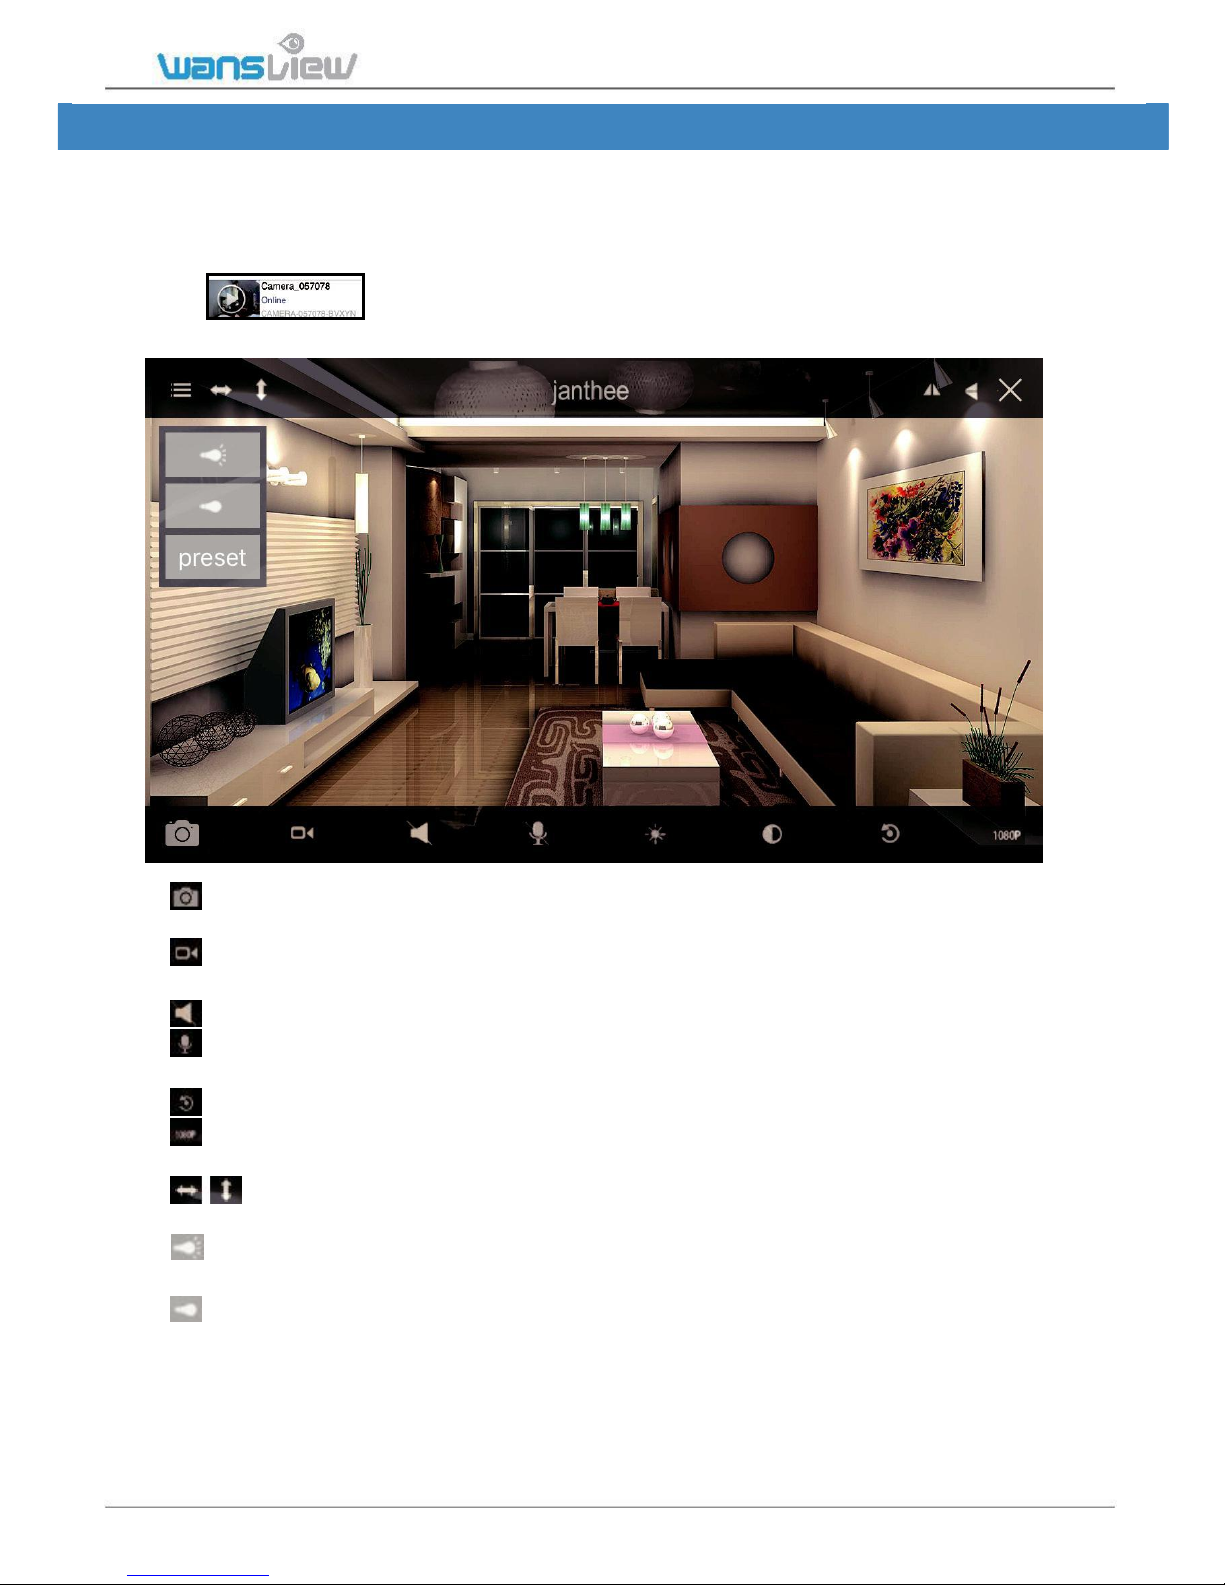
Viewing Camera on a Single Window
Tap
to enter the live feed and do more operations.
Tap the monitoring screen to see the video menu.
Snapshot: User can save snapshot picture to the mobile phone storage, and can check
the snapshot from More-Pictures or from Local Picture/Record.
Record: User can record video to the mobile phone, and check it from More-Records
or Local Picture/Record.The record will stop if you leave the live video screen.
Listen: When the Listen is on, user can listen what happening on the camera end.
Talk: When enabled the Talk, user can hold the “Hold Talk” to communicate with
the people/pets on the camera end.
Restore: To restore the Contrast and Brightness to default value.
1080P Resolution:Switch 1080P/480P (K3) and 720P/480P/240P (K2). When the
network is not good, try lower down the resolution to get a smooth video feed.
Cruise Vertically/Horizontally : Max 10 cruise, default 1 cruise, user can set up
from camera’s web page: Set Up-System-Pan & Tilt.
IR Auto: IR Led switches on at night when the luminosity is under 5 lux, if the
camera has no night vision, tap here to enable the IR led.
IR OFF: Tap here to turn on the IR light, if disabled, camera has no night vision.
www.wansview.com 13
/ Flip/Mirror: If the live video is upside down because of the installation,tap
and to make it right.
Exit: Turn off the live feed screen.
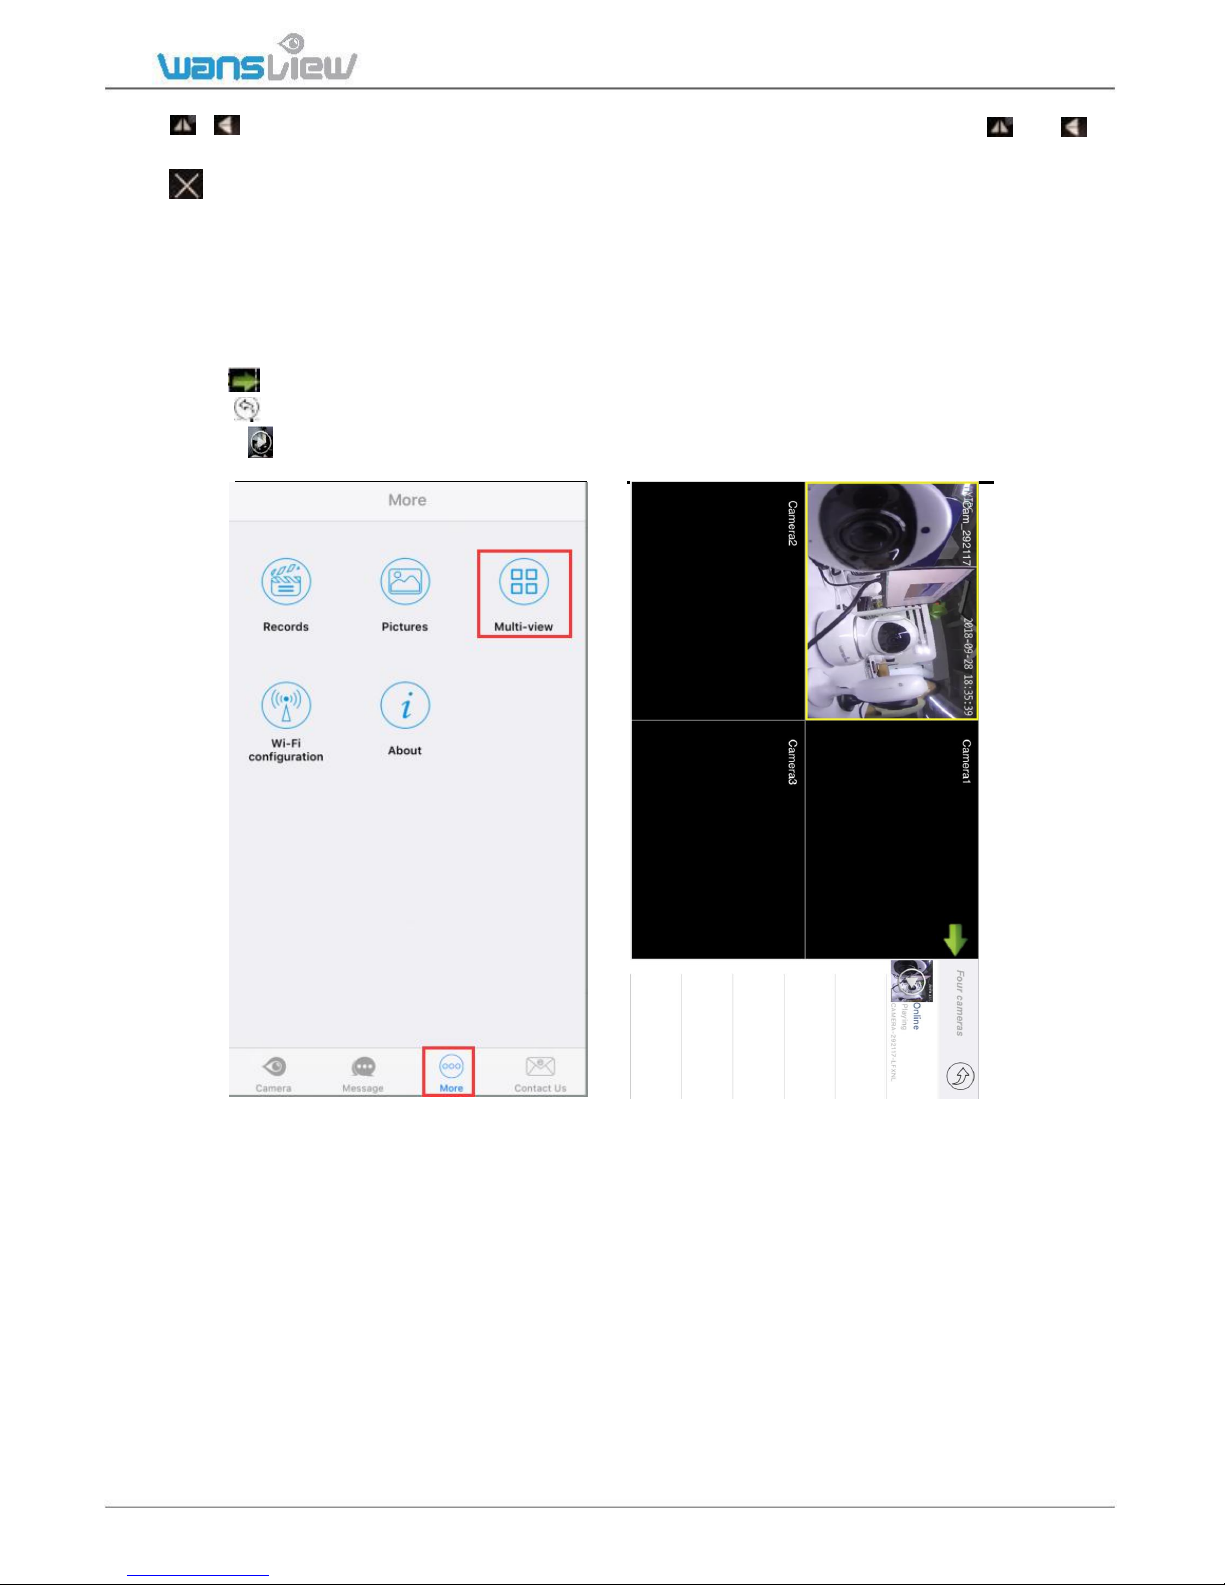
Viewing Camera on Multi-View
User can monitor several cameras (Max. 4 )at the same time on Multi-View.
1: Tap “More” and select “Multi-View” Click on cameras on the list to add the view on
the main screen.
2:Tap
to hide the camera’s list
3: Tap
to exit multi-view mode
4: Press
to play camera, Tap again to stop the video.
14
www.wansview.com 14
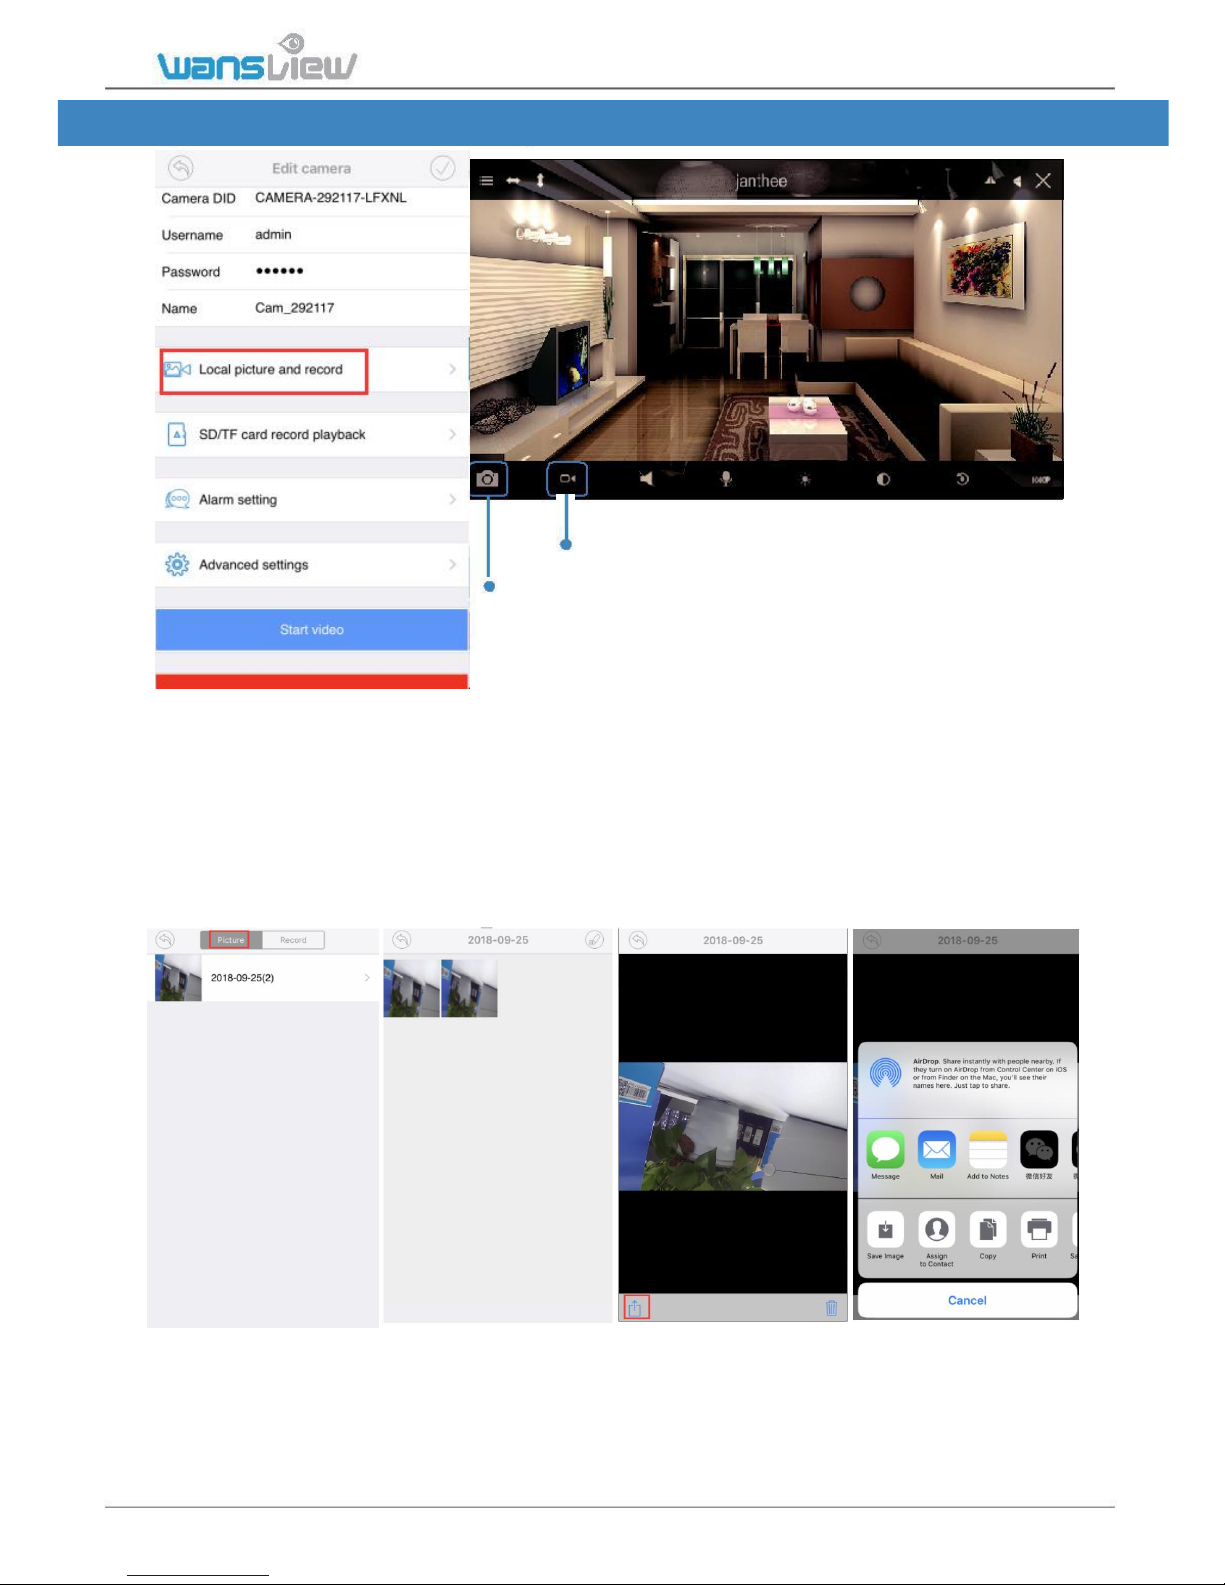
2.3 Local Picture and Record
record
snap
During live streaming, user can take snapshots by tapping on Snapshot to phone and
Record to phone. To stop recording, tap again or exit from the live streaming.
In Local Picture and Record, User can find all the pictures and videos taken manually.
Share pictures
To share pictures, follow the steps indicated in the screenshot.
Please long press the picture, then it will shows some choices. You can delete it or share it.
www.wansview.com 15

Share videos
Please tap “Record” and choose the video you want to save. Tap the icon on the right
side to save it to photo.
2.4 SD/TF Record and Playback (only for K3 camera with SD card)
SD Card recording
If a SD Card is installed in the camera, When the camera shows “Online” on
Wansview app, tap to enter Edit Camera page, from Advanced Settings>SD/TF
Card schedule recording, users can choose to record or not on the SD card by
switching the SD/TF Recording button.
Supports max 128GB micro SD card(SD card is not included in the box), 1080p 24
hour video can be saved for almost 4days, 720P can record about 8 days,480P can
record 24 days.
The new recorded video will automatically overwrite the old files if the SD card capacity
is not enough.
If SD Card is inserted, but cannot read or cannot use, please tap “Format SD/TF
card” first.
Note: The SD card recording is for constant recording, record time can be set from 2-15
minutes, if you only need alarm video, please do not enable SD Card recording, and go to
Alarm Setting to save alarm Video to SD card.
www.wansview.com 16
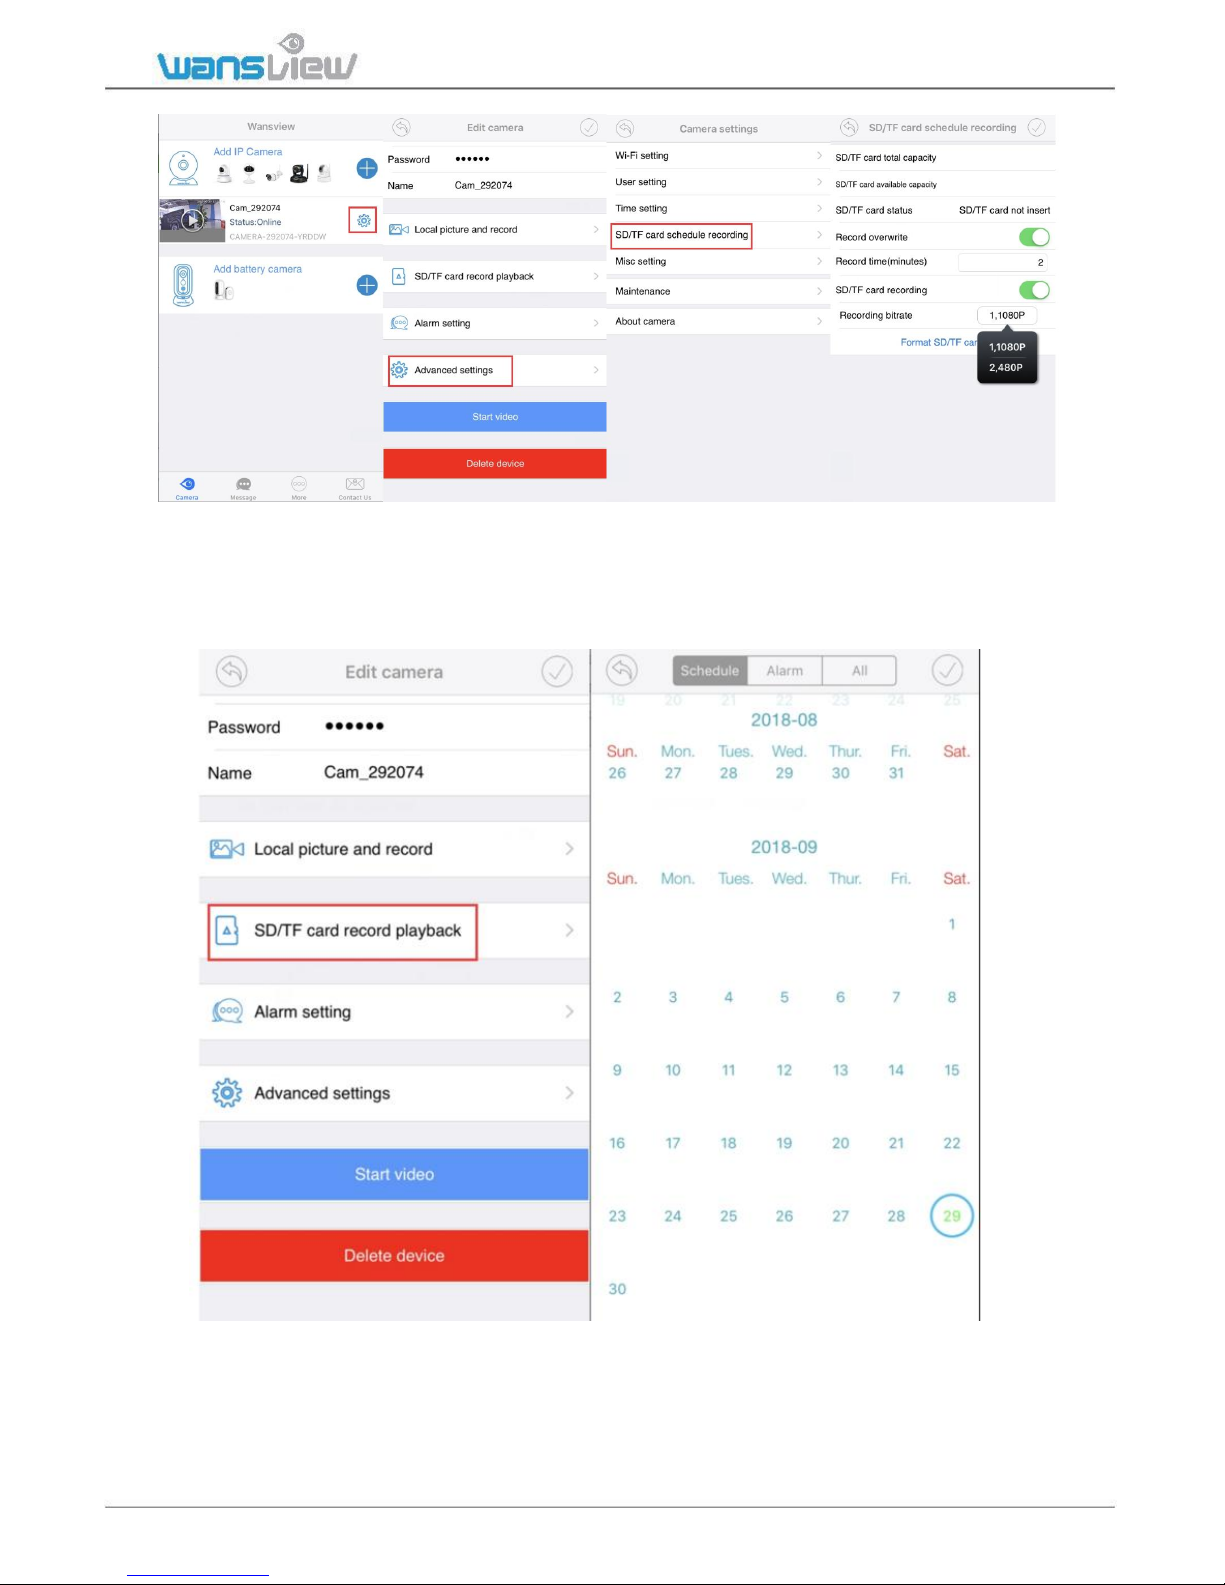
Playback recorded video
Access to SD/TF Record Playback. Choose a day in the calendar, then select Schedule
or Alarm click Done to see the list of recorded video on the SD card.
www.wansview.com 17
2.5 Alarm Setting
The camera is mostly for live video, what we achieve is to make the video more clear and
easy set up. it is not a professional security camera, the motion detection is only an addon feature. So the alarm notification will not be very accurate.
But if you want the motion detection works accurately, you may connect the camera to
some professional security software like: Blue Iris, iSpy or Sighthound, the camera
alert works great on them.
Follow the below steps to set up alarm.
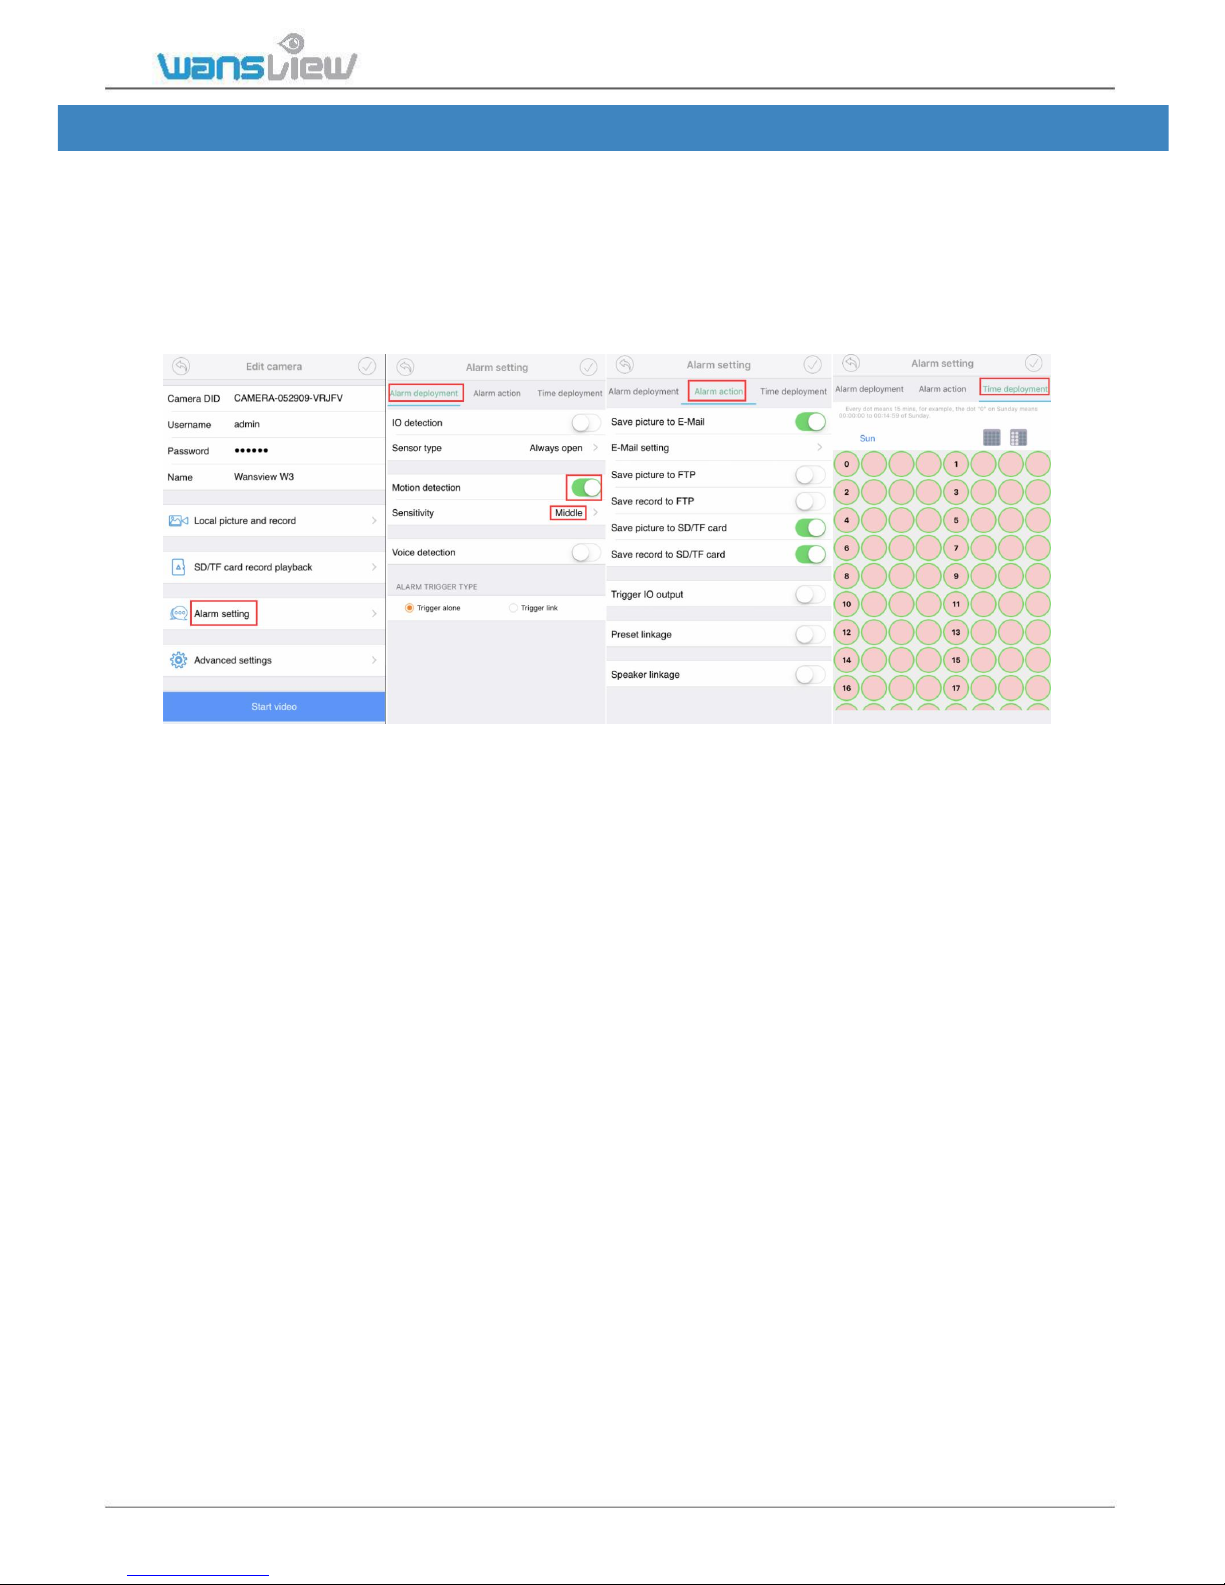
Alarm Deployment
IO Detection: this is for camera that can connect external source of alert device. The
K2/K3 is not available.
Sensor Type: For external source of alert device. The external sensor can be always
open or always close.
Motion Detection: Enable Motion Detection, user can set up camera with motion alarm
Motion Detection Sensitivity: User can choose Low/Middle/High sensitivity according
to needs.
Voice Detection: Enable Voice Detection, user can set up camera with voice alarm
Voice Detection Sensitivity: User can choose Low/Middle/High sensitivity according
to needs.
Trigger Alone: The alarm will be triggered for any kind of active
alarm event(Motion/Voice/IO)
Trigger Link: The alarm will be triggered for multiple detection at the
same time(Motion/Voice/IO).
Alarm Action:
Save Picture to Email: When an alarm is detected, the camera will send pictures to
the email box. Users can set up to 2 recipients.
Click Mail Setting to setup the email. Check your email provider for SMTP Server
and Port.
www.wansview.com 18
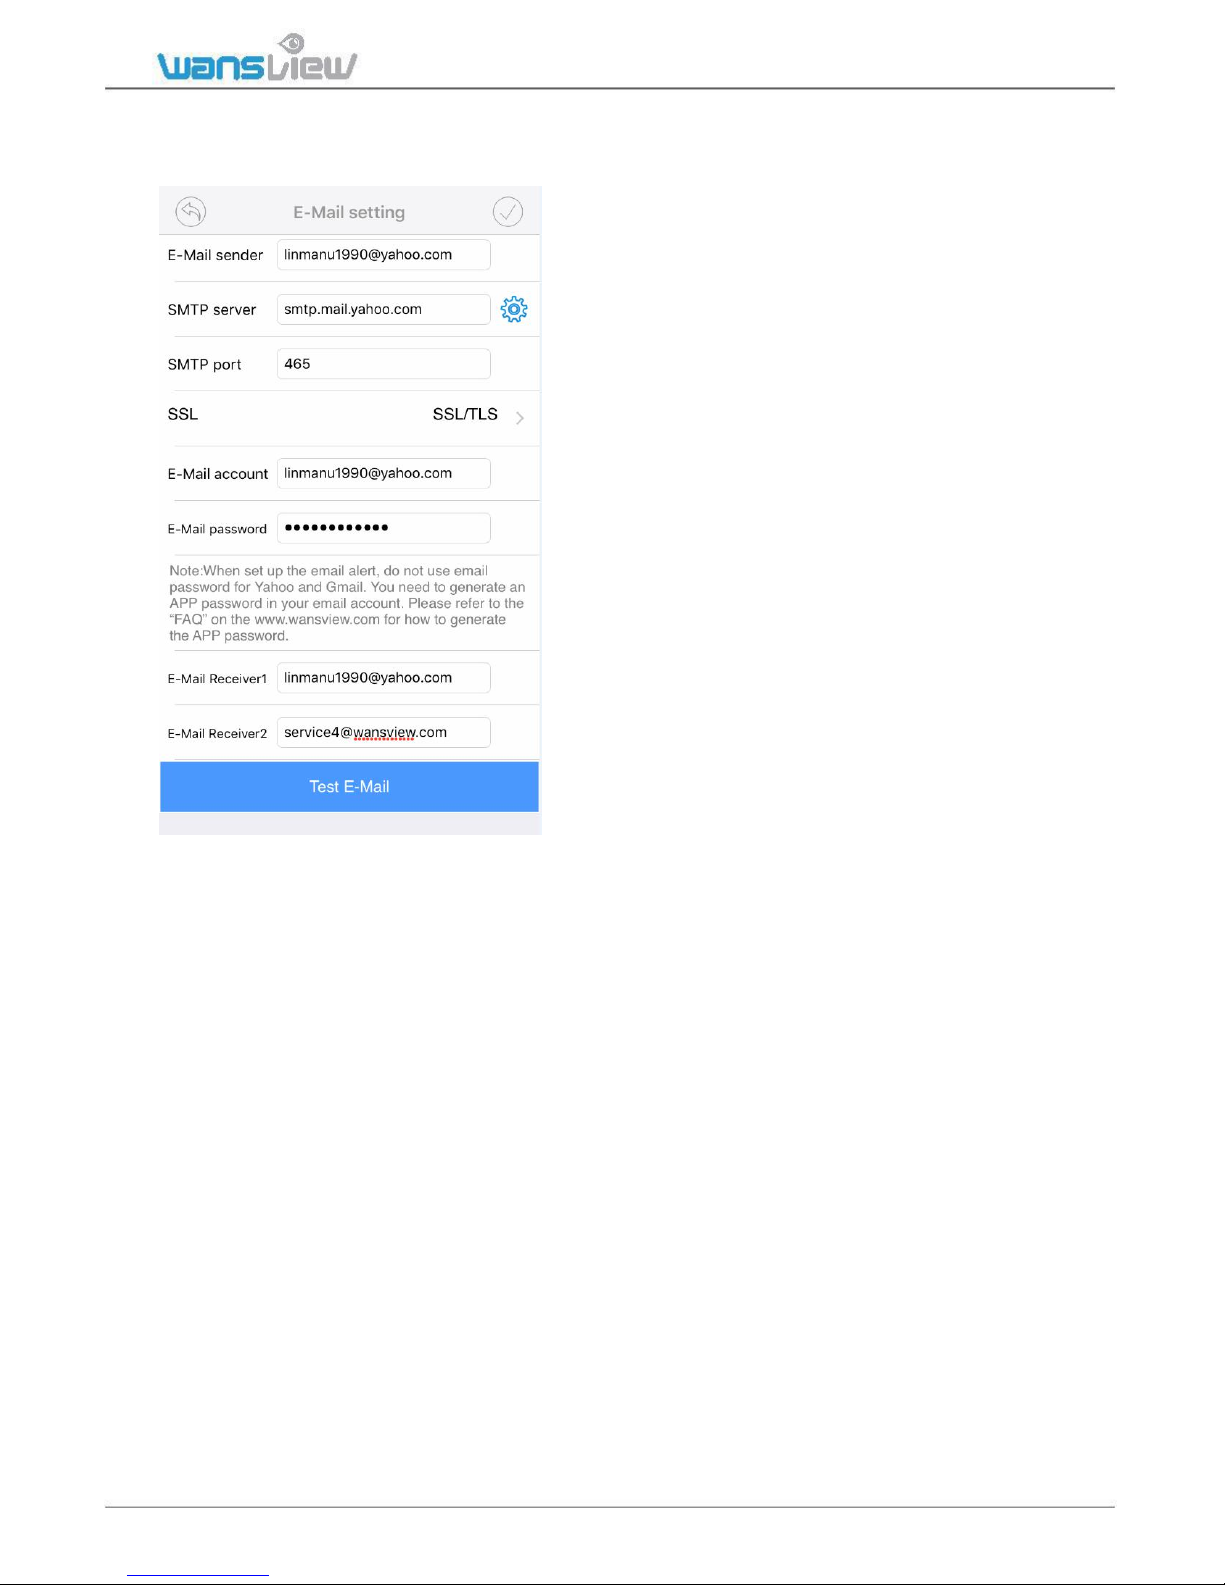
For Email Setting, please follow the below parameters:
Sender: your email address
Smtp Server: such as smtp.mail.yahoo.com etc.
Smtp port: 465
SSL: SSL
User name: your email address, the same with
sender
Password: your email password, if you are using
Yahoo and Gmail, please generate an app
password, and using the app password. Check the
FAQ document on website to generate app
password.
Receiver: any email address
After you fill in the chart of the email setting
page, please Save and Test E-Mail.
Save Picture to FTP: When an alarm is detected, the camera will send pictures to your
FTP server. Click on FTP Setting to setup FTP.
Save Record to FTP: When an alarm is detected, the camera will send a video to your
FTP server.
For FTP paramters, please refer to Page 40
Save Picture to SD/TF: When an alarm is detected, the camera will send pictures to the
SD card.
Save Record to SD/TF: When an alarm is detected, the camera will save an video to the
SD card.
Trigger IO Output: Not available for K2/K3.
Preset Linkage: When an alarm is detected, the camera will focus on one of the 8 Preset
spots (see above).
Speaker Linkage: When an alarm is detected the speaker will act as a siren for the
chosen length (5-30sec).
www.wansview.com 19
 Loading...