


Wanscam
HW series IP Camera User Manual For Browser View
Version number : 20160721
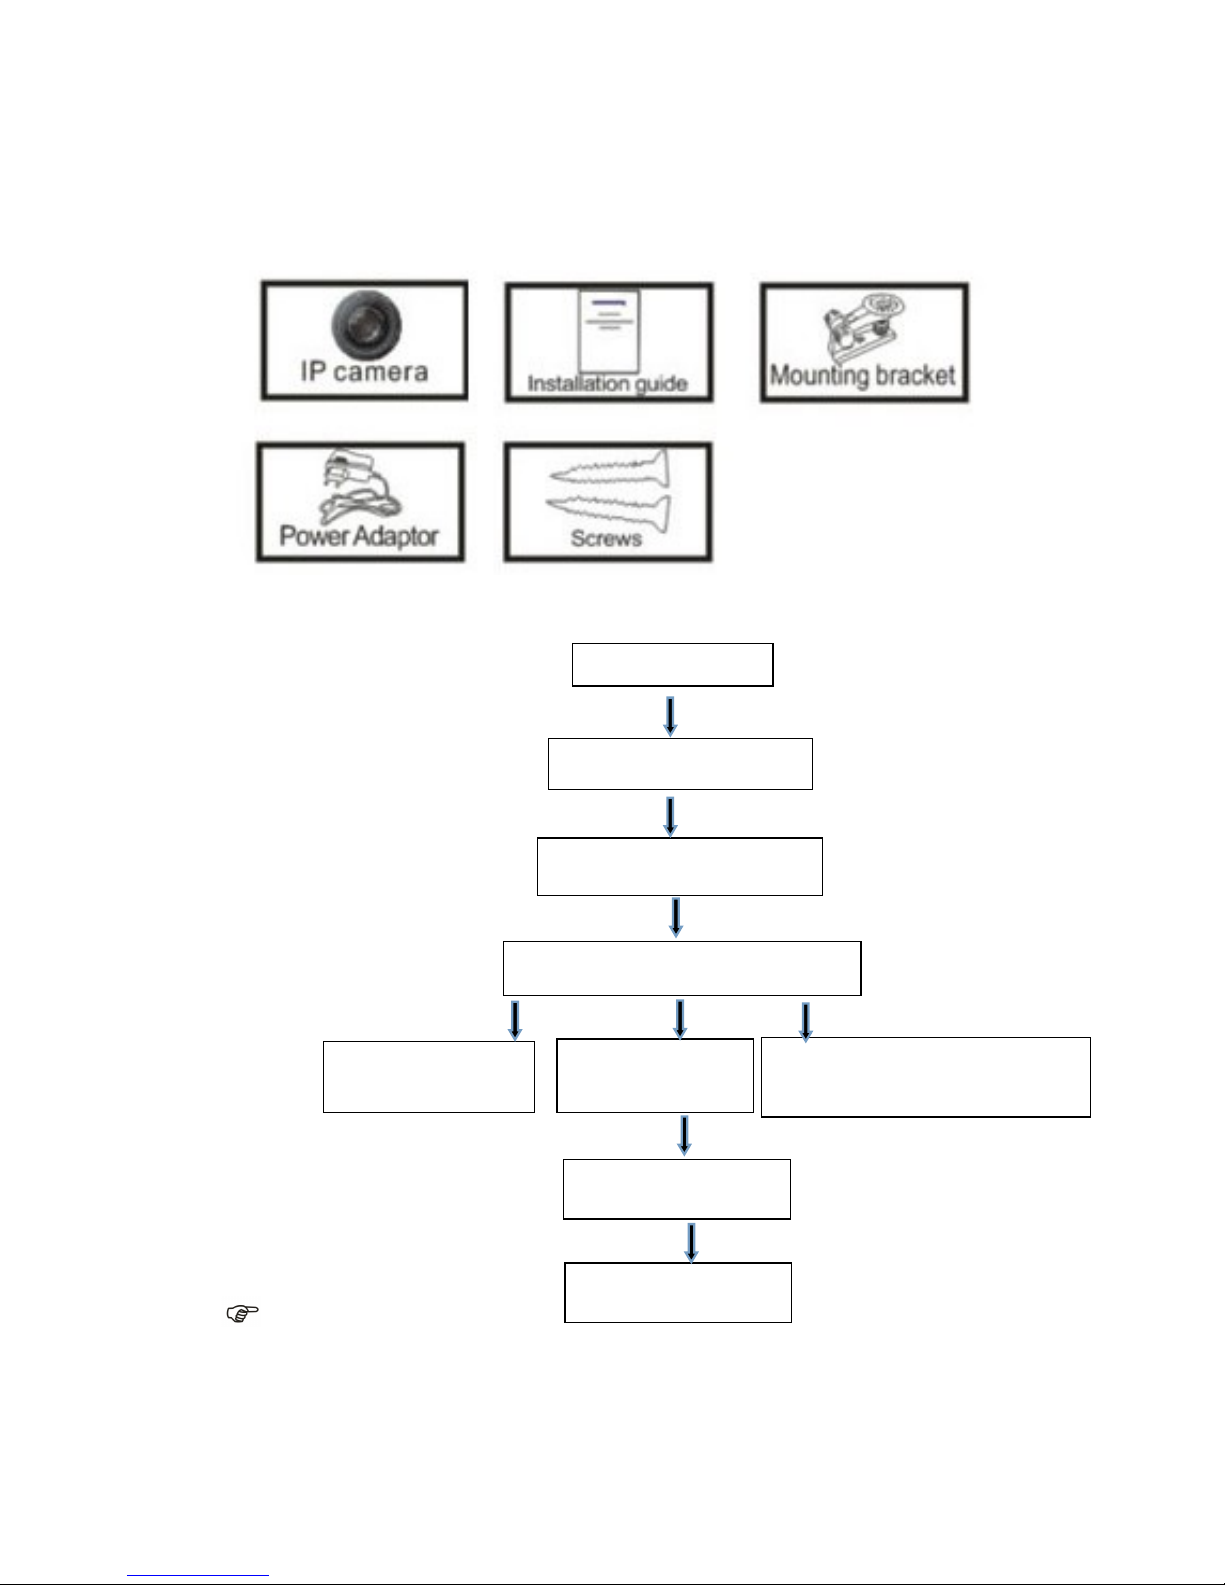
Packaging list:
Installation procedures:
Note:For the first time use IP Camera, please refer to the procedures above.
Start
Connect Hardwares
One Key Wifi Setting
Login the IP Camera in Lan
Access in Browser
Login the IP Camera in PC
Client
Access By Mobile
Install Search Tool
in PC
The End
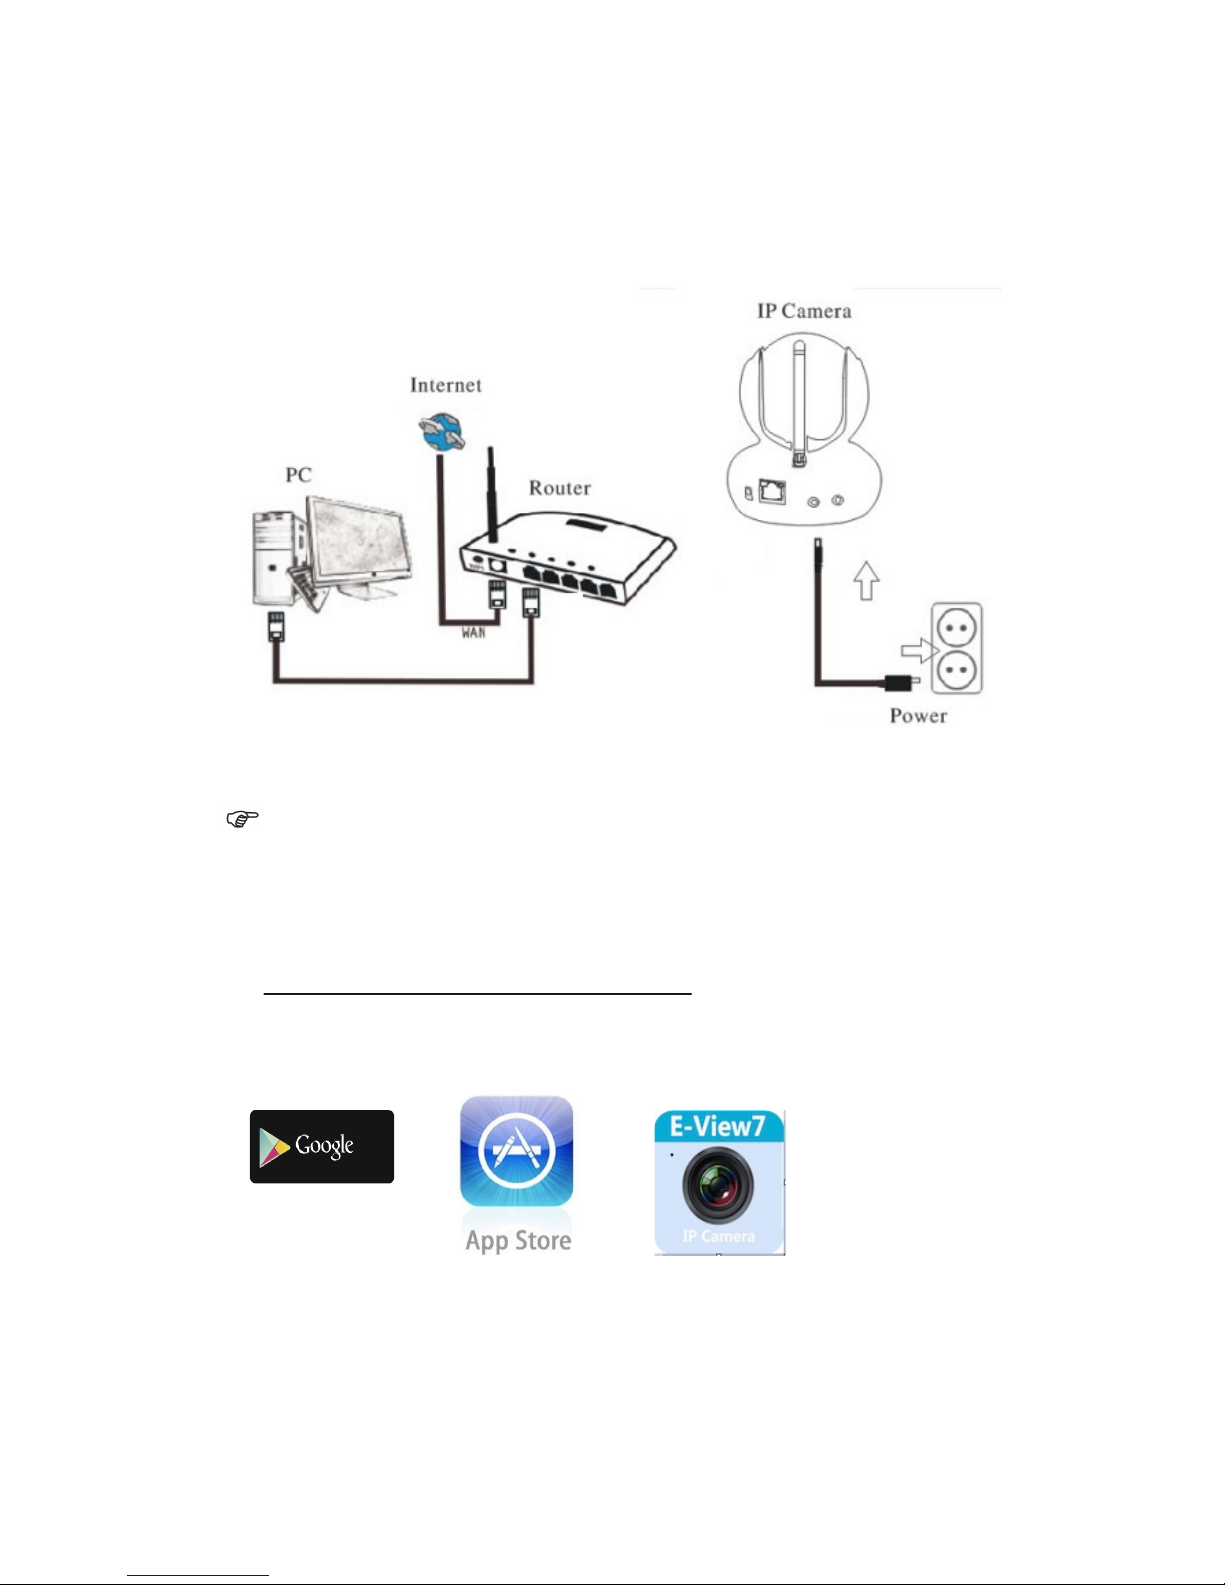
1.Connect Hardwares Diagram:
Note:Connect the power supply as above.
2.One Key Wifi Setting:
APP Download
Please Download and install the E-view7 APP before you set up the
IP Camera. Search on Google Play store or APP Store for “E-view7”
One Key Setting Function (cell phone must be connected to the WiFi)
Step1.Connect the camera with power adaptor .
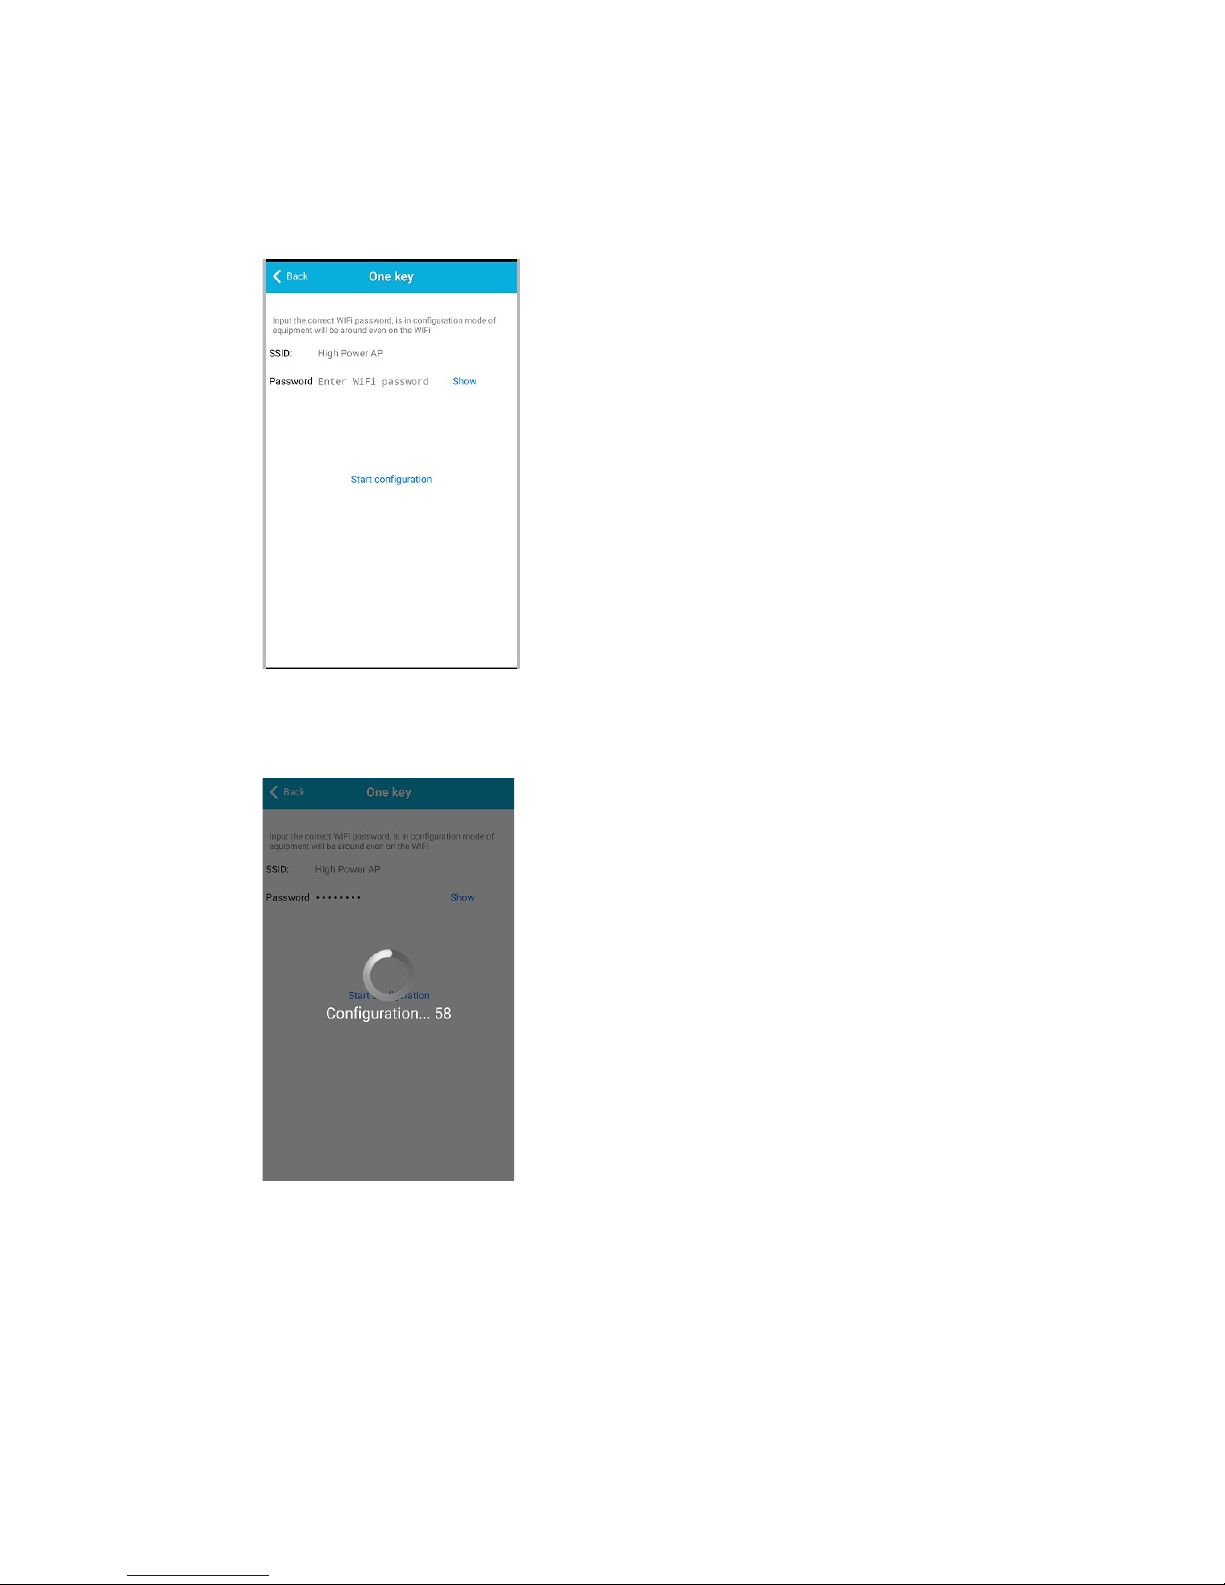
Step2.Launch the APP, tap on “+” to access the “Add Camera” function, then click on
“One Key Setting”, and the screen shown below will appear:
Step3.Enter the correct WiFi password, then click on “Start configuration”, like shown
in the screen below:
Step4. Wait for 60 seconds, then choose the respective device and enter the
password. If done, click on save to connect to the WiFi.
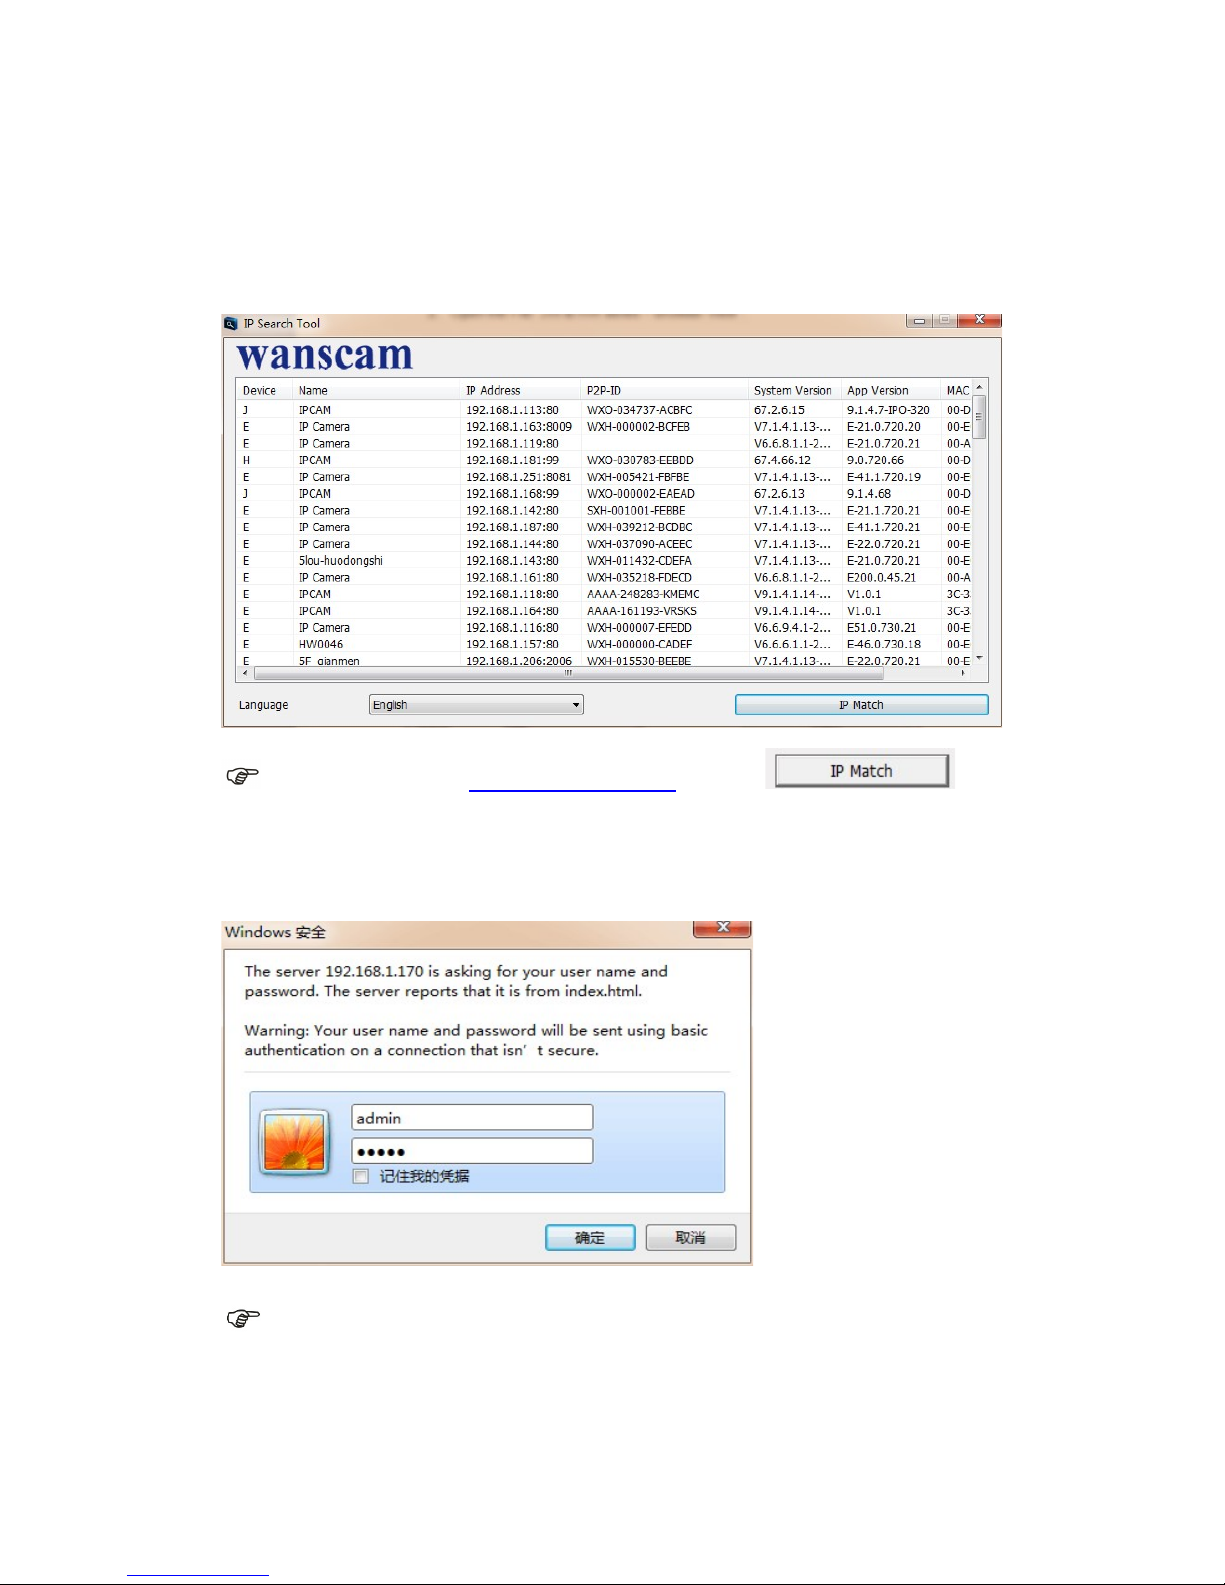
3.Install Search Tool in PC
After hardwares connection properly, run the search tool, the Camera IP Address will
be showed automatically.(Before viewing camera in IE, you must set One Key
Setting )
Note:If the Search Tool shows subnet mask does not match,please click
Double click the camera IP address in the search tool.
In your default browser a login screen like shown below will be displayed:
Note: Both the username and password are “admin”
(Please change the account user name and password for safety later)
After entering the correct user name and password, the Login screen will be
displayed.
Note: If the OCX already has been installed you may login directly. If not, please install OCX.
A. Click “OCX” to download and Install it.
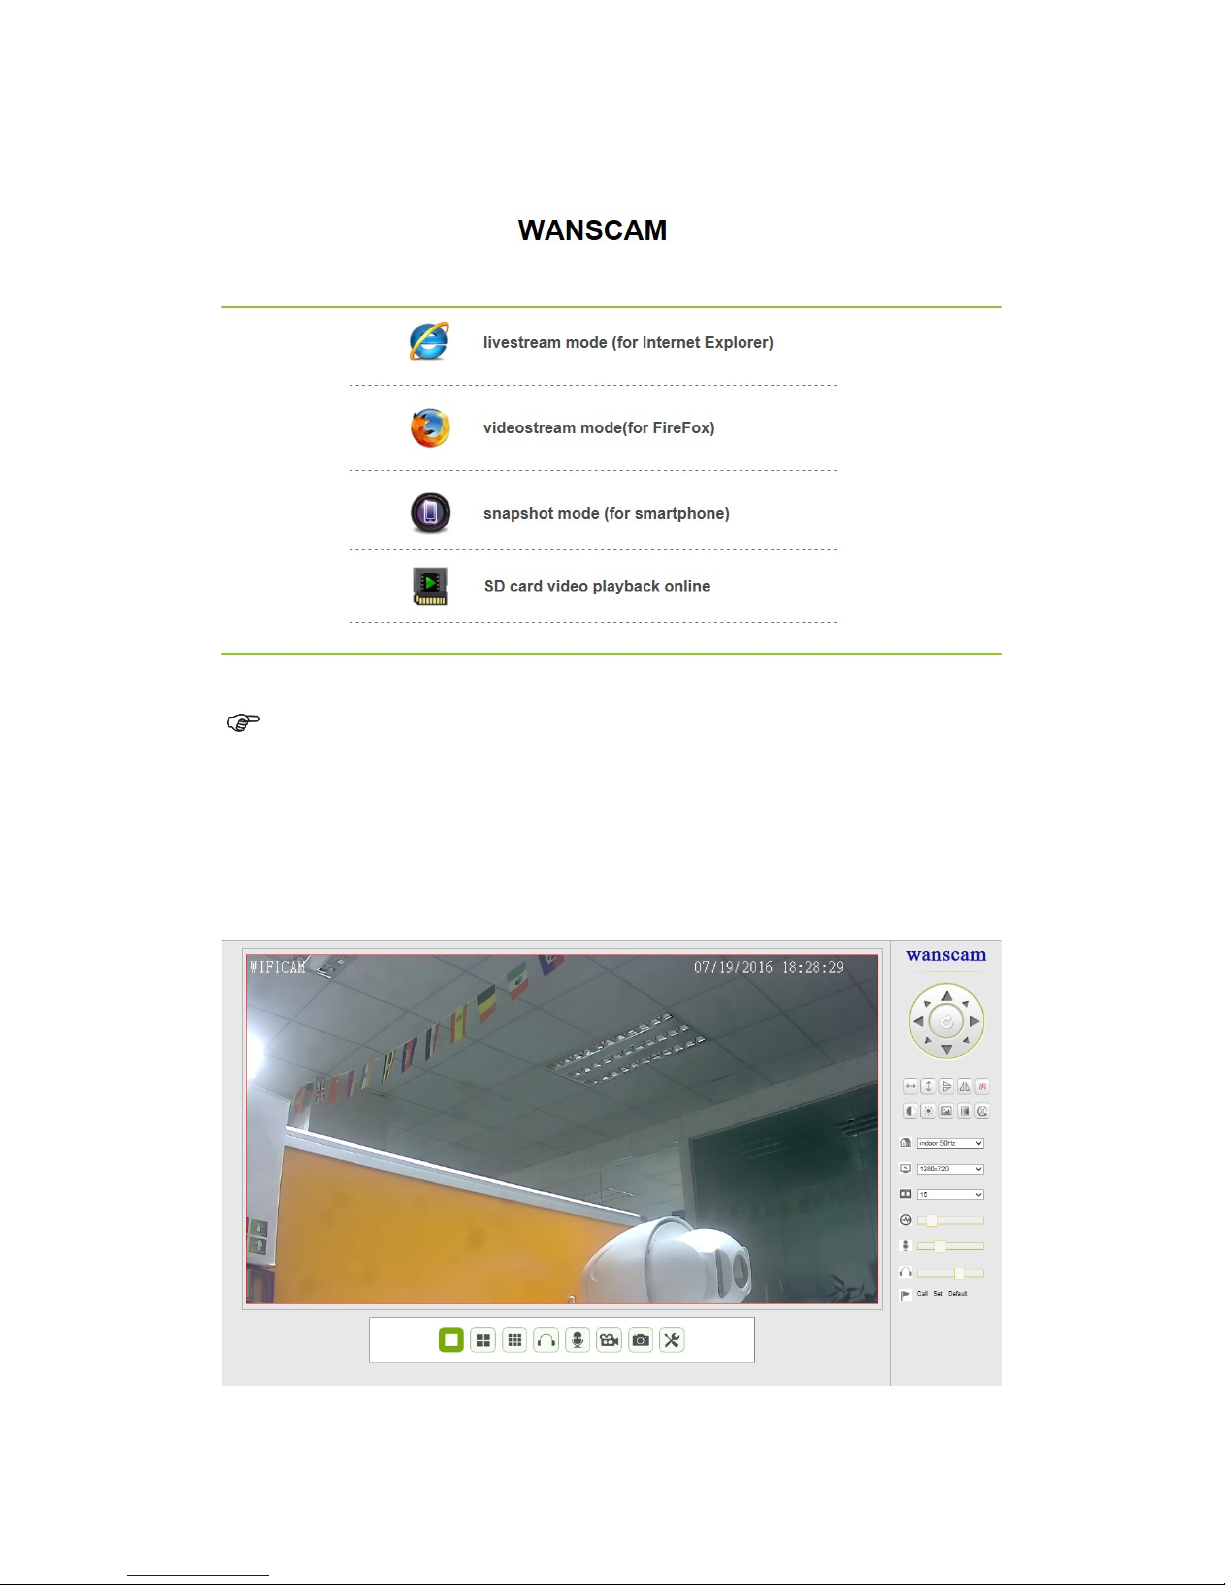
B. Refresh the webpage and login again,the camera video will be displayed as
below
Live video
.

4.Function Setting :
1)Device imformation Setting
a..Click , access the “ Device imformation” settings
b.Checking the imformation of the ip camera

2) Alias setting
The display name of the camera
3)Device date&Time Settings

4)Local record path setting
Record & Capture Path: Where to store the files, video and photos. (If you can’t choose
this, pay attention to your PC OS and IE version, please use the IE browser.)
Record file length: At least 100MB
Record time length: At least 5 minutes.
Reserved disk space: If your pc disk space is less than 200MB, stop recording.
Record cover: Delete the old files when the disk capacity is nearly full .
Note :If you can not change the recording path, please follow these steps:
First,please open search tool,Find the camera's ip address and copy it :
Then,Run IE browser as administrator :
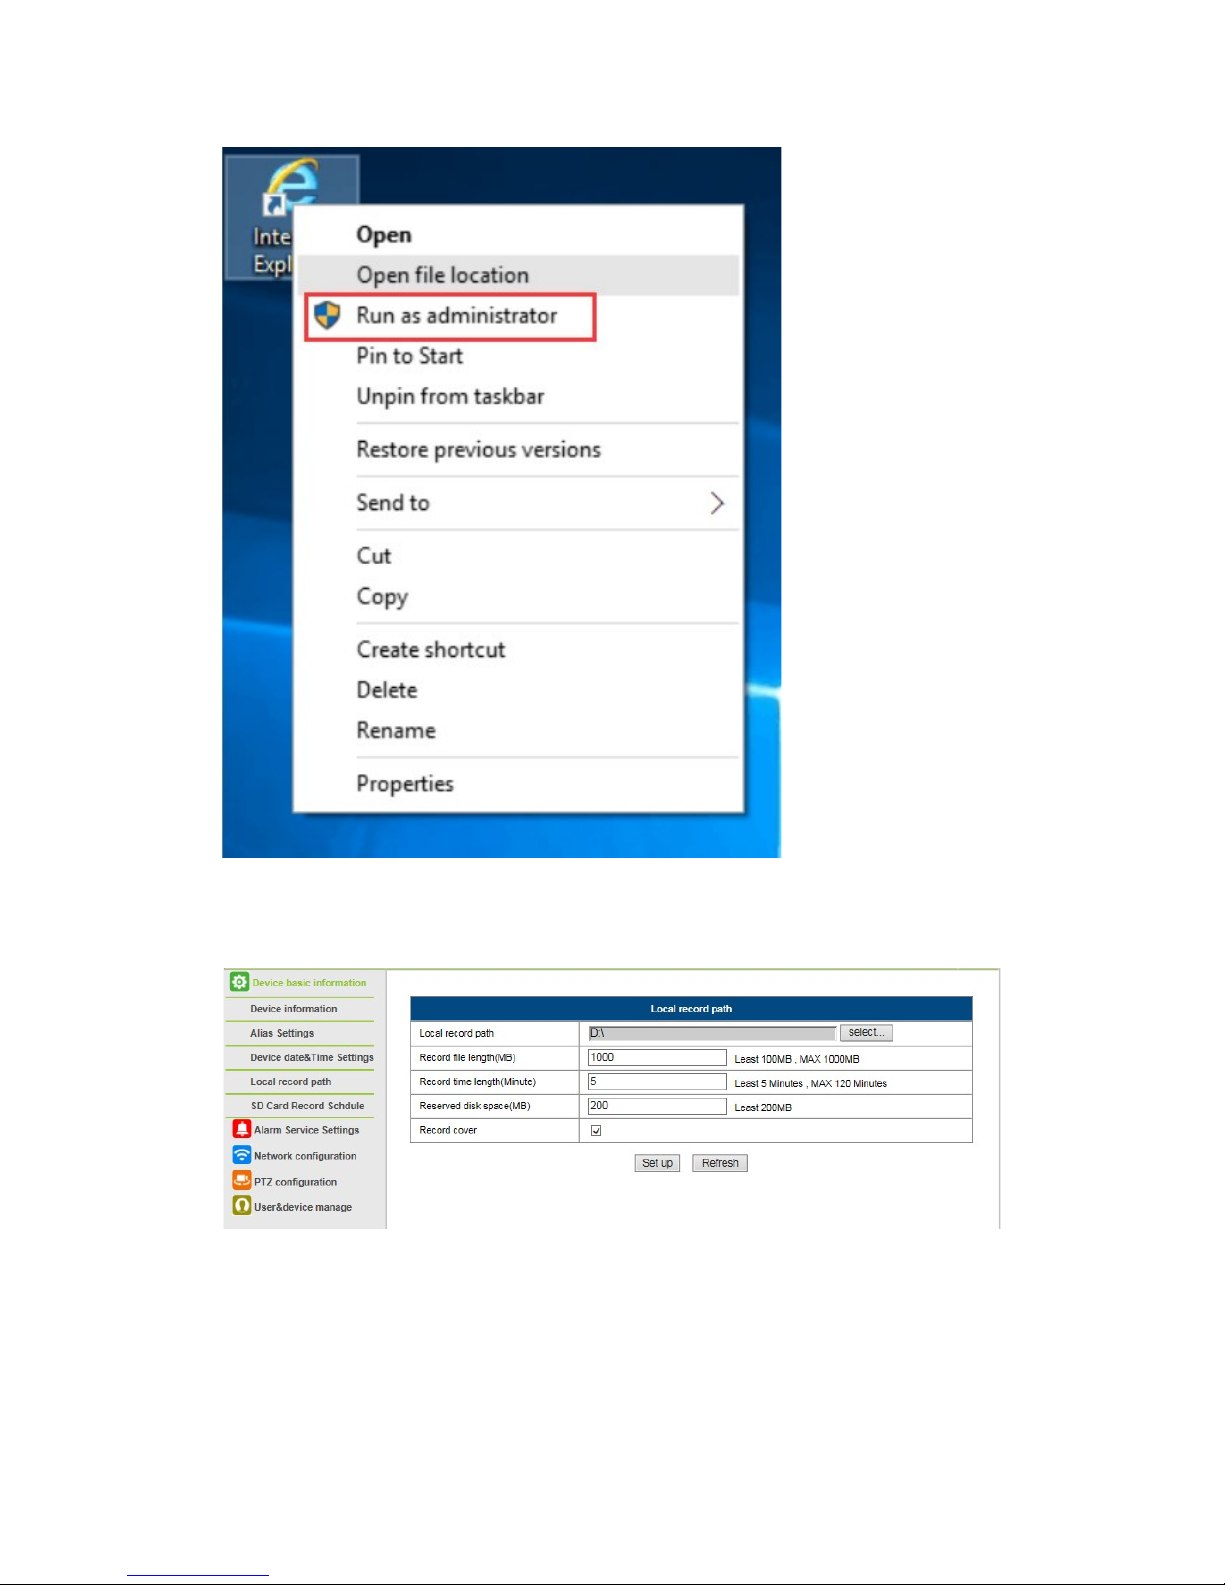
Finally, Paste IP address of the camera in IE browser, Click “Enter” and find the below
page then you can modify the video path :
5)SD Card Record Schedule
If the SD card has been inserted, the capacity of the card will be displayed. But at first,

you need to format it. This setting includes: Record coverage, Record time, Timer
recording.as follow:
Record coverage: Delete old files when the SD card is nearly full.
Record time: Create a video file every 10 minutes.
Timer recording: Set the time, select all, store recording to the SD card.
You can playback the video online in IE browser: Click “SD card video playback
online” menu as below:

6) Alarm Service Settings and Mail Service Settings
The mail service settings serve for the preparation of the alarm function. If the motion
detect activates your camera is triggered, you will receive an email containing photos.
Precondition for this is the correct setup and test of the service. Here the configuration of a
Gmail account as example:

You must enter the following information:
Sender: Enter your email address
Receiver: Enter your email address or a different email address
SMTP user: Enter the email username
SMTP password: Enter your email password
Note: This function only works if the IP camera is connected to the network. If you use Gmail, you must configure the
port as 465, SSL as TLS. But the most important is, that you check if your email client has SMTP enabled.
After first test email,you will receive an email from google with an login attemt.
Option 2 :
Change your setting to allow less secure apps to access your account,follow these
steps :
1.Go to the “Less secure apps ”section in my account.
2.Next to “Access for less secure apps”,select Turn on.(Note to Google Apps
users :This setting is hidden if your administrator has locked less secure app account
access)
3.More details about allow less secure apps ,please refer to this link :
https://support.google.com/a/answer/6260879?hl=en.
Alarm Service Settings, please use the same settings as the screenshot below:

7)Ftp service setting and system Log
FTP service setting:(Upload pictures to FTP when motion detection)
The Alarm log is provided for administrators to monitor the alarm events:

8).Basic Network Settings
1)You may modify the network Settings about IP address ,subnet Mask,Gateway, and the http
port
9)Wireless Lan Setting (for changing wireless )
1).Click “Wireless Lan Settings”
2).Search the WIFI signals and choose the SSID you want
3)Make sure all the parameters are the same as your router, input the WIFI pasword

in “share Key”
4).Click “set up”, after 60 seconds,the camera will reboot .
10)Onvif Stream Setting&Rtsp stream Setting (Open or close)

11)PTZ setting
12)User Setting & Multi-Device Setting
Modification of the user name & password of IP Camera :
Multi-Device Setting:

a.Refresh “Device list in LAN “
b.Click on “the 2nd device” or any other device
c.Click “Device list in LAN” and add ip of another camera
d.Input user name and password of the camera
e.Click on “set up”

13)Maintain
With this option you may restore it to the factory settings, reboot device,and upgrade
device firmware,Upgrade Device Emdeded Web UI :
After-Sale service :
If you have any suggestions or questions to us Wanscam,please contact your direct
Seller first;if they canot help you,please send email to Wanscam Support Team .
Email : support@wanscam.com .
Website:www.wanscam.com .
Thanks for your support to Wanscam!
 Loading...