

Page 1
LED
LE2833
1-866-96-LEGEND
24 h
ours a Day/ 7 Da ys a w ee k.
Page 2

Table Of Contents
Important Safety Instructions
View of Unit
Front Panel
Rear Panel
Remote Control
Remote Control Drawing
Preparation of Remote Control
Using of Remote control
System Connections
Connecting to the Power Supply
Connecting a USB Device
Connecting to an External HDMI Signal Source
Connecting External Equipment to COMPONENT Video IN (YPbPr)
Connecting to an amplifier or home theater system
Connecting to COAX Output jack
Connecting to a PC
Connecting to TV-Signal Input
Connecting to AV Input
Basic Operation
Turning the TV On and Off
Source selecting
Channel Selection
The First Time Installation
TV Operation and System Setup
Picture
Audio
Time
Setup
Lock
Channel
Media Playback
Media Playback
Function Buttons
Troubleshooting
Specifications
....................................................................................................................................................................
...................................................................................................................................................................
....................................................................................................................................................................
..............................................................................................................................................................
....................................................................................................................................................
...................................................................................................................................................
............................................................................................................................................................
........................................................................................................................................................
.....................................................................................................................................................
........................................................................................................................................................................
..........................................................................................................................................................................
............................................................................................................................................................................
......................................................................................................................................................................
............................................................................................................................................................
.........................................................................................................................................................
.......................................................................................................................................................
..........................................................................................................................................................
...............................................................................................................................................................
.....................................................................................................................................
...........................................................................................................................................
.................................................................................................................................
............................................................................................................................................
............................................................................................................................
........................................................................................................................................
...................................................................................................
...........................................................................................
...........................................................................................................................
...............................................................................................................................
...........................................................................................................................................
......................................................................................................................................
........................................................................................................................................
..............................................................................................................................
.................................................................
2
5
5
6
7
7
9
9
10
10
10
10
11
11
11
12
12
13
14
14
14
14
14
15
15
16
16
17
18
19
20
20
21
22
23
The images in this manual are for reference only and may differ from your model.
1
Page 3
Important Safety Instructions
Thank you for choosing our product. Please read this manual carefully and observe all safety and
operating instructions. Store the manual in a safe place for later reference.
This symbol indicates that dangerous voltage instituting a risk of
electric shock is present within this unit.
This symbol indicates that t here are important operation and
maintenance instructions in the literature accompanying the
appliance.
Caution
1. The product contains a low-power device. In order to ensure the safety ofthe
laser device, do not remove any cover and attempt to repair the unit. If any
service is needed, please contact the distributor or its authorised service center.
2. To reduce the riskofelectric shock, do not remove the cover (back). No
user-serviceable parts inside. Refer servicing to qualified service personnel.
Unplug the product from the power source before servicing or when it is
unused for a long period of time.
3. The manufacturer w ill not be held responsible for the damage caused by any
substitutions and modification of the product without authorisation from the
manufacturer’s or authorised service agent.
WARNING
The apparatus shall not be exposed to dripping or splashing and that no objects
filled with liquids, such as vases, shall be placed on the apparatus.
The information symbol in the documentation indicates useful information and
tips for using and maintaining the device.
The information symbol in the documentation indicates cautions for operators to
avoid potential damages. Please note and remember.
2
Page 4

Important Safety Instructions
NOTES:
1. Read these instructions.
2. Keep these instructions.
3. Heed all warnings.
4. Follow all instructions.
5. Do not use near water.
6. Cleanonlywithdrycloth.
7. Do not block any ventilation openings. Maintain well ventilated conditions around the
product. Do not put product on a bed, sofa or anything that blocks ventilation. Install
according to the manufacturer’s instructions.
8. Do not install near any heat sources such as radiators, heat registers, stoves or other
apparatus (including amplifiers) that produce heat.
9. Do not defeat the safety purpose o f the polarized. A polarized plug has two blades with
one wider than the other. The wide blade are provided for your safety. If the provided plug
does not fit into your outlet, consult an electrician for replacement of the obsolete outlet.
10. Read, heed and follow all instructions to ensure correct and safe installation and
interconnection of the apparatus;
11. The apparatus shall not be exposed to dripping or splashing and that no objects filled with
liquids, such as vases, shall be placed on the apparatus.
12. The mains socket-outlet shall be installed near the apparatus and the mains plug shall
remain readily operable.
13. Protect the power cord from being walked on or pinched particularly at plugs, power
sockets, and the point where they e xit f rom the apparatus.
14. Only use attachments/accessories specified by the manufacturer.
15. Use only with the stand, tripod, bracket, or table specified by the manufacturer, or sold
with the apparatus.
16. Unplug the apparatus during lightning storms or when unused for long periods of time.
17. Batteries (battery pack or batteries installed) shall not be exposed to excessive heat such
as sunshine, fire or the like.
18. Well disposed the disused battery, spent batteries must be deposited at the designated
collection points.
19. Refer all servicing to qualified service personnel. Servicing is required when the apparatus
has been damaged in any way, such as power-supply cord or plug is damaged, liquid has
been spilled or objects have fallen into the apparatus, the apparatus has been exposed to
rain or moisture, does not operate normally, or has been dropped.
Do not touch the color LED screen directly by hand.
3
Page 5

Important Safety Instructions
FCC requirements
This equipment has been tested and found to comply with the limits for a Class B
digital device, pursuant to part 15 of the FCC Rules. These limits are designed to
provide reasonable p rotection against harmful interference in a residential
installation. This equipment generates, uses and can radiate radio frequency
energy and, if not installed and used in accordance with the instructions, may
cause harmful interference to radio communications. However, there is no
guarantee that interference will not occur in a particular installation. If this
equipment does cause harmful interference to radio or television reception, which
can be determined by turning the equipment off and on, the user is encouraged to
try to correct the interference by one or more of the following measures:
Reorient or relocate the receiving antenna.
Increase the separation between the equipment and receiver.
Connect the equipment into an outlet on a circuit different from that to which
the receiver is connected.
Consult the dealer or an experienced radio/TV technician for help.
CAUTION:
To comply with the limits of the Class B digital device, pursuant to Part 15 of the
FCC Rules, this device is comply w ith Class B limits. All peripherals must be shielded
and grounded. Operation with non-certified peripherals or non-shielded cables
may results in interference to radio or reception.
MODIFICATION:
Any changes or modifications not expressly approved by the grantee of this device
could void the user’s authority to operate the device.
4
Page 6
View of Unit
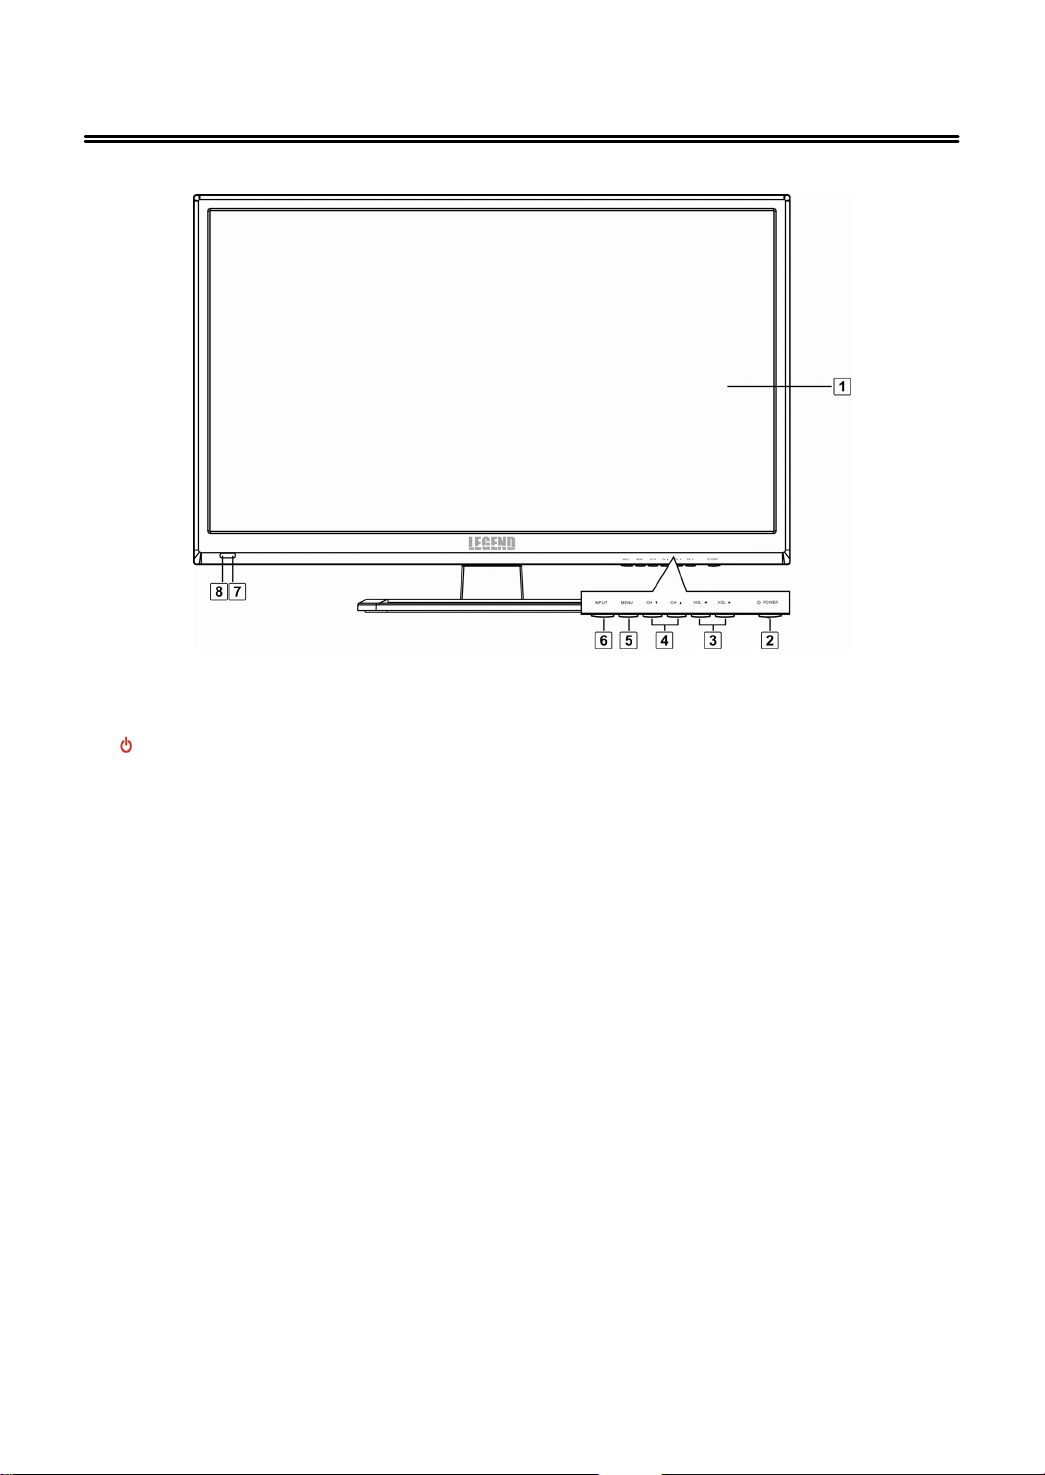
Front Panel
1. Color TFT screen
Presents high resolution picture.
2. POWER button
Press to switch on or off the device (enter or exit the standby mode).
3. VOL
◄►
buttons
Press to decrease or increase the volume.
When in setup menu, this button also serves the
4. CH ▲▼ buttons
◄►
direction button.
Press to page up or down through programs in TV mode.
When in setup menu, this button also serves the ▲▼ direction button.
5. MENU button
Press to enter or exit system setup menu.
6. INPUT button
Press to display a menu of all of the available input sources.
When in setup menu, this button also serves the ENTER button.
7. Remote Sensor
Remote sensor window for the remote control.
8. Power Indicator
In active mode, it is green; in standby mode, it turns red.
5
Page 7

View of Unit
y
k
Rear Panel
1. Earphone Jack
When earphone is inserted, the
loudspeaker is switched off.
2. USB Port
Connect the USB device.
3. COAX Jack
Connect an optional Optical digital
cable (not included) througha
compatible amp/receiver to enjo
superior audio sound.
4. AUDIO IN Jacks
Connectingfor COMPONENT or AV
audio signal input.
5. COMPONENT IN Jacks
Connectingfor the Y/PB/PRor the
AV input in COMPONENT or AV
mode.
6. HDMI1(ARC)、HDMI2(MHL)、
HDMI3 Input Jacks
Connectingfor HDMI signal.
7. RF INPUT Jack
Connect an antenna or cable
connection for television reception.
8. VGA IN Jack
Connected to the VGA outputjac
on a personal computer.
9. VGA AUDIO IN Jack
Connectingfor VGA audio signal
input.
10. AUDIO OUT Jack
Connect to audio receiver.
6
Page 8
Remote Control
k
play
p
play
prog
y
f
y
p
p
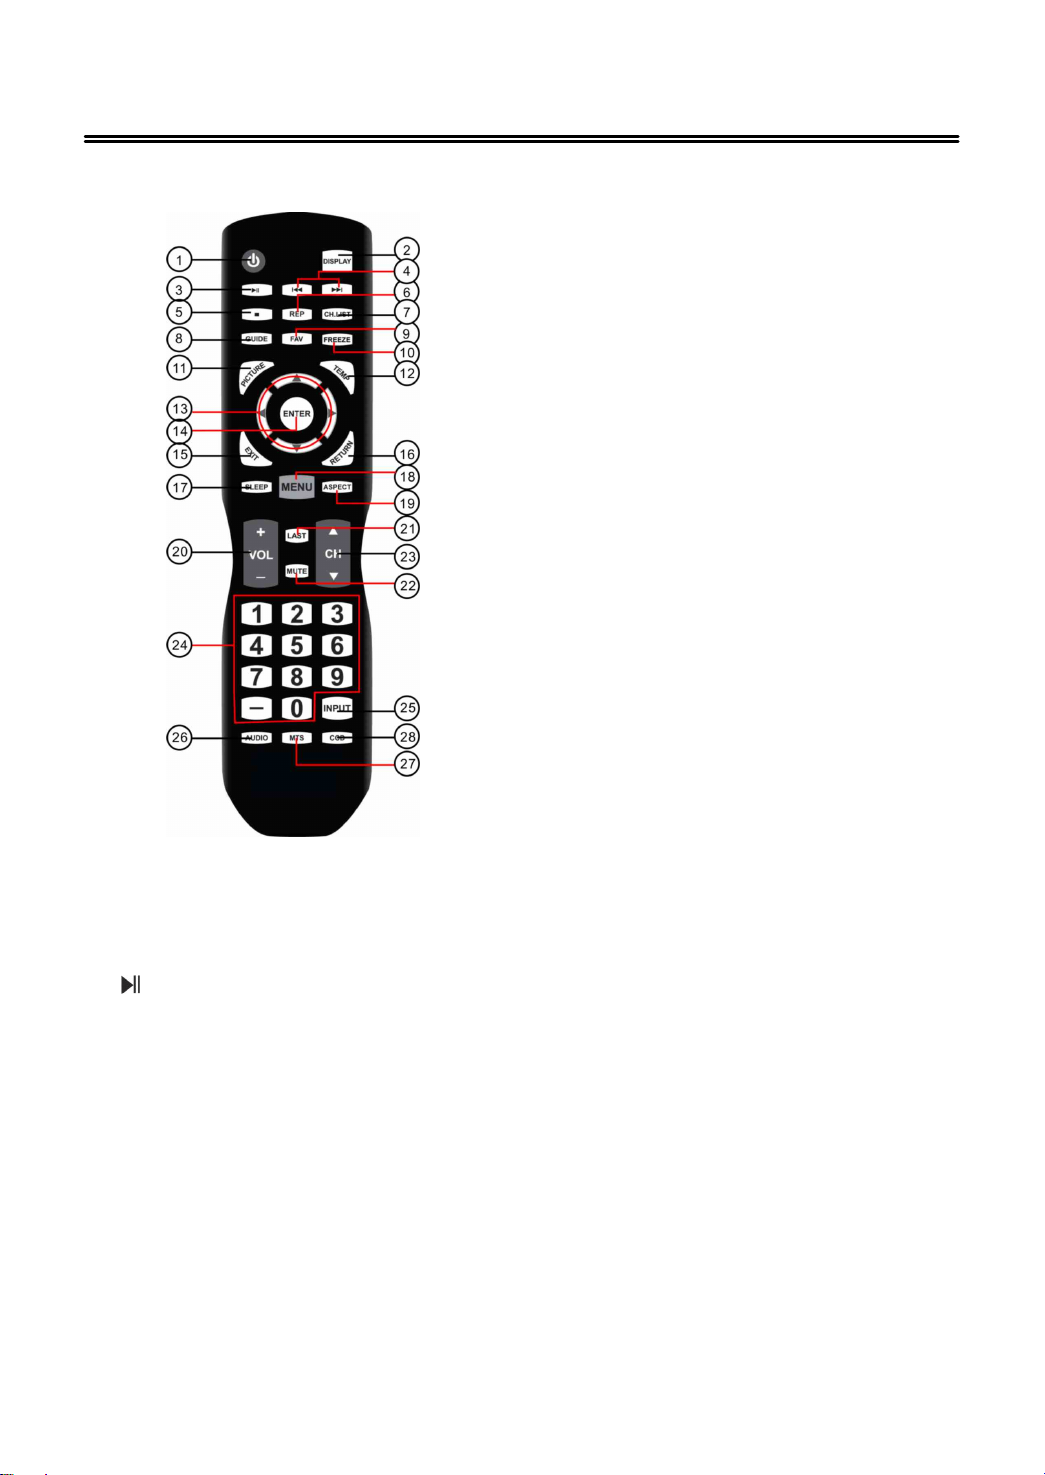
Remote Control Drawing
1. POWER button
Press to enter or exit standbymode.
2. DISPLAY button
Press to displaythe reference
information ofthe current mode.
3. Play/Pause button
Press to start orpause theplaybac
in USB mode.
/
4.
5. ■ button
6. REP button
buttons
Presstoreturntotheprevious file
or skipto the next one in media
er.
Press to sto
mode.
Press to repeatplaybackin USB
mode.
backin USB
7. CH.LIST button
Press to displaya list ofchannels
saved in the TV tuner memory.
8. GUIDE button
Press to review scheduled
rammingfor the currentl
viewed channel.
9. FAV button
Press to displaya listingo
favorite TV channels.
10.FREEZE button
Pause and still-frame the current
imageonthedisplay.Pressagain
for live TV.
11.PICTURE button
Press repeatedlyto select the
icture mode: Standard,
Dynamic,Mild or User.
12.TEMP button
Select the Color Temperature:
NORMAL > WARM > COOL.
13.Direction buttons (▲▼
In the setupmenu,press the ▲▼
button to select a desired item and
ress the
set.
14.ENTER button
Press to confirm selection in the
setupmenu.
15.EXIT button
Press to exit a displayed menu.
16.RETURN button
Presstoreturntotheprevious
menu.
17.SLEEP button
Press the button repeatedlyto
select the desired time to sleepor
select Offto close the function.
18.MENU button
Press to enter setupmenu or return
to theprevious menu.
◄►
button to adjust or
◄►
our
)
7
Page 9

Remote Control
19.ASPECT button
Select the v iewable display aspect
options: Normal, Wide, Zoom, or
Cinema. VGA and DVI mode is Full
100%, Point to Point.
20.VOL+/- button
Press to increase or decrease the
volume.
21.LAST buttons
Press to switch between the current
channel and previously viewed
channel.
22.MUTE button
Presstoturnonoroffthespeaker
output.
23.CH▲/▼ button
Press to select the next or previous
program in TV mode.
25.INPUT button
Press to enter the source selecting
menu, press the ▲▼ direction
buttons or press the INPUT button
repeatedly to select desired source
and press the ENTER button to
enter the selected source.
26.AUDIO button
Press to select the sound mode:
choose from STANDARD, MUSIC,
MOVIE and USER.
27.MTS button
Press to select a program’s second
audio channel (if available).
CCD button
28.
Press to select closed caption
subtitles (if available) CC Off> CC
on > CC on mute.
24.0~9/- Number buttons
Select desired TV channel directly.
For example: to select digital
channel “8”, press number key “8”;
to select digital channel “4-1” ,
press “4”, press “-”, and press “1” =
(4-1).
8
Page 10

Remote Control
y
y
y
y
/
y
g
p
ydep
g
j
g
f
Preparation of Remote Control
1. Softlypush the backcover to open
the batterycompartment.
2. Insert two batteries (1.5V, size AAA),
please make sure the polarit
matches the marks inside the
compartment.
3. Softl
press the backcover to close
it.
Under normal use the
batterywill last for six
months.
Take out batter
when
the remote is not in use
for a lon
time.
Using of Remote control
Point the remote control unit from no
more than about 7 meters from the
remote control sensor and within
about 60 degrees ofthe front ofthe
unit.
Universal Remote Code:
To operate this TV usingthe remote
control provided b
our Cable
Satellite provider, follow the
programminginstructions included
with the providers’remote control
and input the followingcodes when
prompted;
• For Comcast or DirecTV remote
controls, input the code- 10030.
• For AT & T (U-verse) remote controls,
input the code- 1043.
• For RCA Universal Remote Controls,
input the code- 0030.
The o
endingon the brightness in the
room.
eratingdistance mayvar
Do not point bri
ht lights
directlyat the remote
control sensor.
Do not place ob
ects
between the remote
control unit and the
remote control sensor.
Do not use this remote
control unit while
simultaneouslyoperatin
the remote control unit o
anyother equipment.
9
Page 11

System Connections
Do not connect the power cord until all other connections have
been made.
Ensure that you observe the color code when connecting audio and
video cables.
Connecting to the Power Supply
Connect the plug of the power cord on the rear panel of the unit to the
AC100~240V wall outlet.
Connecting a USB Device
This unit is designed with a USB port so that
you can connect your USB device for media
play, record or software upgrade.
Make sure that the desired file for media play or software upgrade is
stored in the USB device before connection.
Connecting to an External HDMI Signal Source
1. Connect an HDMI signal source to one ofthe
HDMI jacks on the rear panel ofthe unit.
2. After connection, turn on the power ofthe unit
and the HDMI signal source.
3. Press INPUT then direction buttons to select
HDMI 1, HDMI 2 or HDMI3 mode, and then
press the ENTER button to confirm.
NOTE: This unit supports the MHL(HDMI2) and
ARC(HDMI1) functions. HDMI maximum resolution
ratio is: 1366*768.
10
Page 12

System Connections
HDMI provides both audio and video signals and typically provides
superior image quality to AV and YPBPR.
Connecting External Equipment to COMPONENT Video IN
1. When connecting external equipment to
your television, match the colors ofthe
connecting jacks (Video: Blue, Green, Red;
Audio: White/Red ).
2. Connect the optional component video
cables (blue, green, red) (not included) from
the video output jacks (Y, Pb, Pr) on your
external equipment to the Component Y Pb
Pr input on the TV’s rear panel.
3. Connect white/red audio cables for sound
from the audio (L / R) output jacks on your external equipment to the AUDIO
L / R input jacks on the TV’s rear panel.
4. Press INPUT then direction buttons to select COMPONENT/AVmode, and
then press the ENTER button to confirm.
Connecting to an amplifier or
home theater system
Use the AV cables to connect the
external AV signal source to the AUDIO
OUT jacks on the rear panel ofthe unit.
Connecting to COAX Output jack
Connect an optional digital cable directly to the television’s COAX audio output to listen
through all inputs except VGA. (VGA does not support digital audio)
11
Page 13

System Connections
f
k
p
f
p
Connecting to a PC
The unit can be connected to a PC via the VGA cable and PC audio cable.
1. Connect one end ofthe VGA cable
to the VGA jackon the jackpanel o
the unit and the other end to the
PC VGA output.
2. Connect one end ofthe audio
cables to the PC INjackon thejac
anel ofthe unit and the other end
to the PC audio outputjack.
3. Set the PC video resolution to match that ofthe television After connection,
turn on thepower ofthe unit and the PC.
4. Press INPUT then direction buttons to select VGA mode, and thenpress the
ENTER button to confirm.
Connecting to TV-Signal Input
Connect the TV signal cable (the antenna
cable, for example) to the RF input Jackon
the backofthe unit so thatyou can
receive televisionprograms.
1. Connect TV signal input source from
the aerial to the RF inputjackon the
rearpanel ofthe unit.
2. After connection, turn on thepower o
the unit.
3. Thenpress the INPUT button and the direction buttons to select TV mode,
ress the ENTER button to confirm and conductprogram selection.
12
Page 14

System Connections
k
f
Connecting to AV Input
Use the AV cables to connect the external AV
signal source to the Y( AV) and AUDIO IN input
jac
s on the rear panel ofthe unit.
After connection, turn on the power o
and the external AV signal source. Press INPUT
then direction buttons to select
COMPONENT/AVmode, and then press the
ENTER button to confirm.
the unit
13
Page 15

Basic Operation
p
g
g
y
g
Turningthe TV On and Off
Connect the
ower adapter to wall AC Outlet. A front mounted indicator light
will be illuminated red indicatingthe TV haspower.
Press the POWER button on the remote control or the TV set. The TV’s indicator
light will be illuminatedgreen indicatingthe TV is turned ON.
Press the POWER button a
ain to turn the TV off. A front mounted indicator
light will be illuminated red indicatingthe TV is off.
Source selecting
The unit incorporates multiple input sources which can be
selected via the INPUT button on the television or remote. Press
the INPUT button to enter Input menu, as shown right.
Use the ▲▼ direction buttons and the ENTER button
On the input menu, press the ▲▼ direction button to select
the desired input source. After several seconds, the TV will
enter the selected source.
Or afteryou selected the desired source press the ENTER button to enter the
selected source immediately.
Use the INPUT button and the ENTER button
On the input menu,press the INPUT button repeatedlyto select the desired
input source. After several seconds, the TV will enter the selected source.
Or afteryou selected the desired sourcepress the ENTER button to enter the
selected source immediately.
Channel Selection
1. Usin
2. You have also quick access to the different TV channels b
buttons.
3. Usin
watching.
CH▲/▼ button
usingthe numeric
LAST button on the remote control t o view the last channelyou were
The First Time Installation
The first timeyou turn on the TV or afteryou reset all the settings to their original
status, the Setup Wizard will start automatically. Follow the prompts on the screen
to set t he Menu Language, Air/Cable, Cable System and the Auto Scan, then press
ENTER button and the channel tuningstarts immediately.
All found TV programs will be saved into the channel list.
14
Page 16

TV Operation and System Setup
y
g
k
/
/
Press the MENU button to displa
ories, such as Picture, Audio, Time, Setup, Lock and Channel.
cate
You can change the category using the
the setup menu. It includes different
◄►
buttons and press the ENTER
button or ▼button to enter it.
Using the ▲▼ buttons and press ENTER button to enter the submenu of each
option in the category. Press the MENU button to exit the submenu and return
to the previous menu.
To leave the system settings, press the EXIT button.
Picture
PICTURE settingincludes Picture Mode,
Contrast, Brightness, Color, Sharpness,
etc.
Picture Mode
Press the ▲▼ buttons to select Picture Mode and thenpress the
can select Standard, Dynamic, Mild or User.
◄►
buttonsyou
Contrast/ Brightness/ Color/ Tint/ Sharpness
Press the ▲▼ buttons to select Contrast/Brightness/Color/Tint/Sharpness
andpress the ENTER or►button to e nter it, thenpress the
◄►
buttons to adjust
the level.
Color Temp.
Press the ▲▼ buttons to select Color Temp. ,and thenpress the
◄►
buttonsyou
can select Normal, Warm or Cool.
HDMI CEC
Press the ▲▼ buttons to select HDMI CEC, and thenpress the►button to enter
the submenu.
INlin
Control/Device Auto Power Off/TV Auto Power On/TV Auto Switch
Audio Receiver
Press the ▲▼ buttons to select, andpress the
◄►
buttons to turn on or offthe
function.
Connect
Root Menu ( These functions are available onlyin HDMI mode )
Press the ▲▼ buttons to select Connect/Root Menu,thenpress the►button to
15
Page 17

TV Operation and System Setup
confirm.
Note: make s ure the device is connected to an HDMIport and ispowered on.
Audio
The sound settings include the options for
Sound Mode, Bass, Treble, Surround,
SPDIF Type, etc.
Sound Mode
Press the ▲▼ buttons to select Sound Mode and thenpress the
can select Standard, Music, Movie and User.
Bass/Treble/Balance
Press the ▲▼ buttons to select Bass/Treble/Balance and thenpress the
buttonsyou can adjust the level ofit.
◄►
buttonsyou
◄►
Surround
Press the ▲▼ buttons to select Surround Sound and thenpress the
to select Offor On.
SPDIF Type
Press the ▲▼ buttons to select SPDIF Type and thenpress the
select RAW or PCM.
Audio Language
Press the ▲▼ buttons to select Audio Language and then press the
to select English, French or Spanish.
◄►
Time
The Setupcategoryincludes the options
for Sleeptimer, Time Zone and Daylight
SavingTime.
◄►
button
buttons to
◄►
buttons
16
Page 18

TV Operation and System Setup
/
Sleep Timer
Set the SleepTimer to have the TV to enter the standbymode automaticallyafter
thepreset time interval.
Press the ▲▼buttons to select SleepTimer andpress the
thepreset minutes or turn offthis function.
Time Zone
Press the ▲▼ buttons to select Time Zone and select the time zone asyou
desired with the
Daylight Saving Time
Press the ▲▼ buttons to select Daylight SavingTime andpress the
to select On or Off.
◄►
buttons.
◄►
buttons to select
◄►
Setup
The Setupcategoryincludes the options
for Menu Language, Transparent, Zoom
Mode, Noise Reduction, Advanced,
Closed Caption, DLC and Restore Default.
buttons
Menu Language
This option is for settingthe Menu Language.
Press the ▲▼ buttons to select Menu Language andpress the
select the Menu Language.
Closed Caption
Press the ▲▼ buttons to select Closed Caption andpress the►buttontoenter
the submenu.
CC Mode
Press the ▲▼ buttons to highlight the item and press the
Option
Press the ▲▼ buttons to select Option,andpress the►button to enter a menu
with options.
DLC
Press the ▼▲ buttontoselectDLC andpress the
Basic Selection/Advanced Selection
17
◄►
buttons to select On or Off.
◄►
◄►
buttons to select.
buttons to
Page 19

TV Operation and System Setup
y
t
p
g
p
Restore Default
With this optionyou can load and reset the factorydefault settings. Allpersonall
settings are deleted.
Lock
Before you change the settings, you
have to inserttheprese
enter the menu. The default is 0000.
The lock settings include the options for
System Lock, Change Password, etc.
Change Password
Press the ENTER button to enter the submenu. With this option you can change
the old password.
asswordto
System Lock
Press the
US (It is available when System Lock is “on” )
Press the ▲▼buttons to select US, press the ENTER button to enter the submenu.
In the submenu, you can select TV or MPAA with the ▲▼buttons and press the
ENTER or►buttontoenterit.
TV
In this menu,you canpress the ▲▼
want to lock or unlock,press the ENTER button to confirm.
MPAA
In this menu,you canpress the
reference.
Canada (It is available when System Lock is “on” )
Press the ▲▼buttons to select Canada,press the ENTER button to enter the
submenu.
In the submenus (Canada English and Canada French),you canpress the
◄►
◄►
buttons select On or Off.
◄►
buttons to select the ratingsthatyou
◄►
buttons to selectyour movingratin
buttons to select the optionsyou desired.
18
Page 20

TV Operation and System Setup
Channel
CHANNEL includes Air/Cable, Auto Scan,
Favorite, Show/ Hide, Channel No., etc.
NOTE:The Channel category is only active
in TV mode.
Auto Scan
Select this item and press the ENTER button to start scanning, Press the MENU or
EXIT button when you want to stop scanning.
After finishing the scanning, all found TV programs will be saved into the channel
list.
NOTE: Please allow a few minutes for this feature to scan the entire range of
available programs.
Favourite
Press the ▲▼buttons to Select this item and press►button to enter the submenu.
Use the ▲▼buttons to select channels to be added or deleted from your list, press
ENTER button to add or delete a channel. A checkmark indicates a channel has
been added. You may also display your list of Favourite channels by pressing the
FAV button on the remote control.
Show / Hide
Press the ▲▼buttons to Select this item and press►button to access the list of
available channels. Press ENTER button to change the channels status. A
checkmark indicates a channel has been added.
Channel Label
Press the ▲▼buttons to Select this item andpress►button to enter the screen
menu to relabel a channel. Use the ▲▼buttons to spell out each letter, number or
character. Use
◄►
buttons to advance to the next space.
19
Page 21

Media Playback
f
This unit is designed with a USB port so that you can connect your USB device and
playback the files in the USB device.
NOTES:
The recognition speed of a USB storage device may depend on each device.
Please do not turn of
USB storage device is working. When such device is suddenly separated or
unplugged, the stored files or the USB storage device may be damaged.
Please do not connect the USB storage device which was artificially
maneuvered on the PC. The device may cause the product to malfunction or
fail to be played. Never forget to use only a USB storage device which has
normal media files.
Please use only a USB storage device which was formatted as a FAT32 or NTFS
file system provided with the Windows operating system. In case of a storage
device formatted a s a different utility program which is not supported by
Windows, it may not be recognized.
Some USB storage devices may not be supported or operated smoothly.
If the name of a folder or file is too long, it will not be displayed or r ecognized.
Please backup the important file because a data ofUSB device may be
damaged. Data management is consumer's responsibility and in consequence
the manufactures does not cover the product bearing data damage.
the TV or unplug the USB device when the connected
Media Playback
It’s available t o play the photo and music in the USB device.
The On Screen Display may be different from your set. Images are an example
to assist with the TV operations.
1. Connect a USB device, then
press the INPUT button to
enter the Input Source menu.
Press the ▲▼button to
select USB mode and press
ENTER to display the media
menu as shown right:
20
Page 22

Media Playback
2. Press the◄► direction buttons to select your desired media type (photo or
music) and p ress ENTER to enter the corresponding submenu. The palyback
procedures of these two type files are similar and we will use Music as an
example.
3. In the Music submenu, press the▲▼direction buttons to select your storage
device and press the ENTER button to open it. The songs list will appear.
4. In the songs list, you can use the ▲▼buttons to select one of them and press
ENTER or
5. Press the INPUT button and select the other source to exit the USB mode.
Function Buttons
button to p lay it.
Button Function Button Function
Start or pause the
playback.
Stop the playback. REP To replay all or none.
Note: When playing photo files, the function buttons may vary from the above
ones.
Return to the previous file
or skip to the next file.
21
Page 23

Troubleshooting
SYMPTOM CHECK ITEM
Make sure the system connection is correct.
There is no sound.
LED has no display.
There is no picture or
picture jitters up and
down Unsteady.
The remote control does
not work.
Make sure the speakers are not muted.
Set the correct sound mode.
Make sure the unit is turned on and the connections are
correct.
Make sure the power adapter is correctly
connected.
Checkifthe connections with the external AV
signal source are correct.
Correctly set the items in the picture menu.
Checkifthe video type input signal is not
corresponding to the unit.
Make sure the unit is turned on and in the correct
video type.
Make sure there are no obstructions between the
remote control and the player.
Make sure the remote control is pointing at the
player.
Make sure the batteries are inserted and the
polarity is correct.
Make sure the battery is not weak.
Other Notes:
Static or other external interference may cause the player to behave abnormally. If
this occurs, unplug the power-supply cord from the outlet and plug it in again to
reset the player. If the problems persist, then please disconnect the power and
consult a qualified technician.
22
Page 24

Specifications
Model LE2833
Screen Size 28-inch LED
Native Resolution 1366 × 768 Pixels
Brightness
280 cd/m
Contrast Ratio 3000 :1
Response time (ms) 6.5 ms
Speaker Output 6W+6W
AC Input 100-120V ~ 50/60Hz
Power Consumption <40W
Standby Power < 1 W
2
Dimension (with stand)
Dimension (without stand)
644mm × 450 mm ×185 mm(W×H×D)
644 mm ×399mm ×76 mm(W×H×D)
Net Weight About 4.6 kg
Ambient Temperature
Specifications subject to change without pre-notice. Weight and dimensions are
approximate.
If at any time in the future you should need to dispose of this product please note
that: Waste electrical products should not be disposed of with household waste.
Please recycle where facilities exist. Check with your Local Authority or retailer for
recycling advice. (Waste Electrical and Electronic Equipment Directive)
10~40 ℃
23
 Loading...