

Page 1
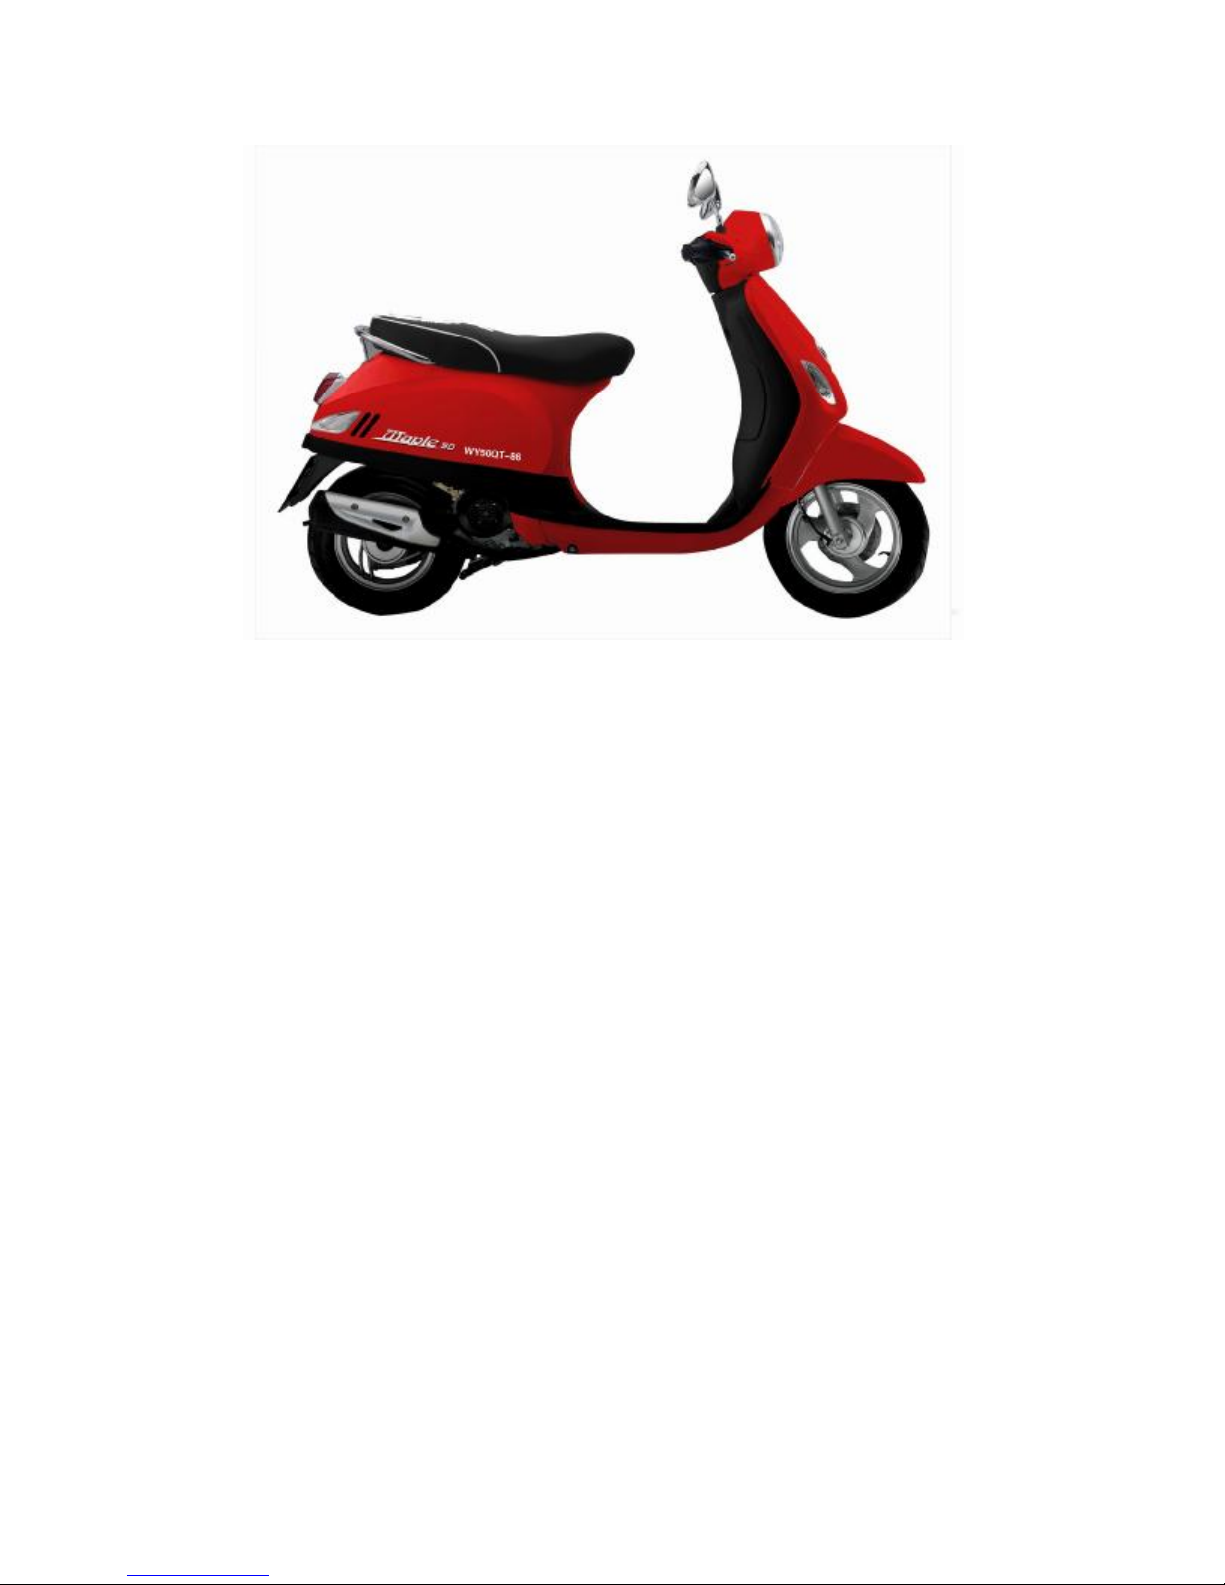
User’s manual :WY50QT-86
PREFACE
Thank you for your purchasing the Motorcycle WY50QT-86,and
sincerely welcome you to join the user of ours. To enjoy a more safe
and pleasurable driving,at first please familiarity with the manual must
carry on before driving. Your personal safety depends not only the
vigilance and familiar operation skills, but also relates to whether you
are familiar with the mechanical performance. Before driving, check-up
and periodical maintenance are basic requirement. If maintenance and
repair needed, go to our service center for help. If you know the
mechanic knowledge and have the tools, the dealer can offer you help
with the maintenance and repair, like providing the parts catalogue and
the spare parts.
This manual explains in detail the correct operation and
maintenance, together with the expectation for your long-time use.
Modifications in specification could cause the discrepancy with some
figures and content in the manual, we feel sorry for that and hold the
final right of interpretation.
Have a good enjoyment and thanks again for your purchasing.
Page 2

The main items for attention
Ÿ The driver and passenger,
This motorcycle was limited to one driver and one passenger (except children younger than12
years old). Never exceed the Max load capacity of motorcycle.
l For the safety, avoid driving the motorcycle in atrocious weather or cold weather (under -12).℃
l For the road condition
Only drive on the highroad.
The caution banners about the safety or environment protection stick to the sundries box cover,
the rear carrier, and fuel tank cap. (Being visible before or during driving)
l Modifications in specification could cause the discrepancy with some figures and content in the
manual, we feel sorry for that and hold the final right of interpretation.
l Please carefully read the user manual
You must attention to the warning sentence or paragraph.
Warning:
Not following the operation instruction in this manual may cause great damage to you .
ATTENTION
Not following the operation instruction in this manual may cause injury to both you and
vehicle.
Regard this manual as a permanent parts, even when transfer the vehicle to a new owner,
transfer the manual at the same time.
Page 3

LIST
I、Motorcycle safe driving
Rules for safe driving………………………1
The payload…………………………………2
II、The parts & subassemblies and use
manual
The parts&subassemblies ………………3
Meter and indicator light……………………5
Fuel meter……………………………………5
Ignition switch………………………………6
Lock cover switch……………………………6
The light switch………………………………7
The starting switch……………………………7
The head light change switch………………7
The turning light switch………………………7
The horn switch………………………………7
The turnning lock……………………………7
The seat lock…………………………………8
The luggage box ……………………………9
III、The operation
Checking before driving……………………10
Starting engine………………………………14
Driving the motorcycle……………………15
Operation for driving………………………16
Operation for brake…………………………16
Operation for stopping the engine…………17
Operation for stopping the motorcycle……17
VI、Maintenance and service
The blank of seasonal maintenance…………19
Simple trouble shooting……………………22
Air filter cleaning…………………………24
The battery maintenance……………………24
Adjustment idle speed………………………25
Change the engine oil and filter net clean…26
Change the gear box oil……………………27
The spark plug………………………………28
Change the fuse……………………………28
V、Motorcycle storage……………………29
VI、Vehicles identification…………………30
VII、Tool ………………………………31
VIII、Main technical parameter…………32
IX、Circuit diagram………………………34
X 、 Emission Control System Warranty
Statement……………………………………35
.Motorcycle safe driveⅠ
Rule for safe drive
Only drivers can insure the driving safety.
The motorcycle happens many accidents; all reasons are that the car drivers didn’t lock at the
motorcycle drivers. So the motorcycle drivers must:
l Put up the coat in bright color.
l Avoid driving at night. You must drive on guard and carefully to the strong light.
1、 Be particular carefully driving at the crossing,entrance and exit of the park and the level
crossing of roads.
2、 Over-speed driving always occur the accident,so please obey the speed rules.Don’t breach of the
rules.
3、 You must get to the driving license and familiar with motorcycle. Never lend motorcycle to the
man without driving license or unfamiliar with motorcycle.
4、 Avoid to driving the road in accident, easily result in the operation without used or the parts was
broken.
5、 You must check up the motorcycle before driving. (Look at page 10)
6、 During driving,please hold the handle with two hands,put your feet on the footrest.
7、 Keep distance with the other motors.Don’t drive over speed.Obey the local traffic law.
- 1 -
Page 4
Payload
Warning※ :
The light goods can only put in the rear shelf or other deposited place.
The goods payload cannot heavier than blank 1:
Blank 1
Storage item Weight
Rear shelf 5kg
The luggage box 1kg
The rear box 5kg
The motorcycle max payload is 75kg, including the weight with the driver, the passenger, ※
the goods.
If it is over loading,it will affect the stability and operation of the motorcycle.※
Tie the cargo on the motorcycle tight※ ly.
The children on the rear shelf is not allowed.※
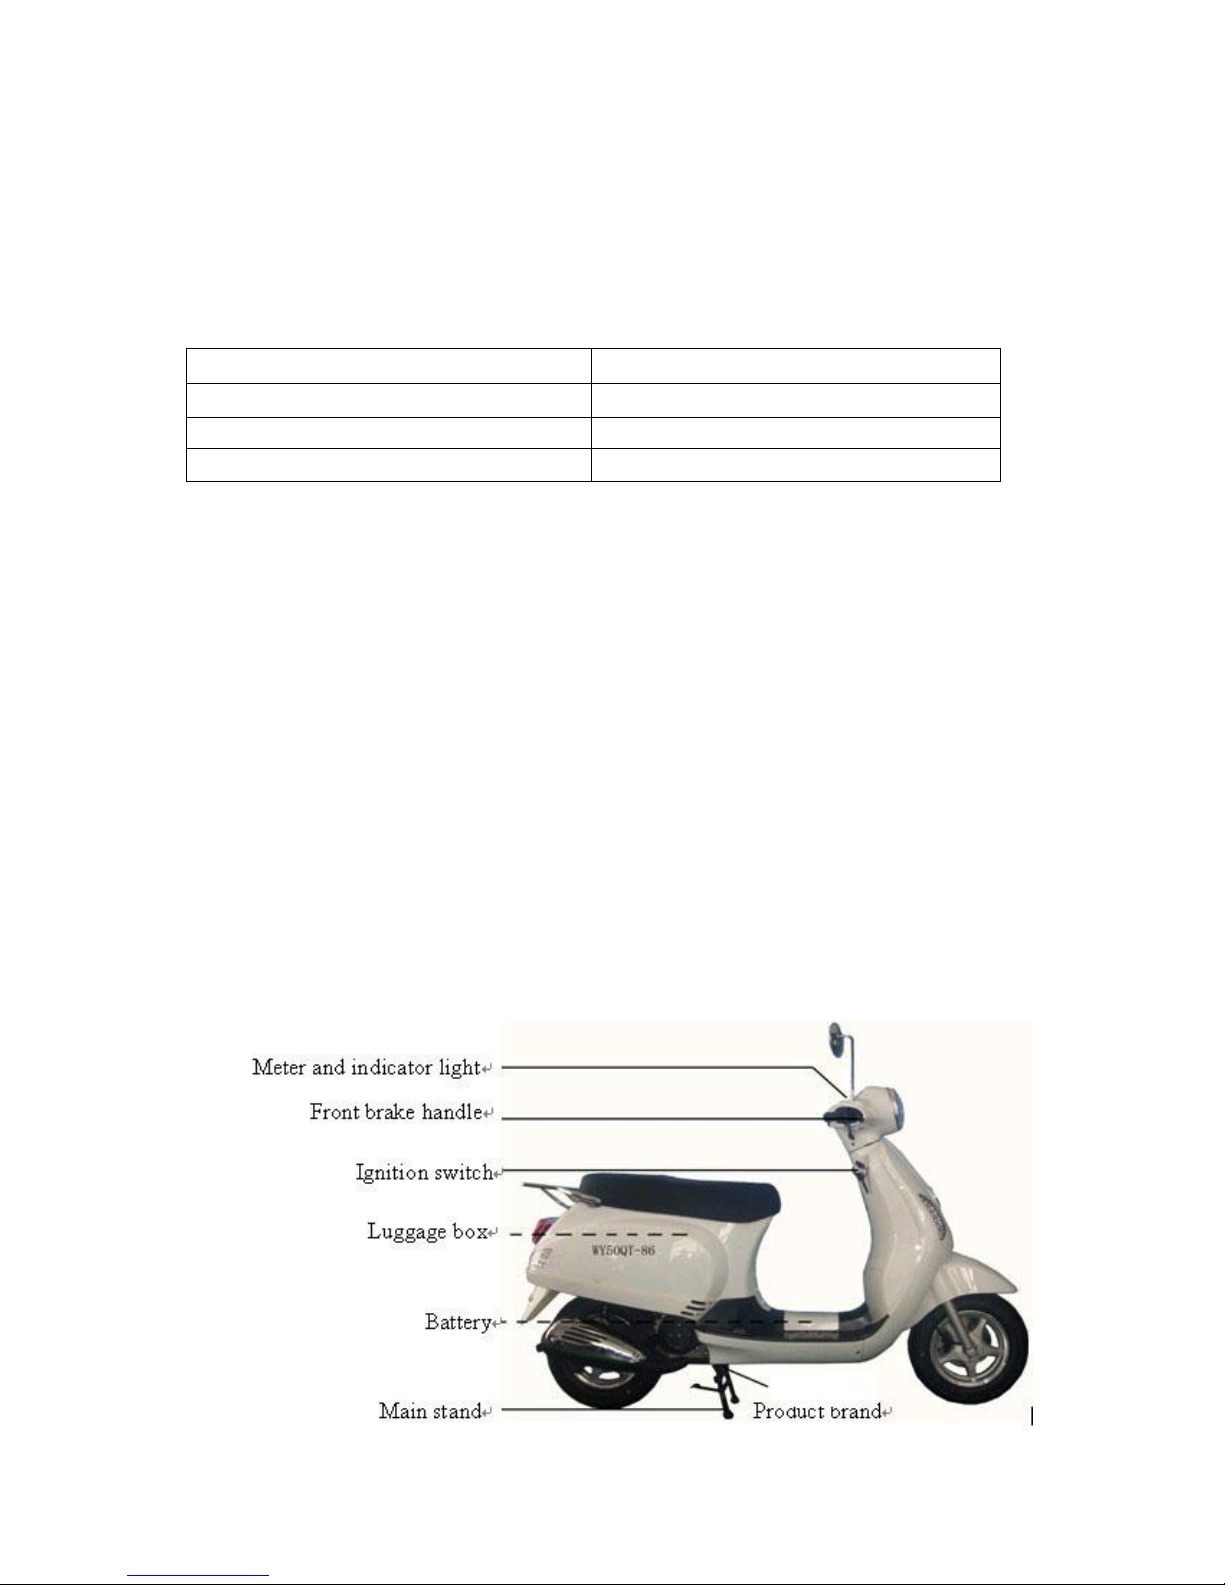
II The parts & subassemblies and use manual
The parts’ location(diagram 1、diagram 2)
- 2 -
Diagram 1
- 3 -
Page 5
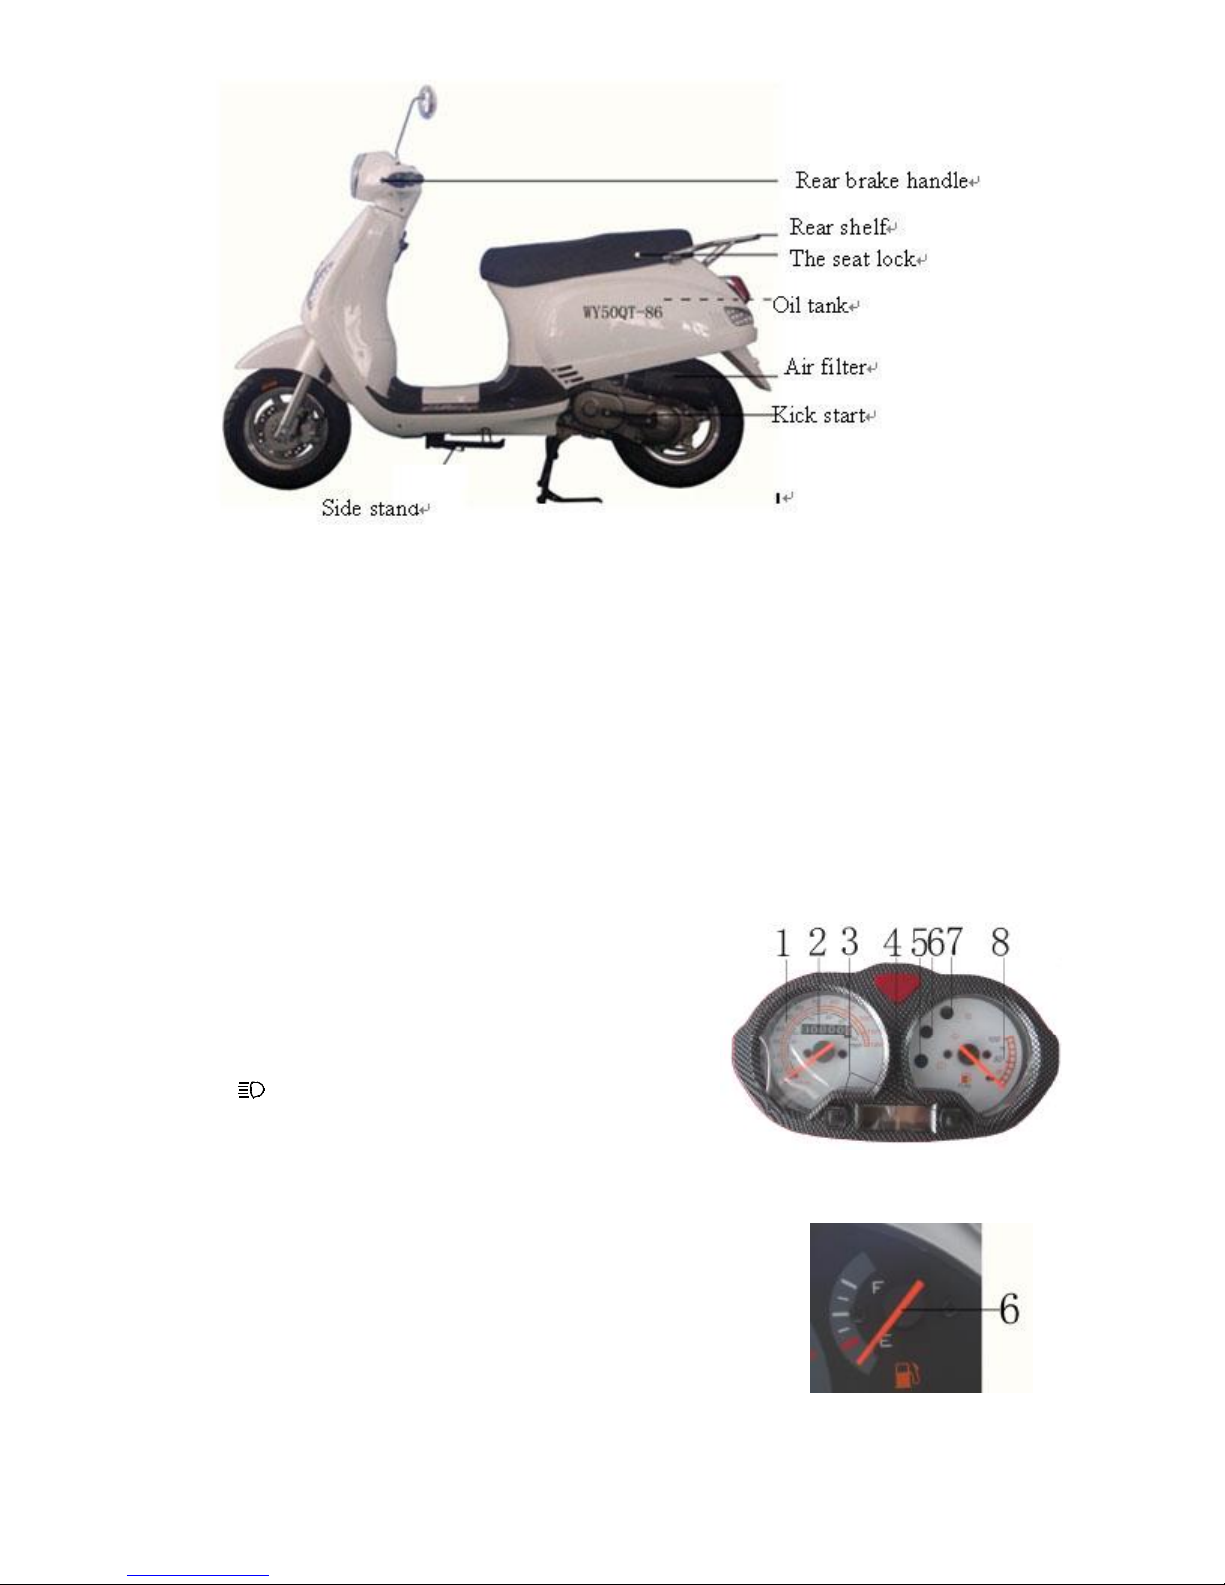
Diagram 2
- 4 -
The broken line(……)indicate the parts unseen in the picture
Mater and indicator light(Diagram 3)
⑴ Speedometer:During driving, the speed can be showed.
⑵Turn left signal light:When the trunning signal light switch
is moved to left,the indicator light will work.
⑶Odometer:The record for it has run
⑷High beam indicator:When the changing light switch is set
on“ ”, high beam indicator will work.
⑸Turn right signal light:When the trunning signal light
switch is moved to lright,the indicator light will work.
⑹Fuel meter:Show the left volume in the oil tank.
(7) Electric meter:Show the quantity of electricity of the battery
(8) Time meter:Show the time.
(9) Time regulator:When the time is not on time,set it agagin。
Fuel meter(Diagram 4)
Diagram 3
• Fuel meter 8 shows the left oil volume,when the indicator is on F
position,shows the oil capacity is 5L.
• When it is on the Red-marked position,the volume is about 1.2L.
Diagram 4
- 5 -
Page 6

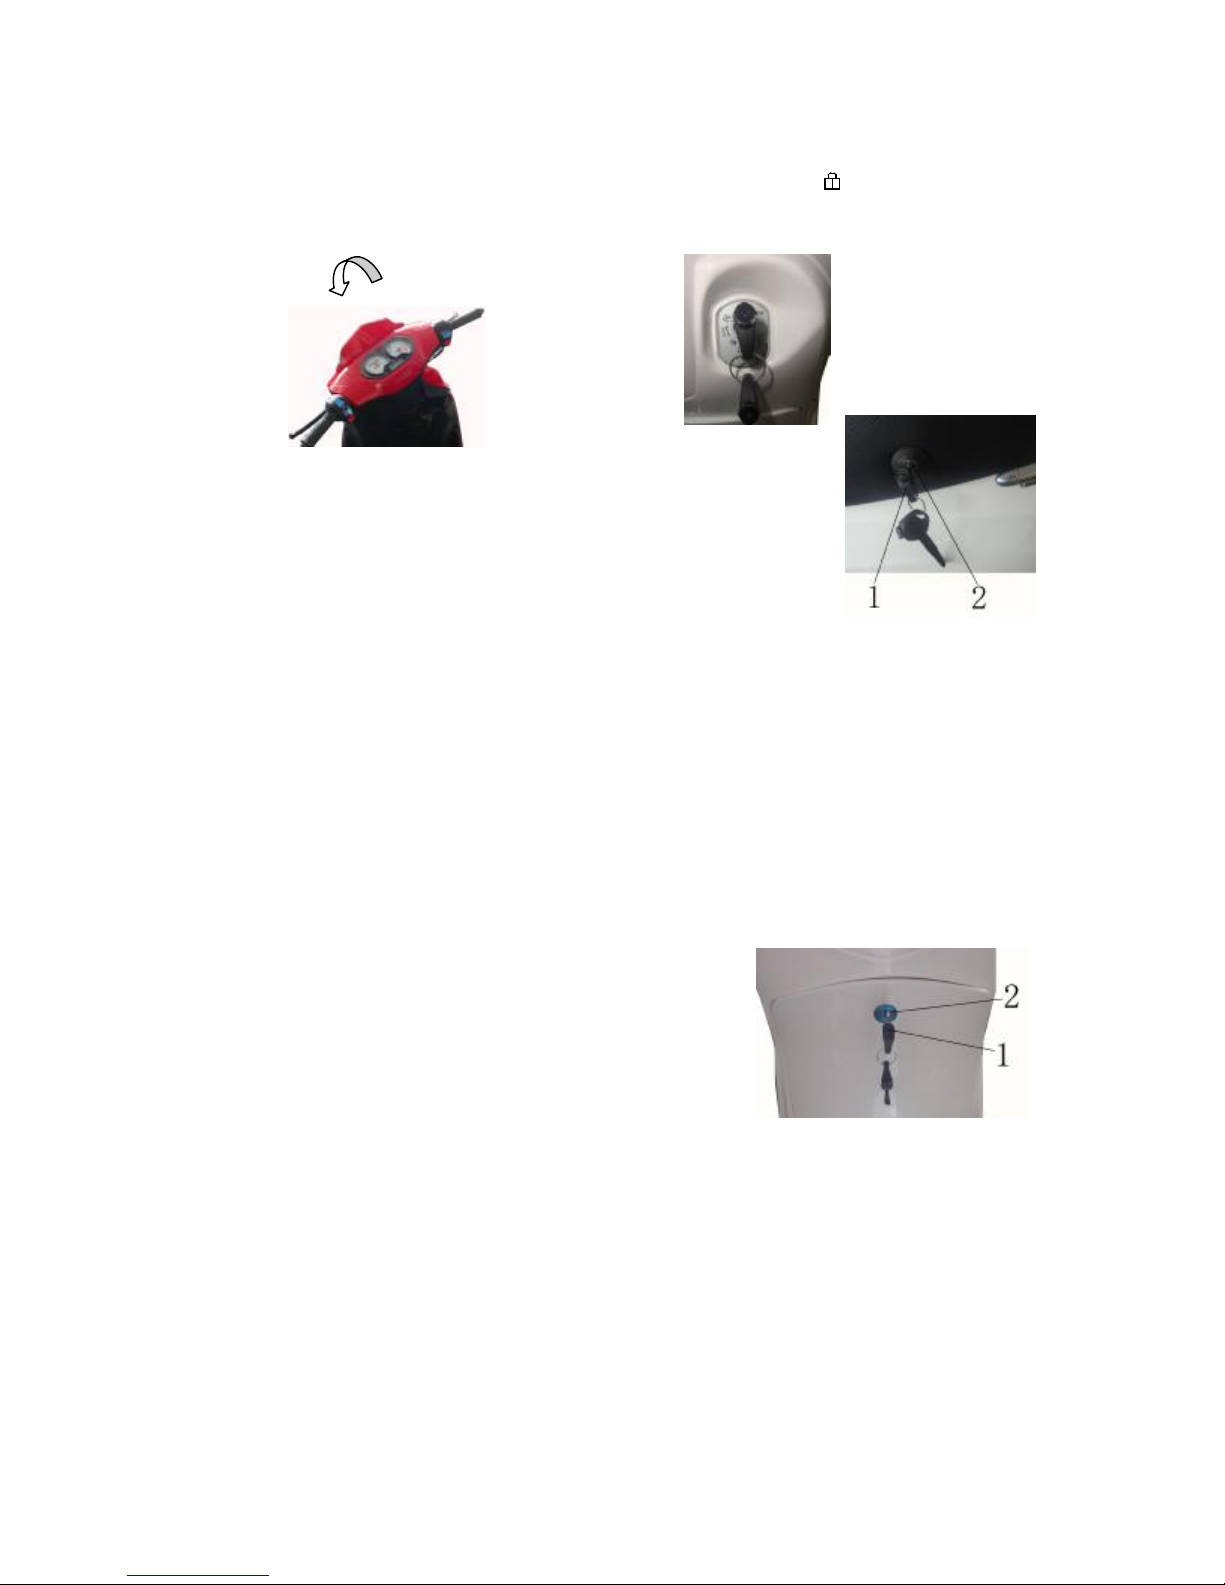
Ignition switch(Diagram 5)
⑴ON( )—When the key is turnned to this position,you can start the
engine,and now,the key cann’t be pulled out.
⑵OFF( )—When the switch is trunned to this position,the engine
will close,pull the key out.
⑶Lock( )—When the key is turnned to( ), pull it out,and now,
cann’t do the turnning operation,the engine and all lights don’t work.
Lock cover switch(Diagram 6)
(1)Lock cover controling handle:Pull the handle up,the lock cover is
closed.
(2)SHUT:Turn the key in the direction of SHUT,the lock cover is
closed
(3)Lock cover:When the lock cover is closed,the key cann’t be put into
the hole for improving the ability of security.
(4)OPEN: Turn the key in the direction of OPEN,the lock cover is open.
Diagram 5
Diagram 6
- 6 -
Light switch 1(Diagram 7)
Three marked positions,“ ” ,“ ”and“•”
:When it is here,the front light,position light,rear light and meter light
work.
:When it is here,the position light,rear light and meter light work.
•: When it is here,the front light,rear light,position light and meter light
don’t work.
Starting switch 2(Diagram 7)
When you pull it in,the engine is started。( Consult P14)
The front light changing switch 1(Diagram 8)
Press“ ”, hight beam;press“ ”, low beam.
Diagram 7
Turnning signal light switch 2(Diagram 8)
When the switch is on“ ”, shows turnning left,and it is on“ ”, shows
turnning right,and now the right turning light and signal light work. When the
button is on “ ”,the signal light doesn’t work.
Diagram 8
- 7 -
Page 7
Horn switch 3(Diagram 8)
Diagram
11
Pull it in,the horn works.
Steering handle switch(Diagram 9、dirgram 10)
Turn the steering handle to left until the end,and then turn the key to( ), you can lock it
well.,when you need to open the turnning lock,you can do it with opposite way.
The seat lock(diagram 11)
• When the key 1 is pulled into the lock hole 2,and then turn right,the lock
is open.
• Press the seat,and then you can sound the lock voice.and then pull the
rear part of the seat for it is lock,pull the key out.
Diagram 9
Diagram 10
- 8 -
The luggage box(Diagram 12)
l When the key 1 is pulled into the lock hole 2,and then turn
right,the lock is open.
l Pull the key into the hole,turn the key in clockwise
for 90°,and press the luggage box to close,and then
turn the key in counter-clockwise for 90°.the luggage box is closed.
Diargam 12
- 9 -
Page 8

III Operation instruction
Check before driving
Make routine check-up before riding to insure the vehicle perform well and safe
driving.
Oil tank volume
Turn on the ignition switch and check the fuel meter, replenish gasoline when
the pointer is close to red section, moreover, check the fuel tank and oil filter if
leakage.
• Oil tank volume:5L
• Pull the key into the hole and then turn it to right to open it.(diagram 13
• Recommended gasoline: low lead content, common oil with octane number 90
• Do not replenish oil together with dirt, water or other conta
Warning:
• Replenish oil in a well-ventilated place.
• Do not replenish over-full, and remember to fasten the cap of fuel tank.
• If carelessly swallow the oil, go to the doctor immediately.
- 10 -
Check the volume of the engine oil
Check the volume(diagram 14diagram 15
1.Use the jiffy stand to support the vehicle on smooth road,and
then screw out the cover of oil hole / oil dip rod (1) and clean the
oil dip rod with a wash cloth, then, just insert the rod back ( do not
screw it in) and check the oil stain.
2. If the oil mass is near to the lower limit mark (2), you should
replenish standard oil but don’t exceed the mark of upper
limit(3) .Then reinsert the cover of oil hole / oil dip rod ,screw it
down and check it if leakage.
Diagram 14
Diagram 13
Recommend to use the oil NO.
SAE-15W/40
3
2
Diagram 15
- 11 -
Page 9

Free path of rear brake handle(diagram 16 diagram 17)
Measure the free path of rear brake l before it works. The free path range is 20-30mm
measuring from the end of the brake handle.
Adjust the nut:(A) increase the distance of free path.
(B) decrease the distance of free path.
The axle pin2 should touch closely with nut (1) groove after adjustment.
Warning:
When the thickness of the disc brake goes to the marked minimum size
(MIN.TH.3mm),please change it.
- 12 -
Diagrqam 17 Diagram 16
Abrasion mark of the brake(diagram 18)
(1) Reference marks
(2) Indicative marks
Replace the brake shoe when reference marks and Indicative marks
are in line under thorough braking.
Tire
Check the tire pressure periodically and adjust it if necessary.
• Check it only when it is cooled
• Check if puncture on the tire, and also the air leakage.
• Check if any metal trash or gravel in the groove of tires.
• Replace the tire when it wears to the abrasion mark.
Warning:
• If the tire pressure is not normal, it will probably cause a traffic accident
• It is dangerous to use over-worn tires, for it affects the adherence force between the
tires and ground.
Diagram 18
- 13 -
Page 10

Starting engine(diagram 19)
Diagram
19
• Preparation:release the vehicle main stand,pull the key in to
ignition switch and trun to “ ”.
• Electric-start: press start button (1) while applying the
throttle slowly, and the engine starts in less than 5 seconds.
Attention:
• Before starting the engine,hold the brake handle tightly.
• When eleectric-start fails,try it again after 30 seconds.If
it also doesn’t work,please try kick-start.
• Engine kick-start : Turn ignition switch on and apply the throttle slowly, step
kick-starter pedal down quickly with strength.
Attention:After starting the engine, do pull the pedal back to original position.
To use the vehicle after a long time, it is better to kick the pedal several times at first with
ignition switch off, so the engine can start easier.
• If cold start the engine, warm up engine for about 3 minutes before driving.
- 14 -
Driving the motorcycle
Warning
• When riding the motor, the temperature of the exhaust pipe and muffler is very high, so
you’d better wear long pants to avoid touching with the hot parts of the exhaustion
system
• It is necessary to wear helmet, goggles and gloves while riding the vehicle
• When driving,do not wear loosen or unsuitable clothes. Otherwise the clothes may hook
with the handle bar, start pedal or the stand.
• Each equipment of the motorcycle should accord with the traffic law of local
government
• Attention:Control the speed and payload during the first1000kmPayload among100kg
is appropriate (including driver)Overtaking and overloading will shorten the life of
engine, so change the crankcase oil after 300km.
Speed reference 2:
Blank 2
- 15 -
Page 11

Log(km) 0~200 200~500 500~1000
Speed (km/h) ≤20 ≤30 ≤35
Operation for driving
• Release the main stand, and sit on the saddle with left foot on the ground to make the
vehicle straight.
• Apply the throttle slowly and pull back the left foot to gain proper speed.
Warning:
• Do not apply the throttle abruptly, or the vehicle will rush forward.
• Remember to put away the main stand before running forward.
Operation for brake
1.Control throttle grip
To reduce speed, control the throttle grip and apply front-rear brakes at the same time.
Warning:when driving in rain, or on watery road, pay close attention with braking,
speeding-up, or turning.
2.Operate front and rear brake simultaneously.
- 16 -
Attention:when riding down the slope, totally release the throttle and use two-brake system
to reduce speed. Avoid continuous operating the brake, otherwise the brake may be
overheated and decrease the braking efficiency.
Warning:
Riding at mid-high speed in slippery road or at the crook, do apply the front and rear brake at the
same time, or the vehicle may slip aside and cause accident.
Operation for stopping the engine(diagram 20、diagram 21)
• Close the throttle grip:Turn it to final position according to the diagram.(Normally when
release the throttle grip, the engine runs at idle speed.)
• Turn the ignition switch key to( )。
Diagram 20
- 17 -
Diagram 21
Page 12

Fuel pipe
I I I I
﹡
Operation of
Air filter core
C/1000km if necessary R
23
﹡
Spark plug
C/2000km if
necessary
R 24
Operation for stopping the motorcycle
When stopping the motorcycle, turn the ignition switch to( )first, then step down stand and lock
the steering handle.(Consult p 8)
Warning:Park the motor in a smooth ground, or it may fall down and cause injuring.
Points for anti-thief:
• Lock the handle in time,don’t leave the key in the ignition switch hole.
• If possible,park it in the garage locked.
• Use the high quality anti-thief devices.
•
IV Maintenance and service
Maintenance periodic form
The maintenance is important to motorcycle. If drive with high speed in bad situation for a long
time, must add the times of maintenance. If motorcycle have a big repaired or a accident,. Must
take it to check for mainly spare parts. For example: frame, indicator parts and so on. Repair or
change the worn parts and make sure safety.
Attention:Don’t refit motorcycle make sure it’s safety. Must use good quality spare parts if
replace spare parts. If use bad quality spare parts, it will influence the safety of motorcycle.
- 18 -
Warning:Must close engine when make maintenance. It makes sure the repairer’s safety,
and put down the stand on the smooth ground.
Attention:Must make a good maintenance if the motorcycle don’t use over one month, or
don’t use in all the winter, make fuel, tyre and battery avoiding corrode.
Serivice periodic form(Blank 3)
Check before time based maintenance (Consult p 10)
I:Check-up and adjustment needed.
C:Clean
R:Change
Blank 3
Item
Cyc
Within 2000km
1 4 8 12
Speedometer(×1000km)
Consult
Page
﹡
throttle
﹡
I I I I 16
(Note 1)
- 19 -
Page 13

Item
Wave gap
I I I I
﹡
Engine oil
RR
25 ﹡
Oil filter net
25
﹡
Idle Speed of
Cooled system
I I
R
otate belt
I/1000km If necessary R
﹡ G
earbox
Brake
Brake
switch
Head light
I I I ﹡ Hanging
Nuts/bolts
I I ** Wheel/tire
I I I 13
Turnning
﹡
Carburetor
﹡
Cyc
Item
﹡
engine oil
system
Cyc
Speedometer(×1000km)
Within 2000km
(300km)
1 4 8 12
(R/3000 km)
Change oil :C、If necessary: R
I I I I 24
Add blank 3
Speedometer(×1000km)
Within 2000km
(Note
(300km)R
1 4 8 12
I 26
3)
I I I I 12
- 20 -
Consult
Page
Consult
Page
Cyc
Item
Within 2000km
Speedometer(×1000km)
1 4 8 12
Consult
Page
I I I
﹡
I I I
system
﹡
**
(注 2)
I I
bearing
﹡If you have all of tools and maintenance document, you are a mechanic person, or else must let special person maintenance
and repair
﹡﹡For safety, we claim all of items have been done by mechanic person
Note:1.If this area is very damp or have a lot of dirty You had better make a short time for maintenance, when it takes
more oil quantity or mot strength, it must change.
2、If it was used every day, must make maintenance.
3、According to season to change in a cold area.
- 21 -
Page 14

Simple trouble shooting (Blank 4) Blank 4
Valve
cushion worn
Polish
The piston
-
ring or the cylinder
Replacement
The oct
ane value of the fuel is too low
Change flue
Trouble Trouble reason Solution
Engine
doesn’t
work
Spark
plug no
spark
Spark plug wear out Change
Ignition coil wear out Change
CDI wear out Change
Ignition switch wear out Change
Ignition come off or become flexible
Connect well or firm and tight
Spark plug gap too small or big Adjust
The
spark is
weak
Spark plug pole burn Change
The spark plug accumulates
Clear out
No spark to consult the spark plug
No fuel Replenish
Oil mouth stop up Dredge
No mixed
air in
cylinder
Fuel tank pressed the switch to
Change
The oil passage stops up Dredge
Air cleaner stop up Clear
Take in system leak Check and clear out
The cylinder
compresses
strength low
Spark plug seat leak Screw up spark
Cylinder cover leak Change spacer
- 22 -
Piston-ring broke or stopped by
the accumulated carbon
Replace piston-ring or clear
carbon
Trouble Trouble reqason Solution
Oil path stop up Clean oil path
The vehicle is
unable to
accelerate
performance
badly
Ignition tie is too early or too late Check wire and change CDI
Spark too weak or flameout Check ignition and clear out
Mixed air too dense or race Clean adjust carburetor
Engine leak Check and clear out
Muffler stop up
Dredge
Belt wear out Change
The automatic clutch roller wearing Change
Consult engine can not start
Electric-start
doesn’t work
Exceed clutch worn
Start the relay wear Change
Change
Lack of electric consumption Charge
Turning axletree gap too wide Adjust
Riding
unsteady
Lack of tire pressure Pump
Front and rear shaft flexible Screw up nut
- 23 -
续表 4
Page 15

Air filter cleaning(Diagram 22)
• Take out air cleaner cover
• Screw up the blot.
• Take apart the core from air cleaner box.
• Compress air or use dry brush clean the filter element or
put a new filter in the air clean box.
• Do the above opposite to reinstall the air filter.
Warning:
• Do not use gasoline or low burning point solvent to clean
The battery maintenance(diagram 23)
It is adopted the airtight battery (don’t add water)
Attention:Never take apart upper cover of the battery.
l If the motorcycle don’t use for a long time. Must take off the battery and put it into a place
where it is a dry and air.
l If the head of battery is corroded. Please take it off and clean.(use boil water)
Remarks:Before removing the battery,close the ignition switch and then remove○-,when
installing,first○+,and then○-。
Diagram 22
Diagram 23
- 24 -
Adjustment idle speed(diagram 24、diagram 25)
The carburetor has adjusted to the best situation before selling out.
If it is not well adjusted, ask professional to adjust it as the following
instruction.
• Warm up several minutes after engine starting.
• Screw the bolt 1 in slightly to increase the idle speed,then
screw in the mix ratio bole first and next out from the idle
speed adjustment screw to gain the minimum torque.
• After adjusting the idle speed, adjust the throttle free path to
2-4mm.
• After well adjusted, the engine speed can transit steadily when
suddenly apply the throttle instead of turning off.
Diagram 24
Diagram 25
- 25 -
Page 16

Change the engine oil and filter net clean(Diagram 24)
Change the engine oil
l Change the engine oil only when the engine is not cool and the vehicle is
supporting by jiffy Stand, to pour out all the oil completely and quickly.
Filter net clean
l Screw out the the cover of oil hole /oil dip rod and the cover of oil filter
screen,then unbolt the oil filter(1) Net(2) and the spring (3) lean the oil
filter net with the impregnant
• Clean the oil filter net with the impregnant
• Fill in the oil filter net,spring and the cover of oil filter screen
• Cover of oil hole / oil dip rod. When measuring the oil level,
do not screw down the cover of oil hole / oil dip rod.
• Screw up the cover of oil hole / oil dip rod.
Diagram 26
• Let the engine work at the idle speed for several minutes and stop it .then start the engine.。
• Remeasure the oil mass. Make sure the oil mass is near to or in the mark of upper limit
without leakage.
- 26 -
Change the gear box oil(Diagram 27)
Recommend to use the oil NO.
SAE 80W/90(North cold district can use the special oil)
Refuel volume
Volume when change:0.10L
• Fix the motorcycle with the main stand
Remove the injection oil bolt 1 and leak oil bolt 2
.Attention : When leakage,the engine should take a
certain temperature. For keeping the gear box is empty.
With the main stand to fix the vehicle.
• Fix it after cleaning the leak oil bolt and screw up.
• Full in the gear box with engine oil by injector
• Fix the injection oil bolt and screw up.
•
Diagram 27
- 27 -
Page 17

2
The spark plug(diagram 28)
Spark plug types
Standaed: C7HSA(NGK)、 A7T or A7RT
• Disconnect the joint of the spark plug cover and take
apart the spark plug with special tool.
• Check if any accumulated carbon or dirt, clean them in
cleanser or brusher. Replace the spark plug if badly
corroded.
• Normally the gap between side electrode (1) and Center
electrode (2) is 0.6-0.7 mm
• Don’t use the other types spark plug 。
1
Change the fuse
The rated electric current of the fuse is 15 A
If the fuse often burns down, it indicates the short circuit or overload in the electric system.
Ask the serviceman to repair it, and never use the brass wires to replace the fuse.
- 28 -
(0.6~0.7)mm
Diagram 28
V Motorcycle storage
STORAGE
For the motorcycle not to be used for a long time, some steps should be taken to prevent
malfunction and damage to the parts. Besides, before the long-time storage, proper repairs should
also be done.
• Change the engine oil.
• Drain out the fuel in the fuel tank and carburetor.
Warning: Gasoline is inflammable and may cause fire and even explosion under certain
conditions. Therefore, do not smoke or make fire.
n Take apart the spark plug, inject about 15~20ml oil into the cylinder, step down the kick
pedal several times and then fix the spark back on.
u Take apart the battery and place it in a place without strong light or frozen ice, charge it every
month.
u Clean the vehicle and wipe it dry, coat the wax on the surface of the paint, and anti-rust oil on
other metal parts.
Cover the vehicle and put it in a cool place.
- 29 -
Page 18

Use the vehicle after long-time storage
• Take off the cover and clean the vehicle. You should change the oil after 4 months above storage.
• Charge the battery if necessary, and fix it on.
• Check all the parts before driving. (Consult p), ride motorcycle in a low speed in non-busy
area, make sure the safety.
Ⅵ.Vehicle identification.
Position of the model No, reference No and escutcheon.(Diagram 27)
Provide the above No when register, get the license, yearly inspection, and also enjoy the
after-service clause. The escutcheon is riveted on the fixing board of the right part of stand frame.
VIN number is on the mid part of the frame syphon
Vehicle model fix/stick on the R/L board
Engine code is on the L cam
Diagram 29
- 30 -
VII Tool
Toolbox (Diagram 30) is placed in the luggage box under the saddle, and
toolbox contains the following tools:
Wrench 8x10mm Wrench 12x14mm
Screwdriver Hexagonal wrench
Handle of screwdriver Sleeve wrench 18.5x17
- 31 -
Diagram 30
Page 19

Item
200
Speed Ratio of
m
Economic Oil
L
/100km
Item Parameter
Item Parameter
Idling
Speed
VIII Main technique parameter
Parameter
Item Parameter
Blank 5
L×W×H (mm) 1830×685×1130
Wheel Base (mm)
Ground Clearance (mm) 110 Fr.T. pressure KPa 180
Dry Weight kg
Max Payload kg 75 Transmission Type CVT
Turning Angle of Steering
Handle º
V=40km/h
1300 Rear tire 3.50-10
92 Rr.T. pressure KPa
≤48
Fr.brake
distance m
Speed-down average
2
/s
Front tire 3.50-10
10.83~33.85
Transmission
Rr. Brake distance m Speed-down average m/s2
≤21.78 ≥3.4 ≤26.86 ≥2.7
139QMB
Max speed km/h
≤50
Engine type
Single cylinder、4-stroke、
air-cooled
≤2.3
Climbing º ≥4.5
Gradient of Low
Beam
-1.3% Starting model Electric-start/Kick-start
Bore/stroke mm
39.0×41.3
Displacement ml 49.3
Battery 12V 7Ah Fuel tank capacity L 5
- 32 -
Add blank 5
Lubricating Way Press and splash
Rated Power
kW/r/min
Max Torque
N.m/r/min
Compression Ratio
Specification of Spark
Plug
Spark Plug Gap mm
Capacity of Crankcase
oil, L
Crankcase oil
2.2/7500 Head light 12V 35W/35W
3.0/7500
10.5:1
C7HSA(NGK)或 A7TC、A7RTC
0.6~0.7
(1500±150)
0.8
SF SAE 15W/40 Gearbox oil SAE 80W/90
Fuse 15 A
Tail Light/Brake
LED
Turnning light LED
Front light 12V 5W
Licence plate light 12V 5W
Fuel RQ93 Above
Capacity of Gearbox oil ,
L
0.11
Ignition way CDI Valve gap mm 0.03~0.05
Clutch type Auto centrifugal
- 33 -
Page 20

IX Circuit diagram
- 34 -
Ⅹ.Emission Control System Warranty Statement
Wangye USA Co., LLC is pleased to explain the emission control system warranty on
Highway Motorcycle. New Highway Motorcycle must be designed, built and equipped to
regulations and standards of the United States Environmental Protection Agency and the
California Air Resource Board and free from defects in material and workmanship that may
keep it from these requirements in the all applicable regulations.
Wangye USA Co., LLC must warrant the emission control system on the highway motorcycle
for 5 years or 6,000 km, whichever comes first, provided that there has been no abuse, neglect
or improper maintenance of highway motorcycle.
1. Period of Warranty
The period of warranty shall be one year on delivery, during this period of warranty:
(i). Any part defective by reason of the manufacturer’s faulty workmanship or material will
be replaced or repaired free of charge;
(ii). Any repairs or adjustments made necessary by reason of the manufacturer’s faulty
workmanship or material will be performed free of charge.
Emission control system may include parts such as the carburetor or fuel injection system,
the ignition system, catalytic converter and engine computer, if it is equipped. Also
included may be hoses, belts, connectors and other emission-related assemblies.
- 35 -
Page 21

2. Responsibilities of Customer
To obtain repairs under warranty, the customer must:
(i). Ensure that the motorcycle is properly operated, maintained and stored as specified in the
Owner’s Manual;
(ii). Give notice to dealer approved by Wangye USA Co., LLC or other qualified service
facility of any and all apparent defects immediately upon discovery, and make the entire
motorcycle available at the time for inspection and repair at the dealer’s place of
business;
(iii). Provide proof of warranty coverage to dealer;
(iv). Authorize the dealer to tear down the motorcycle for diagnostic evaluation should it be
required.
All warranty repairs must be done by the dealer and final approval of any repairs rests with
Wangye USA Co., LLC. All parts replaced become the property of Wangye USA Co.,
LLC.
3. Exclusion
This warranty does not cover the repair or damage resulting from abuse or neglect of the
motorcycle. Examples of abuse and neglect include, but are not limited to:
(i). Racing and competition;
(ii). Use of lubricants, oils and fuel/oil mixture other than those recommender in the Owner’s
Manual, improperly installed accessories and use of parts or accessories that are not
equivalent in design and quality to genuine Wangye parts;
(iii). Damage as a result of accidents, collisions, contact with foreign materials, impact,
submersion or use of the motorcycle after discovery of a defect;
(iv). Appearance-related damages of body parts. Examples of such damages include but are
not limited to: scratches, dents, fading, flaking and peeling;
- 36 -
(v). Motorcycle which has been modified in any way from the standard specifications shown
in the Owner’s Manual, for example, the odometer has been altered;
(vi). Normal wear and tear, corrosion and routine maintenance, such as the recommended
service inspections;
(vii). Pre-delivery inspection and assembly;
(viii). Damage from theft, fire, vandalism, explosion, water or acts of God.
4. Restriction
This warranty is in addition to, and not a modification of, any legal warranty required by the
laws of any state of US.
Subject to any applicable sales or consumer legislation, the above warranty is in lieu of any
warranty or representation, express or implied, including any warranty of performance,
merchantability or fitness for a particular purpose on the part of Wangye USA, and any other
obligation or liability on behalf of Wangye USA, and the above warranty constitutes your
sole remedy and the full liability of Wangye USA. In no event shall Wangye USA be liable
for special, incidental or consequential damages howsoever caused, whether by negligence or
otherwise resulting directly or indirectly from the use of the Motorcycle, or the Motorcycle’s
having replacement parts or the unavailability of replacement parts. Wangye USA does not
assume or authorize any person to create or assume for Wangye USA any obligation or
liability in connection with the Motorcycle or any part thereof distributed by Wwangye USA.
5. Contact
For any questions regarding emission control system warranty, please contact as following:
Company Name: Wangye USA Co., LLC
Address: 1170 Corporate Dr. West Ste. 204, Arlington, TX 76006
Tel: 817-640-1108 ext 219
- 37 -
Page 22

Fax: 817-649-5006
- 38 -
 Loading...