


Black Diamond
Black Diamond Compact
01072011
INK.00.7918
GB Users guide and installation manual

16
User’s Guide and Installation Manual
Black Diamond and Black Diamond Compact
GB
© Copyright 2011 Wanders res & stoves
The information contained herein is subject to change without notice. Wanders res & stoves shall not be liable for technical or editorial errors or omissions contained herein.
General information 18
Installation 18
Lighting the stove 18
Lighting the stove for the rst time 19
Fuel 20
The best way to burn your stove 20
Chimney and ue 21
Maintenance 21
Small maintenance 21
When the stove is not used 22
Yearly maintenance 22
Safety 22
Guarantee 22
Installation Instructions Black Diamond and Black Diamond Compact 23
Preparation 23
The chimney ue 23
Fire Safety 24
Installation 24
Supply of combustion air 24
External air supply 24
Connecting the hearth 24
Mounting the standing model 25
Mounting the suspended model 25
Mounting the rear connection of the external air supply. 26
Repairs 27
Replacing the glass in the door 27
Replacing the front glass 27
Technical details 28
Technical drawings 60

17
GB
• Do not use the appliance without glass.
• Do not place highly ammable materials like nylon clothes of ammable uids in the neighbourhood
of the appliance.
• This appliance is not meant for operation by persons (including children) with limited physical
or intellectual faculties, or by persons who are unfamiliar with the operation of these kind of
appliances. Always ensure that they are supervised when near the appliance.
• Use a re-screen to avoid burning and to protect the above-mentioned children and persons.
• The appliance must be mounted and connected by an acknowledge installer in accordance with
the installation instructions and national and currently applicable local regulations
!
Dear Client,
Congratulations on your new wood-burning stove, which will be a comfortable source of heat to enjoy for many
years on end. With its unique design you can view the Black Diamond from all corners of the room.
When designing this replace we took particular care regarding the ease of use, the operational safety and the
design. The Black Diamond is developed and produced at our own factory in Netterden (the Netherlands) and is
for the greater part handmade. Only the best materials are used for the construction and comply with current
international standards. This will guarantee that your woodstove has a long life.
The rst part of this user’s guide gives you tips and directions about how to use your wood-burning stove correctly
and safely. The second part of the manual contains the installation instructions and the technical specications of
the Black Diamond. They are of particular importance to the installer.
We advise you to read this manual thoroughly before using your new stove and to keep the manual in a handy
place. Your installer may need the manual for the yearly maintenance of your replace.
We wish you much warmth with your new replace!
The WANDERS team
18
General information
The Black Diamond Black Diamond Compact with duct casing
The Black Diamond is a combination of comfort and ecient heat emission. The large glass panes allow
emission of the heat from the stove directly to the environment to make your room instantly comfortable. The
built-in ue gas deector ensures circulation of ue gases in the interior parts. Combined with the extra afterburning, it means that the ue gases have better combustion and reduce the burden on the environment. You
can regulate the intake of combustion air with the integrated air slide valve and adjust the intensity of the re
and the output of your stove.
Installation
It is common practice for the dealer where you purchased your Black Diamond stove to also take care of
installing it. If this is not the case, please ensure that the installation is done by a certied installer. A certied
installer can also give you the right advice about the ue tube to which the stove must be connected.
Connecting wood-burning stoves by unqualied persons is prohibited, in which case we cannot give any
guarantee about proper functioning of your Black Diamond stove. Please bear the re safety in mind when
installing the stove. See also page 24.
The wood-burning stove is suitable as an extra heat source and does not replace your principal
heating device.
Lighting the stove
Usage early in autumn or late in winter
When the external and internal temperatures do not dier much, a proper chimney draught is a real
challenge. You can help chimney draught get started by burning some wood while keeping all air
inlets maximally open. An abundant air supply speeds up quick heating which in turn increases the
draught in the chimney. Lighting up the stove with only a little wood prevents smoke from streaming
into the room.
The stove will become very hot when you light it and will need at least two hours to cool o. Don’t
touch the stove without protection during ring and for two hours after. Handle the stove always with
a glove to avoid getting serious burns.
!
!
!
19
GB
Slide the valve in the ue gas pipe open. Slide the
air valve to its maximum position. Open the door
and put some balls of paper or some relighters inside
the stove and place some wood kindling on top. Light
the kindling and leave the door ajar to let in extra air
and, if necessary, slide the ashpan and the shaking
grate a bit open. Once the stove is burning, which
is after about ve minutes, you may close the door
and the ashpan again. Do not place more than three
logs in the stove at a time. Be sure there is always
enough ventilation when the stove is burning. If you
want to temper the re, you must rst close the valve
in the ue tube and then close the air supply and the
shaking grate.
Avoid nger marks
Do not touch the glass of the stove with your ngers. Finger marks will burn into the glass and cannot
be removed later.
It is prohibited to light the stove with liquids like petrol or spirits.
Do not have the cooker hood on in the room where you operate your stove. Never touch the varnished
parts when you heat your stove.
Lighting the stove for the rst time
Discolouration of walls, ceilings and grates
The walls, ceilings and grates may show some discolouration after lighting your hearth. This is caused
by the dust particles that burn in the convection cover. This is a natural process for which WANDERS
cannot be held responsible. To minimize discolouring we refer to the advice given for atmospheric
hearths. Your installer can give you more information about this.
When you light the Black Diamond for the rst time, the hearth must still ‘anneal’ and temper itself. The unit
has a heat resistant lacquer which must burn in the stove at temperatures above 400 °Celsius. This will happen
during the rst few times of lighting the stove and temperatures rise to 600 °C. Though this may give an
unpleasant smell, it is otherwise harmless. It is advisable to keep the stove burning with limited fuel for at
least 6 hours when lighting the stove for the rst 4 or 5 times. Air the room well when the stove is burning.
Make sure that any cooking hood is not turned on when the stove is burning; a cooking hood extracts the
combustion air that the stove needs.
Some deposit may form on the glass panes of the stove when you ‘anneal’ your hearth. You can easily remove
this deposit with a damp cloth after the stove has cooled down. You can also use some cleansing agent for
ceramic rings. Please make sure you do not leave any nger marks on the clean glass. Finger marks burn into
the glass and cannot be removed later.
Newly-built house or recently renovated?
It is advisable to wait six weeks before lighting the stove in a newly-built house that has recently been completed, or in
a space that has recently been renovated drastically. The walls and ceilings still contain gases, softeners and moisture
from plasterwork or paint. The warm air-streams may discolour the dust particles in the space which may stick to
walls and ceilings. Even the moisture in the walls and ceilings will become warm and may cause yellow stains.
!
!
!
20
Fuel
Wood species and storage
You can use all kinds of woods as fuel as long as it is clean, split and dry. Hardwood like oak, beech and
birch burn slowly, give o much heat and form charcoal easily. Softer woods like spruce, r and poplar
give more ames but less heat and less charcoal.
The best place to store timber is in a windy spot but sheltered from the rain. This is how the logs can
dry in a natural way. Pile the logs on an old pallet or a frame to let the wood dry from underneath and
to prevent the lower logs from being in contact with water.
Wood species Drying time
Fir, Poplar 1 year
Lime, Willow, Spruce, Birch,
Ash, Alder
1,5 years
Fruit trees, Beech 2 years
Oak 2,5 years
The Black Diamond only burns on wood. Do not put more than 3 to 4 kg of fuel in the stove at the time. Always
use clean and cut logs, which have suciently dried. Please see the above list for drying times. Wet wood does
not burn well and gives heavy smoke emission. It may blacken the glass pane of your stove with soot and build
up smut in the ue pipe. This may increase the risk of chimney re.
Fresh, moist wood contains about 50% moisture. Cleaved wood still contains 20% moisture after drying it for
a year and moisture percentage will be decreased to 12 to 15% after drying it for two years. Dry wood gives
nice ames and little or no smoke, and the re will crackle when burning. Wet wood makes a hissing sound,
gives much smoke and only small ames which will considerably dampen the pleasure of burning your stove
and the heat output.
Do not put any paran-containing logs in your stove. When the door is closed, the high heat will
melt the paran from the logs too quickly. The polluted ue gasses which consequently develop will
deposit on and burn in the glass of your stove and cannot be removed later.
Do not use any wood that is painted, impregnated, glued together or processed in any other way. The
ue gases are very harmful to the environment and may aect your stove. It is also prohibited to burn
plastics and other waste matter due to poisonous smoke development.
The best way to burn your stove
All WANDERS’ stoves are designed so that they give a maximum output. A well-lit wood-burning stove can
produce a yield of about 75%. This means that you need less wood for the same amount of heat. Moreover, a
well-lit stove produces less smoke pollution. Below are a few tips to give you optimum pleasure:
• Always burn your stove with its door closed; this will improve the output within 8 to 10 times. When the
door of the stove is open, the chimney will draw more air than is needed for proper combustion. The relatively cold air will cool the re. It will also preclude re damage by any sputtering sparks, especially from
softwood.
• Do not put more than 3 logs on the re at one time. Too much fuel at one time thwarts ecient combus-
!
!

21
GB
tion and burdens the environment unnecessarily.
• Ventilate the space well when you have the stove on. A crackling re has a minimum air consumption of 25
cubic metres an hour. Never put on your cooking hood when you have a stove burning in the same space.
• Be careful with lighting the stove when it is foggy or when there is no wind outside. There is hardly any
draught in the cold chimney when the weather is calm. Since smoke is heavier than air there is the chance
of smoke streaming into the room. In foggy weather, the smoke from the chimney (outside) cools quickly
and may descend and become a nuisance in your neighbourhood.
• Don’t smother the re suddenly with water, but let it burn out. The materials inside the stove may deform
or crack as a result of sudden or great dierences in temperature.
• If you want to temper the re, rst close the valve in the ue tube and then close the air supply.
Chimney and ue
What to do in case of chimney re?
In case of chimney re, immediately close the shut-o valve in the chimney and all air supply ducts.
Call the re department. After the re is extinguished, the chimney and the stove must be inspected
again by your installer.
The chimney is the most important part of your wood-burning hearth.
When the chimney is right it will not distribute any smoke into your room, leave any deposit on the glass pane
or create bad combustion. Before starting the installation of the stove, your installer or a qualied chimney
sweep must check whether the chimney ue has a diameter of at least 150 millimetres over the entire length,
and whether the channel is clean, smooth and leak-proof.
Chimney with a proper draught
Warm air wants to ascend. This is the principle of every chimney. It helps when the wind near the
chimney mouth draws the air from the chimney.
Fall wind may give the opposite eect and blow the air back into the chimney. Relatively cold foggy
air may thwart proper draught in your chimney as does a long ue pipe with a rough inside and many
bends. If the natural draught in your chimney is poor your installer can give you information about
using a ventilator for your ue tube.
Maintenance
Small maintenance
• It is advisable to leave an ash layer of about two to three centimetres, as this will protect the re plate.
• Remove the cooled ash from the ashpan two or three times a week. It is advisable to use an ash bucket. A
clean ashpan is important because the stove sucks in combustion air also via the ashpan.
• Clean the shaking grate inside the stove with a soft brush.
• Clean the exterior of the stove with a damp cloth that does not give o u. Do not use any aggressive
cleansing agents or abrasives.
• Clean the cold glass pane with a cleaning agent for ceramic cooking rings. Do not touch the clean glass
with your ngers. Finger marks may burn into the glass.
• Oil the hinges and the door fastener occasionally.
Do not use any aggressive cleaning agents or abrasives to maintain your stove.
!
!
!

22
When the stove is not used
• Close all doors and air inlets in summer season
• Place absorbent salt inside the stove if it is stored in a humid space.
Yearly maintenance
• Have your chimney properly cleaned by a qualied chimney sweep every year; this is for safety reasons
and any re insurance.
• Have the ue gas outlet and the combustion air supply of the double-walled ue tube system checked for
air-tightness every year.
• Have the valves and/or aps checked for their functioning.
• Have the sealing of doors and glass panes checked for wear and tear.
Safety
A WANDERS wood-burning stove gives you a comfortable and a safe source of heat in your home. Fire safety
starts with a proper installation and a properly working ue tube. Your installer must therefore comply with
the installation instructions as listed on page 22 and further. To burn your stove safely, the following points
are important:
1. Burn your stove as much as possible with a closed door; it increases the output and is better for the
environment.
2. Prevent small children or the inrm from getting too close to a burning stove and do not leave them alone
in the room when the stove is burning. You could use a re-screen.
3. Do not pour or put combustible liquids and materials in the stove, as it may damage the replace beyond
repair.
4. If the oor around the replace is made of combustible material you must use a oor slab. The oor slab
must have a minimum size of: - 50 cm measured from the replace on the front side of the door: - 30 cm
measured from the replace on all sides from the door.
5. Do not place any combustible materials, such as curtains, wooden objects (cupboards, paintings) close to
the replace or the ue tube. A minimum distance of 80 cm measured from the exterior of the stove and
the ue tube is required.
6. Never cover the chimney breast or mantelpiece with combustible material (e.g. paper covering).
7. Please bear in mind the points of the section on ‘the best way to burn your stove’, on page 20.
8. Have your stove repaired only by a certied installer and with original parts.
Guarantee
WANDERS Metaalproducten B.V. in Netterden, the Netherlands, gives a guarantee of ve years after the
purchase date of your wood-burning stove, provided that the replace is properly installed and used in
accordance with the instructions in the manual.
The guarantee includes all defects which can be reduced to aws in material and construction, in which case
you will receive the new parts free of charge. Labour costs or other expenses are not covered by the guarantee.
You can send defect parts (shipping paid) to WANDERS Metaalproducten B.V., Amtweg 4, 7077 AL in Netterden
[The Netherlands].
Before installing your stove you must check if there is any visible damage to the unit. If there is, do not accept
the unit and contact your supplier.
The guarantee does not include: the glass, failure due to improper use; non-compliance with the national
regulations and enclosed installation and operating instructions; installation by an installer of dealer who is
not acknowledged by WANDERS, negligence of the unit and change of owner. The guarantee is also disclaimed
when a wrong fuel is used.
There is a guarantee period of one year for all cast iron and vermiculite parts, the electrical parts and the
lacquer.

23
GB
WANDERS disclaims responsibility for any cracks in stuccoed walls or discolouration of walls, ceilings and/or
grates after burning the replace. Discolouration can be caused when dust particles burn in the convection
cover. To minimize the chance of cracks in stucco and discolouration we refer to the advice given for decorative
hearths. Your installer can give you more information.
Any complaints will be dealt with after the sales rm, the installer has led a complaint and sent a copy of
the purchase receipt with purchase date. Any repairs do not entitle you to extend the guarantee term. All
consequential damages or loss are excluded.
Installation Instructions Black Diamond and Black Diamond Compact
The Black Diamond is tested in accordance with the international EN 13240 standardization, and has an extra
additional standardization for optimally environment-friendly heating devices related to ue gases (Section
15a B-Vg. Des BmfWA). The stove can be connected to a ue tube to which several stoves are connected. The
ue tube has a diameter of 150 millimetres.
The heating device must be placed by an acknowledged installer and according to the installation
instructions given below. The national and local rules and regulations for placing and using woodburning stoves are equally applicable. WANDERS does not give any guarantee if the Black Diamond is
connected or installed incompletely or incorrectly.
It is not allowed to place the stove in:
• Arcades and corridors accessible to the public.
• Stairwells, except in buildings with no more than 2 dwellings.
• Spaces where highly ammable or explosive materials are used.
• Spaces where an exhaust system is used or where a mechanical exhaust system is placed, except when the
air supply is taken directly from outside to assure a hazardless combustion.
Preparation
The chimney ue
Before placing the stove you must observe the following points:
• If the stove is connected to an existing chimney, you must rst have the chimney professionally cleaned
and checked by a qualied chimney sweep company. Any cut-o valves or stop valves must be removed.
• The ue tube of the stove must be connected with the chimney without diversions.
• The underpressure in the chimney must be at least 12 Pa or 0.12 mbar.
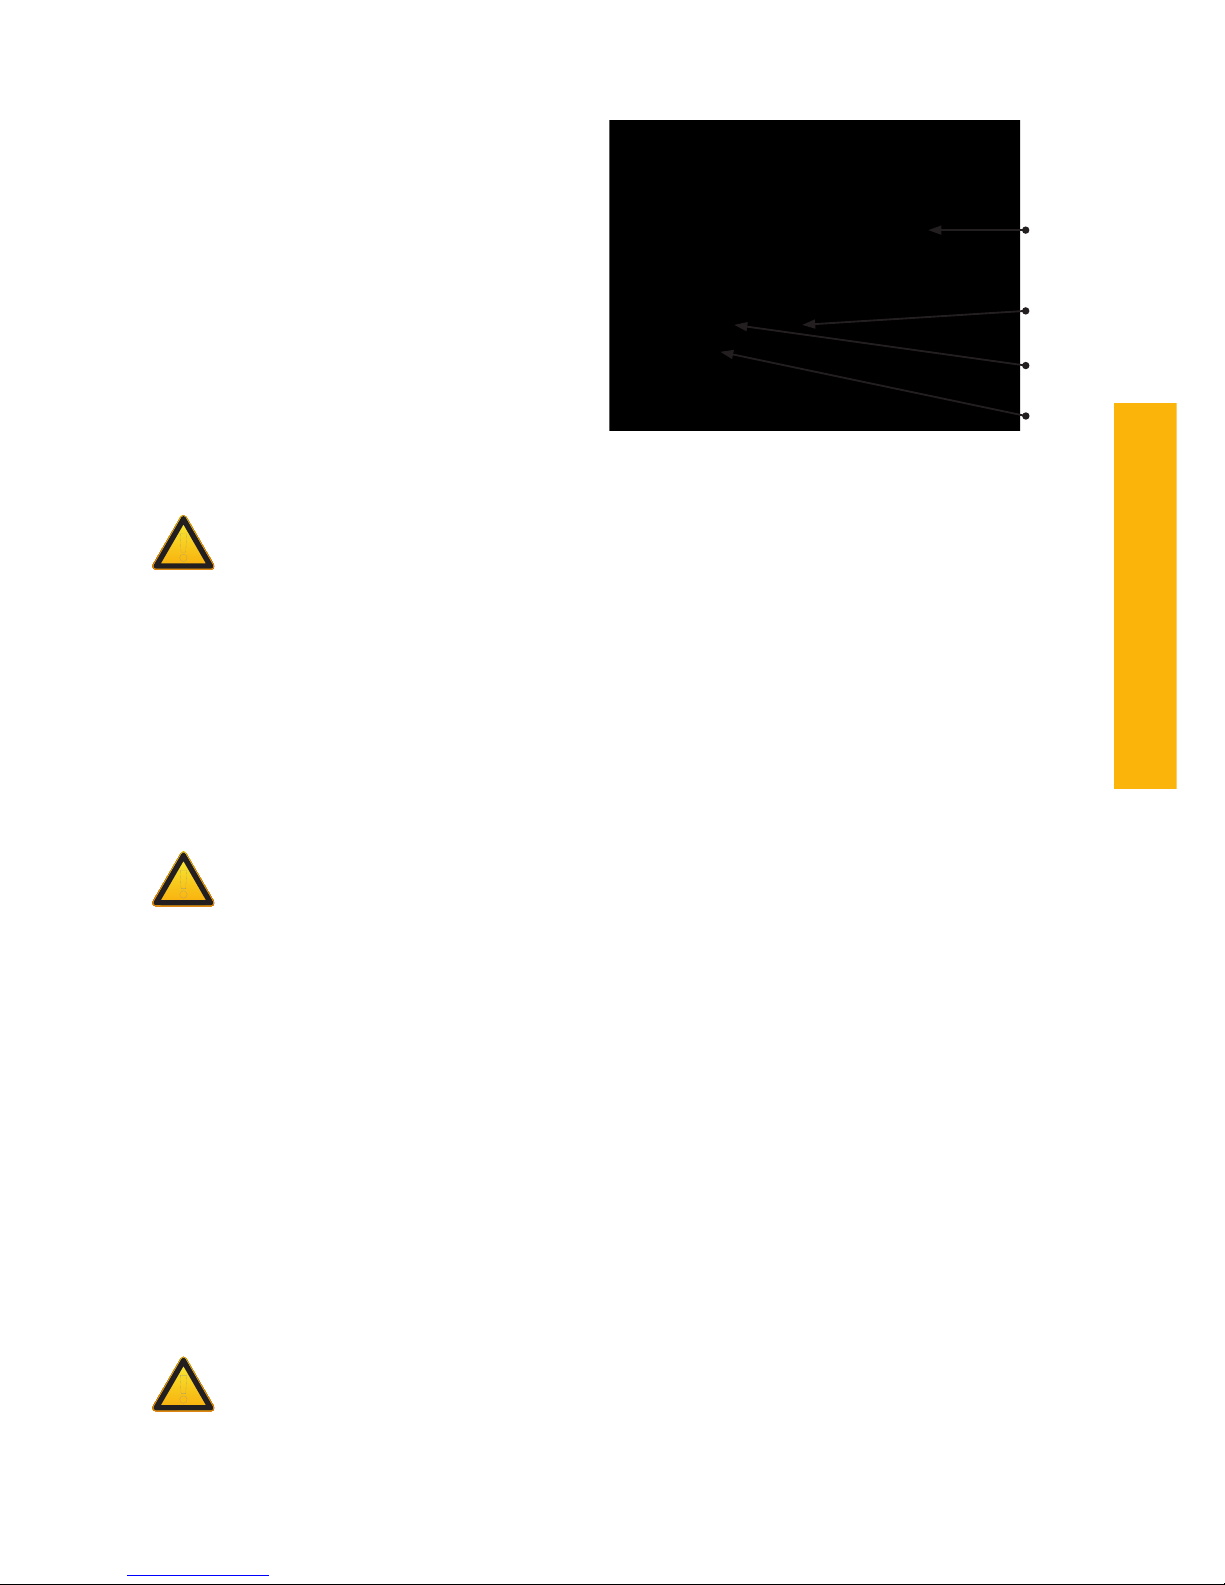
• The chimney ue must always end up in outlet area 1 (see the drawing below)
• At the time of placing the stove, the chimney ue must be clean, leak-proof and without obstructions, and
!
1
3 3
A X
X > 23˚
3
X
X < 23˚
1
500 mm

24
must have a diameter of 150 mm.
• Any bends in the ue tube must not exceed 45 degrees.
• Ensure that the chimney tube can discharge the ue gases adequately, properly and safely.
Fire Safety
For reasons of re safety is it important to observe the instructions below before installing the stove.
1. If the oor around the stove is made of combustible material, you must use a oor slab. The oor slab must
measure at least: - 50 cm from the stove on the front side of the door - 30 cm from the stove on the sides
of the door.
2. Keep at least a distance of 80 cm between the stove and combustible objects such as curtains, wooden
objects (cupboards and paintings) and glass objects. Keep the same distance from the ue tube.
3. Wooden construction parts within the radiation range of the stove (80 cm from the exterior of the stove)
must be covered with reproof material.
4. If the ue tube goes through a ceiling and/or roof that consist of ammable materials, the ceiling and the
roof must be covered with reproof materials all around (about 80 cm). Pay also attention to joisted oor
layers and any electric wiring.
5. Keep a distance of at least 50 cm (in all directions) between the stove and supporting steel construction
parts.
6. Shield o all combustible materials within a radius of 80 cm from the stove openings with non-combustible
materials.
7. Never cover the chimney breast with combustible material (e.g. paper covering).
8. The wall behind the stove must consist of, or be insulated with, re-proof materials. The insulation material
must resist a temperature of 700 °C and have a density of 80 kg/m3. Please see for insulation materials
table page 29).
9. Avoid heat transmission when placing the stove. Heat transmission of a burning stove can penetrate the
wall and even cause re damage on the other side of the wall. Prevention is better than cure.
Installation
The Black Diamond stove is tested in accordance with the international EN 13240 standardization and has
an extra additional standardization for optimally environment-friendly heating devices related to ue
gases (Section 15a B-Vg. Des BmfWA). The stove can be connected to a ue tube to which several stoves are
connected. The ue tube has a diameter of 150 mm.
Supply of combustion air
The stove must have a sucient fresh supply of combustion air. To avoid draft, make if necessary an extra air
supply opening as close to the stove as possible. An extra air supply opening is denitely required if:
• the room has a heat recovery system.
• the room has a central exhaust system.
• the same space has a cooker hood.
The air supply opening must be sealable if it goes through a re-resistant wall. If there are several heating
devices in the same room there must be enough air openings to guarantee proper combustion.
External air supply
The tube for supplying fresh outside air has a diameter of 100 mm. The air supply duct can be placed with
a connection at the bottom. If the external air supply duct goes through a re-resistant wall, the duct must
be sealable. If the duct is longer than 1 metre including a 90° bend, the diameter of the duct must be bigger.
Please see page 26 to read how to connect the external air supply.
Connecting the hearth
The Black Diamond is a heavy woodstove. The standing model weighs 150 kg, including the 2 metre ue tube.
Verify whether the wall or the oor onto which the stove is installed is strong enough to hold the weight.

25
GB
Follow the instructions given in the previous chapter (Preparation) before installing the stove. Protect the oor
during mounting the stove, and mind your back.
Mounting the standing model
1. Check whether the wall in front of which the hearth is placed is adequately re-proof. Please read the text
in the chapter on ‘Fire Safety’ on page 24.
2. Check the packaging of the stove and the base. Do not mount a stove or a base that has been damaged in
the box. If there is any damage, please report to WANDERS.
3. Be careful when unpacking the stove and protect the oor while unpacking: the mouth of the tube
underneath the stove has a sharp edge.
4. Remove the glass plate from the hearth to avoid any damage.
5. If you need an extra air supply connection to the hearth please read the section on “Mounting the
connection to the external air supply” on page 26.
6. Protect the oor and carefully turn the stove on its backside.
7. Remove the four screws on the bottom side.
8. Take the base from the box and remove the clipped-on front plate from the base.
9. Fasten the base to the stove with the four screws.
10. Lift the stove carefully in an upright position, and put it in the right place, but mind your back.
11. Connect a separate air supply duct, if necessary (minimum diameter: 100 mm). You can use the connection
at the bottom.
12. Click the front piece of the base back in its place.
13. Fasten the top of the hearth to the wall. Never use any synthetic fastenings.
14. Put the glass plate back on the stove.
15. Then mount the ue gas duct overlappingly.
Mounting the suspended model
1. Check whether the wall in front of which the hearth is placed is adequately re-proof. Please read the text
in the chapter on ‘Fire Safety’ on page 24.
2. Check the packaging of the stove and the base. Do not mount the stove or the base that has been damaged
in the box. If there is any damage, please report to WANDERS.
3. Be careful when unpacking the stove and protect the oor while unpacking: the mouth of the tube
underneath the stove has a sharp edge.
4. Remove the glass plate from the hearth to avoid any damage.
5. Fasten the suspension clip to the wall. Never use any synthetic fastenings. Be sure to place the clip exactly
beneath the centre of the outlet and to hold the hooks face upward. The fastening bolts should not
protrude more than 10 mm from the wall.

26
6. Connect a separate air supply duct, if necessary (minimum diameter: 100 mm). You can use the connection
at the bottom. For placing the external air supply please read the next paragraph.
7. Hang the stove in the clips. Mind your back! To decrease the weight you can temporarily remove the glass
plate and the re plate. Fit the hearth with its top to the wall clip.
8. Put the glass plate back on the stove.
9. Then mount the ue gas duct overlappingly.
Mounting the rear connection of the external air supply.
1. Follow points 1 to 5 inclusive given in the previous paragraph (Mounting the suspending model).
2. See the illustration in the previous paragraph for the measurements for boring the holes.
3. Hang the stove in the clips, but mind your back. To decrease the weight you may remove the glass pane
and the re plate. (See also the chapter on ‘Repairs’ on page 27).
4. If there is a rear connection: slide the external air supply pipe into the opening and slide the external air
chamber between the lips.
5. If there is a bottom connection: it is not possible to connect an extra air chamber.
6. Continue with point 7 of the previous paragraph (Mounting the suspending model).
1
2
3
4
5
6
OPMERKINGEN:
2
3
0
,0
0
305,50
1
5
9
,0
0
6
0
0
,2
5
152,75152,75
1
0
5
,
0
0
7
6
1
,2
5
164,53
10,00
1
2
3
4
5
6
305,50
1
8
9
,
0
0
2
3
0
,
0
0
10,00
152,75152,75
1
0
5
,
0
0
5
1
0
,
0
0
1
2
3
4
7
6
1
,2
5
164,53
1
2
3
4
5
RUWHEID
VOLGENS NEN 3634
TOLERANTIES +/- 0,5MM
TENZIJ ANDERS AANGEGEVEN
WANDERS BV.
AMTWEG 4
7077AL NETTERDEN
MAATEENHEID: MM
GETEKEND:
KACHEL:
OPMERKINGEN:
WIJZ.:
AMERIKAANSE PROJECTIE
R
obG
305,50
1
8
9
,
0
0
2
3
0
,
0
0
10,00
152,75152,75
1
0
5
,
0
0
5
1
0
,
0
0
168,50
6
9
5
,
5
0

27
GB
Repairs
Replacing the glass in the door
• Open the door with the broken glass.
• Remove the glass strips on the inside of the door.
• Replace the glass. Be careful, the glass may be sharp!
• Check if the ceramic strip is undamaged and properly xed to the door.
• If it isn’t, stick it on again with neutral silicone paste or replace it entirely.
• Replace the broken glass (Watch out for sharp edges!).
• Reassemble everything.
Replacing the front glass
• Remove the glass plate and unscrew the two clips.
• Then take the arched front glass by moving it forward and lowering it slightly. Be careful! The glass may
be sharp.
• Remove the glass strips.
• Check if the ceramic glass strip is undamaged and still xed to the stove. If it isn’t, stick it on again with
neutral silicone paste or replace it entirely.
• Replace the arched front glass. Watch out for sharp edges!
• Assemble the stove.

28
Technical details
Black Diamond Black Diamond Compact
Door latch I & II I & II Ba
Nominal capacity* 8 7 kW
Flue collar 150 150 mm
Maximum lumber supply 3 3 kg
* the nominal heat is obtained with a chimney draft of 0.12 mBar
Fuel: wood logs (30 x 10 cm)
Maximum supply 3 pieces
Primary airvalve maximum
Secundary air outlet maximum
Fuel burning period about 1 hour
Flue gas values in accordance with DIN 4705, DIN 18895 part 2
When the door is closed and fueled with wood
Black Diamond Black Diamond Compact
Flue gas quantity 8,4 g/s
Flue gas temperature 290
0
C
Pre pressure 0,12 mBar
Eciency 78,9 %
CO at 13% O
2
0,07 %
Particulate matter 26 mg/m
3
Certicate institute 1625 1625
Test standard EN13240 EN13240
Test report number RRF - 400 169
Target value for the volume of the space to be heated:
Not all spaces meet the present insulating values. According to DIN 18893, the following values can be taken
for the volume of the spaces to be heated:
If heating circumstances are favourable:
In less favourable circumstances:
In unfavourable circumstances:
calculate according to DIN 4701
135 (Black Diamond) 000 (Compact) m
3
95 (Black Diamond) 000 (Compact) m
3
For temporary heating you may assume a reduction of 25% for the volume to be heated if the interval is
more than 8 hours.

29
GB
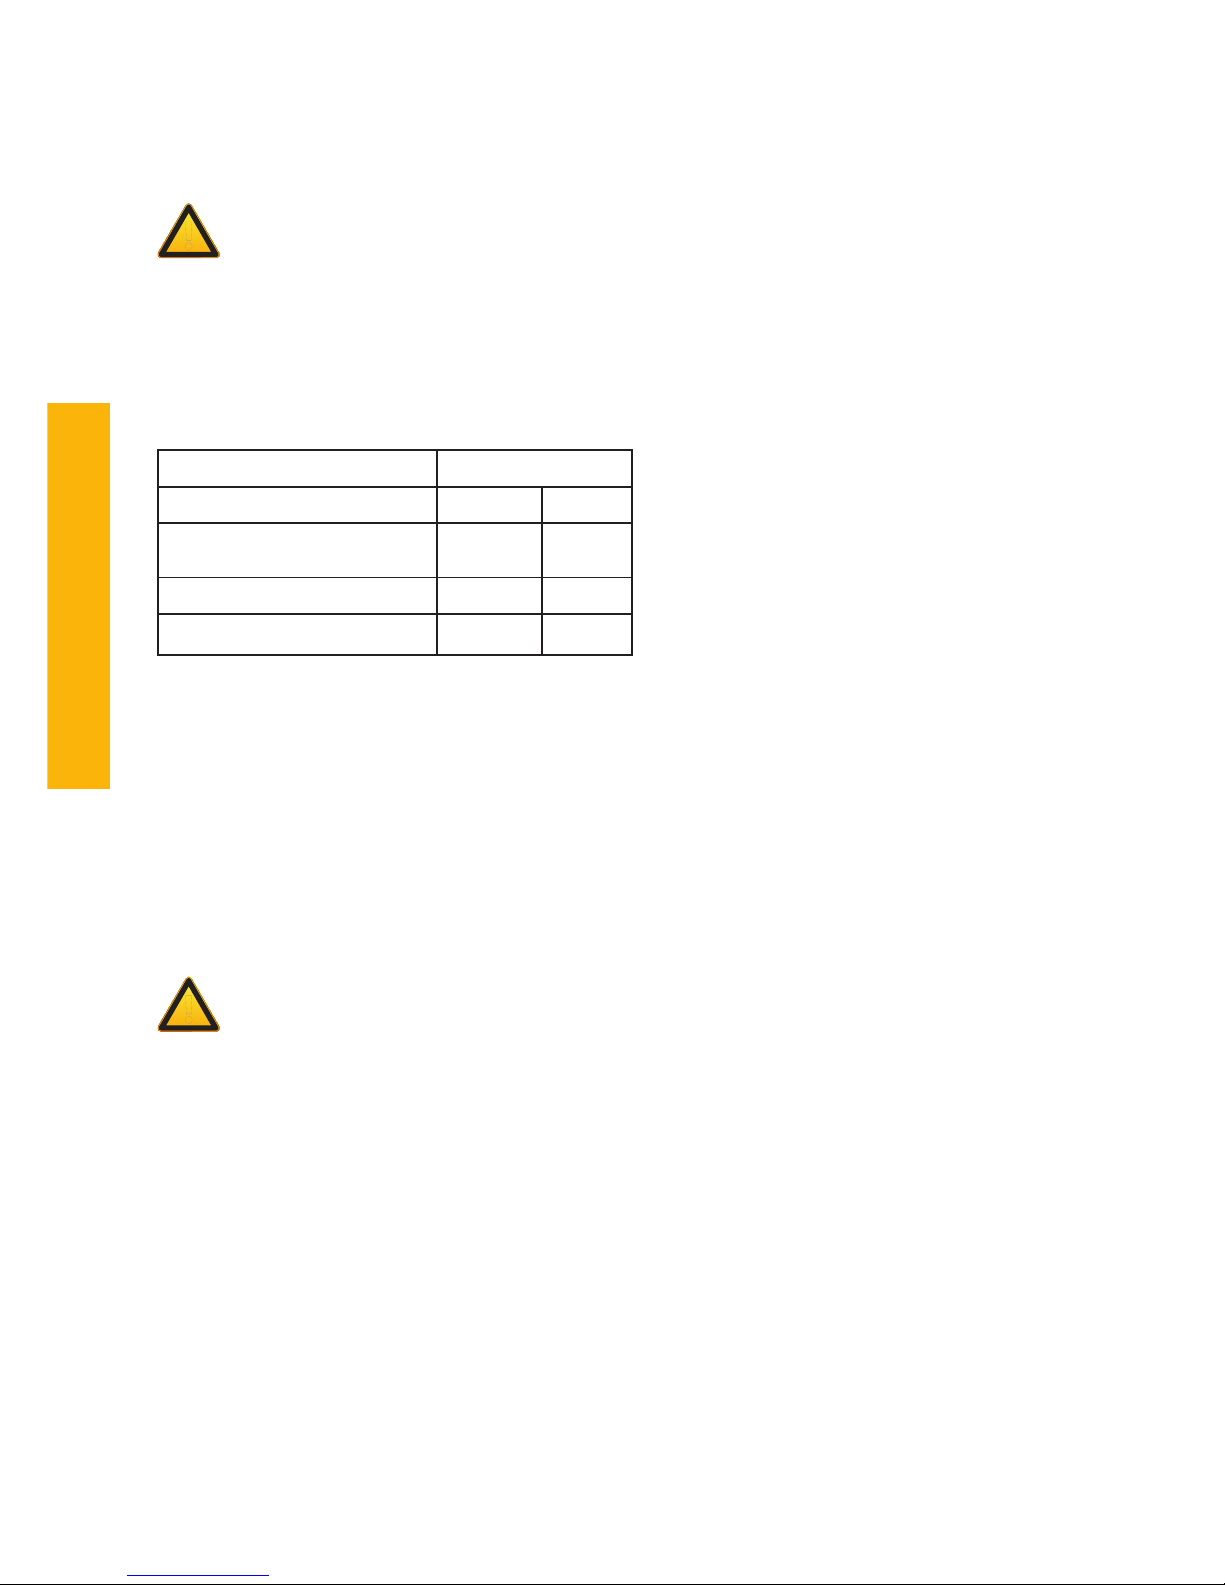
Table for thickness of insulation cf thickness of the wall
Wall thickness 10
cm
Insulation Convection
house
Protection of the wall
Back side
8 cm
On the side
8 cm
Under side
6 cm
Walls made of combustable construction parts X X
Supporting walls in steel construction X X
Integrated pieces against stove X X
Integrated pieces in the wall behind X X
Other walls
Wall thickness < 10 cm X X
Wall thickness > 10 cm (e.g. a brickwork wall) - -
Table gives the insulation thickness to be used for a given wall thickness to protect intergrated wall
Table for insulation material. Only use products in the shaded area
Insulation Packed Thermal conduction Maximum Density
appliance
temp.
nr article nr form nr packed nr �
C
nr kg/m³
10
11
12
13
01
02
03
04
05
06
07
08
09
10
99
01
02
10
11
20
21
99
10
12
14
16
72
74
76
99
02
03
04
05
06
07
08
09
10
11
12
13
18
99
20
30
40
50
60
70
80
90
100
110
120
130
180
mineral wool
glass wool
rock wool
waste prod.
bands
loose wool
wool
granule
felt
lamella mat
stitched mats
plates
scales
segments
interwoven
otherwise
stitched mats
stitched mats
stitched mats
g. curv
e 2
flakes
g. curv
e 1
flakes
g. curv
e 2
plates
g. curv
e 1
plates
g. curv
e 2
single
100
120
140
160
720
740
760
Select the insulation material from this table. Group 99 is NOT allowed.

60
Technische tekeningen / Technical drawings / Dessins techniques / Technische Zeichnungen
586
161
451
877
Ø
1
5
0
381
483
498
581
693
Black Diamond
1
2
3
4
5
6
OPMERKINGEN:
2
3
0
,0
0
305,50
1
5
9
,0
0
6
0
0
,2
5
152,75152,75
1
0
5
,
0
0
7
6
1
,2
5
164,53
10,00
1
2
3
4
7
6
1
,2
5
164,53

61
1
2
3
4
5
6
A
B
C
D
RUWHEID
VOLGENS NEN 3634
TOLERANTIES +/- 0,5MM
TENZIJ ANDERS AANGEGEVEN
WANDERS BV.
AMTWEG 4
7077AL NETTERDEN
tel.: +31 (0)315-386414
fax.:+31 (0)315-386201
WWW.WANDERS.COM
MATERIAAL:
MAATEENHEID: MM
DATUM:
GETEKEND:
KACHEL:
OPMERKINGEN:
BENAMING:
NUMMER:
WIJZ.:
AMERIKAANSE PROJECTIE
RobG
BLACK DIAMOND COMPACT
7-12-2010
sam
GDI.4000
510,47
516,54
885,27
6
6
4
,
5
0
6
3
2
,
5
0
4
3
2
,
0
0
771,85
1
7
1
,
0
0
150,00
468,50
3
4
8,
6
8
4
6
1
,
4
4
3
0
9
,
0
0
152,98
5
4
0
,
0
0
407,54
5
2
1
,
0
0
5
0
5
,
5
0
5
1
2
,
5
1
Black Diamond Compact
1
2
3
4
5
6
305,50
1
8
9
,
0
0
2
3
0
,
0
0
10,00
152,75152,75
1
0
5
,
0
0
5
1
0
,
0
0
1
2
3
4
5
RUWHEID
VOLGENS NEN 3634
TOLERANTIES +/- 0,5MM
TENZIJ ANDERS AANGEGEVEN
WANDERS BV.
AMTWEG 4
7077AL NETTERDEN
MAATEENHEID: MM
GETEKEND:
KACHEL:
OPMERKINGEN:
WIJZ.:
AMERIKAANSE PROJECTIE
R
obG
305,50
1
8
9
,
0
0
2
3
0
,
0
0
10,00
152,75152,75
1
0
5
,
0
0
5
1
0
,
0
0
168,50
6
9
5
,
5
0

62
Black Diamond
Gla.00.0923
SDI.2011
INK.00.2049
HDI.0011
GLA.00.0921
HDI.0054
SDI.2007
HDI.2034
GIE.00.0001
GLA.00.0922
HDI.2061
HDI.2035
INK.00.0110
GIE.00.2334
GIE.00.2335
HDI.0035
HDI.2027
HDI.2056
SDI.2008
SDI.2003
HDI.2027
HDI.0053
HDI.0055
HDI.2023
DRA.00.1573
DRA.00.1572
DRA.00.1576
SDI.2010
HDI.0040
HDI.0041
SDI.2005
INK.00.0110
GIE.00.0001
SDI.2009
HDI.2034
HDI.2035
SDI.2002
SDI.2004
HDI.2045
HDI.2025
HDI.2021
HDI0023
HDI.2044

63
1
2
3
4
5
6
GLA.00.0927
SDI.2008
HDI.4092
HDI.2075
HDI.4041
HDI.4050
DRA.00.1562
DRA.00.1586
GIE.00.0002
HDI.4093
INK.00.2050
HDI.4054
GLA.00.0926
INK.00.0112
HDI.2035
BEV.01.7025
HDI.0070
DRA.00.2503
DRA.00.1550
HDI.2050
DRA.00.1584
HDI.2056
HDI.2027
INK.00.6846
HDI.4061
GLA.00.0925
SDI.4002
HDI.2025
HDI.2045
DRA.00.1587
HDI.2048
HDI.4035
SCHUDROOSTER WANDECO
GIE.00.2335
SDI.4003
HDI.0023
HDI.2044
HDI.2021
HDI.2028
Black Diamond Compact

garantiebewijs / guarantee certicate / certicat de garantie / garantieschein
Wanders res & stoves
Amtweg 4
7077 AL Netterden
The Netherlands
T: +31 (0) 315 - 386 414
F: +31 (0) 315 - 386 201
E: service@wanders.nl
I: www.wanders.com
model / model / modèle / modell
serienummer / serial number
nr. de série / seriennummer
aankoop datum / date of purchase
date de láchat / kaufdatum
s'il vous plaît joindre copie de la preuve d'achatplease enclose copy of proof of purchase bitte kopie vom kaufbeleg beifügenkopie aankoopbewijs bijvoegen aub
/ / /
naam / name / nom / name
adres / address / adresse / adresse
postcode - plaats / postal code - town
code postal - lieu / postleitzahl - ort
land / country / pays / land
naam / name / nom / name
adres / address / adresse / adresse
postcode - plaats / postal code - town
code postal - lieu / postleitzahl - ort
land / country / pays / land
dealer gegevens / dealer information / l'information revendeur / händler informationen
Onder de garantie vallen alle gebreken die te herleiden zijn
tot materiaal- en constructiefouten. In die gevallen ontvangt
u gratis nieuwe onderdelen. Arbeidsloon en andere kosten
vallen niet onder de garantie. Defecte onderdelen kunt
franco toezenden aan WANDERS Metaalproducten B.V.,
Amtweg 4, 7077 AL, Netterden.
Voordat de haard geplaatst wordt, moet u controleren of er
zichtbare schade is aan het toestel.
In dat geval moet u het toestel niet accepteren, maar contact
opnemen met uw leverancier.
Buiten de garantie vallen: het glas, storingen ontstaan
door onoordeelkundig gebruik; niet juiste naleving van de
landelijke voorschriften en de bijgevoegde installatie- en
bedieningsvoorschrif-ten; installatie door een niet door
WANDERS erkend installateur of dealer; verwaarlozing van
het toestel en bij wisseling van eigenaar. De garantie vervalt
ook bij gebruik van een verkeerde brandstof.
WANDERS is niet verantwoordelijk voor eventuele
scheuren in sierpleisterwerk en verkleuringen van wanden,
plafonds en/of roosters na het stoken van de haard.
Verkleuringen kunnen ontstaan doordat stofdeeltjes
verbranden in de convectiemantel. Om de kans op
scheuren in sierpleisterwerk en eventuele verkleuringen te
minimaliseren verwijzen wij naar het advies dat gegeven
wordt in de sfeerhaardenbranche. Uw installateur kan u
hierover informeren.
Klachten worden in behandeling genomen nadat de
verkooprma/installateur of het gasbedrijf een klacht
heeft ingediend, vergezeld van de aankoopdatum en een
kopie van de aankoopbon. Reparaties geven geen recht op
verlenging van de garantietermijn.
Alle gevolgschade wordt uitgesloten.
The guarantee includes all defects which can be reduced
to aws in material and construction, in which case you
will receive the new parts free of charge. Labour costs
or other expenses are not covered by the guarantee.
You can send defect parts (shipping paid) to WANDERS
Metaalproducten B.V., Amtweg 4, 7077 AL in Netterden
[The Netherlands].
Before installing your stove you must check if there is any
visible damage to the unit. If there is, do not accept the
unit and contact your supplier.
The guarantee does not include: the glass, failure due
to improper use; non-compliance with the national
regulations and enclosed installation and operating
instructions; installation by an installer of dealer who is
not acknowledged by WANDERS, negligence of the unit
and change of owner. The guarantee is also disclaimed
when a wrong fuel is used.
WANDERS disclaims responsibility for any cracks in
stuccoed walls or discolouration of walls, ceilings and/
or grates after burning the replace. Discolouration can
be caused when dust particles burn in the convection
cover. To minimize the chance of cracks in stucco and
discolouration we refer to the advice given for decorative
hearths. Your installer can give you more information.
Any complaints will be dealt with after the sales rm,
the installer has led a complaint and sent a copy of the
purchase receipt with purchase date. Any repairs do not
entitle you to extend the guarantee term.
All consequential damages or loss are excluded.
La garantie couvre tous les défauts qui résulteraient des vices
de matière et de construction. Dans ces cas, vous recevrez des
pièces nouvelles gratuitement. Les frais de salaire et les autres frais
n’entrent pas dans le champ de la garantie. Les pièces défectueuses
peuvent être expédiées franco à WANDERS Metaalproducten B.V.,
Amtweg 4, 7077 AL, Netterden, Pays-Bas .
Avant de procéder à la pose de l’appareil vous devrez vérifier si
le poêle ne présente pas des dommages visibles. Dans ce cas, il
ne faut pas accepter l’appareil en prendre contact avec votre
fournisseur.
La garantie ne couvre pas la vitre et ne s’applique pas aux
dérangements provenant d’une mauvaise utilisation, d’un
manque de respect de la réglementation nationale et des
instructions d’installation et d’emploi fournis avec l’appareil, d’une
installation effectuée par un installateur ou revendeur non-agréé
par WANDERS , d’un défaut d’entretien et en cas où le poêle serait
passé en d’autres mains. La garantie ne s’applique pas non plus si
un combustible non approprié a été utilisé.
WANDERS n’est pas responsable des éventuelles fissures au
plâtrage de parement et des décolorations des parois, plafonds et/
ou grilles après le chauffage du poêle. Les décolorations peuvent
être causées par la combustion des grains de poussière dans le
manteau de convection. Pour réduire au maximum les fissures au
plâtrage et les décolorations éventuelles, veuillez vous reporter
aux consignes généralement données dans le commerce sur les
poêles d’ambiance. Votre installateur vous renseignera.
Les plaintes sont examinées après qu’elles ont été présentées
par l’établissement de vente, par l’installateur, accompagnées
d’une copie de la facture d’achat indiquant la date d’achat. Les
réparations ne donnent pas droit à une prorogation de la durée
de garantie.
Les dommages conséquents sont exclus.
Unter diese Garantie fallen alle Mängel die auf Materialoder Konstruktionsfehler zurückzuführen sind. In
diesen Fällen erhalten Sie gratis neue Ersatzteile. Der
Arbeitslohn und andere Kosten fallen nicht unter die
Garantie. Fehlerhafte Teile können Sie franco an WANDERS
Metaalproducten B.V. Amtweg 4, 7077 AL Netterden
(Holland) schicken.
Vor Montage des Ofens müssen Sie kontrollieren ob das
Gerät keine sichtbaren Schäden aufweist. In dem Fall
müssen Sie das Gerät nicht akzeptieren, müssen aber mit
Ihren Lieferanten Kontakt aufnehmen.
Nicht unter die Garantie fallen: Störungen die durch nicht
sachgemäßen Gebrauch entstanden sind; nicht strikte
Befolgung der Installations- und Bedienungsvorschriften;
Montage durch einen nicht von WANDERS anerkannten
Installateur, Vernachlässigung des Ofens und bei einem
Wechsel des Besitzers. Die Garantie verfällt auch, wenn
verkehrtes Heizmaterial benützt wurde.
Wanders ist nicht verantwortlich für eventuelle Risse im
Feinputz und Verfärbungen der Wände, Decken und/
oder Roste nach Heizen des Ofens. Verfärbungen können
entstehen weil Staubteilchen im Konvektionsmantel
verbrennen. Um eventuelle Risse im Feinputz und
Verfärbungen zu minimalisieren, verweisen Sie auf den
Rat der von der Branche für Kaminöfen gegeben wird. Ihr
Installateur kann Sie darüber informieren.
Reklamationen werden erst dann behandelt, wenn
die Verkaufsrma, der Installateur eine Reklamation,
zusammen mit einer Kopie des Kassenzettels mit
Kaufdatum, eingereicht hat. Reparaturen berechtigen
nicht zu einer Verlängerung der Garantie.
Alle Folgeschäden sind ausgeschlossen.
 Loading...