

Walthers Cornerstone, 933-3196 Series Manual

Thanks for purchasing this
Cornerstone Series®Kit. Please
take a few minutes to read these
instructions and study the drawings before starting construction.
All parts are made of styrene, so
use compatible paint and glue to
finish your model.
For thousands of years, natural
obstacles such as rivers and valleys prevented humans from traveling easily. In ancient times, we
used natural bridges or created our
own from fallen logs, piles of
stones, or by twisting natural
materials together. These three
starting points were the foundation for the beam, arch and suspension bridges of today.
Over time, the art and science of
bridge building continued to
evolve. With the rise of the
Roman Empire and its extensive
road system, bridge building took
on a new importance across
Europe. During this time, engineers made significant advances
including the development of the
masonry arch and the use of natural cement. During medieval
times, bridges were often constructed by religious orders, often
incorporating shops and fortifications in their designs. By the
Renaissance, advances in mathematics led to improved truss and
arch designs, and a better understanding of the workings of pilings and supports. In this period,
bridges were designed with more
attention to how they fit the ideal
of
a city scene, with more atten-
tion to visual and artistic details.
While iron had been used in a
very limited way since ancient
times, it became available in large
quantities for the first during the
late 18
th
century. Engineers had a
new and durable material with
which to work, and iron bridges
began to appear. With its
increased load-bearing ability, iron
was also adapted to the heavier
bridges required by the new railroads.
But iron had its limitations and by the late 19thcentury,
steel was taking over as the
material of choice, especially for
railroad bridges that had to support heavier trains.
At the same time, advances in
concrete and cement technology
made it increasingly popular as a
building material for both foundations and bridges. Engineers soon
found that pouring concrete over a
skeleton of iron screen, rods or
bars increased the strength of the
finished design and allowed for a
variety of shapes and forms. On a
larger scale, this “reinforced concrete” became increasingly common as a material for new bridges.
As America began shifting from
horses to horsepower, a new generation of highway bridges
appeared. Increasing volumes of
trucks and automobiles presented
problems for bridges built to carry
horses and carriages in cities, as
major routes became increasingly
congested. And as the highway
system expanded into rural areas,
older wooden bridges had to be
replaced. During the 1920s and
30s, many of these older bridges
were replaced as state and federal
projects. These combined ancient
ideas such as the arch with modern technology to produce
durable, attractive structures.
Many of these bridges remained
in use for decades, until outdated
by newer safety standards,
increasing volumes of traffic and
old age. On less traveled routes,
some survive today.
ON YOUR LAYOUT
Perfect for any highway from the
1920s to the present, this single
arched, concrete bridge is typical
of those built all over America.
Handling traffic above and below,
bridges like this were often constructed in areas where existing
intersections were creating bottlenecks and safety hazards.
Both the deck and the lower level
are designed for use with any of
Walthers Cornerstone Series
Street Systems components,
which are available to model
brick, concrete or asphalt streets
to fit a wide range of modeling
eras. You can also set the time and
place of your street scene quickly
and easily with the many styles of
Cornerstone Series Built-Ups
Street Lamps (#933-1080 and
#933-1090 series).
HO Scale Kit
ARCHED ROAD BRIDGE
933-3196
For additional figures, vehicle and
accessories to set the scene, see
your dealer, check out the lastest
Walthers HO Scale Model Railroad
Reference book or visit our Web site
at waltherscornerstone.com for
more ideas.
© 2012 Wm. K. Walthers, Inc., Milwaukee, WI 53218 waltherscornerstone.com I-933-3196
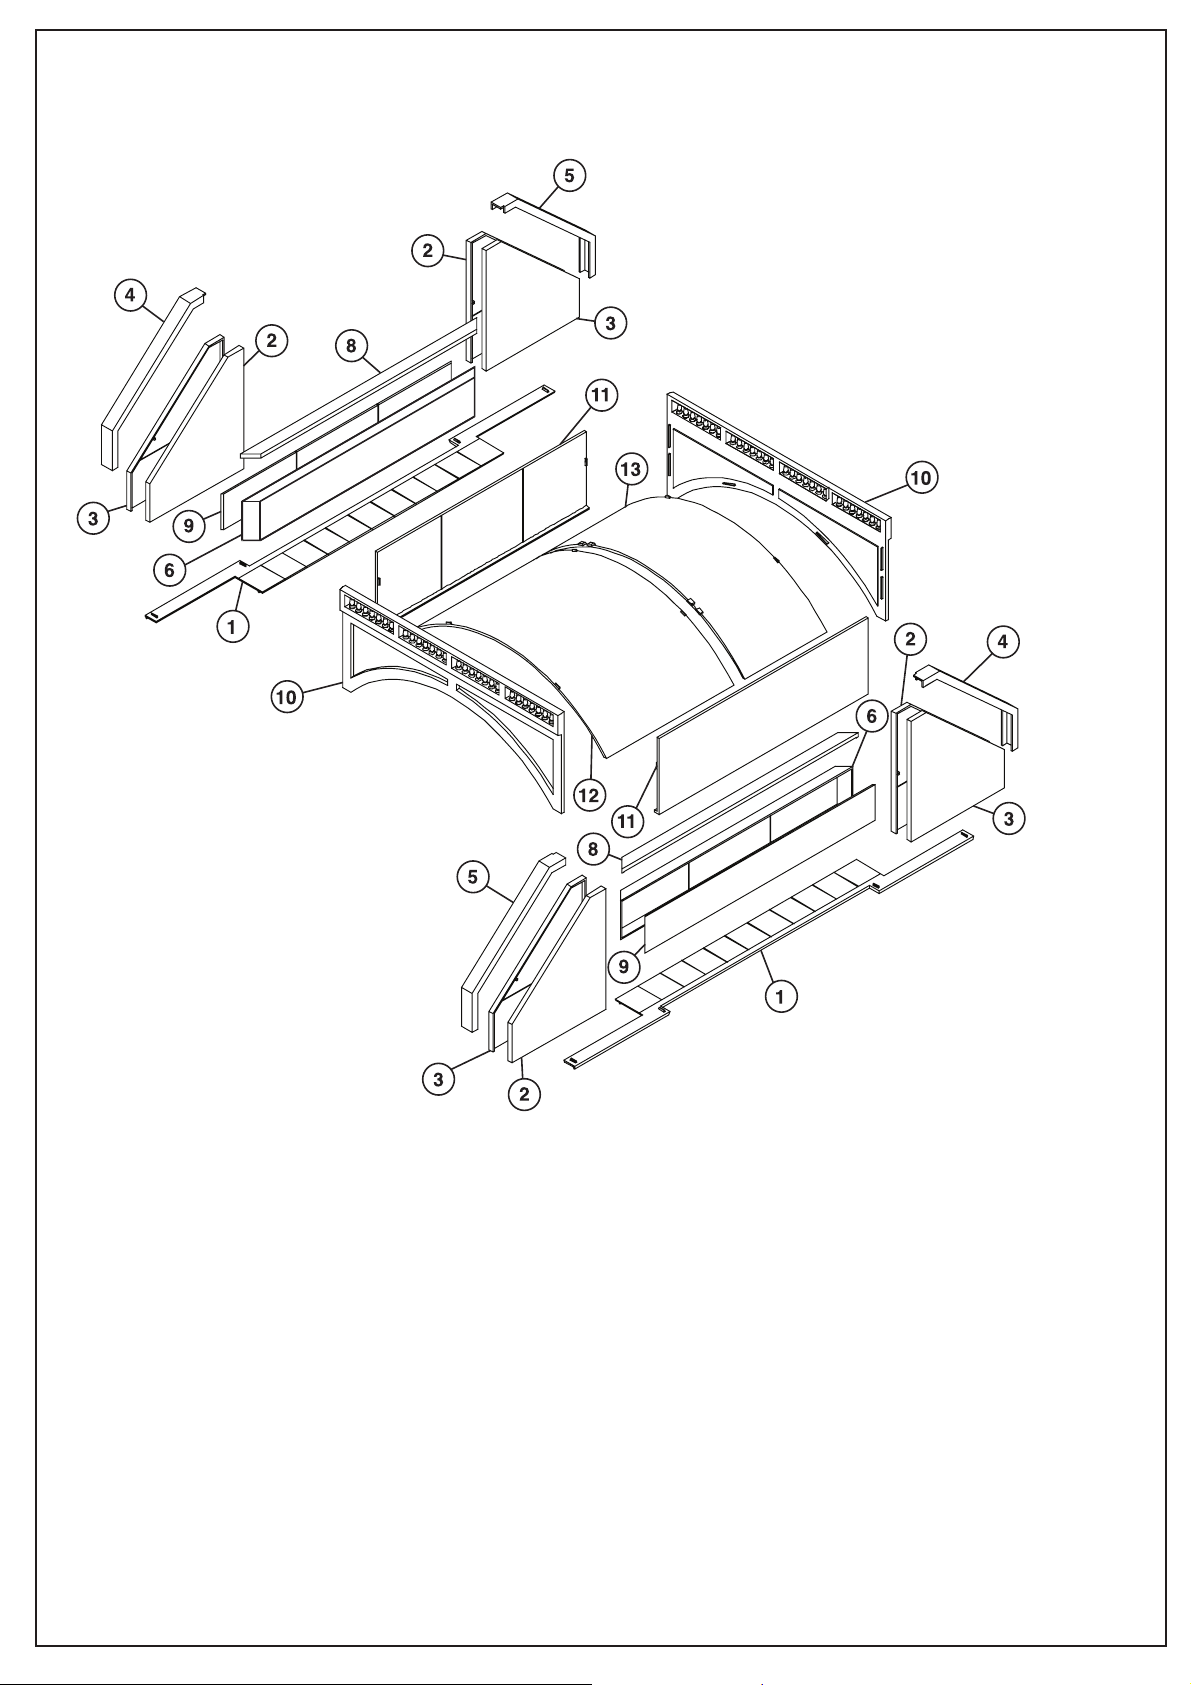
STANDARD CONSTRUCTION:
1. Glue abutment walls (2, 3) together as shown. Glue the finishing caps (4, 5) onto
the walls. Note: The finishing caps have notches in one corner, and should be
installed as “pairs” of left and right hand parts. Study the drawing closely for proper
positioning and glue the completed wing walls to the sidewalk baseplate (1).
2. Glue the piers (6, 8, 9) together. Then glue the completed pier assemblies to the
sidewalk base (1), making sure it is centered.
3. Glue the inner walls (11) to the sides (10) as illustrated. Glue arch sections (12,
13) together, and then to the sides (10) and ends (11) of the bridge as shown.
Walthers Street System components are used for the upper roadway.You will need
to construct 4 full panels, including the sidewalks, curbs, road surface, and splice
plates as shown in the Street System instructions. (Available versions include
Concrete 933-3128, Asphalt 933-3194 or Brick 933-3139. All three will work with
this kit but are not included). After the completed panels have had time to dry, glue
the roadway to the completed arch support. Glue the completed arch/roadway
assembly to the piers built in step 2 as shown.
IMPORTANT NOTE: There are various ways to build this kit. Before beginning construction,
look over the possiblities and choose the one that fits your needs. Depending on the one you pick,
you may need to purchase additional bridge kits and/or Cornerstone
®
Street System kits.
 Loading...