

Page 1

Not a toy. Adult supervision required. Misuse or careless use may cause serious
injury or death. May be dangerous up to 350 yards (320 meters).
Owner's Manual
patented
8.412.80.10.U.06-06.3.18
CP99
CO2 Air Pistol
.177 cal. (4.5 mm) Pellet
WARNING:
YOU AND OTHERS WITH YOU SHOULD ALWAYS WEAR SHOOTING GLASSES TO PROTECT YOUR
EYES. READ ALL INSTRUCTIONS BEFORE USING.
BUYER AND USER HAVE THE DUTY TO OBEY ALL LAWS ABOUT THE USE AND OWNERSHIP OF
THIS AIRGUN.
THIS AIRGUN IS INTENDED FOR USE BY THOSE 16 YEARS OF AGE OR OLDER.
www.umarex-usa.com
®
®
Page 2
Content Page
Please read this owner's manual completely. This air
pistol is not a toy. Treat it with the same respect
you would a firearm. Always carefully follow the
safety instructions found in this owner's manual and
keep this manual in a safe place for future use.
If you have any questions regarding your new air pistol,
please contact Umarex USA Customer Service at
Umarex USA Inc.
6007 South 29
th
Street
Fort Smith, AR 72908 USA
Phone: (479) 646 - 4210
Fax: (479) 646 - 4206
www.umarex-usa.com
Lead pellets.
Do not inhale dust or put pellets in mouth.
Wash hands after handling. This product contains
lead, a chemical known to the State of California
to cause cancer and birth defects
(or other reproductive harm).
WARNING:
1 Components of your new pistol 3
2 Handling the safety 4
3 Insertion and removal of the CO2
cartridge
5 - 6
4 Loading and unloading the air gun 7 - 8
5 Safe aiming and shooting 8 - 9
6 Adjusting the sight 10
7 Removing the backstrap 10
8 Use and handling of CO2 cartridges 10 - 11
9 Removing a jammed pellet 12
10 Storage 12
11 Care and Maintenance 13
12 Safety Review 13 - 14
13 Technical Data 15
14 Warranty 16
15 Problems 17
Contact details 17
Page 3
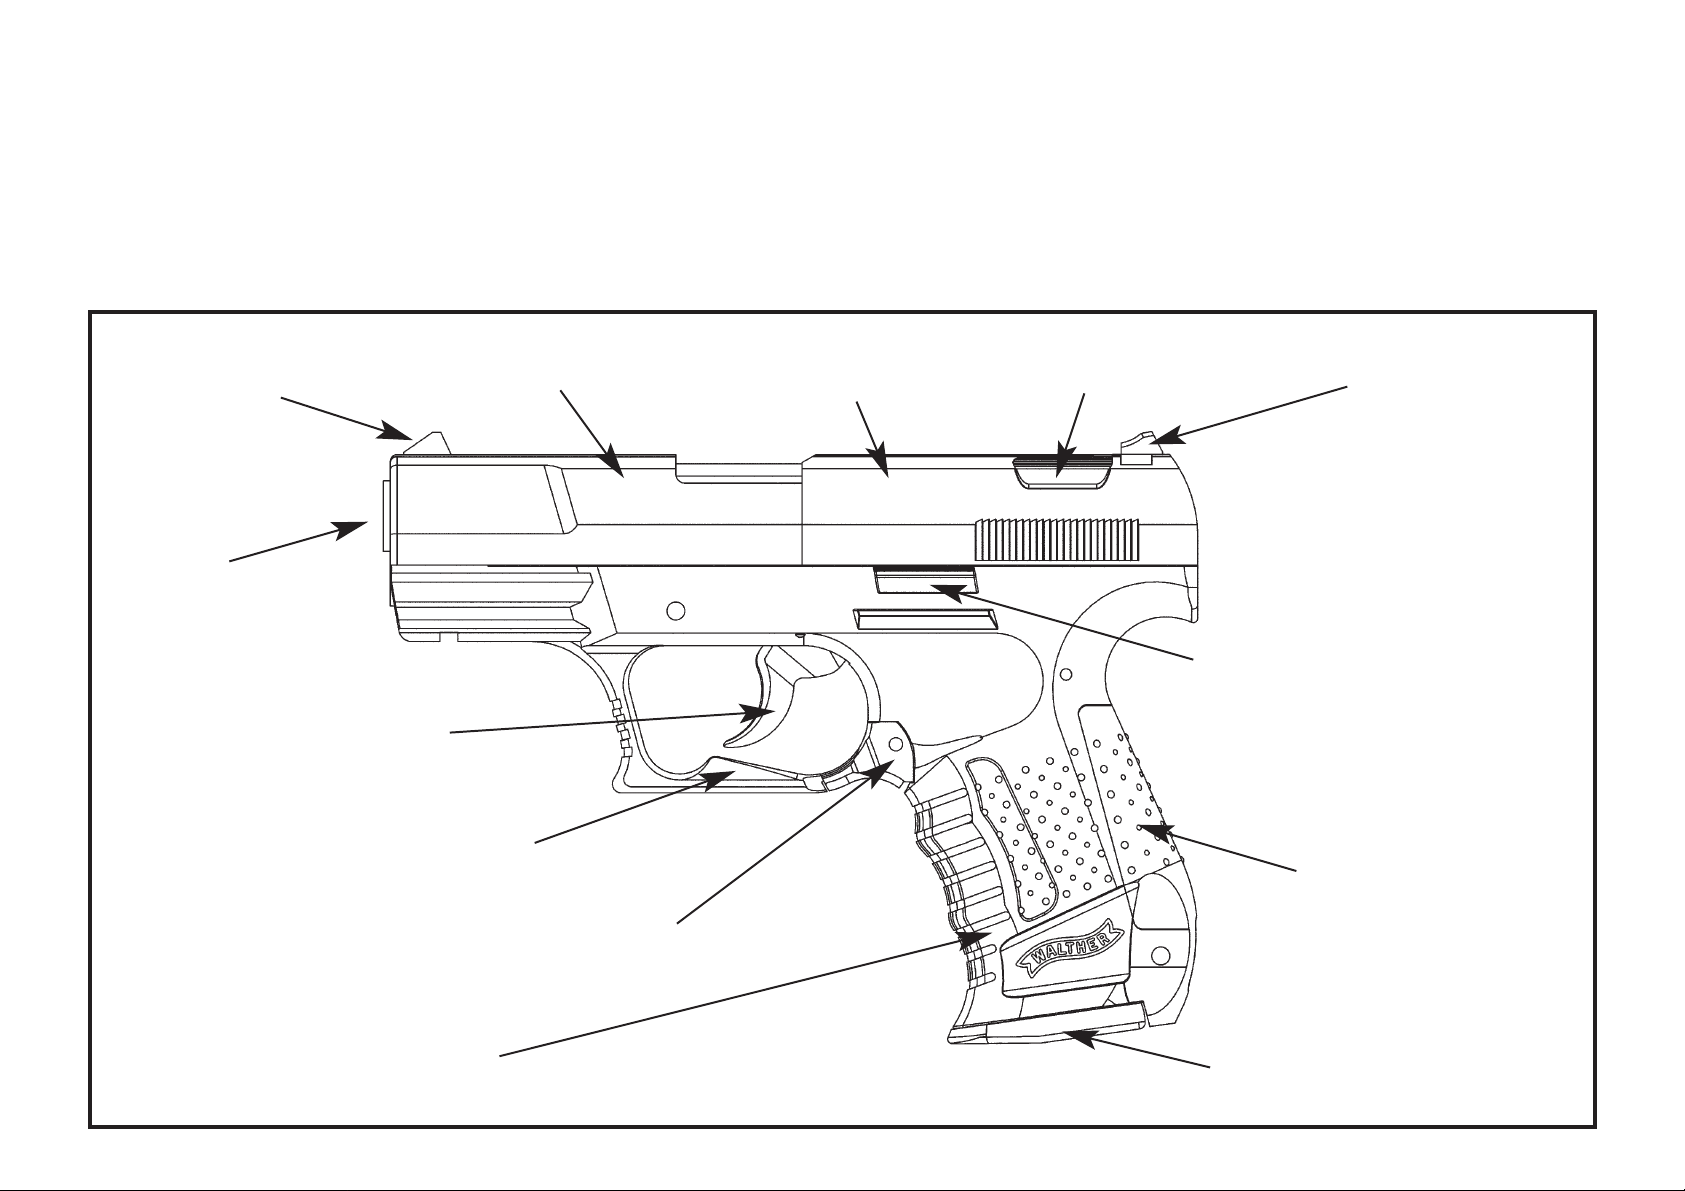
Front sight
Muzzle
Front slide
Rear slide
Slide release lever
Rear sight
De-cocking lever
Backstrap
Trigger
Trigger guard
Grip frame
Magazine shoe
Magazine release lever
1. Get to know the components of your new air pistol
Familiarity with the components of your pistol will help you to understand this instruction manual. Read this manual in
order to better enjoy the use of your new weapon.
Page 4
1.
2.
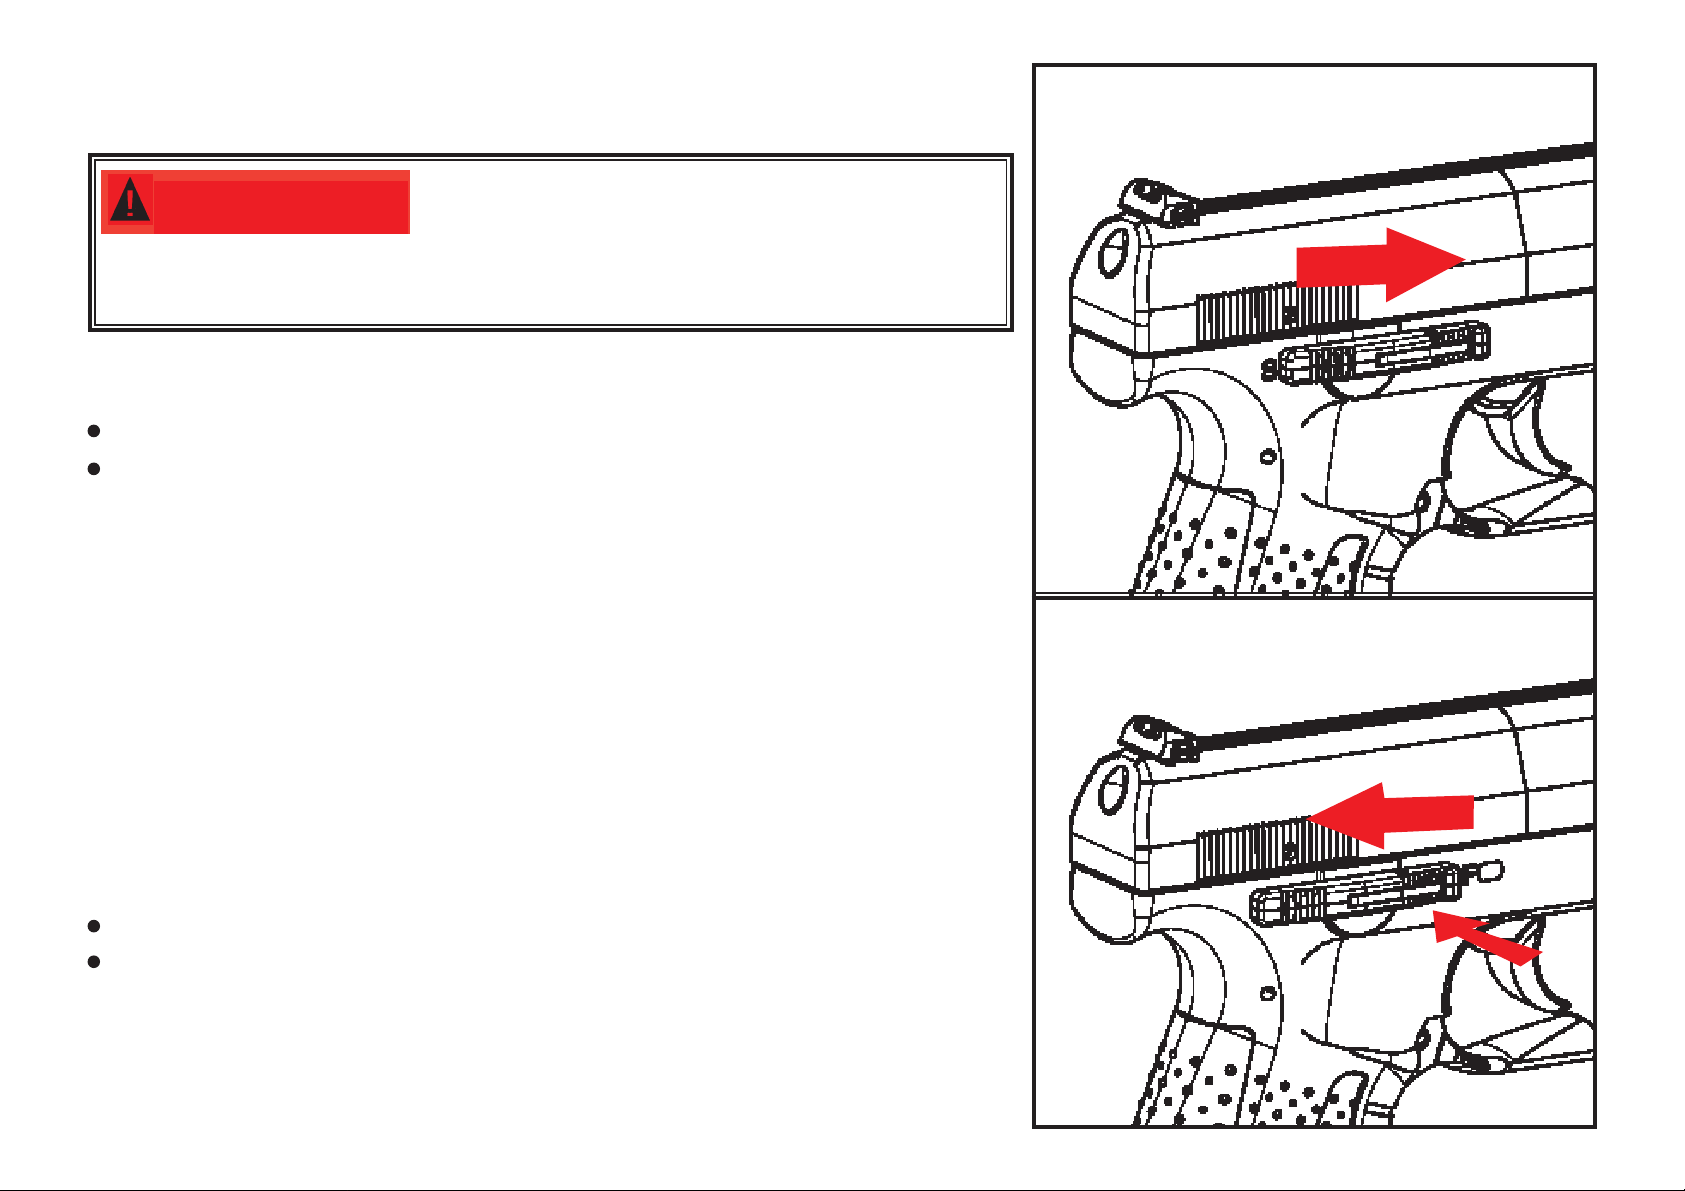
2. Handling the safety
“Off Safe”
Fig. 2
“On Safe”
Fig.1
Keep the air pistol in the "ON SAFE"
position until you are actually ready to shoot. Then push the
safety to the "OFF SAFE" position.
WARNING:
2.1 To Put The Air Pistol "ON SAFE":
Locate the safety on the right hand side of the receiver.
Push the safety forward, toward the muzzle end of the air
pistol (Fig. 1). The safety is not "On Safe" unless it is pushed
forward all the way and the RED dot and the "F" on the grip
frame are not showing.
Like all mechanical devices, an air pistol safety can fail.
Even when the safety is "On Safe", you should continue to
handle the air pistol safely. Do not ever point the air pistol at
any person. Do not ever point the air pistol at anything you do
not intend to shoot.
2.2 To Take The Air Pistol "OFF SAFE":
Locate the latch on the safety (Fig. 2)
Push in the latch on the safety (1.) and slide the safety
rearward (2.) toward the rear sight.
When you can see the RED dot and the "F" on the grip frame,
the air pistol is "Off Safe" and can be fired.
Page 5
3. Insertion and Removal of CO2 cartridges
CO2 cartridges may explode at temperatures above 122° F (50° C).
Do not mutilate or incinerate them. Do not expose them to heat or store CO
2 cartridges at temperatures
above 122°F (50°C)
.
WARNING:
Keep hands away from escaping CO2 gas. It can cause frostbite if allowed to
come in contact with skin.
WARNING:
3.1 Inserting the CO2 cartridge
Make sure the air pistol is "On Safe" (See Step 2.1).
Make sure the air pistol is unloaded (See Step 4.2).
Point the air pistol in a SAFE DIRECTION.
While supporting the bottom of the grip with your hand to catch the magazine, press the magazine release
lever and remove the magazine from the bottom of the grip (Fig 3).
Turn the magazine shoe clockwise towards "OPEN" (Fig. 4).
If a CO
2
cartridge is already installed, See Step 3.2 - Removing the CO2 cartridge.
Insert the CO
2 cartridge with the small neck of the cartridge pointing upward toward the top of the
magazine (Fig. 5).
Tighten the cartridge into place by turning brass retaining screw clockwise (up) until secure and close the
magazine shoe by turning counterclockwise towards "POWER" (Fig. 6) to pierce the CO
2
cartridge.
Insert the magazine up into the bottom of the grip until it locks into place (Fig. 7).
With the air pistol unloaded (See Step 4.2) and pointed in a SAFE DIRECTION, take "Off Safe" (See Step
2.2) and squeeze the trigger to fire. If your air pistol does not make a popping noise after pulling the
trigger, the CO
2 is not being discharged. In that event you will have to put the air pistol "On Safe" (See
Step 2.1), remove the CO
2 cartridge (See Step 3.2), and re-insert the CO2 cartridge as described in Step
3.1, point in a SAFE DIRECTION, take "Off Safe" (See Step 2.2) and squeeze the trigger to fire.
Page 6
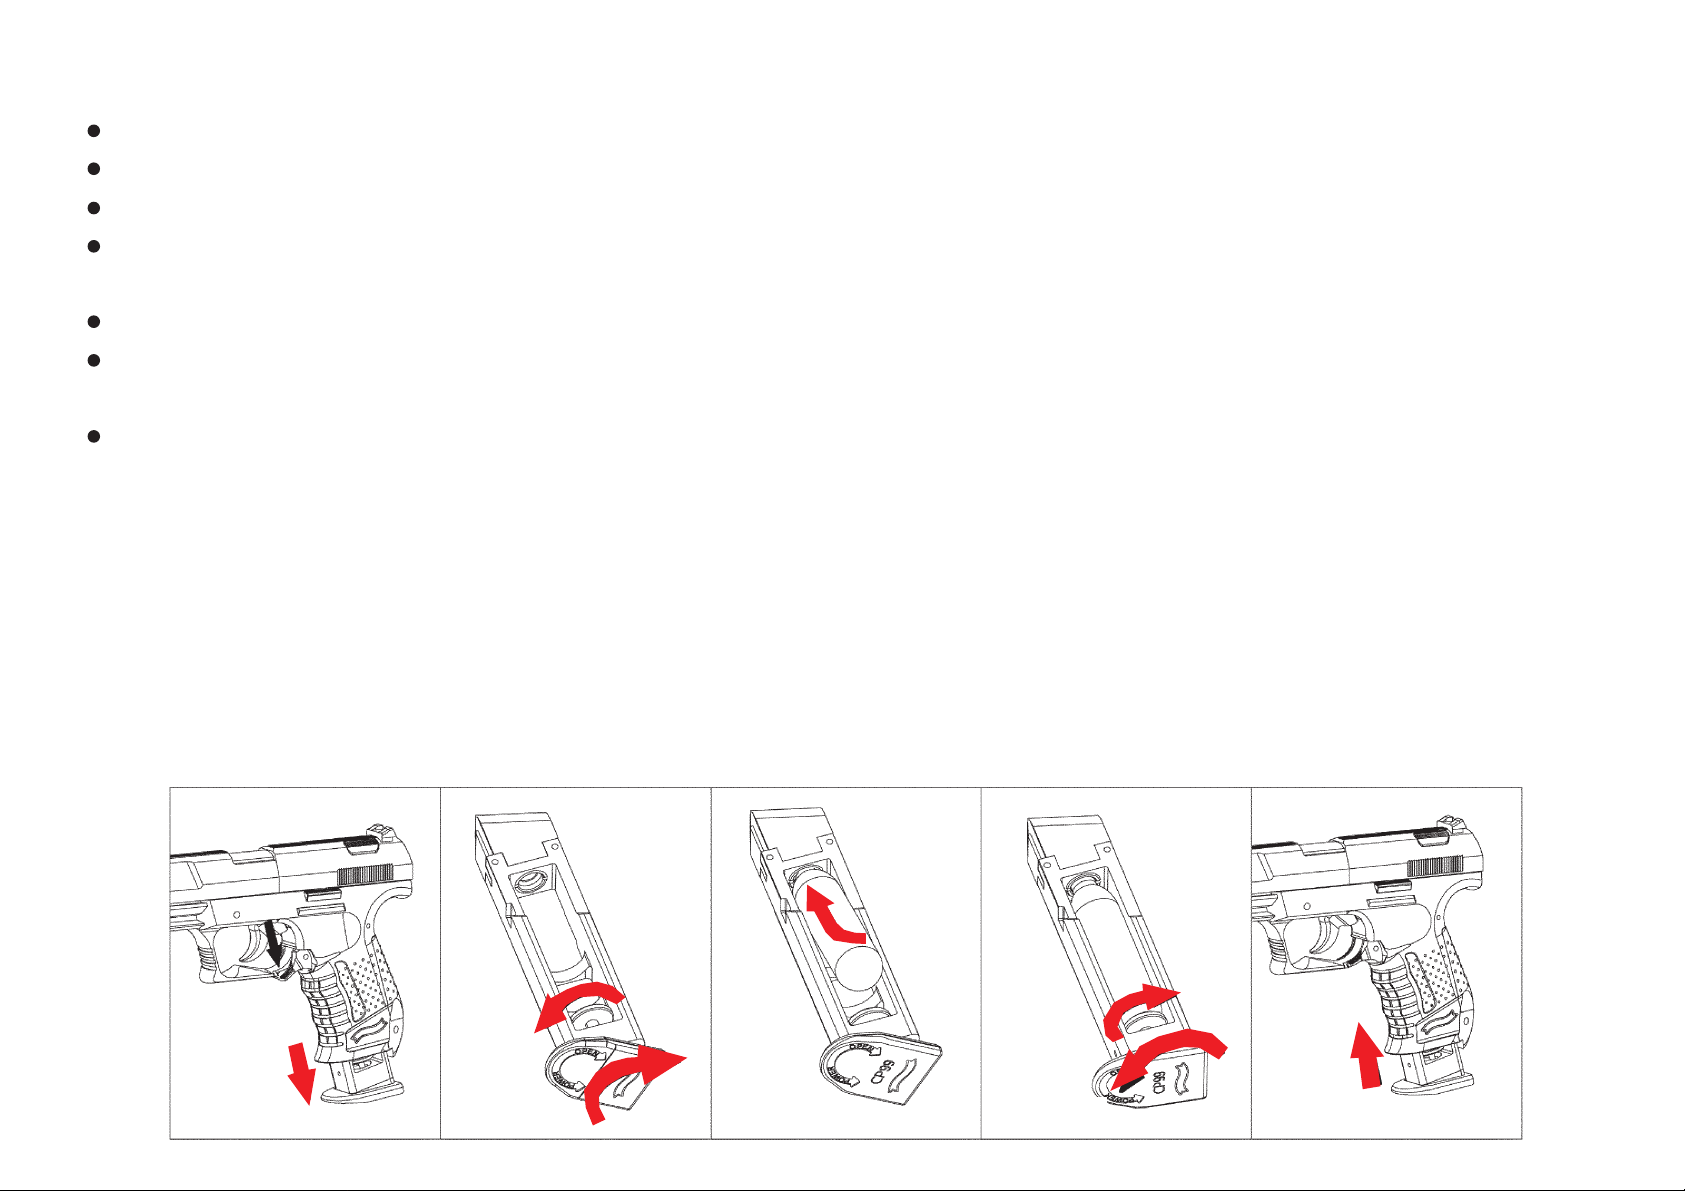
Fig. 3
Fig. 4
Fig. 5
Fig. 6
Fig. 7
3.2 Removing the CO2
cartridge
Make sure the air pistol is "On Safe" (See Step 2.1).
Make sure the air pistol is unloaded (See Step 4.2).
Point the air pistol in a SAFE DIRECTION.
While supporting the bottom of the grip with your hand to catch the magazine, press the magazine
release lever and remove the magazine from the bottom of the grip (See Fig. 3).
Turn the magazine shoe clockwise towards "OPEN" (See Fig. 4).
Slowly turn the brass cartridge retaining screw counter clockwise (down) until it stops; allowing any
remaining CO
2 gas to escape (See Fig. 4).
Remove the CO2 cartridge.
NOTE: High temperatures may cause damage to the air pistol. The maximum temperature for the storage
or use of this air pistol should not exceed 122°F (50°C). This temperature can easily be reached when the
air pistol is exposed to direct sunlight.
FIRING THE AIR PISTOL WITH LOW GAS PRESSURE MAY CAUSE A PELLET TO GET STUCK IN
THE BARREL.
Never try to force any CO
2 cartridge into or out of place as it may result in injury to you or damage to your
air pistol. Do not store your air pistol with a CO2 cartridge in it. This is very important to remember, as it
will prolong the longevity of your air pistol seals.
Page 7
4. Loading and unloading the air gun
Fig. 8
Fig. 9
Head
Skirt
wrong
right
Fig. 10
wrong
Use .177 (4.5mm) caliber pellets only in this air pistol. Never reuse pellets. Use
of any other ammunition can cause injury to you or damage to the air pistol.
WARNING:
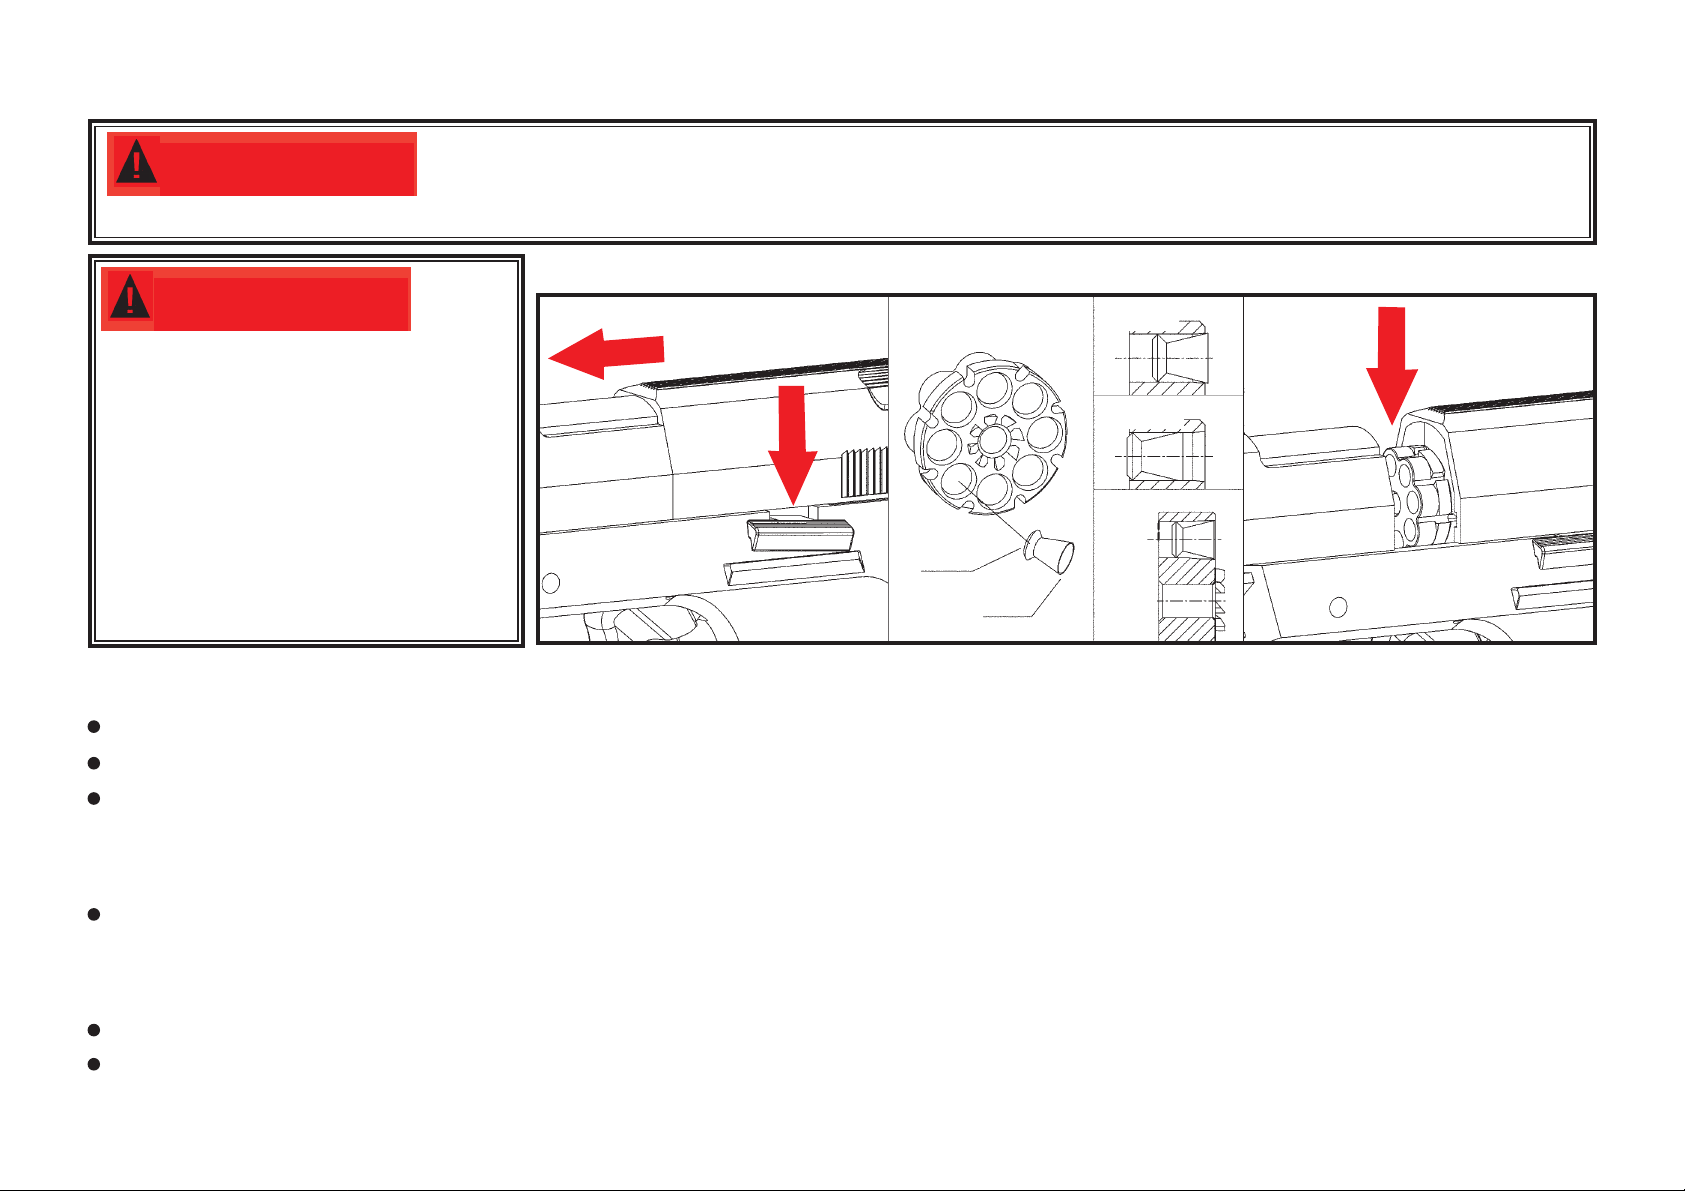
4.1 Loading the pistol
Make sure the air pistol is "On Safe" (See Step 2.1).
Point the air pistol in a SAFE DIRECTION.
While keeping the air pistol in an upright position (to keep the pellet clip from falling out) as shown in
Fig. 11, open the slide by pressing the slide release lever down (Fig. 8) until the slide opens and
exposes the pellet clip.
Place a .177 caliber (4.5 mm) pellet, nose first, in each pellet chamber of the pellet clip. (Fig. 9).
IMPORTANT: To avoid jams or deforming the pellets, make sure the pellet skirt is level or slightly below
the rim of the pellet chamber.
Place the pellet clip in the pistol (ratchet teeth facing the rear sight, Fig. 10).
Close the air pistol by gripping the slide and pushing it back until it locks into place (Fig. 11).
Note: Do not place your hand or fingers over the muzzle when opening or closing the slide.
Do not place your hand or
fingers over the muzzle.
Always make sure your air
pistol is pointing in a SAFE
DIRECTION, and keep your
finger away from the trigger.
Failure to follow this warning
may cause serious injury.
WARNING:
Page 8
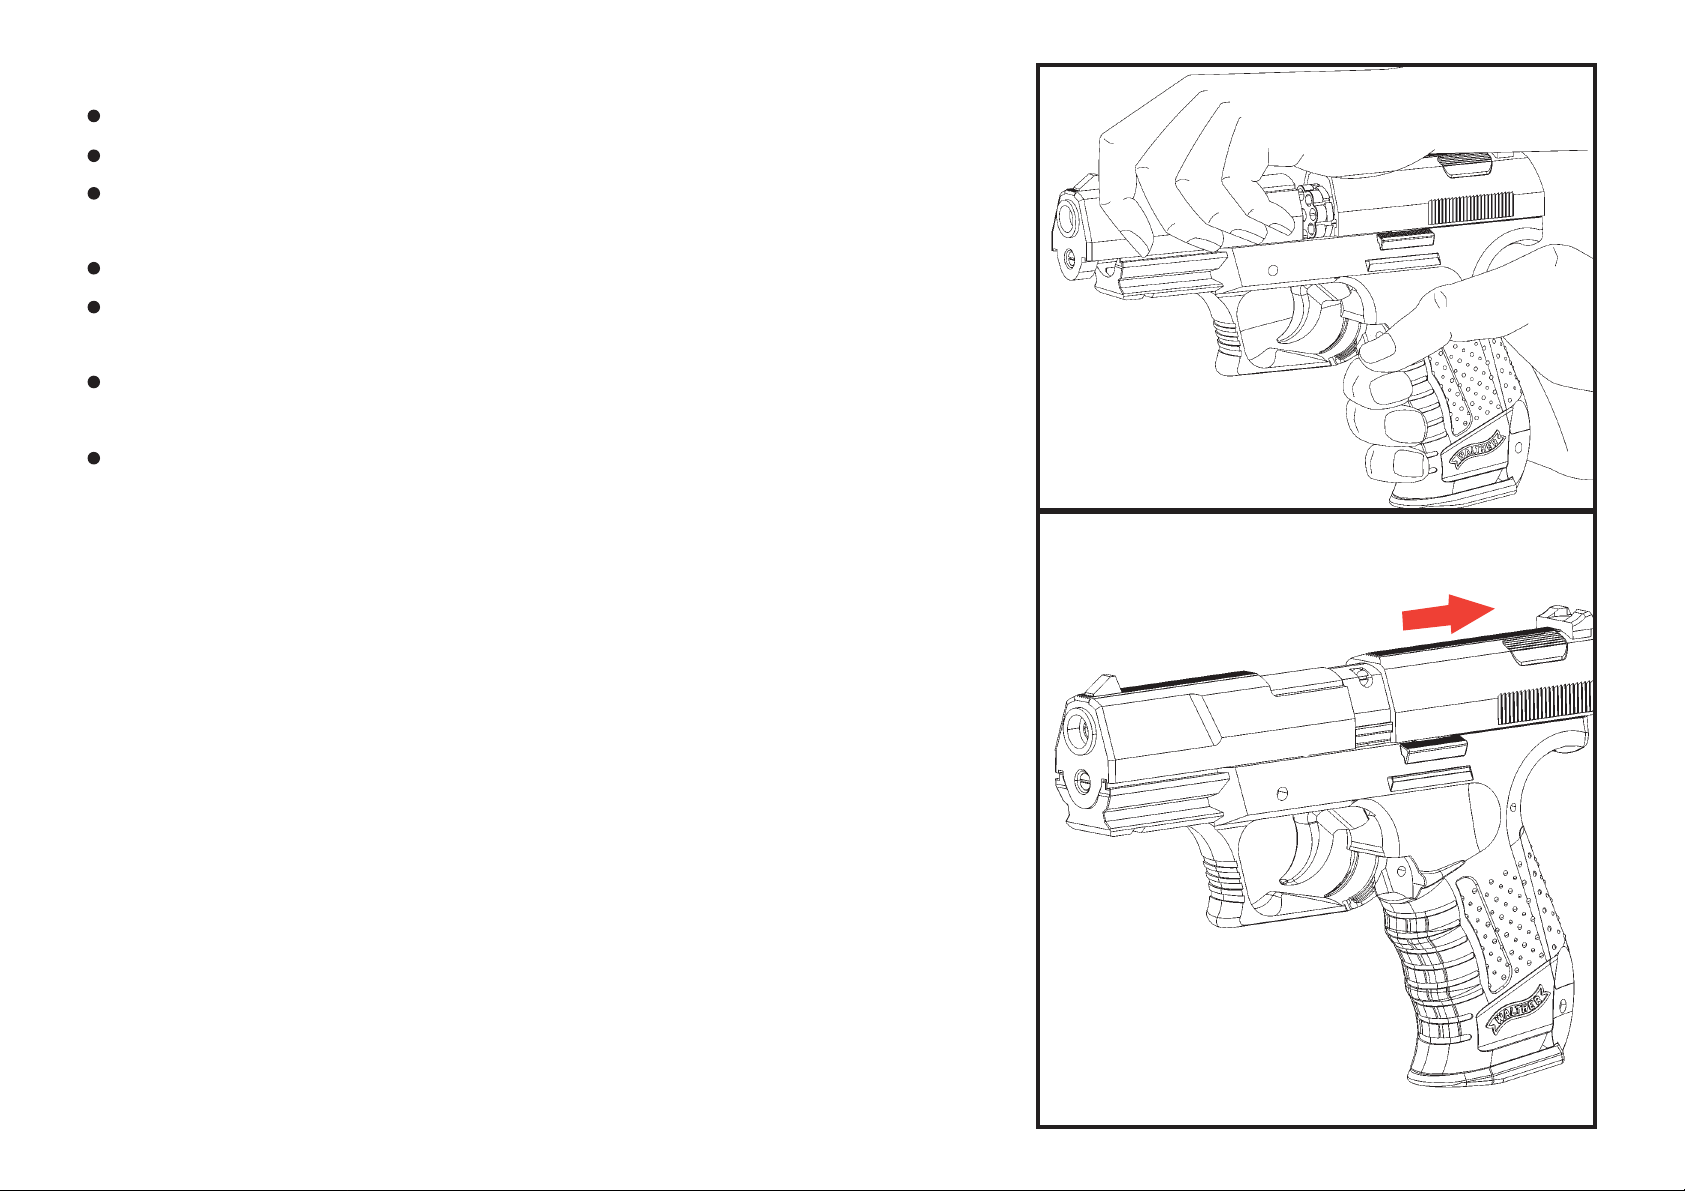
Fig. 11
4.2 Unloading the pistol
Put air pistol "On Safe" (See Step 2.1).
Open the slide (See Step 4.1).
Remove the pellet clip and close the slide. Using a ramrod,
gently push each pellet out of the pellet chamber.
IMPORTANT: Never use sharp metal tools to remove pellets.
Replace the empty pellet clip (ratchet teeth facing the rear sight)
in the pistol (See Fig. 10).
Close the slide by pushing it all the way back until it locks into
place (See Step 4.1 and Fig. 11).
Check to make sure the barrel is completely unloaded by
pointing the muzzle in a SAFE DIRECTION,
taking "OFF SAFE" (See Step 2.2) and pulling the trigger to
fire. You may also unload your air pistol by
following the directions listed under Step 9 - Removing a
jammed pellet.
Fig.12
5. Safe aiming and shooting
NOTE: This air pistol will function in either "Double Action" or
"Single Action" mode. To fire in "Double Action", apply steady
pressure to the trigger until the pistol fires. "Single Action" mode
means that the internal striker has to be manually cocked prior to
firing. To use "Single Action" mode, grip the rear part of the slide
and pull it back, release it to allow it to move forward and squeeze the trigger (Fig.12). For rapid-fire shooting, we recommend
the "Double Action" mode, for more precise shooting, we recommend the "Single Action" mode.
Page 9

You and others with you should always wear shooting glasses to protect your eyes.
Always aim your air pistol in a SAFE DIRECTION. When you are sure of your target and backstop, and
the area around the target is clear, take the air pistol "Off Safe" (See Step 2.2) and squeeze the trigger
to fire. NOTE: In "Single Action" mode, you may de-cock the air pistol by pushing the de-cocking lever
while the air pistol is pointed in a SAFE DIRECTION (Fig. 13).
Do not shoot at hard surfaces or at the surface of water. The pellet may bounce off or ricochet and hit
someone or something you had not intended to hit.
Always choose your target carefully. It is best to shoot at paper bullseye targets, which are attached to
a safe backstop. Your backstop should be checked for wear before and after each use. Replace your
backstop if the surface is worn or damaged, or if a ricochet occurs.
Your air pistol is designed for target shooting and is suited for both indoor and outdoor use. Always
remember to place your target carefully. THINK about what you will hit if you miss the target.
The air pistol is correctly aimed when the front sight blade is positioned exactly in the notch of the rear
sight. The top of the front sight blade should be even with the top of the notch in the rear sight. The
bullseye should appear to rest on the top of the front sight (Fig. 14).
Fig. 13
Make sure that the air pistol always points in
a safe direction. Never point at people or animals. Always handle
the air pistol as if it was loaded and ready to fire.
WARNING:
Due to high shooting velocity of this airgun,
take particular care and caution in choosing a safe target. Only
choose targets with a safe backstop. Do not choose targets that
will cause ricochets. Never shoot at water.
WARNING:
Page 10
6. Adjusting the sight
The rear sight can be adjusted for windage. This adjustment is made
by pulling the rear slide back and loosening the two sight screws. If
your air pistol is shooting too far to the right, slide the rear sight to the
left. If your air pistol is shooting too far to the left, slide the rear sight
to the right (Fig. 15). Fire several test shots to confirm your sight
adjustment and
then tighten the
screws that
secure the rear
sight.
Fig. 15
Rear sight
Rear sight screw
to high
to low
Fig. 14
right
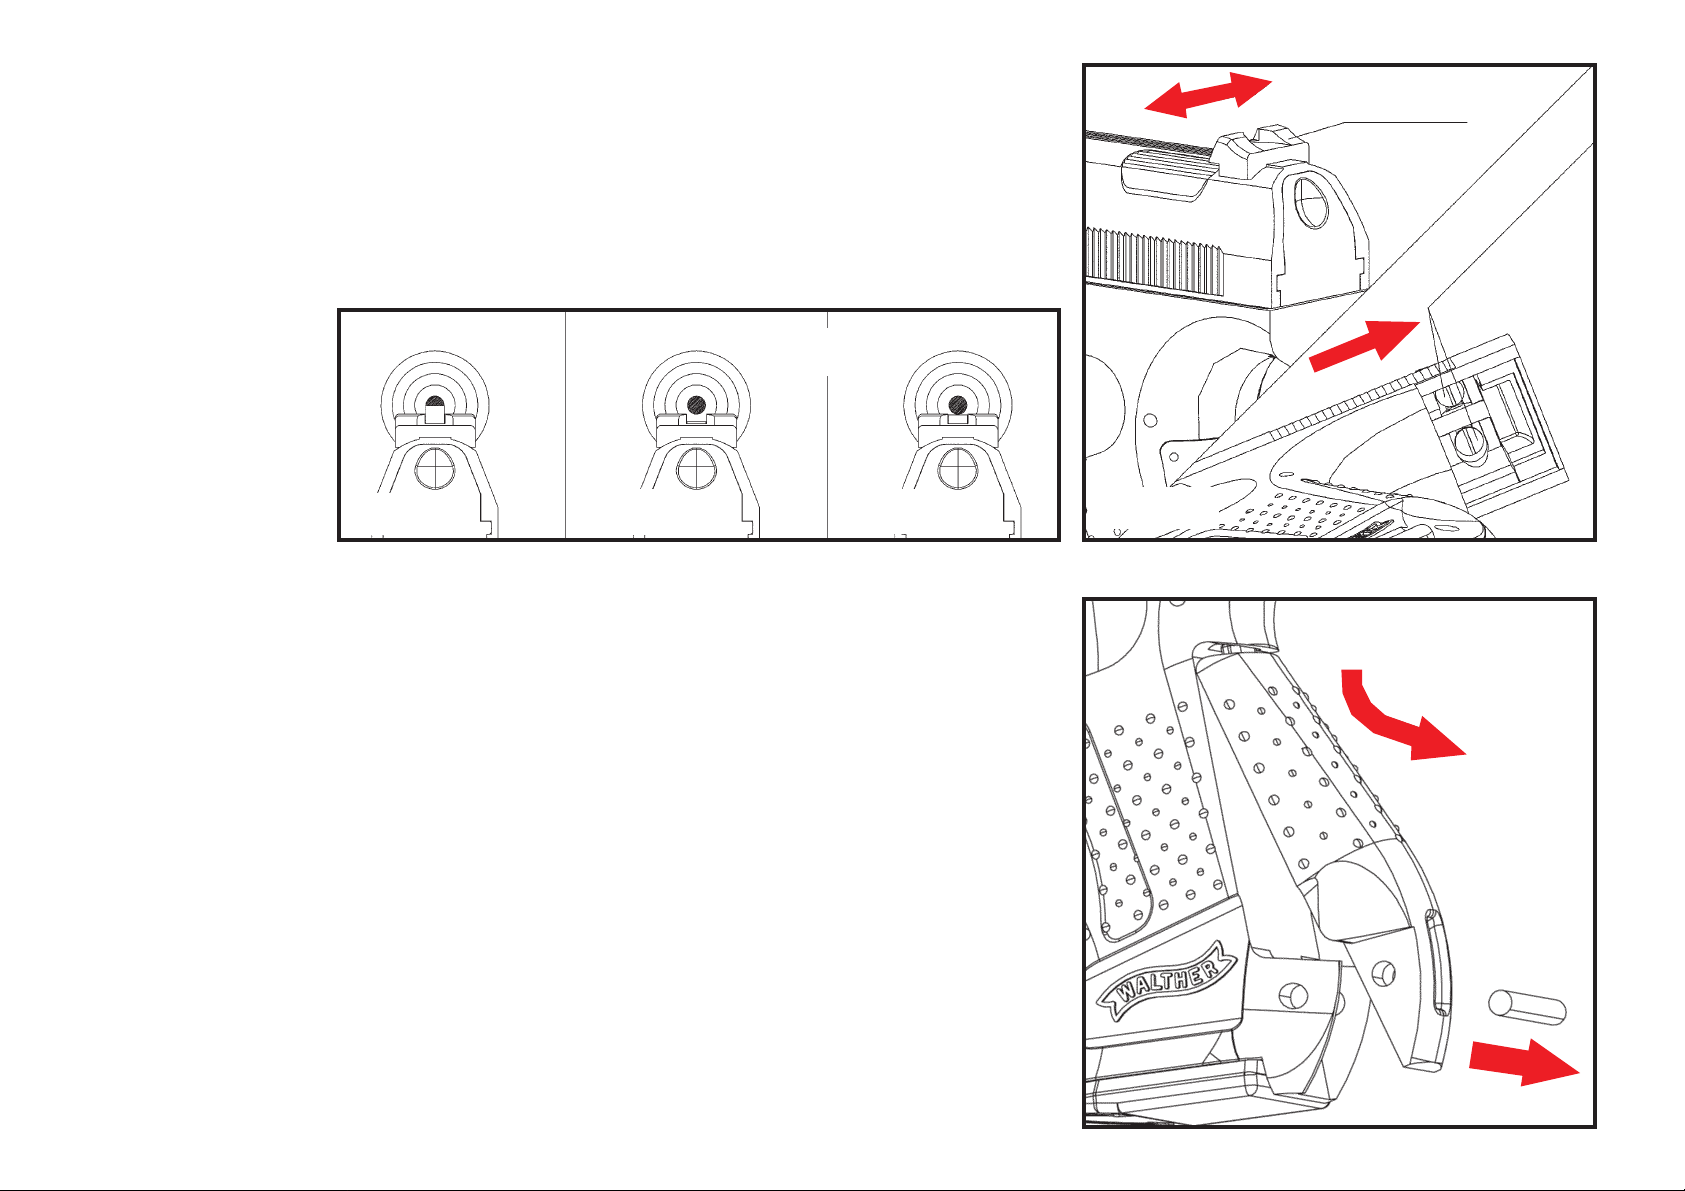
7. Removing the backstrap
Remove the pin and remove the backstrap from the bottom
of the grip (Fig. 16).
Fig. 16
8. Use and handling of CO2 cartridges
It is possible that certain conditions may affect a CO2pistol, which
can impact its proper performance. These conditions include the
usage, maintenance, and storage at certain temperatures that are
higher or lower than normal outdoors temperatures
(from 59°F / 15°C to 69.8°F / 21°C).
Another condition may be when the gun is shot at fast speeds.
Page 11

1. High temperatures can increase pressure in the CO2 cartridge and also within the gun, leading to higher than
standard operating pressure. This excess pressure could cause the gun to malfunction or be permanently damaged.
Maximum storage or operation temperature should never exceed 122°F (50°C). This temperature can be reached if
you leave the gun under direct sunlight on a bright day. Thus, to ensure proper gun operation, do not expose it to high
temperatures or direct sunlight for long periods of time. Otherwise, the CO
2 cartridge could overheat and explode,
which could damage the weapon and cause injuries or death to people around it.
2. Fast consecutive shooting may produce a decrease of temperature in the gun, as well as the CO2 cartridge.
This could lead to a lower muzzle speed, uneven gas pressure.
3. Keep in mind that during a rapid-fire sequence, the muzzle speed will diminish with each shot, which may
negatively affect the power of the shot.
4. Try not to shoot the weapon with a CO
2 cartridge that has already lost a considerable portion of its pressure.
Here are some indicators of insufficient CO2 cartridge pressure:
A) The sound of the shot is not as loud as when the cartridge is full.
B) The ammunition hits the target, but in a lower position than it would with a full CO
2 cartridge
(that is, the shooting speed has dropped).
Shooting with low CO2 pressure can cause a pellet to get jammed in the barrel.
Bear in mind the indications for jams.
WARNING:
A jam is a dangerous situation.
WARNING:
Page 12
9. Removing a jammed pellet
IMPORTANT: The fact that the air pistol does not fire a projectile is never a reason to assume that the
pellet clip does not contain any more pellets. Firing the air pistol with too little gas pressure left may
cause a pellet to get stuck in the barrel.
Make sure the air pistol is "ON SAFE" (See 2.1).
Remove the CO
2 magazine (See 3.2).
Open the slide and remove the pellet clip.
Insert a ramrod of the proper size into the muzzle end of the barrel and carefully push the jammed pellet
into the loading port(Fig. 10.). The barrel could be damaged if the proper sized ramrod is not used.
Once you have pushed the pellet back into the loading port, shake the air pistol until the jammed pellet
falls out.
Do not try to reuse that pellet.
If you are not able to unjam your air pistol by following this procedure, take no further action.
Umarex USA Inc. or an Authorized Service Station will unjam your air pistol.
(no cost during the warranty period)
Do not assume that the pistol is unloaded if it fails to fire properly!
WARNING:
10. Storage
Never leave the air gun loaded.
WARNING:
Always store the air gun with the ammunition removed and the safety on. Carefully check that there is no ammunition in
the barrel and remove the pellets from the pellet clip. Before storing it, we recommend to also remove the CO2 cartridges.
Keep the air gun out of the reach of children and users not familiarized with its use. Store the air gun separately from
the pellets and the CO
2 cartridges.
Page 13
To clean the outside, use a soft cloth.
Your air pistol will work best if you put just a drop of oil directly on the tip of the CO
2
cartridge before inserting.
DO NOT use a petroleum distillate based oil or solvent and DO NOT over-oil as this can cause damage to your air pistol.
Occasionally apply between 2 and 3 drops of oil for air guns to the following pieces:
front and rear slide rails and magazine release lever
Tampering with the air pistol or attempts to modify the air pistol in any way may make it unsafe to use and will void the
warranty. If you drop your air pistol, check to see that it works properly before you use it again.
If your air pistol is damaged or does not perform properly, call Umarex USA Customer Service for assistance
before using your air pistol again.
11. Care and Maintenance
If you maintain and care for your air pistol properly, you will be able to enjoy it for many years.
Before you attempt to clean your air pistol, always make sure it is "On Safe"
(see Step 3.1), the pellet clip is removed and you have checked the barrel to make sure there are
no pellets left in it.
WARNING:
12. Safety Review
- Do not ever point the air pistol at any person. Do not ever point the air pistol at anything
you do not intend to shoot.
- Always treat the air pistol as if it was loaded and handle it with the same respect you would a firearm.
- Always aim in a SAFE DIRECTION. Always keep the muzzle of the air pistol pointed in a
SAFE DIRECTION.
- Always keep the air pistol on "Safe" until you are ready to shoot in a SAFE DIRECTION.
- Check behind and beyond your target to be certain you have a safe backstop and that no person or
property could be endangered.
Page 14

- This air pistol may only be shot on the owner's property or at shooting ranges allowed by the police,
and only if the ammunition does not travel further than the shooting area. Bear in mind the maximum
range of the pellet (approximately 350 yards (320 m).
- Always check to see if the air pistol is on "Safe" and unloaded when getting it from another person
or from storage.
- Always keep your finger away from the trigger and away from the trigger guard until ready to shoot.
- You and others with you should always wear shooting glasses to protect your eyes.
- Use only ammunition and an CO2cartridge designed for this air pistol.
- Never reuse pellets.
- Do not shoot at hard surfaces or at the surface of water. The pellet may bounce off or ricochet and
hit someone or something you had not intended to hit.
- Replace the backstop if it becomes worn. Place the backstop in a location that will be safe should
the backstop fail.
- Always store the air pistol with the safety on, unloaded, separated from the ammunition and
CO2cartridge, and in a safe manner to prevent unauthorized people from accessing it.
- Do not attempt to disassemble or tamper with your air pistol. Use an Authorized Service Station
or return it to Umarex USA for repair.
- Do not put the air pistol away loaded. (See chap. 4.2).
- Always store this air pistol in a secure location.
- Never leave the air pistol loaded if it is out of your reach.
- Unload the air pistol before giving it to someone else.
Page 15

13. Technical Data
Mechanism: Repeater
Caliber/Ammunition: cal. .177 (4.5 mm) pellets
Magazine capacity: 8 shots
Weight: 1.63 lbs (740 g)
Overall Length: 7 inch (180 mm)
Sights:
Front Fixed Ramp
Rear Adjustable for windage
Barrel Length/Material: 3.35 inch (85 mm) / Rifled steel
Power source 12g CO
2 cartridge
Safety: Slide style
Velocity: Up to 360 f/s (109 m/s)
PERFORMANCE
Many factors affect velocity, including brand of projectile, type of projectile, amount of CO2in cartridges,
lubrication, barrel condition and temperature.
REPAIR SERVICE
If your air pistol needs repair, we recommend that you take or send it to an Authorized Service Station or
Unarex USA. For an Authorized Service Station near you, visit our web site at
www.umarex-usa.com or call Customer Service at (479) 646 - 4210.
(International customers should contact their distributor.) DO NOT ATTEMPT TO DISASSEMBLE IT!
Your air pistol requires special tools and fixtures to repair it. If you take it apart, you probably will not
be able to reassemble it correctly. Umarex USA assumes no warranty responsibility under such
circumstances.
Page 16

14. Warranty
LIMITED ONE YEAR WARRANTY
This product is warranted to the retail consumer for one year from date of retail purchase against defects
in material and workmanship and is transferable.
WHAT IS COVERED
Replacement parts and labor. Transportation charges to consumer for repaired product.
WHAT IS NOT COVERED
Transportation charges to Umarex USA for defective product. Damages caused by abuse or failure to
perform normal maintenance. (See Step 11) Any other expense. CONSEQUENTIAL DAMAGES, INCI-
DENTAL DAMAGES, OR INCIDENTAL EXPENSES, INCLUDING DAMAGE TO PROPERTY. SOME
STATES DO NOT ALLOW THE EXCLUSION OR LIMITATION OF INCIDENTAL OR CONSEQUENTIAL
DAMAGES, SO THE ABOVE LIMITATION OR EXCLUSION MAY NOT APPLY TO YOU.
WARRANTY CLAIMS
W
arranty Claims for U.S. and Canadian Customers:
Please return product to your nearest distributor. If you do not know your distributor, please visit
www
.umarex-usa.com and click on "warranty and repair service" or call (479) 646 - 4210 and ask for
our assistance.
IMPLIED WARRANTIES
ANY IMPLIED WARRANTIES, INCLUDING THE IMPLIED WARRANTIES OF MERCHANTABILITY AND
FITNESS FOR A PARTICULAR PURPOSE, ARE LIMITED IN DURATION TO ONE YEAR FROM DATE
OF RETAIL PURCHASE. SOME STATES DO NOT ALLOW LIMITATIONS ON HOW LONG AN IMPLIED
WARRANTY LASTS, SO THE ABOVE LIMITATIONS MAY NOT APPLY TO YOU.
To the extent any provision of this warranty is prohibited by federal, state, or municipal law which cannot
be preempted, it shall not be applicable. This warranty gives you specific legal rights, and you may also
have other rights which vary from state to state and country to country.
Page 17

15.Problems
Distributed by
Umarex USA Inc.
6007 South 29
th
Street
Fort Smith, AR 72908 USA
Phone: (479) 646 - 4210
Fax: (479) 646 - 4206
www.umarex-usa.com
Bad shooting performance
Gun does not function
Low pellet velocity
safety activated
CO
2
-cartridge empty
dirty barrel
is defective
CO
2
-cartridge
temperatures
extreme
pellets loaded
slide is not properly
Incorrect sight
incorrect pellets
incorrectly
closed and locked
adjustment
Problems
REASONS
POSSIBLE
®
Page 18

MODE D'EMPLOI
Il ne s'agit pas d'un jouet. La surveillance par des personnes adultes
est exigée. L'abus ou l'emploi imprudent peuvent causer des blessures
graves ou la mort. Le modèle BERETTA 92 FS peut être dangereux jusqu'à 400 yards (366 mètres). Le
modèle 92FS Match peut être dangereux jusqu'à 400 yards (366 mètres).
Mod. Beretta 92FS and 92FS Match
Pistolet à air comprimé CO
2
cal. .177 diabolo de 4,5 mm
Breveté
VOUS ET D'AUTRES DEVRAIENT TOUJOURS PORTER DES LUNETTES PROTECTRICES AFIN DE
PROTEGER VOS YEUX . VEUILLEZ LIRE TOUTES LES INSTRUCTIONS AVANT L'EMPLOI.
L'ACHETEUR ET L'UTILISATEUR DOIVENT RESPECTER TOUTES LES RÈGLES RELATIVES À
L'UTILISATION ET À LA DÉTENTION DE CE PISTOLET À AIR COMPRIMÉ.
8.419.90.05.U.02-06.?.18
!AVERTISSEMENT:
CE PISTOLET À AIR COMPRIMÉ EST DESTINÉE À L'EMPLOI PAR DES PERSONNES DE 16 ANS
ET PLUS.
www.umarex-usa.com
®
Page 19

Plombs diabolos.
N'inhalez pas la poussière et ne mettez pas de plomb
diabolo dans la bouche. Lavez-vous les mains après
avoir utilisé l'arme. Ce produit contient du plomb, un
élément chimique qui, en Californie, est connu comme
pouvant provoquer des cancers et des malformations
congénitales (ou d’autres effets néfastes sur la
reproduction).
ATTENTION :
Veuillez lire entièrement le présent mode d'emploi.
Ce pistolet à air comprimé n'est pas un jouet.
Utilisez-le comme s’il s’agissait d’une arme à feu.
Suivez toujours attentivement les instructions de
sécurité indiquées dans le présent mode d'emploi
et gardez ce dernier dans un lieu sûr pour l'usage
futur.
Pour toute question concernant votre nouveau pistolet
à air comprimé, veuillez contacter le service Clientèle
d’Umarex USA à l’adresse suivante :
Umarex USA Inc.
6007 South 29th Street
Fort Smith, AR 72908 USA
Phone : (479) 646 - 4210
Fax : (479) 646 - 4206
www.umarex-usa.com
Sommaire Page
1 Élements de votre nouveau pistolet 3
2 Manier la sûreté 4
3
Insérer et extraire la cartouche de CO
2
5 - 6
4 Charger et décharger 7 - 8
5 Viser et tirer en toute sécurité 9
6 Adaption de la visée 10
7 Ècarter un plomb diabolo coincé 11
8
Utiliser et manier les cartouches de CO
2
11 - 12
9 Rangement 13
10 Entretien 13 - 14
11 Récapitulatif de sécurité 14
12 Caractéristiques techniques 15
13 Garantie 16
14 Dysfonctionnements 17
Contact 18
Page 20

1. Apprendre les pièces de votre nouveau pistolet à air CO
2
Retenez les noms des pièces de votre nouveau pistolet, cela vous aidera à comprendre le mode d'emploi.
Utilisez ce mode d'emploi pour mieux profiter de ce pistolet à air CO2.
Guidon
Glissière
Hausse
Poignée
Sûreté
Chien
Bouche
Levier d'arrêt
Détente
Bouton d'arrêt de la poignée
Culasse cylindrique CO
2
Page 21

2. Maniement de la sécurité
Maintenez le pistolet à air
comprimé dans la "POSITION ARRÊTÉE" jusqu'à ce que vous
soyez en effet prêt à tirer. Ensuite poussez la sûreté dans la
"POSITION ARMÉE".
A. Pour poser le pistolet à air comprimé sur "ARRÊTÉ":
- Placez la sûreté directement au-dessous de la hausse
(Illustration 1).
- Bougez le levier de sûreté vers la position inférieure (S) pour
couvrir l'indicateur ROUGE comme indiqué. La sûreté est
uniquement "Arrêtée" si l'indicateur ROUGE auprès de la
sûreté est cachée.
Même si la sûreté est "arrêtée" vous devriez continuer à
manier le pistolet à air comprimé avec prudence. Ne dirigez
jamais le pistolet à air comprimé sur une personne. Ne dirigez
jamais le pistolet à air comprimé sur un objet sur lequel vous
ne voulez pas tirer.
B. Pour poser le pistolet à air comprimé sur "ARMÉ":
- Poussez le sûreté vers le haut exposant l'indicateur ROUGE
comme indiqué dans l'illustration 2.
- Le pistolet à air est prête à tirer s'il est "Armé". Lorsque vous
pouvez voir l'indicateur ROUGE auprès de la sûreté, le
pistolet à air comprimé est "Armé" et peut être tiré.
arrêté
Illustration 1
Illustration 2
prêt à tirer
!AVERTISSEMENT:
Page 22

3. Mise en place et écartement de la capsule CO
2
A. Installation de la capsule CO
2
- Assurez-vous que le pistolet à air comprimé est "Arrêté" (voir Point 2A).
- Poussez le bouton d'arrêt de la plaquette de poignée vers le côté droit pour retirer la poignée.
(voir Illustration 3) Basculez le tendeur de la capsule CO2vers le bas et dévissez le dispositif de fixation
de la capsule le tournant en sens horaire. (Illustration 5)
- Installez une nouvelle capsule CO2dans le pistolet à air comprimé, la petite tige de la capsule indiquant
en haut vers l'unité de perçage.
- Vissez à fond le dispositif de fixation de la capsule le tournant en sens antihoraire jusqu'à ce qu'il avance
doucement la capsule CO2en haut dans sa position. Ne le serrez pas trop, parce que cela pourrait
endommager le joint de la capsule.
- Fermez le tendeur de la capsule le basculant vers la haut. Cela percera la capsule CO2.(Illustration 7)
- Pressez la plaquette de crosse avec prudence de nouveau en sa position.
Des capsules CO2peuvent exploser lors des températures de 120 F
(48,9° C). Ne les détruisez et brûlez pas. Ne les exposez pas à la chaleur et ne stockez pas les capsules
CO
2
par des températures au-dessus de 120 F (48,9°C).
Tenez les mains et le visage à une distance sûre du gaz CO2qui
s'échappe. Il peut provoquer des gelures s'il entre en contact avec la peau.
REMARQUE: Nous recommandons l'utilisation de capsules CO2Umarex. Elles sont produites
conformément à votre pistolet à air comprimé .Il est possible que d'autres marques de capsules CO2ne
conviennent pas exactement et si vous les forcez dans leur position, cela peut entraîner une
blessure chez vous ou un endommagement de votre pistolet à air comprimé. N'essayez jamais de forcer
une capsule CO2dans ou hors de sa position. Ne stockez pas votre pistolet à air comprimé avec des
capsules CO2dedans ( Il est très important de tenir cela en compte, parce que cela prolonge la durabilité
des joints de votre pistolet à air comprimé). Lorsque vous savez que vous ne réutiliserez pas votre pistolet
à air comprimé à l'intérieur de 24 heures, retirez les capsules CO2du pistolet à air comprimé comme
expliqué au Point 3B ci-dessous.
!AVERTISSEMENT:
!AVERTISSEMENT:
Page 23

- Dirigez le pistolet à air comprimé dans une DIRECTION SÛRE, mettez sur "Armé" (voir Point 2B) et
appuyez sur la détente. Si votre pistolet ne fait pas un bruit retentissant après avoir tiré la détente,
le CO
2
n'est pas déchargé. Dans ce cas vous devrez retirer la poignée, basculer le tendeur de la
capsule vers le bas et visser un peu plus le dispositif de fixation de la capsule le tournant en sens
antihoraire. Fermez ensuite le tendeur de la capsule, remplacez la poignée et vérifiez de nouveau en
dirigeant l'arme dans une direction sûre. Remettez la sûreté sur la position "Arrêtée" (voire Point 2A).
B. Enlèvement de la capsule CO
2
- Mettez le pistolet à air sur "Arrêté" (voir Point 2A).
- Assurez-vous que le pistolet à air comprimé est déchargé. (Voir Point 4B)
- Dirigez le pistolet à air comprimé dans une DIRECTION SÛRE.
- Basculez la capsule CO2vers le bas avec prudence, de manière que tout gaz CO2résiduel puisse
s'échapper. (Voir illustration 5)
Important: Avant tout tenez vos mains et votre visage éloignés du gaz CO2qui s'échappe.
- Poussez le bouton d'arrêt de la poignée vers le côté gauche pour retirer la poignée droite. (voir illustr. 3)
- Dévissez le dispositif de fixation de la capsule en la tournant en sens horaire jusqu'à ce qu'il s'arrête. La
capsule CO2pourrait être froide.
- Évitez un contact prolongé avec la capsule CO2lorsqu'elle est très froide.
Fermez le tendeur de la capsule le basculant vers le haut (Illustration 7). Poussez la plaquette de poignée
droite avec prudence de nouveau dans sa position.
Illustr. 3
Illustr. 4 Illustr.5 Illustr. 6
Illustr. 7
1
2
2
1
Page 24

A. Chargement des diabolos
- Assurez-vous que le pistolet à air est "Arrêté." (Voir Point 2A)
- Dirigez le pistolet à air dans une DIRECTION SÛRE. Tenez le pistolet comme indiqué dans l'illustration 8
pour conserver le barillet dans sa position et pour éviter qu'il tombe hors du pistolet.
- Ouvrez la glissière en poussant le levier d'arrêt en bas vers la position indiquée dans l'illustration 8.
4. Chargement et déchargement des diabolos
Utilisez uniquement des diabolos du calibre .177 (4,5mm) dans votre
modèle BERETTA 92FS ou BERETTA 92FS Match. L'emploi de n'importe quelle munition différente peut
causer une blessure pour vous ou un dommage au niveau du pistolet à air comprimé. N'utilisez jamais
des diabolos une nouvelle fois.
Ne placez jamais la main ou vos doigts devant la bouche. Lorsque
vous ouvrez ou fermez la culasse, assurez-vous que votre pistolet à air comprimé soit dirigé dans une
DIRECTION SÛRE et ne mettez pas le doigt sur la détente. Si vous ne suivez pas cet avertissement
vous risquez une blessure grave.
!AVERTISSEMENT:
!AVERTISSEMENT:
Illustr. 8
Illustr. 9
Illustr. 10.1
Illustr. 10.2
à fleur
légèrement excavée
Page 25

- Retirez le barillet et chargez les diabolos la tête en avant
(voire Illustration 10) dans le barillet en assurant que
chaque diabolo est complètement logé.
IMPORTANT: Pour éviter que des pannes de chargement
détruisent les diabolos, assurez que le pied de chaque
diabolo affleure au niveau ou est légèrement en-dessous
du bord du logement.
- Placez le barillet dans la culasse (avec les dents de blocage
en direction de la hausse. (Voir Illustration 9).
- Saisissez la glissière au niveau du bout (voire Illustration 11) et
poussez-la vers l'arrière jusqu'à ce qu'elle enclenche dans sa
position.
- IMPORTANT: Ne placez jamais une partie de votre main
devant la bouche du canon; saisissez seulement le bout et les côtés de la glissière.
Illustration 11
B. Déchargement des diabolos
- Mettez le pistolet à air comprimé sur "Arrêté" (Voir Point 2A). Dirigez le pistolet à air comprimé dans
une DIRECTION SÛRE.
- Si nécessaire, désarmez le pistolet à air comprimé en plaçant votre pouce sur le chien et poussant la
détente lorsque vous guidez le chien lentement dans la position supérieure, ensuite relâchez la détente.
- Ouvrez la glissière en poussant le levier d'arrêt en bas vers la position indiquée dans l'illustration 8.
- Enlevez le barillet. En utilisant un bâton de nettoyage, poussez doucement chaque diabolo en hors du
logement des diabolos.
IMPORTANT: N'utilisez jamais des outils métalliques pointus pour enlever les diabolos.
Page 26

5. Viser et tirer en toute sécurité
- Vous et d'autres avec vous devriez toujours porter des lunettes protectrices pour protéger vos yeux.
- Tirez votre arme toujours dans une DIRECTION SÛRE. Si vous êtes sûr de votre objectif et de votre fond
et si la zone autour de l'objectif est évidente, mettez le pistolet à air comprimé sur "Armé" (Voir Point 2B).
- Ce pistolet à air fonctionnera soit en système "Double Action", soit en système "Single Action". Pour tirer
en "Double Action" appuyez de manière constante sur la détente jusqu'à ce que le pistolet tire. Le système
"Single Action" signifie que le chien doit être armé manuellement avant de tirer. Pour utiliser le système
"Single Action", tirez le chien vers l'arrière et appuyez sur la détente. Pour tirer avec feu rapide nous
recommandons le système "Double Action", pour tirer de manière plus précise nous recommandons le
système "Single Action". Pour désarmer le chien, mettez le pistolet à air comprimé sur "Arrêté", dirigez le
pistolet à air comprimé dans une DIRECTION SÛRE, placez votre pouce sur le chien et appuyez sur la
détente lorsque vous guidez le chien doucement de retour dans la position supérieure, ensuite relâchez la
détente.
- Ne tirez pas sur des surfaces dures ou sur des plans d'eau. Le diabolo pourrait rebondir ou ricocher et
atteindre quelqu'un ou quelque chose que vous n'avez pas voulu atteindre.
- Replacez le barillet vide avec les dents de blocage en direction de la hausse (voir Illustration 9).
- Saisissez la glissière au niveau du bout et poussez-la vers l'arrière jusqu'à ce qu'elle enclenche dans sa
position.
- IMPORTANT: Ne placez jamais une partie de votre main devant la bouche du canon; saisissez
seulement le bout et les côtés de la glissière.
- Vérifiez pour vous assurer que le canon est complètement déchargé. Dirigez la bouche dans une
DIRECTION SÛRE, mettez sur "Armé", (voir Point 2B) armez le chien et appuyez sur la détente
pour tirer.
- Vous pouvez décharger également votre pistolet à air comprimé en suivant les indications énumérées
sous Point 6 - Enlèvement d'un diabolo coincé.
Page 27

6. Adaptation de la hausse
Utilisez un clé hexagonal pour tourner le vis de la hausse en sens antihoraire pour dévisser la visée. (voir
Illustration 13)
Si le pistolet tire trop vers la droite, poussez le guidon vers la gauche.
Si le pistolet tire trop vers la gauche, poussez le guidon vers la droite.
Trop élevé
Trop bas
Illustration 12
Correcte
Illustration 13
Vis de la
hausse
hausse
- Choisissez votre objectif toujours avec prudence. Le mieux est de tirer sur des cibles en papier qui sont
attachés à un fond sûr, comme par exemple un pare-balles. Un paravent lourd devrait être
suspendu derrière le fond pour éviter des ricochets au cas où vous manqueriez le fond.
- Votre fond devrait être contrôlé concernant l'usure avant et après chaque utilisation. Remplacez
votre fond si la superficie est usée ou endommagée ou s'il se passe un ricochet.
- Votre pistolet à air comprimé est dessiné pour tirer sur une cible et est approprié à un emploi à
l'intérieur et à l'extérieur. Faites attention à ce que la cible soit placée avec prudence. RÉFLÉCHISSEZ
sur ce que vous atteindrez si vous manquez votre objectif.
- Le pistolet à air est visé correctement si on peut voir le guidon exactement dans l'entaille de la hausse.
Le bord supérieur du guidon devrait être au même niveau que le bord supérieur de la hausse. Cela doit
apparaître comme si la cible était posée sur le bord supérieure du guidon (Illustration 12).
Page 28

7. Écarter un diabolo coincé
IMPORTANT: Le fait que le pistolet à air comprimé ne tire pas un projectile n'est jamais une raison pour
supposer que le pistolet à air comprimé n'est pas chargé. Assurez-vous qu'il n'y a plus de diabolo coincé
entre le barillet et le canon.
- Suivez les instructions sous Point 4B -Déchargement des diabolos.
- Si le bouchon est dans le canon, enlevez le barillet (voir Point 4B), introduisez un bâton de nettoyage
d'une dimension appropriée dans la bouche du canon et poussez le diabolo coincé avec prudence dans
l'arme ouverte. Le canon pourrait être endommagé si on n'utilise pas un bâton de nettoyage d'une
dimension appropriée.
- Lorsque vous avez repoussé le diabolo dans l'arme ouverte, agitez le pistolet à air comprimé jusqu'à ce
que le diabolo coincé sorte. N'essayez pas de réutiliser ce diabolo.
- Si vous n'êtes pas en mesure de débloquer votre pistolet à air comprimé suivant la procédure de
déchargement, arrêtez de l'essayer. Umarex USA ou une station de service autorisée
débloqueront votre pistolet à air comprimé (gratuitement pendant la période de garantie).
8. Utiliser et manier les cartouches de CO
2
Il est possible que certaines conditions affectent les performances d’une arme au CO2. Cela inclut
notamment l’utilisation, l’entretien et le stockage à des températures considérablement plus hautes ou
basses que la température extérieure normale (de 59 à 69,8 °F / de 15 à 21 °C). Le fait de tirer à des
vitesses élevées peut également affecter les performances d’une arme au CO2.
Page 29

1. Des températures élevées peuvent créer une pression supplémentaire dans la cartouche de CO2, ainsi que sur l'arme
elle-même, pression s’avérant alors supérieure à la pression normale de fonctionnement. Cet excès de pression peut
provoquer des dysfonctionnements et endommager l'arme de manière définitive. La température maximale de stockage
ou d'utilisation de cette arme ne doit jamais dépasser 122 °F (50 °C). Cette température peut être atteinte si vous laissez
votre pistolet exposé aux rayons solaires directs par temps clair. Ainsi, pour assurer un bon fonctionnement du pistolet,
ne l’exposez pas à des températures élevées ni aux rayons solaires directs pendant de longues périodes de temps.
Sinon, la cartouche de CO
2
pourrait surchauffer et exploser ce qui pourrait endommager l’arme et blesser gravement ou
mortellement les personnes se trouvant à proximité.
2. Des tirs consécutifs rapides peuvent entraîner une chute de la température à l’intérieur du pistolet ainsi que de la
cartouche de CO
2
. Cela peut entraîner un ralentissement de la vitesse de sortie du projectile et une pression irrégulière
du gaz et influencer l’action de retour de l’arme.
3. Gardez à l’esprit que, lors d’une séquence de tirs rapide, la vitesse de sortie du projectile diminue à chaque tir, ce qui
peut avoir une influence négative sur la puissance de tir.
4. N’essayez pas de tirer avec une cartouche de CO
2
qui a déjà perdu une part considérable de sa pression. Voici
quelques facteurs indiquant que la pression de la cartouche de CO
2
est insuffisante :
A) Le bruit du tir n’est pas aussi fort que lorsque la cartouche est pleine.
B) Le projectile touche la cible mais la position de l’impact est plus basse que lors d’un tir avec une cartouche
de CO
2
pleine (ce qui signifie que la vitesse de tir a diminué).
Si vous tirez avec une pression de CO2trop faible, un plomb peut rester
coincé dans le canon. Tenez compte des indications relatives aux projectiles coincés.
ATTENTION :
Un plomb coincé peut être dangereux.
ATTENTION :
Page 30

IMPORTANT: Avant d'essayer de lubrifier votre pistolet à air comprimé, assurez-vous toujours que la
capsule CO2et le barillet sont enlevés et que vous avez vérifié le canon pour être sûr qu'il n'y ait plus
de diabolos restés dedans (voir points 3B & 4B).
- Votre pistolet à air conservera un fonctionnement correct pour une longue durée si vous lubrifiez le
tendeur de la capsule CO2, le guidage de la glissière et l'arrêtoir de chargeur avec 2-3 gouttes d'huile
de lubrification après avoir réalisé environ 250 tirs. N'UTILISEZ PAS une huile ou un solvant basés
sur un distillat de pétrole. N'APPLIQUEZ PAS trop d'huile, parce que cela peut provoquer des
dommages au niveau de votre pistolet à air.
- Votre pistolet à air comprimé fonctionnera le mieux si vous mettez seulement une goutte d’ huile
directement sur la pointe de la capsule CO2avant de l'introduire. N'UTILISEZ PAS une huile ou un
solvant basés sur un distillat de pétrole. N'APPLIQUEZ PAS trop d'huile, parce que cela peut
provoquer des dommages au niveau de votre pistolet à air.
9. Rangement
10. Entretien de votre pistolet à air comprimé
Veillez à ce que la sûreté soit toujours mise et à ce que l'arme soit déchargée avant de la ranger. Vérifiez
bien qu'il ne reste aucun projectile dans le canon et retirez les plombs du barillet. Avant de ranger l'arme,
nous vous recommandons également de retirer la cartouche de CO2. Conservez l'arme hors de portée
des enfants et des utilisateurs non habitués à son maniement. Rangez l'arme, les plombs et la cartouche
de CO2séparément.
Ne laissez jamais l'arme chargée.
ATTENTION :
Avant d'entreprendre le nettoyage de votre pistolet à air comprimé,
assurez-vous toujours qu'il est "ARRÊTÉ" (Voir Point 2.1), que le barillet est retiré et qu’il ne reste
aucun plomb dans le canon.
ATTENTION :
Page 31

11. Contrôle de la sécurité
- Ne dirigez jamais le pistolet à air comprimé sur une personne. Ne dirigez jamais le pistolet à air
comprimé sur une chose sur laquelle vous ne voulez pas tirer.
- Traitez le pistolet comme s’il était chargé et avec le même respect avec lequel vous traiteriez une
arme à feu.
- Tenez la bouche du pistolet à air comprimé dirigée dans une DIRECTION SÛRE. NE mettez JAMAIS
une partie de votre main sur la bouche.
- Laissez rester le pistolet à air comprimé toujours à "ARRÊTÉ" jusqu'à ce que vous soyez prêt à tirer
dans une DIRECTION SÛRE.
- Vérifiez toujours si le pistolet à air comprimé est "ARRÊTÉ" et déchargé lorsque vous le recevez d'une
autre personne ou lorsqu'il vient du stockage.
- Tenez le doigt toujours éloigné de la détente et hors du levier de la détente jusqu'à ce que vous soyez
prêt à tirer.
- Vous et d'autres devraient toujours porter des lunettes de protection pour protéger vos yeux.
- Tenez les mains et le visage éloignés du gaz CO2qui s'échappe. Il peut provoquer des gelures lorsqu'il
entre en contact avec la peau.
- Utilisez uniquement des diabolos calibre .177. N'utilisez jamais des diabolos une nouvelle fois.
- Ne tirez pas sur des surfaces dures et sur des plans d'eau. Le diabolo pourrait rebondir ou ricocher et
atteindre quelqu'un ou quelque chose que vous n'avez pas voulu atteindre.
- Remplacez le fond s'il devient usé. Placez le fond dans un lieu sûr au cas où le fond échouerait.
- N'essayez pas de démonter ou d'améliorer les performances de votre pistolet à air comprimé. Utilisez
une station de service autorisée ou rendez-le à l'usine pour le faire réparer.
- N'évacuez pas le pistolet à air en état chargé ou chargé avec CO
2
. Assurez-vous que TOUS les
diabolos sont déchargés du pistolet à air comprimé. (Voir Point 3B et 4B).
- Toute tentative d'améliorer les performances ou modification peut rendre dangereuse l'utilisation de
l'arme et annuler la garantie.
- Lorsque vous n'utilisez plus votre pistolet à air comprimé, vérifiez si elle fonctionne correctement avant
de l'utiliser une nouvelle fois. Si n'importe quoi paraît changé comme un levier de la détente plus court
ou plus faible, cela signifie qu'il y a des parties usées ou cassées. Appelez Customer Service chez
Umarex USA pour vous aider avant d'utiliser de nouveau votre pistolet à air comprimé.
Page 32

12. Caracteristiques Techniques
Mécanisme: Pistolet CO
2
Calibre/Munition .177 cal. (4.5 mm)
Diabolos de pistolet à air comprimé en plomb
Poids: Modèle 92FS 44 oz. (1260 kg)
Modèle 92FS Match 48 oz. (1360 kg)
Longueur: Modèle 92FS 8 in. (210 mm)
Modèle 92FS Match 10 in. (260 mm)
Longueur du canon: Modèle 92FS 5 in. (127 mm)
Modèle 92FS Match 5 in. (127 mm)
Canon: Acier étiré
Visée:
Hausse: Modèle 92FS Adaptable pour réglage latéral
Modèle 92FS Match Adaptable pour réglage latéral et vertical
Guidon: Fixé
Actionnement: Capsules CO2de 12 grammes
Sûreté: Sûreté du chien
Vitesse: Modèle 92FS Jusqu'à 425 fps (130 m/s)
Modèle 92FS Match Jusqu'à 425 fps (130 m/s)
PERFORMANCE
Beaucoup de facteurs influencent la vitesse, par exemple la marque du projectile, le type du projectile, le
montant de CO2dans les capsules, la lubrification, la nature du canon et la température.
SERVICE DE RÉPARATION
Si votre pistolet doit être réparé, nous vous recommandons de le mener ou de l'envoyer chez une station
de service autorisée ou Umarex USA. Afin de trouver une station de service autorisée près de vous
visitez notre site Web chez www.umarex-usa.com ou appelez Customer Service par (479) 646 - 4210.
Page 33

13. Garantie
À partir de la date d'achat le client dispose d'une garantie d'une année en ce qui concerne des défauts de
matière et d'élaboration. Cette garantie est transférable. Afin d'enregistrer le numéro de série qui se
trouve sur le canon de votre pistolet, veuillez renvoyer le formulaire d'enregistrement du produit trouvé
dans votre mode d'emploi. La garantie ne dépend pas du renvoi de la carte.
SONT COUVERTS PAR LA GARANTIE
Pièces de rechange et travaux. Coûts de transport du produit réparé jusqu'au client
NE SONT PAS COUVERTS
Coûts de transport du produit défectueux jusqu'à Umarex USA ou une station de service autorisée.
Dommages causés par abus ou non-respect des conditions d'entretien normales. Toute dépense d'autre
nature. DES DOMMAGES SECONDAIRES, DES DOMMAGES D'ACCOMPAGNEMENT OU DES
DÉPENSES D'ACCOMPAGNEMENT, DES DOMMAGES CAUSÉS À LA PROPRIÉTÉ INCLUS.
QUELQUES ÉTATS NE PERMETTENT PAS L'EXCLUSION OU LA LIMITATION DES DOMMAGES
D'ACCOMPAGNEMENT OU SECONDAIRES, AINSI QUE LA LIMITATION OU EXCLUSION
MENTIONNÉES CI-DESSUS NE VOUS CONCERNENT PEUT-ÊTRE PAS.
REVENDICATIONS DE GARANTIE
Demande de garantie pour marché US et Canadien
Retournez s'il vous plait le produit chez le distributeur le plus proche. Si vous ne connaissez pas notre
distributeur visiter notre site www.umarex-usa.com et cliquez sur garantie et service après vente ou
appeler nous au (479) 646 - 4210 et demander notre assistance.
Des clients internationaux devraient contacter leurs fournisseurs.
N'ESSAYEZ PAS DE LE DÉMONTER! Votre pistolet à air exige des outils et accessoires spéciaux pour le
réparer. Si vous le démontez, vraisemblablement vous ne serez pas en mesure de le monter
correctement. Dans ces conditions Umarex USA n'assume pas de responsabilité de garantie.
Page 34

GARANTIES IMPLICITES
CHAQUE GARANTIE IMPLICITE, LES GARANTIES IMPLICITES DE FACILITÉ D'ÉCOULEMENT ET
QUALIFICATION POUR UNE FONCTION SPÉCIALE INCLUES ONT UNE DURÉE LIMITÉE D'UNE
ANNÉE Á PARTIR DE LA DATE D'ACHAT. QUELQUES ÉTATS NE PERMETTENT PAS UNE LIMITATION DE LA DURÉE D'UNE GARANTIE IMPLICITE, AINSI VOUS N'ÊTES PAS CONCERNÉE PAR LES
LIMITATIONS CI-DESSUS.
Dans la mesure qu'une disposition de cette garantie est défendue par loi fédérale nationale ou municipale,
ce qu'on ne pouvait pas prévoir, elle ne sera pas applicable. La garantie vous donne des droits légaux
spéciaux et peut-être vous avez d'autres droits qui varient d'état en état et de pays en pays.
14. Dysfonctionnements
Sûreté activée
Cartouche de CO
2
vide
Canon encrassé
défectueuse
Cartouche de CO
2
trop élevées
Températures
Culasse non fermée et
Mauvais ajustement
adaptées
Plombs mal chargés
verrouillée correctement
latéral
Dysfonctionnements
POSSIBLES
CAUSES
Mauvaise performance de tir
L'arme n'effectue pas de tir
Faible vitesse de tir
Munitions non
Page 35

Umarex USA Inc.
6007 South 29
th
Street
Fort Smith, AR 72908 USA
Téléphone : (479) 646 - 4210
Fax : (479) 646 - 4206
www.umarex-usa.com
Distribué par
®
Page 36

MANUAL DE INSTRUCCIONES
No se trata de un juego. Se exige la supervisión de personas adultas. El
abuso o el uso descuidado pueden provocar heridas graves o la muerte. El modelo
BERETTA 92FS puede ser peligroso hasta 400 yards (366 metros). El modelo 92FS Match puede ser
peligroso hasta 400 yards (366 metros).
MODELOS Beretta 92FS y 92FS Match
Pistola de aire comprimido CO
2
Cal. .177 diabolo (4,5 mm)
patentada
USTED Y OTROS DEBERÍAN SIEMPRE LLEVAR ANTEOJOS DE TIRADOR PARA PROTEGER SUS
OJOS. LEA TODAS LAS INSTRUCCIONES ANTES DEL USO.
LOS COMPRADORES Y LOS UTILIZADORES TIENEN LA OBLIGACIÓN DE OBSERVAR TODAS LAS
LEYES RESPECTO AL USO Y A LA PROPIEDAD DE ESTA CARABINA DE AIRE COMPRIMIDO.
ESTA CARABINA DE AIRE COMPRIMIDO ESTÁ DESTINADAAL USO POR PERSONAS DE 16
AÑOS Y MÁS.
8.419.90.05.U.02-06.?.18
¡AVISO!:
www.umarex-usa.com
®
Page 37

Rogamos lea todo el manual de instrucciones. Esta
carabina de aire comprimido no es un juguete, por
lo que debe tratarla con el mismo respeto que si
fuera un arma de fuego. Siempre deberá observar
las instrucciones de seguridad que se detallan en el
manual de instrucciones, guardando éste último en
un lugar seguro para su utilización futura.
Si tuviera cualquier duda en relación con su nueva
carabina de aire comprimido, rogamos se ponga en
contacto con el servicio de atención al cliente de
Umarex USA bajo:
Umarex USA Inc.
6007 South 29
th
Street
Fort Smith, AR 72908 USA
Teléfono: (479) 646 - 4210
Fax: (479) 646 - 4206
www.umarex-usa.com
balines de plomo.
No inhale el polvo ni introduzca los balines en la boca.
Lávese las manos después de su manipulación.
Este producto contiene plomo, una substancia
química de la que se conoce su potencial
cancerígeno y de malformaciones durante el
embarazo (u otros daños reproductivos).
AVISO:
Índice Pág.
1 Componentes de su nueva pistola 3
2 Manejo del seguro 4
3
Colocar y extraer el cartucho de CO
2
5 - 6
4 Cargar y descargar 7 - 8
5 Seguridad al apuntar y disparar 9
6 Ajustes de la mira 10
7 Quitar un balín enclavado 11
8
Utilización y manipulación de los cartuchos de CO
2
11 - 12
9 Almacenamiento 13
10 Cuidado y mantenimiento 13
11 Repaso de la seguridad 14
12 Características técnicas 15
13 Garantía 16
14 Problemas 17
Datos de contacto 18
Page 38

1. Conocer las partes individuales de su pistola de aire comprimido nueva
Conozca los nombres de las partes individuales de su pistola de aire comprimido nuevo, esto le ayudará
a comprender el manual de instrucciones. Utilice este manual de instrucciones para aprovechar más de
esta pistola de aire comprimido.
Guión
Boca
Corredera
Alza
Palanca de retención
Empuñadura
Disparador
Botón de retención de la empuñadura
Tensor de la cápsula CO
2
Seguro
Percutor
Page 39

2. Manejo del seguro
Mantenga la pistola de aire comprimido en
posición "ASEGURADA" hasta que esté efectivamente dispuesto a tirar. Después de este momento ponga el seguro en
"POSICIÓN DESASEGURADA".
A. Para poner la pistola de aire comprimido en
"ASEGURADA:"
- Ponga el seguro directamente debajo de la alza (ilustración 1).
- Mueve la palanca del seguro hacia la posición inferior (S) para
cubrir el indicador rojo como presentado. El seguro está
únicamente en "ASEGURADO" si el indicador ROJO cerca del
seguro está ocultado.
Aunque el seguro esté en "ASEGURADO", debería seguir
manejar la pistola de aire comprimido con cuidado. Nunca dirija
la pistola de aire comprimido hacia una persona. Nunca dirija la
pistola de aire comprimido a algo a lo que usted no quiere
disparar.
B. Para poner la pistola de aire comprimido en
"DESASEGURADA".
- Empuje el seguro hacia arriba exponiendo el indicador ROJO
como presentado en la ilustración 2.
- La pistola de aire comprimido está dispuesta a tirar si está en
"Desasegurada". Si puede ver el indicador ROJO cerca del
seguro, la pistola de aire comprimido está en "Desasegurada"
y puede ser tirada.
asegurado
Ilustración 1
Ilustración 2
dispuesto a tirar
¡AVISO!:
Page 40

3. Colocación y eliminación de cápsulas de CO2
A. Colocación de la cápsula de CO
2
- Convénzase de que la pistola de aire comprimido esté en "Asegurada" (Véase Punto 2A).
- Empuje el botón de retención de la cacha de empuñadura hacia el lado derecho para retirar la
empuñadura. (véase Ilustración 3) Gire el tensor de la cápsula hacia abajo y desatornille el dispositivo de
fijación de la cápsula dándole vuelta en el sentido de las agujas del reloj (Ilustración 4)
- Coloque una cápsula CO2nueva dentro de la pistola de aire comprimido, la pequeña clavija de la
cápsula indicando arriba hacia la unidad picadora.
- Apriete el dispositivo de fijación de la cápsula dándole vuelta en el sentido contrario de las agujas del
reloj hasta que propulse la cápsula CO2ligeramente hacia arriba en su posición. No apriete demasiado,
puesto que esto podría estropear la obturación de la cápsula.
- Cierre el tensor de la cápsula girándolo hacia arriba. Esto picará la cápsula CO2. (Ilustración 7)
- Presione la cacha con cuidado otra vez en su sitio.
Cápsulas CO2pueden explosionar con temperaturas por encima de 120° F (48.9 ° C).
No las destruya o encienda. No las exponga al calor y no almacene cápsulas CO2con temperaturas por
encima de 120° F (48.9° C).
Tenga las manos y la cara en una distancia segura del gas CO2que se escapa.
Puede causar congelaciones si se pone en contacto con la piel.
NOTA: Recomendamos el uso de cápsulas de CO2Umarex. Están producidas
adecuadas a su pistola de aire comprimido. Posiblemente otras clases de cápsulas de CO2no ajusten
exactamente y si las fuerza en su posición esto puede provocar una herida para usted o un defecto de su
pistola de aire comprimido. Nunca trate de forzar una cápsula de CO2en su posición o fuera de su
posición. No almacene su pistola de aire comprimido con una cápsula de CO2dentro. (Es muy importante
de recordar esto, porque prolongará la duración útil de las obturaciones de su pistola de aire comprimido). Si sabe que no reutilizará su pistola de aire comprimido dentro de 24 horas retire la cápsula de CO
2
de la pistola de aire comprimido como explicado en Punto 3B abajo.
¡AVISO!:
¡AVISO!:
Page 41

- Dirija la pistola de aire comprimido en una DIRECCIÓN SEGURA, ponga en "Desasegurada" (véase
Punto 2B) y tire el disparador. Si su pistola de aire comprimido no hace un ruido estallante después
de haber tirado el disparador, el CO
2
no está descargado. En este caso tendrá que retirar la
empuñadura, girar el tensor de la cápsula hacia abajo y atornillar un poco más el dispositivo de fijación de
la cápsula, dándole vuelta en el sentido contrario de las agujas del reloj. Cierre después el tensor de la
cápsula dirigiendo el arma en una dirección segura. Ponga el seguro otra vez en la posición
"Asegurada" (véase Punto 2A).
B. Eliminación de la cápsula CO
2
- Ponga la pistola de aire comprimido en "Asegurado" (véase Punto 2A)
- Convénzase de que la pistola de aire comprimido esté descargada (véase Punto 4B).
- Dirija la pistola de aire comprimido en una DIRECCIÓN SEGURA.
- Gire el tensor de la cápsula CO2hacia abajo con cuidado de manera que cualquier gas CO2residual
pueda escaparse. (véase Ilustración 5)
Importante: Antes de todo tenga sus manos y su cara en distancia del gas CO2que se escapa.
- Empuje el botón de retención hacia el lado izquierdo para retirar la empuñadura derecha. (véase ilustr. 3)
- Destornille el dispositivo de fijación de la cápsula dándole vuelta en el sentido de las agujas del reloj hasta
que se pare.
- Posiblemente la cápsula de CO2esté fría. Evite un contacto prolongado con la cápsula de CO2cuando
está muy fría.
- Cierre el tensor de la cápsula girándolo hacia arriba (Ilustración 7). Presione la cacha de empuñadura
derecha con cuidado otra vez en su posición.
Ilustración 3
Ilustración 4 Ilustración 5 Ilustración 6
Ilustr. 7
1
2
2
1
Page 42

A. Carga
- Convénzase de que la pistola de aire comprimido esté en "Asegurada." (véase Punto 2A)
- Dirija la pistola de aire comprimido en una DIRECCIÓN SEGURA. Tenga la pistola de aire comprimido como
indicado en la ilustración 6 para conservar el cilindro en su posición y evitar que caiga fuera de la pistola.
- Abra la corredera empujando la palanca de retención abajo hacia la posición indicada en la ilustración 8.
4. Carga y descarga
Utilice únicamente los diabolos con un calibro de .177 (4,5 mm) en su modelo
BERETTA 92FS o BERETTA 92FS Match. La utilización de cualquier otra munición puede causar una
herida para usted o un defecto para la pistola de aire comprimido. Nunca reutilice unos diabolos.
Nunca coloque la mano o los dedos encima de la boca. Cuando abre o cierre la
corredera convénzase de que su pistola de aire comprimido esté dirigida en una DIRECCIÓN SEGURA
y no ponga el dedo en el disparador. Si no sigue estos avisos arriesga una herida grave.
¡AVISO!:
¡AVISO!:
Ilustración 8
Ilustración 9
Ilustr.10.1
Ilustr. 10.2
a flor
ligeramente empotrado
Page 43

- Retire el cilindro y cargue los diabolos la cabeza primera
(véase Ilustración 10) en el cilindro convenciéndose de que
cada diabolo esté completamente colocado.
IMPORTANTE: Para evitar que encasquillamientos
destruyan los diabolos convéncese de que la base de cada
diabolo ponga a ras o esté ligeramente debajo del borde del
asiento.
- Ponga el cilindro otra vez en la corredera (con los dientes de
bloqueo en dirección de la alza. (véase Ilustración 9)
- Asa la corredera al nivel de la punta (véase ilustración 11) y
empújela hacia atrás hasta que encaje en su posición.
- IMPORTANTE: Nunca coloque una parte de su mano
encima de la boca; asa únicamente la punta y los lados
de la corredera.
B. Descarga
- Ponga la pistola de aire comprimido en "Asegurada" (véase Punto 2A). Dirija la pistola de aire
comprimido en una DIRECCIÓN SEGURA.
- Si fuera necesario, desarme la pistola de aire comprimido poniendo su pulgar en el percutor y tirando el
disparador cuando conduce el percutor lentamente otra vez en la posición superior , después suelte el
disparador.
- Abra la corredera empujando la palanca de retención abajo hacia la posición mostrada en la
ilustración 8.
- Retire el cilindro. Usando un palo limpiador empuje suavemente cada diabolo fuera del asiento.
IMPORTANTE: Nunca utilice herramienta de metal aguda para quitar los diabolos.
- Reemplace el cilindro vació con los dientes de bloqueo en dirección de la alza (véase Ilustración 9).
Ilustración 11
Page 44

5. Apuntar y disparar con seguridad
- Usted y otras personas junto a usted deberían siempre llevar anteojos de tirador para proteger sus ojos.
- Apunte siempre su pistola de aire comprimido en una DIRECCIÓN SEGURA. Si está seguro de su
objetivo y de su fondo y si el territorio alrededor del objetivo está evidente, ponga la pistola de aire
comprimido en "Desasegurada" (Véase Punto 2B).
- Esta pistola de aire comprimido funcionará sea con el sistema "Double Action" sea con el sistema "Single
Action". Para tirar con "Double Action", presione de manera constante en el disparador hasta que tire la
pistola. El sistema "Single Action" significa que el percutor tiene que ser armado a mano antes de tirar.
Para utilizar el sistema "Single Action" tire el percutor hacia atrás y apriete en el disparador y presione en
el disparador. Para tirar con fuego rápido recomendamos el sistema "Double Action", para tirar de manera
más precisa, recomendamos el sistema "Single Action". Para desarmar el percutor, ponga la pistola de
aire comprimido en "Asegurada", dirija la pistola de aire comprimido en una DIRECCIÓN SEGURA. Ponga
su pulgar en el percutor y tire en el disparador cuando conduce el percutor suavemente de vuelta en la
posición superior, después suelte el disparador.
- No dispare sobre superficies duros o superficies de agua. El diabolo puede rebotar o resaltar y llegar a
alguien o algo quién o que usted no ha intentado alcanzar.
- Asa la corredera al nivel de la punta y muévela en dirección de la alza hacia la posición cerrada.
- IMPORTANTE: Nunca ponga una parte de su mano encima de la boca; asa únicamente la punta y
los lados de la corredera.
- Verifique para convencerse de que el cañón esté completamente descargado. Dirija la boca en una
DIRECCIÓN SEGURA, ponga en "Off Safe," (Véase Punto 2B) arme el percutor y apriete el disparador
para tirar.
- Es también posible descargar su pistola de aire comprimido siguiendo las indicaciones enumeradas
bajo Punto 6 - Quitar un diabolo enclavado.
Page 45

6. Ajuste de la alza
Utilice una llave hexagonal para dar vuelta al tornillo de la alza en sentido contrario de las agujas del reloj
para desatornillar la mira. (véase ilustración 13)
Si la pistola tira demasiado hacia la derecha, empuje el guión hacia la
izquierda.
Si la pistola tira demasiado hacia la izquierda, empuje el guión hacia la
derecha.
Demasiado alto
Demasiado bajo
Ilustración 12
Correcto
- Siempre elija su objetivo con cuidado. Lo mejor es disparar en blancos de papel ligados a un fondo
seguro, como por ejemplo un parabalas. Una pantalla pesada debería ser colgado detrás
del fondo para evitar rebotados en caso de que desacierte el fondo.
- Su fondo tendría que ser controlado respecto al desgaste antes y después de cada uso. Reemplace su
fondo si la superficie está usado o deteriorado o si ocurre un rebotado.
- Su pistola de aire comprimido está determinada para disparar en un blanco y es adecuada para el uso
en el interior así que para el uso afuera. Cuide de colocar su blanco con cuidado. PIENSE en qué
alcanzará si desacierta su objetivo.
- La pistola de aire está apuntada de manera correcta si se puede ver el guión exactamente en la
entalladura de la alza. El borde superior del guión debería estar al mismo nivel que el borde superior de
la alza. Tiene que aparecer como si el blanco estuviera situada en el borde superior del guión (Ilustr. 12).
Ilustración 13
Tornillo de la alza
Alza
Page 46

7. Quitar un diabolo enclavado
IMPORTANTE: El hecho de que la pistola de aire comprimido no dispara un proyectil nunca es una razón para
suponer que la carabina de aire comprimido no está cargada. Convénzase de que ya no hay un
diabolo enclavado entre el cilindro y el cañón.
- Siga las instrucciones bajo Punto 4B -Descarga de los diabolos
- Si el obstáculo está en el cañón, quite el cilindro (véase Point 4B), introduzca un palo limpiador de una
dimensión adecuada en la boca del cañón y empuje el diabolo enclavado con cuidado en el arma abierta.
El cañón podría ser perjudicado si no se utiliza un palo de dimensión adecuada.
- Cuando ha empujado el diabolo otra vez en el arma abierta, agite la pistola de aire comprimido hasta que
el diabolo enclavado caiga fuera. No trate de reutilizar este diabolo.
- Si no es capaz de desenclavar su pistola de aire comprimido siguiendo este procedimiento de descarga,
deje de tratarlo más. Umarex USA o una estación de servicio autorizada desenclavará su pistola de aire
comprimido (gratuitamente durante el período de garantía).
8. Utilización y manipulación de los cartuchos de CO
2
Es posible que determinadas condiciones afecten a la pistola de CO
2
, alterando su rendimiento. Estas
son, entre otras, el uso, el mantenimiento y el almacenamiento a determinadas temperaturas superiores a
las normales (desde 59°F / 15°C a 69.8°F / 21°C). Otro factor puede ser cuando el arma se dispara a
velocidades demasiado altas.
Page 47

1. Temperaturas altas pueden incrementar la presión dentro del cartucho de CO2y también dentro del arma
por encima de la presión estándar de servicio. Este exceso de presión podría impedir el funcionamiento y
causar daños permanentes en la pistola. La temperatura máxima de servicio y almacenamiento nunca debería
exceder los 122 °F (50 °C). Esta temperatura puede alcanzarse si deja el arma expuesta al sol directo. Por ello
es recomendable no exponer la pistola a temperaturas altas o al sol directo durante largos periodos de tiempo
para que funcione correctamente. De lo contrario el cartucho de CO
2
puede sobrecalentase y explotar,
pudiendo dañar el arma y causar lesiones físicas o la muerte de las personas que se encuentren en las
inmediaciones.
2. El disparo rápido consecutivo puede producir un descenso de la temperatura en la pistola y en el cartucho
de CO2. Esto puede conducir a una reducción de la velocidad en la boca, presión desigual y afectar a la
operación de retroceso del arma.
3. Recuerde que durante una secuencia rápida de disparos la velocidad en la boca del cañón disminuirá con
cada disparo, pudiendo afectar negativamente a la potencia del disparo.
4. Nunca intente disparar la pistola de aire comprimido con un cartucho de CO2que ya haya perdido gran
parte de su presión inicial. Algunos de los indicadores que hacen sospechar una presión insuficiente en el
cartucho de CO2son:
A) el sonido del disparo no es tan ruidoso como cuando el cartucho está lleno
B) la munición impacta en la diana, pero en una posición inferior de lo que lo haría en el caso de que el
cartucho de CO2estuviera lleno (en consecuencia, la velocidad de disparo ha disminuido)
disparar con presión de gas insuficiente puede implicar que el balín quede atascado
en el cañón. Tenga siempre en cuenta las instrucciones en caso de obstrucciones.
AVISO:
una obstrucción es una situación de peligro.
AVISO:
Page 48

9. Almacenamiento
Siempre deberá guardar la pistola habiendo extraído la munición y activado el seguro. Compruebe con
cuidado que no se encuentre munición en el cañón y elimine los balines del cilindro. Antes de almacenar
el arma recomendamos extraer también el cartucho de CO2. Mantenga la pistola de aire comprimido
fuera del alcance de los niños y de cualquier otra persona que no esté familiarizada con su uso. Guarde
la pistola en un lugar diferente de los balines y los cartuchos de CO2.
bajo ningún concepto deberá dejar el arma cargada.
AVISO:
antes de proceder a limpiar su pistola de aire comprimido, asegúrese siempre de que
el seguro esté “Asegurado” (ver apdo. 3.1), el cilindro haya sido extraído y en el cañón no se encuentre
ningún balín.
AVISO:
10. Cuidados y mantenimiento
IMPORTANTE: Antes de tratar de lubrificar su pistola de aire comprimido, convénzase siempre de que la
cápsula de CO2y el cilindro estén retirados y de que usted haya verificado el cañón para estar seguro de
que ya no hay unos diabolos quedados dentro (véase puntos 3B & 4B).
- Su pistola de aire comprimido conservará un funcionamiento correcto para un período largo si
lubrifique la charnela del tensor de la cápsula CO2, los rieles de la corredera y la la palanca de
retención del cilindro con 2-3 gotas de aceite de lubrificación después de haber disparado alrededor de
250 tiros. NO UTILICE un aceite o un disolvente basado en un destilado de petróleo y NO ENGRASE
demasiado porque esto puede causar daños a nivel de su pistola de aire comprimido.
- Su pistola de aire comprimido funcionará lo mejor posible si pone solo una gota de aceite
directamente en la punta de la cápsula de CO2antes de introducirla. NO UTILICE un aceite o un
disolvente basado en un destilado de petróleo y NO ENGRASE demasiado porque esto puede causar
daños a nivel de su pistola de aire comprimido.
Page 49

11. Revisión de la seguridad
- Nunca apunte la pistola de aire comprimido sobre una persona. Nunca apunte la pistola de aire comprimido
sobre algo sobre lo que no intenta disparar.
- Siempre trate la pistola de aire comprimido como si estuviera cargada y con el mismo respeto como para un
arma de fuego.
- Siempre tenga la boca de la pistola de aire comprimido dirigida en una DIRECCIÓN SEGURA. NUNCA
ponga parte de su mano encima de la boca.
- Siempre mantenga la pistola de aire comprimido "Asegurada" hasta que esté dispuesto a disparar en una
DIRECCIÓN SEGURA .
- Siempre verifique si la pistola de aire comprimido está en "Asegurada" y descargada cuando la recibe de otra
persona o cuando viene del almacenamiento.
- Siempre tenga el dedo en distancia del disparador y fuera de la palanca del disparador hasta que esté
dispuesto a disparar.
- Usted y otras personas junto a usted deberían siempre llevar anteojos de tirador para proteger sus ojos.
- Tenga sus manos y su cara en distancia del gas CO2que se escapa. Puede causar congelaciones si entra
en contacto con la piel.
- Utilice únicamente diabolos del calibro .177 (4,5 mm). Nunca reutilice unos diabolos.
- No dispare sobre superficies duras o sobre superficies de agua. El diabolo puede rebotar o resaltar y alcanzar
a alguien o algo a quién o que no ha intentado alcanzar.
- Sustituya el fondo si se hace usado. Coloque el fondo en un lugar que estará seguro en el caso de que falle
el fondo.
- No trate de desmontar o mejorar la capacidad de su pistola de aire comprimido. Utilice una estación de
servicio autorizada o devuelvala a la fábrica para que se la reparen.
- No ponga a un lado la pistola de aire comprimido en estado cargado o cargado con CO2. Convénzase de
que TODOS los diabolos estén descargados de la pistola de aire comprimido. (Véase Punto 3B y 4B)
- Cualquier ensayo de mejorar la capacidad o cualquiera modificación pueden hacer el uso de esta arma
peligroso. Esto anulará la garantía.
- Cuando ya no utilice su pistola de aire comprimido tiene que controlar si funciona de manera adecuada
antes de reutilizarla. Si alguna cosa parece cambiada así que una palanca del disparador más corta o
más débil, esto puede significar que existen partes usadas o rotas. Llame a Customer Service cerca
de Umarex USA para que le ayude antes de reutilizar su pistola de aire comprimido.
Page 50

12. Características técnicas
MECANISMO: Pistola CO
2
Calibro/Munición Calibro .177 (4,5 mm),
Diabolos de pistola de
aire comprimido en plomo
Peso: Modelo 92FS 44 oz. (1260 kg)
Modelo 92FS Match 48 oz. (1360 kg)
Longitud: Modelo 92FS 8 in. (210 mm)
Modelo 92FS Match 10 in. (260 mm)
Longitud del cañón: Modelo 92FS 5 in. (127 mm)
Modelo 92FS Match 5 in. (127 mm)
Cañón: Acero rayado
Mira:
Alza: Modelo 92FS Adaptable para ajuste lateral
Modelo 92FS Match Adaptable para ajuste lateral y vertical
Guión: Fijado
Accionamiento:. Capsules de CO2de 12 gramos
Seguro: Seguro del gatillo
Velocidad: Modelo 92FS Hasta 425 fps (130 m/s)
Modelo 92FS Match Hasta 425 fps (130 m/s)
CAPACIDAD
Muchos factores influyen en la velocidad por ejemplo la marca del proyectil, el tipo del proyectil, la
cantidad de CO2en las cápsulas, el engrase, la naturaleza del cañón y la temperatura.
SERVICIO DE REPARACIÓN
Si su pistola de aire comprimido necesita reparación, le recomendamos de llevarla o enviarla a una estación de servicio autorizada o Umarex USA. Para encontrar una estación de servicio autorizada cerca
de usted visite nuestro sitio Web cerca de www.umarex-usa.com o llame Customer Service con
(479) 646 - 4210.
Page 51

13. Garantía
Desde la fecha de compra el cliente dispone de un año de garantía respecto a defectos
de material y elaboración. Esta garantía es transferible. Para registrar el número de serie encontrándose
en el cañón de su pistola, sírvanse devolver el formulario de registro del producto encontrado en su
manual de instrucciones. La garantía no depende de la devolución de la ficha.
ESTÁN CUBIERTAS POR LA GARANTÍA
Piezas de recambio y trabajos. Costes de transporte del producto reparado hasta el cliente.
NO ESTÁN CUBIERTAS POR LA GARANTÍA
Gastos de transporte del producto defecto hasta Umarex USA o una estación de servicio autorizada.
Daños causados por abuso o falta de respeto de las condiciones de entretenimiento normal. Cualquier
otro gasto. DAÑOS SECUNDARIOS; DAÑOS ACOMPAÑANTES, O GASTOS ACOMPAÑANTES,
DAÑOS A LA PROPIEDAD INCLUIDOS. ALGUNOS ESTADOS NO PERMITEN LA EXCLUSIÓN O
LIMITACIÓN DE DAÑOS ACOMPAÑANTES O SEGUNDARIOS, ASÍ QUE LA LIMITACIÓN O
EXCLUSIÓN MENCIONADAARRIBA NO LE AFECTE.
PRETENSIONES DE GARANTÍA
Garantía p
ara compradores de Canadá y los EE.UU.:
Por favor devuelva el producto a su distribuidor más cercano. Visite www.umarex-usa.com y haga clic
en "warranty and repair service" o llame al (479) 646 - 4210 para obtener información acerca del distribuidor más cercano.
Clientes internacionales deberían ponerse en contacto con sus suministradores. ¡NO TRATE DE
DESMONTARLA! Su pistola de aire comprimido exige herramienta y accesorios especiales para repararla. Si la desmonta probablemente no será capaz de montarla otra vez de manera correcta. Umarex no
asume responsabilidad de garantía bajo tales circunstancias.
Page 52

GARANTÍAS INCLUIDAS
TODAS LAS GARANTÍAS IMPLÍCITAS, INCLUIDAS LAS GARANTÍAS IMPLÍCITAS DE VENDIBILIDAD
Y CUALIFICACIÓN PARA UN PROPÓSITO ESPECIAL, TIENEN UNALIMITACIÓN DE VALIDEZ DE UN
AÑO DESDE LA FECHA DE COMPRA: ALGUNOS ESTADOS NO PERMITEN UNA LIMITACIÓN DE
VALIDEZ DE GARANTÍA IMPLÍCITA, ASÍ QUE POSIBLEMENTE LAS LIMITACIONES MENCIONADAS
ARRIBA NO LE AFECTEN.
En el caso de que una disposición de esta garantía fuera defendida por ley federal, nacional o municipal,
lo que no se podía prever, no se aplicará. Esta garantía le da derechos específicos y posiblemente usted
tenga otros derechos que varian de un estado a otro y de un país a otro.
15.Problemas
Rendimiento insuficiente
Pistola no funciona
Velocidad deficiente del balín
Seguro puesto
vacío
Cartucho de CO
2
Cañón sucio
defectuoso
cartucho de CO
2
extremas
Temperaturas
Corredera mal cerrada
Munición inapropiada
Balines mal cargados
y bloqueada
Problemas
CAUSAS
POSIBLES
Ajuste lateral
incorrecto
Page 53

Distribuido por
Umarex USA Inc.
6007 South 29
th
Street
Fort Smith, AR 72908 USA
Teléfono: (479) 646 - 4210
Fax (479) 646 - 4206
www.umarex-usa.com
®
 Loading...