

Page 1
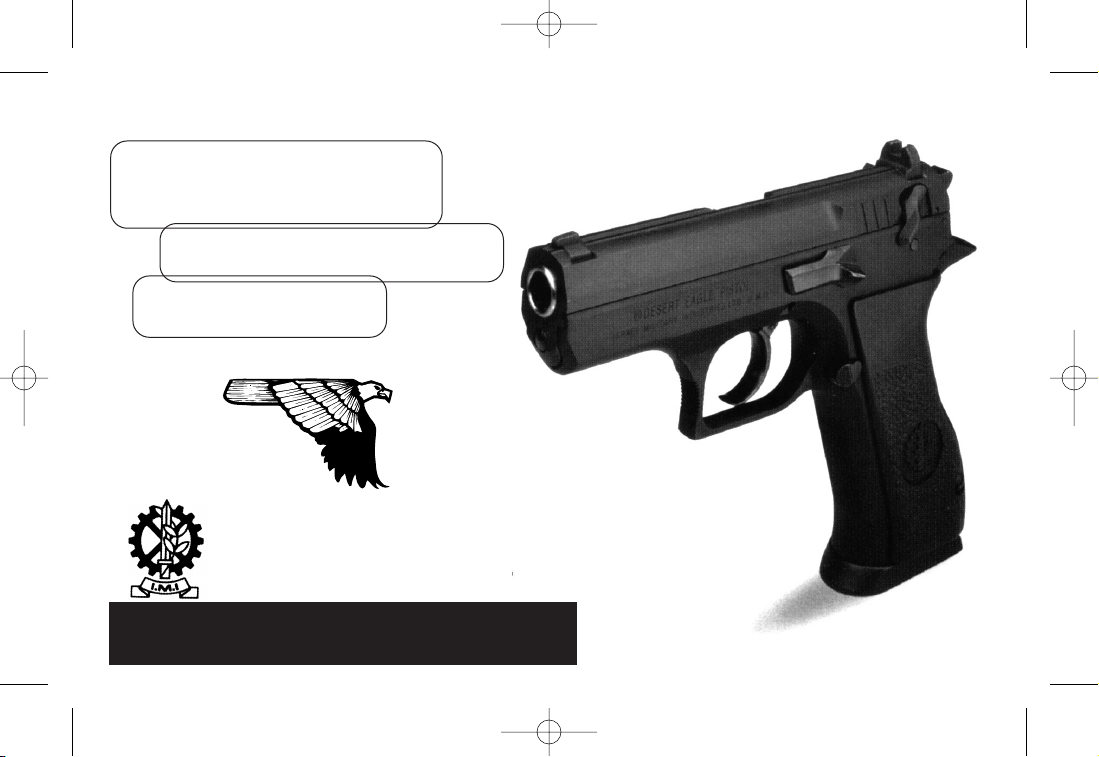
INSTRUCTION MANUAL
ISRAEL MILITARY INDUSTRIES LTD (IMI)
MAGNUM RESEARCH, INC.
SEMI-AUTOMATIC PISTOL™
DOUBLE ACTION
9mm Para./.45 ACP/.40 S&W
B ABY
EAGLE
PISTOL
25772 - PRINT 11/18/03 8:20 AM Page 1
Page 2

WARNING
ALL FIREARMS ARE DANGEROUS OBJECTS - PISTOLS INCLUDED.
ALWAYS CONSIDER THE PISTOL LOADED. TO RENDER IT SAFE, FIRST SET THE SAFETY ON THE “SAFE”
POSITION; REMOVE THE MAGAZINE, THEN EJECT ANY REMAINING ROUND BY PULLING THE SLIDE
TO THE REAR.
IT IS DANGEROUS TO ALTER OR MODIFY THIS FIREARM IN ANY WAY. ANY ALTERATIONS OR
MODIFICATIONS OF THE FIRING MECHANISM MAY RESULT IN THIS FIREARM BECOMING UNSAFE,
AND WILL NULLIFY ALL WARRANTIES.
USER IS ADVISED TO READ THE ENTIRE MANUAL PRIOR TO HANDLING
THIS PISTOL AND OPERATING IT FOR THE FIRST TIME.
1
25772 - PRINT 11/18/03 8:20 AM Page 2
Page 3

Table of Contents
1. Preface . . . . . . . . . . . . . . . . . . . . . . . . . . . . . . . . . . . . . . . . . . . . . . 4
2. Caution . . . . . . . . . . . . . . . . . . . . . . . . . . . . . . . . . . . . . . . . . . . . . . 5
3. Safety precautions . . . . . . . . . . . . . . . . . . . . . . . . . . . . . . . . . . . . . . . 6
4. General description and characteristics . . . . . . . . . . . . . . . . . . . . . . . . . 7
5. Technical data . . . . . . . . . . . . . . . . . . . . . . . . . . . . . . . . . . . . . . . . . . 8
6. Operating principles . . . . . . . . . . . . . . . . . . . . . . . . . . . . . . . . . . . . . 9
7. Operating instructions . . . . . . . . . . . . . . . . . . . . . . . . . . . . . . . . . . . . . 10
8. Sights and zeroing . . . . . . . . . . . . . . . . . . . . . . . . . . . . . . . . . . . . . . . 14
9. Loading and firing . . . . . . . . . . . . . . . . . . . . . . . . . . . . . . . . . . . . . . . 15
10. Disassembly and assembly . . . . . . . . . . . . . . . . . . . . . . . . . . . . . . . . . 19
11. Care and cleaning . . . . . . . . . . . . . . . . . . . . . . . . . . . . . . . . . . . . . . . 26
3
25772 - PRINT 11/18/03 8:20 AM Page 4
Page 4
PREFACE
Welcome to the proud family of DESERT EAGLE
PISTOL owners. This instruction manual refers to
DESERT EAGLE PISTOL pistols in:
• 9mm parabellum (9x19)
• .45 ACP
• .40 S&W
Care and handling are the same for all calibers.
They share many parts in common as well.
ATTENTION
The Operating instructions in this manual refer to
the DESERT EAGLE R model pistol (slide-mounted
de-cocking safety)
The explanations specific to the Desert Eagle F
& FS models (frame-mounted safety) are given at
the end of this manual (page 29).
Care and maintenance are identical for all
Desert Eagle pistols. Furthermore, most parts are
common to all models.
4
25772 - PRINT 11/18/03 8:20 AM Page 5
Page 5

Failure to heed the warnings in this booklet may
result in serious injury to you or others, as well as
damage to the firearm or other property. Take note
of the following warnings on the gun handling before
attempting to use the pistol:
• Always check the chamber and magazine of any
firearm before handling.
• Never load or carry a loaded gun until you are
ready to use it.
• Watch your muzzle so the other fellow doesn’t
have to.
• Keep guns and ammunition separate and in
locked storage.
• Don’t shoot unless absolutely sure of your target
and what is beyond it.
• Know the range of your gun.
• Always wear eye and ear protection when
shooting.
• Always be sure the barrel is clear of
obstructions and only carry ammunition
specifically intended for the gun you are using.
• Never use alcohol or drugs of any kind while
using your firearm.
• Always store your firearm in a safe and
responsible manner to prevent unauthorized
use. Cable locks are provided with all firearms
sold by Magnum Research, Inc.
CAUTION
5
25772 - PRINT 11/18/03 8:20 AM Page 6
Page 6

Make sure that the pistol is unloaded and in the
“SAFE” position before:
• Receiving or handling over a pistol.
• Transporting a pistol.
• Cleaning or servicing a pistol.
Immediately after firing, set the safety on the “SAFE”
position, remove the magazine and make sure the
chamber is empty.
Make sure that the safety is in the “SAFE” position
when:
• Inserting the magazine.
• You have stopped firing.
• Transporting or moving the pistol.
• The pistol is not in use.
When handling the pistol:
• Never point it at anyone.
• Always make sure that the barrel points in a
safe direction.
• Always assume that the pistol is locked.
• Practice handling the pistol empty.
• The DESERT EAGLE PISTOL may be dry fired
without harm to the pistol’s mechanism.
Never load a pistol until you are ready to use it.
Before firing the pistol:
• Wear ear and eye protection.
• Always be sure of your target backstop and
what lies beyond it.
• Make sure that the barrel, the magazine,
the springs assembly, and ammunition are of
the same caliber.
SAFETY PRECAUTIONS
6
25772 - PRINT 11/18/03 8:20 AM Page 7
Page 7

The DESERT EAGLE PISTOL by I.M.I. is a semiautomatic magazine-fed, double-action pistol. The
safety of the DESERT EAGLE PISTOL locks the firing
pin, decock the hammer and also disconnects the
trigger from the mechanism.
In addition to the high accuracy of the polygonal
rifled barrels and low recoil, the DESERT EAGLE
PISTOL offers the convenience of firing standard
9mm Parabellum (9 x 19), .40 S&W and .45 ACP
in pistols with these caliber designations.
The anatomically formed grip dimensions permit
rapid, accurate, instinctive shooting. The combat
style trigger guard is designed for two-handed
shooting.
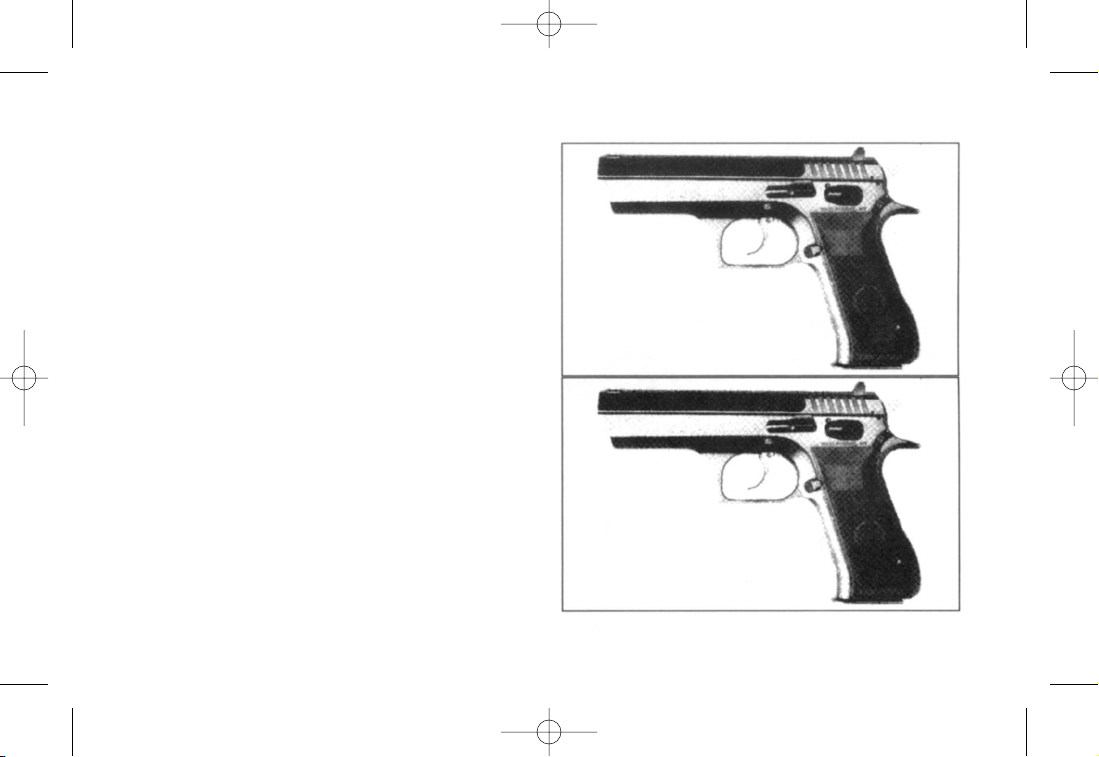
SLIDE-MOUNTED SAFETY
An easily operated slide-mounted thumb safety
and deep-groove serrated slide grip are designed
for positive operation.
FRAME-MOUNTED SAFETY
The models FS and F employ a frame-mounted
safety. This safety disconnects the trigger bar
from the sear while in the safe position. There
is a firing pin block.
GENERAL DESCRIPTION AND CHARACTERISTICS
7
25772 - PRINT 11/18/03 8:20 AM Page 8
Page 8
Common features:
TECHNICAL DATA
8
• Black, slide safety, decocker • Full size grip 3
3/4”
and Short grip 3
1/4”
• Double action/Single Action • Magazine capacity 10-rounds
• Width 1
1/8”
• Polygonal rifling reduces barrel ware and
enhance the contact between bullet and the bore.
Standard Models (MR9900/MR9400) Steel,
Full-Size Grip
• Barrel length 4.72”
• Weight w/empty magazine 2 lbs. 6.6 oz. (9mm)
2 lbs. 5.9 oz. (.40 S&W)
• Overall length 8 1/4”
• Height 5 3/4”
Specific features to models:
Semi-Compact Models (MR9900RS/MR9400RS/
MR4500RS) Steel, Full-Size Grip
• Barrel length 3.7”
• Weight w/empty magazine 2 lbs. 4.1 oz. (9mm)
2 lbs. 4.1 oz. (.40 S&W) 2 lbs. 7.8 oz. (.45 ACP)
• Overall length 7 3/4
”
• Height 5 3/4”
Compact Models (MR9900RB/MR9400RB) Steel,
Short Grip
• Barrel length 3.5”
• Weight w/empty magazine 2 lbs. 2 oz. (9mm)
2 lbs. .7 oz. (.40 S&W)
• Overall length 7 1/4”
• Height 5”
Compact Polymer Models (MR9900BL/MR9400BL)
• Weight w/empty magazine 1 lb .7 oz. (9mm)
1 lb. 9.6 oz (.40S&W)
• Barrel length 3
1/2”
• Short Grip 3 1/4”
• Overall length 7 1/4”
• Height 5”
25772 - PRINT 11/18/03 8:20 AM Page 9
Page 9

OPERATING PRINCIPLES
RETRACTION MOVEMENT
Prior to firing the pistol, the barrel is locked in
position by three lugs engaged in three slots in the
slide assembly. Upon firing the pistol, propellant
gas pressure pushes the slide rearward. During this
movement, both barrel and slide recoil together a
short distance, then the barrel stops and disengages
from the slide; the slide continues its rearward
travel. When the bullet has left the barrel, the empty
cartridge case is extracted and ejected with the
continuing movement of the slide to the rear. At the
same time, the slide pushes the hammer down into
the cocked position, where it is retained by the sear.
The recoil springs are now compressed.
FORWARD MOVEMENT
When the recoil springs expand, they drive the slide
forward. During this movement the slide strips a
cartride from the magazine and inserts it into the
chamber. The locking lugs on the barrel once again
engage the slots in the slide and lock the cartridge
in the chamber.
CONTINUED FIRING
When the trigger is pulled, the sear releases the
hammer which in turn hits the firing pin thus firing
the chambered cartridge. Firing may be continued
in this manner until the magazine is empty. When
the last cartridge is fired and the empty case is
ejected the slide is retained in its rear position by
the slide catch. The slide is actuated by the
magazine follower. The slide catch will release the
slide when depressed by hand.
SAFETY FEATURES
The safety is located at the back of the slide, just
below the rear sight. Pushing the safety downward
will engage the safety. In this position the sear is
held down by the firing pin safety and the trigger
bar, which is pushed downward and cannot engage
the interrupter thus neutralizing the trigger. The safety
is also a decocking device which pulls the firing pin
inside the firing pin channel before the hammeris
released, preventing any contact between them. Due
to the unique blocking of the firing pin by the safety,
the pistol will not fire when dropped accidentally on
its hammer or muzzle.
9
25772 - PRINT 11/18/03 8:20 AM Page 10
Page 10

OPERATING INSTRUCTIONS
OPERATING THE PISTOL
1.Move the safety down into the “SAFE” position
(Fig. 1): a white dot will be visible.
2.Press the magazine release button on the left
hand side of the pistol (Fig. 2), and remove the
magazine.
3.Draw the slide to the rear, and check the chamber
visually to ensure that the pistol is unloaded.
(Fig. 3): Release the slide.
4.Move the safety lever up into the “FIRE” position
(Fig. 4): a red dot will be visible.
5.Point the pistol in a safe direction and pull the
trigger (Fig. 5).
10
25772 - PRINT 11/18/03 8:20 AM Page 11
Page 11

11
6.Cock the pistol again and then release the
hammer by moving the safety down to “SAFE”
position (decocking test).
7.Point the pistol a safe direction, and check
that the trigger is neutralized.
8.Move the safety up to the “FIRE” position and
then pull the trigger, checking the double-action
mechanism.
9.Move the safety down to the “SAFE” position.
WARNING:
The DESERT EAGLE PISTOL can be fired with
magazine removed & a round in chamber.
Always clear chamber when unloading pistol.
25772 - PRINT 11/18/03 8:20 AM Page 12
Page 12

FILLING THE MAGAZINE
1.With the magazine in an upright position, place
a catridge on the magazine follower, in front of
the magazine lips.
2.Press the cartridge down and slide it under the
magazine lips, push the cartidges all the way
to the rear of the magazine (Fig 6).
3.Repeat the process until fully loaded.
NOTE: The number of cartridges in the magazine
can be verified by the indicator holes (Fig 7)
in both sides of the magazine.
CAUTION
Damaged or bent magazine lips will cause a
malfunction. Do not force Cartridges.
12
AMMUNITION WARNING
Use only original, high quality, commercially
manufactured ammunition which is in good condition.
Only use ammunition of the caliber for which your
pistol is chambered. You will find the correct caliber
engraved on the side of the firearm. Never use
ammunition of any other caliber. You should always
use ammunition that complies with performance
standards established by The Sporting Arms and
Ammunition Manufacturers’ Institute, Inc. The use of
hand-loaded or other non-standard
ammunition will void all warranties.
25772 - PRINT 11/18/03 8:20 AM Page 13
Page 13

EMPTYING THE MAGAZINE
1.Push the cartridges forward with your thumb
until they are out from under the magazine lips.
2.Repeat until the magazine is empty (Fig. 7).
13
25772 - PRINT 11/18/03 8:20 AM Page 14
Page 14

SIGHTS AND ZEROING
Standard DESERT EAGLE PISTOL sights consist of
a front and rear sight. Both are combat style,
and are designed to ensure rapid and accuarate
aiming. The square notch on the rear sight is
3mm wide and the front sight blade is 3.3mm
wide. The sight line radius is 150mm.
The single-caliber pistol is supplied with combatstyle front and rear sights.
The DESERT EAGLE PISTOL is factory zeroed at
25 meters. Due to individual eyesight variations,
the actual mean point of impact (M.P.I.) may
vary. Zeroing can be changed on combat style
sights for windage only. To adjust the sights:
1.Use a small hammer and a brass punch to
lightly tap the sight on the side. (Moving the
rear sight to the left will move the point of
impact to the left).
2.Adjustments to the sights in this manner
should only be performed by a competent
gunsmith.
14
25772 - PRINT 11/18/03 8:20 AM Page 15
Page 15

LOADING AND FIRING
PRE-LOADING AND PRE-FIRING CHECKS
1.Perform the safety checks listed on page 10
(para. 1-4) to ensure that the pistol is not
loaded.
2.Make sure that the barrel is clean and dry (all
factory packing grease shouold be removed from
all surfaces before firing the pistol for the first
time).
3.Check that the magazines are clean and
properly loaded.
4.Check that barrel, recoil spring assembly and
magazine are for the same caliber:
Barrel - stamped either 9x19 or .40 S&W
Recoil spring assembly rod - 9mm is blued;
.40 S&W plated (Fig. 9).
Magazine - Stamped .40 S&W. 9mm is not
marked.
5.Always wear ear and eye protection when
firing the pistol.
COCKING THE PISTOL
1. Never chamber a round unless you are ready
to fire.
2.Verify that safety is on “SAFE” position.
3.Insert the magazine into the pistol (Fig 10).
4.Grasp the slide, pull it all the way back and
release it (Fig 11). This operation chambers
a cartridge.
15
25772 - PRINT 11/18/03 8:20 AM Page 16
Page 16

WARNING
• The pistol is now loaded - make sure that the
barrel is pointed in a safe direction.
• Keep your index or trigger finger out of the
trigger guard while cocking.
• If pistol is cocked when safety is in “FIRE”
position, hammer will remain cocked.
FIRING THE PISTOL
1.With the pistol pointed at the target, move the
safety to the “FIRE” position (RED dot will be
visible).
2.AIM and pull the trigger.
RELOADING DURING FIRING
the slide will remain in the rear position after the
16
25772 - PRINT 11/18/03 8:20 AM Page 17
Page 17

17
last cartridge is ejected and the magazine is empty
(Fig. 12)
1.Remove the empty magazine.
2.Insert a full magazine.
3.Release the slide by depressing the slide catch
lever (Fig. 13) or by pulling the slide slightly to
the rear and releasing it.
WARNING
The pistol is now loaded and cocked with the
safety in the “FIRE” position.
OBSTRUCTION WARNING
• Always clean all grease and oil from the
chamber and the bore before loading.
• Be sure there is no obstruction in the barrel.
25772 - PRINT 11/18/03 8:20 AM Page 18
Page 18

A foreign object in the barrel could cause a burst
barrel or other damage to the firearm as well as
serious injury to the shooter or to others.
• It is the sole responsibility of the user to check
the bore for obstructions before discharging the
firearm.
• Always visually check the chamber and bore
after a misfire or any odd sounding high or
low report.
• Discontinue firing until the obstruction, full or
partial, is cleared. “Warranty Claims” resulting
from an uncleared obstruction will not be
covered by the warranty.
• Always wear shooting glasses.
UNLOADING THE PISTOL
1. Set the safety in the “SAFE” position.
2. Press the magazine release button and remove
the magazine.
3.Pull the slide to the rear and eject any
chambered cartridge.
4.While the slide is in the rear position, visually
check to make certain that the chamber is empty.
5.Return the slide to the forward position.
6.Confirm the safety is in the “SAFE” position.
7.Remove all the cartridges fro mthe magazine
(see Filling and Emptying the Magazine).
8.Replace te empty magazine in the pistol.
WARNING
The DESERT EAGLE PISTOL can be fired with
magazine removed & a round in chamber.
Always clear chamber when unloading pistol.
18
25772 - PRINT 11/18/03 8:20 AM Page 19
Page 19

DISASSEMBLE AND ASSEMBLY
GENERAL
This chapter deals with those disassembly and
assembly operations which the user should carry out
for routine maintenance of the pistol.
Disassembling or assembling of any other parts is not
recommended and will void all warranties.
Disassembly should be carried out on a clean surface.
All the disassembled parts should be placed in order
of their removal.
CAUTION
Carry out the following operations before disassembling:
1.Remove the magazine (Fig 3).
2.Draw back the slide several times (without pulling
the trigger) to ensure that there are no live
cartridges in the chamber.
3.Check the chamber visually to make sure that it is
empty (Fig 4).
4.Move the safety to the “FIRE” position (Fig 2).
DISASSEMBLING THE PISTOL
1.With the pistol completely unloaded, and safety
in the “FIRE” position, manually move the hammer
to the cocked position (Fig 14).
2.Push the slide slightly to the rear until the mark
behind the safety is just above the mark on the
frame (Fig. 15).
3.While holding the pistol in that position, remove
19
25772 - PRINT 11/18/03 8:20 AM Page 20
Page 20

the slide catch lever by pushing in on the pin of
the lever on the opposite side of the frame (Fig.
16).
4. Pull the slide from the frame (Fig. 17).
5. Remove the recoil spring assembly from its
housing under the barrel (Fig. 18).
6. Remove the barrel from the slide (Fig. 19).
20
25772 - PRINT 11/18/03 8:20 AM Page 21
Page 21

21
WARNING
No further disassembly is required or advised for
routine maintenance. See par. GENERAL.
ASSEMBLING THE PISTOL
1. Insert the barrel into the slide in its rearmost
(locked) position (Fig 20).
25772 - PRINT 11/18/03 8:20 AM Page 22
Page 22

2. Insert the recoil spring assembly, making sure
that it is securely fitted into the recess in the
bottom lug of the barrel (Fig 21). the coneshaped end of the recoil spring assembly fits
into the barrel lug.
3. Manually move the hammer to the cocked
position.
4. Mount the slide on the frame (Fig. 22) and
push it to the rear until the marks are in line,
one above the other, then insert the slide catch
pin until it snaps into place.
5. Check correct pistol operation by cocking it.
6. Check trigger and hammer operation and
verify that safety is functioning proerly and safely.
22
25772 - PRINT 11/18/03 8:20 AM Page 23
Page 23

-WEAR SAFETY GLASSES-
DISASSEMBLING THE MAGAZINE
1.Before disassembly, remove all
cartridges from the magazine.
2.Hold the magazine with the base
facing upward.
3.With the aid of a small pointed
object, push the base catch button
inward (Fig. 25).
4.With the catch depressed, carefully
slide the magazine base backwards
(Fig. 26) while maintaining
pressure on the base.
23
25772 - PRINT 11/18/03 8:20 AM Page 24
Page 24

5. Carefully holding spring in place with the thumb,
remove magazine base (with other hand)
(Fig. 27).
6. Remove the magazine base catch and spring.
7. Press the follower plunger in and slide it through
the base opening of the magazine (Fig. 28).
WARNING
The magazine spring is under pressure and may
be released accidentally, causing injury if not held
in place during disassembly or assembly. Do not
point the magazine base toward your face or
another person.
24
25772 - PRINT 11/18/03 8:20 AM Page 25
Page 25

ASSEMBLING THE MAGAZINE
To assemble the magazine perform the above steps
in reverse order.
NOTE: We do not recommend further disassembly
of this pistol. Any other maintenance or
repairs must be performed by a factory warranty
repair station. Any work done by others or an
unqualified gunsmith will void the warranty.
25
25772 - PRINT 11/18/03 8:20 AM Page 26
Page 26

CARE AND CLEANING
GENERAL
Comprehensive knowledge of how to service and
handle the pistol is of great importance. Experience
has shown that most failures which occur while
operating the pistol are due to negligence in maintenance. Special attention must be paid to cleaning,
lubricating and inspecting the pistol; this will determine whether or not the pistol functions properly
when you need it. In order to maintain accuracy, the
barrel must be serviced thoroughly. The slide and
other moving parts of the pistol must be kept clean
and lightly lubricated to ensure proper operation.
Care and cleaning included the magazines, which
must be kept free from rust, grit, etc., in order to
function properly.
CLEANING THE PISTOL
1.Upon receiving the pistol, disassemble and
inspect it (see page 19, Disassembly).
26
25772 - PRINT 11/18/03 8:20 AM Page 27
Page 27

2.Clean the pistol regularly to ensure it functions
properly when needed.
3.For the initial cleaning, make certain that any
heavy or sticky deposits of protective material
are removed. To do so, use a very light rustpreventative oil to remove the coating.
4.When cleaning the slide, pay particular
attention to the area around the extractor and
firing pin, making certain that all powder
residue is removed (Fig. 29) A small brush,
swabs and solvent should be used to remove
dirt from hard to reach areas. (Fig. 29).
5.To clean the barrel, use the brass wire brush.
Run the brush completely through the chamber
and bore until it protrudes from the other end
of the barrel.
6.Pull the brush in the opposite direction and
remove it from the barrel (Fig. 30). Repeat this
operation several times.
7.Use a patch moistened with powder solvent and
clean the bore (Fig. 31). Repeat this operation
using clean, dry patches.
27
25772 - PRINT 11/18/03 8:20 AM Page 28
Page 28

8. Oil the chamber, bore and all moving parts of
the pistol with a lightly oiled patch/cloth, then
remove all excess oil with a dry one.
9. While cleaning, inspect all parts for wear and
damage; make sure all surfaces are free from
rust.
10.Assemble the pistol and make sure it functions
properly.
11.Never use abrasive or metallic objects,
synthetic cloth, dry cleaning fliuds,
detergents, acids, lyes, water or steam for
cleaning.
28
25772 - PRINT 11/18/03 8:20 AM Page 29
Page 29

DESERT EAGLE PISTOL
(Frame-mounted safety) MODELS F, FS & FSS
This supplement refers to the following pistols:
F & FS 9mm Para (Luger) - single caliber
F & FS .40 S&W - single caliber
The priciple differences distinguishing the F & FS
from the slide-mounted safety are:
• Frame-mounted safety, left side only
• In “FIRE” position, the safety lever points down
(parallel to the slide - red dot visible)
• In “SAFE” position, the safety lever points up
Hammer cannot be decocked.
• Firing pin remains blocked until trigger is pulled.
• In “SAFE” position, pistol can be cocked only if
hammer is cocked!
Apart from these differences, operation and
maintenance of the two pistol types are identical.
The differences between the pistol parts are listed
on page 32.
ATTENTION
Note that “FIRE” and “SAFE” positions in the F &
FS are not the same as in the slide-mounted safety.
In the F & FS there are no white dots in the
“SAFE” position.
IMPORTANT NOTE
MODELS F, FS & FSS FRAME-MOUNTED SAFETY
The models Fs and F employ a frame-mounted
safety. This safety disconnects the trigger bar from
the sear while in the safe position. There is a firing
pin block.
After firing, the safety may be placed in the safe
position with the hammer cocked or the hammer
must be manually lowered by restraining hammer
with thumb and disengaging sear by pulling
trigger and then moving safety to safe position.
29
25772 - PRINT 11/18/03 8:20 AM Page 30
Page 30

WARNING
ALL FIREARMS ARE DANGEROUS OBJECTS - PISTOLS INCLUDED.
ALWAYS CONSIDER THE PISTOL LOADED. TO RENDER IT SAFE, FIRST SET THE SAFETY ON
THE “SAFE” POSITION. REMOVE THE MAGAZINE, THEN EJECT ANY REMAINING ROUND BY
PULLING THE SLIDE TO THE REAR.
IT IS DANGEROUS TO ALTER OR MODIFY THIS FIREARM IN ANY WAY. ANY ALTERATIONS
OR MODIFICATIONS OF THE FIRING MECHANISM MAY RESULT IN THIS FIREARM BECOMING
UNSAFE, AND WILL NULLIFY ALL WARRANTIES.
USER IS ADVISED TO READ THE ENTIRE MANUAL PRIOR TO HANDLING THIS PISTOL AND
OPERATING IT FOR THE FIRST TIME.
LIMITATION OF LIABILITY
The liability of I.M.I. for any and all
ISRAEL MILITARY INDUSTRIES
losses and/or damage to the purchaser MAGNUM RESEARCH, INC. reserves the right to make such
shall in no event exceed the purchase 7110 University Avenue N.E. • Minneapolis, MN 55432 alterations in design, dimensions,
price of pistol. In no event shall (763) 574-1868 • FAX (763) 574-0109 specifications and manufacture as
I.M.I. be liable for incidental or are deemed necessary to ensure
consequential damage. continued improvement.
25772 - PRINT 11/18/03 8:20 AM Page 31
 Loading...