

SURFOX 304
User’s guide
Manuel de l’utilisateur
Manual del usuario
Manual do Usuário
SURFOX website
(Link to surfox.com)


Table of contents
Table of contents
1 Introduction 2
2 Safety instructions 3
3 Equipment controls 4
A) Control panel pictograms 4
B) Front and back view of the machine 5
C) Wand control buttons 6
D) Fume elimination system 6
E) Tip repositioning (comfort for operator) 6
4 Control panel 7
A) Main power switch 7
B) Wand and accessory selector knob 7
C) Current mode selector knob 7
D) Solution pump switch 7
E) Indicator lights 7
F) Accessory outlet 7
5 Start-up procedure 8
A) What is included in the box 8
B) Filling the reservoir 8
C) Connecting air supply 8
D) Plugging in the power cord 8
E) Plugging in the ground clamp 8
6 Using the large wand to electrochemically
clean, polish and passivate 9
A) Selecting the proper wand and accessory 9
B) Selecting the proper current type, AC or DC and
proper current level, STD or MAX 9
C) Selecting the proper pumping mode 9
D) Cleaning and passivating 9
E) Neutralizing 9
7 Large wand accessories 10
A) Selection and mounting of the cleaning
pads and tips 10
B) PTFE clamp rings 12
C) SURFOX electrolyte solutions 12
D) Mounting a cleaning pad 12
8 Using the micro wand (optional) to clean, polish
and passivate 13
A) Selecting the proper wand and accessory 13
B) Selecting the proper current type, AC or DC and
proper curent level, STD or MAX 13
C) Manual pumping mode 13
D) Cleaning and passivating 13
E) Neutralizing 13
9 Using the marking/etching wand (optional) 14
A) Marking kits 14
B) Selecting the proper wand and accessory 14
C) Selecting the proper current type, AC or DC and
proper curent level, STD or MAX 14
10 Neutralizing 15
A) Directions for neutralizing SURFOX
electrolyte cleaning solutions 15
B) SURFOX weld cleaning and neutralization
procedure 15
11 Safety features 16
A) Sparks on the tip/work piece 16
B) Internal temperature 16
C) AC/DC current basics 16
D) AC/DC settings on the SURFOX machine 17
E) Welds that cannot be cleaned 17
12 Technical data 18
13 Warranty and service 18
A) Warranty policy 18
B) Repair and service 18
Version française 20
Versión española 39
Versão Português 58
SURFOX 304 User’s Guide 1

Introduction
1
Introduction
Congratulations on purchasing the finest electrochemical
weld cleaning and passivation equipment available today.
WALTER’s SURFOX
easily and cost effectively removes the heat tint from heat
affected zones while completely passivating the stainless
steel surface.
Our new generation of SURFOX machines are equipped
with self-regulating inverter boards, automatically monitoring
and adjusting the current so as to ensure maximum
cleaning effectiveness without loss of productivity.
Before starting, please read the SURFOX
completely as we take you step-by-step through the startup, operating and maintenance procedures of your new
SURFOX
built with extra durability to stand up to the heavy demands
of industrial use. However, like any piece of electrical
equipment, care and safety should always be taken when
using and maintaining this valuable investment. With proper
care and maintenance your SURFOX equipment will provide
years of dependable service.
To learn more about other WALTER products, visit our
website: www.walter.com
equipment. Your new SURFOX machine has been
TM
weld cleaning equipment quickly,
owner’s manual
1.1 General Information
This manual provides all the information required for a safe
installation, start-up and operation of the machine, along
with troubleshooting and maintenance instructions.
WALTER is not liable for any consequences of incorrect use
of its products, for example:
u Incorrect use of the machine or use by untrained
persons;
u Use in violation of the reference standards;
u Incorrect installation;
u Unsuitable main power supply;
u Incorrect maintenance;
u Incorrect maintenance;unauthorized modifications and
tampering;
u Incorrect maintenance;use of non-original spare parts
or spare parts not specified as suitable for the model in
question;
u Incorrect maintenance;partial or total failure to follow the
instructions;
u Unexpected events;
u And any other improper use.
Operation
The SURFOX machine works by an electrochemical
process to clean and passivate welds on stainless steel.
SURFOX electrolyte solutions are phosphoric acid based,
approved for food industry, and are activated by an electrical current to clean welds. The process takes only a few
seconds without damaging or scratching the surface of the
parts to be cleaned.
The manual is an integral part of the machine and must be
kept carefully with the machine until it is disposed of, to
allow for reference to future updates. Should your copy of
the manual be lost or unreadable, you can request a new
copy from: WALTER - walter.com or surfox.com
The present manual reflects the condition of the machine
at the time of manufacture and may not be deemed
inadequate in case of updates due to subsequent
experience.
WALTER reserves the right to update its products and
manuals without prior notification to users of previously
manufactured machines.
2
Your SURFOX 304 machine can clean:
u TIG welds
u Plasma welds
u Laser welds
u Spot welds
u MIG welds
Basics of passivation:
u The cleaning of the welds is not only for aesthetic
purposes but most importantly for passivation.
u Passivation is the treatment of stainless steel surfaces
to remove contaminants and promote the formation of
a thick and durable protective chromium oxyde layer.
u This passive layer will insure the corrosion resistance of
stainless steel.
u If passivation is not done properly, stainless steel and
heat affected zones may start to rust.

Safety instructions
Safety instructions
2
WALTER weld cleaning machines are produced in accor-
dance with applicable standards governing the manufacture, performance and safety of industrial products.
WARNING: When using these machines, basic safety
precautions should always be observed to reduce the risk
of fire, electrical shocks and personal injuries.
Before using this machine, read all Safety and
Operating Instructions carefully and save this owner’s
manual for future reference.
1. Read this owner’s manual to familiarize yourself with
this unit’s operation, its particular features, applications
and limitations.
2. This unit is equipped with a 3-conductor power cord
and 3-prong electrical plug, it must be connected to
a correspondingly grounded receptacle.
3. Allow a minimum of 8” clearance around the unit to
keep all air openings clear of any obstruction. Free
airflow through the vent openings is required to
prevent the unit from overheating.
Keep work area clean and well lit. A cluttered environ-
4.
ment invites accidents. Remove any material that
may be ignited by sparks. Do not use this tool when
flammable liquids or gases are present. Keep handles
clean, dry and free from cleaning solution, oil and
grease. Do not use in rain, damp or wet locations.
5. Keep children and other persons at a safe distance
from the work. Make sure no one is under you when
working in high places. Do not let unqualified persons
handle this machine.
6. When working, always wear appropriate clothing
and safety gear, such as suitable and safety approved
chemical resistant gloves, overalls, safety shoes, etc.
7. Always wear approved safety goggles.
8. During the cleaning process, the wand tip and work
piece can reach very high temperatures, allow to cool
before coming in contact with exposed skin.
9. Avoid inhalation of fumes, use only in well ventilated
areas. Use a respirator, if necessary.
10. All electric shocks can be potentially dangerous.
11. Should you encounter an electrical problem, do not
use the unit until qualified personnel have inspected
the equipment.
12. Never operate the unit without its protective cover.
13. Stay alert at all times when handling this unit. Watch
what you are doing. Use common sense. Do not
operate the tool when you are tired. Never leave it
running unattended.
14. Make sure the switch is in its OFF position before
plugging in or when moving the unit to avoid uninten tional starting.
15. Hold the wand firmly. Do not overreach, maintain good
footing and balance at all times.
16. Before use, all parts should be carefully examined to
determine that the unit will operate properly and
perform its intended function.
17. Parts that are damaged or defective should be repaired
or replaced by a WALTER Authorized Service Center.
18. Do not use the unit if the switch does not turn ON/OFF.
19. Use only the accessories recommended for this
system. Always check accessories before starting to
work and do not use if damaged.
20. CAUTION: WALTER SURFOX electrolyte weld cleaning
solutions contain phosphoric acid and may cause burns
when not handled properly. Avoid skin contact.
First aid Wash affected area with water.
Eye contact Flush with water for 15 minutes lifting
eyelids occasionally. Contact physician if necessary.
Ingestion DO NOT induce vomiting. Rinse mouth,
drink plenty of water and get medical attention.
Refer to WALTER product MSDS or SDS for complete
safety data information on walter.com or surfox.com.
21. Use only WALTER SURFOX electrolyte solutions with
this unit and NEVER mix it with any other products.
22. The use of the fume elimation system (page 6.) is highly
recommended when working in confided areas.
23. Do not use your SURFOX machine on the same struc-
ture when arc welding is in progress. Current could
ground back tot he SURFOX machine and cause irreparable damage.
24. Store solution in its original container and in a safe
place, out of the reach of children and other unquali fied persons. Keep container contents clean. Do not
reuse SURFOX electrolyte cleaning solutions.
25. Do not touch the wand tip or work piece while working
or immediately after use, they may be extremely hot
and could cause serious burns.
26. Do not abuse the power cord. Never pull or lift this unit
by its cord or yank to disconnect it from the receptacle.
Keep the cord away from heat, oil and sharp edges.
Inspect the cord periodically, if damaged, have it re placed by a WALTER Authorized Service Center.
27.
When not in use, switch OFF and unplug the electrical
cord and air hose (if connected). It must remain unplugged when replacing cleaning pads and accessories,
while performing maintenance and before servicing.
28.
Store the unit in a dry safe place, out of the reach of
children and other unqualified persons.
SURFOX 304 User’s Guide 3
Safety instructions
Equipment controls
2
Amperage
Before connecting this unit, check that the amperage
shown on the rating plate is the same as the power supply.
Operating this unit on an amperage other than specified on
its rating plate may result in personal injury to the user and
damage the unit.
Preventive maintenance
After use, allow the tip to cool and remove the cleaning pad
Neutralize with SURFOX-N and rinse the cleaning pad and
wand tip with water and dry. Clean dust and dirt deposits
from the exterior of the unit. Keep all airflow vent openings
free of any obstructions. Clean the power cord to prevent
deterioration and check for possible damage to cord and
plug.
Note: Damaged cords must be replaced immediately by
qualified personnel only. Refer to Spare Parts List for the
ordering number.
3
Equipment controls
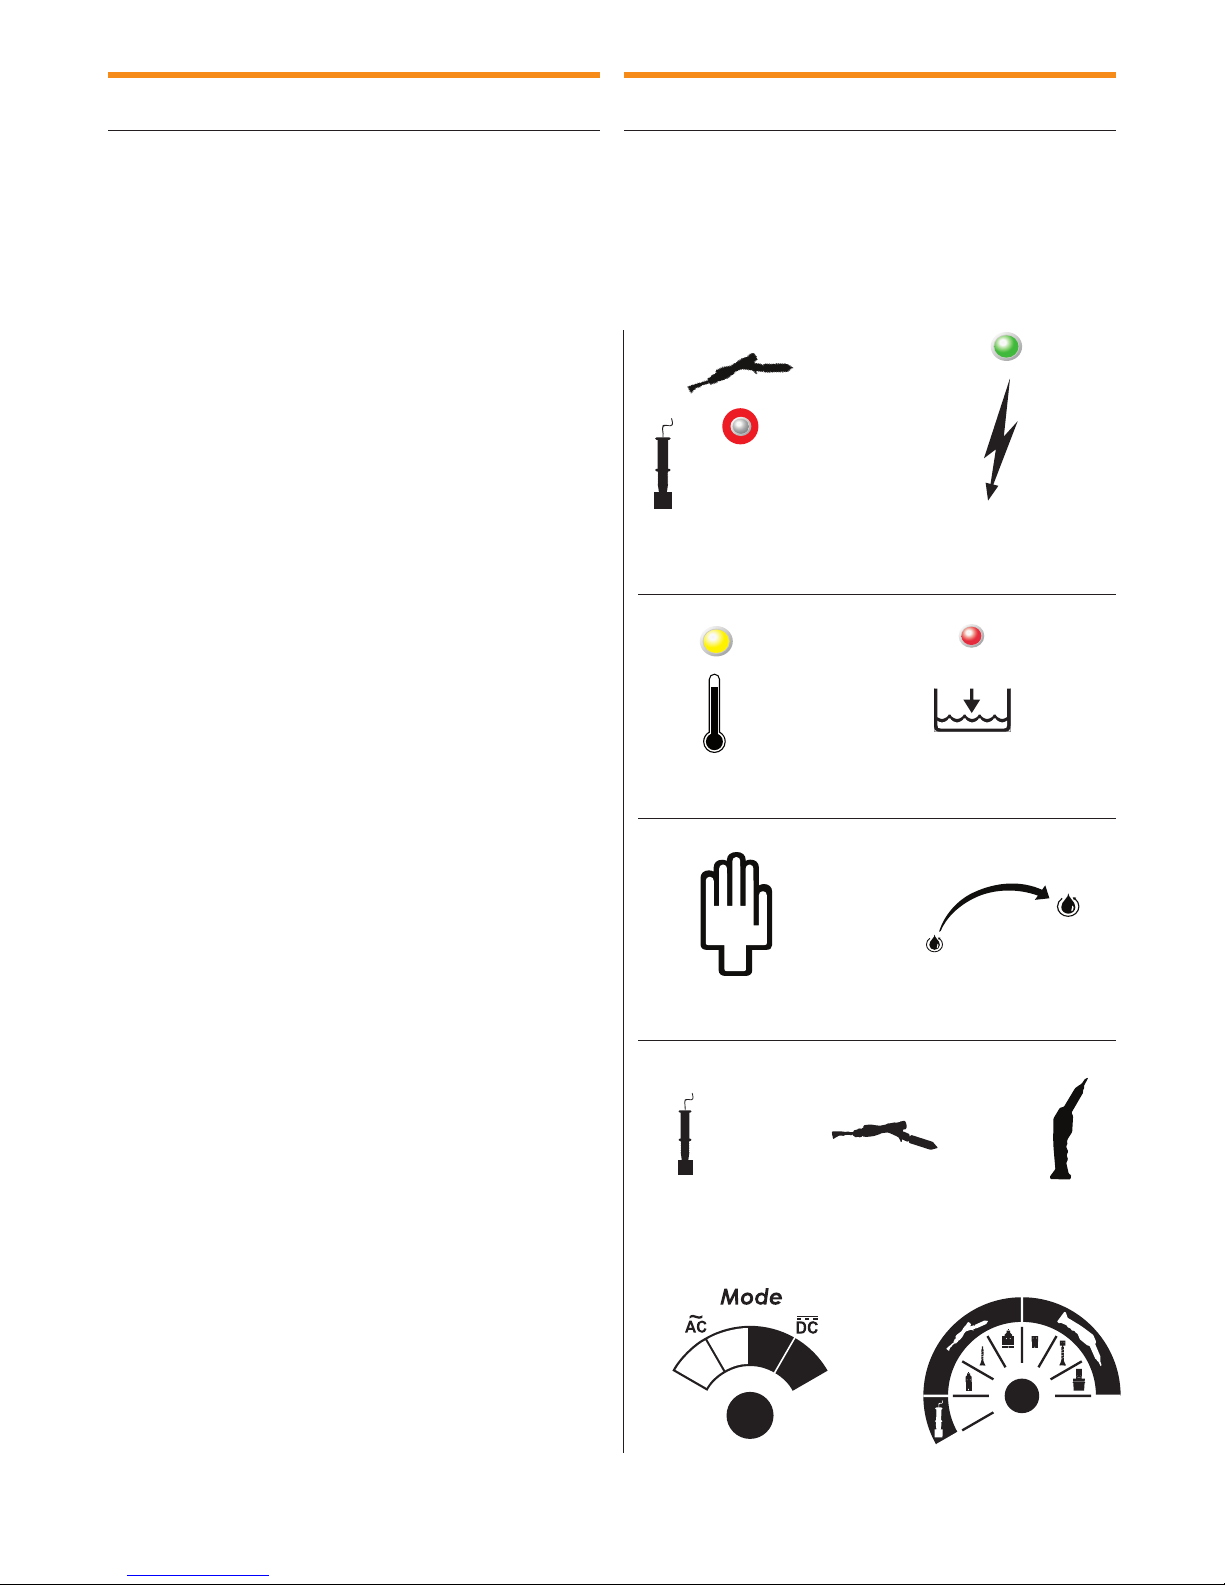
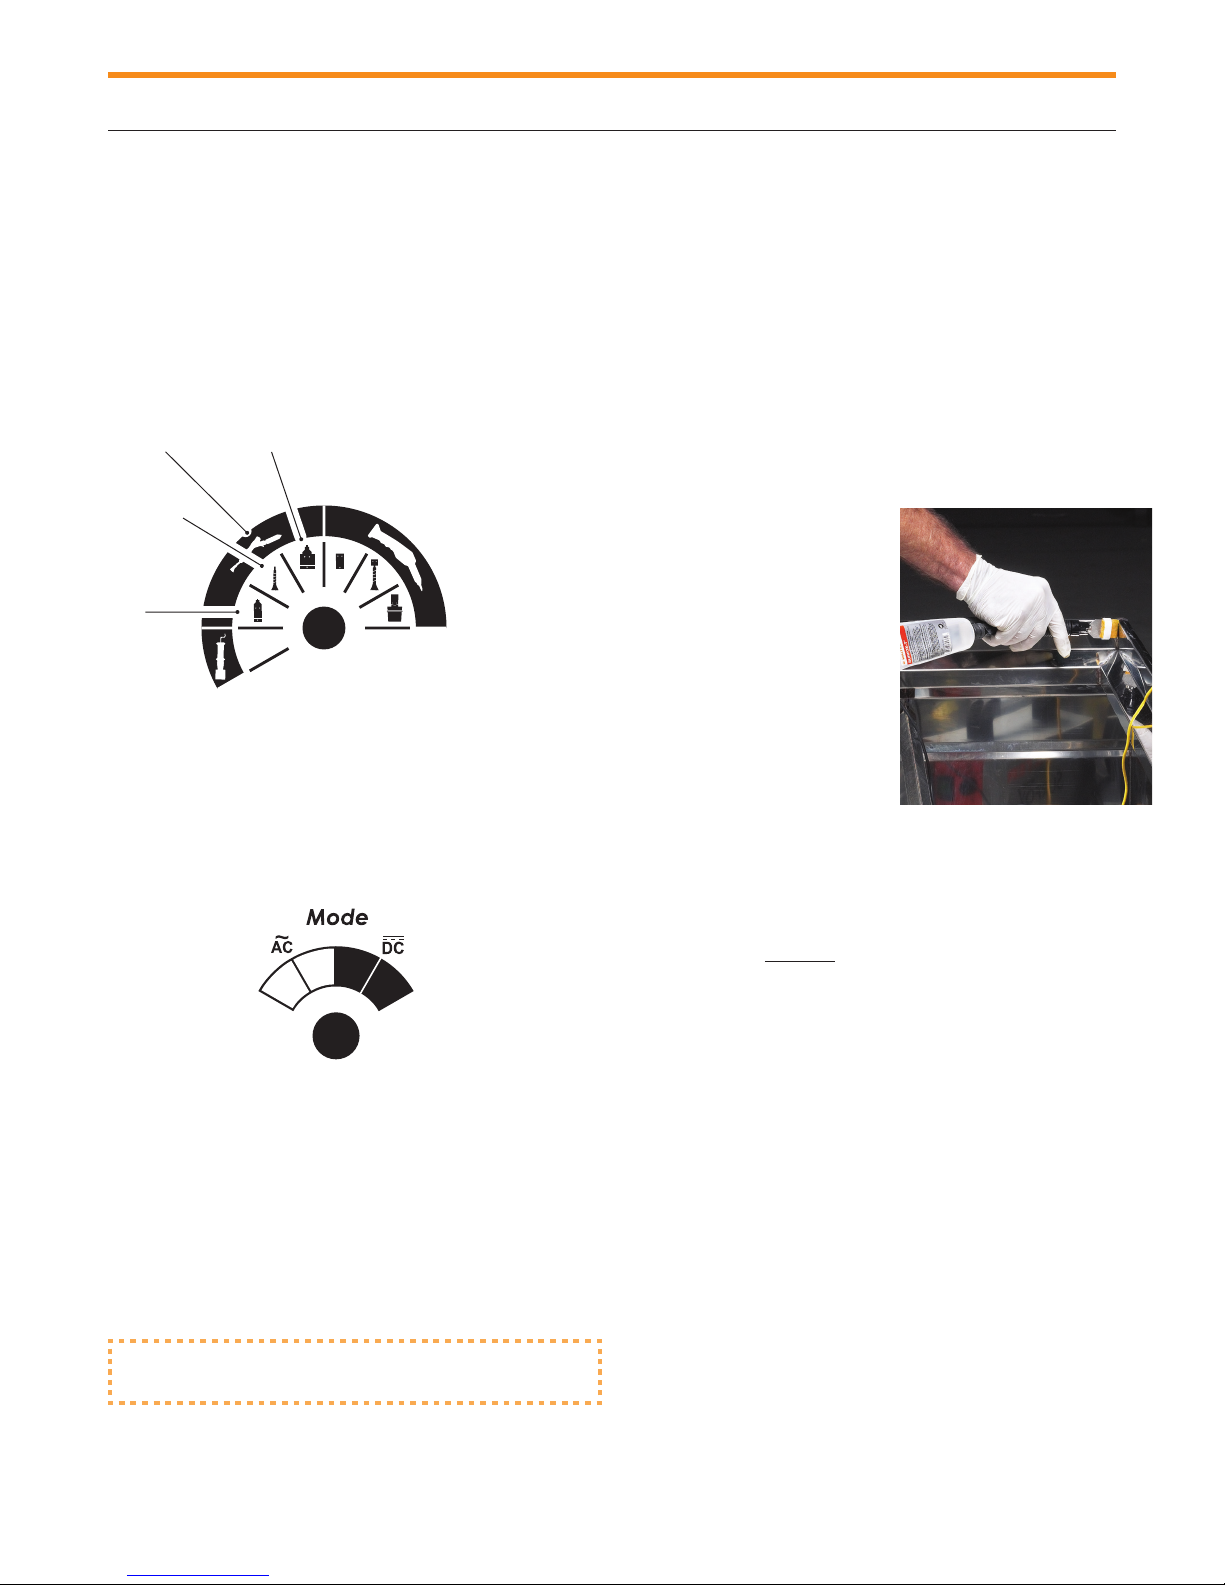
A) Control panel pictograms
.
Outlet for micro-wand
or marking wand
Indicator for wand tip
power ON
Transportation
Before transporting the machine, make sure the cleaning
solution reservoir and supply line are completely empty
and all connecting lines disconnected. The machine must
be carefully packed in a suitable container and properly
protected. WALTER will not be held responsible for any
damages resulting from leaked cleaning solution or rough
handling.
Storage
If the machine is to be stored for any length of time, the
cleaning solution reservoir and supply line must be emptied,
cleaning pad removed (neutralized, rinsed and left off) and
the tip neutralized, rinsed and dried. Store in a dry
safe place to avoid damage, especially to the electronic
components.
Waste disposal
Dispose of residual waste in compliance with Federal,
Provincial, State and local environmental regulations. Refer
to WALTER Material Safety Data Sheet of the SURFOX
electrolyte cleaning solutions on walter.com or surfox.com.
Extension cord
Indicator for high internal
temperature
Manual pumping mode Automatic pumping mode
Marking wand Micro-wand Large wand
MAX STD
STD MAX
Indicator for LOW
solution level
When an extension cord is needed, use wire size 14 (AWG)
for up to 50 feet (15 meters) and size 12 (AWG) for 50 to
100 feet (15 to 30 meters).
4
Current mode selector
Wand and Accessory
Selector Knob

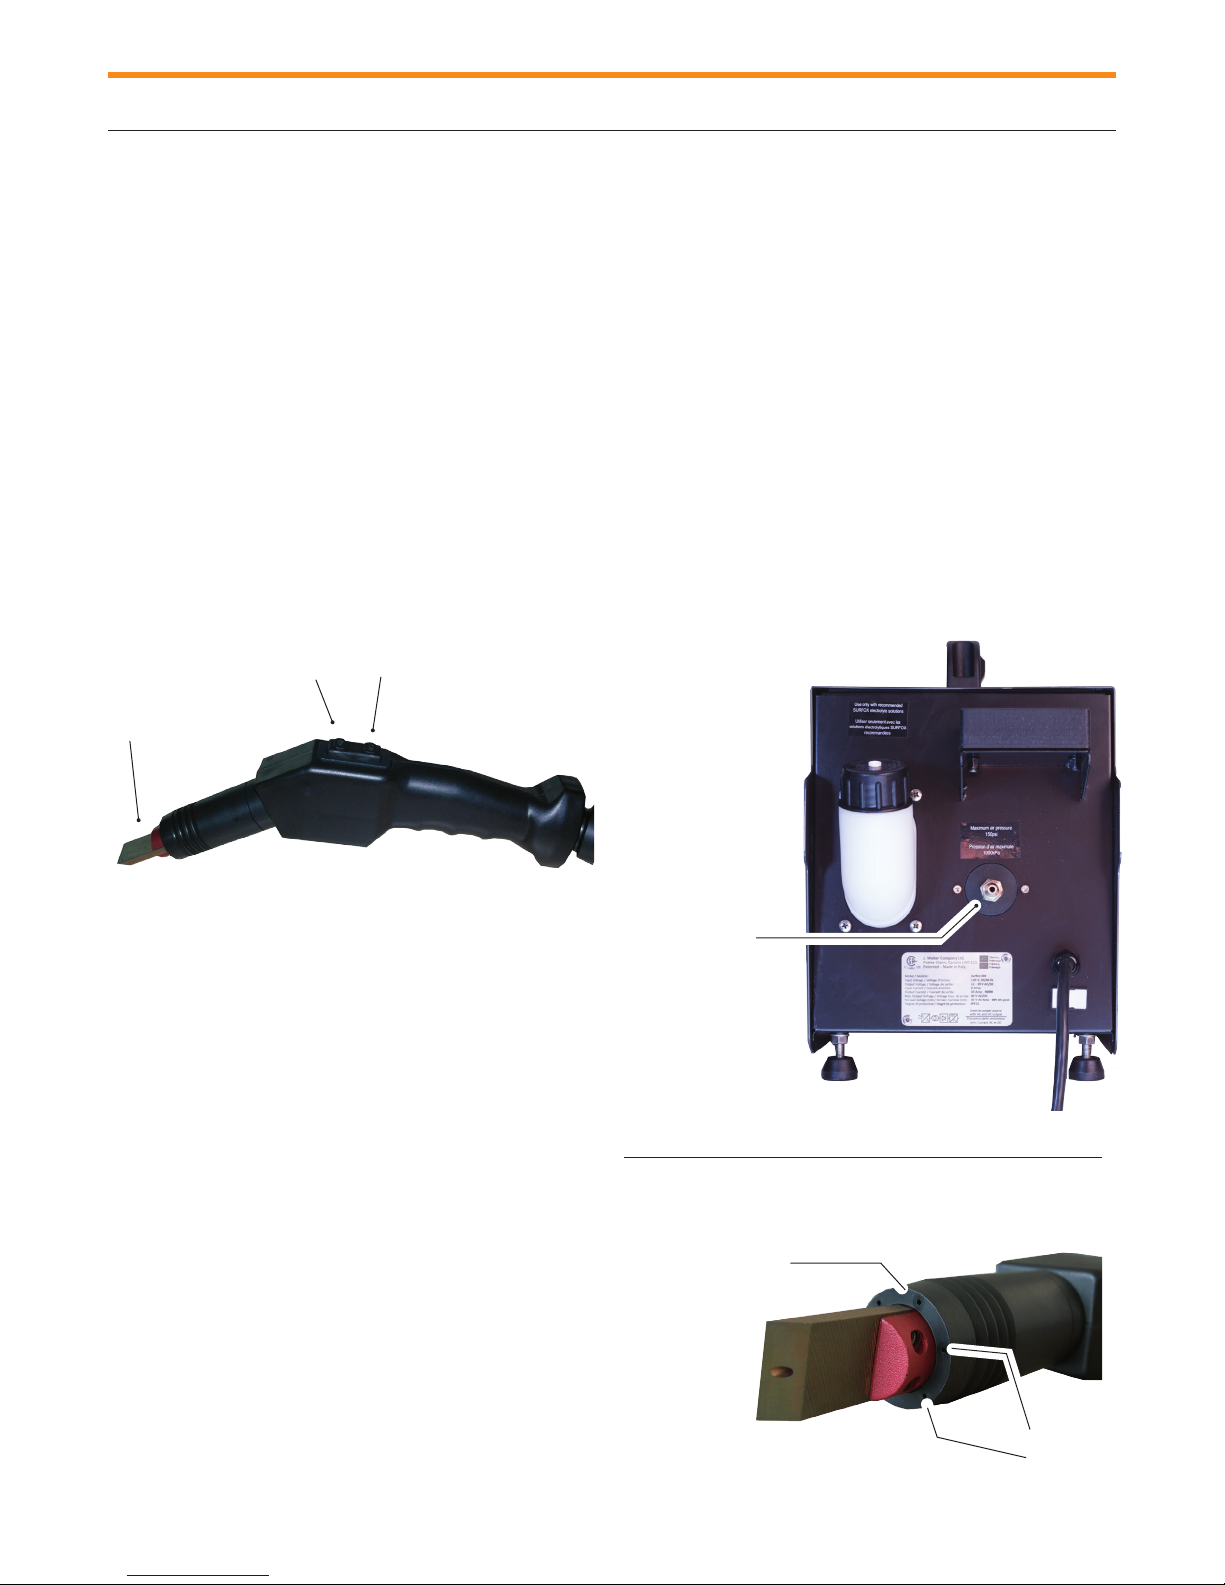
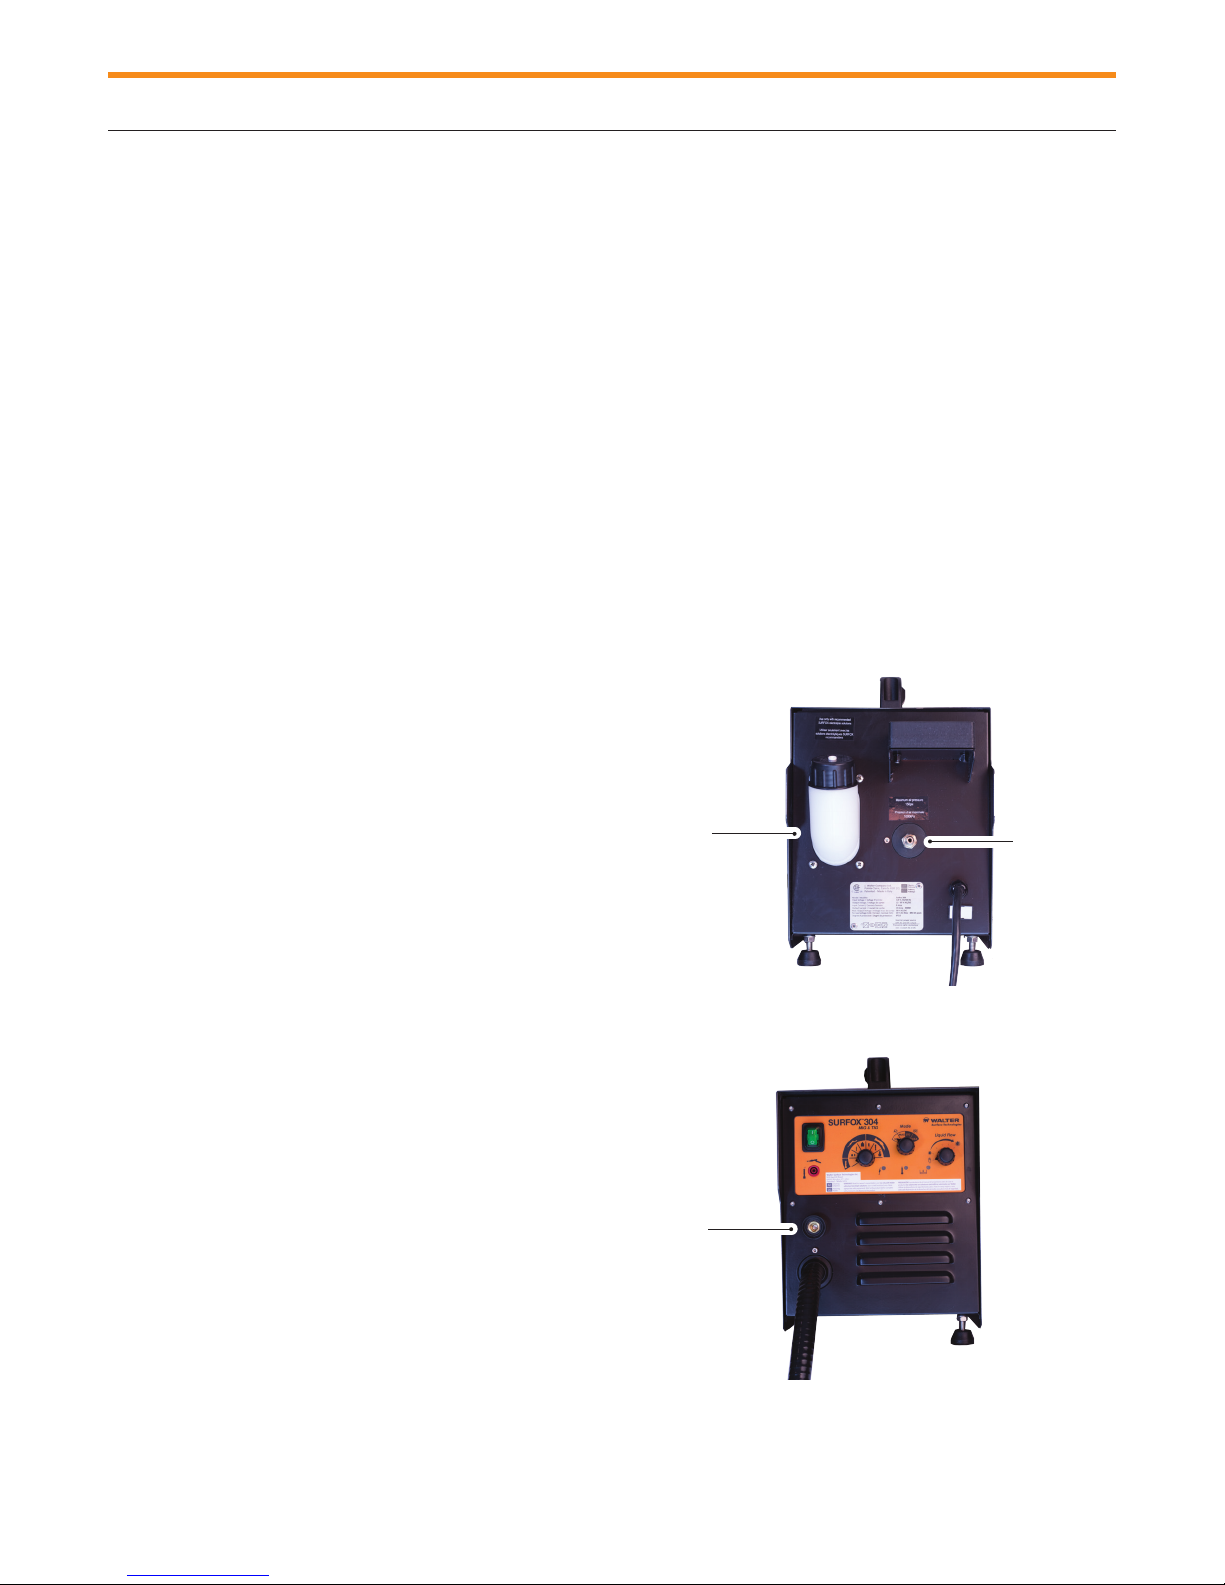
B) Front and back view of the machine
Equipment controls
3
ON/OFF button
Accessory outlet
Ground connector
Large wand hose
(electrical and solution
supply lines)
Control panel
SURFOX electrolyte solution
filling and reservoir
Cleaning pad mounting unit
Compressed air
connector (for fume
elimination system)
Power cord
SURFOX 304 User’s Guide 5
Equipment controls
3
C) Large wand control buttons
The ON button is used to give power to the cleaning
accessory. When the pumping mode is set to Manual, press
the ON button to activate the pump. Press and keep the
button pressed to get continuous flow of liquid.
However, if the pumping mode is set to automatic, press
the ON button once to activate the pump. To stop the
pump, press the OFF button. When finished working
with the machine (in either mode) make sure to press
the OFF button.
Once the ON button is pressed, there will be continuous
power at the tip until the OFF button is pressed.
ON OFF
Cleaning
Accessory
E) Tip repositioning (comfort for operator)
The tungsten tip may be rotated from the standard horizontal position to a vertical position or anywhere in between to
make your cleaning as comfortable as possible. To loosen
the right hand threaded fume elimination sleeve, turn tip to
desired position and retighten sleeve.
Important: Always retighten fume elimination sleeve to
ensure a good electrical connection and avoid damaging
the contact points.
D) Fume elimination system (patented)
The SURFOX 304 machine comes with the integrated fume
elimination system. This system provides for better working conditions. Although the fumes are non-toxic and non
hazardous, they can be uncomfortable when working in
confined areas.
To activate this feature simply connect a compressed air line
(150 PSI max., 80 PSI min.) to the fitting at the back of the
machine. The fume elimination system is automatically activated when the ON button is pressed on the large wand.
The fume elimination system is turned OFF when the OFF
button on the large wand is pressed. If the fume elimination
system is not wanted, simply disconnect the compressed
air line.
The working principle is quite simple and highly effective;
the air comes out through the small openings behind the
cleaning accessory. This preset regulated air pressure condenses the vapors out of the air.
6
Compressed
air line fitting
Cleaning accessory close up
Small openings
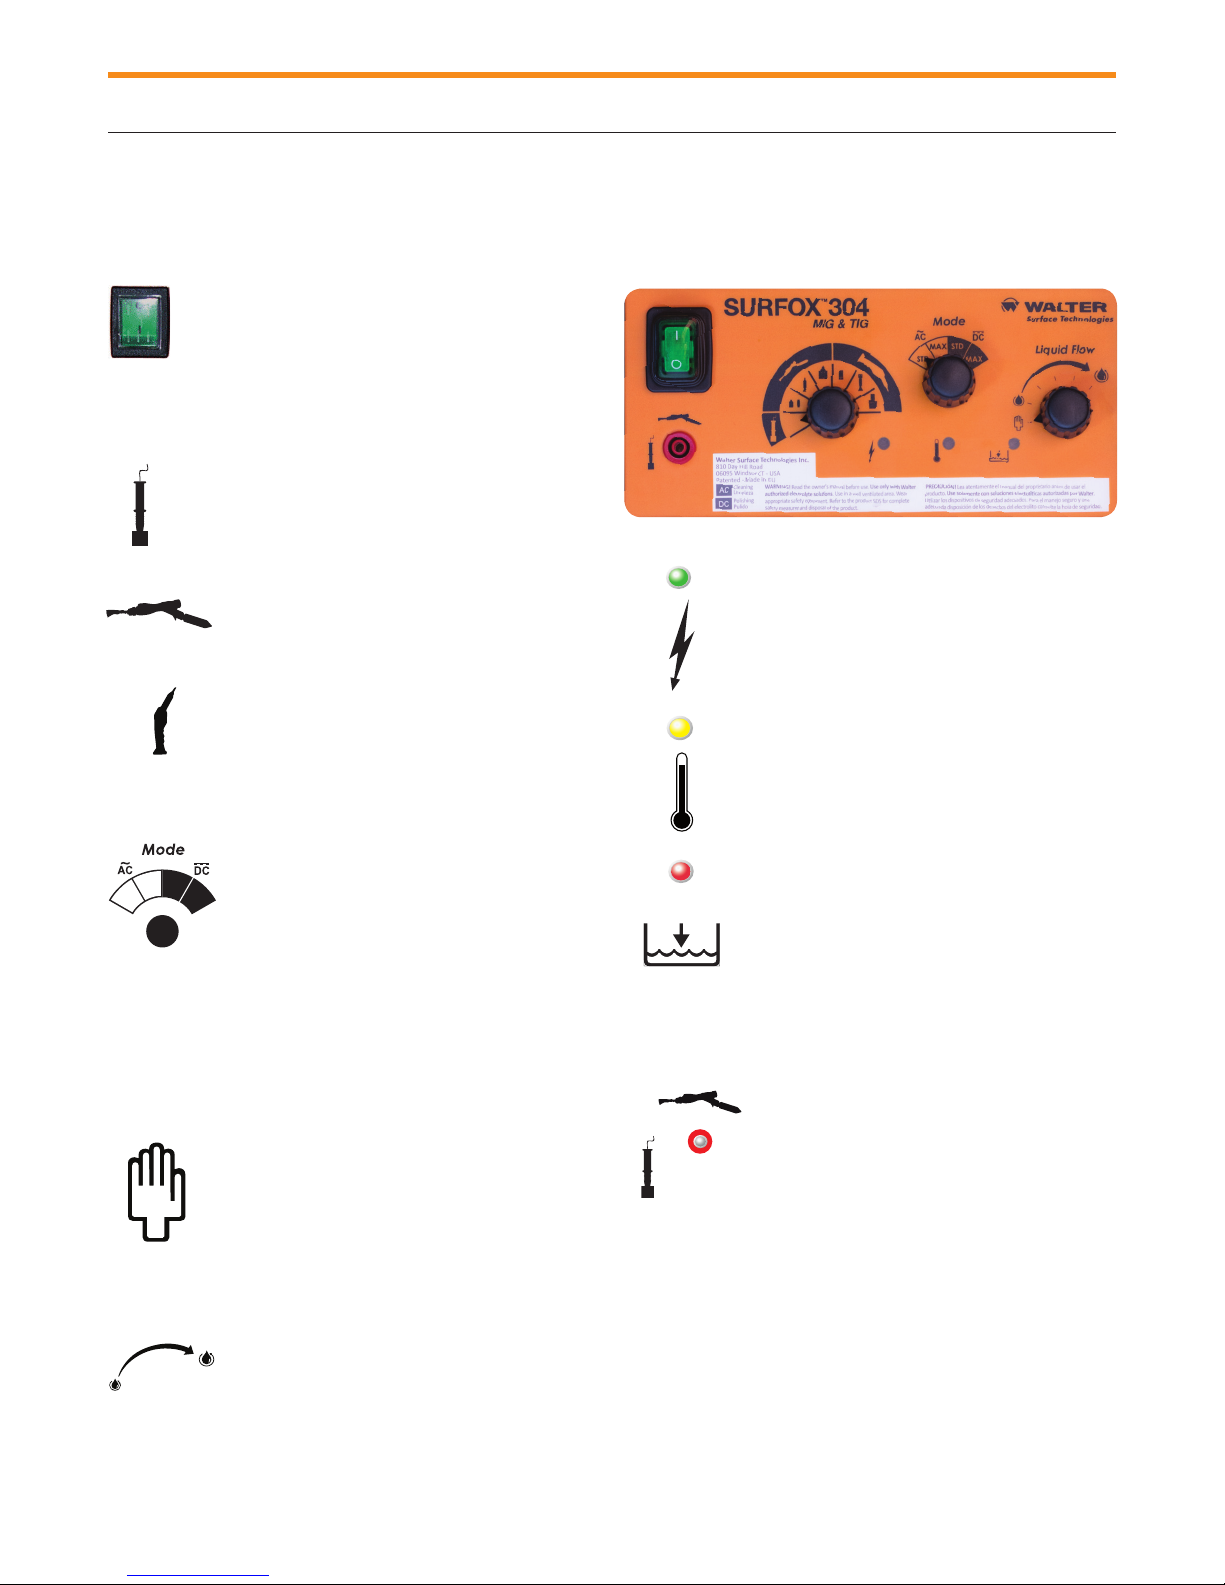
Control panel
A) Main power switch
Control panel
4
MAX STD
STD MAX
Turns the main power to the unit ON
and OFF.
B) Wand and accessory selector
knob
Marking and etching wand. Select this
icon when using a marking/etching wand
which has been plugged into the accessory
outlet.
Micro wand. Select this icon when using
the micro wand which has been plugged
into the accessory outlet. Select the right
accessory, either the tungsten insert, the
brush or the large insert.
Large wand. Select this icon when using
the large wand attached to the SURFOX
unit.
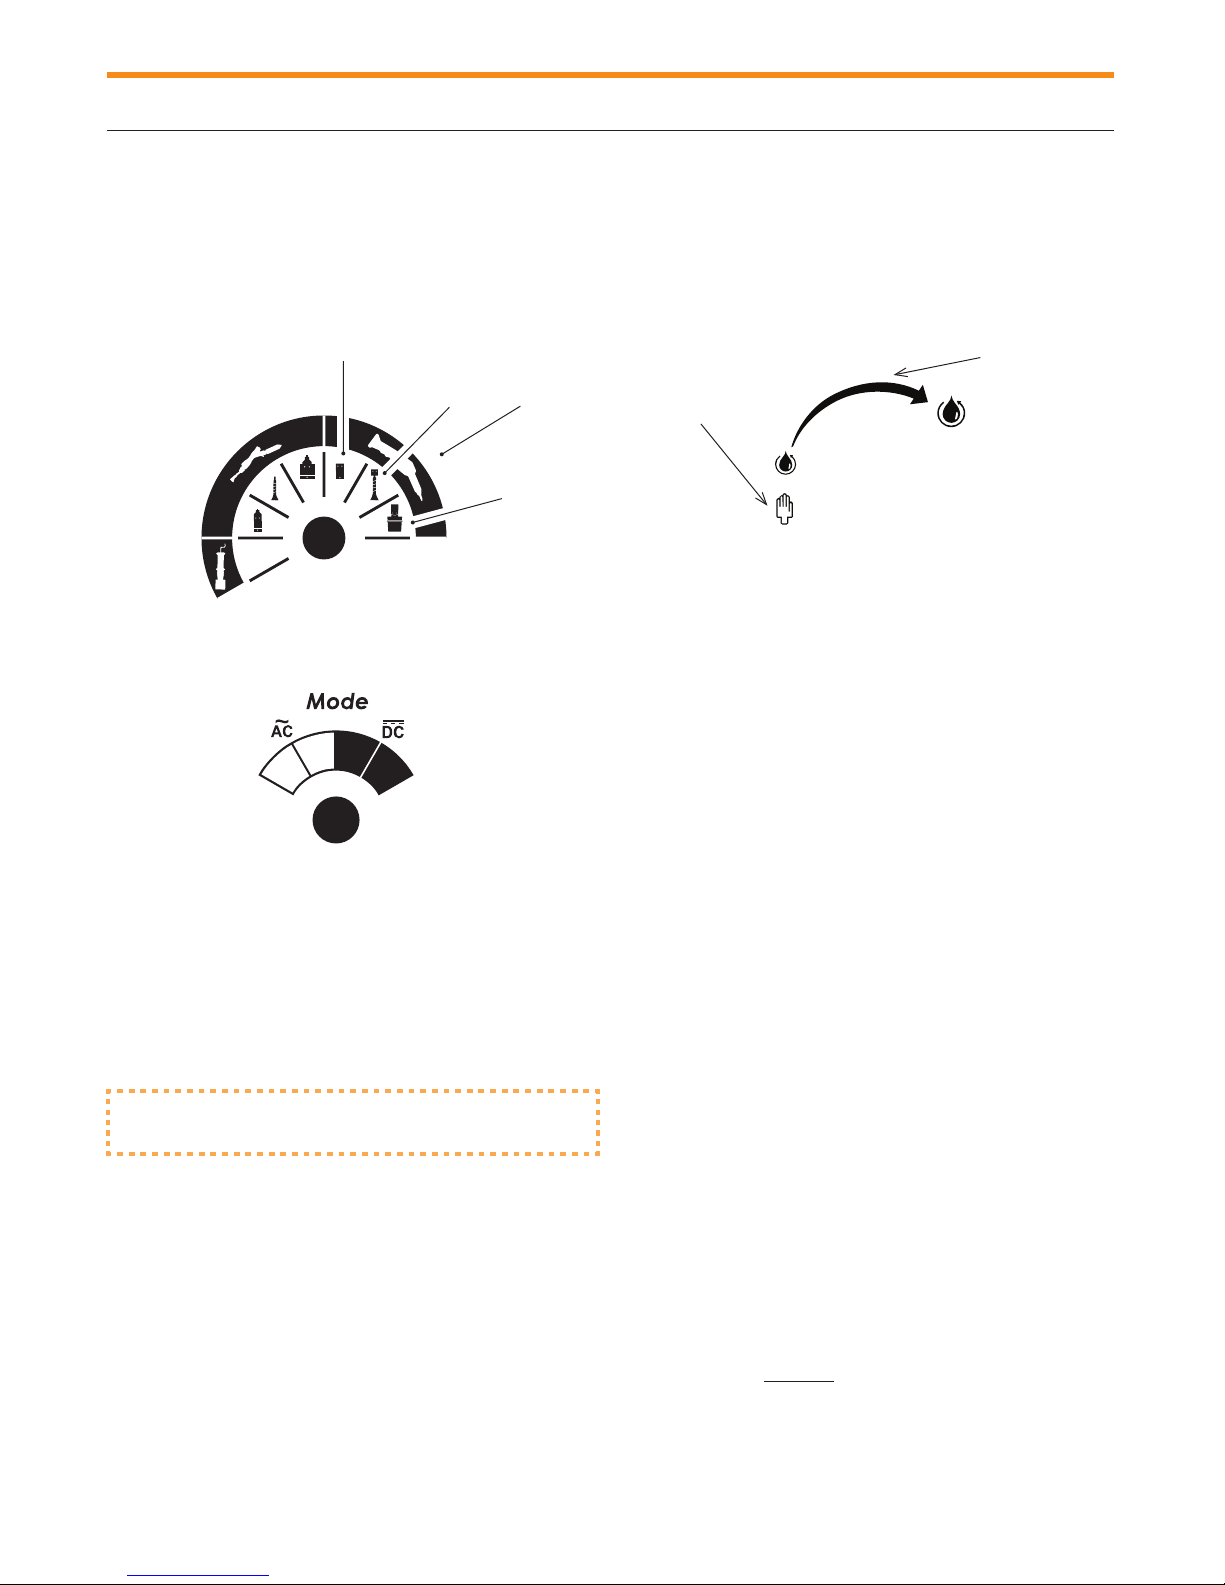
C) Current mode selector
Selecting the proper current type, AC
or DC, STD or MAX. AC for cleaning
and passivating the weld. DC for cleaning,
passivating and polishing the weld. STD is
recommended when using the tungsten
inserts and pads, MAX is recommended
when using the brush or the large graphite
insert.
A
F
C
B
D
E
E) Indicator lights
Large wand power ON indicator. The
green light goes ON when the large wand
ON button is pressed and there is power
to the tip. Power to the tip is OFF when the
large wand OFF button is pressed.
If the operating temperature is too high, the
yellow light goes on and the machine will
shut down and restart by itself when the
temperature reaches an acceptable level.
Low solution level indicator. When
solution level is low, the red indicator light
will go on.
D) Solution pump switch
Manual pumping mode. Choose the man-
ual pumping mode to control the amount of
solution pumping to the tip. Hold the large
wand ON button down to pump solution to
the tip. Release the ON button to stop the
pumping cycle. Always use enough solution
to keep the cleaning pad wet. Too little solution will reduce the cleaning accessory's life.
Automatic pumping mode. To start the
automatic pumping mode, press the ON
button on the wand. Once it is activated,
it will automatically pump the liquid. The
quantity of liquid can be selected from less
to more. Pumping will continue in this mode
until the OFF button is pressed.
F) Accessory outlet
Outlet for optional micro wand or
marking/etching wand. The marking/
etching wand is used to permanently etch/
mark your company name, logo, part
number or other desired information onto
stainless steel surfaces. The micro-wand
is used to access hard to reach areas for
cleaning and passivating, which are too
small for the large wand.
SURFOX 304 User’s Guide 7
Start-up procedure
5
Start-up procedure
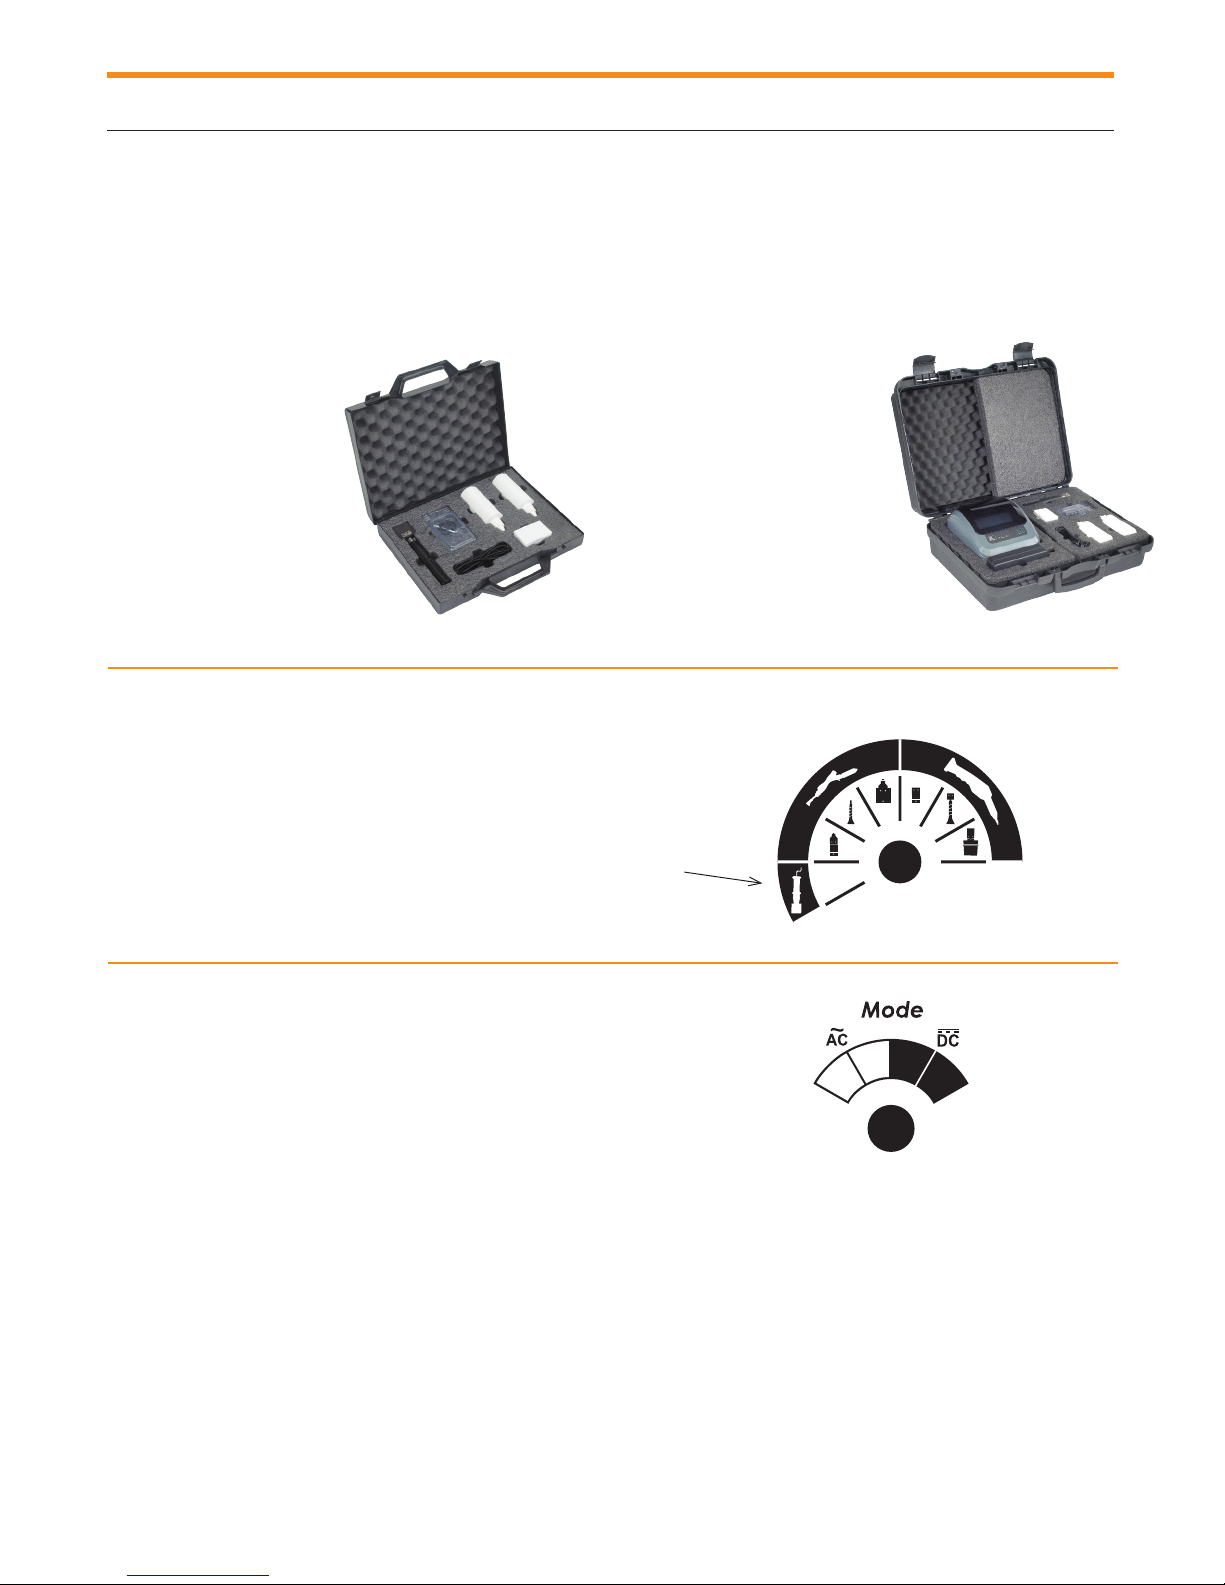
A) What is included in the box
u 1 x Large wand and connecting hose
u 1 x 48-R 136 Ground clamp
u 1 x 54-B 094 Wand Holder for Surfox 204/304
u Accessory kit containing:
• 1 x 54-B 095 Carbon Fiber Brush for Large Wand
• 1 x 54-B 099 Large Wand Brush Adaptor
• 1 x 54-B 101 Triangular Sleeve
• 1 x 54-B 102 Cylindrical Sleeve
• 1 x 48-R 133 Tungsten Insert
(Already mounted on the large wand)
• 3 x 54-B 026 High Conductivity Standard
Cleaning Pads
• 1 x 54-B 002 PTFE Clamping Ring
• 1 x 2.5 mm hexagonal key for changing tungsten insert
• 1 x 5.0 mm hexagonal key for mounting the
wand holder
B) Filling the reservoir
Fill the reservoir in the back of the machine with SURFOX
electrolyte solution. The reservoir holds 1.9 L of SURFOX
electrolyte solution.
C) Connecting air supply
Connect the air supply at the back of the machine. Note
that the maximum allowed pressure is 150 PSI max.,
80 PSI min. (1000 KPa). If the air supply is not plugged into
the machine, the machine will still work but there will not be
any fume elimination.
D) Plugging in the power cord
When an extension cord is needed, use wire size 14 (AWG)
for up to 50 feet (15 meters) and size 12 (AWG) for 50 to
100 feet (15 to 30 meters).
Reservoir
Ground
clamp
Air supply
connector
E) Plugging in the ground clamp
Plug the ground clamp at the front of the unit. Attach the
clamp to the work piece being cleaned. The cleaning and
passivating process will not work if the part is not properly
grounded.
8
Using the large wand to electrochemically clean, polish and passivate
Using the large wand to electrochemically clean, polish
and passivate
6
A) Selecting the proper wand and accessory
Tungsten
insert
Brush
Large
wand
Large
graphite
insert
B) Selecting the proper current type, AC or DC
and proper current level, STD or MAX
MAX STD
STD MAX
AC for cleaning and passivating the weld.
DC for cleaning, passivating and polishing the weld.
STD is recommended when using the tungsten inserts and
pads, MAX is recommended when using the brush or the
large graphite insert.
WARNING! DC mode is used to polish the weld bead to
match the mirror finish of the parent material.
TIP! When using the polishing mode (DC), use plenty
of SURFOX electrolyte solution.
Note: When using DC setting, the SURFOX electrolyte
solution will become slightly yellow or will darken.
C) Selecting the proper pumping mode
Automatic
mode
Manual
mode
Manual pumping mode. Choose the manual pumping
mode to control the amount of solution pumping to the tip.
Hold the large wand ON button down to pump solution to
the tip. Release the ON button to stop the pumping cycle.
Always use enough solution to keep the cleaning pad wet.
Automatic pumping mode. To start the automatic
pumping mode, press the ON button on the wand. Once
it is activated, it will automatically pump the liquid. The
quantity of liquid can be selected from less to more.
D) Cleaning and passivating
To clean and passivate, press the large wand ON button.
Make sure the cleaning accessory is saturated with
SURFOX electrolyte cleaning solution before starting to
work. If the cleaning accessory is too dry, it will wear
prematurely. Start working when solution drips from the
cleaning pad.
Do not press hard, let the electrochemical process do the
work. Do not use the cleaning accessory like an abrasive
pad.
WARNING! When using the machine for the first time, there
could be water in the system from factory testing. Adjust
the liquid pump setting to automatic at maximum speed
and let the liquid drip into a disposal cup for 2 minutes
(amount of time required to empty the hose from the tank
to the wand). Then, adjust the liquid pump setting back to
desired pumping speed.
E) Neutralizing
1. Remove any excess of SURFOX electrolyte cleaning
solution using a soft clean cloth.
2. Spray SURFOX-N on the surface.
3. Wipe dry with another soft clean cloth to avoid cross
contamination.
Refer to neutralization procedure in neutralization section for
instructions on how to properly neutralize (page 15).
SURFOX 304 User’s Guide 9
Large wand accessories
7
Large Wand Accessories
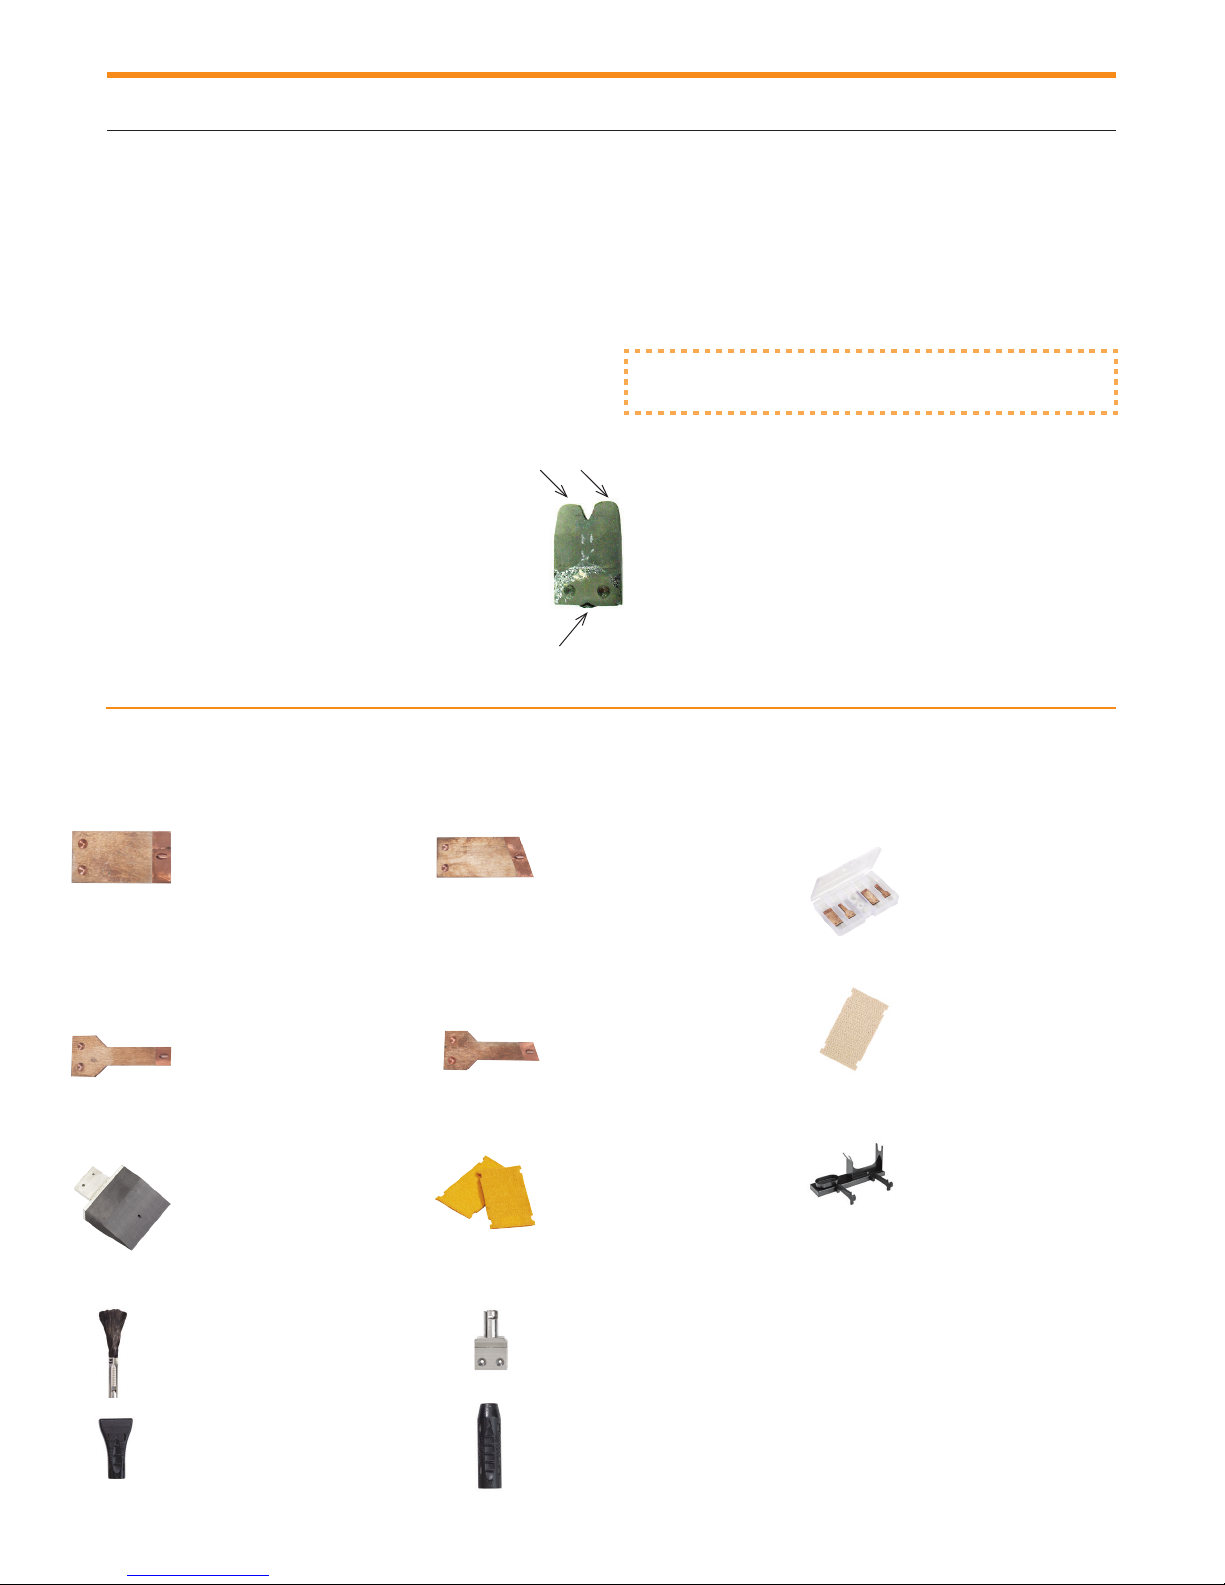
A) Selection and mounting
of the cleaning pads and tips
Tungsten tips are made from high quality tungsten alloy
material. Other materials will not resist the harsh environment created by the electrochemical process.
WARNING! When the insert is too worn, it can
cause damage to the cleaning pads.
In this example of a worn insert, there are only two
contact points. All the current comes out of these
two points. Because of the lower available cross
section, the temperature will be higher at the two
points and the cleaning pads may become damaged or wear out prematurely.
O-Ring
Inserts
Tungsten insert 90°
No: 48-R 133
Use with cleaning pads 54-B 026
or 54-B 040 and clamp ring
54-B 002 or boot 54-B 005
Tungsten insert 60°
No: 54-B 016
Use with cleaning pad 54-B 027
and clamp ring 54-B 002 or boot
54-B 006
TIP! Resurface the insert using a bench grinding wheel
or angle grinder.
Note: Be sure to install the O-Ring located at the back of
the insert whenever they are changed.
Tungsten insert kit for
SURFOX 104, 204 and 304
Order No.: 54-B 012
Includes:
1 x 48-R 133
1 X 54-B 017
1 X 54-B 016
1 X 54-B 018
Narrow tungsten insert 90°
No: 54-B 017
Use with cleaning pad 54-B 028
or 54-B 041 and clamp ring
54-B 020 or boot 54-B 007.
Large graphite insert for
SURFOX 204 and 304
Order No.: 54-B 009
45 mm W - Ideal for surface
renewing or restoring, and to
clean the back of MIG welds
Carbon fiber brush for large
wand on SURFOX 304
Order No.: 54-B 095
Without adaptor - Pack of 5
Triangular sleeve for large
wand carbon fiber brush
Order No.: 54-B 101
10
Narrow tungsten insert 60°
No: 54-B 018
Use with cleaning pad 54-B 028
and clamp ring 54-B 020 or boot
54-B 008.
Large pads for large
graphite insert
Order No.: 54-B 043
90 mm L X 50 mm W X 2 mm H
Pack of 10 with O-ring
Spare brush adaptor for large
wand on SURFOX 304
Order No.: 54-B 099
Cylindrical sleeve for large
wand carbon fiber brush
Order No.: 54-B 102
Large pad for graphite
insert for SURFOX 304
Order No.: 54-B 052
Pack of 5
Wand holder for
SURFOX 304 and 204
Order No.: 54-B 094
Large wand accessories
7
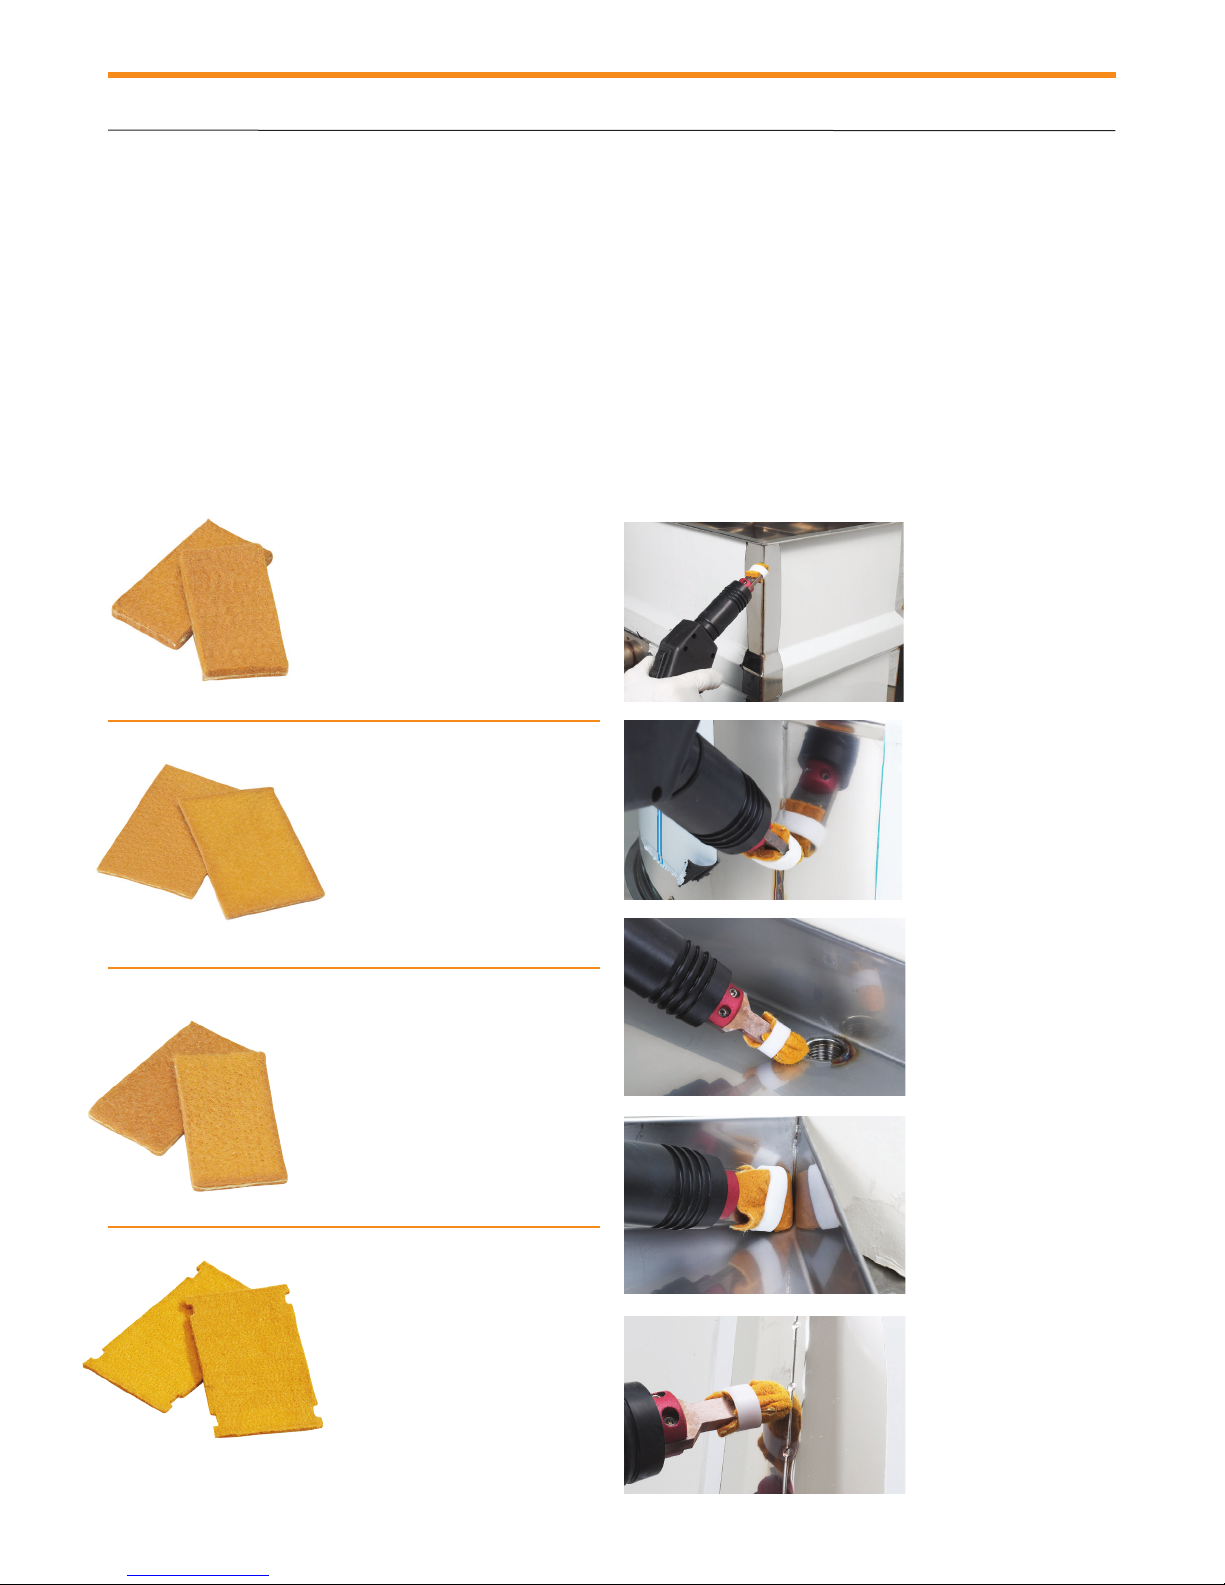
High conductivity cleaning pads
Cleaning pads are made of a complex blend of highly
conductive synthetic polymer which is very resistant to wear
and which offers excellent thermal stability. For longer life,
remove the cleaning pad and neutralize with SURFOX-N at
the end of each working day.
Cleaning pads are available in four types:
Standard cleaning pad
No: 54-B 026
Use with insert 48-R 133
Inside corners cleaning pad
No: 54-B 027
Use with insert 54-B 016
Features
• Flexible: Can be folded many ways
• Soft on surfaces
• Can be used both sides
• Long lasting
• Highly conductive (4x more conductive than previous
generation)
Narrow cleaning pad
No: 54-B 028
Use with inserts 54-B 017
and 54-B 018
Large cleaning pad
No: 54-B 043
Use with large graphite insert
54-B 009
SURFOX 304 User’s Guide 11
Large wand accessories
7
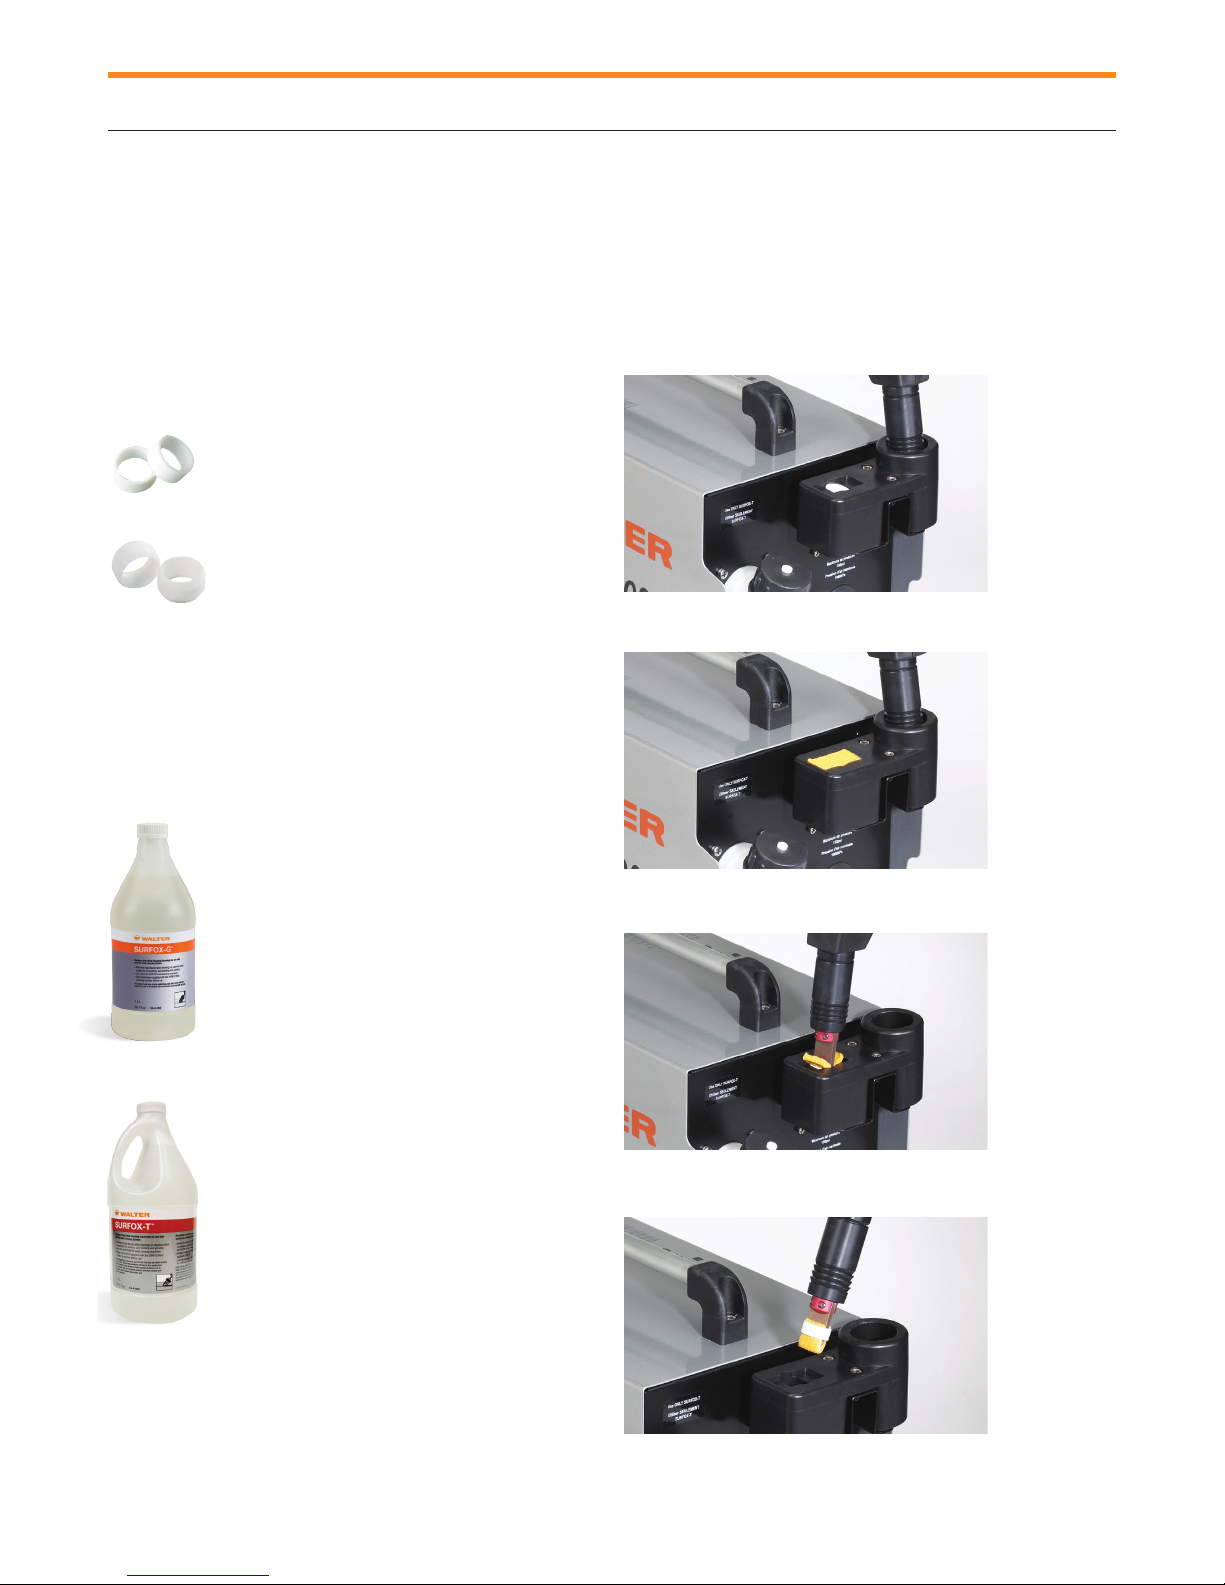
B) PTFE clamp rings
PTFE clamp rings are designed to hold the cleaning pads
on the tungsten inserts.
They are available in two sizes:
Narrow clamp ring for narrow pads
No: 54-B 020
Use with narrow inserts. 10 per package.
Clamp ring for standard cleaning pads
No: 54-B 002
Use with standard inserts. 10 per package.
C) SURFOX electrolyte solutions
Surfox electrolyte solutions are specially formulated phosphoric acid cleaning solutions designed to be used only in
Walter SURFOX systems.
SURFOX-G
Electrolyte Cleaning Solution
Cleans up to 3-5 feet per minute.
1.5 L/50.7 oz. No: 54-A 065
STD Pack: 1 STD Carton: 4
5 L/1.3 gal. No: 54-A 066
1 STD Pack: 1 STD Carton: 1
20 L/5.2 gal. No: 54-A 067
STD Pack: 1 STD Carton: 1
208 L/55 gal. No: 54-A 068
STD Pack: 1 STD Carton: 1
D) Mounting a cleaning pad
1. Squeeze and insert clamp ring.
2. Insert cleaning pad.
3. Firmly press in tungsten tip.
SURFOX-T
Heavy-Duty
Cleans up to 3-5 feet per minute.
1.5 L/50.7 oz. No: 54-A 005
STD Pack: 1 STD Carton: 4
5 L/1.3 gal No: 54-A 006
1 STD Pack: 1 STD Carton: 1
20 L/5.2 gal. No: 54-A 007
STD Pack: 1 STD Carton: 1
208 L/55 gal. No: 54-A 008
STD Pack: 1 STD Carton: 1
12
Electrolyte Cleaning Solution
4. Remove tip with installed pad and clamp ring.
Note: When mounting classic pads, ensure the Ω sign
is facing up on step 2.
Using the micro wand (optional) to clean and passivate
8
Using the micro-wand (optional) to clean, polish and passivate.
54-B 033 and 54-B 133
Use the micro-wand to get into tight places where the large
wand cannot go. Plug the micro wand into the accessory
outlet on the front panel.
A) Selecting the proper wand and accessory
Microwand
Brush
Tungsten
insert
When this mode is selected, it automatically cuts the power
to the large wand, stops the solution pump and the fume
elimination system (if connected) from operating. Only
power is provided to the micro wand/marking wand outlet.
Be sure work piece is grounded.
Large
graphite
insert
B) Selecting the proper current type, AC or DC
and proper current level, STD or MAX
C) Manual pumping mode
The micro-wand uses a manual pumping mode only. One (1)
press equals one (1) stroke. To pump more liquid, press repeatedly. See micro wand instructions for more information.
D) Cleaning and passivating
Screw in SURFOX electrolyte solution 100 ml tube onto the
micro-wand. Make sure the cleaning pad is saturated with
solution before starting to work.
If the cleaning pad is too dry,
it will wear prematurely. Start
working when solution drips
from the cleaning pad.
Do not press hard, let the
electrochemical process do
the work. The cleaning pad is
a bridge between the machine
and the weld. Do not use the
cleaning pad like an abrasive
pad.
E) Neutralizing
1. Remove any excess of SURFOX electrolyte cleaning
solution using a soft clean cloth.
MAX STD
STD MAX
AC for cleaning and passivating the weld.
DC for cleaning, passivating and polishing the weld.
STD is recommended when using the tungsten inserts and
pads, MAX is recommended when using the brush or the
large graphite insert.
WARNING! DC mode is used to polish the weld bead to
match the mirror finish of the parent material.
TIP! When using the polishing mode (DC), use plenty
of SURFOX electrolyte solution.
Note: When using DC setting, the SURFOX electrolyte solution will become slightly yellow or will darken.
2. Spray SURFOX-N on the surface.
3. Wipe dry with another soft clean cloth to avoid cross
contamination.
Refer to neutralization procedure in neutralization section for
instructions on how to properly neutralize.
SURFOX 304 User’s Guide 13
Using the marking/etching wand (optional)
9
Using the marking/etching wand (optional)
A) Marking kits
Standard kit (54-B 080) includes:
• 1 marking/etching wand with
graphite insert
• 35 mm X 10 mm
and connecting cable
• 20 marking pads
• 5 O-Rings
• 1 SURFOX-M, 100 ml
solution
• 1 SURFOX-E, 100 ml
solution
B) Selecting the proper wand and accesssory
Turn the selector knob to the marking/etching wand icon.
Use the marking/etching wand to permanently mark or etch
your company name, logo, part number or other desired
information onto the surface of stainless steel, using permanent or disposable stencils. Plug the marking/etching wand
into the accessory outlet on the front panel.
PRO kit (54-B 081) includes:
• 1 marking/etching wand with
graphite insert
• 35 mm X 10 mm
and connecting cable
• 20 marking pads
• 5 O-Rings
• 1 SURFOX-M, 100 ml solution
• 1 SURFOX-E, 100 ml solution
• 1 Stencil printer and software
• 1 Stencil paper roll 100 mm (W) X 20 m (L)
Marking/etching
wand
C) Selecting the proper current type, AC or DC
and proper current level, STD or MAX
AC for marking using Surfox-M.
DC for etching using Surfox-E.
STD current level is recommended for marking or etching.
14
MAX STD
STD MAX
TECHNICAL BULLETINS AVAILABLE ON OUR WEB SITE.

Neutralizing
Neutralizing
10
The SURFOX-N liquid is a specially formulated neutralizer for the SURFOX electrolyte solutions. It is a powerful
ready-to-use formula which leaves no residue, is non-toxic,
solvent free, water-based and biodegradable.
A) Directions for neutralizing SURFOX
electrolyte cleaning solutions
1. Remove any excess SURFOX electrolyte solution using a
soft clean cloth.
2. Spray SURFOX-N on the surface.
3. Wipe dry with another soft clean cloth.
For more information about this product, refer to product
MSDS or SDS on walter.com or surfox.com.
WARNING! Be sure to wipe off all excess SURFOX electrolyte solution from the surface and neutralize otherwise the
inorganic salt from the phosphoric acid will adhere to the
surface and cause deposits.
B) SURFOX weld cleaning and neutralization
procedure
Clean the weld using the SURFOX machine and SURFOX
electrolyte solutions. Work only 2 feet at a time.
Note: The cleaning pad should be kept moist – not
dripping.
1. After weld cleaning, use a clean cloth or paper towel
and wipe the affected area in a squeegee action from left
to right. Then discard the cloth or paper towel.
After cleaning the weld with the SURFOX weld cleaning
machine, the electrolyte solution must be neutralized.
1. Spray the affected area with SURFOX-N neutralizer.
Allow to sit for 15 seconds on the surface.
2. Use a clean cloth or paper towel and wipe the affected
area in a squeegee action from left to right. Then discard
the cloth or paper towel.
Note: Failure to neutralize or neutralize properly will result in
clouding, hazing and dulling of the surface.
SURFOX-N neutralizer Part No.
500 ml 54-A 023
5 L 54-A 026
20 L 54-A 027
208 L 54-A 028
Salt deposits due to unproper
neutralization and rinsing.
SURFOX 304 User’s Guide 15
Safety features
11
Safety features
A) Sparks on the tip/work piece
To avoid short circuits (arcing), the machine automatically
stops when the insert touches the work piece (metal to
metal contact). There is an inverter board that monitors the
voltage every millisecond. If the voltage sharply increases
creating a short, the system will automatically cut the power
to the tip to avoid any damage to the equipment.
To restart the machine, simply press the large wand ON
button.
WARNING! To avoid drawing too much amperage and
automatically stopping the power to the tip, make sure that
you touch only one surface at a time. The machine is set
to work at a maximum of 30 amps. If the amperage goes
above 30 amps, the machine automatically shuts down.
Example: On a flat surface, the amperage is around
24 amps. The contact surface area is relatively small.
B) Internal temperature
To protect the internal components of the machine, there
are temperature sensors inside the machine. If the operating
temperature is too high, the machine will shut down and restart by itself when the temperature reaches an acceptable
level. There is an internal fan inside the machine to keep all
the components cool.
WARNING! The inside temperature can increase for many
reasons: high ambient temperature, lack of proper air circulation around the machine, fluctuations in voltage, electrical
set-up in the shop, etc.
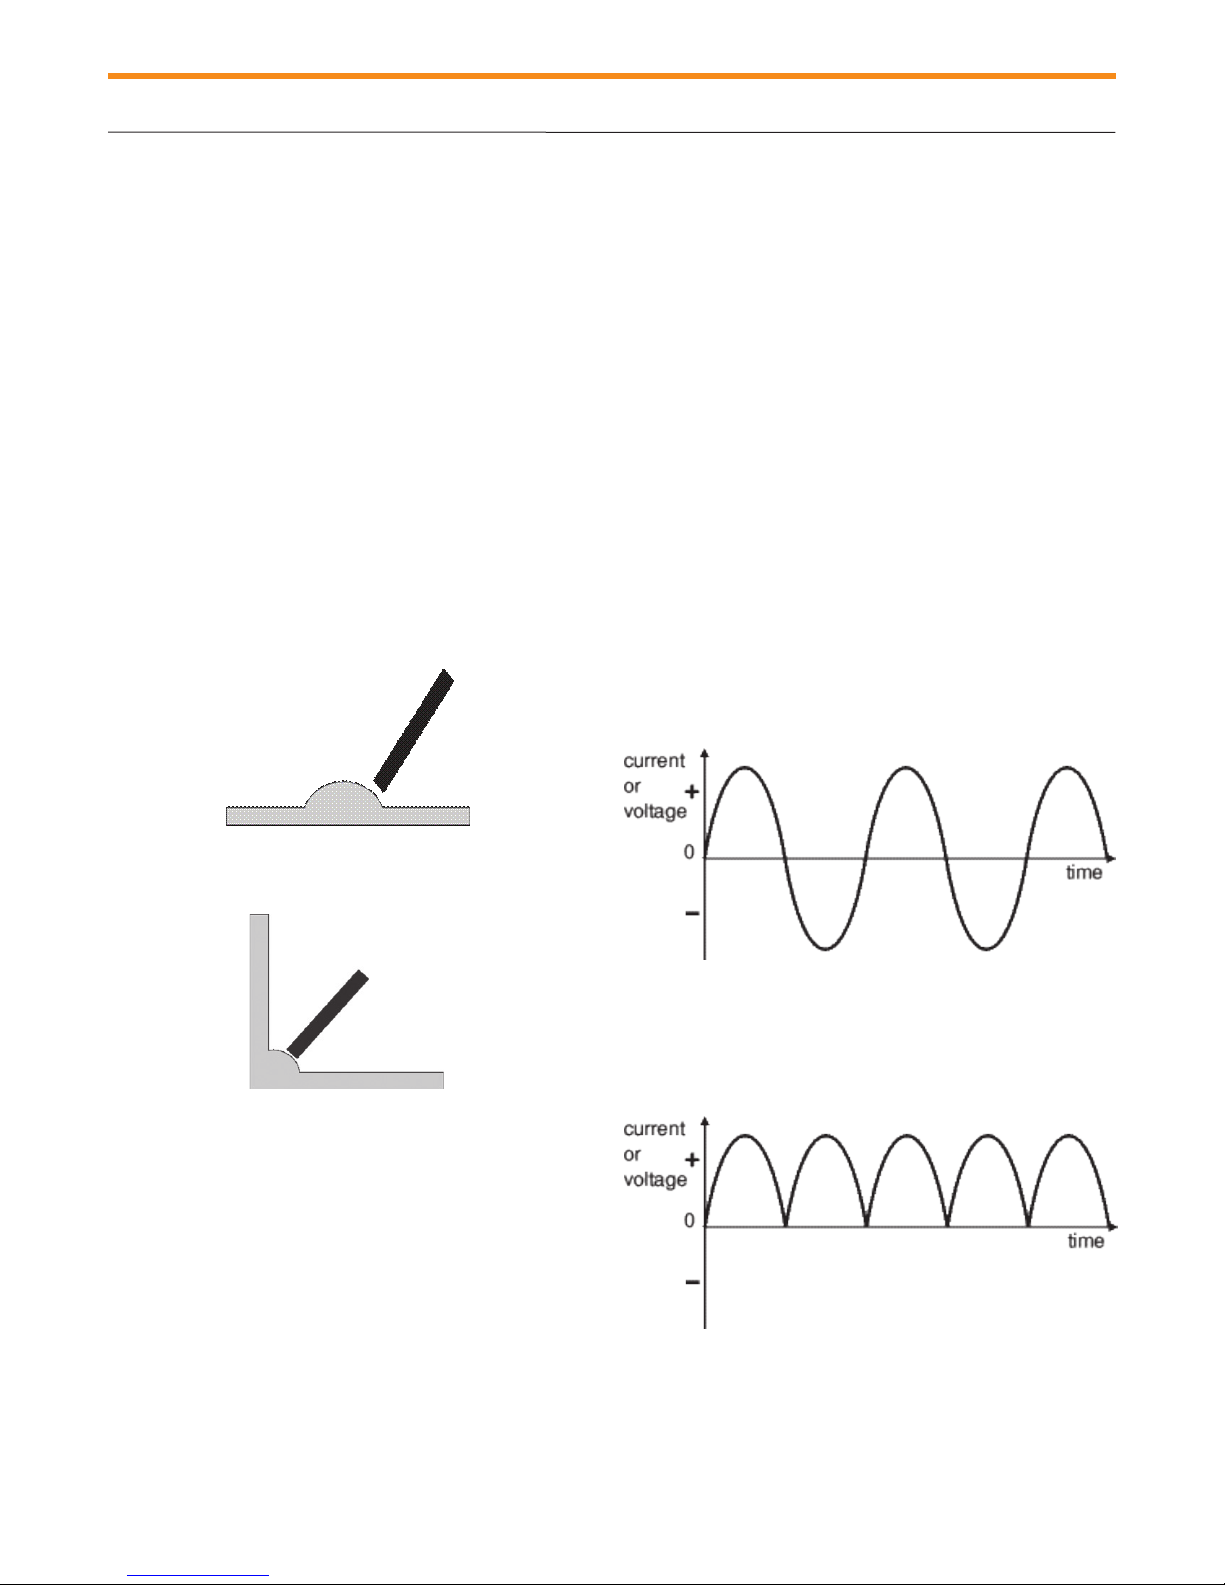
C) AC/DC current basics
Alternating Current (AC) flows one way, then the other
way, continually reversing direction. An AC voltage is continually changing between positive (+) and negative (-).
Example: An internal angle, which if you touch 2 sides
simultaneously, the contact surface area is doubled, amperage goes above 30 amps and the machine stops.
Note: Automatic shut off if ground is not detected within
20 seconds.
16
Direct Current (DC) always flows in the same direction, but
it may increase and decrease. A DC voltage is always positive, but may increase and decrease.

Safety features
11
D) AC/DC settings on the SURFOX machine
Example of cleaning and passivation with SURFOX in AC
mode:
Microscopic view of the material
BEFORE
Oxide
layer to be
removed
Example of cleaning and passivation with SURFOX in DC
mode:
Microscopic view of the material
AFTER
Cleaning and passivation is
perfect. Cleans every crack in
the material.
E) Welds that cannot be cleaned
If the area around the weld is black (not blue) from contamination, this is a problem of high heat generated during the
welding process. The contaminated areas do not conduct
electricity. If there is no conductivity in the material, the
SURFOX system cannot work.
If there are two welds on top of the other, the structure of
the material has been seriously altered. These areas may
not be cleaned.
The quality of the weld is critical. The better the weld, the
easier it will be to clean.
Oxide
layer to be
removed
BEFORE
AFTER
Cleaning and passivation is
perfect. Cleans every crack in
the material.
Alteration of the
material due to
the DC setting
SURFOX 304 User’s Guide 17

Warranty and serviceTechnical data
1312
Technical data
MODEL: SURFOX 304
PART NUMBER: 54-D 314
INPUT VOLTAGE: 120 V, 50/60 Hz
OUTPUT VOLTAGE: 30 V, AC/DC
INPUT CURRENT: 7.5 Amps
OUTPUT CURRENT: 30 Amps Max, AC/DC
MAX. OUTPUT VOLTAGE: 33 V, AC/DC
DIMENSIONS: 525 mm x 370 mm x 250 mm
(20-2/3” x 9.84” x 14.57”)
RESERVOIR CAPACITY: 1.9 L
WEIGHT: 22 kg (48.5 lbs.)
INPUT AIR PRESSURE: 150 PSI max., 80 PSI min.
Warranty and service
A) Warranty policy
All WALTER SURFOX cleaning systems and accessories
are inspected and tested before shipment and are warranted to be free from any defect in material and faulty
workmanship. Should any malfunction occur within six (6)
months from the date of original purchase, return the complete system prepaid with proof of purchase, to the nearest WALTER Authorized Service Center. If an examination
shows that the malfunction was caused by defective material or faulty workmanship, WALTER will repair (or at our
option, replace the unit) without charge. This warranty does
not apply when; normal maintenance is required, repairs or
replacements have been made or were attempted by anyone other than WALTER authorized service personnel, and
does not cover any damage caused by accidents, modifications, use of improper accessories, abuse or misuse, which
also includes overloading the tool beyond its rated capacity
as well as its continued use after partial failure. No other
warranty, written or verbal, is authorized.
In no event shall WALTER be liable for any indirect, inciden-
tal or consequential damages from the sale of the product.
This disclaimer applies both during and after the term of this
warranty.
This warranty gives you specific rights. The provisions
contained in this warranty are not intended to limit, modify,
take away from, disclaim or exclude any warranties set forth
in any Provincial or State legislation. To the extent required
by law, the provisions in any Provincial, State or Federal
legislation with respect to warranties take precedence over
the provisions in this warranty.
B) Repair and service
When shipping:
• Drain the SURFOX electrolyte solution from the reservoir
• Use original shipping case
• Use sufficient packing
• Ship on a small pallet
• Give detailed description of the problem as well as
company name, address, phone and fax numbers and
contact person
18

SURFOX 304 User’s Guide 19

Table des matières
Table des matières
1 Introduction 21
2 Directives de sécurité 22
3 Commandes de l’équipement 23
A) Pictogrammes du panneau de commande 23
B) Vue de l’appareil – avant et arrière 24
C) Boutons de contrôle de la baguette 25
D) Système d’élimination des fumées 25
E) Positionnement de la buse (confort de l’opérateur) 25
4 Panneau de commande 26
A) Interrupteur d’alimentation principal 26
B) Bouton de sélection de baguette et d'accessoires 26
C) Bouton de sélection du type de courant 26
D) Interrupteur de la pompe de solution 26
E) Témoins lumineux 26
F) Sortie pour les accessoires 26
5 Procédure de démarrage 27
A) Contenu de la boîte 27
B) Remplissage du réservoir 27
C) Raccordement de l’alimentation d’air 27
D) Branchement du cordon d’alimentation 27
E) Branchement du collier de mise à la terre 27
6 Utilisation de la baguette large pour
le nettoyage, le polissage et la passivation
électrochimique 28
A) Sélectionner la baguette et l'accessoire de
nettoyage 28
B) Choisir le bon type de courant AC ou DC et
la bonne intensité STD ou MAX 28
C) Sélectionner le mode de pompage adéquat 28
D) Nettoyage et passivation 28
E) Neutralisation 28
7 Accessoires pour baguette large 29
A) Sélection et assemblage des buses et tampons de
nettoyage 29
B) Bagues de serrage en PTFE 31
C) Solutions électrolytiques SURFOX 31
D) Assemblage d’un tampon nettoyeur 31
8 Utilisation de la micro-baguette pour le nettoyage,
le polissage et la passivation (facultatif) 32
A) Sélectionner la baguette et l'accessoire de
nettoyage 32
B) Choisir le bon type de courant AC ou DC et
la bonne intensité STD ou MAX 32
C) Mode de pompage manuel 32
D) Nettoyage et passivation 32
E) Neutralisation 32
9 Utilisation de la baguette de marquage/gravure
(facultatif) 33
A) Trousses de marquage 33
B) Sélectionner la baguette et l'accessoire de
nettoyage 33
C) Choisir le bon type de courant AC ou DC et
la bonne intensité STD ou MAX 33
10 Neutralisation 34
A) Directives pour la neutralisation des solutions
de nettoyage électrolytiques SURFOX 34
B) Procédure de neutralisation et de nettoyage
des soudures SURFOX 34
11 Éléments de sécurité 35
A) Étincelles sur la buse ou la pièce de travail 35
B) Température interne 35
C) Rudiments du courant CA/CC 35
D) Réglages CA/CC pour l’appareil SURFOX 36
E) Les soudures qui ne peuvent pas être nettoyées 36
12 Données techniques 37
13 Garantie et service 37
A) Politique de garantie 37
B) Réparation et service 37
20

Introduction
Introduction
1
Félicitations! Vous avez acheté le meilleur équipement de
nettoyage de soudures et de passivation électrochimique
sur le marché. L’équipement de nettoyage de soudures
SURFOX
la teinte de chaleur sur les zones affectées rapidement,
facilement et de manière rentable, tout en permettant une
passivation totale de la surface en acier inoxydable.
Notre nouvelle génération d’appareils SURFOX est équipée
de panneaux convertisseurs à régulation automatique qui
surveillent l’intensité du courant et le règlent automatiquement de manière optimale afin d’assurer une efficacité de
nettoyage maximum sans perte de productivité.
Avant de commencer vos travaux, nous vous demandons
de lire ce manuel du propriétaire SURFOX en entier; nous
vous guiderons, étape par étape, du démarrage aux procédures de maintenance, en passant par la mise en œuvre de
votre nouvel équipement SURFOX. Votre nouvel appareil
SURFOX possède une durabilité accrue pour résister aux
exigences élevées d’une utilisation industrielle. Toutefois,
comme c’est le cas pour toute pièce d’équipement électrique, son utilisation exige des soins et la sécurité nécessaires à la protection de cet important investissement.
En y apportant les soins et l’entretien appropriés, vous
pourrez compter sur votre équipement SURFOX pendant
des années.
MC
fabriqué par WALTER permet de supprimer
u Alimentation principale inadéquate ;
u Mauvais entretien ;
u Modifications et manipulations non autorisées ;
u L'utilisation de pièces de rechange non originales ou des
pièces de rechange non spécifiées comme appropriées
pour le modèle en question ;
u Respect partiel ou l'échec total du respecter des con-
signes ;
u Événements inattendus ;
u Et toute autre mauvaise utilisation de la machine.
Opérations
L’appareil SURFOX utilise un procédé électrochimique
pour nettoyer et passiver les soudures faites sur l’acier
inoxy dable. Les solutions électrolytiques utilisées par les
appareils SURFOX sont à base d’acide phosphorique. Elles
sont approuvées par l’industrie alimentaire et sont activées
par un courant électrique pour nettoyer les soudures. Le
traitement ne prend que quelques secondes et ne provoque
aucun dommage ou égratignure à la surface des pièces
nettoyées.
Pour obtenir des informations sur les autres produits
WALTER, visitez notre site Web : walter.com ou
surfox.com
1.1 Informations générales
Ce manuel fournit toutes les informations nécessaires
pour une installation sécuritaire, le démarrage et le fonctionnement de la machine, ainsi que des instructions de
dépannage et de maintenance . Le manuel est une partie
intégrante de la machine et doit être conservé avec la machine. Si votre copie du manuel est perdue ou illisible , vous
pouvez demander une nouvelle copie à: WALTER - www.
walter.com Le présent manuel reflète l'état de la machine au
moment de la fabrication et ne peut être jugé insuffisant en
cas de mises à jour en raison de d'expériences ultérieures .
WALTER se réserve le droit de mettre à jour ses produits et
ses manuels sans notification préalable aux utilisateurs de
machines fabriquées antérieurement . WALTER n'est pas
responsable des conséquences d' une mauvaise utilisation
de ses produits, par exemple :
u Mauvaise utilisation de la machine ou l'utilisation par des
personnes non qualifiées ;
u Utiliser en violation des normes de référence ;
u Installation incorrecte ;
Votre appareil SURFOX peut nettoyer :
u les soudures TIG;
u les soudures plasma;
u les soudures laser;
u les soudures par points;
u les soudures MIG
Rudiments de la passivation :
u Le nettoyage des soudures se fait non seulement à des
fins esthétiques, mais surtout pour les besoins de
passivation.
u La passivation est un traitement des surfaces en acier
inoxydable qui élimine les contaminants et favorise la
formation d’une couche de protection en oxyde de
chrome épaisse et durable.
u Cette « couche passive » permet une meilleure résistance
de l’acier inoxydable à la corrosion.
u Si la passivation n’est pas correctement réalisée, l’acier
inoxydable et les zones touchées par la chaleur peuvent
commencer à rouiller.
SURFOX 304 Manuel de l’utilisateur 21

Directives de sécurité
2
Directives de sécurité
Les appareils de nettoyage de soudure WALTER sont produits
conformément aux normes en vigueur pour la fabrication, le
rendement et la sécurité des produits industriels.
AVERTISSEMENT : Lorsque vous utilisez ces appareils, vous
devez toujours prendre des précautions pour réduire les risques
d’incendie, de décharges électriques et de blessures personnelles.
Avant d’utiliser cet appareil, lisez attentivement toutes les
consignes de fonctionnement et de sécurité; assurez-vous de
conserver ce manuel pour pouvoir vous y référer dans le futur.
1. Lisez ce manuel du propriétaire pour vous familiariser avec le
fonctionnement de cet appareil, ses particularités, son champ
d’application et ses limites.
2. Cet appareil est muni d’un cordon d’alimentation à 3 con ducteurs et de prises électriques enfichables doubles avec
terre (3 fiches); il doit être branché à une prise adéquate avec
mise à la terre.
3. Prévoyez un dégagement minimum de 8 pouces autour
de l’appareil afin de maintenir les ouvertures de ventilation
libres de toute obstruction. Un débit d’air libre à travers les
ouvertures de ventilation est nécessaire pour empêcher la
surchauffe de l’appareil.
4. Gardez la zone de travail propre et bien éclairée. Un envi ronnement encombré peut provoquer des accidents. Enlevez
tout matériel qui pourrait s’enflammer au contact d’étincelles.
N’utilisez pas cet outil lorsque des liquides inflammables ou
des gaz sont présents dans l’environnement. Gardez les
poignées propres, sèches et sans souillure de solution
nettoyante, d’huile ou de graisses. N’utilisez pas cet appareil
sous la pluie et dans des endroits humides ou mouillés.
5. Gardez les enfants et les autres personnes à une distance
sécuritaire des travaux. Veillez à ce que personne ne soit placé
en dessous de vous lorsque vous travaillez en hauteur. Ne
laissez personne sans formation adéquate utiliser cet appareil.
6. Portez toujours des vêtements appropriés et l’équipement de
sécurité nécessaire lorsque vous travaillez, des gants de
protection certifiés pour résister aux produits chimiques par
exemple, des combinaisons ou chaussures de sécurité, etc.
7. Portez toujours des lunettes de protection approuvées.
8. Pendant le processus de nettoyage, la buse de la baguette et
la pièce de travail peuvent atteindre des températures extrême ment élevées; assurez-vous que ces pièces refroidissent avant
de les mettre en contact avec une surface cutanée.
9. Évitez d’inhaler des fumées; n’utilisez l’appareil que dans un
environnement bien ventilé. Utilisez un masque filtrant au
besoin.
10. Toute décharge électrique peut être dangereuse.
11. Si vous éprouvez des problèmes d’ordre électrique,
n’utilisez pas l’appareil avant qu’une personne qualifiée ait
vérifié l’équipement.
12. N’utilisez jamais l’appareil lorsque le couvercle de protection
est retiré.
13. Restez vigilant en tout temps lorsque vous utilisez cet
appareil. Prenez garde à ce que vous faites. Utilisez votre bon
sens. N’utilisez pas l’appareil lorsque vous êtes fatigué. Ne
laissez jamais l’appareil en marche sans surveillance.
14. Assurez-vous que l’appareil est à l’arrêt (position OFF) avant
de le brancher ou lors d’un déplacement afin d’éviter un
démarrage intempestif.
22
15. Tenez la baguette fermement. Ne travaillez pas à bout de bras
afin de maintenir un bon équilibre en tout temps.
16. Avant l’utilisation, toutes les pièces devraient être examinées
soigneusement pour vous assurer que l’appareil fonctionne
correctement et remplisse sa fonction.
17. Les pièces endommagées ou défectueuses doivent être
réparées ou remplacées par un centre de service agréé par
WALTER.
18. N’utilisez pas l’appareil s’il est impossible de faire passer
l’interrupteur de l’arrêt à la mise en marche ou le contraire (ON
et OFF).
19. N’utilisez que les accessoires recommandés pour ce système.
Faites toujours une vérification des accessoires avant de com mencer le travail et ne les utilisez pas s’ils sont endommagés.
20. ATTENTION : Les solutions électrolytiques de nettoyage
SURFOX de WALTER contiennent de l’acide phosphorique
pouvant causer des brûlures lorsqu’elles ne sont pas
manipulées correctement. Évitez tout contact avec la peau.
Premiers soins : laver la zone affectée avec de l’eau.
Contact avec les yeux : rincez à l’eau pendant 15 minutes
en soulevant les paupières de temps en temps. Appelez
unmédecin au besoin. Ingestion : NE PAS PROVOQUER le
vomissement. Rincez votre bouche, buvez beaucoup d’eau
et recherchez une aide médicale. Reportez-vous aux fiches
signalétiques ou aux fiches de données de sécurité des
produits WALTER pour obtenir des informations de sécurité
exhaustives. Disonibles au walter.com ou surfox.com
21. N’utilisez que les solutions électrolytiques de nettoyage de
soudures SURFOX de WALTER avec cet appareil; ne les
mélangez JAMAIS avec d’autres solutions.
22. L'utilisation du système d'élimination des fumées (page 25)
est fortement recommandé lors de travaux dans des endroits
confinés.
23. N'utilisez pas votre machine SURFOX sur la même structure
lorsque vous soudez à l'arc. Le courant pourrait endomamger
irréparablement motre machine SURFOX. pourrait terre retour
tot il SURFOX machine et causer des dommages irréparables .
24. Entreposez la solution dans son contenant original et dans
un endroit sûr se trouvant hors de portée des enfants et des
personnes non qualifiées. Gardez le contenu du récipient
propre. Ne réutilisez jamais les solutions électrolytiques de
nettoyage SURFOX.
25. Ne touchez pas la buse de la baguette ou la pièce de travail
lorsque vous utilisez l’appareil ou immédiatement après l’avoir
utilisé; ils peuvent être extrêmement chauds et pourraient vous
causer de graves brûlures.
26. Ne maltraitez pas le cordon d’alimentation. Ne tirez jamais cet
appareil en utilisant le cordon et ne tirez pas brusquement sur
celui-ci pour débrancher l’appareil. Gardez le cordon électrique
loin de la chaleur, de l’huile et des rebords tranchants.
Inspectez régulièrement le cordon et, s’il est endommagé,
faites-le remplacer par un centre de service agréé par
WALTER.
27. Lorsqu’il n’est pas utilisé, il faut mettre l’appareil en arrêt (OFF)
et débrancher le cordon électrique ainsi que le boyau pour l’air
(s’il est branché). L’appareil doit également demeurer débran ché pour le remplacement de tampons de nettoyage ou
d’autres accessoires ainsi que pendant les périodes d’entretien
et de réparation.
28. Entreposez l’équipement dans un endroit sûr et sec se
trouvant hors de portée des enfants et des personnes qui ne
possèdent pas la formation appropriée.

Directives de sécurité
Commandes de l’équipement
2
Tension électrique
Avant de brancher cet appareil, vérifiez que l’intensité du courant (ampérage) indiqué sur la plaque signalétique est la même
que sur le bloc d’alimentation.
L’utilisation de cet appareil avec une intensité de courant
différente de celle affichée sur la plaque signalétique pourrait
provoquer des blessures à l’utilisateur et des dommages à
l’appareil.
Entretien préventif
Après une utilisation, donnez à la buse le temps de refroidir,
puis enlevez le tampon de nettoyage. Faites une neutralisation
avec le SURFOX-N, puis rincez le tampon de nettoyage et la
buse de la baguette avec de l’eau; laissez sécher. Nettoyez la
poussière et les dépôts qui se sont formés sur la partie exté
rieure de l’appareil. Gardez les ouvertures de ventilation libres
de toute obstruction. Nettoyez le cordon d’alimentation pour
prévenir sa détérioration et cherchez d’éventuels dommages
qui auraient pu survenir au cordon ou à la fiche d’alimentation.
Remarque : Les cordons électriques endommagés doivent
être remplacés immédiatement par du personnel qualifié
uniquement. Reportez-vous à la liste des pièces de rechange
pour obtenir le numéro de commande.
Transport
Avant de transporter l’appareil, assurez-vous que le réservoir de la solution de nettoyage et sa conduite d’alimentation
sont complètement vides et que tous les raccordements sont
débranchés. L’appareil doit être emballé soigneusement dans
un contenant approprié et doit être convenablement protégé.
WALTER ne pourra être tenu responsable des dommages
résultant d’une fuite de solution de nettoyage ou d’une manipulation brusque.
Entreposage
Si vous devez entreposer l’appareil, peu importe la durée de
l’entreposage, le réservoir de la solution de nettoyage et sa
conduite d’alimentation doivent être complètement vidés; le
tampon de nettoyage enlevé (neutralisé, rincé et laissé de
côté); la buse doit être neutralisée, rincée et séchée. Entreposez l’appareil dans un endroit sec et sécuritaire pour éviter
les dommages qui pourraient survenir, particulièrement aux
composantes électroniques.
Élimination des déchets
Éliminez les déchets résiduels en conformité avec les réglementations environnementales en vigueur (fédérales, provinciales, territoriales ou locales). Consultez les fiches signalétiques
ou les fiches de données de sécurités du matériel de WALTER
qui traitent des solutions électrolytiques de nettoyage SURFOX.
Cordon de rallonge
Lorsque l’ajout d’un cordon de rallonge est nécessaire, utilisez
la taille 14 (AWG) pour les cordons ayant une longueur maximum de 50 pieds (15 mètres) et la taille 12 (AWG) pour les
cordons de 50 à 100 pieds (15 à 30 mètres).
-
3
Commandes de l’équipement
A) Pictogrammes du panneau de commande
Sortie pour la micro-baguette ou
baguette de marquage
Indicateur de haute température interne
Mode pompage manuel Mode pompage automatique
Bbaguette de marquage Micro-baguette
MAX STD
STD MAX
Bouton de sélection du type et
du niveau de courant
Indicateur de mise en marche pour
la buse de la baguette
Indicateur de bas niveau
de la solution
Baguette large
Bouton de sélection de
baguette et d'accessoires
SURFOX 304 Manuel de l’utilisateur 23

Commandes de l’équipement
3
B) Vue de l’appareil – avant et arrière
Bouton
EN MARCHE/ARRÊT (ON/OFF)
Sortie pour accessoires
Raccord de mise à la terre
Boyau de la baguette
large (alimentation
de la solution et
alimentation électrique)
Unité d’assemblage pour les
tampons de nettoyage
Panneau
de commande
Réservoir et unité de
remplissage de la solution
électrolytique SURFOX
24
Support à baguette
Cordon d’alimentation
Connexion d’air compressé (système
d’élimination des fumées)
Cordon d’alimentation

Commandes de l’équipement
3
C) Boutons de contrôle de la baguette
Le bouton EN MARCHE (ON) est utilisé pour alimenter les
accesoires de nettoyage. Lorsque le pompage est réglé en
mode Manuel, appuyez sur le bouton EN MARCHE (ON)
pour activer la pompe. Appuyez sur le bouton et gardez-le
enfoncé pour obtenir une arrivée continue de liquide.
Toutefois, si le pompage est en mode automatique, appuyez sur le bouton EN MARCHE (ON) une seule fois pour
activer la pompe. Pour arrêter le pompage, appuyez sur le
bouton ARRÊT (OFF). Lorsque votre travail est terminé (peu
importe le mode), assurez-vous d’appuyer sur le bouton
ARRÊT (OFF).
Une fois que le bouton EN MARCHE (ON) est activé, il
y aura une arrivée continuelle de courant à la buse de la
baguette jusqu’au moment où vous appuierez sur le bouton
ARRÊT (OFF).
ON OFF
Accessoire de
nettoyage
E) Positionnement de la buse (confort de
l’opérateur)
La position normale de la buse de tungstène est à
l’horizontale, mais elle peut être placée en position verticale – ou tout autre positon entre les deux – pour faire
votre nettoyage de la manière la plus confortable possible.
Desserrez le manchon fileté d’élimination des fumées vers
la droite; placez la buse dans la position désirée; resserrez
le manchon.
Important : Resserrez toujours le manchon d’élimination
des fumées pour assurer une bonne connexion électrique
et prévenir les dommages aux points de contact.
D) Système d’élimination des fumées (breveté)
L’appareil SURFOX 204 est muni d’un système intégré
d’élimination des fumées. Ce système permet d’obtenir
un meilleur environnement de travail. Bien que les fumées
dégagées par l’appareil ne soient pas toxiques ou
dangereuses, elles peuvent vous rendre inconfortable si
vous travaillez dans un espace clos.
Pour activer cette fonctionnalité, il suffit de brancher une
conduite d’air comprimé (150 lb/po
min) au raccord situé à l’arrière de l’appareil. Le système
d’élimination des fumées est activé automatiquement
lorsque vous appuyez sur le bouton EN MARCHE (ON)
de la baguette large. Le système se ferme lorsque vous
appuyez sur le bouton ARRÊT (OFF) de la baguette large.
Si vous ne désirez pas utiliser ce système, il suffit de
débrancher la conduite d’air.
Le fonctionnement est très efficace et fort simple : l’air
sort par les petites ouvertures derrière l'accessoire de
nettoyage. Cette pression d’air préréglée agit de manière
constante. Elle condense les vapeurs pour les expulser hors
de l’air ambiant.
2
max., 80 lb/po2
Raccord de la
conduite d’aire
comprimé
Gros plan sur les
accessoires de nettoyage
Petites
ouvertures
SURFOX 304 Manuel de l’utilisateur 25

Panneau de commande
4
Panneau de commande
A) Interrupteur d’alimentation
principal
Permet de mettre l’appareil en marche ou à
l’arrêt (ON et OFF).
A
B
C
D
MAX STD
STD MAX
26
B) Bouton de sélection de
baguette et d'accessoires
Baguette de marquage et gravure. Sé-
lectionnez ce réglage lorsque vous utilisez
la baguette de marquage/gravure qui a été
branchée dans la sortie d’accessoires.
Micro-baguette. Sélectionnez ce réglage
lorsque vous utilisez la micro-baguette qui a
été branchée dans la sortie d’accessoires.
Sélectionnez le bon accessoire de nettoyage
soit la buse en tungstène, la brosse ou la buse
large en graphite.
Baguette large. Sélectionnez ce réglage
lorsque vous utilisez la baguette rattachée à
l’appareil SURFOX.
C) Bouton de sélection du type et
du niveau de courant
Choisir le bon type de courant AC ou DC
et la bonne intensité STD ou MAX AC
est pour le nettoyage et la passivation des
soudures. DC est pour le nettoyage, la passivation et le polissage des soudures STD est
recommandé pour l'utilisation avec buse en
tungstène et les tampons.
MAX est recommandé pour l'utilisation avec
les brosses et les embouts large en graphite.
D) Interrupteur de la pompe
de solution
Mode pompage manuel. Choisissez le mode
de pompage manuel pour contrôler la quantité
de solution à envoyer vers la buse. Gardez le
bouton EN MARCHE (ON) de la baguette large
enfoncé pour pomper la solution vers la buse.
Relâchez le bouton EN MARCHE (ON) pour
arrêter le cycle de pompage. Utilisez toujours
la quantité de solution adéquate pour garder le
tampon de nettoyage humide. Une trop petite
quantité de solution réduira la durabilité du
tampon de nettoyage.
Mode pompage automatique. Pour lancer
le mode de pompage automatique, appuyez
sur le bouton EN MARCHE (ON) de la baguette. Une fois activé, le pompage du liquide
se fera automatiquement. La quantité de
liquide utilisée peut être réglée de « moins » à
« plus ». Le pompage de solution se poursuivra
jusqu’au moment où le bouton ARRÊT (OFF)
sera enfoncé.
E
F
E) Témoins lumineux
Indicateur de mise en marche (ON) de
la baguette large. Le témoin lumineux vert
s’allume lorsque le bouton de la microbaguette EN MARCHE (ON) est enfoncé
et que du courant passe jusqu’à la buse.
La buse n’est plus alimentée en courant
lorsque le bouton ARRÊT (OFF) de la
baguette large est enfoncé.
Lorsque la température opérationnelle
devient trop élevée, le témoin lumineux
jaune s'allume et l’appareil se met à l’arrêt
et redémarre automatiquement
lorsque la température redevient
acceptable.
Indicateur de bas niveau pour la
solution. Lorsque le niveau de la solution
devient trop bas, le témoin lumineux
passera au rouge.
F) Sortie pour les accessoires
Sortie pour la micro-baguette ou
la baguette de marquage/gravure
en option. La baguette de marquage/
gravure est utilisée pour créer une gravure
permanente sur les surfaces en acier
inoxydable, que ce soit votre nom, logo,
numéro de pièce ou toute autre information
que vous souhaiteriez inscrire. La microbaguette permet d’accéder à des zones qui
sont difficiles à atteindre ou trop petites pour
la baguette large lorsque vous procédez à
un nettoyage et une passivation.

Procédure de démarrage
A) Contenu de la boîte
u 1 x Baguette large et boyau de raccordement
u 1 x 48-R 136 Collier de mise à la terre
u 1 x 54-B 094 Support à baguette pour Surfox 204/304
u La trousse d’accessoires comprend :
• 1 x 54-B 095 Brosse en carbone pour baguette large
• 1 x 54-B 099 Adaptateur pour brosse de
baguette large
• 1 x 54-B 101 Guide triangulaire
• 1 x 54-B 103 Guide cylindrique
• 1 x 48-R 133 Buse en tungstène (déjà installée sur
la baguette large)
• 3 x 54-B 026 Tampons standards de nettoyage à
haute conductivité
Procédure de démarrage
5
• 1 x 54-B 002 1 anneau de serrage en PTFE
• 1 x clé hexagonale (clé Allen) de 2.5 mm pour le
changement des accessoires de nettoyage.
• 1 x clé hexagonale (clé Allen) de 5.0 mm pour
l'assemblage du support de la baguette large
B) Remplissage du réservoir
Remplissez le réservoir situé à l’arrière de l’appareil avec la
solution de nettoyage électrolytique SURFOX. Le réservoir
peut contenir 1,9 L de solution électrolytique SURFOX.
C) Raccordement de l’alimentation d’air
Raccordez l’alimentation d’air à l’arrière de l’appareil. Notez
que la pression maximum tolérée est de 150 lb/po
mum de 80 lb/po
rectement sans alimentation d’air, mais il n’y aura aucune
élimination des fumées.
2
(1000 kPa). L’appareil fonctionnera cor-
2
; mini-
D) Branchement du cordon d’alimentation
Lorsque l’ajout d’un cordon de rallonge est nécessaire,
utilisez la taille 14 (AWG) pour les cordons ayant une
longueur maximum de 50 pieds (15 mètres) et la taille
12 (AWG) pour les cordons de 50 à 100 pieds (15 à 30
mètres).
Réservoir
Collier de
mise à la
terre
Connexion de
l’alimentation
d’air
E) Branchement du collier de mise à la terre
Branchez le collier de mise à la terre sur le devant de
l’appareil. Attachez le collier à la pièce de travail qui doit
être nettoyée. Vous ne pourrez pas nettoyer et passiver une
pièce si elle n’est pas mise à la terre correctement.
SURFOX 304 Manuel de l’utilisateur 27

Utilisation de la baguette large pour le nettoyage, le polissage et la passivation électrochimique
6
Utilisation de la baguette large pour le nettoyage,
le polissage et la passivation électrochimique
A) Sélectionner la baguette et l'accessoire de
nettoyage
Embout en
Tungsten
Brosse
Baguette
large
Embout
large en
graphite
B) Choisir le bon type de courant AC ou DC et
la bonne intensité STD ou MAX
Mode pompage manuel. Choisissez le mode de pompage
manuel pour contrôler la quantité de solution à envoyer vers
la buse. Gardez le bouton EN MARCHE (ON) de la baguette
large appuyé pour pomper la solution vers la buse. Relâchez le bouton EN MARCHE (ON) pour arrêter le cycle de
pompage. Utilisez toujours la quantité de solution nécessaire pour garder le tampon de nettoyage humide.
Mode pompage automatique. Pour lancer le mode
de pompage automatique, appuyez sur le bouton EN
MARCHE (ON) de la baguette. Une fois activé, le pompage
du liquide se fera automatiquement. La quantité de liquide
utilisée peut être réglée de « moins » à « plus ».
D) Nettoyage et passivation
MAX STD
STD MAX
AC est pour le nettoyage et la passivation des soudures.
DC est pour le nettoyage, la passivation et le polissage
des soudures. STD est recommandé pour l'utilisation avec
buse en tungstène et les tampons. MAX est recommandé
pour l'utilisation avec les brosses et les embouts large en
graphite.
AVERTISSEMENT! Le mode DC est utilisé pour polir la
tête de soudure afin de la faire correspondre au fini miroir du
matériel.
TRUC ! Lorsque vous utilisez le mode polissage (DC),
utilisez une grande quantité de solution
électrolytique SURFOX.
Remarque : Lorsque vous utilisez le réglage DC, la solution
électrolytique SURFOX prendra une teinte jaunâtre ou plus
foncée.
Pour nettoyer et passiver, appuyez sur le bouton EN
MARCHE (ON) de la baguette large. Assurez-vous que
l'accessoire de nettoyage est saturé de solution nettoyante
électrolytique SURFOX avant de commencer le travail. Si
l'accessoire de nettoyage est trop sec, il s’usera prématurément. Commencez à travailler au moment où des gouttes
de solution commencent à tomber du tampon de nettoyage.
N’appliquez pas une pression trop forte; laissez le traitement électrochimique faire le travail. N’utilisez pas le tampon de nettoyage comme un tampon abrasif.
AVERTISSEMENT ! À la première utilisation de l’appareil,
de l’eau provenant des tests de fabrication pourrait subsister à l’intérieur du système. Réglez la pompe à liquide
en mode automatique à la vitesse maximale et laissez le
liquide s’égoutter pendant deux minutes dans un récipient
à déchets (le temps nécessaire pour vider le tuyau entre le
réservoir et la baguette), puis ramenez les réglages de la
pompe à la vitesse de pompage désirée.
E) Neutralisation
1. Enlevez le surplus de solution électrolytique SURFOX à
l’aide d’un chiffon souple et propre.
C) Sélectionner le mode de pompage adéquat
Mode
manuel
28
Mode
automatique
2. Vaporisez du SURFOX-N sur la surface.
3. Asséchez en utilisant un nouveau chiffon souple et
propre pour éviter une contamination croisée.
Reportez-vous à la procédure de neutralisation dans la
section portant sur la neutralisation pour obtenir les directives appropriées (page 34).

Accessoires pour baguette large
A) Sélection et assemblage des buses
et tampons de nettoyage
Accessoires pour baguette large
7
Les buses de tungstène sont fabriquées avec un alliage de
tungstène de haute qualité. D’autres matériaux pourraient
ne pas résister à l’environnement hostile créé par un traitement électrochimique.
AVERTISSEMENT ! Des embouts trop usés
peuvent endommager les tampons de nettoyage.
Dans cet exemple d’embout trop usé, il ne subsiste que deux points de contact. Tout le courant
passe par ces deux points. En raison de la section
transversale inférieure, la température deviendra
plus élevée sur les deux points et les tampons de
nettoyage pourraient s’endommager ou s’user
prématurément.
O-Ring
Embouts
Embout en tungstène 90°
No de comm. : 48-R 133
S’utilise avec tampon 54-B 026
ou 54-B 040 et bague de serrage
54-B 002 ou chausson 54-B 005
Embout en tungstène
étroit 90°
No de comm. : 54-B 017
S’utilise avec tampon 54-B 028
ou 54-B 041 et bague de serrage
54-B 020 ou chausson 54-B 007
TRUC ! Rectifiez l’embout à l‘aide d’une meuleuse
d’établi ou une meuleuse angulaire.
Remarque : Assurez-vous d’installer le joint torique (O-Ring)
à l’arrière des embouts chaque fois que vous les changez.
Embout en tungstène 60°
No de comm. : 54-B 016
S’utilise avec tampon 54-B 027
et bague de serrage 54-B 002
ou chausson 54-B 006
Embout en tungstène
étroit 60°
No de comm. : 54-B 018
S’utilise avec tampon 54-B 028
et bague de serrage 54-B 020
ou chausson 54-B 00854-B 008.
Ensemble d’embouts
en tungstène
No de comm. : 54-B 012
Comprend :
1 x 48-R 133
1 X 54-B 017
1 X 54-B 016
1 X 54-B 018
Tampon grand format
pour SURFOX 304
No de comm. : 54-B 052
(paquet de 5)
Embout en graphite large
pour 204 et 304
No de comm. : 54-B 009
1,8 Larg. (45 mm Larg.) Idéal pour
les grandes zones soudées et la
restauration de surface et le nettoyage
de l’arrière de soudures au MIG.
Brosse en fibre de
carbone pour grand
applicateur SURFOX 304
No de comm. : 54-B 095
Sans adaptateur. (paquet de 5)
Manchon triangulaire
pour brosse en fibre de
carbone s’adaptant au
grand applicateur
No de comm. : 54-B 101
Tampon large pour embout
en graphite large
No de comm. : 54-B 043
90 mm L X 50 mm W X 2 mm H
Paquet de 10 avec joint
d’etancheite
Adaptateur de brosse
de rechange pour grand
applicateur SURFOX 304.
No de comm. : 54-B 099
Manchon cylindrique pour
brosse en fibre de carbone
s’adaptant au grand
applicateur
No de comm. : 54-B 102
Support d’applicateur pour
Surfox 304 et 204.
No de comm. : 54-B 094
SURFOX 304 Manuel de l’utilisateur 29

Accessoires pour baguette large
7
Tampons de nettoyage à haute conductivité
Les tampons de nettoyage sont faits d’un mélange complexe de polymères synthétiques extrêmement conductifs.
Ces polymères sont très résistants à l’usure et offrent une
excellente stabilité thermique. Pour obtenir un cycle de
vie plus long, enlevez le tampon de nettoyage à la fin de
chaque journée de travail et faites une neutralisation en
utilisant le SURFOX-N.
Les tampons de nettoyage sont offerts en quatre formats :
Tampons de nettoyage
standards
No : 54-B 026
Utilisez avec l’embout
48-R 133.
Tampons de nettoyage
pour coins intérieurs
No : 54-B 027
Utilisez avec l’embout 54-B 016.
Caractéristiques
• Flexibilité; ils peuvent être pliés de plusieurs manières.
• Doux pour les surfaces.
• Utilisable sur les deux côtés.
• Durée prolongée.
• Conductivité élevée (4x plus conducteurs que la
génération précédente).
Tampons de nettoyage
étroits
No : 54-B 028
Utilisez avec les embouts 54-B 017
et 54-B 018.
Tampons de nettoyage
larges
No : 54-B 043
Utilisez avec l’embout large
en graphite 54-B 009.
30

Accessoires pour baguette large
7
B) Bagues de serrage en PTFE
Les bagues de serrage en PTFE sont conçues pour
maintenir en place les tampons de nettoyage sur les
embouts de tungstène.
Elles sont offertes en deux formats :
Bague étroite pour les tampons étroits
o
: 54-B 020
N
Utilisez avec des embouts étroits. 10 par paquet.
Bague de serrage pour les tampons
de nettoyage standards
o
: 54-B 002
N
Utilisez avec des embouts standards. 10 par paquet.
C) Solutions électrolytiques SURFOX
Les solutions électrolytiques SURFOX utilisent une formule
de nettoyage comprenant de l’acide phosphorique. Cette
formule est conçue pour être utilisée uniquement avec les
systèmes de nettoyage électrolytique SURFOX fabriqués
par WALTER.
SURFOX-G
Solution de nettoyage électrolytique
Nettoie une surface de 3 à 5 pieds par minute.
1.5 L/50.7 oz. N
Paquet ST D : 1 Emballage STD : 4
5 L/1.3 gal. N
Paquet ST D : 1 Emballage STD : 1
20 L/5.2 gal. N
Paquet ST D : 1 Emballage STD : 1
208 L/55 gal. N
Paquet ST D : 1 Emballage STD : 1
o
: 54-A 065
o
:54-A 066
o
: 54-A 067
o
: 54-A 068
D) Assemblage d’un tampon nettoyeur
1. Pressez et insérez la bague de serrage.
2. Insérez le tampon de nettoyage.
3. Appuyez fermement sur la buse de tungstène.
SURFOX-T
Solution de nettoyage
électrolytique surpuissante
Nettoie une surface de 3 à 5 pieds par minute.
1.5 L/50.7 oz. N
Paquet ST D : 1 Emballage STD : 4
5 L/1.3 gal. N
Paquet ST D : 1 Emballage STD : 1
20 L/5.2 gal. N
Paquet ST D : 1 Emballage STD : 1
208 L/55 gal. N
Paquet ST D : 1 Emballage STD : 1
o
: 54-A 005
o
: 54-A 006
o
: 54-A 007
o
: 54-A 008
4. Enlevez la buse y compris le tampon et la
bague de serrage qui sont installés.
Remarque : Lorsque vous faites l’assemblage de tampons
classiques, assurez-vous que le symbole Ω vous fait face
lorsque vous êtes à l’étape no 2.
SURFOX 304 Manuel de l’utilisateur
31

Utilisation de la micro-baguette pour le nettoyage et la passivation (facultatif)
8
Utilisation de la micro-baguette (en option) pour le nettoyage
et la passivation 54-B 033 et 54-B 133
Utilisez la micro-baguette pour atteindre les endroits étroits,
là où la baguette large n’a pas accès. Branchez la microbaguette dans la sortie d’accessoire située sur la partie
avant de l’appareil.
A) Sélectionner la baguette et l'accessoire de
nettoyage
Microbaguette
Brosse
Buse en
tungstène
Lorsque ce mode est sélectionné, le courant vers la
baguette large est automatiquement coupé, la pompe
à solution s’arrête et le fonctionnement du système
d’élimination des fumées (s’il est en fonction) est
interrompu. Seules les sorties prévues pour la microbaguette ou la baguette de marquage reçoivent du courant.
Assurez-vous que la pièce sur laquelle vous travaillez est
mise à la terre.
Buse large
en graphite
C) Mode de pompage manuel
La micro-baquette ne peut être utilisée qu’en mode de
pompage manuel. Une (1) pression équivaut à un (1)
pompage. Pour pomper une plus grande quantité de
liquide, faites des pressions répétitives. Consultez les
directives portant sur la micro-baguette pour obtenir plus
d’informations.
D) Nettoyage et passivation
Visser le tube de 100 ml
de solution électrolytique
SURFOX sur la microbaguette. Assurez-vous
que le tampon de
netto yage est saturé
de solution avant de
commencer le travail. Si
le tampon de nettoyage
est trop sec, il s’usera
prématurément.
Commencez à travailler
au moment où la solution
commence à s’égoutter du tampon de nettoyage.
B) Choisir le bon type de courant AC ou DC et
la bonne intensité STD ou MAX
AC est pour le nettoyage et la passivation des
soudures.
DC est pour le nettoyage, la passivation et le polissage
des soudures STD est recommandé pour l'utilisation avec
buse en tungstène et les tampons. MAX est recommandé
pour l'utilisation avec les brosses et les embouts large en
graphite.
AVERTISSEMENT ! Le mode DC est utilisé pour polir la
tête de soudure afin de la faire correspondre au fini miroir
du matériel.
TRUC ! Lorsque vous utilisez le mode polissage (DC),
utilisez une grande quantité de solution
électrolytique SURFOX.
Remarque: Lorsque vous utilisez le réglage DC, la solution
électrolytique SURFOX prendra une teinte jaunâtre ou plus
foncée.
32
N’appliquez pas une pression trop forte; laissez le
traitement électrochimique faire le travail. Le tampon
de nettoyage représente un pont entre l’appareil et
la soudure. N’utilisez pas le tampon de nettoyage
comme un tampon abrasif.
E) Neutralisation
1. Enlevez le surplus de solution électrolytique SURFOX à
l’aide d’un chiffon souple et propre.
2. Vaporisez du SURFOX-N sur la surface.
3. Asséchez en utilisant un nouveau chiffon souple et
propre pour éviter une contamination croisée.
Reportez-vous à la procédure de neutralisation dans la
section portant sur la neutralisation pour obtenir les
directives appropriées.

Utilisation de la baguette de marquage/gravure (facultatif)
Utilisation de la baguette de marquage/gravure (facultatif)
9
A) Trousses de marquage
La trousse standard (54-B 080)
comprend :
• 1 baguette de marquage/
gravure avec embout
de graphite;
• Câble de 35 mm X 10 mm
et câble de raccordement;
• 20 tampons de marquage;
• 5 joints toriques (O-Rings);
• 1 contenant de 100 ml de
solution SURFOX-M;
• 1 contenant de 100 ml de
solution SURFOX-E.
B) Sélectionner la baguette
Utilisez la baguette de marquage/gravure pour graver ou
marquer de façon permanente votre nom, logo, numéro de
pièce ou toute autre information que vous souhaitez inscrire
sur les surfaces en acier inoxydable à l’aide de pochoirs
permanents ou jetables. Branchez la baguette de marquage/gravure à la sortie d’accessoire située sur la partie
avant de l’appareil.
La trousse PRO (54-B 081) comprend :
• 1 baguette de marquage/
gravure avec embout
de graphite;
• Câble de 35 mm X 10 mm
et câble de raccordement;
• 20 tampons de marquage;
• 5 joints toriques (O-Rings);
• 1 contenant de 100 ml de solution
SURFOX-M;
• 1 contenant de 100 ml de solution
SURFOX-E;
• 1 imprimante à pochoir et logiciel;
• 1 rouleau de papier pochoir de 100 mm de
largeur X 20 m de longueur.
Baguette de
marquage/gravure
C) Choisir le bon type de courant AC ou DC et la bonne intensité STD ou MAX
AC est pour le marquage avec Surfox-M.
DC est pour la gravure avec Surfox-E.
STD est le niveau de courant recommandé pour le marquage ou la gravure.
MAX STD
STD MAX
DES PUBLICATIONS TECHNIQUES SONT OFFERTES
SUR NOTRE SITE WEB.
SURFOX 304 Manuel de l’utilisateur 33

Neutralisation
10
Neutralisation
Le liquide SURFOX-N est spécialement conçu pour neutraliser les solutions électrolytiques produites par SURFOX.
Sa puissante formule est à base d’eau et ce produit « prêt
pour l’utilisation » est biodégradable. Il est non toxique, ne
contient aucun solvant et ne laisse aucun résidu.
A) Directives pour la neutralisation des
solutions électrolytiques de nettoyage
SURFOX :
1. Enlevez le surplus de solution électrolytique SURFOX à
l’aide d’un chiffon souple et propre.
2. Vaporisez du SURFOX-N sur la surface.
3. Asséchez en utilisant un nouveau chiffon souple
et propre.
Pour obtenir plus d’informations au sujet de ce produit,
reportez-vous à sa fiche signalétique ou fiche de données
de sécurité.
AVERTISSEMENT ! Assurez-vous d’essuyer toute quantité
résiduelle de solution électrolytique SURFOX de la surface
et pensez à faire une neutralisation. Dans le cas contraire,
le sel inorganique de l’acide phosphorique adhérera à la
surface et provoquera la formation de dépôts.
B) Procédure de neutralisation et de nettoyage
des soudures SURFOX
Nettoyez la soudure en utilisant l’appareil SURFOX et les
solutions électrolytiques SURFOX. Ne travaillez que sur
deux pieds à la fois.
Remarque : le tampon de nettoyage doit rester humide,
mais sans laisser échapper de gouttes.
1. Une fois la soudure nettoyée, utilisez un chiffon propre
ou une serviette de papier et essuyez la zone touchée
dans une action de balayage de gauche à droite. Jetez
ensuite le chiffon ou la serviette de papier.
Une fois la soudure nettoyée avec l’appareil de nettoyage
SURFOX, la solution électrolytique doit subir une
neutralisation.
1. Vaporisez le neutralisant SURFOX-N sur la zone touchée.
Laissez agir sur la surface pendant 15 secondes.
2. Utilisez un chiffon ou une serviette de papier propre et
essuyez la zone touchée dans une action de balayage
de gauche à droite. Jetez ensuite le chiffon ou la
serviette de papier.
Remarque : L’absence de neutralisation ou une procédure
de neutralisation inadéquate se traduira par une surface
assombrie, brouillée ou ternie.
34
Neutralisant
SURFOX-N N
pièce
500 ml 54-A 023
5 L 54-A 026
20 L 54-A 027
208 L 54-A 028
Dépôts de sel laissés en raison
d’une procédure de neutralisation
et de rinçage inadéquate.
o
de

Éléments de sécurité
Éléments de sécurité
11
A) Étincelles sur la buse ou la pièce de travail
Pour éviter les courts-circuits (arcs électriques), l’appareil
s’arrête automatiquement lorsque l’embout entre en contact avec la pièce à souder (contact métal sur métal). Un
panneau convertisseur fait une surveillance de l’intensité
du courant à chaque milliseconde. Si l’intensité du courant
augmente fortement et crée un court-circuit, le système
coupe automatiquement l’alimentation de la buse pour
éviter tout dommage à l’équipement.
Pour redémarrer l’appareil, appuyez sur le bouton EN
MARCHE (ON) de la baguette large.
AVERTISSEMENT ! Pour éviter une intensité de courant
trop élevée et un arrêt automatique de l’alimentation de la
buse, assurez-vous de ne toucher qu’une seule surface à
la fois. L’appareil est réglé pour travailler avec un maximum
de 30 ampères. Si l’intensité du courant dépasse cette
intensité, l’appareil se ferme automatiquement.
B) Température interne
Des capteurs de température sont installés à l’intérieur
de l’appareil afin d’en protéger les composantes internes.
Lorsque la température opérationnelle devient trop élevée,
l’appareil se met à l’arrêt et redémarre automatiquement
lorsque la température redevient acceptable. Un ventilateur
interne permet de garder tous les composants de l’appareil
au frais.
AVERTISSEMENT ! Il y a plusieurs facteurs susceptibles
de faire augmenter la température interne : une température ambiante très chaude, un manque de circulation d’air
autour de l’appareil, la fluctuation de l’intensité du courant,
la configuration électrique dans l’atelier, etc.
C) Rudiments du courant CA/CC
Le courant alternatif (CA) circule dans une direction, puis
dans l’autre, et le flux s’inverse continuellement. L’intensité
du CA alterne entre le positif (+) et le négatif (-).
Courant
+
ou
tension
Exemple : Pour une surface plane, l’intensité de courant
est d’environ 24 ampères; la surface de contact est
relativement petite.
Exemple : Lorsque vous travaillez sur un angle interne, il est
possible que vous touchiez les deux côtés en même temps
et la surface de contact s’en trouve doublée; l’intensité
monte alors au-dessus de 30 ampères et force l’arrêt de
l’appareil.
Remarque : Arrêt automatique si la mise à la terre n’est pas
détectée dans une période de 20 secondes.
temps
Le courant continu (CC) circule toujours dans la même
direction, mais son intensité peut augmenter et décroître.
L’intensité du CC est toujours positive, mais elle peut augmenter et décroître.
Courant
ou
+
tension
temps
SURFOX 304 Manuel de l’utilisateur 35

Éléments de sécurité
11
D) Réglages CA/CC pour l’appareil SURFOX
Exemple de nettoyage et passivation en utilisant le mode
CA de SURFOX :
Vue microscopique du matériel
AVANT
Couche
d’oxyde à
enlever
Exemple de nettoyage et passivation en utilisant le SURFOX
en mode CC :
Vue microscopique du matériel
APRÈS
Nettoyage et passivation
parfaits. Nettoie chaque fente
dans le matériel.
E) Les soudures qui ne peuvent pas
être nettoyées
Si la zone entourant la soudure est noire (non bleue) et
contaminée, il s’agit d’un problème de chaleur trop intense
survenu pendant le processus de la soudure. Les zones
contaminées ne sont pas conductrices d’électricité. S’il n’y
a pas de conductivité dans le matériel, le système SURFOX
n’est pas en mesure de fonctionner.
Si deux soudures se superposent, la structure du matériel
a été sérieusement altérée. Il est possible que ces zones ne
soient pas nettoyées.
La qualité de la soudure représente un point critique. Une
soudure de qualité favorisera un nettoyage facile.
36
Couche
d’oxyde à
enlever
AVANT
APRÈS
Nettoyage et passivation
parfaits. Nettoie chaque fente
dans le matériel.
Altération du
matériel causé
par le réglage
en CC

Garantie et serviceDonnées techniques
1312
Données techniques
MODÈLE : SURFOX 304
NUMÉRO DE PIÈCE : 54-D 314
INTENSITÉ DU COURANT EN ENTRÉE : 120 V, 50/60 Hz
INTENSITÉ DU COURANT EN SORTIE : 30 V, AC/DC
COURANT D’ENTRÉE : 7.5 ampères.
COURANT EN SORTIE : 30 ampères Max, CA/CC
INTENSITÉ MAX. DU COURANT EN SORTIE : 33 V, CA/CC
DIMENSIONS : 525 mm x 370 mm x 250 mm
(20-2/3” x 9,84” x 14,57”).
CAPACITÉ DU RÉSERVOIR : 1,9 L.
POIDS : 22 kg (48.5 lb).
PRESSION D’AIR EN ENTRÉE : 150 lb/po
80 lb/po
2
min.
2
max. –
Garantie et service
A) Politique de garantie
Tous les systèmes de nettoyage SURFOX de WALTER
et les accessoires qu’ils comprennent sont inspectés et
testés avant leur expédition et sont garantis sans défaut de
matériel et de fabrication. Si un mauvais fonctionnement
survient dans les six (6) mois suivant la date d’achat,
retournez l’ensemble du système, prépayé avec preuve
d’achat, à un centre de service agréé par WALTER. Si un
examen démontre que le mauvais fonctionnement est dû
à un défaut matériel ou de fabrication, WALTER réparera
ou remplacera – à son choix – l’appareil défectueux sans
frais. Cette garantie ne s’applique pas dans certains cas :
un entretien normal était nécessaire; des réparations ou
remplacements ont été faits ou tentés par des personnes
qui ne font pas partie du personnel de service agréé par
WALTER. En outre, cette garantie ne couvre pas les
dommages causés par des accidents, des modifications,
l’utilisation d’accessoires inappropriés, les abus ou mauvaises utilisations de l’appareil, y compris une surcharge de
l’outil au-delà de sa capacité nominale et la poursuite de
son utilisation après une défaillance partielle. Aucune autre
garantie, qu’elle soit écrite ou verbale, n’est autorisée.
En aucun cas, WALTER ne peut être tenu responsable des
dommages indirects et fortuits qui sont consécutifs à la
vente du produit. Cet avis de non-responsabilité s’applique
à la fois pour la période couvrant cette garantie et la période
succédant à cette couverture.
Cette garantie vous donne des droits spécifiques. Les dispositions contenues dans la présente garantie n’entendent
pas limiter, modifier, réduire l’effet, disqualifier ou exclure les
garanties énoncées dans les lois provinciales ou fédérales.
Lorsqu’elles sont requises par les lois, les dispositions contenues dans toutes les lois provinciales, d’État ou fédérales
ont préséance sur les dispositions contenues dans la
présente garantie.
B) Réparation et service
Pour l’envoi :
•
Vidangez le réservoir de la solution électrolytique SURFOX.
• Utilisez l’emballage d’origine.
• Utilisez un emballage adéquat.
• Envoyez sur une petite palette.
• Donnez une description détaillée du problème et inscrivez
les informations suivantes : nom de l’entreprise, adresse,
numéros de téléphone et de télécopieur ainsi que le nom
de la personne ressource.
SURFOX 304 Manuel de l’utilisateur 37

38

Índice
Índice
1 Introducción 40
2 Instrucciones de Seguridad 41
3 Controles del equipo 42
A) Pictogramas del panel de control 42
B) Vista frontal y posterior de la máquina 43
C) Botones del control de vara 44
D) Sistema de eliminación de vapores 44
E) Reposición de la punta (confort para el operario) 44
4 Panel de Control 45
A) Interruptor principal de encendido 45
B) Selector de vara y de accesorios 45
C) Selector de tipo de corriente 45
D) Interruptor de la bomba de solución 45
E) Indicador de luces 45
F) Tomacorrientes para accesorios 45
5 Procedimiento de encendido 46
A) Contenido de la caja 46
B) Llenado del depósito 46
C) Conexión del suministro de aire 46
D) Conexión del cable de alimentación 46
E) Conexión a tierra 46
6 Uso de la vara grande para limpiar, pulir y pasivar
electroquímicamente 47
A) Selección vara y accesorio correcto 47
B) Selección del tipo de corriente correcto, AC o DC
y el nivel de corriente correcto, STD o MAX 47
C) Selección del modo de bombeo correcto 47
D) Limpieza y pasivado 47
E) Neutralizado 47
7 Accesorios para vara grande 48
A) Selección y montaje de almohadillas de limpieza
y puntas 48
B) Anillos de sujeción PTFE 50
C) Solución electrolítica SURFOX 50
8 Uso de la micro vara (opcional) para limpiar,
pulir y pasivar 51
A) Selección de vara y accesorio apropiado 51
B) Selección de tipo de corriente apropiado, AC o DC
y nivel de corriente apropiado, STD o MAX 51
C) Modo de bombeo manual 51
D) Limpieza y pasivado 51
E) Neutralizado 51
9 Uso de vara de marcado/grabado (opcional) 52
A) Kits de marcado 52
B) Selección de vara y accesorio apropiados 52
C) Selección de tipo de corriente apropiada, AC o DC
y nivel de corriente apropiado, STD or MAX 52
10 Neutralizado 53
A) Instrucciones para las Soluciones Electrolíticas
de limpieza SURFOX 53
B) Procedimiento de limpieza y neutralizado SURFOX 53
11 Características de Seguridad 54
A) Chispas en la punta/pieza de trabajo 54
B) Temperatura interna 54
C) Corrientes básicas AC/DC 54
D) Ajustes de AC/DC en la máquina SURFOX 55
E) Soldaduras que no pueden limpiarse 55
12 Datos Técnicos 56
13 Servicio y garantía 56
A) Póliza de garantía 56
B) Servicio y reparación 56
D) Montaje de almohadilla de limpieza 50
SURFOX 304 Manual del usuario 39

Introducción
1
Introducción
Felicitaciones por haber adquirido el más fino equipo de
limpieza electroquímica y pasivado de soldadura que existe
hoy en día. El equipo de limpieza SURFOX
quita con rapidez, facilidad y en forma rentable las manchas de calor de las zonas afectadas, realizando al mismo
tiempo el pasivado en la superficie de acero inoxidable.
Nuestra nueva generación de máquinas SURFOX están
equipadas con tableros inversores autoregulables que
monitorean y ajustan la corriente para asegurar la máxima
eficacia en limpieza sin pérdida de productividad.
Antes de comenzar, por favor lea el manual del usuario
SURFOX completamente, mientras le mostramos paso a
paso desde el encendido, los procedimientos de operación
y mantenimiento de su nuevo equipo SURFOX. Su nueva
máquina SURFOX ha sido construida con una durabilidad
extra para soportar las demandas del uso industrial. Sin
embargo, como cualquier pieza de equipo eléctrico, se
debe tratar siempre con cuidado y debe tenerse cuidado
al hacer el mantenimiento de esta valiosa inversión. Con
cuidado y mantenimiento apropiados, su equipo SURFOX
le brindará años de servicio confiable.
Para conocer más sobre otros productos WALTER visite
nuestro sitio web: www.walter.com
TM
de WALTER,
1.1 Información General
Este manual le brinda toda la información que se require
para una instalación segura, puesta en marcha y para la
operación de la máquina, junto con instrucción de mantenimiento y solución de problemas.
u Fuente de energía eléctrica incorrecta;
u Mantenimiento incorrecto;
u Mantenimiento incorrecto; modificaciones y manipu-
lación no autorizadas;
u Mantenimiento incorrecto; uso de piezas o respuestos
no originales o no indicados para el modelo en cuestión;
u Mantenimiento incorrecto; falla parcial o total al seguir las
instrucciones;
u Eventos inesperados;
u Y cualquier otro uso inapropiado.
Operación
La máquina SURFOX funciona con un proceso electroquímico para limpieza y pasivado de soldaduras en acero
inoxidable. Las soluciones electrolíticas SURFOX son a
base de ácido fosfórico, aprobado para la industria alimenticia, y son activados por una corriente eléctrica para limpiar
las soldaduras. El proceso lleva sólo unos segundos, sin
dañar ni rayar la superficie de la pieza limpiada.
Su máquina SURFOX 304 puede limpiar:
u Soldaduras TIG
u Soldaduras por plasma
u Soldaduras láser
u Soldaduras por Puntos
u Soldaduras MIG
El manual es una parte integral de la máquina y debe ser
guardado cuidadosamente con la máquina hasta que se
deseche para referencia de futuras actualizaciones. Si su
manual o la copia se vuelven ilegibles o se pierden, puede
pedir una nueva copia en: WALTER - walter.com o surfox.
com
El presente manual refleja la condición de la máquina en
el momento de su fabricación y no puede considerarse
inadecuada en caso de actualización debido a la experiencia posterior.
WALTER se reserve el derecho de actualizar sus productos
y manuales sin previa notificación a los usuarios de máquinas fabricadas previamente.
WALTER no es responsable por el uso indebido de sus
productos, como por ejemplo:
u Uso incorrecto de la máquina o uso de la misma por
personas no capacitadas;
u Uso en violación de los estándares de referencia;
u Instalación incorrecta;
40
Básicos de la pasivación:
u La limpieza de las soldaduras no es sólo por una
cuestión estética, sino sobre todo para su pasivación.
u El pasivado es el tratamiento de las superficies de acero
inoxidable para quitarles los contaminantes y promover
la formación de una capa protectora espesa y durable
de óxido de cromo.
u Esta capa de pasivado le asegura la resistencia a la cor-
rosión del acero inoxidable.
u Si el pasivado no se realiza correctamente, el acero
inoxidable y las zonas afectadas por el calor pueden
comenzar a oxidarse.

Instrucciones de Seguridad
Instrucciones de seguridad
2
Las máquinas de limpieza WALTER son producidas en
conformidad con las normas que regulan la fabricación,
funcionamiento y seguridad de los productos industriales.
ADVERTENCIA: Al usar estas máquinas deben observarse
siempre las precauciones básicas para reducir el riesgo de
incendio, descargas eléctricas y lesiones personales.
Antes de utilizar esta máquina lea cuidadosamente todas
las instrucciones de Operación y Seguridad y conserve el
manual para referencias futuras.
1. Lea el manual del usuario para familiarizarse con las
operaciones de esta unidad, sus caracterísiticas particulares,
usos y limitaciones.
2. Esta unidad está equipada con cable tripolar y un enchufe
de tres (3) clavijas. Debe ser conectado a un tomacorrientes a
tierra correspondiente.
3. Dejar al menos un mínimo de 8’’ (20 cms aprox.) alrededor
de la unidad para mantener libres las salidas de aire, sin
obstrucciones. Permita la libre circulación de aire por las
aberturas para prevenir el recalentamiento de la unidad.
4. Mantenga limpia y ordenada el area de trabajo. Un
ambiente desordenado invita a los accidentes. Quite cualquier
material que pueda encenderse con chispas. No utilice
esta herramienta donde haya líquidos inflamables o gases.
Conserve limpias las manijas, secas y sin solución de limpieza,
aceite y grasa. No utilice bajo la lluvia o en lugares húmedos o
mojados.
5. Mantenga a los niños y demás personas a una distancia
prudente de la zona de trabajo. Asegúrese que nadie se
encuentre debajo de usted si trabaja en alturas. No permita
que personal no calificado opere esta máquina.
6. Utilice siempre vestimenta apropiada cuando opere la
máquina. Equipo de seguridad como por ejemplo guantes
resistentes apropiados y aprobados, overol, calzado de
seguridad, etc.
7. Siempre use anteojos de seguridad (gogles).
8. Durante el proceso de limpieza, la punta de la vara y la
pieza trabajada pueden alcanzar muy altas temperaturas. Deje
que se enfríen antes de entrar en contacto con la piel.
9. Evite la inhalación de vapores, sólo utilice en lugares bien
ventilados. Si es necesario, utilice un respirador.
10. Todas las descargas eléctricas son potencialmente
peligrosas.
11. Si existe un problema eléctrico, no utilice la unidad hasta
que personal calificado haya revisado el equipo.
12. No opere nunca la unidad sin la cubierta protectora.
13. Manténgase alerta en todo momento al utilizar la unidad.
Preste atención a lo que hace. Use el sentido común. No opere
la máquina cuando esté cansado. Nunca la deje funcionando si
está desatendida.
14. Asegúrese que el interruptor esté apagado (OFF) antes de
conectarla o cuando mueva la unidad para evitar el encendido
sin que usted lo desee.
15. Sostenga la vara con firmeza. No se extralimite, siempre
mantenga buen apoyo y equilibrio.
16. Antes de usar debe examinar cuidadosamente todas
las piezas para determinar que la unidad va a operar
correctamente y realizará su función.
17. Las piezas dañadas o defectuosas deben ser reparadas o
remplazadas por un Centro de Servicios Autorizado WALTER.
18. No use la unidad si el interruptor no se enciende y apaga
(ON/OFF).
19. Sólo use accesorios recomendados para este sistema.
Controle siempre los accesorios antes de comenzar a trabajar
y no utilice si están dañados.
20. PRECAUCIÓN: Las soluciones electrolíticas de limpieza de
soldadura SURFOX de WALTER contienen ácido fosfórico y
pueden causar quemaduras si no se manipulan correctamente.
Evite el contacto con la piel.
Primeros auxilios: Lave la zona afectada con agua.
Contacto con los ojos: limpie con chorros de agua por 15
minutos levantando los párpados. Contacte a un médico si es
necesario.
Ingestión: NO induzca al vómito. Enjuague la boca con
abundante cantidad de agua y obtenga atención médica.
Remitirse a las planillas de seguridad (MSDS o SDS) del
producto de WALTER para una información más detallada en
walter.com or surfox.com.
21. Use sólo las soluciones electrolíticas SURFOX de WALTER
con esta unidad y NUNCA las mezcle con otros productos.
22. El uso del sistema de eliminación de vapores (pág. 6) es
altamente recomendable cuando se trabaja en áreas cerradas.
23. No use la máquina SURFOX en la misma estructura
mientras se trabaja con soldadura con arco, La corriente podría
volver a la máquina SURFOX y causar daños irreparables.
24. Almacene la solución en su contenedor original y en un
sitio seguro, fuera del alcance de los niños o de personas no
calificadas. Mantenga limpios los contenedores. No vuelva a
utilizar las soluciones electrolíticas de limpieza SURFOX.
25. No toque la punta de la vara o la pieza de trabajo mientras
está trabajando o inmediatamente después, ya que puede
estar extremadamente caliente y puede causar quemaduras
graves.
26. No abuse del cable. Nunca tire o levante la unidad usando
el cable, ni tampoco tire de él para desconectarla. Mantenga el
cable lejos del calor, aceite y bordes filosos.
Controle el cable periódicamente. Si se encuentra dañado,
remplácelo en un Centro de Servicios Autorizados WALTER.
27. Cuando no esté en uso, apáguelo y desconecte el cable
y la manguera de aire (si está conectada). Debe permanecer
desconectada cuando se remplacen las almohadillas de
limpieza y otros accesorios, cuando se haga el mantenimiento
y antes del mismo.
28. Almacene la unidad en un lugar seco y seguro, lejos del
alcance de los niños y de otras personas no calificadas.
SURFOX 304 Manual del usuario 41

Instrucciones de seguridad
2
Controles del equipo
3
Controles del equipo
Amperaje
Antes de conectar esta unidad controle que el amperaje que se
muestra en la placa indicadora de potencia sea el mismo del
tomacorrientes.
Si opera esta máquina en un amperaje distinto puede ocasionar
lesiones personales al usuario y daños a la unidad.
Mantenimiento preventivo
Luego de usar, deje que se enfríe la punta y quite la almohadilla
de limpieza. Neutralice con SURFOX-N y enjuague la
almohadilla y la punta de la vara con agua y seque. Limpie
la suciedad y polvo del exterior de la unidad. Mantenga la
libre circulación de aire en todas las aberturas, sin ninguna
obstrucción. Limpie el cable para prevenir el deterioro y
controle que no haya daños en el cable ni en el enchufe.
Nota: Los cables dañados se deben remplazar inmediatamente
sólo por personal calificado. Remitirse a la lista de piezas de
repuesto para el número de orden.
Transportación
Antes de transportar la máquina, asegúrese que el depósito
para la solución y la línea de suministros estén completamente
vacíos y que todas las líneas de conexión estén desconectadas.
La máquina debe ser cuidadosamente embalada en un
contenedor apropiado y protegido correctamente. WALTER no
se hará responsable por ningún daño que resulte por la pérdida
de la solución de limpieza o por manipulación incorrecta.
A) Pictogramas del panel de control
Enchufe para la micro vara o
vara de marcado
Indicador de alta
temperatura interna
Indicador para punta de vara
Encendido ON
Indicador de BAJO Nivel
de solución
Almacenamiento
Si ldebe almacenar la máquina por un tiempo, deb vaciar el
depósito y la línea de suministro de la solución, debe quitar
la almohadilla de limpieza (neutralizar, enjuagar y dejar fuera)
y la punta neutralizada, enjuagada y secada. Guardar en un
lugar seco y seguro para evitar daños, especialmente a los
componentes electrónicos.
Eliminación de residuos
La eliminación de los desechos debe ser en conformidad
con las regulaciones medioambientales Estatales, Federales,
Provinciales y locales. Consultar las hojas de seguridad de las
soluciones electrolíticas de limpieza SURFOX de WALTER para
más información en walter.com or surfox.com.
Cable para extensión
Cuando necesite una extensión, utilice un cable calibre 14
(AWG) para hasta 50 pies (15 metros) y calibre 12 (AWG) para
de 50 a 100 pies (15 a 30 metros).
42
Modo de bombeo manual Bombeo en modo automático
Vara de marcado Micro-vara
MAX STD
STD MAX
Selector modo corriente
Vara grande
Selector de vara y
accesorios

B) Vista frontal y posterior de la máquina
Controles del equipo
3
Botón ON/OFF
Tomacorrientes p/accesorio
Conector a tierra
Manguera de vara grande
(líneas de suministro
eléctrico y de la solución)
Panel de control
Depósito y llenado de la
solución electrolítica de
limpieza SURFOX
Unidad de montaje de almohadilla
de limpieza
Conector de aire comprimido
(sistema para eliminación de
vapores)
Cable
SURFOX 304 Manual del usuario 43

Controles del equipo
3
C) Botones de control de la vara grande
Se utiliza el botón ON para encender al accesorio de
limpieza. Cuando se coloca el bombeo en modo manual,
presione el botón ON para activar la bomba. Presione y
deje presionado el botón para que el flujo del líquido sea
contínuo.
Sin embargo, si el modo de bombeo está en automático,
presione el botón ON una vez para activar la bomba. Para
parar, presione el botón OFF. Cuando haya terminado de
trabajar con la máquina (en cualquier modo), asegúrese de
presionar el botón OFF.
Una vez que presione el botón ON, habrá energía contínua
hacia la punta, hasta que se presione el botón OFF.
ON OFF
Accesorio de
limpieza
E) Reposición de la punta (confort para el
operario)
La punta de tungsteno se puede hacer girar de su posición
horizontal estándar a la posición vertical o a cualquier
posición entre estas dos, para que le sea lo más cómodo
posible realizar la limpieza.Para aflojar el pasador roscado
derecho de la manga para la eliminación de vapores, gire la
punta a la posición deseada y vuelva a ajustar la manga.
Importante: Ajuste siempre la manga de eliminación de
vapores para asegurar una buena conexión y evitar que se
dañen los puntos de contacto.
D) Sistema de eliminación de vapores
(patentado)
La máquina SURFOX 304 viene con un sistema de eliminación de vapores integrado. Este sistema brinda mejores
condiciones de trabajo. Aunque los vapores no son tóxicos
ni peligrosos, pueden generar molestias en lugares de
trabajo cerrados.
Para activar esta característica, simplemente debe conectar
la línea de aire comprimido (150 PSI max., 80 PSI min.) al
accesorio de conexión en la parte posterior de la máquina.
El sistema de eliminación de vapores se activa automáticamente cuando se presiona el botón ON de la vara grande.
El sistema de eliminación de vapores se apaga cuando se
presiona el botón OFF en la vara grande. Si no se desea el
sistema de elimación de vapores, simplemente desconecte
la línea de aire comprimido.
El principio de funcionamiento es bastante simple y altamente efectivo; el aire sale por las pequeñas aberturas
detrás del accesorio de limpieza. Este aire comprimido,
cuya regulación ha sido preestablecida, no condensa los
vapores en el aire.
44
Accesorio para
línea de aire
comprimido
Accesorio de limpieza de cerca
Pequeñas
aberturas

Panel de control
A) Interruptor principal
Enciende (ON) y apaga (OFF) la unidad.
B) Selector de vara y accesorio
Vara de marcado y grabado.
Seleccione este ícono cuando use la vara de
marcado/grabado que ha sido conectada al
tomacorrientes del accesorio.
Micro vara. Seleccione este ícono cuando
use la vara pequeña que ha sido conectada en
el tomacorrientes para accesorios. Seleccione
el accesorio apropiado, ya sea el inserto de
tungsteno, el cepillo o el inserto grande.
Vara grande. Seleccione este ícono cuando
utilice la vara grande adjunta a la unidad
SURFOX.
C) Selector de tipo de corriente
Selección de la corriente apropiada, tipo,
AC o DC, STD o MAX. AC para limpieza y
pasivado de soldaduras. DC para limpieza,
pasivado y pulido de soldaduras. STD se
MAX STD
STD MAX
recomienda cuando se usan insertos de
tungsteno y almohadillas. MAX se recomienda
para cuando se usa el cepillo o el inserto
grande de grafito.
D) Interruptor de la bomba de
solución
Modo manual. Elija el bombeo manual
para controlar la cantidad de solución que
debe llegar a la punta. Sostenga presionado
el botón de la vara grande en ON para que
bombee la solución hacia la punta. Suelte
el botón ON para que pare el ciclo de
bombeado. Siempre utilice sufifiente cantidad
de solución para que mantenga húmeda la
almohadilla. Muy poca solución en la misma
reduce su vida útil.
Panel de control
4
E) Indicador de luces
Indicador de encendido de vara grande.
La luz verde se enciende si se presiona (ON)
el botón de la vara grande y hay energía en la
punta. Se apaga la energía en la punta cuando
se presiona el botón de apagado (OFF).
Si la temperatura es demasiado alta, se
encenderá la luz amarilla, se apagará la
máquina y se reiniciará sola cuando la
temperatura llegue a un nivel aceptable.
Indicador de bajo nivel de la solución.
Cuando el nivel de la solución esté bajo, se
encederá la luz roja.
F) Tomacorrientes de accesorios
Toma opcional para micro vara o
de grabado/marcado.
marcado/grabado se usa para marcar
permanentemente el nombre de la empresa,
el logo u otra información deseada, sobre las
superficies de acero inoxidable. La micro vara
se usa para limpiar y pasivar zonas de difícil
alcance y que son muy pequeñas para la vara
grande.
La vara de
Modo automático. Para arrancar en este
modo, presione el botón ON de la vara.
Una vez activado bombeará el líquido
automáticamente. La cantidad de líquido
puede seleccionarse de menos a más.
Continuará el bombeo en este modo hasta
que presione el botón OFF.
SURFOX 304 Manual del usuario 45

Procedimiento de arranque
5
Procedimiento de arranque
A) Contenido de la caja
u 1 x Vara grande y manguera de conexión
u 1 x Terminal a tierra 48-R 136
u 1 x Soporte de vara 54-B 094 para Surfox 204/304
u Kit de accesorios:
• 1 x Cepillo de fibra de carbono para vara grande
54-B 095
• 1 x Adaptador de cepillo para vara grande 54-B 099
•1 x Adaptador triangular 54-B 101
• 1 x Adaptador cilíndrico 54-B 102
• 1 x Inserto de tungsteno 48-R 133
(Ya montado en la vara grande)
• 3 x Almohadillas de limpieza estándar de alta conductividad 54-B 026
• 1 x Anillo de sujeción PTFE 54-B 002 PTFE
• 1 x Llave hexagonal de 2.5 mm para cambiar insertos
de tungsteno
• 1 x Llave hexagonal de 5.0 mm para montar el soporte
de la vara
B) Llenado del depósito
Llene el depósito en la parte posterior de la máquina con la
solución electrolítica SURFOX. El depósito tiene capacidad
para 1.9L de solución electrolítica SURFOX
C) Conexión del suministro de aire
Conecte el suministro de aire en la parte posterior de la
máquina. El máximo permitido de presión es de 150 PSI.,
80 PSI min. (1000 KPa). Si el suministro de aire no está conectado, la máquina continuará funcionando, pero no habrá
eliminación de vapores.
D) Conexión del cable de alimentación
Cuando necesite una extensión eléctrica, use cable calibre
14 (AWG) (2,08mm2) para hasta 50 pies (15mts) y calibre
12 (AWG) para 50 a 100 pies (15 a 30mts)
Depósito
Toma a
tierra
Conector de aire
E) Conexión a tierra
Conecte la toma a tierra en el frente de la unidad. Sujete la
pinza de masa a la pieza que va a limpiar. Los procesos de
limpieza y pasivado no funcionarán si la pieza no está correctamente conectada a tierra.
46

Uso de vara grande para limpieza, pulido y pasivado electroquímicos
Uso de vara grande para limpieza, pulido y pasivado
electroquímicos
6
A) Selección de vara y accesorio correctos
Inserto de
tungsteno
Cepillo
Vara
grande
Inserto
grande de
grafito
B) B) Selección de tipo de corriente correcta,
AC o DC y nivel de corriente correcta, STD
o MAX
MAX STD
STD MAX
AC para limpieza y pasivado de soldaduras.
DC para limpieza, pasivado y pulido de soldaduras.
Se recomienda STD cuando se usan insertos de tugnsteno
y almohadillas, Se recomienda MAX cuando se usa el
cepillo o el inserto grande de grafito.
¡ADVERTENCIA! El modo DC se usa para que el pulido del
cordón de soldadura haga juego con el acabado espejo del
material base.
Modo manual. Elija este modo para controlar la cantidad
de solución que llega a la punta. Mantenga presionado el
botón ON de la vara para que la solución llegue a la punta.
Suelte el botón ON para que cese el bombeo. Siempre
utilice suficiente solución para que la almohadilla esté
mojada.
Modo automático: Para comenzar con este modo,
presione el botón ON de la vara. Una vez que se activa,
bombeará fluido a la punta automáticamente. Se puede
seleccionar la cantidad de líquido de menos a más.
D) Limpieza y Pasivado
Para limpiar y pasivar presione el botón ON de la vara
grande. Asegúrese que el accesorio de limpieza esté
saturado de líquido electrolítico SURFOX antes de
comenzar a trabajar. Si el accesorio de limpieza está
demasiado seco, se gastará rápido. Comience a trabajar
cuando la solución gotee de la almohadilla de limpieza.
No presione fuerte, deje que el proceso electroquímico
haga el trabajo. No utilice el accesorio de limpieza como
una almohadilla abrasiva.
¡ADVERTENCIA! Cuando utilice la máquina por primera
vez, puede ser que haya agua adentro por las pruebas
realizadas en fábrica. Ajuste el bombeo del líquido en
automático a máxima velocidad y deje que gotee en un
recipiente descartable por 2 minutos (tiempo requerido para
vaciar la manguera del tanque a la vara). Luego, ajuste el
bombeo del líquido a la velocidad deseada nuevamente.
E) Neutralizado
¡CONSEJO! Cuando use el modo pulido (DC), utilice
mucha solución electrolítica SURFOX.
Nota: Cuando la use en el modo DC, la solución
electrolítica SURFOX de volverá algo amarillenta o se
oscrurecerá.
C) Selección del modo de bombeo correcto
Modo
manual
1. Quite cualquier exceso de la solución electrolítica de
limpieza SURFOX usando un paño limpio.
2. Pulverice SURFOX-N en la superficie.
3. Seque con otro paño limpio para evitar contaminar.
Consultar proceso de neutralizado en la sección de cómo
neutralizar correctamente (página 53).
Modo
automático
SURFOX 304 Manual del usuario 47

Accesorios para vara grande
7
Accesorios para vara grande
A) Selección y montaje de puntas y
amohadillas de limpieza
Las puntas de tungsteno están hechas de un material de
aleación de tungsteno de alta calidad. Otros materiales
no soportarían el ambientre riguroso que se genera en el
proceso electroquímico.
¡ADVERTENCIA! Cuando el inserto está muy
gastado, puede dañar la almohadilla de limpieza.
En este ejemplo, el inserto está muy gastado y
hay sólo dos puntos de contacto. Toda la corriente sale por estos dos puntos. Debido a la baja
disponibilidad de corte transversal, la temperatura
va a ser más alta en ambas puntas y la almohadilla
de limpieza se dañará o gastará más rápido.
O-Ring
Insertos
Inserto de Tungsteno 90°
No: 48-R 133
Use con almohadillas de limpieza
54-B 026 o 54-B 040 y anillo de
sujeción 54-B 002 o botilla
54-B 005.
Inserto angosto de
tungsteno 90°
No: 54-B 017
Use con almohadilla de limpieza
54-B 028 o 54-B 041 y anillo de
sujeción 54-B 020 o botilla 54-B
00 7.
Inserto grande de grafito
para SURFOX 204 y304
Orden No.: 54-B 009
45 mm A - Ideal para renovar
o restaurar superficies y para
limpiar detrás la soldadura MIG.
Inserto de tungsteno 60° No:
54-B 016
Use con almohadilla de limpieza
54-B 027 y anillo de sujeción
54-B 002 botilla 54-B 006
Inserto angosto de
tungsteno
Orden No: 54-B 018
Use con almohadillas de limpieza
54-B 028 y anillo de sujeción
54-B 020 o botilla 54-B 008.
Almohadillas grandes para
inserto de grafito grande
Orden No.: 54-B 043
90 mm L X 50 mm A X 2 mm G
Paquete de 10 con O-Ring
¡CONSEJO! Dé nueva vida al inserto usando una
amoladora de banco o angular.
Nota: Asegúrese de instalar el O-Ring en la parte posterior
del inserto cada vez que los cambie.
Kit the insertos de Tungsteno
para SURFOX 104, 204 y 304
Orden No.: 54-B 012
Incluye:
1 x 48-R 133
1 X 54-B 017
1 X 54-B 016
1 X 54-B 018
Almohadilla para inserto de
grafito grande para SURFOX
304 Orden No.: 54-B 052
Paquete de 5
Soporte de vara para
SURFOX 304 y 204
Orden No.: 54-B 094
Cepillo de fibra de carbono
para vara grande para
SURFOX 304
Orden No.: 54-B 095
Sin adaptador - Paquete con 5
Adaptador triangular para
vara grande con cepillo de
carbono Orden No.: 54-B 101
48
Repuesto adaptador de
cepillo para vara grande
para SURFOX 304
Orden No.: 54-B 099
Adaptador cilíndrico para
cepillo de carbono de vara
grande Orden No.: 54-B 102

Accesorios para vara grande
7
Almohadillas de limpieza de alta
conductividad
Las almohadillas de limpieza están hechas de una mezcla
compleja de polímero sintético altamente conductivo que es
muy resistente al uso y brinda excelente estabilidad térmica.
Para una vida útil más larga, quite la almohadilla de limpieza
y neutralice con SURFOX-N al finalizar cada día de trabajo.
Las almohadillas están disponibles en cuatro tipos:
Almohadillas de
limpieza estándar
No : 54-B 026
Use con inserto
48-R 133.
Almohadillas para
limpieza de rincones
No : 54-B 027
Use con inserto
54-B 016
Características
• Flexible: Se puede doblar de varias maneras
• Suave en las superficies
• Se pueden usar ambos lados
• Larga vida útil
• Altamente conductiva (4 veces más conductiva que la
generación anterior)
Almohadillas de
limpieza angostas
No : 54-B 028
Use con insertos 54-B 017
y 54-B 018
Almohadillas de limpieza
grandes
No : 54-B 043
Use con inserto de grafito grande
54-B 009
SURFOX 304 Manual del usuario 49

Accesorios para vara grande
7
B) Anillos de sujeción PTFE
Los anillos de sujeción PTFE están diseñados para sostener
las almohadillas en los insertos de tungsteno.
Están disponibles en dos tamaños:
Anillos de sujeción angostos para
almohadillas angostas No: 54-B 020
Use con insertos angostos. 10 por paquete.
Anillos de sujeción para
almohadillas estándar
Pieza no: 54-B 002
Use con insertos estándar. 10 por paquete.
C) Soluciones electrolíticas SURFOX
Las soluciones electrolíticas SURFOX son especialmente
formuladas con ácido fosfórico y diseñadas para ser usadas sólo en los sistemas SURFOX de WALTER.
SURFOX-G
Solución electrolíticas de limpieza
Limpia hasta 3-5 pies por minuto.
1.5 L/50.7 onzas No: 54-A 065
Paquete estándar: 1 Cartón estándar: 4
5 L/1.3 gal. No: 54-A 066
Paquete estándar: 1 Cartón estándar: 1
20 L/5.2 gal. No: 54-A 067
Paquete estándar: 1 Cartón estándar: 1
208 L/55 gal. No: 54-A 068
Paquete estándar: 1 Cartón estándar: 1
D) Montaje de almohadillas de limpieza
1. Apriete e inserte el aro de sujetador.
2. Inserte la almohadilla de limpieza.
3. Presione firmemente la punta de tungsteno.
SURFOX-T
Solución electrolítica de limpieza
para tareas pesadas
Limpia hasta 3-5 pies por minuto.
1.5 L/50.7 onzas No: 54-A 005
Paquete estándar: 1 Cartón estándar: 4
5 L/1.3 gal. No: 54-A 006
Paquete estándar: 1 Cartón estándar: 1
20 L/5.2 gal. No: 54-A 007
Paquete estándar: 1 Cartón estándar: 1
208 L/55 gal. No: 54-A 008
Paquete estándar: 1 Cartón estándar: 1
50
4. Quite la punta con la almohadilla y el anillo.
Nota: Al montar almohadillas clásicas, asegúrese que el
signo Ω mire hacia arriba en el paso 2.

Uso de la vara micro (opcional) para limpiar y pasivar
8
Uso de la micro vara (opcional) para limpiar, pulir y pasivar. 54-B
033 y 54-B 133
Use la micro vara para llegar a lugares angostos donde la
vara grande no llega. Conecte la micro-vara en la toma para
accesorios en el panel del frente.
A) Selección de vara y accesorio apropiado
Inserto grande
Micro vara
Cepillo
Inserto de
tungsteno
Cuando se selecciona este modo, automáticamente se
corta la energía hacia la vara grande, dejan de funcionar
la bomba de la solución y el sistema de eliminación de
vapores (si está conectado). La energía sólo está dirigida a
la micro vara y al aplicador de marcado. Asegúrese de que
la pieza tenga conexión a tierra.
de grafito
B) Selección de tipo de corriente apropiada,
AC o DC y de nivel de corriente apropiado,
STD o MAX
MAX STD
STD MAX
C) Modo de bombeo manual.
La micro vara se usa solo en el modo manual. Presionar
una (1) vez equivale a un (1) trazo. Para bombear más
líquido, presione repetidamente. Vea las instrucciones de la
micro vara para más información.
D) Limpieza y pasivado
Enrosque el tubo de 100 de
solución electrolítica SURFOX
en la micro vara. Asegúrese
que la almohadilla de limpieza
esté mojada con la solución
antes de comenzar a trabajar.
Si está demasiado seca, se
gastará más rápido. Comience
a trabajar cuando la solución
gotee de la almohadilla de
limpieza.
No presione fuerte, deje que
el proceso electroquímico haga su trabajo. La almohadilla
es un puente entre la máquina y la soldadura. No use la
almohadilla de limpieza como una almohadilla abrasiva.
E) Neutralizado
1. Quite el exceso de solución electrolítica de limpieza
SURFOX con un paño limpio y suave.
2. Pulverice SURFOX-N en la superficie.
AC para limpieza y pasivado de soldaduras.
DC para limpieza, pasivado y pulido de soldaduras.
Se recomienda STD para cuando se usan insertos de
tungsteno y almohadillas, se recomienda MAX para cuando
se usan cepillos o insertos grandes de grafito.
¡ADVERTENCIA! El modo DC se usa para que el pulido
del cordón de soldadura haga juego con el acabado espejo
del material base.
CONSEJO! Al usar el modo DC para pulir, use mucha
cantidad de solución electrolítica SURFOX.
Nota: Cuando la use en el modo DC, la solución
electrolítica SURFOX de volverá algo amarillenta o se
oscrurecerá.
3. Pase otro trapo limpio, seco y suave para evitar la
contaminación cruzada.
Consulte el procedimiento de neutralizado en la sección
correspondiente con las instrucciones para hacerlo
correctamente.
SURFOX 304 Manual del usuario 51

Uso de vara de marcado y grabado (opcional)
9
Uso de vara de marcado y grabado (opcional)
A) Kits de marcado
Kit estándar (54-B 080) incluye:
• 1 vara de marcado/grabado
con inserto de grafito
• 35 mm X 10 mm y cable de
conexión
• 20 almohadillas de marcado
• 5 O-Rings
• 1 Solución SURFOX-M, 100 ml
• 1 Solución SURFOX-E, 100 ml
B) Selección de vara y accesorio apropiado
Coloque la perilla selectora en el ícono de vara de grabado/
marcado.
Use la vara de marcado/grabado para marcar o grabar
permanentemente el nombre de su empresa, logo, número
de pieza o cualquier otra información deseada sobre la superficie de acero inoxidable, usando plantillas desechables
o permanentes. Conecte la vara de marcado/grabado en el
tomacorrientes para accesorios en el panel frontal
El kit Profesional (54-B 081) incluye:
• 1 vara de marcado/grabado con inserto de
grafito
• 35 mm X 10 mm y cable de conexión
• 20 almohadillas de marcado
• 5 O-Rings
• 1 Solución SURFOX-M, 100 ml
• 1 Solución SURFOX-E, 100 ml
• 1 Plantilla de impression y software
• 1 Rollo de papel esténcil 100 mm (ancho) X
20 m (largo)
Vara de
marcado/grabado
C) Selección de tipo de corriente apropiada, AC o DC y
nivel de corriente apropiado, STD o MAX
AC para marcado usar SurfoxM
DC para grabado usar Surfox-E
STD se recomienda para grabado y marcado.
52
MAX STD
STD MAX
BOLETINES TÉCNICOS DISPONIBLES EN NUESTRO SITIO WEB

Neutralizado
Neutralizado
10
El líquido SURFOX-N es un neutralizador que está
especialmente formulado para las soluciones electrolíticas
SURFOX. Es una poderosa fórmula lista para usar que no
deja residuos, no es tóxica, no contiene solventes, es de
base acuosa y biodegradable.
A) Instrucciones para neutralizar las
soluciones electrolíticas de limpieza
SURFOX:
1. Quite cualquier excedente de la solución SURFOX
usando un paño suave y limpio.
2. Pulverice SURFOX-N en la superficie.
3. Pase otro trapo limpio y suave.
Para más información sobre este producto, consulte las
planillas de seguridad (MSDS o SDS) en walter.com or
surfox.com.
¡ADVERTENCIA! Asegúrese de sacar con un trapo todo
el excedente de la solución electrolítica SURFOX de la
superficie y neutralice, sino la sal inorgánica del ácido
fosfórico se adherirá a la superficie y creará depósitos.
B) SURFOX procedimiento de limpieza y
neutralizado
Limpie la soldadura con la máquina SURFOX y on las
soluciones electrolíticas SURFOX. Trabaje sólo en tramos
de 2 pies (60.96cm) a la vez.
Nota: La almohadilla de limpieza debe mantenerse húmeda
– no goteando.
1. Después de limpiar la soldadura, use un paño limpio o
toalla de papel y páselo por la zona afectada como si
limpiara vidrios. De izquierda a derech. Luego, deseche
el paño o toalla de papel.
Luego de limpiar la soldadura con la máquin SURFOX,
debe neutralizar la solución electrolítica.
1. Pulverice la zona afectada con el neutralizador
SURFOX-N. Deje actuar por 15 segundos en la
superficie.
2. Use un paño limpio o toalla de papel y limpie la zona
afectada como si limpiara cristales de izquierda a
derecha. Luego deseche el paño o las toallas de papel.
Nota: Si no se neutraliza o si lo hace incorrectamente, la
superfice se verá opaca, nublada y borrosa.
Neutralizador
SURFOX- N Pieza No.
500 ml 54-A 023
5 L 54-A 026
20 L 54-A 027
208 L 54-A 028
Depósitos de sal debido a una
mala neutralización.
SURFOX 304 Manual del usuario 53

Características de seguridad
11
Características de seguridad
A) Chispas en la punta / pieza de trabajo
Para evitar corto circuitos (arco eléctrico), la máquina para
automáticamente cuando el inserto toca la pieza de trabajo
(contacto de metal con metal). Hay un tablero inversor
que monitorea el voltaje a cada milisegundo. Si el voltaje
aumenta creando un corto circuito, el sistema cortará
automáticamente la energía hacia la punta para evitar
cualquier daño al equipo.
Para reiniciar la máquina, simplemente presione el botón
ON en la vara grande.
¡ADVERTENCIA! Para evitar generar demasiado amperaje
y que la energía hacia la punta se pare automáticamente,
asegúrese de tocar solo una superficie a la vez. La
máquina está programada para trabajar a un máximo de 30
amperios. Si supera esos amperios, la máquina se apagará
automáticamente.
B) Temperatura interna
Para proteger los componentes internos, la máquina tiene
sensores internos de temperatura. Si la temperatura de la
operación es demasiado alta, la máquina se apagará y se
reiniciará por sí sola cuando la temperatura haya alcanzado
un nivel aceptable. La máquina tiene un ventilador interno
para mantener frescos todos los componenetes.
¡ADVERTENCIA! La temperatura interna puede aumentar
por varias razones: alta temperatura ambiente, falta de una
correcta circulación de aire alrededor de la máquina, fluctuación en el voltaje, instalación eléctrica en el taller, etc.
C) Básicos de corrienteAC/DC
La corriente alterna (AC) fluye en un sentido y luego en el
otro, revirtiendo contínuamente su dirección. El voltaje AC
cambia contínuamente entre positivo (+) y negativo (-).
corriente
+
o
voltaje
Ejemplo: En una superficie plana, el amperaje es de unos
24 amperios. El contacto con el área de la superficie es
relativamente pequeño.
Ejemplo: Un ángulo interno, si usted toca dos lados al
mismo tiempo, el contacto con la superficie es doble y el
amperaje supera los 30 amperios, entonces la máquina
deja de funcionar.
Nota: Se apaga automáticamente si no detecta conexión a
tierra en 20 segundos.
tiempo
La corriente directa (DC) fluye siempre en la misma
dirección, pero puede incrementar y disminuir. Un voltaje
DC es siempre positivo, pero puede aumentar o disminuir.
corriente
o
+
voltaje
tiempo
54

Características de seguridad
11
D) Ajustes AC/DC en la máquina SURFOX
Ejemplo de limpieza y pasivado con SURFOX en modo AC:
Vista microscópica del material
ANTES
Capa de
óxido a
remover
Ejemplo de limpieza y pasivado con Surfox en modo DC:
Vista microscópica del material
DESPUÉS
La limpieza y pasivado es
perfecto. Limpia cada grieta en
en material.
E) Soldaduras que no pueden limpiarse
Si el área alrededor de la soldadura está negra (no azul) por
contaminación, es un problema generado por alta temperatura durante el proceso de soldadura. Las áreas contaminadas no conducen electricidad. Si no hay conductividad
en el material, el sistema SURFOX no puede funcionar.
Si hay dos soldaduras, una sobre otra, el material ha sido
seriamente alterado. Estás áreas no se pueden limpiar.
La calidad de la soldadura es fundamental. Cuánto mejor
sea la soldadura, más fácil será la limpieza.
Capa de
óxido a
remover
ANTES
DESPUÉS
La limpieza y el pasivado son
perfectos. Limpia cada grieta
en el material.
Alteración del
material debido al
en modo DC.
SURFOX 304 Manual del usuario 55

Garantía y servicioDatos Técnicos
1312
Datos Técnicos
MODELO:
NÚMERO DE PIEZA:
VOLTAJE DE ENTRADA:
VOLTAJE DE SALIDA:
CORRIENTE DE ENTRADA:
CORRIENTE DE SALIDA:
VOLTAJE MÀXIMO DE SALIDA:
DIMENSIONES:
(20-2/3” x 9.84” x 14.57”)
CAPACIDAD DEL DEPÓSITO:
PESO:
ENTRADA DE PRESIÓN DE AIRE:
80 PSI min
SURFOX 304
54-D 314
120 V, 50/60 Hz
30 V, AC/DC
7.5 Amps
30 Amps Max, AC/DC
525 mm X 370 mm X 250 mm
1.9L
22Kg (48.5 lbs.)
33 V, AC/DC
150 PSI max,
Garantía y servicio
A) Póliza de garantía
Todos los sistemas de limpieza y accesorios SURFOX de
WALTER son inspeccionados y probados antes de su
envío y están garantizados de no tener ningún defecto en
el material o defectos de fabricación. Si ocurre algún mal
funcionamiento dentro de los seis (6) meses a partir de la
fecha de compra original, se devuelve el sistema completo
con el comprobante de pago completo al Centro de Servicio Autorizado de WALTER. Si una inspección muestra
que el mal funcionamiento se debe a material defectuoso
o defectos de fabricación, WALTER lo reparará (o según
nuestra opción, reemplazará la unidad) sin cargo. Esta garantía no se aplicará cuando se requiera el mantenimiento
regular, cuando se hayan hecho reparaciones o reemplazos
o cuando otro que no sea un servicio autorizado de WALTER haya intentado arreglarlo, y no cubre daños causados
por accidentes, modificaciones, uso inapropiado de losaccesorios, abuso o mala utilización, lo que también incluye
la sobrecarga de la herramienta más allá de su capacidad
clasificada, así como su uso continuo luego de una falla
parcial. No se autoriza ninguna otra garantía ni verbal ni
escrita.
En ningún caso WALTER será responsable por daños en
forma indirecta, fortuita o consecuente por la venta del
producto. Esta negación se aplica durante y después del
término de esta garantía.
Esta garantía le brinda derechos específicos. Las disposiciones contenidas en esta garantía no han sido pensadas
para limitar, modificar, quitar, negar o para excluir cualquier
garantía dispuesta en alguna legislación provincial o del
Estado. Para extender lo requerido por ley, las disposiciones en cualquier legislación ya sea Provincial, del Estado
o Federal con respecto a las garantías toman precedencia
sobre las disposiciones en esta garantía.
B) Reparación y servicio
En el envío:
•
Drene toda la solución electrolítica SURFOX del depósito
•
Use su caja original para el envío
•
Use suficiente cantidad de material de embalaje
•
Envíe sobre un palé pequeño
•
Dé una descripción detallada del problema, así como el
nombre de la empresa, dirección, teléfono, número de fax
y persona a contactar.
56

SURFOX 304 User’s Guide 57

Índice
Índice
1 Introdução 59
2 Instruções de Segurança 60
3 Controles do equipamento 61
A) Pictogramas do painel de controle 61
B) Visão frontal e traseira da máquina 62
C) Controles da pistola 63
D) Sistema de eliminação de vapores 63
E) Reposicionamento da ponta (conforto
para o operador) 63
4 Painel de controle 64
A) Interruptor principal de energia 64
B) Seletor de pistola e acessórios 64
C) Seletor de tensão elétrica 64
D) Interrupter de bomba dispersora 64
E) Luzes indicadoras 64
F) Saída para acessórios 64
5 Primeira utilização 65
A) O que está incluído na embalagem 65
B) Abastecendo o tanque 65
C) Conectando o fornecimento de ar 65
D) Conectando o cabo elétrico 65
E) Conectando o grampo de aterramento 65
6 Pistola manual para limpeza, polimento e
passivação eletroquímicas 66
A) Selecionando a pistola e acessório apropriados 66
B) Selecionando a tensão elétrica apropriada,
AC ou DC, e o nível apropriado de corrente,
STD (regular) ou MAX (máximo) 66
C) Selecionando o modo de bombeamento
apropriado 66
D) Limpeza e passivação 66
E) Neutralização 66
7 Acessórios da pistola larga 67
A) Seleção e montagem das mantas de
limpeza e pontas 67
B) Anéis de fixação PTFE 69
C) Soluções eletrolíticas SURFOX 69
D) Montagem da manta de limpeza 69
8 Minipistola (opcional) para limpeza e passivação 70
A) Selecionando a pistola e o acessório apropriados 70
B) Selecionando a tensão elétrica apropriada, AC ou
DC, e o nível apropriado de corrente, STD (regular) ou
MAX (máximo) 70
C) Modo de bombeamento manual 70
D) Limpeza e passivação 70
E) Neutralização 70
9 Manopla de marcação/gravação (opcional) 71
A) Kits de marcação 71
B) Selecionando a pistola e o acessório apropriados 71
C) Selecionando a tensão elétrica apropriada,
AC ou DC, e o nível apropriado de corrente,
STD (regular) ou MAX (máximo) 71
10 Neutralização 72
A) Instruções para neutralizar as soluções eletrolíticas
de limpeza SURFOX 72
B) Procedimentos para limpeza de solda e
neutralização 72
11 Características de Segurança 73
A) Faíscas na ponta/peça-obra 73
B) Temperatura interna 73
C) Princípios básicos de corrente elétrica AC/DC 73
D) Configurações AC/DC na máquina SURFOX 74
E) Soldas que não são possíveis de limpar 74
12 Dados técnicos 75
13 Garantia e serviço 75
A) Política de garantia 75
B) Reparos e serviço 75
58

Introdução
Introdução
1
Parabéns pela aquisição do melhor equipamento eletroquímico de limpeza e passivação para solda disponível no
mercado. O equipamento de limpeza para solda WALTER
SURFOX
maneira rápida, fácil e rentável, ao mesmo tempo em que
passiva completamente a superfície de aço inoxidável.
A nova geração das máquinas SURFOX são equipadas
com sistema inversor autorregulável de última tecnologia.
Isto permite que a máquina monitore e ajuste a corrente
automaticamente, assegurando máxima eficácia de limpeza
sem perda de produtividade.
Leia atentamente todas as informações contidas neste
manual do proprietário SURFOX, com procedimentos
passo a passo para início, operação e manutenção do seu
novo equipamento SURFOX. Sua nova máquina SURFOX
foi construída com durabilidade extra para resistir a aplicações pesadas de uso industrial. Entretanto, como em
qualquer equipamento elétrico, o uso e manutenção deste
valioso investimento devem sempre ser acompanhados
de cuidados e medidas de segurança. Com os cuidados
e manutenção apropriados, seu equipamento SURFOX
proporcionará anos de serviço confiável.
Para saber mais sobre outros produtos WALTER, visite
nosso website: www.walter.com
TM
remove a descoloração causada pela solda de
• Uso em violação das normas de referência;
• Instalação incorreta;
• Fonte de alimentação principal inadequada;
• Manutenção incorreta;
• Manutenção incorreta: modificações não autorizadas e
adulteração;
• Manutenção incorreta; uso de peças de reposição não
originais ou de peças sobressalentes não especificadas
como adequadas para o modelo em questão;
• Manutenção incorreta; incapacidade parcial ou total de
seguir as instruções;
• Eventos inesperados;
• Qualquer outro uso indevido.
Operação
A máquina SURFOX trabalha com um processo eletroquímico para limpar e passivar soldas em aço inoxidável.
As soluções eletrolíticas SURFOX, à base de ácido fosfórico e aprovadas para uso na indústria alimentícia, são
ativadas por uma corrente elétrica para limpeza de soldas.
O processo leva apenas alguns segundos, sem danificar ou
riscar a superfície da peça.
1.1 Informações Gerais
Este manual contém todas as informações necessárias
para a instalação segura, inicialização e operação da
máquina, juntamente com as instruções para solução de
problemas e manutenção.
O manual é parte integrante da máquina e deve ser mantido com cuidado durante toda a vida útil da máquina, servindo de referência para futuras atualizações. Caso perca
ou danifique o manual, solicite uma nova cópia através da
WALTER - walter.com ou surfox.com
O presente manual reflete a condição da máquina no
momento de sua fabricação, e não pode ser considerado
inadequado caso haja atualizações devidas a experiência
subsequente posteriores.
A WALTER reserva-se o direito de atualizar seus produtos
e manuais, sem aviso prévio aos proprietários de modelos
fabricados anteriormente.
A WALTER não se responsabiliza por quaisquer consequências do uso incorreto dos seus produtos, por exemplo:
• Utilização incorreta do equipamento ou utilização por
pessoas não treinadas;
Sua máquina SURFOX® 304 efetua a limpeza
de:
u Soldas TIG
u Soldas plasma
u Soldas laser
u Soldas ponto
u Soldas MIG
Princípios básicos da passivação:
u A limpeza de soldas não deve ser feita apenas com
finalidade estética, mas principalmente para passivar a
superfície.
u Passivação é o tratamento dado a superfícies de aço
inoxidável para remover contaminantes e promover a
formação de uma camada protetora espessa e durável
de óxido de cromo.
u Esta camada protetora garante a resistência do aço
inoxidável contra a corrosão.
u Caso a passivação seja feita de maneira inapropriada,
o aço inoxidável e áreas afetadas pelo calor podem
sofrer oxidação.
Manual do Usuário SURFOX 304 59

Instruções de segurança
2
Instruções de segurança
As máquinas de limpeza para solda WALTER são produzidas
segundo rígidos padrões de fabricação, desempenho e segurança
de produtos industriais.
AVISO: Observe sempre as precauções básicas de segurança
ao utilizar o equipamento, reduzindo assim o risco de incêndio,
choques elétricos e ferimentos.
Antes de usar esta máquina, leia atentamente todas as
Instruções de Segurança e Operação, e guarde o manual do
proprietário para consultas futuras.
1. Leia este manual do proprietário para familiarizar-se com a
operação da máquina, suas características particulares,
aplicações e limitações.
2. Esta unidade está equipada com plugue elétrico tripolar que
deve ser conectado a uma tomada correspondente, a fim de
evitar choques elétricos.
3. Mantenha um espaço mínimo de 20 cm ao redor da undade
para manter todas as saídas de ar livres de qualquer ob
strução. O ar deve circular livremente entre as aberturas de
ventilação, prevenindo o superaquecimento da máquina.
4. Mantenha a área de trabalho limpa e bem iluminada. Um
ambiente desorganizado predispõe a acidentes. Remova
qualquer material que possa ser incinerado por fagulhas. Não
utilize esta ferramenta próxima a líquidos inflamáveis ou gases.
Mantenha suas alças limpas, secas e livres de solução de
limpeza, óleos e graxas. Não utilize a máquina sob a chuva,
em locais úmidos ou molhados.
5. Mantenha crianças e outras pessoas a uma distância segura
da área de trabalho. Ao trabalhar em lugares altos, certifique se que não há ninguém na área abaixo. Não permita que pes soas não qualificadas operem esta máquina.
6. Sempre utilize roupas adequadas e equipamento de proteção
individual como luvas, aventais, sapatos de segurança
apropriados etc.
7. Sempre utilize óculos de segurança aprovados para uso com
agentes químicos.
8. Durante o processo de limpeza, a ponta da pistola e peça obra podem atingir temperaturas extremamente altas; aguarde
seu resfriamento antes de qualquer contato com a pele.
9. Evite a inalação de vapores, e utilize a unidade apenas em
áreas bem ventiladas. Caso necessário, use um respirador.
10. Todo e qualquer choque elétrico pode ser potencialmente
perigoso.
11. Caso verifique um problema elétrico na unidade, não a utilize
até que um profissional qualificado inspecione o equipamento.
12. Nunca opere a unidade sem a capa protetora.
13. Esteja alerta durante todo o tempo que estiver manuseando
esta máquina. Observe o que você está fazendo. Use o bom
senso. Não opere a ferramenta quando estiver cansado.
Nunca deixe a unidade ligada sozinha.
14. Assegure que o interruptor esteja posicionado em OFF (des ligado) antes de conectar a máquina, ou quando movê-la para
outro local, evitando assim seu início acidental.
15. Segure a pistola firmemente. Trabalhe sempre em posição
confortável, mantenha um bom equilíbrio em todos os
momentos.
16. Antes do uso, todas as peças devem ser cuidadosamente
examinadas para determinar que a unidade opere correta mente e desempenhe sua função esperada.
17. O reparo ou substituição de peças danificadas ou defeituosas
devem ser feitos apenas nos Centros de Serviço Autorizado
WALTER.
18. Não use a unidade se o interruptor ON e OFF (Liga/Desliga)
não estiver funcionando adequadamente.
19. Utilize apenas os acessórios recomendados para este sistema
Sempre verifique os acessórios antes de iniciar o trabalho,e
não os utilize se estiverem danificados.
20. ATENÇÃO: As soluções eletrolíticas WALTER SURFOX de
limpeza para solda contêm ácido fosfórico e podem causar
queimaduras quando não manuseadas corretamente.
Evite contato com a pele. Primeiros socorros: Lave a área
afetada com água. Contato com os olhos: Lave com água
abundante por 15 minutos, levantando as pálpebras oca sionalmente. Se necessário, contate o médico. Ingestão NÃO
INDUZA o vômito. Enxágue a boca, beba bastante água e
procure assistência médica. Consulte a FISPQ do produto
WALTER para informações completas sobre segurança.
Consulte a FISPQ do produto para informações completas sobre
segurança em walter.com ou surfox.com.
21. Use apenas as soluções eletrolíticas WALTER SURFOX de
limpeza para solda nesta unidade, e NUNCA misture com
outros produtos.
22. A utilização do sistema de eliminação de vapores (página 64
- please check) é altamente recomendável para trabalhos em
áreas confinadas.
23. Não utilize a máquina SURFOX na mesma estrutura durante
trabalhos de solda. A corrente pode causar danos irreparáveis.
24. Armazene a solução na sua embalagem original e em local
seguro, fora do alcance de crianças e outras pessoas não
qualificadas. Mantenha o conteúdo da embalagem limpo. Não
reutilize as soluções eletrolíticas de limpeza SURFOX.
25. Não toque a ponta da pistola ou a peça-obra durante a
operação ou imediatamente após o uso; elas podem estar
extremamente aquecidas e causar sérias queimaduras.
26. Não force o cabo elétrico. Nunca use o cabo para puxar
ou levantar a unidade, nem tampouco puxe o cabo para
desconectá-la da tomada. Mantenha o cabo afastado do
calor, óleo e bordas afiadas. Inspecione o cabo elétrico
periodicamente; caso esteja danificado, procure um Centro de
Serviço Autorizado WALTER para efetuar sua substituição.
27. Quando não estiver em uso, desligue a unidade e desconecte
o cabo elétrico e a mangueira de ar da fonte de energia.
A máquina deve permanecer desconectada da fonte de
energia durante a substituição das mantas de limpeza e outros
acessórios, durante a manutenção e antes de qualquer reparo.
28. Armazene a unidade em um local seco e seguro, fora do
alcance de crianças e pessoas não qualificadas.
60

Instruções de segurança
Controles do equipamento
2
Tensão Elétrica
Antes de conectar a ferramenta, verifique se a tensão elétrica
(tensão elétrica) indicada na placa de identificação é a mesma
da fonte de energia.
Operar a máquina em uma tensão de operação diferente da
especificada na placa de identificação pode resultar em ferimentos ao usuário e danos à unidade.
Manutenção preventiva
Após o uso, aguarde a ponta esfriar e remova a manta de
limpeza. Neutralize com SURFOX-N, enxague a manta de
limpeza e ponta da pistola com água e seque. Remova pó e
depósitos de sujeira do exterior da unidade. Mantenha todas
as aberturas de ventilação livres de obstruções. Limpe o cabo
elétrico para evitar deterioração e verifique possíveis danos ao
cabo elétrico e ao plugue.
Nota: Cabos danificados devem ser imediatamente substituídos - somente por profissionais qualificados. Os códigos
podem ser encontrados na Lista de Peças para Reposição.
Transporte
Antes de transportar a máquina, certifique-se que o tanque da
solução de limpeza e tubulação da pistola estejam completamente vazios e todos os cabos de conexão desconectados. A
máquina deve ser cuidadosamente acondicionada em embalagem apropriada e devidamente protegida. A WALTER não será
responsabilizada por qualquer dano causado pelo vazamento
da solução de limpeza ou manuseio indevido.
Controles do equipamento
A) Pictograma do painel de controle
Saída para minipistola ou
manopla de marcação
Indicador de alta
temperatura interna
Indicador de energia
da unidade
Indicador de BAIXO nível
da solução
3
Armazenagem
Caso a máquina seja armazenada por qualquer período de
tempo, o tanque de limpeza e tubulação da pistola devem
ser esvaziados, a manta de limpeza removida (neutralizada,
enxaguada e removida) e a ponta neutralizada, enxaguada e
seca. Guarde a unidade em local seguro para evitar danos,
especialmente aos componentes eletrônicos.
Descarte de resíduos
Os resíduos devem ser descartados em conformidade às
regulamentações Federal, Municipal, Estadual e ambientais
locais. Consulte a Ficha de Informações de Segurança de
Produtos Químicos WALTER das soluções eletrolíticas de
limpeza SURFOX em walter.com ou surfox.com.
Cabo de extensão
Quando necessário, utilize cabo de extensão tamanho
14 (AWG) para comprimentos até 15 metros, e tamanho
12 (AWG) para comprimentos entre 15 a 30 metros.
Modo de bombeamento manual Modo de bombeamento automático
Manopla de marcação Seletor para
minipistola
MAX STD
STD MAX
Seletor de tensão elétrica
Manual do Usuário SURFOX 304 61
Pistola larga
Seletor de pistola e
acessórios

Controles do equipamento
3
B) Visão frontal e traseira da máquina
Interruptor ON/OFF
(Liga/Desliga)
Saída para acessório
Conector do grampo
de aterramento
Mangueira da pistola larga
(Alimentação elétrica
e de eletrólito)
Painel de controle
Alimentação do reservatório
do eletrólito SURFOX
62
Dispositivo para montagem
da manta
Conector do ar
comprimido (para
eliminação de vapores)
Cabo elétrico

Controles do equipamento
3
C) Controles da pistola
O interruptor ON (ligado) é usado para suprir energia ao
acessório de limpeza. Quando o modo de bombeamento
estiver definido como manual, pressione o interruptor ON
(ligado) para ativar a bomba. Pressione e mantenha o interruptor pressionado para bombear um fluxo contínuo do
líquido.
Quando o modo de bombeamento estiver definido como
automático, pressione o interruptor ON (ligado) uma vez
para ativar a bomba. Para parar a bomba, pressione o
interruptor OFF (desligado). Ao término do trabalho com a
máquina (em qualquer dos modos, manual ou automático),
certifique-se de pressionar o interruptor OFF (desligado).
Quando o interruptor ON estiver pressionado, haverá corrente contínua à ponta até que o interruptor OFF (desligado)
seja pressionado.
ON OFF
Acessório de
limpeza
E) Reposicionamento da ponta (conforto para
o operador)
A ponta de tungstênio pode ser colocada na posição horizontal, vertical ou qualquer outra, para tornar a operação
de limpeza o mais confortável possível ao operador. Para
soltar a luva de rosca direita para eliminação de vapores,
gire a ponta na posição desejada e reaperte a luva.
Importante: Sempre fixe a luva de eliminação de vapores
para garantir uma boa conexão elétrica e evitar danos às
pontas de contato.
D) Sistema de eliminação de vapores
(patenteado)
A máquina SURFOX 304 vem com um sistema integrado
de eliminação de vapores, que proporciona melhores
condições de trabalho. Os vapores produzidos pela
máquina SURFOX são atóxicos e não prejudiciais, mas
podem gerar desconforto durante trabalhos executados em
áreas fechadas.
Para ativar esta função, conecte o cabo de ar comprimido
(PSI máxima 150, mínima 80) no encaixe localizado na
parte traseira da máquina. O sistema de eliminação de
vapores está automaticamente ativado quando o interruptor ON (liga) estiver pressionado na pistola larga. O sistema
está DESLIGADO quando o interruptor OFF (desliga) da
pistola larga estiver pressionado. Caso não queira utilizar o
sistema de eliminação de vapores, simplesmente desconecte o cabo de ar comprimido.
O princípio de funcionamento é bastante simples e altamente eficaz; o ar sai através das pequenas aberturas atrás
do acessório de limpeza. Esta pressão de ar pré-ajustada
condensa os vapores fora do ar.
Encaixe para
cabo de ar
comprimido
Detalhe do acessório de
limpeza
Pequenas
aberturas
Manual do Usuário SURFOX 304 63

Painel de controle
4
Painel de controle
A) Interruptor principal de energia
MAX STD
STD MAX
Liga e desliga a fonte de energia principal da
unidade.
B) Seletor de pistola e acessórios
Manopla de marcação e de gravação.
Selecione este ícone quando usar a
manopla de marcação/gravação, que deve
ser conectada à saída para acessórios.
Minipistola. Selecione este ícone quando
usar a minipistola, que deve ser conectada
à saída para acessórios. Selecione
o acessório correto, seja a ponta de
tungstênio, a escova ou a ponta larga.
Pistola larga. Selecione este ícone para
usar a pistola larga acoplada à unidade
SURFOX.
C) Seletor de tensão elétrica
Selecione o tipo de tensão elétrica adequada,
AC ou DC, STD (regular) ou MAX (máxima).
AC para limpeza e passivação da solda.
DC para limpeza, passivação e polimento
da solda. STD é recomendado ao utilizar as
pontas de tungstênio e mantas de limpeza, e
MAX é recomendado ao usar a escova ou a
ponta larga de grafite.
D) Interruptor da bomba
dispersora de solução
Modo de bombeamento manual. Selecione o
modo de bobeamento manual para controlar
a quantidade de solução dispen- sada.
Pressione o interruptor ON (ligado) da pistola
larga para dispensar solução à ponta. Solte o
interruptor ON (ligado) para interromper o ciclo
de bombeamento. Sempre use quantidade
suficiente de solução para manter a manta de
limpeza saturada. Quantidade insuficiente de
solução reduzirá a vida útil do acessório de
limpeza.
A
F
C
B
D
E
E) Luzes indicadoras
Indicador de corrente da pistola
larga. Uma luz verde se acende quando
o interruptor ON (ligado) da pistola larga
estiver pressionado, indicando que existe
corrente para a ponta. Quando o interruptor
OFF (desligado) da pistola larga estiver
pressionado, a corrente para a ponta está
DESLIGADA.
Caso a temperatura de operação esteja muito
alta, uma luz amarela se acende, a máquina
desligará automaticamente e reiniciará assim
que a temperatura atingir um nível aceitável.
Indicador de nível de solução. Uma luz
vermelha se acende quando o nível da
solução estiver baixo
F) Saída para acessórios
Saída para minipistola ou manopla
de marcação/gravação opcionais. A
manopla de marcação/gravação é usada
para marcar/gravar permanentemente o
nome da sua empresa, logotipo,código
da peça ou qualquer outra informação
desejada em superfícies de aço inoxidável.
A minipistola é utilizada para efetuar limpeza
e passivação em áreas muito estreitas,
difíceis de serem acessadas com a pistola
larga.
Modo de bombeamento automático.
Para iniciar o modo de bombeamento
automático, pressione o interruptor ON (liga)
da pistola. Uma vez ativado, o líquido será
bombeado automaticamente na quantidade
desejada. O bombeamento continuará sendo
feito deste modo até que o interruptor OFF
(desliga) seja pressionado.
64

Primeira Utilização
A) O que está incluído na embalagem
u 1 Pistola larga e mangueira
u 1 Grampo de aterramento 48-R 136
u 1 Porta-pistola 54-B 094 para Surfox 204/304
u Kit de acessórios contendo:
• 1 Escova de fibra de carbono para pistola larga 54-B 095
• 1 Adaptador para escova para pistola larga Surfox 54-B
099
• 1 Base triangular 54-B 101
• 1 Base cilíndrica 54-B 102
• 1 Ponta de tungstênio 48-R 133 (já montada na pistola
larga)
Primeira Utilização
5
• 3 Mantas de limpeza de alta condutividade 54-B 026
• 1 Anel de fixação 54-B 002
• 1 Chave hexagonal 2,5mm para troca da ponta de tungstênio
• 1 Chave hexagonal 5,0mm para montagem do portapistola
B) Abastecendo o tanque
Abasteça o tanque localizado na parte traseira da máquina
com solução eletrolítica SURFOX. O tanque tem capacidade
para 1,9 litros de solução eletrolítica SURFOX.
C) Conectando a entrada de ar comprimido
Conecte o tubo de ar comprimido no encaixe localizado na
parte traseira da máquina. Observe os limites de pressão permitidos: PSI máxima 150, mínima 80 (1000 KPa). Caso o tubo
de ar comprimido não esteja conectado, a máquina continuará
funcionando, mas os vapores produzidos não serão eliminados.
D) Conectando o cabo elétrico
Tanque
Grampo de
aterramento
Entrada de ar
comprimido
Quando necessário, utilize cabo de extensão tamanho
14 (AWG) para comprimentos até 15 metros, e tamanho
12 (AWG) para comprimentos entre 15 a 30 metros.
E) Conectando o grampo de aterramento
Conecte o grampo de aterramento à parte frontal da unidade.
Fixe o grampo à peça-obra a ser limpa. Os processos de
limpeza e passivação não serão efetuados caso a peça não
esteja adequadamente aterrada.
Manual do Usuário SURFOX 304 65

Pistola manual para limpeza, polimento e passivação eletroquímicas
6
Pistola larga para limpeza, polimento e passivação
eletroquímicas
A) Selecionando a pistola e o acessório
apropriados
Ponta de
tungstênio
Escova
Pistola
larga
Pistola
larga
B) Selecionando a tensão elétrica apropriada,
AC ou DC, e o nível apropriado de corrente,
STD (regular) ou MAX (máximo)
MAX STD
STD MAX
AC para limpeza e passivação da solda.
DC para limpeza, passivação e polimento da solda.
STD é recomendado ao utilizar as pontas de tungstênio
e mantas de limpeza, e MAX é recomendado ao usar a
escova ou a ponta larga de grafite.
ATENÇÃO! O modo DC é usado para eletropolir cordões
de solda, para igualar-se ao acabamento espelhado do
material.
Modo de bombeamento manual. Selecione o modo
de bombeamento manual para controlar a quantidade de
solução a ser dispensada. Mantenha o interruptor ON (liga)
da pistola larga pressionado para dispensar a solução à
ponta. Solte o interruptor ON (liga) para interromper o ciclo
de bombeamento. Sempre use quantidade suficiente de
solução para manter a manta de limpeza embebida.
Modo de bombeamento automático. Para iniciar o modo
de bombeamento automático, pressione o interruptor ON
(liga) da pistola. Uma vez ativado, o líquido será bombeado
automaticamente na quantidade desejada.
D) Limpeza e passivação
Para limpar e passivar, pressione o interruptor ON (liga)
da pistola larga. Certifique-se que o acessório de limpeza
esteja saturado com a solução eletrolítica de limpeza
SURFOX antes de iniciar a operação. Acessórios de
limpeza ressecados desgastam-se prematuramente.
Inicie a operação quando o acessório de limpeza estiver
encharcada com solução.
Não exerça pressão excessiva: deixe o processo
eletroquímico fazer o trabalho. Não use o acessório de
limpeza como uma manta abrasiva.
ATENÇÃO! Ao utilizar a máquina pela primeira vez, você
observará a presença de água no sistema devido a testes
de fábrica. Ajuste o modo de bombeamento do líquido para
automático na velocidade máxima e deixe o líquido escorrer
em um recipiente por dois minutos (tempo necessário
para esvaziar todo o sistema). Em seguida, ajustar o
bombeamento do líquido à velocidade de bombeamento
desejada
E) Neutralização
DICA! Ao operar no modo de polimento (DC), utilize
grande quanitidade de solução eletrolítica SURFOX.
Nota: Quando usar o modo DC, a solução eletrolítica
SURFOX irá escurecer ou adquirir tonalidade levemente
amarelada.
C) Selecionando o modo de bombeamento
apropriado
Modo
manual
66
1. Remova qualquer excesso da solução eletrolítica
SURFOX usando um pano macio.
2. Borrife SURFOX-N na superfície.
3. Seque a superfície com outro pano macio para evitar
contaminação cruzada.
Consulte “procedimento de neutralização” na seção de
neutralização para instruções sobre como neutralizar
adequadamente (página 72).
Modo
automático

Acessórios para Pistola Larga
A) Seleção e montagem das mantas de
limpeza e pontas
Acessórios para Pistola Larga
7
As pontas de tungstênio são feitas de liga de tungstênio de
alta qualidade. Outros materiais não resistem às condições
criadas pelo processo eletroquímico.
ATENÇÃO! Pontas muito gastas podem danificar
as mantas de limpeza.
Neste exemplo de ponta muito desgastada, há
apenas dois pontos de contato, por onde vem
toda a corrente. Devido à menor área do corte
transversal, a temperatura será mais alta nesses
dois pontos, podendo danificar as mantas de
limpeza ou reduzir sua vida útil.
O-Ring
Acessórios
Ponta de tungstênio 90°
Código: 48-R 133
Utilizar com mantas de limpeza
54-B 026
ou 54-B 040 e anel de fixação
54-B 002 ou manta de limpeza
54-B 005
Ponta estreita de
tungstênio 90°
Código: 54-B 017
Utilizar com mantas de limpeza
54-B 028 ou 54-B 041 e anel de
fixação 54-B 020 ou manta 54-B
007
Ponta larga de grafite
para SURFOX 204 e 304
Código: 54-B 009
45 mm de largura - Ideal para
limpeza ou restauração de
superfícies, e para limpeza back
de soldas MIG
Escova de fibra de carbono
para pistola larga Surfox 304
Código: 54-B 095
Sem adaptador – 5 unidades por
embalagem
Base triangular para
escova de fibra de carbono
para pistola larga
Código: 54-B 101
Ponta de tungstênio 60°
Código: 54-B 016
Utilizar com manta de limpeza
54-B 027 e anel de fixação 54-B
002 ou manta de limpeza 54-B 006
Ponta estreita de
tungstênio 60°
Código: 54-B 018
Utilizar com manta de limpeza
54-B 028 e anel de fixação 54-B
020 ou manta de limpeza 54-B
008
Manta larga para ponta
larga de grafite
Código: 54-B 043
90 mm de comprimento x 50 mm
de largura x 2 mm de espessura
10 unidades por embalagem e um
O-ring
Adaptador para escova para
pistola larga da Surfox 304
Código: 54-B 099
Base cilíndrica para
escova de fibra de carbono
para pistola larga
Código: 54-B 102
DICA! Retifique a ponta usando um rebolo de bancada
ou esmerilhadeira angular.
Nota: Sempre que tiver que trocar a ponta de tungstênio,
certifique-se que o O-Ring esteja instalado, localizado no
encaixe da ponta.
Kit de pontas de tungstênio
para Surfox 104, 204 e 304
Código: 54-B 012
Inclui:
1 x 48-R 133
1 X 54-B 017
1 X 54-B 016
1 X 54-B 018
Manta larga para ponta de
grafite para SURFOX 304
Código: 54-B 052
5 unidades por embalagem
Porta pistola para
Surfox 304 e 204
Código: 54-B 094
Manual do Usuário SURFOX 304 67

Acessórios para Pistola Larga
7
Mantas de limpeza de alta condutividade
As mantas de limpeza SURFOX são feitas de uma complexa
combinação de polímeros sintéticos de alta condutividade,
extremamente resistentes e que oferecem excelente
estabilidade térmica. Para maior vida útil, remova a manta e
neutralize com SURFOX-N ao final de cada dia de trabalho.
As mantas de limpeza estão disponíveis em quatro
modelos:
Manta de limpeza
padrão
Código: 54-B 026
Use com ponta 48-R 133.
Manta de limpeza para
cantos internos
Código: 54-B 027
Use com ponta 54-B 016.
Características
• Flexíveis: Podem ser dobradas de várias formas.
• Superfícies mais macias.
• Utilizáveis de ambos os lados.
• Maior vida útil.
• Altamente condutivas (condutividade 4x maior que as
mantas da geração anterior).
Manta estreita
de limpeza
Código: 54-B 028
Use com pontas 54-B 017
and 54-B 018.
Grande almofada de limpeza
Código: 54-B 043
Use 54-B 009 com a grande
inserção de grafite.
68

Acessórios para Pistola Larga
7
B) Anéis de fixação PTFE
Os anéis de fixação PTFE são projetados para reter as
mantas de limpeza nas pontas de tungstênio.
Disponíveis em dois tamanhos:
Anel de fixação estreito
para mantas estreitas
Código: 54-B 020
Use com pontas estreitas. 10 unidades por
embalagem.
Anel de fixação para
mantas padrão
Código: 54-B 002
Use com pontas padrão. 10 unidades por
embalagem.
C) Soluções eletrolíticas SURFOX
As soluções eletrolíticas Surfox são formuladas com ácido
fosfórico e especialmente concebidas para uso unicamente
nos sistemas SURFOX WALTER.
D) Montagem da manta de limpeza
1. Introduza o anel de fixação em sua posição.
2. Coloque a manta de limpeza.
SURFOX-G
Solução eletrolítica de limpeza
Limpa de 1 a 1,5 metro de solda por minuto.
1.5 litro Código: 54-A 065
Embalagem padrão 1 Quantidade por caixa: 4
5 litros Código: 54-A 066
Embalagem padrão 1 Quantidade por caixa: 4
20 litros Código: 54-A 067
Embalagem padrão 1 Quantidade por caixa: 1
208 litros Código: 54-A 068
Embalagem padrão 1 Quantidade por caixa: 1
SURFOX-T
Solução eletrolítica para limpeza pesada
Limpa de 1 a 1,5 metro de solda por minuto.
1.5 L/50.7 oz. Código: 54-A 005
Embalagem padrão 1 Quantidade por caixa: 4
5 litros Código: 54-A 006
Embalagem padrão 1 Quantidade por caixa: 1
20 litros Código: 54-A 007
Embalagem padrão 1 Quantidade por caixa: 1
208 litros Código: 54-A 008
Embalagem padrão 1 Quantidade por caixa: 1
3. Pressione firmemente na ponta de tungstênio.
4. Remova a pistola com a manta e o anel de
fixação instalados.
Manual do Usuário SURFOX 304 69

Minipistola (opcional) para limpeza e passivação
8
Minipistola (opcional) para limpeza e passivação 54-B 033 e
54-B 133
Use a minipistola para trabalhos em áreas onde a pistola
larga não alcança. Conecte a minipistola à saída para o
acessório localizada no painel frontal.
A) Selecionando a pistola e o acessório
apropriados
Ponta larga
Minipistola
Escova
Ponta de
tungstênio
Quando selecionado, este modo para a minipistola corta
automaticamente a corrente da pistola larga, interrompendo
o bombeamento da solução e o sistema de eliminação de
vapores (caso esteja conectado). A energia é fornecida
somente à saída para minipistola/manopla de marcação.
Certifique-se que a peça-obra esteja aterrada.
de grafite
B) Selecionando a tensão elétrica apropriada,
AC ou DC, e o nível apropriado de corrente,
STD (regular) ou MAX (máximo)
MAX STD
STD MAX
Nota: Quando usar o modo DC, a solução eletrolítica
SURFOX irá escurecer ou adquirir tonalidade levemente
amarelada.
C) Modo de bombeamento manual
A minipistola usa apenas o modo de bombeamento manual.
Cada pressão (1) equivale a um (1) bombeamento. Para
dispensar mais líquido, pressione repetidamente. Para
maiores informações, leia as instruções sobre a minipistola.
D) Limpeza e passivação
Acople o tubo de 100
ml da solução eletrolítica
SURFOX na minipistola.
Certifique-se que a manta
de limpeza esteja saturada
com a solução eletrolítica de
limpeza SURFOX antes de
iniciar a operação; mantas
ressecadas desgastam-se
prematuramente. Inicie a
operação quando a manta de
limpeza esitver encharcada
com solução.
Não exerça pressão excessiva:
deixe o processo eletroquímico fazer o trabalho. A manta de
limpeza é uma ponte entre a máquina e a solda. Não use a
manta de limpeza como uma manta abrasiva.
E) Neutralização
AC para limpeza e passivação da solda.
DC para limpeza, passivação e polimento da solda.
STD é recomendado ao utilizar as pontas de tungstênio
e mantas de limpeza, e MAX é recomendado ao usar a
escova ou a ponta larga de grafite.
ATENÇÃO! O modo DC é usado para eletropolir cordões
de solda, para igualar-se ao acabamento espelhado do
material.
DICA! Ao operar no modo de polimento (DC), utilize
grande quanitidade de solução eletrolítica SURFOX.
70
1. Remova qualquer excesso da solução eletrolítica
SURFOX usando um pano macio.
2. Borrife SURFOX-N na superfície.
3. Seque a superfície com outro pano macio para evitar
contaminação cruzada.
Consulte “procedimento de neutralização” na seção de
neutralização para instruções sobre como neutralizar
adequadamente

Manopla de marcação/gravação (opcional)
Manopla de marcação/gravação (opcional)
9
A) Kits de marcação
Kit padrão (Código 54-B 080)
inclui:
• 1 manopla de marcação/
gravação com ponta de
grafite
• Cabo conector de
35 mm X 10 mm
• 20 mantas de marcação
• 5 O-rings
• 1 eletrólito de marcação
SURFOX-M com100 ml
• 1 eletrólito de marcação
SURFOX-E com100 ml
B) Selecionando a pistola e o acessório
apropriados
Posicione o botão seletor no ícone marcação/gravação
Use a manopla de marcação/gravação para marcar
ou gravar permanentemente o nome da sua empresa,
logotipo,código da peça ou qualquer outra informação
desejada em superfícies de aço inoxidável, utilizando
estênceis permanentes ou descartáveis. Conecte a
manopla de marcação/gravação à saída para o acessório
localizada no painel frontal.
Kit PRO (Código 54-B 081) inclui:
• 1 manopla de marcação/
gravação com ponta de grafite
• Cabo conector de
35 mm X 10 mm
• 20 mantas de marcação
• 5 O-rings
• 1 eletrólito de marcação
SURFOX-M com100 ml
• 1 eletrólito de marcação
SURFOX-E com100 ml
• 1 impressora de estêncil e software
• 1 rolo de papel estêncil 100 mm X 20 m
Manopla de
marcação/
gravação
C) Selecionando a tensão elétrica apropriada,
AC ou DC, e o nível apropriado de corrente,
STD (regular) ou MAX (máximo)
AC para marcação usando Surfox-M.
DC para gravação usando Surfox-E.
Recomenda-se o nível de tensão STD para marcação ou
gravação.
MAX STD
STD MAX
BOLETINS TÉCNICOS DISPONÍVEIS EM NOSSO WEBSITE.
Manual do Usuário SURFOX 304 71

Neutralização
10
Neutralização
O líquido SURFOX-N é um potente neutralizante, especialmente formulado para uso com as soluções eletrolíticas
SURFOX. SURFOX-N é um produto atóxico, sem solventes,
à base de água e biodegradável, que não deixa resíduos e
vem pronto para o uso.
A) Instruções para neutralizar as soluções
eletrolíticas de limpeza SURFOX
1. Remova qualquer excesso da solução eletrolítica
SURFOX usando um pano macio.
2. Borrife SURFOX-N na superfície.
3. Seque a superfície com outro pano macio.
Para maiores informações, consulte a FISPQ do produto
em walter.com ou surfox.com.
ATENÇÃO! Remova todo o excesso da solução eletrolítica
SURFOX e neutralize a superfície. A não observância a
estas medidas resultará na formação de depósitos na
superfície do aço inoxidável, causados por resíduos de sal
inorgânico presentes no ácido fosfórico.
B) Procedimentos para limpeza de solda e
neutralização
Limpe a solda usando a máquina SURFOX e as soluções
eletrolíticas SURFOX. Trabalhe em apenas 60 cm de solda
a cada vez.
Nota: a manta de limpeza deve ser mantida úmida – evitar
excessos, impedindo que o líquido pingue.
1. Após a limpeza da solda, utilize um pano limpo ou toalha
de papel como um rodo na área afetada, enxugando
da esquerda para a direita.. Descarte o pano ou toalha
de papel.
Após limpar a solda com a máquina SURFOX, a solução
eletrolítica deve ser neutralizada.
1. Borrife a área afetada com o neutralizador SURFOX-N,
deixando o produto agir por 15 segundos..
2. Utilizando um pano limpo ou toalha de papel como rodo,
enxague a área afetada da esquerda para a direita. Des
carte o pano ou toalha de papel.
Nota: A não neutralização ou neutralização incorreta incorrerá em manchas, devido à formação de resíduos de sal.
72
Neutralizante
SURFOX-N Código No.
500 ml 54-A 023
5 L 54-A 02620
L 54-A 027
208 L 54-A 028
Depósitos de sal causados
por neutralização e enxágue
inadequados.

Características de segurança
Características de segurança
11
A) Faíscas na ponta/peça-obra
A máquina SURFOX apresenta um sistema com inversor
que monitora a tensão elétrica a cada milisegundo. O funcionamento da máquina é automaticamente interrompido
quando a ponta toca a peça-obra (contato metal com metal). Caso haja um curto-circuito, o sistema cortará a energia
automaticamente para evitar danos no equipamento.
Para reiniciar a máquina, pressione o interruptor ON (liga)
da pistola larga.
ATENÇÃO! Para evitar um excesso de corrente elétrica
que possa interromper automaticamente a energia para a
pistola, certifique-se de tocar apenas uma superfície por
vez. A máquina está configurada para operar no máximo
com 30 ampères. Acima deste valor, a máquina desliga-se
automaticamente.
B) Temperatura interna
Sensores no interior da máquina controlam a temperatura
da unidade a fim de proteger seus componentes internos,
Caso a temperatura de operação estiver muito elevada,
a máquina será desligada e reiniciará automaticamente
quando a temperatura atingir um nível aceitável. Um ventilador no interior da máquina mantém todos os componentes
resfriados.
ATENÇÃO! A temperatura interna pode aumentar por
vários motivos: alta temperatura ambiente, falta de circulação de ar apropriada ao redor da máquina, flutuações na
rede elétrica, etc.
C) Princípios básicos de corrente
elétrica AC/DC
A Corrente Alternada (AC) flui em um sentido e depois em
outro, mudando continuamente de direção. Uma corrente
elétrica AC altera-se continuamente entre positiva (+) e
negativa (-).
Corrente
ou
tensão
+
Exemplo: Em uma superfície plana, corrente elétrica média
é de 24 ampères. A superfície de contato é relativamente
pequena.
Exemplo: Já um canto interno, se tocado com dois lados
da ponta de tungstênio, terá sua área de contato dobrada.
A corrente gerada superará os 30 ampères e a máquina
desligará.
Nota: A máquina terá interrupção automática se o aterramento não for detectado em 20 segundos.
tempo
A Corrente Contínua (DC) ) sempre flui na mesma direção,
mas pode aumentar e diminuir. Uma tensão elétrica DC é
sempre positiva, mas pode aumentar e diminuir.
Corrente
ou
tensão
+
tempo
Manual do Usuário SURFOX 304 73

Características de segurança
11
D) Configurações AC/DC na máquina SURFOX
Exemplo de limpeza e passivação feitos com SURFOX em
modo AC:
Visão microscópica do material
ANTES
Camada de
óxido a ser
removida
Exemplo de limpeza e passivação feitos com SURFOX em
modo DC:
Visão microscópica do material
DEPOIS
Limpeza e passivação
perfeitas. Limpa todas as
ranhuras no material
E) Soldas que não são possíveis de limpar
Um aquecimento excessivo gerado durante o processo de
solda provoca contaminação na área ao redor da solda,
tornando-a negra (não azulada). Áreas contaminadas não
conduzem eletricidade, e, sem condutividade no material, o
sistema SURFOX não pode operar.
Em casos onde haja duas soldas sobrepostas, a estrutura
do material foi seriamente alterada, comprometendo a
limpeza dessas áreas.
A qualidade da solda é um fator crítico. Quanto melhor a
solda, mais fácil será sua limpeza.
Camada de
óxido a ser
removida
74
ANTES
DEPOIS
Limpeza e passivação
perfeitas. Limpa todas as
ranhuras no material
Alteração do
material devido à
configuração DC

Garantia e serviço Dados técnicos
1312
Dados técnicos
MODELO: SURFOX 304
CÓDIGO DA PEÇA: 54-D 314
TENSÃO DE ENTRADA: 120 V, 50/60 Hz
TENSÃO DE SAÍDA: 30 V, AC/DC
CORRENTE DE ENTRADA: 7,5 A
CORRENTE DE SAÍDA: 30 A máximo, AC/DC
CORRENTE MÁXIMA DE SAÍDA: 33 V, AC/DC
DIMENSÕES: 525 mm x 380 mm x 250 mm
CAPACIDADE DO TANQUE: 1,9 L
PESO 22 kg
PRESSÃO DE SAÍDA DO AR: 150 PSI máx., 80 PSI mín.
Garantia e serviço
A) Política de garantia
Todos os sistemas de limpeza SURFOX da WALTER e
seus acessórios são inspecionados e testados antes do
embarque, estando livres de qualquer defeito de material
ou falha de montagem. Na eventualidade de um problema
no funcionamento, dentro do prazo de até seis (6) meses
da data da compra original, favor ligar para a WALTER (11)
3783-9500 ou enviar um e-mail para atendimento@walter.
com. Se a análise do produto comprovar que o problema
foi ocasionado por material defeituoso ou problema de
fabricação, a WALTER irá reparar o produto (ou substitui-
lo, a nosso critério) gratuitamente. Esta garantia não se
aplica quando: manutenções normais forem necessárias,
desgastes normais de utilização, reparos ou substituições
realizadas por pessoal não autorizado e defeitos ocasionados por acidentes, modificações, utilização de acessórios
impróprios, uso e abuso de utilização que excedam a
capacidade do equipamento ou mesmo seu uso após um
defeito parcial. Nenhuma outra garantia, escrita ou verbal,
está autorizada.
Sob nenhuma condição a WALTER será responsável por
qualquer prejuízo causado indiretamente, acidentalmente
ou por consequência da venda deste produto. Isto é válido
tanto dentro do período de garantia como fora dele.
Esta garantia lhe proporciona direitos específicos. As
condições contidas nesta garantia não se destinam a limitar, modificar, tirar, negar ou excluir quaisquer garantias estabelecidas em qualquer legislação municipal ou estadual.
Na medida do exigido por lei, as disposições em qualquer
cidade, estado ou legislação federal no que diz respeito a
garantias têm prioridade sobre as disposições da presente
garantia.
B) Reparos e serviço
Ao enviar a unidade para reparos:
•
Drene a solução eletrolítica SURFOX do tanque
• Use a caixa de envio original
• Use material de acondicionamento suficiente
• Embarque em um pequeno palete
• Forneça a descrição detalhada do problema, bem como
nome, endereço, telefone e fax da empresa, e pessoa de
contato.
Manual do Usuário SURFOX 304 75

Notes/Notas
76

Notes/Notas
77

HEAD OFFICE
5977 Trans Canada Highway West
Pointe-Claire, Québec, H9R 1C1
Tel.: 514 630-2800
Fax: 514 630-2825
SIÈGE SOCIAL
5977, Transcanadienne Ouest
Pointe-Claire, Québec, H9R 1C1
Tél. : 514 630-2800
Téléc. : 514 630-2825
WALTER SURFACE TECHNOLOGIES USA
810 Day Hill Road
Windsor, CT, 06095
Phone: 860-298-1100
Fax: 860-298-1112
WALTER DE MÉXICO S.A. DE C.V.
Privada La Puerta 2879, Bodega 15
Colonia Parque Industrial la Puerta
Santa Catarina N.L., C.P. 66367
Tel.: 01-800-09-WALTER (925837)
WALTER INDÚSTRIA E COMÉRCIO LTDA.
Rua Marco Giannini, 426
Jd. Gilda Maria
CEP. 05550-000
São Paulo – SP
Tel.: (11) 3783-9500
Fax: (11) 3783-9501
surfox.com
walter.com
08 /15
 Loading...