

Page 1

20/2415/1912/14
SYSTEMSTANDARD
24/18
COMBI
Your Boiler Serial Number is:
to be found on the Burner Cover.
WALLSTAR
CONDENSING
HANDBOOK AND SERVICE LOG
The code of practice for the
installation, commissioning, and
servicing of oil central heating
Page 2

Householder Information
IMPORTANT!
Your boiler must be commissioned in order to:
- Validate your warranty
- Ensure the boiler has been installed correctly and avoid premature failure
- Set the boiler to its optimum efficiency. Operating conditions for the boiler will vary from site to site, your
commissioning engineer has specialised equipment to check the oil pressure and analyse the exhaust gases for
temperature, smoke and carbon dioxide content.
Your installer will organise the commissioning of your boiler. Should you experience any difficulty locating an
engineer, our service department may be able to provide you with details of an engineer in your area.
“Benchmark” Installation, Commissioning and Service Record Log Book
Please ensure that your installer has completed all sections of the log book (found at the back of this manual).
The log book will be required in the event of any warranty work. Ensure that the service record is completed.
Warranty
Your HRM boiler is under warranty for 2 years from the date of installation.
Warranty Conditions
- The boiler must be installed and commissioned in accordance with our handbook
- The boiler must not be repaired, modified or tampered with by any person not authorised by HRM
Extended Warranty
The “Benchmark” and warranty registration document at the end of this manual should be completed as
appropriate by your installer / engineer. This is your record that the boiler has been correctly installed in accordance
with our recommendations. Return the warranty registration document to HRM in order to qualify for a further 3 year
warranty of the heat exchanger – a total of 5 years.
Extended Warranty Conditions
- The boiler must be serviced annually and maintained in accordance with this handbook. The
“Benchmark” service log is located at the back of this manual
- This warranty is in addition to your statutory and other legal rights
After Sales Service
- If your boiler fails during the warranty period contact your installer, who will be able to identify the
cause of the problem. If appropriate, your installer will contact us.
- Under no circumstances should “in warranty” work be undertaken without authorisation from the HRM
service department
- If you are unable to contact your installer please contact our service department. Quoting your boiler’s
serial number when phoning – this can be found on the cover of this manual.
3
Standard X-ternal & System X-ternal
Handbook
1
Contents Page
1
Standard Wallstar, System Wallstar &
Wallstar Combi Manual
Contents Page
DESCRIPTION
PAGE
Householder Information
Warranty Registration Document End Of Manual
Warranty 3
Extended Warranty 3
After Sales Service 3
Boiler Controls: Wallstar 4
System Wallstar 5
Wallstar Combi 6-7
Burner Lockout 8
Technical Specifications
Boiler Dimensions: Wallstar 9
Boiler Dimensions: System Wallstar 10
Boiler Dimensions: Wallstar Combi 11
Technical Specifications 12
Burner Settings 13
Boiler Installation
Regulations 14
Boiler Sizing 14
Refurbishing An Old System 14
System Protection 14
Boiler Location 15
Wall Construction 15
Flue Terminating Positions 16
Fuel Supply System 17
Oil Supply 17
Installation Procedure
Wallstar 18-23
System Wallstar 24-31
Wallstar Combi 32-40
Condensate Drain 41
Wiring Diagrams
Wallstar 42
System Wallstar 42
Wallstar Combi 43
Boiler Maintenance
Baffle Removal 44
Fault Diagnosis
Wallstar Combi 45
Wallstar Combi Components 46
Page 3
Householder Information
IMPORTANT!
Your boiler must be commissioned in order to:
- Validate your warranty
- Ensure the boiler has been installed correctly and avoid premature failure
- Set the boiler to its optimum efficiency. Operating conditions for the boiler will vary from site to site, your
commissioning engineer has specialised equipment to check the oil pressure and analyse the exhaust gases for
temperature, smoke and carbon dioxide content.
Your installer will organise the commissioning of your boiler. Should you experience any difficulty locating an
engineer, our service department may be able to provide you with details of an engineer in your area.
“Benchmark” Installation, Commissioning and Service Record Log Book
Please ensure that your installer has completed all sections of the log book (found at the back of this manual).
The log book will be required in the event of any warranty work. Ensure that the service record is completed.
Warranty
Your HRM boiler is under warranty for 2 years from the date of installation.
Warranty Conditions
- The boiler must be installed and commissioned in accordance with our handbook
- The boiler must not be repaired, modified or tampered with by any person not authorised by HRM
Extended Warranty
The “Benchmark” and warranty registration document at the end of this manual should be completed as
appropriate by your installer / engineer. This is your record that the boiler has been correctly installed in accordance
with our recommendations. Return the warranty registration document to HRM in order to qualify for a further 3 year
warranty of the heat exchanger – a total of 5 years.
Extended Warranty Conditions
- The boiler must be serviced annually and maintained in accordance with this handbook. The
“Benchmark” service log is located at the back of this manual
- This warranty is in addition to your statutory and other legal rights
After Sales Service
- If your boiler fails during the warranty period contact your installer, who will be able to identify the
cause of the problem. If appropriate, your installer will contact us.
- Under no circumstances should “in warranty” work be undertaken without authorisation from the HRM
service department
- If you are unable to contact your installer please contact our service department. Quoting your boiler’s
serial number when phoning – this can be found on the cover of this manual.
3
Standard X-ternal & System X-ternal
Handbook
Householder Information
IMPORTANT!
Your boiler must be commissioned in order to:
- Validate your warranty
- Ensure the boiler has been installed correctly and avoid premature failure
- Set the boiler to its optimum efficiency. Operating conditions for the boiler will vary from site to site, your
commissioning engineer has specialised equipment to check the oil pressure and analyse the exhaust gases for
temperature, smoke and carbon dioxide content.
Your installer will organise the commissioning of your boiler. Should you experience any difficulty locating an
engineer, our service department may be able to provide you with details of an engineer in your area.
“Benchmark” Installation, Commissioning and Service Record Log Book
Please ensure that your installer has completed all sections of the log book (found at the back of this manual).
The log book will be required in the event of any warranty work. Ensure that the service record is completed.
Warranty
Your HRM boiler is under warranty for 2 years from the date of installation.
Warranty Conditions
- The boiler must be installed and commissioned in accordance with our handbook
- The boiler must not be repaired, modified or tampered with by any person not authorised by HRM
Extended Warranty
The “Benchmark” and warranty registration document at the end of this manual should be completed as
appropriate by your installer / engineer. This is your record that the boiler has been correctly installed in accordance
with our recommendations. Return the warranty registration document to HRM in order to qualify for a further 3 year
warranty of the heat exchanger – a total of 5 years.
Extended Warranty Conditions
- The boiler must be serviced annually and maintained in accordance with this handbook. The
“Benchmark” service log is located at the back of this manual
- This warranty is in addition to your statutory and other legal rights
After Sales Service
- If your boiler fails during the warranty period contact your installer, who will be able to identify the
cause of the problem. If appropriate, your installer will contact us.
- Under no circumstances should “in warranty” work be undertaken without authorisation from the HRM
service department
- If you are unable to contact your installer please contact our service department. Quoting your boiler’s
serial number when phoning – this can be found on the cover of this manual.
3
Standard X-ternal & System X-ternal
Handbook
32
Contents Page
1
Standard Wallstar, System Wallstar &
Wallstar Combi Manual
Contents Page
1
Standard Wallstar, System Wallstar &
Wallstar Combi Manual
Introduction
Dear Householder
Thank you, for selecting a boiler from HRM. Your boiler is the culmination of years of experience in the development,
testing, and manufacture of oil fired equipment.
Our boilers are independently tested and comply with the latest European Boiler Efficiency Directive. Our quality
assurance procedures are also approved and comply with the International Standard, ISO9001.
Each boiler is assembled and tested with care by a member of our production team, you will find their name inside the
boiler casing.
Your boiler will provide you with a long and trouble free service life providing that a few essential steps are addressed.
Please take time to read the “Householder Information” section of this handbook.
In the unlikely event of a fault, please contact your installer who should be able to identify the cause of the problem, if
appropriate your installer will contact us.
HMickleburgh
Hedley Mickleburgh
Chairman
Simon Eastwell
Managing Director
Householder Information
IMPORTANT!
Your boiler must be commissioned in order to:
- Validate your warranty.
- Ensure the boiler has been installed correctly and avoid premature failure.
- Set the boiler to its optimum efficiency. Operating conditions for the boiler will vary from site to site, your
commissioning engineer has specialised equipment to check the oil pressure and analyse the exhaust gases for
temperature, smoke and carbon dioxide content.
Your installer will organise the commissioning of your boiler. Should you experience any difficulty locating an
engineer, our service department may be able to provide you with details of an engineer in your area.
“Benchmark” Installation, Commissioning and Service Record Log Book
Please ensure that your installer has completed all sections of the log book (found at the back of this manual).
The log book will be required in the event of any warranty work. Ensure that the service record is completed.
Warranty
Your HRM boiler is under warranty for 2 years from the date of installation.
Warranty Conditions
- The boiler must be installed and commissioned in accordance with our handbook.
- The boiler must not be repaired, modified or tampered with by any person not authorised by HRM.
- The warranty engineer must have direct access to all the indoor components of the boiler and any
outdoor components of the boiler must be no more than 3 meters above ground level or a safe
working platform.
Extended Warranty
The “Benchmark” and warranty registration document at the end of this manual should be completed as
appropriate by your installer / engineer. This is your record that the boiler has been correctly installed in accordance
with our recommendations. Return the warranty registration document to HRM in order to qualify for a further 3 year
warranty of the heat exchanger – a total of 5 years.
Extended Warranty Conditions
- The boiler must be serviced annually and maintained in accordance with this handbook. The
“Benchmark” service log is located at the back of this manual.
- This warranty is in addition to your statutory and other legal rights.
After Sales Service
- If your boiler fails during the warranty period contact your installer who will be able to identify the
cause of the problem. If appropriate, your installer will contact us.
- Under no circumstances
should “in warranty” work be undertaken without authorisation from the HRM
service department.
- If you are unable to contact your installer please contact our service department, quoting your boiler’s
serial number when phoning – this can be found on the cover of this manual.
If your boiler fails during the warranty period contact your installer who will be able to identify the
cause of the problem and refer to HRM for any warranty work instruction.
Page 4
Householder Information
IMPORTANT!
Your boiler must be commissioned in order to:
- Validate your warranty
- Ensure the boiler has been installed correctly and avoid premature failure
- Set the boiler to its optimum efficiency. Operating conditions for the boiler will vary from site to site, your
commissioning engineer has specialised equipment to check the oil pressure and analyse the exhaust gases for
temperature, smoke and carbon dioxide content.
Your installer will organise the commissioning of your boiler. Should you experience any difficulty locating an
engineer, our service department may be able to provide you with details of an engineer in your area.
“Benchmark” Installation, Commissioning and Service Record Log Book
Please ensure that your installer has completed all sections of the log book (found at the back of this manual).
The log book will be required in the event of any warranty work. Ensure that the service record is completed.
Warranty
Your HRM boiler is under warranty for 2 years from the date of installation.
Warranty Conditions
- The boiler must be installed and commissioned in accordance with our handbook
- The boiler must not be repaired, modified or tampered with by any person not authorised by HRM
Extended Warranty
The “Benchmark” and warranty registration document at the end of this manual should be completed as
appropriate by your installer / engineer. This is your record that the boiler has been correctly installed in accordance
with our recommendations. Return the warranty registration document to HRM in order to qualify for a further 3 year
warranty of the heat exchanger – a total of 5 years.
Extended Warranty Conditions
- The boiler must be serviced annually and maintained in accordance with this handbook. The
“Benchmark” service log is located at the back of this manual
- This warranty is in addition to your statutory and other legal rights
After Sales Service
- If your boiler fails during the warranty period contact your installer, who will be able to identify the
cause of the problem. If appropriate, your installer will contact us.
- Under no circumstances should “in warranty” work be undertaken without authorisation from the HRM
service department
- If you are unable to contact your installer please contact our service department. Quoting your boiler’s
serial number when phoning – this can be found on the cover of this manual.
3
Standard X-ternal & System X-ternal
Handbook
Householder Information
IMPORTANT!
Your boiler must be commissioned in order to:
- Validate your warranty
- Ensure the boiler has been installed correctly and avoid premature failure
- Set the boiler to its optimum efficiency. Operating conditions for the boiler will vary from site to site, your
commissioning engineer has specialised equipment to check the oil pressure and analyse the exhaust gases for
temperature, smoke and carbon dioxide content.
Your installer will organise the commissioning of your boiler. Should you experience any difficulty locating an
engineer, our service department may be able to provide you with details of an engineer in your area.
“Benchmark” Installation, Commissioning and Service Record Log Book
Please ensure that your installer has completed all sections of the log book (found at the back of this manual).
The log book will be required in the event of any warranty work. Ensure that the service record is completed.
Warranty
Your HRM boiler is under warranty for 2 years from the date of installation.
Warranty Conditions
- The boiler must be installed and commissioned in accordance with our handbook
- The boiler must not be repaired, modified or tampered with by any person not authorised by HRM
Extended Warranty
The “Benchmark” and warranty registration document at the end of this manual should be completed as
appropriate by your installer / engineer. This is your record that the boiler has been correctly installed in accordance
with our recommendations. Return the warranty registration document to HRM in order to qualify for a further 3 year
warranty of the heat exchanger – a total of 5 years.
Extended Warranty Conditions
- The boiler must be serviced annually and maintained in accordance with this handbook. The
“Benchmark” service log is located at the back of this manual
- This warranty is in addition to your statutory and other legal rights
After Sales Service
- If your boiler fails during the warranty period contact your installer, who will be able to identify the
cause of the problem. If appropriate, your installer will contact us.
- Under no circumstances should “in warranty” work be undertaken without authorisation from the HRM
service department
- If you are unable to contact your installer please contact our service department. Quoting your boiler’s
serial number when phoning – this can be found on the cover of this manual.
3
Standard X-ternal & System X-ternal
Handbook
54
Contents Page
1
Standard Wallstar, System Wallstar &
Wallstar Combi Manual
Contents Page
1
Standard Wallstar, System Wallstar &
Wallstar Combi Manual
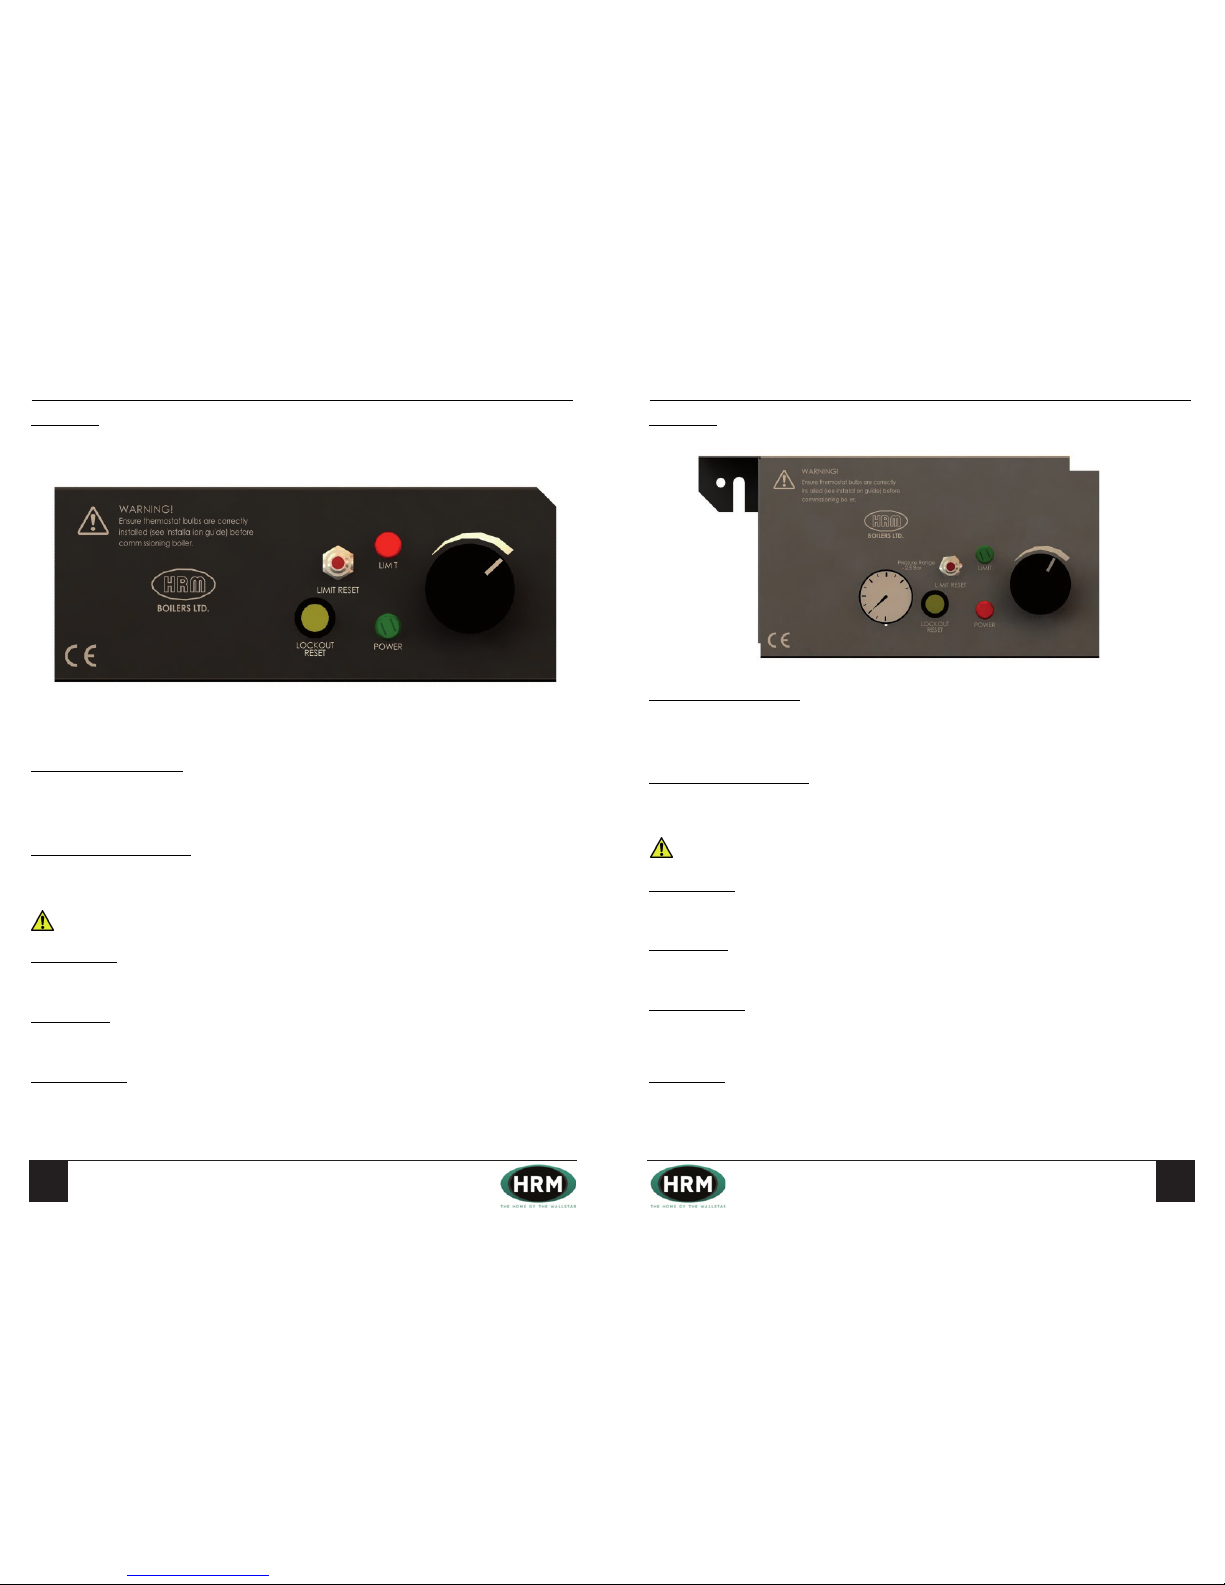
Boiler Controls – Standard Wallstar
Control Panel
Temperature Control Thermostat
The control thermostat regulates the temperature of the water within the boiler.
The recommended settings, governed by the control knob, are maximum for heating and hot water, and minimum for
hot water only.
Boiler Overheat (Limit) Thermostat
In the unlikely event the boiler overheats, the reset button will trip and cut the power supply to the boiler. Allow the
boiler to cool then press the reset button to reset the thermostat.
IMPORTANT - If overheating occurs regularly, consult your installation engineer. There may be a fault with the
central heating system.
Power Neon Lamp
The lamp is illuminated when there is power to the control thermostat and the control system (time clock) is
requesting heat.
Limit Neon Lamp
The lamp is illuminated when there is power to the controls, but the boiler has overheated. When the limit reset is
pressed this lamp should extinguish.
Lockout Reset Lamp
The lamp is illuminated when there is power to the controls, but the burner has not fired correctly. When the lockout
reset is pressed this lamp should extinguish. This lamp is also a reset button which provides an alternative to pressing
the reset on the burner itself.
Boiler Controls – System Wallstar
Control Panel
Temperature Control Thermostat
The control thermostat regulates the temperature of the water within the boiler.
The recommended settings, governed by the control knob, are maximum for heating and hot water and minimum for
hot water only.
Boiler Overheat (Limit) Thermostat
In the unlikely event the boiler overheats, the reset button will trip and cut the power supply to the boiler. Allow the
boiler to cool then press the reset button to reset the thermostat.
IMPORTANT - If overheating occurs regularly, consult your installation engineer. There may be a fault with the
central heating system.
Power Neon Lamp
The lamp is illuminated when there is power to the control thermostat and the control system (time clock) is
requesting heat.
Limit Neon Lamp
The lamp is illuminated when there is power to the controls, but the boiler has overheated. When the limit reset is
pressed this lamp should extinguish.
Lockout Reset Lamp
The lamp is illuminated when there is power to the controls, but the burner has not fired correctly. When the lockout
reset is pressed this lamp should extinguish. This lamp is also a reset button which provides an alternative to pressing
the reset on the burner itself.
Pressure Gauge
The heating system should be pressurised to approximately 1 bar when cold. Check the pressure occasionally, as
loss of pressure may cause the boiler to overheat. Please refer to note 10 (Page 28) in the installation procedure
section for instructions on pressurising the system.
Page 5
Householder Information
IMPORTANT!
Your boiler must be commissioned in order to:
- Validate your warranty
- Ensure the boiler has been installed correctly and avoid premature failure
- Set the boiler to its optimum efficiency. Operating conditions for the boiler will vary from site to site, your
commissioning engineer has specialised equipment to check the oil pressure and analyse the exhaust gases for
temperature, smoke and carbon dioxide content.
Your installer will organise the commissioning of your boiler. Should you experience any difficulty locating an
engineer, our service department may be able to provide you with details of an engineer in your area.
“Benchmark” Installation, Commissioning and Service Record Log Book
Please ensure that your installer has completed all sections of the log book (found at the back of this manual).
The log book will be required in the event of any warranty work. Ensure that the service record is completed.
Warranty
Your HRM boiler is under warranty for 2 years from the date of installation.
Warranty Conditions
- The boiler must be installed and commissioned in accordance with our handbook
- The boiler must not be repaired, modified or tampered with by any person not authorised by HRM
Extended Warranty
The “Benchmark” and warranty registration document at the end of this manual should be completed as
appropriate by your installer / engineer. This is your record that the boiler has been correctly installed in accordance
with our recommendations. Return the warranty registration document to HRM in order to qualify for a further 3 year
warranty of the heat exchanger – a total of 5 years.
Extended Warranty Conditions
- The boiler must be serviced annually and maintained in accordance with this handbook. The
“Benchmark” service log is located at the back of this manual
- This warranty is in addition to your statutory and other legal rights
After Sales Service
- If your boiler fails during the warranty period contact your installer, who will be able to identify the
cause of the problem. If appropriate, your installer will contact us.
- Under no circumstances should “in warranty” work be undertaken without authorisation from the HRM
service department
- If you are unable to contact your installer please contact our service department. Quoting your boiler’s
serial number when phoning – this can be found on the cover of this manual.
3
Standard X-ternal & System X-ternal
Handbook
Householder Information
IMPORTANT!
Your boiler must be commissioned in order to:
- Validate your warranty
- Ensure the boiler has been installed correctly and avoid premature failure
- Set the boiler to its optimum efficiency. Operating conditions for the boiler will vary from site to site, your
commissioning engineer has specialised equipment to check the oil pressure and analyse the exhaust gases for
temperature, smoke and carbon dioxide content.
Your installer will organise the commissioning of your boiler. Should you experience any difficulty locating an
engineer, our service department may be able to provide you with details of an engineer in your area.
“Benchmark” Installation, Commissioning and Service Record Log Book
Please ensure that your installer has completed all sections of the log book (found at the back of this manual).
The log book will be required in the event of any warranty work. Ensure that the service record is completed.
Warranty
Your HRM boiler is under warranty for 2 years from the date of installation.
Warranty Conditions
- The boiler must be installed and commissioned in accordance with our handbook
- The boiler must not be repaired, modified or tampered with by any person not authorised by HRM
Extended Warranty
The “Benchmark” and warranty registration document at the end of this manual should be completed as
appropriate by your installer / engineer. This is your record that the boiler has been correctly installed in accordance
with our recommendations. Return the warranty registration document to HRM in order to qualify for a further 3 year
warranty of the heat exchanger – a total of 5 years.
Extended Warranty Conditions
- The boiler must be serviced annually and maintained in accordance with this handbook. The
“Benchmark” service log is located at the back of this manual
- This warranty is in addition to your statutory and other legal rights
After Sales Service
- If your boiler fails during the warranty period contact your installer, who will be able to identify the
cause of the problem. If appropriate, your installer will contact us.
- Under no circumstances should “in warranty” work be undertaken without authorisation from the HRM
service department
- If you are unable to contact your installer please contact our service department. Quoting your boiler’s
serial number when phoning – this can be found on the cover of this manual.
3
Standard X-ternal & System X-ternal
Handbook
76
Contents Page
1
Standard Wallstar, System Wallstar &
Wallstar Combi Manual
Contents Page
1
Standard Wallstar, System Wallstar &
Wallstar Combi Manual
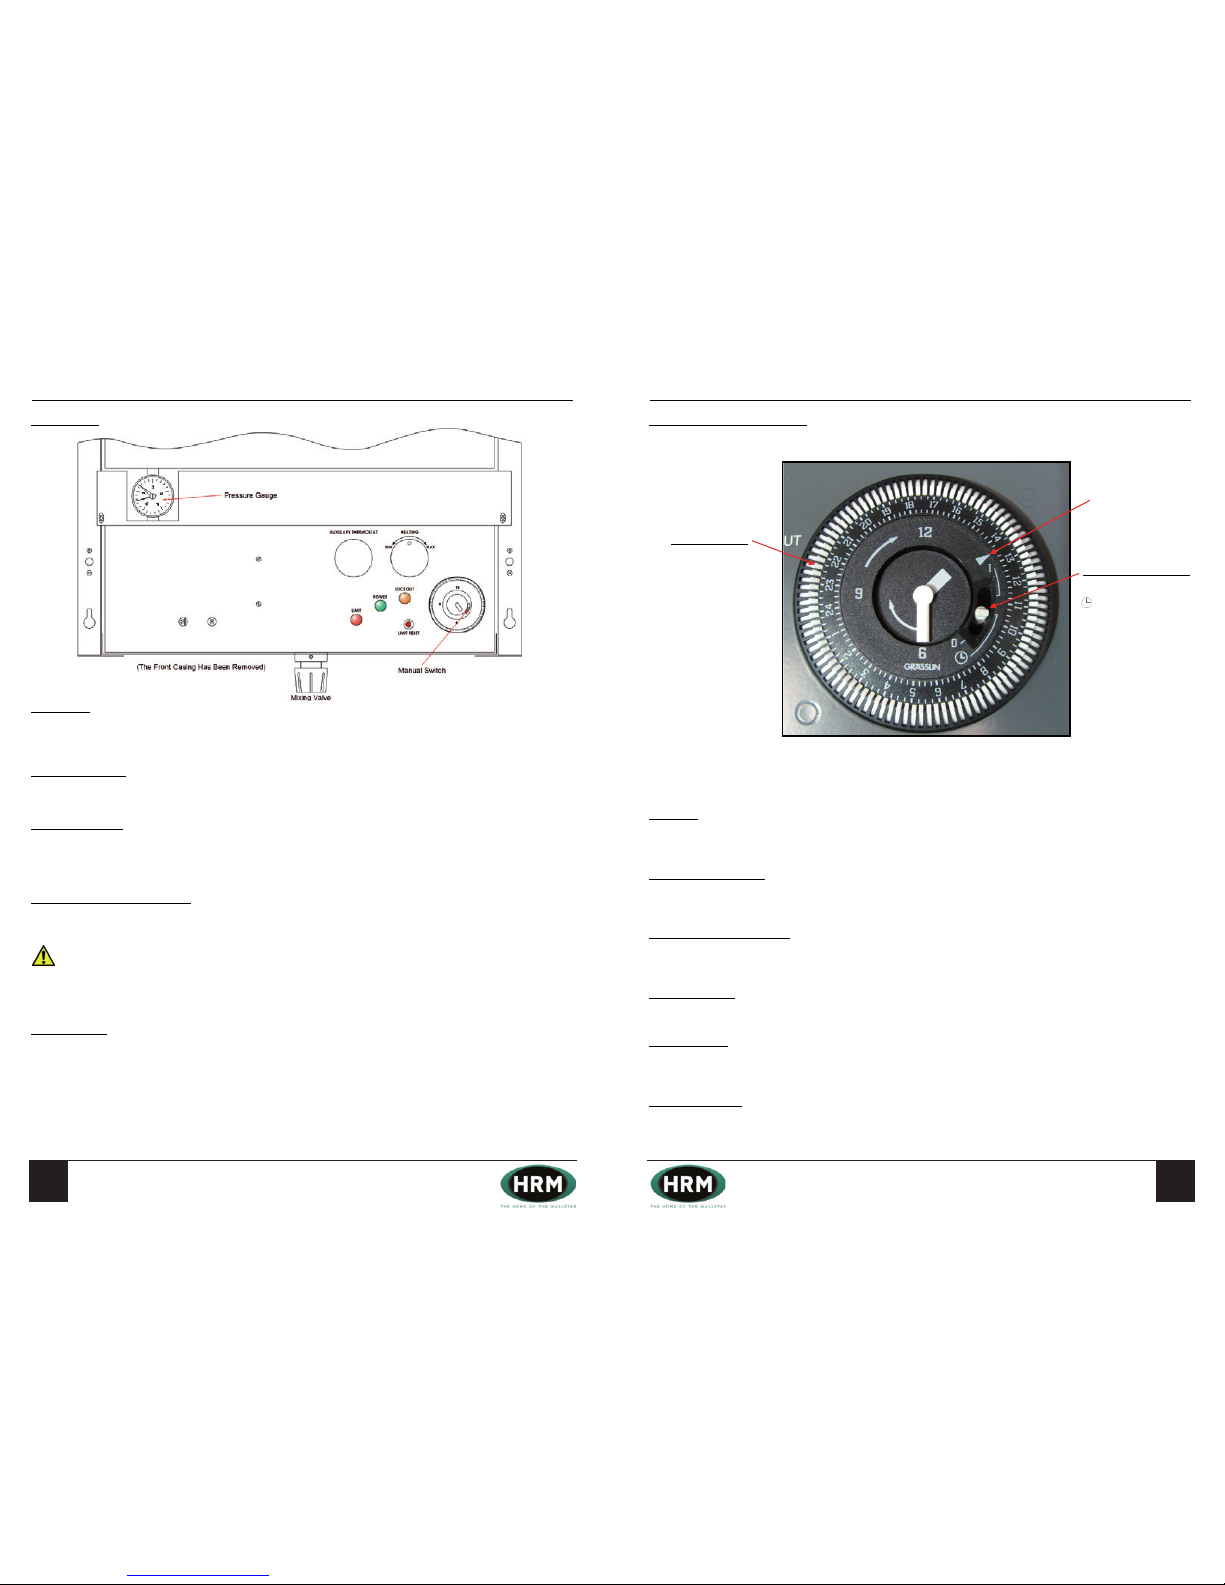
Boiler Controls – Wallstar Combi
Control Panel
Mixing Valve
The mixing valve can be adjusted to set the maximum temperature of hot water produced. The valve is graduated
between 1 to 5, the greater the number the hotter the water.
IMPORTANT - Too high a setting may cause scalding!
Auxiliary Thermostat
This thermostat maintains the temperature of the boiler for the production of hot water. For best hot water
Boiler Controls – Wallstar Combi
Control Panel
Mixing Valve
The mixing valve can be adjusted to set the maximum temperature of hot water produced. The valve is graduated
between 1 to 5, the greater the number the hotter the water.
IMPORTANT - Too high a setting may cause scalding!
Auxiliary Thermostat
This thermostat maintains the temperature of the boiler for the production of hot water. For best hot water
performance leave the knob set in its maximum position.
Heating Thermostat
The heating thermostat regulates the temperature of the water supplied to the central heating system. To achieve the
Boiler Controls – Wallstar Combi
Control Panel
Mixing Valve
The mixing valve can be adjusted to set the maximum temperature of hot water produced. The valve is graduated
between 1 to 5, the greater the number the hotter the water.
Boiler Controls – Wallstar Combi Continued
Time Clock Programming Guide
Setting Up
The outer dial should be set to the current time. Rotate the dial slowly in a clockwise direction, until the correct hour is
approaching the arrow printed on the dial.
Manual Switch Operation
The manual switch will provide On / Timed / Off control, thereby allowing manual control of the heating without
disrupting the timed (tappet) settings.
Programming Switching Times
One tappet is equal to 15 minutes. Set the number of tappets to the outer edge of the dial, equal to the duration of
time the heating is required to be switched on.
Power Neon Lamp
The lamp is illuminated when the mains supply to the boiler is switched on.
Limit Neon Lamp
The lamp is illuminated when there is power to the controls, but the boiler has overheated. When the limit reset is
pressed this lamp should extinguish.
Lockout Neon Lamp
The lamp is illuminated when there is power to the controls, but the burner has not fired correctly.
Arrow
Manual Switch Position
I = On (top position)
= Timed (centre position)
0 = Off (bottom position)
Tappets Position
In = Off
Out = On
Boiler Controls – Wallstar Combi
Control Panel
Mixing Valve
The mixing valve can be adjusted to set the maximum temperature of hot water produced. The valve is graduated
between 1 to 5, the greater the number the hotter the water.
IMPORTANT - Too high a setting may cause scalding!
Auxiliary Thermostat
This thermostat maintains the temperature of the boiler for the production of hot water. For best hot water
performance leave the knob set in its maximum position.
Heating Thermostat
The heating thermostat regulates the temperature of the water supplied to the central heating system. To achieve the
heating system performance indicated by the ‘max’ setting, the auxiliary thermostat should also be set to its maximum
position.
Note: The heating function is interrupted whenever there is a demand for domestic hot water.
Boiler Overheat (Limit) Thermostat
In the unlikely event the boiler overheats, the reset button will trip and cut the power supply to the boiler. Allow the
boiler to cool then press the reset button to reset the thermostat.
IMPORTANT - If overheating occurs regularly, consult your installation engineer. There may be a fault with the
central heating system.
Note: Loss of system pressure may cause the overheat (limit) thermostat to trip; refer to the pressure gauge section
below.
Pressure Gauge
The heating system should be pressurised to approximately 1 bar when cold. Check the pressure occasionally, as
loss of pressure may cause the boiler to overheat. Please refer to the combi fault diagnosis page for instructions
on pressurising the system.
This thermostat maintains the temperature of the boiler for the production of hot water. Pre-set at maximum position.
Page 6
Householder Information
IMPORTANT!
Your boiler must be commissioned in order to:
- Validate your warranty
- Ensure the boiler has been installed correctly and avoid premature failure
- Set the boiler to its optimum efficiency. Operating conditions for the boiler will vary from site to site, your
commissioning engineer has specialised equipment to check the oil pressure and analyse the exhaust gases for
temperature, smoke and carbon dioxide content.
Your installer will organise the commissioning of your boiler. Should you experience any difficulty locating an
engineer, our service department may be able to provide you with details of an engineer in your area.
“Benchmark” Installation, Commissioning and Service Record Log Book
Please ensure that your installer has completed all sections of the log book (found at the back of this manual).
The log book will be required in the event of any warranty work. Ensure that the service record is completed.
Warranty
Your HRM boiler is under warranty for 2 years from the date of installation.
Warranty Conditions
- The boiler must be installed and commissioned in accordance with our handbook
- The boiler must not be repaired, modified or tampered with by any person not authorised by HRM
Extended Warranty
The “Benchmark” and warranty registration document at the end of this manual should be completed as
appropriate by your installer / engineer. This is your record that the boiler has been correctly installed in accordance
with our recommendations. Return the warranty registration document to HRM in order to qualify for a further 3 year
warranty of the heat exchanger – a total of 5 years.
Extended Warranty Conditions
- The boiler must be serviced annually and maintained in accordance with this handbook. The
“Benchmark” service log is located at the back of this manual
- This warranty is in addition to your statutory and other legal rights
After Sales Service
- If your boiler fails during the warranty period contact your installer, who will be able to identify the
cause of the problem. If appropriate, your installer will contact us.
- Under no circumstances should “in warranty” work be undertaken without authorisation from the HRM
service department
- If you are unable to contact your installer please contact our service department. Quoting your boiler’s
serial number when phoning – this can be found on the cover of this manual.
3
Standard X-ternal & System X-ternal
Handbook
Householder Information
IMPORTANT!
Your boiler must be commissioned in order to:
- Validate your warranty
- Ensure the boiler has been installed correctly and avoid premature failure
- Set the boiler to its optimum efficiency. Operating conditions for the boiler will vary from site to site, your
commissioning engineer has specialised equipment to check the oil pressure and analyse the exhaust gases for
temperature, smoke and carbon dioxide content.
Your installer will organise the commissioning of your boiler. Should you experience any difficulty locating an
engineer, our service department may be able to provide you with details of an engineer in your area.
“Benchmark” Installation, Commissioning and Service Record Log Book
Please ensure that your installer has completed all sections of the log book (found at the back of this manual).
The log book will be required in the event of any warranty work. Ensure that the service record is completed.
Warranty
Your HRM boiler is under warranty for 2 years from the date of installation.
Warranty Conditions
- The boiler must be installed and commissioned in accordance with our handbook
- The boiler must not be repaired, modified or tampered with by any person not authorised by HRM
Extended Warranty
The “Benchmark” and warranty registration document at the end of this manual should be completed as
appropriate by your installer / engineer. This is your record that the boiler has been correctly installed in accordance
with our recommendations. Return the warranty registration document to HRM in order to qualify for a further 3 year
warranty of the heat exchanger – a total of 5 years.
Extended Warranty Conditions
- The boiler must be serviced annually and maintained in accordance with this handbook. The
“Benchmark” service log is located at the back of this manual
- This warranty is in addition to your statutory and other legal rights
After Sales Service
- If your boiler fails during the warranty period contact your installer, who will be able to identify the
cause of the problem. If appropriate, your installer will contact us.
- Under no circumstances should “in warranty” work be undertaken without authorisation from the HRM
service department
- If you are unable to contact your installer please contact our service department. Quoting your boiler’s
serial number when phoning – this can be found on the cover of this manual.
3
Standard X-ternal & System X-ternal
Handbook
98
Contents Page
1
Standard Wallstar, System Wallstar &
Wallstar Combi Manual
Contents Page
1
Standard Wallstar, System Wallstar &
Wallstar Combi Manual
Burner Lockout
The burner is equipped with a flame failure device. When activated the reset button on the burner control box is
illuminated. Refer to the fault finding section of the handbook to identify possible causes.
The test switch is provided for the service engineer, in normal operation the switch should be left in the “PROG”
position for Wallstar and System Wallstar boilers and in the “NORMAL” position for the Wallstar Combi.
Switching The Boiler On
- Turn on the oil supply
- Switch on the mains supply
- Set the timer control to “on”
- Set the boiler control thermostat to the required setting
Switching The Boiler Off For Long Periods
- Have the boiler serviced
- Switch off the mains supply
- Turn off the oil at the tank
Pump Priming
If the burner fails to lift oil, the pump may be dry and require priming. To prime the burner, fill a suitable container,
such as a jar, with heating oil, disconnect the flexible oil line at the isolating valve and place the end into the container.
Hold the container above the height of the burner and press the lockout reset button, once the pump has pulled the oil
from the container through, it is primed and can be reconnected to the main supply.
Oil Delivery
Switch the boiler off during an oil delivery, wait for a short period before switching the boiler back on to allow sediment
in the bottom of the oil supply tank to settle.
Maintenance
Your boiler should be serviced annually. Failure to have this done will invalidate your warranty and may also lead to
inconvenient breakdowns. A “Benchmark” service log can be found at the back of this manual.
If you have difficulty in locating a service engineer, please contact our service department who may be able to provide
you with the name of an engineer in your area.
Additional Burner Information
Further information on burner settings can be found within the burner instruction manual which will have been
included with the boiler. If you have misplaced this manual or simply require additional copies, please contact our
service team.
Burner Spares
Please contact our sales department for further information on burner spares.
Burner Lockout
The burner is equipped with a flame failure device. When activated the reset button on the burner control box is
illuminated. Refer to the fault finding section of the handbook to identify possible causes.
The test switch is provided for the service engineer, in normal operation the switch should be left in the “PROG”
position for Wallstar and System Wallstar boilers and in the “NORMAL” position for the Wallstar Combi.
Switching The Boiler On
- Turn on the oil supply
- Switch on the mains supply
- Set the timer control to “on”
- Set the boiler control thermostat to the required setting
Switching The Boiler Off For Long Periods
- Have the boiler serviced
- Switch off the mains supply
- Turn off the oil at the tank
Pump Priming
If the burner fails to lift oil, the pump may be dry and require priming. To prime the burner, fill a suitable container,
such as a jar, with heating oil, disconnect the flexible oil line at the isolating valve and place the end into the container.
Hold the container above the height of the burner and press the lockout reset button, once the pump has pulled the oil
from the container through, it is primed and can be reconnected to the main supply.
Oil Delivery
Switch the boiler off during an oil delivery, wait for a short period before switching the boiler back on to allow sediment
in the bottom of the oil supply tank to settle.
Maintenance
Your boiler should be serviced annually. Failure to have this done will invalidate your warranty and may also lead to
inconvenient breakdowns. A “Benchmark” service log can be found at the back of this manual.
If you have difficulty in locating a service engineer, please contact our service department who may be able to provide
you with the name of an engineer in your area.
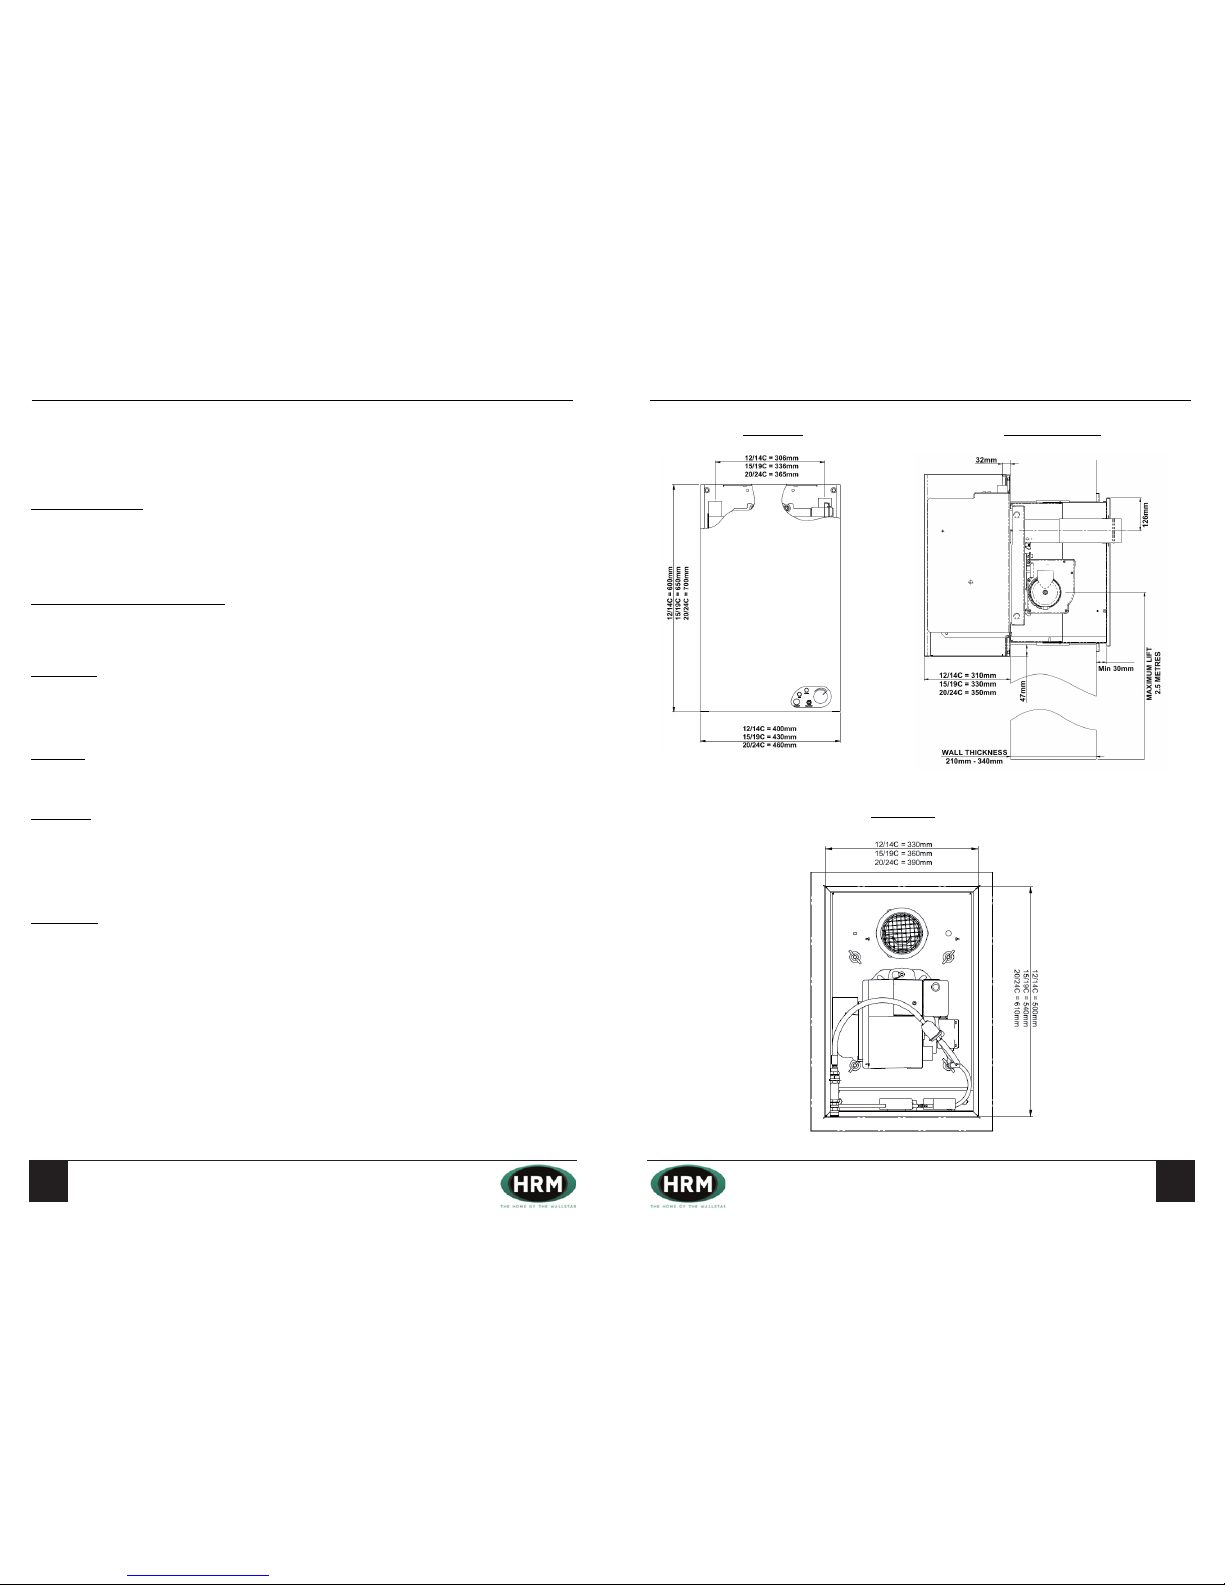
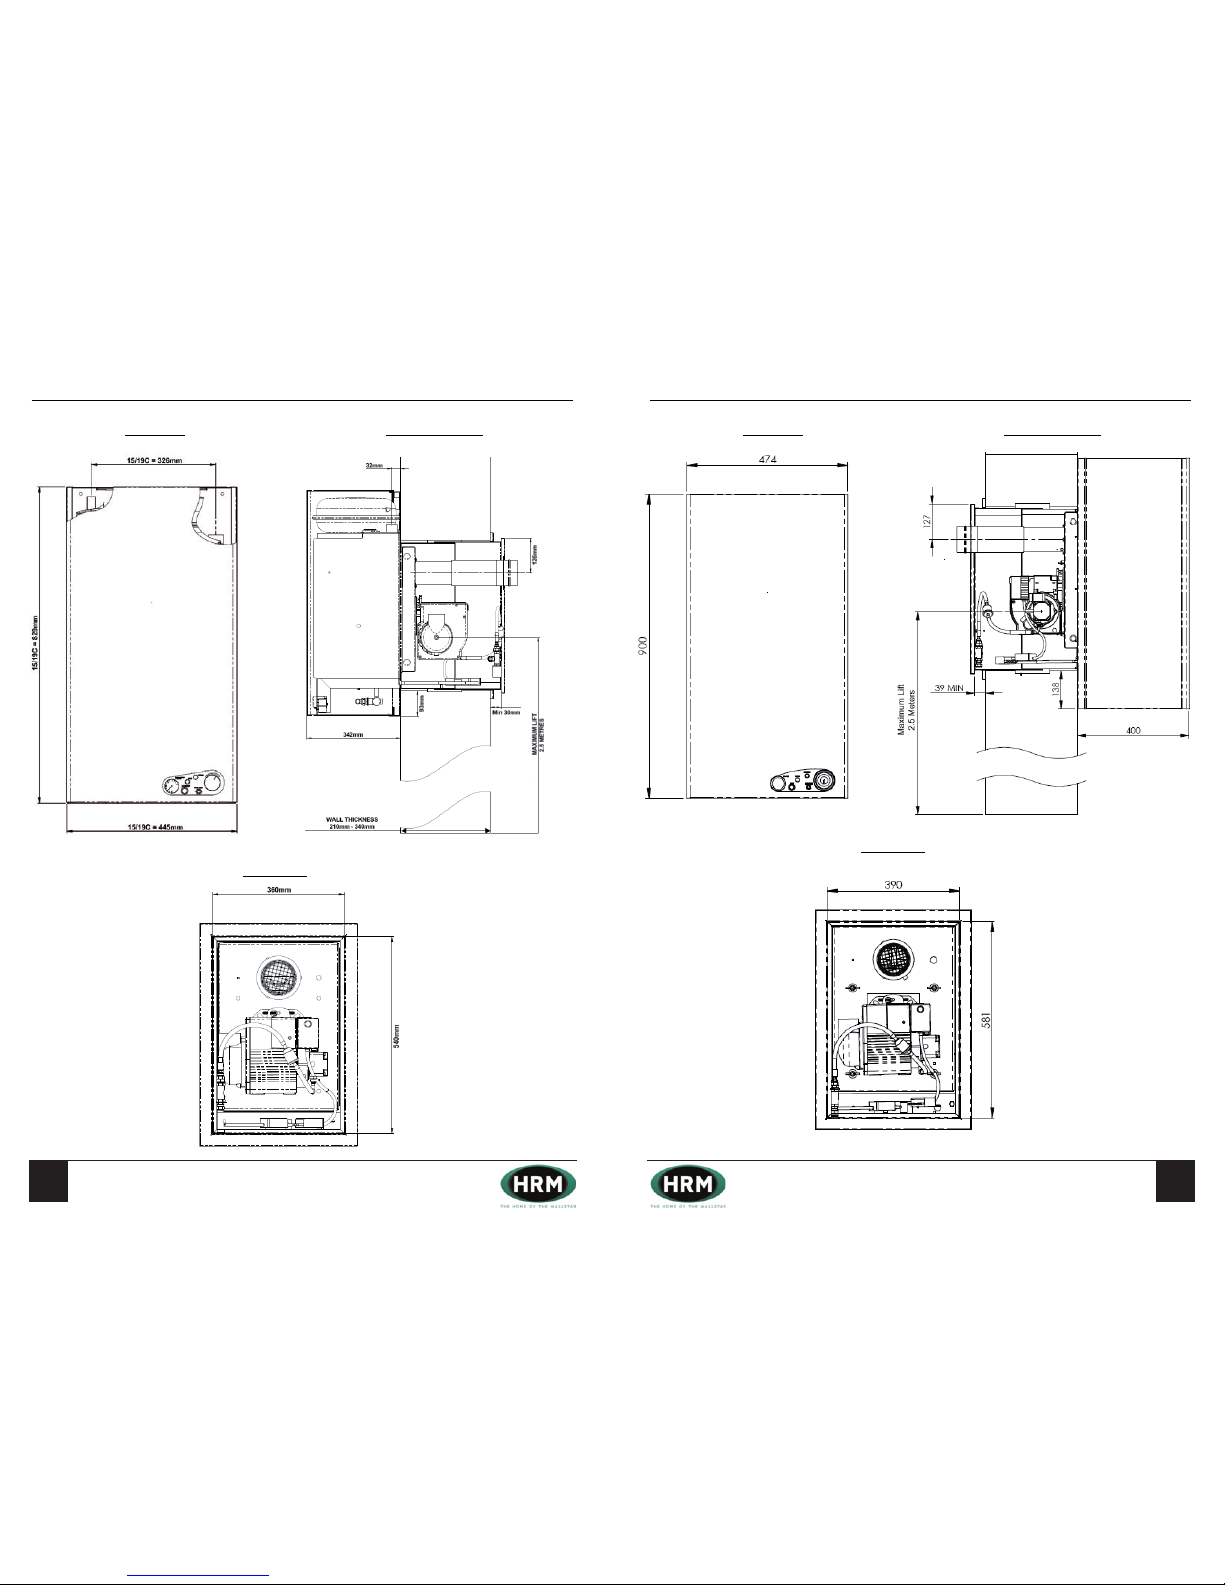
Technical Specifications – Boiler Dimensions – Standard Wallstar
Internal View
Cross-sectional View
External View
If the burner fails to lift oil, the pump may be dry and require priming. To prime the burner, ll a suitable container,
such as a jar, with heating oil, disconnect the exible oil line at the isolating valve and place the end into the container.
Hold the container above the height of the burner while bleeding pump and press the lockout reset button, once the
pump has pulled the oil from the container through, it is primed and can be reconnected to the main supply.
Switch the boiler off during an oil delivery, wait for at least 1 hour before switching the boiler back on to allow sediment
in the bottom of the oil supply tank to settle.
Clear oil line shown
is a BS099A with an
integral lter.
All boilers are now
supplied with a
BS012 clear oil line
with no lter.
Page 7
Householder Information
IMPORTANT!
Your boiler must be commissioned in order to:
- Validate your warranty
- Ensure the boiler has been installed correctly and avoid premature failure
- Set the boiler to its optimum efficiency. Operating conditions for the boiler will vary from site to site, your
commissioning engineer has specialised equipment to check the oil pressure and analyse the exhaust gases for
temperature, smoke and carbon dioxide content.
Your installer will organise the commissioning of your boiler. Should you experience any difficulty locating an
engineer, our service department may be able to provide you with details of an engineer in your area.
“Benchmark” Installation, Commissioning and Service Record Log Book
Please ensure that your installer has completed all sections of the log book (found at the back of this manual).
The log book will be required in the event of any warranty work. Ensure that the service record is completed.
Warranty
Your HRM boiler is under warranty for 2 years from the date of installation.
Warranty Conditions
- The boiler must be installed and commissioned in accordance with our handbook
- The boiler must not be repaired, modified or tampered with by any person not authorised by HRM
Extended Warranty
The “Benchmark” and warranty registration document at the end of this manual should be completed as
appropriate by your installer / engineer. This is your record that the boiler has been correctly installed in accordance
with our recommendations. Return the warranty registration document to HRM in order to qualify for a further 3 year
warranty of the heat exchanger – a total of 5 years.
Extended Warranty Conditions
- The boiler must be serviced annually and maintained in accordance with this handbook. The
“Benchmark” service log is located at the back of this manual
- This warranty is in addition to your statutory and other legal rights
After Sales Service
- If your boiler fails during the warranty period contact your installer, who will be able to identify the
cause of the problem. If appropriate, your installer will contact us.
- Under no circumstances should “in warranty” work be undertaken without authorisation from the HRM
service department
- If you are unable to contact your installer please contact our service department. Quoting your boiler’s
serial number when phoning – this can be found on the cover of this manual.
3
Standard X-ternal & System X-ternal
Handbook
Householder Information
IMPORTANT!
Your boiler must be commissioned in order to:
- Validate your warranty
- Ensure the boiler has been installed correctly and avoid premature failure
- Set the boiler to its optimum efficiency. Operating conditions for the boiler will vary from site to site, your
commissioning engineer has specialised equipment to check the oil pressure and analyse the exhaust gases for
temperature, smoke and carbon dioxide content.
Your installer will organise the commissioning of your boiler. Should you experience any difficulty locating an
engineer, our service department may be able to provide you with details of an engineer in your area.
“Benchmark” Installation, Commissioning and Service Record Log Book
Please ensure that your installer has completed all sections of the log book (found at the back of this manual).
The log book will be required in the event of any warranty work. Ensure that the service record is completed.
Warranty
Your HRM boiler is under warranty for 2 years from the date of installation.
Warranty Conditions
- The boiler must be installed and commissioned in accordance with our handbook
- The boiler must not be repaired, modified or tampered with by any person not authorised by HRM
Extended Warranty
The “Benchmark” and warranty registration document at the end of this manual should be completed as
appropriate by your installer / engineer. This is your record that the boiler has been correctly installed in accordance
with our recommendations. Return the warranty registration document to HRM in order to qualify for a further 3 year
warranty of the heat exchanger – a total of 5 years.
Extended Warranty Conditions
- The boiler must be serviced annually and maintained in accordance with this handbook. The
“Benchmark” service log is located at the back of this manual
- This warranty is in addition to your statutory and other legal rights
After Sales Service
- If your boiler fails during the warranty period contact your installer, who will be able to identify the
cause of the problem. If appropriate, your installer will contact us.
- Under no circumstances should “in warranty” work be undertaken without authorisation from the HRM
service department
- If you are unable to contact your installer please contact our service department. Quoting your boiler’s
serial number when phoning – this can be found on the cover of this manual.
3
Standard X-ternal & System X-ternal
Handbook
1110
Contents Page
1
Standard Wallstar, System Wallstar &
Wallstar Combi Manual
Contents Page
1
Standard Wallstar, System Wallstar &
Wallstar Combi Manual
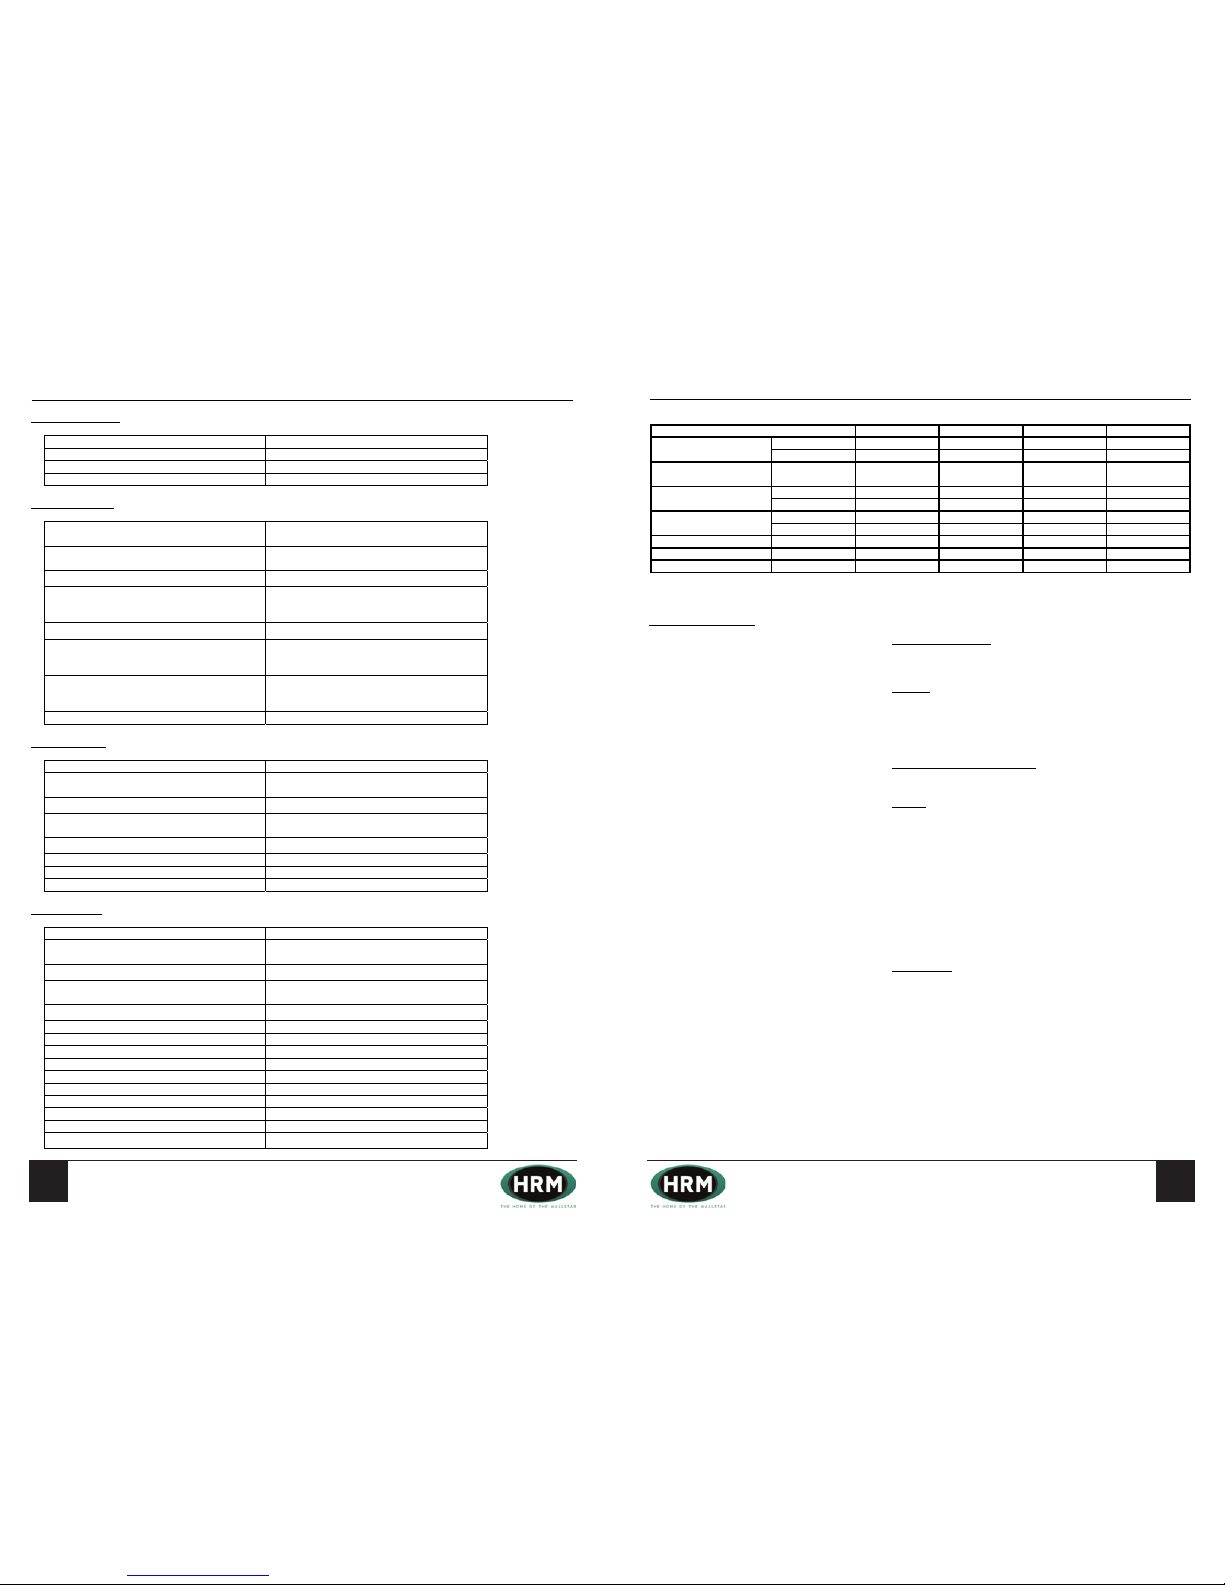
Technical Specifications – Boiler Dimensions – System Wallstar
Internal View
Cross-sectional View
External View
Technical Specifications – Boiler Dimensions – Wallstar Combi
Internal View
Cross-sectional View
External View
Clear oil line shown
is a BS099A with an
integral lter.
All boilers are now
supplied with a
BS012 clear oil line
with no lter.
Clear oil line shown
is a BS099A with an
integral lter.
All boilers are now
supplied with a
BS012 clear oil line
with no lter.
Page 8
Householder Information
IMPORTANT!
Your boiler must be commissioned in order to:
- Validate your warranty
- Ensure the boiler has been installed correctly and avoid premature failure
- Set the boiler to its optimum efficiency. Operating conditions for the boiler will vary from site to site, your
commissioning engineer has specialised equipment to check the oil pressure and analyse the exhaust gases for
temperature, smoke and carbon dioxide content.
Your installer will organise the commissioning of your boiler. Should you experience any difficulty locating an
engineer, our service department may be able to provide you with details of an engineer in your area.
“Benchmark” Installation, Commissioning and Service Record Log Book
Please ensure that your installer has completed all sections of the log book (found at the back of this manual).
The log book will be required in the event of any warranty work. Ensure that the service record is completed.
Warranty
Your HRM boiler is under warranty for 2 years from the date of installation.
Warranty Conditions
- The boiler must be installed and commissioned in accordance with our handbook
- The boiler must not be repaired, modified or tampered with by any person not authorised by HRM
Extended Warranty
The “Benchmark” and warranty registration document at the end of this manual should be completed as
appropriate by your installer / engineer. This is your record that the boiler has been correctly installed in accordance
with our recommendations. Return the warranty registration document to HRM in order to qualify for a further 3 year
warranty of the heat exchanger – a total of 5 years.
Extended Warranty Conditions
- The boiler must be serviced annually and maintained in accordance with this handbook. The
“Benchmark” service log is located at the back of this manual
- This warranty is in addition to your statutory and other legal rights
After Sales Service
- If your boiler fails during the warranty period contact your installer, who will be able to identify the
cause of the problem. If appropriate, your installer will contact us.
- Under no circumstances should “in warranty” work be undertaken without authorisation from the HRM
service department
- If you are unable to contact your installer please contact our service department. Quoting your boiler’s
serial number when phoning – this can be found on the cover of this manual.
3
Standard X-ternal & System X-ternal
Handbook
Householder Information
IMPORTANT!
Your boiler must be commissioned in order to:
- Validate your warranty
- Ensure the boiler has been installed correctly and avoid premature failure
- Set the boiler to its optimum efficiency. Operating conditions for the boiler will vary from site to site, your
commissioning engineer has specialised equipment to check the oil pressure and analyse the exhaust gases for
temperature, smoke and carbon dioxide content.
Your installer will organise the commissioning of your boiler. Should you experience any difficulty locating an
engineer, our service department may be able to provide you with details of an engineer in your area.
“Benchmark” Installation, Commissioning and Service Record Log Book
Please ensure that your installer has completed all sections of the log book (found at the back of this manual).
The log book will be required in the event of any warranty work. Ensure that the service record is completed.
Warranty
Your HRM boiler is under warranty for 2 years from the date of installation.
Warranty Conditions
- The boiler must be installed and commissioned in accordance with our handbook
- The boiler must not be repaired, modified or tampered with by any person not authorised by HRM
Extended Warranty
The “Benchmark” and warranty registration document at the end of this manual should be completed as
appropriate by your installer / engineer. This is your record that the boiler has been correctly installed in accordance
with our recommendations. Return the warranty registration document to HRM in order to qualify for a further 3 year
warranty of the heat exchanger – a total of 5 years.
Extended Warranty Conditions
- The boiler must be serviced annually and maintained in accordance with this handbook. The
“Benchmark” service log is located at the back of this manual
- This warranty is in addition to your statutory and other legal rights
After Sales Service
- If your boiler fails during the warranty period contact your installer, who will be able to identify the
cause of the problem. If appropriate, your installer will contact us.
- Under no circumstances should “in warranty” work be undertaken without authorisation from the HRM
service department
- If you are unable to contact your installer please contact our service department. Quoting your boiler’s
serial number when phoning – this can be found on the cover of this manual.
3
Standard X-ternal & System X-ternal
Handbook
1312
Contents Page
1
Standard Wallstar, System Wallstar &
Wallstar Combi Manual
Contents Page
1
Standard Wallstar, System Wallstar &
Wallstar Combi Manual
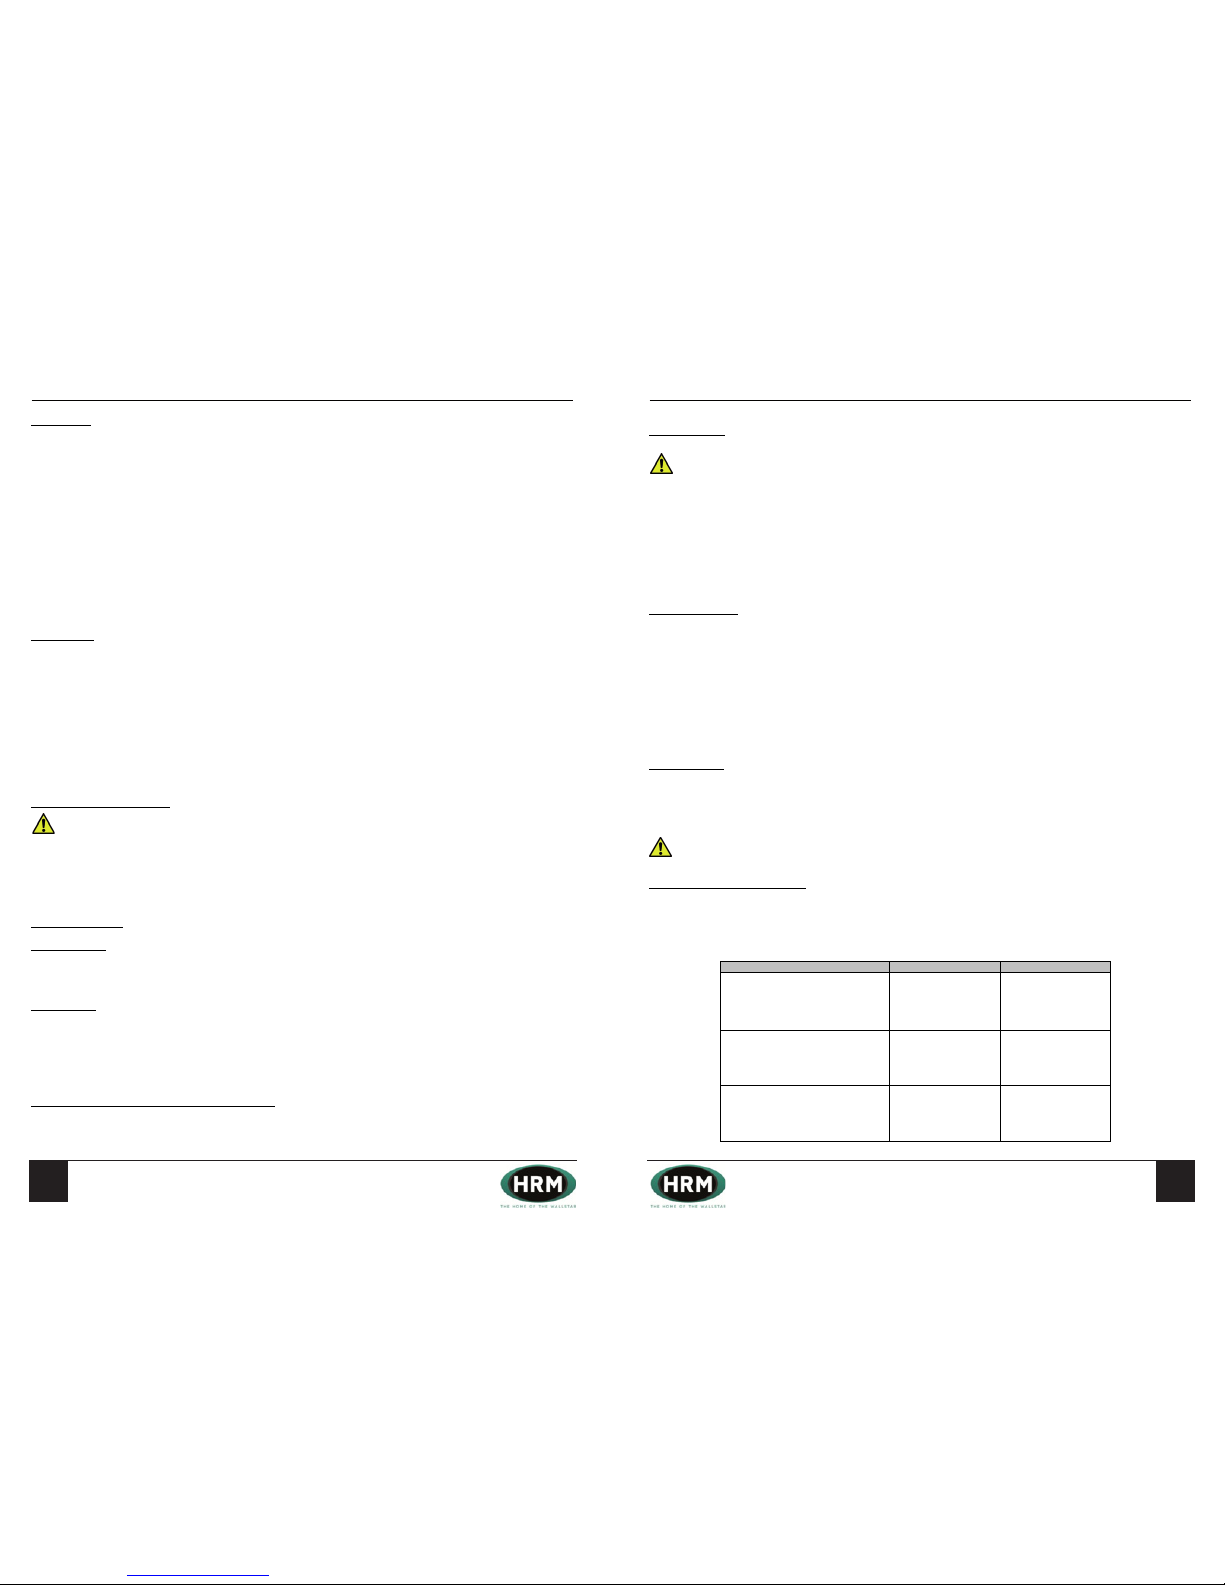
Technical Specifications
All Wallstar Models
Electrical Supply 230V Single Phase, Fused 5amp
Max Power Consumption 125W
Fuel Class C2 (28 Sec Kerosene)
Oil Supply Connection 10mm Compression, Single Pipe
Standard Wallstar
Heating Systems Requirements
Fully Pumped, Conventional Open Vented, or
Sealed System
Max Operating Pressure
3 Bar (43.5psi) Static Head 30.59 Meters
(100ft)
Operating Temperature Range
60
°C to 82°C
Resistance To Water Flow Between Return
and Flow Connections (10 Deg Temp Rise)
12/14C – 26mm
15/19C – 35mm
20/24C – 48mm
Cut Out Temperature
100
°C
Weight Empty
12/14C – 84kg
15/19C – 96kg
20/24C – 107kg
Water Capacity
12/14C – 17.5 Litres
15/19C – 19.25 Litres
20/24C – 21 Litres
SEDBUK Rating A
System Wallstar
Heating Systems Requirements Sealed Systems Only
Max Operating Pressure
3 Bar (43.5psi) Static Head 30.59 Meters
(100ft)
Operating Temperature Range
60
°C to 82°C
Resistance To Water Flow Between Return
and Flow Connections (10 Deg Temp Rise)
35mm
Cut Out Temperature
100
°C
Weight Empty 107kg
Water Capacity 19.25 Litres
SEDBUK Rating A
Wallstar Combi
Heating Systems Requirements Sealed Systems Only
Max Operating Pressure
3 Bar (43.5psi) Static Head 30.59 Meters
(100ft)
Operating Temperature Range
60
°C to 82°C
Resistance To Water Flow Between Return
and Flow Connections (10 Deg Temp Rise)
48mm
Cut Out Temperature
110
°C
Weight Empty 140kg
Water Capacity 35 Litres
Maximum Cold Water Pressure 5 bar / 72.5psi
Minimum Cold Water Pressure 1.5 bar / 21.7psi
Expansion Vessel Capacity 12 Litres
Expansion Vessel Pressure 1 bar / 14.5psi
Safety Relief Valve 3 bar / 43.5psi
Heating Output 18kW
Domestic Hot Water Output 24kW
Hot Water Flow Rate
35
°C Rise @ 10.5 Litres/Min
Technical Specifications – Burner Settings
Burner Fault Diagnosis
Burner fails to start - Mains lamp not illuminated
Blown fuse
Time clock/programmer not calling for heat
Room or hot water thermostats not calling for heat
Burner lockout lamp is illuminated - Lack of oil
Faulty solenoid coil
Blocked nozzle
Faulty fire valve
Air in oil supply
Empty oil tank
Blocked Oil Filter
Flame extinguishes after a short period
Photocell faulty
Faulty cont rol box
No spark
Faulty cont rol box
Faulty ignition tra nsformer
Incorrect electrode setting
Motor does not run - Seized oil pump
Motor faulty
Control box faulty
Capacitor faulty
Radio/T.V interference - Incorrect electrode setting
Poor earth bonding
Faulty ignition transformer
Smokey exhaust - Blocked nozzle
Incorrect burner settings
Burner starts violently - Delayed Ignition
Incorrect electrode adjustment
Electrode insulation damaged
HT leads faulty
Air in oil supply
Incorrect air adjustment
Oil odours - Incorrect combustion settings
Oil leak
Unstable flame - Incorrect head settings
Low oil pressure
Excess air
Faulty nozzle
btu /h
Kw
No zzle
US /GP H
Size & Ty pe
BAR
PSI
Kg/ hr
Litres /hr
Smoke No.
Bac harac h Sc ale
CO
2
%
Flue Gas Tem p
Les s amb iant °C
SEDBUK
Ban d
100
Output
47 ,800
TBA
A
TBA
TBA
TBA
Oi l P ressu re
85
64,8 50
19
0.55 8 0° EH
Bo iler M odel 12/14
Firing Rate
1.3 4
1.7
0.5 0 80° EH
6.9 TBA
TBA
TBA
15/ 19
A
0
11.5 12
85
A
14
2.0 5
0
20/ 24
8.6
125
1.6 3
81, 900
24
TBA
115
B
C ombi
83,00 0
24 .3
0.75 80° EH
7.2 5
105
2.1 5
2.7 5
0
12 .5
12/14 15/19 20/24 24/18 COMBI
btu/h 52,886 64,828 80,182 81,888
Kw 15.5 19.0 23.5 24.0
BAR 6.9 9.0 9.0 9.0
PSI 100 130 130 130
Kg/hr 1.29 1.69 2.13 2.13
Litres/hr 1.63 2.14 2.59 2.59
SMOKE NO Bacharach Scale 0 0 0 0
CO2 % 11.5 12 12.5 12.8
FLUE GAS TEMP Net Flue temp ˚C 85 85 85 85
BOILER MODEL
OUTPUT
NOZZLE Size and Type 0.50 80˚EH 0.55 80˚EH 0.65 80˚EH 0 .65 80˚EH
OIL PRESSURE
FIRING RATE
10
Page 9
Householder Information
IMPORTANT!
Your boiler must be commissioned in order to:
- Validate your warranty
- Ensure the boiler has been installed correctly and avoid premature failure
- Set the boiler to its optimum efficiency. Operating conditions for the boiler will vary from site to site, your
commissioning engineer has specialised equipment to check the oil pressure and analyse the exhaust gases for
temperature, smoke and carbon dioxide content.
Your installer will organise the commissioning of your boiler. Should you experience any difficulty locating an
engineer, our service department may be able to provide you with details of an engineer in your area.
“Benchmark” Installation, Commissioning and Service Record Log Book
Please ensure that your installer has completed all sections of the log book (found at the back of this manual).
The log book will be required in the event of any warranty work. Ensure that the service record is completed.
Warranty
Your HRM boiler is under warranty for 2 years from the date of installation.
Warranty Conditions
- The boiler must be installed and commissioned in accordance with our handbook
- The boiler must not be repaired, modified or tampered with by any person not authorised by HRM
Extended Warranty
The “Benchmark” and warranty registration document at the end of this manual should be completed as
appropriate by your installer / engineer. This is your record that the boiler has been correctly installed in accordance
with our recommendations. Return the warranty registration document to HRM in order to qualify for a further 3 year
warranty of the heat exchanger – a total of 5 years.
Extended Warranty Conditions
- The boiler must be serviced annually and maintained in accordance with this handbook. The
“Benchmark” service log is located at the back of this manual
- This warranty is in addition to your statutory and other legal rights
After Sales Service
- If your boiler fails during the warranty period contact your installer, who will be able to identify the
cause of the problem. If appropriate, your installer will contact us.
- Under no circumstances should “in warranty” work be undertaken without authorisation from the HRM
service department
- If you are unable to contact your installer please contact our service department. Quoting your boiler’s
serial number when phoning – this can be found on the cover of this manual.
3
Standard X-ternal & System X-ternal
Handbook
Householder Information
IMPORTANT!
Your boiler must be commissioned in order to:
- Validate your warranty
- Ensure the boiler has been installed correctly and avoid premature failure
- Set the boiler to its optimum efficiency. Operating conditions for the boiler will vary from site to site, your
commissioning engineer has specialised equipment to check the oil pressure and analyse the exhaust gases for
temperature, smoke and carbon dioxide content.
Your installer will organise the commissioning of your boiler. Should you experience any difficulty locating an
engineer, our service department may be able to provide you with details of an engineer in your area.
“Benchmark” Installation, Commissioning and Service Record Log Book
Please ensure that your installer has completed all sections of the log book (found at the back of this manual).
The log book will be required in the event of any warranty work. Ensure that the service record is completed.
Warranty
Your HRM boiler is under warranty for 2 years from the date of installation.
Warranty Conditions
- The boiler must be installed and commissioned in accordance with our handbook
- The boiler must not be repaired, modified or tampered with by any person not authorised by HRM
Extended Warranty
The “Benchmark” and warranty registration document at the end of this manual should be completed as
appropriate by your installer / engineer. This is your record that the boiler has been correctly installed in accordance
with our recommendations. Return the warranty registration document to HRM in order to qualify for a further 3 year
warranty of the heat exchanger – a total of 5 years.
Extended Warranty Conditions
- The boiler must be serviced annually and maintained in accordance with this handbook. The
“Benchmark” service log is located at the back of this manual
- This warranty is in addition to your statutory and other legal rights
After Sales Service
- If your boiler fails during the warranty period contact your installer, who will be able to identify the
cause of the problem. If appropriate, your installer will contact us.
- Under no circumstances should “in warranty” work be undertaken without authorisation from the HRM
service department
- If you are unable to contact your installer please contact our service department. Quoting your boiler’s
serial number when phoning – this can be found on the cover of this manual.
3
Standard X-ternal & System X-ternal
Handbook
1514
Contents Page
1
Standard Wallstar, System Wallstar &
Wallstar Combi Manual
Contents Page
1
Standard Wallstar, System Wallstar &
Wallstar Combi Manual
Boiler Installation
Regulations
The Installation of oil fired boilers must comply with the following Standards and Codes of Practice:
BS 5410-1:1997 Oil installations up to 45kW
BS 5449 Forced circulation hot water central heating systems for domestic premises
BS 7593:2006 Treatment of water in hot water central heating systems
Building Regulations Part L1 Part J 2006 England and Wales, Part F Scottish Regulations and Technical
Booklet L Northern Ireland
BS 7671:2008 Electrical Regulations
BS 7074 Code of practice for sealed systems
Boiler Sizing
It is important to establish the correct size of boiler required. Boiler output will depend on a number of factors,
including:
- The preferred room temperatures
- Location winter temperature
- Structural and ventilation heat losses
- Domestic hot water requirements
This is a complicated calculation. We recommend you employ the services of a heating engineer, who will determine
the correct size of boiler required for your property.
Refurbishing an Old System
IMPORTANT – Before installing a new boiler:
The system should be chemically cleaned to remove debris, in the form of black magnetite sludge and lime scale that
accumulates in radiators and pipe work. Failure to do this will result in debris adhering to the clean surfaces of a new
boiler, causing kettling or knocking noises. It also prohibits efficient heat transfer. A cleanser such as Fernox
Superfloc should be added to the system 48 hours prior to changing the boiler.
System Protection
After Installation
Flush the system with a cleanser such as Fernox Superfloc to remove traces of flux residues, grease, metal swarf,
solder pieces and oils used during component manufacture.
After Flushing
Add a corrosion inhibitor such as Fernox MB-1. This will minimise the chemical action and chemical change that takes
place in a systems primary water and system components.
Note: The manufacturer’s usage instructions for chemical cleaners and inhibitors should always be followed.
Please refer to BS 7593:2006 for a detailed explanation of cleansing procedures.
Protection of DHW Heat Exchanger (Wallstar Combi)
We recommend that a water scale reducer is installed in areas of hard water.
Boiler Installation - Continued
Boiler Location
IMPORTANT - Boilers should be installed on the ground floor only.
Noise levels – consideration should be given to the following:
- Small rooms will accentuate noise levels.
- Where a flue terminates near the boundary of an adjoining property, consideration should be given to
possible noise disturbance as some people are sensitive to even low noise levels.
Bathroom and bedroom installation should only be considered where there is no alternative.
Wall Construction
The boiler must be installed in a suitable load bearing external wall – a lintel is not normally required.
For walls constructed of timber, stramit or similar material, the structural material must support the weight
of the boiler when filled with water. A stud work frame should be constructed when appropriate.
It is not necessary to construct a heat barrier around the wall duct.
Where the external cladding is of weatherboard or similar, construct a “picture frame” for the wall duct trim
to seat against.
Wall Thickness
The Wallstar condensing models are supplied with telescopic wall ducts and flues, designed to fit through
exterior walls 210mm to 340mm thick. However with the addition of a 100mm extension kit, it is possible
to install a Wallstar condensing boiler in walls up to 440mm thick.
IMPORTANT - Be sure to measure your wall thickness before purchase.
Wall Duct & Flue Extension Kits
Note: Only one extension kit per boiler is permitted.
The extension kit is fitted to the inner half of the telescopic wall duct.
Extension Kit Size Part Number
Wallstar 12/14CA Wall Duct & Flue
Extension
100mm (4”) 12/14CX100
Wallstar 15/19CA Wall Duct & Flue
Extension Kit (Fits Standard & System
Models)
100mm (4”) 15/19CX100
Wallstar 20/24CA & Wallstar Combi Wall
Duct & Flue Extension Kit
100mm (4”) 20/24CX100
Flush the system with a cleanser such as Fernox or similar to remove traces of ux residues, grease, metal swarf,
solder pieces and oils used during component manufacture.
Add a corrosion inhibitor such as Fernox or similar. This will minimise the chemical action and chemical change that
takes place in a systems primary water and system components.
Boilers should be installed no higher than 2.5 m- See diagram on page 17.
Page 10
Householder Information
IMPORTANT!
Your boiler must be commissioned in order to:
- Validate your warranty
- Ensure the boiler has been installed correctly and avoid premature failure
- Set the boiler to its optimum efficiency. Operating conditions for the boiler will vary from site to site, your
commissioning engineer has specialised equipment to check the oil pressure and analyse the exhaust gases for
temperature, smoke and carbon dioxide content.
Your installer will organise the commissioning of your boiler. Should you experience any difficulty locating an
engineer, our service department may be able to provide you with details of an engineer in your area.
“Benchmark” Installation, Commissioning and Service Record Log Book
Please ensure that your installer has completed all sections of the log book (found at the back of this manual).
The log book will be required in the event of any warranty work. Ensure that the service record is completed.
Warranty
Your HRM boiler is under warranty for 2 years from the date of installation.
Warranty Conditions
- The boiler must be installed and commissioned in accordance with our handbook
- The boiler must not be repaired, modified or tampered with by any person not authorised by HRM
Extended Warranty
The “Benchmark” and warranty registration document at the end of this manual should be completed as
appropriate by your installer / engineer. This is your record that the boiler has been correctly installed in accordance
with our recommendations. Return the warranty registration document to HRM in order to qualify for a further 3 year
warranty of the heat exchanger – a total of 5 years.
Extended Warranty Conditions
- The boiler must be serviced annually and maintained in accordance with this handbook. The
“Benchmark” service log is located at the back of this manual
- This warranty is in addition to your statutory and other legal rights
After Sales Service
- If your boiler fails during the warranty period contact your installer, who will be able to identify the
cause of the problem. If appropriate, your installer will contact us.
- Under no circumstances should “in warranty” work be undertaken without authorisation from the HRM
service department
- If you are unable to contact your installer please contact our service department. Quoting your boiler’s
serial number when phoning – this can be found on the cover of this manual.
3
Standard X-ternal & System X-ternal
Handbook
Householder Information
IMPORTANT!
Your boiler must be commissioned in order to:
- Validate your warranty
- Ensure the boiler has been installed correctly and avoid premature failure
- Set the boiler to its optimum efficiency. Operating conditions for the boiler will vary from site to site, your
commissioning engineer has specialised equipment to check the oil pressure and analyse the exhaust gases for
temperature, smoke and carbon dioxide content.
Your installer will organise the commissioning of your boiler. Should you experience any difficulty locating an
engineer, our service department may be able to provide you with details of an engineer in your area.
“Benchmark” Installation, Commissioning and Service Record Log Book
Please ensure that your installer has completed all sections of the log book (found at the back of this manual).
The log book will be required in the event of any warranty work. Ensure that the service record is completed.
Warranty
Your HRM boiler is under warranty for 2 years from the date of installation.
Warranty Conditions
- The boiler must be installed and commissioned in accordance with our handbook
- The boiler must not be repaired, modified or tampered with by any person not authorised by HRM
Extended Warranty
The “Benchmark” and warranty registration document at the end of this manual should be completed as
appropriate by your installer / engineer. This is your record that the boiler has been correctly installed in accordance
with our recommendations. Return the warranty registration document to HRM in order to qualify for a further 3 year
warranty of the heat exchanger – a total of 5 years.
Extended Warranty Conditions
- The boiler must be serviced annually and maintained in accordance with this handbook. The
“Benchmark” service log is located at the back of this manual
- This warranty is in addition to your statutory and other legal rights
After Sales Service
- If your boiler fails during the warranty period contact your installer, who will be able to identify the
cause of the problem. If appropriate, your installer will contact us.
- Under no circumstances should “in warranty” work be undertaken without authorisation from the HRM
service department
- If you are unable to contact your installer please contact our service department. Quoting your boiler’s
serial number when phoning – this can be found on the cover of this manual.
3
Standard X-ternal & System X-ternal
Handbook
1716
Contents Page
1
Standard Wallstar, System Wallstar &
Wallstar Combi Manual
Contents Page
1
Standard Wallstar, System Wallstar &
Wallstar Combi Manual
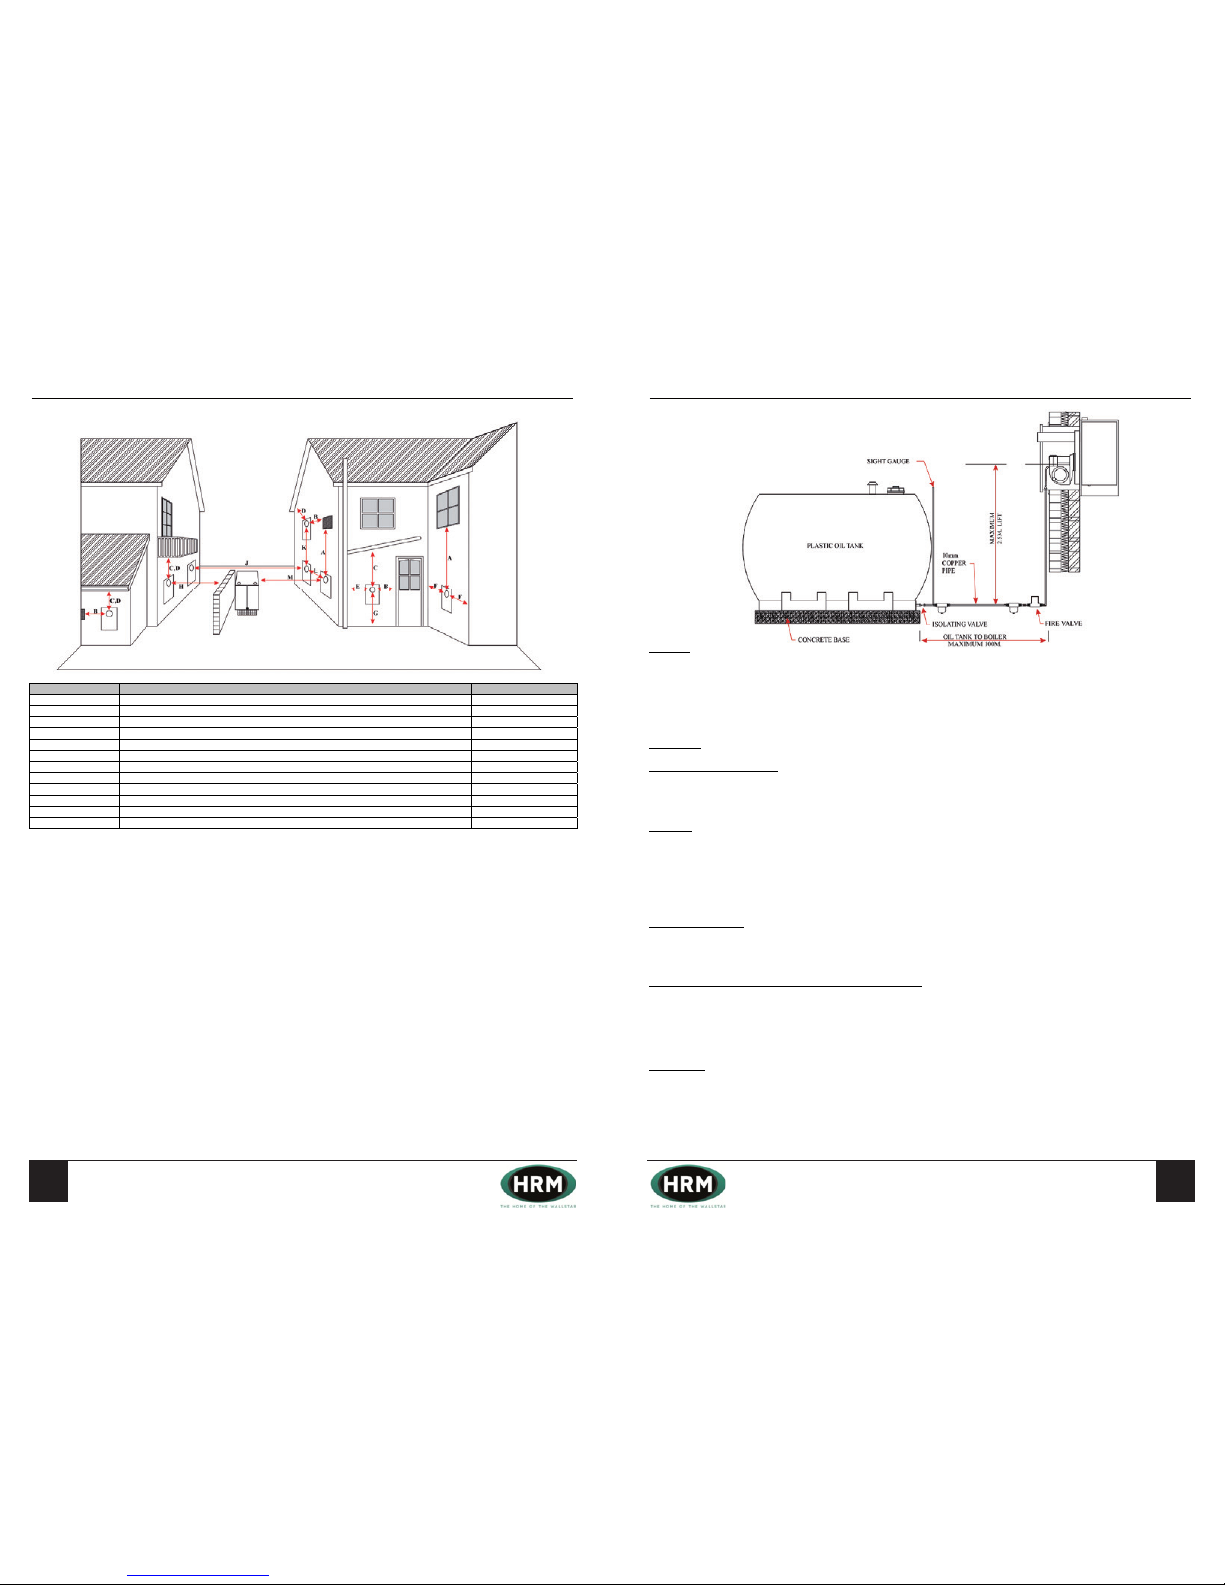
Flue Terminating Positions
Information taken from BS 5410-1:1997 and The Building Regulations: Approved Document J
Notes:
1 - Terminals should be positioned so as to avoid products of combustion accumulating in stagnant pockets around
the building or entering into buildings.
2 - Where a flue is terminated less than 600mm away from a projection above it and the projection consists of plastics
or has a combustible or painted surface, then a shield of at least 750mm should be fitted to protect these surfaces.
3 - If the lowest part of the terminal is less than 2m above the ground, balcony, flat roof or other place to which any
person has access, the terminal should be protected by a guard.
4 - Where a flue terminates near the boundry of an adjoining property, consideration should be given to possible noise
disturbance as some people are sensitive to even low noise levels.
5 - Boilers can produce sulphur deposits, occasionally these deposits are discharged out of the flue, this should be
taken into consideration when planning to site flues over patios etc.
Position Description Dimension
A Directly Below An Opening (Air Brick, Window, etc)
600mm
B Horizontally To An Opening
600mm
C Below a Gutter, Eaves or Balcony With Protection (Note 2)
75mm
D Below a Gutter, Eaves or Balcony Without Protection
600mm
E From Vertical Sanitary Pipework
300mm
F From An Internal or External Corner
300mm
G Above Ground or Balcony Level
300mm
H From Surface or Boundry Facing The Terminal
600mm
J From a Terminal Facing a Terminal
1200mm
K Vertical From a Terminal On The Same Wall
1500mm
L Horizontally From A Terminal On The Same Wall
750mm
M From An Oil Tank
1800mm
Fuel Supply System
Oil Tank
We recommend the use of plastic oil tanks, they require less maintenance than steel tanks and are longer lasting.
A bunded oil tank may be required on any environmentally sensitive site where spillage of oil could pollute rivers,
ponds, or any other water courses. Please refer to the appropriate requirements when locating oil tanks: “Control of
Pollution Regulations”, “Building Regulations” and OFTEC Technical Paper T19.
Oil Supply
Fuel Tank Below the Burner
The fuel pump can lift fuel to a height of 2.5m. A two pipe system or deaerator (Tiger Loop, 3K or similar) is not
required. For heights above 2.5m, please consult our technical department.
Pipework
Soldered fittings should not be used, as the joints will fail in the event of a fire. Flux deposits may damage the pump
and fuel may deteriorate the solder within the joint. Galvanised pipes and fittings must not be used. The aggressive
action of the fuel will erode the zinc and damage the fuel pump.
Keep the number of pipe joints to a minimum, form bends rather than using compression fittings.
Jointing Compounds
Jointing compounds should be used with care. Excessive amounts can cause blockages, and fragments may cause
failure of the fuel pump or the non-return valve. We recommend the use of a non-setting liquid pipe sealant.
Automatic Isolation of the Fuel Supply in the Event of a Fire
In accordance with Document J of the Building Regulations, we provide “a means of automatic isolation of
the fuel supply” in the form of a remote acting fire valve which must be fitted inline of the fuel supply in
accordance with BS 5410-1:1997. A clip is provided in the top of the wall duct for the fire valve capillary
bulb.
Oil Filtration
All boilers are supplied with flexible fuel lines with in line filter included. If the flexible fuel line needs replacing it must
be replaced by an item of this type (Part Number: BS099). A paper element filter is also supplied and must be fitted
adjacent to the boiler, replacement filters are available (Part Number: BS076). Where a steel oil tank is installed we
recommend a further paper element filter is also fitted adjacent to the oil tank.
In accordance with Document J of the Building Regulations, “a means of automatic isolation of
the fuel supply” in the form of a remote acting re valve must be tted inline of the fuel supply in
accordance with BS 5410-1:1997. A clip is provided in the top of the wall duct for the re valve capillary
bulb.
All boilers are supplied with exible fuel line. If the exible fuel line needs replacing it must be replaced by an item of this
type (Part Number: BS012). A paper element lter is also supplied and must be tted adjacent to the boiler, replacement
lters are available (Part Number: BS076). Where a steel oil tank is installed we recommend a further paper element
lter is also tted adjacent to the oil tank.
Page 11
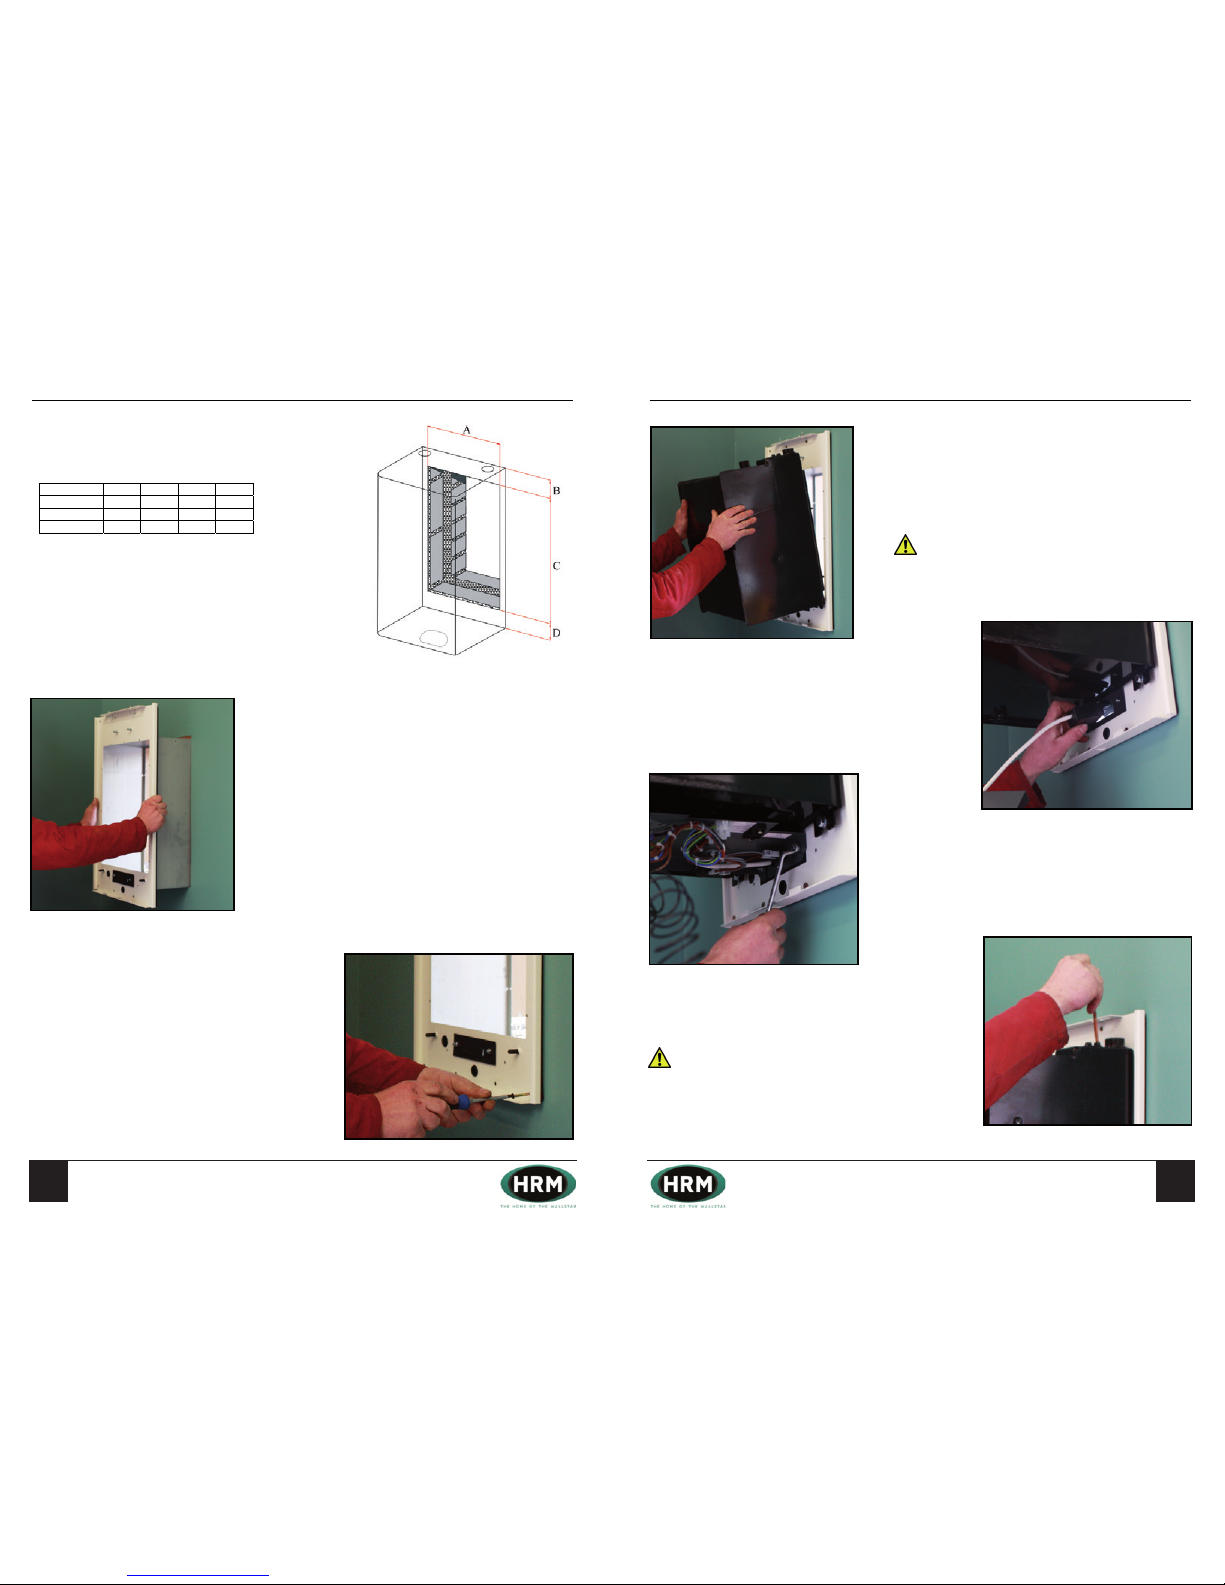
Householder Information
IMPORTANT!
Your boiler must be commissioned in order to:
- Validate your warranty
- Ensure the boiler has been installed correctly and avoid premature failure
- Set the boiler to its optimum efficiency. Operating conditions for the boiler will vary from site to site, your
commissioning engineer has specialised equipment to check the oil pressure and analyse the exhaust gases for
temperature, smoke and carbon dioxide content.
Your installer will organise the commissioning of your boiler. Should you experience any difficulty locating an
engineer, our service department may be able to provide you with details of an engineer in your area.
“Benchmark” Installation, Commissioning and Service Record Log Book
Please ensure that your installer has completed all sections of the log book (found at the back of this manual).
The log book will be required in the event of any warranty work. Ensure that the service record is completed.
Warranty
Your HRM boiler is under warranty for 2 years from the date of installation.
Warranty Conditions
- The boiler must be installed and commissioned in accordance with our handbook
- The boiler must not be repaired, modified or tampered with by any person not authorised by HRM
Extended Warranty
The “Benchmark” and warranty registration document at the end of this manual should be completed as
appropriate by your installer / engineer. This is your record that the boiler has been correctly installed in accordance
with our recommendations. Return the warranty registration document to HRM in order to qualify for a further 3 year
warranty of the heat exchanger – a total of 5 years.
Extended Warranty Conditions
- The boiler must be serviced annually and maintained in accordance with this handbook. The
“Benchmark” service log is located at the back of this manual
- This warranty is in addition to your statutory and other legal rights
After Sales Service
- If your boiler fails during the warranty period contact your installer, who will be able to identify the
cause of the problem. If appropriate, your installer will contact us.
- Under no circumstances should “in warranty” work be undertaken without authorisation from the HRM
service department
- If you are unable to contact your installer please contact our service department. Quoting your boiler’s
serial number when phoning – this can be found on the cover of this manual.
3
Standard X-ternal & System X-ternal
Handbook
Householder Information
IMPORTANT!
Your boiler must be commissioned in order to:
- Validate your warranty
- Ensure the boiler has been installed correctly and avoid premature failure
- Set the boiler to its optimum efficiency. Operating conditions for the boiler will vary from site to site, your
commissioning engineer has specialised equipment to check the oil pressure and analyse the exhaust gases for
temperature, smoke and carbon dioxide content.
Your installer will organise the commissioning of your boiler. Should you experience any difficulty locating an
engineer, our service department may be able to provide you with details of an engineer in your area.
“Benchmark” Installation, Commissioning and Service Record Log Book
Please ensure that your installer has completed all sections of the log book (found at the back of this manual).
The log book will be required in the event of any warranty work. Ensure that the service record is completed.
Warranty
Your HRM boiler is under warranty for 2 years from the date of installation.
Warranty Conditions
- The boiler must be installed and commissioned in accordance with our handbook
- The boiler must not be repaired, modified or tampered with by any person not authorised by HRM
Extended Warranty
The “Benchmark” and warranty registration document at the end of this manual should be completed as
appropriate by your installer / engineer. This is your record that the boiler has been correctly installed in accordance
with our recommendations. Return the warranty registration document to HRM in order to qualify for a further 3 year
warranty of the heat exchanger – a total of 5 years.
Extended Warranty Conditions
- The boiler must be serviced annually and maintained in accordance with this handbook. The
“Benchmark” service log is located at the back of this manual
- This warranty is in addition to your statutory and other legal rights
After Sales Service
- If your boiler fails during the warranty period contact your installer, who will be able to identify the
cause of the problem. If appropriate, your installer will contact us.
- Under no circumstances should “in warranty” work be undertaken without authorisation from the HRM
service department
- If you are unable to contact your installer please contact our service department. Quoting your boiler’s
serial number when phoning – this can be found on the cover of this manual.
3
Standard X-ternal & System X-ternal
Handbook
1918
Contents Page
1
Standard Wallstar, System Wallstar &
Wallstar Combi Manual
Contents Page
1
Standard Wallstar, System Wallstar &
Wallstar Combi Manual
Installation Procedure – Standard Wallstar
Unpack the boiler, remove the burner and silencer box from
the heat exchanger.
1. Cut a Hole in the Wall
Hole sizes stated allow for a 10mm clearance around the
wall duct.
Note: For 12/14 models, please allow 120mm clearance
above the casing for removal of the thermostat phials.
For 15/19 and 20/24 models, please allow 75mm clearance
above the casing for access to the case retaining screws.
2. Wall Plate and Duct Assembly
Place the Wall Plate and attached Wall Duct inner through the
opening you have created in the wall.
3. Wall Plate and Duct Assembly (Cont.)
Drill through the holes in the wall plate and wall duct, and
secure the assembly to the interior wall using the eight wall
plugs and screws provided.
Note: Hole positions vary according to model.
If the wall is uneven avoid distortion of the wall plate. Place
packing behind the wall plate, ensure the rubber foam on the
rear of the wall plate forms an air tight seal against the wall.
Use silicone sealant to fill any gaps if necessary.
Dimension A B C D
12/14C 350 40 520 40
15/19C 380 100 560 40
20/24C 410 110 600 40
Installation Procedure Continued – Standard Wallstar
4. Heat Exchanger
Lift the heat exchanger into position and secure it with the nuts
and washers provided
Fit 1” BSP pipe fittings to the flow and return sockets and a drain
cock to the ½” socket.
IMPORTANT: The heat exchanger is heavy, two people
will be required to lift it into position.
.
5. Burner Lead
Pass the burner lead which is attached to the control panel
through the switch gasket located towards the bottom of the
Wall Plate.
6. Control Panel
Fit the control panel onto the wall plate with the nuts provided.
7. Thermostats
Place the thermostat phials into their pockets located at the
top of the heat exchanger.
IMPORTANT: Ensure the thermostat capillary tubes
are kept clear of any possible electrical contact on the
control panel.
Page 12
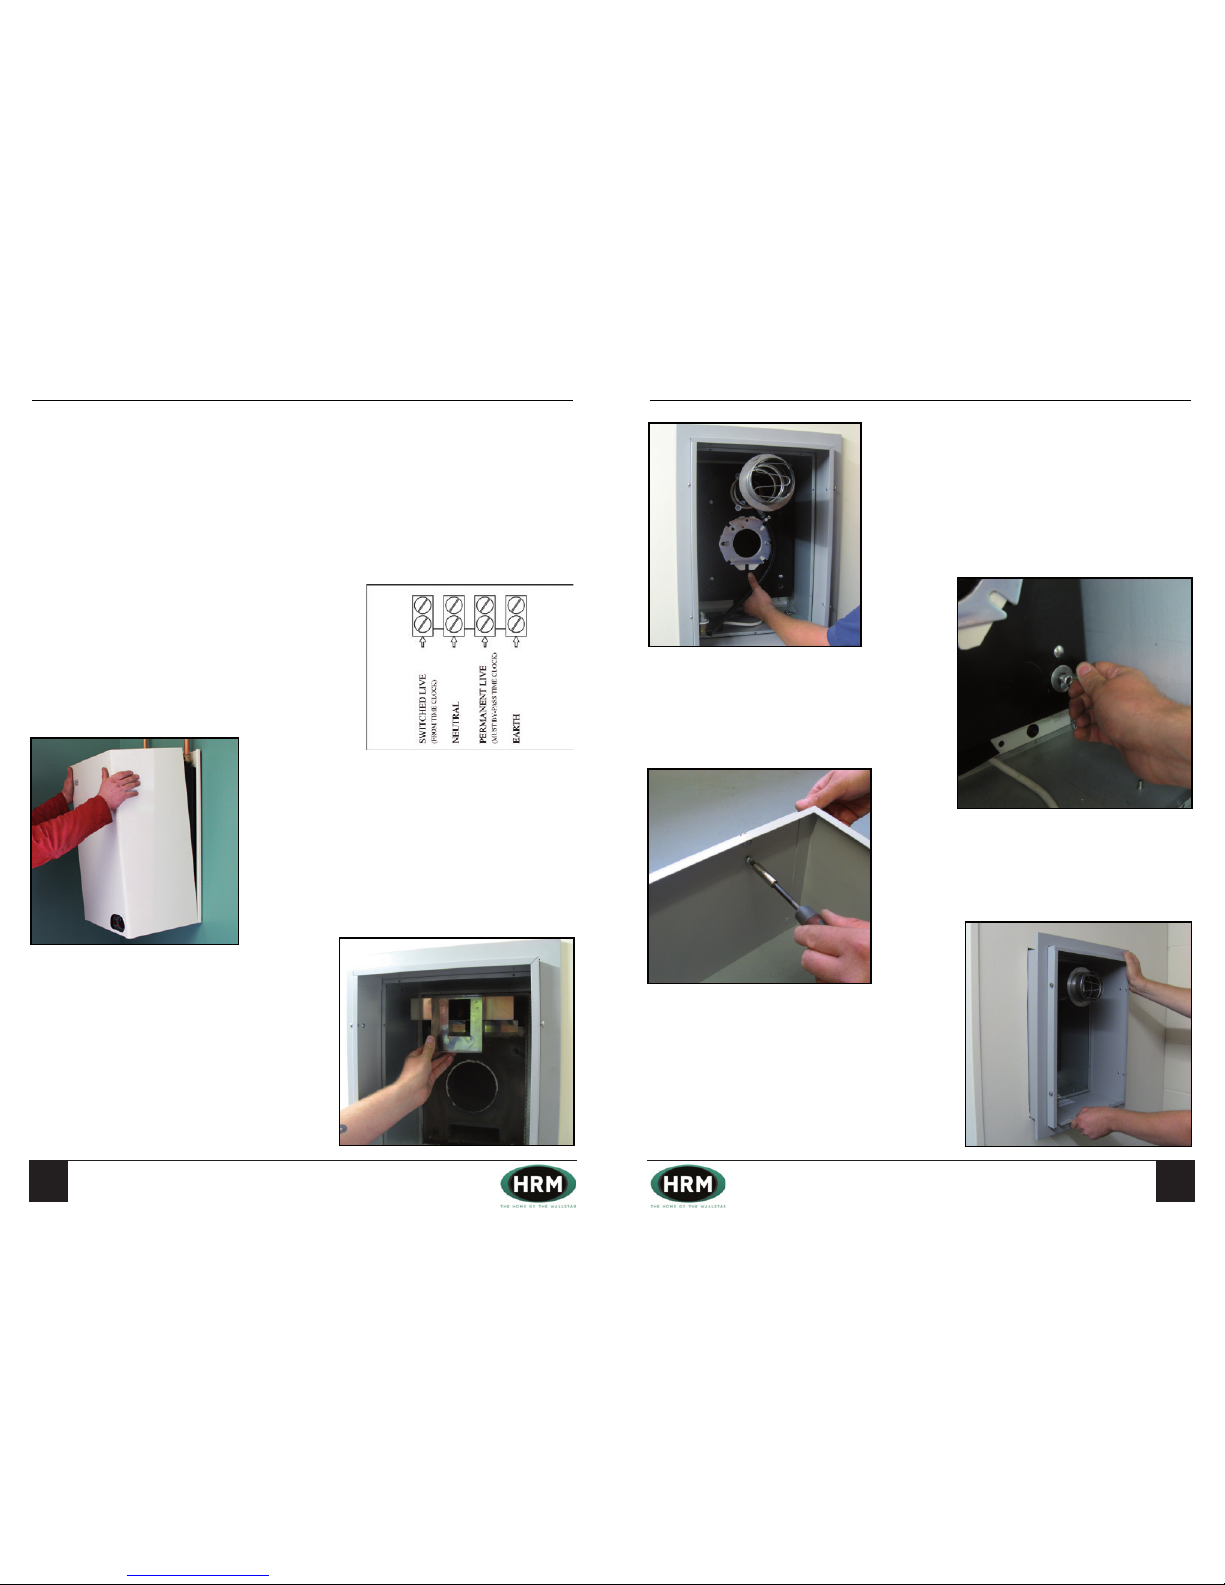
Householder Information
IMPORTANT!
Your boiler must be commissioned in order to:
- Validate your warranty
- Ensure the boiler has been installed correctly and avoid premature failure
- Set the boiler to its optimum efficiency. Operating conditions for the boiler will vary from site to site, your
commissioning engineer has specialised equipment to check the oil pressure and analyse the exhaust gases for
temperature, smoke and carbon dioxide content.
Your installer will organise the commissioning of your boiler. Should you experience any difficulty locating an
engineer, our service department may be able to provide you with details of an engineer in your area.
“Benchmark” Installation, Commissioning and Service Record Log Book
Please ensure that your installer has completed all sections of the log book (found at the back of this manual).
The log book will be required in the event of any warranty work. Ensure that the service record is completed.
Warranty
Your HRM boiler is under warranty for 2 years from the date of installation.
Warranty Conditions
- The boiler must be installed and commissioned in accordance with our handbook
- The boiler must not be repaired, modified or tampered with by any person not authorised by HRM
Extended Warranty
The “Benchmark” and warranty registration document at the end of this manual should be completed as
appropriate by your installer / engineer. This is your record that the boiler has been correctly installed in accordance
with our recommendations. Return the warranty registration document to HRM in order to qualify for a further 3 year
warranty of the heat exchanger – a total of 5 years.
Extended Warranty Conditions
- The boiler must be serviced annually and maintained in accordance with this handbook. The
“Benchmark” service log is located at the back of this manual
- This warranty is in addition to your statutory and other legal rights
After Sales Service
- If your boiler fails during the warranty period contact your installer, who will be able to identify the
cause of the problem. If appropriate, your installer will contact us.
- Under no circumstances should “in warranty” work be undertaken without authorisation from the HRM
service department
- If you are unable to contact your installer please contact our service department. Quoting your boiler’s
serial number when phoning – this can be found on the cover of this manual.
3
Standard X-ternal & System X-ternal
Handbook
Householder Information
IMPORTANT!
Your boiler must be commissioned in order to:
- Validate your warranty
- Ensure the boiler has been installed correctly and avoid premature failure
- Set the boiler to its optimum efficiency. Operating conditions for the boiler will vary from site to site, your
commissioning engineer has specialised equipment to check the oil pressure and analyse the exhaust gases for
temperature, smoke and carbon dioxide content.
Your installer will organise the commissioning of your boiler. Should you experience any difficulty locating an
engineer, our service department may be able to provide you with details of an engineer in your area.
“Benchmark” Installation, Commissioning and Service Record Log Book
Please ensure that your installer has completed all sections of the log book (found at the back of this manual).
The log book will be required in the event of any warranty work. Ensure that the service record is completed.
Warranty
Your HRM boiler is under warranty for 2 years from the date of installation.
Warranty Conditions
- The boiler must be installed and commissioned in accordance with our handbook
- The boiler must not be repaired, modified or tampered with by any person not authorised by HRM
Extended Warranty
The “Benchmark” and warranty registration document at the end of this manual should be completed as
appropriate by your installer / engineer. This is your record that the boiler has been correctly installed in accordance
with our recommendations. Return the warranty registration document to HRM in order to qualify for a further 3 year
warranty of the heat exchanger – a total of 5 years.
Extended Warranty Conditions
- The boiler must be serviced annually and maintained in accordance with this handbook. The
“Benchmark” service log is located at the back of this manual
- This warranty is in addition to your statutory and other legal rights
After Sales Service
- If your boiler fails during the warranty period contact your installer, who will be able to identify the
cause of the problem. If appropriate, your installer will contact us.
- Under no circumstances should “in warranty” work be undertaken without authorisation from the HRM
service department
- If you are unable to contact your installer please contact our service department. Quoting your boiler’s
serial number when phoning – this can be found on the cover of this manual.
3
Standard X-ternal & System X-ternal
Handbook
2120
Contents Page
1
Standard Wallstar, System Wallstar &
Wallstar Combi Manual
Contents Page
1
Standard Wallstar, System Wallstar &
Wallstar Combi Manual
Installation Procedure Continued – Standard Wallstar
8. Electrical Connections
A 20mm hole is provided in the wall plate for concealed cable
entry. Alternatively use plastic ducting to any corner of the wall
plate.
The earth bonding cable can be passed through an 8mm hole,
adjacent to the test switch, and secured to the 5mm stud
provided in the wall duct.
Note: The power supply to the boiler should be fitted with a
5 amp fuse. The electrical supply to the boiler should be
made via a switched and fused spur located near the boiler,
fitted with a 5 amp fuse.
A frost thermostat is fitted as standard to protect the boiler.
Where appropriate, an additional frost thermostat may be
required to protect the rest of the heating system.
9. Fit the White Casing
Lift the case into position, ensure the tabs and slots are aligned,
and then tighten the retaining screws located on the top of the
wall plate/white casing.
10. Top Baffle
Firstly place the two separate top baffle boxes into the flue
chamber and then slide the single piece of the baffle on top
of these.
Installation Procedure Continued – Standard Wallstar
11
. Silencer Box
Slide the silencer box over the 4 mounting pins located on the
heat exchanger.
12. Silencer Box (Cont.)
Secure the silencer box to heat exchanger by tightening the
4 supplied wing nuts and penny washers down onto the
mounting pins.
13. Trim
Take the wall duct outer and attach the trim using the 4 self
drilling screws from the fixing kit.
14. Wall Duct Outer
Slide the wall duct outer with the now attached trim over the
wall duct inner as shown.
Page 13
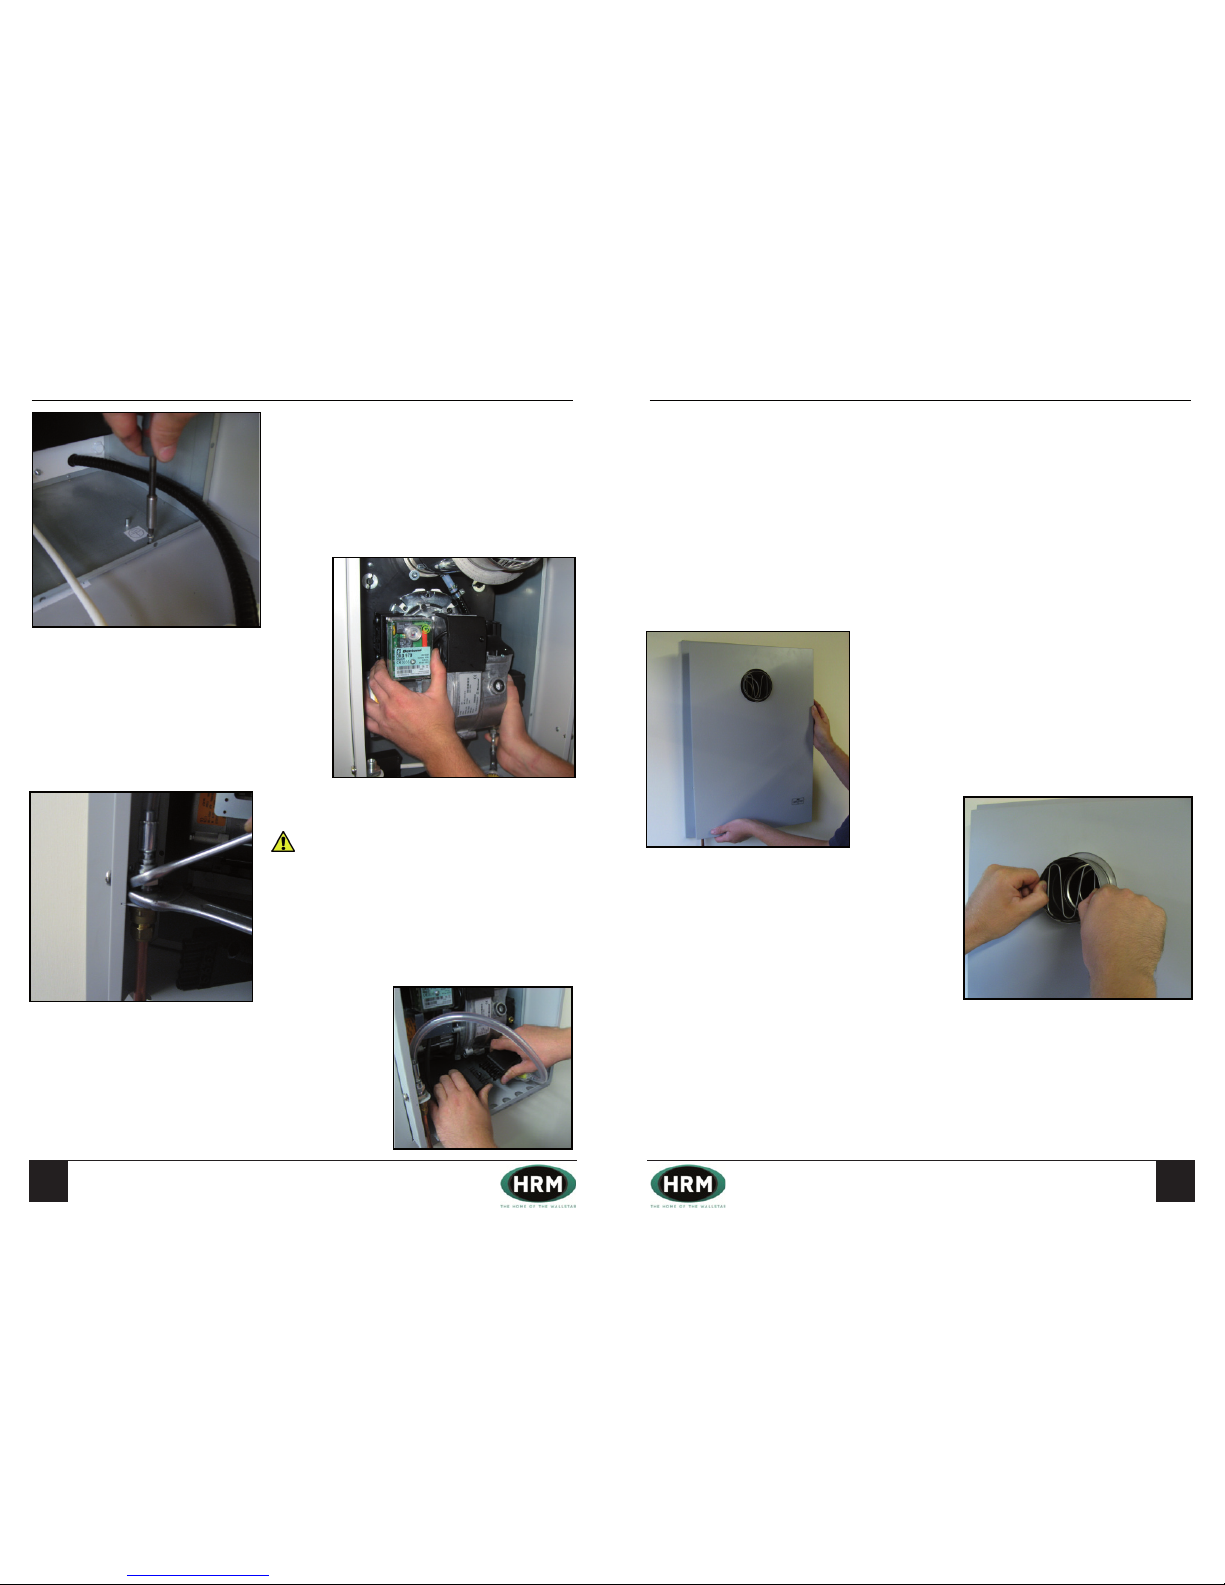
Householder Information
IMPORTANT!
Your boiler must be commissioned in order to:
- Validate your warranty
- Ensure the boiler has been installed correctly and avoid premature failure
- Set the boiler to its optimum efficiency. Operating conditions for the boiler will vary from site to site, your
commissioning engineer has specialised equipment to check the oil pressure and analyse the exhaust gases for
temperature, smoke and carbon dioxide content.
Your installer will organise the commissioning of your boiler. Should you experience any difficulty locating an
engineer, our service department may be able to provide you with details of an engineer in your area.
“Benchmark” Installation, Commissioning and Service Record Log Book
Please ensure that your installer has completed all sections of the log book (found at the back of this manual).
The log book will be required in the event of any warranty work. Ensure that the service record is completed.
Warranty
Your HRM boiler is under warranty for 2 years from the date of installation.
Warranty Conditions
- The boiler must be installed and commissioned in accordance with our handbook
- The boiler must not be repaired, modified or tampered with by any person not authorised by HRM
Extended Warranty
The “Benchmark” and warranty registration document at the end of this manual should be completed as
appropriate by your installer / engineer. This is your record that the boiler has been correctly installed in accordance
with our recommendations. Return the warranty registration document to HRM in order to qualify for a further 3 year
warranty of the heat exchanger – a total of 5 years.
Extended Warranty Conditions
- The boiler must be serviced annually and maintained in accordance with this handbook. The
“Benchmark” service log is located at the back of this manual
- This warranty is in addition to your statutory and other legal rights
After Sales Service
- If your boiler fails during the warranty period contact your installer, who will be able to identify the
cause of the problem. If appropriate, your installer will contact us.
- Under no circumstances should “in warranty” work be undertaken without authorisation from the HRM
service department
- If you are unable to contact your installer please contact our service department. Quoting your boiler’s
serial number when phoning – this can be found on the cover of this manual.
3
Standard X-ternal & System X-ternal
Handbook
Householder Information
IMPORTANT!
Your boiler must be commissioned in order to:
- Validate your warranty
- Ensure the boiler has been installed correctly and avoid premature failure
- Set the boiler to its optimum efficiency. Operating conditions for the boiler will vary from site to site, your
commissioning engineer has specialised equipment to check the oil pressure and analyse the exhaust gases for
temperature, smoke and carbon dioxide content.
Your installer will organise the commissioning of your boiler. Should you experience any difficulty locating an
engineer, our service department may be able to provide you with details of an engineer in your area.
“Benchmark” Installation, Commissioning and Service Record Log Book
Please ensure that your installer has completed all sections of the log book (found at the back of this manual).
The log book will be required in the event of any warranty work. Ensure that the service record is completed.
Warranty
Your HRM boiler is under warranty for 2 years from the date of installation.
Warranty Conditions
- The boiler must be installed and commissioned in accordance with our handbook
- The boiler must not be repaired, modified or tampered with by any person not authorised by HRM
Extended Warranty
The “Benchmark” and warranty registration document at the end of this manual should be completed as
appropriate by your installer / engineer. This is your record that the boiler has been correctly installed in accordance
with our recommendations. Return the warranty registration document to HRM in order to qualify for a further 3 year
warranty of the heat exchanger – a total of 5 years.
Extended Warranty Conditions
- The boiler must be serviced annually and maintained in accordance with this handbook. The
“Benchmark” service log is located at the back of this manual
- This warranty is in addition to your statutory and other legal rights
After Sales Service
- If your boiler fails during the warranty period contact your installer, who will be able to identify the
cause of the problem. If appropriate, your installer will contact us.
- Under no circumstances should “in warranty” work be undertaken without authorisation from the HRM
service department
- If you are unable to contact your installer please contact our service department. Quoting your boiler’s
serial number when phoning – this can be found on the cover of this manual.
3
Standard X-ternal & System X-ternal
Handbook
2322
Contents Page
1
Standard Wallstar, System Wallstar &
Wallstar Combi Manual
Contents Page
1
Standard Wallstar, System Wallstar &
Wallstar Combi Manual
Installation Procedure Continued – Standard Wallstar
15. Wall Duct Outer (Cont.)
Join the wall duct outer and wall duct inner together using the 4
supplied self drilling screws.
.
16. Burner
Fit the burner to the mounting flange on the silencer box.
17. Connect The Fuel Line
Connect the fuel line from the burner, to the oil supply.
IMPORTANT: The Wallstar comes supplied with a remote
acting fire valve and has a non-return valve attached to the
burner bump. No additional non return valve must be used.
Should the boiler be used in conjunction with a purpose designed
underground tank, the foot valve found inside such tanks must be
removed or at least rendered ineffective. In addition to the sealed
fuel filter found in the boilers flexible fuel line, a replaceable
element fuel filter must be fitted near the tank.
Note: Please refer to page 17 of this manual for oil tank
installation recommendations.
18. Burner Lead
Connect the 5 pin plug and socket.
Installation Procedure Continued – Standard Wallstar
19. Priming The Burner
Ensure both power and fuel supplies to the boiler are switched
on. Press the reset button, the burner will start its firing
sequence. To release air from the oil line, slacken the vent plug
during this sequence. If ignition fails the burner will go to lock
out, wait 60 seconds and repeat the procedure.
20. Test The Fuel Supply
With the burner running, check the fuel supply for air leaks. It is
normal for a static air bubble to remain at the highest point of the oil
line, but a continuous stream of bubbles through the oil line
indicates that air is being drawn in. This must be cured before
proceeding.
21. Access Door
Fit the access door onto the wall duct, secure it in place by
tightening the 2 screws located on both sides.
22. Flue Positioning
Pull the end of the flue out until the flange on it sits flush
against the back of the access door.
.
22. Commissioning the Boiler
Installation is complete. The boiler must now be commissioned
by a competent engineer. The “Benchmark” log found at the
back of this manual should be completed and the warranty
documentation returned to HRM Boilers Ltd.
The Wallstar comes supplied with a nonreturn valve attached to the burner pump. No additional non
return valve must be used. Should the boiler be used in
conjunction with a purpose designed underground tank, the
foot valve found inside such tanks must be removed or at least
rendered ineffective. In addition to the sealed fuel lter found in
the boilers exible fuel line, a replaceable element fuel lter must
be tted near the tank.
Page 14
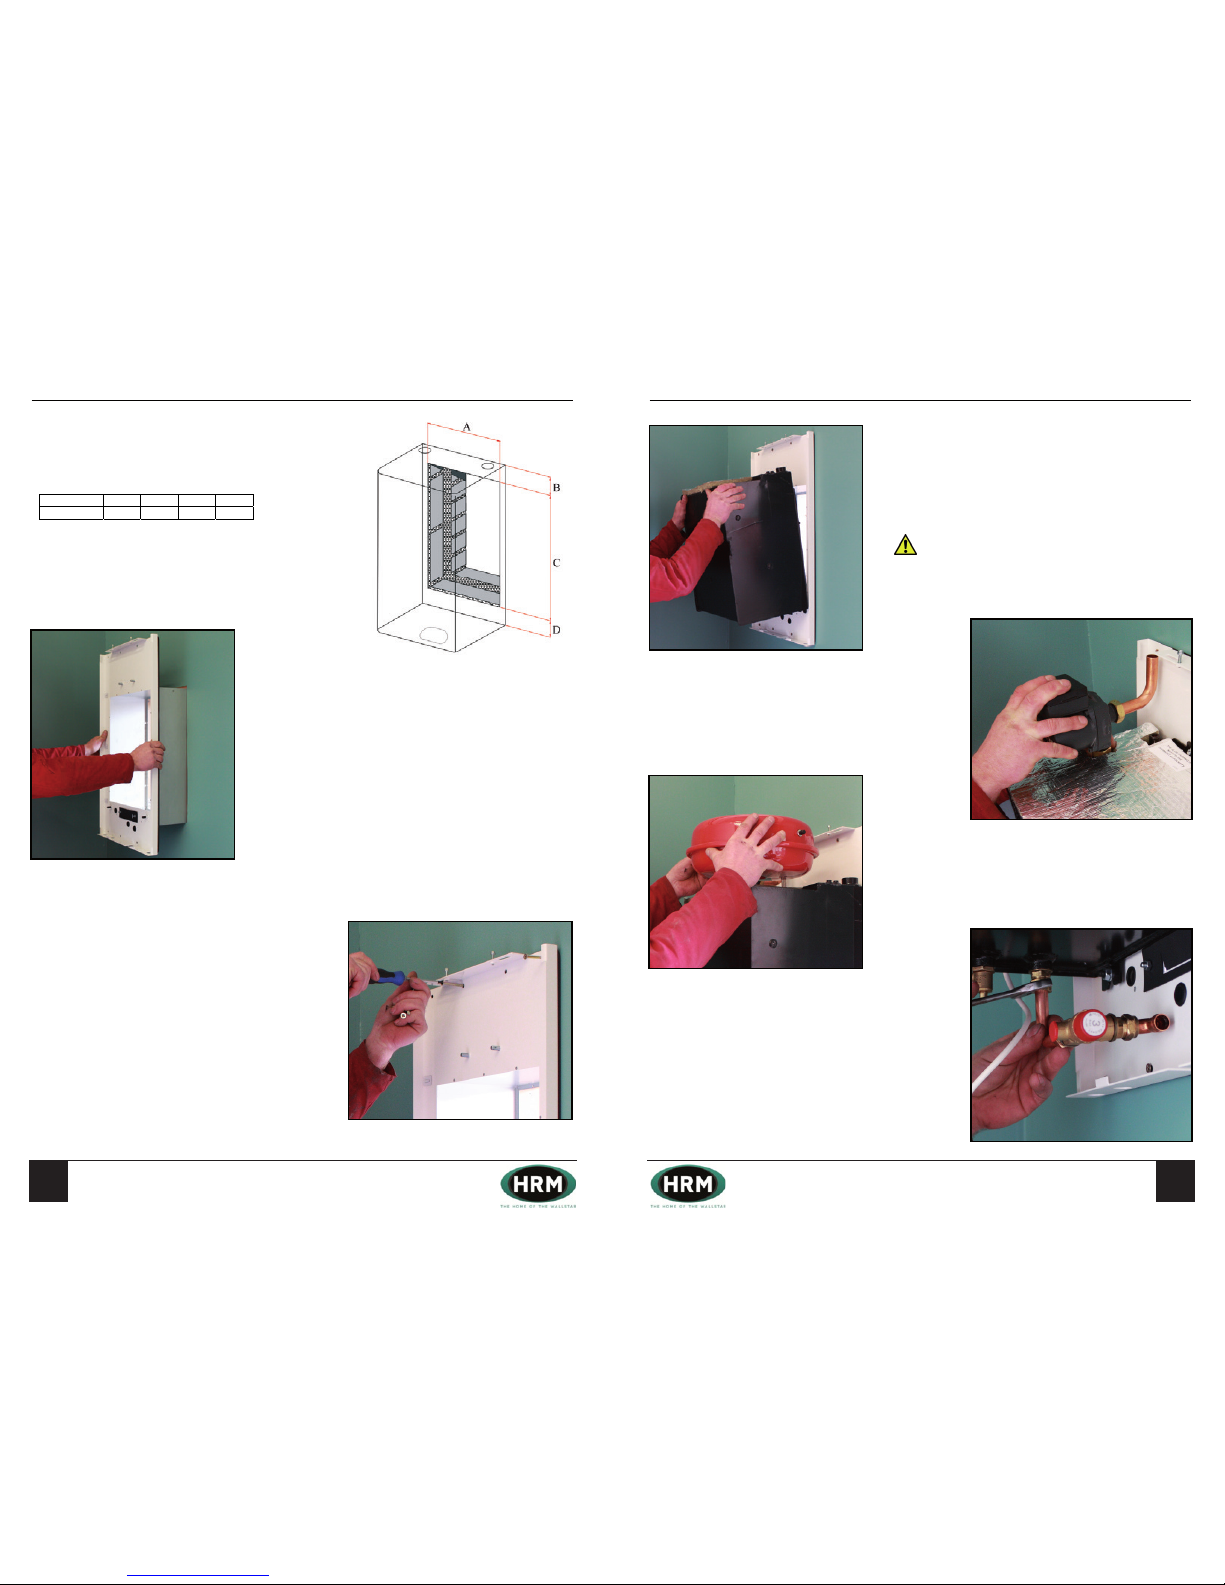
Householder Information
IMPORTANT!
Your boiler must be commissioned in order to:
- Validate your warranty
- Ensure the boiler has been installed correctly and avoid premature failure
- Set the boiler to its optimum efficiency. Operating conditions for the boiler will vary from site to site, your
commissioning engineer has specialised equipment to check the oil pressure and analyse the exhaust gases for
temperature, smoke and carbon dioxide content.
Your installer will organise the commissioning of your boiler. Should you experience any difficulty locating an
engineer, our service department may be able to provide you with details of an engineer in your area.
“Benchmark” Installation, Commissioning and Service Record Log Book
Please ensure that your installer has completed all sections of the log book (found at the back of this manual).
The log book will be required in the event of any warranty work. Ensure that the service record is completed.
Warranty
Your HRM boiler is under warranty for 2 years from the date of installation.
Warranty Conditions
- The boiler must be installed and commissioned in accordance with our handbook
- The boiler must not be repaired, modified or tampered with by any person not authorised by HRM
Extended Warranty
The “Benchmark” and warranty registration document at the end of this manual should be completed as
appropriate by your installer / engineer. This is your record that the boiler has been correctly installed in accordance
with our recommendations. Return the warranty registration document to HRM in order to qualify for a further 3 year
warranty of the heat exchanger – a total of 5 years.
Extended Warranty Conditions
- The boiler must be serviced annually and maintained in accordance with this handbook. The
“Benchmark” service log is located at the back of this manual
- This warranty is in addition to your statutory and other legal rights
After Sales Service
- If your boiler fails during the warranty period contact your installer, who will be able to identify the
cause of the problem. If appropriate, your installer will contact us.
- Under no circumstances should “in warranty” work be undertaken without authorisation from the HRM
service department
- If you are unable to contact your installer please contact our service department. Quoting your boiler’s
serial number when phoning – this can be found on the cover of this manual.
3
Standard X-ternal & System X-ternal
Handbook
Householder Information
IMPORTANT!
Your boiler must be commissioned in order to:
- Validate your warranty
- Ensure the boiler has been installed correctly and avoid premature failure
- Set the boiler to its optimum efficiency. Operating conditions for the boiler will vary from site to site, your
commissioning engineer has specialised equipment to check the oil pressure and analyse the exhaust gases for
temperature, smoke and carbon dioxide content.
Your installer will organise the commissioning of your boiler. Should you experience any difficulty locating an
engineer, our service department may be able to provide you with details of an engineer in your area.
“Benchmark” Installation, Commissioning and Service Record Log Book
Please ensure that your installer has completed all sections of the log book (found at the back of this manual).
The log book will be required in the event of any warranty work. Ensure that the service record is completed.
Warranty
Your HRM boiler is under warranty for 2 years from the date of installation.
Warranty Conditions
- The boiler must be installed and commissioned in accordance with our handbook
- The boiler must not be repaired, modified or tampered with by any person not authorised by HRM
Extended Warranty
The “Benchmark” and warranty registration document at the end of this manual should be completed as
appropriate by your installer / engineer. This is your record that the boiler has been correctly installed in accordance
with our recommendations. Return the warranty registration document to HRM in order to qualify for a further 3 year
warranty of the heat exchanger – a total of 5 years.
Extended Warranty Conditions
- The boiler must be serviced annually and maintained in accordance with this handbook. The
“Benchmark” service log is located at the back of this manual
- This warranty is in addition to your statutory and other legal rights
After Sales Service
- If your boiler fails during the warranty period contact your installer, who will be able to identify the
cause of the problem. If appropriate, your installer will contact us.
- Under no circumstances should “in warranty” work be undertaken without authorisation from the HRM
service department
- If you are unable to contact your installer please contact our service department. Quoting your boiler’s
serial number when phoning – this can be found on the cover of this manual.
3
Standard X-ternal & System X-ternal
Handbook
2524
Contents Page
1
Standard Wallstar, System Wallstar &
Wallstar Combi Manual
Contents Page
1
Standard Wallstar, System Wallstar &
Wallstar Combi Manual
Installation Procedure – System Wallstar
Unpack the boiler, remove the burner and silencer box from
the heat exchanger.
1. Cut a Hole in the Wall
Hole sizes stated allow for a 10mm clearance around the
wall duct.
Note: Please allow 75mm clearance above the casing for
access to the case retaining screws.
2. Wall Plate and Duct Assembly
Place the Wall Plate and attached Wall Duct inner through the
opening you have created in the wall.
3. Wall Plate and Duct Assembly (Cont.)
Drill through the holes in the wall plate and wall duct, and
secure the assembly to the interior wall using the eight wall
plugs and screws provided.
If the wall is uneven avoid distortion of the wall plate. Place
packing behind the wall plate, ensure the rubber foam on the
rear of the wall plate forms an air tight seal against the wall.
Use silicone sealant to fill any gaps if necessary.
Dimension A B C D
15/19C 380 180 560 85
Installation Procedure Continued – System Wallstar
4. Heat Exchanger
Lift the heat exchanger into position and secure it with the nuts
and washers provided.
Fit 1” BSP pipe fittings to the flow socket and a drain cock to the
½” socket.
IMPORTANT: The heat exchanger is heavy, two people
will be required to lift it into position.
.
5. Attach The Pump
Attach the circulating pump to the heat exchanger and tighten,
ensuring that the supplied washers are used between the
connections.
6. Expansion Vessel
Place the expansion vessel on top of the heat exchanger and
connect the hose to the expansion vessel nipple on the heat
exchanger.
7. Pressure Relief Valve
Connect the pressure relief valve to the underside of the
heat exchanger as shown.
Page 15
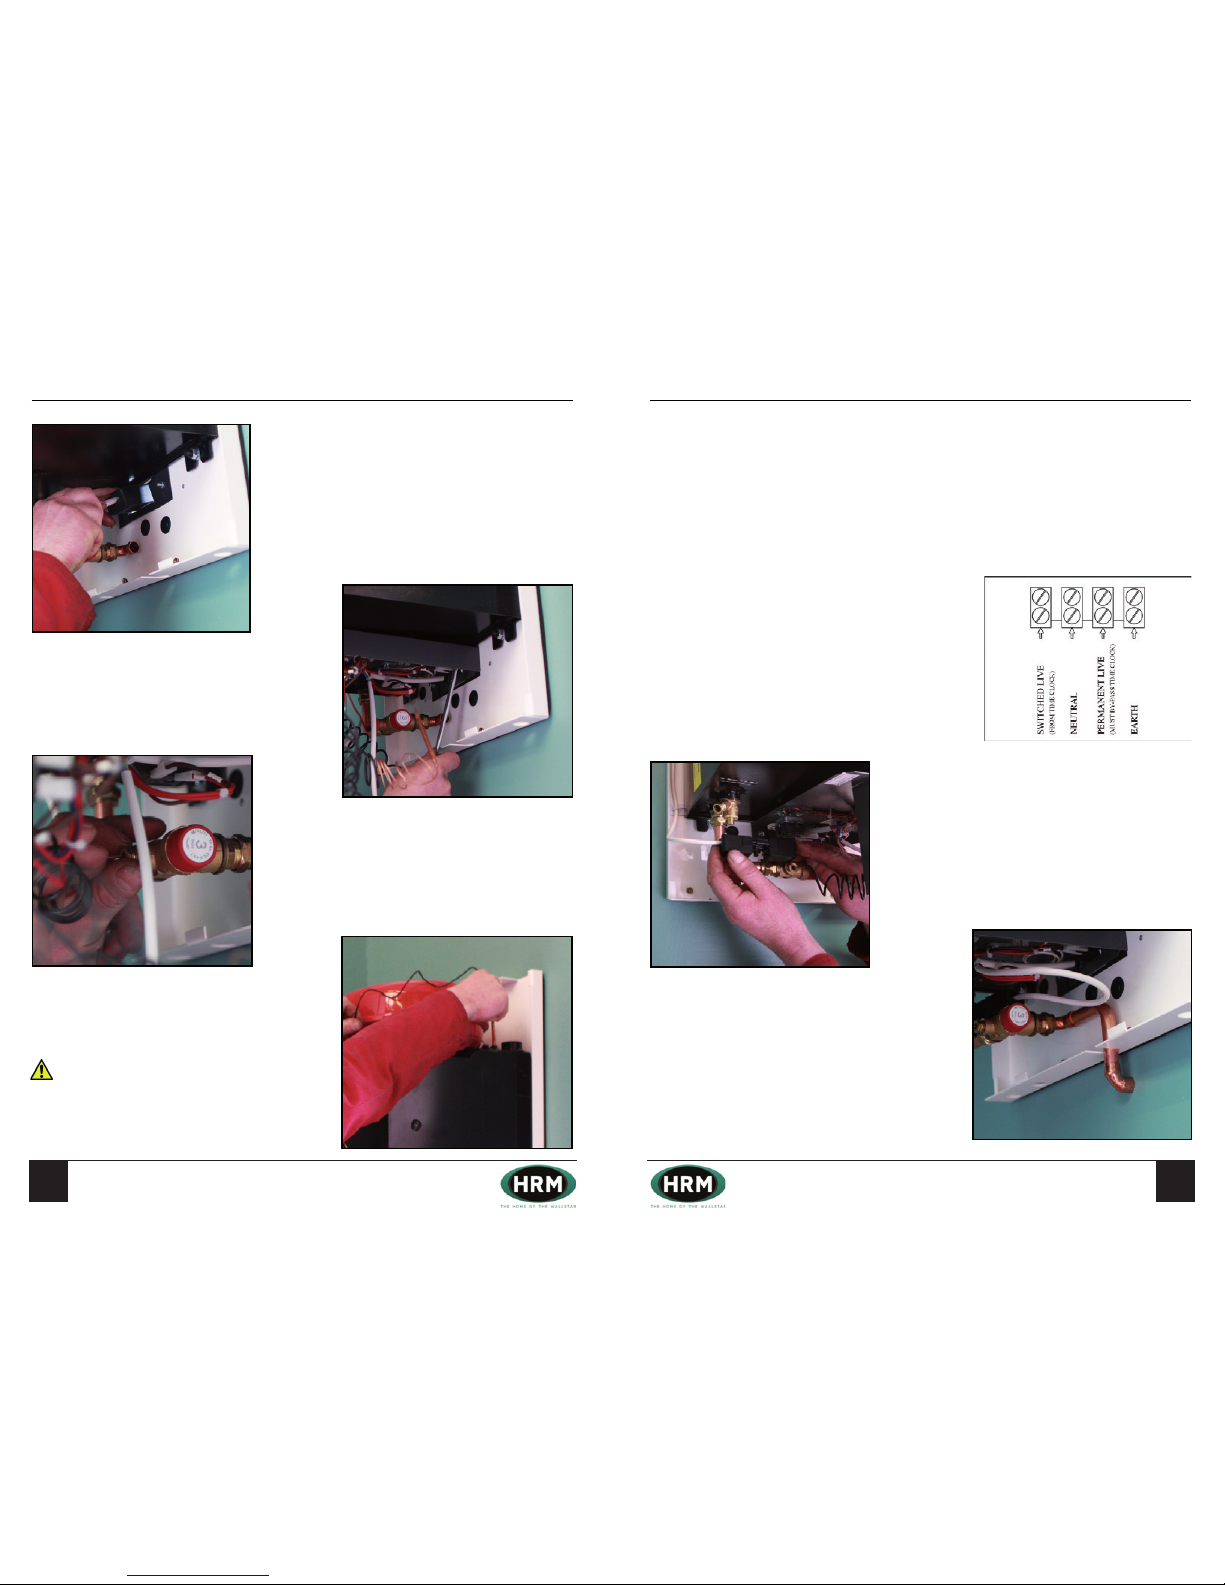
Householder Information
IMPORTANT!
Your boiler must be commissioned in order to:
- Validate your warranty
- Ensure the boiler has been installed correctly and avoid premature failure
- Set the boiler to its optimum efficiency. Operating conditions for the boiler will vary from site to site, your
commissioning engineer has specialised equipment to check the oil pressure and analyse the exhaust gases for
temperature, smoke and carbon dioxide content.
Your installer will organise the commissioning of your boiler. Should you experience any difficulty locating an
engineer, our service department may be able to provide you with details of an engineer in your area.
“Benchmark” Installation, Commissioning and Service Record Log Book
Please ensure that your installer has completed all sections of the log book (found at the back of this manual).
The log book will be required in the event of any warranty work. Ensure that the service record is completed.
Warranty
Your HRM boiler is under warranty for 2 years from the date of installation.
Warranty Conditions
- The boiler must be installed and commissioned in accordance with our handbook
- The boiler must not be repaired, modified or tampered with by any person not authorised by HRM
Extended Warranty
The “Benchmark” and warranty registration document at the end of this manual should be completed as
appropriate by your installer / engineer. This is your record that the boiler has been correctly installed in accordance
with our recommendations. Return the warranty registration document to HRM in order to qualify for a further 3 year
warranty of the heat exchanger – a total of 5 years.
Extended Warranty Conditions
- The boiler must be serviced annually and maintained in accordance with this handbook. The
“Benchmark” service log is located at the back of this manual
- This warranty is in addition to your statutory and other legal rights
After Sales Service
- If your boiler fails during the warranty period contact your installer, who will be able to identify the
cause of the problem. If appropriate, your installer will contact us.
- Under no circumstances should “in warranty” work be undertaken without authorisation from the HRM
service department
- If you are unable to contact your installer please contact our service department. Quoting your boiler’s
serial number when phoning – this can be found on the cover of this manual.
3
Standard X-ternal & System X-ternal
Handbook
Householder Information
IMPORTANT!
Your boiler must be commissioned in order to:
- Validate your warranty
- Ensure the boiler has been installed correctly and avoid premature failure
- Set the boiler to its optimum efficiency. Operating conditions for the boiler will vary from site to site, your
commissioning engineer has specialised equipment to check the oil pressure and analyse the exhaust gases for
temperature, smoke and carbon dioxide content.
Your installer will organise the commissioning of your boiler. Should you experience any difficulty locating an
engineer, our service department may be able to provide you with details of an engineer in your area.
“Benchmark” Installation, Commissioning and Service Record Log Book
Please ensure that your installer has completed all sections of the log book (found at the back of this manual).
The log book will be required in the event of any warranty work. Ensure that the service record is completed.
Warranty
Your HRM boiler is under warranty for 2 years from the date of installation.
Warranty Conditions
- The boiler must be installed and commissioned in accordance with our handbook
- The boiler must not be repaired, modified or tampered with by any person not authorised by HRM
Extended Warranty
The “Benchmark” and warranty registration document at the end of this manual should be completed as
appropriate by your installer / engineer. This is your record that the boiler has been correctly installed in accordance
with our recommendations. Return the warranty registration document to HRM in order to qualify for a further 3 year
warranty of the heat exchanger – a total of 5 years.
Extended Warranty Conditions
- The boiler must be serviced annually and maintained in accordance with this handbook. The
“Benchmark” service log is located at the back of this manual
- This warranty is in addition to your statutory and other legal rights
After Sales Service
- If your boiler fails during the warranty period contact your installer, who will be able to identify the
cause of the problem. If appropriate, your installer will contact us.
- Under no circumstances should “in warranty” work be undertaken without authorisation from the HRM
service department
- If you are unable to contact your installer please contact our service department. Quoting your boiler’s
serial number when phoning – this can be found on the cover of this manual.
3
Standard X-ternal & System X-ternal
Handbook
2726
Contents Page
1
Standard Wallstar, System Wallstar &
Wallstar Combi Manual
Contents Page
1
Standard Wallstar, System Wallstar &
Wallstar Combi Manual
Installation Procedure Continued – System Wallstar
8. Burner Lead
Pass the burner lead which is attached to the control panel
through the switch gasket located towards the bottom of the Wall
Plate.
9. Control Panel
Fit the control panel onto the wall plate with the nuts and
washers provided.
10. Pressure Gauge
Take the capillary/phial from the pressure gauge mounted in the
control panel and insert it into the pressure relief valve as shown.
11. Thermostats
Place the thermostat phials into their pockets located at the
top of the heat exchanger.
IMPORTANT: Ensure the thermostat capillary tubes
are kept clear of any possible electrical contact on the
control panel.
Installation Procedure Continued – System Wallstar
12. Electrical Connections
A 20mm hole is provided in the wall plate for concealed cable
entry. Alternatively use plastic ducting to any corner of the wall
plate.
The earth bonding cable can be passed through an 8mm hole,
adjacent to the test switch, and secured to the 5mm stud
provided in the wall duct.
Note: The power supply to the boiler should be fitted with a
5 amp fuse. The electrical supply to the boiler should be
made via a switched and fused spur located near the boiler,
fitted with a 5 amp fuse.
A frost thermostat is fitted as standard to protect the boiler.
Where appropriate, an additional frost thermostat may be
required to protect the rest of the heating system.
13. Pump Lead
Take the lead that comes from the pump and place it behind the
clips running down the left hand side of the wall plate. Connect
the 3 pin plug on the end of the lead to the 3 pin socket coming
from the control panel.
14. Pressure Relief Valve Pipe Work
The flow from the pressure relief valve should be plumbed
away.
Page 16
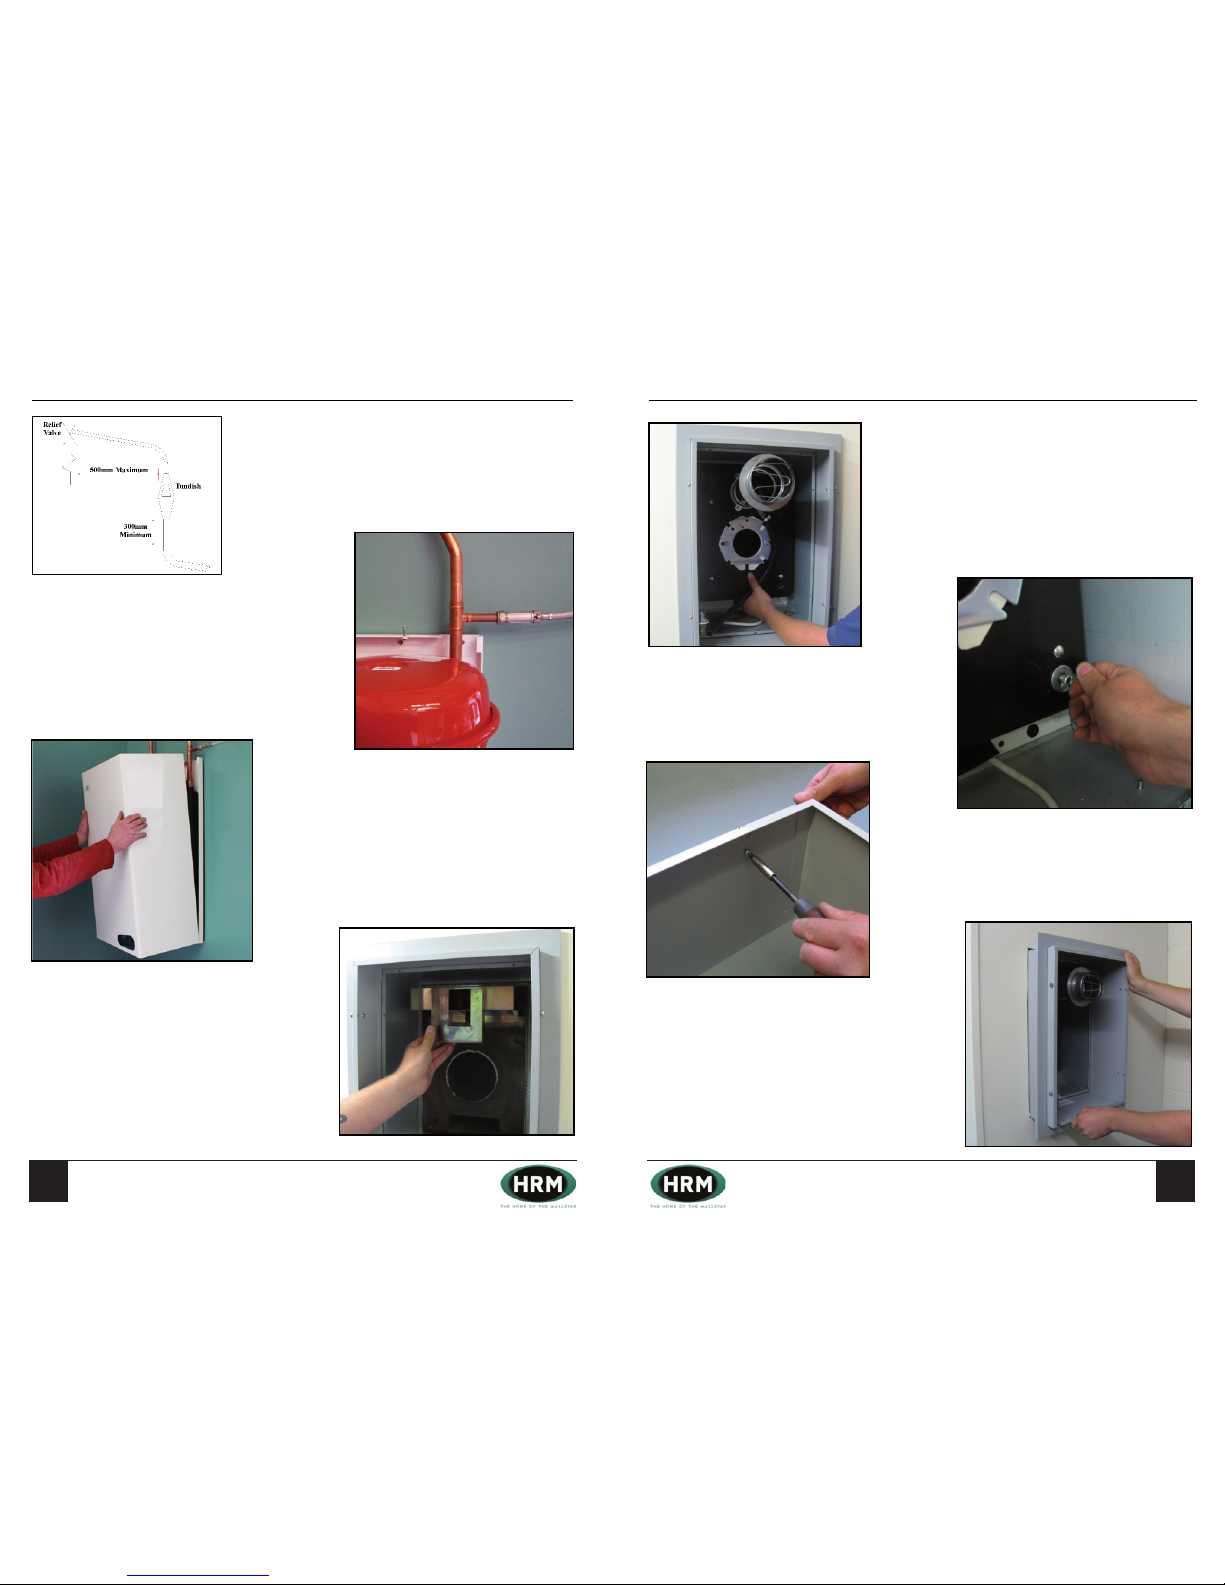
Householder Information
IMPORTANT!
Your boiler must be commissioned in order to:
- Validate your warranty
- Ensure the boiler has been installed correctly and avoid premature failure
- Set the boiler to its optimum efficiency. Operating conditions for the boiler will vary from site to site, your
commissioning engineer has specialised equipment to check the oil pressure and analyse the exhaust gases for
temperature, smoke and carbon dioxide content.
Your installer will organise the commissioning of your boiler. Should you experience any difficulty locating an
engineer, our service department may be able to provide you with details of an engineer in your area.
“Benchmark” Installation, Commissioning and Service Record Log Book
Please ensure that your installer has completed all sections of the log book (found at the back of this manual).
The log book will be required in the event of any warranty work. Ensure that the service record is completed.
Warranty
Your HRM boiler is under warranty for 2 years from the date of installation.
Warranty Conditions
- The boiler must be installed and commissioned in accordance with our handbook
- The boiler must not be repaired, modified or tampered with by any person not authorised by HRM
Extended Warranty
The “Benchmark” and warranty registration document at the end of this manual should be completed as
appropriate by your installer / engineer. This is your record that the boiler has been correctly installed in accordance
with our recommendations. Return the warranty registration document to HRM in order to qualify for a further 3 year
warranty of the heat exchanger – a total of 5 years.
Extended Warranty Conditions
- The boiler must be serviced annually and maintained in accordance with this handbook. The
“Benchmark” service log is located at the back of this manual
- This warranty is in addition to your statutory and other legal rights
After Sales Service
- If your boiler fails during the warranty period contact your installer, who will be able to identify the
cause of the problem. If appropriate, your installer will contact us.
- Under no circumstances should “in warranty” work be undertaken without authorisation from the HRM
service department
- If you are unable to contact your installer please contact our service department. Quoting your boiler’s
serial number when phoning – this can be found on the cover of this manual.
3
Standard X-ternal & System X-ternal
Handbook
Householder Information
IMPORTANT!
Your boiler must be commissioned in order to:
- Validate your warranty
- Ensure the boiler has been installed correctly and avoid premature failure
- Set the boiler to its optimum efficiency. Operating conditions for the boiler will vary from site to site, your
commissioning engineer has specialised equipment to check the oil pressure and analyse the exhaust gases for
temperature, smoke and carbon dioxide content.
Your installer will organise the commissioning of your boiler. Should you experience any difficulty locating an
engineer, our service department may be able to provide you with details of an engineer in your area.
“Benchmark” Installation, Commissioning and Service Record Log Book
Please ensure that your installer has completed all sections of the log book (found at the back of this manual).
The log book will be required in the event of any warranty work. Ensure that the service record is completed.
Warranty
Your HRM boiler is under warranty for 2 years from the date of installation.
Warranty Conditions
- The boiler must be installed and commissioned in accordance with our handbook
- The boiler must not be repaired, modified or tampered with by any person not authorised by HRM
Extended Warranty
The “Benchmark” and warranty registration document at the end of this manual should be completed as
appropriate by your installer / engineer. This is your record that the boiler has been correctly installed in accordance
with our recommendations. Return the warranty registration document to HRM in order to qualify for a further 3 year
warranty of the heat exchanger – a total of 5 years.
Extended Warranty Conditions
- The boiler must be serviced annually and maintained in accordance with this handbook. The
“Benchmark” service log is located at the back of this manual
- This warranty is in addition to your statutory and other legal rights
After Sales Service
- If your boiler fails during the warranty period contact your installer, who will be able to identify the
cause of the problem. If appropriate, your installer will contact us.
- Under no circumstances should “in warranty” work be undertaken without authorisation from the HRM
service department
- If you are unable to contact your installer please contact our service department. Quoting your boiler’s
serial number when phoning – this can be found on the cover of this manual.
3
Standard X-ternal & System X-ternal
Handbook
2928
Contents Page
1
Standard Wallstar, System Wallstar &
Wallstar Combi Manual
Contents Page
1
Standard Wallstar, System Wallstar &
Wallstar Combi Manual
Installation Procedure Continued - System Wallstar
15. Tundish Installation
The flow from the pressure relief valve should be plumbed away.
.
16. Filling The System
Open the filling loop valve and pressurise the system until 1
bar is showing on the pressure gauge, it may be necessary
after venting air from the heating system, to repeat this
operation in order to fill the system correctly.
17. Fit the White Case
Lift the case into position, ensure the tabs and slots are aligned,
and then tighten the retaining screws.
18. Top Baffle
Firstly place the two separate top baffle boxes into the flue
chamber and then slide the single piece of the baffle on top
of these.
Installation Procedure Continued - System Wallstar
19. Silencer Box
Slide the silencer box over the 4 mounting pins located on the
heat exchanger.
20. Silencer Box (Cont.)
Secure the silencer box to heat exchanger by tightening the
4 supplied wing nuts and penny washers down onto the
mounting pins.
.
21. Trim
Take the wall duct outer and attach the trim using the 4 stainless
steel screws from the fixing kit.
22. Wall Duct Outer
Slide the wall duct outer with the now attached trim over the
wall duct inner as shown.
Page 17
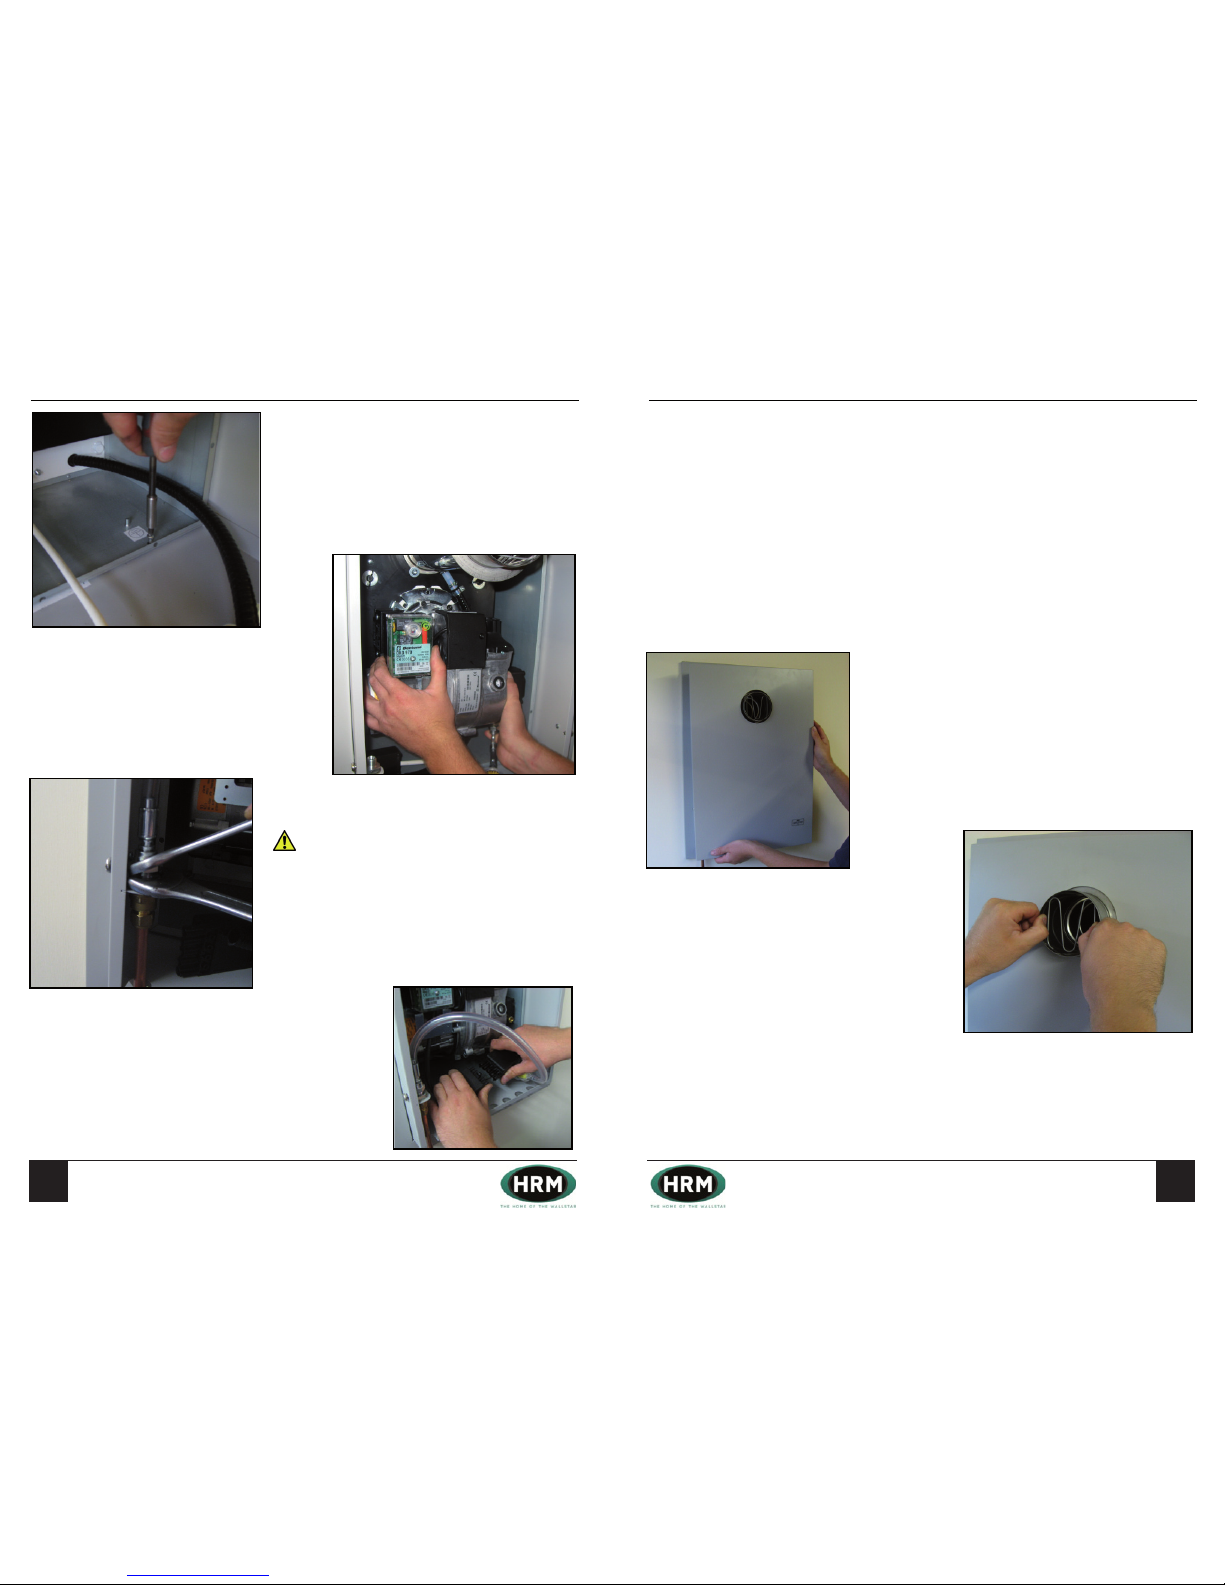
Householder Information
IMPORTANT!
Your boiler must be commissioned in order to:
- Validate your warranty
- Ensure the boiler has been installed correctly and avoid premature failure
- Set the boiler to its optimum efficiency. Operating conditions for the boiler will vary from site to site, your
commissioning engineer has specialised equipment to check the oil pressure and analyse the exhaust gases for
temperature, smoke and carbon dioxide content.
Your installer will organise the commissioning of your boiler. Should you experience any difficulty locating an
engineer, our service department may be able to provide you with details of an engineer in your area.
“Benchmark” Installation, Commissioning and Service Record Log Book
Please ensure that your installer has completed all sections of the log book (found at the back of this manual).
The log book will be required in the event of any warranty work. Ensure that the service record is completed.
Warranty
Your HRM boiler is under warranty for 2 years from the date of installation.
Warranty Conditions
- The boiler must be installed and commissioned in accordance with our handbook
- The boiler must not be repaired, modified or tampered with by any person not authorised by HRM
Extended Warranty
The “Benchmark” and warranty registration document at the end of this manual should be completed as
appropriate by your installer / engineer. This is your record that the boiler has been correctly installed in accordance
with our recommendations. Return the warranty registration document to HRM in order to qualify for a further 3 year
warranty of the heat exchanger – a total of 5 years.
Extended Warranty Conditions
- The boiler must be serviced annually and maintained in accordance with this handbook. The
“Benchmark” service log is located at the back of this manual
- This warranty is in addition to your statutory and other legal rights
After Sales Service
- If your boiler fails during the warranty period contact your installer, who will be able to identify the
cause of the problem. If appropriate, your installer will contact us.
- Under no circumstances should “in warranty” work be undertaken without authorisation from the HRM
service department
- If you are unable to contact your installer please contact our service department. Quoting your boiler’s
serial number when phoning – this can be found on the cover of this manual.
3
Standard X-ternal & System X-ternal
Handbook
Householder Information
IMPORTANT!
Your boiler must be commissioned in order to:
- Validate your warranty
- Ensure the boiler has been installed correctly and avoid premature failure
- Set the boiler to its optimum efficiency. Operating conditions for the boiler will vary from site to site, your
commissioning engineer has specialised equipment to check the oil pressure and analyse the exhaust gases for
temperature, smoke and carbon dioxide content.
Your installer will organise the commissioning of your boiler. Should you experience any difficulty locating an
engineer, our service department may be able to provide you with details of an engineer in your area.
“Benchmark” Installation, Commissioning and Service Record Log Book
Please ensure that your installer has completed all sections of the log book (found at the back of this manual).
The log book will be required in the event of any warranty work. Ensure that the service record is completed.
Warranty
Your HRM boiler is under warranty for 2 years from the date of installation.
Warranty Conditions
- The boiler must be installed and commissioned in accordance with our handbook
- The boiler must not be repaired, modified or tampered with by any person not authorised by HRM
Extended Warranty
The “Benchmark” and warranty registration document at the end of this manual should be completed as
appropriate by your installer / engineer. This is your record that the boiler has been correctly installed in accordance
with our recommendations. Return the warranty registration document to HRM in order to qualify for a further 3 year
warranty of the heat exchanger – a total of 5 years.
Extended Warranty Conditions
- The boiler must be serviced annually and maintained in accordance with this handbook. The
“Benchmark” service log is located at the back of this manual
- This warranty is in addition to your statutory and other legal rights
After Sales Service
- If your boiler fails during the warranty period contact your installer, who will be able to identify the
cause of the problem. If appropriate, your installer will contact us.
- Under no circumstances should “in warranty” work be undertaken without authorisation from the HRM
service department
- If you are unable to contact your installer please contact our service department. Quoting your boiler’s
serial number when phoning – this can be found on the cover of this manual.
3
Standard X-ternal & System X-ternal
Handbook
3130
Contents Page
1
Standard Wallstar, System Wallstar &
Wallstar Combi Manual
Contents Page
1
Standard Wallstar, System Wallstar &
Wallstar Combi Manual
Installation Procedure Continued - System Wallstar
23. Wall Duct Outer (Cont.)
Join the wall duct outer and wall duct inner together using the 4
supplied self drilling screws.
24. Burner
Fit the burner to the mounting flange on the silencer box.
25. Connect The Fuel Line
Connect the fuel line from the burner to the oil supply.
IMPORTANT: The Wallstar comes supplied with a remote
acting fire valve and has a non-return valve attached to the
burner pump. No additional non return valve must be used.
Should the boiler be used in conjunction with a purpose designed
underground tank, the foot valve found inside such tanks must be
removed or at least rendered ineffective. In addition to the sealed
fuel filter found in the boilers flexible fuel line, a replaceable
element fuel filter must be fitted near the tank.
Note: Please refer to page 17 of this manual for oil tank
installation recommendations.
26. Burner Lead
Connect the 5 pin plug and socket.
Installation Procedure Continued - System Wallstar
27. Priming The Burner
Ensure both power and fuel supplies to the boiler are switched
on. Press the reset button, the burner will start it’s firing
sequence. To release air from the oil line slacken the vent plug
during this sequence. If ignition fails the burner will go to lock
out, wait 60 seconds and repeat the procedure.
28. Test The Fuel Supply
With the burner running, check the fuel supply for air leaks. It is
normal for a static air bubble to remain at the highest point of the oil
line, but a continuous stream of bubbles through the oil line
indicates that air is being drawn in. This must be cured before
proceeding.
29. Access Door
Fit the access door onto the wall duct, secure it in place by
tightening the 2 screws located on both sides.
30. Flue Positioning
Pull the end of the flue out until the flange on it sits flush
against the back of the access door.
31. Commissioning the Boiler
Installation is complete. The boiler must now be commissioned
by a competent engineer. The “Benchmark” log found at the
back of this manual should be completed and the warranty
documentation returned to HRM Boilers Ltd.
The Wallstar comes supplied with a nonreturn valve attached to the burner pump. No additional non
return valve must be used. Should the boiler be used in
conjunction with a purpose designed underground tank, the
foot valve found inside such tanks must be removed or at least
rendered ineffective. In addition to the sealed fuel lter found in
the boilers exible fuel line, a replaceable element fuel lter must
be tted near the tank.
Ensure both power and fuel supplies to the boiler are switched
on. Press the reset button, the burner will start it’s ring
sequence. To release air from the oil line remove the vent plug
during this sequence.
Page 18
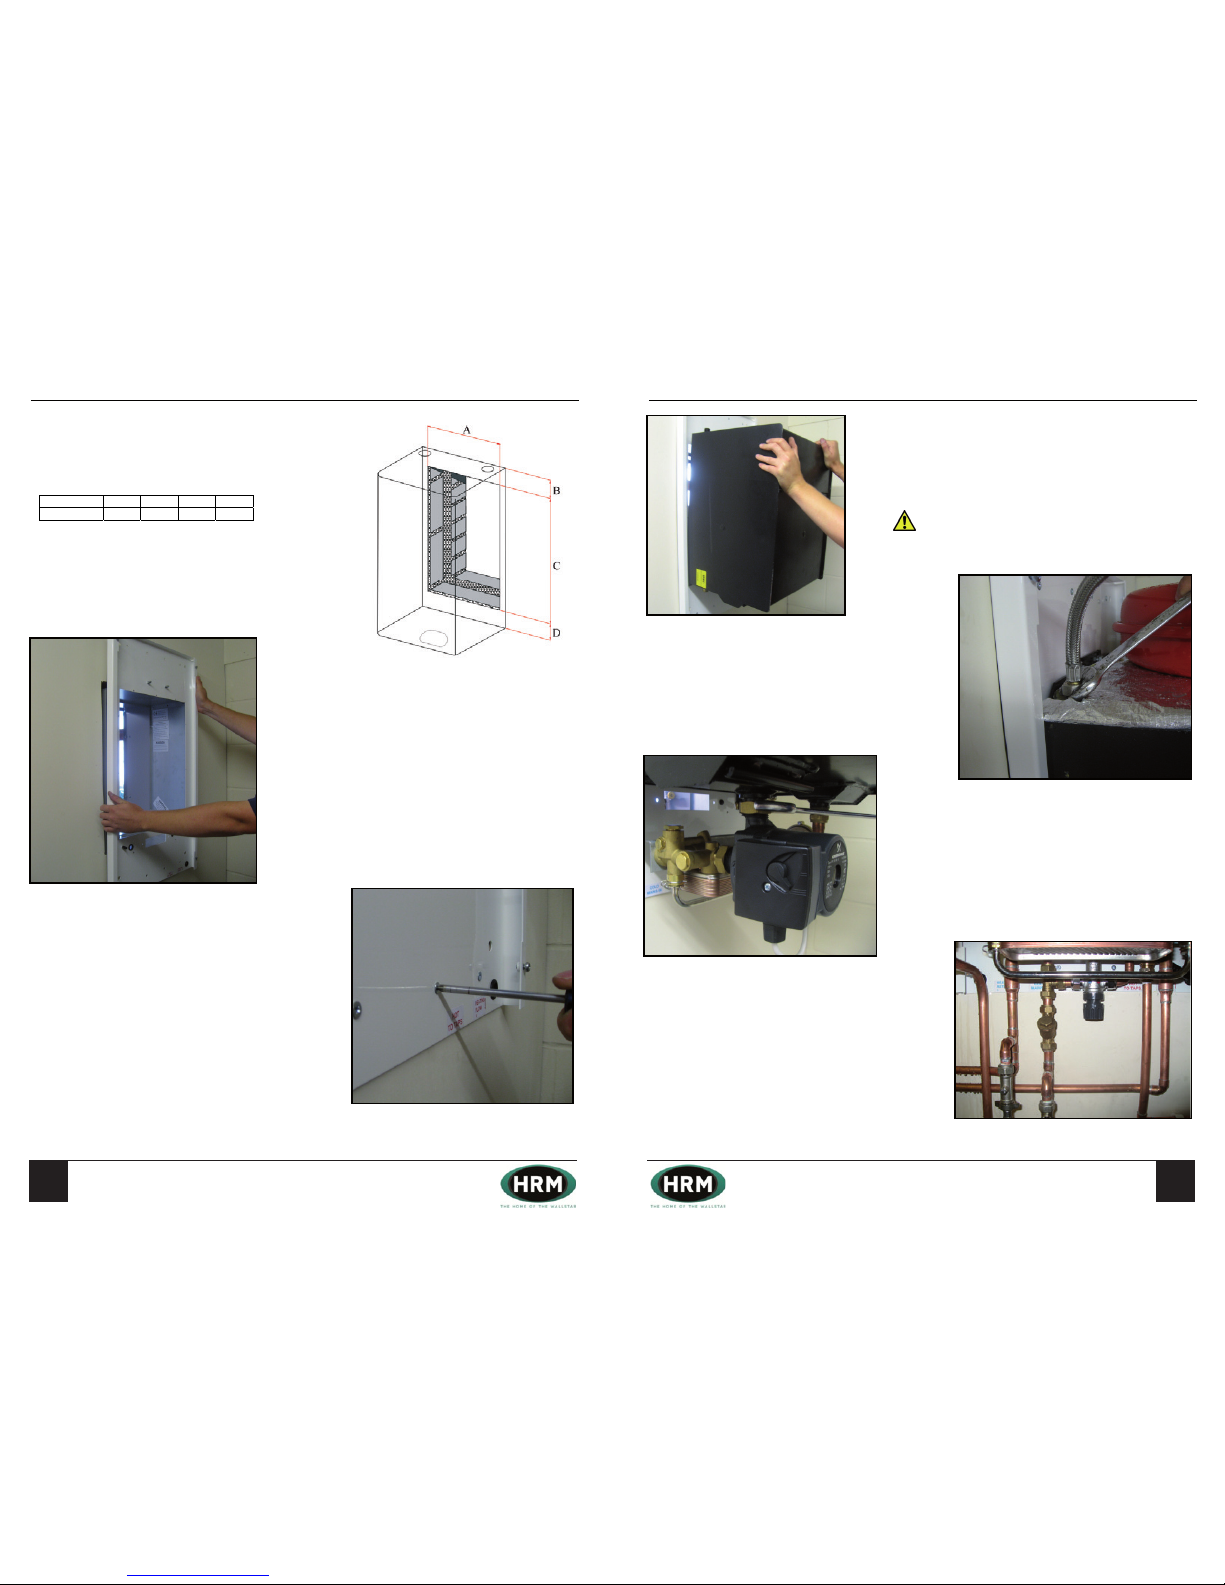
Householder Information
IMPORTANT!
Your boiler must be commissioned in order to:
- Validate your warranty
- Ensure the boiler has been installed correctly and avoid premature failure
- Set the boiler to its optimum efficiency. Operating conditions for the boiler will vary from site to site, your
commissioning engineer has specialised equipment to check the oil pressure and analyse the exhaust gases for
temperature, smoke and carbon dioxide content.
Your installer will organise the commissioning of your boiler. Should you experience any difficulty locating an
engineer, our service department may be able to provide you with details of an engineer in your area.
“Benchmark” Installation, Commissioning and Service Record Log Book
Please ensure that your installer has completed all sections of the log book (found at the back of this manual).
The log book will be required in the event of any warranty work. Ensure that the service record is completed.
Warranty
Your HRM boiler is under warranty for 2 years from the date of installation.
Warranty Conditions
- The boiler must be installed and commissioned in accordance with our handbook
- The boiler must not be repaired, modified or tampered with by any person not authorised by HRM
Extended Warranty
The “Benchmark” and warranty registration document at the end of this manual should be completed as
appropriate by your installer / engineer. This is your record that the boiler has been correctly installed in accordance
with our recommendations. Return the warranty registration document to HRM in order to qualify for a further 3 year
warranty of the heat exchanger – a total of 5 years.
Extended Warranty Conditions
- The boiler must be serviced annually and maintained in accordance with this handbook. The
“Benchmark” service log is located at the back of this manual
- This warranty is in addition to your statutory and other legal rights
After Sales Service
- If your boiler fails during the warranty period contact your installer, who will be able to identify the
cause of the problem. If appropriate, your installer will contact us.
- Under no circumstances should “in warranty” work be undertaken without authorisation from the HRM
service department
- If you are unable to contact your installer please contact our service department. Quoting your boiler’s
serial number when phoning – this can be found on the cover of this manual.
3
Standard X-ternal & System X-ternal
Handbook
Householder Information
IMPORTANT!
Your boiler must be commissioned in order to:
- Validate your warranty
- Ensure the boiler has been installed correctly and avoid premature failure
- Set the boiler to its optimum efficiency. Operating conditions for the boiler will vary from site to site, your
commissioning engineer has specialised equipment to check the oil pressure and analyse the exhaust gases for
temperature, smoke and carbon dioxide content.
Your installer will organise the commissioning of your boiler. Should you experience any difficulty locating an
engineer, our service department may be able to provide you with details of an engineer in your area.
“Benchmark” Installation, Commissioning and Service Record Log Book
Please ensure that your installer has completed all sections of the log book (found at the back of this manual).
The log book will be required in the event of any warranty work. Ensure that the service record is completed.
Warranty
Your HRM boiler is under warranty for 2 years from the date of installation.
Warranty Conditions
- The boiler must be installed and commissioned in accordance with our handbook
- The boiler must not be repaired, modified or tampered with by any person not authorised by HRM
Extended Warranty
The “Benchmark” and warranty registration document at the end of this manual should be completed as
appropriate by your installer / engineer. This is your record that the boiler has been correctly installed in accordance
with our recommendations. Return the warranty registration document to HRM in order to qualify for a further 3 year
warranty of the heat exchanger – a total of 5 years.
Extended Warranty Conditions
- The boiler must be serviced annually and maintained in accordance with this handbook. The
“Benchmark” service log is located at the back of this manual
- This warranty is in addition to your statutory and other legal rights
After Sales Service
- If your boiler fails during the warranty period contact your installer, who will be able to identify the
cause of the problem. If appropriate, your installer will contact us.
- Under no circumstances should “in warranty” work be undertaken without authorisation from the HRM
service department
- If you are unable to contact your installer please contact our service department. Quoting your boiler’s
serial number when phoning – this can be found on the cover of this manual.
3
Standard X-ternal & System X-ternal
Handbook
3332
Contents Page
1
Standard Wallstar, System Wallstar &
Wallstar Combi Manual
Contents Page
1
Standard Wallstar, System Wallstar &
Wallstar Combi Manual
Installation Procedure – Wallstar Combi
Unpack the boiler, remove the burner, silencer box, top
baffles, expansion vessel, pump and fugas assembly from the
heat exchanger.
1. Cut a Hole in the Wall
Hole sizes stated allow for a 10mm clearance around the
wall duct.
Note: Please allow 150mm clearance below and 50mm
above the white casing for service access.
2. Wall Plate and Duct Assembly
Place the Wall Plate and attached Wall Duct inner through the
opening you have created in the wall.
3. Wall Plate and Duct Assembly (Cont.)
Drill through the holes in the wall plate, and secure the
assembly to the interior wall using either the eight wall plugs
and screws or the four rawl bolts provided.
If the wall is uneven, avoid distortion of the wall plate. Place
packing behind the wall plate, ensure the rubber foam on the
rear of the wall plate forms an air tight seal against the wall.
Use silicone sealant to fill any gaps if necessary.
Dimension A B C D
24/18C 410 170 600 130
Installation Procedure Continued – Wallstar Combi
4. Heat Exchanger
Lift the heat exchanger into position and secure it with the nuts
and washers provided.
IMPORTANT: The heat exchanger is heavy, two people
will be required to lift it into position.
5. Expansion Vessel
Place the expansion vessel on top of the heat exchanger
and connect the hose to the expansion vessel nipple on the
heat exchanger.
6. Pump & Fugas Group
Re-attach the circulating pump and the fugas group to the heat
exchanger.
7. Connect Pipe Work
Connect the system pipe work as shown, the boiler has a
built in bypass. 90 degree copper bends are supplied for
connecting the Heating Return and Heating Flow.
Page 19
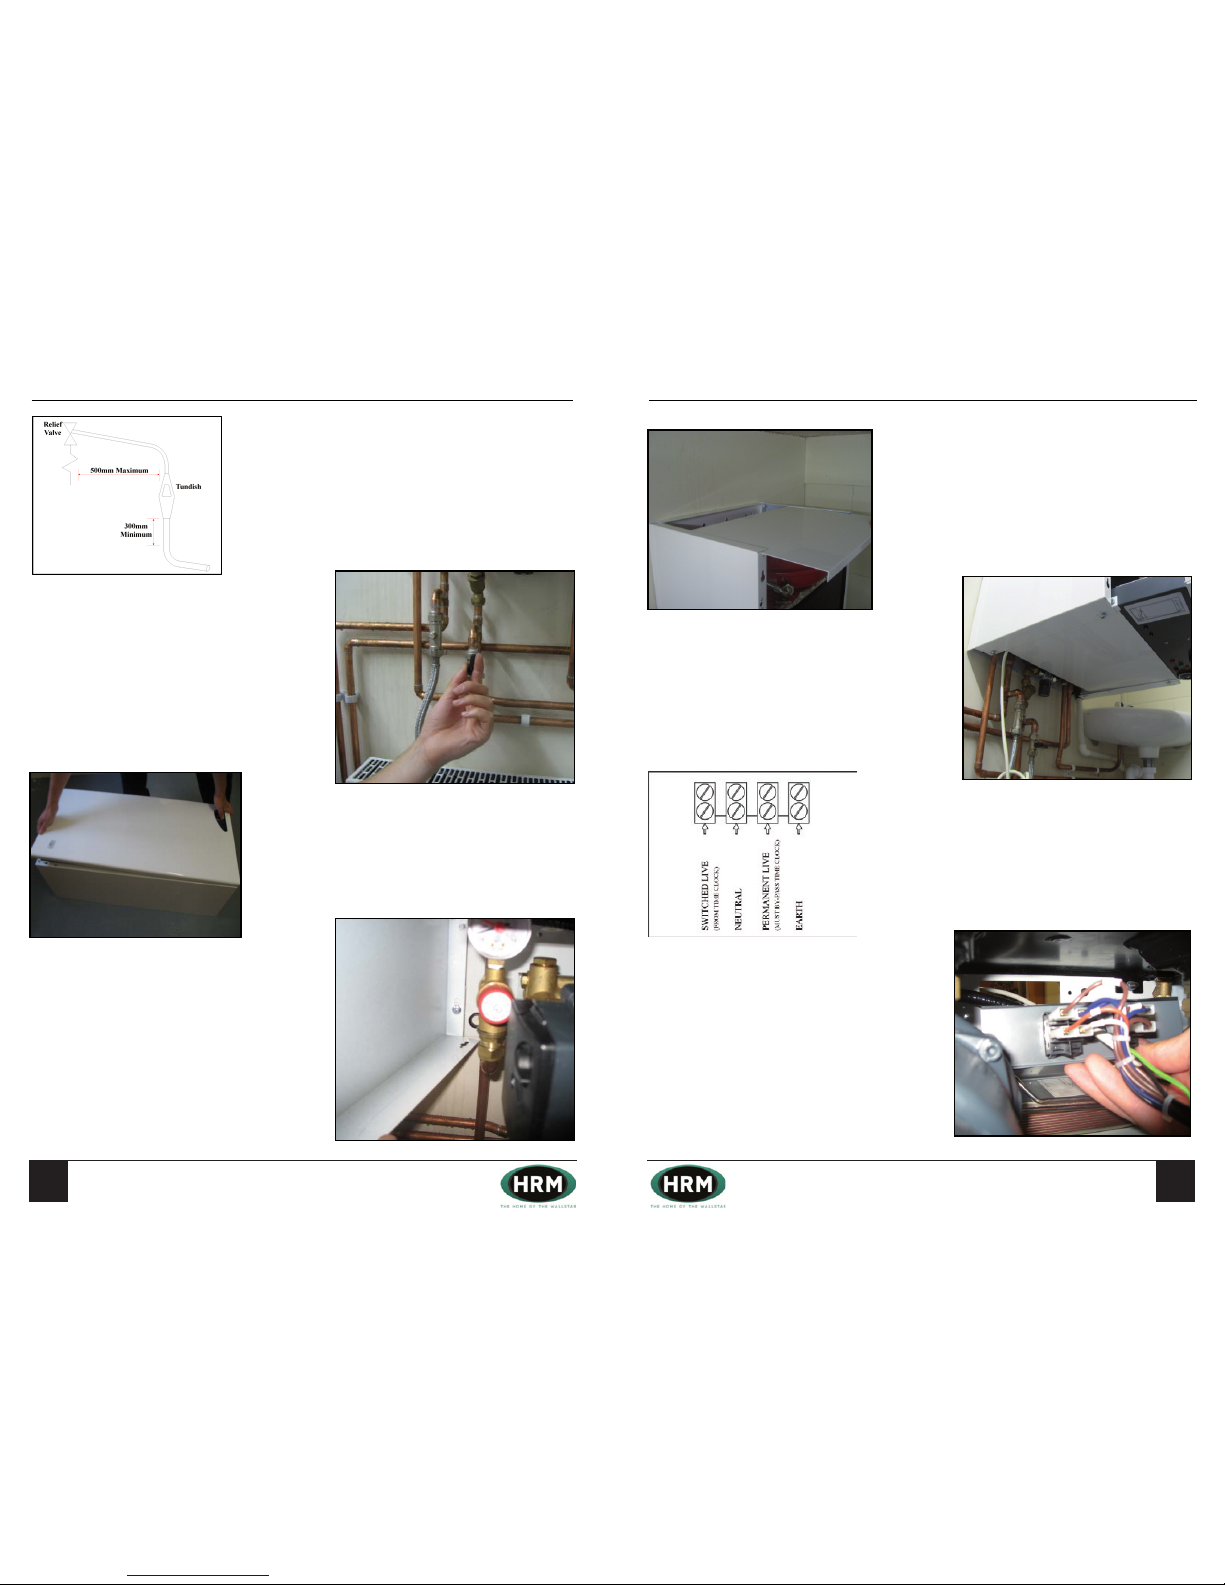
Householder Information
IMPORTANT!
Your boiler must be commissioned in order to:
- Validate your warranty
- Ensure the boiler has been installed correctly and avoid premature failure
- Set the boiler to its optimum efficiency. Operating conditions for the boiler will vary from site to site, your
commissioning engineer has specialised equipment to check the oil pressure and analyse the exhaust gases for
temperature, smoke and carbon dioxide content.
Your installer will organise the commissioning of your boiler. Should you experience any difficulty locating an
engineer, our service department may be able to provide you with details of an engineer in your area.
“Benchmark” Installation, Commissioning and Service Record Log Book
Please ensure that your installer has completed all sections of the log book (found at the back of this manual).
The log book will be required in the event of any warranty work. Ensure that the service record is completed.
Warranty
Your HRM boiler is under warranty for 2 years from the date of installation.
Warranty Conditions
- The boiler must be installed and commissioned in accordance with our handbook
- The boiler must not be repaired, modified or tampered with by any person not authorised by HRM
Extended Warranty
The “Benchmark” and warranty registration document at the end of this manual should be completed as
appropriate by your installer / engineer. This is your record that the boiler has been correctly installed in accordance
with our recommendations. Return the warranty registration document to HRM in order to qualify for a further 3 year
warranty of the heat exchanger – a total of 5 years.
Extended Warranty Conditions
- The boiler must be serviced annually and maintained in accordance with this handbook. The
“Benchmark” service log is located at the back of this manual
- This warranty is in addition to your statutory and other legal rights
After Sales Service
- If your boiler fails during the warranty period contact your installer, who will be able to identify the
cause of the problem. If appropriate, your installer will contact us.
- Under no circumstances should “in warranty” work be undertaken without authorisation from the HRM
service department
- If you are unable to contact your installer please contact our service department. Quoting your boiler’s
serial number when phoning – this can be found on the cover of this manual.
3
Standard X-ternal & System X-ternal
Handbook
Householder Information
IMPORTANT!
Your boiler must be commissioned in order to:
- Validate your warranty
- Ensure the boiler has been installed correctly and avoid premature failure
- Set the boiler to its optimum efficiency. Operating conditions for the boiler will vary from site to site, your
commissioning engineer has specialised equipment to check the oil pressure and analyse the exhaust gases for
temperature, smoke and carbon dioxide content.
Your installer will organise the commissioning of your boiler. Should you experience any difficulty locating an
engineer, our service department may be able to provide you with details of an engineer in your area.
“Benchmark” Installation, Commissioning and Service Record Log Book
Please ensure that your installer has completed all sections of the log book (found at the back of this manual).
The log book will be required in the event of any warranty work. Ensure that the service record is completed.
Warranty
Your HRM boiler is under warranty for 2 years from the date of installation.
Warranty Conditions
- The boiler must be installed and commissioned in accordance with our handbook
- The boiler must not be repaired, modified or tampered with by any person not authorised by HRM
Extended Warranty
The “Benchmark” and warranty registration document at the end of this manual should be completed as
appropriate by your installer / engineer. This is your record that the boiler has been correctly installed in accordance
with our recommendations. Return the warranty registration document to HRM in order to qualify for a further 3 year
warranty of the heat exchanger – a total of 5 years.
Extended Warranty Conditions
- The boiler must be serviced annually and maintained in accordance with this handbook. The
“Benchmark” service log is located at the back of this manual
- This warranty is in addition to your statutory and other legal rights
After Sales Service
- If your boiler fails during the warranty period contact your installer, who will be able to identify the
cause of the problem. If appropriate, your installer will contact us.
- Under no circumstances should “in warranty” work be undertaken without authorisation from the HRM
service department
- If you are unable to contact your installer please contact our service department. Quoting your boiler’s
serial number when phoning – this can be found on the cover of this manual.
3
Standard X-ternal & System X-ternal
Handbook
3534
Contents Page
1
Standard Wallstar, System Wallstar &
Wallstar Combi Manual
Contents Page
1
Standard Wallstar, System Wallstar &
Wallstar Combi Manual
Installation Procedure Continued – Wallstar Combi
8. Tundish Installation
The flow from the pressure relief valve should be plumbed away.
A Tundish must be installed in accordance with Building
Regulations: G3.
9. Filling The System
Ensure the automatic air vent on top of the heat exchanger
is functioning correctly.
Open the filling loop valve and pressurise the system until 1
bar is showing on the pressure gauge. It may be necessary
after venting air from the heating system, to repeat this
operation in order to fill the system correctly.
10. Fit The White Casing
The casing is supplied pre-assembled. Remove the front cover
first, then the top panel and then the bottom panel which has the
control panel assembly attached to it.
11. Side Panels
Locate the side panels by hooking the slots over the screws
located in the wall plate. Tighten to secure.
Installation Procedure Continued – Wallstar Combi
12. Top Panel
Slide the white case top panel under the returns on the two side
panels until it rests on the supports at the back. Secure the top to
the sides with the screws provided.
13. Bottom Panel & Control Panel
Slide the bottom panel, with the control panel assembly still
attached inside the white case. Align the screws on the
bottom panel up with the slots on the base of the side
panels and drop them through, slide the bottom panel back
and tighten the screws. Leave the control panel in the
forward position.
14. Mains Supply
A switched 13amp socket should be installed near the boiler.
The boiler is supplied with a 13amp plug (fused at 5amps) with a
1.5 metre lead.
For concealed cable entry, 20mm holes are provided in the wall
plate, alternatively use plastic ducting to any corner of the wall
plate.
15. Burner Lead
Pass the burner lead which is attached to the control panel
through the rectangular opening in the wall plate and secure
the switch panel. Ensure the switch plate gasket is in
position.
A switched 13amp socket should be installed near the boiler.
The boiler is supplied with a plug (fused at 5amps) with a
1.5 metre lead.
Page 20
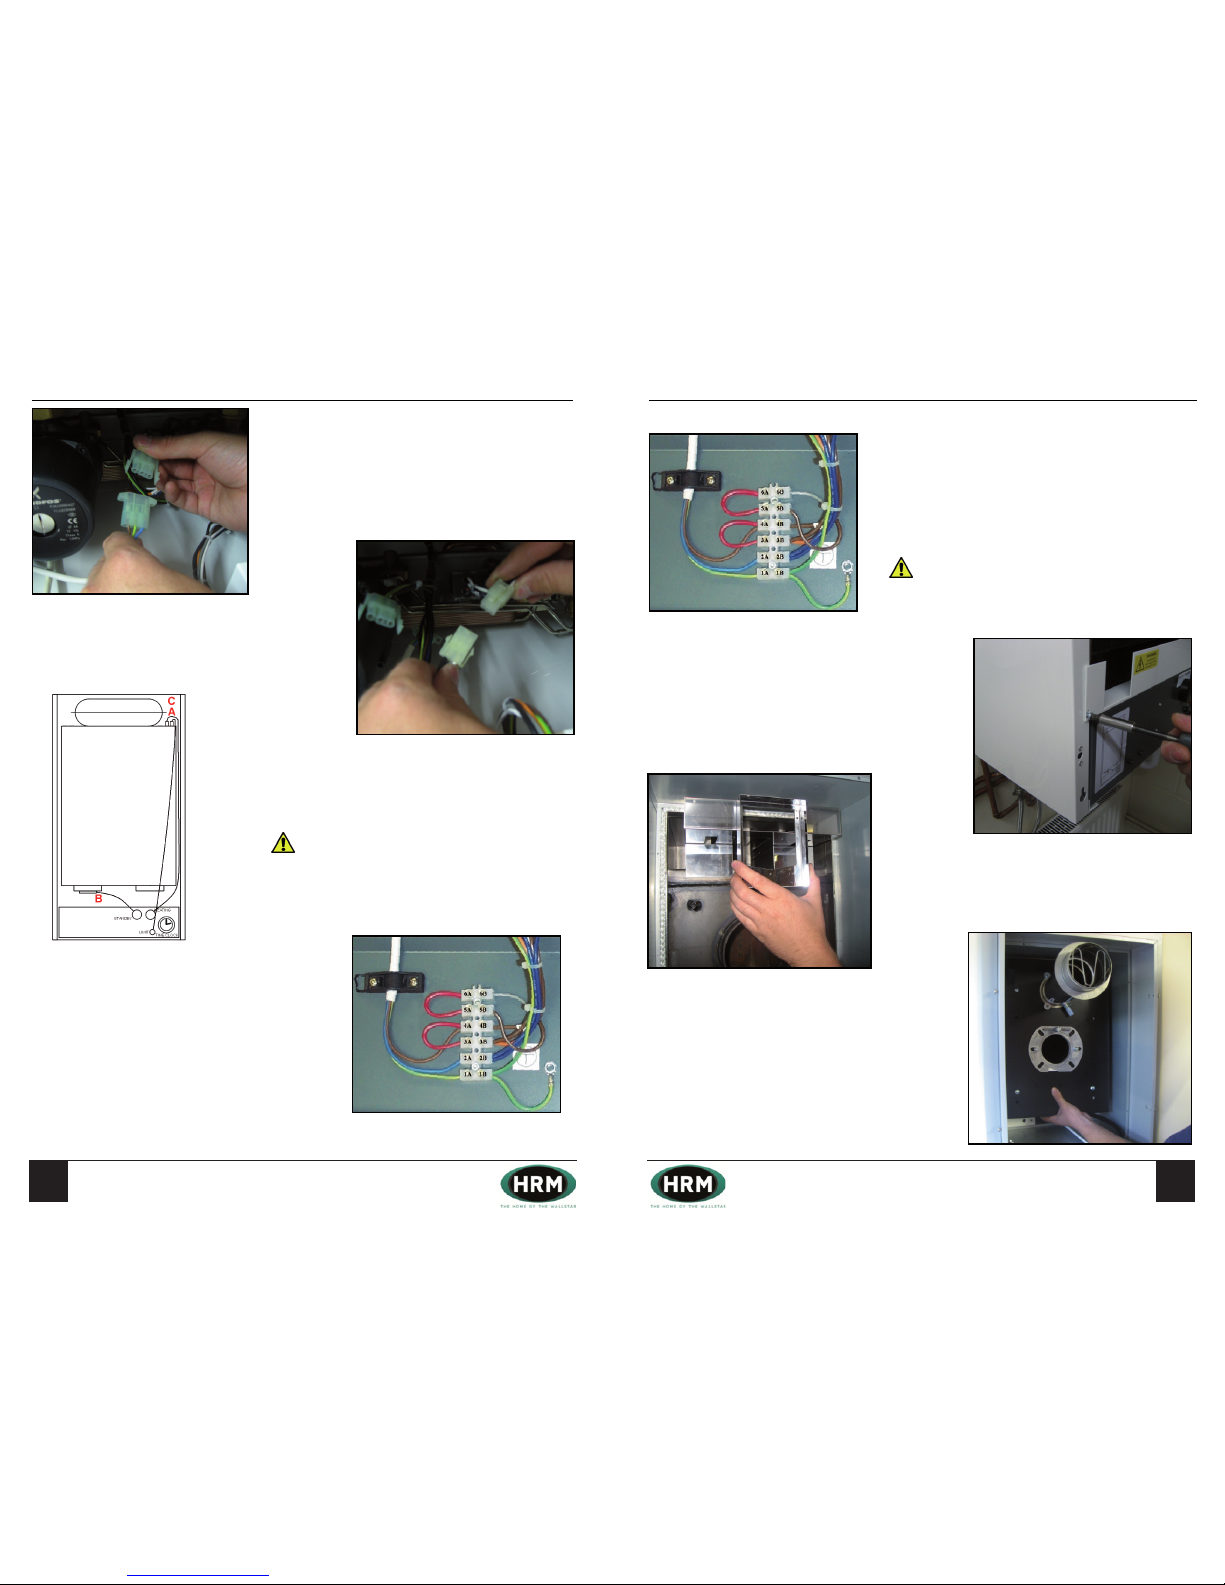
Householder Information
IMPORTANT!
Your boiler must be commissioned in order to:
- Validate your warranty
- Ensure the boiler has been installed correctly and avoid premature failure
- Set the boiler to its optimum efficiency. Operating conditions for the boiler will vary from site to site, your
commissioning engineer has specialised equipment to check the oil pressure and analyse the exhaust gases for
temperature, smoke and carbon dioxide content.
Your installer will organise the commissioning of your boiler. Should you experience any difficulty locating an
engineer, our service department may be able to provide you with details of an engineer in your area.
“Benchmark” Installation, Commissioning and Service Record Log Book
Please ensure that your installer has completed all sections of the log book (found at the back of this manual).
The log book will be required in the event of any warranty work. Ensure that the service record is completed.
Warranty
Your HRM boiler is under warranty for 2 years from the date of installation.
Warranty Conditions
- The boiler must be installed and commissioned in accordance with our handbook
- The boiler must not be repaired, modified or tampered with by any person not authorised by HRM
Extended Warranty
The “Benchmark” and warranty registration document at the end of this manual should be completed as
appropriate by your installer / engineer. This is your record that the boiler has been correctly installed in accordance
with our recommendations. Return the warranty registration document to HRM in order to qualify for a further 3 year
warranty of the heat exchanger – a total of 5 years.
Extended Warranty Conditions
- The boiler must be serviced annually and maintained in accordance with this handbook. The
“Benchmark” service log is located at the back of this manual
- This warranty is in addition to your statutory and other legal rights
After Sales Service
- If your boiler fails during the warranty period contact your installer, who will be able to identify the
cause of the problem. If appropriate, your installer will contact us.
- Under no circumstances should “in warranty” work be undertaken without authorisation from the HRM
service department
- If you are unable to contact your installer please contact our service department. Quoting your boiler’s
serial number when phoning – this can be found on the cover of this manual.
3
Standard X-ternal & System X-ternal
Handbook
Householder Information
IMPORTANT!
Your boiler must be commissioned in order to:
- Validate your warranty
- Ensure the boiler has been installed correctly and avoid premature failure
- Set the boiler to its optimum efficiency. Operating conditions for the boiler will vary from site to site, your
commissioning engineer has specialised equipment to check the oil pressure and analyse the exhaust gases for
temperature, smoke and carbon dioxide content.
Your installer will organise the commissioning of your boiler. Should you experience any difficulty locating an
engineer, our service department may be able to provide you with details of an engineer in your area.
“Benchmark” Installation, Commissioning and Service Record Log Book
Please ensure that your installer has completed all sections of the log book (found at the back of this manual).
The log book will be required in the event of any warranty work. Ensure that the service record is completed.
Warranty
Your HRM boiler is under warranty for 2 years from the date of installation.
Warranty Conditions
- The boiler must be installed and commissioned in accordance with our handbook
- The boiler must not be repaired, modified or tampered with by any person not authorised by HRM
Extended Warranty
The “Benchmark” and warranty registration document at the end of this manual should be completed as
appropriate by your installer / engineer. This is your record that the boiler has been correctly installed in accordance
with our recommendations. Return the warranty registration document to HRM in order to qualify for a further 3 year
warranty of the heat exchanger – a total of 5 years.
Extended Warranty Conditions
- The boiler must be serviced annually and maintained in accordance with this handbook. The
“Benchmark” service log is located at the back of this manual
- This warranty is in addition to your statutory and other legal rights
After Sales Service
- If your boiler fails during the warranty period contact your installer, who will be able to identify the
cause of the problem. If appropriate, your installer will contact us.
- Under no circumstances should “in warranty” work be undertaken without authorisation from the HRM
service department
- If you are unable to contact your installer please contact our service department. Quoting your boiler’s
serial number when phoning – this can be found on the cover of this manual.
3
Standard X-ternal & System X-ternal
Handbook
3736
Contents Page
1
Standard Wallstar, System Wallstar &
Wallstar Combi Manual
Contents Page
1
Standard Wallstar, System Wallstar &
Wallstar Combi Manual
Installation Procedure Continued – Wallstar Combi
16. Pump Connection
Connect the 3 pin socket coming from the control panel to the
corresponding lead attached to the pump.
17. Micro Switch Connection
Connect the 6 pin socket coming from the control panel to
the corresponding lead attached to the micro switch.
18. Thermostats
Uncoil the three thermostat capillaries marked A, B and C and
place the phials into the appropriate pockets as shown.
Thermostats A and C must be routed up the side of the heat
exchanger in order to reach their corresponding pockets.
IMPORTANT: Part L1 of the Building Regulations requires
the installation of a room thermostat.
19. Installation Of A Room Thermostat
To install the room thermostat, connect it to terminals 5A
and 6A and discard the link wire.
Installation Procedure Continued – Wallstar Combi
20. Installation Of A Programmable
Room Thermostat or Time Clock
Connect a remote programmable room thermostat or time clock
to terminals 5A and 6A, discard the link wire. The integral time
clock should be switched to ‘On’ (Position 1, see page 7).
The integral time clock can be used to time the domestic hot
water function. To achieve this, move the link wire from terminal
3A to terminal 5A and move the wire from terminal 5B to terminal
3A.
IMPORTANT: If the domestic hot water function is to be
timed, a frost protection thermostat must be fitted.
Note: The heating system will not function when the domestic hot
water function is timed to be off.
21. Secure Control Panel
Pivot the control panel into its upright position and secure it
to the side panels using the two screws provided.
22. Top Baffles
Firstly place the two separate top baffle boxes into the flue
chamber and then slide the single piece of the baffle on top of
these.
23. Silencer Box
Slide the silencer box over the 4 mounting pins located on
the heat exchanger.
Page 21
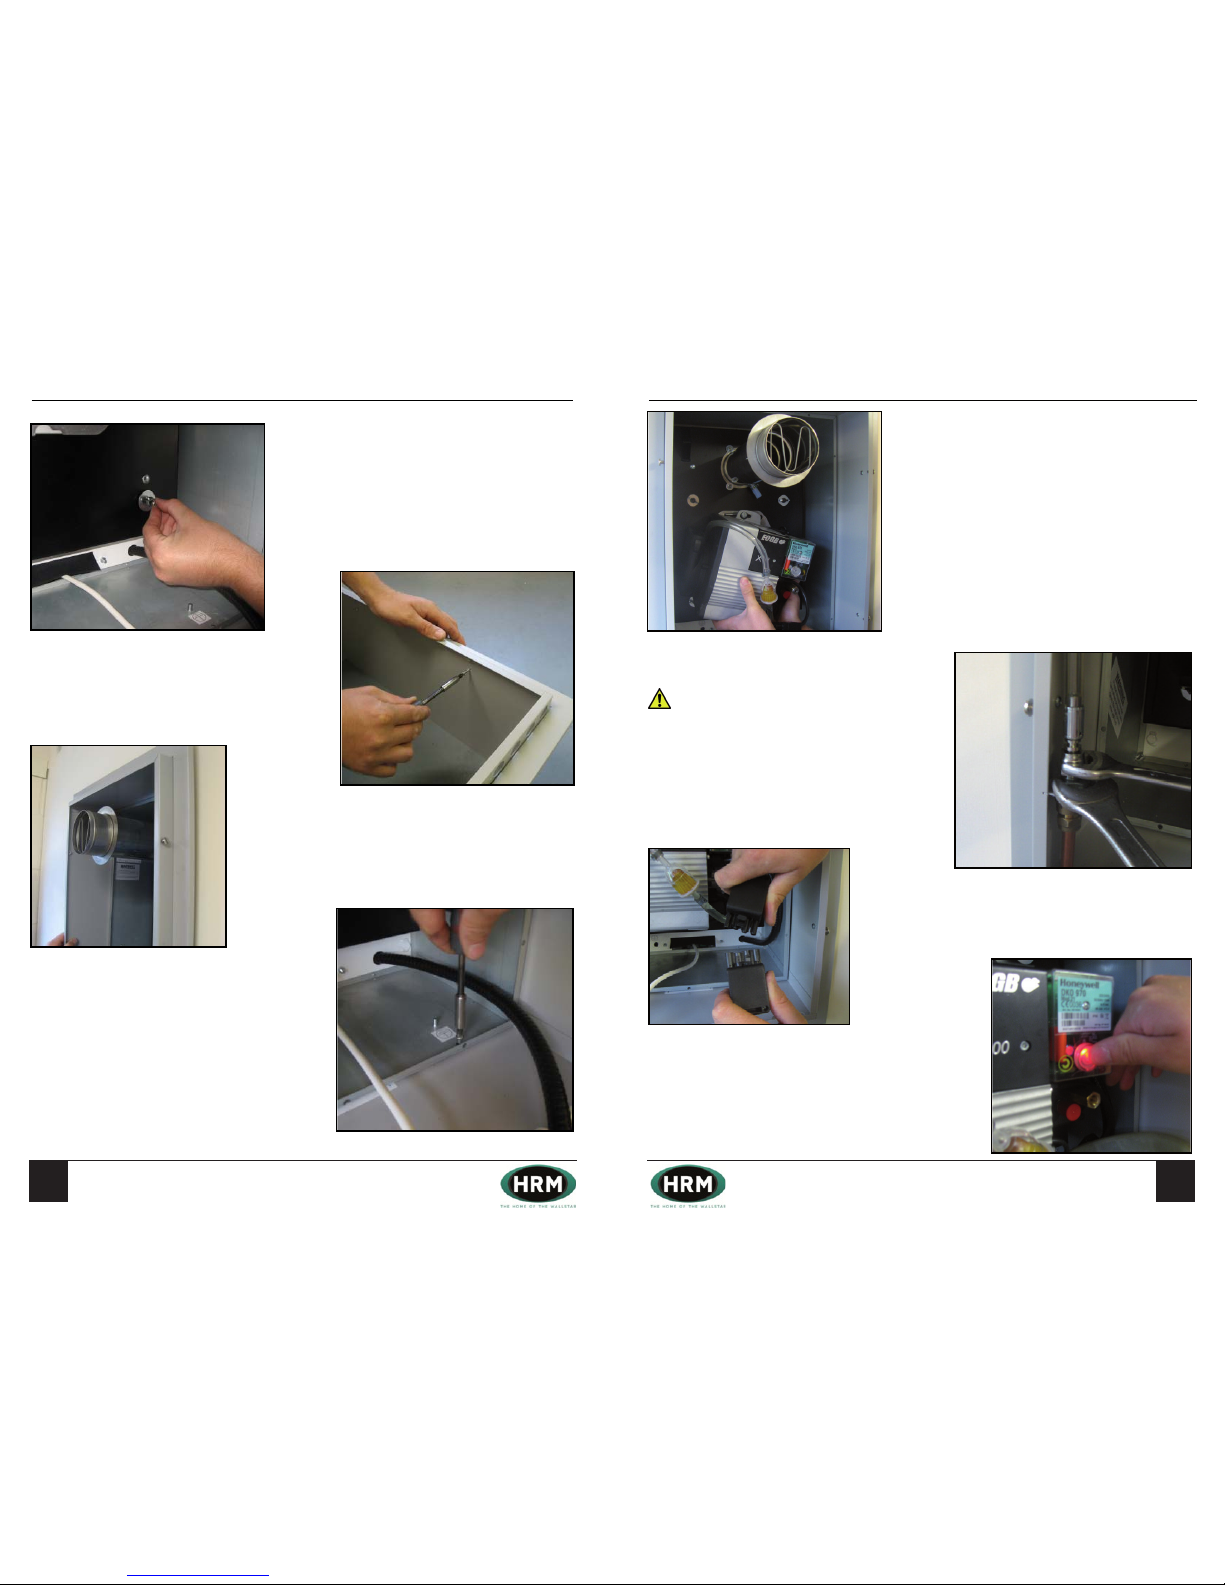
Householder Information
IMPORTANT!
Your boiler must be commissioned in order to:
- Validate your warranty
- Ensure the boiler has been installed correctly and avoid premature failure
- Set the boiler to its optimum efficiency. Operating conditions for the boiler will vary from site to site, your
commissioning engineer has specialised equipment to check the oil pressure and analyse the exhaust gases for
temperature, smoke and carbon dioxide content.
Your installer will organise the commissioning of your boiler. Should you experience any difficulty locating an
engineer, our service department may be able to provide you with details of an engineer in your area.
“Benchmark” Installation, Commissioning and Service Record Log Book
Please ensure that your installer has completed all sections of the log book (found at the back of this manual).
The log book will be required in the event of any warranty work. Ensure that the service record is completed.
Warranty
Your HRM boiler is under warranty for 2 years from the date of installation.
Warranty Conditions
- The boiler must be installed and commissioned in accordance with our handbook
- The boiler must not be repaired, modified or tampered with by any person not authorised by HRM
Extended Warranty
The “Benchmark” and warranty registration document at the end of this manual should be completed as
appropriate by your installer / engineer. This is your record that the boiler has been correctly installed in accordance
with our recommendations. Return the warranty registration document to HRM in order to qualify for a further 3 year
warranty of the heat exchanger – a total of 5 years.
Extended Warranty Conditions
- The boiler must be serviced annually and maintained in accordance with this handbook. The
“Benchmark” service log is located at the back of this manual
- This warranty is in addition to your statutory and other legal rights
After Sales Service
- If your boiler fails during the warranty period contact your installer, who will be able to identify the
cause of the problem. If appropriate, your installer will contact us.
- Under no circumstances should “in warranty” work be undertaken without authorisation from the HRM
service department
- If you are unable to contact your installer please contact our service department. Quoting your boiler’s
serial number when phoning – this can be found on the cover of this manual.
3
Standard X-ternal & System X-ternal
Handbook
Householder Information
IMPORTANT!
Your boiler must be commissioned in order to:
- Validate your warranty
- Ensure the boiler has been installed correctly and avoid premature failure
- Set the boiler to its optimum efficiency. Operating conditions for the boiler will vary from site to site, your
commissioning engineer has specialised equipment to check the oil pressure and analyse the exhaust gases for
temperature, smoke and carbon dioxide content.
Your installer will organise the commissioning of your boiler. Should you experience any difficulty locating an
engineer, our service department may be able to provide you with details of an engineer in your area.
“Benchmark” Installation, Commissioning and Service Record Log Book
Please ensure that your installer has completed all sections of the log book (found at the back of this manual).
The log book will be required in the event of any warranty work. Ensure that the service record is completed.
Warranty
Your HRM boiler is under warranty for 2 years from the date of installation.
Warranty Conditions
- The boiler must be installed and commissioned in accordance with our handbook
- The boiler must not be repaired, modified or tampered with by any person not authorised by HRM
Extended Warranty
The “Benchmark” and warranty registration document at the end of this manual should be completed as
appropriate by your installer / engineer. This is your record that the boiler has been correctly installed in accordance
with our recommendations. Return the warranty registration document to HRM in order to qualify for a further 3 year
warranty of the heat exchanger – a total of 5 years.
Extended Warranty Conditions
- The boiler must be serviced annually and maintained in accordance with this handbook. The
“Benchmark” service log is located at the back of this manual
- This warranty is in addition to your statutory and other legal rights
After Sales Service
- If your boiler fails during the warranty period contact your installer, who will be able to identify the
cause of the problem. If appropriate, your installer will contact us.
- Under no circumstances should “in warranty” work be undertaken without authorisation from the HRM
service department
- If you are unable to contact your installer please contact our service department. Quoting your boiler’s
serial number when phoning – this can be found on the cover of this manual.
3
Standard X-ternal & System X-ternal
Handbook
3938
Contents Page
1
Standard Wallstar, System Wallstar &
Wallstar Combi Manual
Contents Page
1
Standard Wallstar, System Wallstar &
Wallstar Combi Manual
Installation Procedure Continued – Wallstar Combi
24. Silencer Box (Cont.)
Secure the silencer box to heat exchanger by tightening the 4
supplied wing nuts and penny washers down onto the mounting
pins.
25. Trim
Take the wall duct outer and attach the trim using the 4
stainless steel screws from the fixing kit.
26. Wall Duct Outer
Slide the wall duct outer with the now attached trim over the wall
duct inner as shown.
27. Wall Duct Outer (Cont.)
Join the wall duct outer and wall duct inner together using
the 4 supplied self drilling screws.
Installation Procedure Continued – Wallstar Combi
28. Burner
Fit the burner to the mounting flange on the silencer box.
29. Connect The Fuel Line
Connect the fuel line from the burner to the oil supply.
IMPORTANT: The Wallstar comes supplied with a
remote acting fire valve and has a non-return valve attached
to the burner pump. No additional non return valve must be
used. Should the boiler be used in conjunction with a
purpose designed underground tank, the foot valve found
inside such tanks must be removed or at least rendered
ineffective. In addition to the sealed fuel filter found in the
boilers flexible fuel line, a replaceable element fuel filter
must be fitted near the tank.
Note: Please refer to page 17 of this manual for oil tank
installation recommendations.
30. Burner Lead
Connect the 4 pin plug and socket.
31. Priming The Burner
Ensure both power and fuel supplies to the boiler are
switched on. Press the reset button, the burner will start it’s
firing sequence. To release air from the oil line slacken the
vent plug during this sequence. If ignition fails the burner
will go to lock out, wait 60 seconds and repeat the
procedure.
Ensure both power and fuel supplies to the boiler are
switched on. Press the reset button, the burner will start it’s
ring sequence. To release air from the oil line remove the
vent plug during this sequence.
The Wallstar comes supplied with a
non-return valve attached to the burner pump. No additional
non return valve must be used. Should the boiler be used in
conjunction with a purpose designed underground tank, the
foot valve found inside such tanks must be removed or at
least rendered ineffective. In addition to the sealed fuel lter
found in the boilers exible fuel line, a replaceable element
fuel lter must be tted near the tank.
Page 22
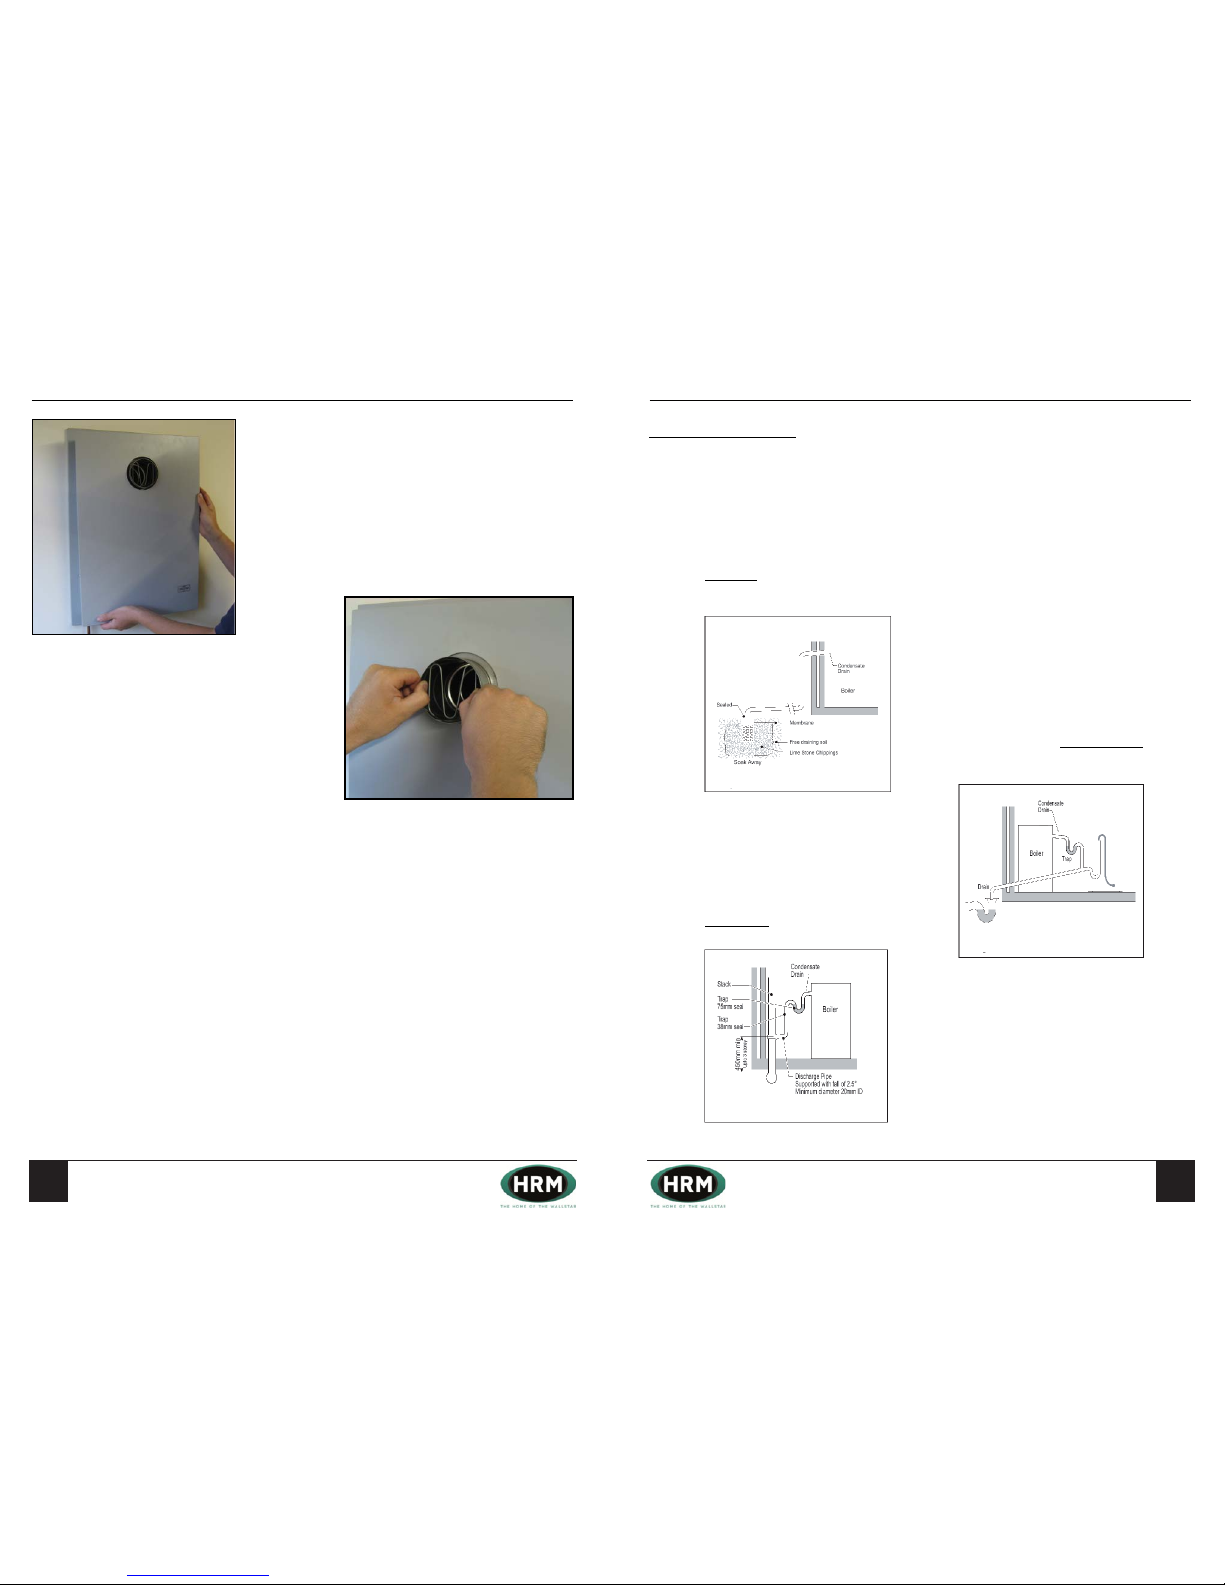
Householder Information
IMPORTANT!
Your boiler must be commissioned in order to:
- Validate your warranty
- Ensure the boiler has been installed correctly and avoid premature failure
- Set the boiler to its optimum efficiency. Operating conditions for the boiler will vary from site to site, your
commissioning engineer has specialised equipment to check the oil pressure and analyse the exhaust gases for
temperature, smoke and carbon dioxide content.
Your installer will organise the commissioning of your boiler. Should you experience any difficulty locating an
engineer, our service department may be able to provide you with details of an engineer in your area.
“Benchmark” Installation, Commissioning and Service Record Log Book
Please ensure that your installer has completed all sections of the log book (found at the back of this manual).
The log book will be required in the event of any warranty work. Ensure that the service record is completed.
Warranty
Your HRM boiler is under warranty for 2 years from the date of installation.
Warranty Conditions
- The boiler must be installed and commissioned in accordance with our handbook
- The boiler must not be repaired, modified or tampered with by any person not authorised by HRM
Extended Warranty
The “Benchmark” and warranty registration document at the end of this manual should be completed as
appropriate by your installer / engineer. This is your record that the boiler has been correctly installed in accordance
with our recommendations. Return the warranty registration document to HRM in order to qualify for a further 3 year
warranty of the heat exchanger – a total of 5 years.
Extended Warranty Conditions
- The boiler must be serviced annually and maintained in accordance with this handbook. The
“Benchmark” service log is located at the back of this manual
- This warranty is in addition to your statutory and other legal rights
After Sales Service
- If your boiler fails during the warranty period contact your installer, who will be able to identify the
cause of the problem. If appropriate, your installer will contact us.
- Under no circumstances should “in warranty” work be undertaken without authorisation from the HRM
service department
- If you are unable to contact your installer please contact our service department. Quoting your boiler’s
serial number when phoning – this can be found on the cover of this manual.
3
Standard X-ternal & System X-ternal
Handbook
Householder Information
IMPORTANT!
Your boiler must be commissioned in order to:
- Validate your warranty
- Ensure the boiler has been installed correctly and avoid premature failure
- Set the boiler to its optimum efficiency. Operating conditions for the boiler will vary from site to site, your
commissioning engineer has specialised equipment to check the oil pressure and analyse the exhaust gases for
temperature, smoke and carbon dioxide content.
Your installer will organise the commissioning of your boiler. Should you experience any difficulty locating an
engineer, our service department may be able to provide you with details of an engineer in your area.
“Benchmark” Installation, Commissioning and Service Record Log Book
Please ensure that your installer has completed all sections of the log book (found at the back of this manual).
The log book will be required in the event of any warranty work. Ensure that the service record is completed.
Warranty
Your HRM boiler is under warranty for 2 years from the date of installation.
Warranty Conditions
- The boiler must be installed and commissioned in accordance with our handbook
- The boiler must not be repaired, modified or tampered with by any person not authorised by HRM
Extended Warranty
The “Benchmark” and warranty registration document at the end of this manual should be completed as
appropriate by your installer / engineer. This is your record that the boiler has been correctly installed in accordance
with our recommendations. Return the warranty registration document to HRM in order to qualify for a further 3 year
warranty of the heat exchanger – a total of 5 years.
Extended Warranty Conditions
- The boiler must be serviced annually and maintained in accordance with this handbook. The
“Benchmark” service log is located at the back of this manual
- This warranty is in addition to your statutory and other legal rights
After Sales Service
- If your boiler fails during the warranty period contact your installer, who will be able to identify the
cause of the problem. If appropriate, your installer will contact us.
- Under no circumstances should “in warranty” work be undertaken without authorisation from the HRM
service department
- If you are unable to contact your installer please contact our service department. Quoting your boiler’s
serial number when phoning – this can be found on the cover of this manual.
3
Standard X-ternal & System X-ternal
Handbook
4140
Contents Page
1
Standard Wallstar, System Wallstar &
Wallstar Combi Manual
Contents Page
1
Standard Wallstar, System Wallstar &
Wallstar Combi Manual
Installation Procedure Continued – Wallstar Combi
32. Access Door
Fit the access door onto the wall duct, secure it in place by
tightening the 2 screws located on both sides.
33. Flue Positioning
Pull the end of the flue out until the flange on it sits flush
against the back of the access door.
34. Commissioning the Boiler
Installation is complete. The boiler must now be commissioned
by a competent engineer. The “Benchmark” log found at the back
of this manual should be completed and the warranty
documentation returned to HRM Boilers Ltd.
The Condensate Drain
Condensate Drain Installation
The Wallstar condensing range of boilers use a single unit heat exchanger similar to those in the conventional noncondensing Wallstar. However, in order to drain away condensate produced in operation, there is a stainless steel
tube connection on the underside of the flue, which comes pre-connected to a flexible hose. The flexible hose
supplied forms the condensate trap and is terminated with a rubber fitting which will seal inside 22mm plastic waste
pipe.
The hose can either exit the boiler casework through the bottom of the wall-plate or be taken out through the bottom
of the wall duct, in both cases it must be connected into a soak-away (fig 1.1), the household drains (fig 1.2), or a
vertical stack (fig 1.3), via the supplied condensate trap.
Soak Away
Household Drains
Vertical Stack
fig 1.1
fig 1.2
fig 1.3
Page 23
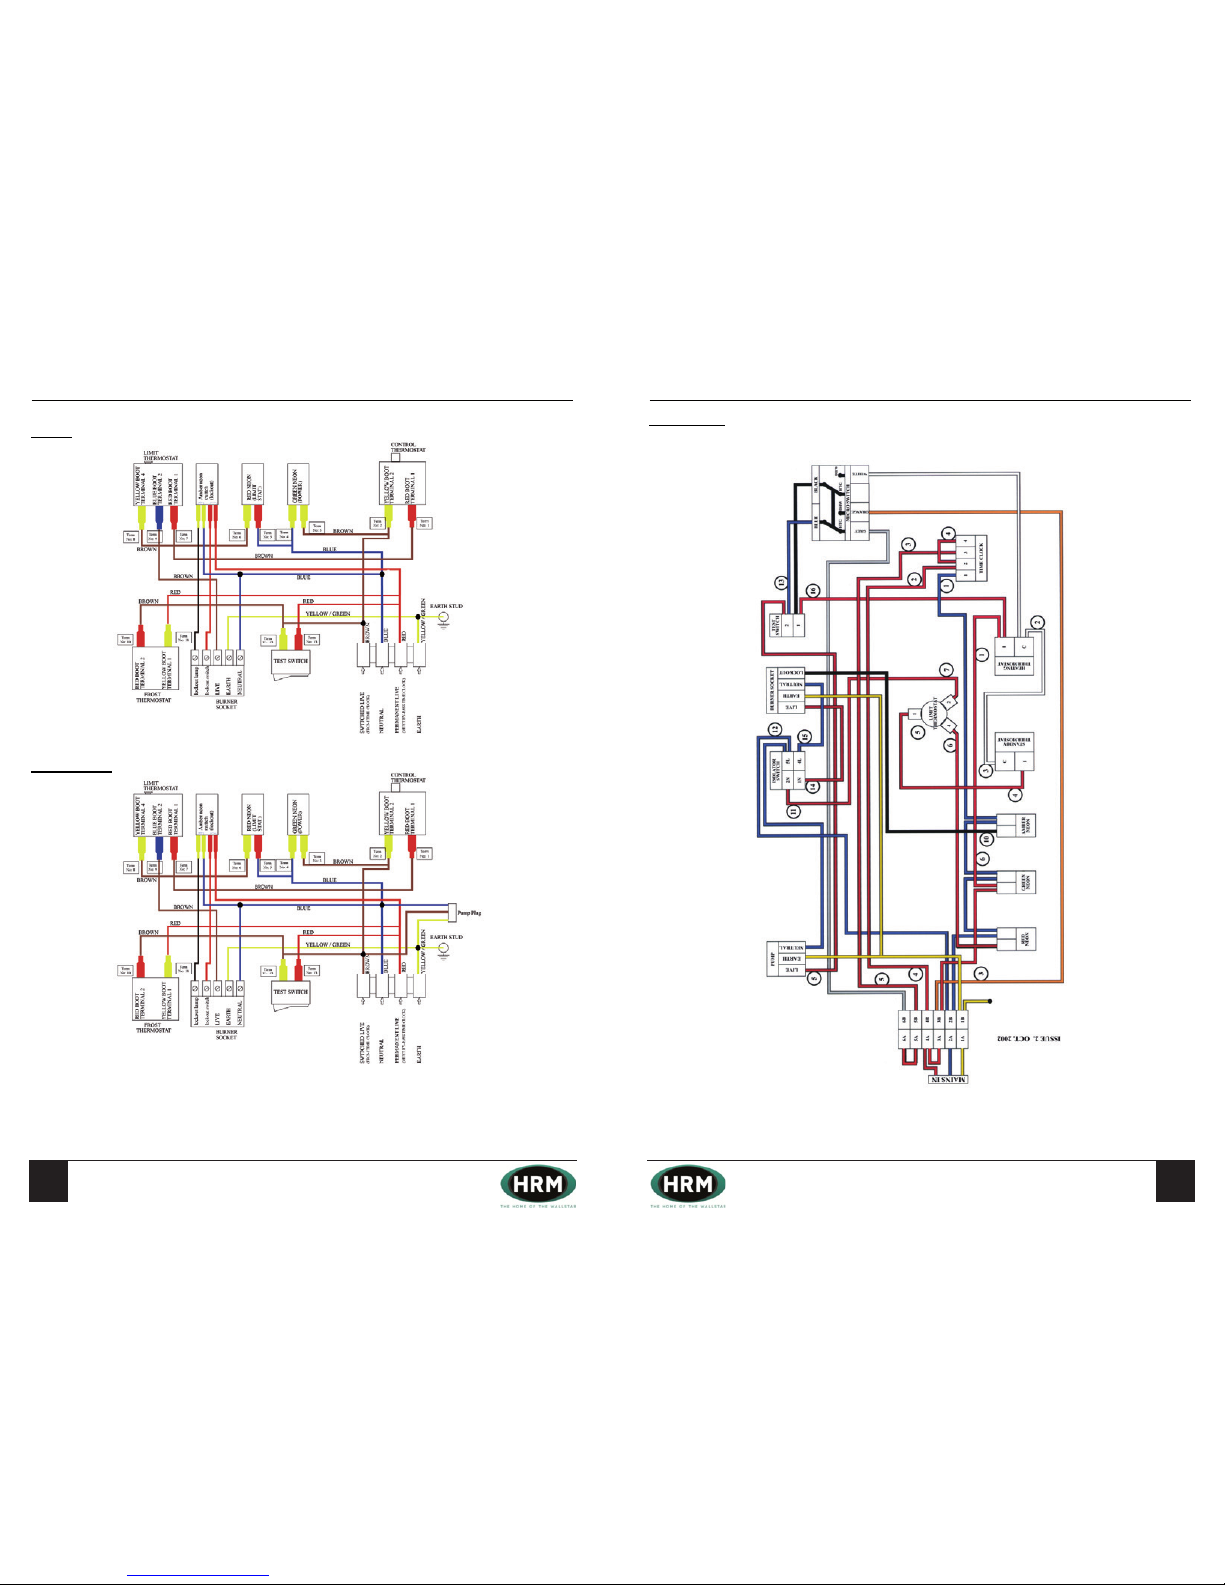
Householder Information
IMPORTANT!
Your boiler must be commissioned in order to:
- Validate your warranty
- Ensure the boiler has been installed correctly and avoid premature failure
- Set the boiler to its optimum efficiency. Operating conditions for the boiler will vary from site to site, your
commissioning engineer has specialised equipment to check the oil pressure and analyse the exhaust gases for
temperature, smoke and carbon dioxide content.
Your installer will organise the commissioning of your boiler. Should you experience any difficulty locating an
engineer, our service department may be able to provide you with details of an engineer in your area.
“Benchmark” Installation, Commissioning and Service Record Log Book
Please ensure that your installer has completed all sections of the log book (found at the back of this manual).
The log book will be required in the event of any warranty work. Ensure that the service record is completed.
Warranty
Your HRM boiler is under warranty for 2 years from the date of installation.
Warranty Conditions
- The boiler must be installed and commissioned in accordance with our handbook
- The boiler must not be repaired, modified or tampered with by any person not authorised by HRM
Extended Warranty
The “Benchmark” and warranty registration document at the end of this manual should be completed as
appropriate by your installer / engineer. This is your record that the boiler has been correctly installed in accordance
with our recommendations. Return the warranty registration document to HRM in order to qualify for a further 3 year
warranty of the heat exchanger – a total of 5 years.
Extended Warranty Conditions
- The boiler must be serviced annually and maintained in accordance with this handbook. The
“Benchmark” service log is located at the back of this manual
- This warranty is in addition to your statutory and other legal rights
After Sales Service
- If your boiler fails during the warranty period contact your installer, who will be able to identify the
cause of the problem. If appropriate, your installer will contact us.
- Under no circumstances should “in warranty” work be undertaken without authorisation from the HRM
service department
- If you are unable to contact your installer please contact our service department. Quoting your boiler’s
serial number when phoning – this can be found on the cover of this manual.
3
Standard X-ternal & System X-ternal
Handbook
Householder Information
IMPORTANT!
Your boiler must be commissioned in order to:
- Validate your warranty
- Ensure the boiler has been installed correctly and avoid premature failure
- Set the boiler to its optimum efficiency. Operating conditions for the boiler will vary from site to site, your
commissioning engineer has specialised equipment to check the oil pressure and analyse the exhaust gases for
temperature, smoke and carbon dioxide content.
Your installer will organise the commissioning of your boiler. Should you experience any difficulty locating an
engineer, our service department may be able to provide you with details of an engineer in your area.
“Benchmark” Installation, Commissioning and Service Record Log Book
Please ensure that your installer has completed all sections of the log book (found at the back of this manual).
The log book will be required in the event of any warranty work. Ensure that the service record is completed.
Warranty
Your HRM boiler is under warranty for 2 years from the date of installation.
Warranty Conditions
- The boiler must be installed and commissioned in accordance with our handbook
- The boiler must not be repaired, modified or tampered with by any person not authorised by HRM
Extended Warranty
The “Benchmark” and warranty registration document at the end of this manual should be completed as
appropriate by your installer / engineer. This is your record that the boiler has been correctly installed in accordance
with our recommendations. Return the warranty registration document to HRM in order to qualify for a further 3 year
warranty of the heat exchanger – a total of 5 years.
Extended Warranty Conditions
- The boiler must be serviced annually and maintained in accordance with this handbook. The
“Benchmark” service log is located at the back of this manual
- This warranty is in addition to your statutory and other legal rights
After Sales Service
- If your boiler fails during the warranty period contact your installer, who will be able to identify the
cause of the problem. If appropriate, your installer will contact us.
- Under no circumstances should “in warranty” work be undertaken without authorisation from the HRM
service department
- If you are unable to contact your installer please contact our service department. Quoting your boiler’s
serial number when phoning – this can be found on the cover of this manual.
3
Standard X-ternal & System X-ternal
Handbook
4342
Contents Page
1
Standard Wallstar, System Wallstar &
Wallstar Combi Manual
Contents Page
1
Standard Wallstar, System Wallstar &
Wallstar Combi Manual
Control Panel Wiring Diagrams – Wallstar and Wallstar System
Wallstar
Wallstar System
Note: The electrical supply to the boiler should be made via a switched and fused spur located near the boiler, fitted
with a 5 amp fuse.
A frost thermostat is fitted as standard to protect the Wallstar and Wallstar System boilers. Where appropriate an
additional frost thermostat may be required to protect the rest of the heating system.
Control Panel Wiring Diagrams – Wallstar Combi
Wallstar Combi
Note: The electrical supply to the boiler should be made via a switched and fused spur located near the boiler, fitted
with a 5 amp fuse.
Page 24
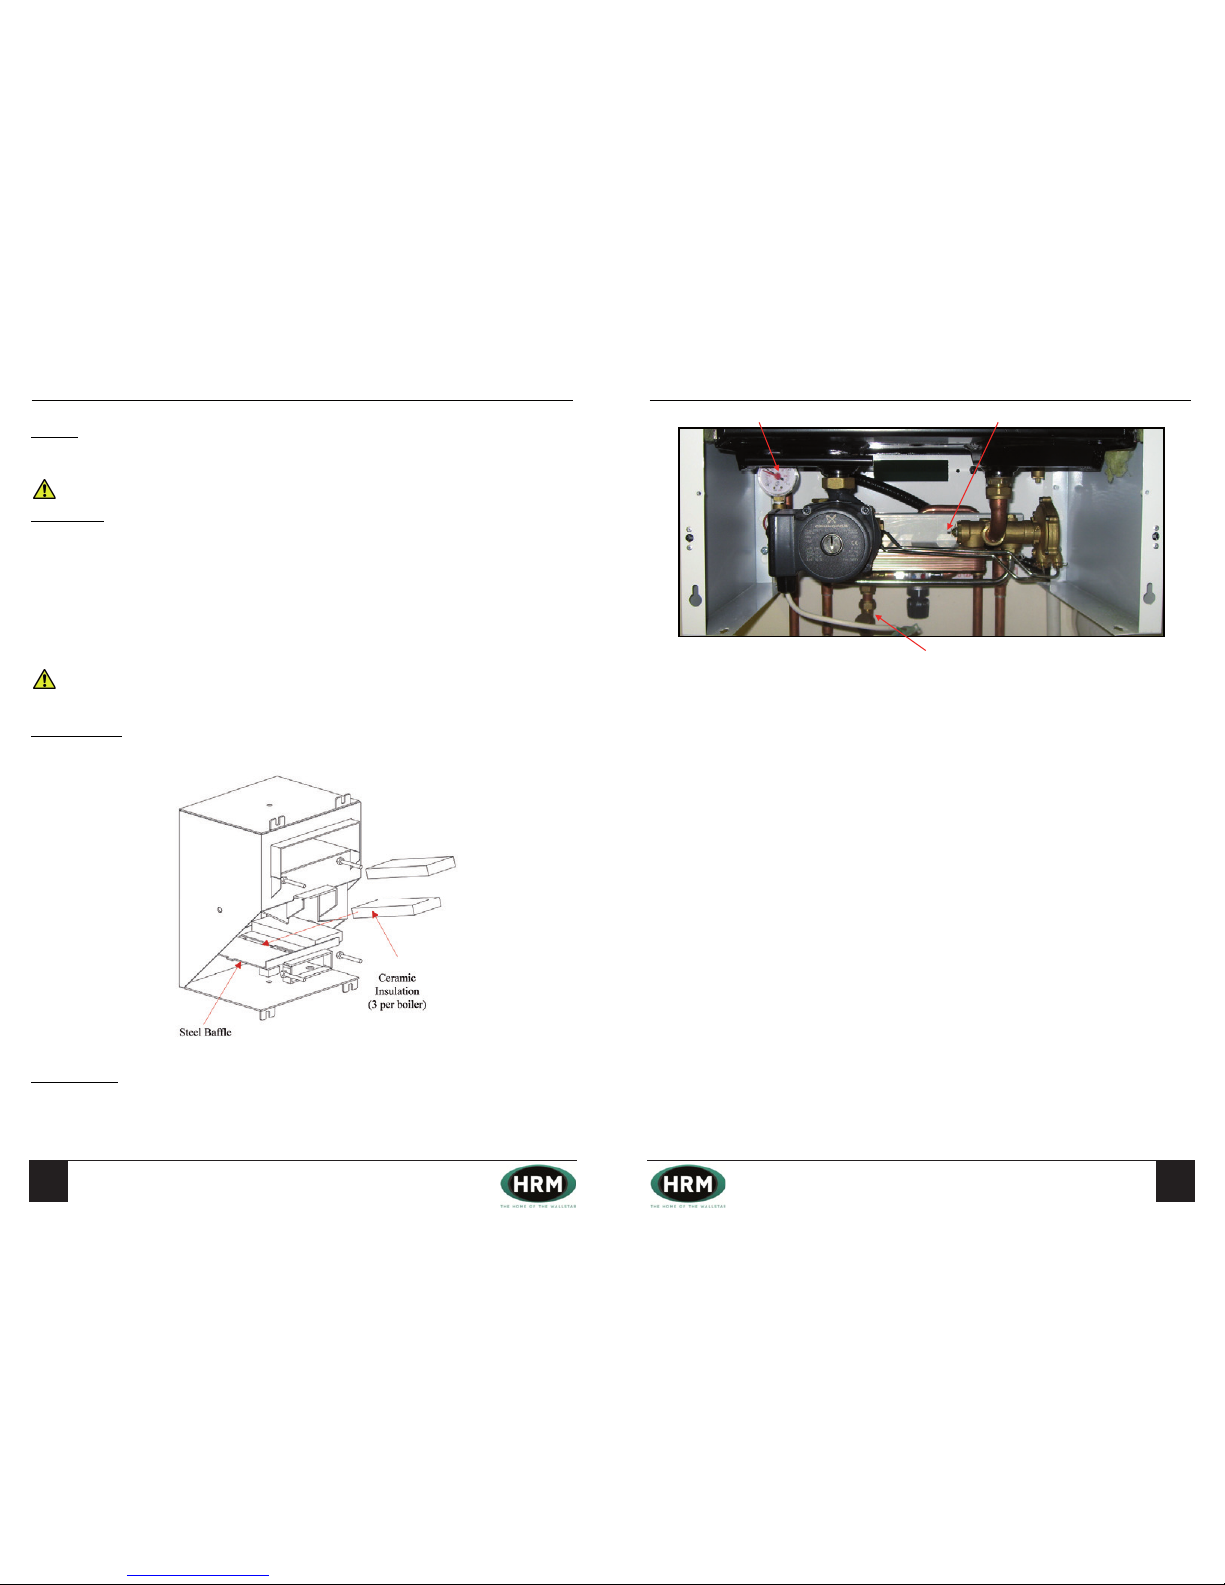
Householder Information
IMPORTANT!
Your boiler must be commissioned in order to:
- Validate your warranty
- Ensure the boiler has been installed correctly and avoid premature failure
- Set the boiler to its optimum efficiency. Operating conditions for the boiler will vary from site to site, your
commissioning engineer has specialised equipment to check the oil pressure and analyse the exhaust gases for
temperature, smoke and carbon dioxide content.
Your installer will organise the commissioning of your boiler. Should you experience any difficulty locating an
engineer, our service department may be able to provide you with details of an engineer in your area.
“Benchmark” Installation, Commissioning and Service Record Log Book
Please ensure that your installer has completed all sections of the log book (found at the back of this manual).
The log book will be required in the event of any warranty work. Ensure that the service record is completed.
Warranty
Your HRM boiler is under warranty for 2 years from the date of installation.
Warranty Conditions
- The boiler must be installed and commissioned in accordance with our handbook
- The boiler must not be repaired, modified or tampered with by any person not authorised by HRM
Extended Warranty
The “Benchmark” and warranty registration document at the end of this manual should be completed as
appropriate by your installer / engineer. This is your record that the boiler has been correctly installed in accordance
with our recommendations. Return the warranty registration document to HRM in order to qualify for a further 3 year
warranty of the heat exchanger – a total of 5 years.
Extended Warranty Conditions
- The boiler must be serviced annually and maintained in accordance with this handbook. The
“Benchmark” service log is located at the back of this manual
- This warranty is in addition to your statutory and other legal rights
After Sales Service
- If your boiler fails during the warranty period contact your installer, who will be able to identify the
cause of the problem. If appropriate, your installer will contact us.
- Under no circumstances should “in warranty” work be undertaken without authorisation from the HRM
service department
- If you are unable to contact your installer please contact our service department. Quoting your boiler’s
serial number when phoning – this can be found on the cover of this manual.
3
Standard X-ternal & System X-ternal
Handbook
Householder Information
IMPORTANT!
Your boiler must be commissioned in order to:
- Validate your warranty
- Ensure the boiler has been installed correctly and avoid premature failure
- Set the boiler to its optimum efficiency. Operating conditions for the boiler will vary from site to site, your
commissioning engineer has specialised equipment to check the oil pressure and analyse the exhaust gases for
temperature, smoke and carbon dioxide content.
Your installer will organise the commissioning of your boiler. Should you experience any difficulty locating an
engineer, our service department may be able to provide you with details of an engineer in your area.
“Benchmark” Installation, Commissioning and Service Record Log Book
Please ensure that your installer has completed all sections of the log book (found at the back of this manual).
The log book will be required in the event of any warranty work. Ensure that the service record is completed.
Warranty
Your HRM boiler is under warranty for 2 years from the date of installation.
Warranty Conditions
- The boiler must be installed and commissioned in accordance with our handbook
- The boiler must not be repaired, modified or tampered with by any person not authorised by HRM
Extended Warranty
The “Benchmark” and warranty registration document at the end of this manual should be completed as
appropriate by your installer / engineer. This is your record that the boiler has been correctly installed in accordance
with our recommendations. Return the warranty registration document to HRM in order to qualify for a further 3 year
warranty of the heat exchanger – a total of 5 years.
Extended Warranty Conditions
- The boiler must be serviced annually and maintained in accordance with this handbook. The
“Benchmark” service log is located at the back of this manual
- This warranty is in addition to your statutory and other legal rights
After Sales Service
- If your boiler fails during the warranty period contact your installer, who will be able to identify the
cause of the problem. If appropriate, your installer will contact us.
- Under no circumstances should “in warranty” work be undertaken without authorisation from the HRM
service department
- If you are unable to contact your installer please contact our service department. Quoting your boiler’s
serial number when phoning – this can be found on the cover of this manual.
3
Standard X-ternal & System X-ternal
Handbook
4544
Contents Page
1
Standard Wallstar, System Wallstar &
Wallstar Combi Manual
Contents Page
1
Standard Wallstar, System Wallstar &
Wallstar Combi Manual
Boiler Maintenance
Servicing
The boiler should be serviced annually. Should you experience any difficulty in locating an engineer, our service
department may be able to provide you with the contact details of an engineer in your area.
IMPORTANT: Isolate the power supply before servicing the boiler.
Servicing Steps
1. Remove the burner and combustion chamber baffles/insulation, clean the internal heat exchanger surfaces and
components. Replace the combustion chamber baffles and insulation with new items.
2. Check and replace seals, gaskets and flexible oil lines as appropriate.
3. Clean or replace filter elements and de-sludge the oil tank.
4. Dismantle the burner assembly and clean. Fit a new nozzle. For instructions on how to carry this out please read
the separate burner instructions supplied with your boiler.
5. Check the oil pressure and flue gas analysis. Adjust the burner settings as appropriate.
IMPORTANT: Do not use a wire brush to clean flue ways.
Baffle Replacement
(
Priming the Burner
Ensure both power and fuel supplies to the boiler are switched on. Press the reset button. The burner will start it’s
firing sequence. To release air from the oil line slacken the vent plug during this sequence. If ignition fails the burner
will go to lock out. Wait 60 seconds and repeat the procedure.
Wallstar Combi Fault Diagnosis
No heating or domestic hot water (DHW)
- If the heating and DHW works when the test switch is in the “test” position, check the plug and socket
connection from the micro switch.
- Is the circulation pump working?
Cold DHW, heating functions satisfactorily
- Pipe work for the “mains in” and DHW have been connected the wrong way round.
Warm DHW, heating functions satisfactorily
- Is the system pressure set to one bar (when cold)?
- Is the black plastic plug in the automatic air vent open?
- Is there a combustion problem/faulty nozzle?
- Is the mains water temperature low? The boiler will raise the mains water temperature by 35
°C at a
flow rate of 10.5 litres per minute.
- Check the operation of the mixing valve – is the “hot water” (right hand) inlet to the valve excessively
hot indicating that water is not flowing through the valve?
- If the “hot water” inlet to the mixing valve is cool, the plate heat exchanger may be
blocked/contaminated.
No heating, DHW functions satisfactorily
- Has the plunger on diverter valve stuck in the out position? Press the plunger a few times to free, or
dismantle the diverter valve assembly and clean.
DHW flow is less than 10.5 litres
- Is the mains water pressure sufficient? It should be greater than 1.5bar or 15 litres per minute.
- Is the mains water filter blocked?
Heating runs constantly
- Has the switch under the burner been left in the test position?
- Has the heating time clock been left in the permanently “on” position?
The boiler overheat thermostat needs resetting frequently
- Has the boiler lost system pressure?
System pressure is low
- Recharge system pressure by opening the filling loop valve and increasing pressure to the jet point
indicator on the pressure gauge (approximately 1 bar).
Mains Filter
Pressure Gauge Diverter Valve Plunger
Ensure both power and fuel supplies to the boiler are switched on. Press the reset button. The burner will start it’s
ring sequence. To release air from the oil line remove the vent plug during this sequence.
Page 25
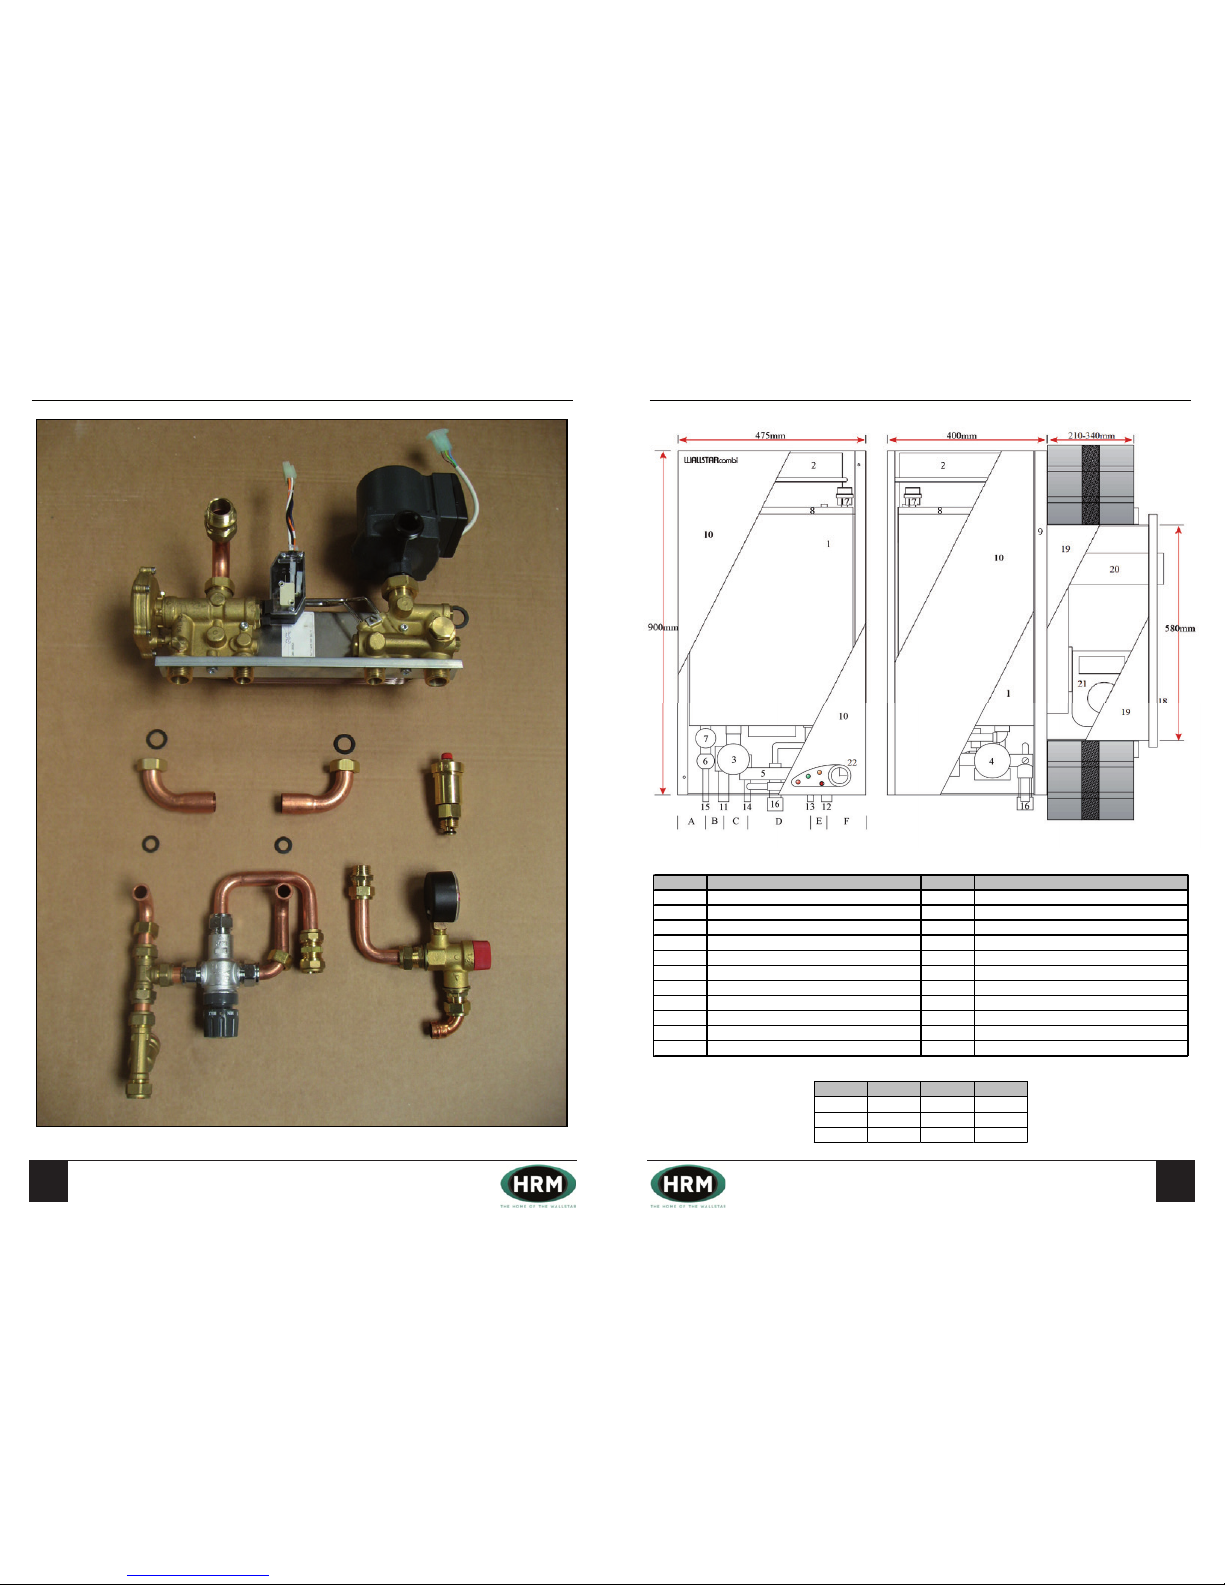
Householder Information
IMPORTANT!
Your boiler must be commissioned in order to:
- Validate your warranty
- Ensure the boiler has been installed correctly and avoid premature failure
- Set the boiler to its optimum efficiency. Operating conditions for the boiler will vary from site to site, your
commissioning engineer has specialised equipment to check the oil pressure and analyse the exhaust gases for
temperature, smoke and carbon dioxide content.
Your installer will organise the commissioning of your boiler. Should you experience any difficulty locating an
engineer, our service department may be able to provide you with details of an engineer in your area.
“Benchmark” Installation, Commissioning and Service Record Log Book
Please ensure that your installer has completed all sections of the log book (found at the back of this manual).
The log book will be required in the event of any warranty work. Ensure that the service record is completed.
Warranty
Your HRM boiler is under warranty for 2 years from the date of installation.
Warranty Conditions
- The boiler must be installed and commissioned in accordance with our handbook
- The boiler must not be repaired, modified or tampered with by any person not authorised by HRM
Extended Warranty
The “Benchmark” and warranty registration document at the end of this manual should be completed as
appropriate by your installer / engineer. This is your record that the boiler has been correctly installed in accordance
with our recommendations. Return the warranty registration document to HRM in order to qualify for a further 3 year
warranty of the heat exchanger – a total of 5 years.
Extended Warranty Conditions
- The boiler must be serviced annually and maintained in accordance with this handbook. The
“Benchmark” service log is located at the back of this manual
- This warranty is in addition to your statutory and other legal rights
After Sales Service
- If your boiler fails during the warranty period contact your installer, who will be able to identify the
cause of the problem. If appropriate, your installer will contact us.
- Under no circumstances should “in warranty” work be undertaken without authorisation from the HRM
service department
- If you are unable to contact your installer please contact our service department. Quoting your boiler’s
serial number when phoning – this can be found on the cover of this manual.
3
Standard X-ternal & System X-ternal
Handbook
Householder Information
IMPORTANT!
Your boiler must be commissioned in order to:
- Validate your warranty
- Ensure the boiler has been installed correctly and avoid premature failure
- Set the boiler to its optimum efficiency. Operating conditions for the boiler will vary from site to site, your
commissioning engineer has specialised equipment to check the oil pressure and analyse the exhaust gases for
temperature, smoke and carbon dioxide content.
Your installer will organise the commissioning of your boiler. Should you experience any difficulty locating an
engineer, our service department may be able to provide you with details of an engineer in your area.
“Benchmark” Installation, Commissioning and Service Record Log Book
Please ensure that your installer has completed all sections of the log book (found at the back of this manual).
The log book will be required in the event of any warranty work. Ensure that the service record is completed.
Warranty
Your HRM boiler is under warranty for 2 years from the date of installation.
Warranty Conditions
- The boiler must be installed and commissioned in accordance with our handbook
- The boiler must not be repaired, modified or tampered with by any person not authorised by HRM
Extended Warranty
The “Benchmark” and warranty registration document at the end of this manual should be completed as
appropriate by your installer / engineer. This is your record that the boiler has been correctly installed in accordance
with our recommendations. Return the warranty registration document to HRM in order to qualify for a further 3 year
warranty of the heat exchanger – a total of 5 years.
Extended Warranty Conditions
- The boiler must be serviced annually and maintained in accordance with this handbook. The
“Benchmark” service log is located at the back of this manual
- This warranty is in addition to your statutory and other legal rights
After Sales Service
- If your boiler fails during the warranty period contact your installer, who will be able to identify the
cause of the problem. If appropriate, your installer will contact us.
- Under no circumstances should “in warranty” work be undertaken without authorisation from the HRM
service department
- If you are unable to contact your installer please contact our service department. Quoting your boiler’s
serial number when phoning – this can be found on the cover of this manual.
3
Standard X-ternal & System X-ternal
Handbook
4746
Contents Page
1
Standard Wallstar, System Wallstar &
Wallstar Combi Manual
Contents Page
1
Standard Wallstar, System Wallstar &
Wallstar Combi Manual
Components – Wallstar Combi
Pump Washer
Auto Air Vent
(COM317)
Pump (COM402)
3 Pin Plug
Mixing Valve
(COM415)
2 x Washer
Flow & Return Bend
(COM416-5B)
2 x Washer
Relief Valve
(COM301)
Pressure Gauge
(COM301)
6 Pin Plug
Micro
Switch
Diaphragm
Heating
Return
Heating Flow
Mains
Cold In
Hot
Out
Wallstar Combi Component Guide
Item Item
1 12
2 13
3 14
4 15
5 16
6 17
7 18
8 19
9 20
10 21
11 22
Mixi ng Valve
Descript ion
Heating Flow
15mm DHW Out let
15mm Mains Water Inlet
Press ure Vent Pipe
Air Ve nt
Service Acc ess Door
Wall Duc t
Flue
Burner
Tim er
Descri ption
Boiler Heat E xchanger
Expans ion Vessel
Circulat ing Pump
Di vert er V al ve
Plate Heat Exchanger
Press ure Relief Valve
Press ure Gauge
Insulation
Wall Plate
Whit e Casing
Heating Return
Item Dis tance Item Distance
A 67 D 160
B 38 E 40
C 65 F 105
Page 26

NOTES
The code of practice for the installation,
commissioning & servicing of oil central heating.
Installation,
Commissioning and
Service Record
Log Book
IMPORTANT
1. Please keep the Log Book in a safe place for future reference.
2. This Log Book is to be completed in full by the competent person(s)
who commissioned the boiler and associated equipment and then
handed to the customer. When this is done, the Log Book is a
commissioning certificate that can be accepted as evidence of
compliance with the appropriate Building Regulations.
3. Failure to install and commission this appliance to the manufacturer’s
instructions may invalidate the warranty.
The above does not affect your statutory rights.
The content of this Log Book has been
produced in consultation with
C HEATING AND HOT WATER INFORMATION COUNCIL
44258 wallstar.qxp 24/01/2006 10:04 Page 49
Page 27

$33/,$1&(,167$//$7,21$1'&21752/ '(7$,/6
,167$//(5'(7$,/6
&203$1< 1$0( ,167$//$7,21'$7(
$''5(66
7(/12
2)7(&5(*12 LIDSSOLFDEOH
&200,66,21,1*'(7$,/6
&203$1< 1$0( &200,66,21,1*'$7(
$''5(66
7(/12
2)7(&5(*12 LIDSSOLFDEOH
$33/,$1&('(7$,/6
02'(/ :$//67$5
6(5,$/ 180%(5
,6$'(48$7(&20%867,219(17,/$7,21$,56833/< 3529,'('" <(6
)/8(7(50,1$7,1*326,7,21
'2(67+()/8(7(50,1$7(,1$&&25'$1&(:,7+7+(,167$//$7,210$18$/" <(6
2,/ 6<67(0
7$1.&$3$&,7< OLWUHV
%81'(' <(6 12
,67+(7$1.6833257('21$ 68,7$%/(%$6(" <(6 12
,6$3$3(5(/(0(172,/ ),/7(5),77('" <(6 12
&21752/6
7RFRPSO\ ZLWKWKH%XLOGLQJ5HJXODWLRQVHDFKVHFWLRQPXVWKDYHDWLFNLQ RQHRURWKHURIWKHER[HV
5(48,5(0(176 0($685(63529,'('
7,0($1'7(03(5$785( 522067$7$1' 352*5$00$%/(
&21752/ 72 +($7,1* 352*5$00(57,0(5 522067$7
7,0($1'7(03(5$785( &</,1'(567$7$1' &20%,
&21752/ 72 +27:$7(5 352*5$00(57,0(5 %2,/(5
+($7,1*=21(9$/9(6 ),77(' 1275(48,5('
7+(50267$7,&5$',$7259$/9(6 ),77('
$8720$7,& %<3$66726<67(0 ),77(' 1275(48,5('
3OHDVHHQWHUPRGHOQXPEHU
APPLIANCE INSTALLATION AND CONTROL DETAILS
CIRCULATION
HAS THE SYSTEM BEEN FLUSHED IN ACCORDANCE WITH THE INSTALLATION
INSTRUCTIONS? YES
HAS AN INHIBITOR BEEN ADDED: YES
(For the central heating mode, measure and record)
CENTRAL HEATING FLOW TEMPERATURE
0
C
CENTRAL HEATING RETURN TEMPERATURE
0
C
BURNER SETTINGS
SMOKE NO CO
2
% NETT FLUE GAS TEMPERATURE 0C
NOZZLE SIZE OIL PRESSURE
COMBINATION BOILERS ONLY
HAS A WATER SCALE REDUCER BEEN FITTED? YES NO
TYPE FITTED?
(For the domestic hot water mode, measure and record):
MAXIMUM OPERATING WATER PRESSURE bar
COLD WATER INLET TEMPERATURE
0
C
HOT WATER OUTLET TEMPERATURE
0
C
WATER FLOW RATE AT MAXIMUM SETTING litres/min
IS THE SYSTEM PRESSURE CORRECT YES
CONDENSING BOILERS ONLY
HAS THE CONDENSATE DRAIN BEEN INSTALLED IN ACCORDANCE
WITH THE MANUFACTURER’S INSTRUCTIONS? YES NO
FOR ALL INSTALLATIONS
DOES THE HEATING AND HOT WATER SYSTEM COMPLY
WITH THE APPROPRIATE BUILDING REGULATIONS? YES
HAS THE BOILER AND ASSOCIATED EQUIPMENT BEEN INSTALLED AND
COMMISSIONED IN ACCORDANCE WITH THE INSTALLATION INSTRUCTIONS? YES
HAVE YOU DEMONSTRATED THE OPERATION OF THE BOILER
AND SYSTEM CONTROLS TO THE CUSTOMER? YES
HAVE YOU LEFT ALL MANUFACTURER’S LITERATURE WITH THE
CUSTOMER? YES
HAS WARRANTY DOCUMENTATION BEEN COMPLETED AND RETURNED? YES
COMPETENT PERSON’S CUSTOMER’S
SIGNATURE: ............................................. SIGNATURE: .............................................
(To confirm demonstrations of equipment, and receipt of appliance instructions)
44258 wallstar.qxp 24/01/2006 09:28 Page 51
Page 28

SERVICE LOG
Service engineer’s name: ............................................. Telephone No: .............................................
Date
Parts Replaced
Comments/Parts to be
replaced Next Service
www.hrmboilers.co.uk
Haverscroft Industrial Estate, Attleborough, Norfolk, NR17 1YE. Tel: 01953 455400. Fax: 454483.
E-mail: [email protected] E-mail: [email protected]
Page 29

Code: LI044
Issue No: 2 (03/14).
HRM Boilers Limited Haverscroft Industrial Estate Attleborough Norfolk NR17 1YE
HRM Boilers Limited
Registered in England No. 4168704
 Loading...