

Page 1
GETTING STARTED
This manual will guide you through the setup of your new Point Of Sale system. You will also find
answers to all your questions about your daily use of OneStore POS.
0
Page 2

HARDWARE
SETUP
To attach the printer
and cash drawer
Label printer
Connect scanner
GETTING
GOING
Login for the first time
To open the register
FRONT-END
Overview
EOD(End Of Day)
Profile
Inventory
Return
Discount
Manual product
Receipts
Sales
BACKOFFICE
Sales
Turnover
Orders
KPI
Average sales
Gross margin
Inventory
Products
Add product
Categories
Add categories
Users
Add user
Create new users
Permissions
Settings
Account
Printers
WELCOME
This is your new cash register. Your OneStore POS will be a focal point in your business, so we
recommend reading this manual thoroughly in order to optimally use the options the system provides.
The manual is divided into hardware setup, system use, front-end options and back office options.
Everything is set up with pictures and explanations.
Page 3
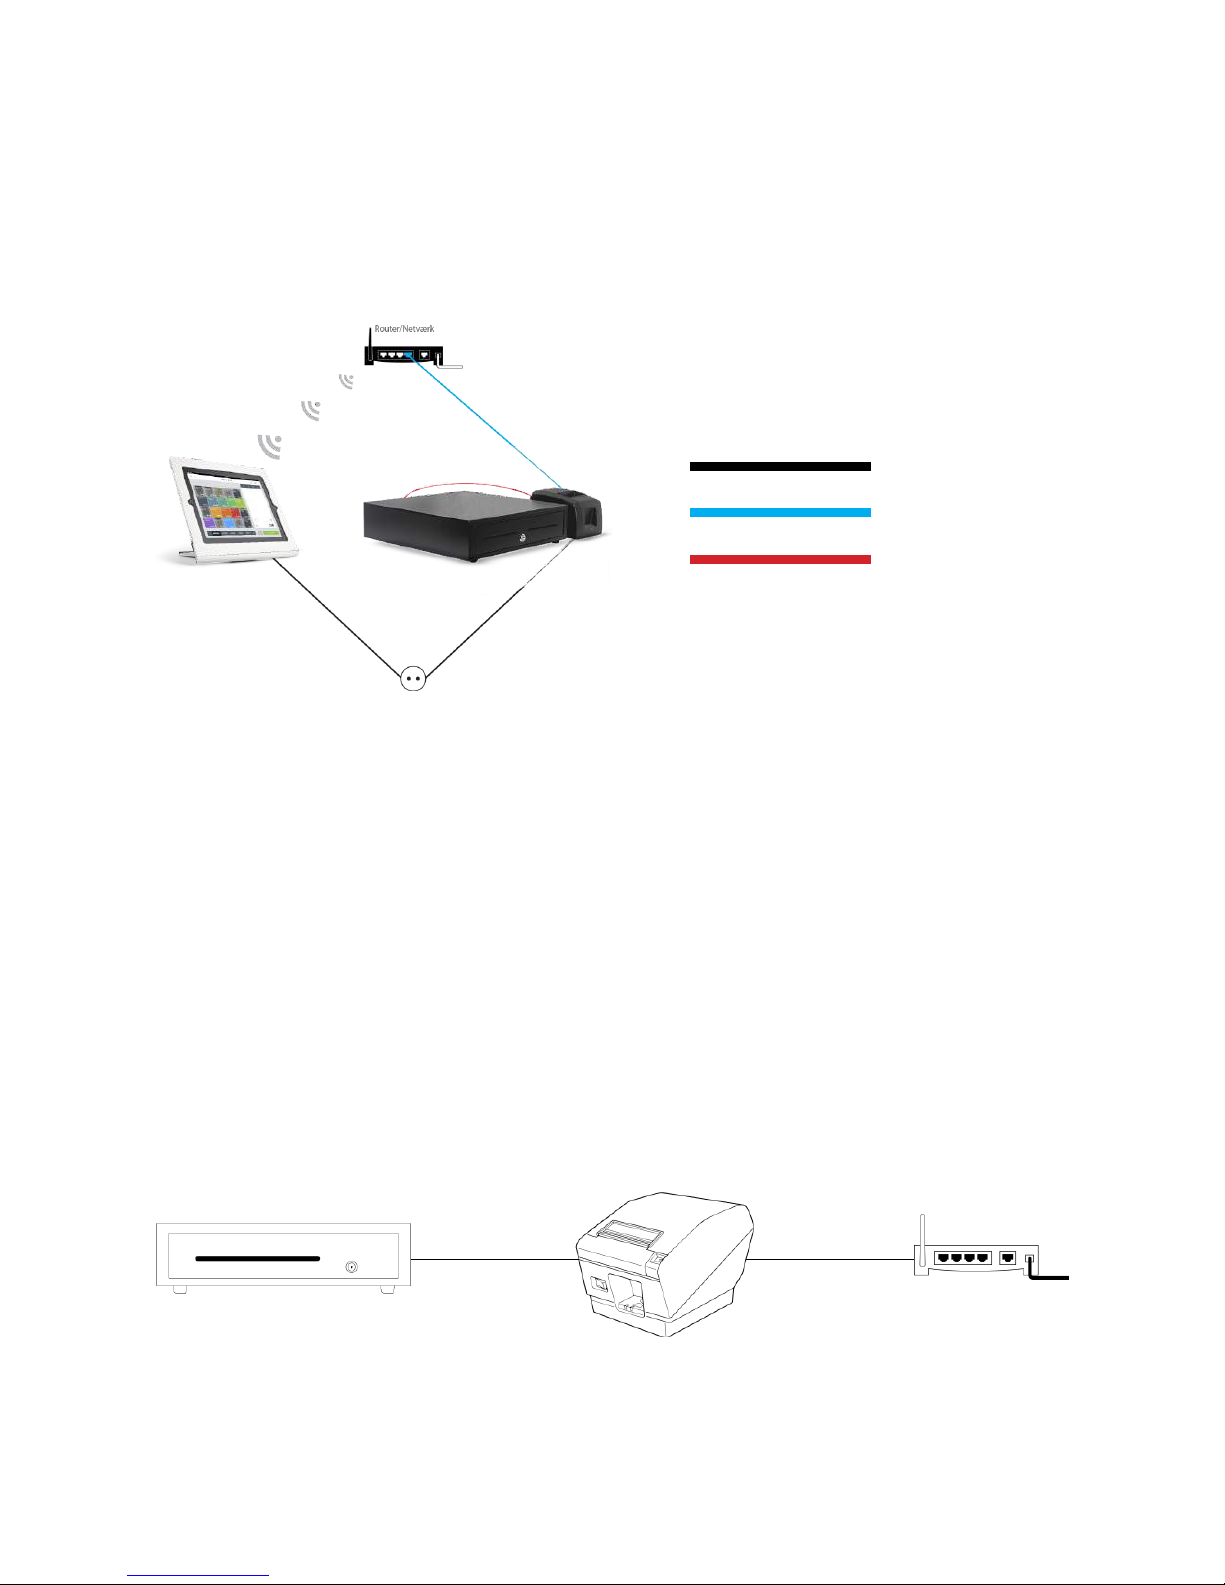
CABLE DEFINITION
Power cable
Network cable
Cash drawer cable
Wireless network
HARDWARE SETUP
The following is an overview of setting up the system. Here we will go over the setup step by step.
TO SET UP PRINTER AND CASH DRAWER.
Page 4
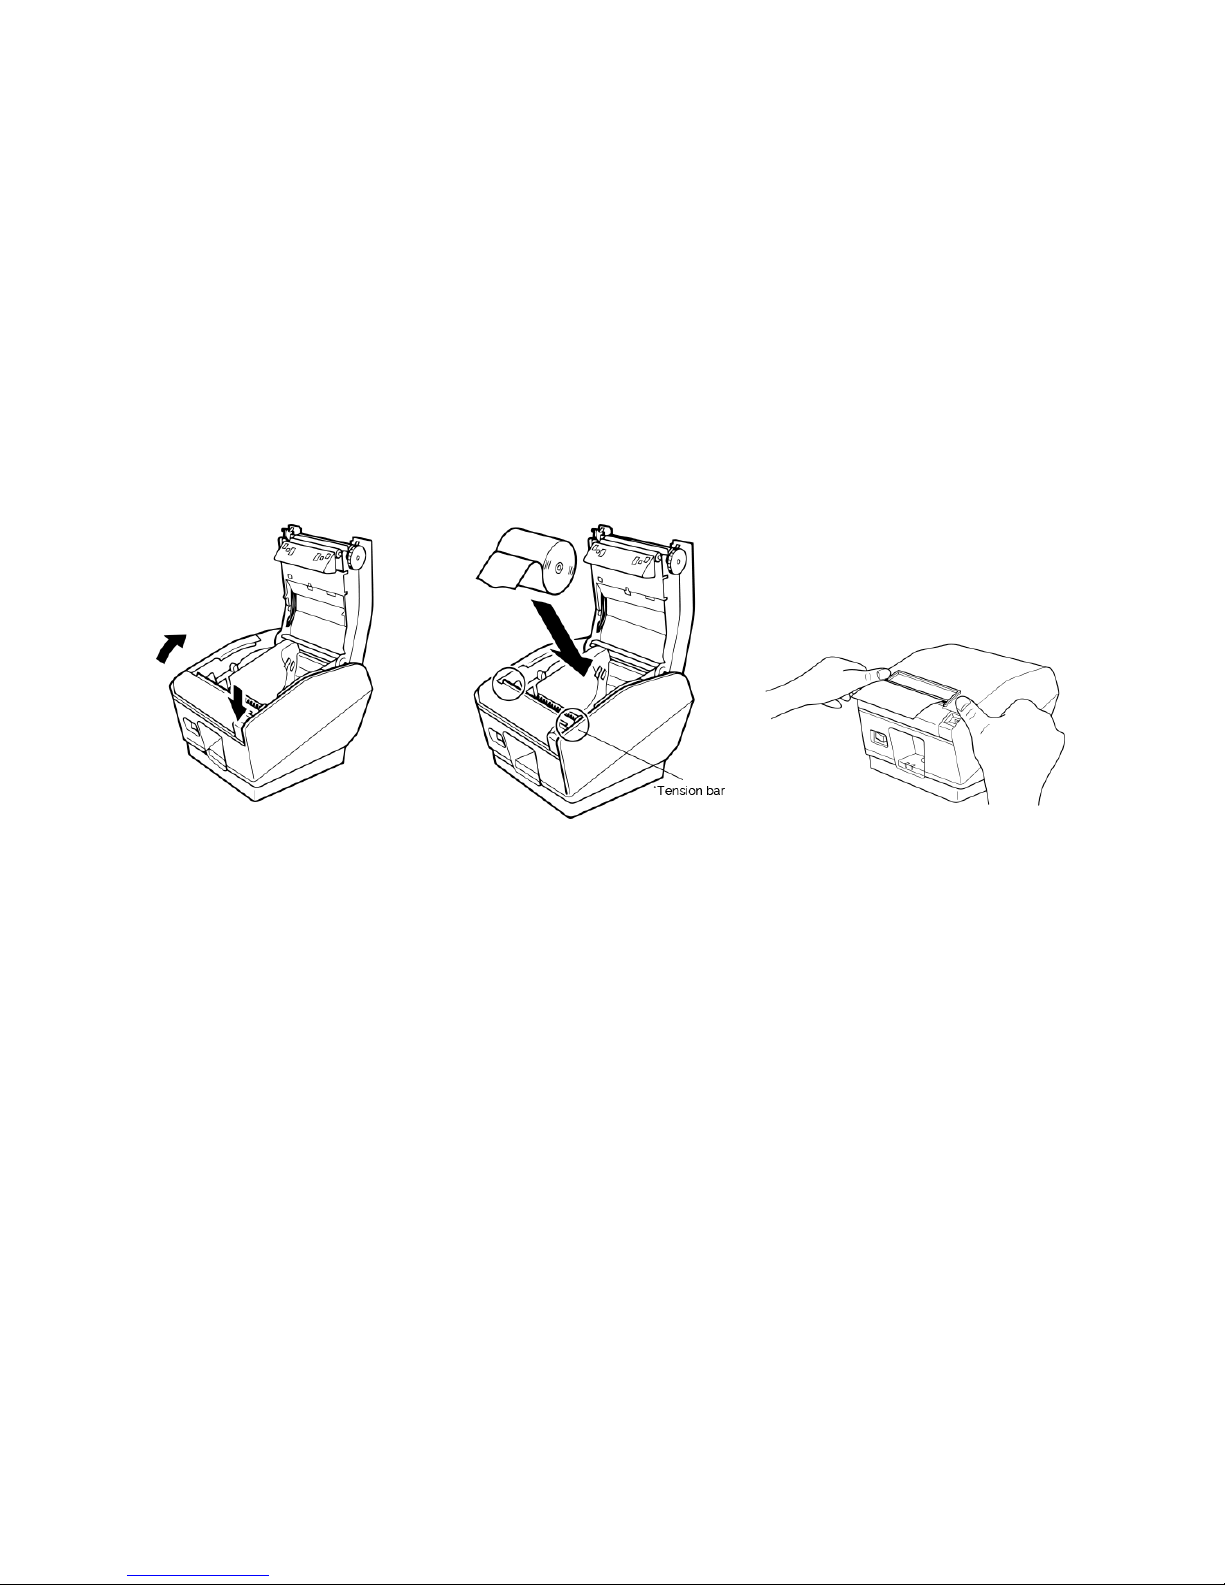
1. Open printer 2. Add paper to printer
*The tension bar helps keep
the paper in place.
3. Close the printer
Step
Step
TO ADD PAPER TO YOUR PRINTER
CONNECTING THE PRINTER, CASH DRAWER
AND IPAD. IMPORTANT - THERE MUST BE
ACCESS TO LAN AND WIFI NETWORK.
1
/4
2
/4
Page 5
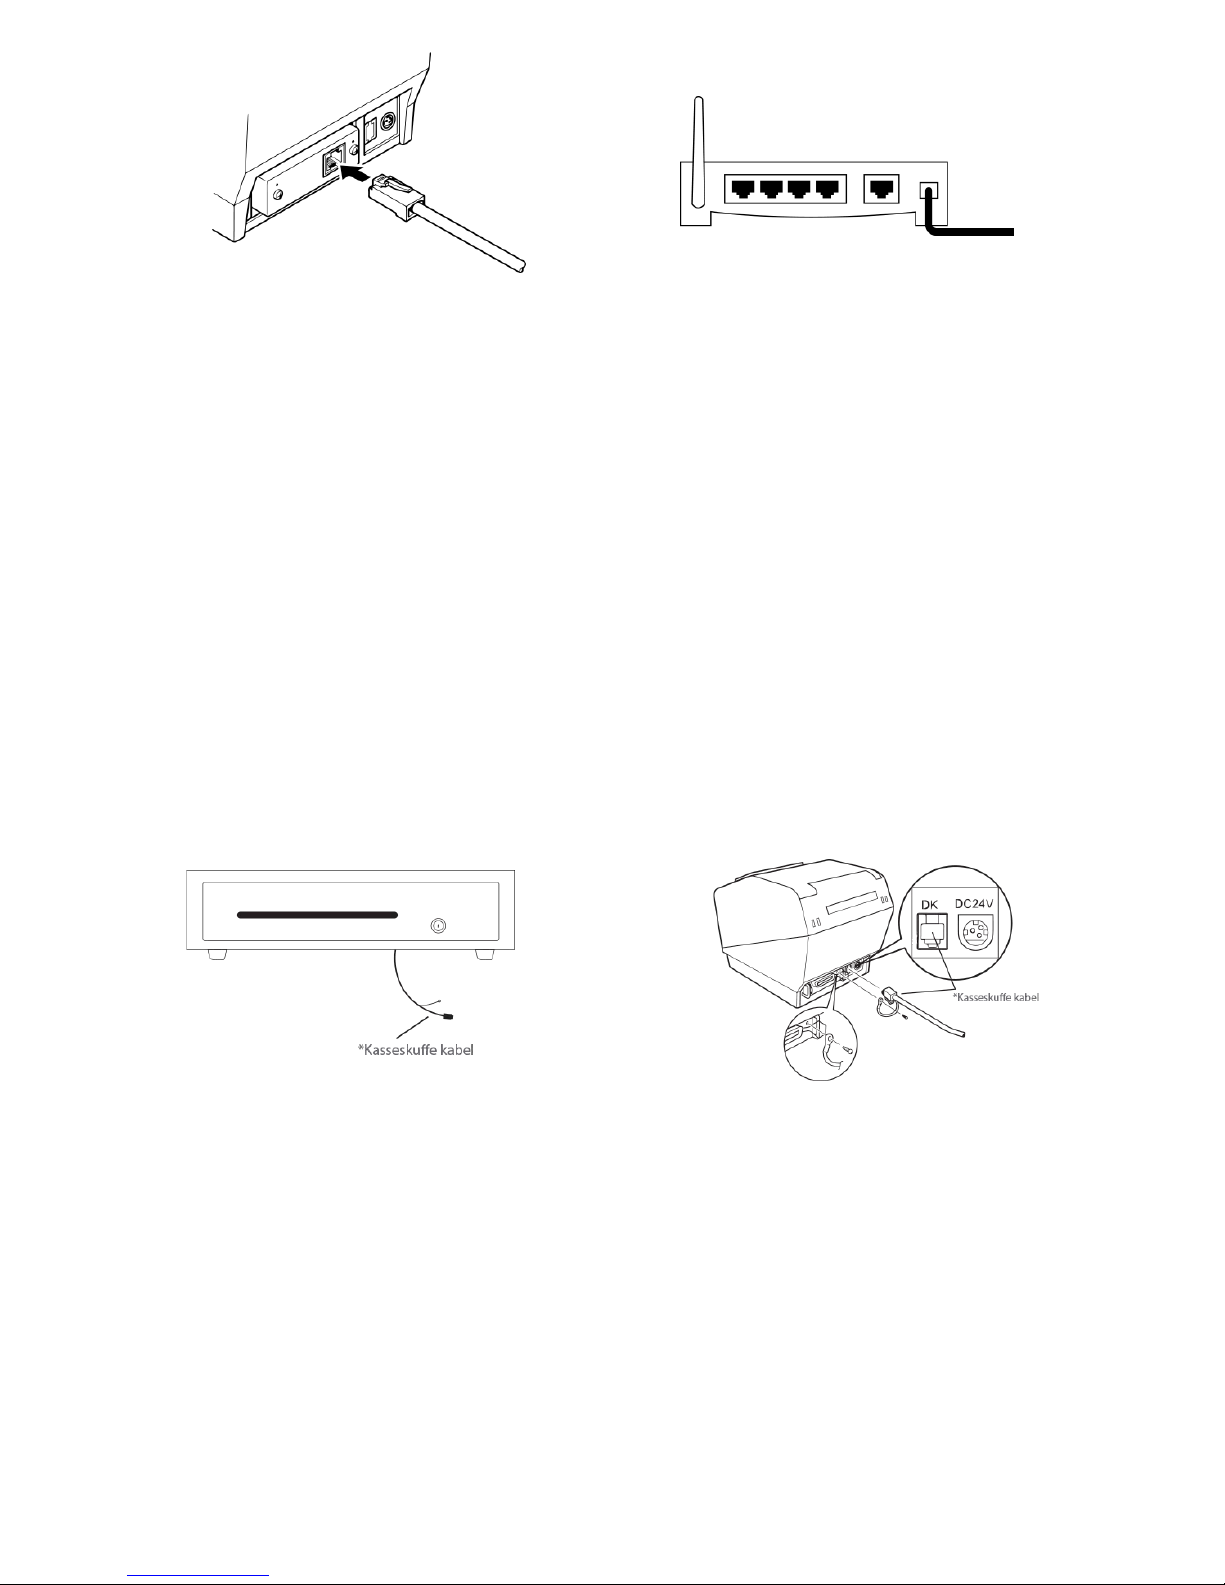
1. Connect network cable to printer. 2. Connect the other end to the router.
1. Take the cable* under the cash drawer 2. Connect the cable to the printer.
Step
The cash drawer will be set to the printer in step 3 and will thus be on the network.
Note: If the printer is not connected to the iPad, the cash drawer will not work either.
CONNECT CASH DRAWER TO PRINTER.
Finally, turn on the power to the printer and everything works.
The power plug is connected to the last available plug (DC24V) in the printer.
3
/4
Page 6
Step
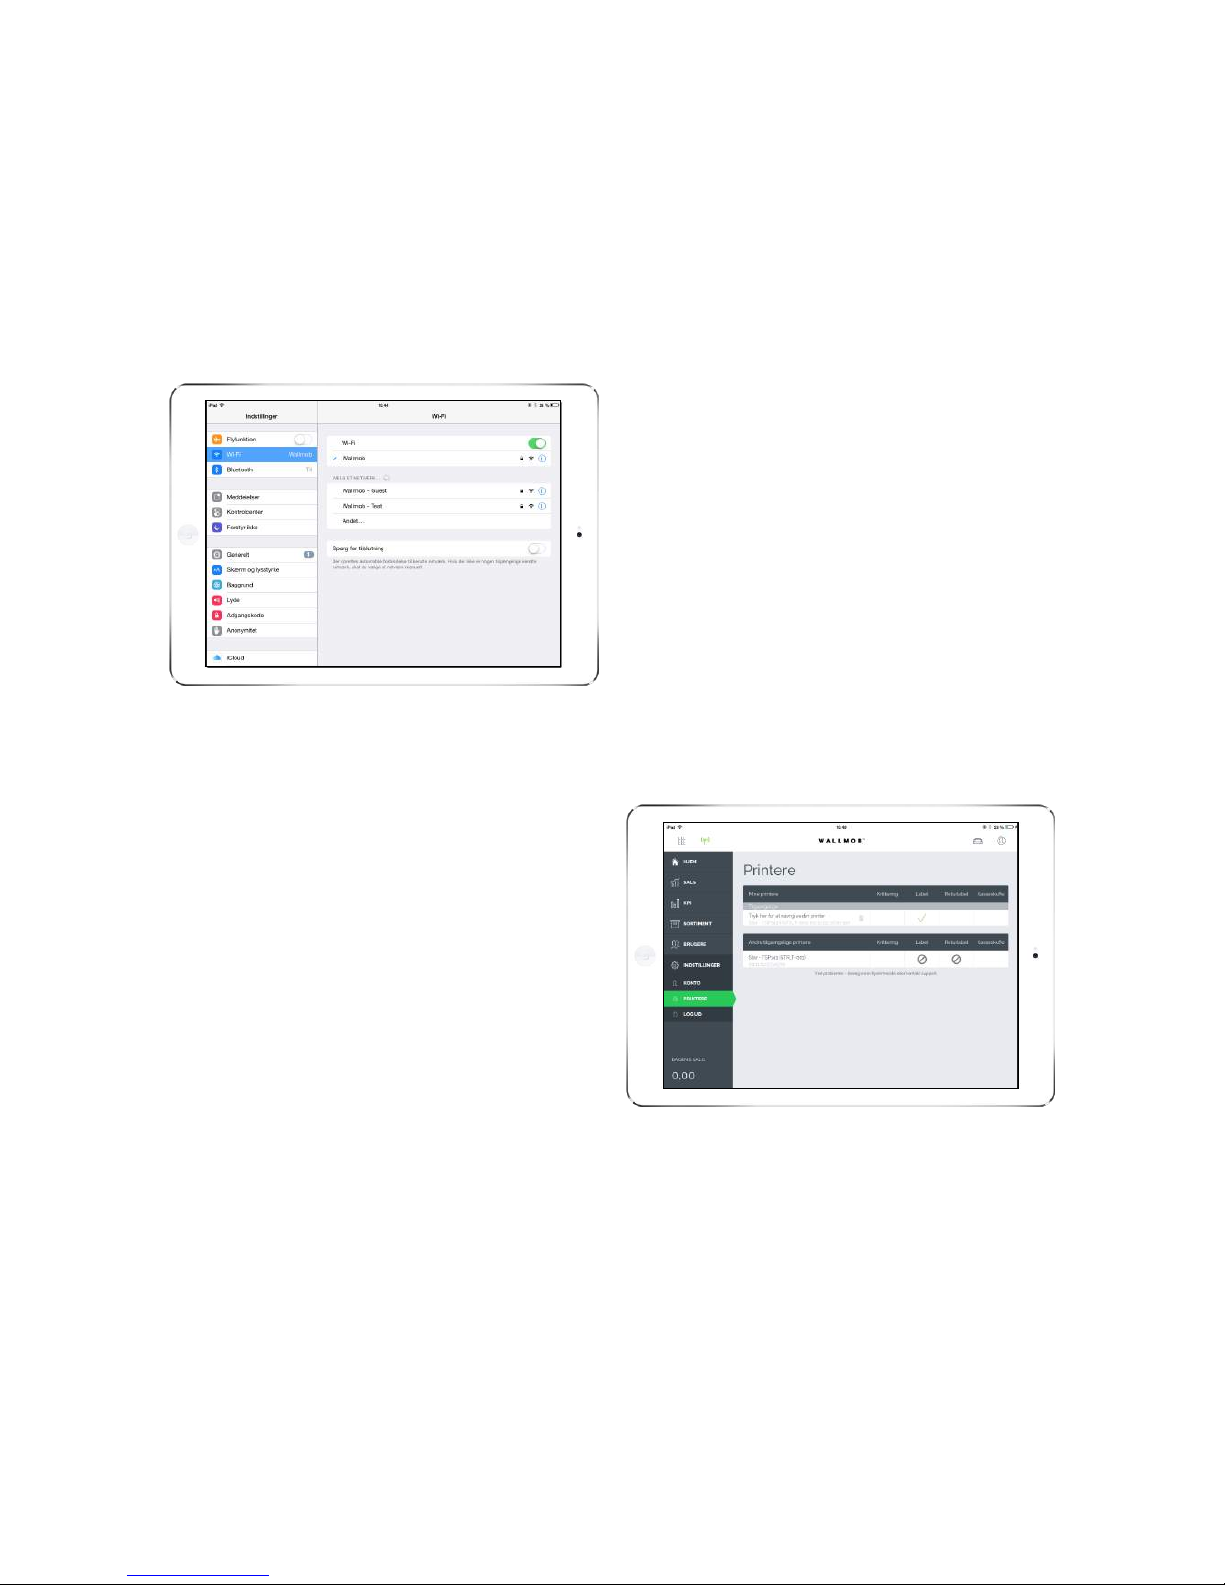
TO CONNECT IPAD TO WIFI
1: Go to settings on the iPad
2: Press Wifi (in order for everything to
work, you must be sure to connect the
iPad to the same wireless network as the
printer and cash drawer)
CONNECT PRINTER AND CASH DRAWER
TO THE IPAD
1: Login
2: Press the BackOffice button
3: Choose Settings
4: Then choose Printers.
5: The program automatically searches for
all available printers. When it has found
the printer, choose the desired function
and you are now ready to print receipts,
for example.
Everything is now set up and you can start
using your OneStore POS.
TO GET THE PRINTER AND CASH DRAWER TO
COMMUNICATE WITH THE IPAD, THE IPAD
MUST BE CONNECTED TO THE SAME
NETWORK VIA WIFI.
4
/4
Page 7
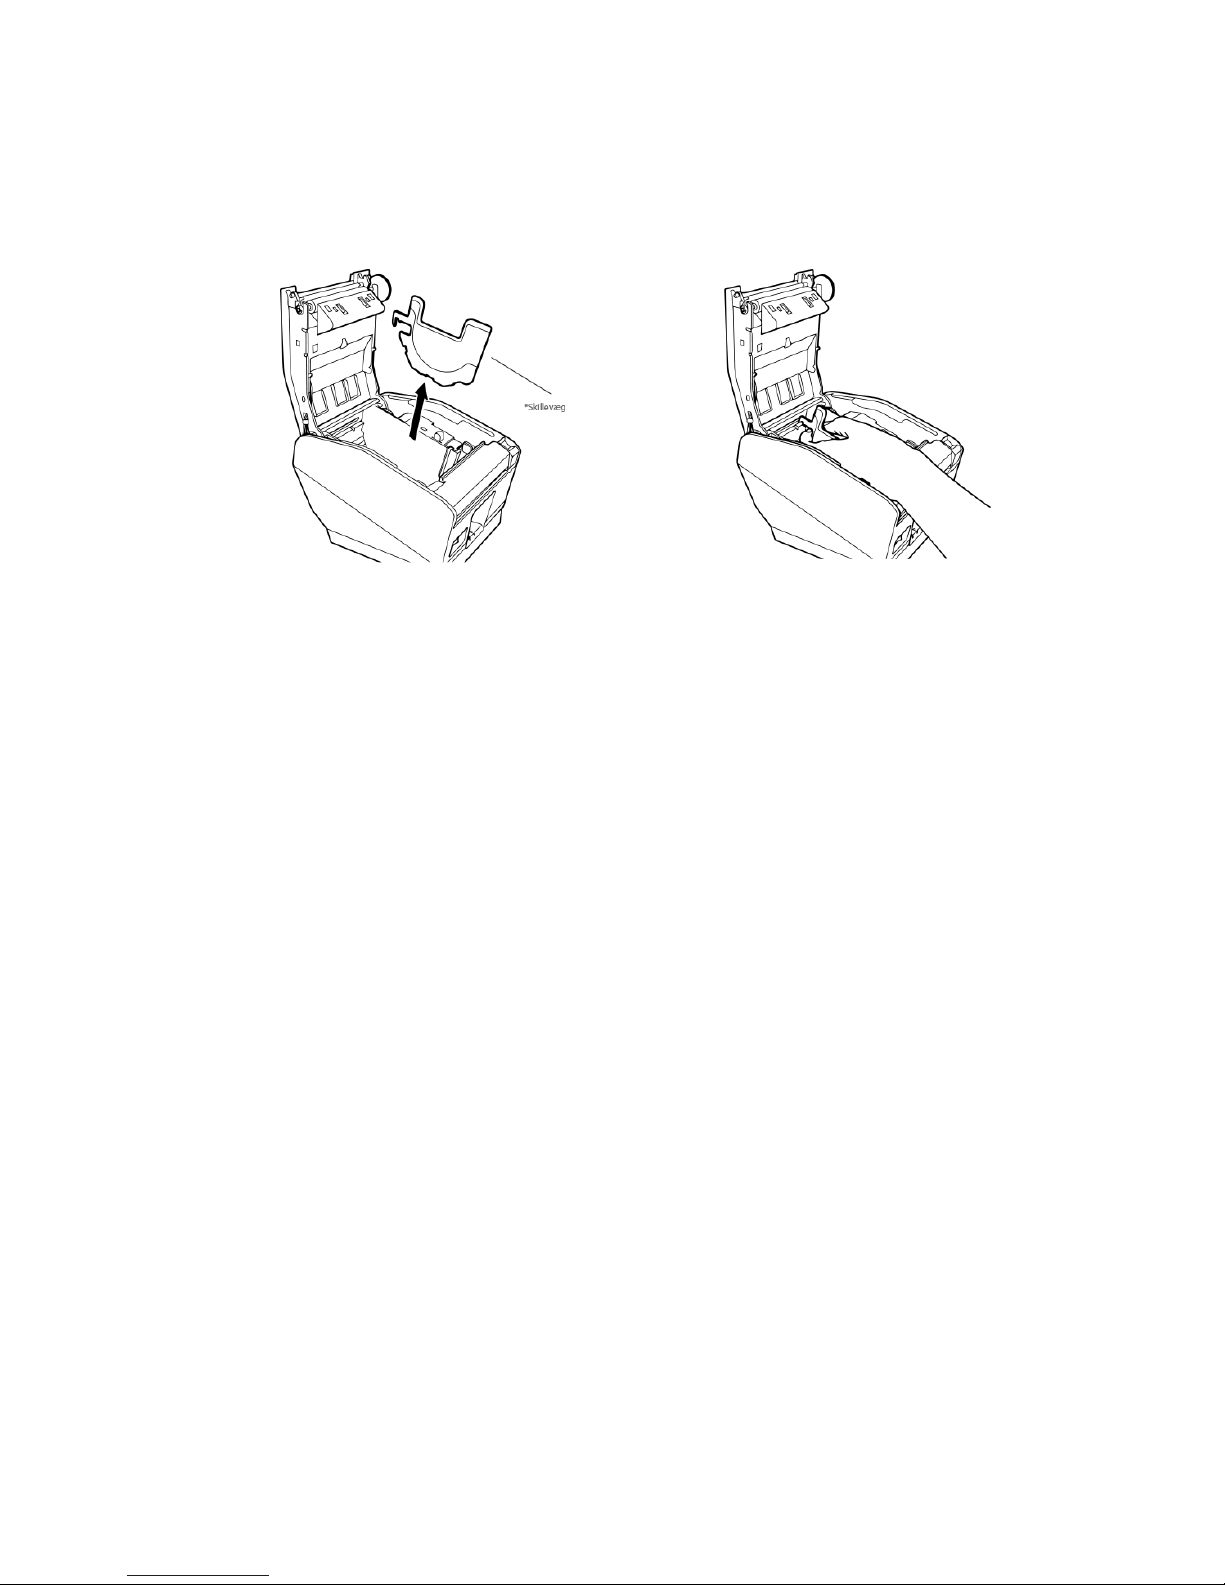
1. Open printer
*The partition can be moved a notch to get
your receipt/label rolls to fit the printer.
2. Move the partition so the label roll fits.
CHANGE RECEIPT PRINTER TO LABEL PRINTER.
To add label rolls to the printer.
Important!: You must turn off the printer before switching between label and receipt printer.
YOU ARE NOW READY TO PRINT LABELS
How to print labels can be seen here
Page 8
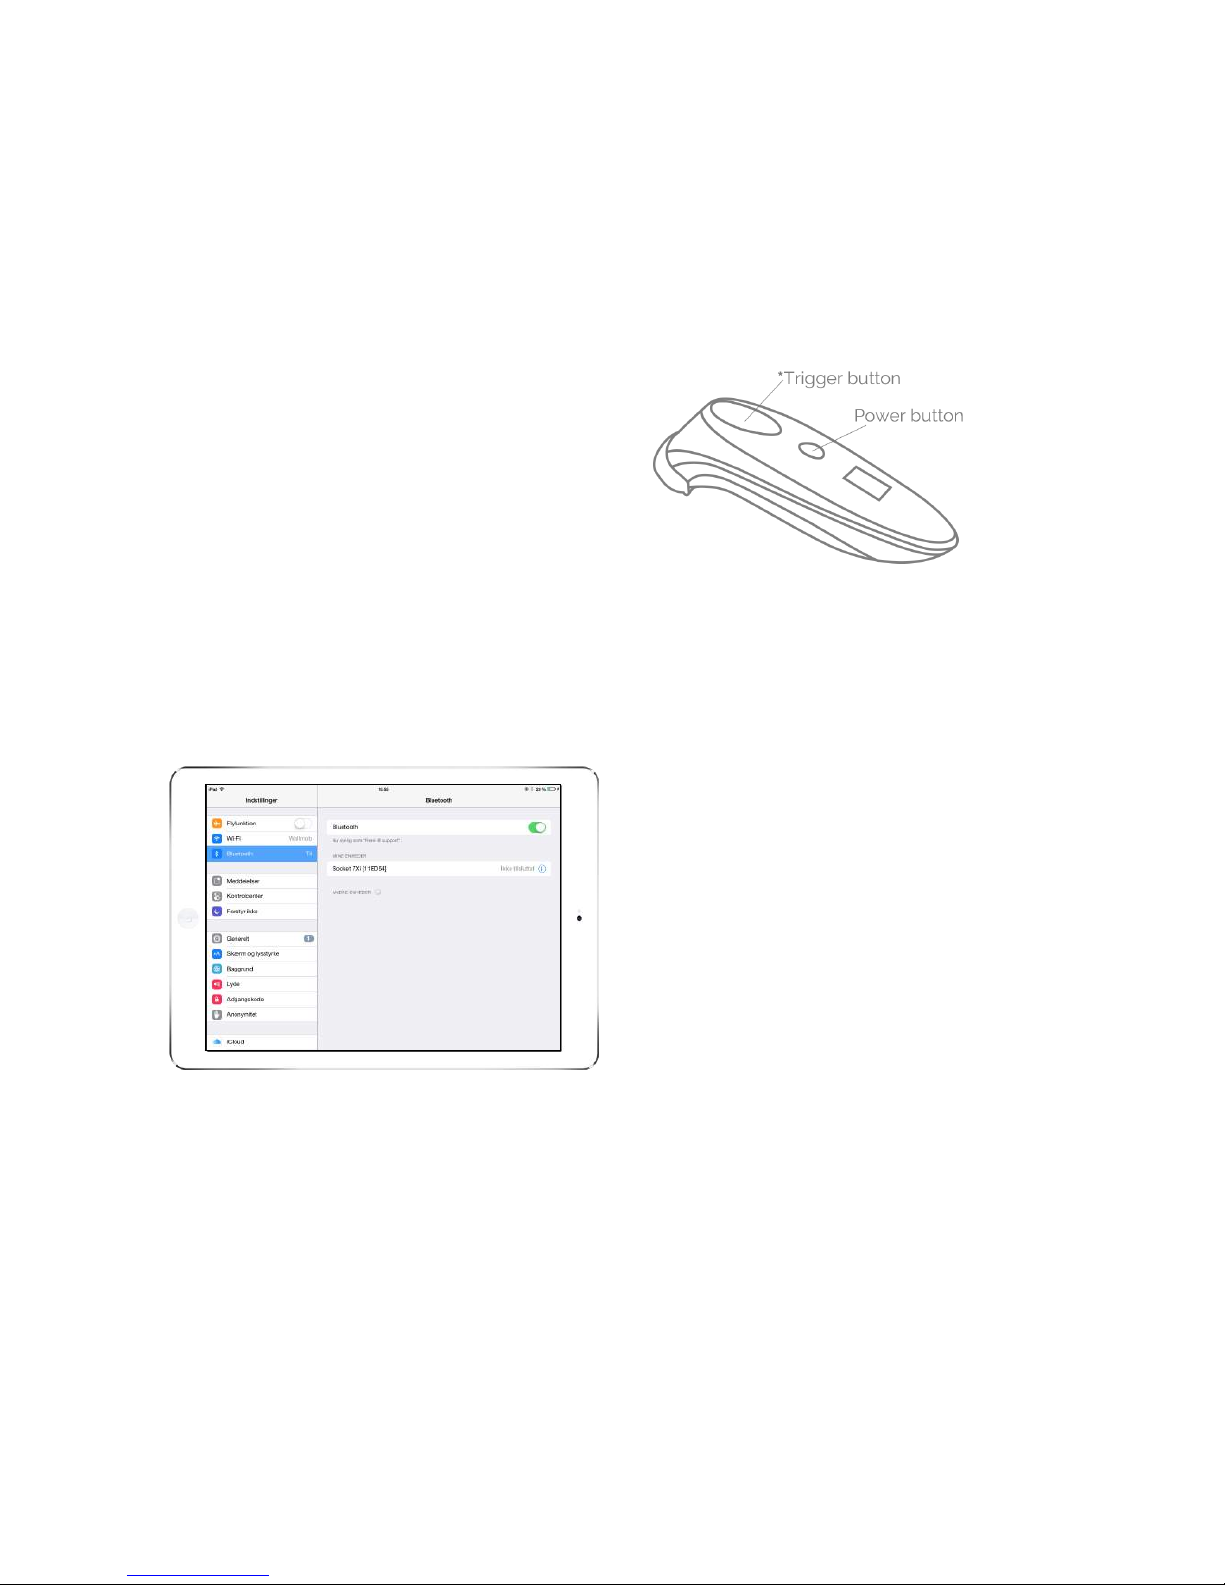
1. Turn on the scanner by pressing the
Power button.
Note: Use the Trigger button when
scanning.
CONNECT SCANNER TO IPAD
When the scanner is on, you can connect
the scanner to the iPad.
1: Press Settings on the iPad.
2:Select the menu item: Bluetooth
3: The iPad automatically searches for the
scanner.
(Name on device: iOS Socket 7Xi)
4: Choose the scanner to connect to the
iPad
CONNECT SCANNER TO IPAD
To scan your labels, you must connect the scanner to the iPad.
Page 9
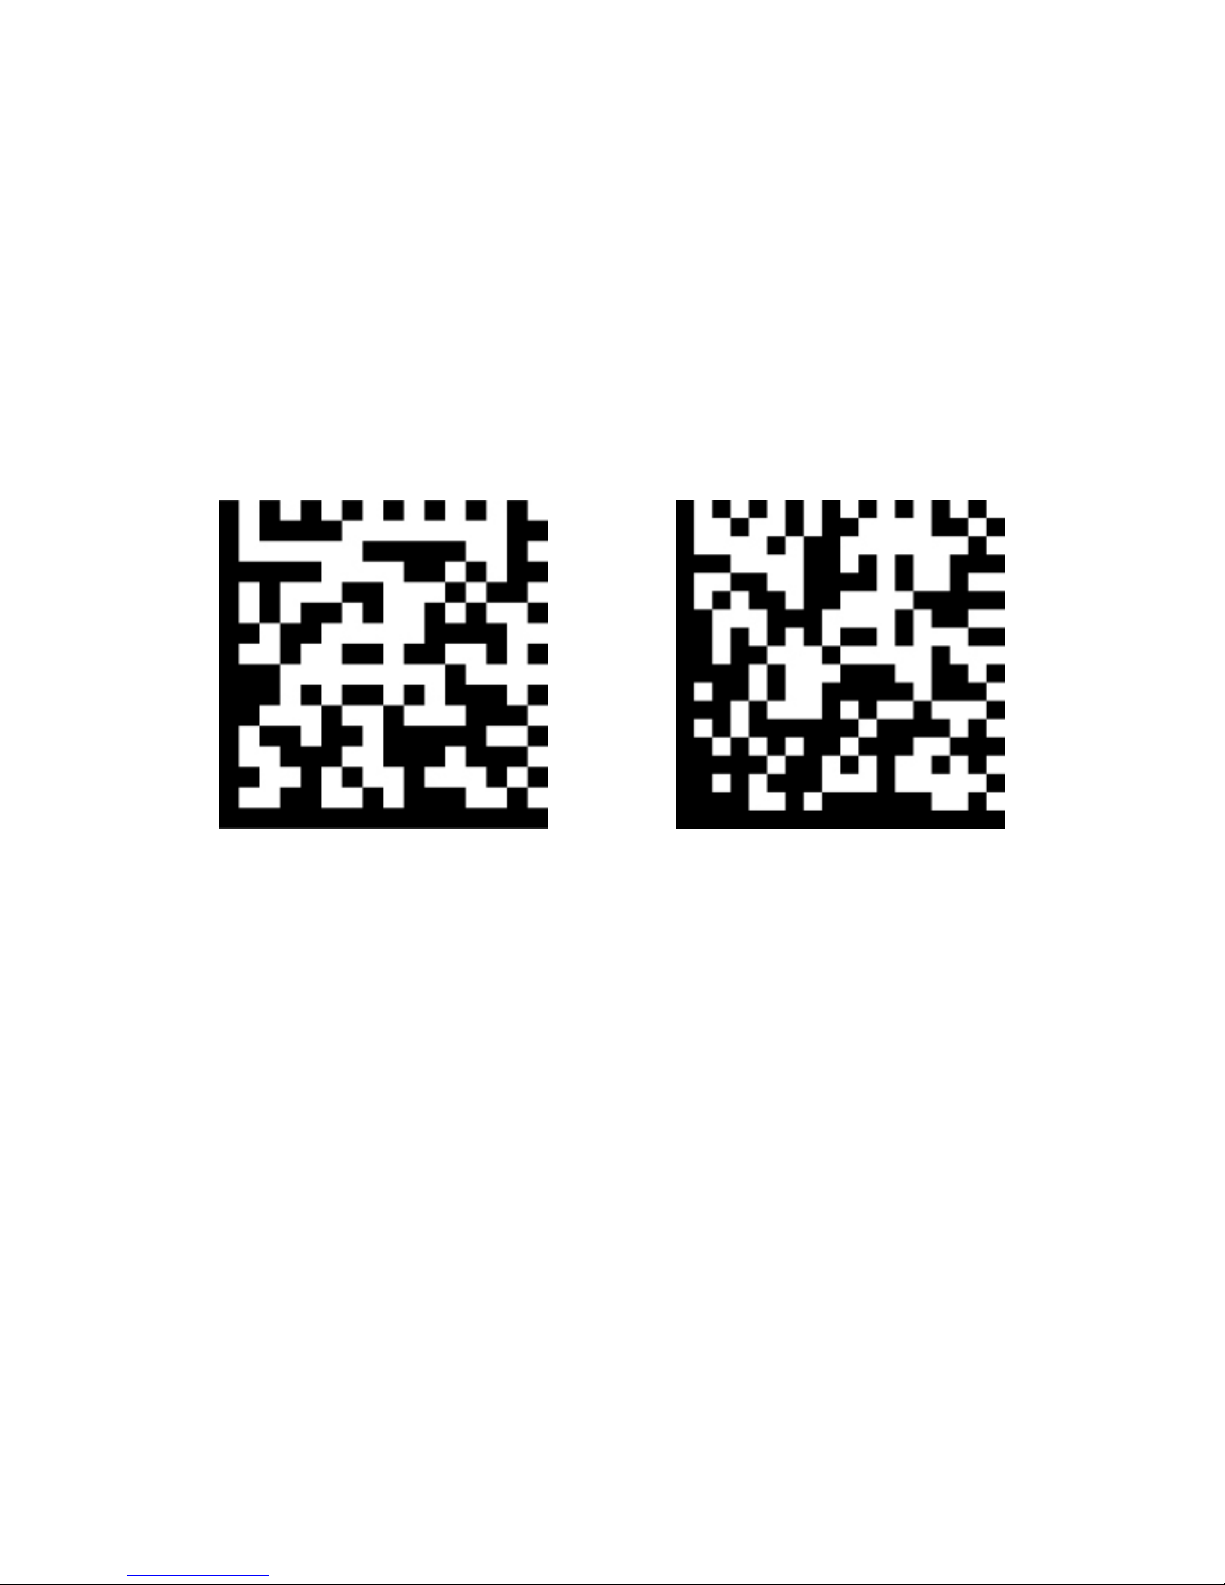
RESTART SCANNER.
To get the scanner to reset to factory settings
- Scan this code.
KEYBOARD
If you are always seeing the keyboard on the iPad.
- Scan this code and it will disappear.
RESTART SCANNER
Sometimes the scanner may require you to restart it.
Restart the scanner by scanning one of the following QR codes.
Page 10

USER INSTRUCTIONS
To use the POS, you must log in. In the following steps, you can see how to log in.
Page 11
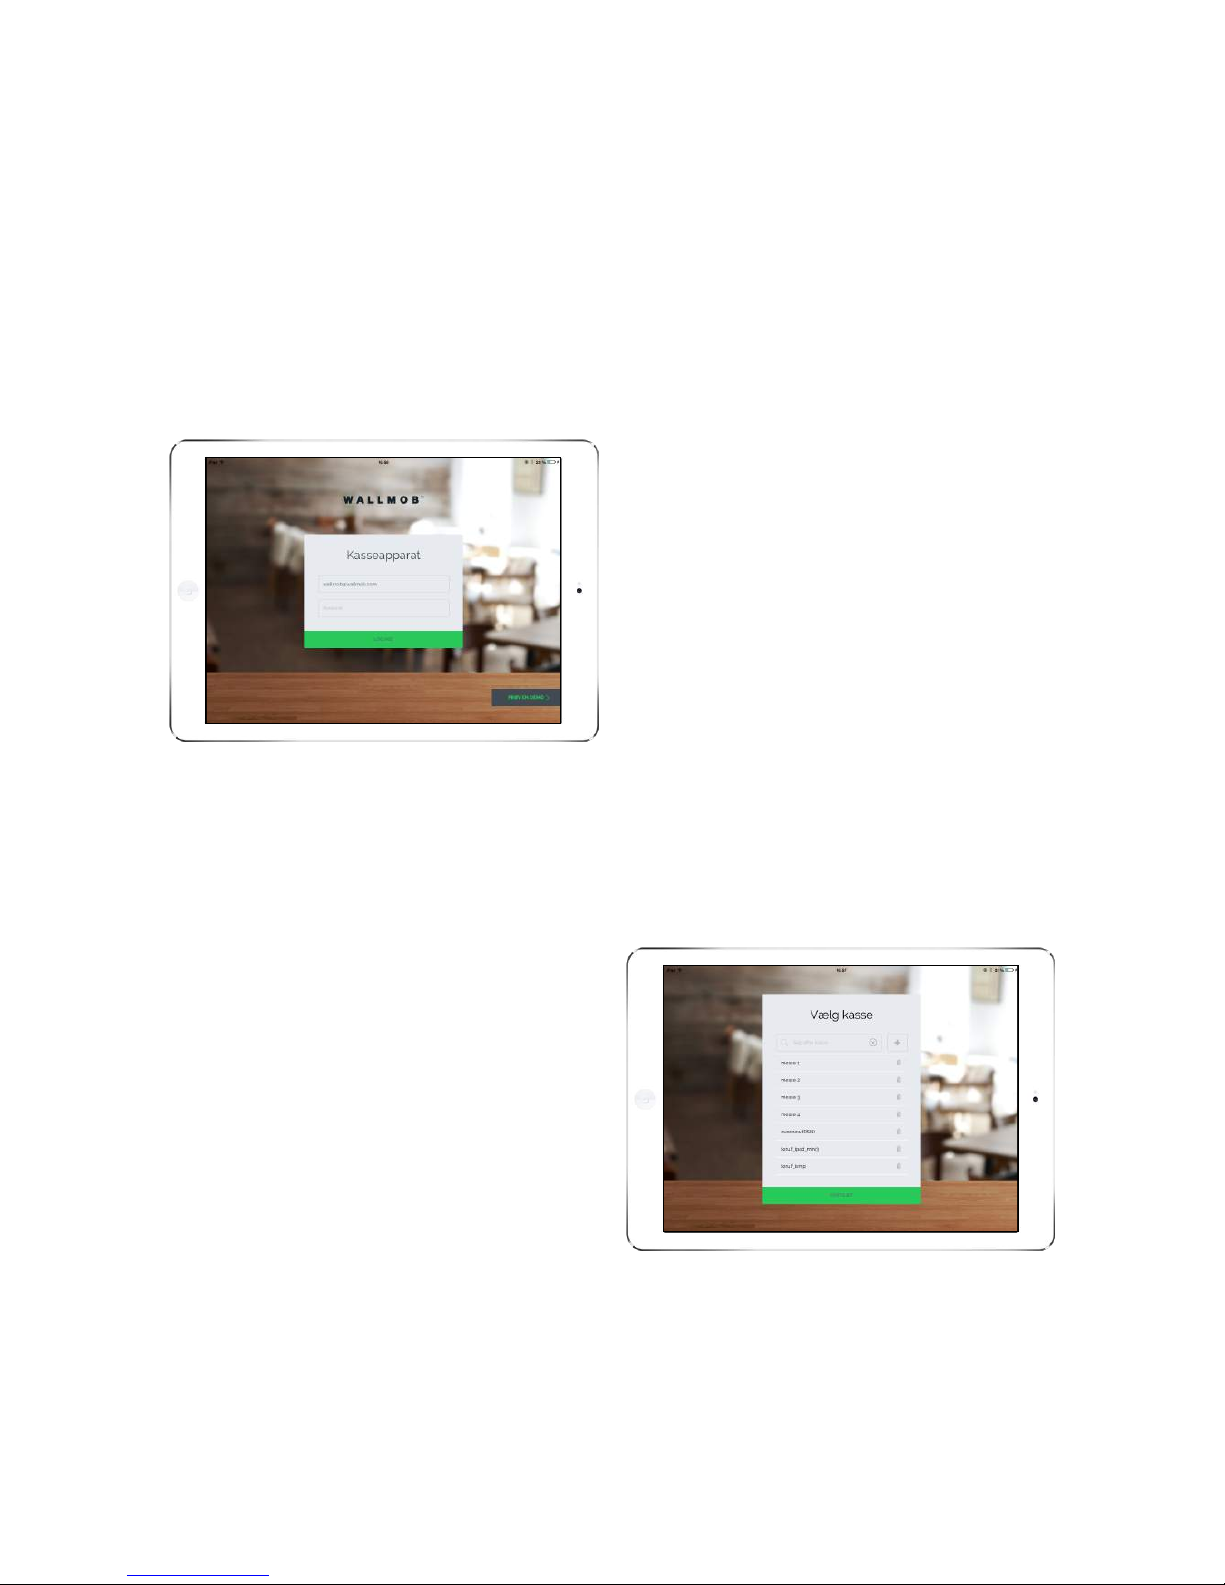
LOGIN STEP BY STEP 1/3
1: Enter your username and password
You receive your username and password
in an e-mail.
For example:
Username: Demostore@OneStore.com
Password: *********
Then press login.
STEP 2/3
2: Here you choose which cash register
you want to use this device as. (If you have
multiple cash registers, you will have the
option of choosing which one)
When you have chosen a cash register,
this iPad will be connected to the selected
cash register.
LOGIN FOR THE FIRST TIME
For at bruge POS’et skal du logge ind. Du kan i de følgende trin se, hvordan du logger ind.
Page 12
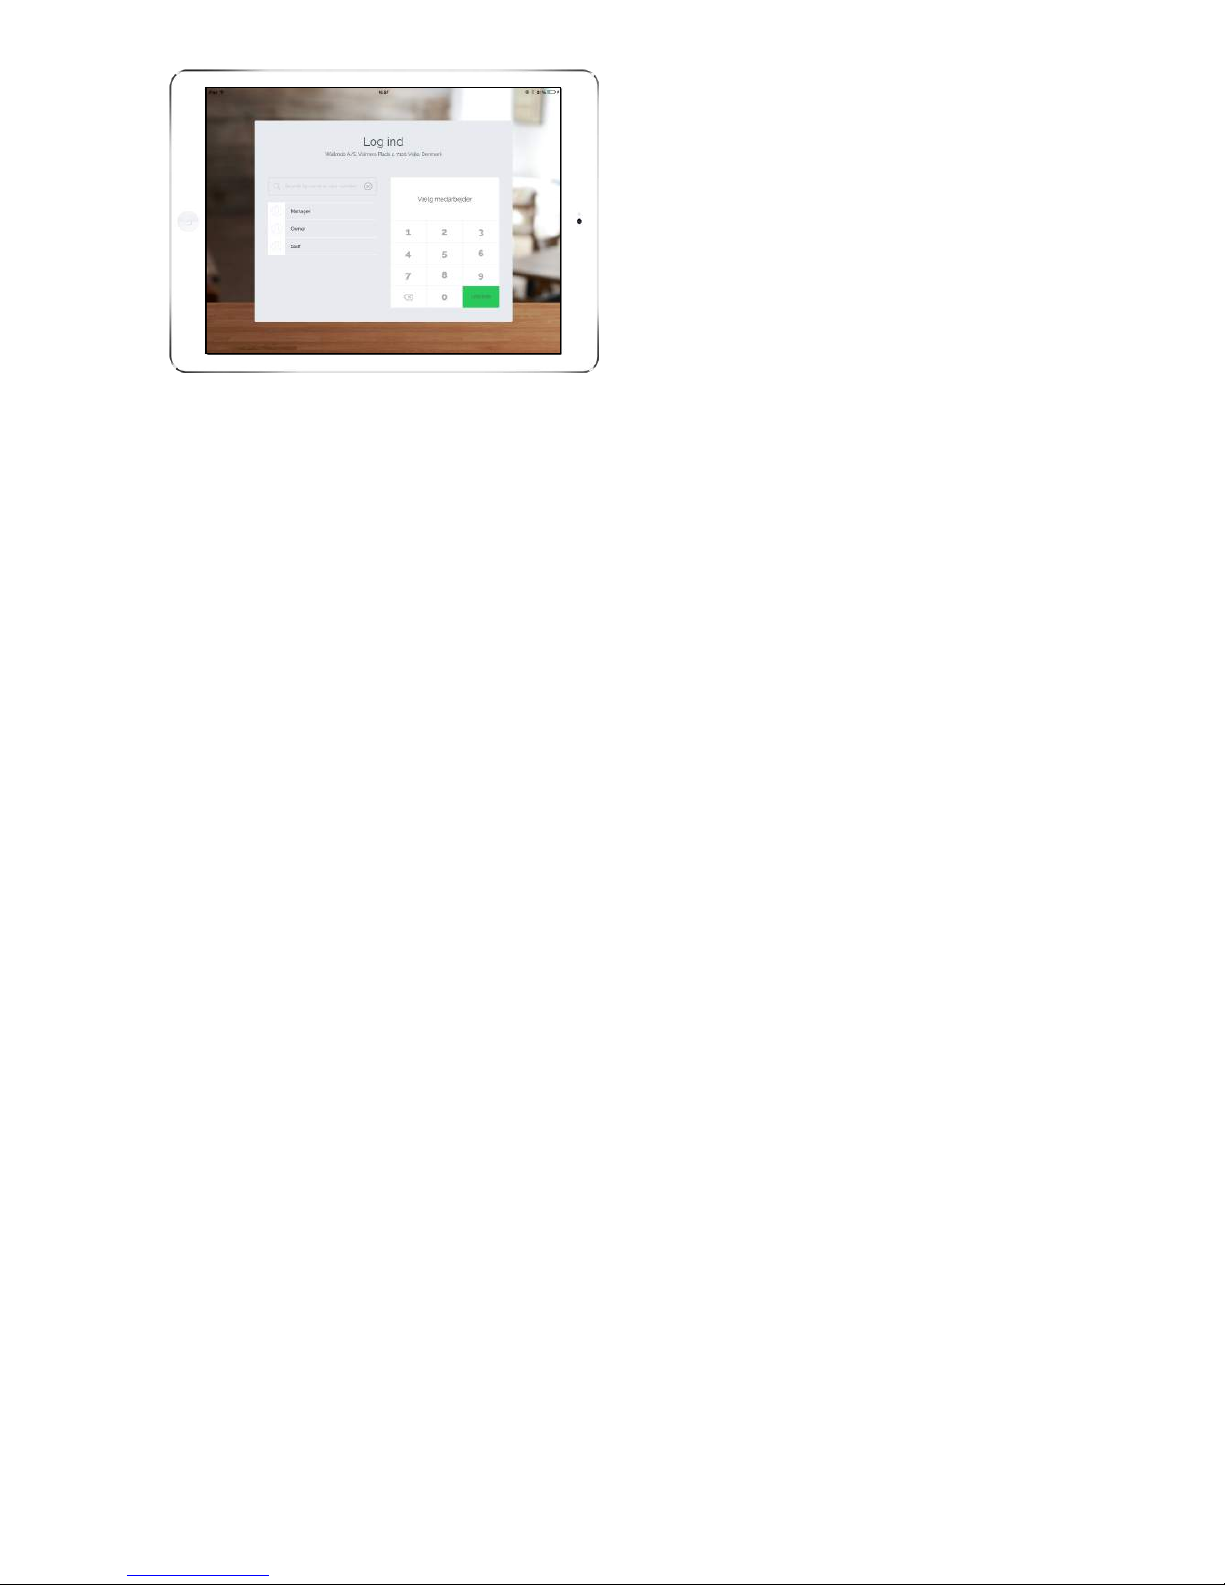
STEP 3/3
3: The first time, you will only see your own
name.
Your code the first time will be 1-2-3-4
This image will be the image you see
every time you log out.
YOU ARE NOW LOGGED IN
- and you will now be ready to open your store
Page 13
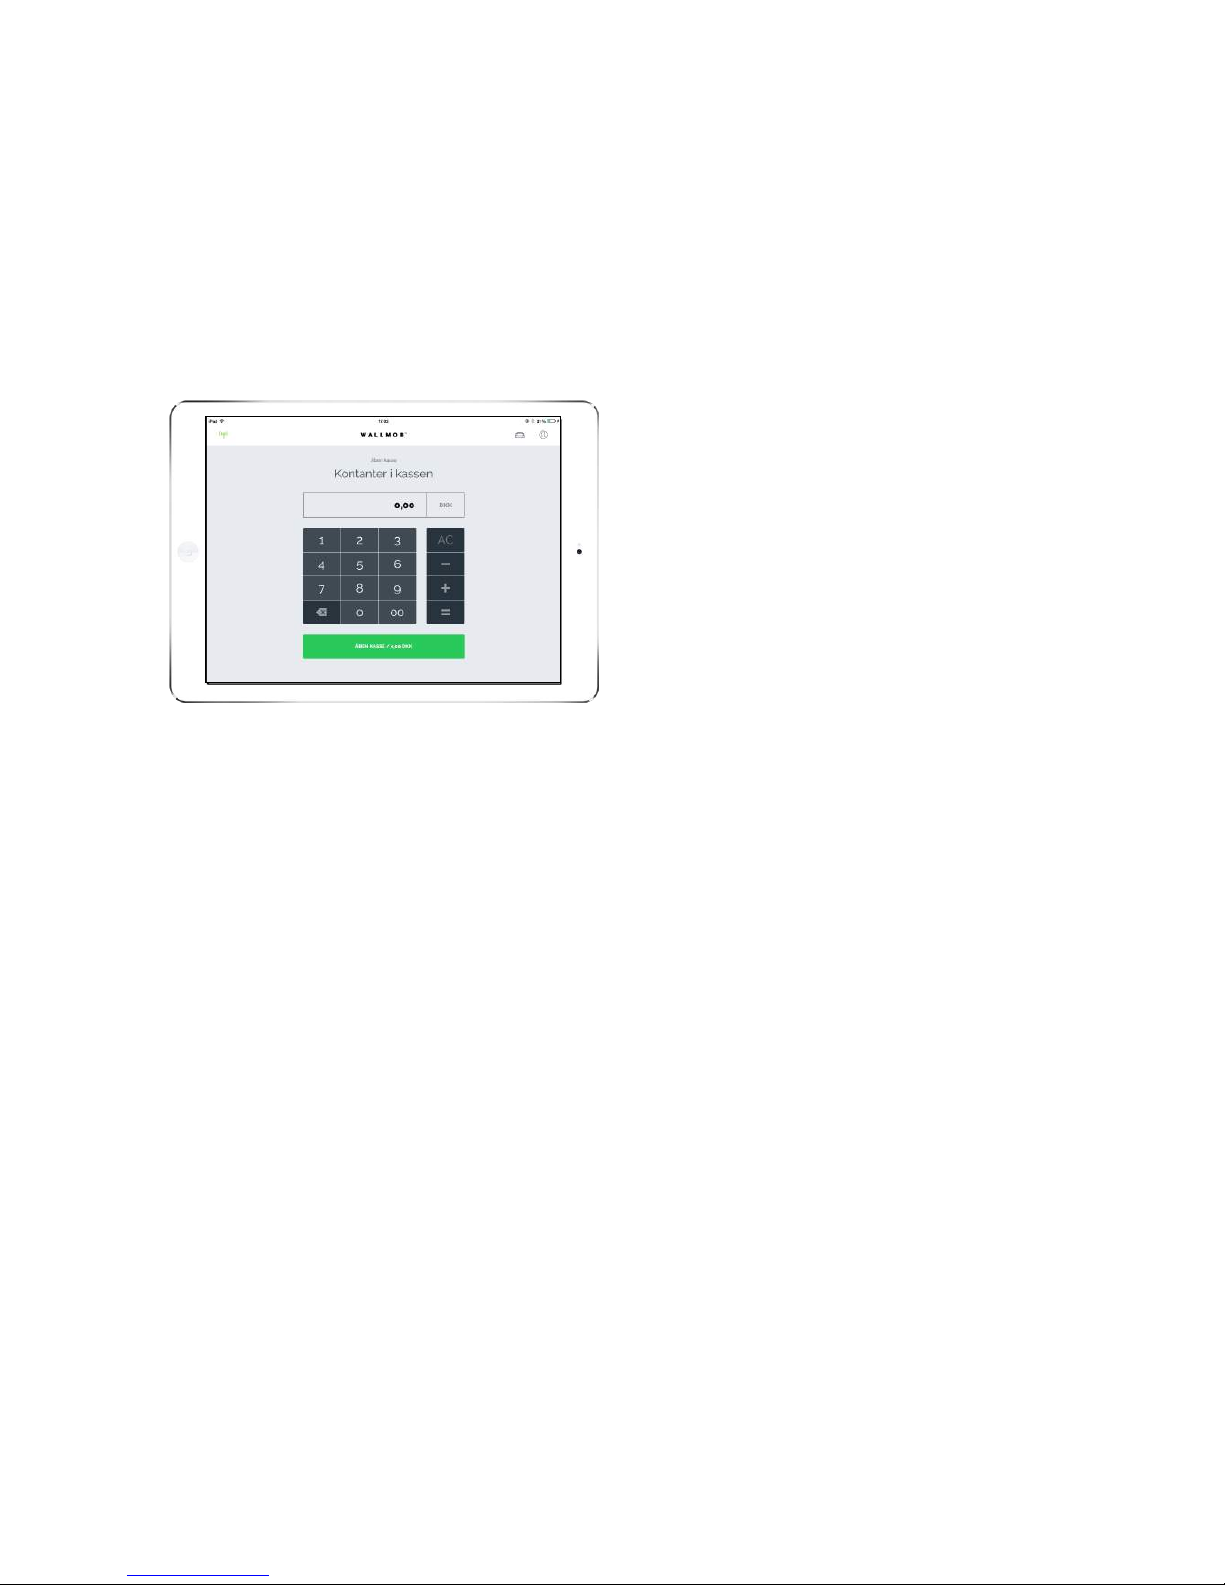
Here you enter the amount you have in the
cash register when you open.
For example, DKK 2,350.00
OPEN CASH REGISTERE
Every day, you will be asked how much cash you have in your till.
When the day is over, you can see whether your cash register agrees with what you have sold in cash,
in card payments and what is in the cash register.
YOUR STORE IS NOW OPEN
- and you can start selling your products.
Page 14
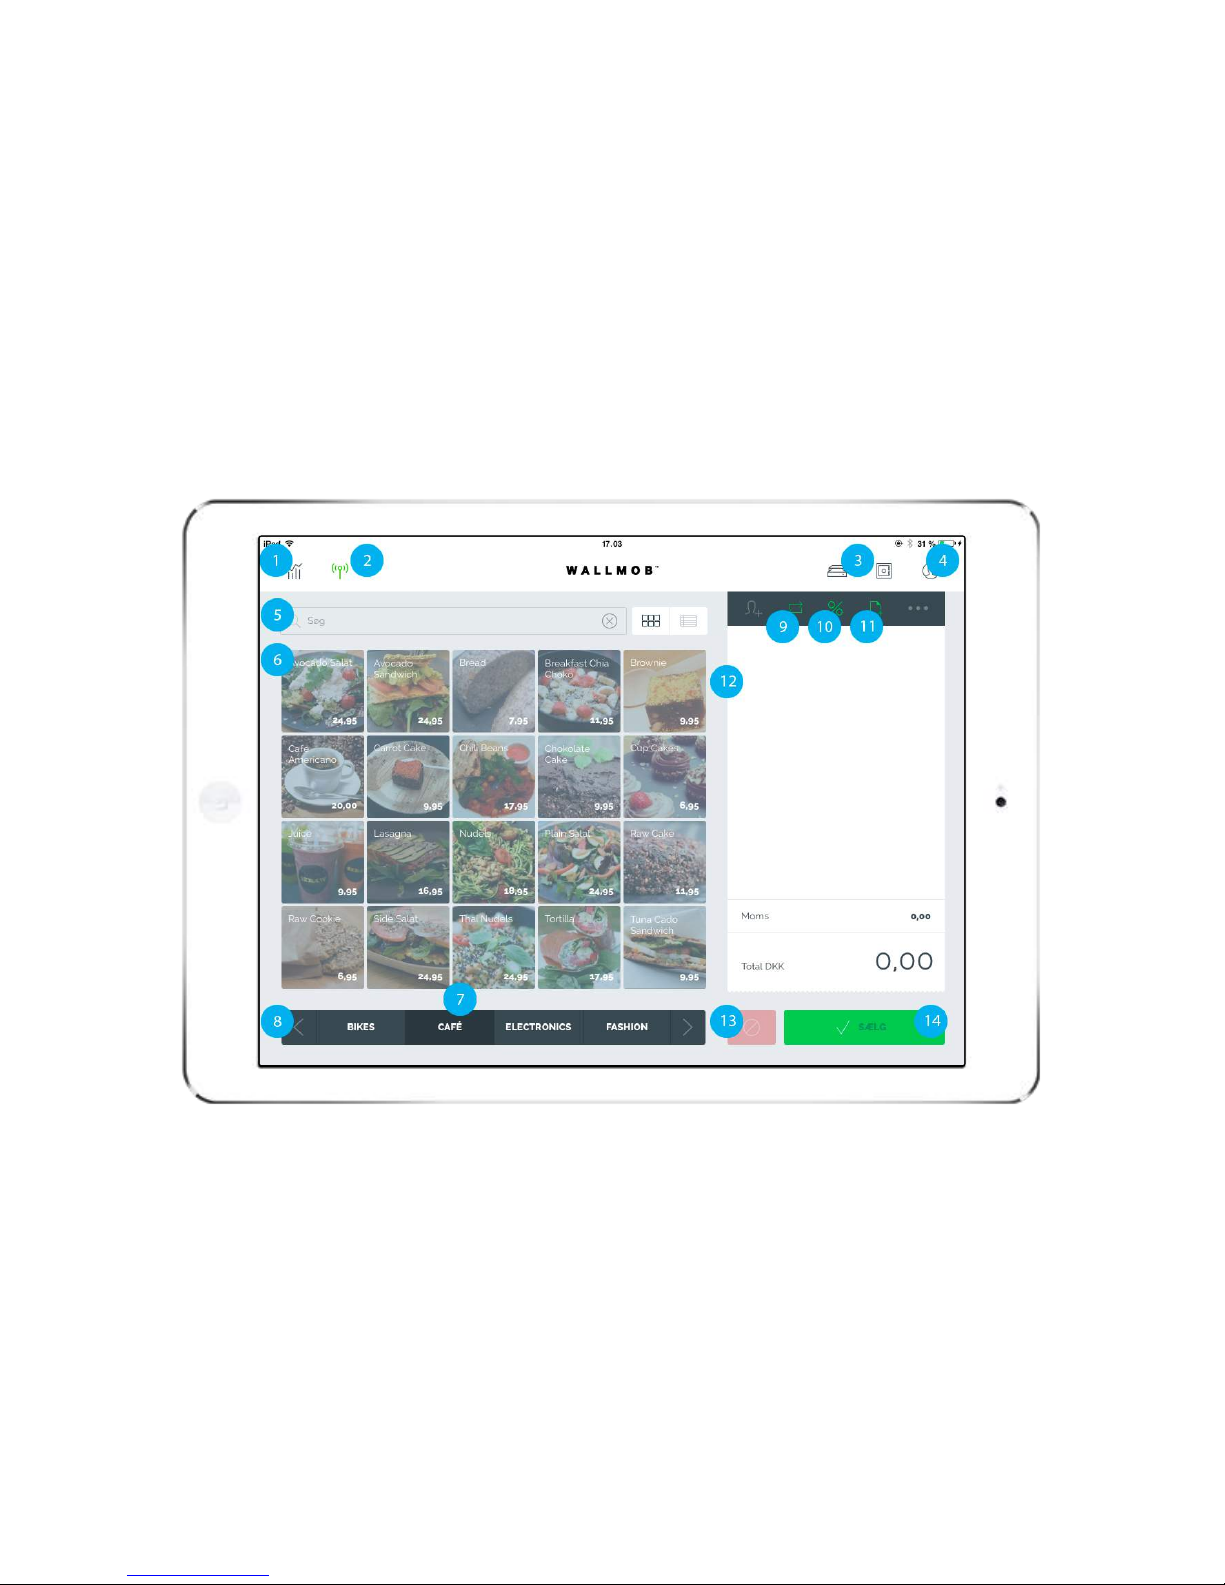
POS
Here is an overview of what the different buttons mean and what their
functions are.
Page 15

Here you can see and manage your
entire business. You can see more
here and below.
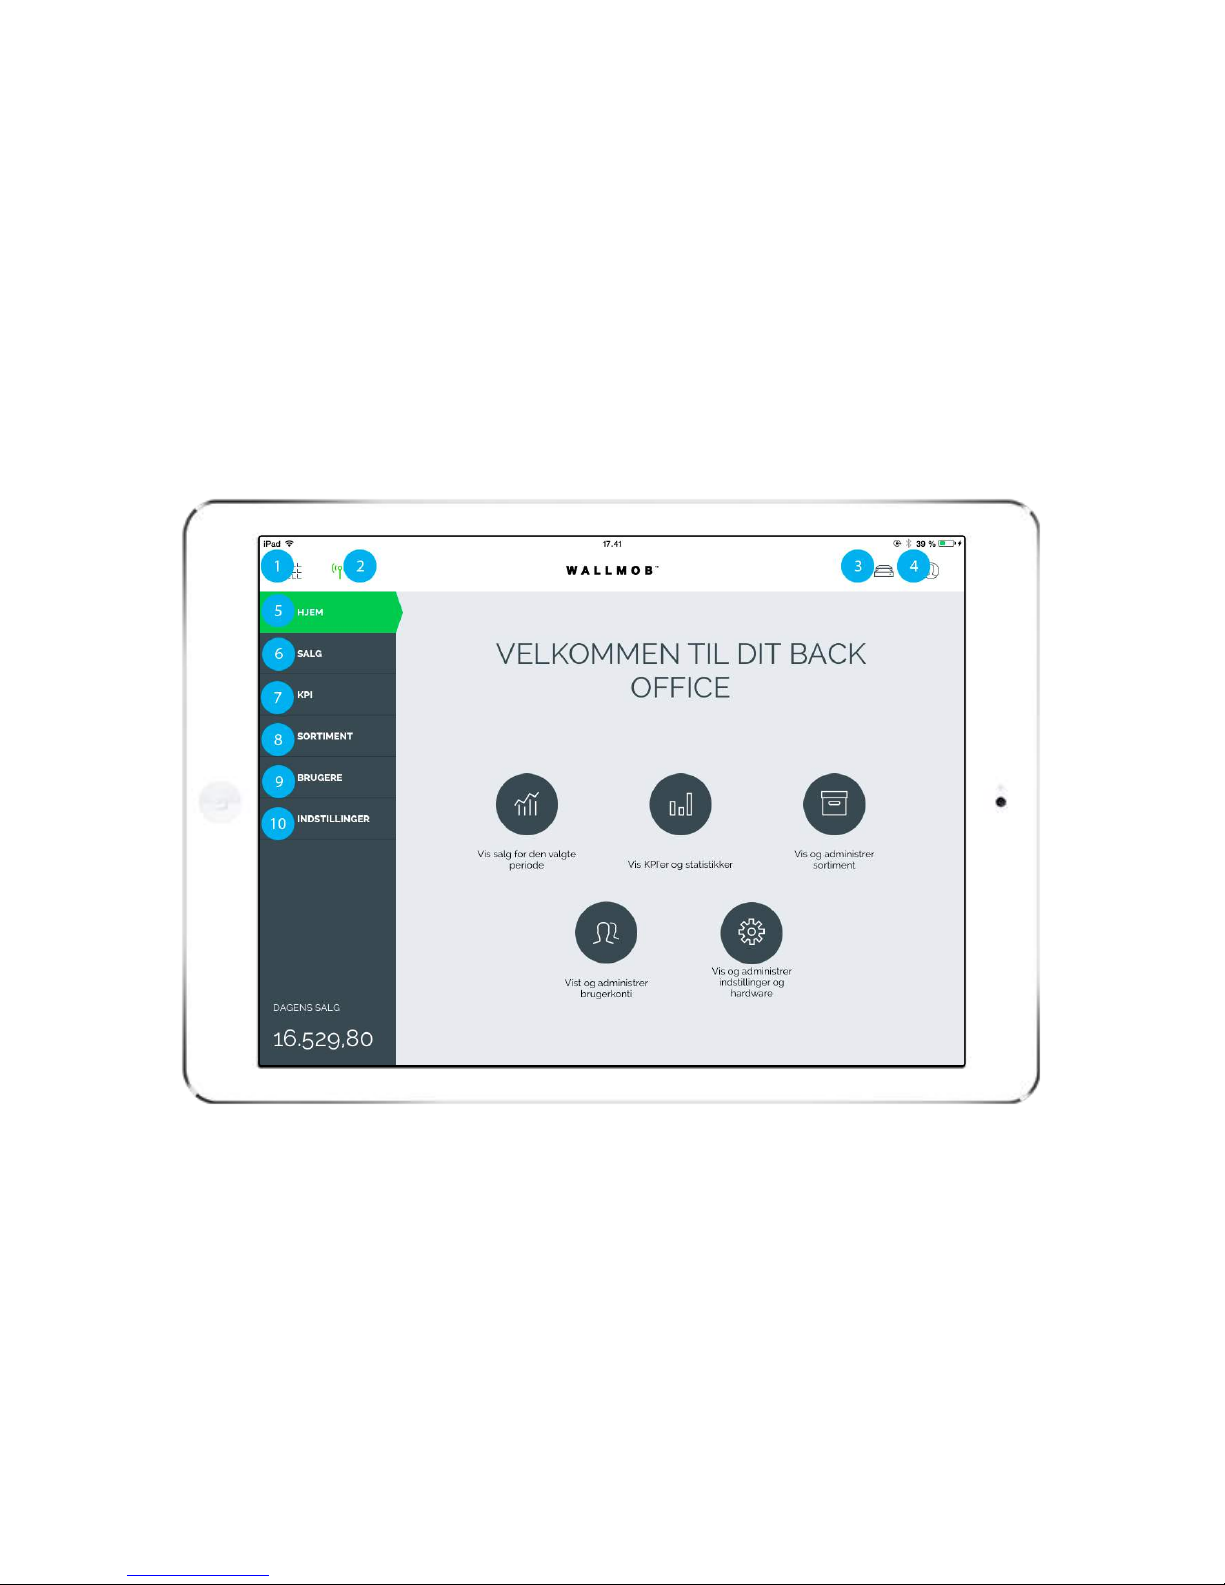
1. BACK OFFICE
Here you can see whether your system
is live or offline, i.e. whether the system
is synchronised with the database.
2. SYNCHRONISATION
Here you count up your cash and end
the day.Read more
3. EOD (END OF DAY / CLOSE REGISTER)
Here you can see who is logged in and
you can also log off here. read more
4. PROFILE
Here you can search in your products.
5. SEARCH
This shows all products you have
added to the POS. Read more
6. PRODUCTS
If there are more products than can be
shown, you can scroll between the
products.
7. MORE PRODUCTS
You can segment your products by
selecting a category.
8. CATEGORY
Here you return products. Read more
9. RETURN
Here you can add a discount.Read
more
10. ADD DISCOUNT
Here you can manually add product.
Read more
11. ADD A PRODUCT MANUALLY
Here you can see the product you have
"added" to the cart. Read more
12. RECEIPTS
Here you can cancel an ongoing sale.
13. DELETE RECEIPT
Here you go to payment. Read more
14. TENDER
Page 16
To close your cash register, you must count the till.
In the following steps, you can see how you count
your till in the POS./p>
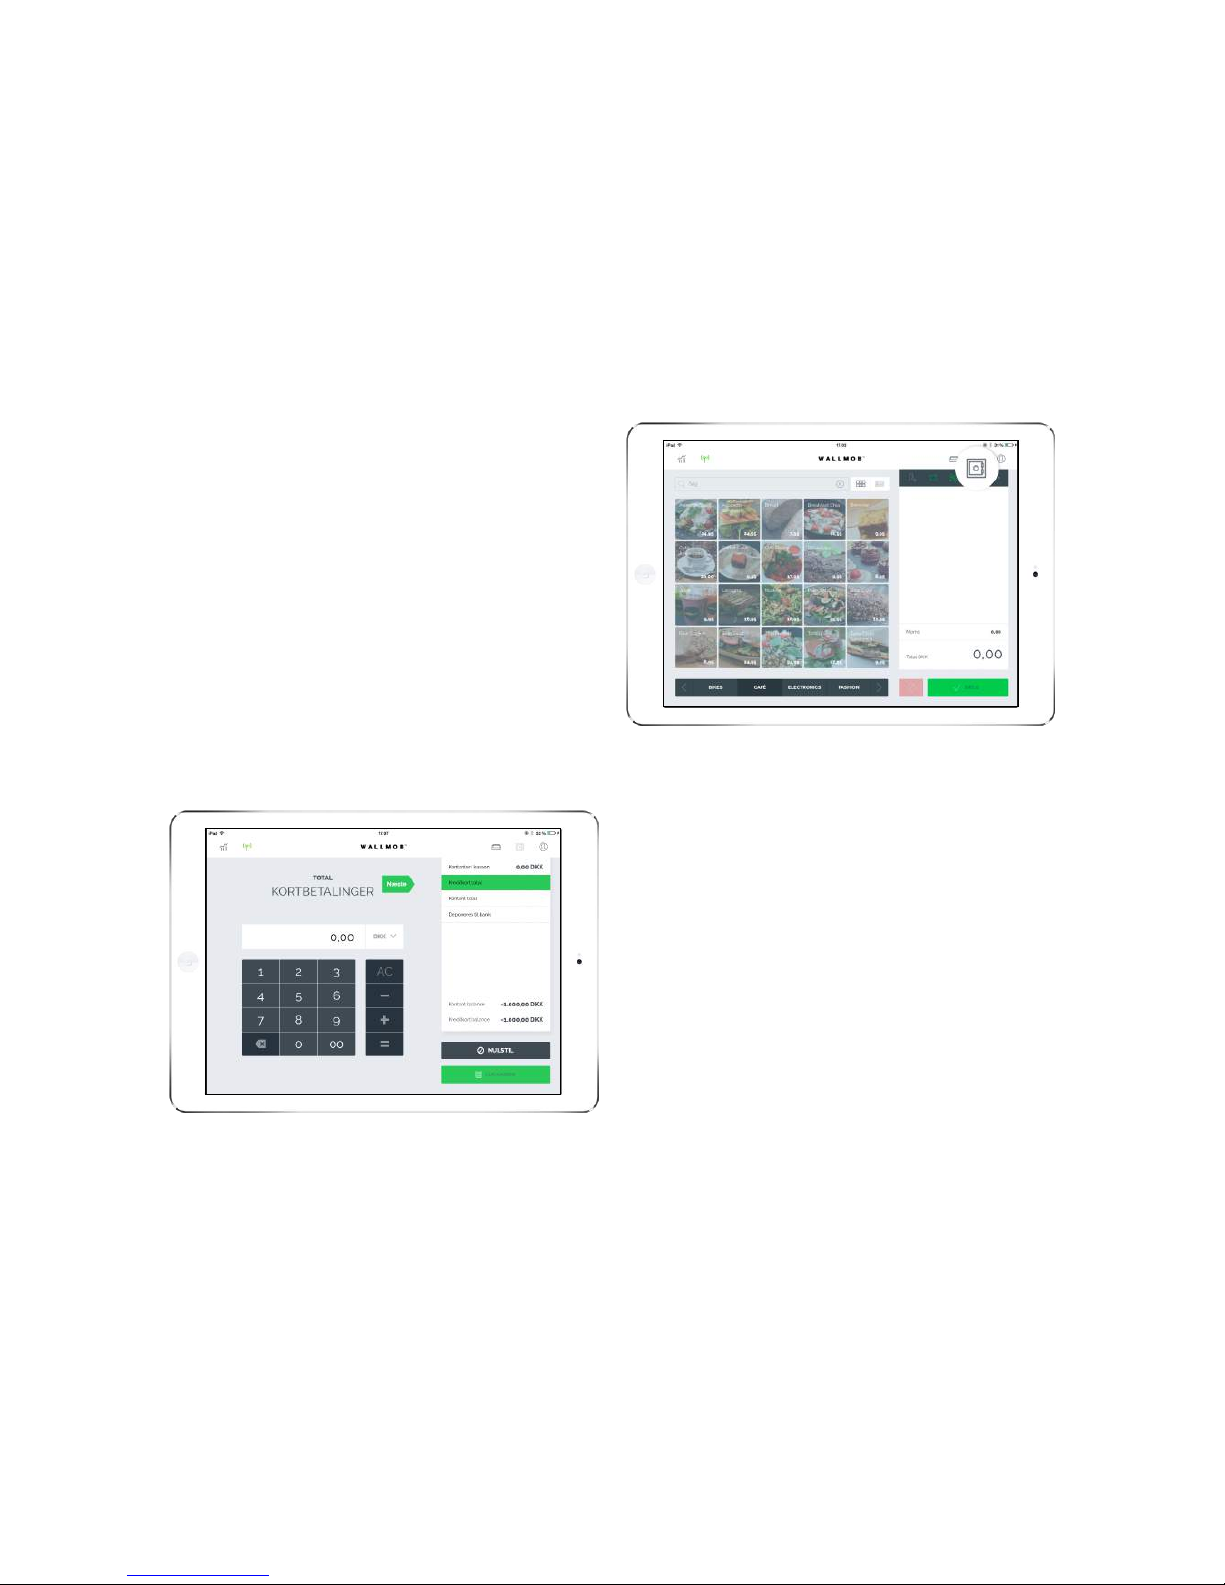
EOD STEP BY STEP
Step
1: Here you enter the amount you get from
your card terminal.
2: Then press next.
EOD (END OF DAY / CLOSE
REGISTER)
HOW TO COUNT YOUR CASH BALANCE
1
/5
Page 17
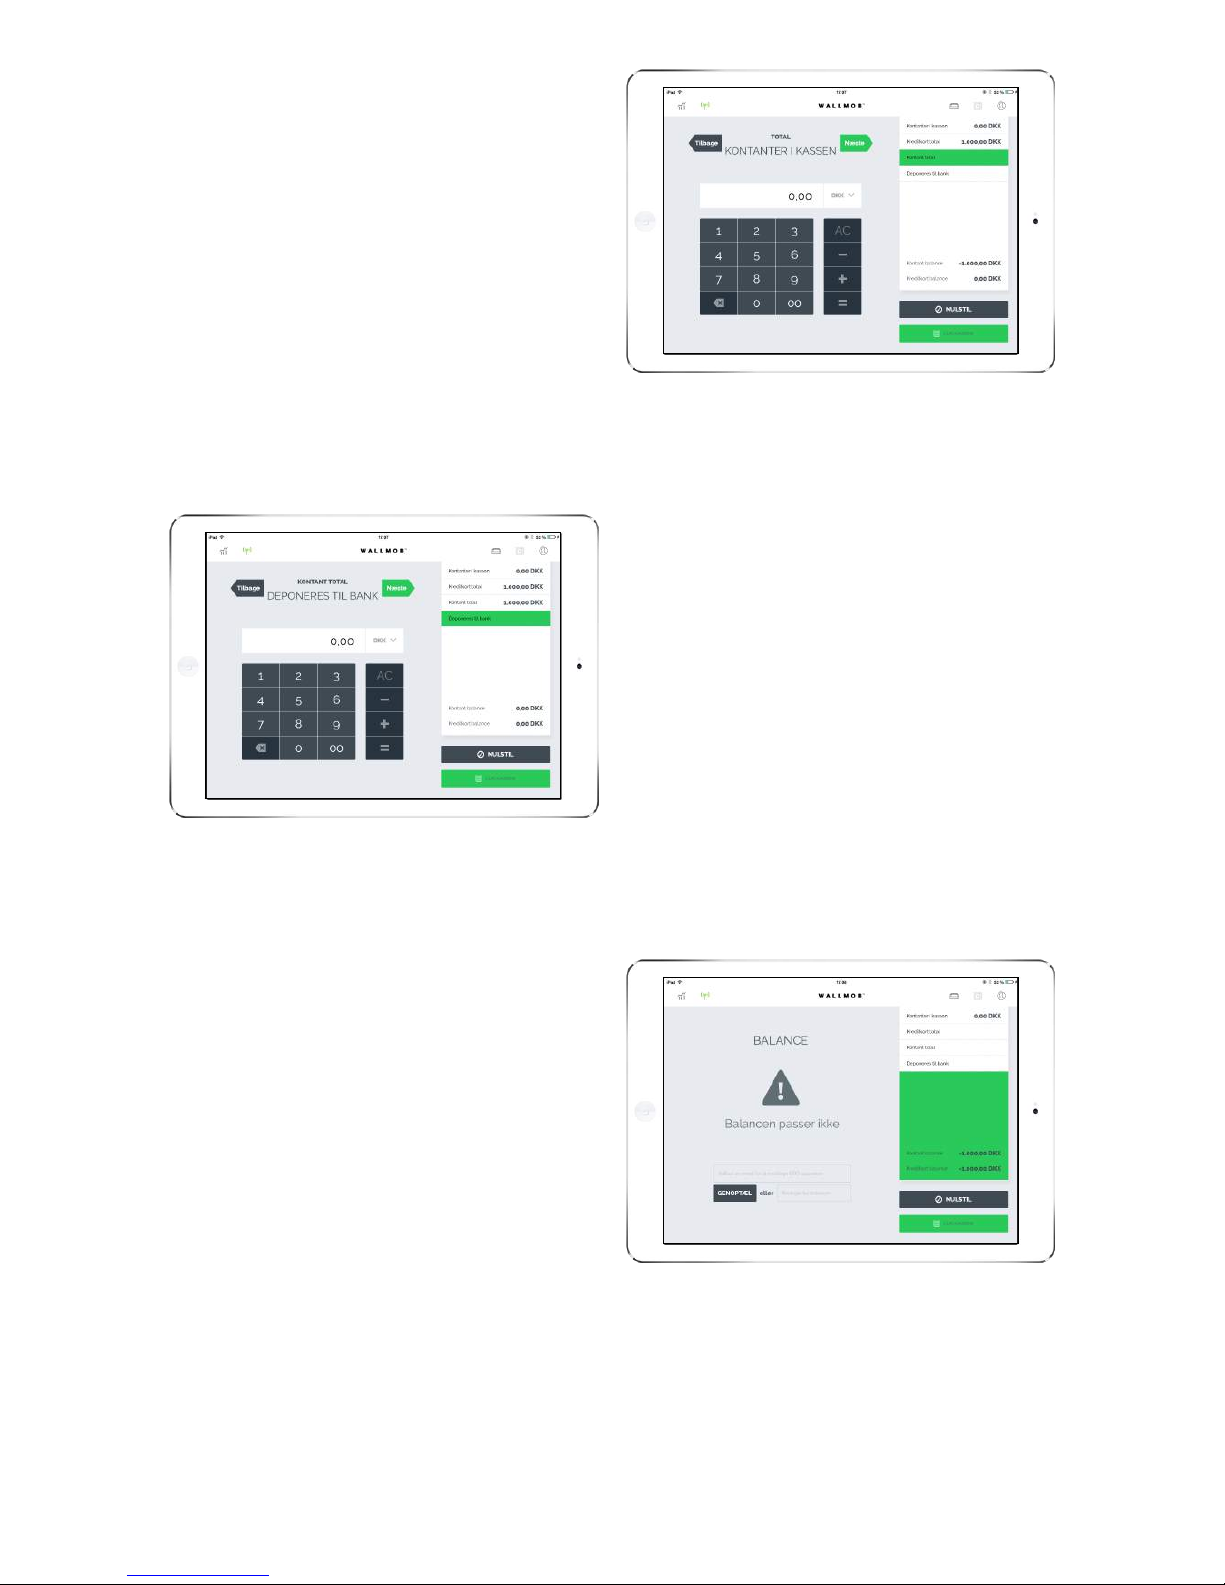
Step
1: Enter the total amount you have in the
register.
2: Then press next.
Step
1: Here you enter how much money you
put in the bank
2: Then press next.
Step
1: You will now be able to see if the
register agrees. If the register does not
agree, you can choose to recount or just
acknowledge the error and exit by
pressing close register.
2
/5
3
/5
4
/5
Page 18
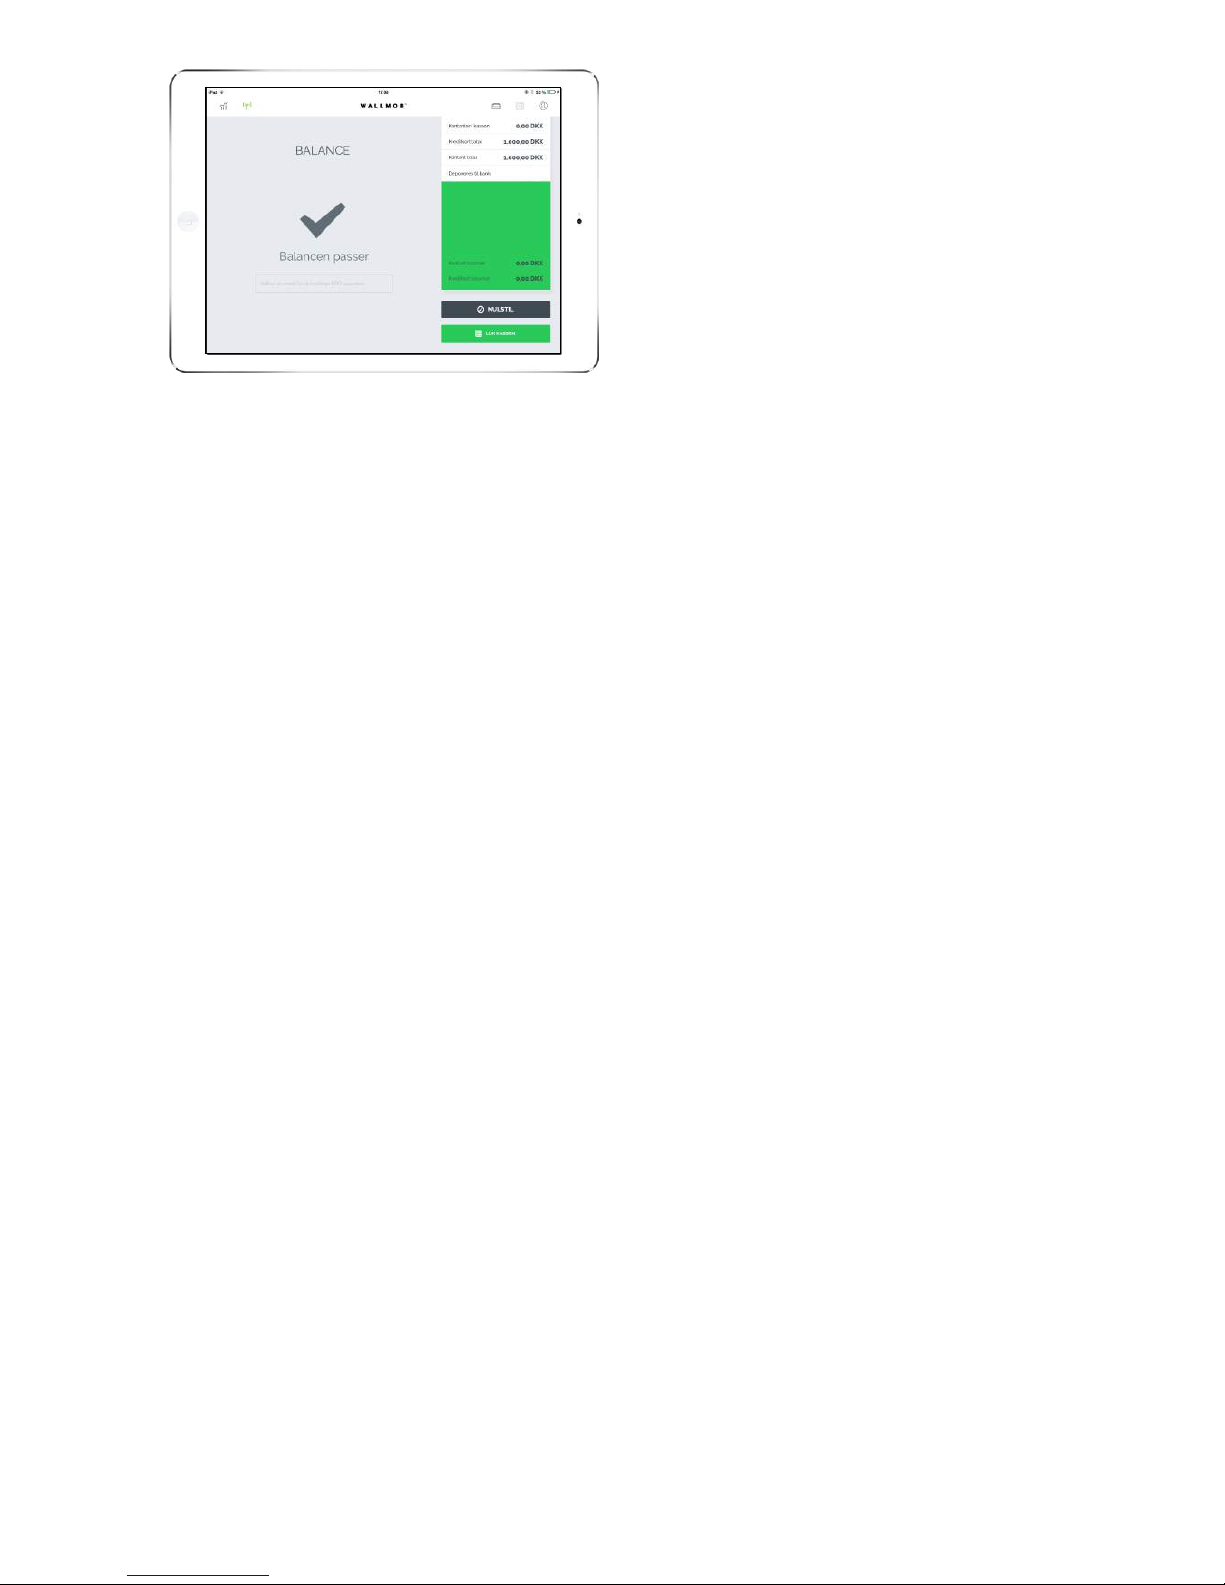
Step
1: If the register agrees, the screen looks
like this and you now have the option to
enter an e-mail to receive the report.
Remember to exit with the green button -
close registern
EOD
The register is now closed and you now have to open the register again before you can start selling
products.
5
/5
Page 19

Here you can see who is logged in.
1: To log in, choose your own name and
enter your personal code.
PROFILE
CHANGE USER
To be able to see who is selling what, it is important to log in to your own account.
Page 20
PRODUCTS
This shows the products which have been
added to the POS.
You have the option of changing the
category at the bottom of the screen.
You also have the option of changing the
pattern in which your products are
presented. Try pressing one of the buttons
after the search field.
ADD PRODUCT STEP BY STEP
Step
1: Press on a product to add it to your
receipt.
SELL PRODUCTS
To be able to sell a given product, you must add it to the receipt.
1
/3
Page 21
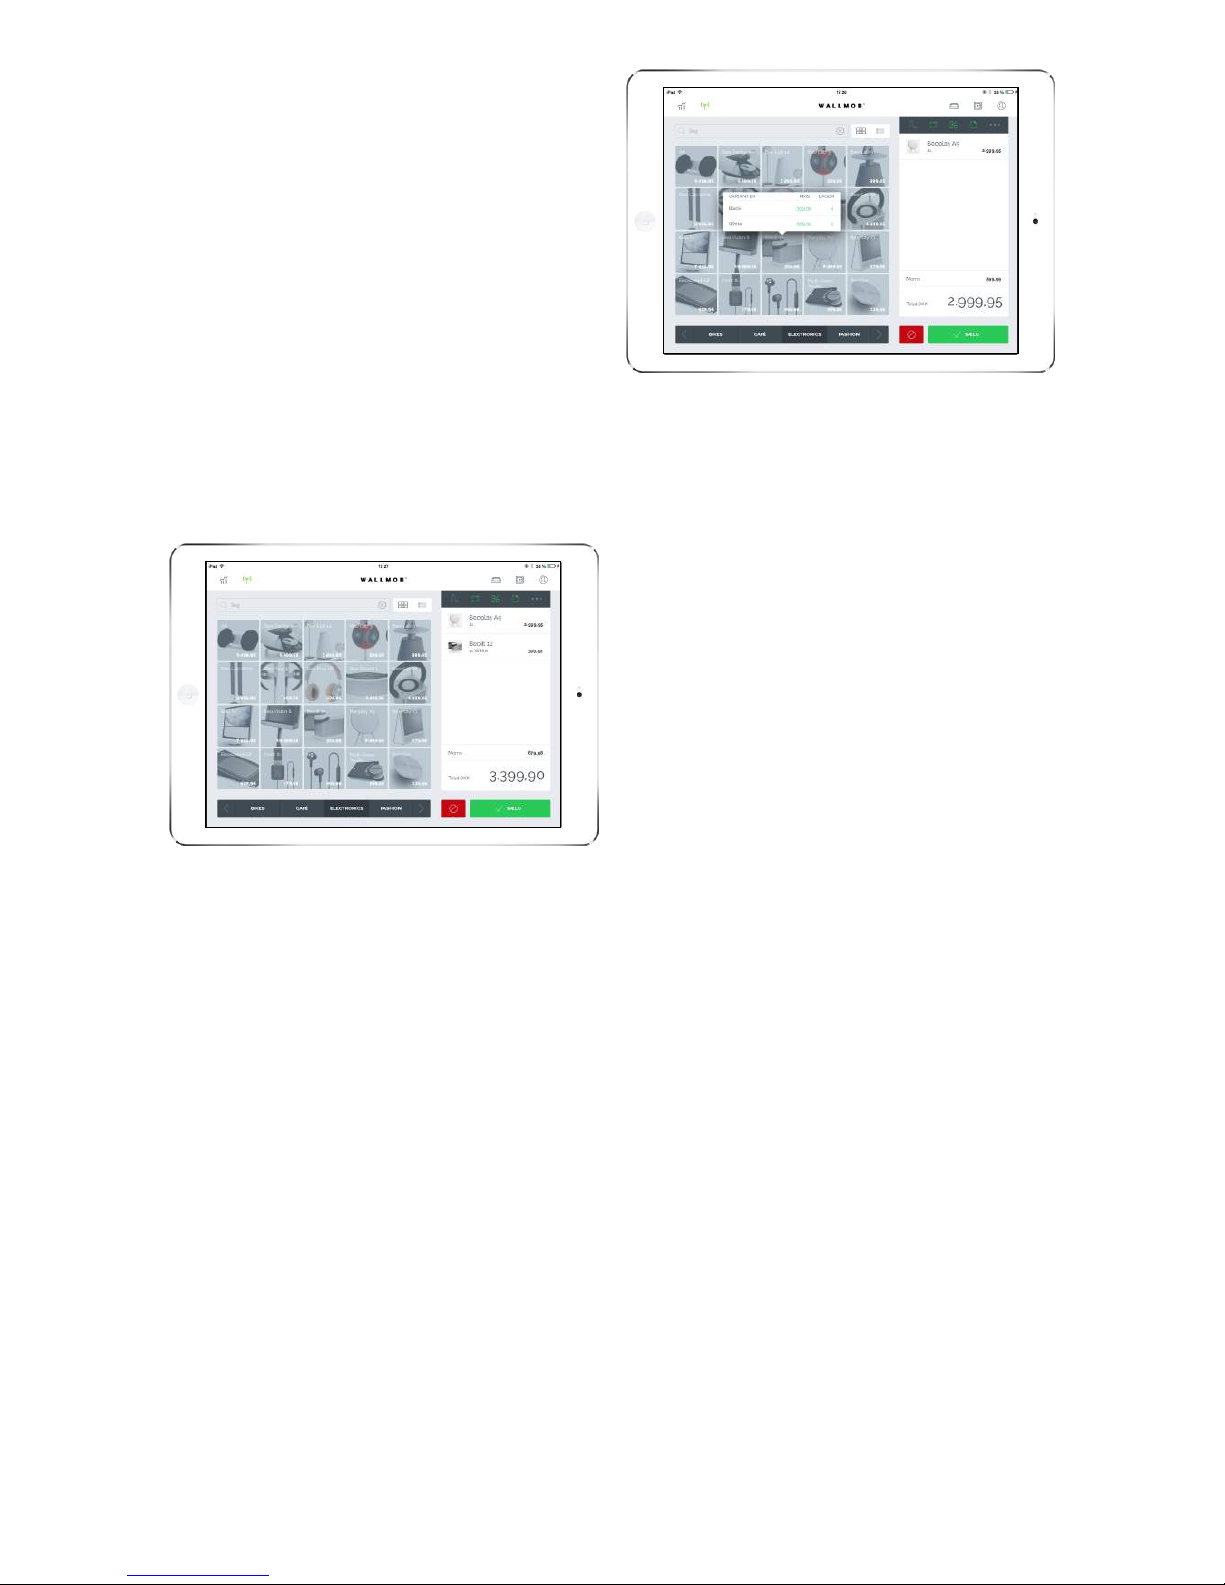
Step
1: If you have created multiple variants of a
product, they will be shown. You must
than choose a product variant, for
example, whether you are selling a size 36,
37 or 38.
Step
1: When you have chosen a variant, it will
be added to your receipt.
ADD A PRODUCT TO YOUR RECEIPT
You have now added a product. You can now add more products or go to payment.
2
/3
3
/3
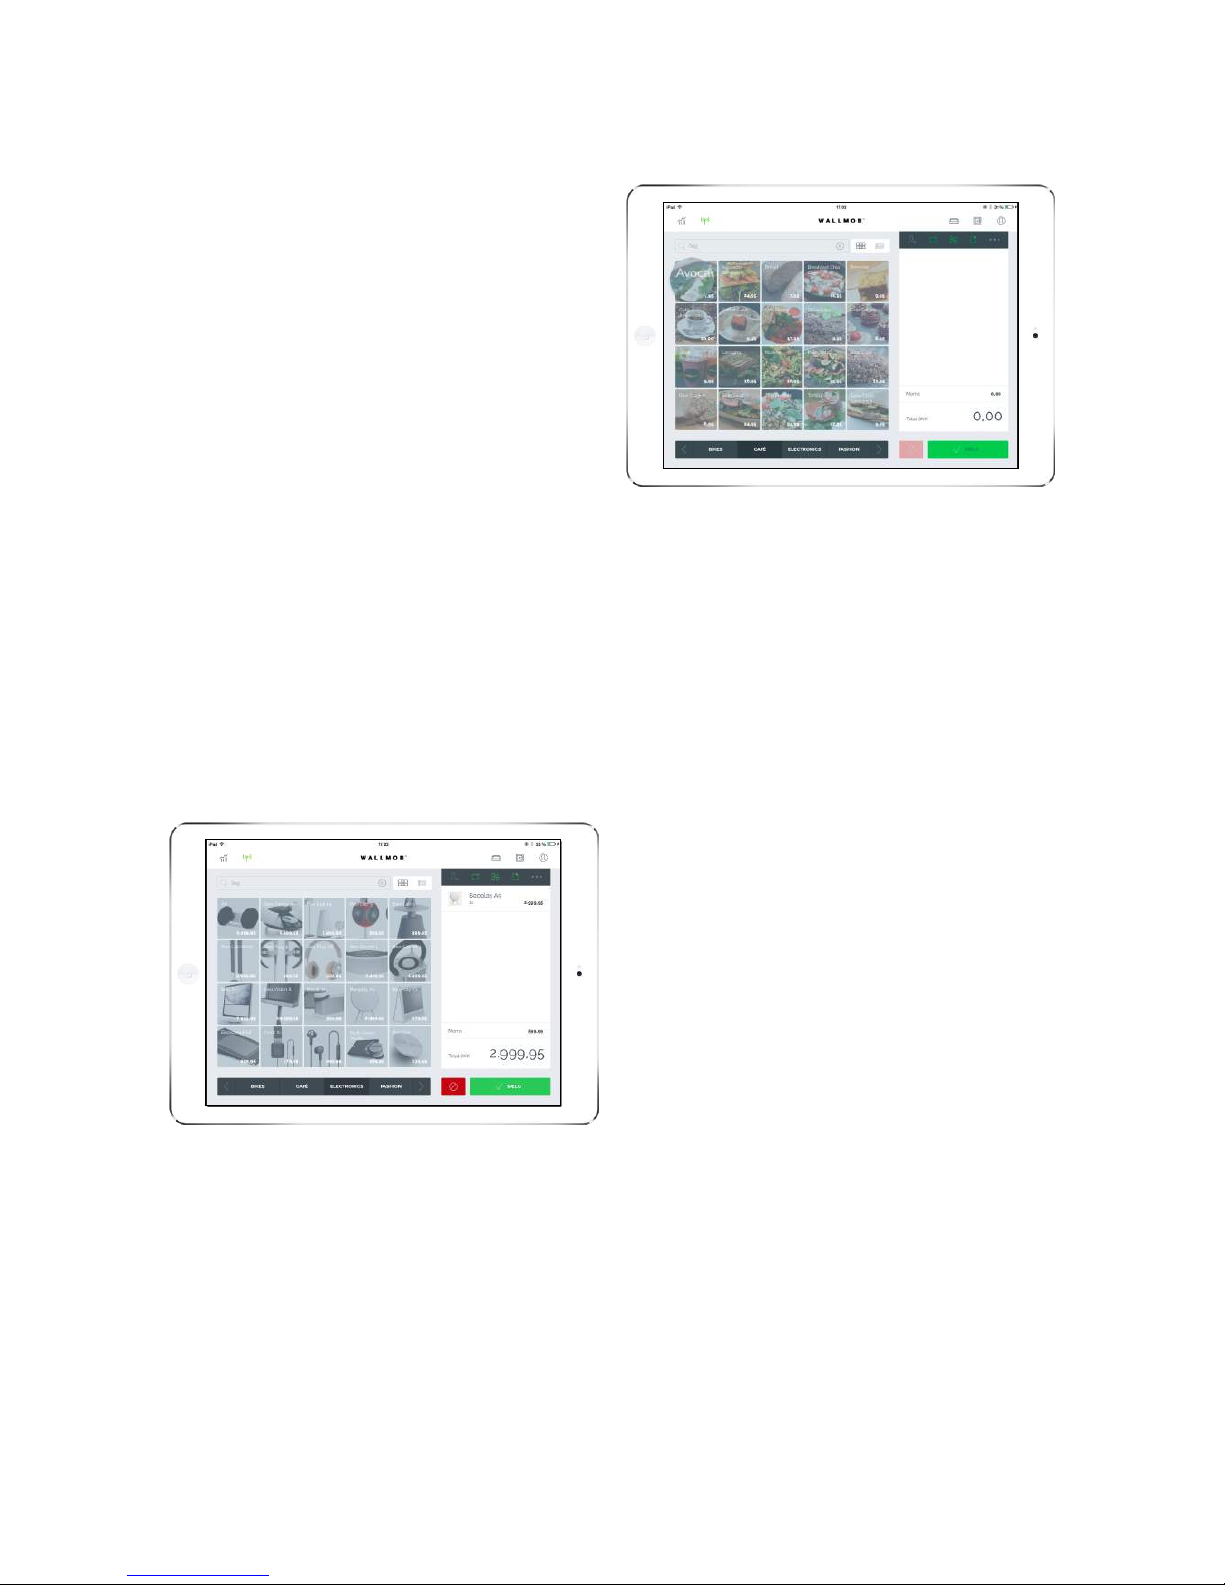
Page 22
You can return a product if the product is
to be exchanged.
There will be two different ways you can
do this. A manual method and a method
where you specifically select the product
you want to return.
MAKING A PRODUCT RETURN STEP BY
STEP
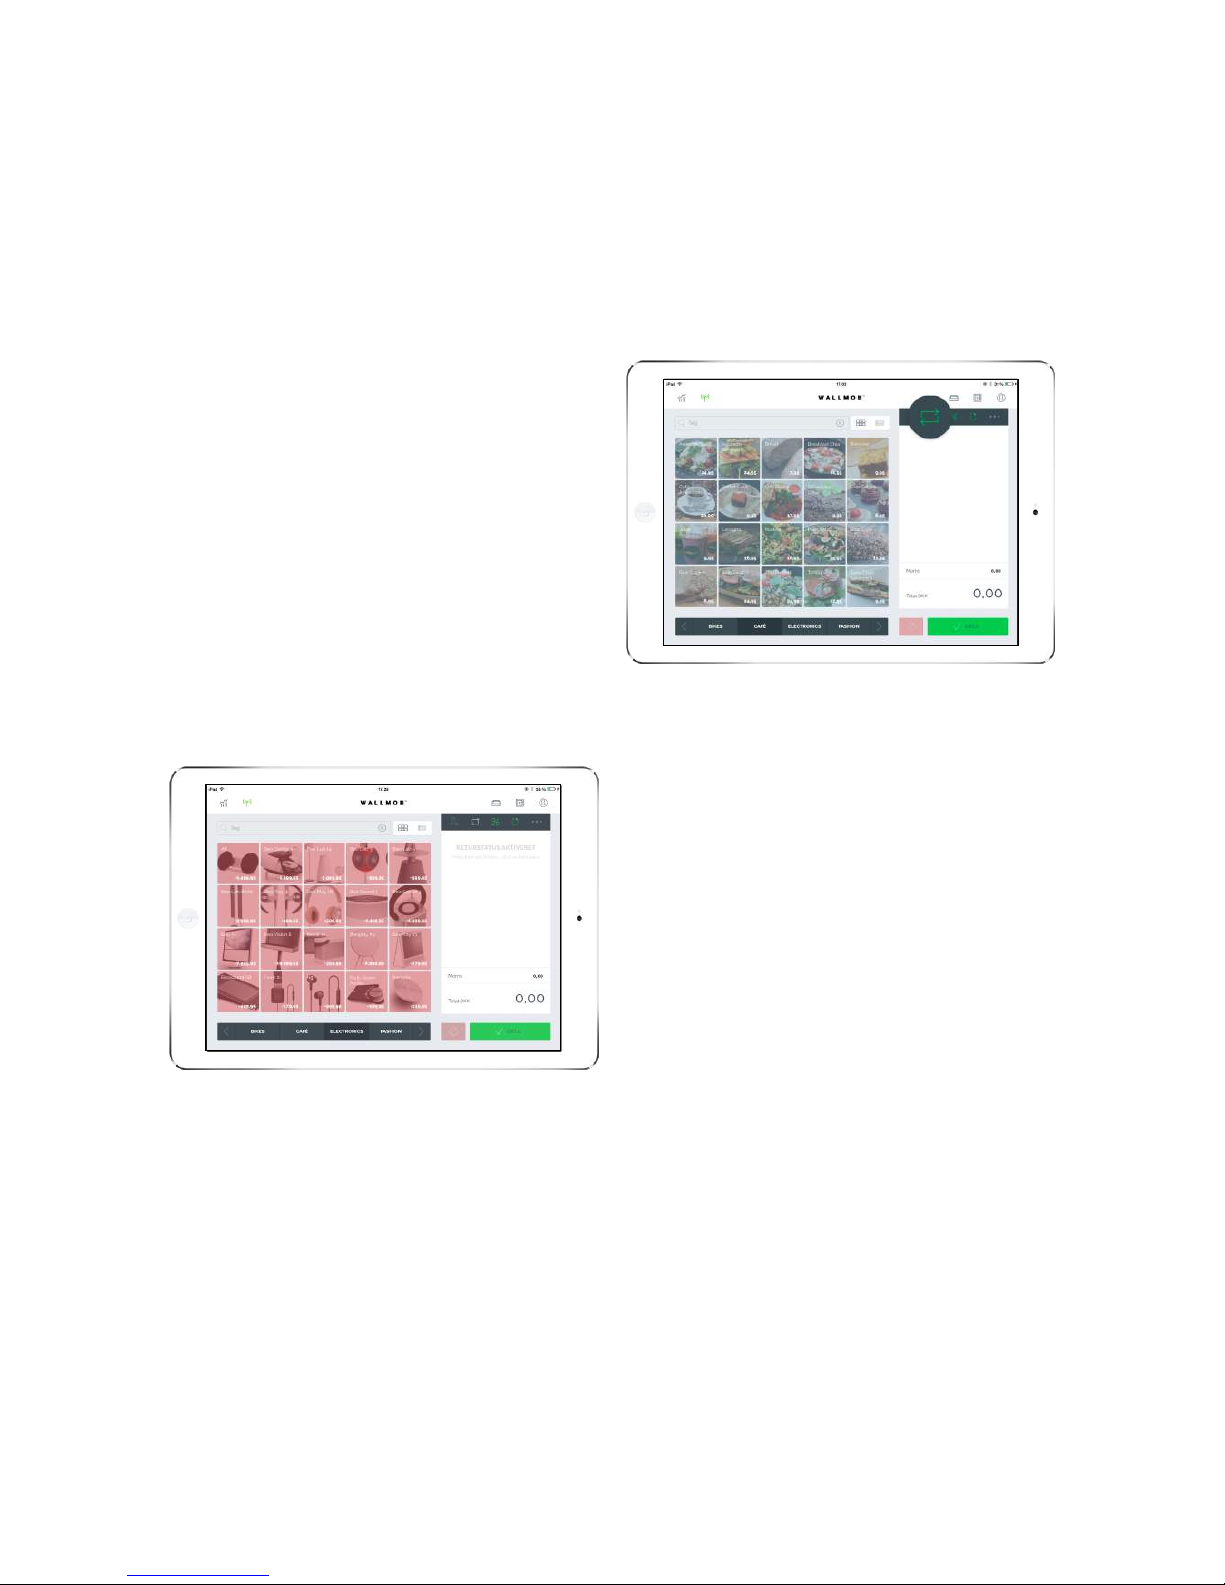
Step
1: When you press the return icon, there
will be two different methods of making a
product return, depending on whether the
product is managed in inventory. This is
example 1 with inventory management.
Important: When you have pressed the
return icon, all prices change to negative,
which is shown with a minus in front of the
price. Only after pressing the return button
again will you be able to make regular
sales.
RETURN
MAKING A PRODUCT RETURN
1
/2
Page 23

Page 24

Step
2: For manual returns, first press the return
button, then the manual product button
and then enter the amount to be returned.
Specify a reason for the product being
returned, for example, 'T-shirt was too
small'
PRODUCT RETURN
You can now make returns in two different ways.
2
/2
Page 25
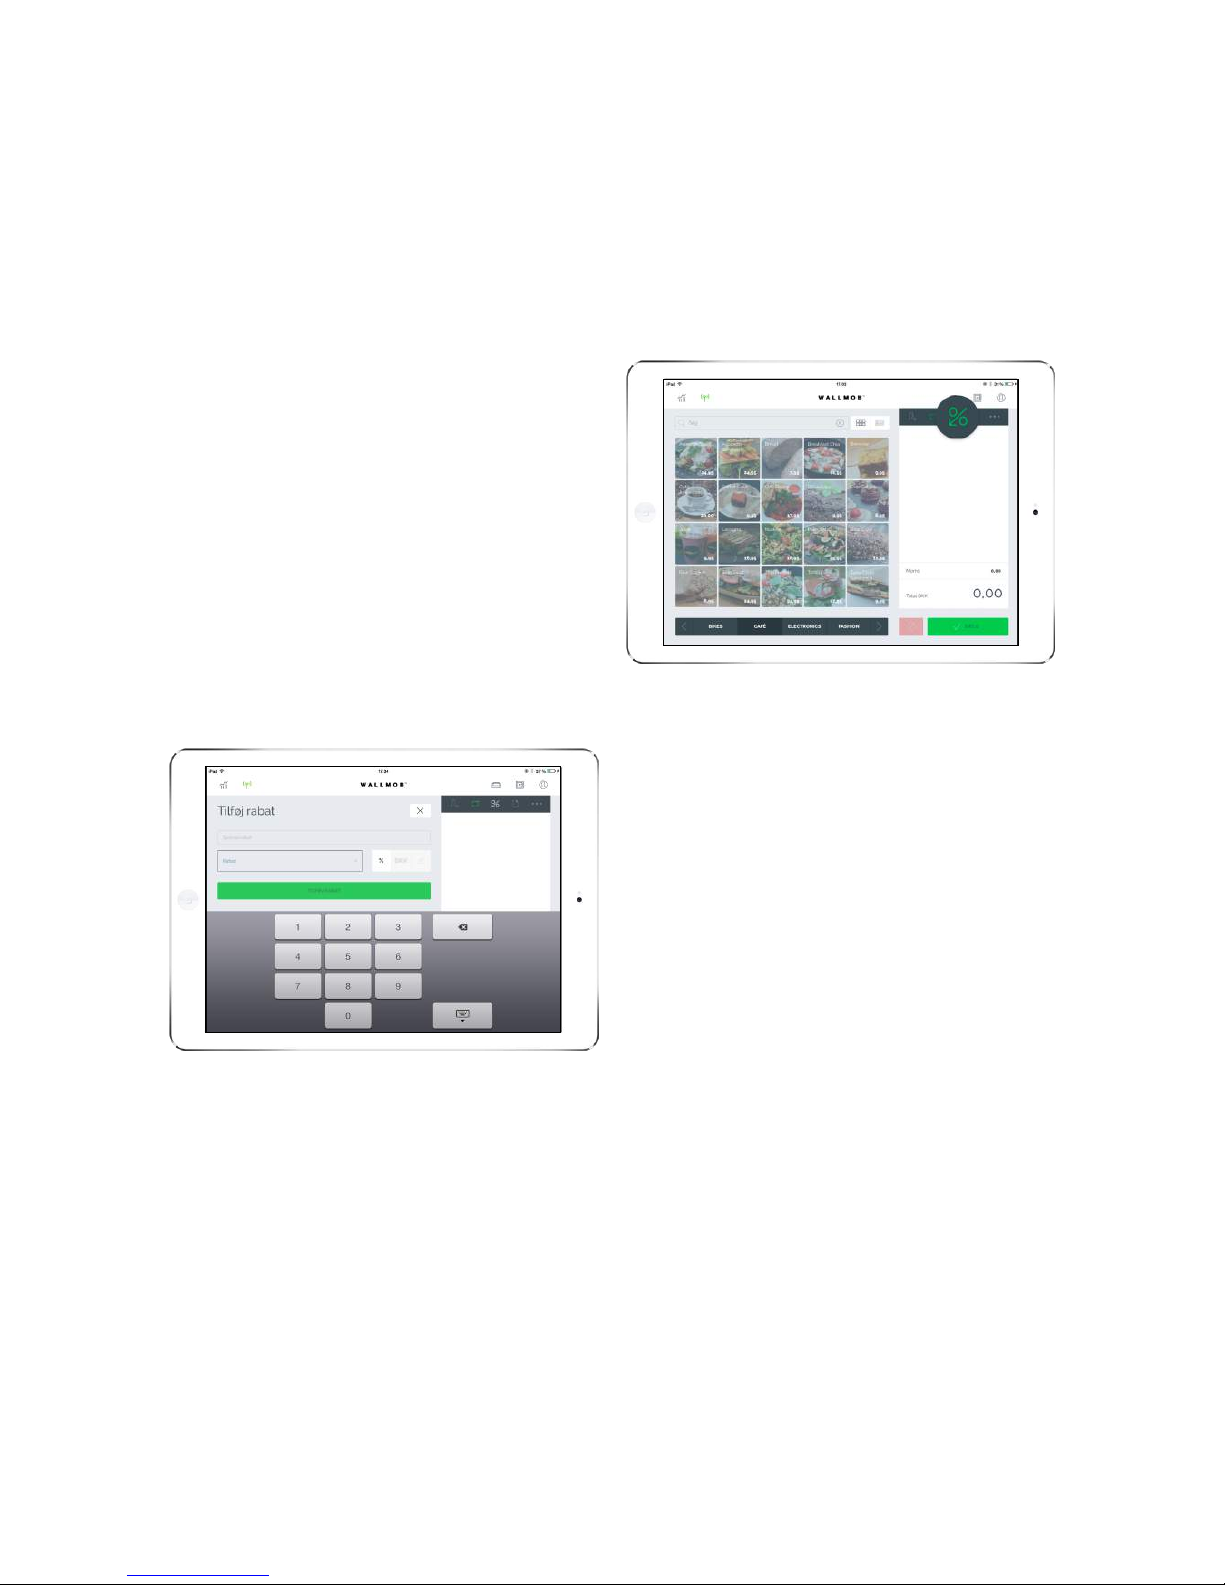
You can add a discount by pressing the
icon.
ADD A DISCOUNT
1: Choose between percentage or cash
amount.
2. Enter the percentage or amount.
3. Optional: Enter a reason for the discount.
ADD DISCOUNT
ADD DISCOUNT
Page 26

You can add a product manually by
pressing the icon.
ADD A PRODUCT MANUALLY
1: Enter the amount of the product.
2. Enter the number of products.
3. Optional: Enter the name of the product.
ADD A PRODUCT MANUALLY
ADD A PRODUCT MANUALLY
Page 27
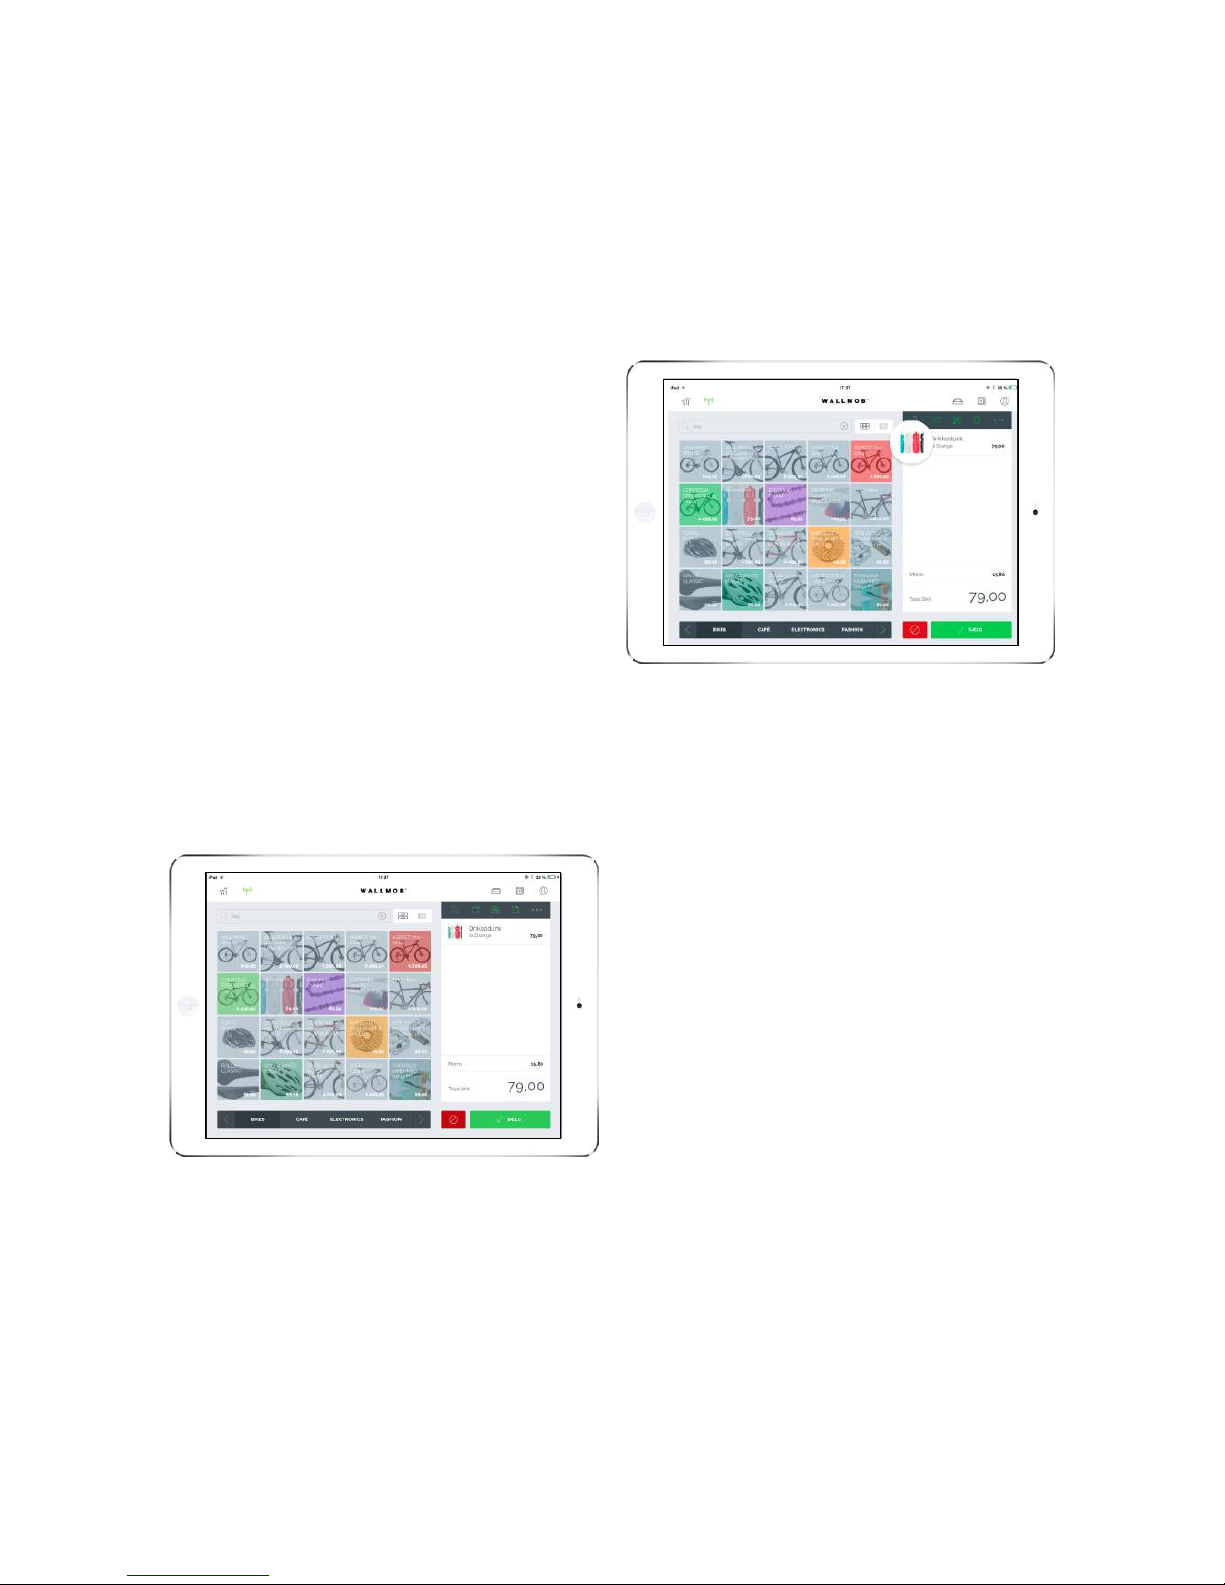
You have the option of changing your
receipt by pressing the desired product.
KVITTERING TRIN FOR TRIN
Step
1: Tryk på det produkt du vil ændre.
RECEIPTS
HOW THE RECEIPT WORKS
You have the option of editing your selected products on the receipt.
1
/4
Page 28

Step
1: When you have chosen a product, you
can change it, for example, to another size.
You can also choose to add or subtract
quantity.
2: You can also choose to give each
product a discount by pressing Discount.
Step
1: Enter a reason for the discount.
2: Enter the percentage or cash amount
Step
1: This shows how a product looks with a
discount added.
2: You have the option of deleting the
discount by pressing the minus button.
3: However, if you want to change your
discount, press the reason.
2
/4
3
/4
4
/4
Page 29

When you have chosen the desired
products, press "Sale" to complete the
payment.
SÆLG TRIN FOR TRIN
Step
1: Press TOTAL to match the total sales
price.
2: If the customer does not have correct
change, enter the amount paid
SALE
HOW SALES WORK
1
/4
Page 30

Step
1: You have the option of accepting other
currencies
2: This is done by pressing "Currency".
Step
1: After entering the amount, choose
whether they are paying by card or cash.
2: It is also possible to pay in multiple
ways, called a "split payment." For
example, EUR 300 cash and EUR 75 on a
card.
3: First enter EUR 300 and then press Cash,
then press Tender.
4: The remaining amount will be shown at
the top.
In this case, DKK 75 to be paid on a card
5: If you want to cancel the
transaction,press "Void".
2
/4
3
/4
Page 31

Step
1: The payment is now complete. You can
now choose to send the receipt to the
customer if they want.
2: If not, press "Clear payment" and the
receipt is automatically printed.
4
/4
Page 32
Pressing here returns you to your
'register'
1. BACK TO POS
Here you can see whether you are
online - Green is online, Red is offline
2. SYNCHRONISATION
Here you pull out the cash drawer.
3. OPEN REGISTER
4. PROFILE
Here you can see everything having to
do with your sales. Read more
6. SALES
Here you can see your key ratios in a
visually clear, concise way. Read more
7. KPI
Here you can see your inventory and
create new categories and products.
Read more
8. INVENTORY
BACK OFFICE / HOME
Here is an overview of your Back Office. This is where your entire store is
managed.
Page 33

Here you can see who is logged in and
you can also log off here. Read more
Here you can see a short introduction
to the various functions Read more
5. HOME SCREEN
Here you can see your employees,
create and manage users of the
system. Read more
9. USERS
Here you can set up your printer
andequipment and manage your
OneStore account. Read more
10. SETTINGS
Page 34
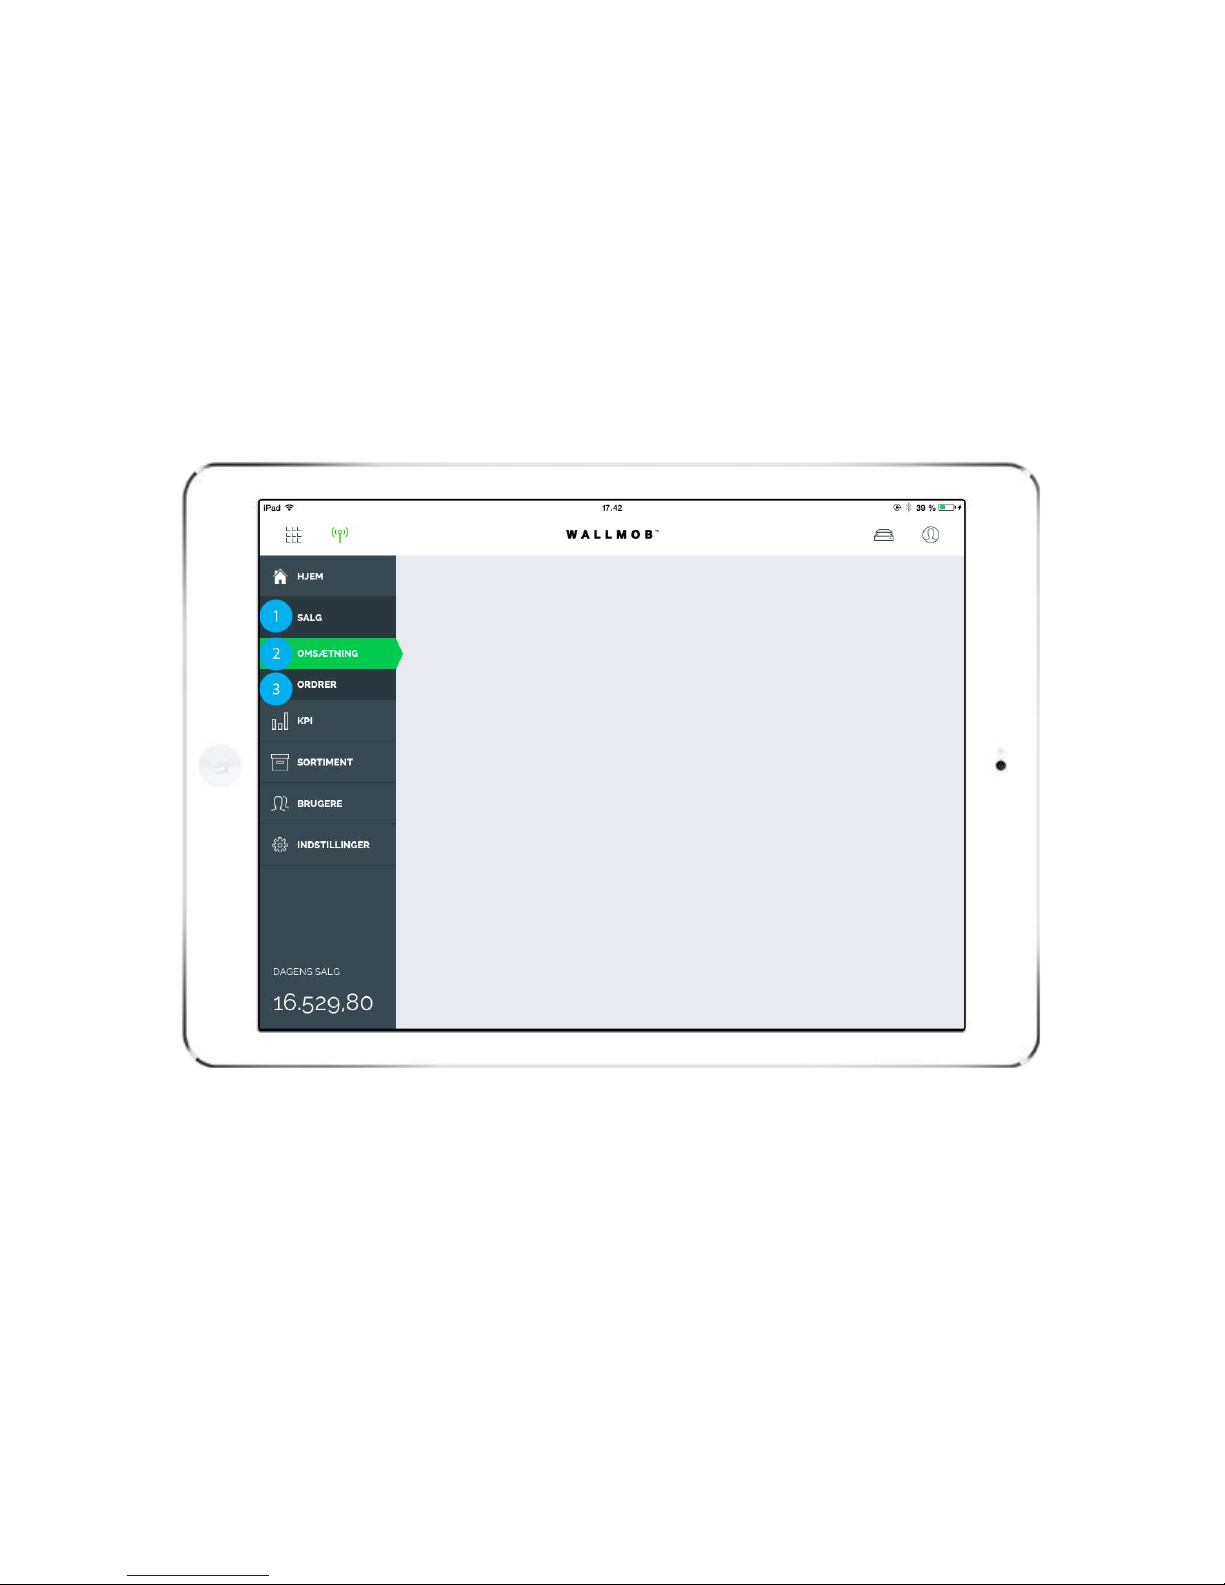
Under the point "SALES", you can see
everything about your sales. Read
more
1. SALES
Here you can see your turnover. Read
more
2. TURNOVER
Here you can see all your sales. You
can open each sale and reprint a
receipt if the customer wants. Read
more
3. ORDERS
SALES
Under the point "SALES", you can see everything about your sales.
Page 35
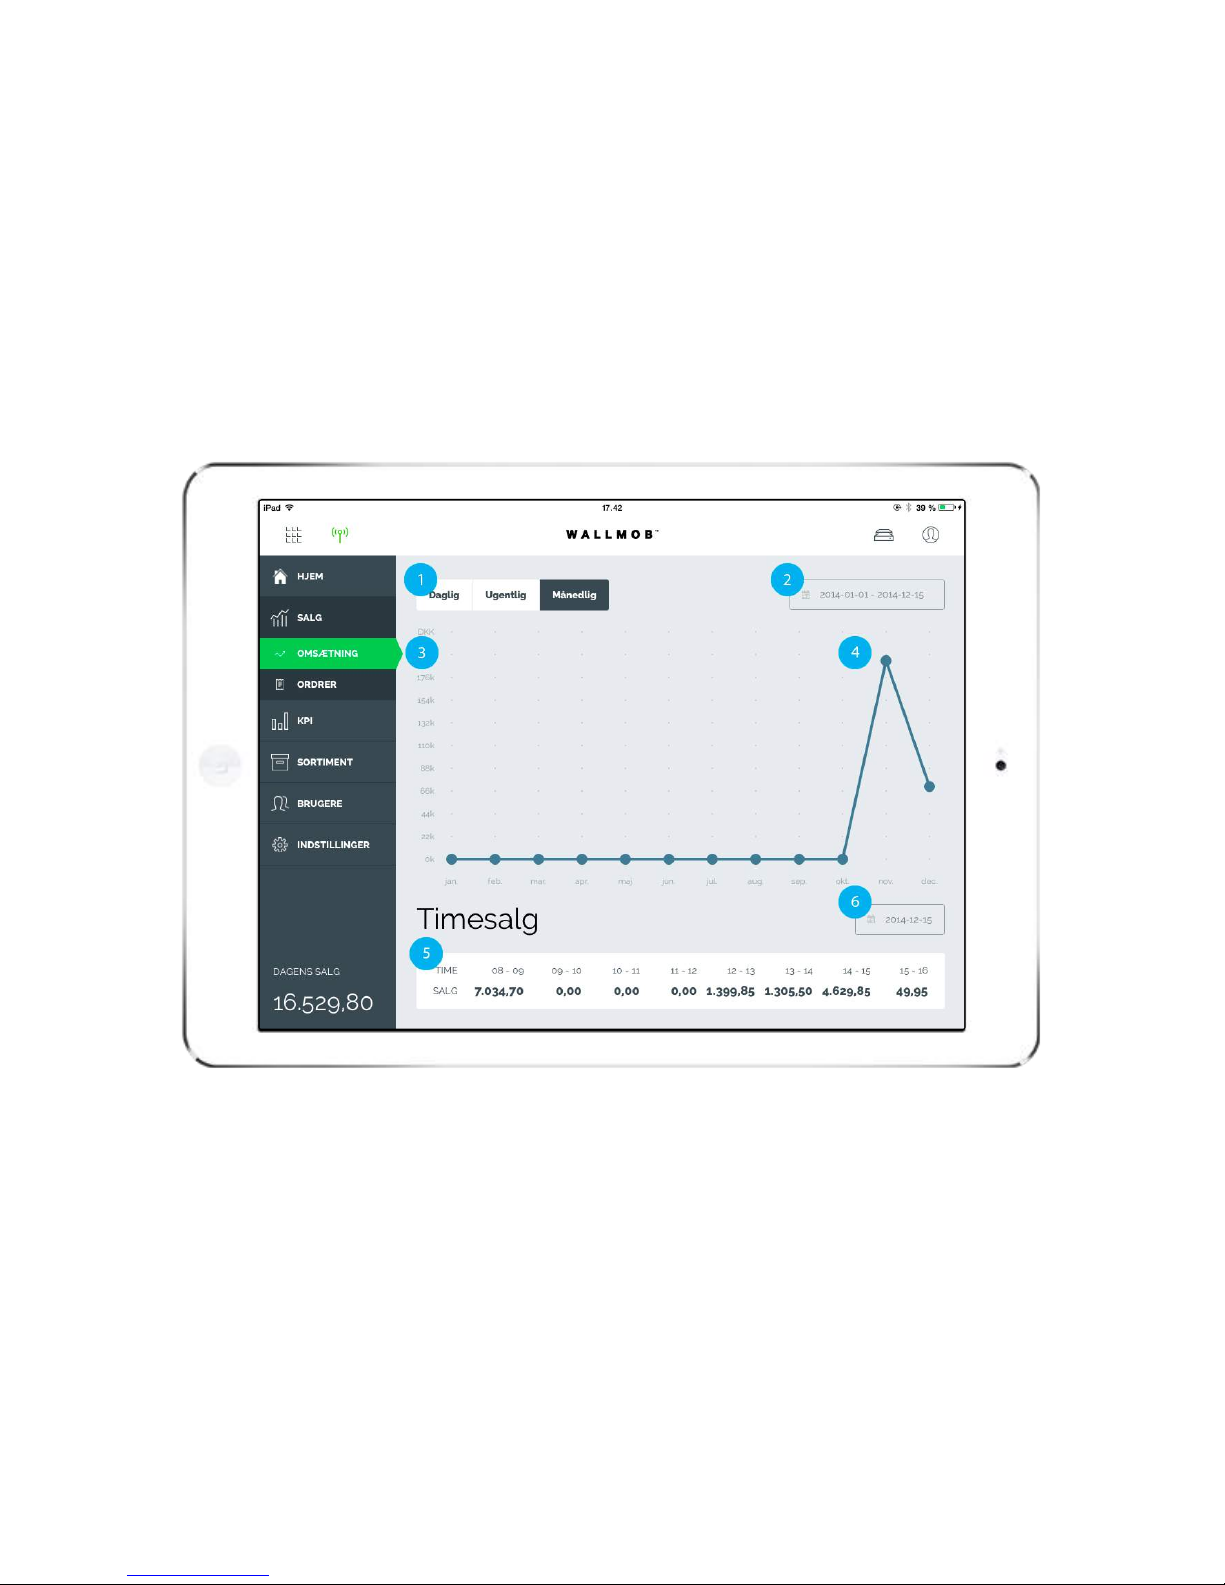
Here you can choose whether the
overview will show your turnover from
a specific day, week or month.
1. TIME INTERVAL
Here you choose the period from which
you would like to see your turnover.
2. CHOOSE DATE
Here you can see how the graph for
your turnover looks.
3. GRAPH
If you press one of the blue dots, you
can see the turnover for the selected
point.
4. INFORMATION
Here you can see the sales hour by
hour on a given day.
5. HOURLY SALES
Here you choose the day for which you
would like to see hourly sales.
6. CHOOSE DATE
SALES - TURNOVER
Under the point "SALES", you can see how your sales are going.
Page 36

Here you can see all your completed
sales. You can see when a given
product was purchased and the
currency that was used.
You can also see which products were
purchased at the same time.
You also have the ability to print a new
receipt.
1. LIST
Here you can see all your sales. If you
press on a line. You can see which
products have been sold.
2. LINE ORDER
SALES - ORDERS
Here you can see all your sales in any order.
Page 37

Page 38

Here you can see how much money an
average customer spends in your store.
Read more Read more
1. AVERAGE SALES
Here you can see which products have
high or low earnings. This gives you
daily insight into whether there was a
focus on selling products which earn
money. Read more
2. GROSS MARGIN
KPI
Here you can quickly get an overview of how your business is going using
some important Key Point Indicators.
Page 39
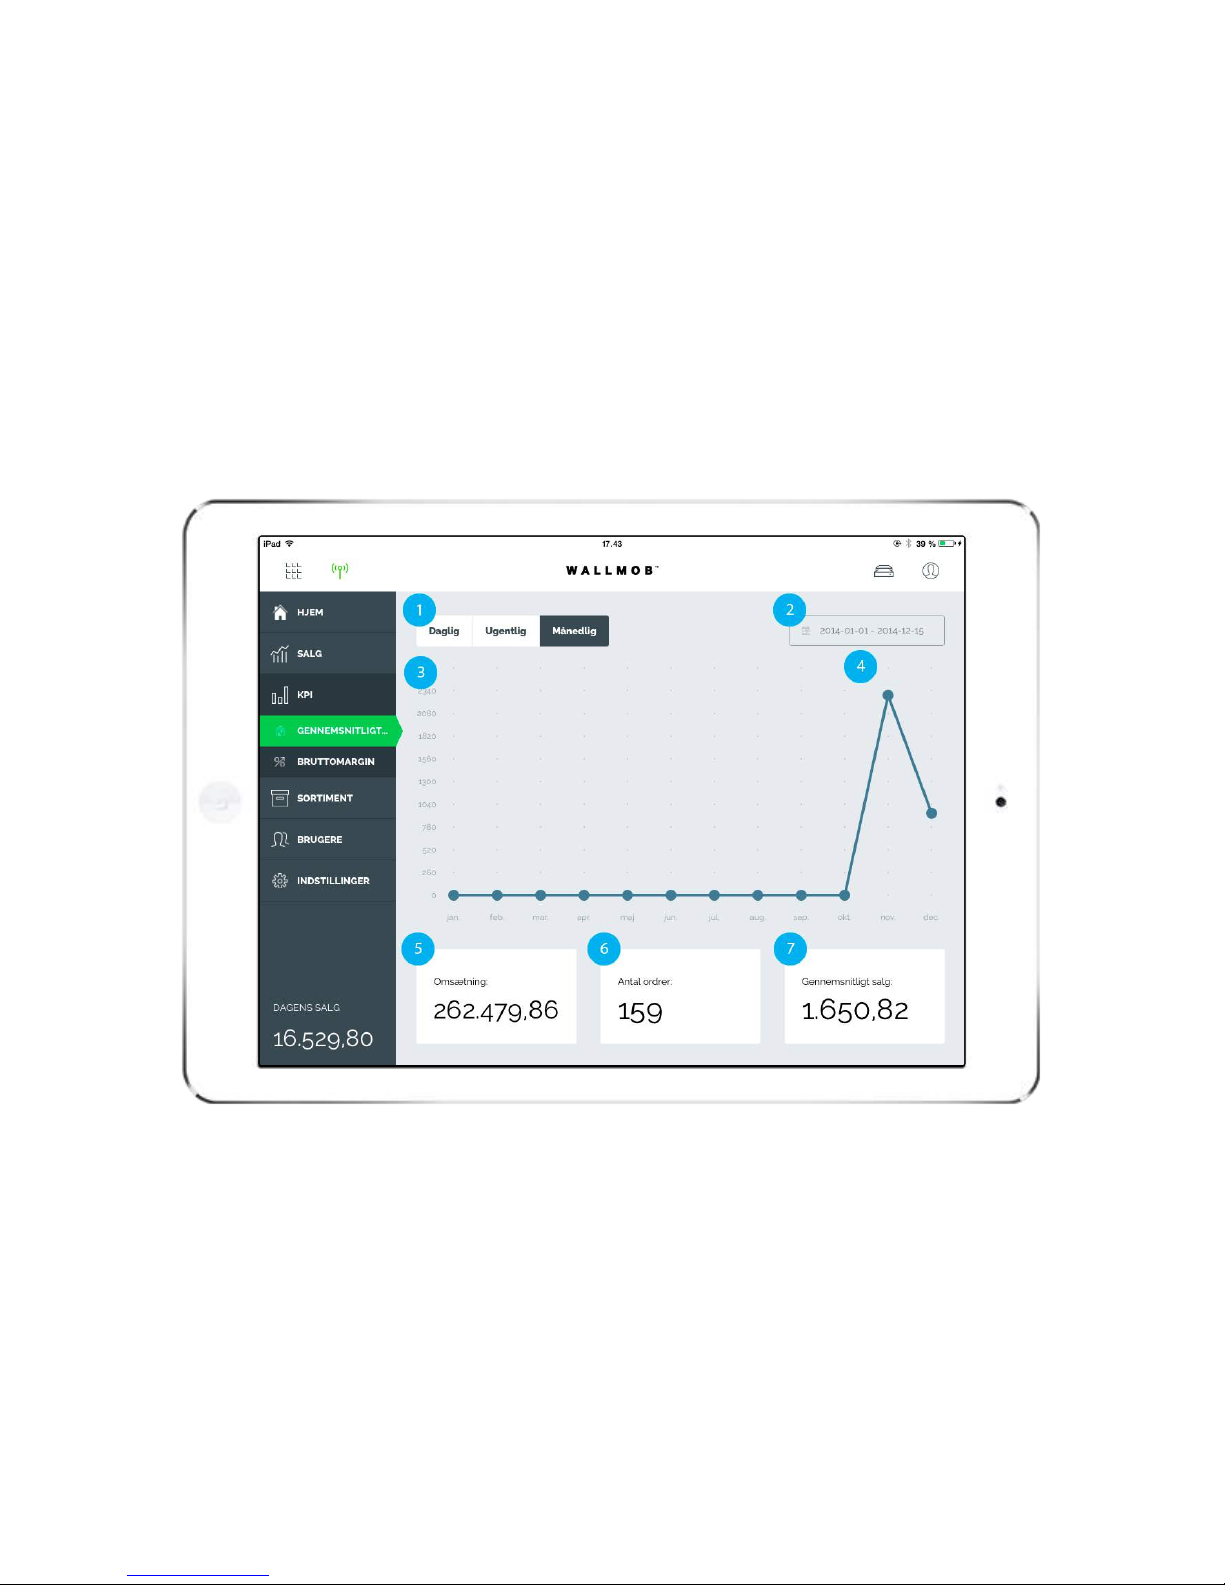
Here you can choose whether you
want to view by hour, day, week or
month.
1. TIME INTERVAL
Here you choose the period from which
you would like to see your turnover.
2. CHOOSE DATE
On the graph, you can see how much a
customer spends in your store on
3. GRAPH
Here you can see your total sales for
the selected period. Read more
5. TURNOVER
Here you can see how many
transactions you have had in the
selected period. Read more
6. TRANSACTIONS
This shows what a customer has spent
on average in your store. Read more
7. AVERAGE SALES
KPI - AVERAGE SALES
Here you can see an overview of how much a customer purchases in your
store on average.
Page 40

average.
If you press one of the blue dots, you
can see the turnover for the selected
point.
4. INFORMATION
Page 41
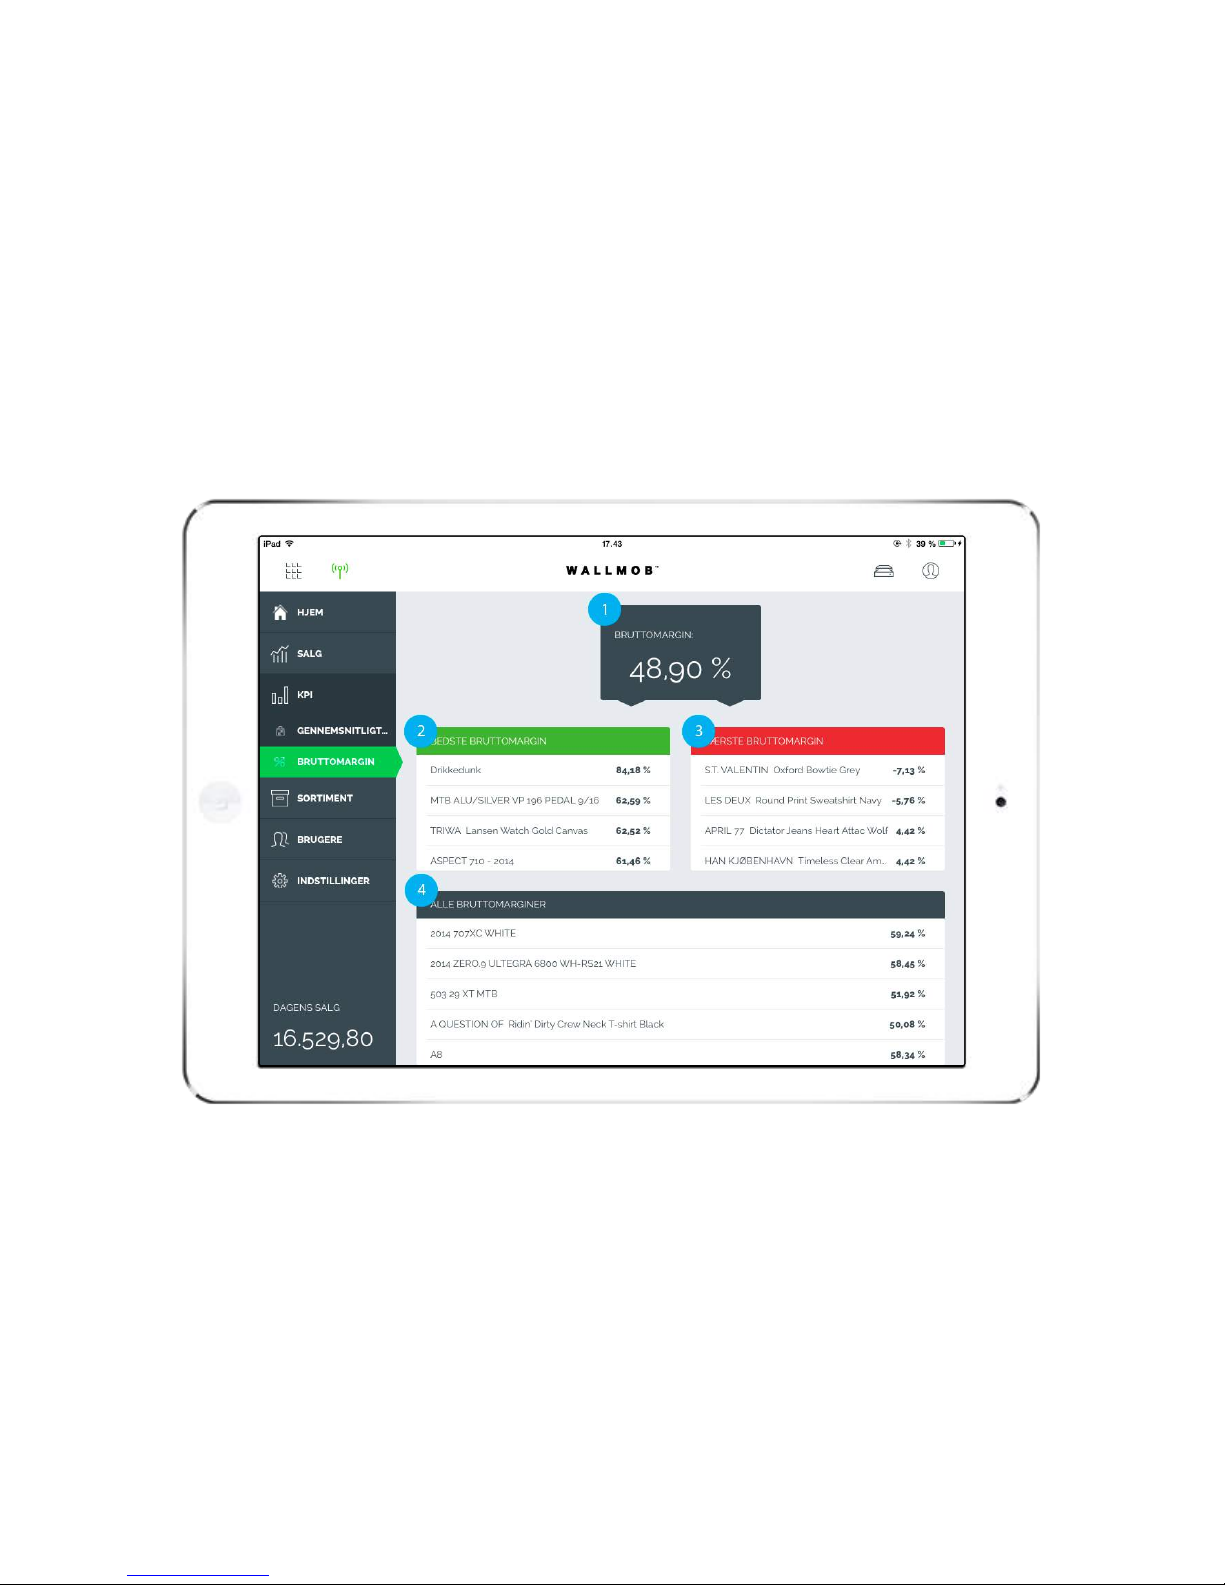
Average contribution margin for the
business. Read more
1. GROSS MARGIN
Green. 4 best-performing products.
2. BEST GROSS MARGIN
Red. 4 worst-performing products.
3. WORST GROSS MARGIN
A list of the contribution margin of all
products sold.
4. ALL GROSS MARGIN
KPI - GROSS MARGIN
Here you can get a quick overview of products with highest and lowest
contribution margin.
Page 42

Here you can see inventory, add
products and categories. Read more
1. INVENTORY
Here you can see all your products and
add new ones. Read more
2. PRODUCTS
Here you can see your categories and
create new ones. Read more
3. CATEGORIES
INVENTORY
Here you have access to an overview of your inventory.
You can manage it by adding categories and products and editing the existing
inventory.
Page 43
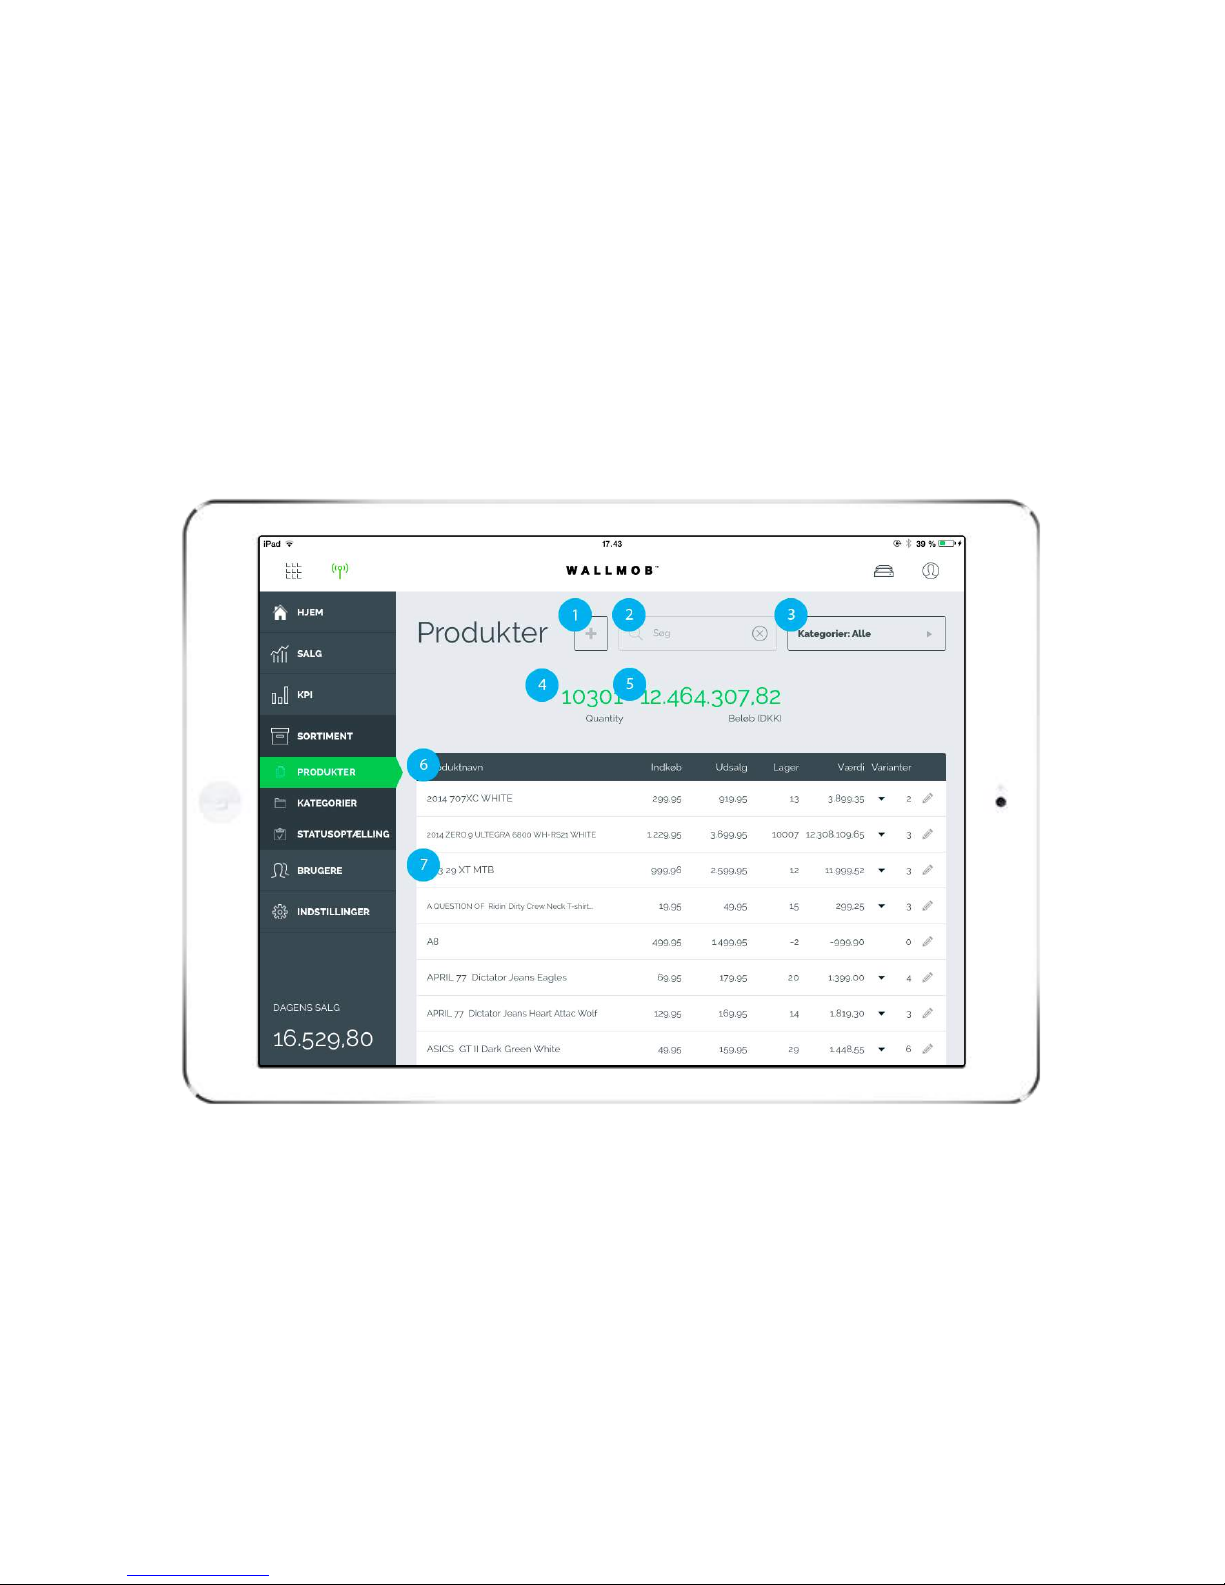
Here you create/add a new product.
Read more
1. ADD PRODUCT
Here you can search for a specific
product
2. SEARCH
Here you can see the category to
which a specific product belongs.
Read more
3. CATEGORIES
This shows the value of the selected
category.
5. AMOUNT
This describes what you can see about
each product.
6. LIST
Here you can see the product and the
information associated with it. Read
more
7. PRODUCT
INVENTORY - PRODUCTS
Here you can see all your products.
You can edit them and create new ones.
Page 44

This shows the number of units in the
selected category.
4. QUANTITY
If you press the small pencil, you have
the option of editing the selected
product.
8. EDIT
Page 45

By pressing the green +, you can
create/add a new product to your store.
SET UP A PRODUCT STEP BY STEP
Step
1: First give the product a name.
ADD PRODUCT
HOW TO SET UP A PRODUCT
In the following steps, you can see how to set up a product
1
/3
Page 46

Step
1: Then choose the category to which the
product will belong.
(You have the option of choosing multiple
categories for a product)
(Note! A category must be created first)
2: You can choose to add an image or a
colour to the product.
Step
1: Then enter what you purchased the
product for, excluding VAT.
2: Then what you are selling the product
for, including VAT.
3: If you have the product in different
variants, you can set them up under the
product.
4: If you press the printer icon, you can
print labels for your products.
ADDED PRODUCT
You have now added a product. You can now to the front-end and see it. And start selling it.
2
/3
3
/3
Page 47

By pressing the green plus sign, you
can add a new category.
1. ADD CATEGORIES
Here you can see your categories.
2. CATEGORIES
You can edit your categories by
pressing the small pencil.
Note! If you change the name of a
category, all the products you
already set up under the category
will now only be under the new
category name.
3. EDIT
INVENTORY - CATEGORIES
Here you can see all your categories.
And add new ones.
Page 48
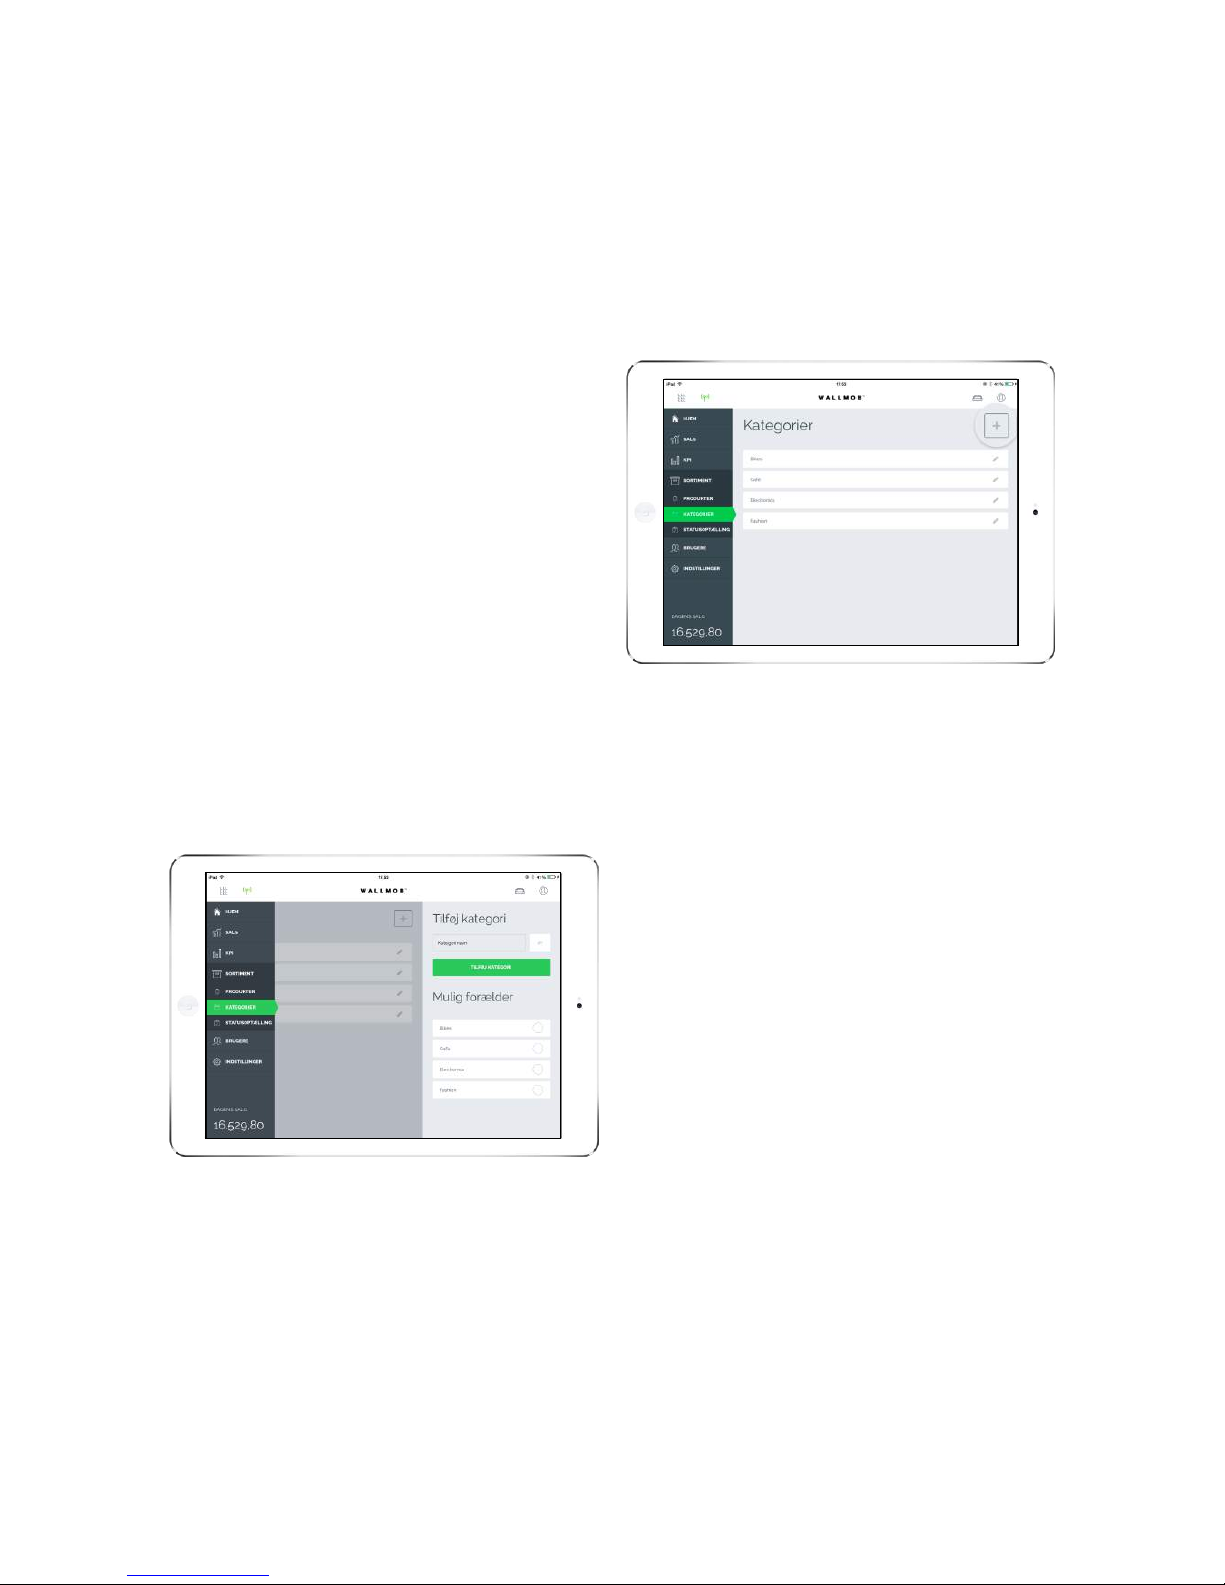
By pressing the green plus sign, you can
create a new category.
CREATE A CATEGORY STEP BY STEP
Step
1: Enter the name you want to give a
category.
2: You have the option of creating a main
category, for example, T-shirt, and then a
sub-category which describes the brand,
for example, Samsøe Samsøe
3: Then press 'Add' and the category is
added.
CREATE A CATEGORY
CREATE A CATEGORY
Here you can see how to create a category.
1
/1
Page 49

Here you can manage your employees.
1. USERS
Here you can see your users, create
new ones and delete old ones.
2. CREATE USERS
Here you manage what the different
roles and rights Youcan edit the
settings later - you can also do it here.
3. PERMISSIONS
USERS
Here you can see and manage your users.
Page 50
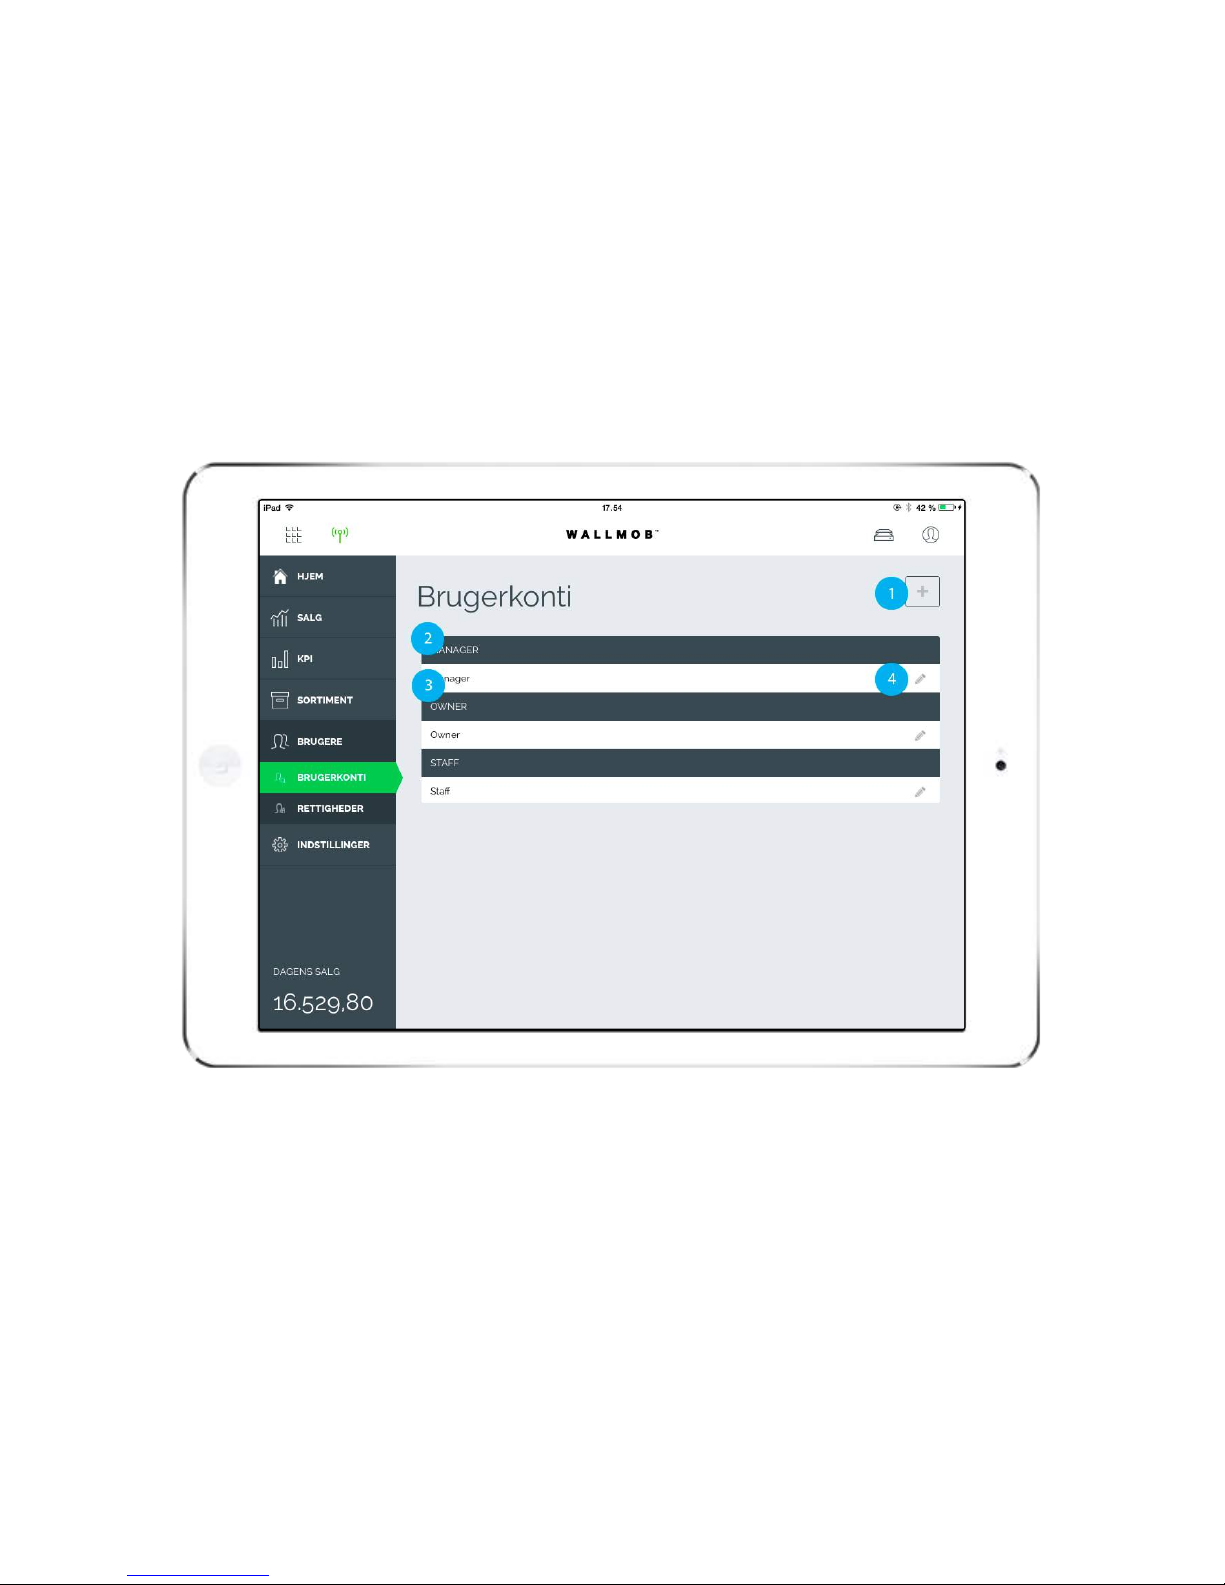
If you press the green plus sign, you
can create a new user.
1. CREATE NEW USER
Here you can see the position/role the
employee has been assigned.
2. SELECT ROLE
Name of the employee.
3. NAME
If you press the small pencil, you can
edit information on your employees.
4. EDIT
USERS - CREATE USERS
Here you can see all your employees.
Page 51

You must press the green plus sign to
create a new user.
CREATE A USER STEP BY STEP
Step
1: Enter the name of your new employee.
CREATE A NEW USER
CREATE A NEW USER
In the following steps, you will learn to create a user.
1
/3
Page 52
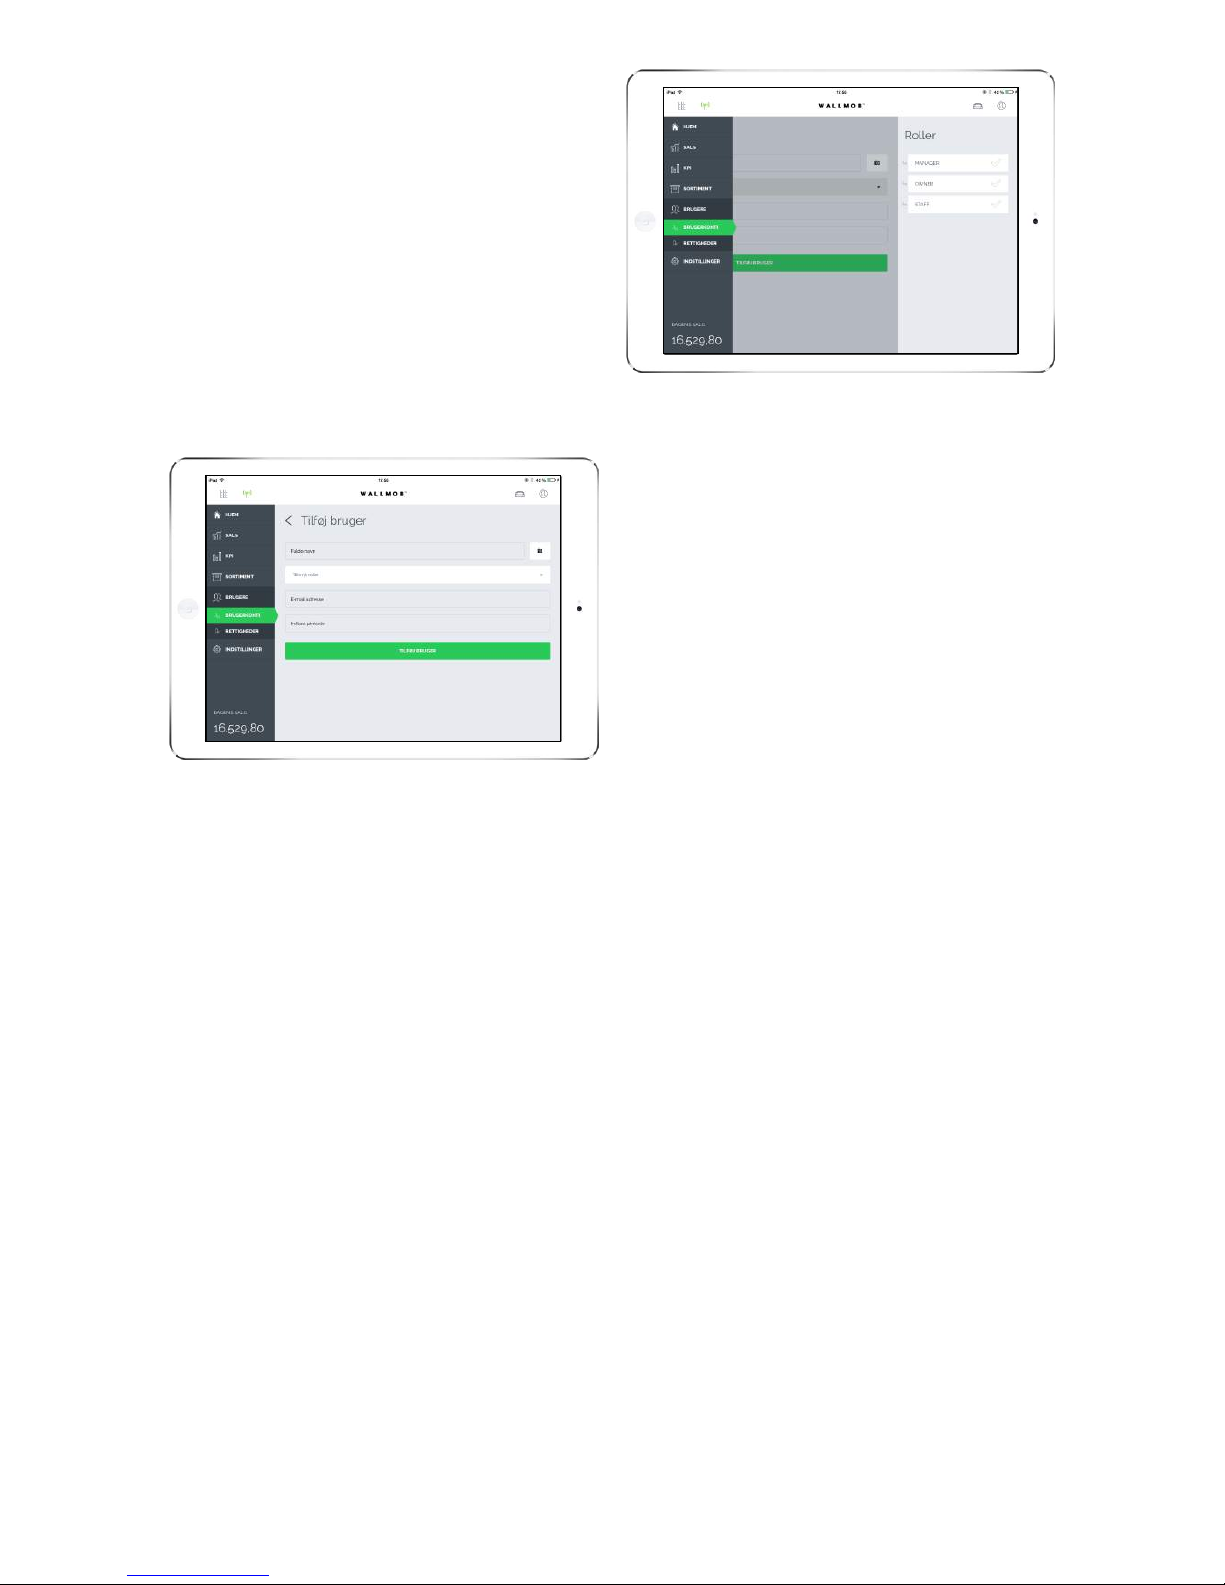
Step
1: Assign your new employee a
position/role.
Step
1: Enter the phone number and e-mail of
your employee.
2: It is important that you assign your
employee a unique code, because this is
the code your employee will use to log in
to the POS.
YOU HAVE NOW CREATED A NEW USER
Your new employee has been created in the system and can now log in.
2
/3
3
/3
Page 53

Here you can see the breakdown of the
various roles.
1. ROLES
Here you can see the functionalities
you have given permissions to.
2. FUNCTIONALITIES
You can give permission to view or edit
in an area in back office by "ticking" the
white fields for a given role.
3. PERMISSIONS
USERS - PERMISSIONS
Here you can manage the rights your employee will have in back office.
Page 54

Here you can see the information
connected to the iPad and the store.
Read more
1. ACCOUNT
Here you add, for example, printers or
other equipment. Read more
2. PRINTERS
Here you have the option of logging
out of the application or switch to a
different register.
3. LOG OUT
SETTINGS
Here are the settings for your store.
Page 55
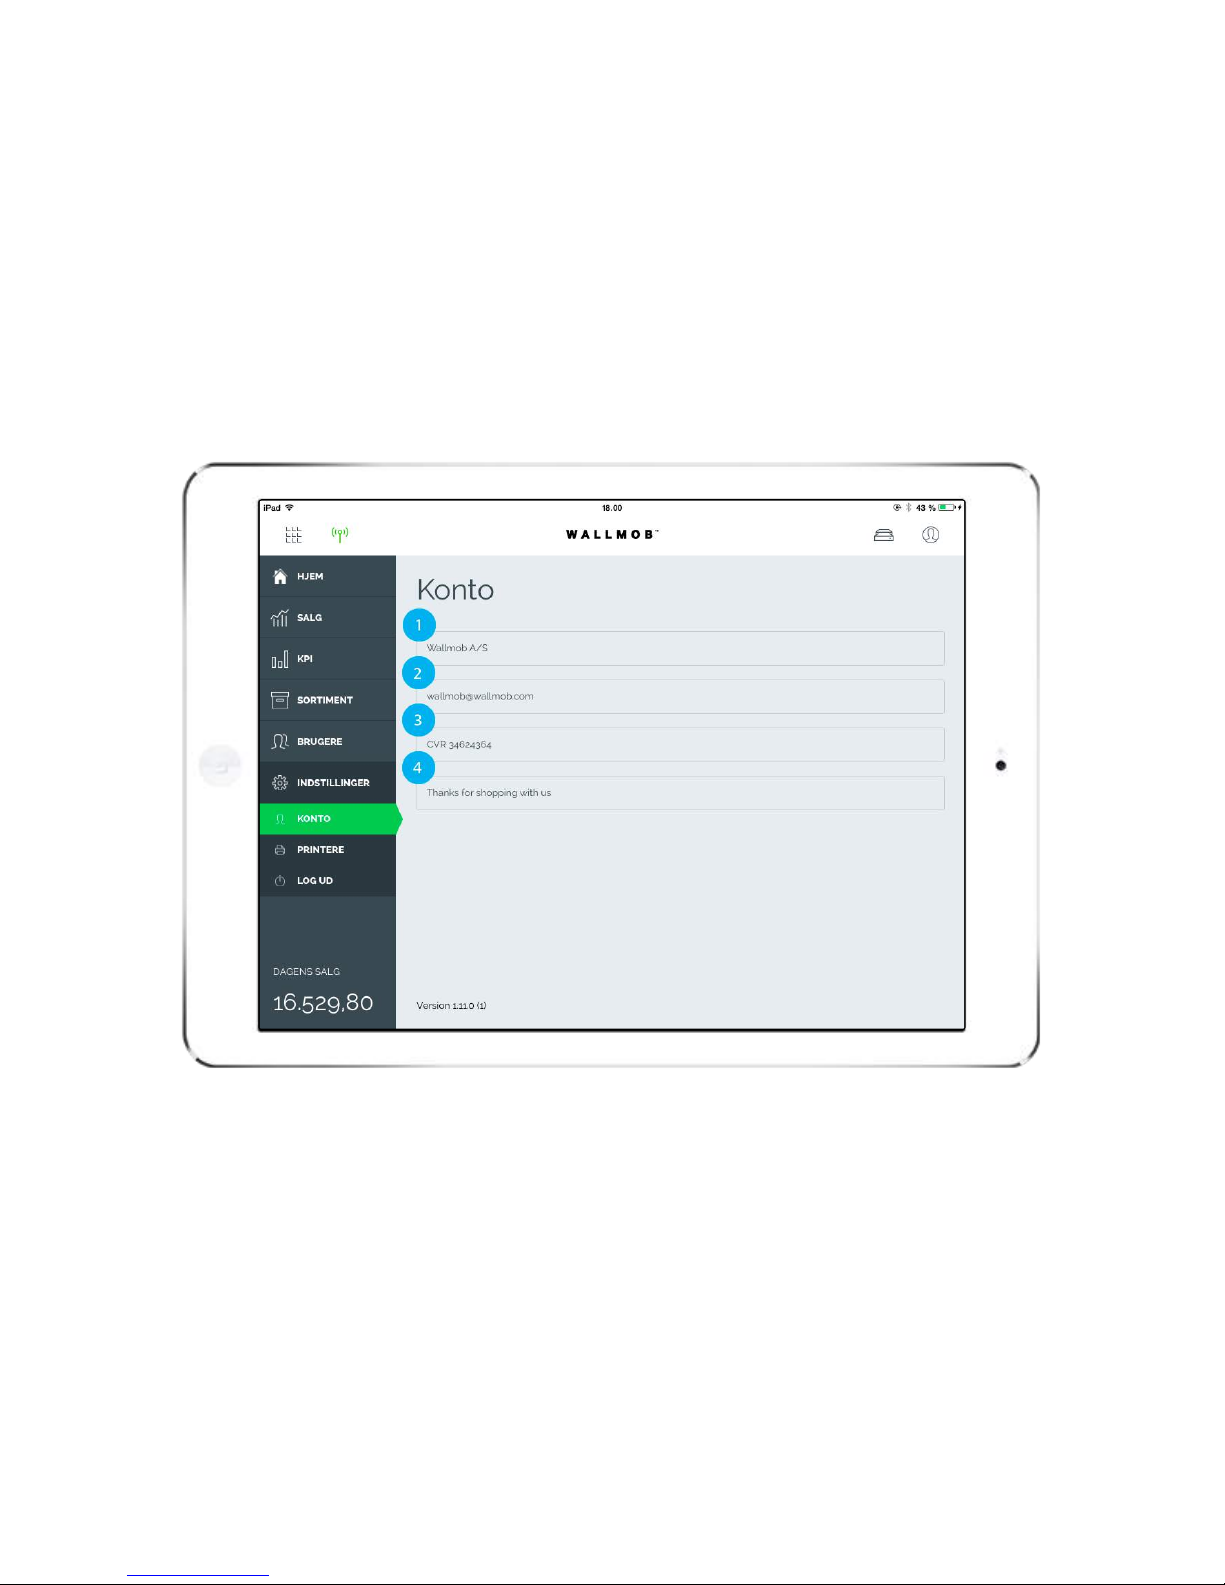
Here you can see or change the name
of your store. It is also the name at the
top of your receipts.
1. NAME ON RECEIPT
Here you can see the e-mail connected
to OneStore POS. This is what you need
to log in to the POS.
2. LOGIN E-MAIL
Here you can add your own text to the
receipt's header.
3. RECEIPT HEADER
Here you can add your own text to the
receipt's footer.
4. RECEIPT FOOTER
SETTINGS - ACCOUNT
Here you can see the settings for your store.
Page 56
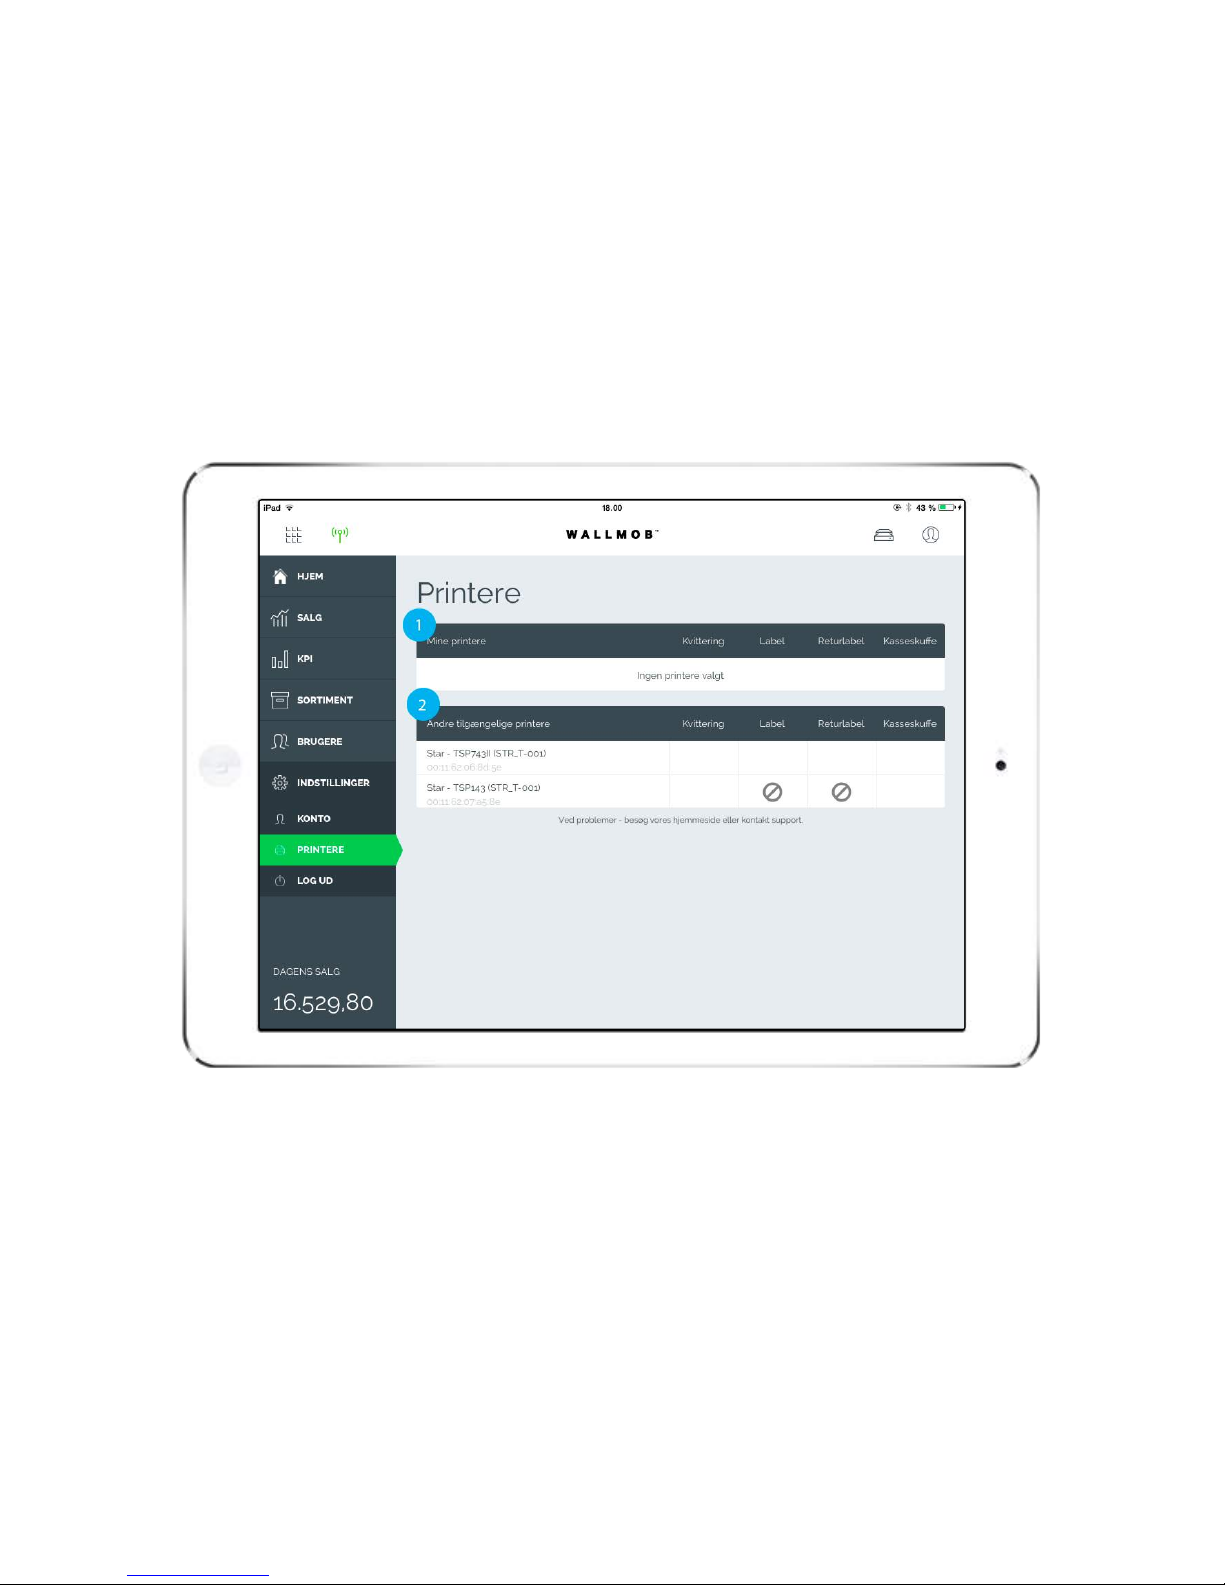
Below are shown the printers you have
selected for your store. If you own a
multi-function printer, then remember
to tick the functionality you want the
printer to use.
1. MY PRINTERS
Below are shown all the printers
available in your network. To use one or
more of them, tick the desired
functionality.
2. OTHER AVAILABLE PRINTERS
SETTINGS - PRINTERS
Here you can add a printer/cash drawer to your iPad.
Page 57

To the far right is a switch symbol
where you can log out of the current
register. This can be advantageous if
you want another iPad to take over this
register.
1. ACTIVE REGISTER
To the far right is a switch symbol
where you can log out of the current
account. This can be advantageous if
the iPad must be used as a substitute in
another store, for example.
2. ACTIVE ACCOUNT
SETTINGS - LOG OUT
Here you have the option of logging out of the application or switch to a
different register.
 Loading...