

Page 1
OPERATION GUIDE
www.lpadjustablebeds.com
EDR10512 r1 5/05
Document Part No. 99300805
© Leggett & Platt, Inc.
Page 2

Page 3

CONTENTS
S-cape II MR Function ......................................................................................... 4
Optional “J Box” Programming Procedure ........................................................5
Powerdown Box Operation. ..............................................................................5
S-cape II MR Programming (1 hand control - 1 bed) ........................................6
S-cape II MR Programming (2 hand controls - 1 bed).......................................7
S-cape II MR Programming (1 hand control - 2 beds) ...................................... 8
S-cape II MR Programming (2 hand controls - 2 beds) .................................... 9
S-cape II MR Reprogramming (separating 2 beds) ......................................... 10
Page 4
S-CAPE II MR FUNCTION
IMPORTANT INFORMATION
READ ADVISORY INFORMATION IN THE OWNERS MANUAL CAREFULLY BEFORE
USING THIS PRODUCT. THE POTENTIAL FOR ELECTRICAL SHOCK EXISTS IF
ELECTRICAL COMPONENTS ARE NOT INSTALLED OR OPERATED PROPERLY.
S-CAPE II MR OPERATION
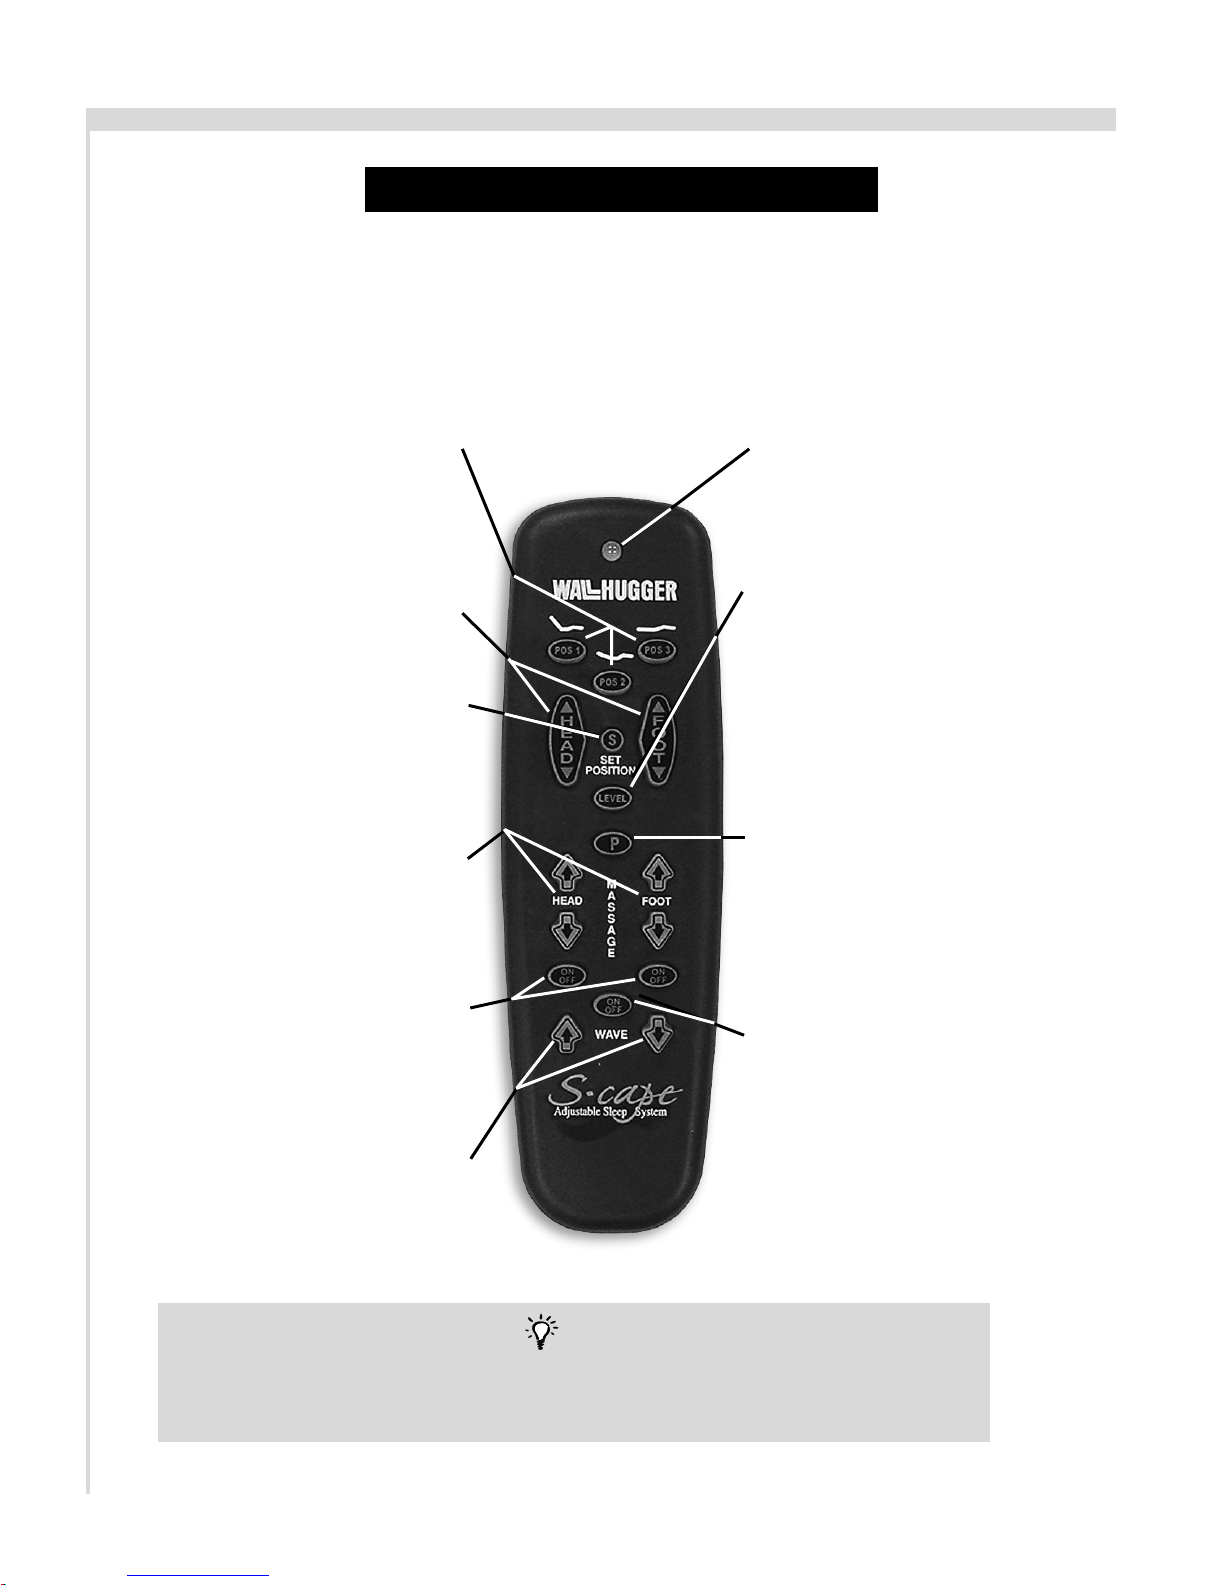
Refer to the matrix below for location and explanation of the S-cape II MR hand control
buttons:
POSITION BUTTONS
Press and release position button
and the bed will automatically
move to selected position. To stop
bed while in motion press and hold
any button until the bed stops.
HEAD & FOOT UP/DOWN BUTTON
Adjusts the head & foot sections of
the bed to the desired position.
S BUTTON
Once the desired position of head,
foot, massagers and wave have
been made, press and hold the SET
button for 2 seconds to record the
position.
HEAD/FOOT MASSAGE ARROW
BUTTONS
Slowly increases or decreases the
intensity of the massager as long as
the appropriate button is pressed.
TRANSMISSION INDICATOR LIGHT
Verifies a button is being pressed
and data is being sent to the bed.
LEVEL BUTTON
To level the bed to the flat position
press and release the LEVEL
button. This button will also turn
off the massagers. To stop bed
while in motion, press and hold
any button until bed stops.
P BUTTON
To recall the beds saved position,
press and release the P button. To
stop the bed while in motion,
press and hold any button until
bed stops moving.
MASSAGE ON/OFF BUTTONS
Turns on or off the corresponding
massager. When turned on, the
massage has an automatic shut
off timer of 30 minutes.
WAVE ARROW BUTTONS
Once the massagers are activated
and the wave feature is selected,
these buttons increase or decrease
the speed of the wave.
HAND CONTROL REQUIRES FOUR (4) AAA SIZE BATTERIES. TO CONSERVE
BATTERY LIFE, THE TRANSMITTER TURNS OFF ALL FUNCTIONS WHEN ANY
BUTTON IS PRESSED FOR MORE THAN 50 SECONDS.
S-Cape II MR Hand Control Operation Guide
4
WAVE ON/OFF BUTTON
Once one or both massagers are
activated, this button turns the
wave feature on and off.
NOTE
Page 5
OPTIONAL “J BOX” PROGRAMMING PROCEDURE
ALTERNATE
For adjustable beds equipped with “J box” only—no power down box.
“J BOX”
PROGRAMMING
When programming the hand control,
unplug the adjustable bed electrical power
cord. Wait 30 seconds, then plug the cord
back in to the power source. This simple
process automatically sets the bed to the
program mode for 90 seconds. For
convenience, use this procedure in lieu of
pressing the learn button (located on the J
Box, mounted to the underside of the bed
base frame).
POWERDOWN BOX OPERATION
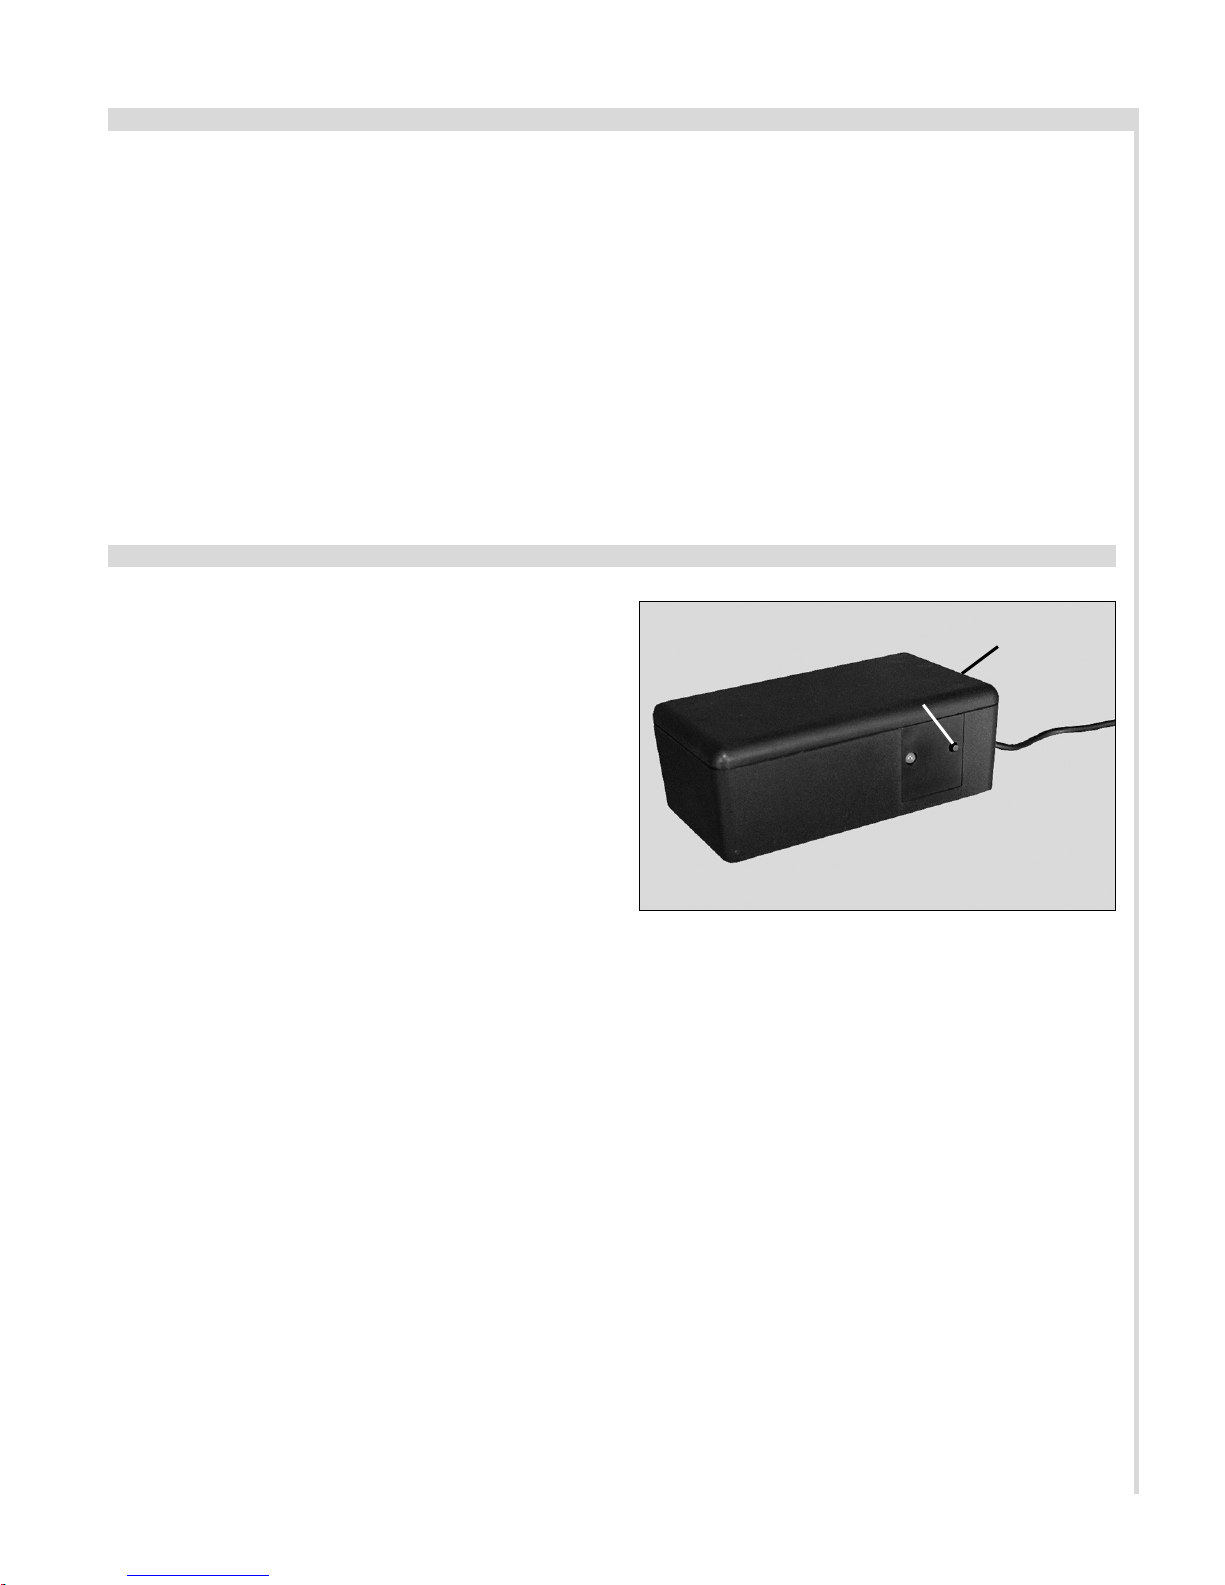
In case of a power outage, press and hold
the learn button on the power down box
to lower the bed to the flat position
(FIGURE 1).
This function is only for lowering the bed
and will not operate the bed to any other
position. The (2) 9 volt batteries should be
replaced after this function is used.
At any point where “press the learn
button” is designated, disconnecting and
reconnecting the electrical power cord will
achieve the same function. Note that this
alternate programming feature is only
applicable to beds without a power down
box. Power down equipped adjustable
beds require use of the learn button when
programming the hand control.
POWER
DOWN BOX
LEARN
BUTTON
In the event the powerdown feature does
not work, check to make sure the (2) 9 volt
batteries are good.
FIGURE 1: Power down box learn button.
S-Cape II MR Hand Control Operation Guide
5
Page 6
S-CAPE II MR PROGRAMMING 1 hand control - 1 bed
The two step procedure below is required to program 1 hand control to operate 1 bed.
Before beginning, make certain the bed is plugged into a working grounded electrical
outlet.
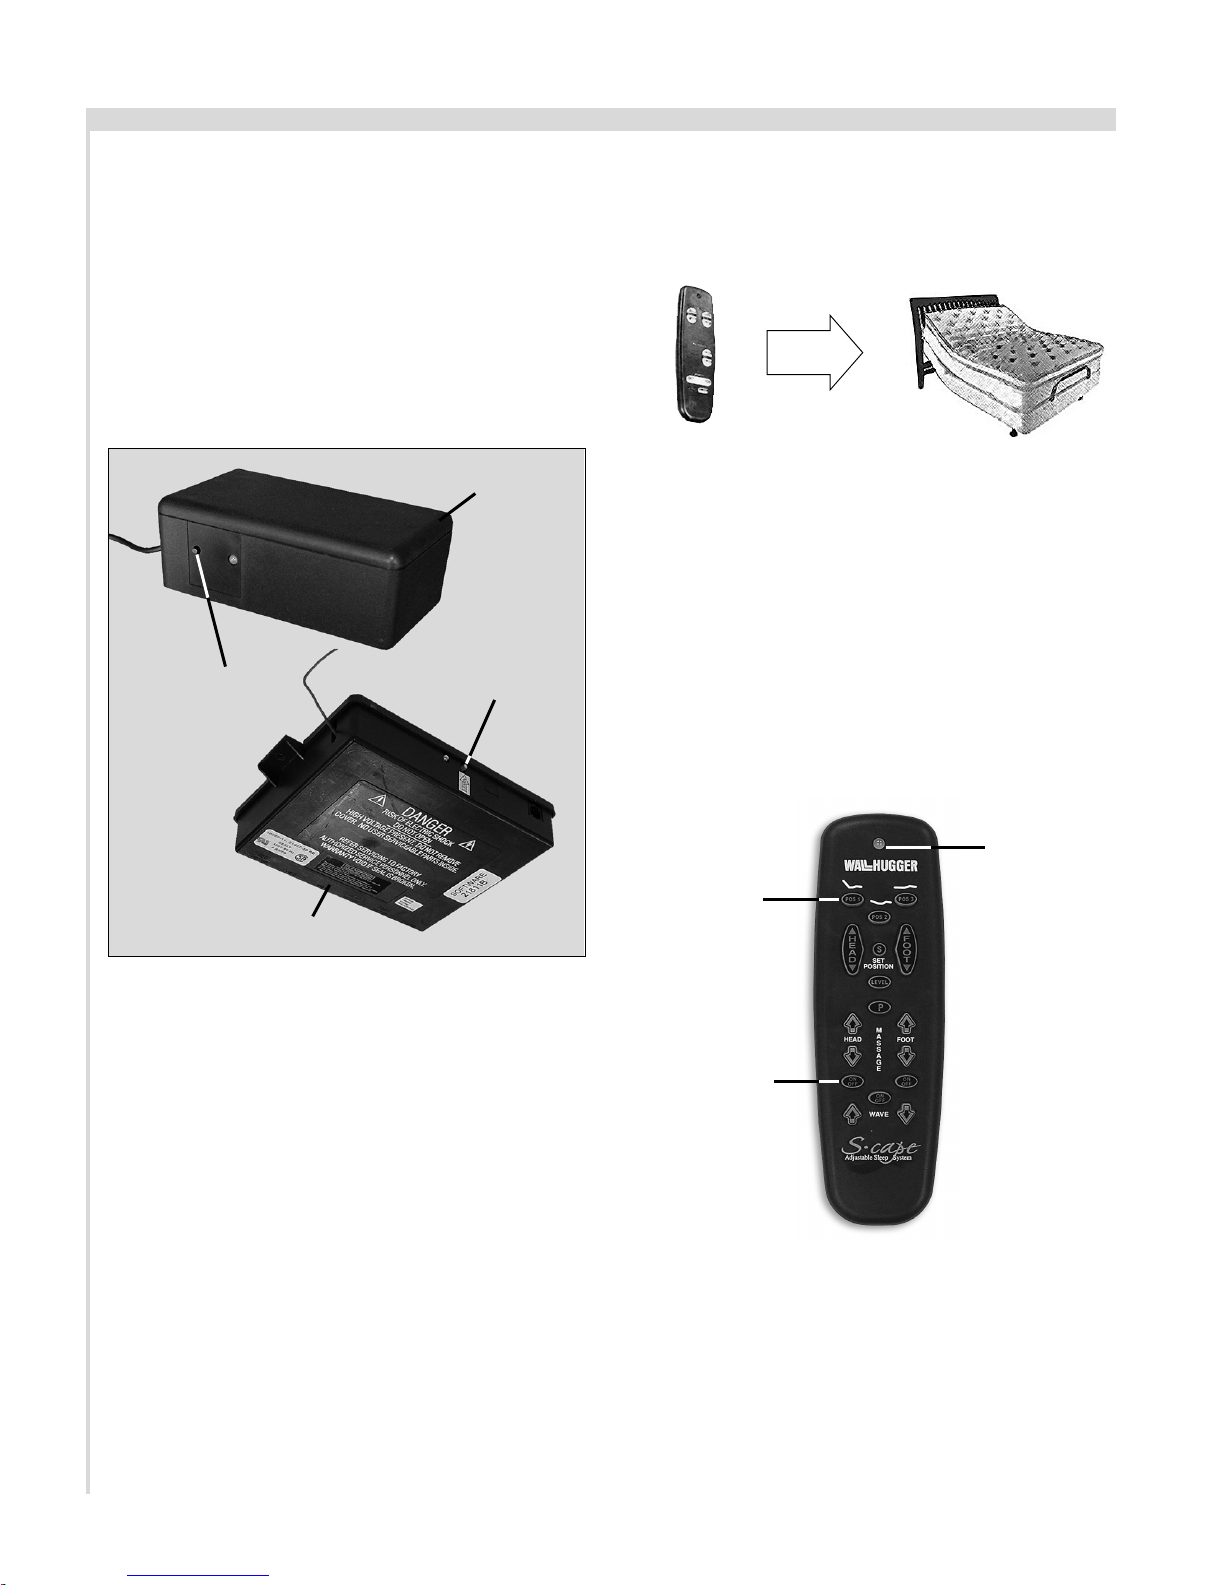
STEP 1
On bed 1, press the learn button for 1
second and release. The bed will be
equipped with either a power down box
or J box (FIGURE 1).
POWER
DOWN BOX
LEARN
BUTTON
NOTE: POWER
DOWN BOX IS
NOT MOUNTED
TO BED FRAME.
J BOX IS
MOUNTED TO
THE BOTTOM
SIDE OF THE
BED FRAME.
J BOX
FIGURE 1: Power down box and J box receiver units.
LEARN
BUTTON
STEP 2
Simultaneously press and hold the Pos 1
and the head massage on/off buttons. The
transmission indicator light will flash
slowly and then flash rapidly. Continue to
hold for 2 seconds and then release the
buttons (FIGURE 2).
One hand control is now programmed to
operate one bed.
FIGURE 2
TRANSMISSION
INDICATOR LIGHT
POS 1 BUTTON
HEAD MASSAGE
ON/OFF BUTTON
S-Cape II MR Hand Control Operation Guide
6
Page 7
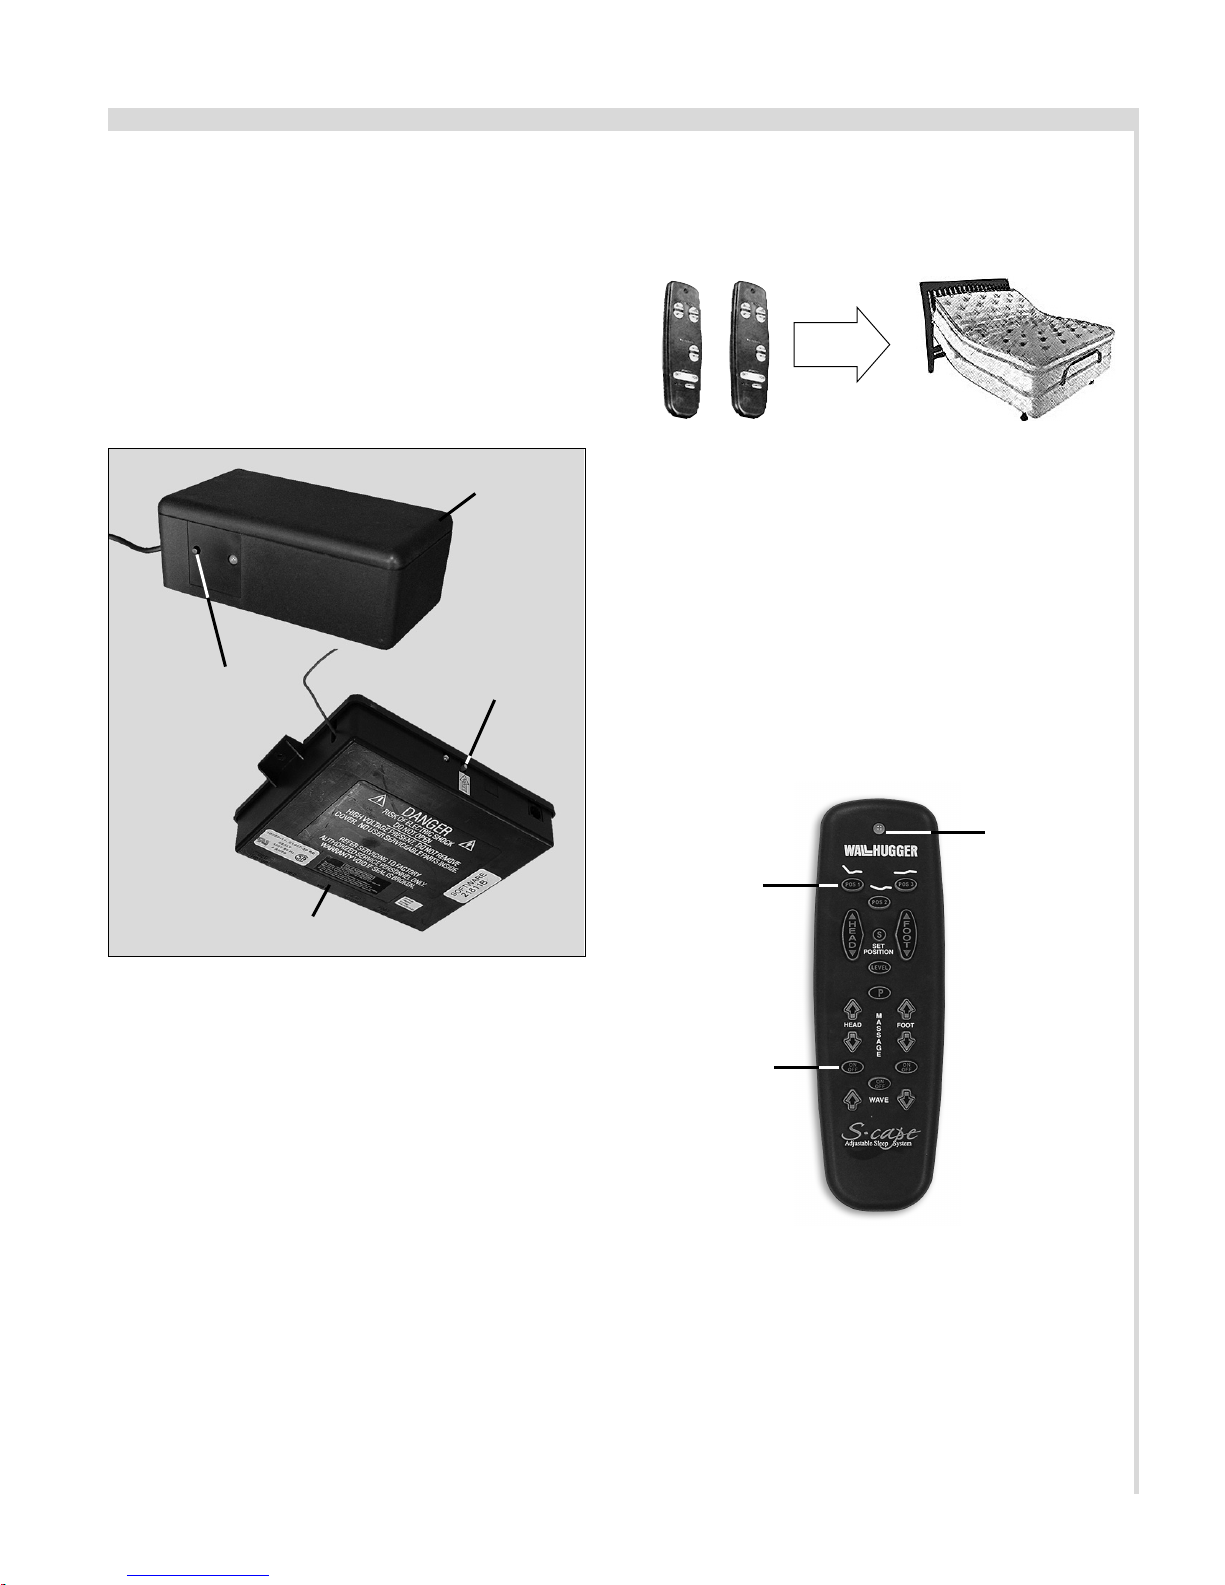
S-CAPE II MR PROGRAMMING 2 hand controls - 1 bed
The three step procedure below is required to program 2 hand controls to operate 1 bed.
Before beginning, make certain the bed is plugged into a working grounded electrical
outlet.
STEP 1
On bed 1, press the learn button for 1
second and release. The bed will be
equipped with either a power down box
or J box (FIGURE 1).
POWER
DOWN BOX
LEARN
BUTTON
NOTE: POWER
DOWN BOX IS
NOT MOUNTED
TO BED FRAME.
J BOX IS
MOUNTED TO
THE BOTTOM
SIDE OF THE
BED FRAME.
J BOX
FIGURE 1: Power down box and J box receiver units.
LEARN
BUTTON
STEP 2
Simultaneously press and hold the Pos 1
and the head massage on/off buttons. The
transmission indicator light will flash
slowly and then flash rapidly. Continue to
hold for 2 seconds and then release the
buttons (FIGURE 2).
STEP 3
Repeat Step 1 and Step 2 with hand
control 2.
FIGURE 2
TRANSMISSION
INDICATOR LIGHT
POS 1 BUTTON
HEAD MASSAGE
ON/OFF BUTTON
Two hand controls are now programmed
to operate one bed.
S-Cape II MR Hand Control Operation Guide
7
Page 8
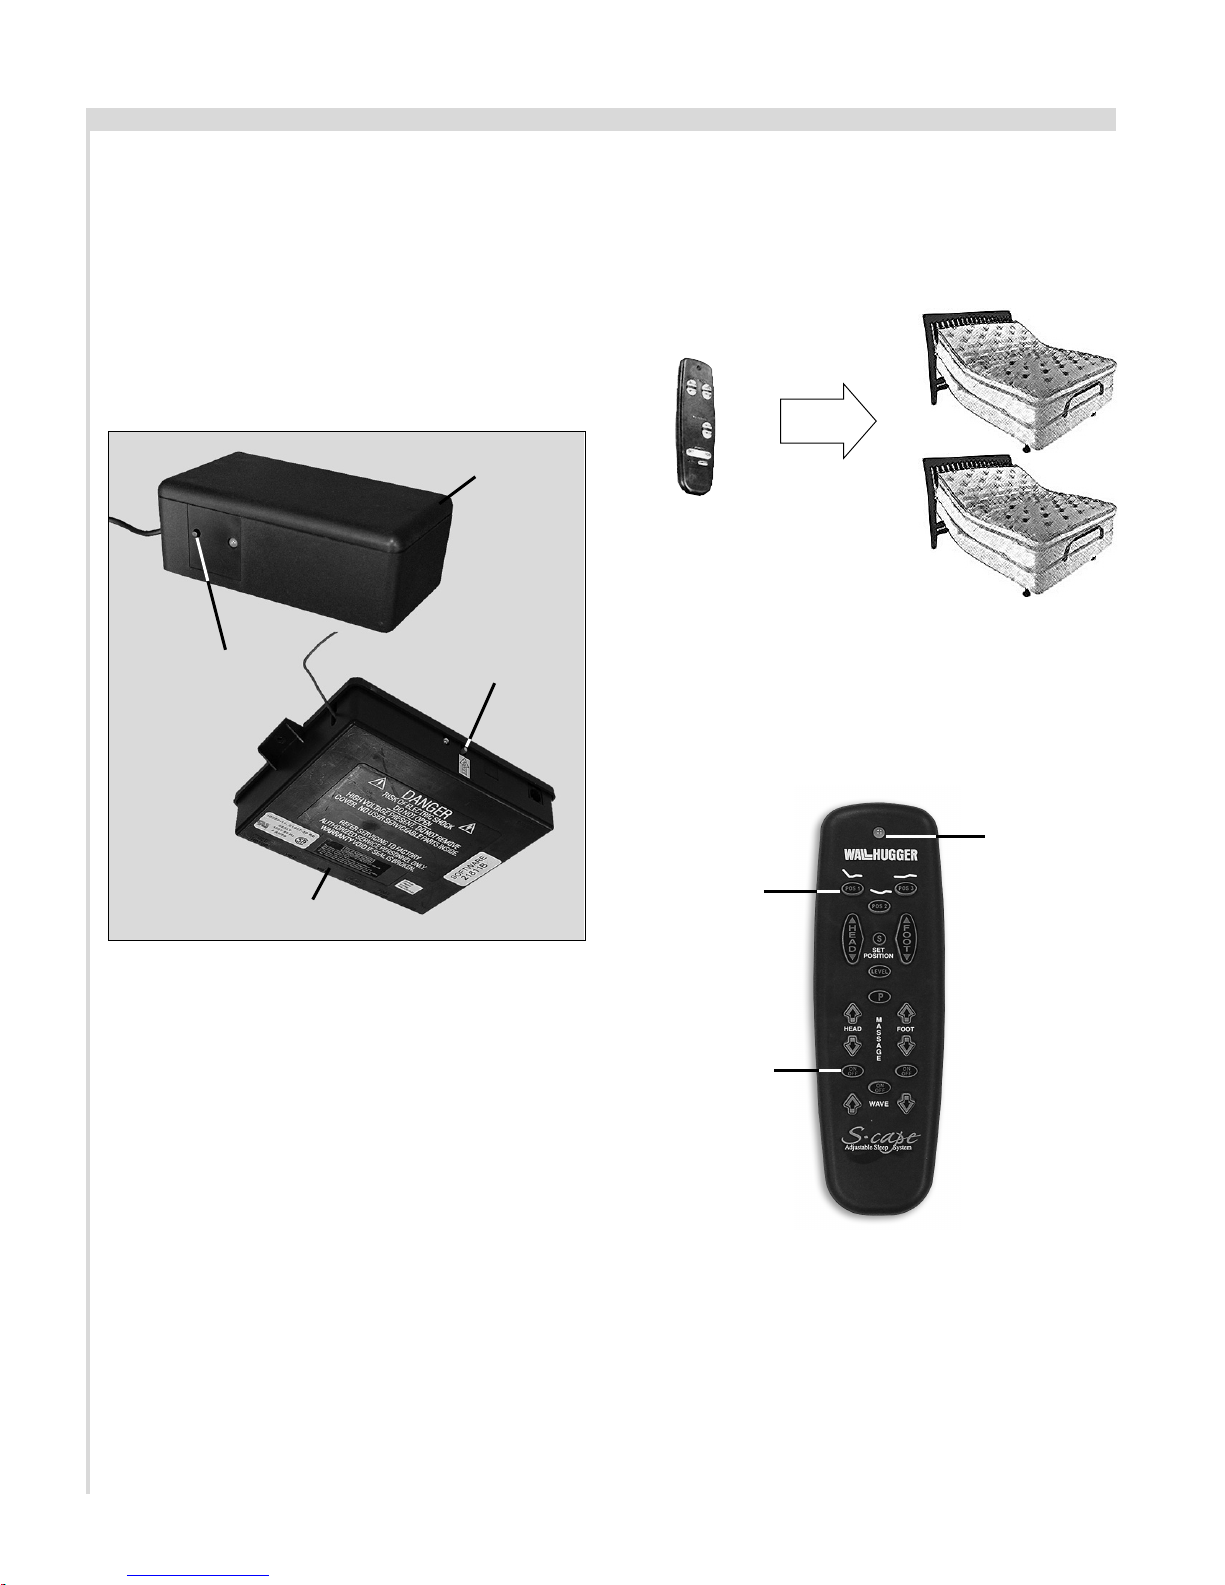
S-CAPE II MR PROGRAMMING 1 hand control - 2 beds
The three step procedure below is required to program 1 hand control to operate 2 beds.
Before beginning, make certain the beds are plugged into a working grounded electrical
outlet.
STEP 1
On bed 1, press the learn button for 1
second and release. The bed will be
equipped with either a power down box
or J box (FIGURE 1).
POWER
DOWN BOX
LEARN
BUTTON
NOTE: POWER
DOWN BOX IS
NOT MOUNTED
TO BED FRAME.
J BOX IS
MOUNTED TO
THE BOTTOM
SIDE OF THE
BED FRAME.
J BOX
FIGURE 1: Power down box and J box receiver units.
LEARN
BUTTON
STEP 2
Simultaneously press and hold the Pos 1
and the head massage on/off buttons. The
transmission indicator light will flash
slowly and then flash rapidly. Continue to
hold for 2 seconds and then release the
buttons (FIGURE 2).
FIGURE 2
TRANSMISSION
INDICATOR LIGHT
POS 1 BUTTON
HEAD MASSAGE
ON/OFF BUTTON
STEP 3
Repeat Step 1 and Step 2 for bed 2.
One hand control is now programmed to
operate two beds.
S-Cape II MR Hand Control Operation Guide
8
Page 9
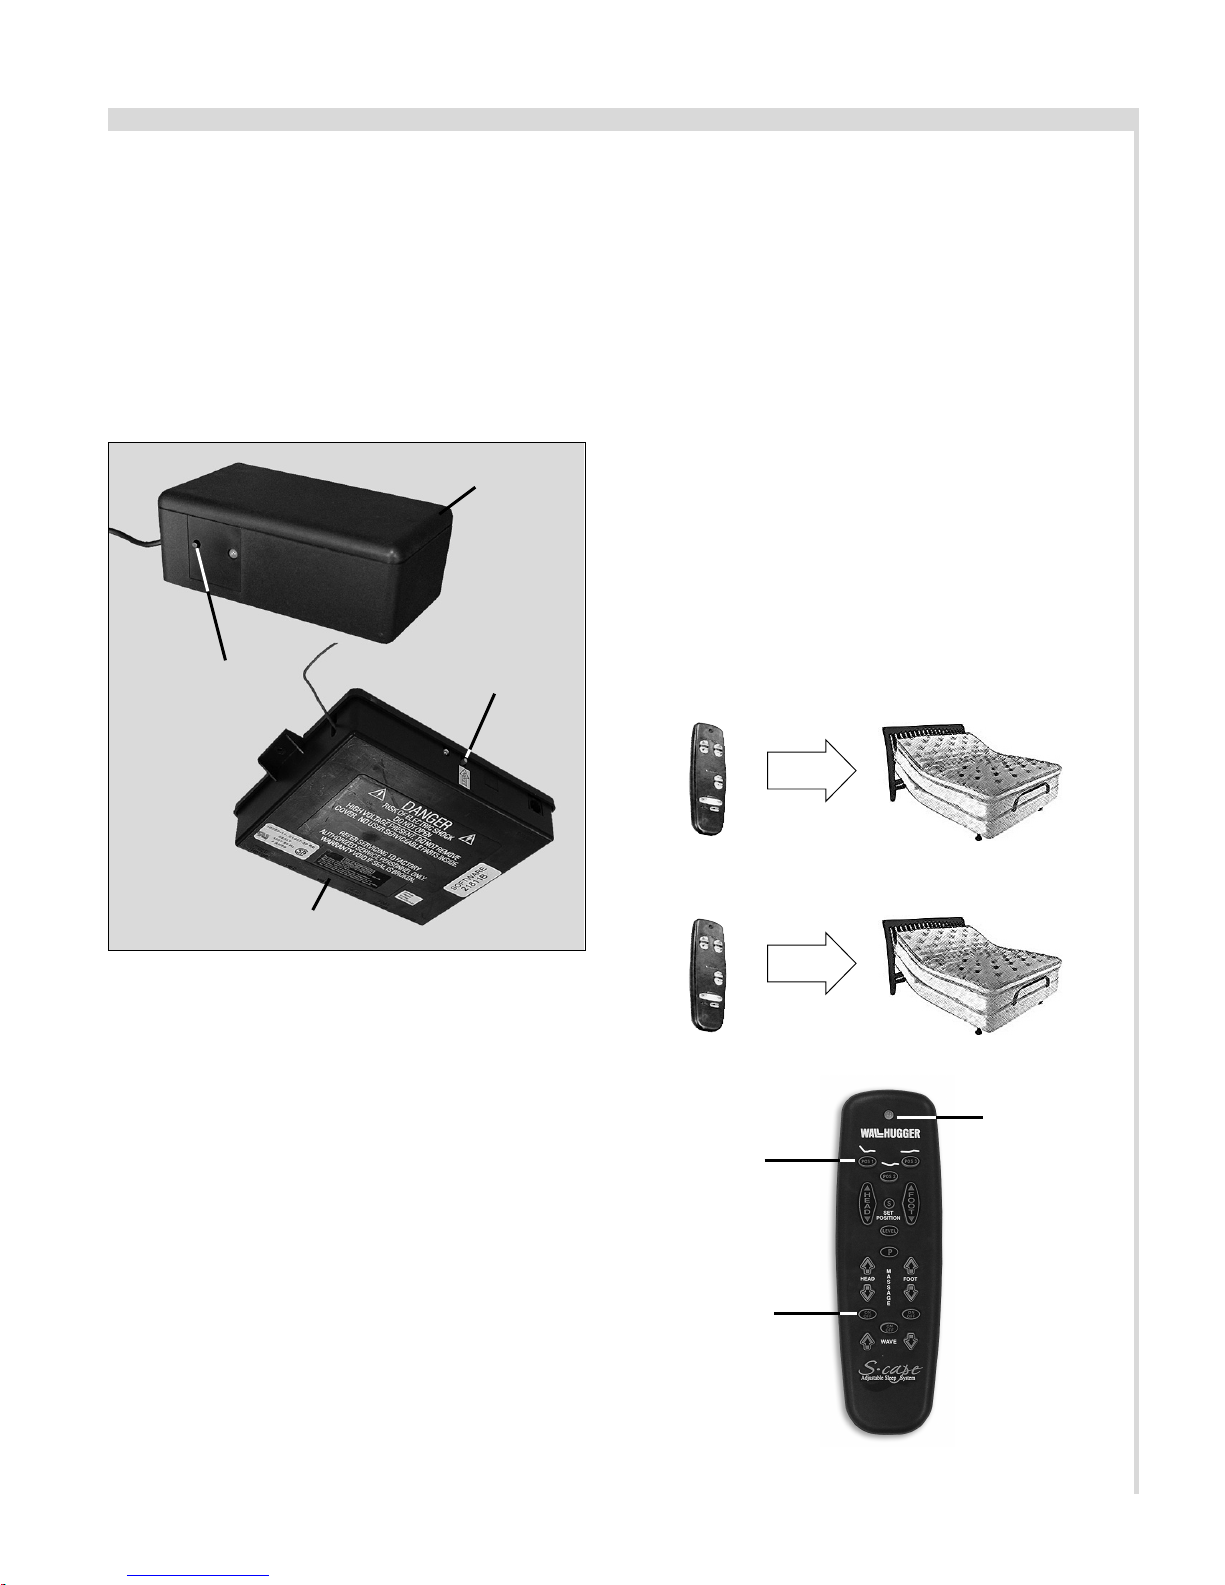
S-CAPE II MR PROGRAMMING 2 hand controls - 2 beds
The six step procedure below is required to program 2 hand controls to operate 2 beds.
Before beginning, make certain the beds are plugged into a working grounded electrical
outlet.
STEP 1
On bed 1, press the learn button for 1
second and release. The bed will be
equipped with either a power down box or
J box (FIGURE 1).
POWER
DOWN BOX
LEARN
BUTTON
NOTE: POWER
DOWN BOX IS
NOT MOUNTED
TO BED FRAME.
J BOX IS
MOUNTED TO
THE BOTTOM
SIDE OF THE
BED FRAME.
J BOX
LEARN
BUTTON
STEP 5
On hand control 1, simultaneously press and
hold the
Pos 1 and the head massage on/off
buttons. The transmission indicator light will
flash slowly and then flash rapidly. Continue
to hold for 2 seconds and then release the
buttons (FIGURE 2).
STEP 6
Repeat Step 4 and Step 5 with hand
control 2.
Two hand controls are now programmed
to operate two beds.
HAND CONTROL
HAND CONTROL
BED 1
BED 2
FIGURE 1: Power down box and J box receiver units.
STEP 2
On hand control 1, simultaneously press and
hold the
Pos 1 and the head massage on/off
buttons. The transmission indicator light will
flash slowly and then flash rapidly. Continue
to hold for 2 seconds and then release the
buttons (FIGURE 2).
STEP 3
Repeat Step 1 and Step 2 with hand control 2.
STEP 4
On bed 2, press the learn button for 1
second and release. The bed will be
equipped with either a power down box or
J box (FIGURE 1).
FIGURE 2
TRANSMISSION
INDICATOR LIGHT
POS 1 BUTTON
HEAD MASSAGE
ON/OFF BUTTON
S-Cape II MR Hand Control Operation Guide
9
Page 10
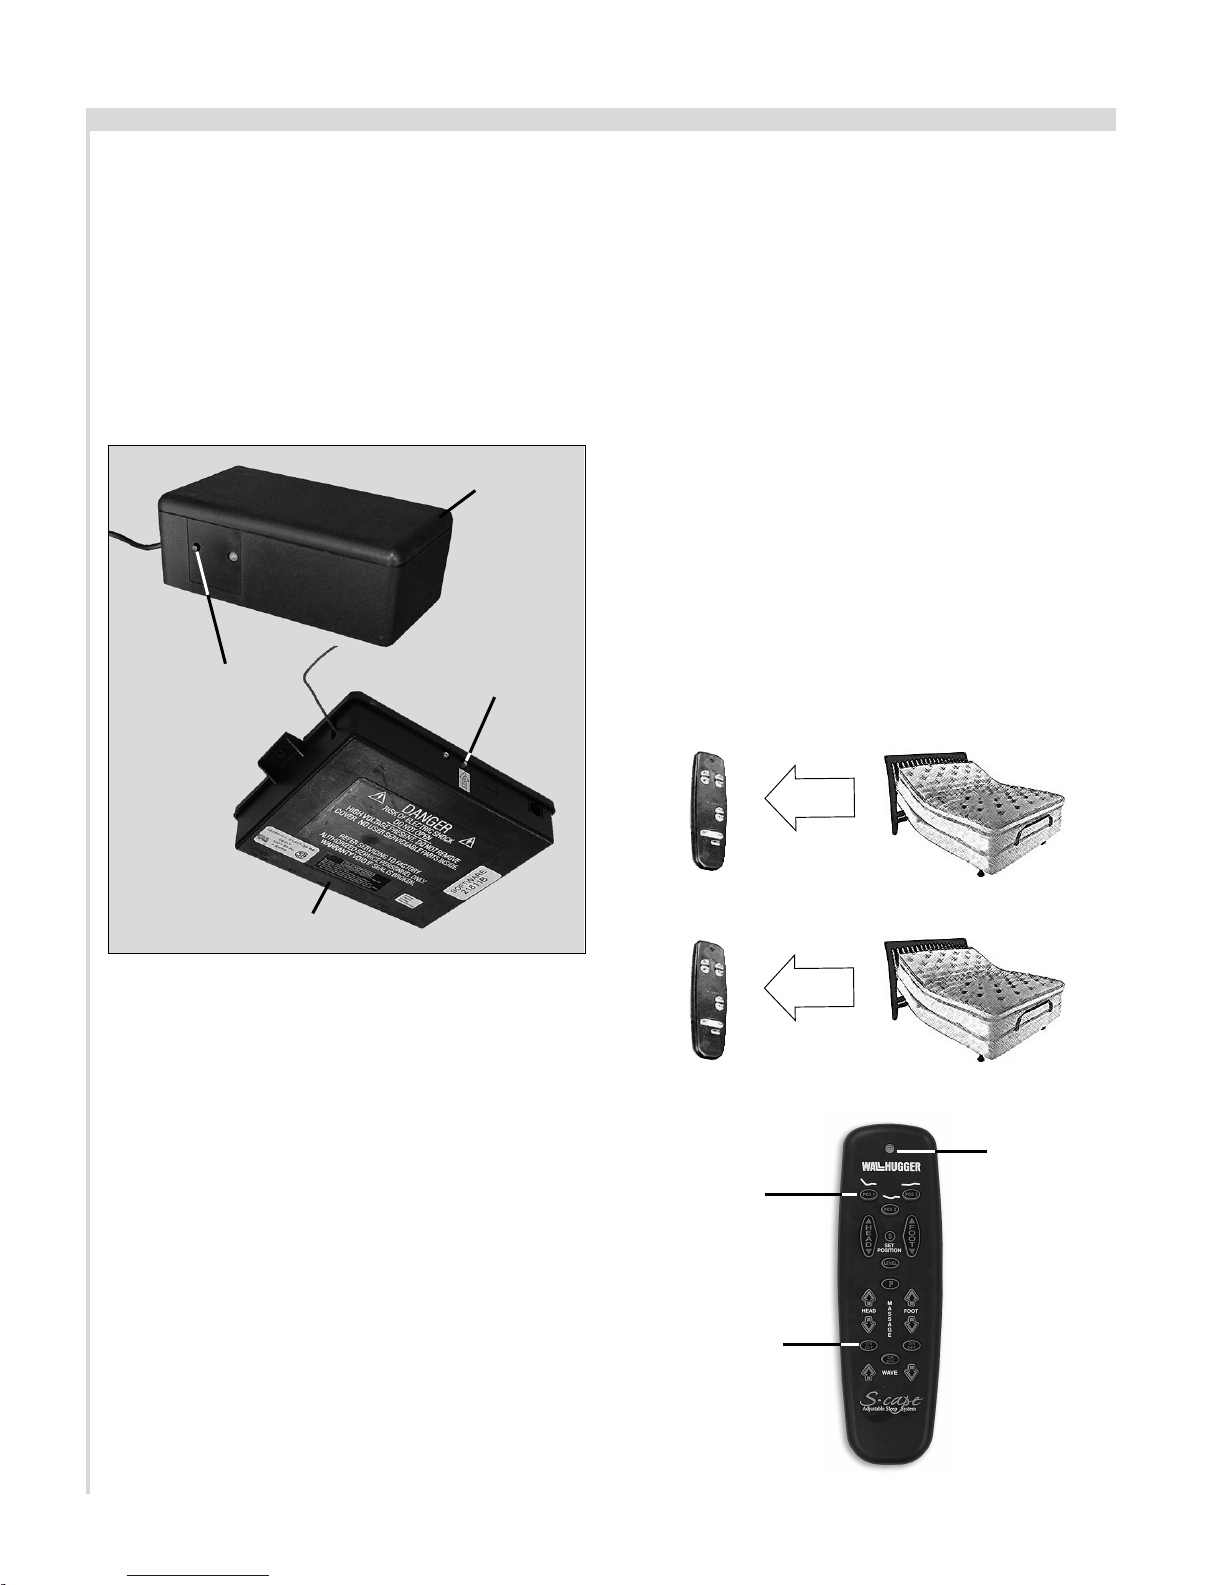
S-CAPE II MR REPROGRAMMING separating 2 beds
The six step procedure below is required to separate 2 hand controls from operating 2
beds. One hand control per bed operation will result. Before beginning, make certain the
beds are plugged into a working grounded electrical outlet.
STEP 1
On bed 1, press the learn button for 1
second and release. The bed will be
equipped with either a power down box or
J box (FIGURE 1).
POWER
DOWN BOX
LEARN
BUTTON
NOTE: POWER
DOWN BOX IS
NOT MOUNTED
TO BED FRAME.
J BOX IS
MOUNTED TO
THE BOTTOM
SIDE OF THE
BED FRAME.
LEARN
BUTTON
STEP 5
On hand control 2, simultaneously press and
hold the
Pos 1 and the head massage on/off
buttons. The transmission indicator light will
flash slowly and then flash rapidly. Continue
to hold for 2 seconds and then release the
buttons (FIGURE 2).
STEP 6
Repeat Step 4 and Step 5 with hand
control 2.
Independent hand control operation is
now restored (hand control 1 operating
bed 1; hand control 2 operating bed 2).
HAND CONTROL
BED 1
J BOX
FIGURE 1: Power down box and J box receiver units.
STEP 2
On hand control 1, simultaneously press and
hold the
Pos 1 and the head massage on/off
buttons. The transmission indicator light will
flash slowly and then flash rapidly. Continue
to hold for 2 seconds and then release the
buttons (FIGURE 2).
STEP 3
Repeat Step 1 and Step 2 with hand control 1.
Note: wait 90 seconds before proceeding to
Step 4.
STEP 4
On bed 2, press the learn button for 1
second and release. The bed will be
equipped with either a power down box or
S-Cape II MR Hand Control Operation Guide
J box (FIGURE 1).
10
HAND CONTROL
POS 1 BUTTON
HEAD MASSAGE
ON/OFF BUTTON
BED 2
FIGURE 2
TRANSMISSION
INDICATOR LIGHT
 Loading...