

Page 1
OPERATOR'S MANUAL
WE
Trailer Wood Splitter
225,
WE
235
Part Number: Z97112_EnRev May-2019
Page 2

Introduction
WE225, WE235
Trailer Wood Splitter
1. Introduction
1.1 Foreword
Congratulations on choosing a Wallenstein Trailer Wood
Splitter!
This high-quality machine is designed and manufactured
to meet the needs of an efcient wood splitting operation.
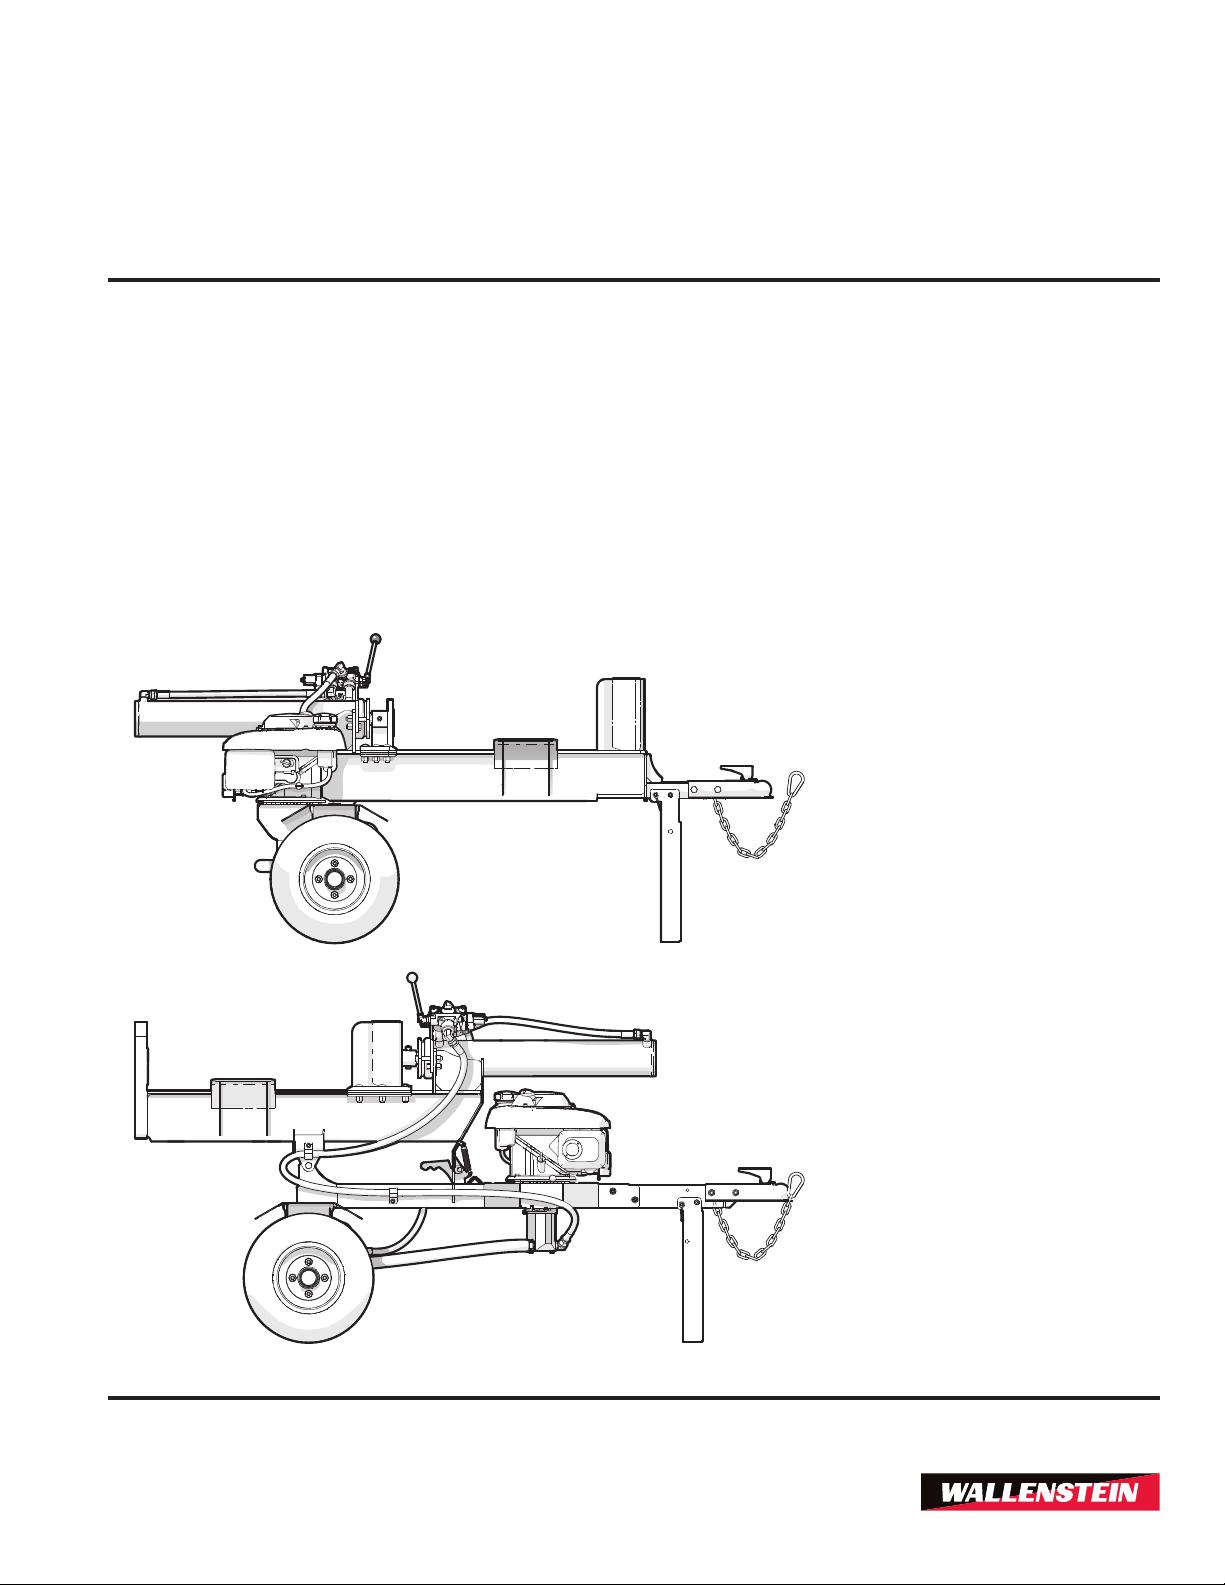
This manual covers the Wallenstein 20 ton WE Series
trailer wood splitters
Model Variants Covered in this Manual
• WE225 (Horizontal splitting only)
• WE235 (Horizontal and vertical splitting)
Units of measurement in Wallenstein Equipment technical
manuals are written as:
US Customary (SI metric)
Keep this manual handy for frequent reference and to
pass on to new operators or owners. Call your Wallenstein
dealer or distributor if you need assistance, information or
additional copies of the manuals.
.
Review all safety, operation and maintenance
information contained in this manual.
WARNING!
Do not attempt to start or operate the machine
without thoroughly reviewing this manual for
safe and proper operation.
Keep this manual with the machine at all times.
W034
Wallenstein Equipment Inc. • © 2019
www.wallensteinequipment.com
2
Page 3

WE225, WE235
Trailer Wood Splitter
Introduction
Table of Contents
1. Introduction ............................................................2
1.1 Foreword .........................................................2
1.2 Delivery Inspection Report ..............................4
1.3 Serial Number Location ...................................5
1.4 Warranty ..........................................................6
1.5 Decal Information ............................................7
2. Safety ......................................................................8
2.1 Safety Alert Symbol .........................................8
2.2 Signal Words ...................................................8
2.3 Why is SAFETY important? .............................9
2.4 Safety Rules ....................................................9
2.5 Equipment Safety Guidelines ........................10
2.6 Safety Training ..............................................10
2.7 Refueling Safety ............................................10
2.8 Tire Safety .....................................................10
2.9 Hydraulic System Safety ...............................11
2.10 Gas Engine Safety .........................................11
2.11 Being Prepared ..............................................12
3. Safety Signs .........................................................14
3.1 Safety Sign Locations ....................................14
3.2 Safety Sign Explanations ...............................15
3.3 Replacing Damaged Safety Signs .................16
4. Familiarization......................................................17
4.1 To the New Operator .....................................17
4.2 Machine Components ....................................18
5. Controls ...............................................................20
5.1 Engine ...........................................................20
5.2 Hydraulic Valve ..............................................22
6. Operating Instructions ......................................... 23
6.1 Operating Safety ............................................23
6.2 Before Starting the Engine ............................24
6.3 Pre-operation Checklist .................................24
6.4 Machine Break-In ..........................................25
6.5 Engine Oil Level Check .................................25
6.6 Hydraulic Oil Level Check .............................25
6.7 Fuel Level Check ...........................................26
6.8 Machine Set-up .............................................27
6.9 Starting the Engine ........................................27
6.10 Stopping the Engine ......................................28
6.11 Log Placement ...............................................29
6.12 Splitting Wood ...............................................29
6.13 Vertical Splitting ............................................30
6.14 Transporting ..................................................31
6.15 Connecting a Tow Vehicle .............................32
7. Storing the Wood Splitter ...................................32
7.1 Removing from Storage .................................32
8. Service and Maintenance ....................................33
8.1 Maintenance Safety .......................................33
8.2 Fluids and Lubricants ....................................33
8.3 Maintenance Schedule ..................................34
8.4 Grease Points ................................................34
8.5 Hydraulic Oil – Changing ...............................36
8.6 Hydraulic Oil Filter – Changing ......................36
8.7 Engine Air Cleaner ........................................37
9. Troubleshooting ...................................................38
10. Specications ....................................................39
10.1 Machine Specications ..................................39
10.2 Common Bolt Torque Values ........................40
10.3 Hydraulic Fitting Torque ................................41
10.4 Wheel Lug Torque .........................................41
11. Alphabetical Index .............................................42
3
Page 4

Introduction
1.2 Delivery Inspection Report
WALLENSTEIN
WE Series Trailer Wood Splitters
To activate warranty, register your product online at
http://www.wallensteinequipment.com
_________________________________________
Customer’s Name
_________________________________________
Contact Name
_________________________________________
Dealer Name
(_________)_______________________________
Phone Number
_________________________________________
Serial Number
__________ /__________ /__________
Delivery Date
I have thoroughly instructed the buyer on the equipment care, adjustments, safe operation and applicable
warranty policy and reviewed the manual.
WE225, WE235
Trailer Wood Splitter
Pre-delivery Inspection
Inspect for damage from shipping. Immediately contact the
shipping company if damage is found.
Trailer Wood Splitter
Hydraulic Valve Control Function
Hydraulic Cylinder Function
Hydraulic Reservoir level
Engine Oil Level
Horizontal / Vertical Pivot Moves Freely (as equipped)
Front and Rear Support Stands Move freely
All fasteners are Tight
Lubricate all Pivot Points (as equipped)
Check that all Hydraulic Connections are tight
Review Operating and Safety Instructions
Safety Checks
All Safety Decals Installed
Guards and Shields Installed and Secured
Check Function of Brake and Signal Lighting
Supports Function Correctly
Safety Chain on Hitch
Retainer Installed Through Ball Hitch
Review Operating and Safety Instructions
_________________________________________
Dealer’s Rep. Signature
__________ /__________ /__________
Date
The product manuals have been received by me and
I have been thoroughly instructed as to care, adjust-
ments, safe operation and applicable warranty policy.
_________________________________________
Owner's Signature
__________ /__________ /__________
Date
4
Page 5
WE225, WE235
Trailer Wood Splitter
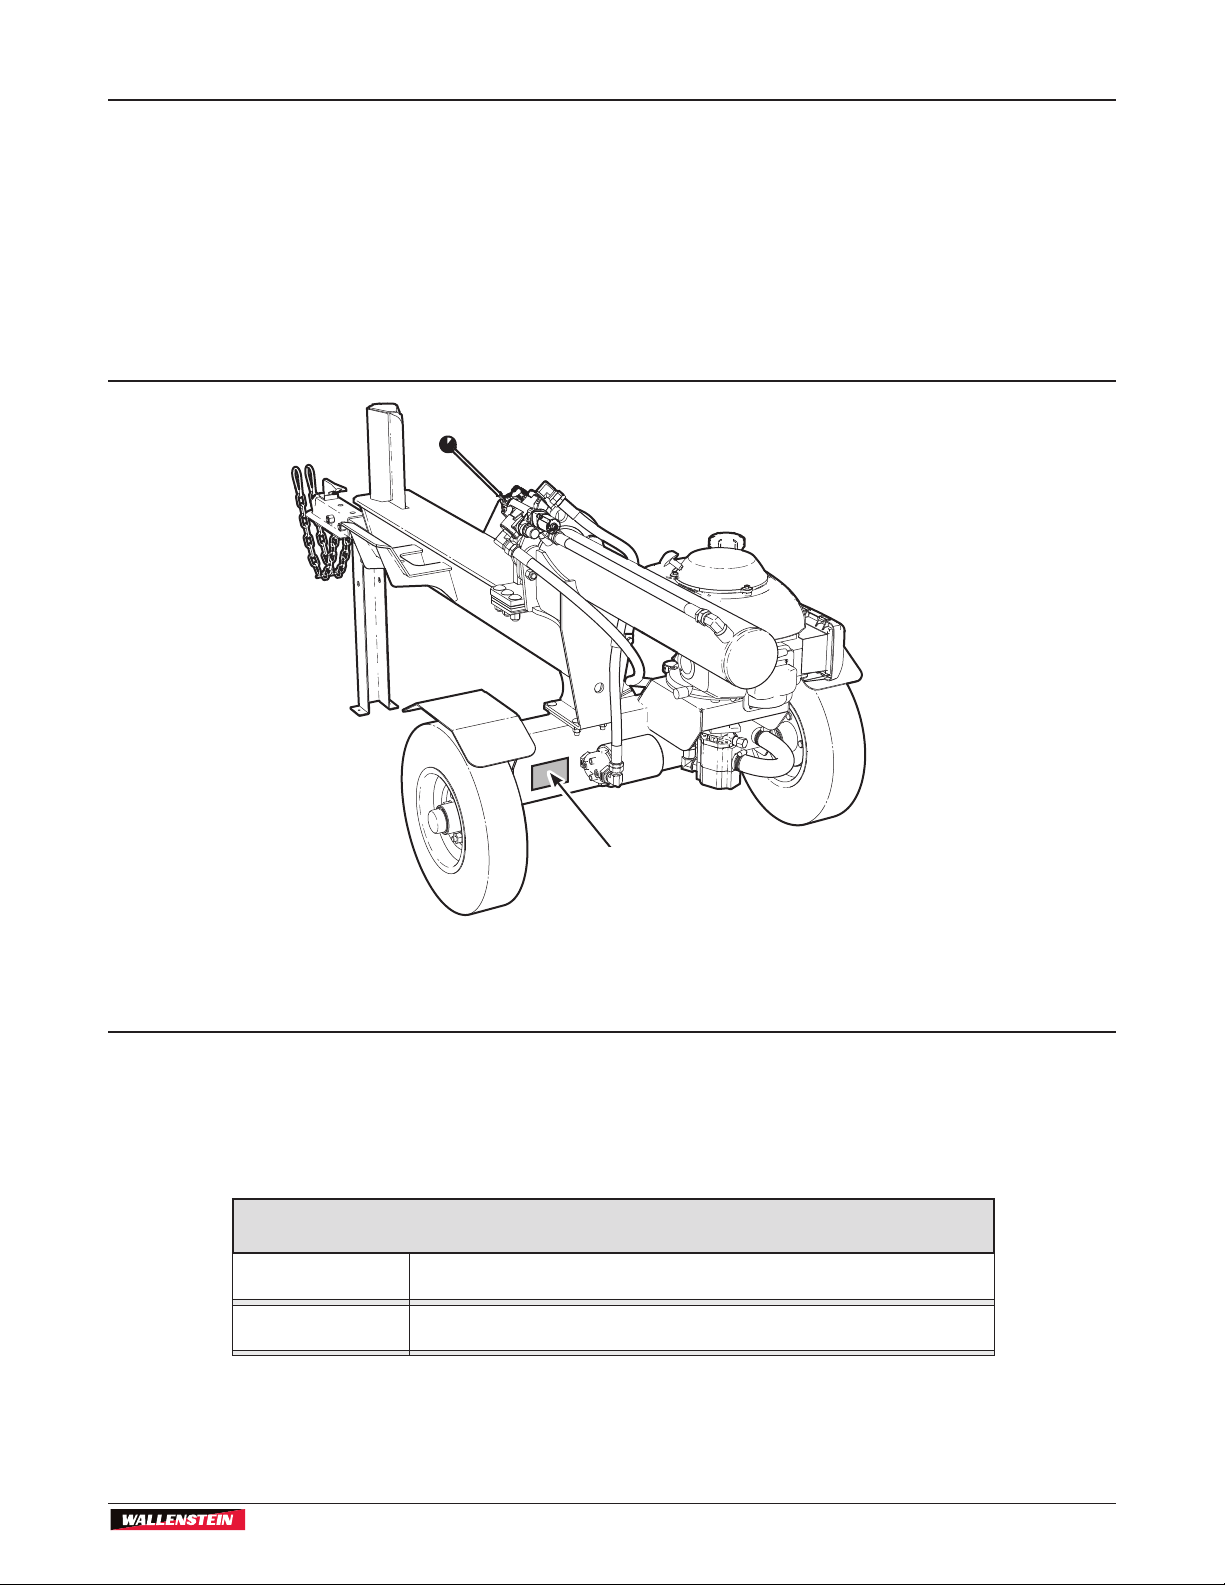
1.3 Serial Number Location
Always provide the model and serial number of your
Wallenstein product when ordering parts, or requesting
service or other information. The product information plate
location is shown in the illustration.
For future convenience, record the product Model and
Serial Number in the spaces provided below.
Introduction
Fig. 1 – Product Information Plate Location (typical for both models)
Model:
Serial Number:
Model and Serial
Number Location
Record Product Information Here
5
Page 6

Introduction
1.4 Warranty
from the date of purchase, when operated and maintained in accordance with the operating
and maintenance instructions supplied with the unit. Warranty is limited to the repair of the
product and/or replacement of parts.
This warranty is extended only to the original purchaser and is not transferable.
WE225, WE235
Trailer Wood Splitter
LIMITED WARRANTY
Wallenstein products are warranted to be free of defects in materials and
workmanship under normal use and service, for a period of
Five Years for Consumer Use
Two Years for Commercial/Rental Use
Repairs must be done by an authorized dealer. Products will be returned to the dealer at the
customer’s expense. Include the original purchase receipt with any claim.
This warranty does not cover the following:
1) Normal maintenance or adjustments
2) Normal replacement of wearable and service parts
3) Consequential damage, indirect damage, or loss of profits
4) Damages resulting from:
• Misuse, negligence, accident, theft or fire
• Use of improper or insufficient fuel, fluids or lubricants
• Use of parts or aftermarket accessories other than genuine Wallenstein parts
• Modifications, alteration, tampering or improper repair performed by parties other
than an authorized dealer
• Any device or accessories installed by parties other than an authorized dealer
5) Engines. Engines are covered by the manufacturer of the engine for the warranty period
they specify. For the details of your engine warranty, see your engine owner’s manual.
Information about engine warranty and service is also available in the FAQ section at
www.wallensteinequipment.com
rev. Nov-2018
6
Page 7

WE225, WE235
Trailer Wood Splitter
Introduction
1.5 Decal Information
When getting familiar with the Wallenstein product, notice
that there are numerous decals located on the machine.
There are different types of decals for safety, information,
and product identication. The following section explains
what they are for and how to read them.
Safety Decals are pictorial with a yellow background and
generally two panel. The top panel shows the safety alert
(the potential hazard) and the bottom panel shows the
message (how to avoid the hazard).
Safety alert
Message
Informative Decals are generally pictorial with a white
background and can vary in the number of panels. This
type of decal provides additional information to the
operator or explains the operation of a control.
Product Decals indicate machine model and serial
number, and other important information.
Manufactured by:
Wallenstein Equipment Inc., 7201 Line 86, Wallenstein ON N0B2S0, Canada
MODEL: ##########
DIMENSION- RIM/JANTE /ERIT : PNEU:
###
COLD INFL. PRESS/PRESS DE
CONFLA A FROID (PSI/LPC):
THIS VEHICLE CONFORMS TO ALL APPLICABLE STANDARDS
PRESCRIBED UNDER THE CANADIAN MOTOR SAFTEY REGULATIONS
IN EFFECT ON THE DATE OF MANUFACTURE / CE VEHICLE EST
CONFORME A TOUTES LES NORMES QUI LUI SONT APPLICABLES EN
VERTU DU REGLEMENT SUR LA SECURITE DES VEHICLES
###
AUTOMOBILES DU CANADA EN VIGUEUR A LA DATE DE SA FABRICATION.
VIN/
NLV:
TYPE OF VEHICLE/TYPE DE VEHICLE:
GAWR/PNBE (KG): GVWR/PNBV (KG):
#########
TRA / REM
###
###
###
Safety Notice Decals are pictorial with a blue
background and generally rectangular with single or
multiple symbols. This decal informs what Personal
Protective Equipment is required for safe operation.
Maintenance Decals have a green background and
can vary in number of panels. This decal shows a type
maintenance required and frequency interval.
See the section on safety signs for safety decal
denitions. For a complete illustration of decals and decal
locations, download the parts manual for your model
product at www.wallensteinequipment.com.
7
Page 8

Safety
2. Safety
2.1 Safety Alert Symbol
This Safety Alert Symbol means:
ATTENTION! BE ALERT!
WE225, WE235
Trailer Wood Splitter
Safety
YOUR SAFETY IS INVOLVED!
The Safety Alert Symbol identies important safety
messages on the Wallenstein wood splitter and in
the manual. When you see this symbol, be alert to
the possibility of personal injury or death. Follow the
instructions in the safety message.
2.2 Signal Words
The signal words DANGER, WARNING and CAUTION
determine the seriousness level of the warning messages
in this manual. The appropriate signal word for each
message in this manual has been selected using the
following guidelines:
DANGER –
Indicates an imminently hazardous situation that, if not
avoided, will result in death or serious injury. This signal
word is to be limited to the most extreme situations
typically for machine components which, for functional
purposes, cannot be guarded.
IMPORTANT – To avoid confusing equipment
protection with personal safety messages, a signal word
IMPORTANT indicates a situation that if not avoided,
could result in damage to the machine.
NOTE:
(plus text) – indicates an additional
explanation for an element of information.
WARNING –
Indicates a potentially hazardous situation that, if not
avoided, could result in death or serious injury, and
includes hazards that are exposed when guards are
removed. It may also be used to alert against unsafe
practices.
CAUTION –
Indicates a potentially hazardous situation that, if not
avoided, may result in minor or moderate injury. It may
also be used to alert against unsafe practices.
8
Page 9

WE225, WE235
Trailer Wood Splitter
Safety
2.3 Why is SAFETY important?
Three Big Reasons:
• Accidents Disable and Kill
• Accidents Cost
• Accidents Can Be Avoided
The policy of Wallenstein Equipment Inc. is to produce
products that are safe and reliable. However, even when
using well-engineered equipment, there is always an
element of risk. To minimize the risks and promote safety
at all times, this section of the operator’s manual details a
number of safety rules that must always be followed and
obeyed.
YOU are responsible for the SAFE operation and
maintenance of your Wallenstein Trailer Wood Splitter.
YOU must ensure that you and anyone else who is going
to use, maintain or work around the wood splitter be
familiar with the operating and maintenance procedures
and related safety information contained in this manual.
This manual provides good safety practices that should
be followed while using the wood splitter.
Remember, YOU are the key to safety. Good safety
practices not only protect you but also the people
around you. Make these practices a working part of
your safety program. Be certain that EVERYONE using
this equipment is familiar with the recommended use
and maintenance procedures and follows all the safety
precautions.
2.4 Safety Rules
• DO give operating instructions to operators or
employees before allowing them to operate the
machine, and REVIEW annually thereafter.
• DO read and understand ALL
Safety and Operating instructions
in the manual and follow them.
The most important safety device
on this equipment is a SAFE
operator.
• DO wear appropriate Personal Protective
Equipment (PPE). The suggested equipment
includes but is not limited to the following:
- Hearing Protection
- Protective glasses, goggles or face shield
- Heavy work gloves
- Protective shoes with slip resistant soles
• DO have a rst-aid kit available
for use should the need arise and
know how to use it.
• DO read and understand all safety signs located
on the machine before operating, servicing,
adjusting, or cleaning.
• DO inspect and secure all guards before starting.
• DO check engine intake and exhaust. Make
sure they are clear of debris prior to starting the
machine.
• DO have a re extinguisher available for
use should the need arise. Know how to
use it.
• DO think SAFETY! Work SAFELY!
• DO NOT touch hot engine parts, mufer cover,
hydraulic hoses, engine body, engine oil, and so on
during operation or if the engine was recently shut
off. Contact may cause burns.
• DO NOT expect a person who has not read and
understood all operation and safety instructions
to use the machine. An untrained operator is
not qualied and is exposed to possible serious
injury or death. It is the owner's responsibility
to make sure to the operator has familiarity and
understanding of the machine.
• DO NOT allow riders during transport.
• DO NOT risk injury or death by ignoring good
safety practices.
Safety
• DO review safety related items annually with
all personnel who are operating the machine or
performing maintenance.
9
Page 10
Safety
WE225, WE235
Trailer Wood Splitter
2.5 Equipment Safety Guidelines
Always place the machine in a Safe Condition before
performing any service work, maintenance procedures, or
storage preparation.
Safety
SAFE CONDITION
• Shut off engine.
• Make sure all moving parts have stopped.
• Disconnect battery ground (-) cable.
• Block or chock wheels.
1. Never use equipment with safety shields removed.
Keep all shields in place. If shield removal becomes
necessary for repairs, reinstall the shield prior to use.
2. Replace any safety sign or instruction sign that is not
readable or is missing. Location of safety signs is
indicated in this manual.
3. Do not allow anyone other than a responsible,
properly trained and physically able person to operate
this machine. This equipment is dangerous to children
and persons unfamiliar with its operation.
4. Do not modify the equipment in any way.
Unauthorized modication may result in serious injury
or death and may impair the function and life of the
equipment.
3. Learn the controls and how to stop the machine
quickly in an emergency.
4. If this machine is loaned or rented, it is the machine
owner's responsibility to make certain that every
operator:
• Reads and understands the owner's manual
• Is instructed in safe and proper use of the
equipment
• Understands and knows how to perform the
Safe Condition procedure
2.7 Refueling Safety
1. Engine fuel is highly ammable. Handle with care.
2. Fill fuel tank outdoors.
3. Stop the engine before refueling. Allow engine to
cool for ve minutes. Clean up spilled fuel before
restarting engine.
4. Do not overll the fuel tank.
5. If fuel is spilled, wipe it away carefully and wait until
the fuel has dried before starting the engine.
6. Do not refuel the machine while
smoking or when near open ame
or sparks.
5. Never exceed the limits of the machine. If its ability to
do the job or to do it safely is in question—
STOP IMMEDIATELY!
2.6 Safety Training
1. The best safety feature is an
informed, careful operator—we
ask you be that kind of operator.
It is the operator's responsibility
to read, understand and follow
ALL safety and operation
instructions in the manual.
2. Train all new personnel and review instruc tions
frequently with existing workers. Only properly
trained and physically able operators should use
this equipment. A person who has not read and
understood all operation and safety instructions
is not qualied to use the machine. Untrained
operators expose themselves and bystanders to
possible serious injury or death. If elderly people are
assisting with the work, their physical limitations need
to be recognized and accommodated.
7. After refueling, make sure that the fuel cap is secured
to prevent spillage.
8. Prevent res by keeping machine clean of
accumulated trash, grease, and debris.
2.8 Tire Safety
1. Failure to follow proper procedures when mounting a
tire on a wheel or rim can produce an explosion which
may result in serious injury or death.
2. Do not attempt to mount a tire unless you have the
proper equipment and experience to do the job.
3. Have a qualied tire dealer or repair service perform
required tire maintenance.
4. When replacing worn tires, make sure they meet the
original tire specications. Never install undersized
tires.
10
Page 11

WE225, WE235
Trailer Wood Splitter
Safety
2.9 Hydraulic System Safety
1. Make sure that all the components in the hydraulic
system are kept in good condition and are clean.
2. Before applying pressure to the
system, make sure all components
are tight, and that lines, hoses and
couplings are not damaged.
3. Do not attempt any makeshift repairs to the
hydraulic lines, ttings or hoses by using tapes,
clamps or cements. The hydraulic system operates
under extremely high pressure. Such repairs can
fail suddenly and create a hazardous and unsafe
condition.
4. Wear proper hand and eye
protection when searching for a
high-pressure hydraulic leak. Use
a piece of wood or cardboard as
a backstop instead of hands to
isolate and identify a leak.
5. If injured by a concentrated high-pressure stream of
hydraulic uid, seek medical attention immediately.
Serious infection or toxic reaction can develop from
hydraulic uid piercing the skin surface.
6. Relieve pressure in the hydraulic system before
working on it.
2.10 Gas Engine Safety
CAUTION!
Before starting engine, review the operating and
maintenance instructions in the engine manual.
W019
7. DO NOT operate engine if gasoline is spilled. Move
machine away from the spill and avoid engine ignition
until gasoline has evaporated.
8. DO NOT smoke while lling fuel tank.
9. DO NOT choke carburetor to stop engine. Whenever
possible, gradually reduce engine speed before
stopping.
10. DO NOT run engine above rated speeds. This may
result in injury.
11. DO NOT tamper with governor springs, governor
links or other parts which may increase the governed
speed.
12. DO NOT tamper with the engine as set by the original
equipment manufacturer.
13. DO NOT check for spark with spark plug or spark
plug wire removed.
14. DO NOT crank engine with spark plug removed. If
engine is ooded, crank until engine starts.
15. DO NOT strike ywheel with a hard object or
metal tool as this may cause ywheel to shatter in
operation. Use proper tools to service engine.
16. DO NOT operate engine without a mufer. Inspect
periodically and replace, if necessary.
17. DO NOT operate engine with an accumulation of
grass, leaves, dirt or other combustible materials in
the mufer area.
18. DO NOT use this engine on any forest covered, brush
covered, or grass covered unimproved land unless a
spark arrester is installed on the mufer. The arrester
must be maintained in effective working order by
the operator. In the state of California, the above is
required by law (Section 4442 of the California Public
Resources Code). Other states may have similar
laws. Federal laws apply on federal land.
Safety
1. DO NOT operate engine in an enclosed area.
Exhaust gases contain odorless and deadly carbon
monoxide that can cause death by asphyxiation.
2. DO NOT place hands or feet near moving or rotating
parts.
3. DO NOT store, spill, or use gasoline near an open
ame, or devices such as a stove, furnace, or water
heater which use a pilot light or devices which can
create a spark.
4. DO NOT refuel indoors where area is not well
ventilated.
5. DO NOT refuel while engine is running. Allow engine
to cool for ve minutes before refueling. Store fuel in
approved safety containers.
6. DO NOT remove fuel tank cap while engine is
running.
19. DO NOT touch hot mufer, engine body or cooling
ns. Contact may cause burns.
20. DO NOT run engine with air cleaner or air cleaner
cover removed.
Be sure to:
1. Remove the wire from the spark plug when servicing
the engine or equipment to prevent accidental
starting. Disconnect the (-) ground wire from the
battery terminal.
2. Keep engine cooling ns and governor parts free of
grass and other debris that can affect engine speed.
3. Examine mufer periodically to be sure it is
functioning effectively. A worn or leaking mufer
should be repaired or replaced as necessary.
4. Use fresh gasoline. Old fuel can clog carburetor and
cause leakage.
11
Page 12

2.11 Being Prepared
Safety
Safety
5. Check fuel lines and ttings frequently for cracks or
leaks. Replace if necessary.
1. Determine where the split wood is going to be piled
ahead of time. Make sure it does not interfere with
safe loading of wood into the splitter.
2. Precut logs so wood is ready to load into the splitter.
Do not run a chain saw and the splitter at the same
time.
3. Determine a safe work area location:
• Area must be clear of stones, branches or
hidden obstacles that might cause a tripping,
hooking or snagging hazard.
• Ground should be rm and level.
4. Operate only in daylight or good articial light.
5. Make sure machine is properly adjusted and in good
operating condition.
WE225, WE235
Trailer Wood Splitter
6. Store fuel well away from the wood pile.
7. Perform the Pre-operation Checklist procedure
before starting work (see Pre-operation Checklist on
page 36).
8. Do not operate on hillsides or when working area is
cluttered, wet, muddy or icy to prevent slipping and
tripping. Operate only on level ground.
9. Position machine so prevailing winds blow engine
exhaust fumes away from operator's station.
10. Do not operate machine inside a closed building to
prevent asphyxiation from engine exhaust.
11. Stop engine when leaving the machine unattended.
12
Page 13

WE225, WE235
Trailer Wood Splitter
Safety
2.11.1 Sign-Off Form
Anyone using this machine must read and thoroughly
understand all Safety, Operation and Maintenance
information in this manual. An untrained operator should
never use this machine.
To help document this training, the sign-off sheet provided
below can be used.
Make periodic reviews of Safety and Operation a standard
practice for all operators. Review again at the startup of
every season.
Sign-off Form
Date Owner Employee
The design and manufacture of this product conforms to
relative provisions in the following standards:
ISO 4254-1 Agricultural machinery – Safety
ASABE S318 Safety for Agricultural Field Equipment
ISO 3600 Operator’s Manual – Machinery for Agriculture,
Forestry & Lawn Equipment
Safety
13
Page 14

3. Safety Signs
3.1 Safety Sign Locations
The types of safety signs and locations on the equipment
are shown in the illustrations that follow. Good safety
requires that you familiarize yourself with the various
Safety
safety signs, the type of warning and the area, or
particular function related to that area, that requires your
SAFETY AWARENESS.
Think SAFETY! Work SAFELY!
Safety Signs
WE225, WE235
Trailer Wood Splitter
41 2 3
Fig. 2 – Safety Decal Locations (typical)
14
00687
Page 15

WE225, WE235
Trailer Wood Splitter
3.2 Safety Sign Explanations
1. Warning!
Keep feet away from falling split wood. Always wear steel
toed foot wear while machine is operating to avoid serious
personal injury.
2. Warning!
Pinch point / crushing danger! Keep your hands away
from all moving parts during and after split operation!
Never try to clear a jammed log with your hands! Wait
for all moving parts to come to a complete stop before
loading or clearing obstructions.
Safety Signs
Safety
3. Caution!
Refer to the operator's manual. Read ALL operating
instructions in the manual and learn the meaning of ALL
safety signs on the machine.
The best safety feature is an informed operator.
15
Page 16

Safety
3.3 Replacing Damaged Safety
Safety Signs
4. Warning!
Always wear appropriate Personal Protective Equipment
when using this machine. For example:
• A hard hat
• Heavy gloves
• Hearing protection
• Protective shoes with slip resistant soles
• Protective glasses, goggles or face shield
Signs
1. Keep safety signs clean and legible at all times.
2. Replace safety signs that are missing or have
become illegible.
WE225, WE235
Trailer Wood Splitter
3. Parts that were replaced with a safety decal on them
must also have the safety sign replaced.
4. Replacement safety signs are available from your
authorized Distributor or Dealer Parts Department or
the factory.
3.3.1 How to Install Safety Signs
Ambient temperature must be above 50 °F (10 °C) to
install decals.
1. Clean and dry the installation area.
2. Determine exact position before removing the backing
paper.
3. Peel back the corner of the backing paper.
4. Align the sign over the specied area and carefully
press the small portion with the exposed sticky
backing in place.
5. Slowly peel back the remaining paper and carefully
smooth the remaining portion of the sign in place.
6. Small air pockets can be pierced with a pin and
smoothed out using the piece of sign backing paper.
16
Page 17

WE225, WE235
Trailer Wood Splitter
Familiarization
4. Familiarization
4.1 To the New Operator
It is the responsibility of the owner or operator to read
this manual and to train all other operators before
they start working with the machine. Follow all safety
instructions exactly.
By following recommended procedures, a safe
working environment is provided for the operator,
bystanders and the area around the work site.
Untrained operators are not qualied to use the
machine.
Many features incorporated into this machine are the
result of suggestions made by customers like you. Read
this manual carefully to learn how to use the machine
safely and provide maximum operating efciency. By
following the instructions in conjunction with a good
maintenance program, your wood splitter can provide
many years of trouble-free service.
IMPORTANT! Make sure all operators understand
how to put the wood splitter in a Safe Condition
before working with this machine. See Safe
Condition page 10.
4.1.1 Training
Each operator must be trained in the proper set-up and
operating procedures before using the machine.
1. Move the unit to a large open area to allow the
operator to become familiar with control functions and
machine response.
2. Do not allow untrained operators to use the machine.
They can endanger themselves and others, or
damage property and the machine.
4.1.2 Job Site Familiarization
It is the responsibility of the operator to be thoroughly
familiar with the work site prior to starting.
1. Check for close or cramped work space. Be sure
there is sufcient space and clearance for the
machine to operate.
2. Organize the working area to minimize movement.
3. Position the machine so prevailing winds blow engine
exhaust fumes away from operator's station.
17
Page 18

Familiarization
4.2 Machine Components
WE225
13
12
WE225, WE235
Trailer Wood Splitter
1
2
3
4
5
11
1. Hydraulic Control Valve
2. Sliding Push Block
3. Splitter Bed
4. Shelf
5. Wedge
6. Trailer Hitch–2" Ball
7. Safety Chains
8. Jack Stand
9. Tube for Manuals
10. Hydraulic Tank
11. 4.8-8 LRB SportTrail Tires
12. Honda™ GCV160 Engine
13. Hydraulic Cylinder
6
7
9
10
8
00668
Fig. 3 – WE225 Wood Splitter Components
18
Page 19

WE225, WE235
Trailer Wood Splitter
WE235
Familiarization
13
12
14
1
2
3
4
6
7
8
5
11
1. Honda™ GCV160 Engine
2. Hydraulic Cylinder
3. Hydraulic Control Valve
4. Sliding Wedge
5. Spring Latch For Tilting Splitter Bed
6. Tilting Splitter Bed
7. Shelf
8. Anvil
9. Hydraulic Tank
10. 4.8-8 LRB SportTrail Tires
11. Hydraulic Gear Pump
12. Jack Stand
13. Safety Chains
14. Trailer Hitch–2" Ball
9
00669
10
Fig. 4 – WE235 Wood Splitter Components
19
Page 20

Controls
5. Controls
IMPORTANT! Before starting work with the wood
splitter, become familiar with the location and
function of all controls.
5.1 Engine
Refer to the engine manual that came with this product for
further explanation on engine controls.
1 2
1
2
3
1. Recoil Starter
2. Oil Level Check
3. Oil Drain Plug
WE225, WE235
Trailer Wood Splitter
00694
Fig. 6 – Engine Controls
1. Ignition Switch
2. Choke Control
3. Fuel Valve
5.1.1 Ignition Switch
This rotary switch controls the ignition system.
• The engine operates in the ON position. Before
starting the engine, turn the switch to ON.
• Turn it counter-clockwise to OFF to stop the
engine.
00690
3
Fig. 5 – Engine Controls
20
00693
Fig. 7 – Ignition Switch
Page 21

WE225, WE235
Trailer Wood Splitter
Controls
5.1.2 Choke Lever
The choke lever opens and closes the choke valve in the
carburetor.
• Pull the lever out to CLOSE the choke when
starting a cold engine.
• Push the lever in to OPEN the choke after the
engine starts. When restarting a warm engine,
leave the choke OPEN.
00692
Fig. 8 – Choke Lever
If your equipment will not be used for 3 to 4 weeks,
operate the engine until the carburetor is out of fuel. Do
this by leaving the fuel valve OFF, restarting the engine,
and running it out of fuel. Running time should be less
than 3 minutes.
5.1.4 Recoil Starter
The recoil starter is located on the side of the engine. The
starter grip is pulled out by hand to start the engine.
00704
Fig. 10 – Recoil Starter
5.1.3 Fuel Shut-off Valve
The engine is equipped with a valve between the fuel tank
and the carburetor.
• Rotate the valve so it is in-line with the fuel line (1)
to turn fuel ON.
• Turn the valve 90° to turn the fuel OFF (2). Turn
the fuel OFF when not in use or when transporting.
1
2
00691
• Pull the grip on the rope out slowly until resistance
is felt, then pull briskly to start the engine.
NOTE:
Do not allow the starter grip to snap back
against the engine.
Return it gently to prevent damage to the
starter.
5.1.5 Throttle
The engine features an automatic throttle that sets
engine rpm at a preset speed. Engine speed cannot
be set manually.
The auto throttle feature only functions when the
engine is fully warmed.
1. ON Position
2. OFF Position
Fig. 9 – Fuel Valve
21
Page 22

Controls
00697
WE225, WE235
Trailer Wood Splitter
5.2
The control valve extends and retracts the wedge or push
block to split the wood. The lever on the valve has three
positions—Extend, Neutral, and Retract.
1. Push the lever forward (toward the wood) and hold to
Hydraulic Valve
00695
Fig. 11 – Splitter Control Valve
extend the wedge and split the wood.
Neutral Position
• Neutral is the center position on the valve.
• The wedge or push block stops moving when the
valve lever is moved to Neutral.
• The valve lever can be moved to Neutral from
Extend or Retract at any time.
Fig. 12 – Center (Neutral) Position
2. Pull the lever fully back to retract the wedge. When
retracting, a detent holds the lever until the wedge
/ push block fully returns, providing hands-free
operation.
3. Once the wedge is fully retracted, the lever spring-
returns to neutral.
Extend
• Push the lever forward (toward the wood) and hold
to extend the wedge and split the wood.
• Releasing the lever returns it to Neutral.
00696
Fig. 13 – Extend Wedge or Push Block to split Wood
22
Page 23

WE225, WE235
Trailer Wood Splitter
Operating Instructions
Retract Position
• Pull the lever fully backwards to retract the wedge
/ push block. The valve detent holds the lever in
Retract allowing a hands-free return cycle.
• The valve lever spring-returns to Neutral when
released from auto-retract.
00698
Fig. 14 – Retract Wedge or Push Block
6. Operating Instructions
The operator has the responsibility of being familiar
with all operating and safety procedures and
following them.
6.1 Operating Safety
Read and obey the safety signs on the machine. Clean or
replace them if they are not legible.
There is no substitute for a cautious, safe-minded
operator who recognizes potential hazards and follows
reasonable safety practices. This machine must be used
with all its safety equipment properly installed to minimize
the chance of accidents.
1. Wear appropriate personal protective equipment. Tie
back long hair, remove jewelry, and avoid loose tting
clothing. Prolonged exposure to loud noise can cause
permanent hearing loss! Wear hearing protection on
a full-time basis when using this machine.
2. The operator must be in control of the machine at all
times. Read and understand owner's manual before
starting. Review safety instructions annually.
3. Never use engine-powered machinery indoors. Gas
engine exhaust contains toxic carbon monoxide,
which cannot be smelled or seen. Breathing carbon
monoxide can be lethal.
4. Make sure all guards, deectors and shields are in
place before starting and operating.
5. Keep hands out of splitting area. Do not rest hands
on the log being split.
6. Do not step over or straddle splitter during operation.
7. Do not try to split more than one log at a time. The
logs can y out and cause injury.
8. Keep your ngers and hands away from cracks in the
log that can open while splitting.
9. Always load logs by grasping the bark side, not the
cut ends.
10. Do not reach into or load the splitter when the wedge
is in motion.
11. Do not try to split logs across the grain. Some types
of wood can burst or splinter causing pieces to be
thrown causing injury.
12. For uneven cut logs, always place the square-cut end
against the splitting wedge.
13. Never place any part of your body where it would be
in danger if machine movement should occur during
assembly, installation, operation, maintenance,
repairing or moving.
14. Before servicing or repairing the machine, place it in a
Safe Condition. See page 10.
23
Page 24

Operating Instructions
WE225, WE235
Trailer Wood Splitter
6.2 Before Starting the Engine
1. Check the engine oil level. See page 25.
2. Check the hydraulic oil level. See page 25.
3. Check the fuel level.
4. Check the engine air cleaner. See page 37.
5. Clear the area of bystanders, especially small
children.
6. Make sure each operator is trained and familiar with
the set up and operation of the wood splitter.
7. Follow the Pre-Operation Checklist.
8. Review the Controls (see page 20).
9. Survey the work site and position the wood splitter in
a clear, level work area.
10. Set up the machine correctly. See Machine Set-up on
page 27.
6.3 Pre-operation Checklist
Efcient and safe operation of the Wallenstein wood
splitter requires that each operator reads and understands
the operating procedures and all related safety
precautions outlined in this section.
A Pre-operation Checklist is provided for the operator. The
checklist is important for both personal safety and keeping
the wood splitter in good mechanical condition.
Before operating the machine and each time thereafter,
the following areas should be checked off:
Pre-operation Checklist
Check engine oil level. Top level up as
required.
Check hydraulic uid level. Top level up as
required.
Check and lubricate the machine following
the schedule outlined in the Maintenance
section.
Check the wedge and block. Be sure they
are not damaged or broken and is not badly
worn. Repair or replace as required.
Check and remove any entangled material.
Check for hydraulic leaks. Tighten
connections or replace components to stop
leaks.
Check and ensure that all covers, guards
and shields are in place, secured, and can
function as designed.
Check and inspect tires, wheels, and hubs.
Check and tighten all fasteners. Make sure
the equipment is in good condition.
Check that appropriate equipment for
personal protection is being used and in good
condition.
Check that jewelry, loose- tting clothing are
not worn. Make sure long hair is tied back.
24
Page 25

WE225, WE235
Trailer Wood Splitter
6.4 Machine Break-In
Although there are no operational restrictions on the wood
splitter when used for the rst time, it is recommended
that the following items be checked:
Review the engine owner's manual for break-in
recommendations. Place the machine in a Safe
Condition before checking any components. Refer to
Safe Condition on page 10.
After 1 hour of operation
1. Check that the push block or wedge is adequately
lubricated.
2. Check all nuts, bolts and other fasteners are tight.
3. Check hydraulic system for leaks. Tighten all leaking
ttings and replace any leaking components.
4. Check machine uid levels—Fuel, engine oil, and
hydraulic oil reservoir. Top up as required.
5. Check for entangled material. Remove all entangled
material before resuming work.
6. Check tire pressure. Inate as required.
Operating Instructions
00699
Fig. 15 – Engine Oil Level check
After 8 hours of operation
7. Repeat the above steps.
6.5 Engine Oil Level Check
Check engine oil level daily.
Check with the machine parked on level ground and the
engine stopped.
IMPORTANT! Running the engine with a low oil
level can cause engine damage that is not covered
by warranty.
1. Remove the oil level dipstick and wipe it clean.
2. Fully insert the oil level dipstick, then remove it to
check the oil level. The proper level is when the oil
is visible at the full (upper) mark on the dipstick.
3. If the oil level is low, add oil until the level is at the full
mark.
SAE 10W-30 is recommended for general use.
4. Reinstall the oil level dipstick.
Refer to the engine owner's manual included in the
manual tube for further information on engine oils.
6.6 Hydraulic Oil Level Check
Check hydraulic oil level every 40 hours or weekly.
Check with the machine parked on level ground and the
engine stopped.
The proper level is when the oil is visible at the full
(upper) mark on the dipstick.
25
00638
Fig. 16 – Hydraulic Tank Oil Level Dipstick
Page 26

Operating Instructions
WE225, WE235
Trailer Wood Splitter
IMPORTANT! Do not operate machine if oil level is
not visible on the dipstick. Damage to the pump and
other components can occur.
• Do not overll the tank past the full mark.
• Always check oil levels after changing lters
or servicing hydraulic components.
• Hydraulic oil quality should be inspected
every 40 hours. If the oil is dirty or smells
burnt, it should be replaced.
• Be aware of high oil temperatures.
Temperatures higher than 180 °F (82 °C) could
cause seal damage and degrade oil quality.
6.6.1 Hydraulic Oil – Adding
The hydraulic system uses Dexron® III ATF.
1. Clean the area around ller cap and remove it.
2. Use a clean funnel and add oil until the level is at the
full mark on the dipstick.
3. Install ller cap securely. Wipe up any spilled oil.
6.7.1 Refueling
Fuel tank capacity: 0.25 US gal (0.93 L).
WARNING!
Fuel vapors can explode causing
injury or death. Do not smoke while
refueling. Keep sparks, fl ames, and hot
components away.
W027
Refuel in a well-ventilated area with the engine stopped.
If the engine has been running, allow it to cool rst. Never
refuel the engine inside a building where gasoline fumes
can come in contact with ames or sparks.
For fuel specication, see Fluids and Lubricants on
page 33 . Refer to the engine manual for additional
information on fuels.
1. Clean the area around fuel tank cap. Fill the tank
to 1/2" (12 mm) below bottom of ller neck to
provide space for any fuel expansion. Do not
overll.
6.7 Fuel Level Check
Check the fuel level daily.
Starting with a full tank helps to eliminate or reduce
operating interruptions for refueling.
The fuel tank is located on the engine. Avoid running the
tank dry.
00198
Fig. 17 – Fuel Filler Cap
2. Install fuel ll cap securely and wipe up any spilled
fuel.
26
Page 27

WE225, WE235
00702
Trailer Wood Splitter
Operating Instructions
6.8 Machine Set-up
IMPORTANT! Park the wood splitter on a level, dry
work area free of debris and other objects.
Position the splitter so the prevailing wind blows
engine exhaust away from the operator.
If a tow vehicle is available, leaving the
splitter attached to it provides greater
stability.
1. Position the splitter next to the wood to be split.
2. Leave the splitter attached to the tow vehicle. If no
tow vehicle is available, lower the jack stand and
insert the snap lock pin. Chock the wheels so the
machine is stable.
3. Make sure working area is clear of stones, branches
or other obstacles.
4. Precut logs to desired block size, ready to load onto
splitter bed.
5. Determine where the split wood is going to be piled.
Make sure that location does not interfere loading the
splitter.
6.9 Starting the Engine
CAUTION!
Before starting engine, review the operating and
maintenance instructions in the engine manual.
CAUTION!
Hearing loss hazard. Prolonged
exposure to loud noise may cause
permanent hearing loss. Use suitable
protection while operating the
machine.
Make sure the wood splitter is set up to work and
otherwise ready to run.
1. If the engine is cold, close (pull out) the choke control.
To start a warm engine, leave the choke in (control
pushed in).
W019
W016
1. Snap Lock Pin
2. Jack Stand
1
2
Fig. 18 – Machine Set-up
00701
2
1. Choke Lever
2. Choke OPEN
3. Choke CLOSED
3
1
Fig. 19 – Choke Lever
27
Page 28

Operating Instructions
WE225, WE235
Trailer Wood Splitter
2. Turn the engine ignition switch ON.
00703
Fig. 20 – Ignition Switch
3. Pull the starter grip out lightly until resistance is felt,
then pull briskly in the direction of the arrow as shown
below. Return the starter grip gently.
00704
6.10 Stopping the Engine
To stop the engine in an emergency, turn the ignition
switch OFF. Correct fault situation before restarting.
00693
Fig. 21 – Recoil Starter
IMPORTANT! Do not allow the starter grip to snap
back against the engine. Return it gently to prevent
damage to the starter.
4. Gradually push the choke control lever in (open)
as the engine warms. The auto throttle feature only
functions when the engine is fully warmed.
IMPORTANT! Engine should be warmed up before
putting to work.
Fig. 22 – Ignition Switch
Under normal conditions, use the following procedure
1. Stop loading material onto the splitter bed.
2. Turn the ignition switch OFF.
28
Page 29

WE225, WE235
Trailer Wood Splitter
Operating Instructions
6.11 Log Placement
WARNING!
Risk of pinching or crushing hazard between the
wedge or push block and the log!
Never place hands at the ends of the log.
Always grasp logs by the sides when loading or
removing.
W035
6.12 Splitting Wood
WARNING!
Risk of pinching or crushing hazard! The worker
loading the splitter MUST be the only one in
control of the hydraulic cylinder and splitting
wedge.
Only one worker should operate and load the
wood splitter.
1. Place wood or log on the splitter.
2. Push control lever forward and hold to split wood.
3. Release the lever when the log splits or cylinder
reaches full stroke and stops.
4. Pull the lever back to retract the push block or wedge.
The detent holds the lever until the cylinder fully
retracts, allowing hands-free operation.
W036
00645
Fig. 23 – Correct Log Placement—Horizontal
• Always grasp the log by the sides not the ends
when placing in or removing logs from the
splitter. This minimizes the chance of the operator
getting ngers, hands or arm between the wedge /
push block and the log.
• Any logs or debris remaining on the splitter bed
should only be removed after it is safe to do so.
00695
Fig. 24 – Hydraulic Control Valve Positions
IMPORTANT! Do not hold the valve lever to extend
or retract the cylinder once it has reached the end of
it's stroke. Doing so can overheat the oil and could
damage the engine.
5. If the log is large enough to require another split,
reposition and repeat steps.
6. Pile the split wood close to the working area, but
do not allow pieces to pile up and clutter the area.
A cluttered working area can lead to tripping and an
accident.
29
Page 30

Operating Instructions
6.13 Vertical Splitting
1. While standing beside the controls, release the
splitter beam by pulling the spring-loaded frame latch.
2. At the same time, grab the cylinder end and tip
the splitter beam assembly up towards the vertical
position.
2
1
WE225, WE235
Trailer Wood Splitter
WARNING!
Risk of pinching or crushing hazard! The worker
loading the splitter MUST be the only one in
control of the hydraulic cylinder and splitting
wedge.
Only one worker should operate and load the
wood splitter.
W036
00707
Fig. 25 – Rotate Splitter to Vertical
3. Continue tipping, while placing your foot on the
hydraulic tank / axle as a brace, until splitter is in the
full vertical position.
4. Set the log or block onto the splitter base.
00708
Fig. 27 – Vertical Splitting
00645
Fig. 26 – Correct Log Placement—Vertical
30
Page 31

WE225, WE235
Trailer Wood Splitter
Operating Instructions
6.14 Transporting
6.14.1 Transport Safety
1. Comply with local laws governing safety and
transporting of machinery on public roads.
2. Do not exceed 50 mph (80 km/h) when towing this
machine. Slow down for rough terrain and cornering.
3. Do not transport or move the wood splitter with the
engine running.
4. Be sure the trailer is hitched correctly to the towing
vehicle and a retainer is used through the hitch
mechanism.
5. Always attach safety chains between the hitch and
the towing vehicle. Cross the chains underneath the
trailer tongue.
6. Check wheel lugs and tighten if required. Inspect rims
for damage.
7. Inspect tires for cuts or damage. Check tire pressure
and adjust if required.
8. Ensure the stability jacks are raised and secured with
the latch pin.
9. Make sure tow vehicle is tted with the correct size
(2 in) towing ball.
6.14.2 Prepare for Transport
• Turn the fuel OFF when transporting.
00709
Fig. 28 – Fuel Valve OFF
• Clean all debris from the splitter that could fall off in
transport.
• Check tire pressure. Inspect for tire cuts or
damaged rims.
• Check lug nuts and re-torque as necessary.
Inspect again after 20–25 mi (32–40 km). Check
weekly. See page 41.
• Inspect and replace any axle dust caps that are
missing, damaged or leaking.
• Always be in compliance with all applicable local
regulations when transporting.
10. Make sure fuel and hydraulic tank caps are on tight to
prevent spills while transporting.
11. Clean all debris off the splitter. Remove any tools or
other loose items.
12. Check that all the lights, reectors and other lighting
requirements are installed and in good working
condition.
13. Never allow riders on the machine.
14. Be a safe and courteous driver. Always yield to
oncoming trafc in all situations, including narrow
bridges, intersections, and so on.
15. Watch for other trafc when near or crossing
roadways.
16. Do not drink and drive.
17. Before transporting, perform a walk-around inspection
to ensure everything is safe.
WE235 Models
• Make sure the splitter beam assembly is lowered
to horizontal and properly latched.
00710
Fig. 29 – WE235 Splitter Beam Latched
31
Page 32

Storing the Wood Splitter
00669
WE225, WE235
Trailer Wood Splitter
6.15 Connecting a Tow Vehicle
1. Keep bystanders are clear of the machine.
2. Make sure there is enough room and clearance to
safely back up to the machine.
3. Slowly back the tow vehicle until the coupler on the
hitch and ball are aligned.
Fig. 30 – Ball Hitch Aligned
4. Lift the hitch and place the coupler over the ball on
the hitch.
5. Flip the latch to lock the coupler around the ball.
6. Pull out the jack stand snap lock pin and raise the
jack stand to its stowed position. Install snap lock pin
to secure it.
7. Cross safety chains under trailer tongue and attach
securely to the tow vehicle hitch.
8. Connect the wiring harness for the lights (as
equipped).
9. Reverse the above procedure when unhooking.
7. Storing the Wood Splitter
After the season's use and the wood splitter is going to
be put away in storage, it should be thoroughly inspected
and prepared. Repair or replace any worn or damaged
components to prevent any unnecessary down time at the
start of next season. The wood splitter can have a long,
trouble-free life by following these steps:
IMPORTANT! Refer to the engine manufacturer's
manual for information specic to engine storage.
1. Fully retract the cylinder ram.
2. Add a stabilizer to the fuel tank. Top up the tank and
run the engine outdoors for 10 minutes to be sure that
treated gasoline has replaced the untreated gasoline
in the carburetor.
3. Turn fuel valve OFF.
4. Thoroughly wash the machine using a pressure
washer to remove all dirt, mud, debris, and residue.
5. Inspect the wedge, cylinder ram, push block and
wear plates for damage or entangled material. Repair
or replace damaged parts. Remove all entangled
material.
6. Touch up all paint nicks and scratches to prevent
rusting.
7. If the splitter is to be stored for longer periods
(over 6 months), follow the engine manufacturers
recommendations for storage preparation.
8. Store the machine in an area away from human
activity.
9. Select an area that is dry, level and free of debris to
park the wood splitter.
10. If the wood splitter is not stored inside a building,
cover with a waterproof tarp. Tie securely in place.
11. Do not allow children to play on or around the stored
machine.
7.1 Removing from Storage
1. Review and follow the Pre-operation Checklist. See
page 36
2. Review safety and operation procedures. See page
9.
32
Page 33

WE225, WE235
Trailer Wood Splitter
Service and Maintenance
8. Service and Maintenance
WARNING!
Risk of serious personal injury. Stop engine
before performing ANY service or maintenance
procedure. Reinstall all covers and guards
removed before putting machine back into
service.
IMPORTANT! Refer to the engine manufacturer's
manual for engine maintenance and service
information.
8.1 Maintenance Safety
1. Follow good shop practices:
• Keep service area clean
and dry.
• Be sure electrical outlets
and tools are properly
grounded.
• Use adequate light for
the job at hand.
W033
11. Always use proper tools in good condition. Make sure
you understand how to use them before performing
any service work.
8.2 Fluids and Lubricants
1. Engine Oil
SAE 10W-30 motor oil is recommended for general
use. Refer to the engine manufacturer's manual for
maintenance and service information
2. Grease
Use an SAE multi-purpose high temperature
grease with extreme pressure (EP) performance.
Also acceptable is an SAE multipurpose lithiumbased grease.
3. Engine Fuel
This engine is certied to operate on unleaded
gasoline with a pump octane rating of 86 or higher
(a research octane rating of 91 or higher).
4. Hydraulic Oil
Use Dexron® III Automatic Transmission Fluid
(ATF). Dexron VI or Mercon® ATF are also
acceptable substitutions.
2. Never operate the machine or the towing vehicle in
a closed building. The exhaust fumes may cause
asphyxiation.
3. Before servicing or repairing, place the machine in a
Safe Condition. See page 10.
4. Allow the engine to cool before performing
maintenance. Engine components and oil may be hot
enough to cause injury.
5. Never work under equipment unless it is properly
supported.
6. When performing any service or maintenance work
always use personal protective equipment.
7. Where replacement parts are necessary, use only
OEM parts to restore your equipment to original
specications. The manufacturer is not responsible for
injuries or damages caused by the use of unapproved
parts or accessories.
8. Inspect and tighten all bolts, nuts and screws. Check
that all electrical and fuel connections are properly
secured.
9. When completing a maintenance or service function,
make sure all safety shields and devices are installed
before placing splitter in service.
5. Storing Lubricants
Your machine can operate at top efciency
only if clean lubricants are used. Use clean
containers to handle all lubricants. Store them in
an area protected from dust, moisture and other
contaminants.
10. When cleaning any parts, do not use gasoline. Use a
cleanser designed for that purpose.
33
Page 34

Service and Maintenance
WE225, WE235
Trailer Wood Splitter
8.3 Maintenance Schedule
Perform maintenance procedures at time shown or
hour interval, whichever comes rst.
As Required
Check the condition of all hydraulic lines, hoses and
ttings. Replace any that are damaged.
Remove any entangled material from splitter.
Check that all fasteners are tight.
Every 8 hours or Daily
Check fuel level See page 26
Check engine oil level. See page 25
Every 40 hours or Annually
Check hydraulic oil level. See page 25
8.4 Grease Points
Use a hand-held grease gun for all greasing. Pump
one shot of grease per tting.
Look for this decal on your machine. It
indicates a grease point and the interval
in hours.
• Wipe grease tting with a clean cloth before
greasing to avoid injecting dirt and grit.
• If ttings do not take grease, remove and clean
them thoroughly. Replace grease ttings as
necessary.
Clean engine air lter See page 37
Inspect hydraulic oil quality See page 25
Grease frame slide, hinges,
pivot points
See page 34
Every 100 hours or Annually
Grease axle bearings See page 34
Change engine oil See engine manual
Check tire pressure
Change hydraulic oil and lter See page 36
Change engine air lter See page 37
Change fuel lter See engine manual
Clean machine. Remove debris
and entangled material.
See rating on tire
sidewall
—
34
Page 35

WE225, WE235
Trailer Wood Splitter
Service and Maintenance
Location
1 Splitter slide, hinge points
Location
2 Axle bearings – 2 places
Every 40 hours of operation
Every 100 hours of operation
WE225
2
or as required
or annually
1
WE235
1
2
00711
Fig. 31 – Grease Points
35
Page 36

Service and Maintenance
00209
WE225, WE235
Trailer Wood Splitter
8.5 Hydraulic Oil – Changing
Change the hydraulic oil at 100 hours of operation or
annually.
• Hydraulic oil type: Dexron® III ATF
• Reservoir capacity: 3.4 US gal (13 L)
CAUTION!
Risk of burns to exposed skin.
Hydraulic oil becomes hot during
operation. Hoses, lines and other
parts become hot as well. Wait for
the oil and components to cool
before starting any maintenance or
inspection work.
W028
The hydraulic tank drain plug is located under the
machine. A 3/8" Allen (hex) wrench is required to remove
it.
8.6 Hydraulic Oil Filter – Changing
Change hydraulic oil lter at 100 hours of operation
or annually.
The lter is located on side of the hydraulic oil tank.
CAUTION!
Risk of burns to exposed skin.
Hydraulic oil becomes hot during
operation. Hoses, lines and other
parts become hot as well. Wait for
the oil and components to cool
before starting any maintenance or
inspection work.
W028
00208
Fig. 32 – Hydraulic Tank Drain Plug
Procedure
1. Place a drain pan of suitable capacity under the drain
plug.
2. Clean the area around drain and remove the drain
plug.
3. Allow the oil to fully drain, then ush the tank.
4. Replace the plug and ll the tank with clean oil.
5. Dispose of used oil in an environmentally safe
manner.
1 2
Fig. 33 – Hydraulic Filter
1. Hydraulic Filter
2. Drain Plug
Procedure
1. Place a drain pan of suitable capacity under the lter
head.
2. Remove the oil lter. An oil lter wrench may be
required.
3. Apply a light coat of clean oil to the seal on the new
lter and install it. Tighten by hand only.
4. Run the machine for 1–2 minutes operating the
cylinder. Check lter head for oil leaks.
5. If a leak is found, shut off the machine and correct it.
6. Check hydraulic reservoir oil level. Top up as
required.
7. Dispose of spilled oil in an environmentally safe
manner.
36
Page 37

WE225, WE235
Trailer Wood Splitter
Service and Maintenance
8.7 Engine Air Cleaner
Check air lter every 40 hours of operation. Change
air lter elements at 100 hours of operation or
annually.
NOTE:
A dirty air lter can restrict air ow to the carburetor,
reducing engine performance. If the engine is operated
in very dusty areas, clean the air lter more often than
specied.
IMPORTANT! Operating the engine without an air
lter, or with a damaged air lter, can allow dirt to
enter the engine, causing rapid engine wear. This
type of damage is not covered by Warranty.
Refer to the engine manual for information
on servicing the air cleaner.
Inspection
Remove the air cleaner cover and inspect the lter
element. Clean or replace dirty lter elements. Always
replace damaged lter elements.
1. Press the latch tabs (1) on the top of the air cleaner
cover (2), and remove the cover. Check the lter (3)
to be sure it is clean and in good condition.
2. Reinstall the lter and air cleaner cover.
Cleaning
3. Tap the lter several times on a hard surface to
remove dirt, or blow compressed air not exceeding
30 psi (207 kPa) through the lter from the clean
side that faces the engine. Never try to brush off dirt.
Brushing will force dirt into the bers.
4. Wipe dirt from the air cleaner body (4) and cover
using a moist rag. Be careful to prevent dirt from
entering the air duct (5) that leads to the carburetor.
5
4
Fig. 34 – Engine Air Cleaner
1. Tabs on Cover
2. Air Cleaner Cover
3. Filter Element
4. Air Cleaner Body
5. Carburetor Duct
1
3
2
00712
37
Page 38

Troubleshooting
WE225, WE235
Trailer Wood Splitter
9. Troubleshooting
The following table lists some problems that may be
encountered, with possible causes and solutions.
If a problem persists after reading through the
Troubleshooting section, contact the local dealer,
distributor or Wallenstein Equipment. Have the machine
serial number ready.
Engine related issues
Refer to the Honda™ GCV160 owner's manual found in
the manual tube.
Problem Cause Solution
Oil lter plugged. Change lter.
No hydraulic oil pressure.
Cylinder rod moves slowly or
does not move. Screeching or
hissing noise.
Control handle does not go
to neutral after rod is fully
retracted.
Control handle goes to neutral
before rod is fully retracted.
Control handle does not go to
neutral when released.
Cylinder stops on contact with
wood.
Wedge or push block jumps.
Leaking hydraulic hose. Hose worn or damaged. Replace hose.
Leaking cylinder. Seals worn.
Wood jammed around wedge.
Low engine speed.
Valve detent set too tight.
Hydraulic oil too cold. Allow machine to warm up.
Hydraulic uid is contaminated. Change hydraulic uid and lter.
Detent set too loose.
Control may be damaged.
Second stage on pump not
functioning.
Wedge or push block frame
jamming.
Low hydraulic oil level. Add oil.
System relief pressure setting too low.
Call technician.
Shut machine off and safely remove
wood.
Check throttle is set to maximum.
Check that choke is off.
Adjustment required to detent on
valve.
Adjustment required to detent on
valve.
Control may need service or be
replaced. Call technician.
Pump may need to be serviced or
replaced. Call technician.
Lubricate slider wear plates.
Seal replacement may be required.
Call technician.
38
Page 39

WE225, WE235
Trailer Wood Splitter
10. Specications
Specications
10.1 Machine Specications
1
Model WE225 WE235
Mounting Trailer Mounted
Engine Model Honda™ GCV160
Engine Displacement
Splitter Cylinder
Bore x Stroke
Splitting Force
Valve Type
Hydraulic Pump Type
Hydraulic Pump Flow
Bed Height
Wedge Height
Tire Size
Tire Type
Safety Chains
Ball Hitch Size
Splitter Orientation
Average Cycle Time
Full Cycle Time
Weight
Dimensions
(L x W x H)
Accessories
Open Center, Auto-return Detent
24" (61 cm) 27" (69 cm)
4.80 x 8 LRB SportTrail
Horizontal Horizontal / Vertical
319 lb (144.6 kg) 366 lb (166 kg)
81" x 40" x 38" 82" x 40" x 46"
(206 cm x 102 cm x 97 cm) (208 cm x 102 cm x 117 cm)
4-way Splitting Wedge
160 CC
4" x 24"
(102 mm x 610 mm)
20 ton
Gear, two-stage
11 gpm (41.6 Lpm)
9" (23 cm)
Highway
Standard
2"
6.6 seconds
13.2 seconds
Splitter Cover
1 Specicationssubjecttochangewithoutnotice.
39
Page 40

Specications
10.2 Common Bolt Torque Values
WE225, WE235
Trailer Wood Splitter
Checking Bolt Torque
The tables shown give correct torque values for
various bolts and capscrews. Tighten all bolts to the
torque values specied in the table, unless indicated
otherwise. Check tightness of bolts periodically.
IMPORTANT! If replacing hardware, use
fasteners of the same grade.
IMPORTANT! Torque gures indicated in the
table are for non-greased or non-oiled threads.
Do not grease or oil threads unless indicated
otherwise. When using a thread locker, increase
torque values by 5%.
NOTE:
Boltgradesareidentiedbytheir
head markings.
Imperial Bolt Torque Speci cations
Torque Value
Bolt
Diameter
SAE Gr. 2 SAE Gr. 5 SAE Gr. 8
lbf•ft N•m lbf•ft N•m lbf•ft N•m
1/4" 6 8 9 12 12 17
5/16" 10 13 19 25 27 36
3/8" 20 27 33 45 45 63
7/16" 30 41 53 72 75 100
1/2" 45 61 80 110 115 155
9/16" 60 95 115 155 165 220
5/8" 95 128 160 215 220 305
3/4" 165 225 290 390 400 540
7/8" 170 230 420 570 650 880
1" 225 345 630 850 970 1320
Metric Bolt Torque Speci cations
Torque Value
Bolt
Diameter
Gr. 8.8 Gr. 10.9
lbf•ft N•m lbf•ft N•m
M3 0.4 0.5 1.3 1.8
M4 2.2 3 3.3 4.5
M6 7 10 11 15
M8 18 25 26 35
M10 37 50 52 70
M12 66 90 92 125
M16 166 225 229 310
M20 321 435 450 610
M30 1,103 1 495 1,550 2 100
M36 1,917 2 600 2,700 3 675
40
Page 41

WE225, WE235
Trailer Wood Splitter
Specications
10.3 Hydraulic Fitting Torque
Tightening Flare Type Tube Fittings
1. Check are and are seat for defects that might
cause leakage.
2. Align tube with tting before tightening.
3. Hand-tighten swivel nut until snug.
4. To prevent twisting the tube, use two wrenches.
Place one wrench on the connector body and
tighten the swivel nut with the second. Torque
to values shown.
If a torque wrench is not available, use the FFFT
(Flats From Finger Tight) method.
Hydraulic Fitting Torque
Tube
Size
OD
Inches Inches
3/16 7/16 6 8 2 1/6
1/4 9/16 11–12 15–17 2 1/6
5/16 5/8 14–16 19–22 2 1/6
3/8 11/16 20–22 27–30 1-1/4 1/6
1/2 7/8 44–48 59–65 1 1/6
5/8 1 50–58 68–79 1 1/6
3/4 1-1/4 79–88 107–119 1 1/8
1 1-5/8 117–125 158–170 1 1/8
Values shown are for non-lubricated connections.
Hex
Size
Across
Flats
Torque value
lbf•ft
Flats From
Finger Tight
N•m Flats Turns
10.4 Wheel Lug Torque
It is extremely important safety procedure to apply
and maintain proper wheel mounting torque on
your trailer axle. Torque wrenches are the best
method to assure the proper amount of torque is
being applied to a fastener.
Wheel lugs should be torqued before rst road
use and after each wheel removal. Check and re
torque after the rst 10 miles (16 km), 25 miles
(40 km), and again at 50 miles (80 km). Check
periodically thereafter.
WARNING!
Wheel lug nuts must be installed and
kept at the proper torque value to prevent
loose wheels, broken studs, or possible
separation of wheels from axle.
• Start all lug nuts onto the threads by hand.
• Tighten lug nuts in stages, following the
pattern shown in the Wheel Lug Nut Torque
table.
Wheel Lug Nut Torque
Wheel
Size
8"
12"
13"
14"
15"
16"
Wheel Lug Torque Pattern
Units 1st Stage 2nd Stage 3rd Stage
lbf•ft
N•m
lbf•ft
N•m
lbf•ft
N•m
lbf•ft
N•m
lbf•ft
N•m
lbf•ft
N•m
26–32.5
26–32.5
26–32.5
26–32.5
26–32.5
12–20
16–26
20–25
20–25
20–25
20–25
20–25
30–35
39–45.5
35–40
45.5–52
35–40
45.5–52
50–60
65–78
50–60
65–78
50–60
65–78
45–55
58.5–71.5
50–60
65–78
50–60
65–78
90–120
117–156
90–120
117–156
90–120
117–156
41
4-Bolt
5-Bolt 6-Bolt 8-Bolt
Page 42

Alphabetical Index
WE225, WE235
Trailer Wood Splitter
11. Alphabetical Index
A
Air Cleaner Inspection ................................................37
Angled Splitter Bed ....................................................27
B
Before Starting the Engine .........................................24
Bolt torque ..................................................................40
Break-in ......................................................................25
C
Checking Bolt Torque .................................................40
Choke Lever ...............................................................21
Connecting a Tow Vehicle ..........................................32
Controls ......................................................................20
Control Valve .........................................................22
Engine Controls .....................................................20
Control Valve ..............................................................22
D
Decal Information .........................................................7
Delivery Inspection Report ...........................................4
E
Engine ........................................................................33
Engine Air Cleaner .....................................................37
Engine Controls ..........................................................20
Choke Lever ..........................................................21
Fuel Shut-off Valve ................................................21
Ignition Switch .......................................................20
Recoil Starter.........................................................21
Throttle ..................................................................21
Engine Fuel ................................................................33
Engine Oil ...................................................................33
Engine Oil Level Check ..............................................25
Equipment Safety Guidelines .....................................10
F
Familiarization ............................................................17
Job Site Familiarization .........................................17
Machine Components ...........................................18
To the New Operator .............................................17
Training .................................................................17
Fluids ..........................................................................33
Fuel Level – Checking ................................................26
Fuel Shut-off Valve .....................................................21
G
Gas Motor Safety .......................................................11
Grease Points ............................................................34
H
How to Install Safety Signs ........................................16
Hydraulic Fitting Torque .............................................41
Hydraulic Oil ...............................................................33
Hydraulic Oil – Adding ................................................26
Hydraulic Oil – Changing ...........................................36
Hydraulic Oil Level Check ..........................................25
Hydraulic Oil Type ......................................................26
I
Ignition Switch ............................................................20
Informative Labels ........................................................7
Introduction ..................................................................2
Foreword .................................................................2
L
Log Placement ...........................................................29
Lubricants ...................................................................33
M
Machine Components ................................................18
Machine Set-up ..........................................................27
Machine Specications ..............................................39
Maintenance Decals .....................................................7
Maintenance Schedule ...............................................34
O
Operating Hints ..........................................................29
Operating Instructions ................................................23
Before Starting the Engine ....................................24
Engine Oil Level Check .........................................25
Fuel Level Check...................................................26
Hydraulic Oil – Adding ...........................................26
Hydraulic Oil Level Check .....................................25
Log Placement ......................................................29
Machine Break-In ..................................................25
Machine Set-up .....................................................27
Pre-operation Checklist .........................................24
Refueling ...............................................................26
Starting the Engine ................................................27
Stopping the Engine ..............................................28
Vertical Splitting (WE235)......................................30
Operating Safety ........................................................23
P
Personal Protective Equipment (PPE) .........................9
Pre-operation .............................................................24
Product Labels .............................................................7
Product Warranty .........................................................6
Putting Wood Splitter in Storage
Removing from Storage ........................................32
R
Refueling ....................................................................26
Refueling Safety .........................................................10
Replace Damaged Safety Signs ................................16
Rotate Splitter to Vertical ............................................30
S
Safe Condition ............................................................10
Safety ...........................................................................8
Equipment Safety Guidelines ................................10
Gas Motor Safety ..................................................11
How to Install Safety Signs....................................16
42
Page 43

WE225, WE235
Trailer Wood Splitter
Hydraulic Safety ....................................................11
Maintenance Safety...............................................33
Operating Safety ...................................................23
Personal Protective Equipment (PPE) ....................9
Preparation ............................................................12
Refueling Safety ....................................................10
Safety Alert Symbol .................................................8
Safety Do's and Don'ts ............................................9
Safety Training ......................................................10
Signal Words ...........................................................8
Tire Safety .............................................................10
Safety Alert Symbol ......................................................8
Safety Notice Labels ....................................................7
Safety Sign Explanations ...........................................15
Safety Sign Locations ................................................14
Safety Signs ...............................................................14
Safety Sign Explanations ......................................15
Safety Sign Locations............................................14
Safety Training ...........................................................10
Serial Number Location ................................................5
Service and Maintenance ...........................................33
Fluids and Lubricants ............................................33
Grease Points........................................................34
Hydraulic Oil – Changing.......................................36
Hydraulic Oil Filter – Changing..............................36
Maintenance Schedule ..........................................34
Sign-off form ...............................................................13
Specications .............................................................39
Common Bolt Torque Values .................................40
Hydraulic Fitting Torque .........................................41
Machine Specications..........................................39
Wheel Lug Torque .................................................41
Splitting Wood
Operating Hints .....................................................29
Starter ........................................................................21
Stopping in an Emergency .........................................28
Storing the Wood Splitter ...........................................32
Alphabetical Index
T
Throttle .......................................................................21
Transporting ...............................................................30
Connecting a Tow Vehicle .....................................32
Prepare for Transport ............................................31
Troubleshooting Guide ...............................................38
W
Wheel Lug Torque ......................................................41
43
Page 44

www.wallensteinequipment.com
 Loading...