

Page 1
WX410/430
BY EMB MFG INC.
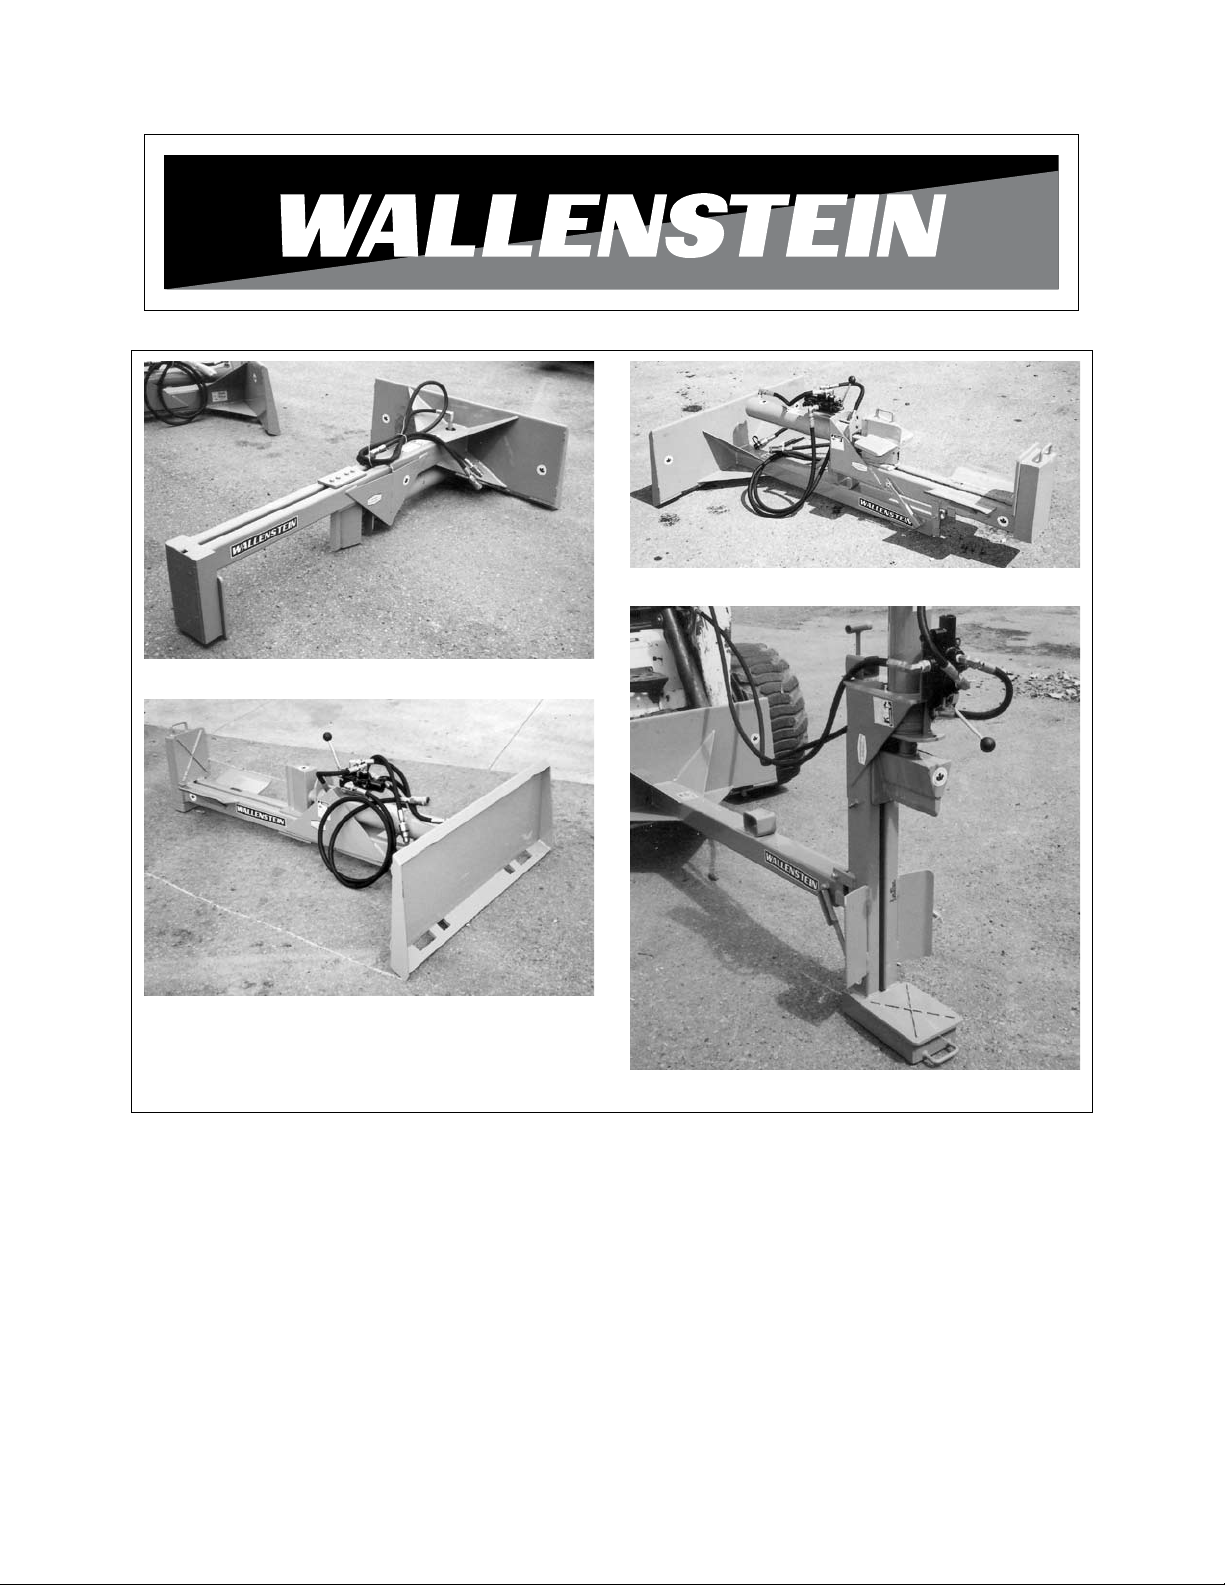
WX470 Horizontal
WX440/450/460
WX470 Vertical
SKID STEER
MOUNTED WOODSPLITTER
MODELS WX410,WX430, WX440,
WX450, WX460 & WX470
OPERATOR'S MANUAL
Page 2

WALLENSTEIN
SKID STEER MOUNTED WOODSPLITTER
WARRANTY
This product is warranted to be free of defects in materials and workmanship under normal use
and service, for a period of one year from the date of purchase, when operated and maintained in accordance with the Operating and Maintenance Instructions supplied with this unit. This warranty does not cover
misuse or negligence.
Under no circumstances will the manufacturer be liable for any consequential damage or expense
of any kind, including loss of prots. The manufacturer is under no circumstances liable for tractor damage
of any kind. The manufacturer is not liable for the maintenance of the product.
This warranty is extended only to the original purchaser. Warranty is void if repairs are attempted
by anyone other than an Authorized Service Centre.
If a difculty develops with the product, you should contact your nearest Authorized Repair Centre,
or distributer. Only these locations are authorized to make repairs to the product or affect the replacement
of defective parts, which will be done at no charge within a reasonable time after the receipt of the product.
Unit or parts should be returned at the customer's expense to the nearest repair location or Authorized
Service Centre. Damage in-transit is not covered by warranty. Include original purchase receipt with any
claim (keeping a copy for your les).
The distributer's liability under warranty is limited to repair of the product and/or replacement of parts
and is given to the purchaser in lieu of all other remedies including incidental and consequential charges.
There are no warranties, expressed or implied other than those specied herein. For the nearest Authorized
Service Centre call the manufacturer.
EMB Manufacturing Inc.
4144 Boomer Line
St. Clements, ON
N0B 2M0 Canada
Phone: 519-699-9283
Fax: 519-699-4146
WARRANTY VOID IF NOT REGISTERED
Page 3

WALLENSTEIN
SKID STEER MOUNTED WOODSPLITTER
WARRANTY REGISTRATION FORM & INSPECTION REPORT
WARRANTY REGISTRATION (please print)
This form must be lled out by the dealer and signed by both the dealer and the customer at the time of delivery.
Customer’s Name Dealer Name
Address Address
City, State/Province, Code City, State/Province, Code
Phone Number ( ) Phone Number ( )
Contact Name
Model
Serial Number
Delivery Date
DEALER INSPECTION REPORT
____ Check that Cylinder Extends Freely
____ Fasteners Tight
____ Hydraulic Fittings Tight - No Leaks
SAFETY
____ All Decals Installed
____ Guards and Shields Installed
____ Review Operating and Safety Instructions
____ Hydraulic Lines Free and in Good Condition
____ Lubricate Machine
____ Frame Anchored to Face Plate
I have thoroughly instructed the buyer on the above described equipment which review included the Op-
erator’s Manual content, equipment care, adjustments, safe operation and applicable warranty policy.
Date Dealer’s Rep. Signature
The above equipment and Operator’s Manual have been received by me and I have been thoroughly
instructed as to care, adjustments, safe operation and applicable warranty policy.
Date Owner's Signature
WHITE
EMB MFG., INC
YELLOW
DEALER
PINK
CUSTOMER
Page 4
SERIAL NUMBER LOCATION
Always give your dealer the serial number of your Wallenstein Skid Steer Mounted Woodsplitter when
ordering parts or requesting service or other information.
The machine is equipped with a serial plate where indicated. Please mark the number in the space provided for easy reference.
WX410/430
WX440/450/460
WX470
SERIAL NUMBER LOCATION
Model Number ____________________________________________________
Serial Number ____________________________________________________
Page 5

TABLE OF CONTENTS
SECTION DESCRIPTION PAGE
1 Introduction ......................................................... 1
2 Safety ................................................................... 2
2.1 General Safety ..................................................... 3
2.2 Equipment Safety Guidelines .............................. 4
2.3 Safety Training ..................................................... 5
2.4 Safety Signs .........................................................
2.5 Preparation .......................................................... 6
2.6 Operating Safety .................................................. 7
2.7 Transport Safety .................................................. 8
2.8 Maintenance Safety ............................................. 8
2.9 Hydraulic Safety ...................................................
2.10 Storage Safety .....................................................
2.11 Employee Sign-Off Form ................................... 10
3 Safety Sign Locations ........................................ 11
4 Operation ........................................................... 13
4.1 To the New Operator or Owner .......................... 13
4.2 Machine Components ........................................ 14
4.3 Machine Break-In ............................................... 15
4.4 Pre-Operation Checklist ..................................... 15
4.5 Assembly ........................................................... 16
4.6 Equipment Matching .......................................... 18
4.7 Controls ............................................................. 19
4.8 Attaching / Unhooking ........................................ 20
4.9 Field Operation .................................................. 24
4.10 Transporting ....................................................... 30
4.11 Storage Safety ................................................... 31
5 Service and Maintenance .................................. 33
5.1 Service ............................................................... 33
5.1.1 Fluids and Lubricants ......................................... 33
5.1.2 Greasing ............................................................ 33
5.1.3 Servicing Intervals .............................................34
5.1.4 Service Record .................................................. 35
6 Troubleshooting ................................................. 36
7 Specications ..................................................... 37
7.1 Mechanical ......................................................... 37
7.2 Hydraulic Fitting Torque ..................................... 37
7.3 Bolt Torque ......................................................... 38
8 Index .................................................................. 39
5
9
9
Page 6

1 INTRODUCTION
Congratulations on your choice of an Wallenstein Skid Steer Mounted Woodsplitter to compliment your
log splitting operation. This equipment has been designed and manufactured to meet the needs of a
discriminating buyer for the efcient splitting of wood.
Safe, efcient and trouble free operation of your Wallenstein Woodsplitter requires that you and anyone
else who will be operating or maintaining the machine, read and understand the Safety, Operation, Maintenance and Trouble Shooting information contained within the Operator's Manual.
WX470 Horizontal
WX410/430
WX440/450/460
WX470 Vertical
This manual covers the Model WX410, WX430, WX440, WX450, WX460 AND WX470 Skid Steer Mounted Woodsplitter manufactured by Wallenstein. Use the Table of Contents or Index as a guide to locate
required information.
Keep this manual handy for frequent reference and to pass on to new operators or owners. Call your
Wallenstein dealer or the Distributer if you need assistance, information or additional copies of the manuals.
OPERATOR ORIENTATION - The directions left, right, front and rear, as mentioned throughout this
manual, are determined when sitting in the operator's seat and facing toward the splitter.
1
Page 7

2 SAFETY
SAFETY ALERT SYMBOL
This Safety Alert symbol means
ATTENTION! BECOME ALERT!
YOUR SAFETY IS INVOLVED!
Why is SAFETY important to you?
3 Big Reasons
SIGNAL WORDS:
Note the use of the signal words DANGER,
WARNING and CAUTION with the safety
messages. The appropriate signal word for
each message has been selected using the
following guide-lines:
The Safety Alert symbol identies
important safety messages on the
Wallenstein Skid Steer Mounted
Woodsplitter and in the manual.
When you see this symbol, be alert
to the possibility of personal injury or
death. Follow the instructions in the
safety message.
Accidents Disable and Kill
Accidents Cost
Accidents Can Be Avoided
DANGER - Indicates an imminently hazardous
situation that, if not avoided, will
result in death or serious injury. This
signal word is to be limited to the
most extreme situations typically for
machine components which, for functional purposes, cannot be guarded.
WARNING - Indicates a potentially hazardous
situation that, if not avoided, could
result in death or serious injury, and
includes hazards that are exposed
when guards are removed. It may
also be used to alert against unsafe
practices.
CAUTION - Indicates a potentially hazardous
situation that, if not avoided, may
result in minor or moderate injury. It
may also be used to alert against
unsafe practices.
If you have any questions not answered in this manual or require additional copies or the manual is damaged, please contact your dealer or Wallenstein, 4144 Boomer Line, St. Clements, ON, N0B 2M0. Phone
(519) 669-9283 or Fax (519) 699-4146.
2
Page 8

SAFETY
2.1 GENERAL SAFETY
YOU are responsible for the SAFE operation
and maintenance of your Wallenstein Skid Steer
Mounted Woodsplitter. YOU must ensure that you
and anyone else who is going to use, maintain or
work around the Woodsplitter be familiar with the
using and maintenance procedures and related
SAFETY information contained in this manual.
This manual will take you step-by-step through
your working day and alerts you to all good safety
practices that should be used while using the
Woodsplitter.
Remember, YOU are the key to safety. Good
safety practices not only protect you but also the
people around you. Make these practices a working part of your safety program. Be certain that
EVERYONE using this equipment is familiar with
the recommended using and maintenance proce-
dures and follows all the safety precautions. Most
accidents can be prevented. Do not risk injury or
death by ignoring good safety practices.
• Skid Steer Mounted Woodsplitter owners
must give operating instructions to operators
or employees before allowing them to operate
the machine, and at least annually thereafter.
• The most important safety device on this
equipment is a SAFE operator. It is the op-
erator’s responsibility to read and understand
ALL Safety and Operating instructions in the
manual and to follow these. Most accidents
can be avoided.
1. Read and understand the
Operator’s Manual and all
safety signs before operating, maintaining, adjusting or
servicing the Woodsplitter.
2. Have a rst-aid kit available
for use should the need
arise and know how to use
it.
3. Have a re extinguisher
available for use should the
need arise and know how to
use it.
4. Do not allow riders.
5. Wear appropriate
protective gear. This
list includes but is not
limited to:
- A hard hat
- Protective
shoes with slip
resistant soles
- Protective glasses,
goggles or face shield
- Heavy gloves
- Wet weather gear
- Hearing Protection
- Respirator or lter mask
• A person who has not read and understood all
using and safety instructions is not qualied
to use the machine. An untrained operator
exposes himself and bystanders to possible
serious injury or death.
• Do not modify the equipment in any way.
Unauthorized modication may impair the
function and/or safety and could affect the life
of the equipment.
• Think SAFETY! Work SAFELY!
6. Install and secure all guards
before starting.
7. Wear suitable ear protection
for prolonged exposure to
excessive noise.
8. Lower splitter frame, place
all controls in neutral, stop engine, remove
ignition key and wait for all moving parts to
stop before servicing, adjusting, repairing or
maintaining.
9. Clear the area of people, especially small
children, before using the unit.
10. Review safety related items annually.
3
Page 9

2.2 EQUIPMENT SAFETY GUIDELINES
1. Safety of the operator and bystanders is one
of the main concerns in designing and de-
veloping equipment. However, every year
many accidents occur which could have been
avoided by a few seconds of thought and a
more careful approach to handling equipment.
You, the operator, can avoid many accidents
by observing the following precautions in this
section. To avoid personal injury or death,
study the following precautions and insist
those working with you, or for you, follow
them.
2. In order to provide a better view, certain
photographs or illustrations in this manual
may show an assembly with a safety shield
removed. However, equipment should never
be used in this condition. Keep all shields in
place. If shield removal becomes necessary
for repairs, replace the shield prior to use.
3. Replace any safety sign or instruction sign
that is not readable or is missing. Location of
such safety signs is indicated in this manual.
4. Never use alcoholic beverages or drugs which
can hinder alertness or coordination while us-
ing this equipment. Consult your doctor about
using this machine while taking prescription
medications.
7. Never exceed the limits of a piece of machinery. If its ability to do a job, or to do so safely,
is in question - DON'T TRY IT.
8. Do not modify the equipment in any way. Unauthorized modication may result in serious
injury or death and may impair the function
and life of the equipment.
9. Use a Skid Steer that is equipped with a Roll
Over Protective Structure (ROPS) and a seat
belt.
10. In addition to the design and conguration of
this implement, including Safety Signs and
Safety Equipment, hazard control and accident prevention are dependent upon the
awareness, concern, prudence, and proper
training of personnel involved in the operation,
transport, maintenance, and storage of the
machine. Refer also to Safety Messages and
operation instruction in each of the appropriate sections of the engine and machine manu-
als. Pay close attention to the Safety Signs
afxed to the skid steer and the machine.
5. Under no circumstances should young
children be allowed to work with this
equipment. Do not allow persons to use or
assemble this unit until they have read this
manual and have developed a thorough
understanding of the safety precautions
and of how it works. Review the safety
instructions with all users annually.
6. This equipment is dangerous to children and
persons unfamiliar with its operation. The
operator should be a responsible, properly
trained and physically able person familiar
with machinery and trained in this equipment's
operations. If the elderly are assisting with
work, their physical limitations need to be
recognized and accommodated.
4
Page 10

2.3 SAFETY TRAINING
2.4 SAFETY SIGNS
1. Safety is a primary concern in the design and
manufacture of our products. Unfortunately,
our efforts to provide safe equipment can
be wiped out by a single careless act of an
operator or bystander.
2. In addition to the design and conguration of
equipment, hazard control and accident pre-
vention are dependent upon the awareness,
concern, prudence and proper training of
personnel involved in the operation, transport,
maintenance and storage of this equipment.
3. It has been said, "The
best safety feature is an
informed, careful operator." We ask you to be that
kind of an operator. It is the
operator's responsibility to read and understand ALL Safety and Using instructions in the
manual and to follow these. Accidents can be
avoided.
4. Working with unfamiliar equipment can
lead to careless injuries. Read this manual
before assembly or using, to acquaint
yourself with the machine. If this machine
is used by any person other than yourself,
or is loaned or rented, it is the machine
owner's responsibility to make certain that
the operator, prior to using:
1. Keep safety signs clean and legible at all
times.
2. Replace safety signs that are missing or have
become illegible.
3. Replaced parts that displayed a safety sign
should also display the current sign.
4. Safety signs displayed in Section 3 each have
a part number in the lower right hand corner.
Use this part number when ordering replace-
ment parts.
5. Safety signs are available from your author-
ized Distributor or Dealer Parts Department or
the factory.
How to Install Safety Signs:
• Be sure that the installation area is clean and
dry.
• Be sure temperature is above 50°F (10°C).
• Determine exact position before you remove
the backing paper.
• Remove the smallest portion of the split backing paper.
a. Reads and understands the operator's
manuals.
b. Is instructed in safe and proper use.
5. Know your controls and how to stop power
unit engine and machine quickly in an emergency. Read this manual and the one pro-
vided with your skid steer.
6. Train all new personnel and review instructions frequently with existing workers. Be
certain only a properly trained and physically
able person will use the machinery. A person
who has not read and understood all using
and safety instructions is not qualied to use
the machine. An untrained operator exposes
himself and bystanders to possible serious in-
jury or death. If the elderly are assisting with
the work, their physical limitations need to be
recognized and accommodated.
• Align the sign over the specied area and
carefully press the small portion with the ex-
posed sticky backing in place.
• Slowly peel back the remaining paper and
carefully smooth the remaining portion of the
sign in place.
• Small air pockets can be pierced with a pin
and smoothed out using the piece of sign
backing paper.
5
Page 11

2.5 PREPARATION
1. Never use the engine and machine until you
have read and completely understand this
manual, the Skid steer Operator's Manual and
each of the Safety Messages found on the
safety signs on the skid steer and machine.
2. Personal protection equipment including
hard hat, safety
glasses, safety
shoes, and
gloves are recommended during assembly,
installation, operation, adjustment, maintaining, repairing, removal, cleaning, or moving
the unit. Do not allow long hair, loose tting
clothing or jewelery to be around equipment.
3. PROLONGED EXPOSURE
TO LOUD NOISE MAY
CAUSE PERMANENT
HEARING LOSS!
Power equipment with or
without equipment attached
can often be noisy enough
to cause permanent, partial
hearing loss. We recommend that you wear
hearing protection on a full-time basis if the
noise in the Operator's position exceeds 80db.
Noise over 85db on a long-term basis can
cause severe hearing loss. Noise over 90db
adjacent to the Operator over a long-term basis may cause permanent, total hearing loss.
NOTE: Hearing loss from loud noise (from
tractors, chain saws, radios, and other such
sources close to the ear) is cumulative over a
lifetime without hope of natural recovery.
4. Operate the machine only
with a skid steer equipped
with an approved RollOver-Protective Structure
(ROPS). Always wear
your seat belt when oper-
ating the skid steer. Serious injury or even death
could result from falling off
the skid steer - - particularly during a turnover
when the operator could be pinned under the
ROPS or the skid steer.
5. Review maps of underground utilities before
starting to dig. Remove all sticks, stones,
roots, and wires from working area before
starting. Take care not to contact overhead
and underground obstructions during operation.
6. Operate only in daylight or good articial light.
7. Be sure machine is properly mounted, adjusted and in good operating condition.
8. Ensure that all safety shielding and safety
signs are properly installed and in good condition.
6
Page 12

2.6
OPERATING SAFETY
1. Please remember it is important that you read
and heed the safety signs on the Woodsplitter.
Clean or replace all safety signs if they cannot be clearly read and understood. They are
there for your safety, as well as the safety of
others. The safe use of this machine is strictly
up to you, the operator.
2. All things with moving parts are potentially
hazardous. There is no substitute for a cau-
tious, safe-minded operator who recognizes
potential hazards and follows reasonable
safety practices. The manufacturer has
designed this Woodsplitter to be used with
all its safety equipment properly attached,
to minimize the chance of accidents. Study
this manual to make sure you have all safety
equipment attached.
3. If a safety shield or guard is removed for any
reason, it must be replaced before the machine is again operated.
4. Always lock face plate to front of loader when
attaching to prevent movement during operation.
12. Do not try to split logs across the grain. Some
kinds can burst or splinter and y out of ma-
chine causing injury.
13. For uneven cut logs, always place the wide
end down and the most square kind against
the splitting wedge.
14. Never carry, lift or move people on loader or
frame.
15. Always use two people to handle heavy, unwieldy components during assembly, installa-
tion, removal or moving.
16. Never place any part of your body where it
would be in danger if movement should occur
during assembly, installation, operation, maintaining, repairing, removal or moving.
17. Do not walk or work under a raised machine
or attachment unless it is securely blocked or
held in position. Do not depend on the skid
steer hydraulic system to hold the machine or
attachment in place.
5. Clear the work area of objects which might be
picked up and snagged or entangled in the
machine. Do not operate on slippery, wet,
muddy or icy surfaces. Good footing prevents
slipping and tripping.
6. Do not allow bystanders within 20 feet of
machine during operation. Wood chips can y
out and injure others.
7. Do not step over or straddle splitter during
operation.
8. Do not try to split more than one log at a time.
The extra log can y out and cause injury.
9. Keep your ngers and hands away from
cracks in the log that can open while splitting.
10. Always load logs by holding on the sides, not
the top and bottom.
11. Do not load the splitter when the wedge is in
motion.
18. Never use alcoholic beverages or drugs which
can hinder alertness or coordination while
operating this equipment. Consult your doc-
tor about operating this machine while taking
prescription medications.
19. Do not allow riders on this machine at any
time. There is no safe place for any riders.
20. Before you operate the machine, check over
all hydraulic lines, hoses, connections and
components. Replace any worn or damaged
parts immediately. Tighten all leaking ttings.
21. Never allow children to operate or be around
this machine.
22. Do not operate on slopes or hillsides. Sloping
terrain can cause logs to roll or slip.
23. Keep hands, feet, hair, jewelry, and clothing
away from all moving and/or rotating parts.
24. Review safety instructions annually.
7
Page 13

2.7 TRANSPORT SAFETY
2.8 MAINTENANCE SAFETY
1. Comply with state and local laws governing
safety and transporting of machinery on public
roads.
2. The use of ashing amber lights is acceptable in most localities. However some localities prohibit their use. Local laws should be
checked for all highway lighting and marking
requirements.
3. At all times, when driving the tractor and
equipment on the road or highway under
20 mph (32 kph) use ashing amber warning lights and a slow moving vehicle (SMV)
identication emblem. Do not exceed 20 mph
(32 kph). Reduce speed on rough roads and
surfaces.
4. Do not drink and drive.
5. Be a safe and courteous driver. Always yield
to oncoming trafc in all situations, including
narrow bridges, intersections, etc. Watch for
trafc when operating near or crossing roadways.
1. Good maintenance is your responsibility. Poor
maintenance is an invitation to trouble.
2. Follow good shop practices.
- Keep service
area clean and
dry.
- Be sure electrical
outlets and tools
are properly
grounded.
- Use adequate
light for the job at
hand.
3. Make sure there is
plenty of ventilation. Never operate the tractor
in a closed building. The exhaust fumes may
cause asphyxiation.
4. Before working on this machine, lower the
boom / bucket to the ground, place all controls
in neutral, shut off the engine, set the park
brake and remove the ignition key.
6. Turn into curves or go up or down hills only
at a low speed and a gradual steering angle.
Slow down on rough or uneven ground.
7. Never allow riders on either skid steer or ma-
chine.
5. Never work under equipment unless it is
blocked securely.
6. Use personal protection devices such as eye,
hand and hearing protectors, when performing
any service or maintenance work.
7. Where replacement parts are necessary for
periodic maintenance and servicing, genuine
factory replacement parts must be used to
restore your equipment to original specications. The manufacturer will not be responsi-
ble for injuries or
damages caused
by use of unapproved parts and/
or accessories.
8. A re extinguisher
and rst aid kit
should be kept readily accessible while per-
forming maintenance on this equipment.
9. Periodically tighten all bolts, nuts and screws
and check that all fasteners are properly
torqued.
10. When completing a maintenance or service
function, make sure all safety shields and
devices are installed before placing unit in
service.
8
Page 14

2.9 HYDRAULIC SAFETY
2.10 STORAGE SAFETY
1. Make sure that all the components in the hydraulic system are kept in good condition and
are clean.
2. Before applying pressure to the system, make
sure all components are tight, and that lines,
hoses and couplings are not damaged.
3. Do not attempt any makeshift repairs to the
hydraulic lines, ttings or hoses by using
tapes, clamps or cements. The hydraulic system operates under extremely high pressure.
Such repairs will fail suddenly and create a
hazardous and unsafe condition.
4. Wear proper hand and eye
protection when searching
for a high pressure hydraulic leak. Use a piece
of wood or cardboard as a
backstop instead of hands
to isolate and identify a
leak.
1. Store the unit in an area away from human
activity.
2. Do not allow children to play on or around the
stored machine.
3. Store the unit in a dry, level area. Support the
frame with planks if required.
5. If injured by a concentrated high-pressure
stream of hydraulic uid, seek medical attention immediately. Serious infection or toxic
reaction can develop from hydraulic uid
piercing the skin surface.
6. Relieve pressure on hydraulic system before
maintaining or working on system.
9
Page 15

2.11 SIGN-OFF FORM
Wallenstein follows the general Safety Standards specied by the American Society of Agricultural and
Biological Engineers (ASABE) and the Occupational Safety and Health Administration (OSHA). Anyone who
will be using and/or maintaining the Woodsplitter must read and clearly understand ALL Safety, Usage and
Maintenance information presented in this manual.
Do not use or allow anyone else to use this Woodsplitter until such information has been reviewed. Annually
review this information before the season start-up.
Make these periodic reviews of SAFETY and OPERATION a standard practice for all of your equipment. We
feel that an untrained operator is unqualied to use this machine.
A sign-off sheet is provided for your record keeping to show that all personnel who will be working with the
equipment have read and understand the information in the Operator’s Manual and have been instructed in
the operation of the equipment.
SIGN-OFF FORM
DATE
EMPLOYEES SIGNATURE EMPLOYERS SIGNATURE
10
Page 16

3 SAFETY SIGN LOCATIONS
The types of safety signs and locations on the equipment are shown in the illustrations that follow. Good
safety requires that you familiarize yourself with the various safety signs, the type of warning and the
area, or particular function related to that area, that requires your SAFETY AWARENESS.
• Think SAFETY! Work SAFELY!
REMEMBER - If safety signs have been damaged, removed, become illegible or parts replaced without
safety signs, new signs must be applied. New safety signs are available from your authorized dealer.
11
Page 17

A
B
Z94040
#Z94036
12
Page 18

4 OPERATION
OPERATING SAFETY
• Read and understand the Operator’s Manual and all safety signs before operating,
servicing, adjusting, repairing or unplugging.
• Do not allow riders.
• Install and secure all guards and shields
before starting or operating.
• Keep hands, feet, hair and clothing away
from moving parts.
• Place all controls in neutral, stop tractor
engine, set park brake, remove ignition key
and wait for all moving parts to stop before
servicing, adjusting, repairing or unplugging.
• Place all tractor and machine controls in
neutral before starting.
• Always wear the appropriate personal
safety equipment when operating splitter
including but not limited to hard hat, safety
shoes, face shield and heavy gloves.
4.1 TO THE NEW OPERATOR
OR OWNER
The Wallenstein Skid Steer Mounted Woodsplitter is
designed to split any kind of wood or log. Be familiar
with the machine before starting.
In addition to the design and conguration of
equipment, hazard control and accident prevention are dependent upon the awareness,
concern, prudence and proper training of personnel involved in the operation, transport,
maintenance and storage of equipment. It is
the responsibility of the owner or operator to
read this manual and to train all other operators
before they start working with the machine.
It is the responsibility of the owner or operator
to read this manual and to train all other operators before they start working with the machine.
Follow all safety instructions exactly. Safety is
everyone's business. By following recommended procedures, a safe working environment is
provided for the operator, bystanders and the
area around the work site. Untrained operators
are not qualied to operate the machine.
• Clear the area of bystanders, especially
small children, before starting.
• Do not operate on slopes or sidehills.
• Keep working area clean, neat and dry to
prevent slipping and tripping.
• Keep all mechanical and hydraulic components in good condition. Do not operate
with leaks or damaged components.
• Load splitter by holding logs on the side
rather than the top and bottom.
• Do not split wood across the grain.
• Review safety instructions with all operators
annually.
Many features incorporated into this machine are
the result of suggestions made by customers like
you. Read this manual carefully to learn how to operate the machine safely and how to set it to provide
maximum eld efciency. By following the operating
instructions in conjunction with a good maintenance
program, your Woodsplitter will provide many years
of trouble-free service.
13
Page 19

4.2 MACHINE COMPONENTS
The Wallenstein Skid Steer Woodsplitter consists
of a wedge on the end of a hydraulic cylinder for
splitting wood or logs. The remote on the skid
steer is used to provide pressurized oil to the
valve and cylinder to split the wood or log. The
WX470 Splitter can be used in vertical or horizon-
tal conguration.
Fig. 1 MACHINE COMPONENTS
A Mounting Frame
B Splitter Frame
C Control Valve
D Control Lever
E Hydraulic Cylinder
F Wedge
G Frame Latch
H Vertical Conguration
J Horizontal Conguration
K Log
L 4 Segment Wedge (optional)
14
Page 20

4.3 MACHINE BREAK-IN
4.4 PRE-OPERATION CHECKLIST
Although there are no operational restrictions on
the Woodsplitter when used for the rst time, it is
recommended that the following mechanical items
be checked:
A. After operating for 1 and 5 hours:
1. Check all nuts, bolts and other fasteners.
Tighten to their specied torque.
2. Check the condition of all hydraulic lines,
hoses and ttings. Replace any that are
damaged. Re-route those that are rubbing, pinched or crimped. Tighten any
tting that is leaking.
3. Check for entangled material. Remove all
entangled material before resuming work.
4. Check the oil level in the hydraulic reservoir in the skid steer. Add as required.
Efcient and safe operation of the Woodsplitter
requires that each operator reads and understands the operating procedures and all related
safety precautions outlined in this section. A
pre-operation checklist is provided for the operator. It is important for both the personal safety and
maintaining good mechanical condition that this
checklist is followed.
Before operating the machine and each time
thereafter, the following areas should be checked
off:
1. Lubricate the machine per the schedule outline in Section 5 Service and Maintenance.
2. Use only a skid steer of adequate power and
weight to operate the machine.
3. Check that the machine is properly attached
to the skid steer. Be sure the lock pins on the
loader face plate are fully engaged to secure
the Woodsplitter to the loader.
4. Check the oil in the reservoir of the skid steer.
Add as required.
5. Check the condition of all hydraulic lines,
hoses and ttings. Replace any that are
damaged. Re-route those that are rubbing,
pinched or crimped. Tighten any tting that is
leaking.
6. Check all parts for entangled material. Remove entangled material.
7. Install and secure all guards, doors and covers before starting.
8. Review the "controls" section in the skid steer
operator's manual to be familiar with the
control settings and functions before operating
machine.
15
Page 21

4.5 ASSEMBLY
The machine is shipped from the factory in a partially
disassembled conguration and attached to a pallet
that provides easy moving and handling. Always
use tools, equipment and fork lifts of appropriate size
and capacity for the job. Always use 2 men when
lifting, moving and assembling the machine.
When the machine is shipped, follow this procedure when preparing for the customer:
1. Clear the area of bystanders, especially small
children.
2. Remove the pallet tie-downs.
3. Use a forklift to lift the pallet/machine from the
truck. Carry the load close to the ground as it is
moved to the assembly area and positioned.
4. Remove the machine from the pallet.
5. Install the control lever:
a. Remove the package of control compo-
nents from the frame and lay out.
b. Attach the lever to the control plunger and
install the pin and anchor.
c. Raise the lever into its vertical position and
install the last anchor pin and retainer.
Fig. 2 LAY OUT
Lever
16
IMPORTANT
Be sure to spread the ends
of the cotter pins retainers.
Retainers
Fig. 3 CONTROL LEVER INSTALLED (Typical)
Page 22

6. Mount or install the 4 way blade:
A slip-on or bolt-on version is available depend-
ing on the model. Use the slip-on for all models
except the WX540 and WX980 models.
a. Slide the 4 blade assembly on over the
single blade.
b. For the bolt-on style:
• Remove the mounting bracket and
hardware.
• Place the 4 blade assembly over the
single blade.
• Mount the U bolt bracket around the
cylinder ram.
Fig. 4 SLIP-ON (Typical)
• Tighten fasteners until the locking nylon
grips securely or until the thread of the
U-bolt protrudes through nut 1/8 inch.
NOTE
It should never get tight. It
is only used as a safety and
needs room to oat.
Lay-Out
Mounted
Fig. 5 BOLT-ON
Splitting
17
Page 23
4.6 EQUIPMENT MATCHING
To insure the safe and reliable operation of the
Woodsplitter, it is necessary to use a skid steer
with the correct specications. Use the following
list as a guide in selecting a skid steer to use on
the machine.
1. Horsepower:
Although horsepower is not required to op
erate the woodsplitter, it does establish the
total weight for machine stability. Do not exceed the woodsplitter power specications.
2. Tractor Weight:
By following the recommendations for the
skid steer power, the skid steer will have
sufcient weight to provide stability for the
unit when splitting or transporting.
3. Hydraulic System:
The skid steer hydraulic system must be
capable of 10 - 16 gpm (38 - 61 lpm) at 3000
psi (20,700 kPa).
Table 1: Model vs. Skid Steer HP
Model Recommended
Skid Steer Horsepower
WX410 40 - 90
-
WX430 40 - 90
WX440 40 - 90
WX450 40 - 90
WX460 40 - 90
WX470 40 - 90
18
Fig. 6 HYDRAULIC OUTLETS (typical)
Page 24

4.7 CONTROLS
Before starting to work, all operators should familiarize themselves with the location and func-
tion of the controls.
1. Skid Steer Controls:
The Skid Steer provides hydraulic power to
the machine whenever it is used.
Always review the "controls" section of the
Skid Steer operator's manual to be familiar
with the location, settings and function of the
controls..
a. Use the hydraulic controls in the cab to
move the cylinder in and out when splitting with the WX410 inverted model. Direct the ow through the front outlets.
b. Place the remote hydraulic circuit in
detent to provide hydraulic power to the
control valve on all other model splitters.
Fig. 7 WX410
2. Splitter Hydraulic Control:
This 3-position spring-loaded-to-center-
neutral lever controls the ow of oil to the
cylinder. Move the lever toward the base
and hold for the cylinder ram to extend and
split the wood. Move the lever away from
the base and hold to retract the cylinder
ram. Release the lever and it will return to
its centered neutral position and the cylinder
ram will stop moving.
Horizontal
Vertical
Fig. 8 HYDRAULIC VALVE
19
Page 25

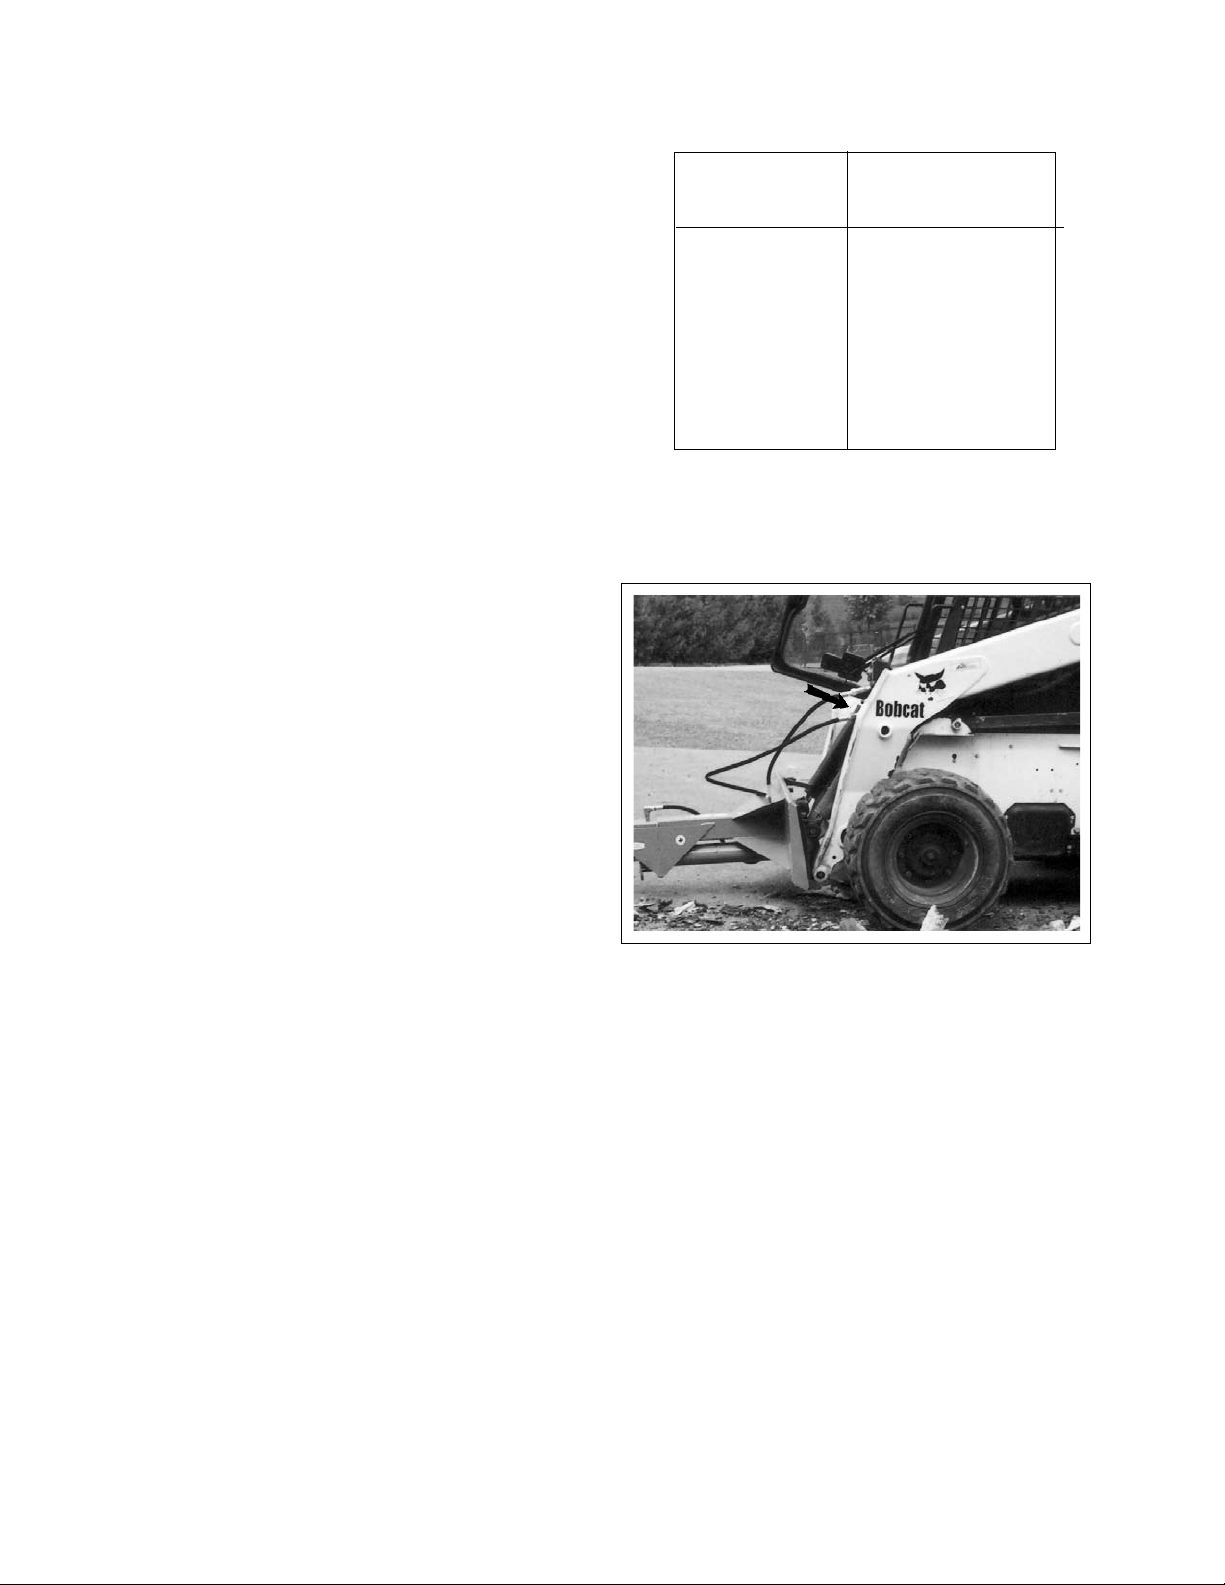
4.8 ATTACHING / UNHOOKING SKID STEER
The machine is shipped from the factory in a
basic, universal conguration that allows it to be
mounted to any model skid steer. However, the
skid steer must be equipped with a remote hy-
draulic outlet on the front of the cab frame.
The Woodsplitter should always be located on
a level, dry area that is free of debris and other
foreign objects. When attaching the Woodsplitter
to the skid steer, follow this procedure:
1. Make sure that all bystanders, especially
small children are clear of the work area.
2. Make sure there is enough room and clearance
to safely drive up to the splitter.
3. Drive up to the splitter while aligning the mounting components.
Fig. 9 MACHINE
Face Plate
20
Mating
Fig. 10 ALIGNING
Page 26

4. Secure the mounting:
a. Drive into the mounting frame.
b. Seat the top of the face plate into the frame
of the Woodsplitter.
c. Raise the loader and tilt the face plate until
it is fully mated.
5. Engage the lock pins to secure the Woodsplitter
to the loader.
Mated
Fig. 11 MOUNTING
Latched
21
Page 27

6. Connect the hydraulics:
NOTE
Clip the plastic ties securing
the hoses for shipping if this
is the rst time the splitter is
mounted.
a. Use a clean rag or paper towel to clean the
dirt from the couplers on the hose ends and
the skid steer.
b. Connect the hoses to the skid steer cou-
plers. Be sure the couplers are securely
seated.
c. Route and secure the hoses along the frame
with clips, tape or plastic ties to prevent binding and pinching. Be sure to provide slack
for tilting.
Hoses
Coupler
22
Connected
Fig. 12 HYDRAULICS
Page 28

7. Raise the loader and frame.
Fig. 13 MOUNTED
8. Reverse the above procedure when un
hooking.
9. Place planks or boards under the frame for
extra support if required.
-
23
Page 29

4.9 FIELD OPERATION
OPERATING SAFETY
• Read and understand the Operator’s Manual
and all safety signs before operating, servicing, adjusting, repairing or unplugging.
• Do not allow riders.
• Install and secure all guards and shields
before starting or operating.
• Keep hands, feet, hair and clothing away
from moving parts.
• Place all controls in neutral, stop tractor
engine, set park brake, remove ignition key
and wait for all moving parts to stop before
servicing, adjusting, repairing or unplugging.
• Place all tractor and machine controls in
neutral before starting.
• Always wear the appropriate personal safety
equipment when operating splitter including
but not limited to hard hat, safety shoes, face
shield and heavy gloves.
• Clear the area of bystanders, especially
small children, before starting.
• Do not operate on slopes or sidehills.
• Keep working area clean, neat and dry to
prevent slipping and tripping.
• Keep all mechanical and hydraulic components in good condition. Do not operate
with leaks or damaged components.
• Load splitter by holding logs on the side
rather than the top and bottom.
• Do not split wood across the grain.
• Review safety instructions with all operators
annually.
Follow this procedure when using the splitter:
1. Prepare the Skid Steer and splitter (refer to
section 4.7)
2. Attach splitter to the skid steer (refer to Section 4.8).
3. Review and follow the pre-operation check-
lists (refer to Section 4.4).
4. Review the location and function of all controls (refer to Section 4.5)
5. Review the work site and plan the project
before starting.
6. Transport the splitter to the worksite (refer to
Section 4.10).
24
Page 30

7. Lower the loader to move the splitter
closer to the ground.
8. Starting:
a. WX410 Model:
• Climb into cab and start engine
(refer to skid steer manual.).
• Engage the remote outlet hydraulic circuit.
• Increase engine speed to mid or
3/4 RPM.
• Use the controls in cab to move
the cylinder ram and splitting
wedge.
b. WX440, WX460 and WX470 Models:
• Climb into cab and start engine
(refer to skid steer manual.).
WX410
• Engage the remote outlet hydraulic circuit and place in detent.
• Set the skid steer controls to allow
for remote operation (refer to skid
steer manual for details.).
• Use the lever on the hydraulic
valve to move the cylinder ram
and wedge.
• Release the lever when the wood
or log splits into 2 pieces or the
wedge reaches the base and the
wedge will stop.
9. Emergency Stopping:
In case of an emergency, lower the frame
to the ground and stop engine (for the
WX410). For the WX440, WX460 and
WX470, climb into cab and stop engine.
Be sure to resolve and correct the emer-
gency situation before resuming work.
Do not take chances in an emergency.
WX470 Horizontal
WX470 Vertical
Fig. 14 STARTING/STOPPING
25
Page 31

10. Log Placement:
A. For the WX410 & WX430 Model:
a. Move the skid steer and position the
frame over wood or log.
b. Lower the frame to position the wood or
log.
c. Split the wood or log.
Positioning
B. For the WX440, WX450, WX460 and WX470
Models:
a. Always grasp the log by the sides when
placing in the splitter. This will minimize
the chance of the operator getting their
ngers or arm between the wedge and the
log.
b. Always wear the appropriate safety gear
when working around the machine. This
includes but is not limited to:
• Hard hat for protection to the head.
• Face mask for protection to the face and
eyes from ying chips.
• Heavy gloves for protection from slivers,
chips and pinching.
• Safety shoes with slip resistant soles
for protection to the feet and toes from
dropped logs and pieces of wood. Slip
resistant soles reduce the change of
slipping.
Splitting
Fig. 15 LOG PLACEMENT (WX410)
Horizontal
26
Vertical
Fig. 16 LOG PLACEMENT (WX470)
Page 32

11. Wedge Conguration:
All Woodsplitters come from the factory
equipped with a single blade wedge. An
optional 4 segment wedge is available that
ts over the single blade. A slip-on or bolt-
on version is available. It can be used at any
time with smaller logs or pieces of wood.
NOTE
The 4 segment wedge is NOT
available on the WX410 or
WX430.
Single
4-Way Slip-On (Typical)
Fig. 17 WEDGES
4-Way Bolt-On
27
Page 33

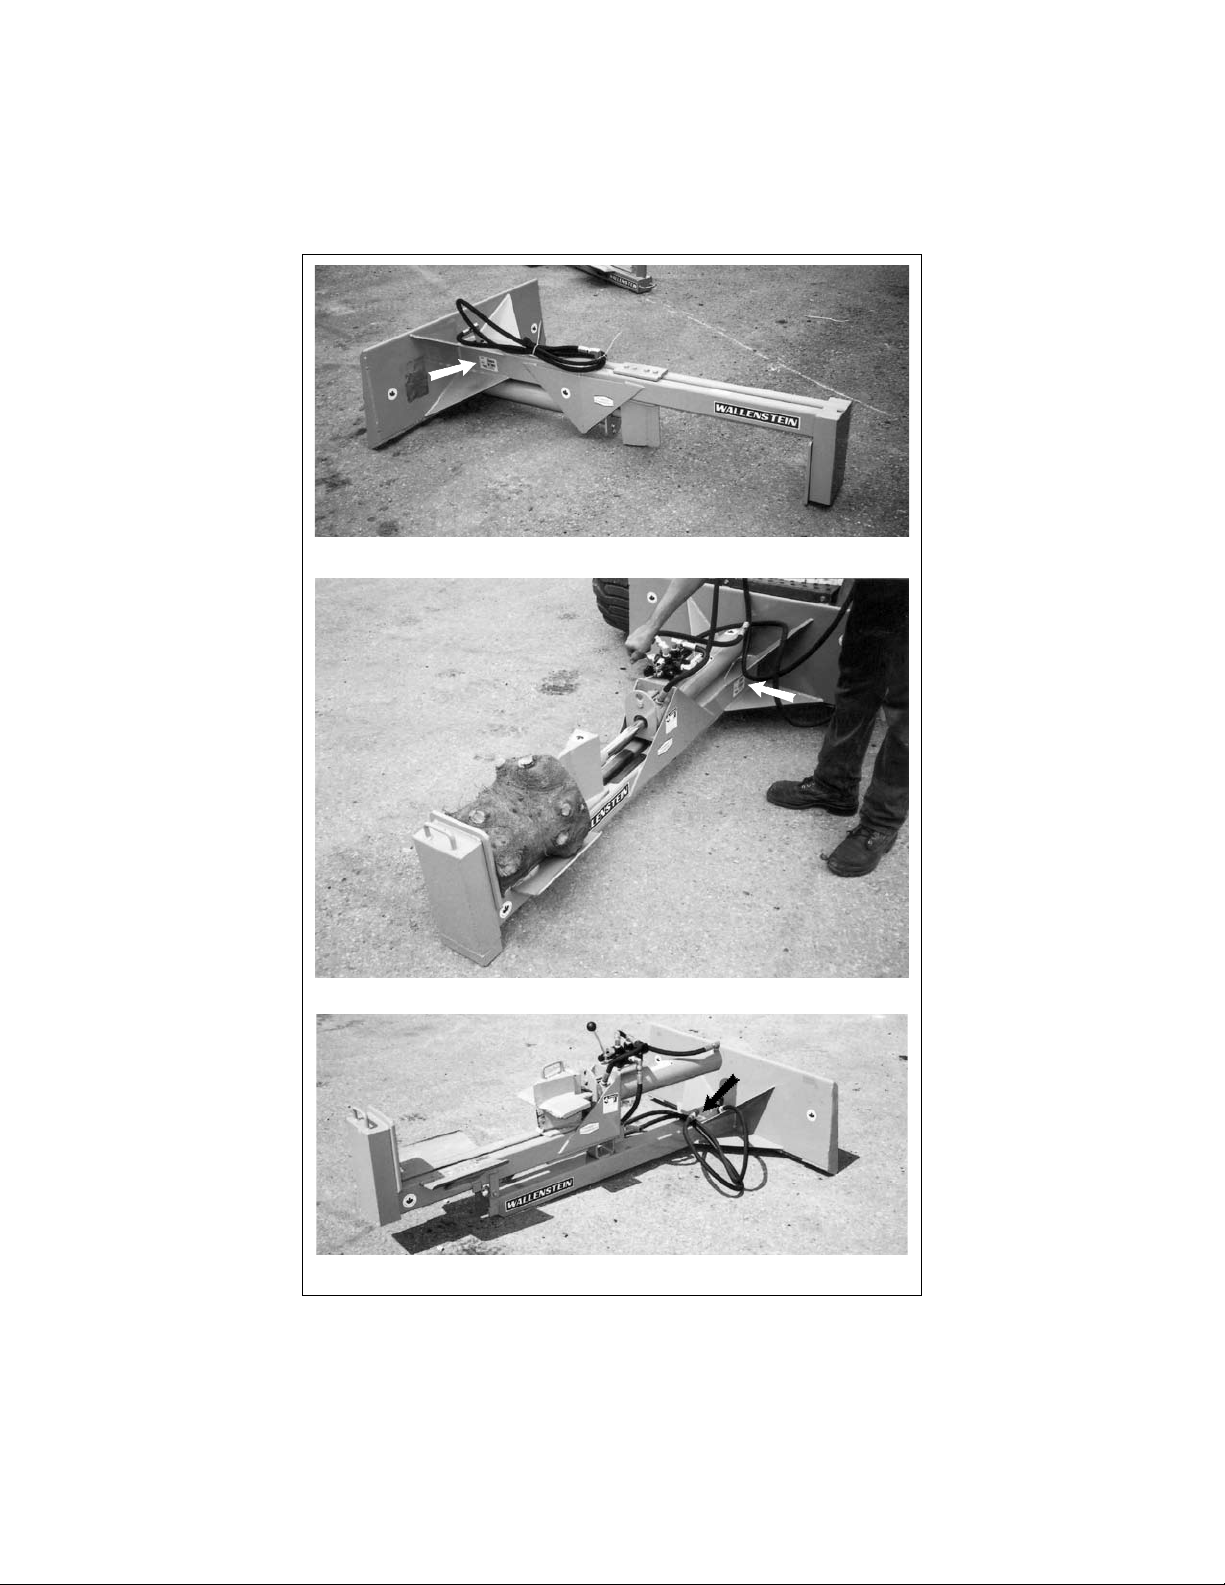
12. Horizontal to Vertical:
The WX470 Model is designed with a pivot-
ing latching main frame that allows it to be
used in the horizontal or vertical congura-
tion.
a. Raise the frame above the ground.
b. Release the frame lock bracket.
c. Release the frame anchor latch.
d. Move the frame into the vertical con-
guration.
e. Engage the frame lock bracket and
secure.
f. Lower frame and support base on the
ground.
Lock Bracket
Frame Latch
28
Vertical
Lock Bracket
Fig. 18 HORIZONTAL TO VERTICAL
Page 34

13. Operating Hints:
a. Hold the hydraulic lever in the
wedge extend direction until
the wedge reaches the base
or the log/wood splits. Move
it in the opposite direction to
retract the wedge.
b. Always keep the working
area neat and clean to pre-
vent tripping. Pile the split
and unsplit wood in piles
close to the working area. Do
not allow pieces to pile up and
clutter the area. A cluttered
working area can lead to tripping and an accident. Do not
take chances with safety.
c. Do not place the splitter on
muddy, icy, wet or cluttered
surfaces. Each can lead to
slipping or tripping and cause
accidents.
Horizontal
d. Lubricate the plate under the
wedge slider each time the
machine is used to improve
wear and reduce friction and/
or binding.
e. Secure the frame lock brack-
et before using the WX470 in
the vertical conguration.
Vertical
Fig. 19 WORK PLACE
Fig. 20 FRAME LOCK BRACKET
29
Page 35

4.10 TRANSPORTING
TRANSPORT SAFETY
• Comply with state and local laws governing safety and transporting of machinery on
public roads.
• The use of ashing amber lights is acceptable in most localities. However some
localities prohibit their use. Local laws
should be checked for all highway lighting
and marking requirements.
• At all times, when driving the tractor and
equipment on the road or highway under 20
mph (32 kph) use ashing amber warning
lights and a slow moving vehicle (SMV)
identication emblem. Do not exceed 20
mph (32 kph). Reduce speed on rough
roads and surfaces.
Wallenstein Woodsplitters are designed to be
easily and conveniently moved from work site
to work site. When transporting, follow this
procedure:
1. Be sure all bystanders are clear of the
machine.
• Do not drink and drive.
• Be a safe and courteous driver. Always
yield to oncoming trafc in all situations,
including narrow bridges, intersections,
etc. Watch for trafc when operating near
or crossing roadways.
• Turn into curves or go up or down hills
only at a low speed and a gradual steering angle. Slow down on rough or uneven
ground.
• Never allow riders on either skid steer or
machine.
2. Be sure that the machine is hitched positively to the skid steer and retainer latches
are engaged.
3. Keep to the right and yield the right-of-way
to allow faster trafc to pass. Drive on the
road shoulder, if permitted by law.
Fig. 21 TRANSPORT CONFIGURATION
4. Make sure the SMV (Slow Moving Vehicle) emblem and all lights and reectors
required by the local highway and transport
authorities are in place, are clean and can be
seen clearly by all overtaking and oncoming
trafc.
5. It is not recommended that the machine be
transported faster than 20 mph (32 kph).
6. Do not allow riders on the Woodsplitter or skid
steer.
7. During periods of limited visibility, use pilot vehicles and use extra lights on the machine.
8. Always use hazard ashers on the tractor when
transporting unless prohibited by law.
30
Page 36

4.11 STORAGE
STORAGE SAFETY
• Store the unit in an area away from human
activity.
• Do not permit children to play on or around
the stored machine.
• Store the unit in a dry, level area. Support the
frame with planks if required.
4.11.1 PLACING IN STORAGE
After the season's use, the machine should be thoroughly inspected and prepared for storage. Repair
or replace any worn or damaged components to
prevent any unnecessary down time at the start of
the next season. To ensure a long, trouble-free life,
this procedure should be followed when preparing
the unit for storage:
1. Clear the area of bystanders, especially small
children.
2. Thoroughly wash the machine using a pressure washer to remove all dirt, mud, debris and
residue.
3. Inspect the wedge, ram and frame for damage
or entangled material. Repair or replace damaged parts. Remove all entangled material.
4. Lubricate all grease ttings. Make sure all
grease cavities have been lled with grease to
remove any water residue from washing.
5. Touch up all paint nicks and scratches to prevent
rusting.
6. Move to storage area.
7. Select an area that is dry, level and free of debris.
8. Place blocks or planks under the frame if required.
9. Unhook from skid steer (See Section 4.8).
WX410/430
WX440/450/460
Fig. 22 STORED (Typical)
12. Store the machine in an area away from human
activity.
10. Apply a coat of heavy grease to exposed cylinder rams to prevent rusting.
11. If the machine cannot be placed inside, cover
with a waterproof tarpaulin and tie securely in
place.
13. Do not allow children to play on or around the
stored machine.
31
Page 37

4.11.2 REMOVING FROM STORAGE
When removing from storage and preparing to use, fol-
low this procedure:
1. Clear the area of bystanders, especially small children and remove foreign objects from the machine
and work area.
2. Attach the skid steer to the splitter by following the
procedure in Section 4.8.
3. Check
a. All hardware. Tighten as required.
b. All hydraulic lines, ttings and connections.
Tighten as required.
4. Lubricate all grease ttings.
5. Remove grease from cylinder rams.
6. Replace any defective parts.
7. Go through the pre-operation checklist (section 4.4)
before using.
32
Page 38

5 SERVICE AND MAINTENANCE
MAINTENANCE SAFETY
5.1 SERVICE
5.1.1 FLUIDS AND LUBRICANTS
• Good maintenance is your responsibility.
Poor maintenance is an invitation to trouble.
• Follow good shop practices.
- Keep service area clean and dry.
- Be sure electrical outlets and tools are
properly grounded.
- Use adequate light for the job at hand.
• Make sure there is plenty of ventilation. Nev-
er operate the engine of the towing vehicle in
a closed building. The exhaust fumes may
cause asphyxiation.
• Before working on this machine, shut off the
engine, set the brake, and turn fuel valve
off.
• Never work under equipment unless it is
blocked securely.
• Always use personal protection devices
such as eye, hand and hearing protectors,
when performing any service or maintenance work. Use heavy gloves when
handling sharp components.
• Where replacement parts are necessary
for periodic maintenance and servicing,
genuine factory replacement parts must be
used to restore your equipment to original
specications. The manufacturer will not be
responsible for injuries or damages caused
by use of unapproved parts and/or accessories.
1. Grease:
Use an SAE multipurpose high temperature
grease with extreme pressure (EP) performance. Also acceptable is an SAE multipurpose lithium base grease.
2. Your machine can operate at top efciency
only if clean lubricants are used. Use clean
containers to handle all lubricants. Store
them in an area protected from dust, moisture
and other contaminants.
5.1.2 GREASING
Use the Maintenance Checklist provided to keep a
record of all scheduled maintenance.
1. Use a hand-held grease gun for all greasing.
2. Wipe grease tting with a clean cloth before
greasing, to avoid injecting dirt and grit.
3. Replace and repair broken ttings immediately.
4. If ttings will not take grease, remove and
clean thoroughly. Also clean lubricant pas-
sageway. Replace ttings if necessary.
• A re extinguisher and rst aid kit should
be kept readily accessible while performing
maintenance on this equipment.
• Periodically tighten all bolts, nuts and
screws and check that all electrical and fuel
connections are properly secured to ensure
unit is in a safe condition.
• When completing a maintenance or service
function, make sure all safety shields and devices are installed before placing unit in service.
33
Page 39

5.1.3 SERVICING INTERVALS
The period recommended is based on normal
operating conditions. Severe or unusual conditions may require more frequent lubrication or oil
changes.
100 Hours or Monthly
1. Grease the frame slide.
WX440
WX470
Fig. 23 FRAME SLIDE
Annually
1. Wash and clean machine.
WX410
WX440
34
WX470
Fig. 24 MACHINE
Page 40

5.1.4 SERVICE RECORD
See Lubrication and Maintenance sections for details of service. Copy this page to continue record.
ACTION CODE CL CLEAN G GREASE
HOURS
SERVICED
BY
MAINTENANCE
100 Hours or Monthly
G Frame Slide
Annually
CL Machine
35
Page 41

6 TROUBLE SHOOTING
The Wallenstein Woodsplitter is designed to t on the front of a skid steer loader and is used to split wood
or logs. It is a simple and reliable system that requires minimal maintenance.
In the following section, we have listed many of the problems, causes and solutions to the problems that
you may encounter.
If you encounter a problem that is difcult to solve, even after having read through this trouble shooting
section, please call your local distributor or dealer. Before you call, please have this Operator's Manual
from your unit and serial number ready.
PROBLEM CAUSE SOLUTION
Wedge moves slowly. Pump worn out. Replace pump.
Low oil ow. Increase engine RPM.
Low oil level. Check oil level. Add as
required.
Wedge doesn't move. Wood jammed around Remove wood.
wedge.
Low oil level. Check oil level. Add as
required.
Wedge jumps. Wedge frame jamming. Lubricate wedge frame wear
plate.
36
Page 42

7 SPECIFICATIONS
7.1 MECHANICAL
Fig. 25 MECHANICAL SPECIFICATIONS
7.1 HYDRAULIC FITTING TORQUE
Tightening Flare Type Tube Fittings
1. Check are and are seat for defects
that might cause leakage.
2. Align tube with tting before tightening.
3. Lubricate connection and hand
tighten swivel nut until snug.
4. To prevent twisting the tube(s), use
two wrenches. Place one wrench
on the connector body and with the
second tighten the swivel nut to the
torque shown.
• The torque values shown are based
on lubricated connections as in
reassembly.
*
Tube Nut Size Torque Recommened
Size Across Value• Turns To Tighten
OD Flats (After Finger
Tightening)
(in.) (in.) (N.m) (lb-ft) (Flats) (Turn)
3/16 7/16 8 6 1 1/6
1/4 9/16 12 9 1 1/6
5/16 5/8 16 12 1 1/6
3/8 11/16 24 18 1 1/6
1/2 7/8 46 34 1 1/6
5/8 1 62 46 1 1/6
3/4 1-1/4 102 75 3/4 1/8
7/8 1-3/8 122 90 3/4 1/8
SPECIFICATIONS SUBJECT TO CHANGE WITHOUT NOTICE
37
Page 43

7.3 BOLT TORQUE
CHECKING BOLT TORQUE
The tables shown below give correct torque values for various bolts and capscrews. Tighten all bolts to
the torques specied in chart unless otherwise noted. Check tightness of bolts periodically, using bolt
torque chart as a guide. Replace hardware with the same strength bolt.
ENGLISH TORQUE SPECIFICATIONS
Bolt
Bolt Torque*
Diameter
"A"
1/4"
5/16"
3/8"
7/16"
1/2"
9/16"
5/8"
3/4"
7/8"
1"
METRIC TORQUE SPECIFICATIONS
SAE 2
(N.m) (lb-ft)
8
13
27
41
61
95
128
225
230
345
6
10
20
30
45
60
95
165
170
225
SAE 5
(N.m) (lb-ft)
12
25
45
72
110
155
215
390
570
850
Bolt Torque*
Bolt
Diameter
"A"
8.8
(N.m) (lb-ft)
(N.m) (lb-ft)
9
19
33
53
80
115
160
290
420
630
10.9
SAE 8
(N.m) (lb-ft)
17
36
63
100
155
220
305
540
880
1320
12
27
45
75
115
165
220
400
650
970
M3
M4
M5
M6
M8
M10
M12
M14
M16
M20
M24
M30
M36
Torque gures indicated above are valid for non-greased or non-oiled threads and heads unless otherwise specied. Therefore, do not grease or oil bolts or capscrews unless otherwise specied in this
manual. When using locking elements, increase torque values by 5%.
* Torque value for bolts and capscrews are identied by their head markings.
.5
3
6
10
25
50
90
140
225
435
750
1495
2600
.4
2.2
4
7
18
37
66
103
166
321
553
1103
1917
1.8
4.5
9
15
35
70
125
200
310
610
1050
2100
3675
1.3
3.3
7
11
26
52
92
148
229
450
774
1550
2710
38
Page 44

8 INDEX
I
Index ..............................................................39
Introduction ......................................................1
O
Operation .......................................................12
Assembly ..................................................16
Attaching/Unhooking.................................20
Controls ....................................................19
Equipment Matching .................................18
Field Operation .........................................24
Machine Break-In .....................................15
Machine Components...............................14
Pre-Operation Checklist ...........................15
Storage .....................................................31
To the New Operator or Owner .................13
Transporting..............................................30
PAGE
S
Safety ..............................................................2
Equipment Safety Guidelines .....................4
General Safety ...........................................3
Hydraulic Safety .........................................9
Maintenance Safety ....................................8
Operating Safety.........................................7
Preparation .................................................6
Safety Signs ...............................................5
Safety Training............................................5
Sign-Off Form ...........................................10
Storage Safety ............................................9
Transport Safety .........................................8
Safety Sign Locations .................................... 11
Service and Maintenance ..............................33
Service......................................................33
Specications ................................................37
Bolt Torque ...............................................38
Hydraulic Fitting Torque ............................37
Mechanical ...............................................37
T
Trouble Shooting ...........................................36
PAGE
39
Page 45

EMB MANUFACTURING INC.
4144 BOOMER LINE
ST. CLEMENTS, ON
N0B 2M0 CANADA
PH: (519) 699-9283
FAX: (519) 699-4146
PRINTED IN CANADA
NUMBER: FEBRUARY 2008 PART NUMBER: Z97019
 Loading...