

WALKY WL1024, WL1024C Quick Start Manual
EN - Quick Start Guide for installation and programming
IT - Guida rapida per l’installazione e la programmazione
FR - Guide rapide d’installation et de programmation
ES - Guía rápida de instalación y programación
DE - Kurzanleitung für die Installation und Programmierung
PL - Skrócona instrukcja montażu i programowania
NL - Snelgids voor installatie en programmering
WALKY
WL1024
WL1024C
Swing gate opener
NL
PL
DE ES FR IT
EN
2
ITALIANO
Istruzioni originali
FRANÇAIS
Instructions originales
ESPAÑOL
Instrucciones originales
DEUTSCH
Originalanleitungen
NEDERLANDS
Originele instructies
POLSKI
Instrukcje oryginalne
Hinweis - Diese Kurzanleitung ersetzt in keiner Weise die kom-
plette Betriebsanleitung, auf die man sich für alle Sicherheitshinweise; für die Nutzungsgrenzen und alle anderen Situationen
in der Anleitung, die mit einem „ “ gekennzeichnet sind, beziehen muss.
Der Messregler (anliegend an dieser Anleitung) darf nur benutzt
werden, um die Höhe „A“ zu berechnen
, wenn die Installation
„3a“ ausgeführt wird. Wenn die Installation „3b“ ausgeführt wird,
benutzt man ein normales Metermaß für die Messungen.
Avvertenza – Questa guida rapida non sostituisce in alcun
modo il manuale di istruzioni completo, al quale è necessario
fare riferimento per tutte le avvertenza sulla sicurezza, per i limiti
d’impiego e tutte le altre situazioni evidenziate nella guida con il
simbolo “ ”.
Il regolo misuratore (allegato a questa guida) deve essere adoperato esclusivamente per calcolare la quota “A”
quando si ef-
fettua l’installazione “3a”. Invece, se si effettua l’installazione “3b”
utilizzare un metro standard per le misurazioni.
Ostrzeżenie – Niniejsza skrócona instrukcja obsługi w żaden
sposób nie zastępuje pełnej wersji instrukcji obsługi, w której znajdują się informacje dotyczące wszystkich ostrzeżeń bezpieczeństwa, ograniczeń eksploatacyjnych i wszelkich innych sytuacji
oznaczonych w skróconej wersji instrukcji symbolem „ “.
Linijkę mierniczą (dołączoną do niniejszego przewodnika) należy
używać wyłącznie do obliczania wysokości „A“
podczas mon-
tażu „3a“. W przypadku wykonywania montażu „3b“, do pomiarów stosować standardową taśmę mierniczą.
Avertissement – Ce guide rapide ne remplace d’aucune manière le manuel d’instructions complet, auquel il faut se référer
pour toutes les recommandations de sécurité, pour les limites
d’utilisation et toutes les autres cas de figure signalés dans le
guide par le symbole “ ”.
La réglette de mesure (incluse dans ce guide) doit être utilisée
uniquement pour calculer la cote “A”
quand on procède à l’ins-
tallation “3a”. Si au contraire on procède à une installation “3b”
utiliser un mètre standard pour effectuer les mesures.
Advertencia – Esta guía rápida no sustituye de ninguna manera el manual de instrucciones completo, al que debe hacerse
referencia para todas las advertencias de seguridad, los límites
de utilización y el resto de situaciones señaladas en la guía con
el símbolo “ ”.
El listón de medición (adjunto a esta guía) debe ser utilizado exclusivamente para calcular la cota “A”
cuando se realiza la ins-
talación “3a”. En cambio, si se realiza la instalación “3b”, utilice
un metro estándar para las mediciones.
Waarschuwing – Deze snelgids vervangt op geen enkele wijze
de volledige handleiding, die moet worden geraadpleegd voor
alle waarschuwingen met betrekking tot veiligheid, gebruikslimieten en alle andere situaties die in de gids zijn aangemerkt
met het symbool “ ”.
De meetlat (die bij deze gids is gevoegd) dient uitsluitend te worden gebruikt voor berekening van de hoogte “A”
wanneer instal-
latie “3a” wordt uitgevoerd. Als installatie “3b” wordt uitgevoerd
dient daarentegen een standaardmeetlat voor de metingen te
worden gebruikt.
ENGLISH
Original instructions
Caution – This Quick start guide does not replace in any way
the compete instruction manual. Please refer to it for all the safety warnings, for the application limits and for all the other situations highlighted in the guide with the “ ” symbol.
The slide rule (attached to this guide) must be only used to cal
-
culate the “A” height when the “3a” installation is carried out.
Whereas, if the “3b” installation is carried out, use a standard
tape measure for the measurements.
3
ENIT
FR
ESDEPL
NL
= 90°
= 90°
> 13 5 mm
< 135 mm
ENGLISH
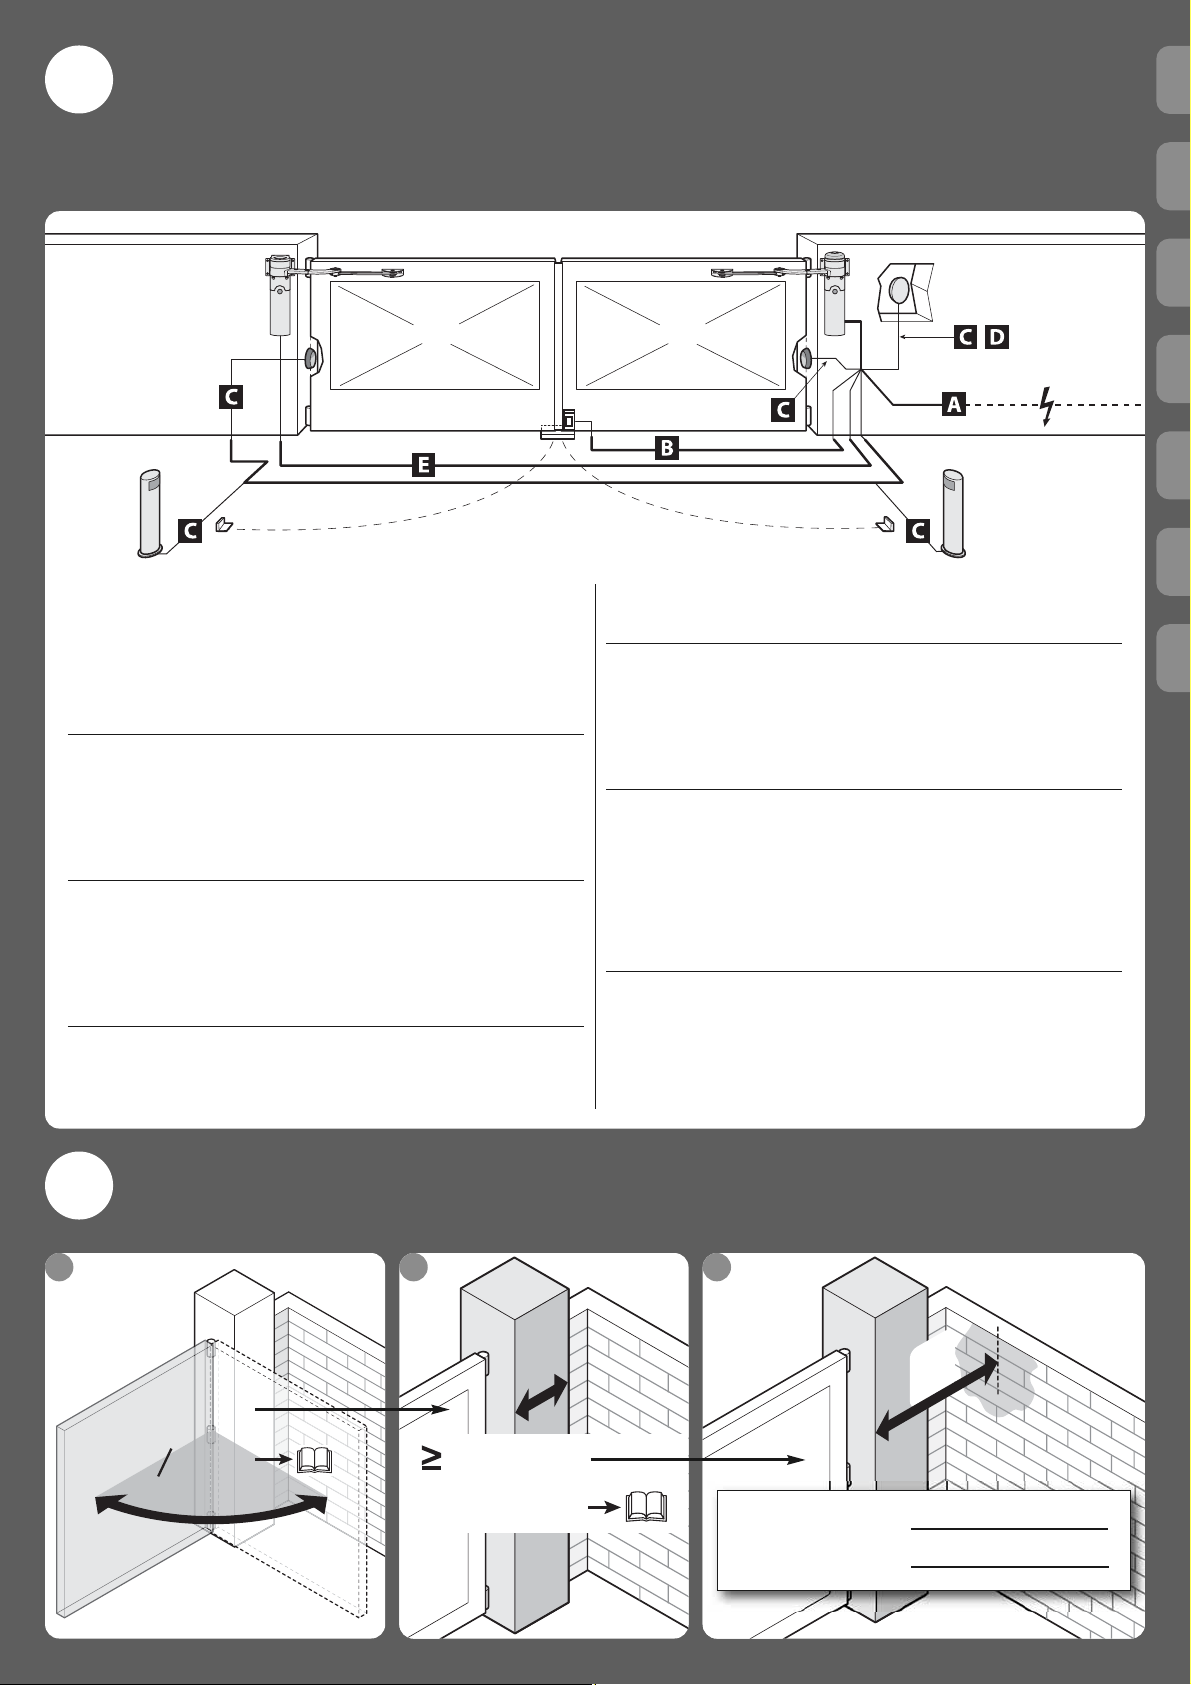
A – Power supply cable: 1 cable 3 x 1.5 mm2, maximum length: 30 m
B – Electric lock cable: 1 cable 2 x 1 mm
2
, maximum length: 6 m
C – Cable for BlueBus devices: 1 cable 2 x 0.5 mm2, maximum length: 20 m
D – Key-operated selector switch cable: 2 cables 2 x 0.5 mm2, maximum
length: 50 m
E – Power supply cable second gearmotor: 1 cable 3 x 1.5 mm2, maximum
length: 6 m
ITALIANO
A – Cavo alimentazione: 1 cavo 3 x 1,5 mm2, lunghezza massima: 30 m
B – Cavo elettroserratura: 1 cavo 2 x 1 mm2, lunghezza massima: 6 m
C – Cavo dispositivi BlueBus: 1 cavo 2 x 0,5 mm2, lunghezza massima: 20 m
D – Cavo selettore a chiave: 2 cavi 2 x 0,5 mm2, lunghezza massima: 50 m
E – Cavo alimentazione secondo motoriduttore: 1 cavo 3 x 1,5 mm
2
, lunghezza
massima: 6 m
FRANÇAIS
A – Câble d’alimentation: 1 câble 3 x 1,5 mm2, longueur maximale: 30 m
B – Câble serrure électrique: 1 câble 2 x 1 mm
2
, longueur maximale: 6 m
C – Câble des dispositifs BlueBus: 1 câble 2 x 0,5 mm
2
, longueur maximale: 20 m
D – Câble sélecteur à clé: 2 câbles 2 x 0,5 mm2, longueur maximale: 50 m
E – Câble d’alimentation du second moto-réducteur: 1 câble 3 x 1,5 mm2, lon-
gueur maximale: 6 m
ESPAÑOL
A – Cable de alimentación: 1 cable 3 x 1,5 mm
2
, longitud máxima: 30 m
B – Cable de electrocerradura: 1 cable 2 x 1 mm
2
, longitud máxima: 6 m
C – Cable de dispositivos BlueBus: 1 cable 2 x 0,5 mm2, longitud máxima: 20 m
D – Cable del selector de llave: 2 cables 2 x 0,5 mm
2
, longitud máxima: 50 m
E – Cable de alimentación del segundo motorreductor: 1 cable 3 x 1,5 mm2,
longitud máxima: 6 m
DEUTSCH
A – Versorgungskabel: 1 Kabel 3 x 1,5 mm2, maximale Länge: 30 m
B – Kabel Elektroschloss: 1 Kabel 2 x 1 mm2, maximale Länge: 6 m
C – Kabel der Vorrichtung BlueBus: 1 Kabel 2 x 0,5 mm2, maximale Länge: 20 m
D – Kabel Schlüsseltaster: 2 Kabel 2 x 0,5 mm2, maximale Länge: 50 m
E – Versorgungskabel zweiter Getriebemotor: 1 Kabel 3 x 1,5 mm2, maximale
Länge: 6 m
POLSKI
A – Kabel zasilający: 1 kabel 3 x 1,5 mm2, maksymalna długość: 30 m
B – Kabel do zamka sterowanego elektrycznie: 1 kabel 2 x 1 mm
2
, maksymalna
długość: 6 m
C – Kabel do urządzeń BlueBus: 1 kabel 2 x 0,5 mm
2
, maksymalna długość: 20 m
D – Kabel przełącznika kluczykowego: 2 kable 2 x 0,5 mm
2
, maksymalna dłu-
gość: 50 m
E – Kabel zasilający drugi motoreduktor: 1 kabel 3 x 1,5 mm
2
, maksymalna dłu-
gość: 6 m
NEDERLANDS
A – Voedingskabel: 1 kabel 3 x 1,5 mm2, maximumlengte: 30 m
B – Elektrisch slot: 1 kabel 2 x 1 mm2, maximumlengte: 6 m
C – Kabel voor BlueBus-inrichtingen: 1 kabel 2 x 0,5 mm2, maximumlengte: 20 m
D – Sleutelschakelaar: 2 kabels 2 x 0,5 mm
2
, maximumlengte: 50 m
E – Voedingskabel tweede reductiemotor: 1 kabel 3 x 1,5 mm
2
, maximum-
lengte: 6 m
F
F ≥ 367 mm → Installation “3a”
F < 367 mm → Installation “3b”
EN - Positioning of devices and
technical specifications of the
electrical cables
IT - Posizionamento dei dispositivi e specifiche tecniche dei cavi
elettrici
FR - Positionnement des disposi-
tifs et caractéristiques techniques des câbles électriques
ES - Colocación de los dispositivos y especificaciones técnicas
de los cables eléctricos
DE - Positionierung der Vorrichtungen und technische Spezifika-
tionen der elektrischen Kabel
PL - Ustawianie urządzeń i specyfikacje techniczne kabli elektrycznych
NL - Plaatsing van de inrichtingen
en technische specificaties van
de elektriciteitskabels
2 31
EN - Checks before installation
IT - Verifiche prima dell’installazione
FR - Vérifications avant l’installation
ES - Controles previos a la instalación
DE - Prüfungen vor der Installation
PL - Kontrole przed montażem
NL - Controles ter voorbereiding van
de installatie
1
2
4
NL
PL
DE ES FR IT
EN
min A max A
A
2
1
3
~45°
2
4
1
5
3
2
1
=
=
A
=
=
3
2
4
1
3
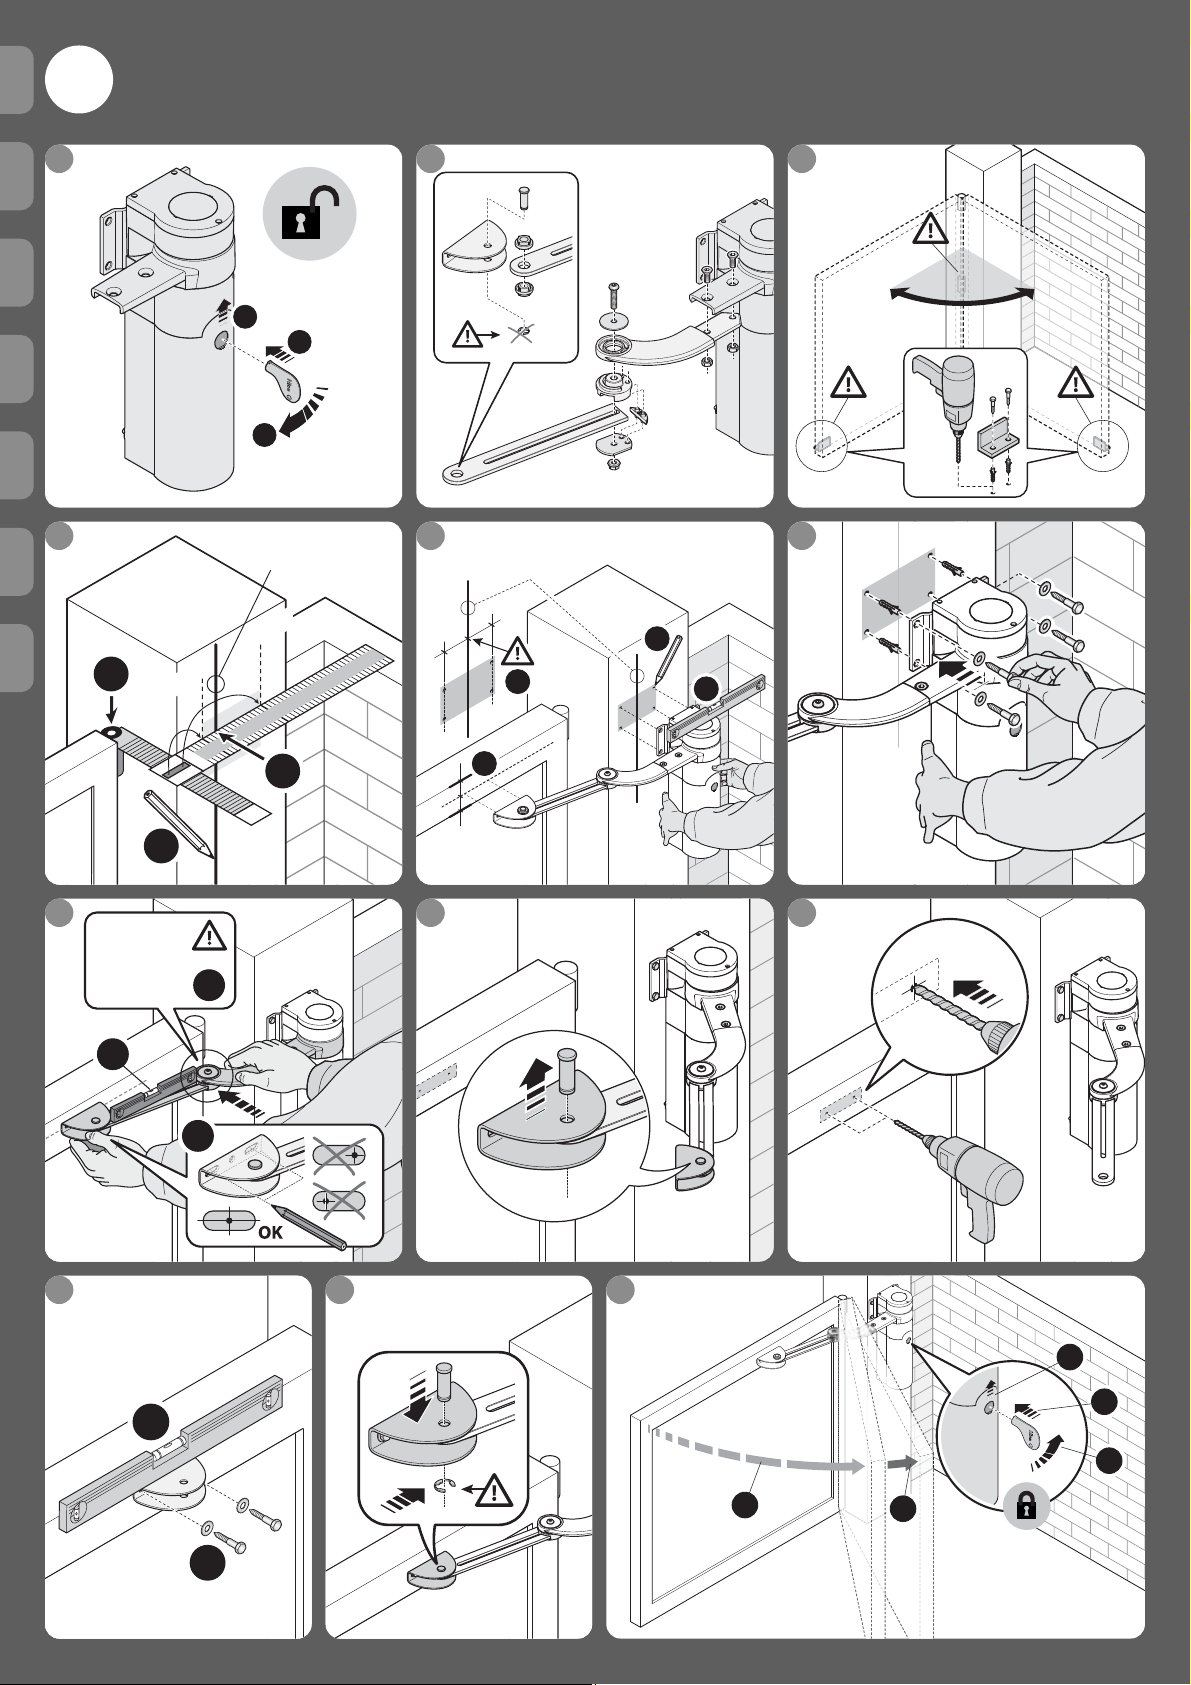
• Push hard!
• Spingere forte!
• Pousser fort!
• Empujar con fuerza!
• Druck machen!
• Mocno naciskać!
• Hard pushen!
1
3
2
1
3
4 5 6
7 8 9
10
11 12
90°
2
3
1
21 3
EN - Installation with standard arm
IT - Installazione con braccio standard
FR - Installation avec bras standard
ES - Instalaciones con brazo estándar
DE - Installation mit Standard-Arm
PL - Montaż z ramieniem standardowym
NL - Installatie met standaardarm
3a
 Loading...