


DASHTRAK USER GUIDE
Congratulations on your purchase of the DashTrak™ by WalkStyles, Inc. The DashTrak is an
innovative and easy to use device designed to help you achieve your personal activity and
wellness goals.
DO NOT WALK YET!
Please review this guide and determine what the proper DashTrak setup process is for you.
The setup process varies depending upon whether you are a MANUAL user (non uploader)
or an UPLOADER using a Platinum Member account on the WalkStyles.com web site. If you
plan to be an uploader, be aware that no steps will upload from your DashTrak until you
establish your account and sync your DashTrak to the web site. All of the required settings
must be input into the DashTrak online within your Platinum Member account!
This guide is divided into five (I-V) sections. The content of each
section and who should use it are as follows:
I. Getting Started
A. Charging/Re-charging your DashTrak
►All Users
B. Determining Your Stride Length
►All Users
II. DashTrak Setup for Manual Users
►Manual users (not uploading to the WalkStyles.com website at this time)
III. DashTrak Setup and Activating your Platinum Member account
►DashTrak purchasers who plan to upload, with a Pre-Paid Platinum Membership or a
Platinum Member subscription commitment to theWalkStyles.com website, or existing
DashTrak owners upgrading to Platinum Membership.
IV. DashTrak Data / Menu Screens & Features Overview
►All users
V. User Tips
►All users
2
Please confirm the content of the DashTrak carton. You should have the
following:
DashTrak, Wall Charging Unit, USB cable, Measuring Tape, Safety Tether,
DashTrak User Guide, Fast Start Guide, Pre-Paid Subscription Code (if purchased as a
DashTrak package).
If you intend to upload your step data to a Platinum Member subscription
account on the WalkStyles.com website, your computer must have the
following:
Windows 98 (or later) operating system, Internet Explorer 6.0 (or later), and
dial-up or broadband (recommended) internet access with a personal e-mail account.
I. Getting Started
I-A. Charging/Re-charging your DashTrak
You should charge your DashTrak for at least 2 hours before beginning the setup process.
1. Remove DashTrak and Wall Charging Unit from carton.
2. Plug the Charging Unit into a 110v outlet (make sure that if the outlet is controlled by a wall
switch, that the switch is turned ON).
3. Plug the USB connector end of the Charging Unit into the USB port of the DashTrak (see
Picture 1, page 4).
Note: It may take up to an hour for the display to become active during its initial charge or if the
battery has lost all of its power.
It is recommended that you re-charge your DashTrak using your Wall Charging Unit overnight at
least every other day (every day if you are continuously walking). After attaching the DashTrak
to the plugged in charger, the display should read DASHTRAK LOCKED-CHARGING. If the
display is blank, you should press the green Menu button. If the display remains blank, confirm
that there is power coming to the charger or computer. The DashTrak battery will also charge
while being attached to a powered on computer via the supplied USB cable. If you charge using
a PC/USB cable, the PC should just be powered on and the operating system NOT launched.
The preferred charge process is via the Wall Charging unit.
The DashTrak will display a Low Battery warning several times, along with a chime, when the
battery needs to be re-charged. Re-charge immediately to prevent any data loss. The Battery
Icon (see Picture 1, page 4) will also show a low level.

3
The DashTrak and the Wall Charging Unit are intended to be used with 110v AC power
only. If you are planning to travel and to re-charge the DashTrak in countries that use current
levels other than 110v, you must use a current converter (available at most travel stores) or
only recharge the DashTrak using a USB cable attached to a powered on computer.
I-B. Determining Your Stride Length
To get the most accurate calorie burn and distance readouts, you will need to determine your
Stride Length. Follow these instructions using the enclosed WalkStyles tape measure.
1. Place the WalkStyles tape measure on a flat surface with the “inch” or “centimeter” side up
depending on your desired unit of measure, and place both heels even with the “0” end of the
tape.
2. Step forward in a normal walking manner and count your steps until the heel of
one foot is closest to the end (3-5 steps average).
3. Note the measurement at the heel of that foot.
4. Repeat 2 - 3 times for accuracy.
5. Divide the distance measured by the number of steps you have taken
(example: 120”/ 4 steps is a 30”stride).
6. Write down this number.
You will use this measurement later when you input your PERSONAL INFO into the DashTrak.
II. DashTrak Setup for Manual Users (non uploader)
Remember, you need to charge your DashTrak for at least 2 hours before you begin this
process. After charging, when you remove the DashTrak from the charging unit, if you see a
warning about having lost power, disregard the warning and push the Next and Exit
buttons until you see the STEPS screen. In the future, if you see this warning, it means your
battery was fully discharged prior to re-charging and you will need to reset the DashTrak clock
using the procedure discussed in Section II-A, page 4.
While you are in the STEPS screen with the DashTrak open, confirm that the counting
mechanism is working by tapping it several times against the palm of your hand. The Step
readout should increase with each tap.
The accurate operation of the DashTrak depends upon the information you enter into the
device. There are two types of information you will enter: DASHTRAK SETTINGS and
PERSONAL INFO.
4
To enter this data, you will need to access the DashTrak Menu system by using the Menu
button (see Picture 1). Menu options are generally phrased as a question, and the actions are
generally: Yes, Next , Done or Exit.
II-A. DASHTRAK SETTINGS
1. Push the green Menu button until you see the SAFE TO CONNECT TO PC screen.
2. Push the Next button until you see the CHANGE DASHTRAK SETTINGS? screen.
3. Push the Yes button and you will see the SET TIME? screen.
4. Push Yes and then enter the time. Use the button adjacent to the horizontal arrow to
switch between hours and minutes. Make sure the AM/PM designator is set correctly.
When the Time is correct, press Done.
6. You will now be in the SET US OR METRIC? screen. The default setting is US. If you
want your distance data shown as Metric, push Yes and then select the desired setting
and then press Done.
7. Press Exit twice until you are back at the STEPS screen.
The other options in the CHANGE DASHTRAK SETTINGS? menu are Features and can
be reviewed in Section IV and input later.
II-
B. PERSONAL INFO
1. Push the green Menu button until you see the SAFE TO CONNECT TO PC screen.
2. Push the Next button until you see the ENTER PERSONAL INFO? screen.
3. Push the Yes button and you will see the SET STRIDE LENGTH? screen.
a. Push the Yes button and using the buttons across from the arrows, enter your Stride
Length in inches (or centimeters if you have selected Metric as your unit of measure).
b. When the Stride Length is correct, push the Done button.
4. You will now be in the SET WEIGHT? screen. Follow steps 3a and 3b to set your Weight.
5. You will now be in the SET AGE? screen. Follow steps 3a and 3b to set your Age.
Menu button (only active in the Data Screens)
Yes or Done button in the Menu screens
Next or action button in the Data and Menu screens
Backlight button (only active in the Data Screens)
Exit or action button in the Menu Screens
Battery level icon
Picture 1
USB port
5
II-A- 6. Once you have correctly entered your Stride, Weight and Age, push the Exit button twice
and you will be back at the STEPS screen.
You have now entered the important data that the DashTrak requires to accurately calculate its
various metrics such as; Distance, Calorie Burn, Aerobic Pace, and Heart Rate data using the
optional WalkStyles HR Transmitter (instructions for use included in HR Transmitter package).
Next, you should review the Features in Section IV to personalize your DashTrak and to learn
about the Data and Menu Screens.
III. DashTrak Setup and Activating your Platinum Member Account
Remember, you need to charge your DashTrak for at least 2 hours before you begin this
process. After charging, when you remove the DashTrak from the charging unit, if you see a
warning about SYSTEM RESTARTED DATE-TIME UNKNOWN, disregard the warning and push
the Next and Exit buttons until you see the STEPS screen. In the future, if you see this warning, it
means your battery was fully discharged prior to re-charging and you will need to re-sync the
DashTrak clock to your account on the WalkStyles.com web site (see USER TIPS, RE-SYNCING
DASHTRAK TO WEB SITE, page 13).
While you are in the STEPS screen with the DashTrak open, confirm that the counting
mechanism is working by tapping it several times against the palm of your hand. The readout
should increase with each tap.
►DO NOT CONNECT THE DASHTRAK TO THE USB CABLE YET!
III-A. Initializing your Platinum Member account
1. If you have a Pre-Paid Subscription Code, have a Platinum Member subscription commitment
or you are upgrading your DashTrak experience by becoming a Platinum Member subscriber,
open Microsoft Internet Explorer and navigate to www.WalkStyles.com.
a. If you ARE already a Basic Member, log in to your account and then click on Go Platinum
(located to the right of the step statistics )and then select Subscribe Now and follow the
directions entering your Pre-Paid Subscription Code, if applicable, into the box under Plan
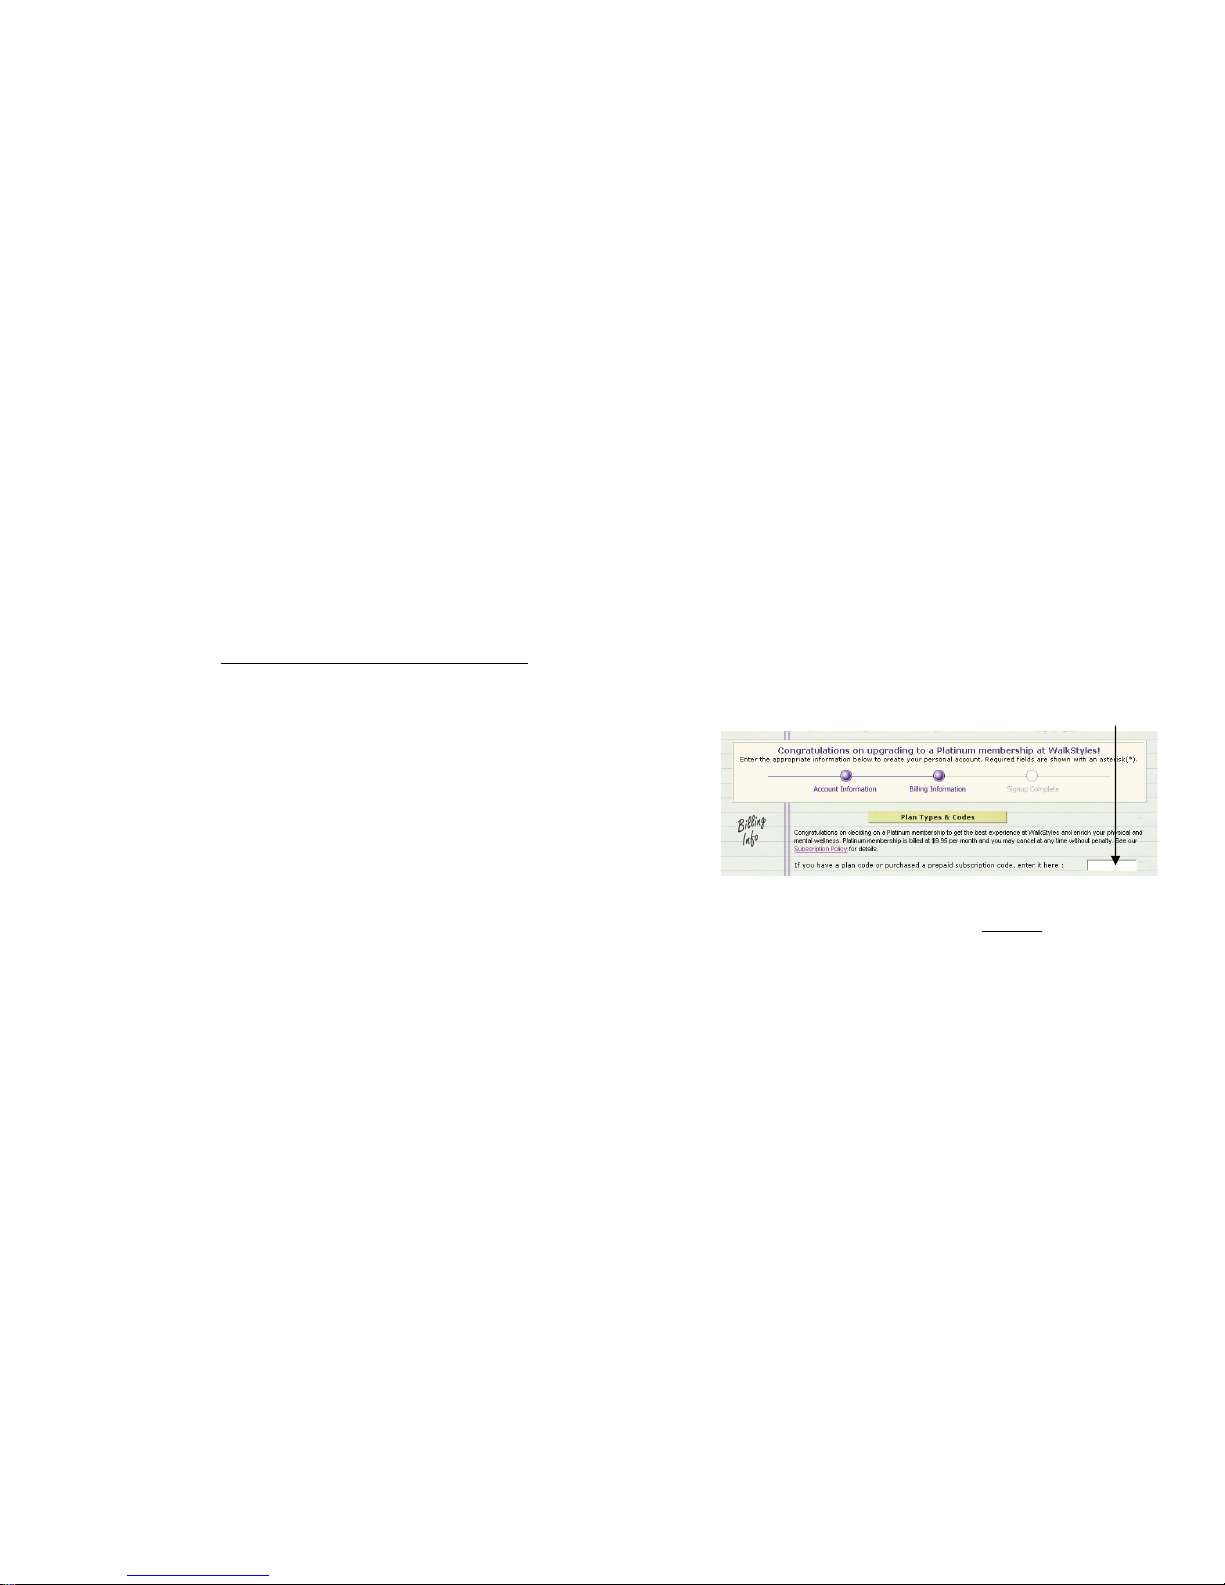
Type & Codes on the Billing Page (see Picture 2). You will be asked for your credit card
information to facilitate the monthly subscription payment. If you are using a Pre-paid
Subscription Code, the billing will start once the pre-paid period concludes. After registering,
while you are still logged into your account, click on the HOME menu option and then refer
to Section III-A-2, page 6.
6
III-A-1- b. If you are NOT already a Basic Member, click on the menu option JOIN US. Under
Platinum Membership at the bottom of the page, enter your zip code and then click on the
Subscribe Today button and follow the directions providing the information as requested.
This information will be used to set up your user profile so that other members (if you
choose) can search you out to walk and/or form a club and vice versa. If you have a Pre Paid Subscription Code, when you get to the Billing Page, enter it into the box under Plan
Type & Codes (see Picture 2). You will also be asked for your credit card information. This
will be used to facilitate your monthly subscription payment. If you are using a Pre-paid
Subscription Code, monthly billing will start once the pre-paid period concludes. As a new
member (not upgrading from a Basic Member) you will be sent a temporary password to
your registered e-mail account. Retrieve the password and then log in to your new
Platinum Membership account at www.WalkStyles.com using your e-mail address and
temporary password. Change your password as prompted then refer to Section III-A-2.
III-A-2. After registering as a Platinum Member, or upgrading to Platinum from Basic Membership,
navigate to your Personal Home Page and click on the Enter Steps
button located in the
MY ACTIVITY SUMMARY section of the page. A pop-up window will appear asking if
you will Upload or Manually enter steps in to your Platinum Member account. In order to take
advantage of all of the features of the DashTrak, we recommend that you select Upload
and then click on the Submit button. If you have already set up your account to Manually
enter steps prior to acquiring your DashTrak, you will need to change your Step Entry
Mechanism setting by going to the My Account / Site Preferences menu options and then
proceed with item III-A-3.
If you are going to be a Manual DashTrak User of your Platinum Member account, skip steps
III-A-3 and III-B, and if you have not already done so, set up your DashTrak for Manual use as
discussed in Section II, page 3, of this guide.
Picture 2
Enter pre-paid code here

7
►DO NOT CONNECT THE DASHTRAK TO THE USB CABLE YET!
III-A-3. You must set up your DashTrak for use with your Platinum account before your steps will
upload properly. If this is the initial set up of your DashTrak with your new Platinum
Member account, in the MY ACTIVITY SUMMARY section on your Personal Home Page
you will now see a DashTrak Setup button. Click on the button and read and follow all the
displayed instructions to complete the online setup process. It is recommended that you
print the instructions for easy reference while you complete the DashTrak Setup. If you are
setting up a new DashTrak with an existing account that you have uploaded to before, see
USER TIPS, RE-SYNCING DASHTRAK TO WEB SITE, on page 13 to set up and sync your
DashTrak.
III-B. Uploading Step Data to your Platinum Member Account
This can only be done if you have chosen to be a DashTrak Uploader and you have completed
the DashTrak Setup process.
1. Go to www.WalkStyles.com and log on using your login (your email address) and
password. You’ll arrive at your WalkStyles personalized Home Page.
2. Be sure your DashTrak display reads SAFE TO CONNECT TO PC by pressing the green
Menu button on the unit, then connect your DashTrak to your PC using the included USB
cable. The DashTrak display will read LINKED TO PC when properly connected.
3. On your Personal Home Page, click on the Load DashTrak button located in the MY
ACTIVITY SUMMARY section. You can also upload by clicking on the TRACKING
TOOLS/Track Actuals/Step & Step Equivalents drop down menu options.
DO NOT DISCONNECT YOUR DASHTRAK until you see the DashTrak Upload Successful
message and then use the following procedure:
IMPORTANT!
When you’re ready to disconnect the DashTrak, click on the “Safely Remove
Hardware” utility on the Windows status bar (see Picture 3), then click on Safely Remove
USB Mass Storage Device – Drive (?:) where ‘?’ is the drive letter used for the DashTrak.
You should disconnect your DashTrak once you have completed the upload process. You may
upload your DashTrak data at any time - many times per day or once every couple of days.
Enjoy the many charts and graphs of your data on your DashBoard and the comparisons to
other walker/Members in and out of your walking communities.
Picture 3
Click on this Icon and follow the prompts to
safely disconnect your DashTrak from the
USB cable and your computer
8
IV. DashTrak Data / Menu Screens & Features Overview
All users should review this information about the various Data / Menu Screens and Features.
Uploaders must use their WalkStyles.com account to input Time and the PERSONAL
INFO required for the DashTrak to operate properly (see III-A-3, page 6) and remember to
ALWAYS
use the SAFE TO CONNECT TO PC Menu option before connecting your DashTrak to
your computer.
IV-A. Data Screens
1. There are five Data Screen displays that can be reviewed by pushing the Next button
(see Picture 4) when the DashTrak is not in the Menu level. Please note that the DashTrak
display, to conserve power, will turn off if there is no activity being recorded. You can lightly
shake the DashTrak or push any of the three buttons to turn the display on and then the Next
button to review the Data Screens. All of the Data Screens show data for the current day.
Picture 4
a. STEPS
i. The STEPS screen shows your daily step total.
b. MILES
i. The MILES screen shows your daily distance traveled based on your stride length
and your step count (if Metric is your unit of measure, this screen will be KM).
c. CALORIES
i. The CALORIES screen shows your daily calorie burn total based on steps and pace
d. TIME
i. The TIME screen shows the current time.
Next or action button in the Data and Menu screens
Menu button (only active in the Data Screens)
Yes or Done button in the Menu screens
Backlight button (only active in the Data screens)
Exit or action button in the Menu Screens
Battery level and Heart data icons
♥

9
IV-A-1- e. HEART
i. The HEART screen will only show if you are wearing the optional WalkStyles HR
Transmitter and HR data is being received by the DashTrak. The screen will show
Average Beats per Minute and your % of Maximum Heart Rate you are achieving
calculated based on your Age input during setup. When HR data is being received, a
Heart icon
♥ will flash next to the Battery icon in all Data Screens (see Picture 4).
ii. The DashTrak uses standard RF technology to receive HR data from the transmitter
strap. As such, it will occasionally pick up and then upload stray data even when an
HR strap is not being worn. Please disregard this data.
2. All of the Data Screens automatically reset to 0000 at midnight. The previous days data is
stored into memory and can be reviewed in the REVIEW PREVIOUS DAY? Menu option
(see IV-C-6-b) or within your Platinum Member account at www.WalkStyles.com after
uploading.
IV-B. Backlight
1. The Backlight is activated by pushing the Next button (across from the light bulb
icon) while you are in the any of the Data Screens only.
a. The backlight has a timer that will allow the backlight to stay on if you need it to
navigate through the Menu Screens.
b. The backlight is a high power consumer, so only use it when necessary.
IV-C. Menu Screens
1. Menu Screens are accessed by pushing the green Menu button (see Picture 4)
2. Menu options are generally phrased as a question, and the action options are
generally: Yes, Next , Done or Exit.
3. Pushing the Next button will scroll through the Menu options at each Menu level.
4. Pushing the Yes button will display the Function option or the next level of Menu options.
5. Pushing the Exit button will take you back one level of Menu options.
6. Menu options
a. SAFE TO CONNECT TO PC
i. This option readies the DashTrak’s USB port while the SAFE TO CONNECT TO PC
message is displayed. It MUST BE
activated prior to connecting your DashTrak to a
USB cable connected to a powered on PC.
b. REVIEW PREVIOUS DAY?
i. This option allows you to view the Data Screens stored in memory from the previous
day. If selected, you can scroll through the data by pushing the Next button. Push
the Done button to exit this option and then Exit to return to the STEPS screen or
Next to see the next Menu option.
10
IV-C-6- c. REVIEW PREVIOUS EVENT?
i. This option allows you to view the Data Screens form your last event. If selected, you
can scroll through the data by pushing the Next button. Push the Done button to exit
this option and then Exit to return to the STEPS screen or Next to see the next Menu
option.
d. SET UP A TIMED EVENT?
i. This option, if selected, allows you to set up a timed event that will record your
activity between starting and stopping the event timer.
ii. You can choose to have the Event Data Screens continuously scroll for easy review
during the event duration by saying Yes to AUTOSCAN EVENT DISPLAYS?
e. CHANGE DASHTRAK SETTINGS?
i. These options are used to set device specific settings.
1) SET TIME?
i) If you are an Uploader, you must set the time using the My Account /
DashTrak menu options within your Platinum Member account.
ii) Non Uploaders (see II-A, page 4).
2) SET US OR METRIC?
i) US is the default setting (see II-A, page 4).
3) ADJUST CHIME VOLUME?
i) This Feature allows you to set the Chime Volume to High, Low or Off.
ii) The Chime will sound when you reach 10,000 steps or, as an Uploader, when
you accomplish a programmed goal.
4) SET AUTOSCAN MODE?
i) This Feature, if selected, will continuously scroll through the Data Screens
for easy review until you deactivate this Feature within this menu option.
5) RESET CURRENT DISPLAYS?
i) This Feature, if selected, will reset the current Data Screens to 0000. It will
not erase the recorded steps however. All of the data will be uploaded during
your next upload session to your account on the WalkStyles.com web site.
6) RESET TO FACTORY INSTALL?
i) WARNING, this feature will re-initialize the DashTrak firmware and erase all
data and settings stored in memory.
- If you are a Manual User, refer to Section II and re-enter required data.
- If you are an Uploader, you must re-sync your DashTrak to the
WalkStyles.com web site (see USER TIPS, RE-SYNCING DASHTRAK TO
WEB SITE, page 13).
►If you do not re-synch your DashTrak prior to walking, all subsequent
step data will NOT upload to your WalkStyles.com account!

11
IV-C-6- f. ENTER PERSONAL INFO?
i. These options allow you to enter your personal data which enables the DashTrak to
compute various metrics such as; distance, calorie burn, pace etc. If you are an
Uploader, we recommend that you input and maintain this information using the My
Account menu option and then selecting DashTrak from the drop down menu while
you are logged into your Platinum Member account and your DashTrak is connected
to the USB cable connected to your PC.
1) SET STRIDE LENGTH? (non uploaders see II-B, page 4)
2) SET WEIGHT? (non uploaders see II-B, page 4)
3) SET AGE? (non uploaders see II-B, page 4)
i) If you are an Uploader, your age is calculated automatically during the
initial DashTrak Setup process based on the birth date you entered during the
activation of your Platinum Member account.
IV-D. Step Sensitivity Adjustment
To get the most accurate step measurement for your size and walking style, you can adjust the
DashTrak’s step sensitivity.
1. Open your DashTrak.
2. Using your thumb, firmly push the slotted edge of the interchangeable face plate cover up
and away from you until the faceplate pops off completely so that the outside of the
DashTrak is exposed.
3. You will see a tension lever on the exposed RIGHT side of the device. To make the
DashTrak count MORE steps adjust the lever up toward the (+) on the label. To make the
DashTrak count LESS steps, move the lever down toward the (-) on the label.
4. Replace faceplate by reengaging both tabs into their respective slots and push till it clicks
into place.
5. With your DashTrak on your waist aligned over your right knee, you should take a test walk
of 40 steps. If it is off by more than 4 steps, try readjusting the impact sensitivity.
PLAN, MANAGE AND TRACK
Now that your DashTrak is set up, you’re ready to walk. Exercise and fitness varies from person to
person. Consult a physician before beginning an exercise program or increasing your physical activity.
The DashTrak is not a medical device. It is designed to support your wellness goals. To best reach your
activity, nutrition and mental wellness goals, utilize one of the following tools:
12
PLATINUM MEMBERSHIP
A Platinum Membership allows you to Upload and personalize your step data. You can easily plan,
manage and track your physical, nutrition and mental wellness with the online journal and worksheets.
As an Uploader, you can even program personalized motivational messages to appear on your
DashTrak throughout the day to encourage you to reach your step goals. You can have your DashTrak
display an encouraging message at the 5,000-step mark to let you know you’re halfway there, or you
can have a message when you’ve surpassed 10,000 steps and one when you reach 12,000 steps or
more. It is easy to set and change your personalized messages and goals within your Platinum Member
account on www.WalkStyles.com. Platinum Members can compare step rankings and averages, find
other WalkBuddies to walk with and compete against, and so much more.
Additional web site features include news, health articles, tools to find walking partners, and the ability
find clubs or create one of your own. For more details visit www.WalkStyles.com and click on Register
Now.
DASHTRAK JOURNAL
You can also keep track of your step data manually with the DashTrak Journal which includes daily tips
to keep you motivated. This journal can be purchased in the SHOP at www.WalkStyles.com
V. USER TIPS & TROUBLESHOOTING
ELECTRONIC DEVICE – The DashTrak is a sophisticated electronic device that should be protected
from excessive moisture such as rain and/or accidental submergence in sinks, pools etc. Care should
be taken not to recharge in the presence of water.
DASHTRAK POWER – For best results, recharge your DashTrak for at least 2 hours nightly using the
supplied wall charging unit or attached to the USB cable attached to a powered-on computer.
PROPER DASHTRAK WEARING POSITION - For best results, the DashTrak must be worn at your
waist positioned directly above your right knee. It should have a vertical orientation with little to no
forward or backward tilt.
CONNECTING YOUR DASHTRAK TO THE USB CABLE / PC – Always use the SAFE TO CONNECT
TO PC Menu Screen, or your PC may not recognize your DashTrak. If this happens, disconnect the
DashTrak from the USB cable, select the SAFE TO CONNECT TO PC menu option on the DashTrak
(see IV-C-6-a, page 9) and then re-attach your DashTrak to the USB cable. If you are connecting to
your PC via a multi-port USB hub, the WalkStyles web site may not be able to distinguish the DashTrak

13
from the other devices connected via the hub and issue an error message. If this happens, connect
your DashTrak to a USB cable that is connected directly to a USB port on your computer.
SETTING TIME - It is critical to set and maintain the correct time on your DashTrak for accurate daily
information. The Data Screens reset to 0000 everyday at midnight based on the DashTrak time setting.
Platinum Members, who are Uploaders, must sync their DashTrak to their account on WalkStyles.com,
to ensure the correct time set and proper uploading of step related data, before you begin walking. If
you should get a warning message that your DashTrak restarted, you must re-sync your DashTrak to
reset the correct time before you walk, or the steps will not upload properly (see Re-Syncing DashTrak
to Web Site below).
DAYLIGHT SAVINGS TIME - To adjust your DashTrak for Daylight Savings time, follow the procedure
in the next tip, Re-Syncing DashTrak to Web Site, to update the time on the DashTrak clock. If you are
a manual user see section IV-6-e-i-
1), page 10.
RE-SYNCING DASHTRAK TO WEB SITE - If you are an Uploader and your DashTrak restarts due to
a full power loss and you see this warning on the DashTrak screen, you must re-sync your DashTrak to
the web site before you walk, or the STEPS WILL NOT UPLOAD
.
To do this, log into your Platinum Member account. Then push the green Menu button on the DashTrak
(see Picture 1, page 4) so the screen reads SAFE TO CONNECT TO PC. Then connect the DashTrak
to the USB cable attached to your computer. Click on the DASHBOARD menu option. Click on the
MORE button (located under the step chart). Click on the DashTrak button under SETTINGS located
on the left side of the DASHBOARD page. On the page that opens, review the settings and correct if
necessary, especially the Time Zone. IMPORTANT, you must click on the Update DashTrak
button
(even if you made no settings changes) to update the time onto the DashTrak.
DISPLAY FLASHES AND/OR IS UNRESPONSIVE TO MENU BUTTON – Like any firmware driven
device, the digital processor may unexplainably lock up. If this happens, allow the power to completely
drain from the unit until the screen goes blank. Then re-charge the device and then refer to Section IVC-6-e-
6), page 10, RESET TO FACTORY INSTALL? After successfully re-installing the firmware, make
If you see this warning message
on your DashTrak, you must
re-sync on-line before you walk!
14
sure you re-sync your DashTrak with your account using the RE-SYNCING DASHTRAK procedure on
page 13.
M ICON APPEARS NEXT TO THE BATTERY ICON ON YOUR DASHTRAK DISPLAY – This
indicates that there is a problem with the digital processor reading the memory chip. Immediately, reset
the DashTrak using the procedure in Section IV-C-6-e-
6), page 10, RESET TO FACTORY INSTALL?
After successfully re-installing the firmware, make sure you re-sync your DashTrak with your account
using the RE-SYNCING DASHTRAK procedure on page 13.
DISCONNECTING YOUR DASHTRAK FROM THE USB CABLE / PC – Always use the Safely
Remove Hardware Utility when disconnecting your DashTrak from the USB cable (see III-B, page 7).
Not doing so may damage the DashTrak.
STRIDE CHANGES - If you will be power walking, jogging or running, you can adjust your stride length
accordingly for more accurate distance calculations.
LCD DISPLAY PROTECTIVE COVERING – To protect the display screen from scratches during
manufacturing, there is a protective film on the display screen. This should be removed for better
viewing quality.
DASHTRAK SAFETY TETHER – The tether is provided to prevent accidental loss or damage due to
an inadvertent dislodging of the device from your waist. Attach the hook end of the tether through the
hole in the metal clip on the back of the DashTrak. Then attach the alligator-clip end of the tether to a
belt loop or garment.
WINDOWS AUTOPLAY – The Windows Operating system utilizes AUTOPLAY functionality to
automatically open and start the related firmware of devices that are attached to the PC, via a USB
cable, such as MP3 players, digital cameras, cell phones etc. To protect the integrity of the DashTrak’s
firmware, it is important that the AUTOPLAY feature is turned OFF for devices that have audio files
such as MP3 players (the DashTrak uses a processor similar to an MP3 player). Otherwise, when the
DashTrak is attached to the PC, the Windows operating system will attempt to open, read and run the
DashTrak’s system files potentially damaging them to the extent that the DashTrak may cease to
operate. Each version of Windows has a different process to turn off the AUTOPLAY functionality. For
your version’s process, check the Windows HELP menu on your PC or e-mail
CustomerService
@WalkStyles.com.

15
ADDITIONAL QUESTIONS - For more user tips and answers to frequently asked questions (FAQs)
visit: www.WalkStyles.com and click on Customer Support then FAQ’s. If you can’t find the answer you
need there, please email us at:
CustomerService@WalkStyles.com or call 1-866-925-5789 x 206
DASHTRAK WARRANTY
WalkStyles, Inc. warrants the DashTrak hardware product against defects in material and
workmanship, under normal use and service, for a period of ninety (90) days. Proof of purchase is
required. During the warranty period, WalkStyles, Inc. will, at its option, repair or replace the defective
product at no charge, provided that you deliver the product to WalkStyles, Inc. A DashTrak returned
under the terms of this warranty must have a Return Merchandise Authorization (RMA) number issued
by WalkStyles, Inc. If you ship the product, you are responsible for proper packaging and must pay the
shipping charges to send the package to WalkStyles, Inc. WalkStyles, Inc. will pay shipping charges
back to any location in the contiguous United States. This warranty is not transferable. WalkStyles, Inc.
may, at its option, replace or repair the product with new or reconditioned parts. WalkStyles, Inc.
warrants the repaired or replaced products to be free from defects in material or workmanship for ninety
(90) days after the return shipping date, or for the duration of the original warranty period, whichever is
greater. This warranty does not cover the replacement of products damaged by abuse, accident,
misuse or misapplication, nor as a result of service or modification other than by WalkStyles, Inc. The
DashTrak product may contain fully tested, recycled or used parts, warranted as if new.
PRODUCT IS NOT A MEDICAL DEVICE
The DashTrak and its accessories are not intended to be medical devices and are provided solely for
your entertainment and information. These products are not meant to substitute for proper medical
diagnosis, care, or treatment related to your physical activity. WalkStyles, Inc. recommends that you
consult your physician before beginning any exercise program.
www.WalkStyles.com
Log-in e-mail:
Password:
Screen Name:
16
26062 Merit Circle, Suite 101 - Laguna Hills, California 92653
9.09
 Loading...