

Walkera VOYAGER 4 Quick Start Manual
DEVO F18 Remote Controller
QUICK START GUIDE
Oct. 18th 2018
V1.1
www.walkera.com

Contents
1.0 Get to know your aircraft
2.0 Get to know your Remote Controller
3.0 Specifications
4.0 Attention Before Flight
5.0 Check Battery Levels
6.0 Charge the Batteries
7.0 Download and install the software APP
8.0 APP Main Screen Instructions
9.0 Prepare the Remote Controller
10.0 Prepare the VOYAGER 4
11.0 Ready to fly
11.1 Starting the aircraft / Get binding
11.2 Connect to APP Software
11.3 GPS indicator light
3
4
5
6
6
6
7
7-8
8
9-10
10
10
10
11
11.4 Motor Unlock / Lock
12.0 Operation Instruction
13.0 End flight
14.0 Additional remarks
14.1 Introduction for FCS-V4 Main Flight Controller
14.2 Compass Calibration
14.3 Remote Controller stick mode switch and stick calibration
14.4 Introduction for DEVO-RX715 receiver
14.5 Brushless ESC and Brushless Motor connection diagram
15.0 Intelligent Flight Battery Safety Guidelines
-2-
11
12-17
17
18
18
18
19
20
20
21
Quick Start Guide
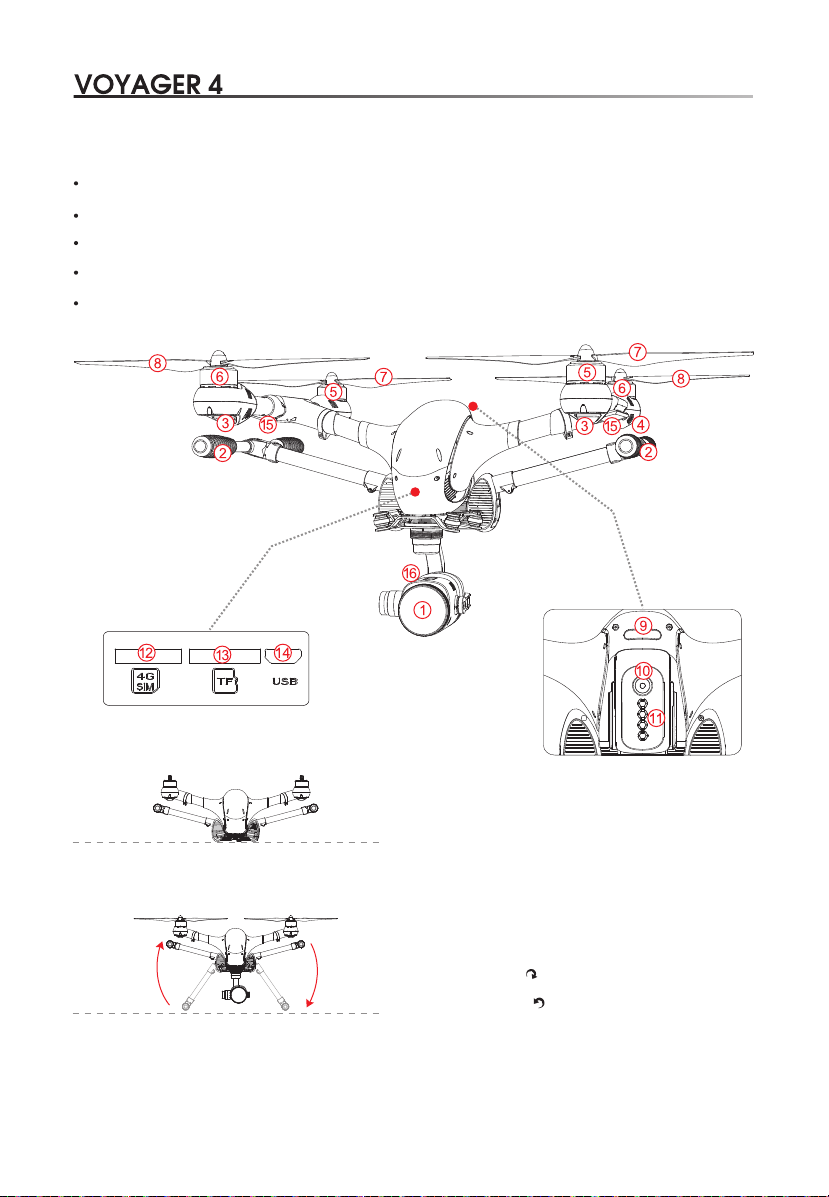
1.0 Get to know your aircraft
Modular design for electronic parts enable convenient connections and easy assembles.
Newly designing of new generation flight controller system ensure stabilized and reliable flight performance.
GPS and GLONASS dual navigation system ensure more accurate and safer flight experience.
Adopting new 4G communication image transmission technology.
Adopting 18X optical zoom/ 4K HD camera to obtain much clearer image and easier operating experience.
1. Gimbal and Camera
Travel Mode
Flight Mode
Landing Gear DownLanding Gear Up
Landing Mode
* 1) 4G communication cards for aircraft and mobile devices are purchased and installed by buyers.
2) The Maximum flight time of 20 minutes was obtained under test environment.
3) To avoid property loss and personal injury caused by wrong operation, please read the manual carefully and
watch the tutorial videos at www.walkera.com before flight.
2. Landing Gear
3. Front LEDS ( Blue )
4. Rear LEDS ( Red )
5. CW motor
6. CCW motor
7. CW propeller( )
8. CCW propeller( )
9. Aircraft Status Indicators
10. Power Button
11. Battery Level Indicators
12. 4G SIM card port
13. Idle port
14. USB upgrade slot
15. 4G communication antenna
16. Camera memory card port
-3-
Quick Start Guide
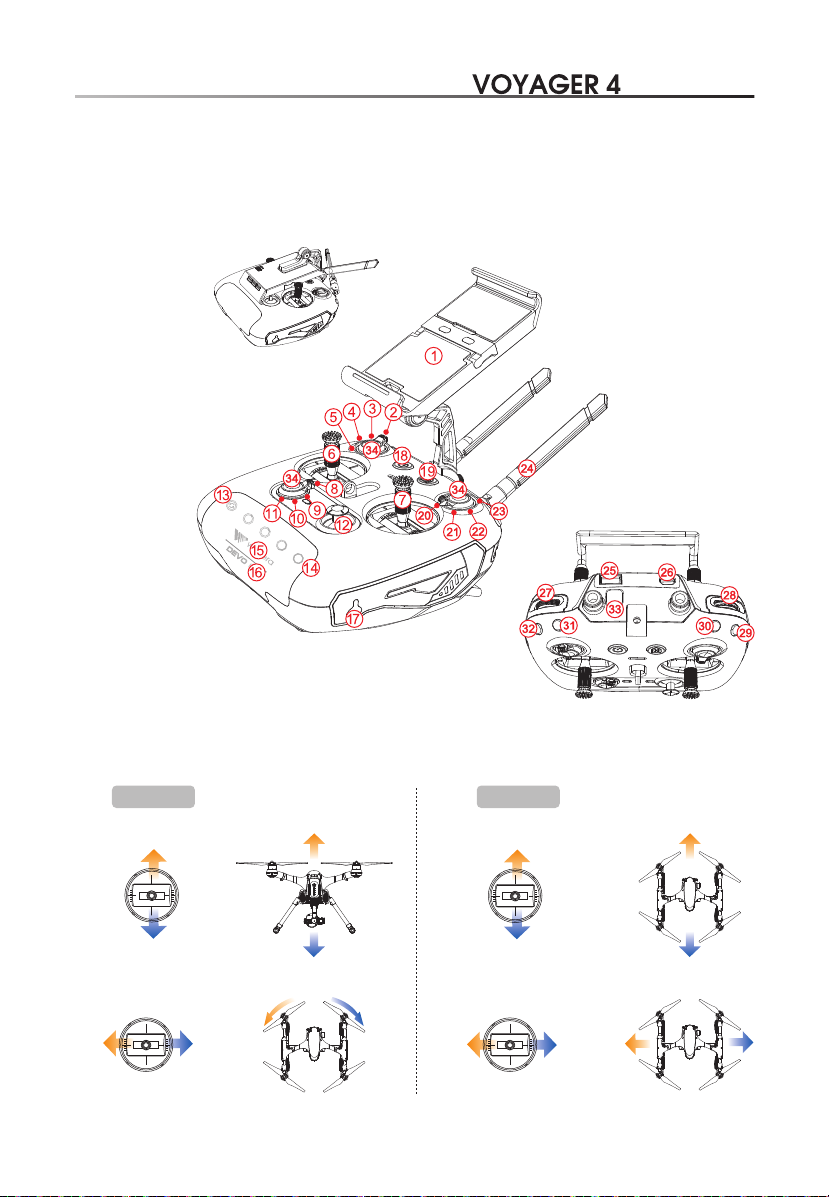
2.0 Get to know your Remote Controller
DEVO-F18 with the built-in Bluetooth Module. Equipped with function like manual mode / GPS hold mode /
Return To Home, camera & Gimbal controlling, the VOYAGER 4 is easier to control.
(You can select the suitable flight mode according to your flying skill.)
1. Mobile Device Holder
14. Battery Level LEDs
15. Charging Indicator
16. Bluetooth blue LED
17. Charger socket
18. Power Button
19. Return To Home
20. AUX3
21. AUX2
22. Motion Mode(Common)
23. Beginner Mode
24. Antenna
25. Data transfer port
26. Upgrade port
27. Left Gimbal Dial
28. Right Gimbal Dial
29. Stop button
30. Skid landing comtrol button
31. Photo button
32. Video button
33. Training port
34. Enter key
Folded
2510
50
100
2. AUTO Landing
3. AUTO Takeoff
4. Manual Mode
5. GPS Mode
6. Left stick
7. Right stick
8. Follow me mode
9. Circle flight
10. IOC
11. AUX4
12. Gimbal control stick
13. Status LED
The default setting is Mode 2. The left stick controls the aircraft's altitude and heading, while the right stick
controls its forward, backward, left and right movements.
Left Stick
Up
Down
Turn
Left
* Maximum transmission distance about 1.5km as measured under the experimental environment, for reference purpose only.
Turn
Right
Right Stick
Forward
Backward
Left Right
-4-
Quick Start Guide
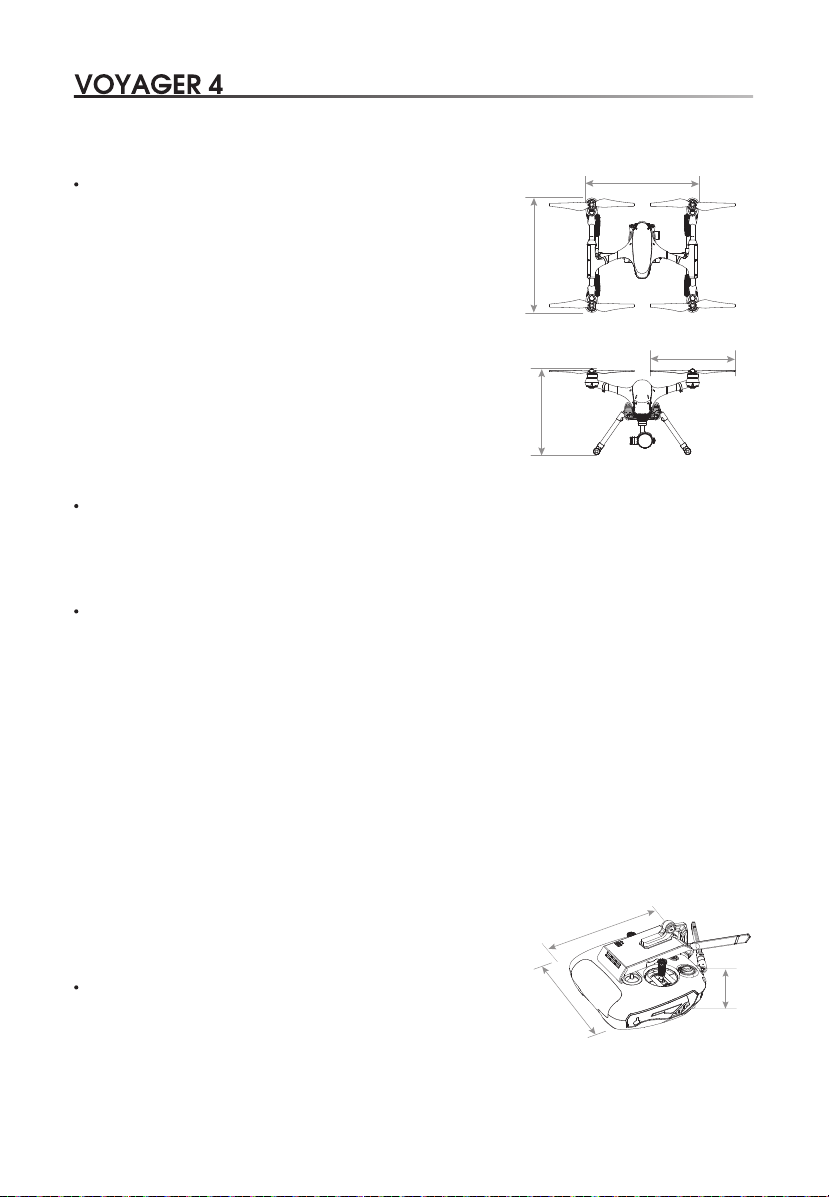
3.0 Specifications
Aircraft
Main Rotor Dia.:
Overall (L x W x H):
Weight:
Remote Controller:
Main Controller:
Receiver:
Brushless Motor:
Brushless ESC:
Battery:
Flight Time:
Working Temperature:
Gimbal
Control accuracy:
Control range:
Camera
Sensor:
ISO Range:
Video Resolution:
Photo Resolution:
Focal Length:
Zoom Ratio:
Zoom Speed:
Horizontal View:
Close-shot Distance:
Video Storage Maximum:
Compress Standard:
Files Format:
Support Micro-SD:
382mm
465 x 465 x 352mm
3250g(Battery included)
DEVO F18
FCS-V4
DEVO-RX715
WK-WS-42-002A
Voyager 4 (R/B)
22.2V 4500mAh 10C(6S) LiPo
About 20mins
-10℃~ +40℃
Static: ±0.008°; Motion: ±0.08°; Shake-proof: ±0.008°
Pitch rotation -90°~ +45°; Horizontal ±150°
1/2.3 SONY IMX117 CMOS
100-3200(Video) / 100-1600(Image)
4K 30fps
4608 x 3456
6.7-134.5mm
18x optical zoom
About 2.0s
59.8°- 3.0°(Wide Angle-Telescopic)
10 - 1500mm(Wide Angle-Telescopic)
32Kbps - 16Mbps
H.264 / H.265
JPG/MP4
SD/SDHC Card(MAX128G)
465mm
465mm
382mm
352mm
165mm
Remote Controller
Overall (L x W x H):
Working frequency:
Signal range:
Built-in battery:
174mm
62mm
165 x 174 x 62mm
2.4G
About 1.5KM (open without shelter, no electromagnetic interference)
7.4V 3000mAh Li-po 2S
-5-
Quick Start Guide
4.0 Attention Before Flight
1) This product is suitable for people who has flight experience of hobby model and ages 14 .
2) Do not fly in bad weather, such as windy, snowy, foggy etc..
3) Select the open, no-tall-buildings area. Extensive steel-used buildings will affect the compass,
blocking the GPS signal, causing worse on the aircraft positioning or even not able to locate.
4) Please keep away from highly spining parts(such as propellers and motors).
5) Please keep away from obstacles, people, water and so on.
6) Do not fly it in where there is high-voltage lines, communication base stations or radio towers, in order to
avoid signal interference.
7) Don’t fly in no-fly zone according to the local laws and regulations.
8) Flight performance will be effected with environment when flying above 4500m of sea levels,
as the battery and gravity system will be influenced.
+
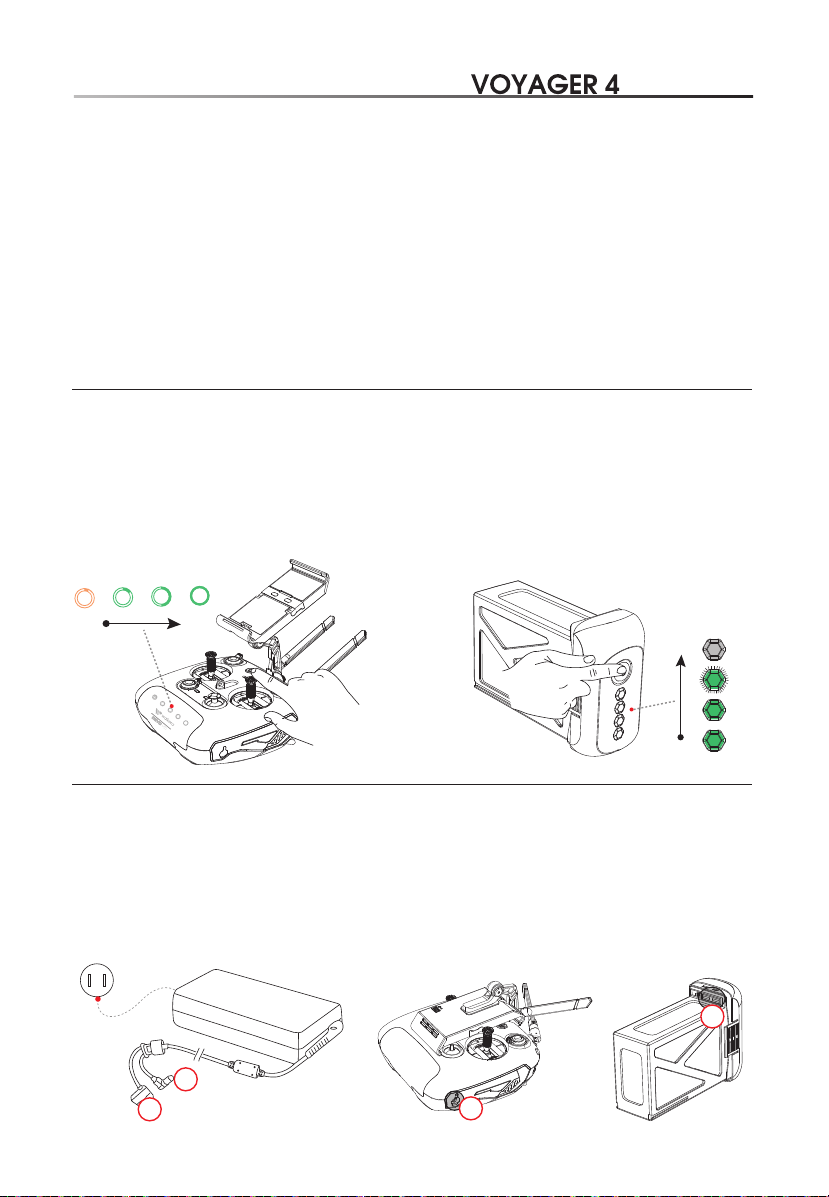
5.0 Check Battery Levels
Turn on the remote controller and intelligent flight Battery to check the battery level.
Be sure the battery was fully charged at the first use.
1) Long press the power button for 2~3 seconds to turn on the remote controller.
2) Long press the power button for 3~5 seconds to turn on Intelligent Flight Battery.
(Repeat above operation to turn off the intelligent flight battery and remote controller)
100
50
2510
Low High
High
2510
50
100
Low
6.0 Charge the Batteries
1) Connect the charger to the AC power (100 ~ 240v 50/60hz).
2) Only use the walkera charger for your Intelligent Flight Battery and remote controller.
Please turn off the intelligent flight battery and remote controller before charging.
3) The Level indicator of intelligent flight battery light off means charging finished completely;
The charging indicator of remote controller turns green means remote controller charging finished completely.
Power Outlet
100~240V
B
A
B
A
-6-
Pos-Hold
GPS
Quick Start Guide
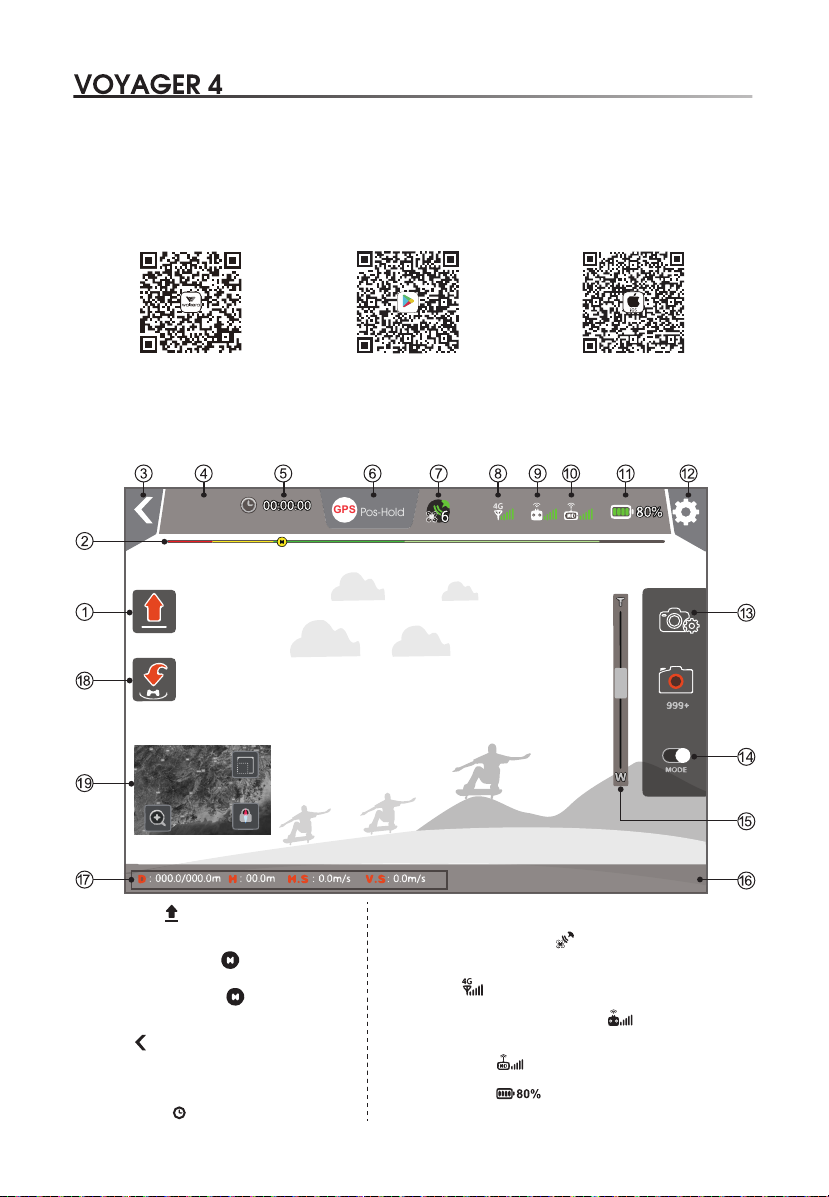
7.0 Downloading and Installing APP
APP software supports Android 5.1 and above systems iOS 9.0 and above,
Android system please download at Walkera official website (www.walkera.com) or go to Google play to search
for Walker Drone or scan the QR code to download and install;
iOS system please go to the APP Store to search for Walker Aircraft or scan the QR code to download and install.
Google Play
Android download Android download
iOS download
8.0 APP Main Screen Instructions
In the interface, HD video and photographs can be real-time previewed, as well as the dynamic setting
parameters, such as aircraft, remote controller, Gimbal and battery.
Connected
GPS Available
1. Auto Takeoff [ ]:
Click the button, the aircraft take off automatically.
2. Battery Levels return [ ]:
The remaining battery power of intelligent
flight reaches this point , the aircraft will
automatically return.
3. Return [ ]: Return to last step.
4. Equipment connection status:
Connected or Disconnected.
5. The flight time [ ] : Aircraft flight time.
6. The aircraft model: Display aircraft flight mode.
7. Number of aircraft satellite [ ]:
Displays the received satellites of aircraft.
8. 4G signal [ ]: Displays the 4G communication signal strength.
9. The remote controller signal strength [ ]:
Displays the signal level between remote controller and aircraft.
10. Camera signal [ ]
11. Battery Levels [ ]: Real-time display the
current Flight Battery remaining levels.
-7-
 Loading...