

Page 1
19”LCDTV+DVD
WPW19LDVD
OPERATING INSTRUCTIONS
Page 2

Table of Contents
Important Safety Instructions
Conformity and Compliance
Precautions and Reminders
Wall Mounting the Set
Specifications
Remote Control Functions
Front Panel Buttons
Rear Panel Inputs
Quick TV Set-Up Guide
Quick Connecting Guide
PC Connection
Remote Control of TV and DVD
On Screen Display (OSD) Menu
3
5
6
8
9
10
11
12
13
14
17
18
19
Menu Display Settings
PC Menu
ADVANCE Menu
TV SETUP Menu
Audio Menu
SYSTEM Menu
TV Setting
MTS (stereo mode)
Manual Scan (manual tuning)
Auto Scan (tune automatically)
Set Channel (s kip)et channel s
Label (re-name Programs)
Channel List (sorting channel order)
Tracking (fine tuning)
TV System (to set your country)
Automatic Frequency Control
DVD Hot Key
19
20
20
21
22
22
23
24
Teletext Instructions
DVD Operation and Settings
Troubleshooting
25
26
32
-2-
Page 3
Important Safety Instructions
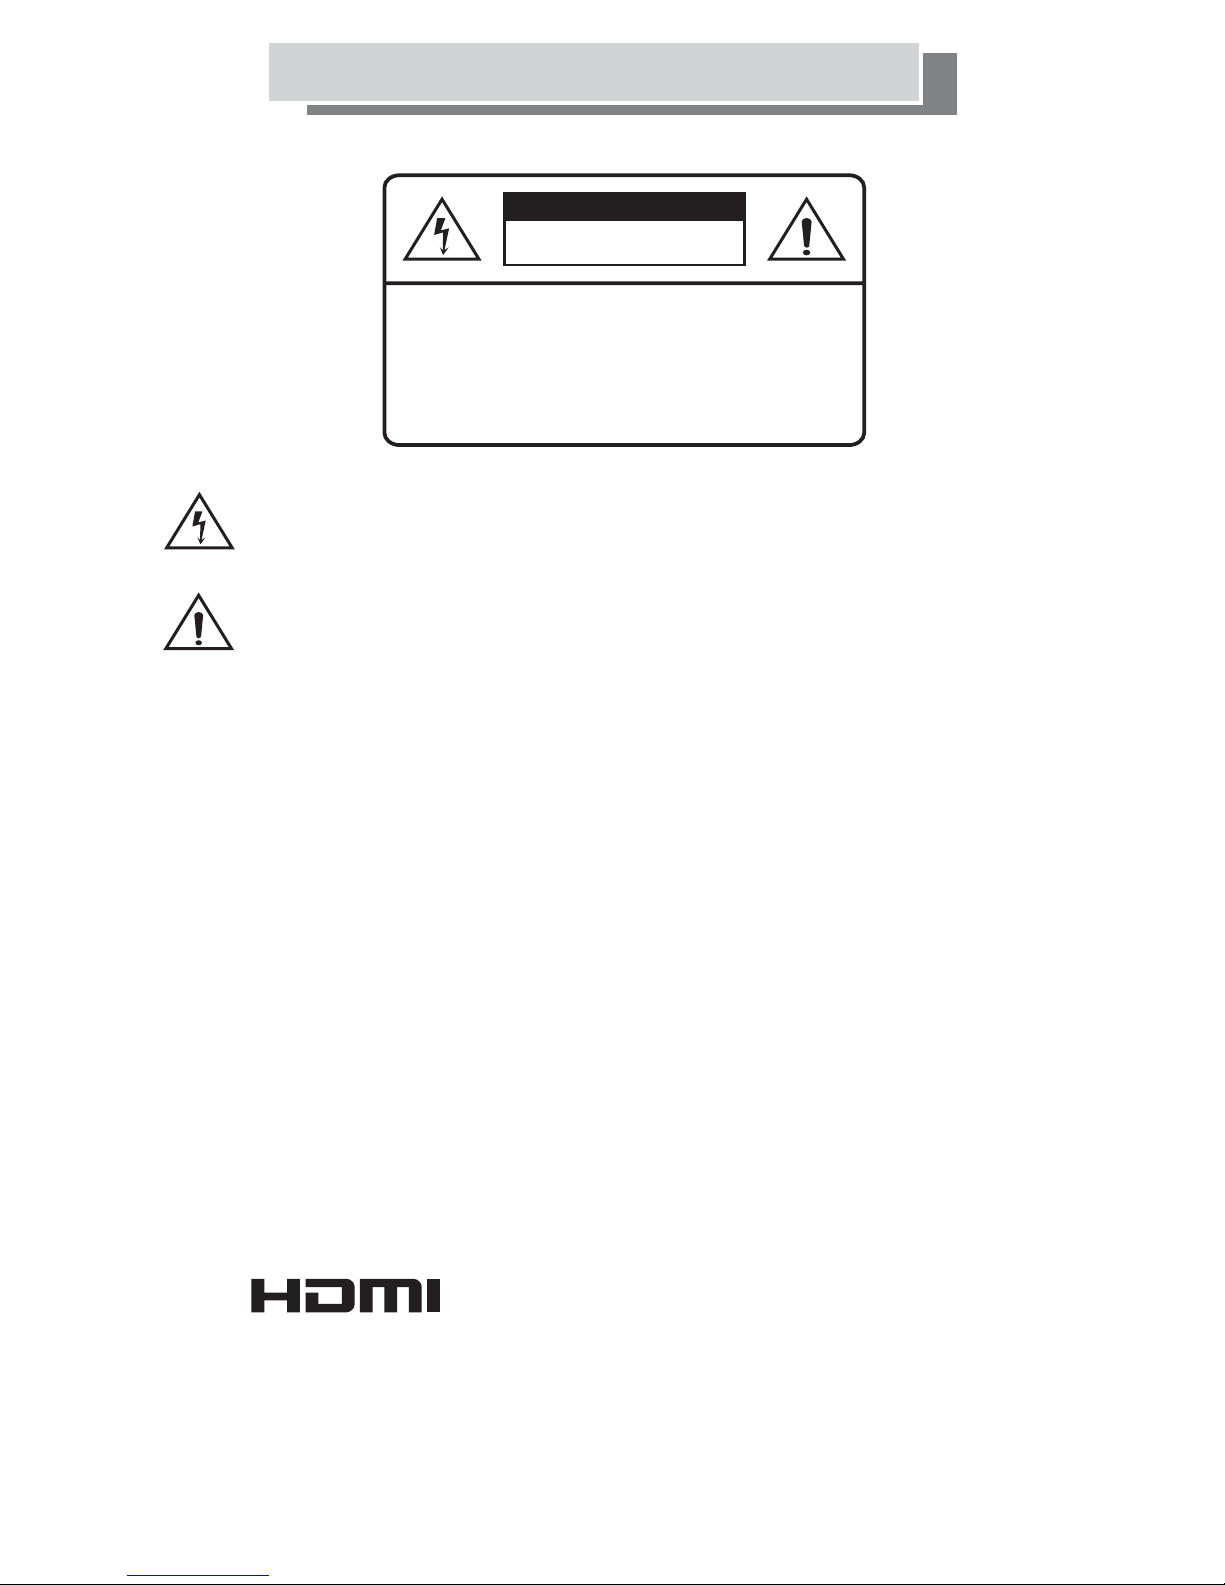
Caution
Risk of electronic shock
Do not open
CAUTION: TO REDUCE THE RISK OF ELECTRIC
SHOCK.
DO NOT REMOVE COVER (OR BACK).
NO USER SERVICEABLE PARTS INSIDE.
REFER SERVICING TO QUALIFIED SERVICE
PERSONNEL.
The lightning flash with arrowhead symbol within an equilateral triangle is intended
to alert the presence of uninsulated "dangerous voltage" within the product's
enclosure that may be of a sufficient magnitude to constitute a risk of electric shock.
The exclamation point within an equilateral triangle is intended to alert
the user to the presence of important operating and maintenance (servicing)
instructions in the literature accompanying the appliance.
Caution
1. Read these instructions.
2. Keep these instructions.
3. Heed all warnings.
4. Follow all instructions.
5. Do not use this apparatus near water.
6. Clean only with dry cloth.
7. Do not block any ventilation openings. Install in accordance with the
manufacturer's instructions.
8. Do not install near any heat sources such as radiators, heat registers, stoves,
or other apparatus (including amplifiers) that produce heat.
9. Iftheplugisnotsuitableordoesnotfitthesocketinyourhomeconsulta
qualified service agent.
This TV incorporates High-Definition
Multimedia Interface (HDMI™) technology.
HDMI, the HDMI logo and High-Definition Multimedia Interface are
trademarks or registered trademarks of HDMI Licensing LLC.
-3-
Page 4

Important Safety Instructions
10. Protect the power cord from being walked on or pinched particularly at plugs,
AC power outlets, and the point where they exit from the apparatus.
11. Only use attachments/accessories specified by the manufacturer.
12. Use only with the cart, stand, tripod, bracket, or table specified by the
manufacturer, or sold with the apparatus. When a cart is used, use caution when
moving the cart/apparatus combination to avoid injury from tip-over.
13. Unplug this apparatus during lightning storms or when unused for long periods
of time.
14. Refer all servicing to qualified service personnel. Servicing is required when the
apparatus has been damaged in any way, such as power-supply cord or plug is
damaged, liquid has been spilled or objects have fallen into the apparatus, the
apparatus has been exposed to rain or moisture, does not operate normally,
or has been dropped.
15.Use this product within 5 C - 35 C , and relative humidity 20-80%.
。
。
16. Unit should not be exposed to liquids of any kind.
17. Always use the POWER BUTTONS on the
alongperiodEGHoliday.
18. Contact service center if the picture displayed by the unit is getting dimmer.
19. do not place the unit on an uneven surface. Make sure it is at least 6 inches
from the wall.
20. Keep unit away from direct sunlight.
21. do not put heavy materials on top of the unit.
22. Do not place unit in confined spaces such as a book case.
The rating
23. plate is at the center of the back cover of the apparatus. It will
not be seen when the apparatus is on the wall.
24. Keep away from naked flames !
25. When using this product as a Computer monitor, health and safety experts
recommend short frequent breaks rather than occasional longer breaks.
Forexamplea5-10minute break after an hour of continuous use is likely to
be better than a 15 minute every 2 hours.
26. This product is designed for domestic use only and is therefore NOT suitable for
mounted
TV when leaving unattended for
commercial use.
27. Do not expose this television to dripping or splashing or place any object filled
with liquids, such as vases on the television.
28. Do not use chemical solvents or strong detergents when cleaning this appliance
as these cleaners may damage the cabinet.
-4-
Page 5

Conformity and Compliance
ELECTRICAL CONNECTION
For your safety please read the following information.
Warning:
This appliance must be earthed by connecting to a mains power outlet with
a protective earthing connection.
The appliance must be connected to a 220-240 volts 50 cycle AC supply by
means of a three pin socket, suitably earthed and should be protected by a
3 Amp fuse in the plug or a 3Amp fuse in the consumer unit.
Never use a fused mains plug without the fuse cover.
Never put a naked flame source near or on the television.
If the mains plug is unsuitable for the socket outlet in your home or is removed
for any other reason, then the plug should be disposed of SAFELY to prevent the
hazard of electric shock.
If a fuse is fitted to the plug, remove the fuse before throwing the plug away.
How to wire a UK mains plug.
The appliance is supplied with a BS1363 plug fitted with a 3 Amp fuse.
should the fuse require replacement, it must be replaced with a fuse
rated at 3 Amp and approved to BS1362.
GREEN/YELLOW
BLUE
Neutral
Earth
E
L
N
Cord Clamp
BROWN
Live
FUSE
3Amps
Important
The wire in the mains lead on this appliance are coloured in accordance with
the following code:
Green and Yellow Earth
Blue Neutral
Brown Live
As the colours may not correspond with the markings identifying the terminals
in your plug, proceed as follows.
The green and yellow wire must be connected to the terminal in the plug which
is marked with the letter E or with the earth symbol or coloured green and
yellow.
The blue wire must be connected to the terminal marked N.
The brown wire must be connected to the terminal marked L.
-5-
Page 6
Precautions And Reminders
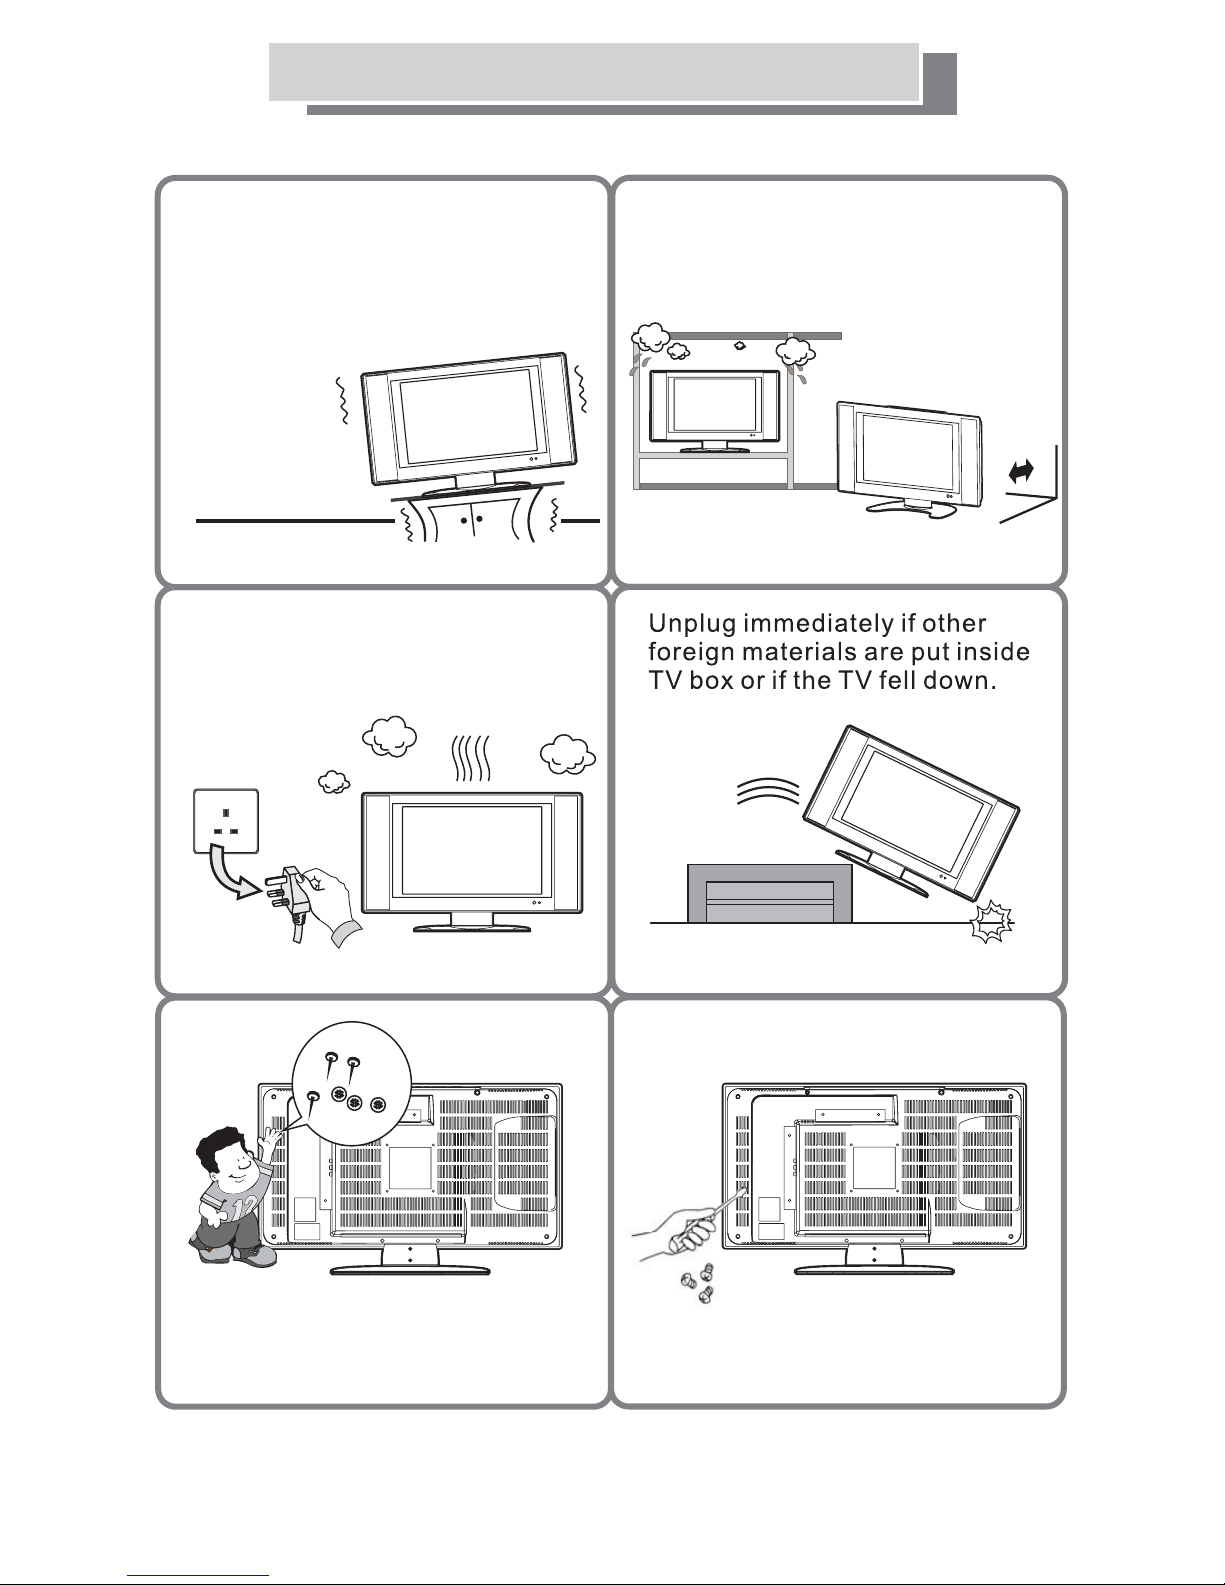
Place unit on even surfaces.
Unplug immediately if there is
malfunction such as no picture, no
video/audio, smoke, bad odor
from TV.
Do not place the TV in confined
spaces or in a box when using it.
6 inches
Do not any object inside
Insert
the TV box such as metals or
flammable materials.
Do not open the TV cabinet.
-6-
Page 7
Precautions And Reminders
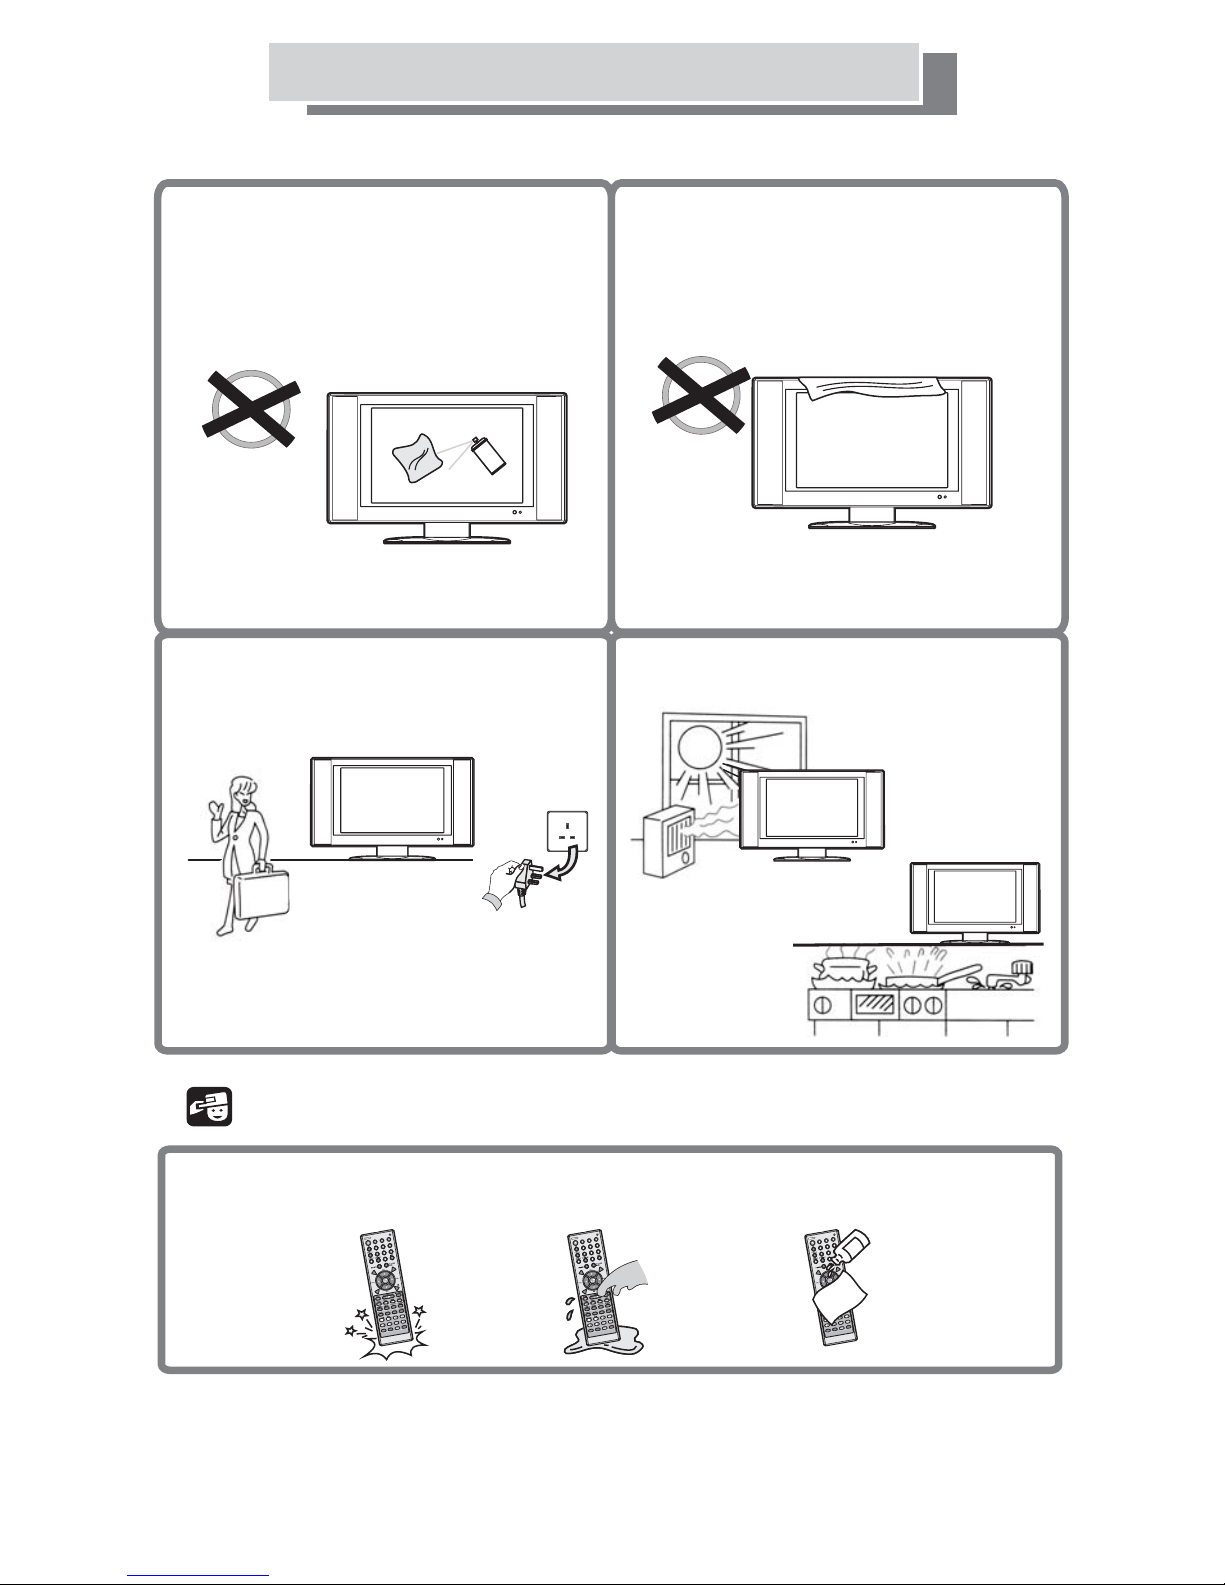
Remember to unplug the power cord from
the power outlet before cleaning the
display unit. Only use recommended
cleaners do not allow water to remain on
the screen as it could cause permanent
damage.Only use a lightly dampened
cloth to clean the LCD screen.
Always remember to protect the screen
from finger prints.
Do not use chemical solvents.
Make sure to unplug the unit when
not in use for a long period of time (days).
Do not cover or block any vents and
openings. Inadequate ventilation may
shorten the life of the display unit
cause overheating.
Avoid direct sunlight, dusty, high
humidity and smoky areas.
or
Notice for Remote Controller
Avoid Dropping
D
V
D
SLEEP
MUTE
/
E
T
A
N
R
E
T
L
A
L
A
U
T
R
I
V
E
L
IT
T
PIP
PICTURESIZE
?
X
i
TXT
Avoid Liquids
D
V
D
SLEEP
MUTE
/
E
T
A
N
R
E
T
L
A
L
A
U
T
R
I
V
E
L
IT
T
PIP
PICTURESIZE
?
X
i
TXT
-7-
Avoid Aerosol Cleaners
D
V
D
SLEEP
MUTE
/
E
T
A
N
R
E
T
L
A
L
A
U
T
R
I
V
E
L
IT
T
PIP
PICTURESIZE
?
X
i
TXT
Page 8
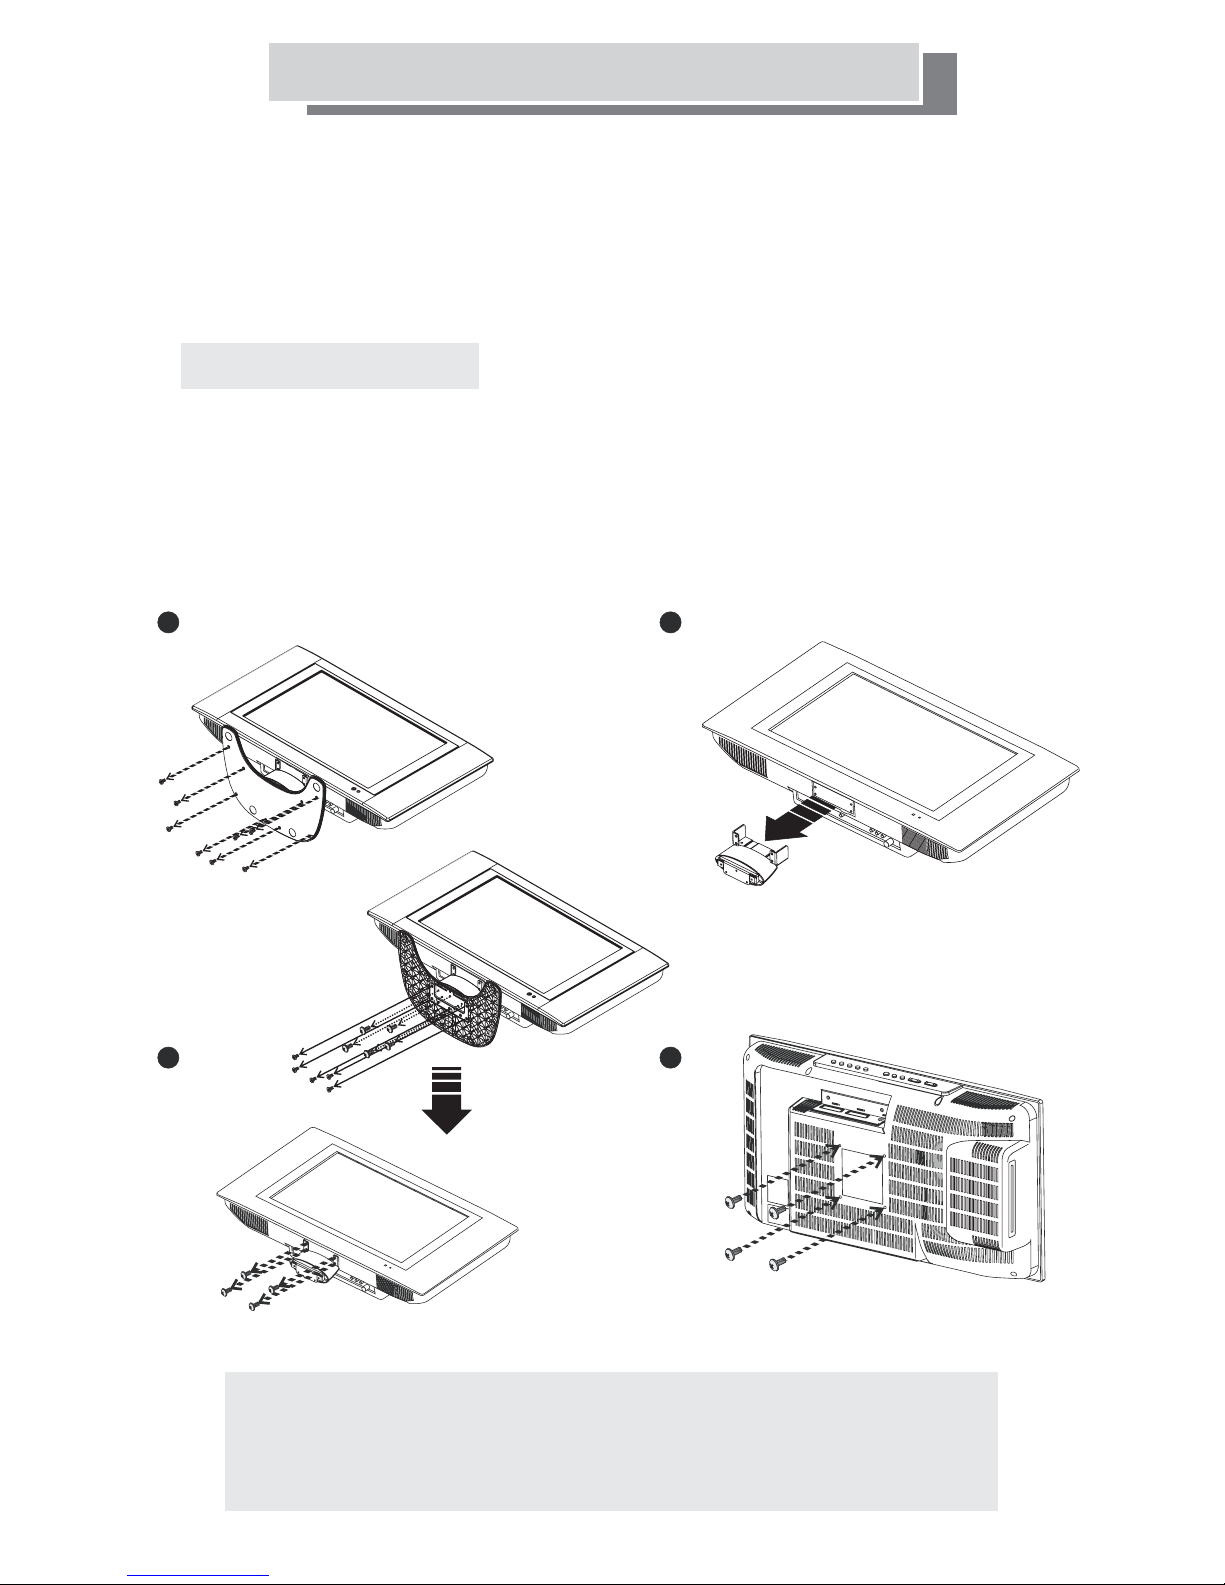
Wall Mounting the Set
The wall mount set (Optional)
Contact a professional installer if you are unsure about wall mount installation.
Improper installation may cause injury and damage display unit.
Caution:
When removing the TV stand, place the display panel face down on a
soft fabric to avoid damaging the unit.
Wall Mount Procedures
This product requires a 100mm VESA wall mounting kit to mount it
on a wall (not supplied).
Please mount this product solidly on the wall or pole.
1. Loosen screws on base stand.
2. Loosen screws on neck of base stand.
3. Detach TV from the neck of base stand.
4. Wall mount the set.
to the
1
1-1
3
1-2
2
4
Warning:
To prevent injury, this apparatus must be securely
attached to the wall in accordance with the installation
instructions supplied with the mounting kit.
The holes for VESA plate mounting
(Total 4 holes)
-8-
Page 9
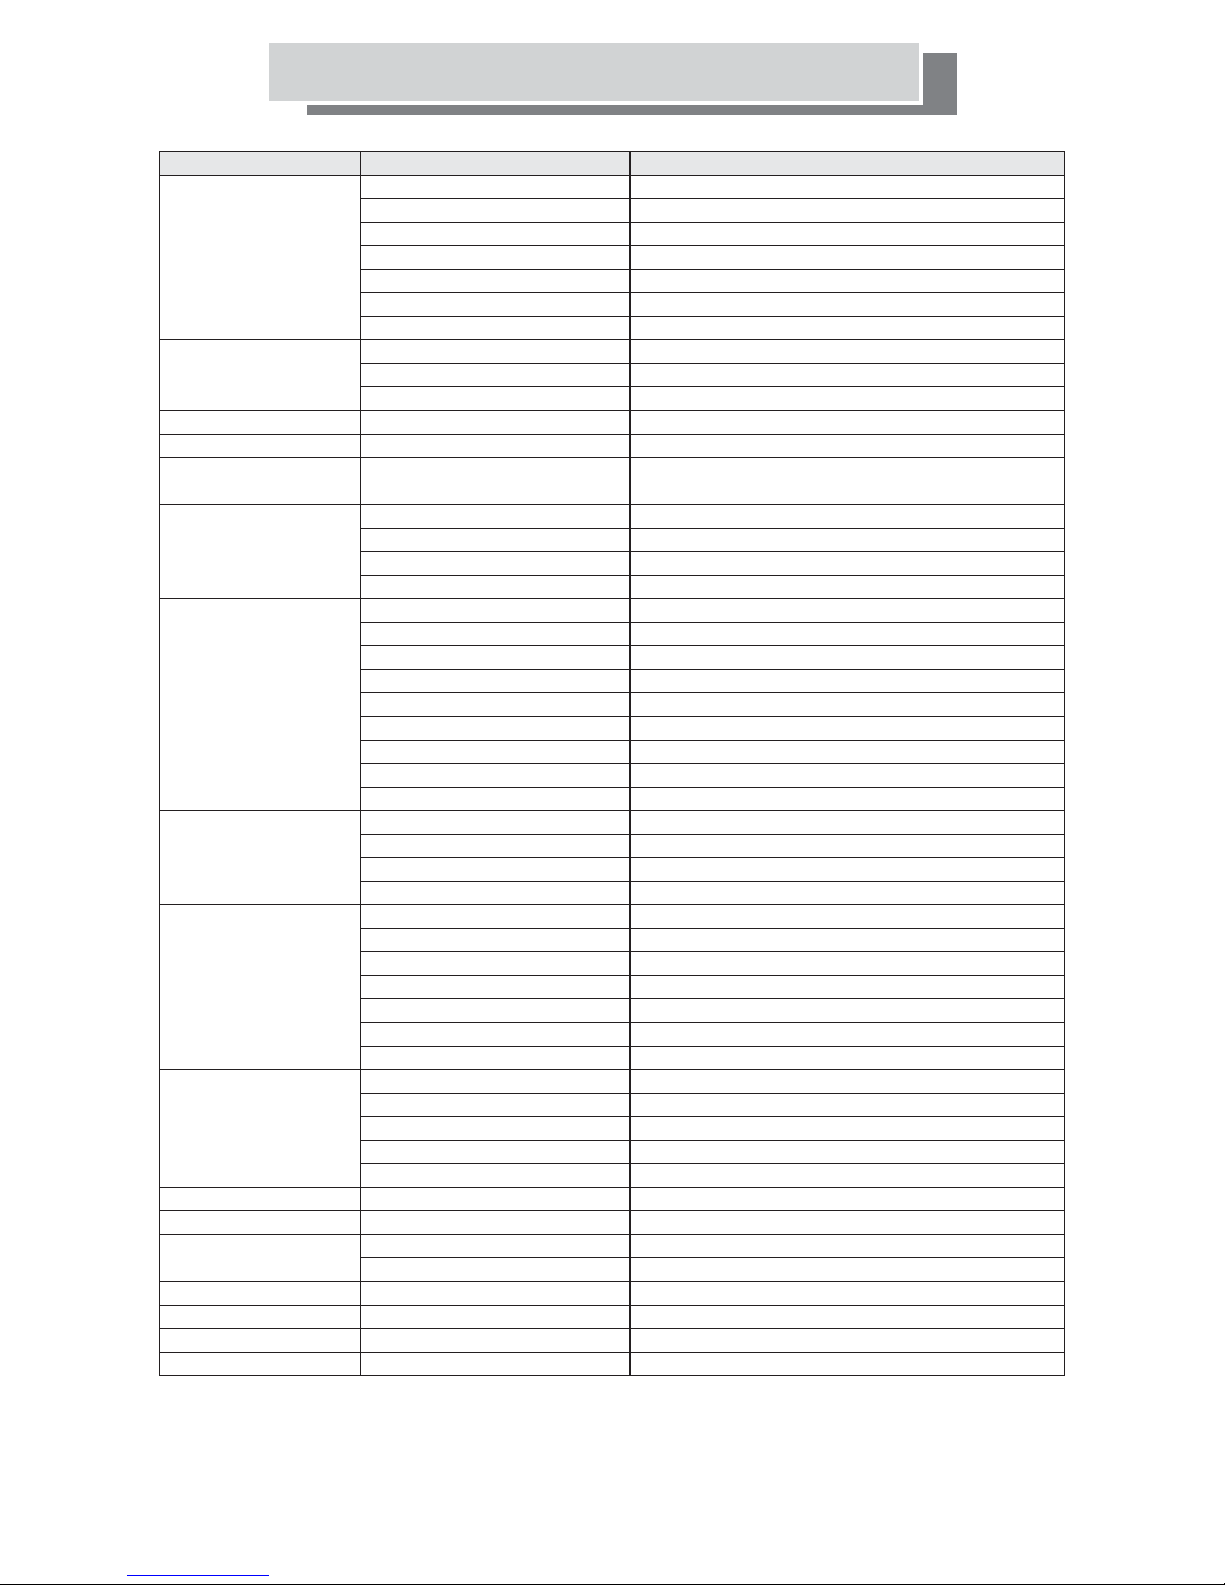
Specifications
Model No.
Panel
TV function
Video System
VBI support
Video Feature
Audio Feature
I/O Connection
User Feature
User key(TV)
User key(DVD)
IR control
DVD
Power Supply
(EDAC EA11003A)
Power consumption
Dimensions
Weight(net)
Accessories
Panel Size
Aspect Ratio
Resolution
Brightness
Contrast Ratio
Viewing Angle (H/V)
Response Time(Tr+Tf)
RF system
Broadcasting System
Channel Coverage
Type
Teletext
Signals Supported
Stereo System
Volume/Bass/Treble/Mute control
Audio Input
Speaker Output
RF-IN
SCART-IN
Component(YPbPr)-IN
AV -IN Video (AV or S-Video in)
HDMI IN
PC - D-Sub IN
Line - IN(for PC)
Audio in (for DVI)
Headphone in
ATS(Auto tunning system)
Sound Auto Detect Display
Auto Adjust(PC mode)
Channel Editing
Channel Up
Channel Down
Volume Up
Volume Down
Menu
Source
Power
EJECT
FR
FF
STOP
PLAY/PAUSE
TV/DVD
Slot-in
AC INPUT (100~240V)
DC OUTPUT (12~17V)
WxHxD
WPW19LDVD
19"
16:9
1440 x 900
300 nits
700:1
150/135
5ms
PAL,SECAM
B/G,D/K,I,L/L'
48.25MHz~863.25MHz
PAL,SECAM
TOP/FLOF
Composite, Y-C, RF,
YPbPr / HDMI(576p/720p/1080i)
A2(B/G,D/K)/NICAM(B/G,D/K,I,L/L')
Yes
Video, SCART, Tuner, Line, HDMI, DVI
2x3W
1
2
1
1
1
1
1
1
1
Yes
Yes
Yes
Yes
Yes
Yes
Yes
Yes
Yes
Yes
Yes
Yes
Yes
Yes
Yes
Yes
Yes
Yes
2.5A, 50-60Hz
7.5A, 90W
70W
650mm x 408mm x 220mm
8.6kg
Remote control unit , adapter, power cord, user manual, battery
-9-
Page 10
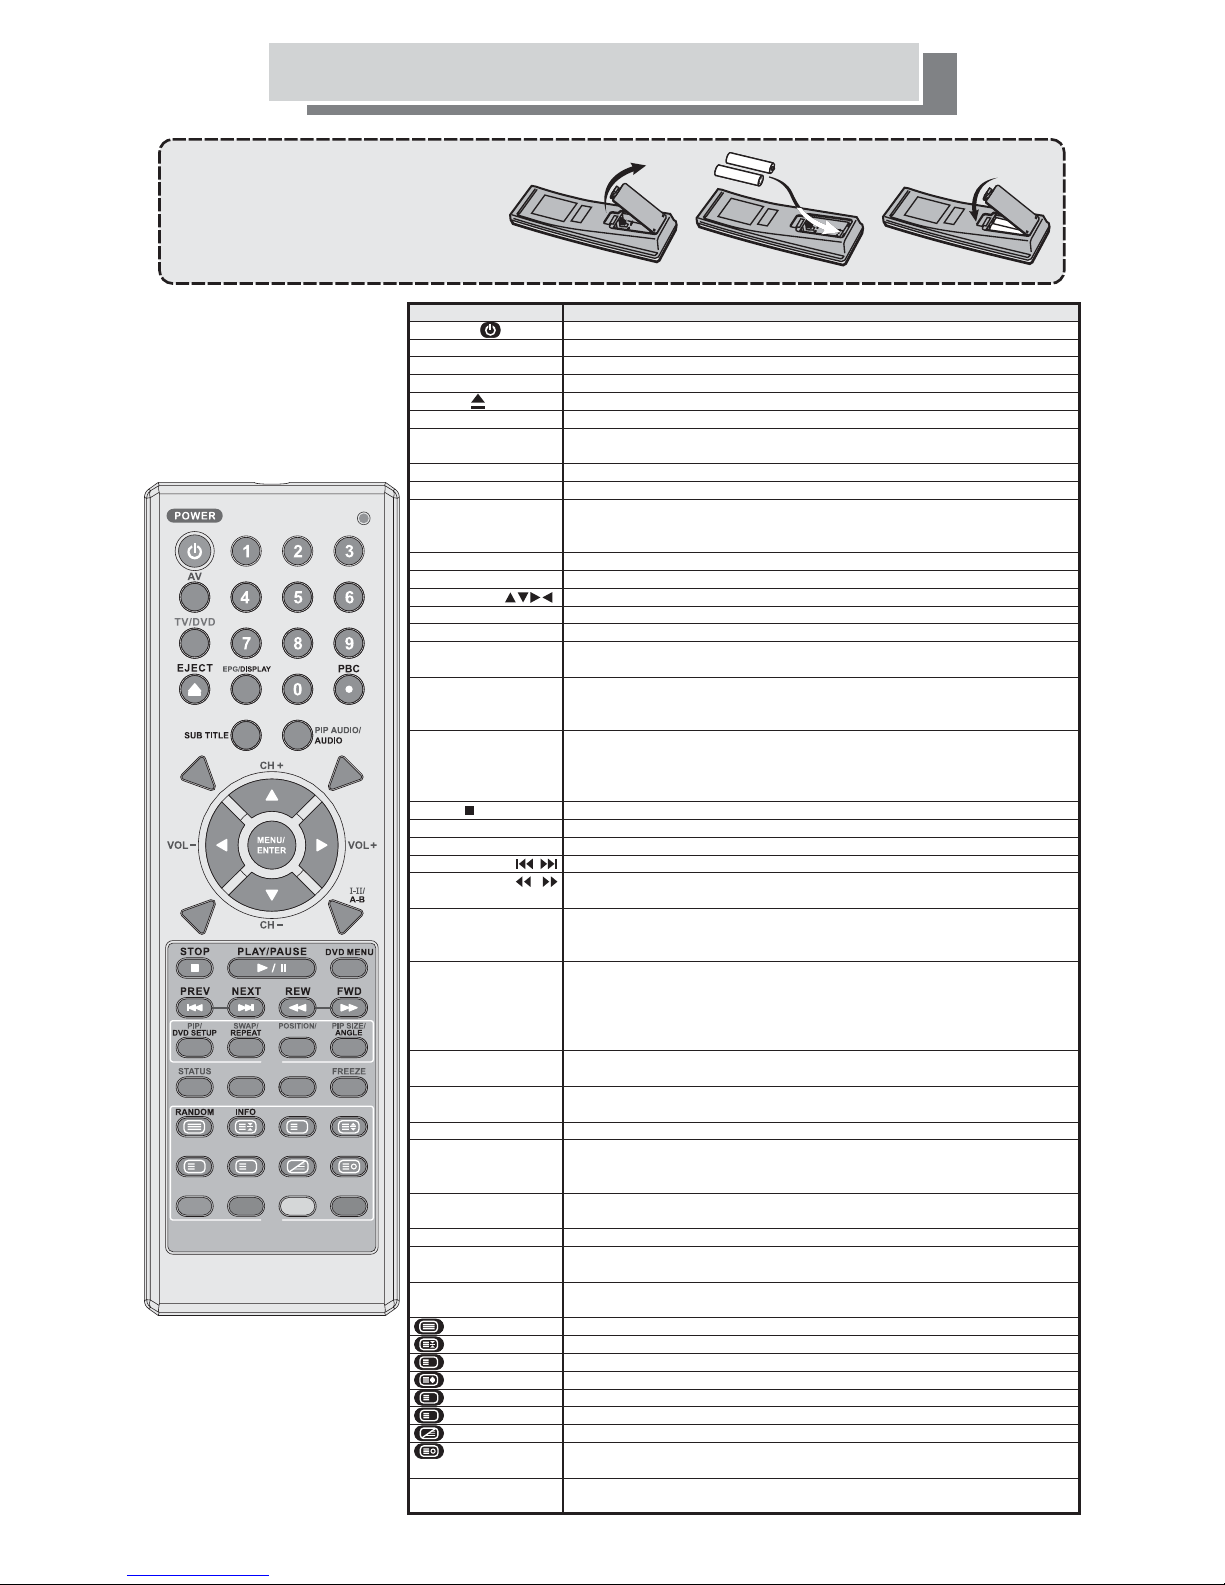
Remote Control Functions
Putting the batteries in the remote
l Open the battery compartment cover and
insert the batteries as shown.
Use two AAA/R03 batteries and
l
follow the indications ( , )
inside the compartment.
Close the cover when you're finished.
l
12
MUTE
ALTERNATE/
VIRTUAL
Functionality
Turn the TV on and off.
In the DVD mode, the LED will be lit.
Use to select an input source. ( see page 14 )
Press to switch remote control inputs between TV or DVD mode.
Open and close the disc tray.
Use number (0-9) buttons to create stations and preset programs.
EPG:
Press to display the on-screen Electronic Program Guide (EPG).
DISPLAY:
Display disc information.
VCD 2.0 playback PBC functions on/off.
Displays or change the subtitle language.
PIP AUDIO:
AUDIO:
Press to selects PIP (sub picture) audio in PIP mode.
When plaing a DVD / Video disc recorded with dialog in two or
DVD
Key(s)
POWER
DVD Indicator
AV
TV/DVD
EJECT
Number (0-9)
EPG /
DISPLAY
PBC
SUB TITLE
PIP AUDIO /
AUDIO
more languages, you can switch audio language during playback.
MUTE
SLEEP
Cursor keys( )
(CH+, CH-)
(VOL+, VOL-)
MENU /
ENTER
ALTERNATE /
VIRTUAL
Press to temporarily cut off the sound.
Performs the sleep timer function.
To move the cursor up/down/right/left to scroll through a list of options.
Cycle through available channels in either Up/down sequence.
Press to increase or decrease the volume.
MENU:
Displays the main on-screen menu.
ENTER:
ALTERNATE:
VIRTUAL:
Press to select options in DVD disc menu.
Return to the previous channel.
In DVD mode pressing the play button shows an on screen
remote control. ( see page19 )
I-II:
SLEEP
I-II /
A-B
Selecting the sound mode. ( see page18 )
A-B:
In DVD mode, The A-B Repeat function allows you to specify two
points (A and B) within a track or title that forms a loop which is played
over and over.
STOP
PLAY / PAUSE
DVD MENU
PREV-NEXT
REW -FWD
Stop playback.
Disc play/pause.
When playing a disc, displays the disc's menu.
Search forward/backward through the disc.
Press to increase/decrease or menu control key
Also advances to the next/preceding chapter or track.
PIP /
DVD SETUP
PIP DISPLAY:
Press again to select the sub picture signal source.
DVD SETUP:
SWAP /
REPEAT
PIP SWAP:
in PIP mode.
REPEAT:
TITLE
PIP
PICTURESIZE
POSITION /
TITLE
PIP SIZE /
?
i
X
ANGLE
STATUS
SIZE
of disc being loaded. It's also possible to use repeat play along with
program play to repeat the tracks/ chapters in the program list.
PIP POSITION:
TITLE:
PIP SIZE:
ANGLE:
Press to display the current channel and audio/video settings.
-FULL (full screen)............standard full-screen text.
-TOP (top half)..................top half of page appears on the full screen.
Press to activate Picture In Picture (PIP) mode.
Display the DVD OSD menu.
Press to switch between main picture and sub picture
There are various repeat play options, depending on the kind
Press to select the position of the sub picture in PIP mode.
Accesses the DVD disc guide.
Press to change the size of sub picture in PIP mode.
The scene change to the selected angle.
-BOTTOM (bottom half)... Bottom half of page appears on the full screen.
TXT
PICTURE
FREEZE
RANDOM
Press to select advanced picture setting.
You can select from five different modes: User/Sport/Movie/Vivid/Game
Press to freeze the picture and press again to restore live viewing.
In DVD mode, Use the random play function to play titles or chapters,
groups, or tracks.
INFO
Various track, chapter and title information, such as the time elapsed and
remaining playing time can be displayed on-screen while the disc is playing.
T.T Display
T.T Hold
?
T.T Reveal
T.T S iz e
i
T.T Index
X
T.T Cancel
T.T M ix
T.T Subcode
Press to access Teletext function.
Stop from advancing to the next Teletext sub Page.
Show hidden information. Press again to conceal the information.
Change the size of Teletext.
Access the Teletext index.
Exit Teletext mode.
To overlay text onto a TV programmer
Select a Teletext subtitle page, then enter desired page number to begin
page search.
RED, GREEN,
Direct access Teletext linked page key
YELLOW, BLUE.
-10-
Page 11
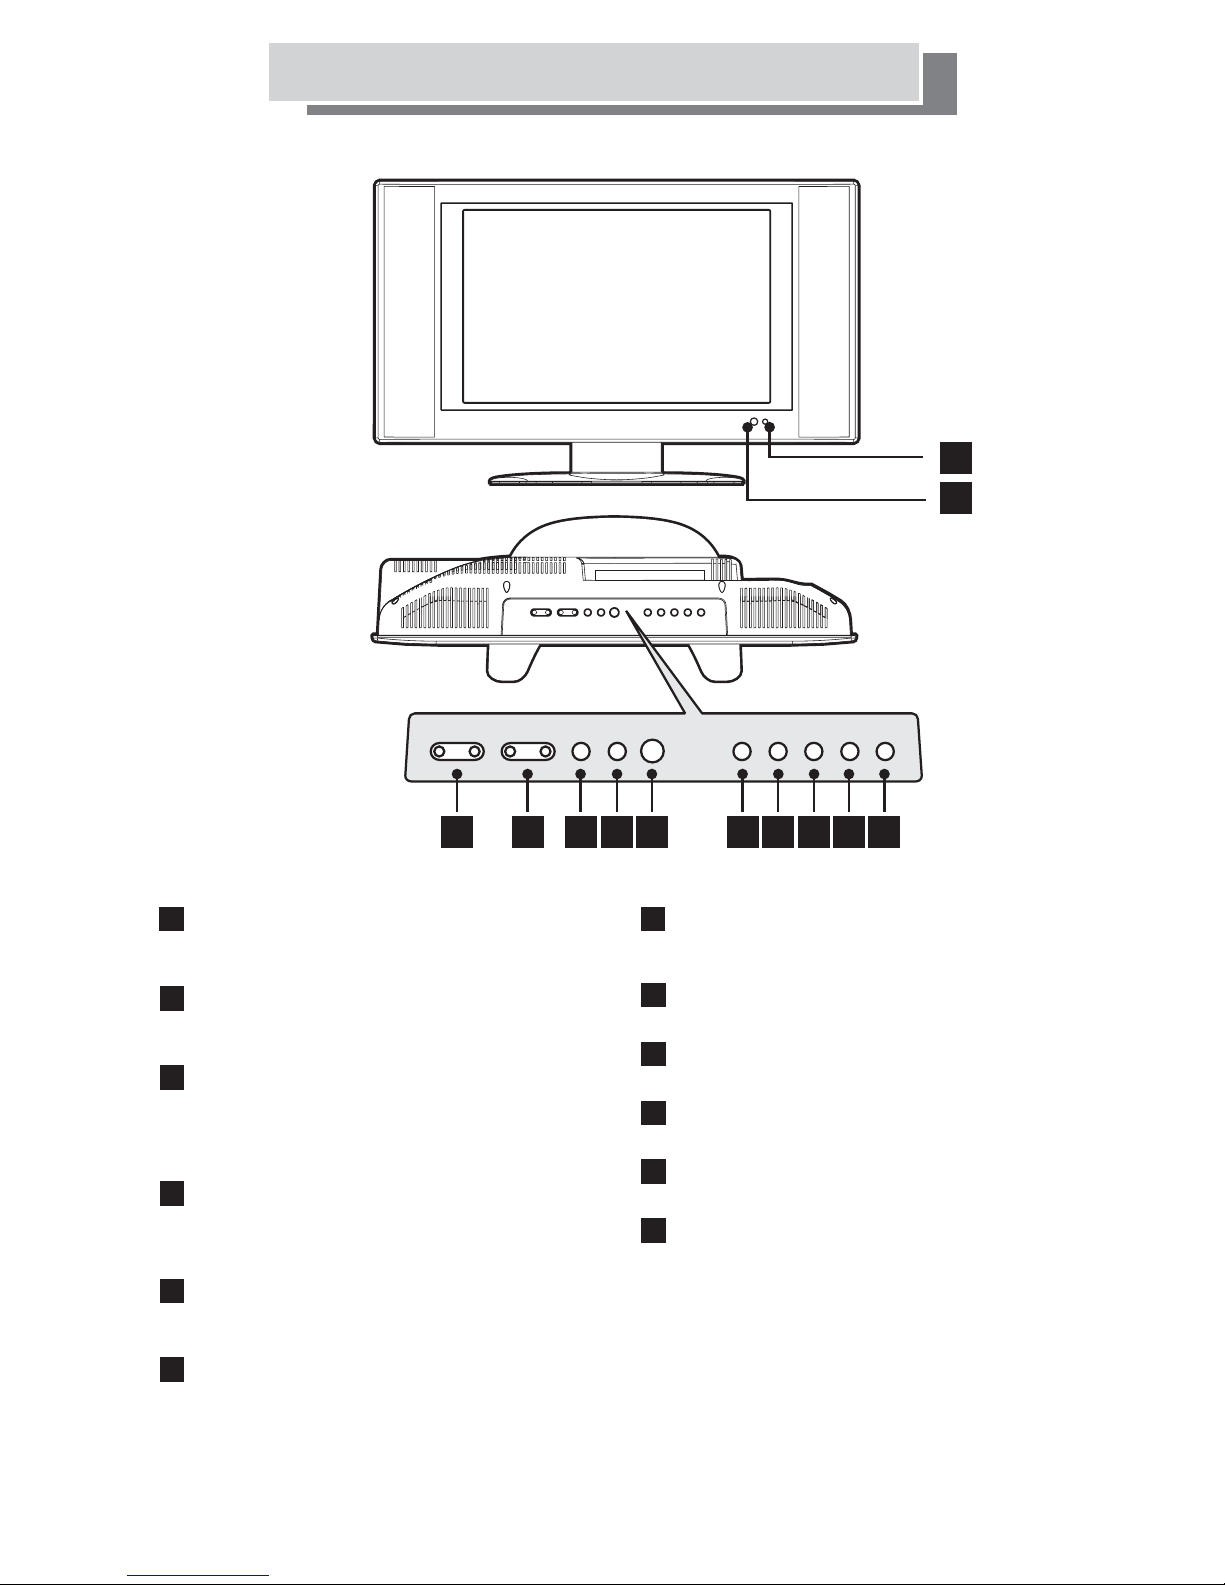
Front Panel
Function Keys
Front Panel Buttons
1
2
3 4 5 6 7 8 9
Power indicator:
1
Stand by mode displays amber. Power on
displays green.
IR Receiver:
2
Aim at the IR receiver window when using
Remote Controls.
Channels / Cursor Up/Down keys:
3
Press - to select channels from high to low,
and press + to select channels from low to high.
When OSD menu displays, these two keys
enable selection of menu items.
Volume Control / Setting keys:
4
Press - to decrease volume, and press +
to increase volume. When OSD menu displays,
these two keys enable change of setting levels.
Menu key:
5
Press to display the Menu. Press again to
exit the Menu.
Source key:
6
Press this button to cycle through:
TV DVD VIDEO SCART1/2(Video/RGB) YPbPr (Component) VGA(PC)
HDMI.
(S-Video/ Video)ªª ª ª ª ª
Power key:
7
Press once to turn on. Press again to return to
stand by mode.
Play/Pause key:
8
Disc play/pause and enter key.
Eject key:
9
Opens and closes the disc tray.
Stop key:
10
Press to stop DVD playback.
FF key:
11
Press to search forward through the DVD.
FR key:
12
Press to search backward through the DVD.
10 11 12
-11-
Page 12
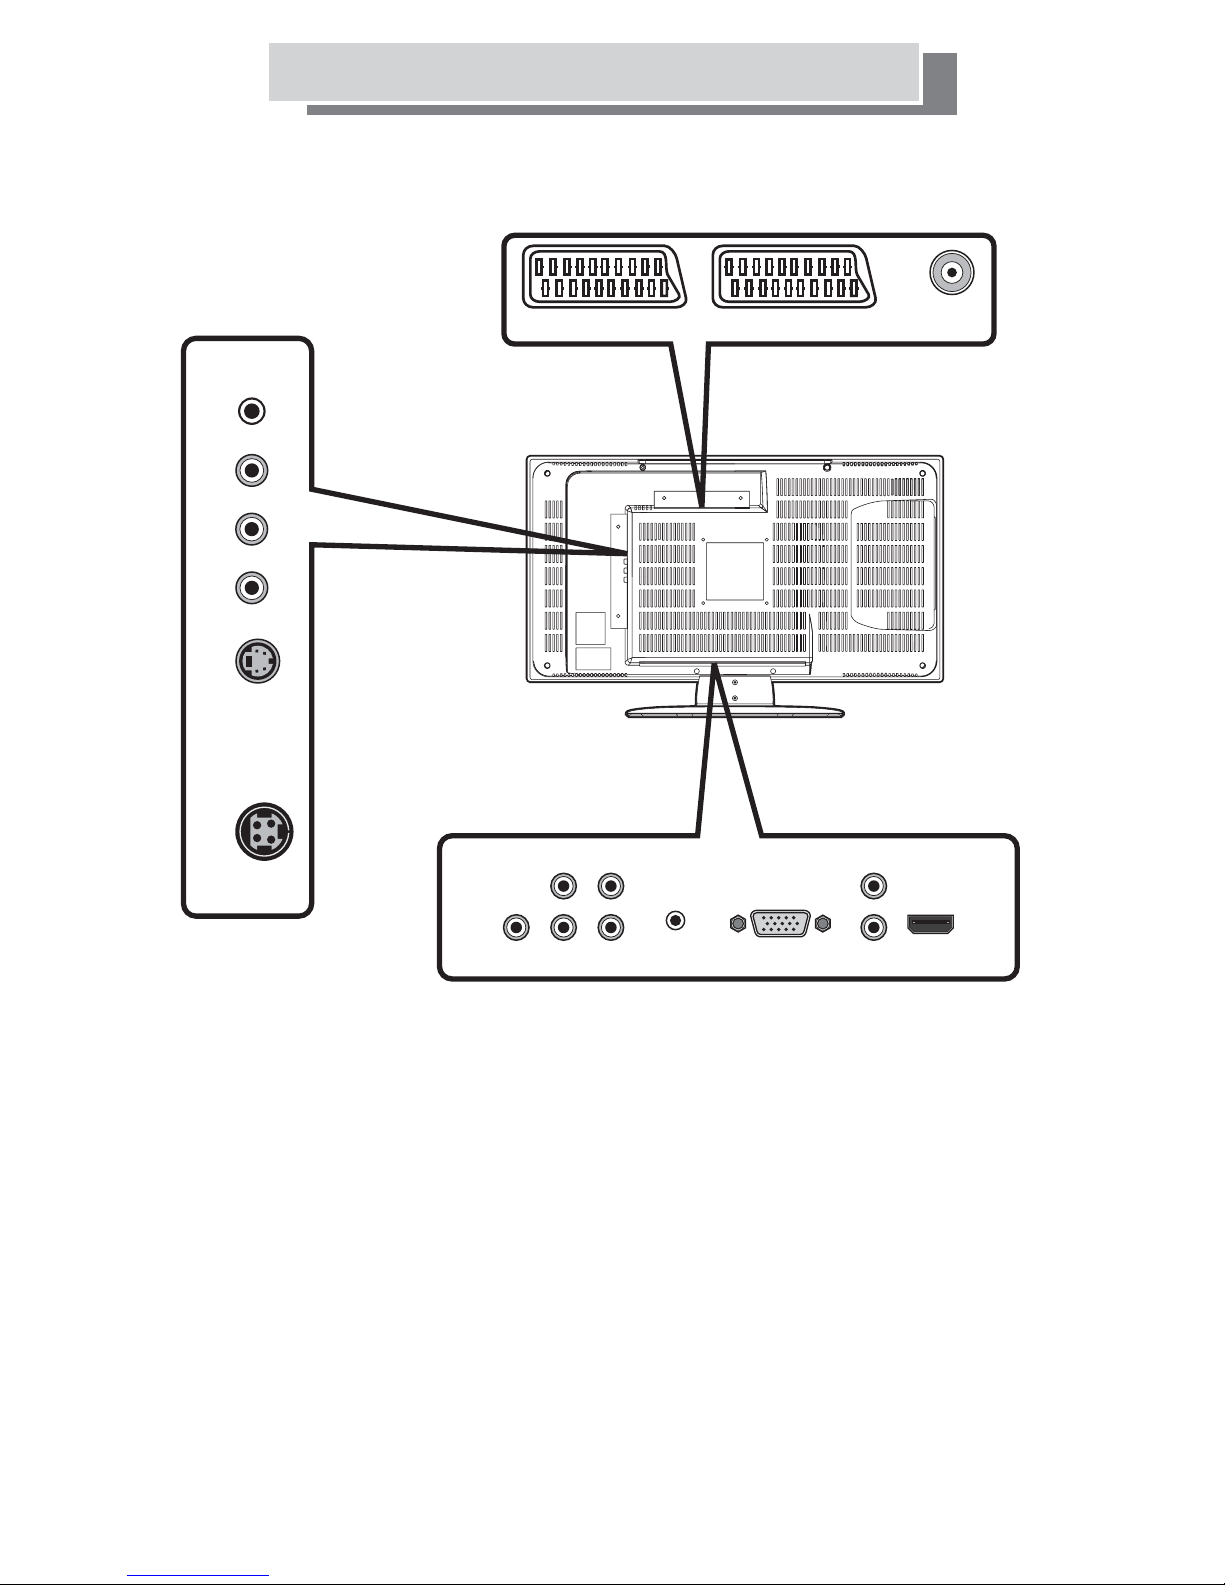
Rear Panel
Rear Panel Inputs
Phone
R
L
Video
S-Video
Power
SCART 2SCART 1
RL L
Antenna
Y
Antenna Input Socket
Y Pb Pr Input Socket
:
75 type coaxial cable connector.
Ω
:
Connect appliances with component output.
AV (Video / L / R) Input Socket
S-VIDEO Input Socket
SCART 1 / 2
Input Socket
:
Connect appliances with S-VIDEO output.
:
Connect DVD pla
Socket 1 : Support SCART CVBS+RGB
Socket 2 : Support SCART CVBS
VGA Input Socket
PC Audio Input Socket
Power
: Input socket connect with AC power cord.
HDMI Input Socket:
HDMIL/R:
If the signal source use DVI format,
:
Connect with VGA socket of PC.
:
Connect with Line Out socket of PC.
Connect
appliances with HDMI output.
then connect appliances with PC output.
Phone:
For earphones.
Audio in
Pr
Pb
:
Connect with DVD player or VCR AV output.
VGA
R
HDMI
yer or VCR AV output.
-12-
Page 13
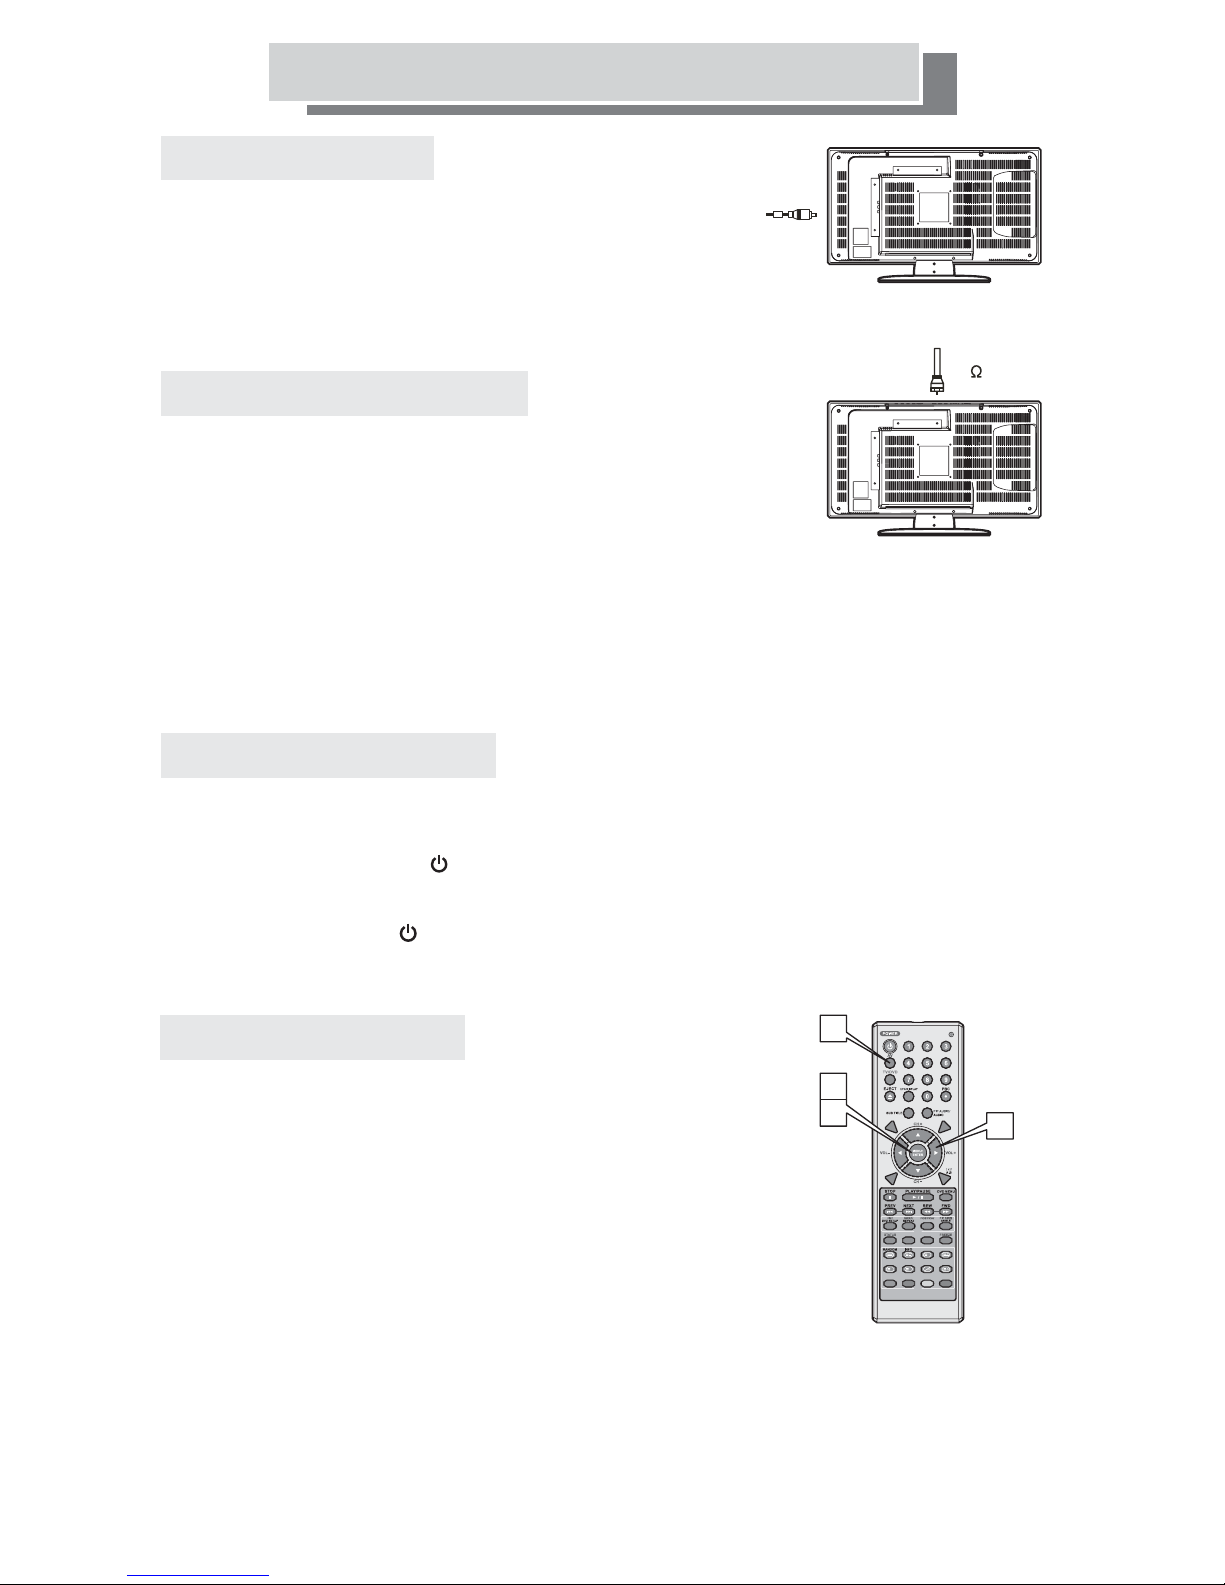
Power connection
Quick TV Set-Up Guide
1. Connect adapter to power input of TV.
POWER
2. Connect adapter to power cord.
3. Connect the other end of power cord to power supply.
75
Connecting to An Aerial
CONNECTING A TV ANTENNA / CABLE
To view television channels correctly,
a signal must be received from one of the following sources:
1. An indoor or outdoor aerial
2. A cable television set top box
Insert the aerial plug into the aerial input socket on the left side of the television.
Note: For receiving over-the-air TV broadcasts, we recommend you use an external
fixed aerial.
If you have to use a set top aerial, please ensure that you use one with sufficient gain to
receive in weak signal areas. Only when you are in close proximity to a transmitter will an
indoor aerial produce a picture as clear as a fixed antenna.
Turning ON/OFF the TV
1. If power input is connected correctly, the LED on the front panel becomes
Amber
(i.e. stand-by mode). Press the POWER button on the function panel OR press
the red POWER button “ ” of the remote control. The TV will switch on and the
LED on the front panel becomes green.
2. To switch the TV off, press the POWER button on the function panel OR press the
red POWER button “ ” of the remote control. The TV will switch off and go to the
stand-by mode.
Auto Scan channels
1. Press the AV key repeatedly to change the input source to TV.
2. Press the MENU/ENTER key on the remote control to show the On
1
2
4
Screen Menu (OSD).
3. Select TV setup with the up / down arrow buttons, then Press Left / Right
arrow buttons to select Auto Search. Then press left arrow again and
"country" will be highlighted. Use the left / right arrow buttons to select
your country. This will only need setting the first time the TV is tuned.
Press the up / down buttons to highlight "Start Search", then press the
ALTERNATE/
MUTE
VIRTUAL
DVD
SLEEP
3
Cursor
keys
TITLE
PIP
PICTURESIZE
?
i
X
TXT
right arrow button to start searching for channels.
4. When the auto scan has finished Press the MENU/ENTER button to leave the Setup stage.
If you would like the channels on certain numbers please refer to 'Manual scan'
on page 24, or channel swap on page 22.
-13-
Page 14

Quick Connecting Guide
●
This product includes SCART, AV, S-VIDEO, input
sockets to connect with DVD player, VCR, DV Camera to obtain
better picture quality.
●
Input jacks and source selection need to match correctly for display
of correct picture.
●
Video and Audio jacks are colour-coded:
Video........................................... Yellow (Y)
Audio (L)..................................... White (W)
Audio (R)..................................... Red (R)
Y.................................................. Green
Pb................................................ Blue
Pr................................................. Red
Audio (L)..................................... White (W)
Audio (R)..................................... Red (R)
YPbPr
Connection Instruction
1. Connect home entertainment appliance with appropriate SCART / AV/SVIDEO
/ YPbPr / PC input / HDMI jacks.
2. Press
AV key on the remote or the SOURCE button
on the TV one of the following
TV DVD VIDEO (S-Video/ Video) SCART 1 /2 (Video/RGB) YPbPr (Component) VGA(PC) HDMI.ªª ª ª ª ª
to select :
-14-
Page 15
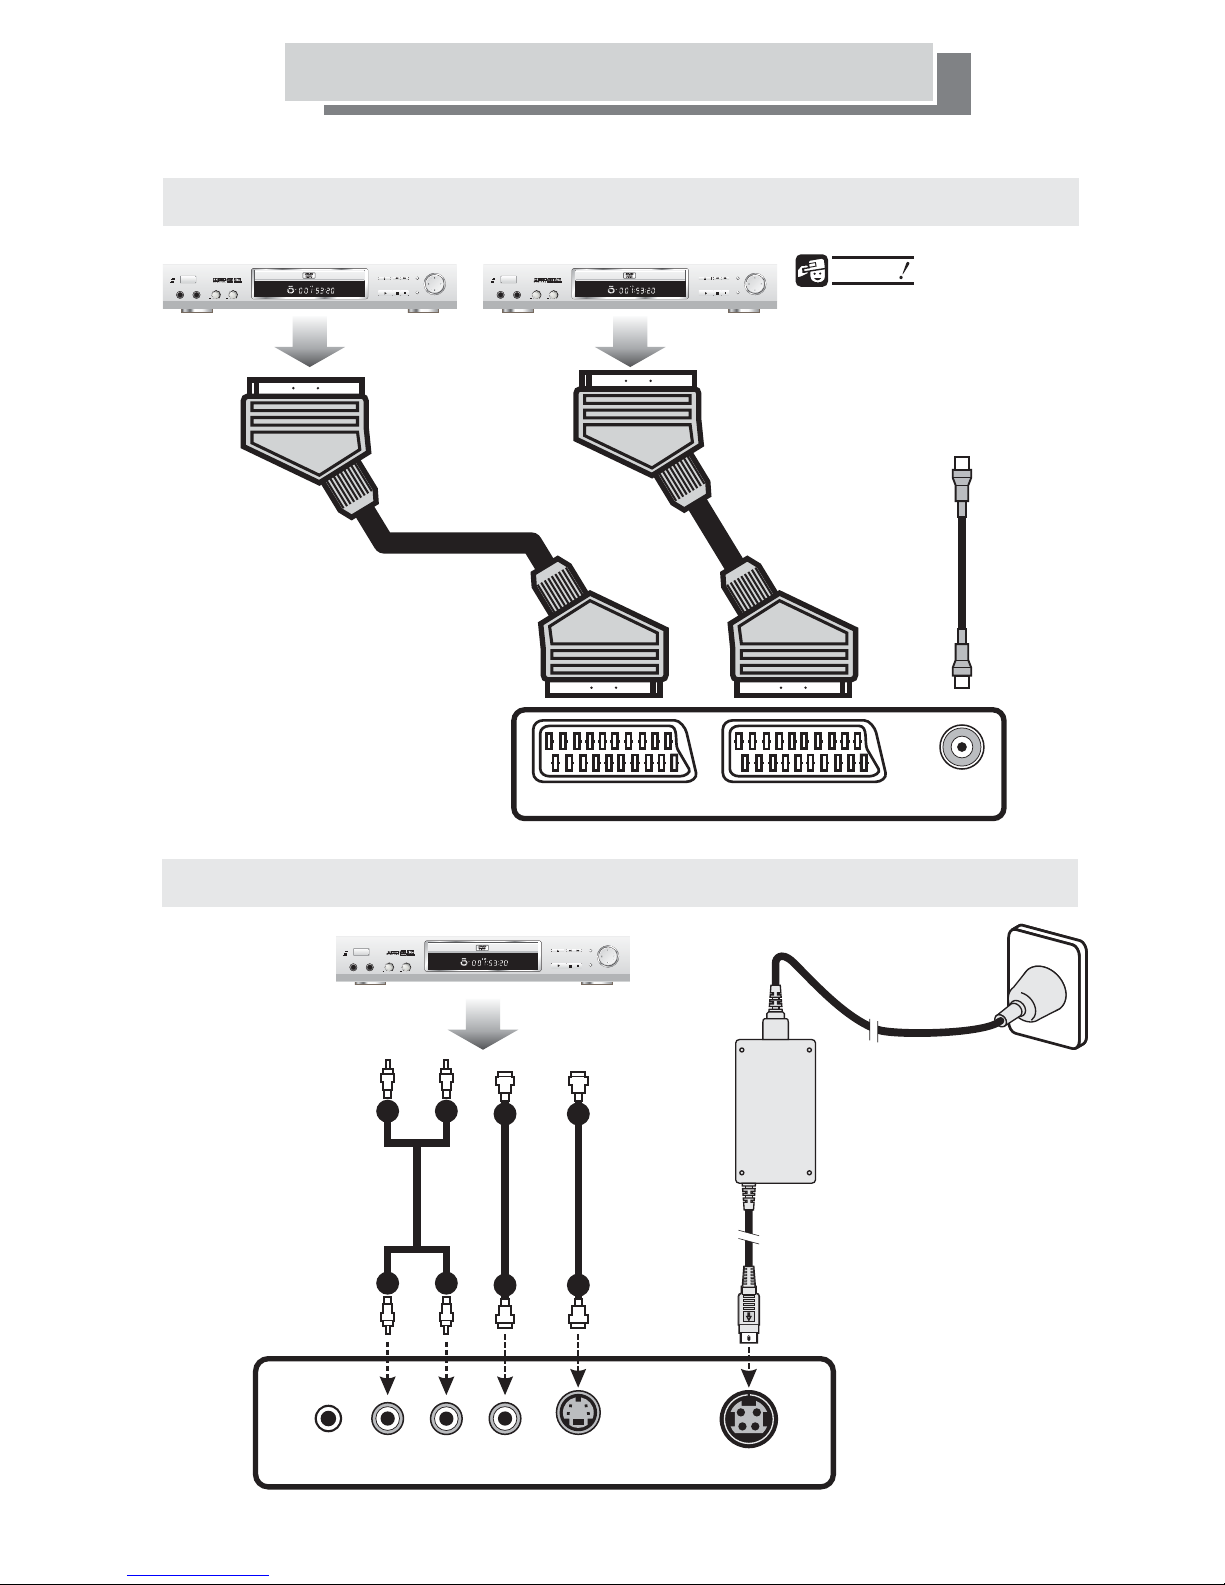
Quick Connecting Guide
Using SCART Input for DVD Player/ VCR
ON
OFF
POWER
MIC1 MIC2
DVD/SVCD / VCD / CD / MP3 PLAYER
VOL.1 VOL.2
++
DVD/SVCD / VCD / CD / MP3 PLAYER
POWER
FWD
TAXT
OPEN/CLOSE
DIGITALOUT
PLAY STOP PAUSE
REW
SOUND
ON
OFF
MIC1 MIC2
POWER
DIGITALOUT
VOL.1 VOL.2
++
OPEN/CLOSE
PLAY STOP PAUSE
FWD
TAXT
REW
SOUND
NOTICE
Please refer to DVD player or
VCR manual for
connecting
more detailed
instructions.
Antenna Socket
SCART 2SCART 1
Antenna
Using VIDEO or VIDEO for DVD Player / VCRS-
DVD/SVCD / VCD / CD / MP3 PLAYER
POWER
ON
DIGITALOUT
OFF
VOL.1 VOL.2
MIC1 MIC2
++
R
R
Phone S-Video Power
L
L
RL
Video
V
V
or
OPEN/CLOSE
PLAY STOP PAUSE
FWD
TAXT
REW
SOUND
S
AC adapter
S
Household
power outlet
Plug into
an AC outlet
AC cord:
product shape
may very from
country to country.
To DC IN PU T
terminal
-15-
Page 16
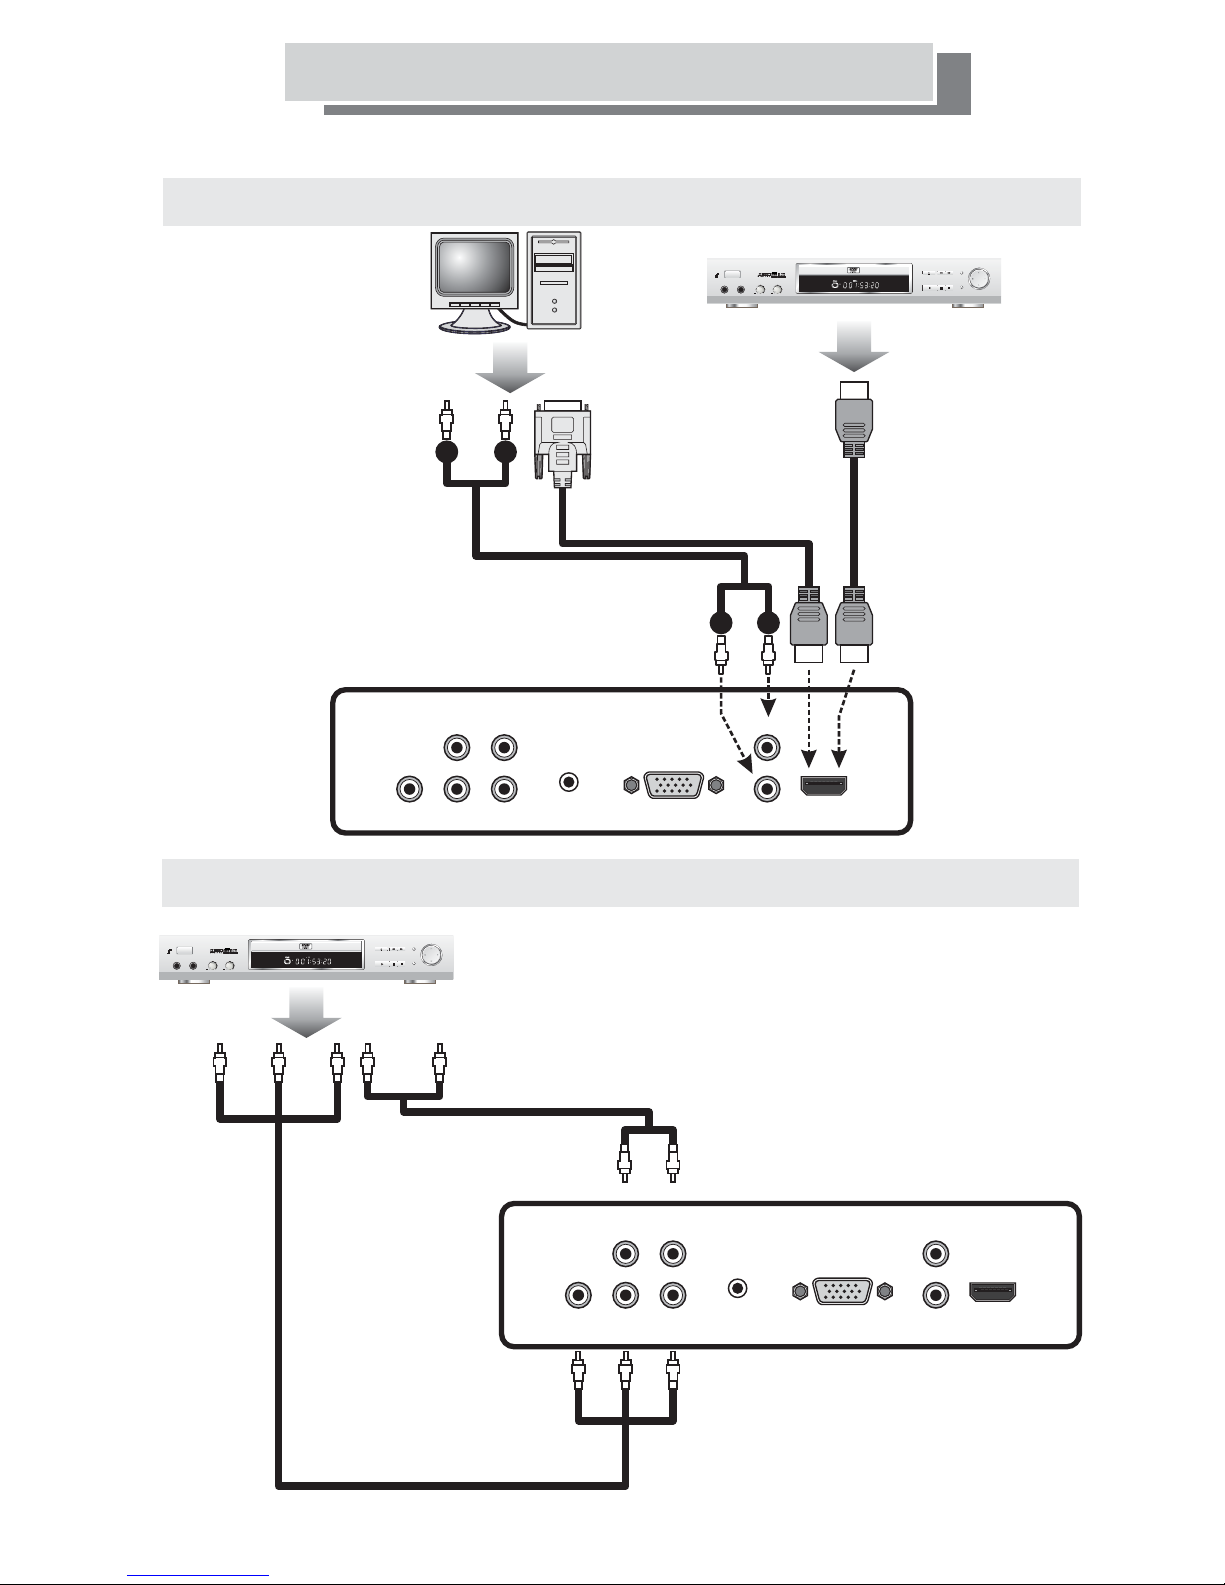
Quick Connecting Guide
UsingHDMIforDVDPlayer/VCR/PC
DVD/SVCD / VCD / CD / MP3 PLAYER
POWER
ON
DIGITALOUT
OFF
VOL.1 VOL.2
MIC1 MIC2
++
OPTION 2
OPTION 1
R
L
DVI
R
L
FWD
TAXT
OPEN/CLOSE
REW
PLAY STOP PAUSE
SOUND
HDMI CABLE
ON
OFF
MIC1 MIC2
POWER
DVD/SVCD / VCD / CD / MP3 PLAYER
VOL.1 VOL.2
++
RL L
Y
Pb
Pr
Audio in
VGA
R
HDMI
Using YPbPr for DVD Player / VCR
FWD
TAXT
OPEN/CLOSE
DIGITALOUT
PLAY STOP PAUSE
REW
SOUND
(Red)(White)
RL L
Y
(Green)
-16-
Pb
(Blue)
Pr
(Red)
Audio in
VGA
R
HDMI
Page 17
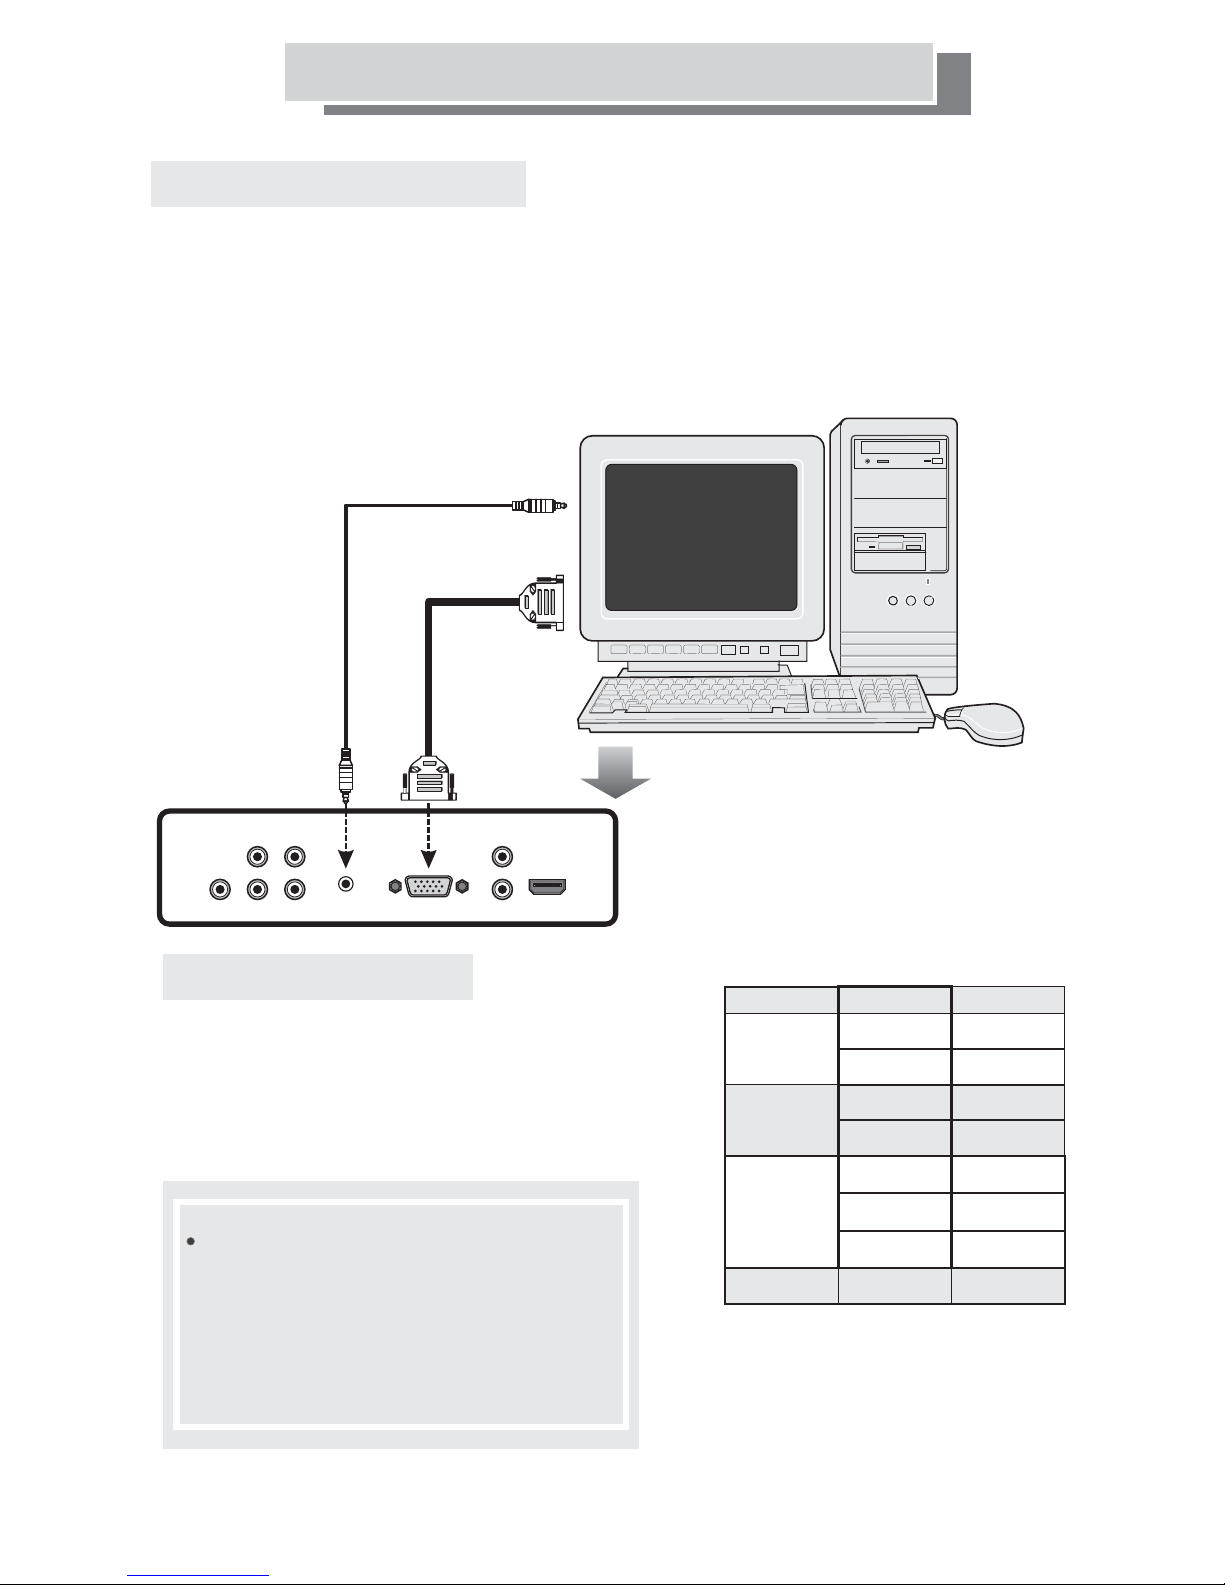
PC Connection
Connecting PC Instructions
1. Video Signal Connection:
Connect VGA signal cable to VGA input and VGA output of the
computer.
2. Audio Signal Connection:
Connect audio signal cable to AUDIO IN and LINE OUT jack of the
computer
sound card.
PC AUDIO OUT
VGA PORT
socket of the TV
jack on the TV
RL L
Y
Pb
Audio in
Pr
VGA
R
HDMI
Operating Instructions
1. Turn on the TV with the power switch.
2. Press the AV button on the remote twice to
select PC mode.
3. Turn on computer, and the PC Desktop will be
displayed.
When the user switches
resolution which is not listed , screen
will display
Please wait for ,
computer to the
the message
10 to 15 seconds
will return back previous
resolution.
thePCtoa
the
OUTOFRANGE .
“”
the
Supported Resolutions
MODE
Resolution
640X480
VGA
640X480
800X600
SVGA
800X600
1024X768
XGA
SXGA
1024X768
1024X768
1280X1024
Refresh Rate
60
75
60
75
60
70
75
60
-17-
Page 18
Remote Control of TV and DVD
The remote control has two modes of operation, one for TV and one for DVD. Switching between the
two modes is achieved by using the TV / DVD button on the remote control.
The TV / DVD button works like a toggle switch. One press switches the remote to DVD mode and the
second press switches the remote back to TV mode.
An indicator appears in the top left hand corner of the TV screen to tell you what mode the remote is
in. If the wrong indicator appears, just press the TV / DVD button again.
To see the DVD picture, press the TV / DVD button until the "DVD” indicator lamp is off, then press the
AV button once. After a short pause, the DVD picture will appear. To operate the DVD player you
must put the remote into DVD mode. To do this, press the TV / DVD button until the “DVD" indicator
lamp is on.
For DVD operation see page 25 and for TV operation see page 20.
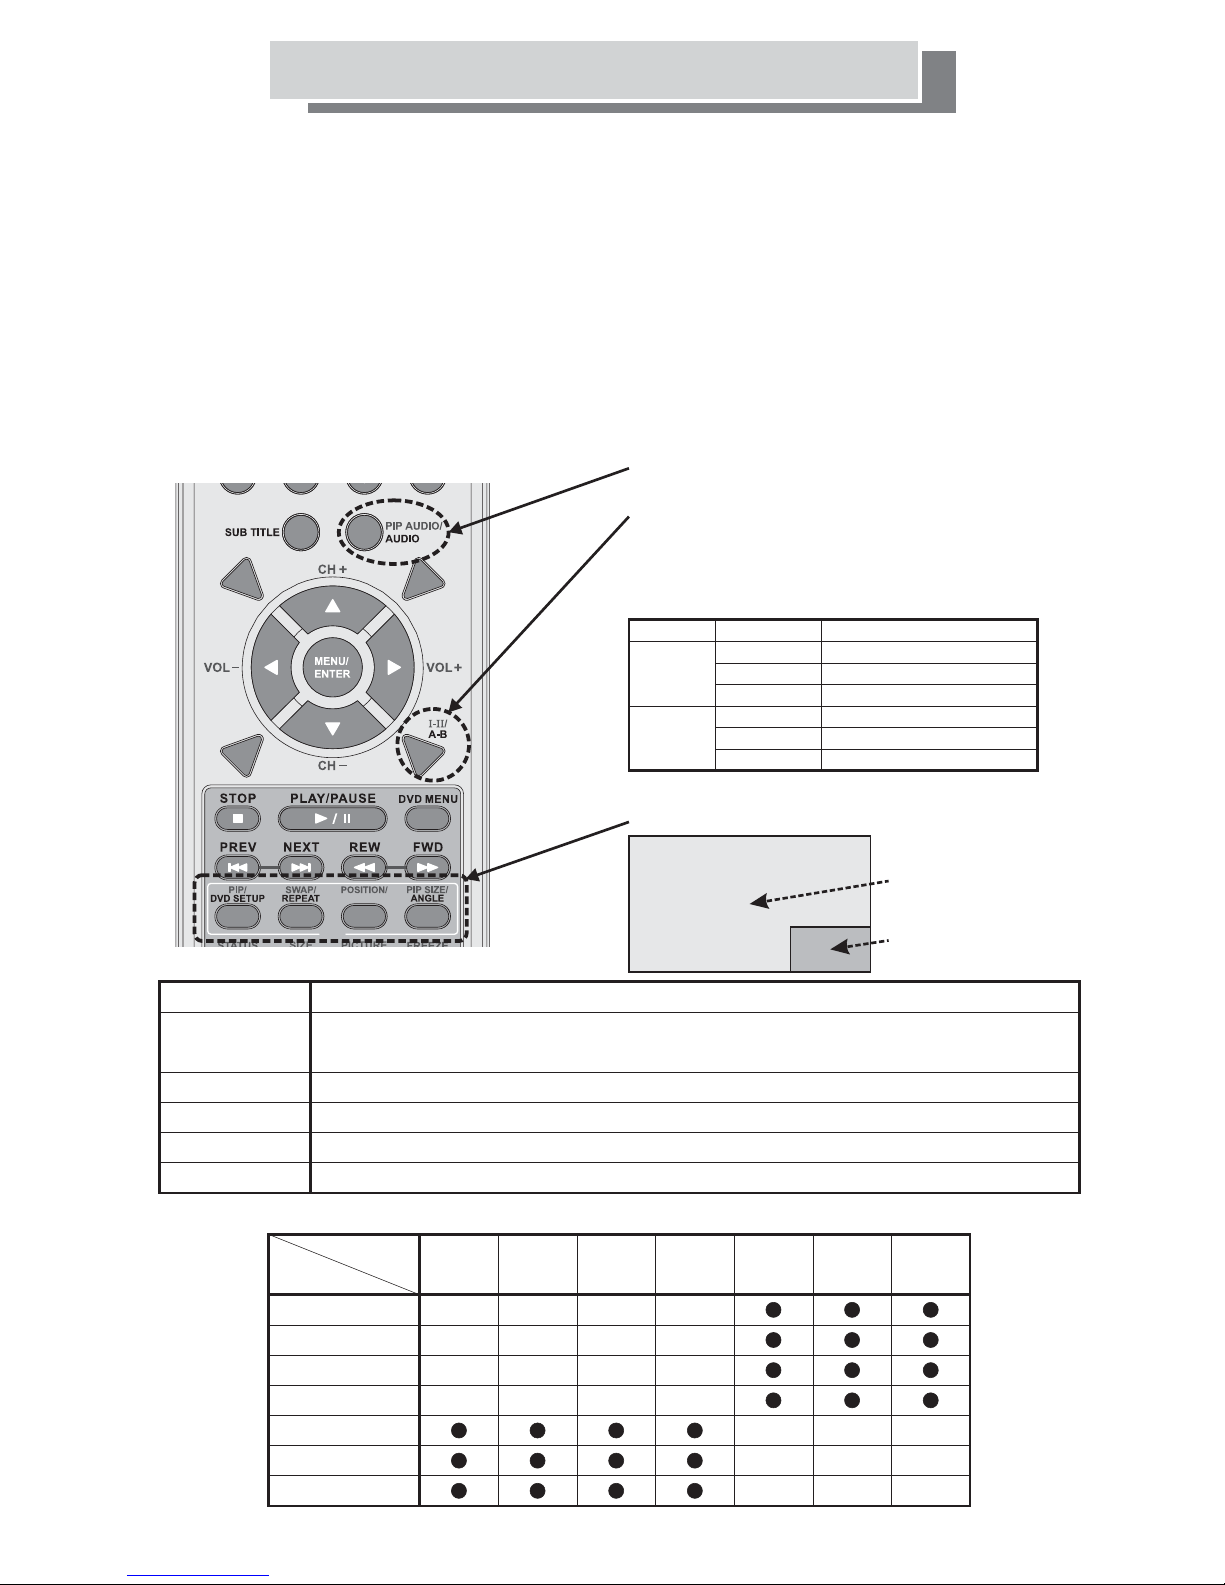
PIP AUDIO
Select the sound mode
You can set the sound mode
MUTE
ALTERNATE/
VIRTUAL
SLEEP
by pressing the .
When you press it, the current sound
mode is displayed on the screen.
Audio Type
FM
Stereo
NICAM
Stereo
Mono
Stereo
Dual
Mono
Stereo
Dual
“I-II” button
Behavior
MONO
STEREO MONO
DUAL 1 DUAL 2
MONO MONO
MONO STEREO
MONO DUAL 1 DUAL 2
1
1
1
1
1
"
Key(s)
PIP
SWAP
POSITION
PIP SIZE
PIP AUDIO
PIP Function (Picture in picture)
Main signal
TITLE
PIP
Functionality
PIP DISPLAY:
Press to activate Picture In Picture (PIP) mode.
Press again to select the sub picture signal source.
PIP SWAP:
PIP POSITION:
PIP SIZE:
PIP AUDIO:
Press to switch between main picture and sub picture in PIP mode.
Press to select the position of the sub picture in PIP mode.
Press to change the size of sub picture in PIP mode.
Press to selects PIP (sub picture) audio in PIP mode.
The sub-signal options change as the main signal source changes.
Main signal
Sub signal
TV DVD VIDEO
SCART
1/2
YPbPr
TV
DVD
VIDEO
SCART 1/2
YPbPr
VGA
HDMI
Sub signal
VGA HDMI
-18-
Page 19
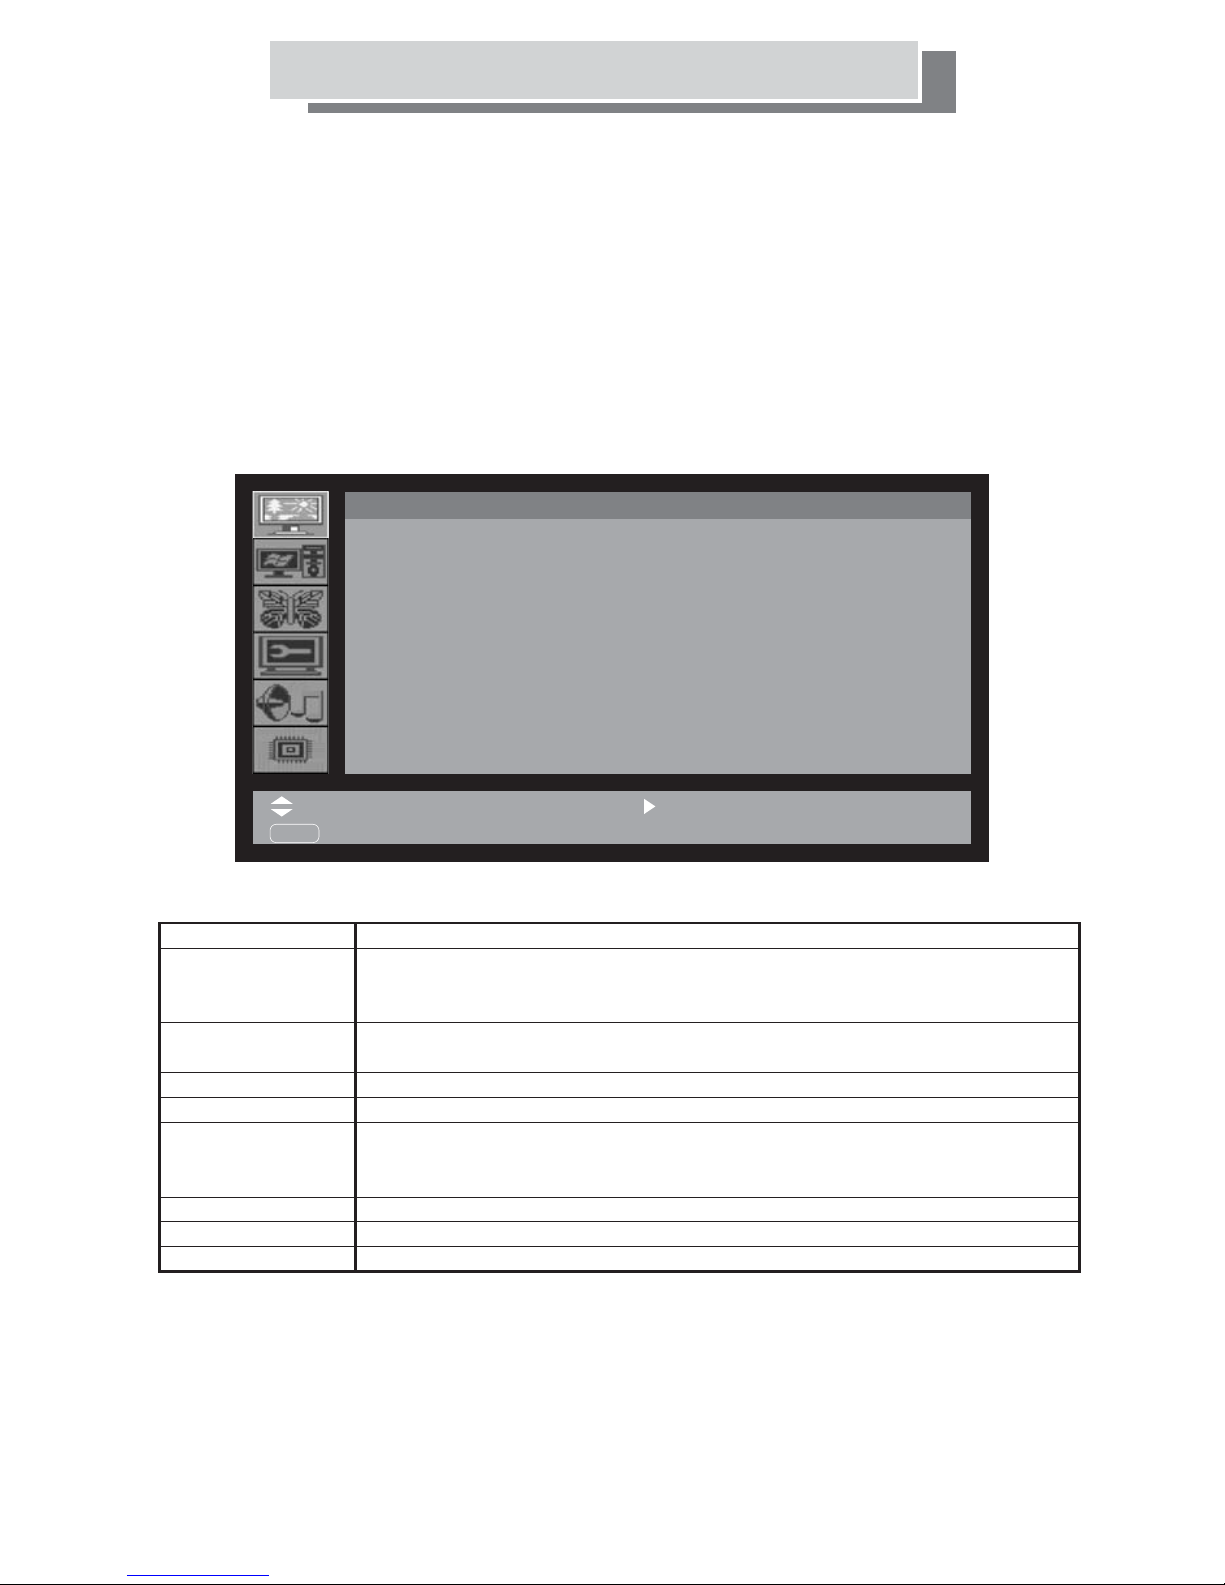
OSD Settings: Menu
Using the on screen display (OSD):
1. Press the MENU button on the remote control to display the main menu.
2. Press the buttons to highlight the menu entries.
3. Press the button to enter the submenu.
4. Press the buttons to highlight the item to be adjusted.
5. Press the button to confirm your choice.
6. Press button to adjust the setting.
7. Press the MENU button again to quit the picture.
NOTE: Items in gray cannot be selected and adjusted.
DISPLAY (for TV/DVD/VIDEO/SCART-1/SCART-2/YPbPr/HDMI)
pq
u
pq
u
tu
DISPLAY
Contrast
Brightness
Sharpness
Saturation
Color Temperature
Tint
Focus
Recall
: SELECT
MENU
: EXIT
Menu
Contrast
Brightness
Sharpness
Saturation
Color Temperature
Tint
Focus
Recall
: ENTER
Descriptions
To adjust the difference between the lightest and darkest areas of the
LCD display screen. Contrast should be adjusted in conjunction
with the brightness setting.
To adjust the light level of the LCD display's screen. It should be
adjusted in conjunction with the contrast setting.
To adjust the sharpness of the image.
To adjust the color density/lightness.
To characterise the spectral properties of a light source.
Low color temperature implies warmer (more yellow/red) light,
While high color temperature implies a colder (more blue) light.
To adjust the picture tone.(NTSC only)
To adjust the phase.(YPbPr only)
To reset all Display function settings to their factory-set default values.
-19-
Page 20
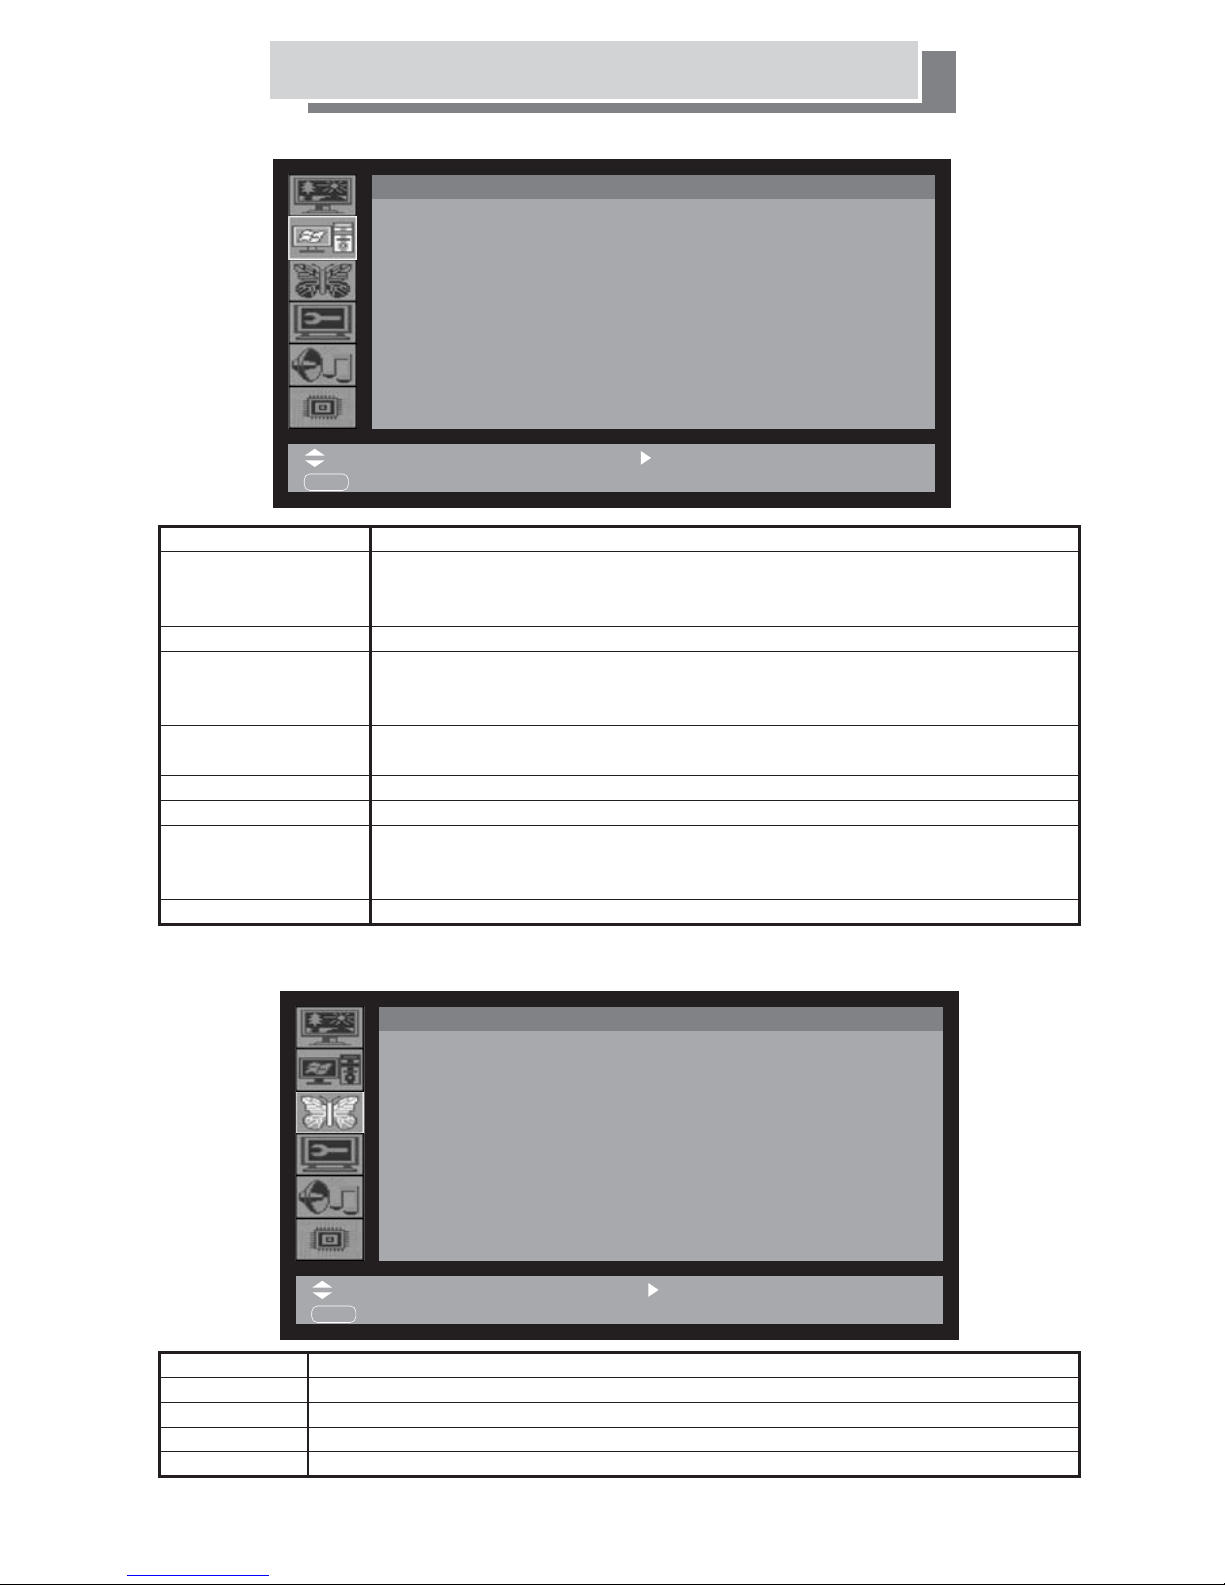
OSD Settings: PC/ADVANCE
PC (for VGA)
PC
AUTO ADJUST
WHITE BALANCE
CONTRAST
BRIGHTNESS
CLOCK
COLOR TEMPERATURE
RECALL
: SELECT
MENU
Menu
Auto Adjust
White Balance
Contrast
Brightness
Clock
Phase
Color Temperature
Recall
ADVANCE (for TV/DVD/VIDEO/SCART-1/ SCART-2/YPbPr/VGA/HDMI)
: ENTER
: EXIT
Descriptions
To allow the monitor to determine and select the horizontal and
vertical adjustment, and clock and phase settings that are most
appropriate for your system requirements.
To return the display's brightness and contrast to the default settings.
To adjust the difference between the lightest and darkest areas of
the LCD display screen. Contrast should be adjusted in conjunction
with the brightness item.
To adjust the light level of the LCD display's screen. It should be
adjusted in conjunction with the contrast setting.
To adjust pixel alignment to help stabilize the VGA display.
To adjust the focus and clarity of the VGA display.
To characterize the spectral properties of a light source.
Low color temperature implies warmer (more yellow/red) light,
While high color temperature implies a colder (more blue) light.
To reset all Display function settings to their factory-set default values.
ADVANCE
NDR
LTI
DCI
Recall
: SELECT
MENU
: EXIT
Menu
NDR
LTI
DCI
Recall
These values are set to personal preference, you need to experiment to find your preferred settings.
Descriptions
To adjust noise reduction level (YPbPr, VGA, HDMI no support)
To adjust the H/V Luminance Transient Improvement function
To adjust dynamic color adoption (VGAno support)
To return all advance function settings to their factory-set default values.
: ENTER
-20-
Page 21
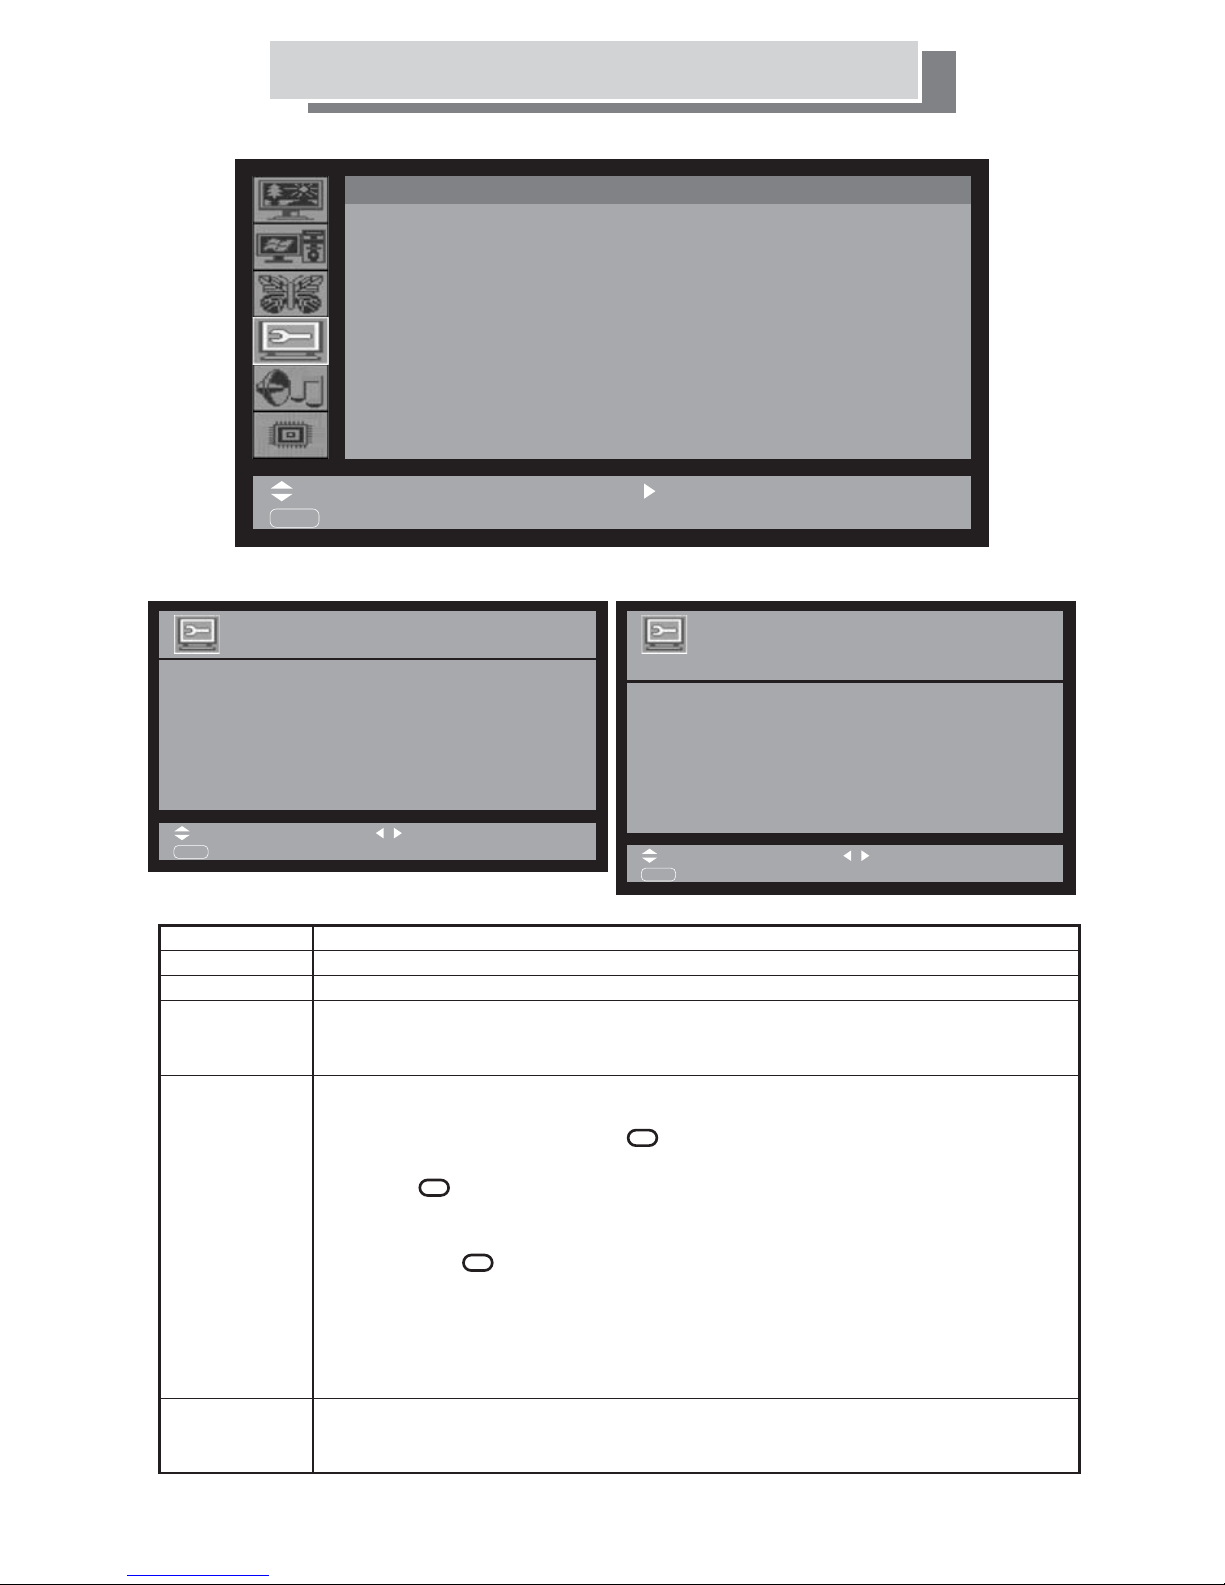
OSD Settings: TV SETUP
TV SETUP (for TV)
TV SETUP
COUNTRY
CH-SCAN
MANUAL SCAN
PR-EDIT
FINE TUNE
: SELECT
MENU
: EXIT
: ENTER
TV SETUP (for TV) - MANUAL SCAN TV SETUP (for TV) - PR-EDIT
MANUAL SCAN
SEARCH 41.250MHztu
CHANNEL tu
SYSTEM PAL - BG
PROGRAM P 1
NAME
SAVE
: SELECT
MENU
:BACK
Menu
Country
CH-Scan
Manual Scan
Descriptions
To select your country.
To automatically scans for available channels.
To select system, program no. , name and search channel manually.
tu
tu
tu
tu
:ADJUST
C1
PR. CH. PREQ. SYSTEM NAME
P1
P2
P3
P4
P5
P6
P7
P8
P9
MENU
: SELECT
:BACK G:SWAP Y:DEL.
MANUAL SCAN
: ENTER
Once TV detects a good signal, TV locks channel automatically and
searching process stops.
PR-Edit
1. Swapping two channels:
After entering the PR-EDIT editing table, you can use the buttons to
pq
select a channel and press the (GREEN button) to highlight the channel
you wish to change. Use the buttons to select a channel to switch and
press the again to switch the two channels.
(GREEN button)
pq
2.Skipping channels:
Use the buttons to select a channel you wish to delete,
then press the to Skip the channel.
pq
(YELLOW button)
3.Editing programs:
Use the button to select channel you wish to edit. Press the to enter
the PR-EDIT editing table. Use the buttons to select the item,
and use the buttons to edit the program. Afar editing the program,
pq u
pq
tu
Please select SAVE to save PR-EDIT.
Fine Tune
To manually adjust the frequency of each channel to get better image quality.
Note, this will be the fixed frequency after adjustment unless you re-update
the channel scan.
-21-
Page 22
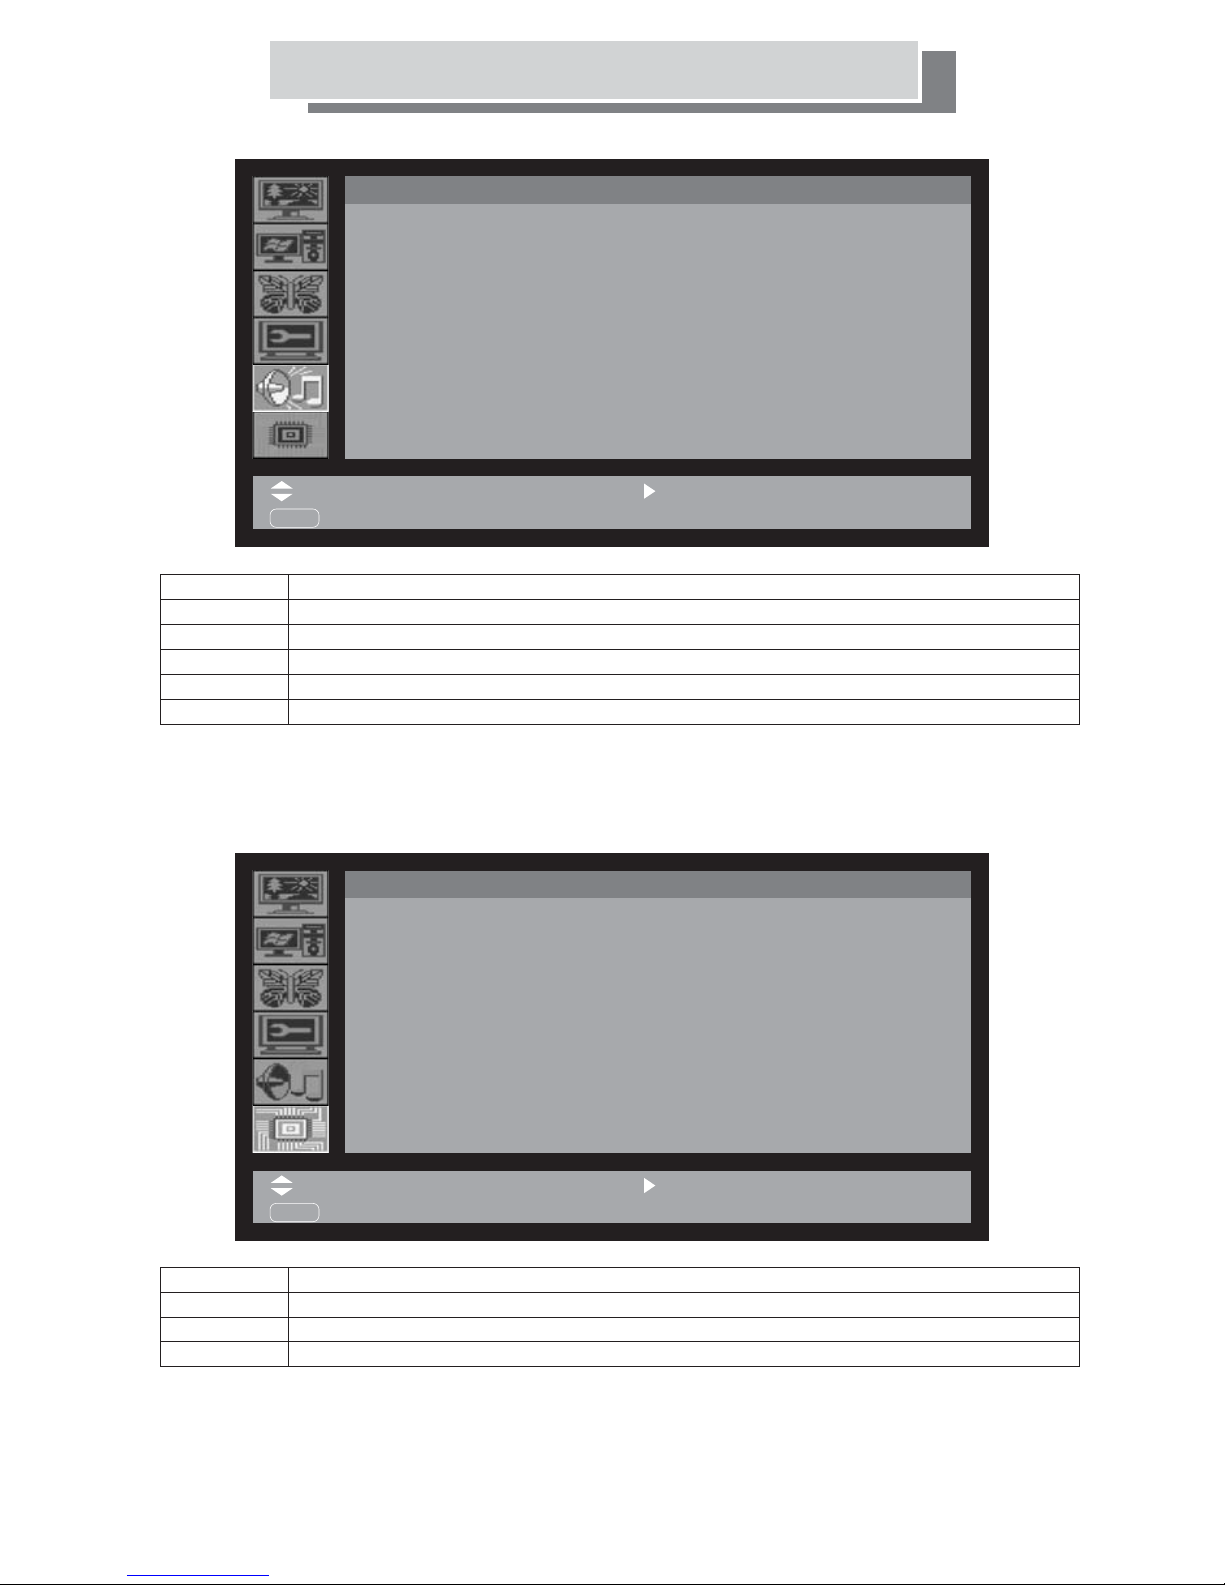
OSD Settings: AUDIO/SYSTEM
AUDIO (for TV/DVD/VIDEO/SCART-1/SCART-2/YPbPr/VGA/HDMI)
AUDIO
BASS
TREBLE
SURROUND
BALANCE
RECALL
Menu
Bass
Treble
Surround
Balance
Recall
SYSTEM (for TV/DVD/VIDEO/SCART-1/SCART-2/YPbPr/VGA/HDMI)
: SELECT
MENU
: EXIT
Descriptions
To adjust the bass level.
To adjust the treble level.
To adjust the surround function.
To balance speaker channel.
To return all Audio function settings to their factory-set default values.
: ENTER
SYSTEM
LANGUAGE
LAMP
RECALL
: SELECT
MENU
: EXIT
Menu
Language
Lamp
Recall
Descriptions
To change the language in which the OSD menus appear.
To adjust lamp current.
To return all system parameters to their default settings.
: ENTER
-22-
Page 23

OSD Settings: TV SETUP
Press TV/DVD button to ensure remote is in TV mode (see "Remote Control of TV and DVD").
Manual Search
1)Press menu button
2)Press Up/down arrow buttons.
3)Select TV Setup and select Left/right arrow buttons to select Manual search.
4)Select desired program number by using Left/right arrow buttons to select
channel number.
5)Select Program name using Up/down arrow buttons for desired name of
program.
6)Colour System using arrow buttons to selectAuto/PAL/SECAM.
7)Sound System using arrow buttons to selectAuto/BG/I/DK/ L/ .
8)Frequency use arrow buttons to select the desired channel frequency.
9)Auto Frequency Control (A. F. C.) Press arrow buttons to select on/off.
10)Skip Can be used to include or exclude channels you want displayed.
Auto Search
1)Press menu button
2)Press Up/down arrow buttons.
3)Select TV setup and Press arrow buttons to selectAuto Search
then press left arrow button again to highlight "country”.
4)You can change the country setting with the left / right arrow buttons or highlight "start
search" with the up/ down buttons.
5)After highlighting "Auto Search" Start searching by pressing the right arrow
Button, when the auto search is finished, exit the menu with the MENU/ENTER button.
If you wish to change the order of the stored channels, see page 21.
▲▼
▲▼
tu
tu
Left/right
tu
Left/right
Left/right
tu
▲▼
Left/ right
tu
tu
Ľ
Left/right
-23-
Page 24
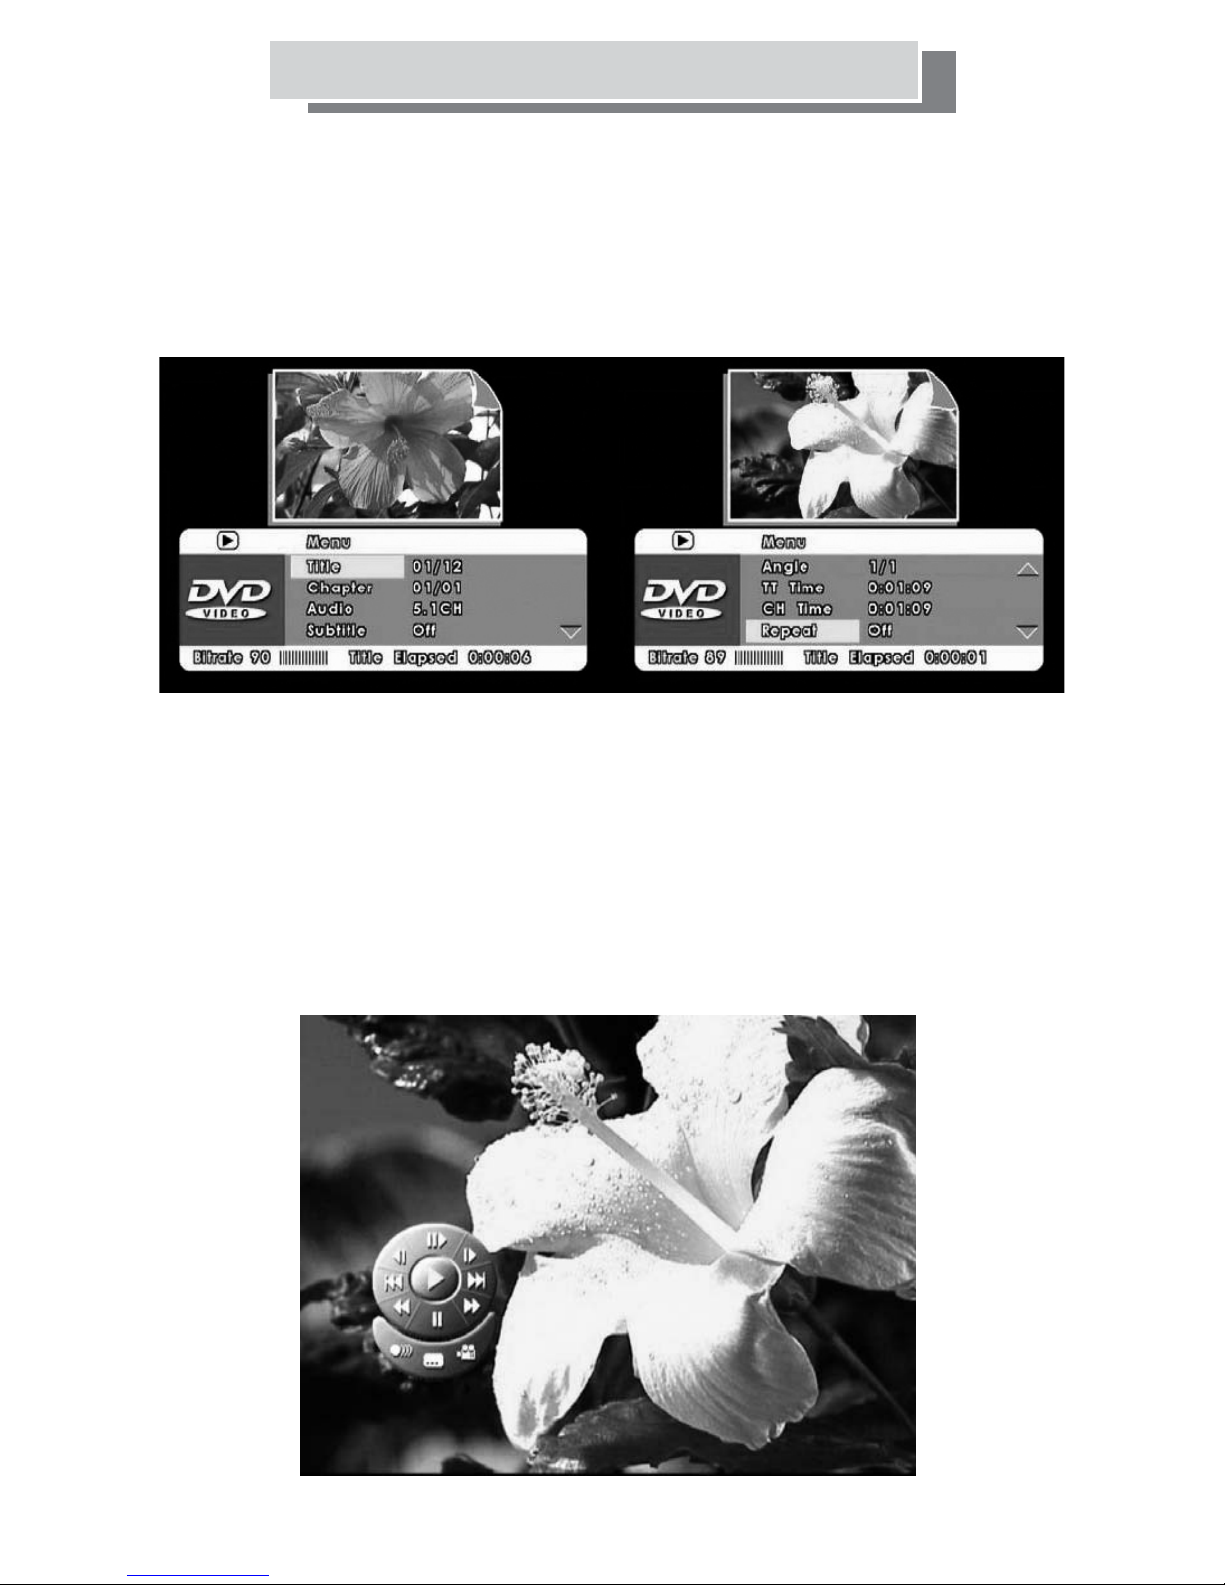
DVD Hot Key
Displaying disc information
Various track, chapter and title information, such as the elapsed and remaining playing
time can be displayed on-screen while a disc is playing.
To show/switch/hide the information displayed, press button.
When a disc is playing, the information appears at the top of the screen. Keep pressing
HOLD/INFO
button to change the displayed information.
HOLD/INFO
To use Virtual Remote Control during DVD playback:
(The function only support DVD and VCD disks)
1.During DVD playback, press key to access the on-screen
Virtual Remote Control.
2.Once the Virtual Remote Control shows up, press cursor
keys to highlight virtual remote control options. The bottom left key of the virtual
remote control provides sound output selections, the mid-bottom key provides subtitle
selections, and the bottom right key provides camera angle selections.
3.Press key to confirm the highlighted selection.
4.Press key again to turn off the Virtual Remote Control.
MENU/ENTER
ALTERNATE/VIRTUAL
ALTERNATE/VIRTUAL
UP/DOWN/LEFT/RIGHT
-24-
Page 25

Teletext is a free information system that displays text on your TV.
It is noteworthy that not all TV stations provide this service.
The time is displayed on the top right corner of the screen.
Using Teletext
Teletext Instructions
Press the T.T. button of the remote control. You will directly go into the list
“”
of contents.
Selecting a page of Teletext
1. According to the list of contents, press the appropriate number buttons. The selected
page number is displayed in the top left corner of the screen. The Teletext system
searches for the desired page until it is located.
2. To move the Teletext forward/backward at one page at a time, respectively press
the LEFT and RIGHT arrow keys of the remote control.
Using the Teletext menu of the remote control
i
1. To select the list of content, press the INDEX button.
2. To modify the size of characters displayed on the screen, press SIZE button.
3. When a Teletext page contains more information than the screen can contain, the rest
of the information will be displayed after a period of time. Press the HOLD button
to stop the automatic page change. Press the HOLD button again to resume the
automatic page change. When HOLD is active the hold icon will appear the top left
of the screen
4. To reveal concealed information such as answers on a quiz, press the REVEAL
button. Press it again to conceal the information.
5. To have Teletext information superimposed over the TV Program, press the MIX
button. Press the MIX button again to return to the basic Teletext format (i.e. Black
background).
6. To select a subcode page, first press the SUBCODE button on the appropriate page
then press the appropriate digit buttons to display the subcode page. Subcode pages are
subsections of teletext pages which can only be displayed one section at a time.
Sub code pages should be entered as a four digit number ( 0001 ) for example.
7. To use fast test, press the appropriate coloured buttons (red, green, yellow, blue) to access
the required page quickly. Some sections and topics have particular colours.
Usually these are positioned at the bottom of the page.
8. To exit Teletext, press the T.T. Button on the remote again.
“”
“”
“”
“”
“”
“”
“”
“”
?
“”
-25-
Page 26
DVD Operation and Settings
BASIC OPERATIONS
Inserting and Ejecting DVD Discs
1) Press TV/DVD button to ensure remote is in TV mode :
"DVD" indicator lamp is off.
2) Select DVD picture by pressing the AV button
on-screen.
3) Press the TV/DVD button until "DVD" indicator lamp is on.
The remote is now in DVD mode.
4) Insert the disc into the disc slot (make sure the label side faces backwards).
Usually Auto-play function starts when the disc is inserted
appears soon afterwards. Press cursor keys to highlight choices in
the disc menus and press ENTER to confirm them.
) Press to eject the disc.
5
Play/Pause :
4;/
Press the Play/Pause button to toggle between PLAY and PAUSE modes..
Stop :
<
Press the STOP button to stop disc playback.
Picture Scan :
uu
uu
1) Press the LEFT/RIGHT arrow keys to scan through the disc quickly.
2) When the button is pressed again, the scanning speed increases
until the maximum scanning speed is reached.
Press play to resume playing the Disc.
Skipping Chapters :
:
Press the LEFT or RIGHT arrow keys to skip to the previous
:
:
or next chapters.
Title Menu
If the current title contains a title menu, press the button to
access the title menu after a short pause.
AUDIO CD Playback Instructions
1) Load an Audio CD: The DVD player starts playback.
2) Press to stop playback.
3) Press to pause playback, press again to resume playback.
4) Press during playback to skip a track ahead.
5) Press during playback to skip a track back.
<
4;/4;/
:
:
PICTURE CD Playback Instructions
1) Load a Picture CD: For Kodak Picture CDs, the DVD player starts slide show
playback; for picture CDs with a menu screen, the menu appears
after a few seconds.
2 Press cursor key to highlight a picture and picture review is shown on
)
pq
the right.
3 Press to begin slide show.
)
4 During slide show, press cursor keys to rotate picture position.
)
5 During slide show, press DVD MENU key and the preview screen shows up.
)
6 Highlight desired pictures or preview screen options, then presses
)
4;/
pqut
MENU/ENTER key to confirm selection.
Preview screen options include:
- SLIDE SHOW: Select to return to full-screen photo viewing.
- MENU: Select to show detail guidelines on viewing/navigating photo CD.
Press MENU/ENTER key again to exit.
- PREV.: Select to show the previous page of photo listings.
- NEXT: Select to show the next page of photo listing.
7 Press to exit from slide show and return to picture CD home menu.
)
<
repeatedly until DVD appears
and a disc menu
pqut
:
TITLE
-26-
Page 27
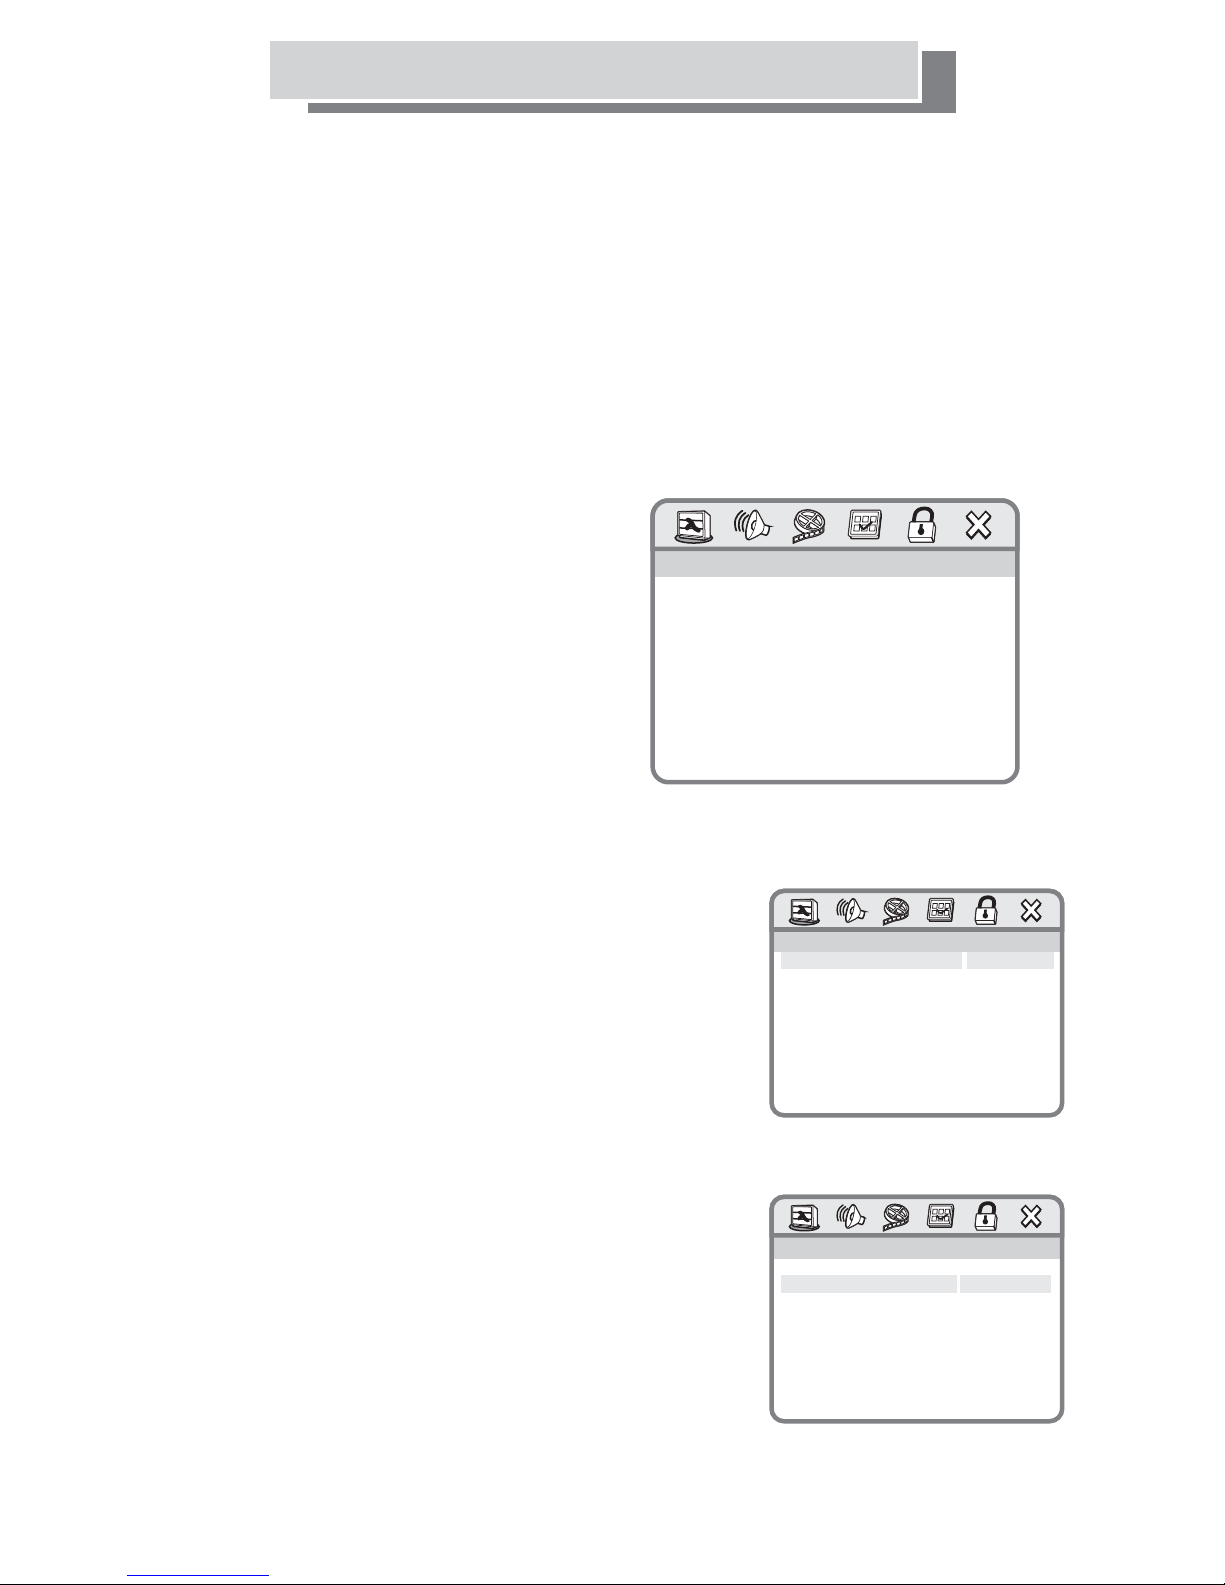
DVD OSD Menu
DVD OSD Menu Descriptions
1) To access the DVD OSD menu, press the TV/DVD button.
2) Press the DVD SETUP button.
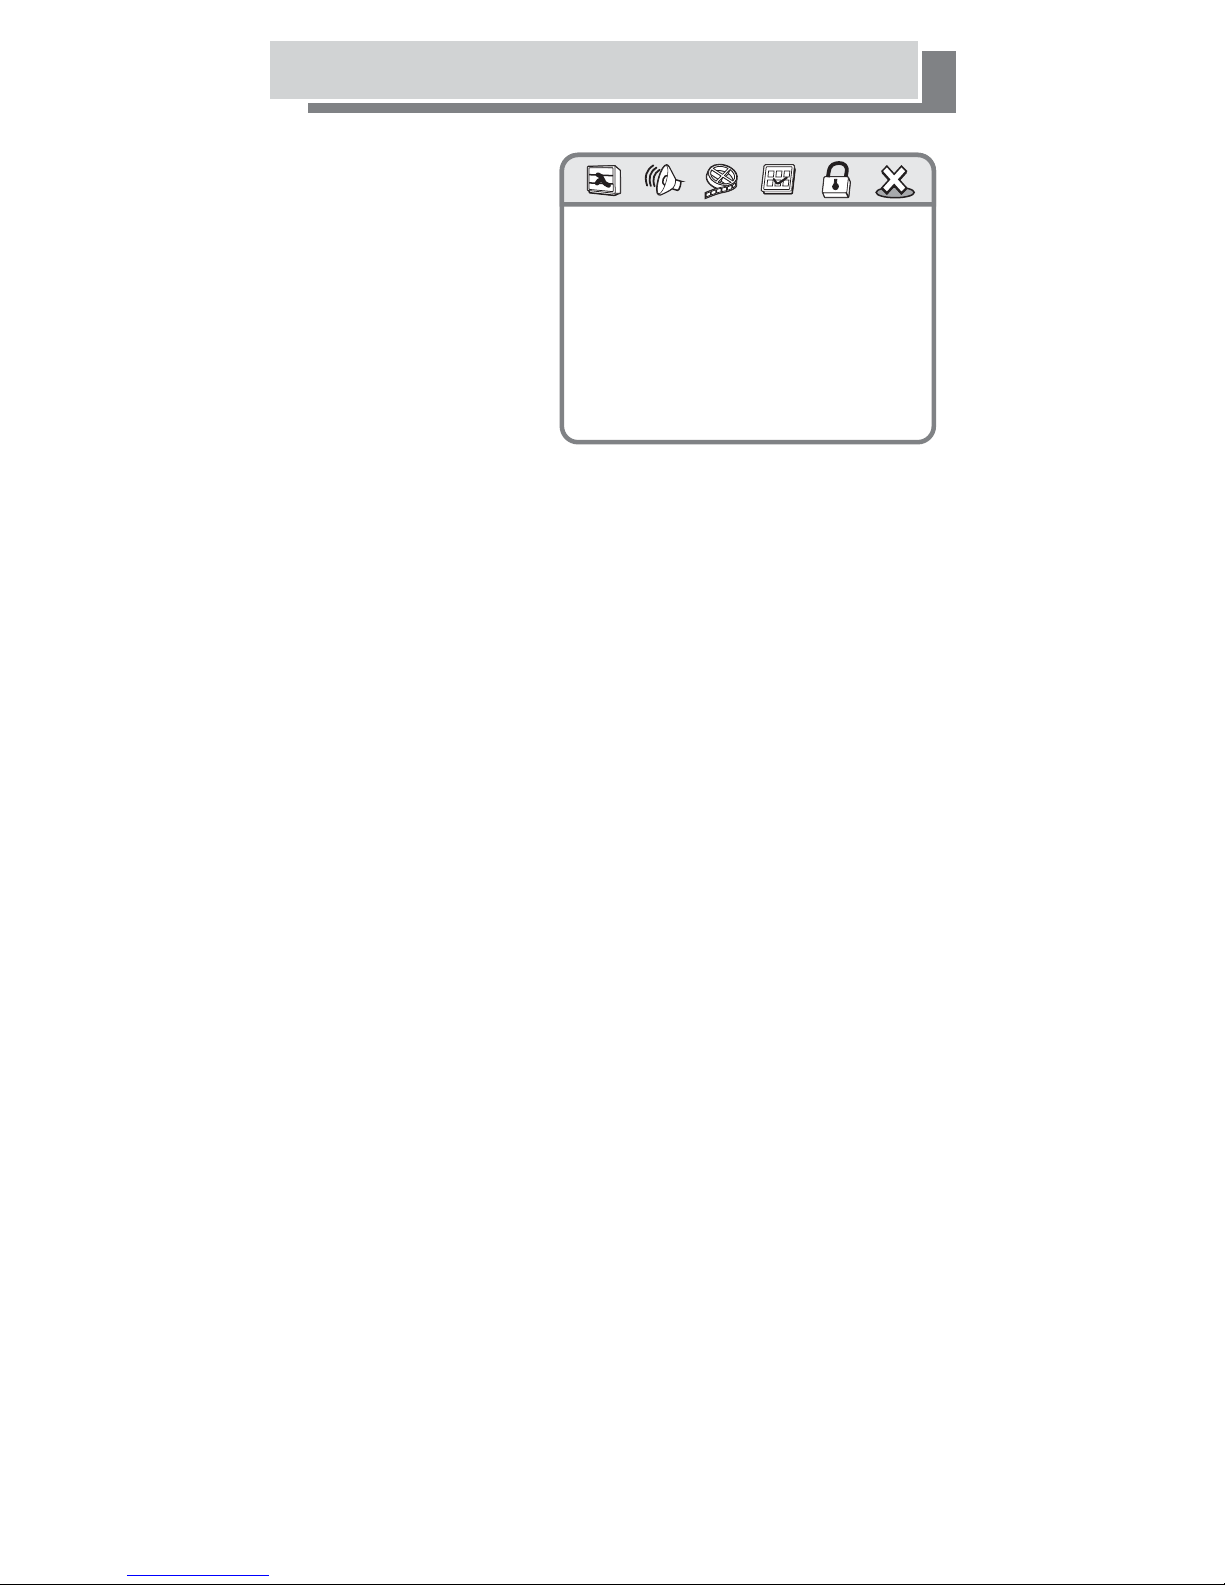
There are six option icons available across the top of the screen.
3) Press the LEFT and RIGHT arrow keys
button) to select the
available options.
4) Press the UP and DOWN arrow keys (above / below the MENU button)
to select the available options.
5) Press the ENTER button to confirm the selected option.
6) Press the Left arrow key until you re-enter the main choices
across the top of the screen.
(1) General Set-up Page
( left / right of the MENU
.. General Setup Page ..
.. General Setup Page ..
Display
TV Display
TV
Lang
OSD
OSD Lang
to General Setup Page
Go
Go to General Setup Page
l TV Display Three options are available:
-normal/PS:4:3
-normal / LB: fake 16:9
-wide : proper 16:9
l OSD Languages
Language menu options:
seven languages
available
.. General Setup Page ..
.. General Setup Page ..
TV Display Normal/PS
TV
Display Normal/PS
OSD Lang Normal/LB
OSD
Lang Normal/LB
Set TV Display Mode
Set TV
Display Mode
.. General Setup Page ..
.. General Setup Page ..
Display
TV Display
TV
OSD
Lang English
OSD Lang English
Set
Set OSD Language
OSD Language
Wide
Wide
French
French
Spanish
Spanish
German
German
Portuguese
Portuguese
Italian
Italian
Dutch
Dutch
-27-
Page 28
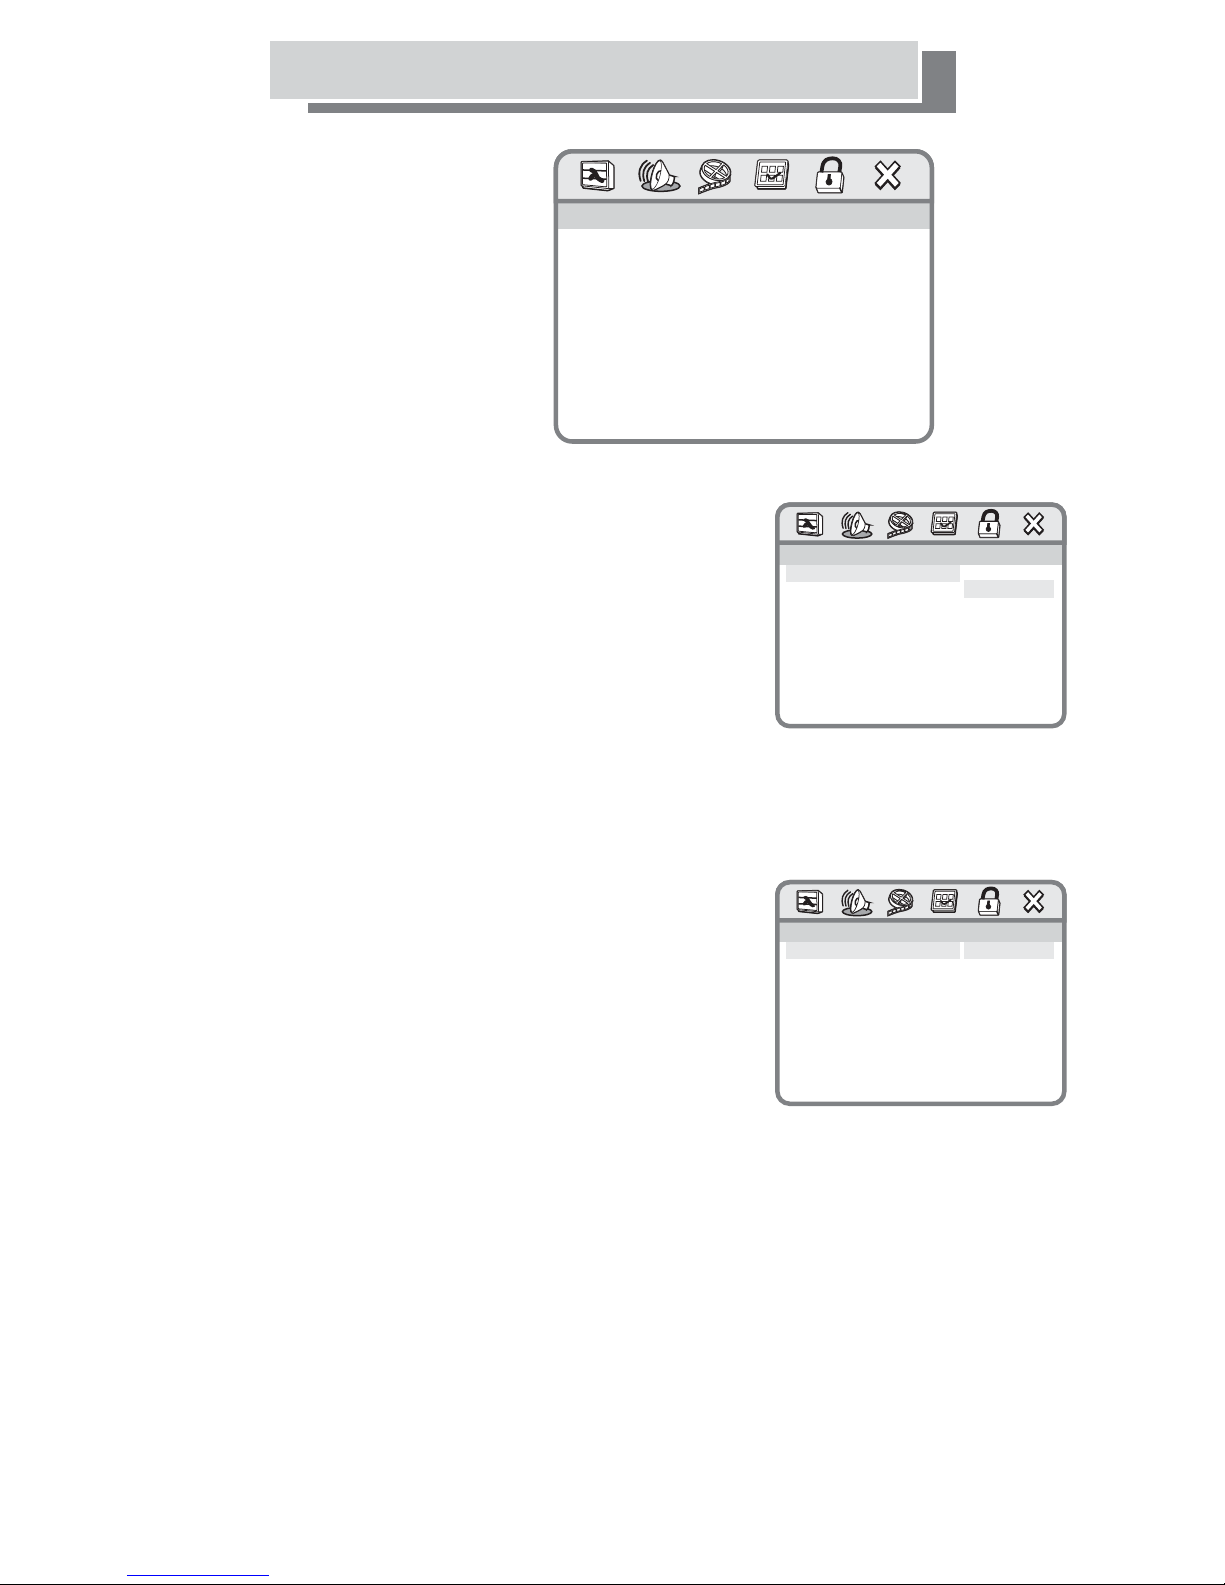
DVD OSD Menu
(2) AUDIO SET-UP PAGE:
.. ..
Audio Setup Page
Audio Setup Page
.. ..
Speaker Setup
Speaker
HDCD
HDCD
Go To Audio Setup Page
Go To Audio
Speaker Set-up Downmix has three settings:
l
LT/RT: Left Total/ Right Total Sound
-
-Stereo: Stereophonic Sound
-V SURR: Virtual Surround Sound
NOTE:
LT = Left channel sound from both
speakers.
RT = Right channel sound from both
speakers.
Setup
Setup Page
.. Speak Setup Page ..
.. Speak Setup Page ..
Downmix LT/RT
Downmix
Downmix Mode
Set
Set Downmix Mode
LT/RT
Stereo
Stereo
SURR
V
V SURR
HDCD : Filter Audio signal filtering feature
=
to enhance sound quality.
Select between 3 levels of
audio signal filtering
(Off/1X/2X) depending on
disc format, for the best
performance. The original
setting is set to Off.
.. HDCD Setup Page ..
.. HDCD Setup Page ..
Filter Off
Filter
Filter
Filter
Off
1X
1X
2X
2X
-28-
Page 29
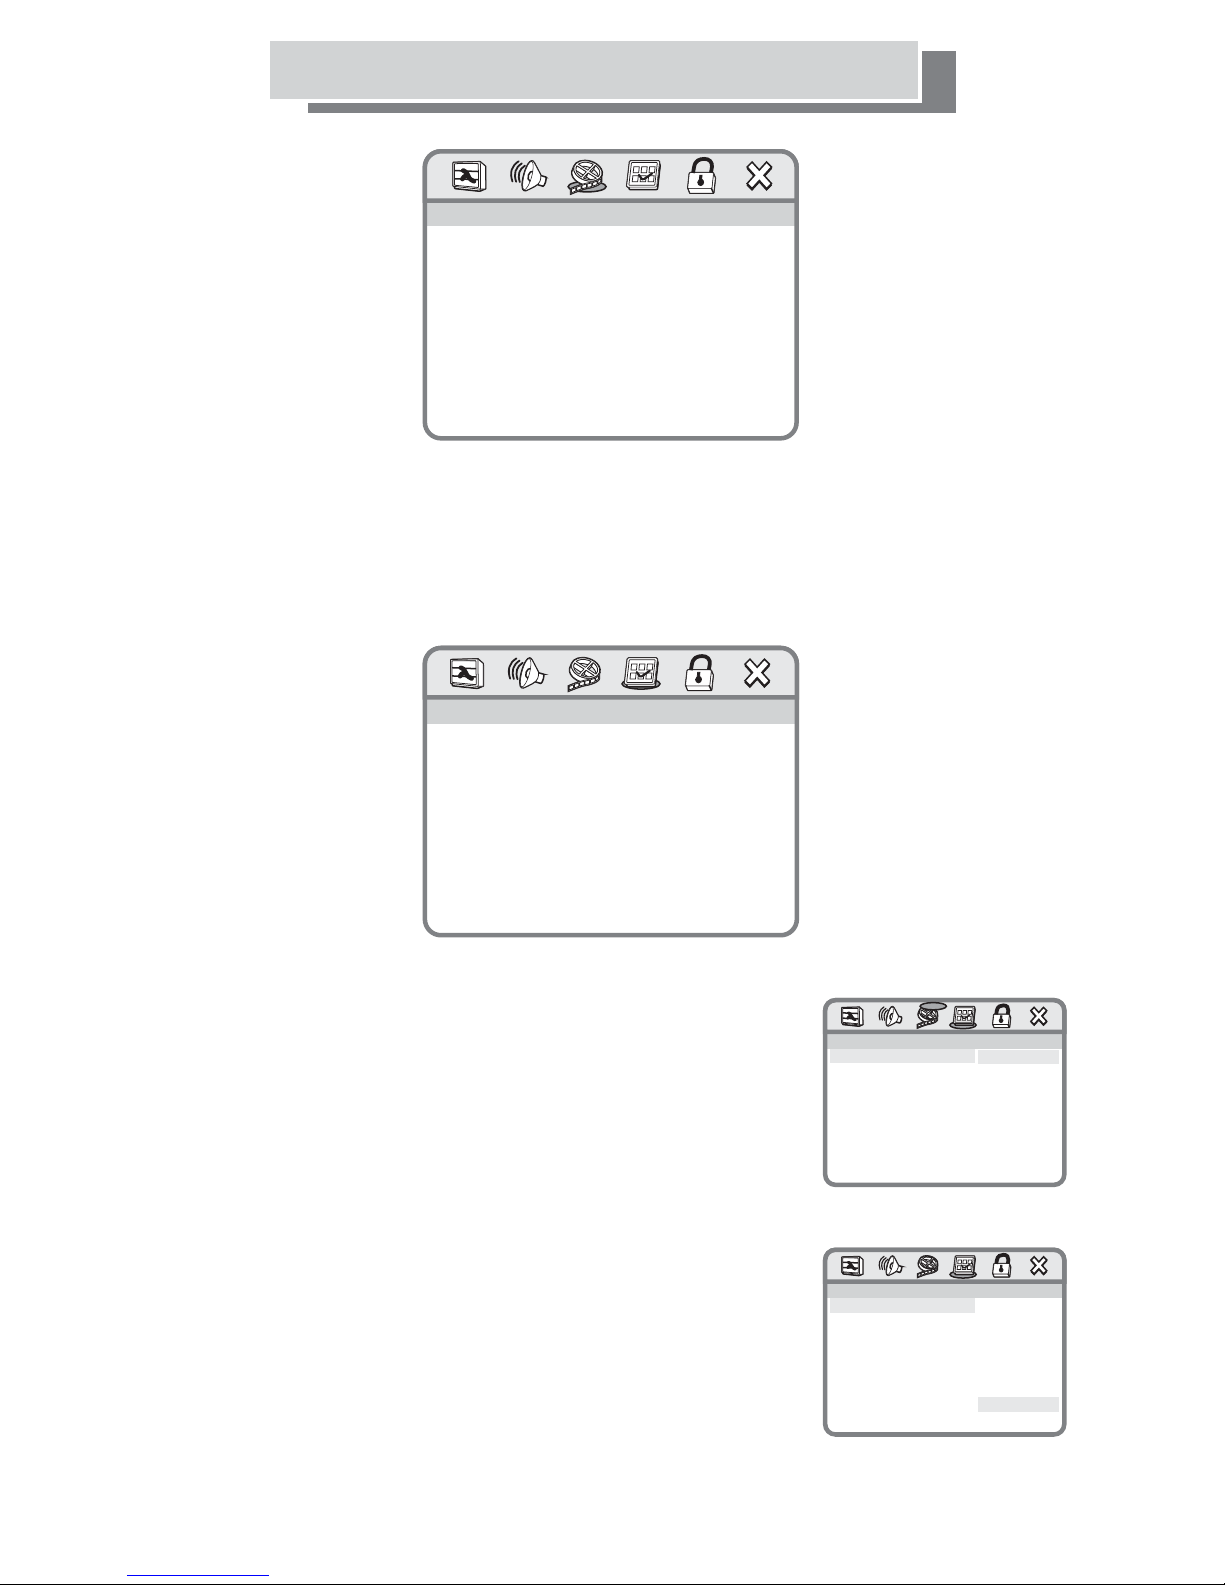
DVD OSD Menu
(3) VIDEO SET-UP
.. Video Setup Page ..
.. Video Setup Page ..
Quality
Quality
Quality
Go To Video Setup Page
Go To
l Quality Select Quality to access the video quality set-up menu.
This menu will allow you to choose among seven options and
modify the quality of the video
(sharpness, brightness, contrast, gamma,
hue, saturation, luma delay).
Quality
Video Setup Page
(4) PREFERENCES
Preference Page
Preference Page
.. ..
.. ..
TV Type
TV Type
Parental
Parental
Audio
Audio
Subtitle
Subtitle
Default
Default
Preference Page
Go To Preference Page
Go To
l TV Type The user can choose the TV
system among the three
available (PAL, MULTI and NTSC).
.. ..
Preference Page
Preference Page
.. ..
TV Type
TV Type
Parental
Parental
Audio
Audio
Subtitle
Subtitle
Default
Default
Preferred Audio Language
Preferred Audio
Language
PAL
PAL
Multi
Multi
NTSC
NTSC
l Parental
The user may want to use the parental control option
for the DVD player to limit its access.
The user first chooses among 8 different categories
(KID SAF, G, etc.). Then press ENTER to see the
password box appear. Finally, press the
TV/DVD button and then the T.T. Button before entering
the password with the number buttons on the remote
which will restrict access to the category of DVD selected.
-29-
.. ..
Preference Page
Preference Page
.. ..
TV Type
TV Type
Parental
Parental
Audio
Audio
Subtitle
Subtitle
Default
Default
Parental Control
Set Parental Control
Set
1KIDSAF
1 KID SAF
G
2G
2
PG
3
3PG
PG 13
4
4PG13
PGR
5
5PGR
R
6
6R
NC17
7
7 NC17
8 ADULT
8 ADULT
Page 30
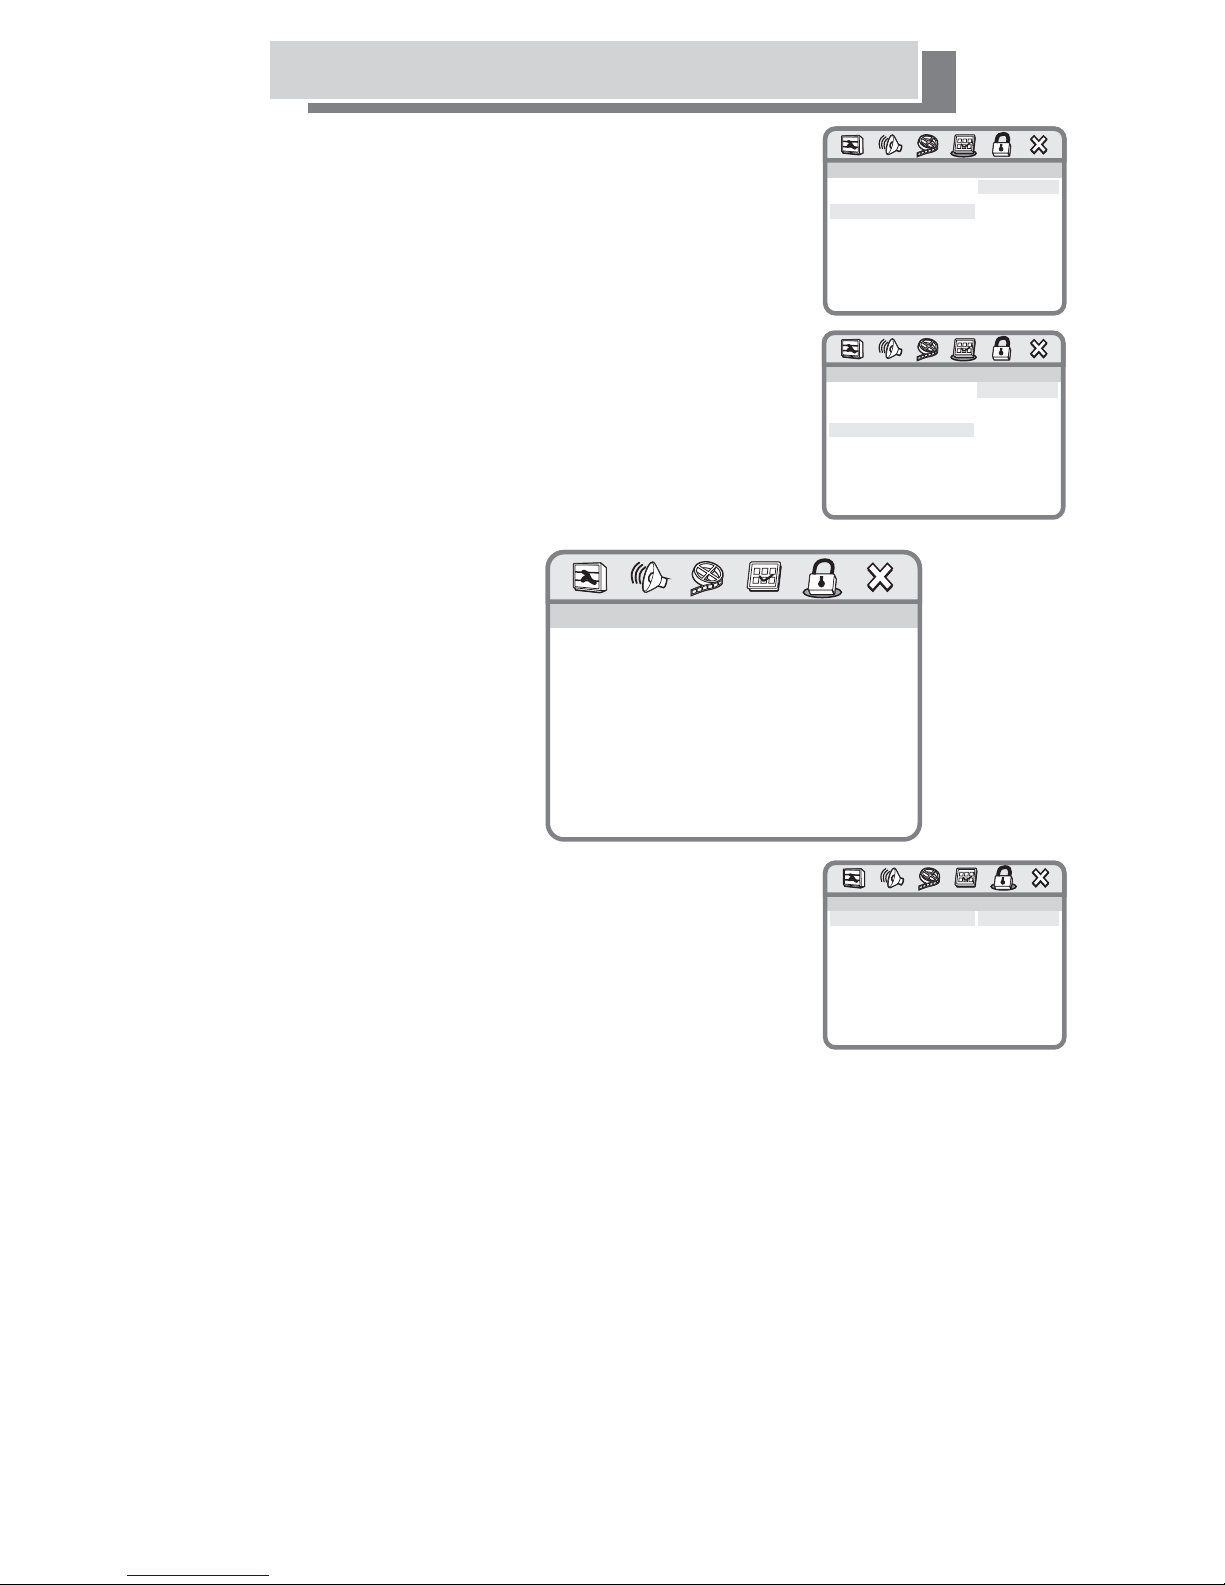
DVD OSD Menu
l Audio Options are available in 8 different
languages (English, French, Spanish,
Chinese, Japanese, Korean, Russian
and Thai). Please note that availability
depends on each DVD original setting.
l Subtitle Subtitles are available in 8 different
languages (English, French, Spanish,
Chinese, Japanese, Korean, Russian
and Thai). Please note that availability
depends on each DVD original setting.
l Default Reset for factory settings.
(5)PASSWORD SET-UP PAGE
.. Password Setup Page ..
.. Password Setup Page ..
Password Mode
Password
Password
Password
Mode
.. ..
Preference Page
Preference Page
.. ..
TV TypeNTSC
TV TypeNTSC
Parental
Parental
Audio
Audio
Subtitle
Subtitle
Default
Default
Preferred Audio Language
Preferred Audio
.. ..
Preference Page
Preference Page
.. ..
TV TypeNTSC
TV TypeNTSC
Parental
Parental
Audio
Audio
Subtitle
Subtitle
Default
Default
Preferred Audio Language
Preferred Audio
Language
Language
English
English
French
French
Spanish
Spanish
Chinese
Chinese
Japanese
Japanese
Korean
Korean
Russian
Russian
Thai
Thai
English
English
French
French
Spanish
Spanish
Chinese
Chinese
Japanese
Japanese
Korean
Korean
Russian
Russian
Thai
Thai
l Password Mode: ON/OFF
Select option ON or OFF as required.
Press Enter key (check unit is in DVD RC
mode first by toggling TV/DVD button,
mode is displayed in top left corner of
screen).
A password window opens up, then press
TV/DVD button and then T.T. button before
entering the password number buttons on the remote control
(default code is 3800) .
Press again TV/DVD button to reaccess DVD RC mode and then
press enter button to complete the procedure.
l Password : Change
Select Change, press Enter button (check unit is in DVD RC mode
first by toggling TV/DVD button, mode is displayed in top left corner
of screen) to get into the password setup screen.
A change password window opens up press TV/DVD button, then
press T.T button immediately once the screen displays the “TV RC”
message on the top left corner before entering the password
number buttons on the remote control (default code is 3800).
Enter four-digit old password (default password is 3800), New
password, and confirm passwod (has to be the same as new
password).
Press TV/DVD button again to reaccess DVD RC mode (mode is
displayed in top left corner of screen ) and press Enter button once
on the remote to complete the precedure.
Go To
Password Setup Page
Go To Password Setup Page
.. ..
Password Setup Page
.. ..Password Setup Page
Password Mode On
Password
Password Off
Password Off
Password
Password Mode
Mode On
Mode
-30-
Page 31
DVD OSD Menu
(6) EXIT
Exit the DVD set-up menu.
Exit Setup MenuExit Setup Menu
-31-
Page 32
OSD Menu Descriptions
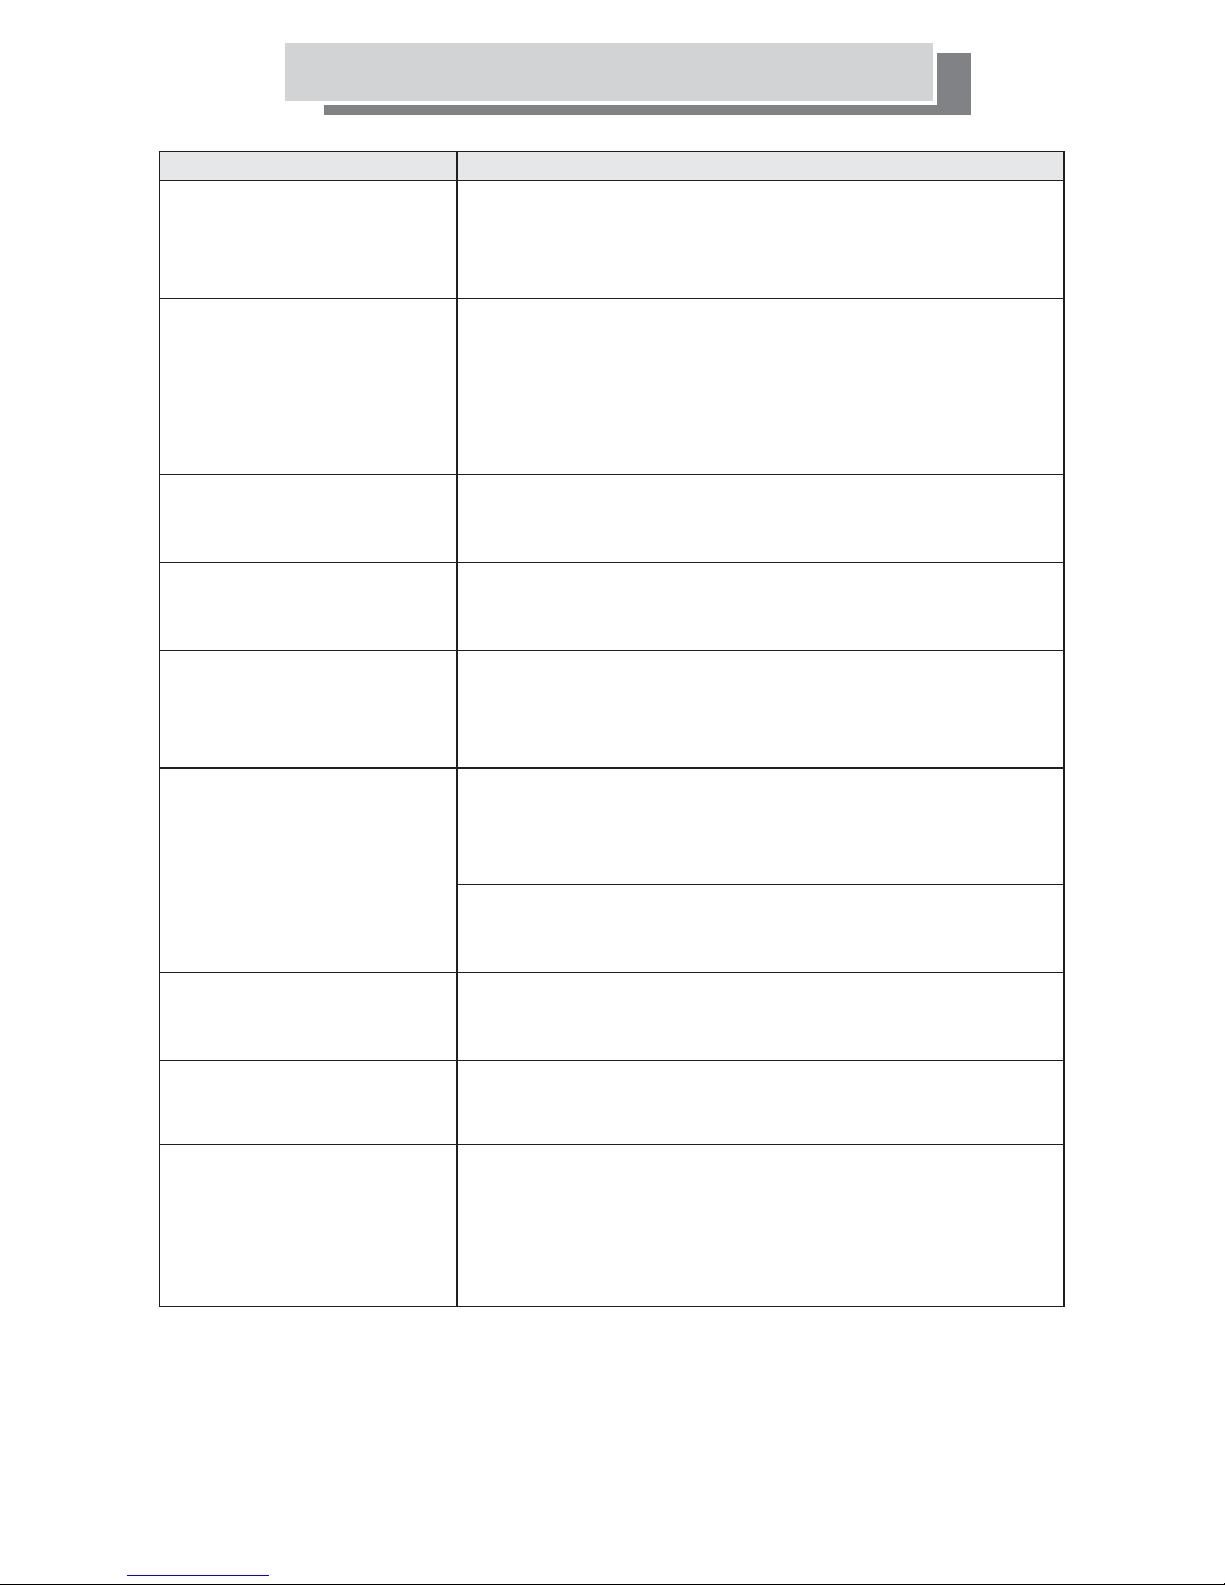
Troubleshooting
Symptoms
TV will not turn on / no power:
Remote control failure:
Buttons on TV or Remote
do not work
No picture and sound:
Picture with NO sound:
Sound with NO picture:
Poor colour tone or NO
No reception from Cable:
No picture when playing DVD:
Picture is blurry or snowy:
colour:
Check Item
l Check power adapter and cord is connected properly.
l
Check power adapter and cord if they have been damaged.
l
Check if outlet is working.
l
Unplug TV for a few minutes and turn it on again.
l
Check batteries are not dead or installed incorrectly.
l
Check if there are obstructions between remote and TV sensor.
l
Aim remote control at IR receiver window from 2 inches away.
l
If failure results from electrical interferences, lighting, or static,
disconnect the TV power cord for 10 seconds before reinstalling it.
Restart your TV.
l Possible Micro Processor crash disconnect the TV from the mains for
a few minutes then re connect and try again.
l
Check if in stand-by mode.
l
Verify all connections are firmly attached.
l
Press "AV" key to cycle to the correct input source.
l
Check volume or mute buttons.
l
Verify all connections are firmly attached.
l
Video and audio plugs connected to different sources.
l
Check brightness and contrast levels.
l
Adjust picture settings.
l
Check reception and the antenna.
l
Make sure S-video terminal has nothing connected.
l
Check memory setting.
l
Check colour or picture setting.
l
Check if program is in correct channel.
l
Check possible outside interferences.
l
Check if cable is connected properly.
l
Check if channels are selected properly.
l
Check if cable company is experiencing technical difficulties.
l
Check the DVD disc is not damaged
l
If DVD player supports progressive scan, switch the DVD player
into interlaced mode.
l
Check other channels. Problem may be an isolated incidence.
l
If using outdoor antenna, please check connection or interference.
l
heck accessories components (VCR, DVD, etc).
C
l
RF signal may be too slow.
, clean the disc, check for fingerprints
-32-
Page 33
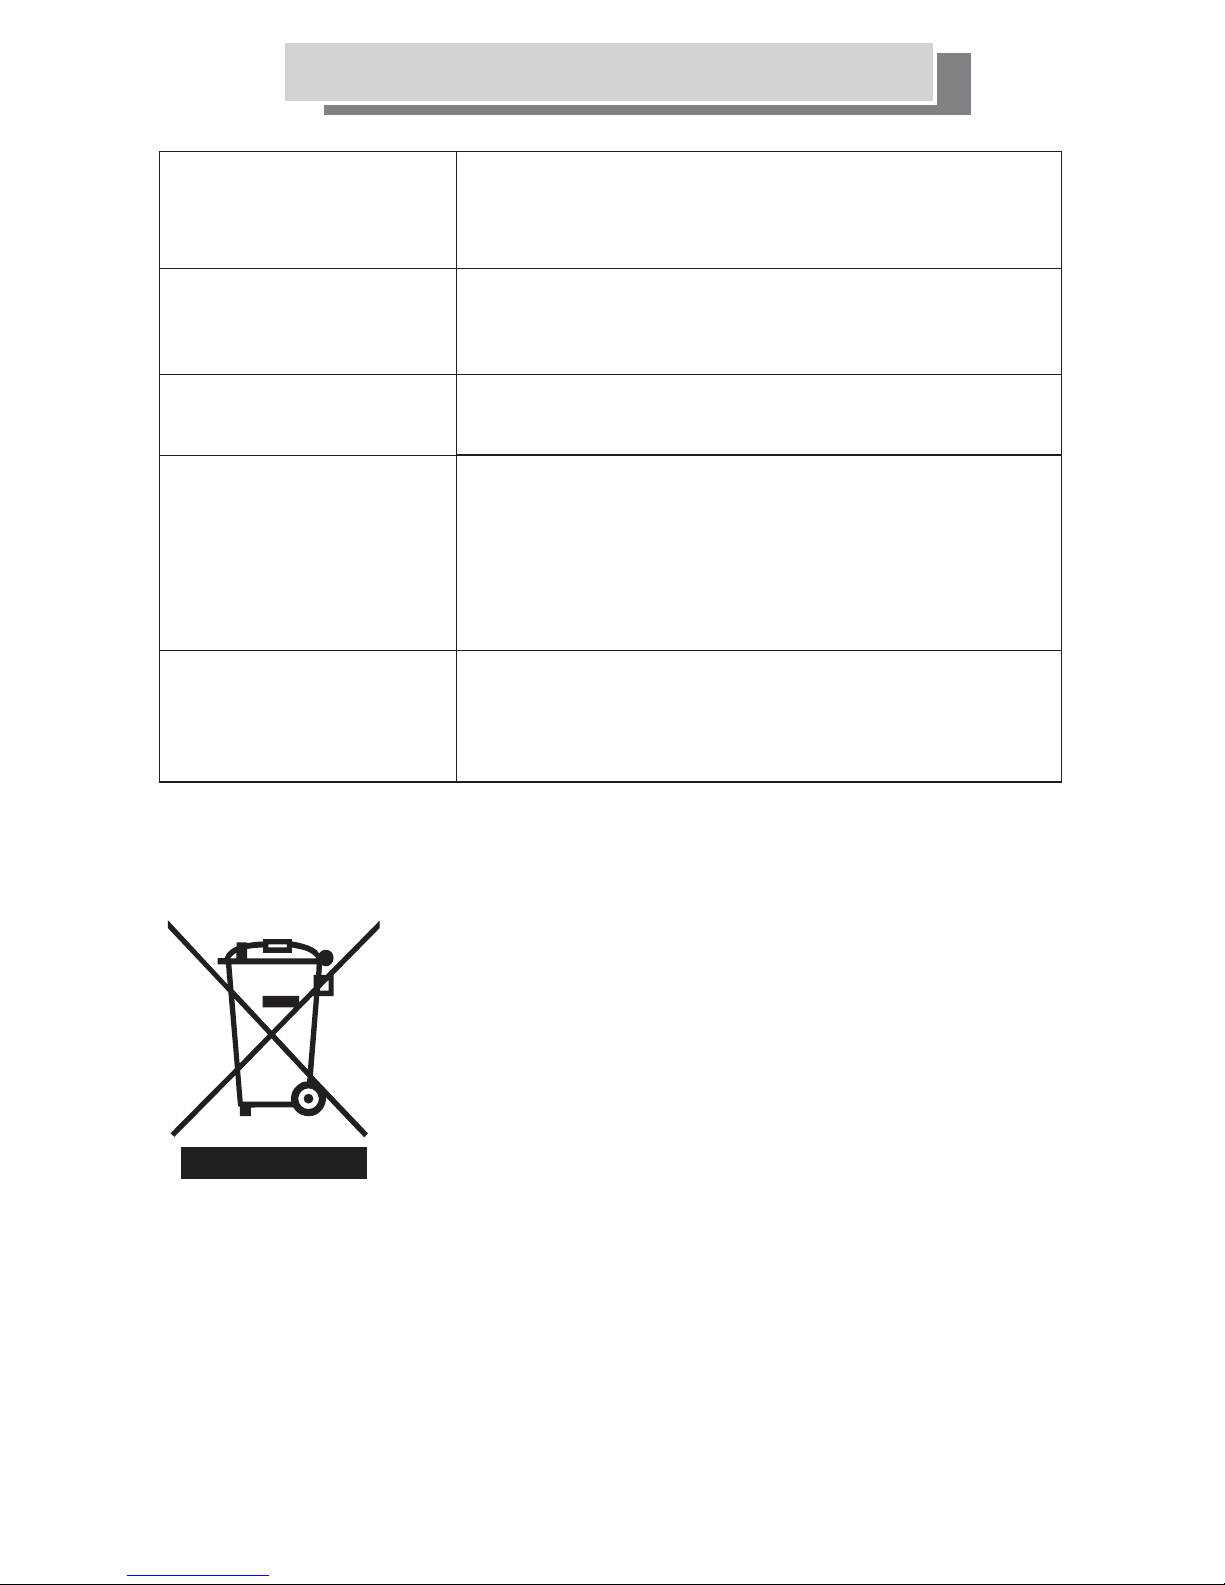
Picture too dark:
Pictureisnotsharporthe
picture shakes:
Picture has ghosts or multiple
pictures:
Picture is spotted or stripes
appear:
OSD Menu Descriptions
Troubleshooting
l
Check brightness level.
l
Check contrast level.
l
Adjust saturation or hue levels.
l
Check LCD monitor for possible damage.
l
The reception may be weak.
l
The quality of the broadcast may also be bad.
l
Adjust the antenna to face the correct direction.
l
Make sure outside antenna has not been disconnected.
l
Results of two signals, try adjusting antenna direction or location.
l
Broadcast waves may be reflected from adjacent mountains or buildings.
l
Video and Audio plugs connected to different sources.
l
There may be interferences from cars, trains, high-voltage lines,
neon lights, etc.
l
There may be interference between the antenna cable and power cable.
Try positioning them further apart.
l
There may be interferences from other devices such as radios or
cellular phones
l
Check reception and the antenna .
Smearing on fast moving objects:
Disposal
Waste electrical and electronic products must not be disposed
of with household waste. Please refer to the retailer from whom
you purchased this item for disposal instructions.
Batteries and packaging materials should be recycled using
local facilities.
l
In low temperature, the picture may leave trails or appear slightly delayed.
This is not a malfunction, the unit will return to normal.
We have made every effort to ensure these instructions are as accurate as possible,
however we apologize for any inconvenience caused by minor inconsistencies
which may occur as a result of product improvement and development.
-33-
 Loading...