

Page 1
DIGITAL TERRESTRIAL RECEIVER
OPERATING INSTRUCTIONS
WP645TS-HD
BE WALKER WISE...logon to www.walker.ie
WP645TS-HD
Page 2

Contents
Contents 1
Safety Information 2
Preparation 2
Introduction 2
Safety Precautions 2
Power Cord 2
Symbols in this Instruction Book 2
Batteries 3
Safety Information & Getting Started 3
Accessories included 3
Batteries 4
Features 4
Viewing remote control 5
Connections on the Set Top Box 6
Inserting Batteries in the Remote Control 7
Connecting the Set Top Box to a TV Set 7
Power Connection 8
Antenna & Satellite Connection 8
Power On-Off 8
Important - USB Connection Precautions 9
First Time Installation 10
Changing Channels 11
On-Screen Information 12
Instant Recording 12
Time Shifting (Pause Live Recording) 12
Basic Features 12
General Operation, Instant Recording, Time
Shifting 12
Menu System 13
Viewing the Main Menu 13
Managing Stations: Channel List 13
Operating the Channel List 13
Selecting a Specifi c Channel 13
Deleting Channels 13
Deleting Multiple Channels 13
Menu System, Channel List 13
Renaming Channels 14
Adding Locks to Channels 14
Locking Multiple Channels: 14
Setting Favourites 14
Viewing Electronic Programme Guide (EPG) 14
Event Options 15
Select Channel 15
Record Programme/Delete Timer 15
Confi guring Timers 15
Channel list, continued - Electronic
Programme Guide 15
Recordings Library 16
Play Options 16
Confi guring Settings 16
Confi guration 16
Country 16
Timers, Recordings Library 16
Output Settings 17
Receiver Upgrade 17
Menu Locking 17
Managing Settings 17
Set Pin 18
Menu Lock 18
Time Settings (Optional) 18
Audio Description 18
HDCP 18
Low Power 18
Automatic Power Down 18
Confi guring Language Preferences 18
Installation 19
Satellite Automatic Scan 19
Terresterial Automatic Scan 19
Satellite Manual Scan (*) 19
Satellite Manual Scan 19
Terresterial Mode 20
Channel Scan 20
Frequency Scan 20
First Time Installation 20
Clear Service List (optional) 20
Recording confi guration 20
Installation Options - continued 20
Load Settings 21
Save Settings 21
Recordings Confi guration 21
Advanced Features 22
Viewing the Media Browser 22
Playing MP3 Files 22
Viewing JPG Files 22
Slideshow Options 22
Playing Video Files 23
Conditional Access 23
Other Information 24
Audio Mode Selection (Yellow Button) 24
Info / Help 24
Audio Language button (AUDIO) 24
EPG (Electronic Programme Guide) 24
Favourite Programme (FAV.) 24
Mute 24
Subtitle (SUBT.) 24
Previous Channel 24
Teletext ( TEXT) 24
OPT button ( MODE CHANGES) 24
Product Support 25
Troubleshooting 25
Important Instruction 28
1
Page 3
Safety Information
IMPORTANT - Please read these instructions fully before installing or operating
Preparation
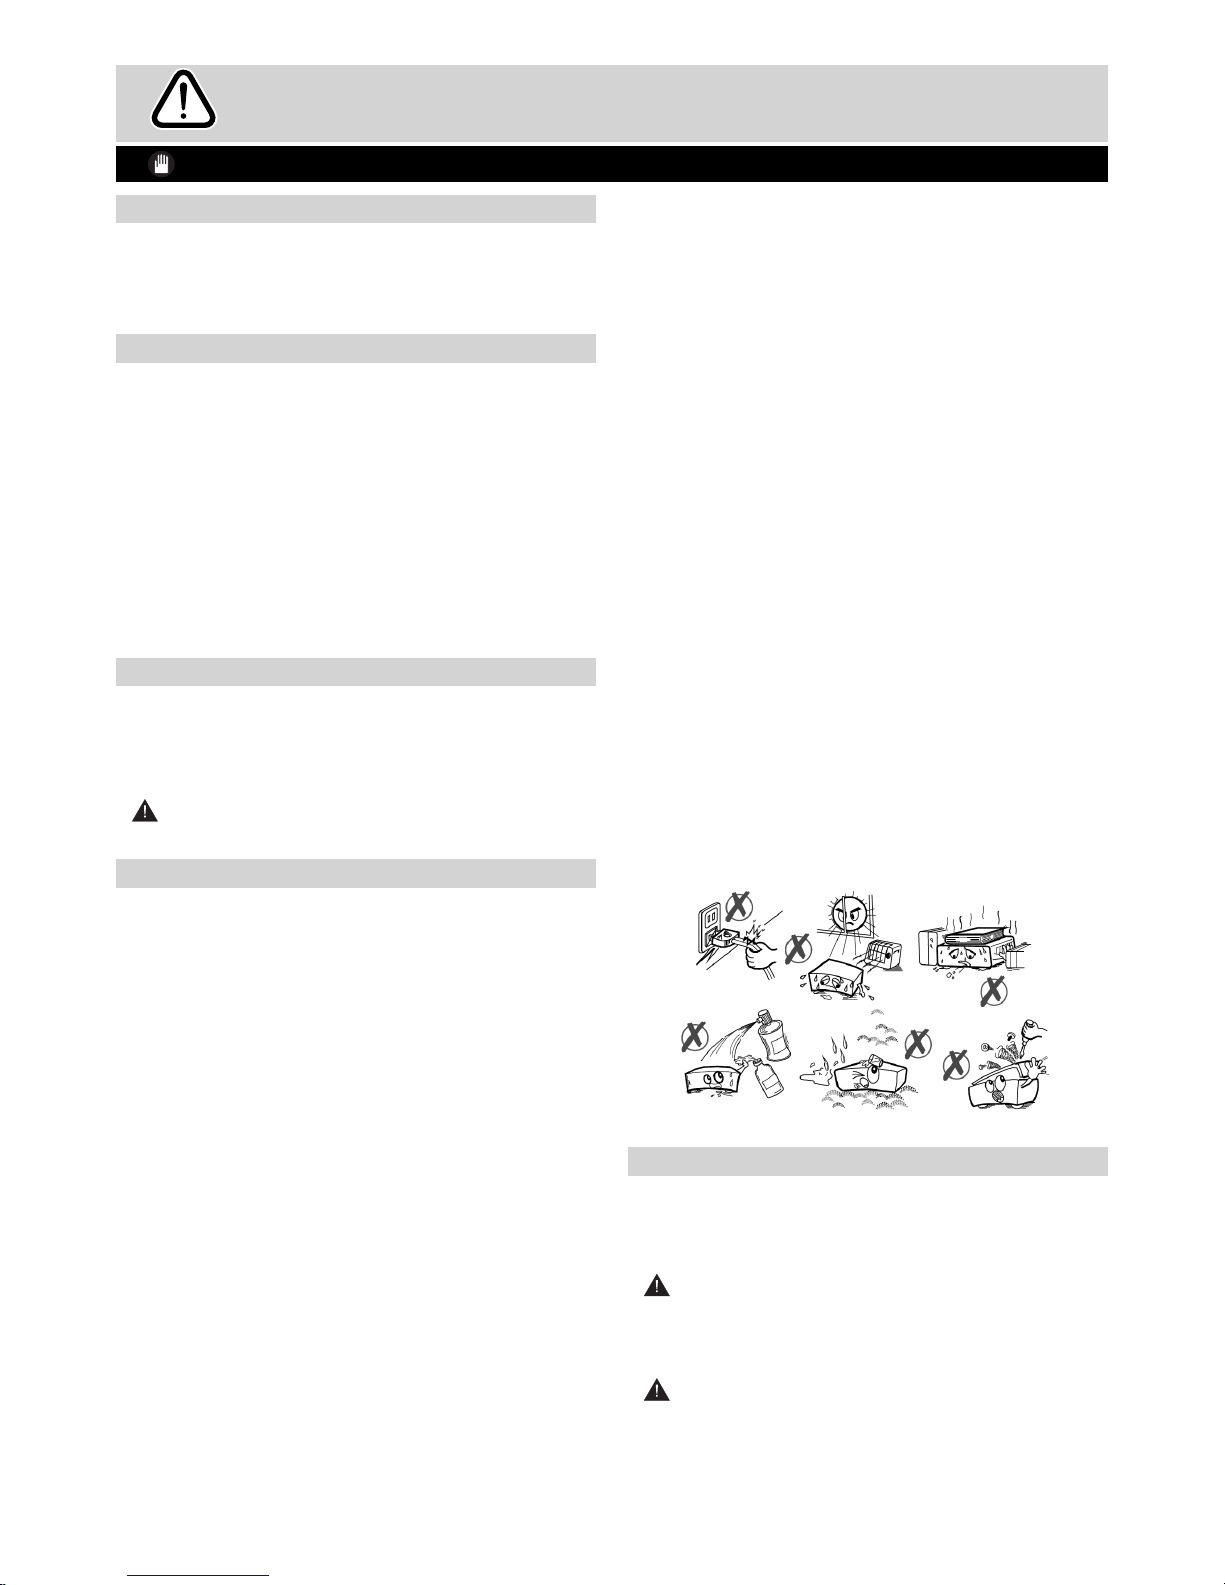
For ventilation, leave a free space of at least 10 cm
all around the set. To prevent any fault and unsafe
situations, please do not place any objects on top
of the set. Use this device in moderate climates.
Introduction
• Thank you for choosing this product. This manual
will guide you for the proper operation of your set
top box.
• Before operating the set top box, please read
this manual thoroughly. Please keep this manual
in a safe place for future references. Read the
corresponding instructions of this handbook prior
to the fi rst use of the device, even when the usage
of electronic devices is familiar to you.
• Please keep this instruction book for future
reference.
Safety Precautions
Power Source
The set should be operated only from a 220-240V
AC, 50 Hz outlet. Ensure that you select the correct
voltage setting for your convenience.
WARNING: When the set is not in use for a long
time, disconnect from the power.
Power Cord
• Do not place the unit, a piece of furniture, etc., on
the power cord (mains lead), or pinch the cord.
• Handle the power cord by the plug. Do not pull out
the plug by tugging the cord and never touch the
power cord when your hands are wet as this could
cause a short circuit or electric shock.
• Never make a knot in the cord or tie it with other
cords. The power cords should be routed in such
a way that they are not likely to be stepped on. A
damaged power cord can cause fi re or give you an
electrical shock.
• Check the power cord once in a while. When you
fi nd it damaged, ask closest service agent for help.
When the AC power cord needs to be changed, it
should be done at a qualifi ed service shop only.
• Please do not place the set in a place subject to
direct sun light, excessive dust or mechanical shock
or in a location near heat sources.
• The device should be placed on a solid and safe
base.
• Do not place the apparatus on a soft surface such
as a rug that might block the ventilation holes on
the bottom.
• A location should not be selected such as a room
with high humidity, as the condensation, arising in
the kitchen for example, may cause malfunction or
damage the device.
• Heating or other thermal radiation under the set also
may cause malfunction or damage the device.
• The hot air, which arises during the operation,
should be ventilated with suffi cient air circulation.
Please do not put the device into closed areas and
do not cover it.
• Please avoid contact of the device with water
or humidity. Do not put into operation near bath,
swimming pools.
• Take care to provide good air circulation. Place
the device in a location with adequate ventilation
to prevent heat build-up in the device.
• Should any solid object or liquid fall into the cabinet,
unplug the device and have it checked by qualifi ed
personnel before operating it any further.
• The device should not be exposed to dripping or
splashing and no objects fi lled with liquids, such as
vases, shall be placed on the device.
CAUTION
• Batteries must not be exposed to excessive heat
such as sunshine, fi re or the like.
Symbols in this Instruction Book
The following symbols are used in the Instruction
Book as a marker for restrictions and precautions and
safety instructions. Note such information for security
reasons.
WARNING
If you do not pay attention to such a marked warning, it
can cause serious injury or death. Note these warnings
strictly, in order to ensure a safe operation.
CAUTION
Such a precaution is marked, you should take up
or note, to avoid injury or property damage. Note
these instructions strictly, in order to ensure a safe
operation.
2
Page 4

Safety Information & Getting Started
Safety Precautions - continued, Features
IMPORTANT
Warnings on the appliance and restrictions are displayed
like this. Read this information strictly in order to operate
the system correctly and avoid damage.
NOTE: Information about the operation and
additional explanations are marked like this. To be
aware of such information is recommended to ensure
that the functions can be used optimally.
Batteries
Warning: Incorrect installation of batteries may
cause battery leakage and corrosion, resulting in
damage to the remote control.
Do not mix old and new batteries, or batteries of
different types.
Do not dispose of batteries in a fi re.
Do not dispose of batteries with normal household
waste, take to a local recycling centre.
CAUTION: Insert the batteries / rechargeable
batteries in the correct polarity. Don´t try to recharge
non rechargeable batteries and under no circumstances
throw them into fi re. Danger of explosion. Do not use
unequal batteries (old and new, Alkaline and carbon,
etc.) simultaneously. If you will not use the device for
a long time, remove the batteries and store the device
in a dry and dust free place. Improper use of batteries
may cause an explosion or leakage. If the batteries have
leaked, use gloves and clean the appliance thoroughly
with a dry cloth! Batteries should not be exposed to
heat, such as sunshine, fi re or the like.
Remote Control
Batteries: 2 x AAA
Instruction Book
Quick Start Guide
HDMI cable
Accessories included
NOTE:You should check the accessories after
purchasing. Make sure that each accessory is
included.
3
Page 5

Safety Information & Getting Started
Safety Precautions - continued, Features
IMPORTANT
Warnings on the appliance and restrictions are displayed
like this. Read this information strictly in order to operate
the system correctly and avoid damage.
NOTE: Information about the operation and
additional explanations are marked like this. To be
aware of such information is recommended to ensure
that the functions can be used optimally.
Batteries
Warning: Incorrect installation of batteries may
cause battery leakage and corrosion, resulting in
damage to the remote control.
Do not mix old and new batteries, or batteries of
different types.
Do not dispose of batteries in a fi re.
Do not dispose of batteries with normal household
waste, take to a local recycling centre.
CAUTION: Insert the batteries / rechargeable
batteries in the correct polarity. Don´t try to
recharge non rechargeable batteries and under
no circumstances throw them into fi re. Danger of
explosion. Do not use unequal batteries (old and
new, Alkaline and carbon, etc.) simultaneously.
If you will not use the device for a long time,
remove the batteries and store the device in
a dry and dust free place. Improper use of
batteries may cause an explosion or leakage.
If the batteries have leaked, use gloves and
clean the appliance thoroughly with a dry cloth!
Batteries should not be exposed to heat, such
as sunshine, fi re or the like.
Features
• 5000 channels TV and Radio programs
• Media Browser ( USB 2.0 ) Support
• DVB-T/ DVB-S2 Compliant
• HDMI Output (576p, 720p, 1080i resoluitons
support)
• Channel lock
• Present/Next event information ( 7-DAY EPG)
• Recording timers
• Mheg support
• Parental lock at menu
• Signal strength bar for transponders
• Multi language audio support
• Digital audio output (optic)
• Teletext function support (DVB)
• Resetting to factory settings option
• TV Scart
• Ku band reception: 10.7 – 12.7 GHz
• Ka band reception: 26.5 – 40 GHz (Requires
Kaband LNB installation on dish)
• LNB Control: Horizontal / vertical polarity
switching (13V %12,825-%14,175 and 18V
%17,575-%19,425), 0-22 kHz switching, tone burst
A/B switching for dish selection,DiSEqC 1.2
• Selectable satellite configurations (Presets:
ASTRA, HOTBIRD, TURKSAT 2A/3A.etc)
• VHFIII; 174–230 MHz, 7MHz bandwith UHFIV
and UHFV; 470-862 MHz,8MHz bandwith
• Supports 16-QAM, 64-QAM (DVB-T) modulations
• Signal strength and signal quality bars for antenna
adjustment
• Various channel search options:
• Automatic Satellite search for preset
transponders
• Transponder search
• Network search
• FTA (Free- to- Air) search option for satellite and
auto search modes
• Auto FEC (Forward Error Correction) search
• Auto PID correction (except user defi ned PIDs)
• Digital Decoding Properties:
• Demodulation: QPSK and 8PSK
• FEC : Auto, 1/2, 2/3, 3/4, 5/6, 7/8 for DVB-S
QPSK
• Auto,1/4,1/3,2/5,1/2,3/5,2/3,3/4,4/5,5/6,8/9,9/10
for DVB-S2 QPSK
• Auto, 3/5, 2/3, 3/4, 5/6, 8/9, 9/10 for DVB-S2 8PSK
• Symbol Rate: 2 to ~ 45 Msps for DVB-S
• Symbol Rate: 5 to ~ 30 Msps for DVB-S2
• Video Decoding: MEPG2 MP@ML, PAL/NTSC
4:3 16:9, MPEG4 AVC/H.264 HP@L4 16:9
• Video Out: PAL
• Audio Decoding: MPEG-1 LAYER I/II, MPEG-2
LAYER II, MPEG-2 AAC, MPEG-4 AAC
• 32-bit OSD color, 720x576 pixels for PAL
• Last watched channel saving
• LNB short circuit and overload protection by
software
• IR remote control
4
Page 6
Getting Started
Viewing remote control
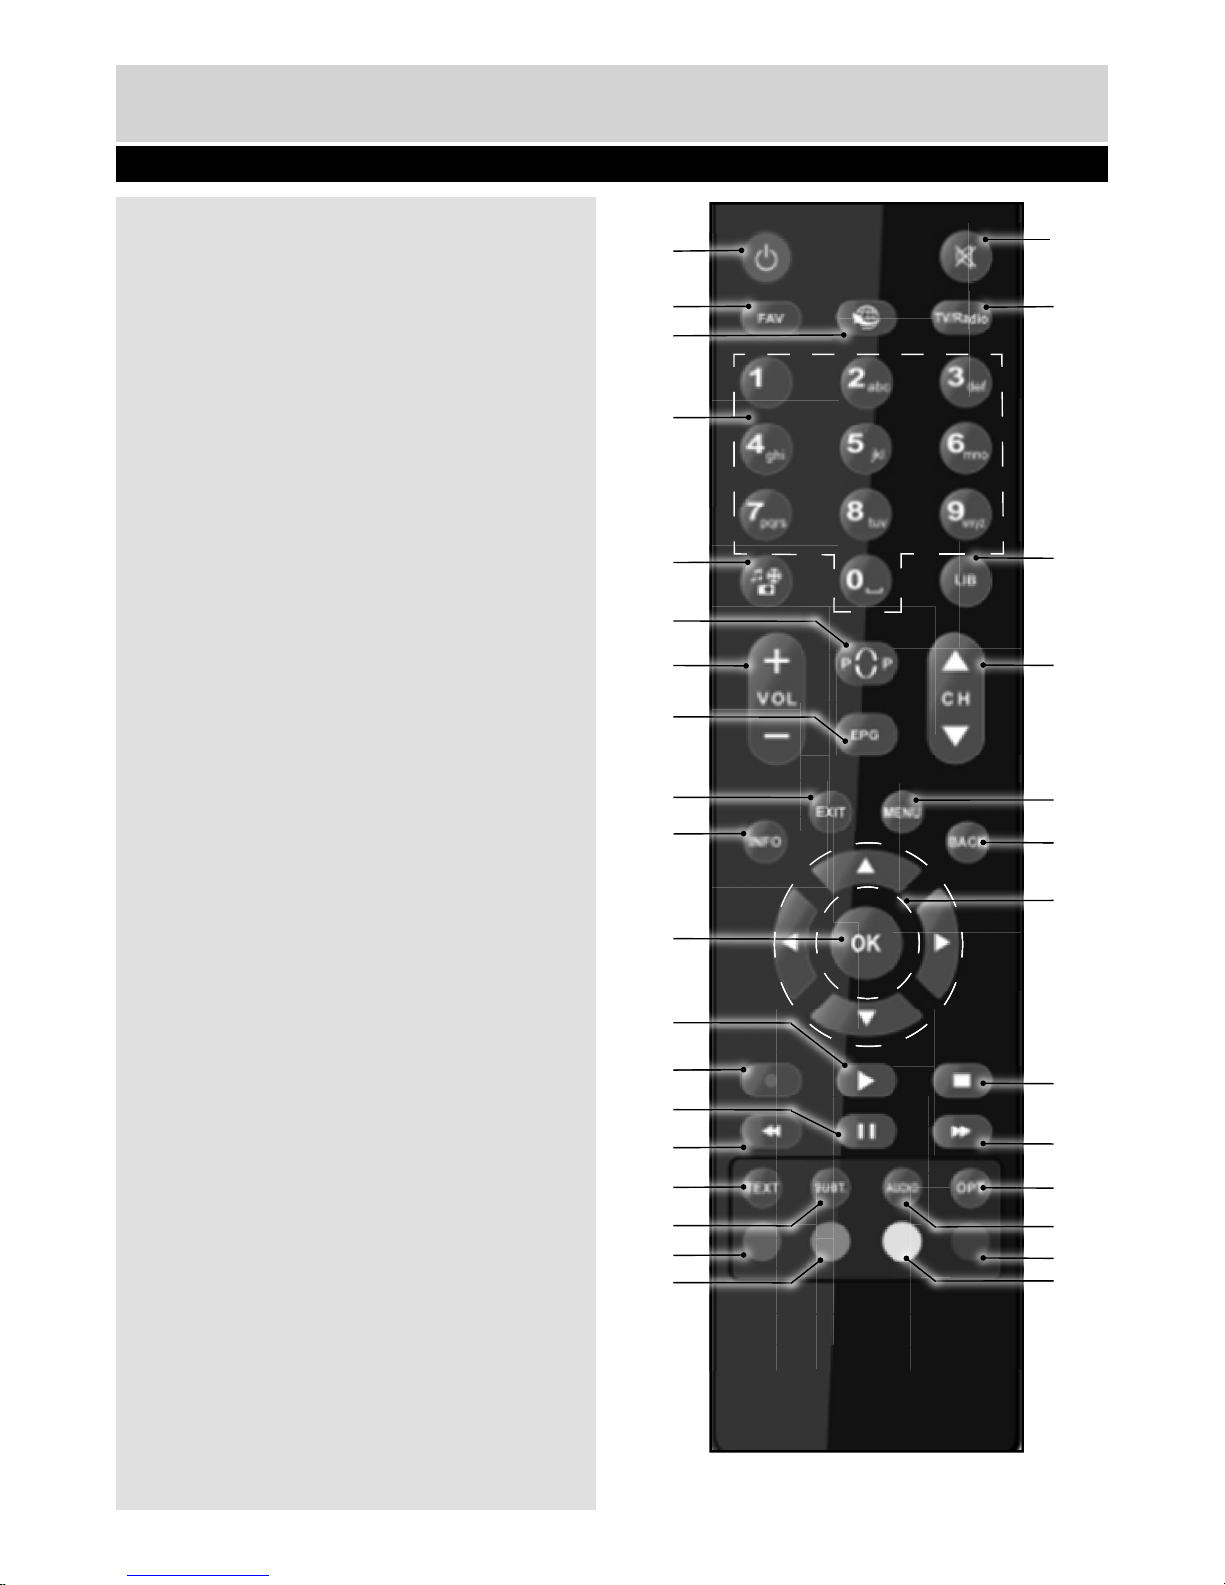
1- Standby
2- Favourite mode
3- No function
4- Numeric buttons
5- Media Browser
6- Previous programme
7- Volume Up/Down
8- Electronic Programme Guide
9- Exit Menu
10- Info
11- OK / Confi rm
12- Play
13- Programme recording
14- Pause / Timeshift recording
15- Rapid reverse
16- Teletext
17- Subtitle
18- RED button
19- GREEN button
20- Mute
21- Switch between TV or Radio broadcasts
22- Recordings Library
23- Channel Up / Down
24- Menu on/off
25- Back
26- Navigation buttons
27- Stop
28- Fast Forward
29- Switches between Satellite and Terrestrial
mode.
30- Audio language selection
31- BLUE button
32- YELLOW button
1
2
3
4
5
6
7
8
9
10
11
12
13
14
15
16
17
18
19
20
21
22
23
24
25
26
27
28
29
30
31
32
5
Page 7
Getting Started
Connections on the Set Top Box
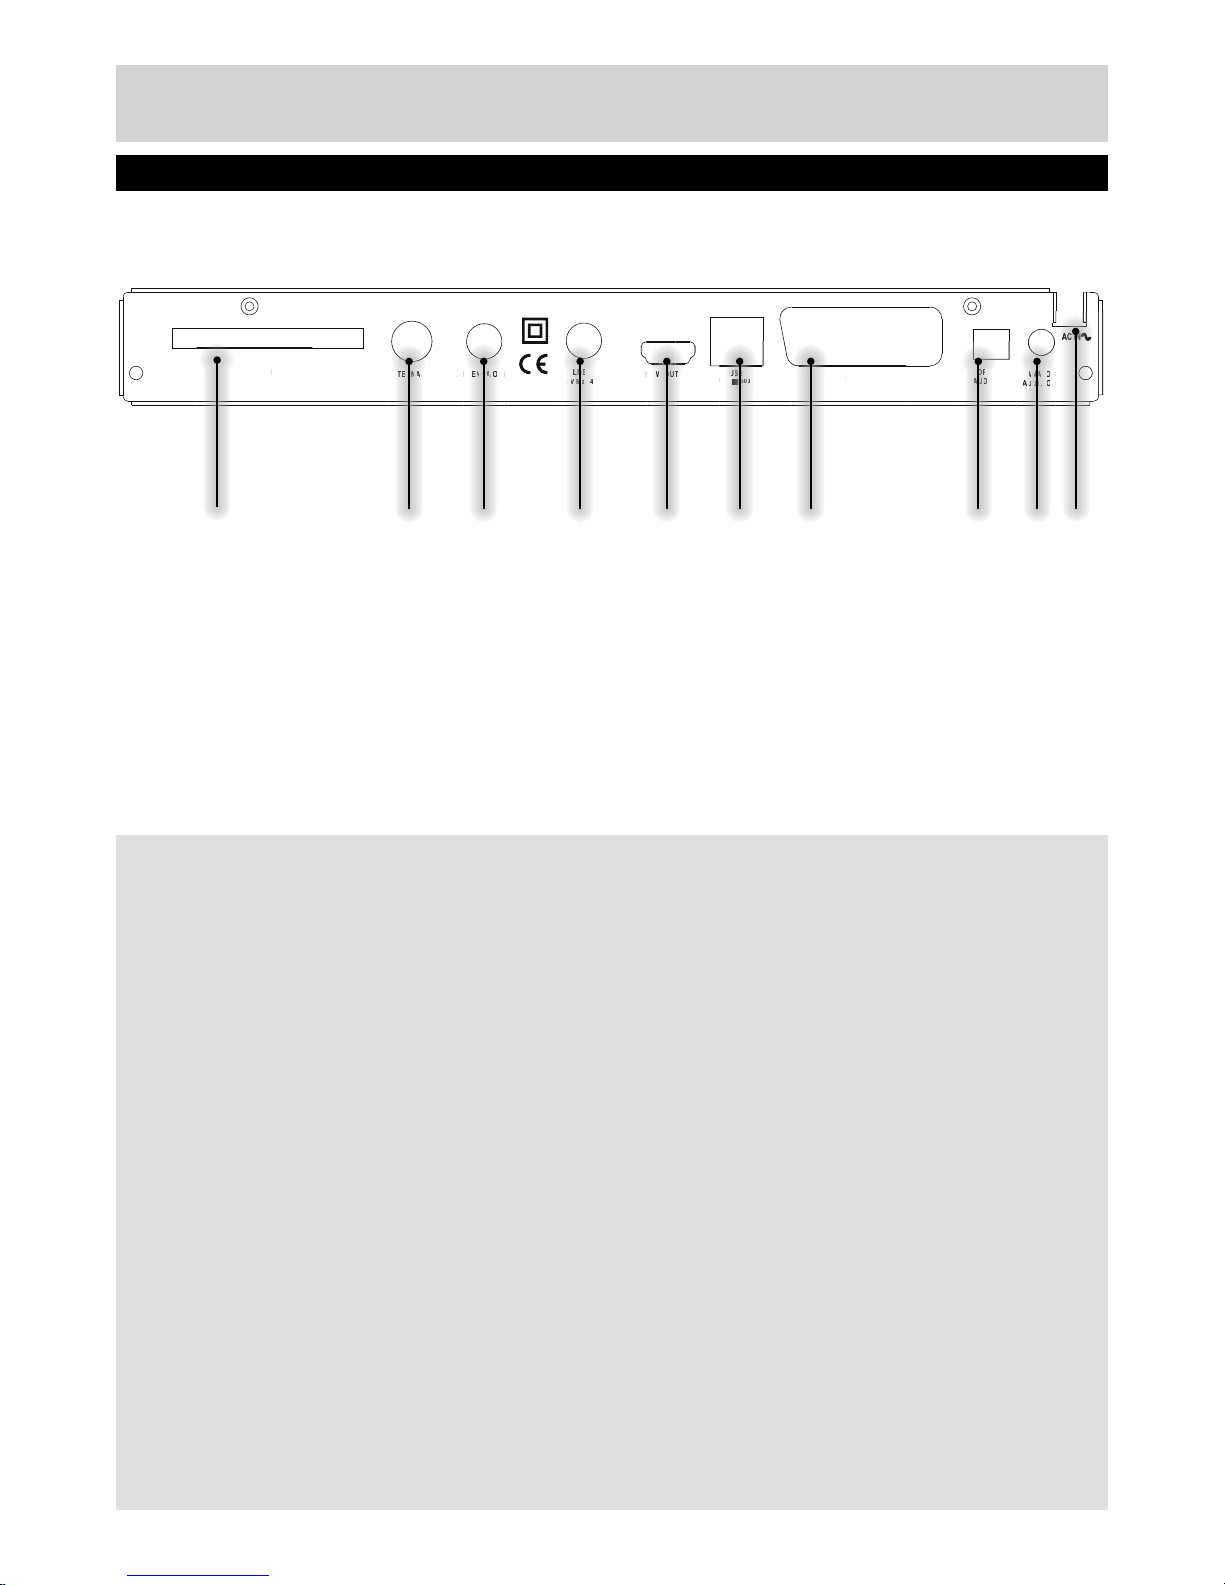
Common Interface (CI) Slot.1.
ANTENNA IN2. : Aerial input.
ANTENNA OUT3. : To watch analogue channels on the TV.
LNB IN: 4. To connect satellite signal to the box.
HDMI IN5. : HDMI connection.
LAN6. : Ethernet Input (for service use only).
SCART OUT7. : If your TV has a scart connector, you can connect the box to your TV using a
scart cable.
OPTICAL AUDIO OUT8. : You can use this connector to output the digital audio to an external
device. See your audio system instruction book for further information.
AUDIO OUT9. : Audio Output.
10. POWER CABLE.
Make sure that you connect all cables and connections before you plug the unit into the mains supply.
After you connect the unit to the mains supply, the LED light located on the front panel will be red (Standby
mode).
Rear Panel
SCART (TV)
HDMI OUTPUT
USB
5V DC ,500mA
OPTICAL
AUDIO OUT
ANTENNA IN ANTENNA OUT
ANALOG
AUDIO OUT
35029345
CI
LNB IN
13/18V Max.400 mA.
CI
NAIN
AN
1
3
NAOT
B I
N
a
xmA.VM
TIOU
,5
,5
,5
,5
0
CART (TV
)
T
AL
AUD OUTANALOAG
A
DIO O
T
1 2 3 4 5 6 7 8 9 10
6
Page 8
fi g.1
fi g.2
7
Getting Started
Inserting Batteries in the Remote Control
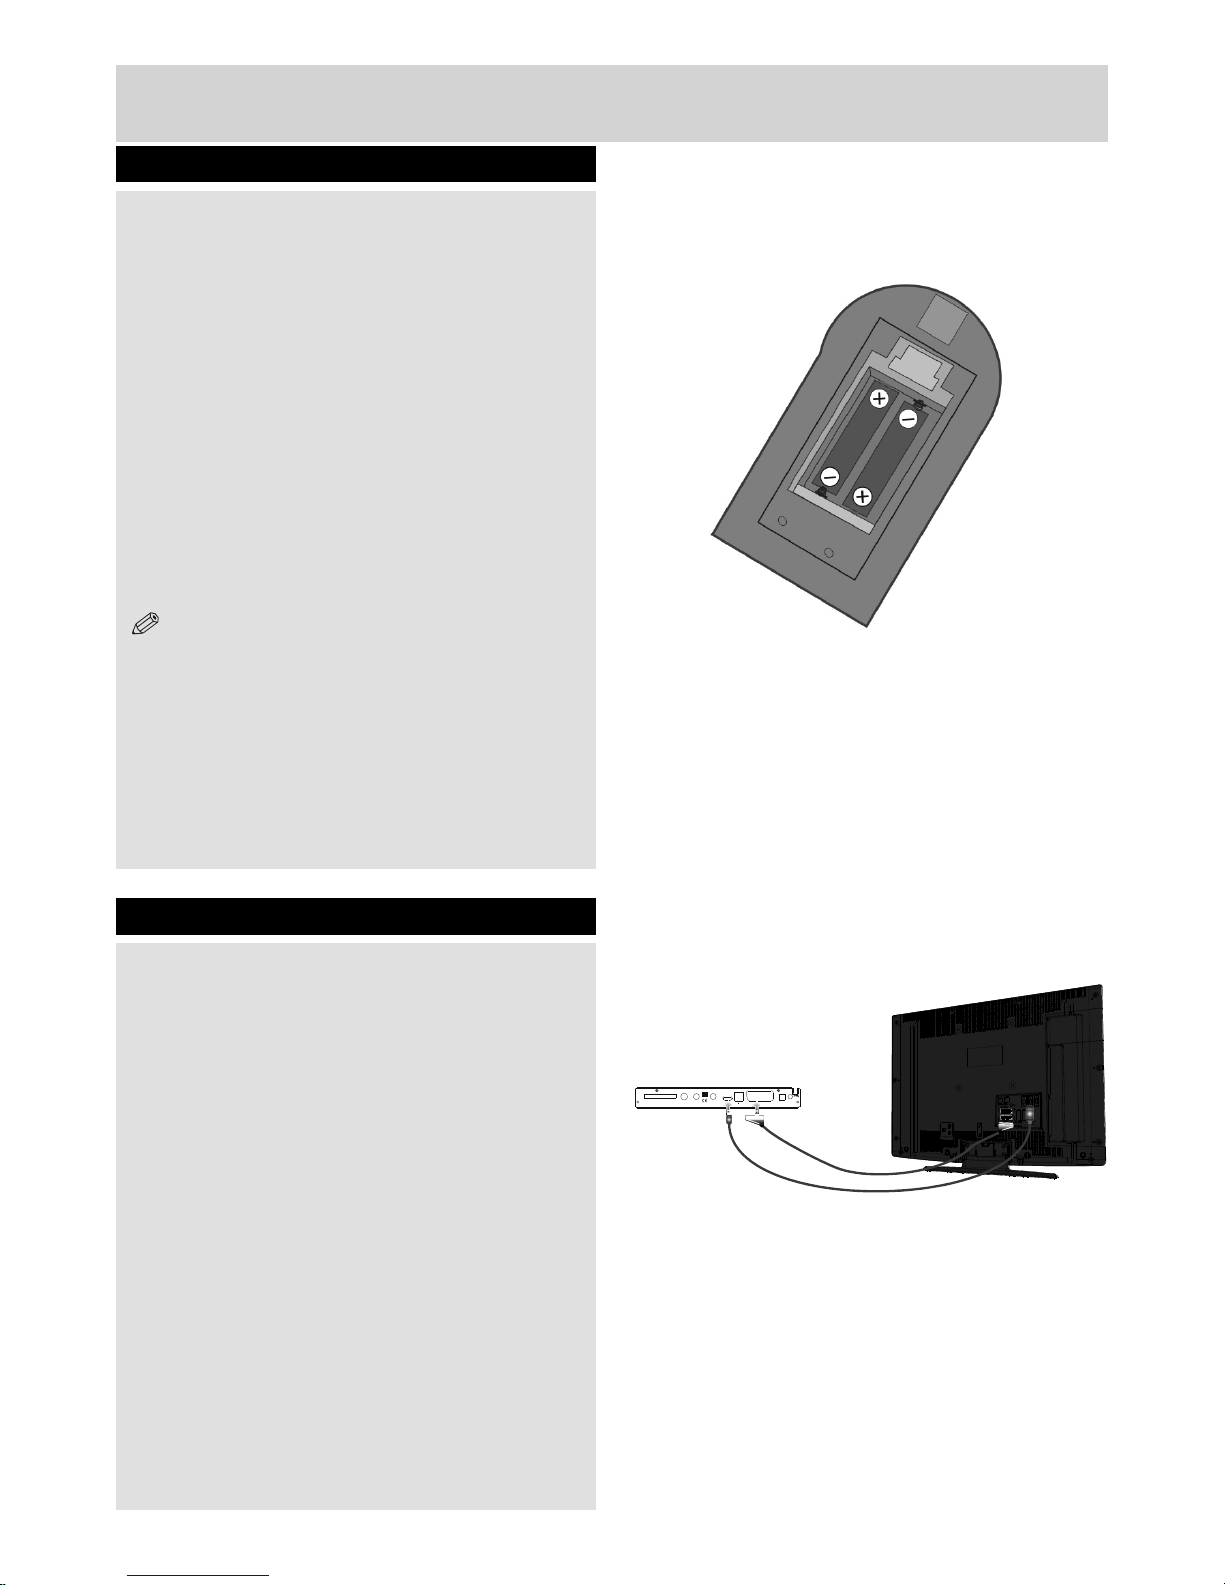
• Remove the battery cover located on the back of
the remote control by gently pulling backwards from
the indicated part.
• Insert two AAA/R3 (2 X 1.5Volt) or equivalent type
batteries inside. Place the batteries in the correct
direction observing the polarity symbols (+/-) and
replace the battery cover.
• While using the remote control, you should direct
it towards the front panel of the receiver. Remote
range is approximately 7m/23ft.
• If your receiver no longer responds to the remote
control. it is probable that the batteries are
exhausted. If so you can still use the local buttons
of the receiver. You can replace batteries after they
are exhausted.
NOTE: Remove the batteries from the remote
control when it is not to be used for a long
period. Otherwise it can be damaged due to
any leakage of batteries.
Connecting the Set Top Box to a TV Set
You can connect the set top box to your TV by
using the scart socket or HDMI input. Use a scart
or HDMI cable to connect the set top box to your
TV.
The set top box gives RGB or CVBS output from
scart or high defi nition quality from HDMI output.
SCART (TV)
HDMI OUTPUT
USB
5V DC ,500mA
OPTICAL
AUDIO OUT
ANTENNA IN ANTENNA OUT
ANALOG
AUDIO OUT
35029345
CI
LNB IN
13/18V Max.400 mA.
HDMI connection
SCARTconnection
Page 9

Getting Started
Power Connection
IMPORTANT: The set top box is designed to
operate on 220-240V AC, 50 Hz. Plug the power
cable to the mains socket outlet.
• After unpacking, allow the set top box to reach the
ambient room temperature before you connect the
device to the mains .
fi g.1
Antenna & Satellite Connection
• Use ANTENNA IN to connect to an antenna to your
receiver (fi g.1). You can also use ANTENNA OUT
to connect antenna to your TV through the set top
box with an appropriate antenna cable.
• Connect the satellite LNB cable to the LNB socket
of your receiver (fi g.2).
Power On-Off
Connect all cables before plugging the box into the
mains. After plugging in the mains cord of the set
top box to the mains supply, a light will be seen on
the front panel (Standby mode). When the set top
box is fi rst powered up, please wait until the box
is initialized before activating the receiver since
booting of software will take some time. Plug the
mains. Please wait until the unit is initialized. This
may take almost a minute.
This product conforms with the latest European
Union Power Consumption Regulations and
features a low power standby mode. The product
enters into the low power standby mode a few
seconds later after pressing the standby button
to turn off the unit. Until the low power mode is
activated, a clock will be displayed at the display.
When the low power mode is activated, the display
will be shut down. When you press the standby
button during low power mode, it may take a
minute until the product is initialized. However if
you press standby button before low power mode
is activated unit will be initialized in a couple of
seconds (Active standby mode). Although it is not
recommended for enviromental reasons, you may
disable low power mode in your product at setup
–confi guration menu.
Auto Power Down
The timeout value of auto power down feature has
been set as four hours by factory default. After the
timeout value is reached and the Tv is not operated
, the TV will go off. (if Auto Power Down option is
enabled). The Automatic power-down can be set
as On or Off from the confi guration menu.
Important Note: If there is any ongoing
programme recording or if any EPG programme
recordings and/or manual recordings is set to a
nearby time, the unit does not switch to low power
mode and remains in active standby mode until
recording tasks have been fi nished. At low power
mode, the unit initializes a couple of minutes before
the actual time of the incoming recording task.
Important Note: The unit initializes time to time
to receive updates from EPG broadcast in order
to sycnronize EPG recording tasks properly. After
getting updates, the unit switches to low power
mode automatically. This takes a short while and
it is not a malfunction.
fi g.2
8
Page 10

Getting Started
Important - USB Connection Precautions
• You can connect a USB hard disk drive or USB
memory stick to your box by using the USB input.
This feature allows you to play fi les stored in a USB
drive or record programmes.
• 2.5” and 3.5” inch (hdd with external power supply)
external hard disk drives are supported.
• To record a programme, you should fi rst connect
a USB disk to your box while the it is switched
off. You should then switch on the box to enable
recording feature. Otherwise, recording feature will
not be available.
IMPORTANT
• You may back up your fi les before making any
connections to the box in order to avoid any
possible data loss. Note that manufacturer will not
be responsible for any fi le damage or dataloss.
• It is possible that certain types of USB devices (e.g.
MP3 Players) or USB hard disk drives/memory
sticks may not be compatible with this device.
• The device may not support all disk formats. If you
connect a USB disk with an unsupported format,
then you will be asked to format the content. See
the section, “Format Disk” in the following pages
for more information on disk formatting. Note that
ALL the data stored on the USB disk will be lost
and then the disk format will be converted to
FAT32 in such a case.
USB Disk Connection
• Plug your USB device to the USB input of the
box.
NOTE: Plug or unplug your USB disk while the
box is switched off. If you are going to connect a USB
hard disk drive to the box, USB connection cable used
between the disk drive and the box should have a USB
logo and should be as short as possible.
While formatting a USB hard disk that has 1TB (Tera
Byte) or more fi le capacity, you can experience problems
with the formatting process. In such a case, you should
format the disk with your personal computer and the
formatted disk type is recommended as FAT32.
CAUTION
Quickly plugging and unplugging USB devices,
is a very hazardous operation. Especially, do not
repeatedly quickly plug and unplug the drive. This
may cause physical damage to the USB player and
especially the USB device itself.
Do not pull out USB module while playing or
recording a fi le.
Programme Recording
IMPORTANT: When using a new USB hard disk
drive, it is recommended that you fi rst format the
disk using your device’s “Format Disk” option.
• For using the recording function, you should
connect a USB disk or an external hard disk drive
to the box and connected USB disk should have
at least 1 GB capacity and should have 2.0 speed
compatibility. If the connected USB device does
not support 2.0 speed, an error message will be
displayed. It is recommended to use external
hard disk drives for programme recording and
timeshifting features.
• An hour of the recordings stored occupies
approximately 2 GB of space.
• For more information on recording programmes,
see the sections “Instant Recording”, “Electronic
Programme Guide”, “Recordings Library” or
“Timers” in the following parts.
• Recorded programmes are stored in the following
directory of the connected USB disk: \DVR\RECS.
An .ifo file is created for each recording. This
file includes information such as broadcaster,
programme, and recording time.
9
Page 11
First Time Installation
10
Getting Started
IMPORTANT: Ensure that the aerial and/or
satellite is connected before switching on the
set top box for the fi rst time.
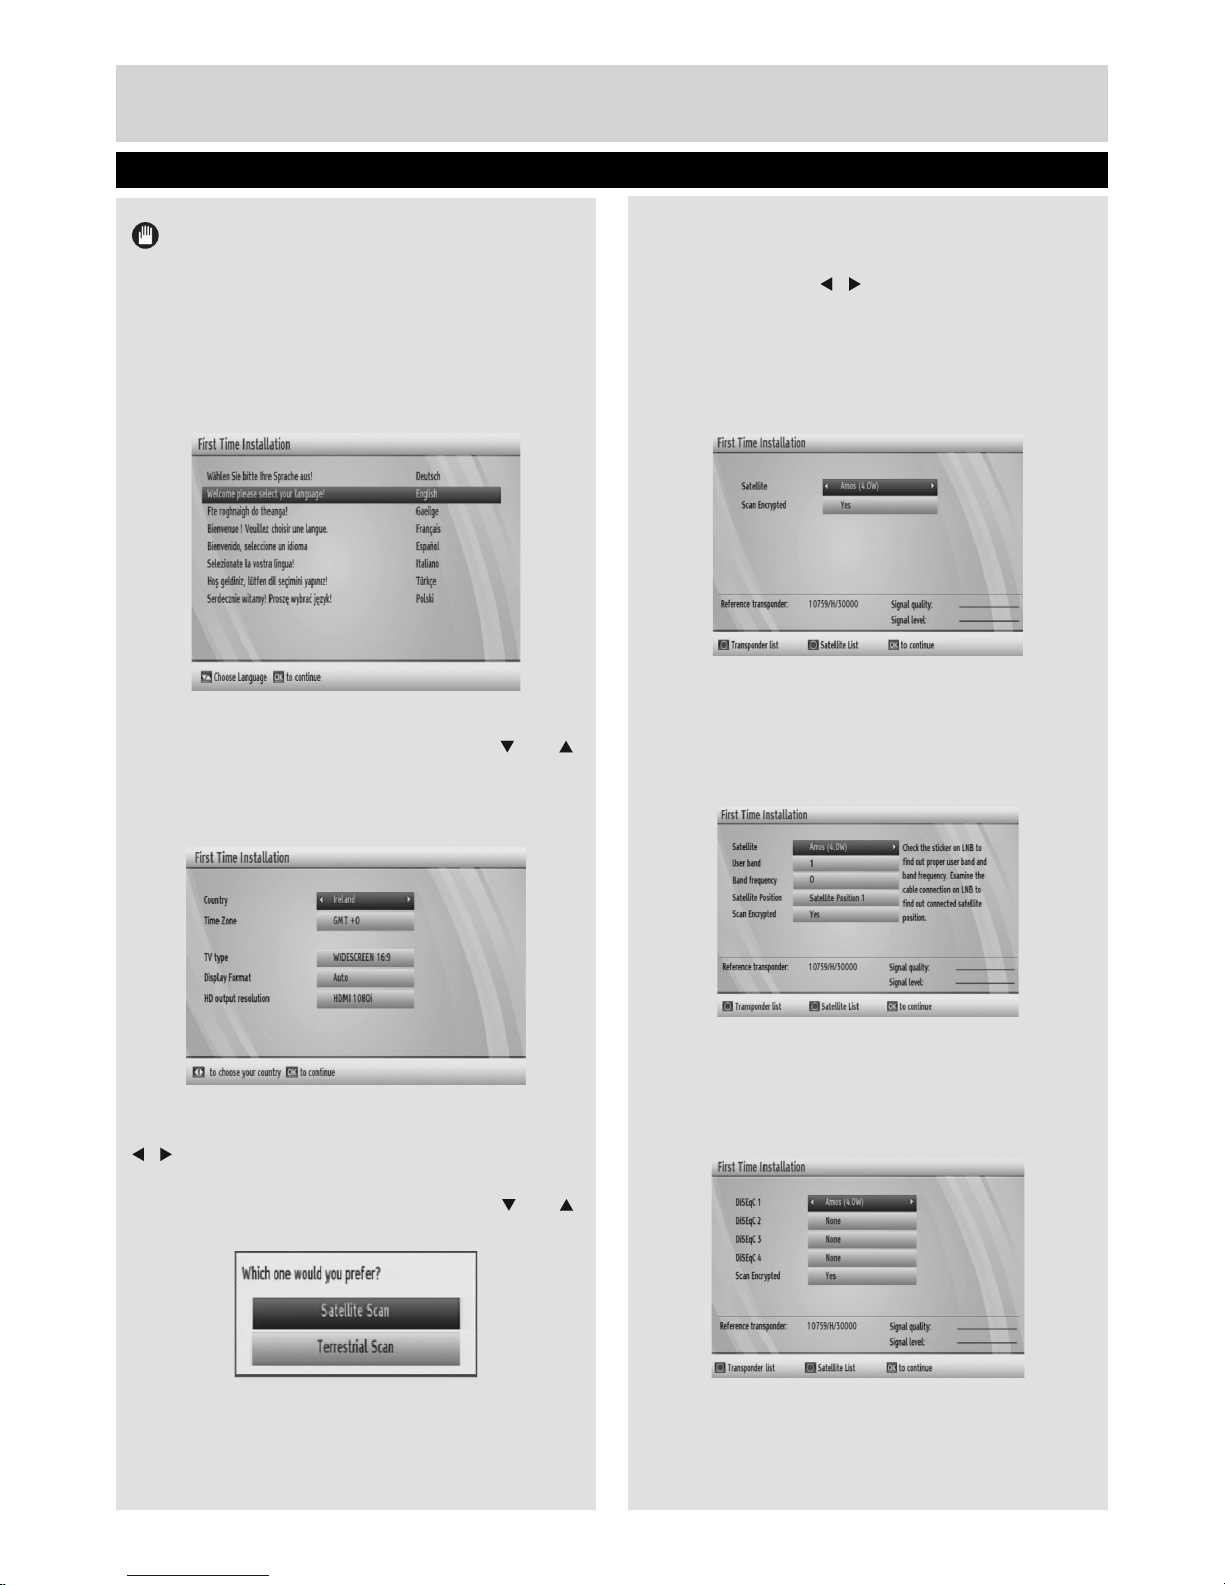
When the box is switched on from the standby
mode and if there is no channel stored in the
database, First Time Installation Menu will be
displayed on the screen. In the fi rst menu screen,
menu language will be asked:
The desired operation language can be set by
highlighting the desired language (with “ ” or “ ”
keys) and pressing OK. Afterwards, Country, Time
Zone, TV type, Display format and HD output
resolution selection screen will be displayed:
Select the desired Country, Time Zone, TV type,
Display format and HD output resolution by using “
”/“ ” buttons and press OK to continue. After pressing
the OK button, search type will be displayed.
Please select your search type by using “
” or “ ”
buttons and press OK to continue.
Satellite Scan: This option scans the selected
satellite channels.
Terrestrial Scan : This option scans the available
terrestrial channels.
Satellite Scan:
There are four types of antenna selection. You can
select Antenna type as, Direct, Unicable, DiSEqC
or Motor by using “
”/“ ” buttons.
Direct: If you have a single receiver and a direct satellite
dish, select this antenna type. After selecting Direct,
another menu screen will be displayed. Select
an available satallite and press OK to scan for
services.
Unicable: If you have multiple receivers and a
unicable system, select this antenna type. Press
OK to continue. Confi gure settings by following
the instructions on the screen. Press OK to scan
for services.
DiSEqC: If you have multiple satellite dishes and
a DiSEqC switch, select this antenna type. After
selecting DiSEqC switch, another menu screen will
be displayed. You can set four DiSEqC options (if
available). Press OK to scan all satellites.
Motor: If you have a motor driven dish, select this
antenna type. Confi gure settings as desired for
positioning the motor. Instructions are present on
this menu screen. Options may vary according to
Page 12
First Time Installation - continued
11
Getting Started
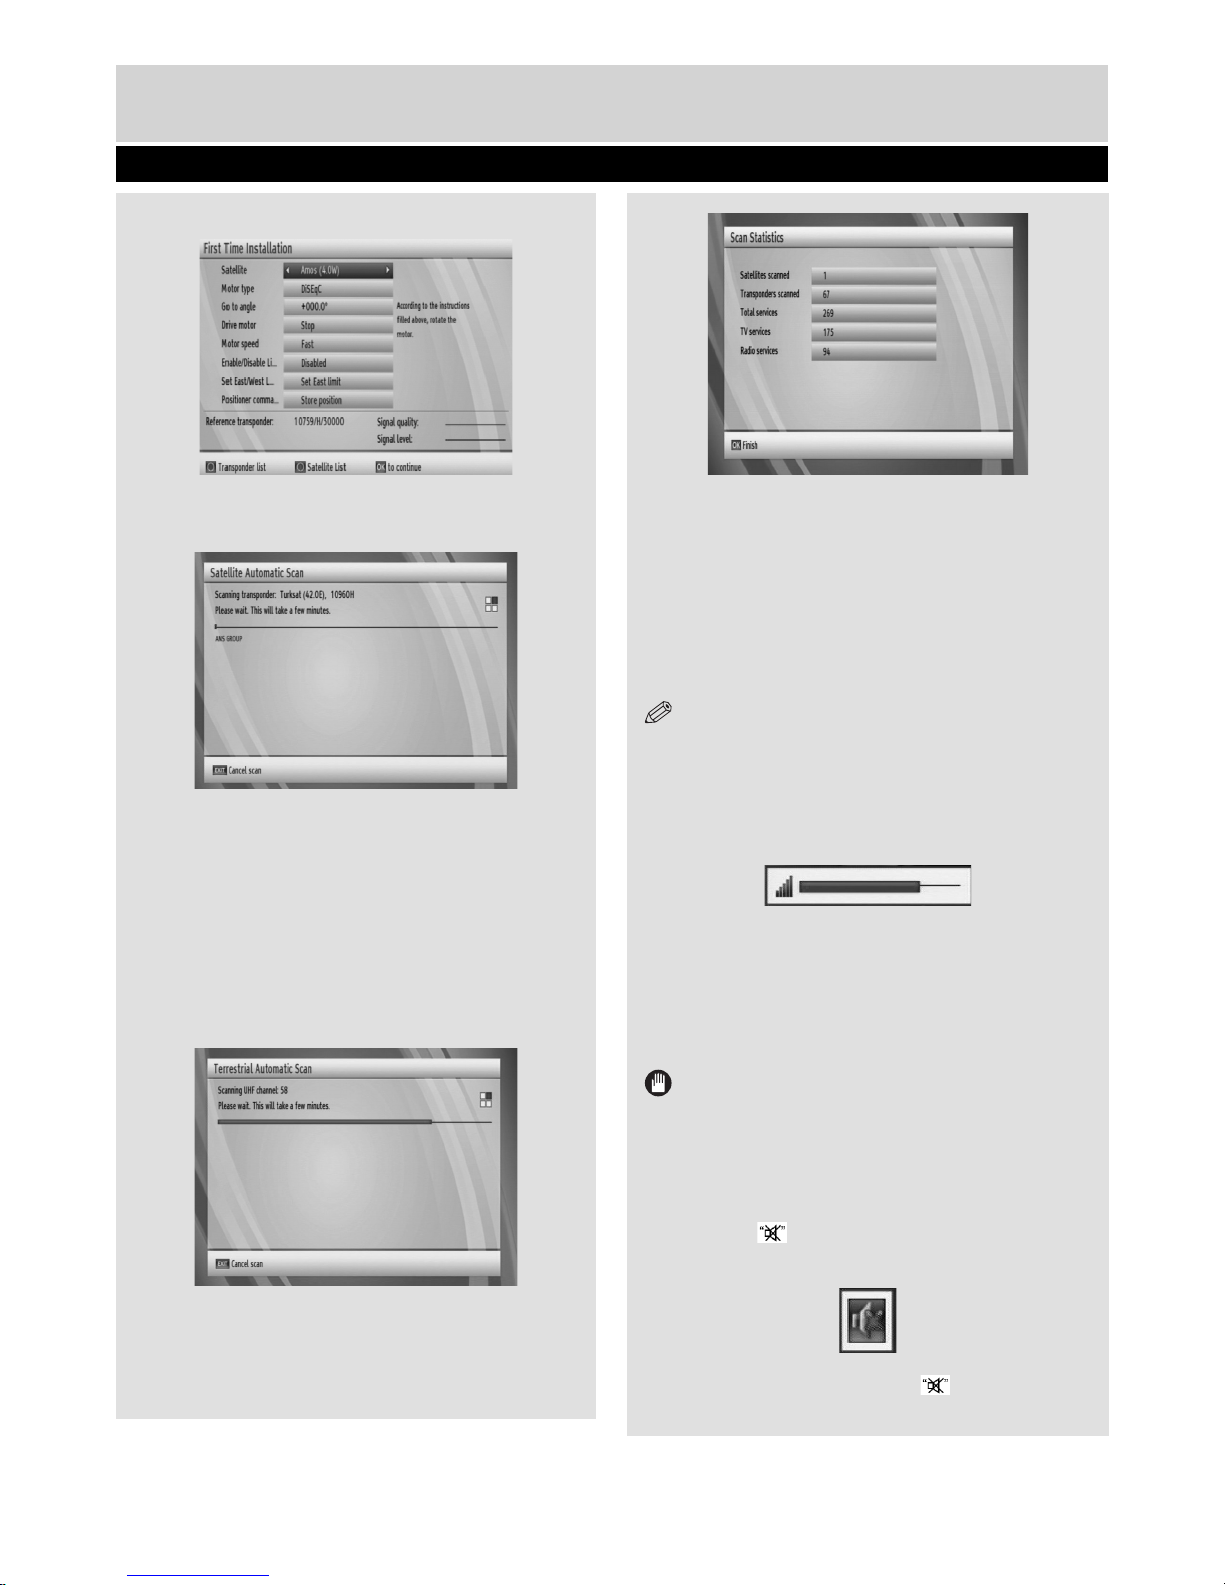
the motor type. When fi nished, press OK to scan
for services.
• After setting antenna settings, press OK to
continue.
The box starts to scan services. The process of
scanning will take a few minutes. You can follow
the scanning process from the scroll bar. After the
scanning, fi rst time installation will be completed for
the satellite search. Scan results will be displayed
on the screen for the satellite channels.
Terrestrial Scan :
The box will be started to scan terrestrial channels
if search type is selected as Terrestrial scan.
After the scanning, fi rst time installation will be
completed for the terrestrial search.
Scan results will be displayed on the screen for
the terrestrial channels.
Scan results view:
Changing Channels
• You can change channels with the following
methods.
• You can press the numeric buttons (0–9) to directly
enter the channel number. You can press numeric
buttons consecutively to enter two or more digits.
• Press the P +/ P - buttons to move up or down to
the next available channel.
NOTE: You can press OK button to display the channel
list.
Volume Up / Down
• You can increase or decrease the volume by using
V+ / V- buttons.
• The volume level selected will remain set, even
when the receiver is turned off and on again, until
you change volume again.
• The audio volume adjustment for the receiver is
independent of the volume control on your TV
set.
IMPORTANT: You should be careful that both
volume controls are kept within reasonable levels
so that when switching on, or when fi rst turning on
your TV set, the sound level is not too high.
Mute
• You can press
to mute the sound of your set top box.
The sound will be muted once this button is pressed.
• To cancel mute, you can press button again or
use the V +/- buttons.
Page 13
12
Basic Features
On-Screen Information
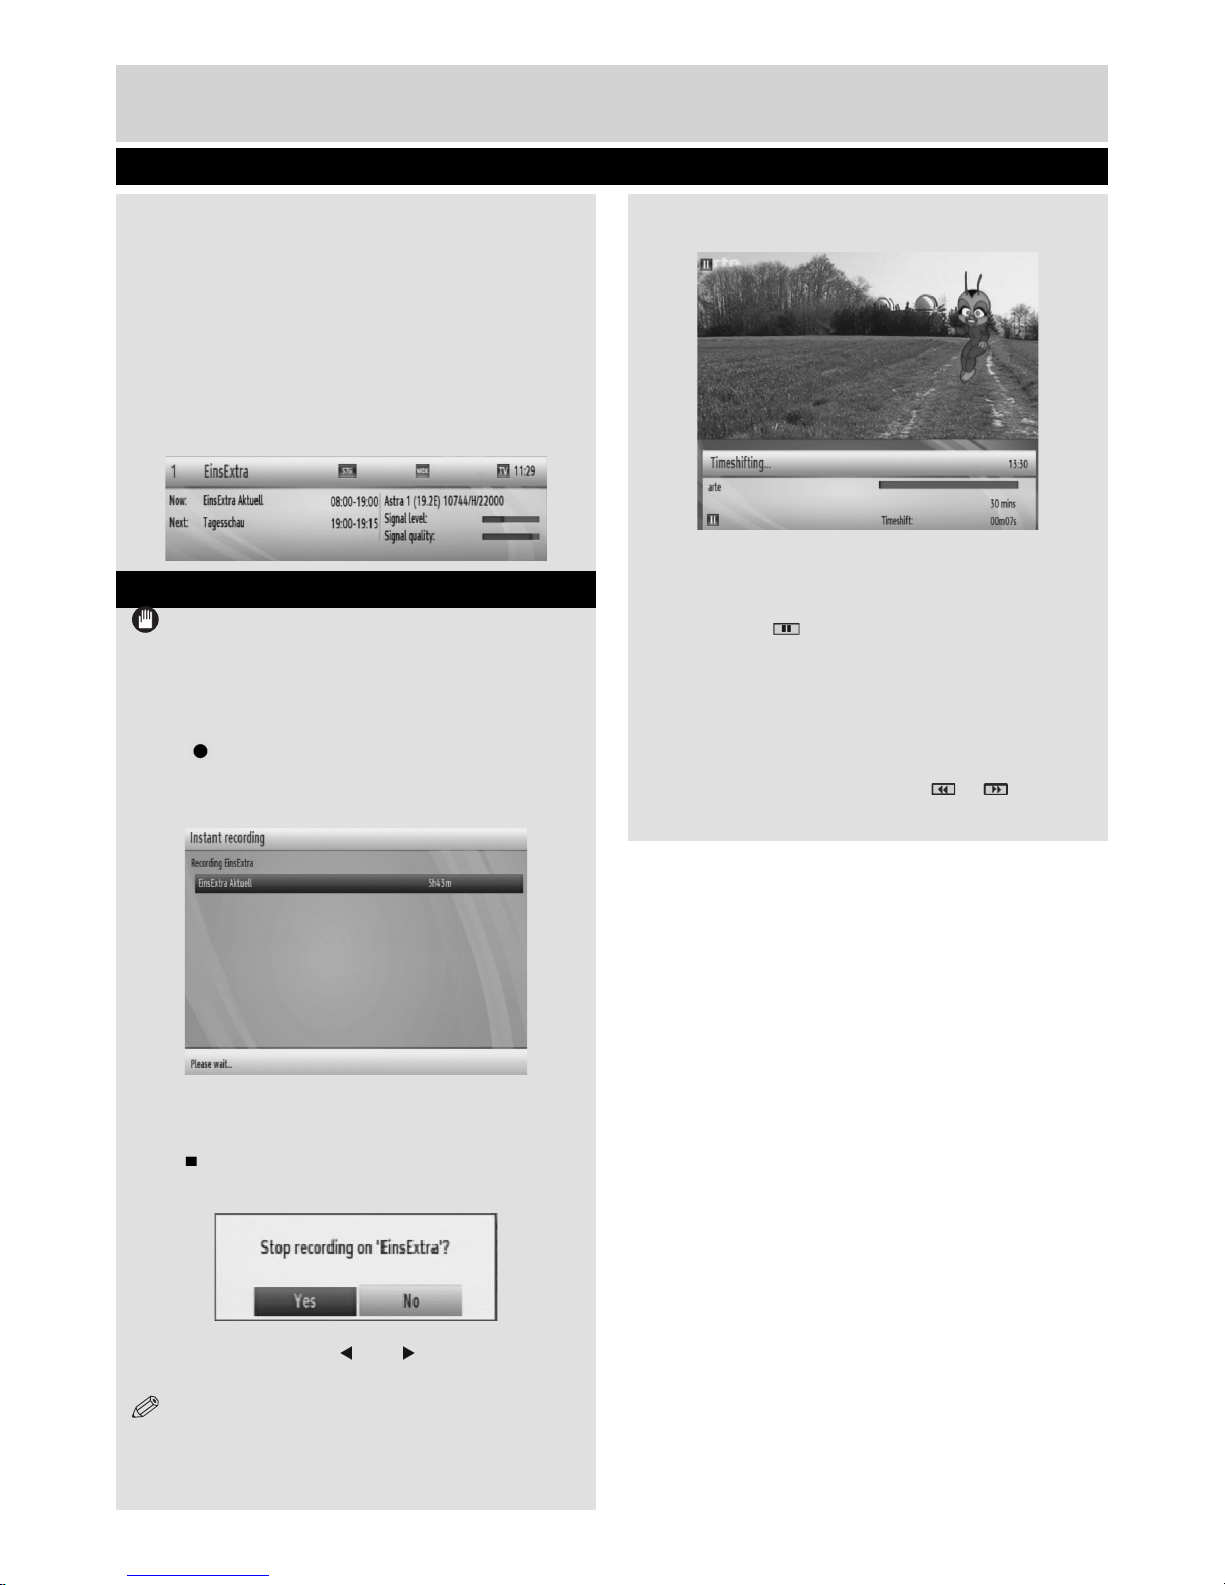
• You can press the INFO button to display on-screen
information. Details of the station and current
programme will be displayed on the information
screen.
• Particularly; current event name, next event
name, and starting and ending time, duration bar,
programme mode, channel number and name
will be displayed on the information screen (if
available).
Instant Recording
IMPORTANT: To record a programme, you
should fi rst connect a USB disk to your box while
the box is switched off. You should then switch on
the box to enable recording feature. Otherwise,
recording feature will not be available.
• Press
(RECORD) button to start recording an
event instantly while watching a programme. The
following OSD appears on the screen:
• Record OSD will then be displayed for a short time
and the current event will be recorded.
• Press
(STOP) button to cancel instant recording.
The following OSD will be displayed:
Select Yes by using “ ” or “ ” / OK buttons to
cancel instant recording.
NOTE: Changing channel is not possible while
recording.
Time Shifting (Pause Live Recording)
• Pause Live Recording is a feature that enables you
to pause a live broadcast. The live broadcasting can
be stopped any time.
‘•Press PAUSE
button to timeshift the broadcasting.
In the INFO banner the timeshift will commence.
• The duration of Timeshift can be adjusted from
Recordings in the Confi guration menu.
• In order to stop the timeshift press PLAY, PAUSE
or OK button. The paused recording can be watched
in different speeds by means of
or keys. To
terminate the timeshifting press STOP button.
General Operation, Instant Recording, Time Shifting
Page 14
13
Basic Features
Menu System
Viewing the Main Menu
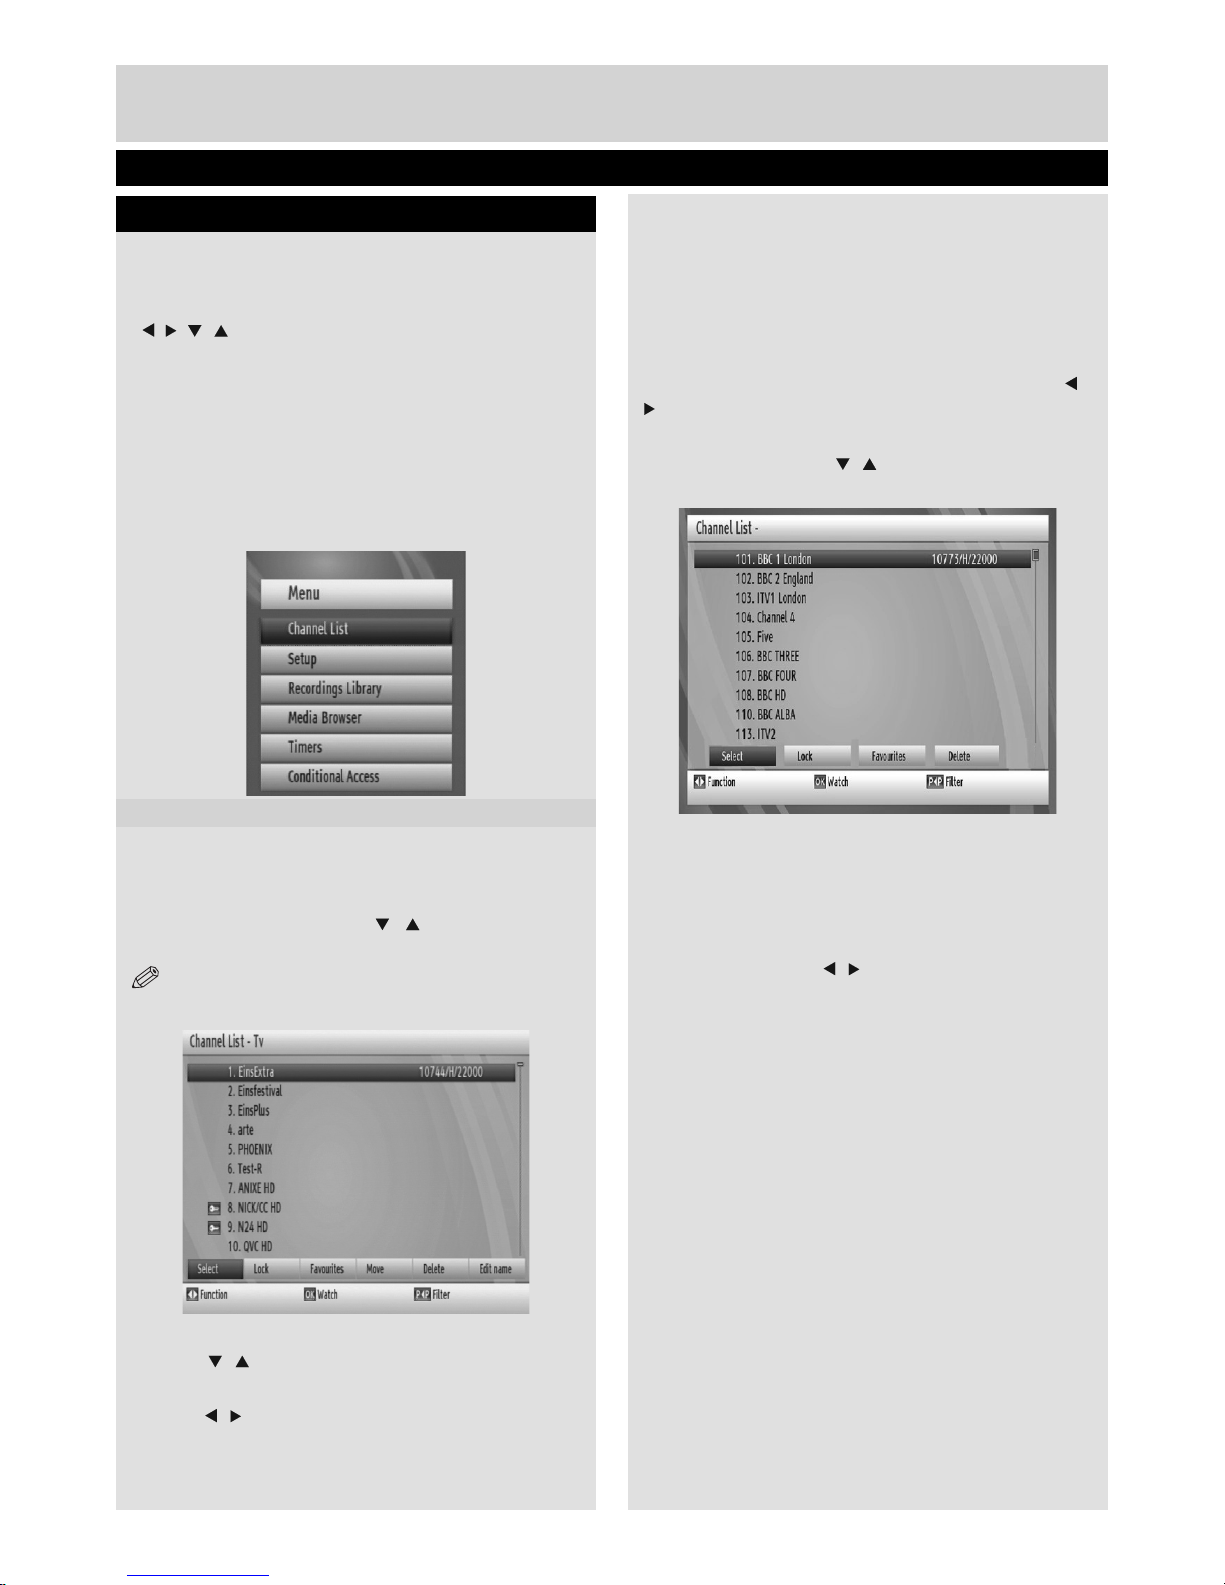
• Press the MENU button to view main menu.
• You can move between menus by using the navigation
(
/ / / ) buttons on the remote control.
• You can enter, select or confi rm a menu option by
using OK button.
• In some sub-menus, you can use BACK button to
return to a previous menu screen.
• To exit from a menu screen, you can press MENU button.
• The following items are located in the main menu
screen:
Managing Stations: Channel List
• The set top box keeps all stored stations in the
Channel List.
• Press MENU button to view main menu. Select
Channel List item by using “
”/“ button. Press OK
to view menu contents.
NOTE: You can direclty press OK button to view
channel list.
Operating the Channel List
• Press “
”/“ ” button to select the channel that will
be processed.
• Press “
”/“ ” button to select a function on Channel
List menu.
• Use Red/Green buttons to move page up or
down.
• Press P<P button to view fi ltering options.
• Press YELLOW button to tag/untag a channel.
• Press BLUE button to tag/untag all.
• Press EXIT button to exit.
• Use INFO button to view more information.
Selecting a Specifi c Channel
• Select option should be highlighted by using “
”/“
” button.
• To watch a specifi c channel, you should highlight the
desired channel using “
”/“ ” button and press OK button.
Selected channel will be displayed.
• If the selected channel is password protected, parental
lock password will be asked. If the correct code is
entered, selected channel can be watched.
Deleting Channels
• Select the channel that you want to delete and select
Delete option using “
”/“ ” button . Press OK button
to continue.
• A message will be displayed to confi rm your decision.
Select YES to delete the selected channel, select NO
to cancel. Press OK button to continue.
• Selected channel will be deleted if you select YES.
The operation will be cancelled if you select NO.
Deleting Multiple Channels
• Select Delete and highlight the channel you want to
delete.
• Press YELLOW key. The channel will be marked.
Move to the next channel you want to delete. Press
YELLOW key.
• Mark the other channels you want to delete like the
same way and press OK.
• You will see a confi rmation menu. Select YES in the
menu. The selected channels will be deleted.
• To mark all the channels in the channel list at once
you can use BLUE key.
Menu System, Channel List
Page 15

14
Basic Features
Renaming Channels
• Select the channel that you want to rename and
select Edit Name option using “
”/“ ” button. Press
OK button to continue.
• Pressing “
”/“ ” button moves to the previous/next
character. Pressing “ ”/“ ” button toggles the current
character, i.e., ‘b’ character becomes ‘a’ by pressing
“ ” and ‘c’ by pressing “ ”.
• Pressing the numeric buttons ‘0...9’ replaces the
highlighted character with the characters printed
above the button one by one as the button is
pressed.
• Press MENU to cancel editing.
• When fi nished, press OK button to save the new
name.
Adding Locks to Channels
• Select the channel that you want to lock and select
Lock option using “
”/“ ” button. Press OK button to
continue.
• You will be asked to enter parental control PIN code.
Default PIN is set as 0000. Enter the PIN number.
• Press OK button when the desired channel is
highlighted to lock/unlock the channel. Lock symbol
will be displayed next to the selected channel. You can
repeat the same operation to cancel the lock.
NOTE: Default PIN code is 0000 and it can be
changed using the Confi guration Menu.
Locking Multiple Channels:
• Select Lock item and highlight the channel you
want to lock. Press YELLOW key. The channel
will be marked.
• Move to the next channel you want to lock and
press YELLOW key.
• Mark the other channels you want to lock like the
same way and press OK.
• Enter the pin code in the menu displayed and
press OK.
• The selected channels will be locked.
• To mark all the channels in the channel list at once
you can use BLUE key.
Setting Favourites
• Select Favourites by using “
”/“ ” button and press
OK button.
• You can set various channels as favourites so that
only the favourite channels are navigated.
• Select a list by pressing “ ”/“ ” buttons. Afterwards select
a channel by using ”/“ ” button. Press OK button to
add selected channel to the favourites list.
• Star icon indicates that the selected channel is
added to the favourites list.
• You can press OK button again to remove the
selected channel from the list.
Button Functions:
• OK: Adds/removes a station.
• P<P Displays fi ltering options.
• YELLOW: Tags/untags a channel.
• BLUE: Tags/untags all.
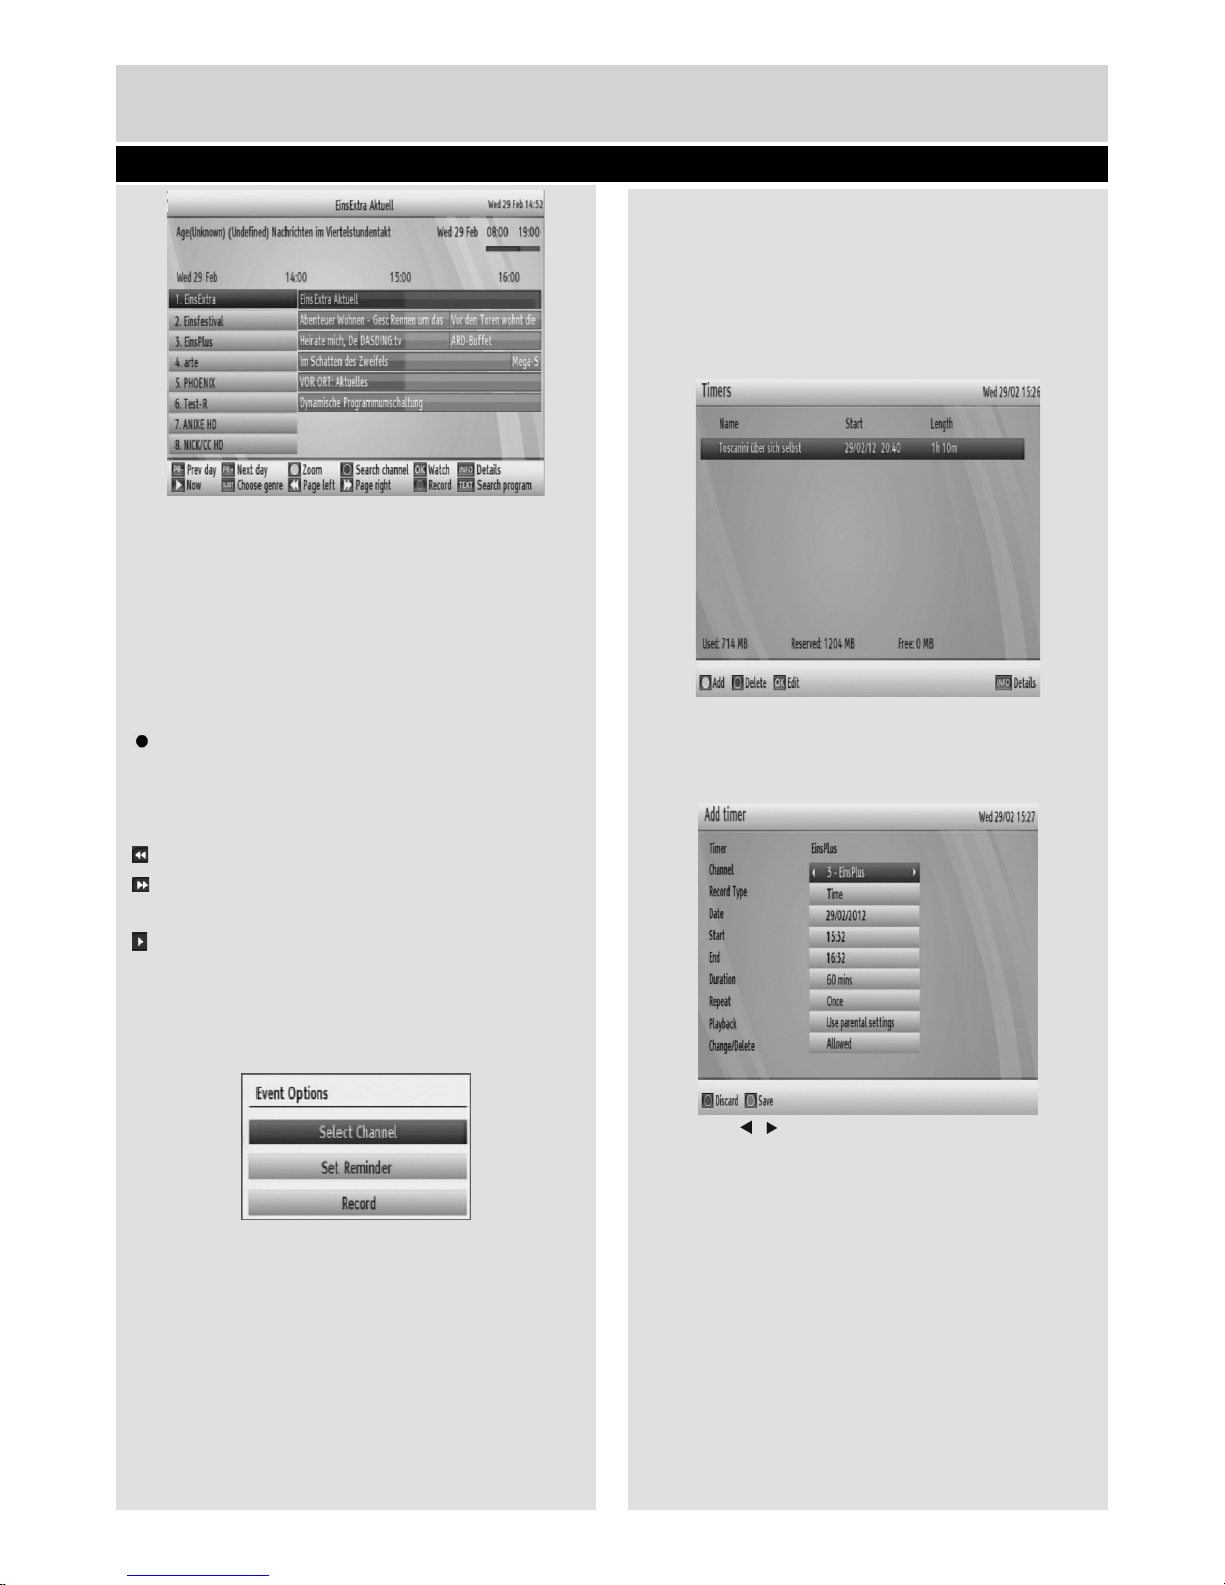
Viewing Electronic Programme Guide (EPG)
You can view the electronic programme guide (EPG)
to view information about available programmes.
The box gets information of the channel - programs
weekly by means of 7-DAY–EPG.
Please press the GUIDE button to view the EPG
menu.
• Press “
”/“ ” buttons to navigate through channels.
• Press “
”/“ ” buttons to navigate through the
programme list.
• EPG menu displays available information on all
channels.
• Please note that event information is updated
automatically. If there are no event information
data available for channels, EPG will be displayed
with blanks.
Channel list, continued
Page 16
Basic Features
15
PR- button (Prev Day): Displays the programmes
of previous day.
PR+ button (Next day): Displays the programmes
of the next day.
Yellow button (Zoom): Expands programme
information.
INFO (Details): Displays the programmes in
detail.
: Records the selected programme.
Numeric buttons (Jump): Jumps to the preferred
channel directly via numeric buttons.
OK (Watch) : Watchs the selected programme.
: Scrolls page left.
: Scrolls page right.
Text (Search): Displays “Guide Search” menu.
(Now) : Shows the current programme.
SUBT: Choose genre
Event Options
In EPG menu, press the OK button to enter the
“Event Options” menu.
Select Channel
• Using this option, you can switch to the selected
programme.
Record Programme/Delete Timer
After you have selected a programme in EPG menu,
press the OK button and Event Options screen
will be displayed. Select “Record” option and press
the OK button. After this operation, a recording
becomes set to the selected programme.
To cancel an already set recording, highlight that
programme and press the OK button and select
the option “Cancel Timer”. The recording will be
cancelled.
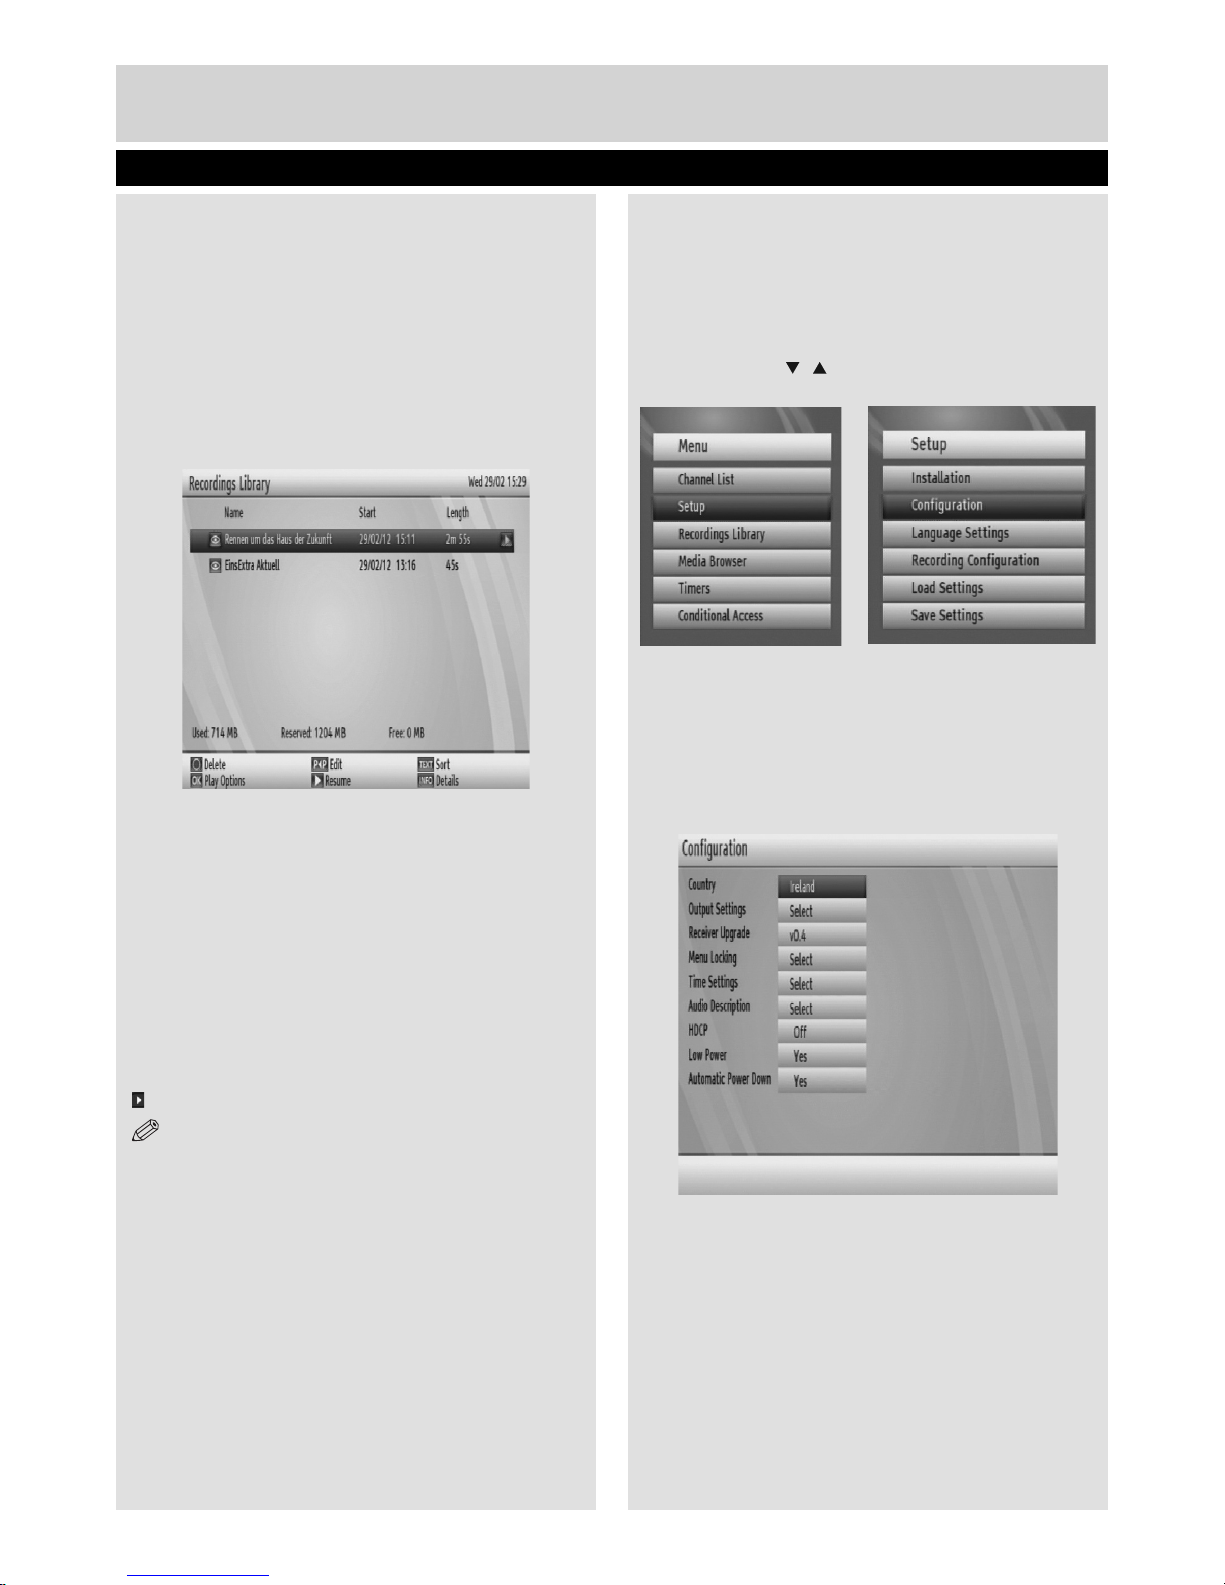
Confi guring Timers
Select Timers from the main menu and press OK
button.
To add a timer, press the YELLOW button on
the remote control. Then “Add Timer” window
appears.
Channel : “ ”/“ ” keys will navigate the user through
the TV or Radio list.
Record Type: Displays recording type.
Date : Starting date is entered via the Left/Right or
the numeric buttons.
Start : Starting time is entered via the Left/Right or
the numeric buttons.
End : Ending time is entered via the Left/Right or the
numeric buttons.
Duration: Duration between Start and End time.
Repeat: Sets the repeating preference.
Playback: Sets playback control.
Change/Delete : permits or prohibits any modifi cations
for other users.
Channel list, continued - Electronic Programme Guide
Page 17
Basic Features
16
You can save the adjustments by pressing the
GREEN key or cancel the process by pressing the
RED button. You can edit the timers list via OK key
and delete with the BLUE button.
Recordings Library
To view the list of recordings, press the MENU button
to display the main menu and use the “d” or “c”
button to highlight the “Recordings Library” line and
press the OK button. Recordings Library will then be
displayed with available recordings.
All the recordings are kept in a list in the recordings
library.
BLUE button (Delete) :Erases the selected
recording.
P<P button (Edit): Makes changes on the selected
recording.
TEXT button (Sort): Changes the order of the
recordings. You can select from a wide range of
sorting options.
OK button: Displays playing options:
(Resume): Resumes the playback.
NOTE: Viewing main menu and menu items will
not be available during the playback.
INFO (Details): Displays the short extended
programmes in detail.
Play Options
Play from start: Plays the recording from the
beginning.
Resume: Begins with playing from the last stopped
position.
Play from offset: Begins with playing, from the
time which is entered.
Manage chapters : It will display any marked
chapters (To set chapter marks, press the Menu
button during playback and enter the “Chapter
Options” menu) and begin with playback from the
selected chapter.
Confi guring Settings
• Detailed settings can be confi gured to suit your
personal preferences.
• Select Setup & Confi guration from the main
menu by using “
”/“ ” buttons and press OK button
to display Setup menu.
Confi guration
• You can confi gure the main settings of your set top
box using the confi guration screen.
• Select Confi guration from Setup menu and press
OK to continue.
• You can press BACK button to exit.
Country
• You can set country only while in fi rst installation
mode.
Timers, Recordings Library
Page 18

Basic Features
17
Managing Settings
Output Settings
TV Type
Channels can be broadcast in a widescreen
format whose output can be different for normal
and widescreen TV sets. This function enables to
change the screen format of the TV connected, so
that broadcasts are displayed correctly. Highlight
the TV Type line in the Confi guration menu and use
the “
”/“ ” keys to select 4:3 if you have a standard
TV set connected or 16:9 if it is a widescreen TV.
This function duplicates the selection made at the
time of fi rst installation and can be used if you
change TV sets.
Display Format
Use “
” or “ ” button to select Display Format and
then press “ ” or “ ” button to set this setting as
Auto, Pillar box or zoom.
Scart mode
The receiver can output RGB and CVBS signal
from the TV SCART on the rear panel. Although
the RGB format results in a better quality picture,
not all equipment can cope with an RGB signal.
Prefer Dolby Digital
Use “
” or “ ” button to select Dolby Digital and
then press “ ” or “ ” button to set this setting as
Yes or No.
Spdif Output
Use “
” or “ ” button to select Spdif Output and
then press “ ” or “ ” button to set this setting as
LPCM or Dolby D.
Active Antenna
This feature enables or disables the use of active
antennas. When antenna power option is set as On,
+5V will be transmitted to the antenna output.
IMPORTANT: Antenna power should be Off when
standard antenna is used instead of the active
antenna.
HDMI Resolution
By pressing “
”/ “ ” on the remote control, you
can change to HDMI resolution as 576P, 720P or
1080i.
AUDIO Delay
First press OK and than by pressing “
”/“ ” buttons
on the remote control, you can set to Audio Delay
to desired value. You can use this setting when
there is a synchronization problem in the received
broadcast . Press “ ” or “ ” button to change the
delay.
Note:This function will be available while using Optical
Audio out only.
Receiver Upgrade
To ensure that your STB always has the most up to
date information. Please ensure that after use it is set
to its standby mode.
• Press Menu button and using the “
”/“ ” buttons to
choose Setup and press the OK button.
• Highlight Confi guration menu with “
”/“ ” keys and
pres OK.
• Use “
”/“ ” buttons to choose “Receiver Upgrade” and
press OK button.
• Highlight “Edit upgrade” menu with “
”/“ ” keys and
press OK to change upgrade options. Please enter
your available satellite information and save all values
all select reset and press OK to re enter.
• Highlight “Scan for upgrade” menu with “
”/“ ” keys
and press OK to commence upgrade.
Menu Locking
• This setting confi gures menu locking.
• Select Menu Locking option by using “
”/“ ”
buttons.
• Press OK button to enter the menu.
• To display parental lock menu options, PIN number
should be entered. Factory default PIN number is
Page 19

Basic Features
18
Managing Settings - continued
0000. After coding the correct PIN number, parental
settings menu will be displayed:
Set Pin
• Press OK to display the “Set PIN” window. Use
numeric buttons to enter the new pin number. You
will need to input your new pin a second time for
verifi cation purposes.
• The factory default pin number is 0000. If you
change the pin number make sure you write it down
and keep it safe.
Menu Lock
• Menu lock setting enables or disables the menu
access. You can disable access to the installation
menu or the whole menu system.
Time Settings (Optional)
• In the configuration menu, highlight the Time
Settings item by pressing “
” or “ ” buttons.
• Press “OK” and Time Settings sub menu will be
displayed on the screen. Current Time,Time Zone
Setting and Time Zone will be available.
‘• Use “
” or “ ” buttons to highlight the Time Zone
Setting. Time Zone Setting is set using “ ” or “ ”
buttons. It can be set to AUTO or MANUAL.
• When AUTO is selected, Current Time and Time
Zone options will not be available to be set. If
MANUAL option is selected as the Time Zone
Setting, Time Zone can be altered:
• By pressing “
” or “ ” buttons select Time Zone. Use
“
” or “ ” buttons to change the Time Zone between
GMT-12 or GMT+12. Current Time on the top of the
menu list will then change according to the selected
Time Zone.
Audio Description
Audio description refers to an additional narration
track for blind and visually impaired viewers of
visual media, including television and movies. The
description narrator talks through the presentation,
describing what is happening on the screen during
the natural pauses in the audio (and sometimes
during dialogue, if deemed necessary).You can use
this feature, only if the broadcaster supports that
additional narration track. Use “
” or “ ” buttons
to select an item. Then use “
” or “ ” buttons to
set.
Audio Description
This function enables or disables the audio
description feature by pressing the “
” or “ ”
buttons.
Preferred Language
By pressing the “
” or “ ” buttons the preferred audio
description language is being changed.
This setting can be used, only if it is available.
HDCP
In the Confi guration Menu, highlight the HDCP item
by pressing “
” or “ ” buttons. Use the “ ” or “ ”
buttons to set the HDCP as On or Off.
Low Power
Use “
” or “ ” button to select Low Power and then
press “ ” or “ ” button to set this setting as Yes or
No. To save energy, Low power option should be
selected as Yes.
Automatic Power Down
Press “
” or “ ” button to select Automatic Power Down.
Use “ ” or “ ” button to set the Automatic Power Down
to Yes or No. If you don’t use STB for a long time, the
box will switch off.
Confi guring Language Preferences
• You can operate the TV’s language settings using
this menu.
• Select Language from Setup menu and press OK
to continue.
Page 20
Basic Features
19
Language Settings, Installation Options
Use “ ” or “ ” buttons to highlight the menu item that
will be adjusted and then press “ ” or “ ” button to
set.
NOTE: Audio Language is used for selecting the
soundtrack of a channel.
Primary settings are the fi rst priority when multiple
choices are available on a broadcast.
Secondary settings are the alternatives when the fi rst
options are not available.
Menu: shows the language of the system.
Guide : Sets guide language.
Installation
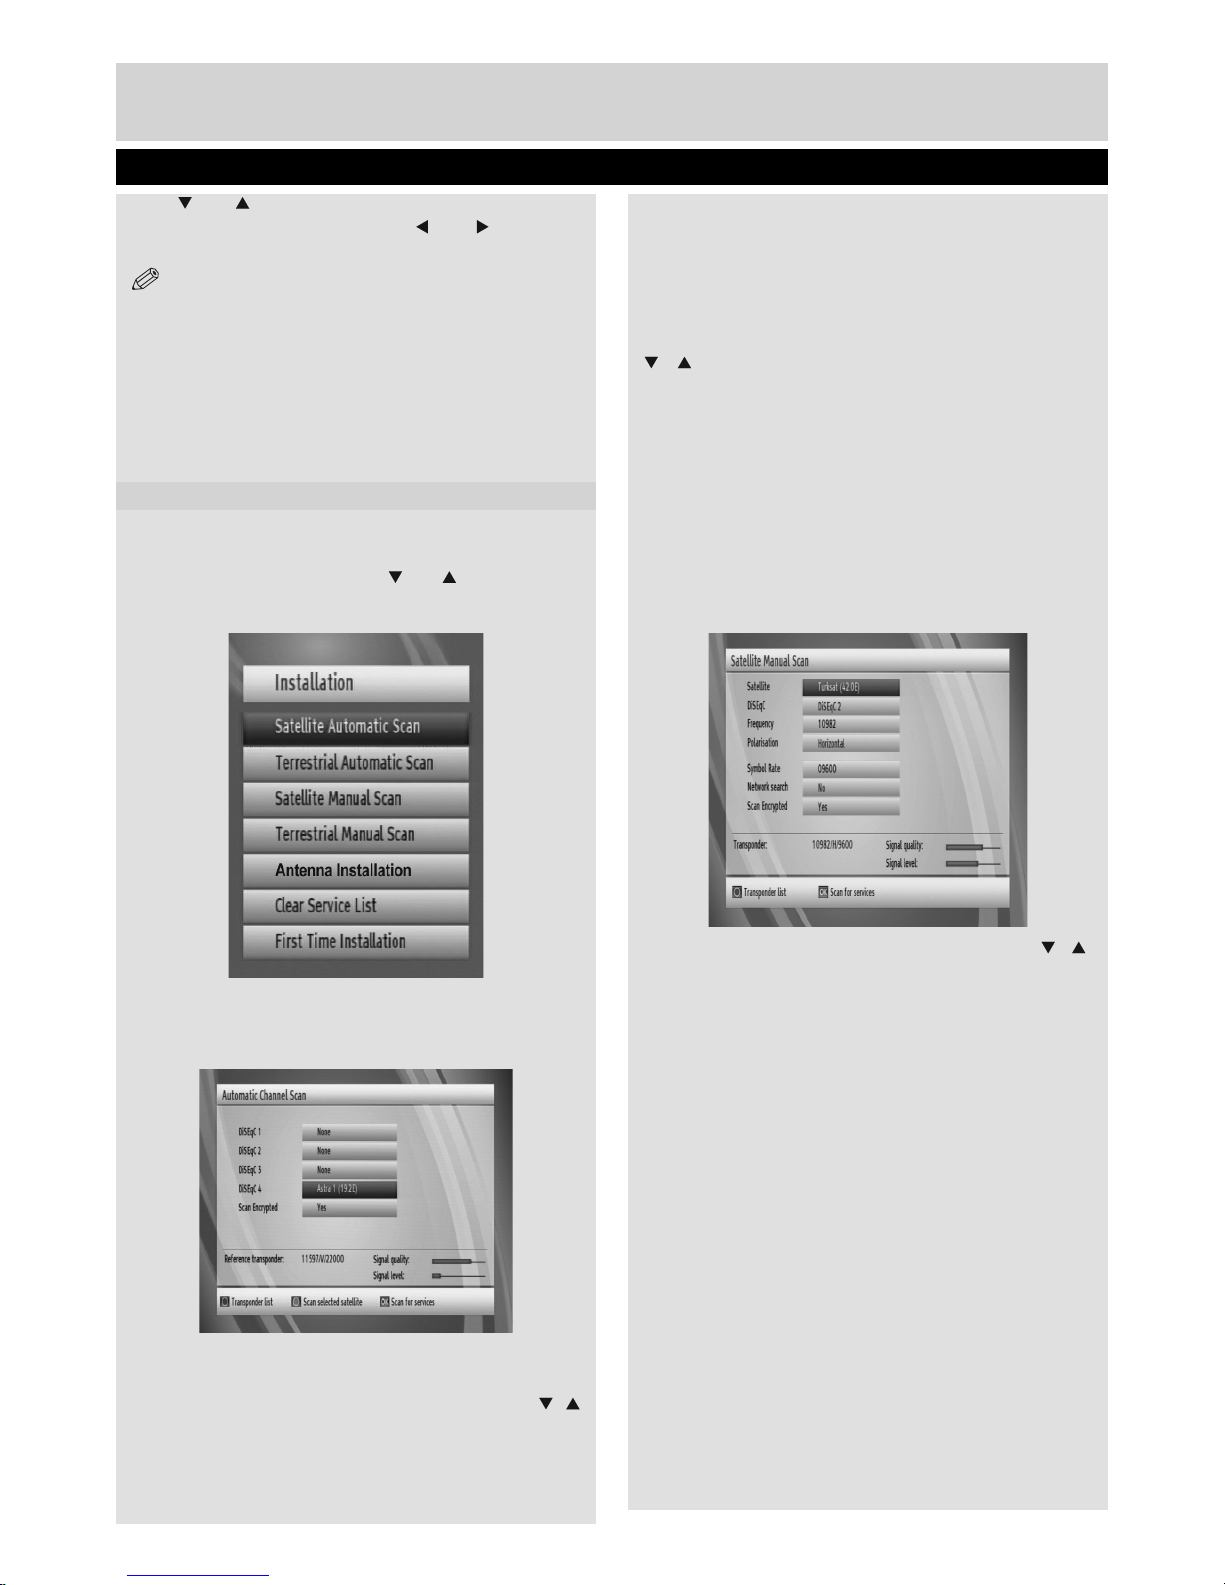
The Installation menu is mainly intended to help
you for creating a channel. Select Installation from
the Setup menu by pressing “ ” or “ ” buttons. This
menu includes the following items:
Satellite Automatic Scan
With this menu, you can search selected or all
satellites. To do this, select “Automatic channel
scan” in the Installation menu, by using the “ ”/“
” buttons. If you press OK button, the “Automatic
channel scan” menu will appear. Settings in this
screen may vary in accordance with antenna type
selection defi ned in fi rst time installation. You can
set satellite values as desired. Press GREEN
button to scan selected satellite. Press BLUE
button to view transponder list. You can use OK
button to scan all satellites.
Terresterial Automatic Scan
• Select Terrestrial Automatic Scan by using
“
”/ “ ” buttons. button and press OK button.
• Then a confi rmation message will be displayed on
the screen. Select Yes to continue or select No to
cancel. If Yes is selected, automatic search starts.
After the scanning is completed, your set top box
will store all the available channels.
Satellite Manual Scan (*)
(*) This screen changes according to the changes made
during the fi rst time installation.
Satellite Manual Scan
This menu will be acivated by using the “ ”/“ ”
buttons in the Installation menu. By pressing the
OK button,
Menu items in manual search menu will be as the
following:
1. Satellite
2. DiSEqC
3 Frequency.
4. Polarization
5. Symbol rate
6. Network search
7. Scan Encrypted
• Satellite Name, Polarization values and Network Search
requirements are changed by toggling.
• Frequency and Symbol Rate are entered directly using
“0, 1, 2…, 9” keys.
• As soon as entering transponder frequency, the signal
level and quality will be refl ected in the signal strength
bars (Signal Level and Signal Quality bars) at the bottom
of the menu. Signal Level bar shows the strength of the
Page 21
Basic Features
20
Installation Options - continued
satellite signal. Signal Quality bar shows lock quality of
the device for entered values.
• If Network Search item selected as YES, after tuning to
that transponder, the parameters of other transponders
will be collected from NIT (Network Information Table)
and tuning will be performed for other transponders.
• By pressing OK button values are stored and after the
search, if a new program is found, it will be added to
the programme list. Found program’s name is shown
as ‘Program’.
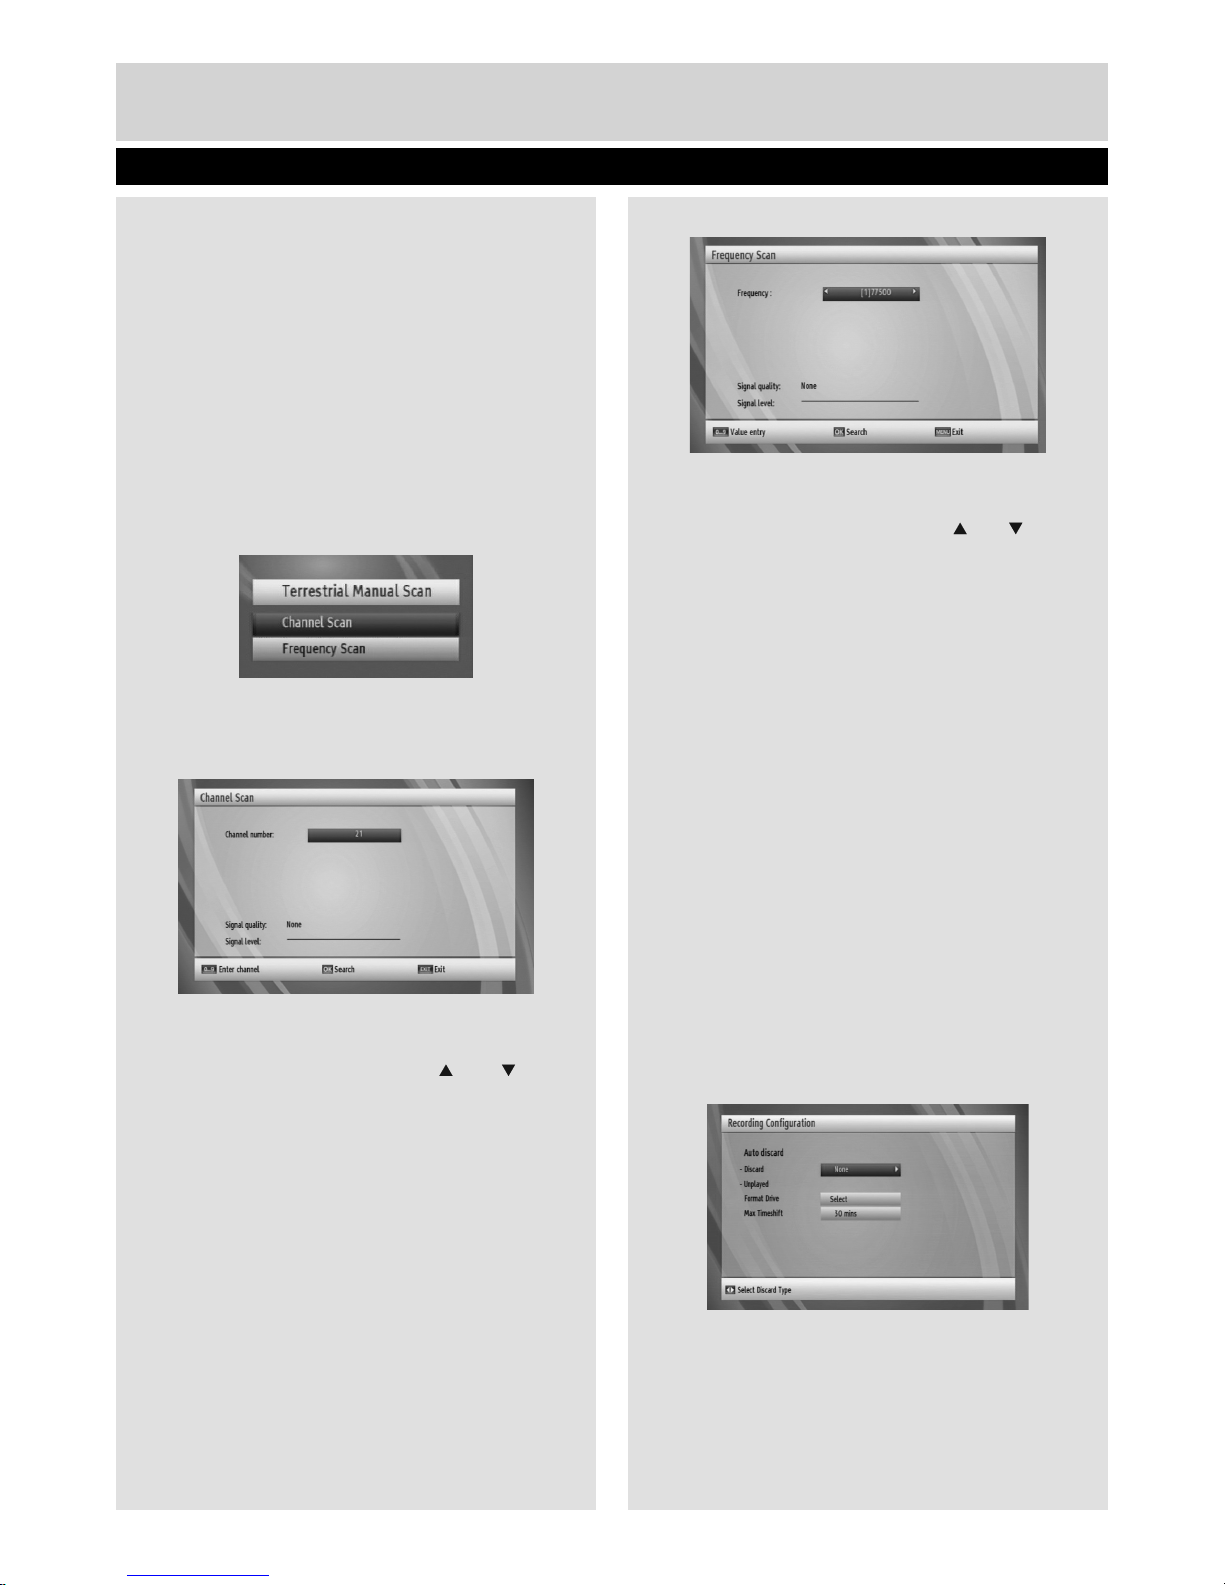
Terresterial Mode
In Terrestrial manual scan mode, you have two
options to search Terrestrial Manual scan.
Please select one of scan type to search channels
as maually
Channel Scan
• This feature can be used for direct broadcast
entry.
• Select Channel Scan by using “
” or “ ”button
and press OK button.
• In manual channel scan, the number of the multiplex
is entered manually and only that multiplex is
searched for the channels.
• For each valid channel number, signal level and
signal quality are shown on the screen.
• In both manual and auto search, any existing
channel in the database is not re-stored to avoid
duplicates of that channel.
Frequency Scan
• This feature can be used for direct broadcast
entry.
• Select Frequency Scan by using “
” or “ ” button
and press OK button.
• In frequency scan, the frequency of the provider
channel system is entered manually and only that
provider channels is searched.
• For valid frequency, signal level and signal quality
are shown on the screen.
First Time Installation
• This section is same with initial installation part.
Please refer to First time installation section for
more information.
Antenna Installation
This setting manages the antenna options. For
more information, see the section Satellite Scan
in the First Time Installation menu.
Clear Service List (optional)
Use this setting to clear channels stored.
Recording confi guration
Select Recordings item in the Setup menu to
confi gure recording settings. The following menu
is displayed for recording confi guration.
The following options are available for adjustments:
Auto discard
Discard
When the USB disk is full and a timer is set to record,
the unit will automatically discard previous recordings
based on this setting. The options are as follows:
Page 22

21
Basic Features
Recordings Confi guration
None: The unit will not discard any recordings and the
timer will not record the requested programme.
Oldest: Starting with the oldest, recordings will be
deleted to make space for the requested timer.
Longest: Starting with the longest, recordings
will be deleted to make space for the requested
timer.
Shortest: Starting with the shortest, recordings
will be deleted to make space for the requested
timer.
Unplayed: If this option is set to EXCLUDED,
any unplayed recordings will not be deleted.If this
option is set to INCLUDED, unplayed recordings
will be deleted.
Format Drive
IMPORTANT: Note that ALL the data stored on the USB
disk will be lost and then the disk format will be converted to
FAT32 if you activate this feature.
• If you want to delete all fi les on the connected USB
hard disk drive or memory stick, you can use Format
Disk option.
• Also, if your USB disk malfunctions, you can try
formatting the USB disk. In most cases, formatting
the USB disk will restore normal operation; however,
ALL the data stored on the USB disk will be lost in
such a case.
• Press OK button while the Format Disk option is
highlighted. A menu will appear on the screen,
requiring you to enter a pin number. If you have not
changed the pin number, the factory default is 0000.
After you enter the pin, a pop-up menu appears on
the screen to ensure that the hard disk should be
formatted, select “YES” and press OK to format the
hard disk. Select “NO” and press OK to cancel. Ensure
you back up important recordings before you format the
USB disk unit.
Max Timeshift : You can set timeshift duration by
using this function
Load Settings
You use this item to load preset channel table or
last saved settings, which had been loaded to
receiver at the factory. To reload factory settings,
highlight this item and press OK button. Then the
following message will be displayed: “Are you sure
to load default program tabel and settings?”
You can confi rm by pressing OK button or cancel
by using MENU button. You can also cancel by
highlightin NO and then pressing OK button.
Save Settings
You can use this item to load preset channel table or
last saved settings as a factory settings. Highlight Save
Settings line and press OK key, Then the following
message will be displayed: “Are you sure to store
current program table and settings as default?”
You can confi rm by OK button or cancel by MENU
button. You can also cancel by highlightin NO and then
pressing OK button.
Page 23

Advanced Features
22
Viewing the Media Browser
• To display Media Browser window, press either
“MENU” button on the remote control and then
select Media Browser by pressing “ ” or “ ” button.
Press “OK” button to continue. Media Browser
menu contents (depending on the contents of your
USB drive) will be displayed.
• Also, when you plug a USB device, the following
screen will be displayed:
To view Media Browser menu, please press MENU
button on the remote control and select Media
browser item by pressing “ ” or “ ” button. After
press OK button, Media Browser screen will be
displayed.
Please select USB Device to explore the
connected USB device. To view your recordings
please select recording library.
You can play music, watch video and view picture
fi les from a USB memory stick.
Note: Some USB compliant devices may not be
supported.
Note: If the USB stick is not recognized after power off/
on or First Time Installation, fi rst, plug the USB device
out and power off/on the STB set. Plug the USB device
in again.
Playing MP3 Files
Select MUSIC option from the main media
browser window and all available music fi les will
be displayed:
Jump (Numeric buttons) : jump to selected fi le
using the numeric buttons.
Play This (OK button) : Plays the selected fi le.
Play ( button) : Plays all media fi les in the folder
starting with the selected one.
Stop (
button) : Stop the playing fi le.
Pause (
button) : Pause playing fi le.
Sort (Audio button) Sorts fi les.
Previous/Next (
buttons) : Jumps to previous
or next file to play.
Viewing JPG Files
Jump (0...9 buttons) : jump to selected fi le using
the numeric buttons.
OK : (OK button) views the selected picture in full
screen.
Slideshow (
button): starts the slideshow with all
pictures in the folder.
Sort (Audio button) Sorts fi les to date.
/ : Navigate
Change Media (Blue Button): Switch between
Videos, Photos and Music.
Change Slide Interval(Yellow Button): Set
Slideshoe interval time.
Slideshow Options
Pause ( button) : Pause the slideshow.
Stop (
button) : Stop the playing fi le.
Loop / Shuffl e (Green button) : Press GREEN
button consecutively to activate Loop/Shuffl e.
Loop:Plays the selected fi le repeatedly.
Page 24

Advanced Features
Media Browser, continued & Conditional Access
23
Shuffl e:Plays the fi les randomly. If shuffl e mode
is enabled, previous/next function will also jump to
the tracks randomly.
Previous/Next (
buttons): Jump to previous
or next file of slideshow.
Rotate (
buttons) : Rotate the picture using up/
down buttons.
MENU: Back to fi le list
Info: Activates the operations bar.
Playing Video Files
Select USB device option from the main media browser screen. Select
VIDEOS option using the Up or Down buttons, press OK button and all
available VIDEO fi les will be displayed:
A..Z: Jumps to fi le.
OK : Play this.
Play (
button): Play fi les.
LANG: Sorts fi les by name.
BLUE: Changes media type.
The following screen will be displayed during the playback:
Play ( button): Play fi les.
Pause (
button) : Pauses the playback.
Stop (
button) : Stop the playing fi le.
Rewind (
button): Goes backward.
Fast Forward (
button): Goes forward.
GREEN : Jumps to the selected time.
LANG: Sets subtitle or audio.
YELLOW : Sets subtitle time correction.
RED: Sets subtitle position on the screen.
BLUE: Sets subtitle size.
SUBTITLE: Enables/disables subtitles.
EXIT : Exit video.
MENU: Go to the previous menu.
Supported video types: .avi / mpg / mkv / mp4
Conditional Access
Press the “MENU” button to display the main
menu and use the “ ” or “ ” button to highlight
the “Conditional Access” line and press the “OK”
button:
Some channels operate on a Pay Per View basis.
These channels require a subscription and a external
device.
Obtain the Conditional Access Module (CAM) and the
viewing card by subscribing to a pay channel company,
then insert those to the set-top box using the following
procedure.
• Switch off the set-top box and unplug from the mains.
• The CAM should be correctly inserted, it is impossible
to insert fully if reversed.
IMPORTANT: The CAM or the set-top box terminal may
be damaged if the CAM is forcefully inserted.
• Connect the set-top box to the mains supply, switch
on and then wait for few moments until the card is
activated.
• Some CAMs may require the following set up. Please
set the CAM by entering the main menu, Conditional
Access then pressing the “OK” button. (CAM set up
menu is not displayed when it is not required.)
• To see the viewing contract information press the
“MENU” button, then highlight Conditional Access and
press the “OK” button.
• When no module is inserted, “No Conditional Access
module detected” message appears on the screen.
• Refer to the module instruction manual for details of
the settings.
Note: Insert or remove the CI module only when the
set-top box is in STANDBY mode or disconnected from
the mains.
Page 25
Other Information
24
Audio Mode Selection (Yellow Button)
The YELLOW key (LRS) will toggle the sound
mode. The mode is stereo as default. If you want to
listen only the left or only the right speaker, sound
mode can be changed with this key.
On single sound channel modes, same sound
channels will be switched to both left and right
outputs. When the mode is changed, an appropriate
OSD will be displayed for a while and this will be
stored for this program for switching back to the
requested audio mode next time.
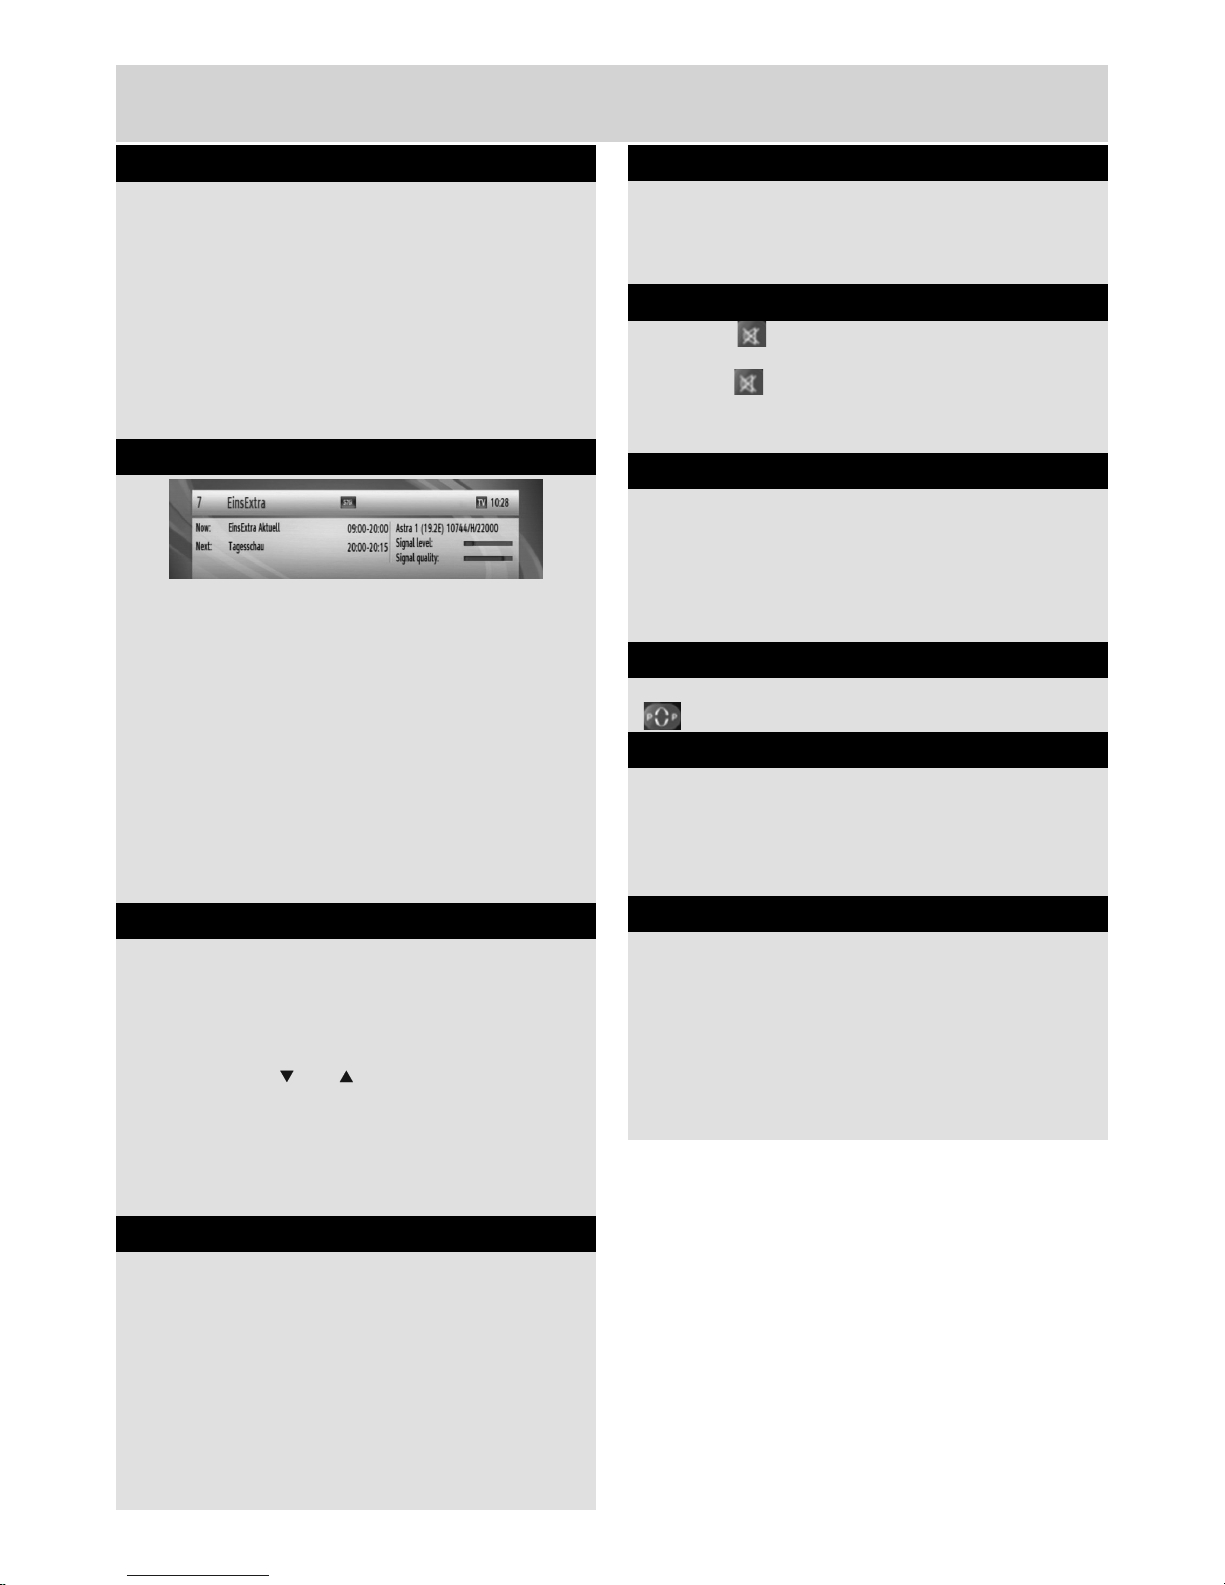
Info / Help
When INFO key is pressed an information menu
OSD will be displayed.
Info bar gives information related to currently
watched program. This info includes program
number, program name, program mode (TV or
Radio), transponder name, transponder frequency,
favourites icon, (if the program is one of the
favourite programs), scrambled/unscrambled
channel, polarisation, audio mode, whether the
program has teletext or not and short event
description, broadcast resolution (i.e. 576i, 576p,
720p or 1080i).
Audio Language button (AUDIO)
The AUDIO button allows selecting another sound
track of the present program. When the language
button is pressed a menu will be displayed showing
the number of possible audio languages for TV
and tracks for radio programs available. You can
navigate using “ ” or “ ” buttons and select with
OK button. If an audio language supports Dolby
digital output, “AC3” expression is seen at the end
of the audio language name. If the program does
not have multi audio, a pop-up message will be
displayed.
EPG (Electronic Programme Guide)
Press the EPG button to display the electronic
program guide (EPG) where you can view the
event information (start and end time for current
and next events, program number, program name,
event name of the programs in tuned transponder)
and set timers for the events. For more information
see the section, Electronic Programme Guide.
Favourite Programme (FAV.)
You can navigate within favourites by pressing
the FAV button (if available). A program can be
selected as a favourite from the program table
menu.
Mute
When the button is pressed, mute symbol will
be displayed on the screen. The mute symbol will
stay until
button is pressed again. The mute
symbol will not be displayed on the screen if there
is another menu displayed on the screen.
Subtitle (SUBT.)
Some channels can be broadcast with subtitles
displayed on-screen for the hard-of-hearing. This
function selects the desired subtitle language
and enables the automatic displaying of subtitles
whenever subtitle information is available. Press
the subtitle buton to activate the subtitle menu.
Previous Channel
You can display the last watched channel by using
button.
Teletext ( TEXT)
You can use teletext with your receiver’s remote
control. By pressing TEXT button you can activate
the Teletext broadcasting. You can use RED,
GREEN, YELLOW and BLUE buttons in TEXT
menu.Press EXIT to exit from Teletext.
OPT button ( MODE CHANGES)
There are two modes available in your device.
You can switch between Satellite and Terrestrial
mode while watching a channel by using the Opt
button.
Page 26

Product Support
Troubleshooting
25
Information for Users on Disposal of Old Equipment and Batteries
[European Union only]
These symbols indicate that equipment with these symbols should not be disposed of as
general household waste. If you want to dispose of the product or battery, please consider
the collection systems or facilities for appropriate recycling.
NOTE: The sign Pb below the symbol for batteries indicates that this battery contains
lead
Battery
Problem Possible Reasons What To Do
The LED indicator does not
glow.
Mains cable is not connected.
Check if the mains cable is plugged into the power
socket.
No picture or sound. No signal or weak signal. Check the aerial and video connections (scart/HDMI).
The settings you have done in the
menus have not been changed
The digital set-top box was
unplugged without fi rst going to
standby.
Before unplugging your digital set-top box, wait for going
to standby.
You see the on-screen error
message related with LNB shortcircuit protection mode.
The dish installation is not correct
or cable connections have been
made incorrect.
Check the connection.
If the problem persist,
Contact with the colsest service for help.
The remote control is not
working.
• The set-top-box is in standby.
• Remote control is out of range.
• Batteries are exhausted.
• Press the STANDBY button.
• Check that the remote control range is clear.
• Replace the batteries with new ones.
You have forgotten any channel
lock code or password..
When the password is forgotten, you can perform
First Time Installation to set it back to its default value
“0000”.
Page 27

Product Support
Supply Voltage 220 - 240 V AC ~ 50Hz
Input Frequency 174Mhz-862Mhz
Frequency Band VHF, UHF
Maximum Power consumption 30 W
Standby Power Consumption 1 W
Operating temperature 5ºC to +40ºC
Storage temperature -15ºC to +55ºC
Humidity 25 to 75 % rel
Physical dimensions 360x280x48 mm
Weight 2820 g
GENERAL CHARACTERISTICS
Main Processor BCM7325
Flash Memory 32 MB
DDRRAM 256 MB
HARDWARE CONFIGURATION
Transmission Standards MPEG2, MPEG4 HD DVB-T,
DVB-S / S2, MPEG2 DVB-S / S2, MPEG4
Frequency Band UHF, VHF
DIGITAL CAPABILITIES
COFDM with 2K/8K FFT mode.
FEC for all DVB Modes.(Automatically found)
QPSK, 16QAM, 64QAM, with 2k, 4k, 8k FFT mode
Supports DVB-S2 Broadcast Services profi le
QPSK rates 1/2, 3/5, 2/3, 3/4, 4/5, 5/6, 8/9, 9/10 8PSK rates 3/5, 2/3, 3/4, 5/6, 8/9, 9/10
Legacy QPSK demodulator/decoder
• 1–45 MBaud DVB-S • 5–30 MBaud DVB-S2
DEMODULATION
ALL MPEG-2 MP@ML Video Decoder
Aspect Ratio 4:3, 16:9 with pan vector
RGB analogue outputs. BW ≥ 5MHz at 0.5 to 5 MHz sweep signal
CVBS analogue output.
VIDEO
MPEG-4 H.264/AVC HP@L 4.0, MP@L 4.0 (HD)
- H.264/AVC MP@L 3 .2, HP@L 3 .2 (SD)
- MPEG-2 MP@HL, MP@ML (SD)
Profi les
MPEG1 Layer 1 and 2
Sampling frequencies supported 32 kHz, 44.1 kHz or 48 kHz.
Output can be programmed as STEREO, LEFT only or RIGHT only (on both outputs). This is useful for
dual mono channels in order to select the correct sound track, which is stored for every channel.
Wide dynamic range 16-bit resolution
AUDIO
26
Page 28

Product Support
Operating Distance 7 m Max.
Batteries 2x1.5V Micro (R-03/AAA)
REMOTE CONTROL
1 xRF In IEC-type, female (75Ohm)
1 x RF Out (loop through) IEC-type, male (75Ohm)
1 x F-type LNB connector
LNB POWER SUPPLY
• Vertical : 13/14 Volt • Horizontal : 17/18 Volt • Max. Output Current : 400mA (Short-circuit protected)
• 22 kHz Tone : Frequency 22KHz ± 2 KHz Amplitude 0.6 Vpp ± 0.2 Vpp
TUNERS & LNB
Display : SEVEN SEGMENT display
Remote Control Keys On / Off, Program+ / Program-
FRONT PANEL
Output 2 Vrms, 0 dBfs / Z = 10 kohm
AUDIO
Output Optical SPDIF
DIGITAL AUDIO
Scart TV scart
RGB Video Output TV scart
Analog Audio Output TV scart
Digital Audio Output Optical output
A/V & DATA IN/OUT
USB POWER SUPPLY
5V @ 500mA max
27
Page 29
Important Instruction
For your own safety read following instruction carefully before attempting to connect this unit to the mains
supply.
MAINS (AC) OPERATION
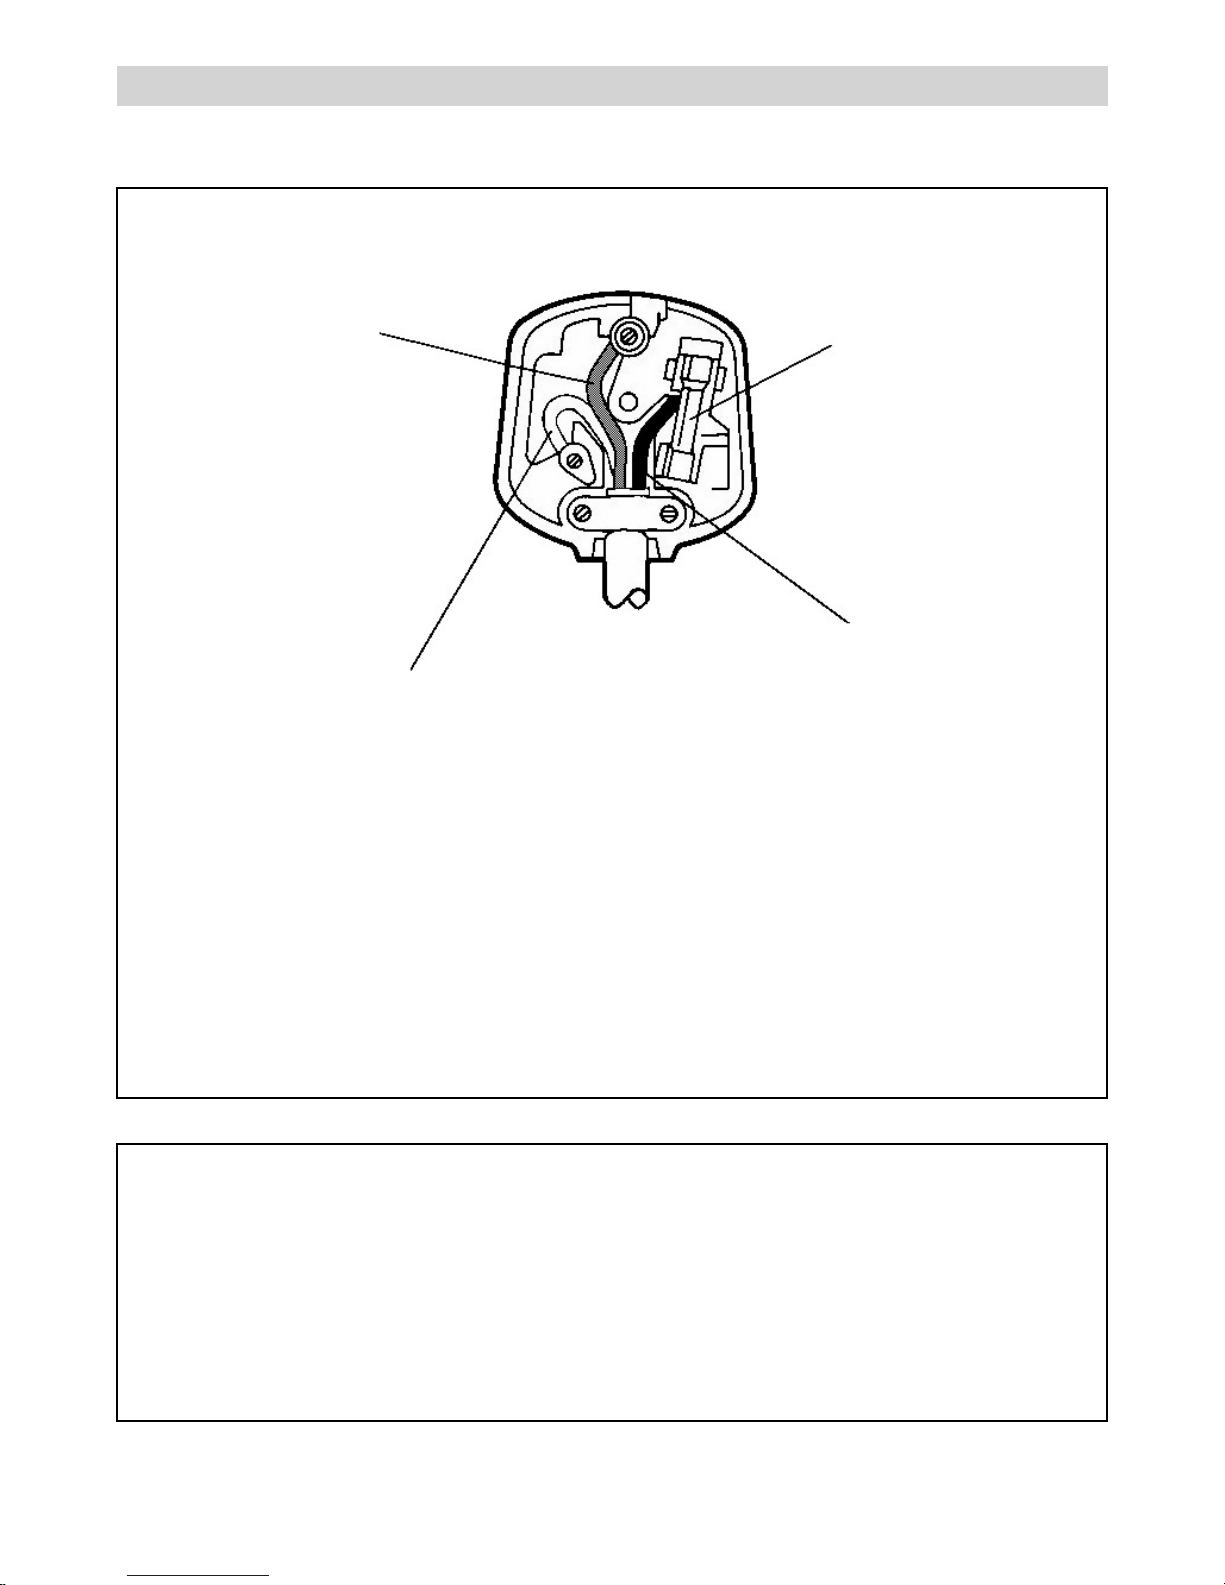
The wires in the mains lead are coloured in accordance with the following code :
IMPORTANT
As the colours of the wires in the mains lead of this appliance may not correspond with the coloured
markings identifying the terminals in your plug, proceed as follows:
The wire which is coloured green and yellow must be connected to the terminal which is marked with
the letter E, or by the earth symbol, or coloured green or green and yellow.
The wire which is coloured blue or black must be connected to the terminal which is marked with the
letter N or coloured Black.
The wire which is coloured brown or red must be connected to the terminal which is marked with the
letter L or coloured Red.
For continued protection against risk of fi re, replace only with same type and rating of fuse (ASTA
approved 5A 250VAC fuse).
CAUTION
TO PREVENT ELECTRIC SHOCK DISCONNECT FROM THE MAINS BEFORE REMOVING
COVER. NO USER SERVICEABLE PARTS INSIDE. REFER SERVICING TO QUALIFIED SERVICE
PERSONNEL.
SAFETY PRECAUTION
THIS EQUIPMENT MUST BE DISCONNECTED FROM THE MAINS WHEN NOT IN USE. DO NOT
ALLOW THIS UNIT TO BE EXPOSED TO RAIN OR MOISTURE.
GREEN
&
YELLOW
(Earth)
(if there is earth cable)
FUSE
BROWN
(Live)
BLUE
(Neutral)
28
Page 30

ENG
Following information is only for EU-member states:
The use of the symbol indicates that this product may not be treated as
household waste. By ensuring this product is disposed of correctly, you will
help prevent potential negative consequences for the environment and
human health, which could otherwise be caused by inappropriate waste
handling of this product. For more detailed information about recycling of
this product, please contact your local city office, your household waste
disposal service or the shop where you purchased the product.
50216711
 Loading...