

Page 1
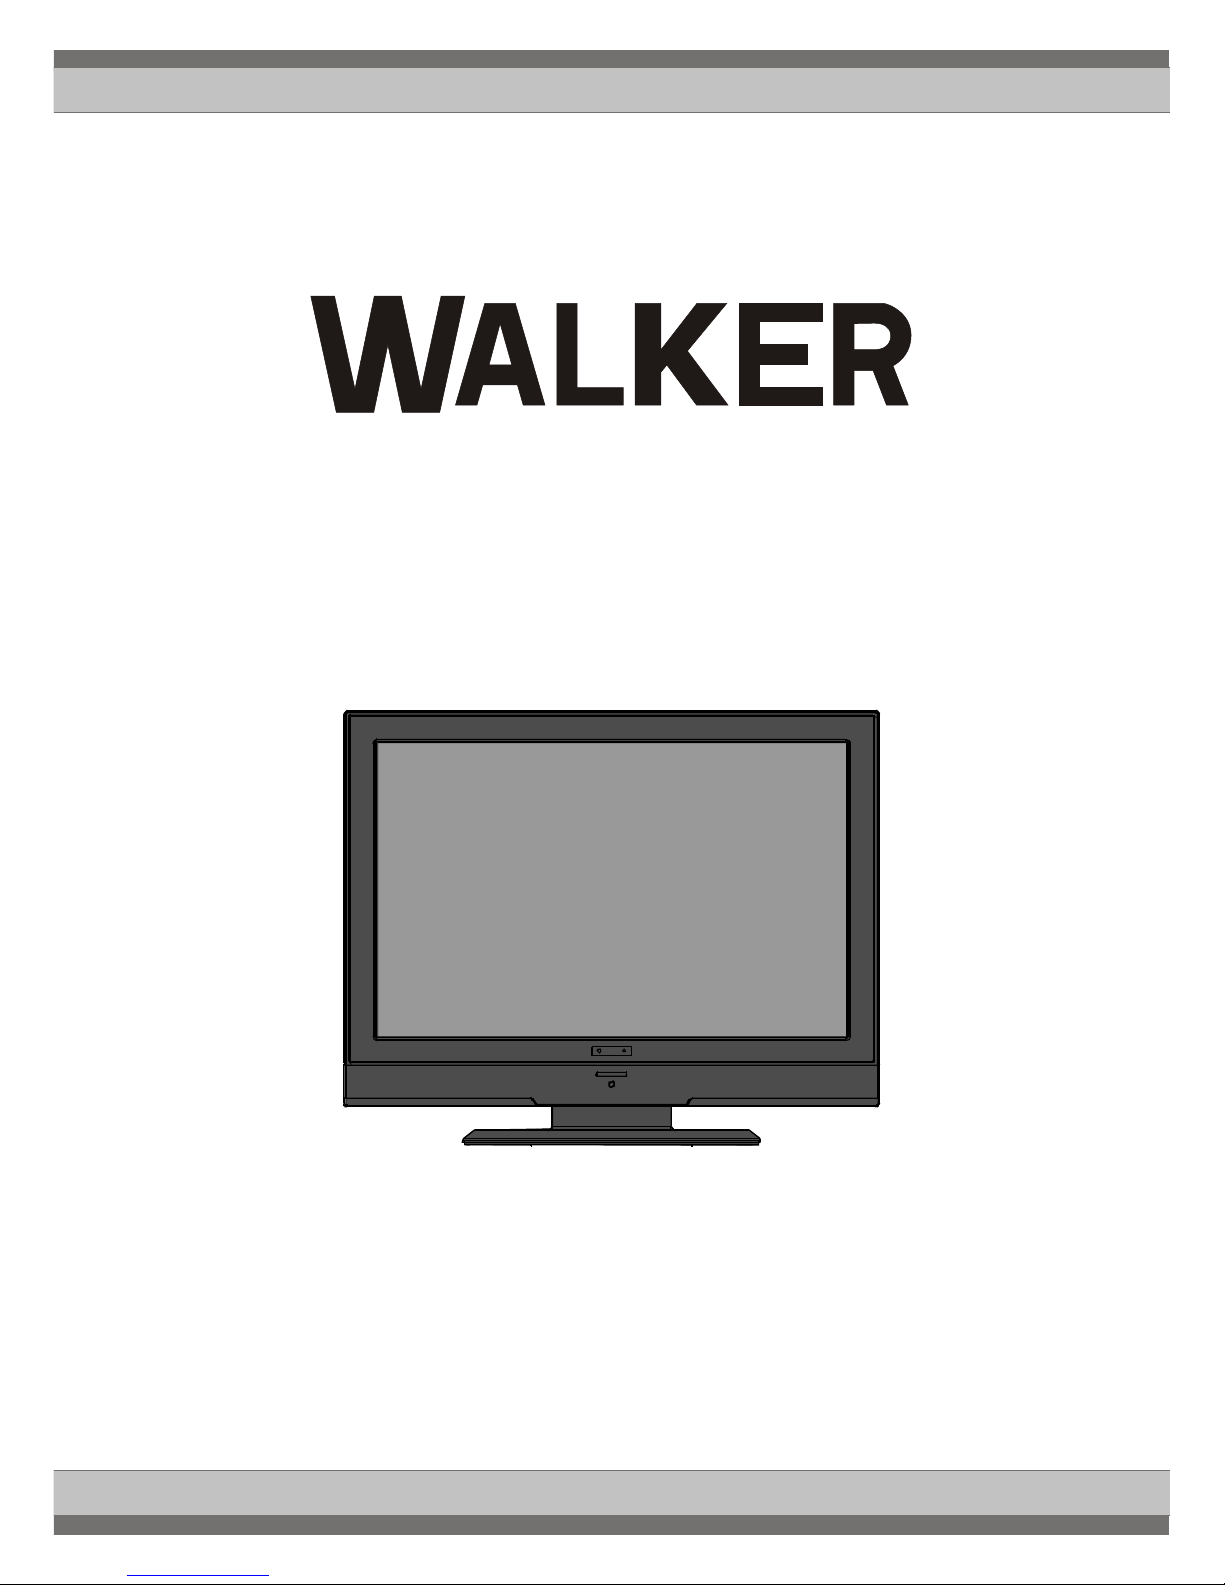
COLOUR TELEVISION WITH REMOTE CONTROL
OPERATING INSTRUCTIONS
WP2209LCD
Page 2

English - 1 -
Contents
Picture Zoom ............................................... 17
Store ........................................................... 17
Reset .......................................................... 17
Sound Menu.................................................... 17
Volume ........................................................ 17
Equalizer ..................................................... 18
Balance ....................................................... 18
Headphone.................................................. 18
Volume .................................................. 18
Store ..................................................... 18
Sound Mode ................................................ 18
AVL ............................................................. 18
Store ........................................................... 18
Feature Menu.................................................. 18
Sleep Timer ................................................. 19
Child Lock ................................................... 19
Language .................................................... 19
Ext-2-SPDIF Out .......................................... 19
PC Audio In .................................................. 19
Default Zoom............................................... 19
Blue Background ......................................... 19
Menu Background ....................................... 19
Backlight ..................................................... 19
Menu Timeout .............................................. 19
TXT Language............................................. 20
Install Menu ..................................................... 20
Program ...................................................... 20
Band ........................................................... 20
Channel....................................................... 20
Colour System............................................. 20
Sound System ............................................. 20
Fine Tune .................................................... 20
Search ........................................................ 20
Store ........................................................... 20
Install Menu in AV Modes ............................ 20
Program Table ................................................. 20
Name .................................................... 21
Move ..................................................... 21
Delete.................................................... 21
APS (Auto Programming System) ......... 21
Source Menu .................................................. 21
Displaying TV Information ................................... 22
Mute Function ..................................................... 22
Freezing Picture ................................................. 22
Zoom Modes ....................................................... 22
Auto ............................................................ 22
16:9 ............................................................. 23
4:3 ............................................................... 23
Panoramic ................................................... 23
14:9 ............................................................. 23
Cinema ........................................................ 23
Subtitle ........................................................ 23
Zoom .............................................................. 23
Features ............................................................... 3
Acc essories ......................................................... 3
Introduction ........................................................... 4
Preparation ........................................................... 4
Safety Precautions ............................................... 4
Power Source .................................................. 4
Power Cord ...................................................... 4
Moisture and Water .......................................... 4
Cleaning ............................................................ 5
Ventilation ......................................................... 5
Heat and Flames ............................................... 5
Lightning ........................................................... 5
Replacement Parts ............................................ 5
Servicing ........................................................... 5
Waste Disposal ................................................. 5
Information for Users in European Union
Countries .......................................................... 5
Disconnecting the Device ................................. 5
Headphone Volume ........................................... 6
Installation ......................................................... 6
LCD Screen ...................................................... 6
Warning ............................................................ 6
Overview of the Remote Control .......................... 7
LCD TV and Operating Buttons ............................ 8
Viewing the Connections ..................................... 9
Power Connection .............................................. 11
Aerial Connection ............................................... 11
Connecting to a DVD Player ............................... 12
Using Side Connectors ....................................... 13
Using Other Connectors ..................................... 13
Inserting Batteries in the Remote Control Handset 14
Operating Range for the Remote Control ............ 14
Switching the TV On/Off .................................... 15
To Switch the TV On ...................................... 15
To Switch the TV Off ...................................... 15
Input Selection .................................................... 15
Navigating the Menu System .............................. 16
Basic Operations ................................................ 16
Operation with the Buttons on the TV ............ 16
Volume Setting ............................................ 16
Programme Selection .................................. 16
Viewing the Main Menu ............................... 16
AV Mode ..................................................... 16
Operation with the Remote Control ................. 16
Volume Setting ............................................ 16
Programme Selection (Previous or Next
Programme) ................................................. 16
Programme Selection (Direct Access) ........ 16
Menu System ...................................................... 17
Picture Menu ................................................... 17
Mode ........................................................... 17
Contrast/Brightness/Sharpness/Colour/Tint 17
Colour Temp ................................................ 17
Noise Reduction .......................................... 17
ENG-22784W-MB30-1055UK-1HDMI-YPBPR-SPDIF-LOUT-CVBS-W O PC-WO SVHS-50130255.p6502.07.2008, 17:001
Page 3

English - 2 -
Teletext ............................................................... 23
Tips .................................................................... 24
Screen Care ................................................... 24
Image Persistence .......................................... 24
No Power........................................................ 24
Poor Picture .................................................... 24
No Picture ....................................................... 25
Sound ............................................................. 25
Remote Control ............................................... 25
Input Sources ................................................. 25
Appendix: AV and HDMI Signal Compatibility ....... 26
Specifications ..................................................... 27
Pin Specifications ............................................... 28
Important Instruction ........................................... 29
ENG-22784W-MB30-1055UK-1HDMI-YPBPR-SPDIF-LOUT-CVBS-W O PC-WO SVHS-50130255.p6502.07.2008, 17:002
Page 4
English - 3 -
Features
• HD TV: It has one HDMI connector for digital
video and audio. This connection is also
designed to accept high definition signals.
• On Screen Display (OSD): Controlling the
TV is very easy by its menu driven system.
• APS: Automatic Programming System.
• Stereo sound system (German+Nicam).
• AVL: Automatic Volume Limiting.
• Child lock.
• Sleep timer.
• Scart sockets and AV connectors.
• Fully functional teletext .
• NTSC playback.
• When no valid signal is detected, after 5
minutes the TV switches itself automatically
to standby mode.
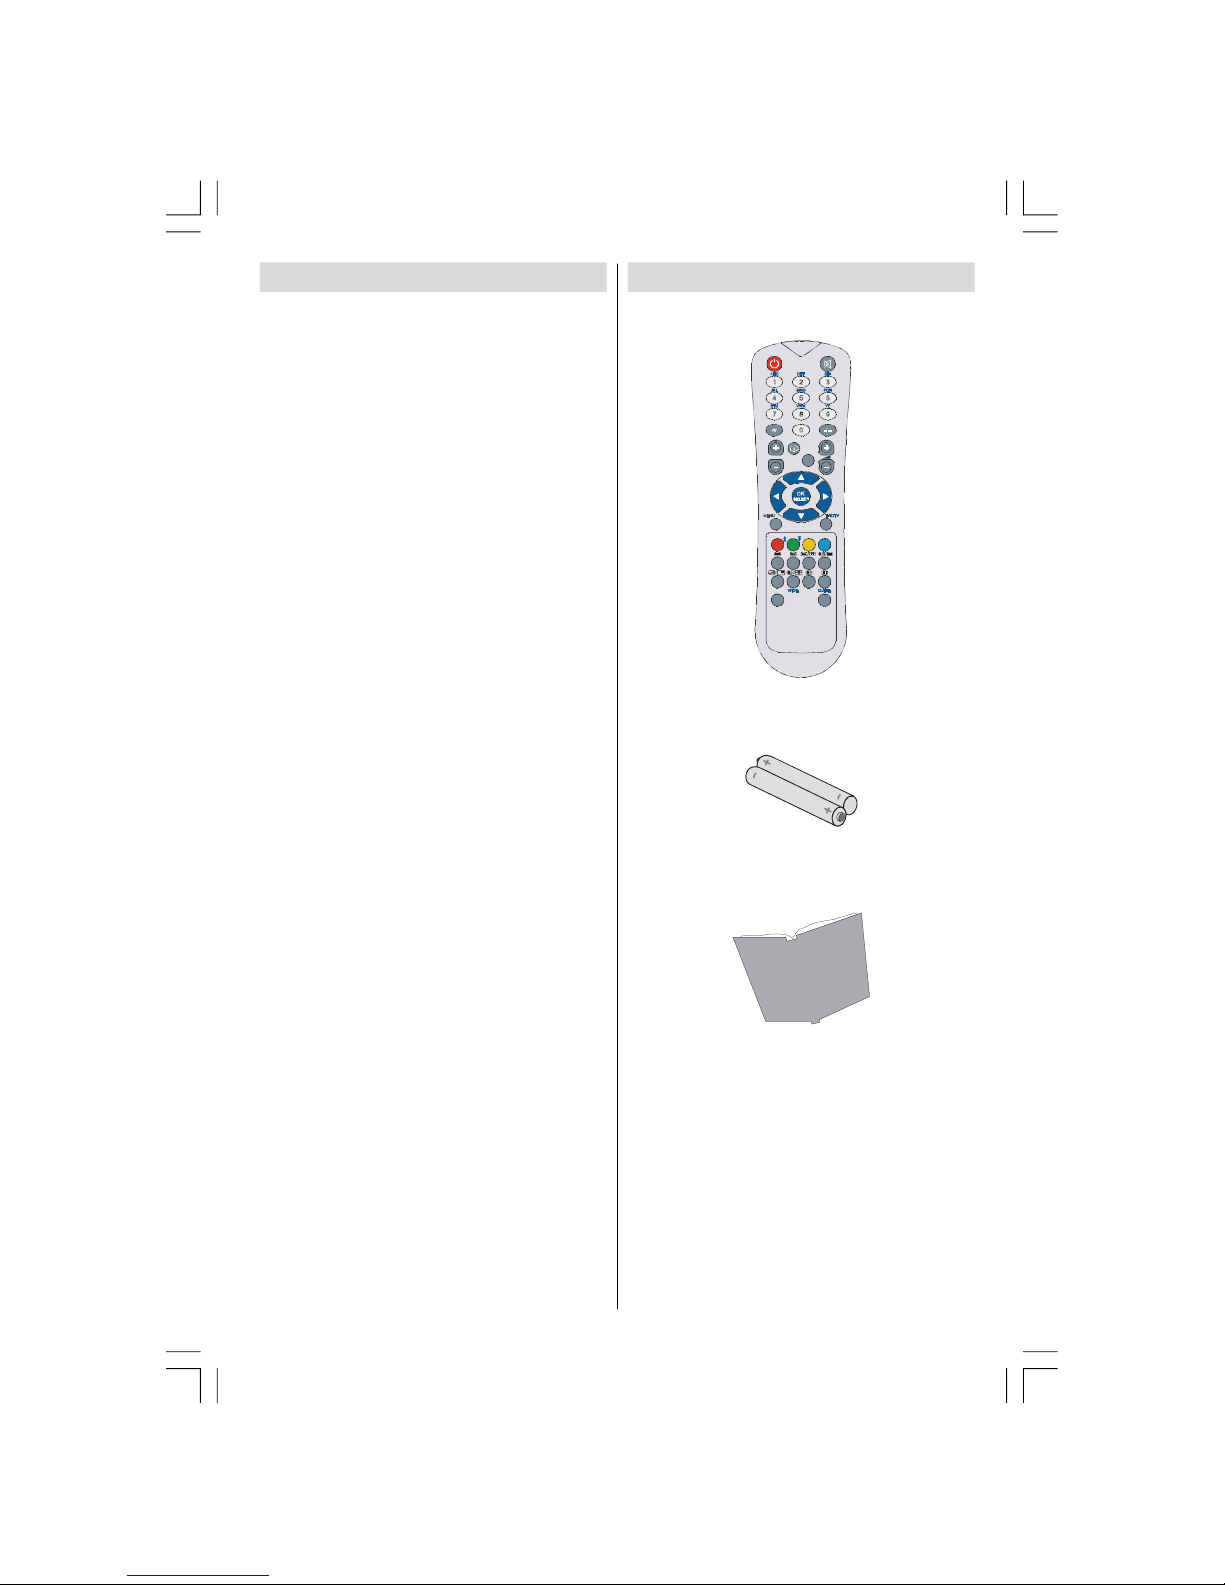
Accessories
ABC DEF
GHI
JKL
MNO
PQR
STU
VWX
YZ
1 2
3
4
5
6
7 8
9
0
AV
SOURCE
P/CH
P<P/SWAP
PP
I-II
INFO
EXIT
-/--
MENU
TV/DTV
OK
WIDE
GUIDE
Remote Controller
Batteries
2 X AAA
Instruction Book
ENG-22784W-MB30-1055UK-1HDMI-YPBPR-SPDIF-LOUT-CVBS-W O PC-WO SVHS-50130255.p6502.07.2008, 17:003
Page 5
English - 4 -
Introduction
Thank you for choosing this
product. This manual will guide
you for the proper operation of your
TV. Before operating the TV, please
read this manual throughly.
Please do keep this manual in a safe place
for future references.
Preparation
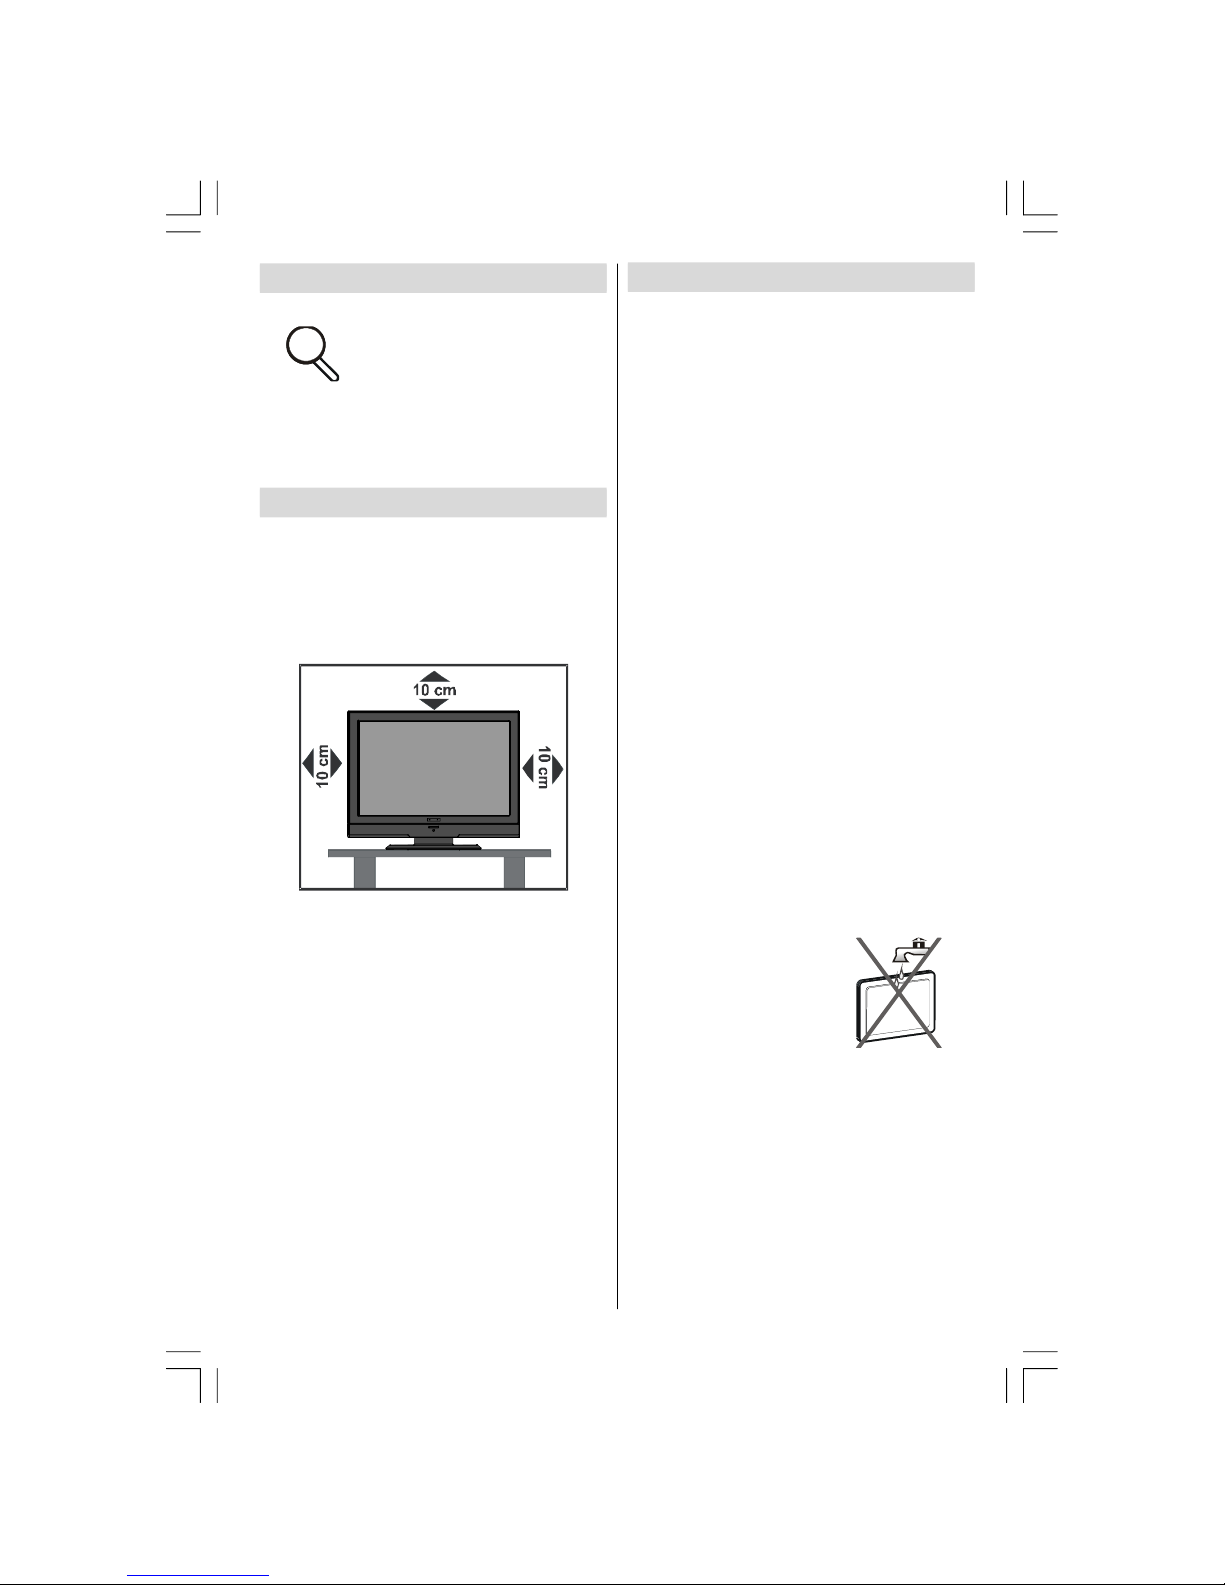
For ventilation, leave a free space of at least
10 cm all around the set. To prevent any fault
and unsafe situations, please do not place
any objects on top of the set.
Use this device in moderate climates.
Safety Precautions
Please read the following recommended
safety precautions carefully for your safety.
Power Source
The TV set should be operated only from a
220-240 V AC, 50 Hz outlet. Ensure that you
sel ect the correct vol tage settin g for your
convenience.
Power Cord
Do not place the set, a piece of furniture, etc.
on the power cord (mains lead) or pinch the
cord. Handle the power cord by the plug. Do
not unplug the appliance by pulling from the
power cord and never touch the power cord
with wet hands as this could cause a short
circuit or electric shock. Never make a knot in
the cord or tie it with other cords. The power
cords should be placed in such a way that
they are not likely to be stepped on. A damaged
powe r cord can cause fire or give you an
electric shock. When it is damaged and needs
to be replaced, it should be done by qualified
personnel.
Moisture and Water
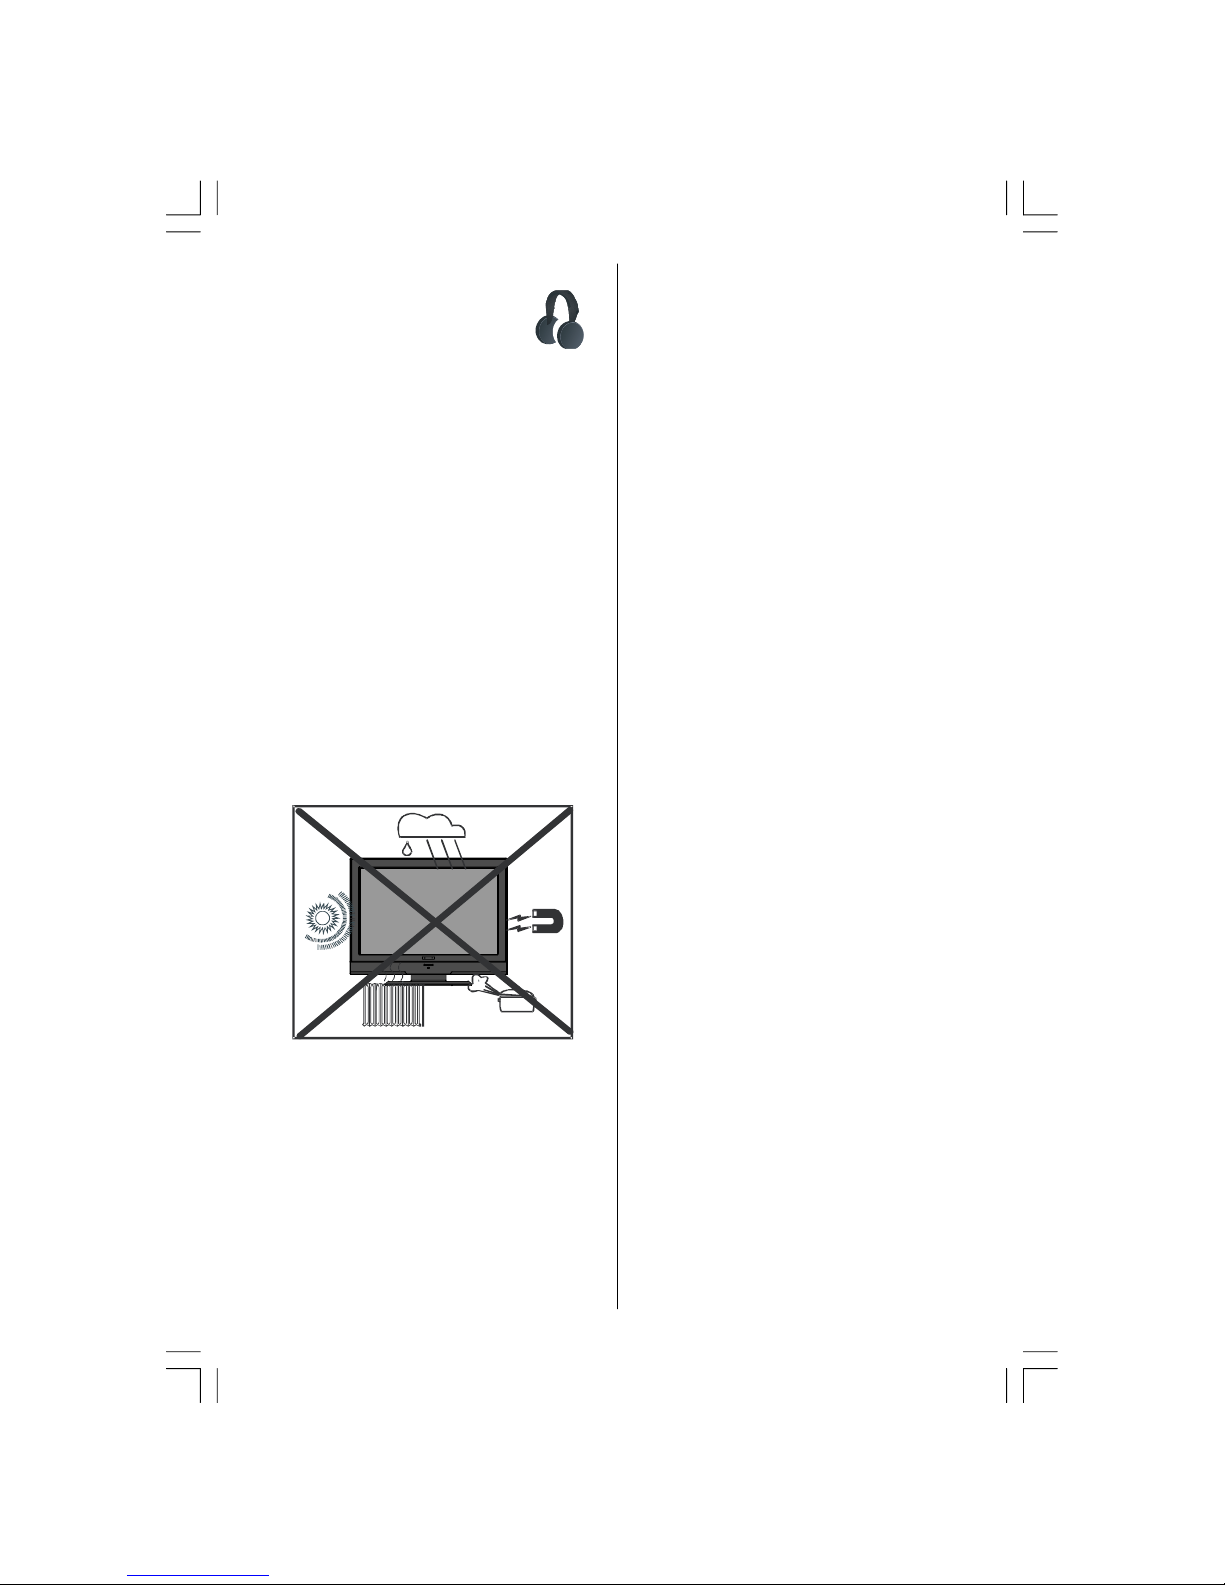
Do not use this device in
a humid and damp place
(avoid the bathroom, the
sink in the kitchen, and
near the washin g
machine). Do not expose
this devic e to rain or
water, as this may be dangerous and do not
place objects filled with liquids, such as flower
va ses, on t op. Avo id f rom dr ip ping or
splashing.
If any solid object or liquid falls into the cabinet,
unplug the TV and have it checked by qualified
personnel before operating it any further.
ENG-22784W-MB30-1055UK-1HDMI-YPBPR-SPDIF-LOUT-CVBS-W O PC-WO SVHS-50130255.p6502.07.2008, 17:004
Page 6
English - 5 -
Cleaning
Before cleaning, unplug the
TV set from the wall outlet.
Do not use liquid or aerosol
cleaners. Use soft and dry
cloth.
Ventilation
The slots and openings on the TV set are
intended for ventilation and to ensure reliable
operation. To pr eve nt overheating , these
openings must not be blocked or covered in
anyway.
Heat and Flames
The set should not be placed
near t o op en f lames and
sources of intense heat such as
an electric heater. Ensure that
no open flame sources , such as lighte d
candles, are placed on top of the TV. Batteries
should not be exposed to excessive heat such
as sunshine, fire or the like.
Lightning
In case of storm and lightning or
wh en going on ho liday,
disconnect the power cord from
the wall outlet.
Replacement Parts
When replacement parts are required, make
sure that the service technician has used
replacement parts, which are specified by the
manufacturer or have the same specifications
as th e origin al on e. Un au tho ri ze d
substitutions may result in fire, electrical shock
or other hazards.
Servicing
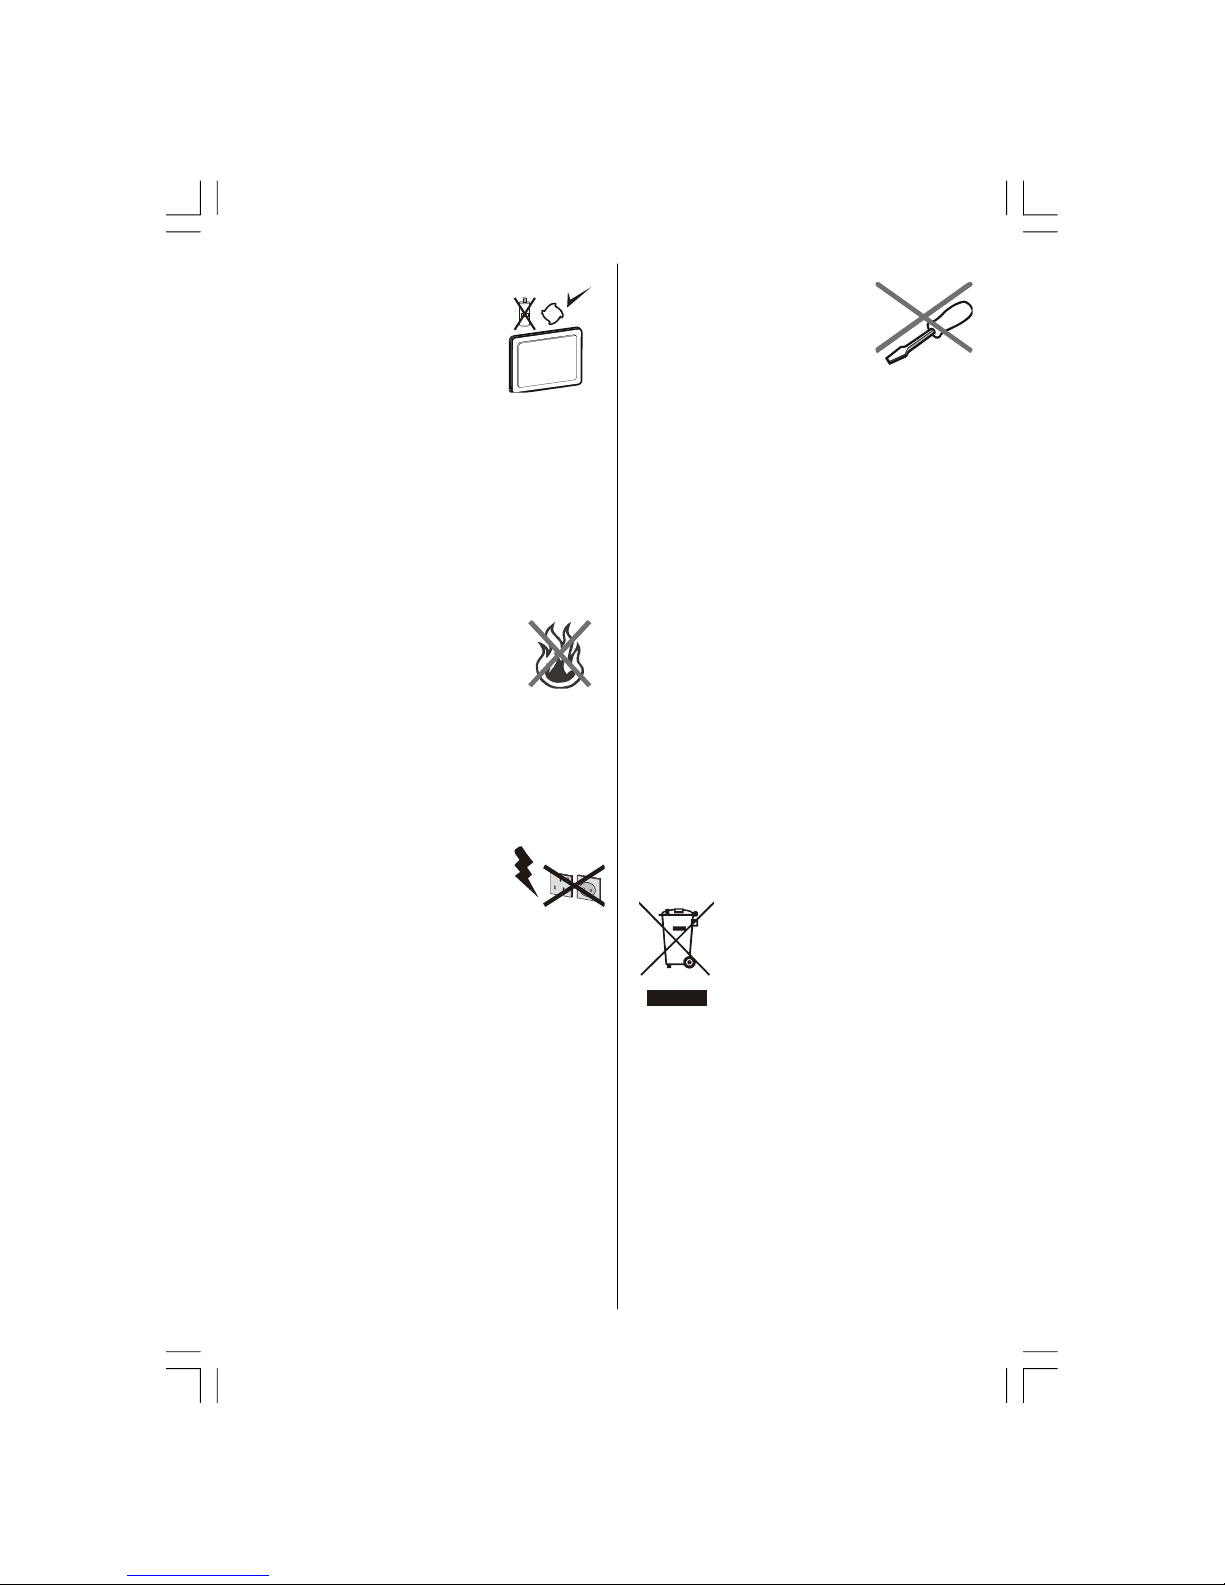
Pleas e refer all servicing to
qu al if ied personnel. Do not
remove the cover yourself as
this may result in an electric shock.
Waste Disposal
Instructions for Waste Disposal
• Packaging and packaging aids are recyclable
and sho ul d princ ip all y be re cycled.
Packaging materials, such as foil bag, must
be kept away from children.
• Batteries, including those which are heavy
metal-free, should not be disposed of with
household waste. Please dispose of used
battery in an environment friendly manner.
Find out about the legal regulations which
apply in your area.
• Cold catho de fl uores cent la mp in LCD
PANEL contains a small amount of mercury;
please follow the local laws or regulations
for disposal.
Information for Users in European
Union Countries
This symbol on the product or
on its packagi ng means that
your electrical and electronic
device should be disposed at
the en d of i ts s er vice l ife
separately from your household
wa stes. There are separ at e co lle ct io n
systems for recycling in EU.
For more information, please contact the local
authority or the dealer where you purchased
the product.
Disconnecting the Device
The mains plug is used to disconnect TV set
from the mains and therefore it must remain
readily operable.
ENG-22784W-MB30-1055UK-1HDMI-YPBPR-SPDIF-LOUT-CVBS-W O PC-WO SVHS-50130255.p6502.07.2008, 17:005
Page 7
English - 6 -
Headphone Volume
Excessive sound pressure from
earphones and headphones can
cause hearing loss.
Installation
To prevent injury, this device must be securely
attached to the wall in accordance with the
installation instructions when mounted to the
wall (if the option is available).
LCD Screen
The LCD pan el is a very high technol ogy
produ ct w it h abo ut a mil li on t hi n fil m
transistors, givi ng you fine picture details.
Occasionally, a few non-active pixels may
appear on the screen as a fixed blue, green
or red point. Please note that this does not
affect the performance of your product.
Warning
Do not leave your TV in standby or operating
mode when you leave your house.
ENG-22784W-MB30-1055UK-1HDMI-YPBPR-SPDIF-LOUT-CVBS-W O PC-WO SVHS-50130255.p6502.07.2008, 17:006
Page 8
English - 7 -
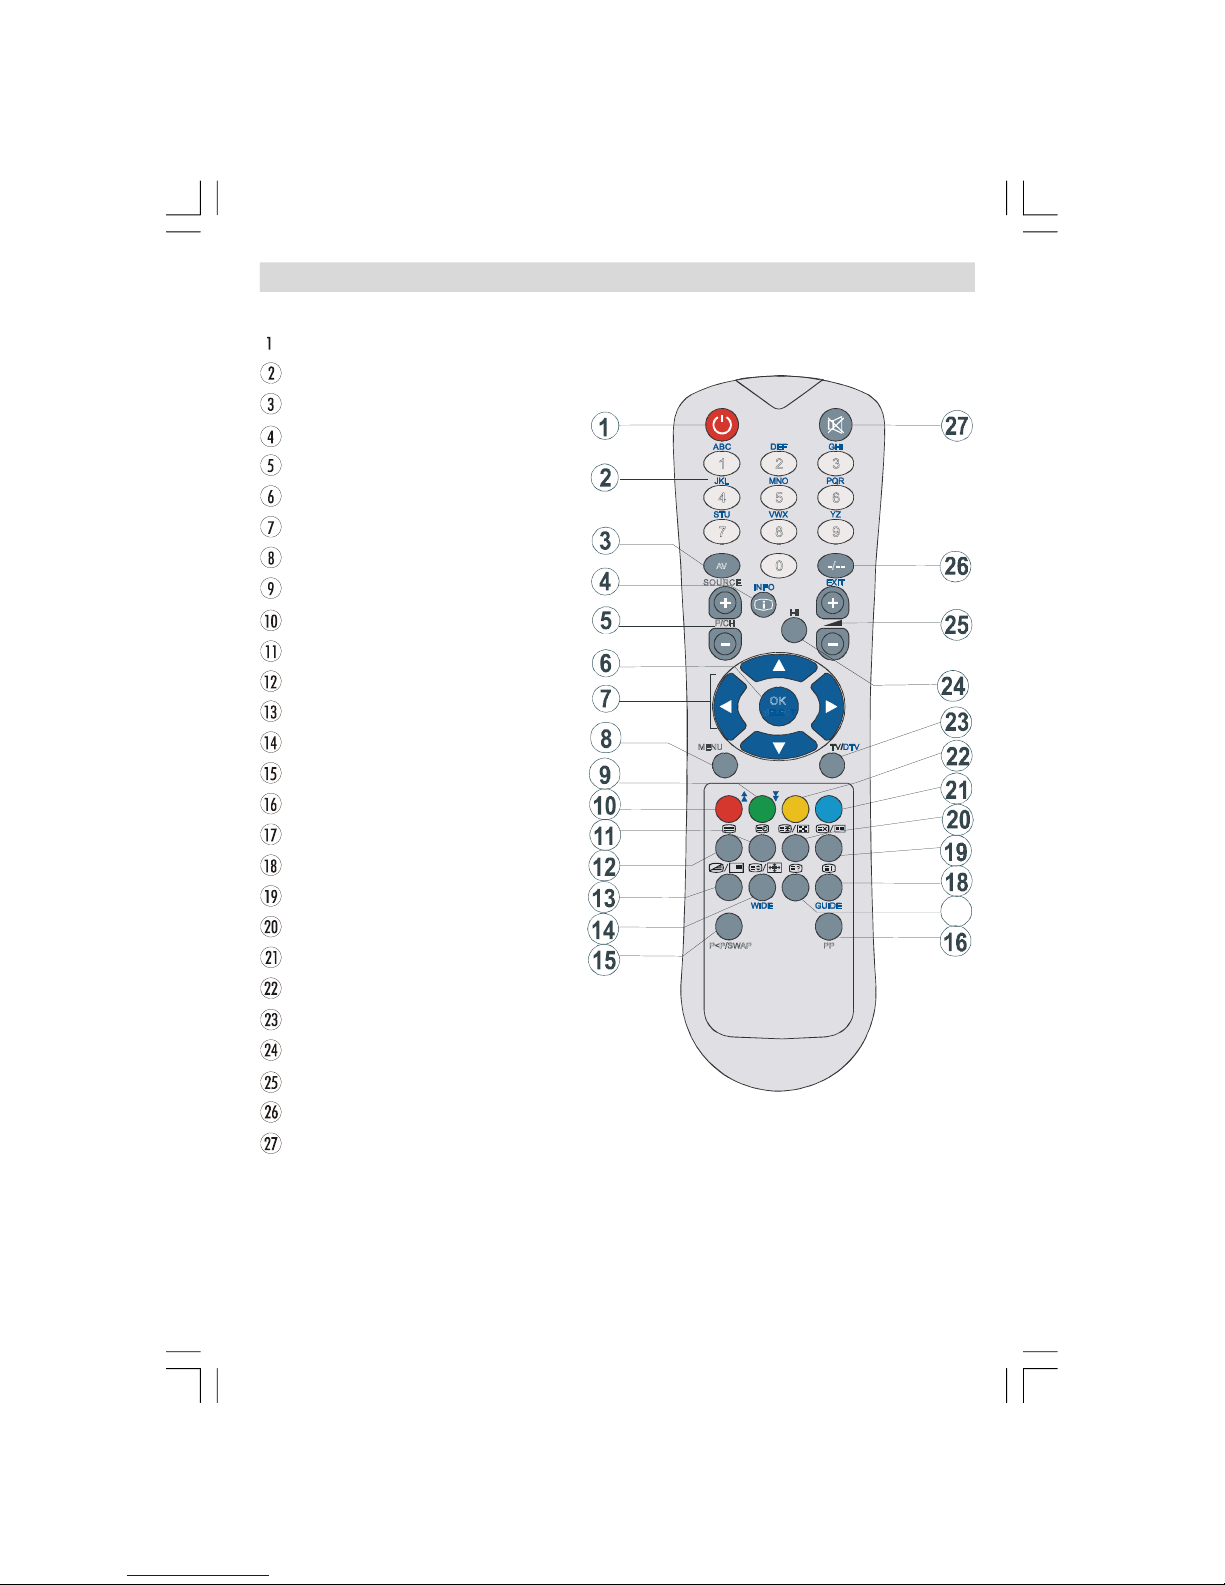
Overview of the Remote Control
Standby
Direct programme
External source
Info
Programme up / Programme down
Okay/Freeze picture
Cursor buttons
Menu
Picture
Sound
Time
Teletext
Mix/no function
Expand/Image size
Previous programme
Picture mode selection
Reveal
Index page
Update/No function
Hold/No function
Instal
Feature
TV/Quit menu
Mono-Stereo/Dual I-II
Volume up / Volume down
No function
Mute
ABC DEF GHI
JKL MNO PQR
STU VWX
YZ
1 2
3
4
5
6
7 8
9
0
AV
SOURCE
EXIT
-/--
INFO
I-II
MENU
TV/DTV
P/CH
OK
WIDE
GUIDE
PP
P<P/SWAP
17
ENG-22784W-MB30-1055UK-1HDMI-YPBPR-SPDIF-LOUT-CVBS-W O PC-WO SVHS-50130255.p6502.07.2008, 17:007
Page 9
English - 8 -
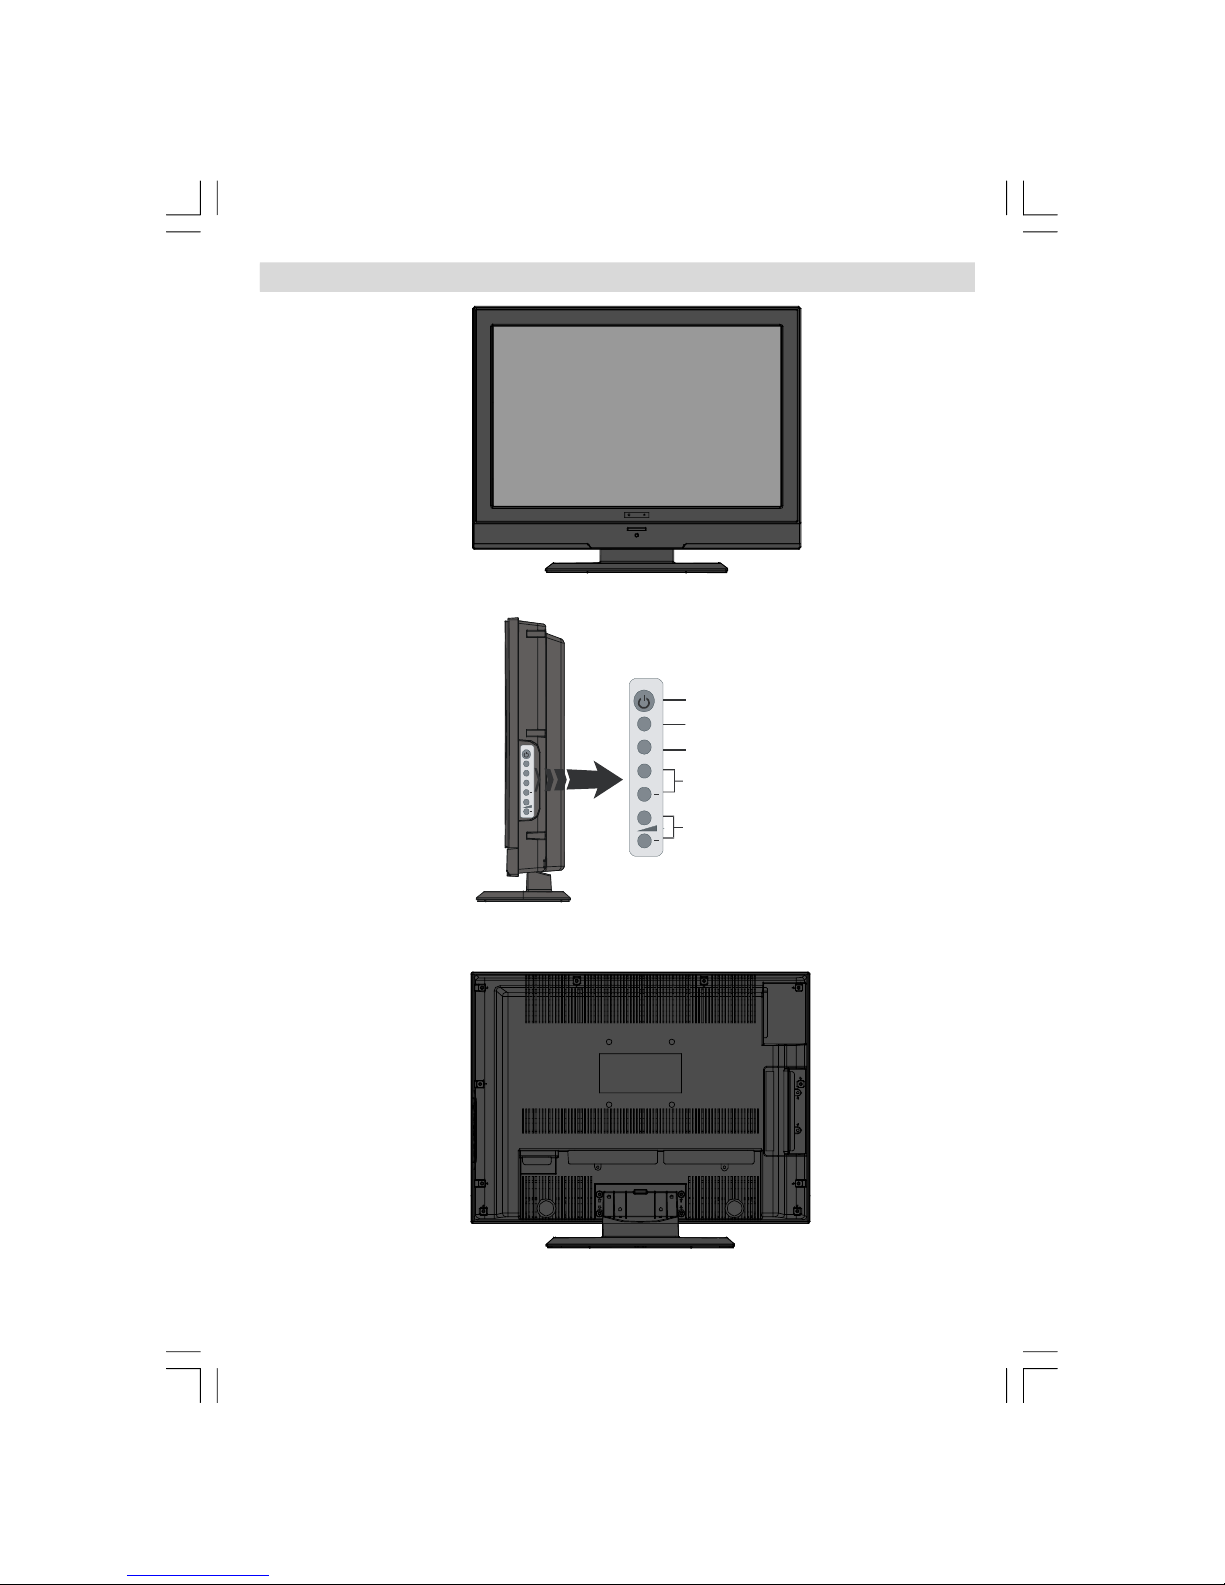
LCD TV and Operating Buttons
FRONT VIEW
REAR VIEW
SIDE VIEW
+
P/CH
+
TV/AV
MENU
+
P/CH+TV/AV
MENU
TV/AV button
MENU button
Program Up/
Program Down buttons
Volume Up/
Volume Down buttons
Standby button
ENG-22784W-MB30-1055UK-1HDMI-YPBPR-SPDIF-LOUT-CVBS-W O PC-WO SVHS-50130255.p6502.07.2008, 17:008
Page 10
English - 9 -
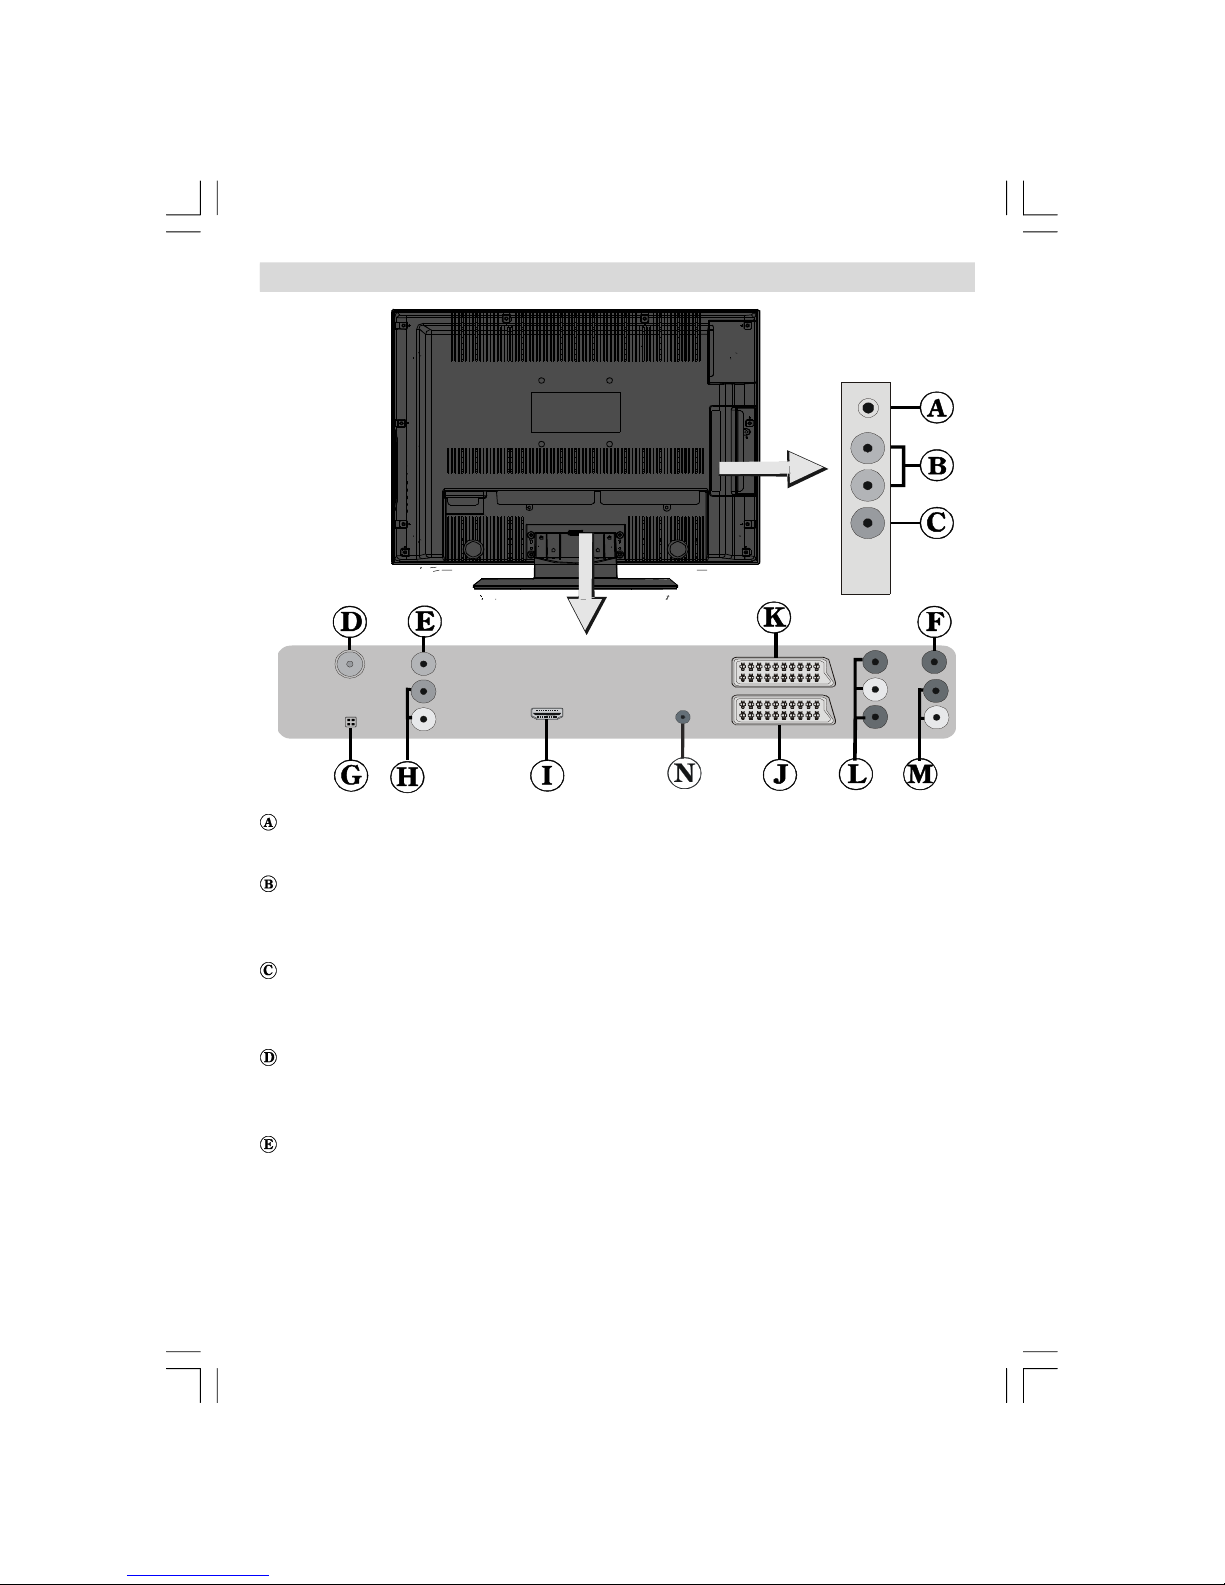
Viewing the Connections
Headphone jack is used for connecting an external headphone to the system.
Connect to the HEADPHONE jack to listen to the TV from headphones (optional).
Audio Inputs are used for connecting audio signals of external devices.
Connect the audio cable between the AUDIO INPUTS on the TV and the AUDIO OUTPUT
jacks on your device.
Video Input is used for connecting video signals of external devices.
Connect the video cable between the VIDEO IN socket on the TV and the VIDEO OUT jack on
your device.
RF Input connects to an antenna or a cable.
Note that if you use a decoder or a media recorder, you should connect the aerial cable
through the device to the television with an appropriate antenna cable.
CVBS Video Out outputs video signals to an external device such as recorder or monitor TV..
You can use CVBS Video Out to send video signals to an external device. The source of the
signal is defined by your selection of EXT-2/SPDIF setting in the Feature menu.
For enabling the sound connection, use Audio Line Outs of the TV.
• Connect your equipment to the TV via
VIDEO (yellow) input.
ENG-22784W-MB30-1055UK-1HDMI-YPBPR-SPDIF-LOUT-CVBS-W O PC-WO SVHS-50130255.p6502.07.2008, 17:009
Page 11

English - 10 -
S/PDIF Out is used for transferring digital audio signals. Use an RCA cable to transfer
audio signals to a device that has S/PDIF input.
This connector is for service use only..
Audio Line Outs output audio signals to an external device such as an optional sound
system.
To connect the external speakers to your TV, use AUDIO LINE OUTS of the TV with an audio
cable.
HDMI Input are for connecting a device that has an HDMI socket.
Your LCD Television is capable of displaying High Definition pictures from devices such as a
High Definition Satellite Receiver or DVD Player. These devices must be connected via the
HDMI sockets or Component Socket. These sockets can accept either 720p or 1080i signals.
No sound connection is needed for an HDMI to HDMI connection.
SCART 1 inputs or outputs for external devices.
Connect the SCART cable between SCART sockets on TV and SCART socket on your
external device (such as a decoder, a VCR or a DVD player).
Note: If an external device is connected via the SCART sockets, the TV will automatically
switch to AV mode. If both sockets are employed at the same time,
SCART 1 becomes
the preferential.
SCART 2 inputs or outputs for external devices.
Connect the SCART cable between SCART sockets on TV and SCART socket on your
external device (such as a decoder, a VCR or a DVD player).
Component Video Inputs (YpBPr) are used for connecting component video.
You can connect the component video and audio sockets with a device that has component
output. Connect the component video cables between the
COMPONENT VIDEO INPUTS on
on the TV and the component video outputs of your device. While connecting, be sure that the
letters on your TV, “Y”, “Pb”, “Pr” correspond with your device’s connectors.
Component Audio Inputs are used for connecting component audio. Connect the audio
cable between
COMPONENT AUDIO INPUTS on the TV and audio outputs of your device.
PC Audio In is used for listening the PC sound from the TV..
Use a PC audio cable to connect between PC Audio In socket of the TV and Audio Out jack
on your computer. See also “PC Auido In” explained in the Feature Menu section.
ENG-22784W-MB30-1055UK-1HDMI-YPBPR-SPDIF-LOUT-CVBS-W O PC-WO SVHS-50130255.p6502.07.2008, 17:0010
Page 12
English - 11 -
Power Connection
IMPORTANT: The TV set is designed to operate on 220-240V AC, 50 Hz.
• After unpacking, allow the TV set to reach the ambient room temperature before you
connect the set to the mains.
• Plug the power cable to the mains socket outlet.
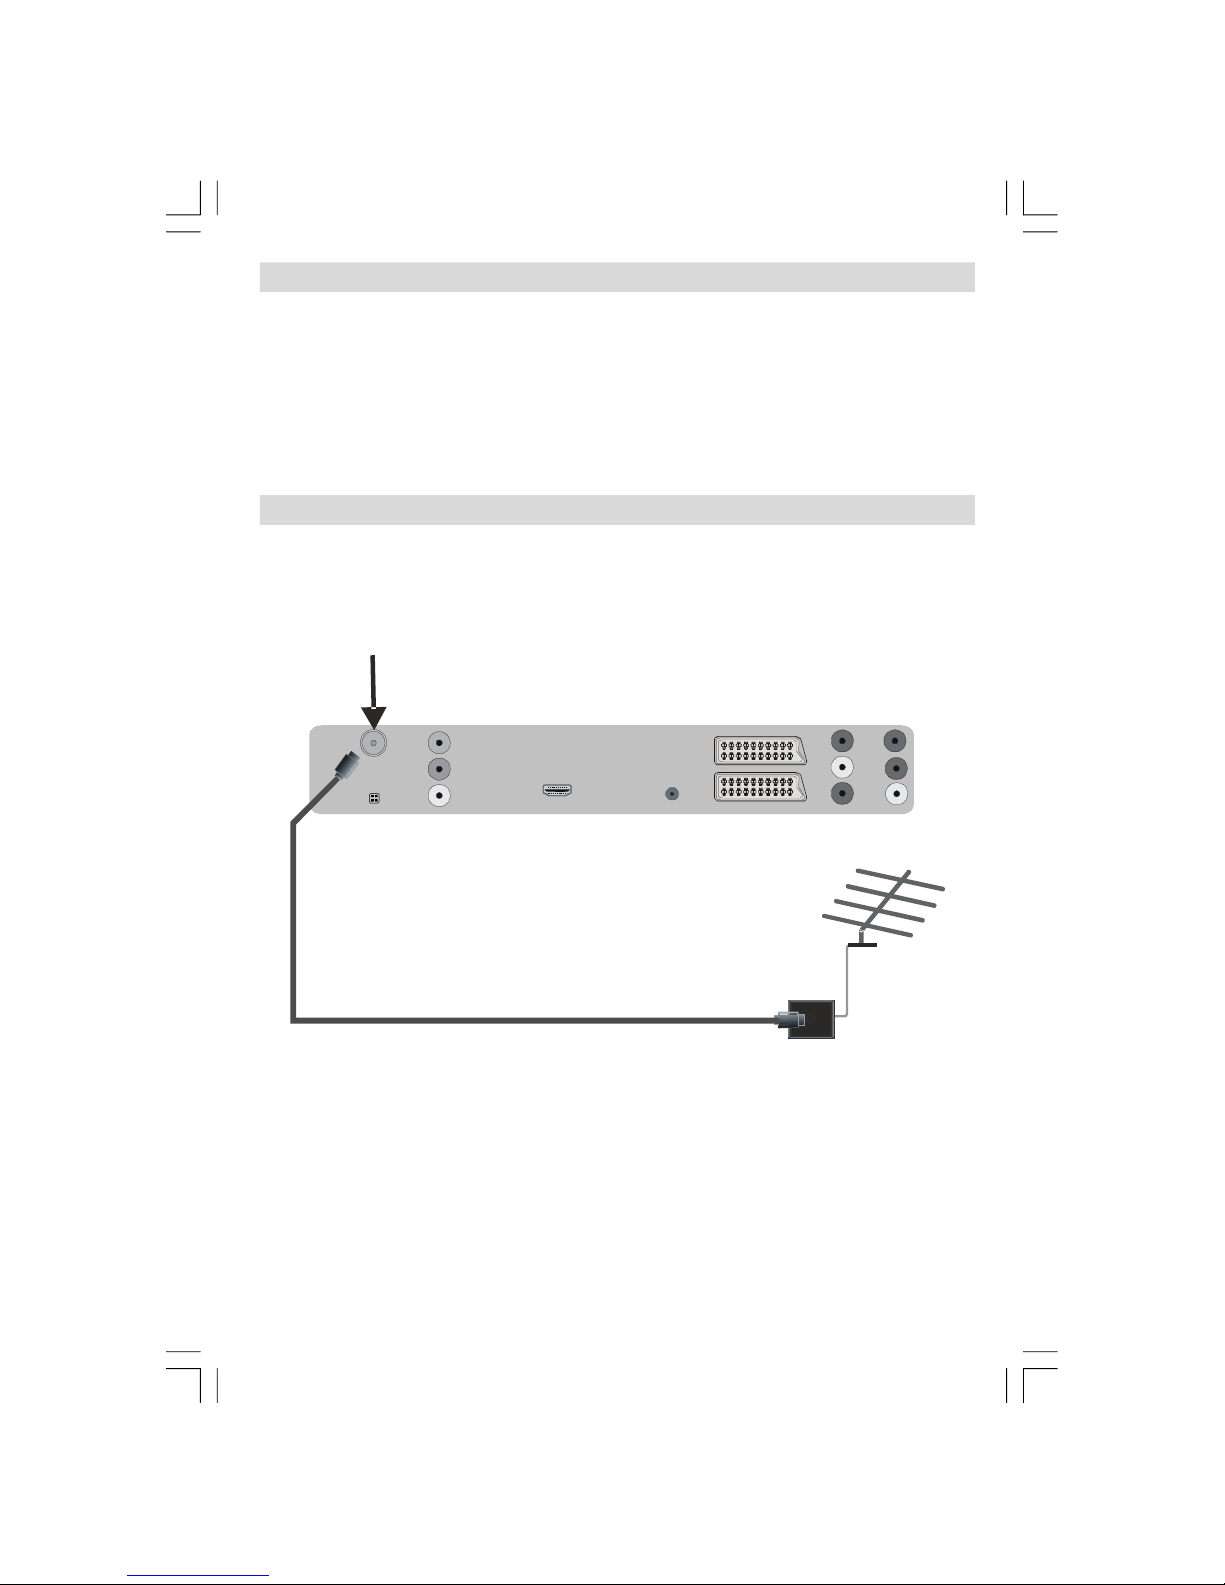
Aerial Connection
• Connect the aerial or cable TV plug to the AERIAL INPUT socket located at the rear of the TV.
Aerial Input
REAR VIEW
ENG-22784W-MB30-1055UK-1HDMI-YPBPR-SPDIF-LOUT-CVBS-W O PC-WO SVHS-50130255.p6502.07.2008, 17:0011
Page 13
English - 12 -
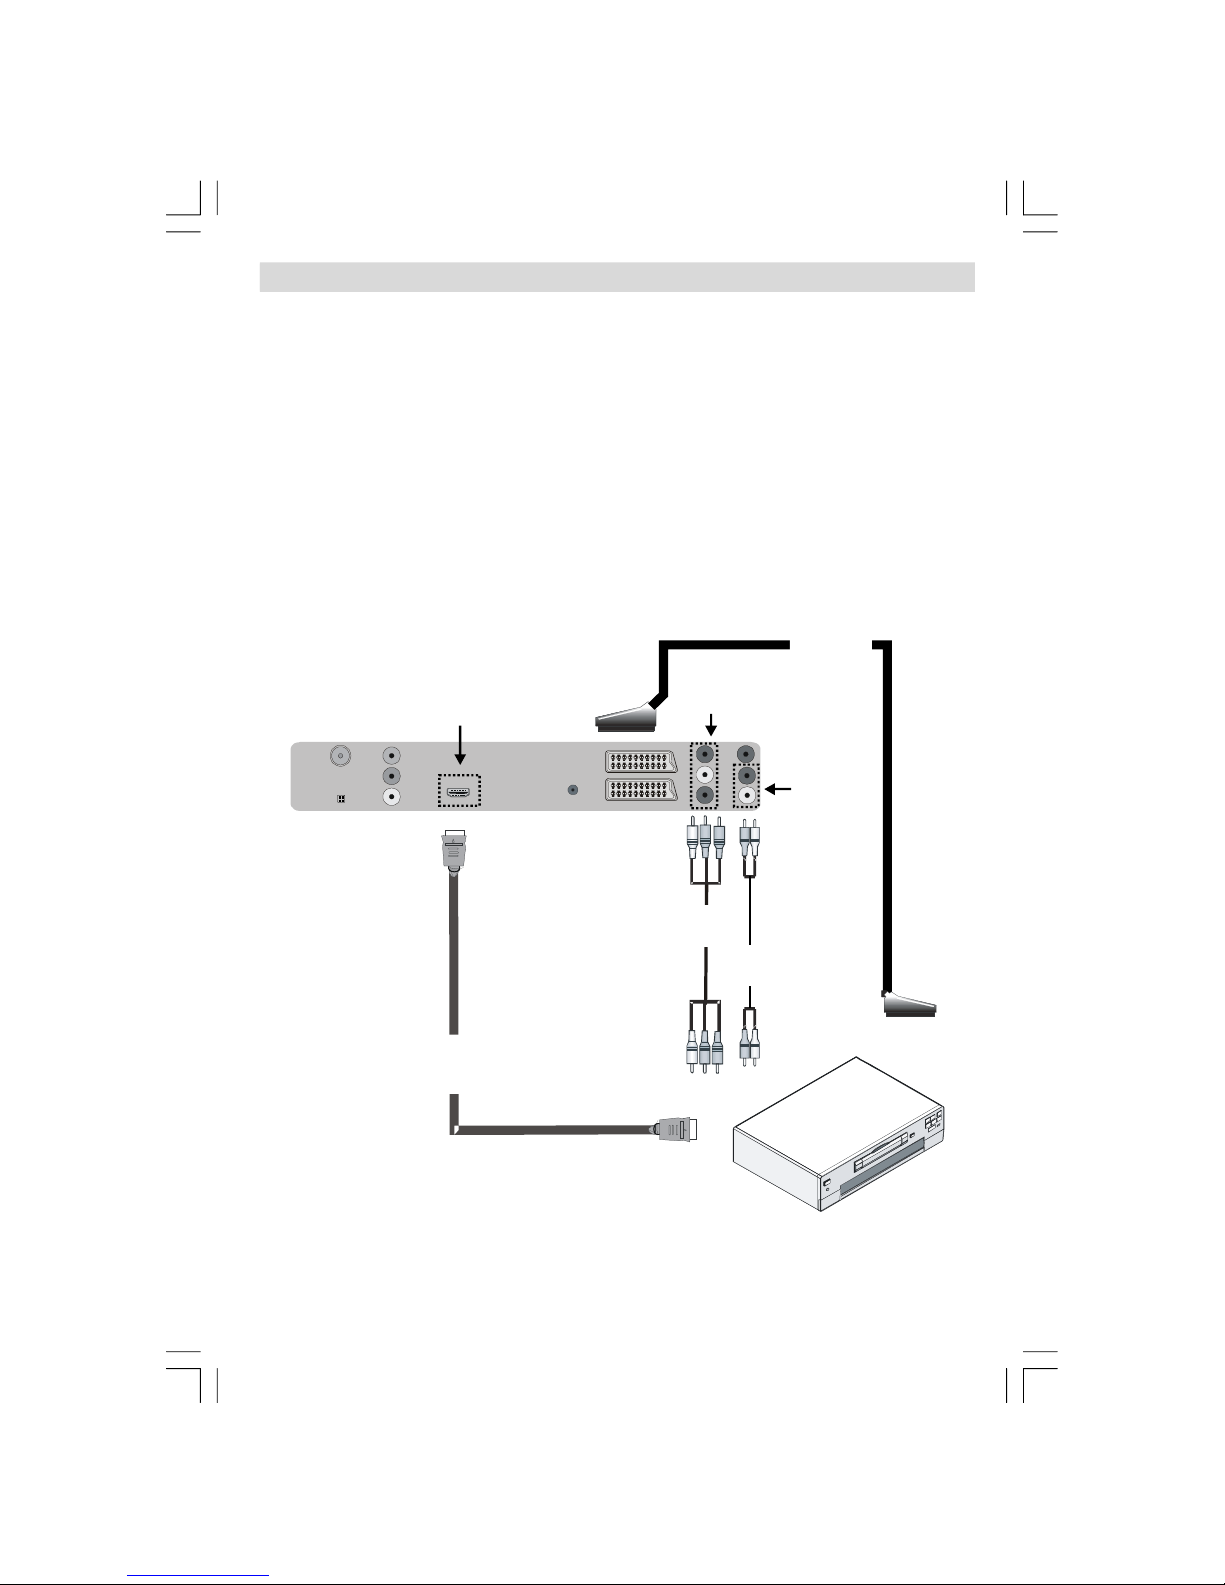
Connecting to a DVD Player
If you want to connect a DVD player to your LCD TV, you can use connectors of the TV set. DVD
players may have different connectors. Please refer to your DVD player’s instruction book for
additional information. Power off both the TV and the device before making any connections.
Note: Cables shown in the illustration are not supplied.
• If your DVD player has an HDMI socket, you can connect via HDMI. When you connect to DVD
player as illustrated below, switch to HDMI source. See, “
Input selection” section.
• Most DVD players are connected through
COMPONENT SOCKETS. Use a component video
cable to connect video input. For enabling audio, use a component audio cable as illustrated
below. When the connection is made, switch to YPbPr source. See, “Input selection” section.
• You may also connect through the
SCART 1 or SCART 2. Use a SCART cable as shown
below.
Component
video
inputs
Component
audio
inputs
Component
video
cable
HDMI
cable
HDMI
input
Component
audio
cable
SCART
cable
REAR VIEW
Note: These three methods of connection perform the same function but in different levels of
quality. It is not necessary to connect by all three methods.
ENG-22784W-MB30-1055UK-1HDMI-YPBPR-SPDIF-LOUT-CVBS-W O PC-WO SVHS-50130255.p6502.07.2008, 17:0012
Page 14
English - 13 -
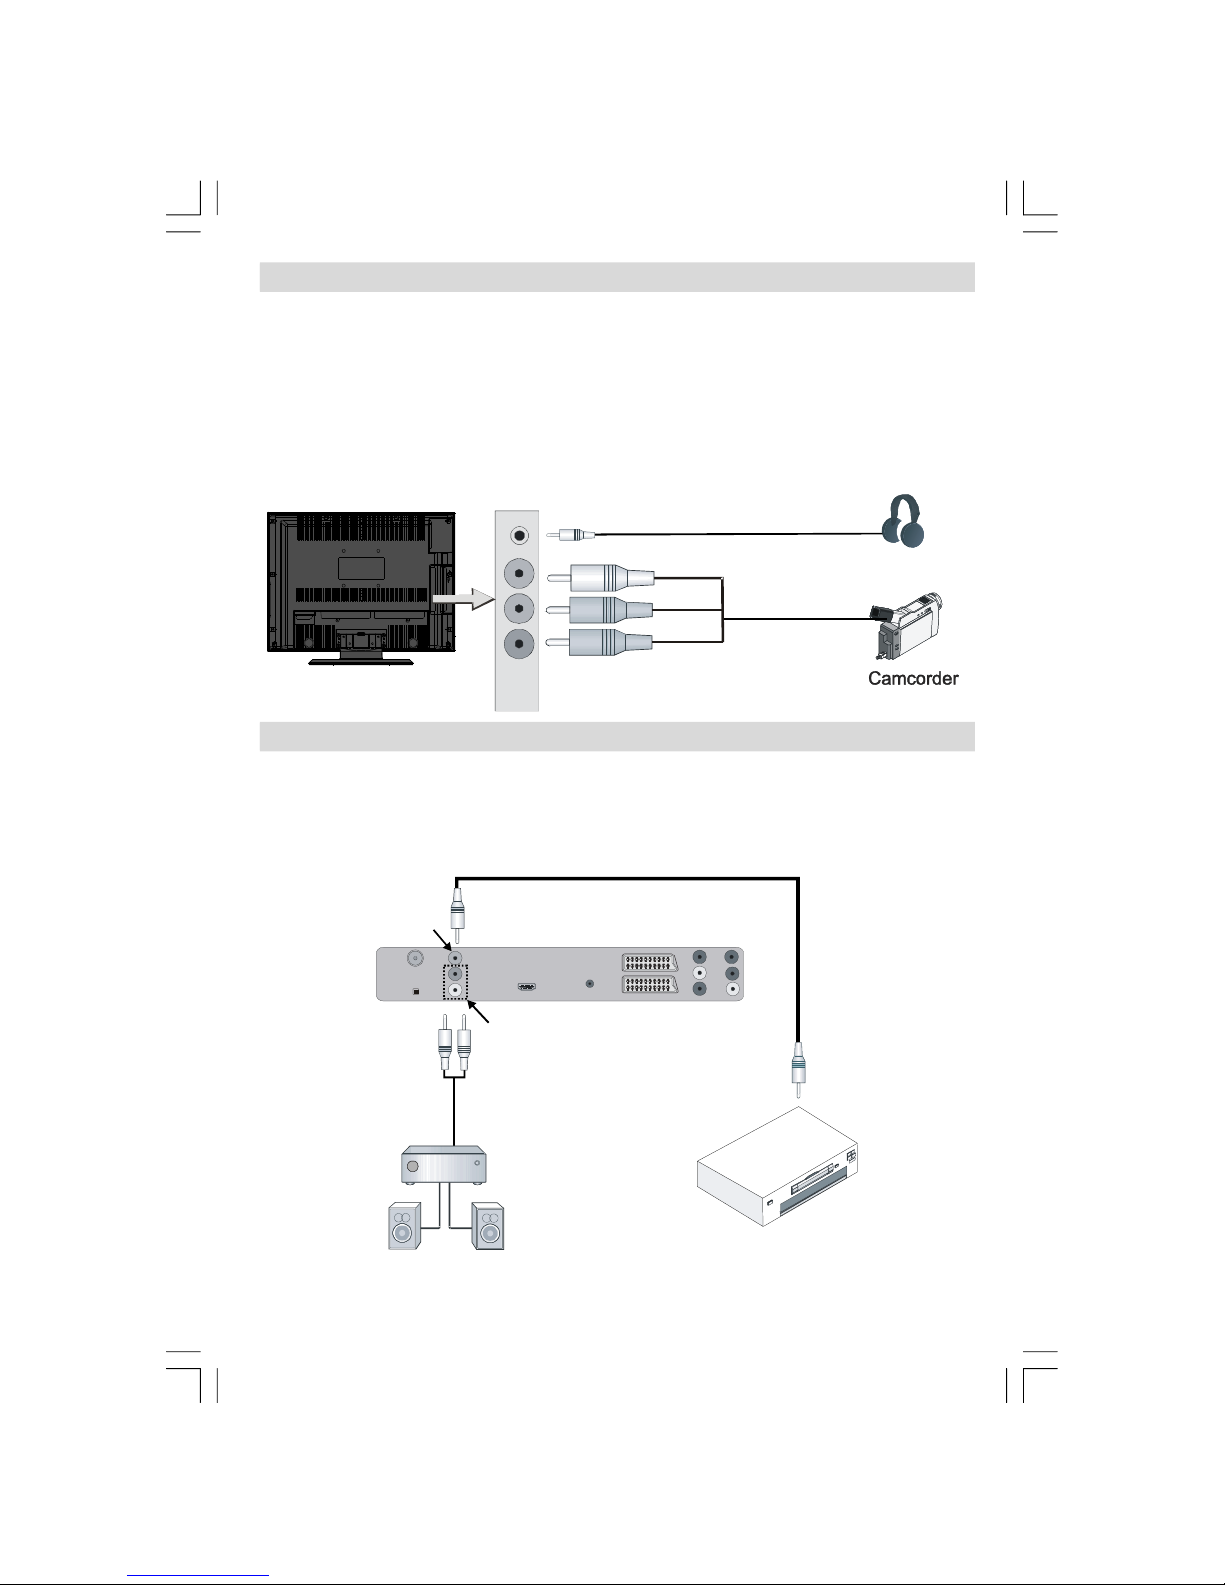
Using Side Connectors
You can connect a range of optional equipment to your LCD TV. Possible connections are
shown below.
Note that cables shown in the illustration are not supplied.
•
For connecting a camcorder, connect to the VIDEO IN socket and the AUDIO SOCKETS. Do
not connect the camcoder to
VIDEO IN socket at the same time since it can cause noise in
the picture. For selecting the related source, see the section “
Input selection” in the following
parts..
• To listen the sound from headphones, connect to the HEADPHONE jack of theTV.
Headphones
Using Other Connectors
• For connecting a VIDEO, connect to the CVBS OUT.
• To connect external speakers, use an audio cable. Do not reverse the
AUDIO LEFT and
AUDIO RIGHT jacks. Turn on the LCD TV and external speaker set after all connections are
made. Refer to your speaker set’s manual for further queries.
External speakers
Audio
Line Out
CVBS Out
VÍDEO
Amplifier
ENG-22784W-MB30-1055UK-1HDMI-YPBPR-SPDIF-LOUT-CVBS-W O PC-WO SVHS-50130255.p6502.07.2008, 17:0013
Page 15
English - 14 -
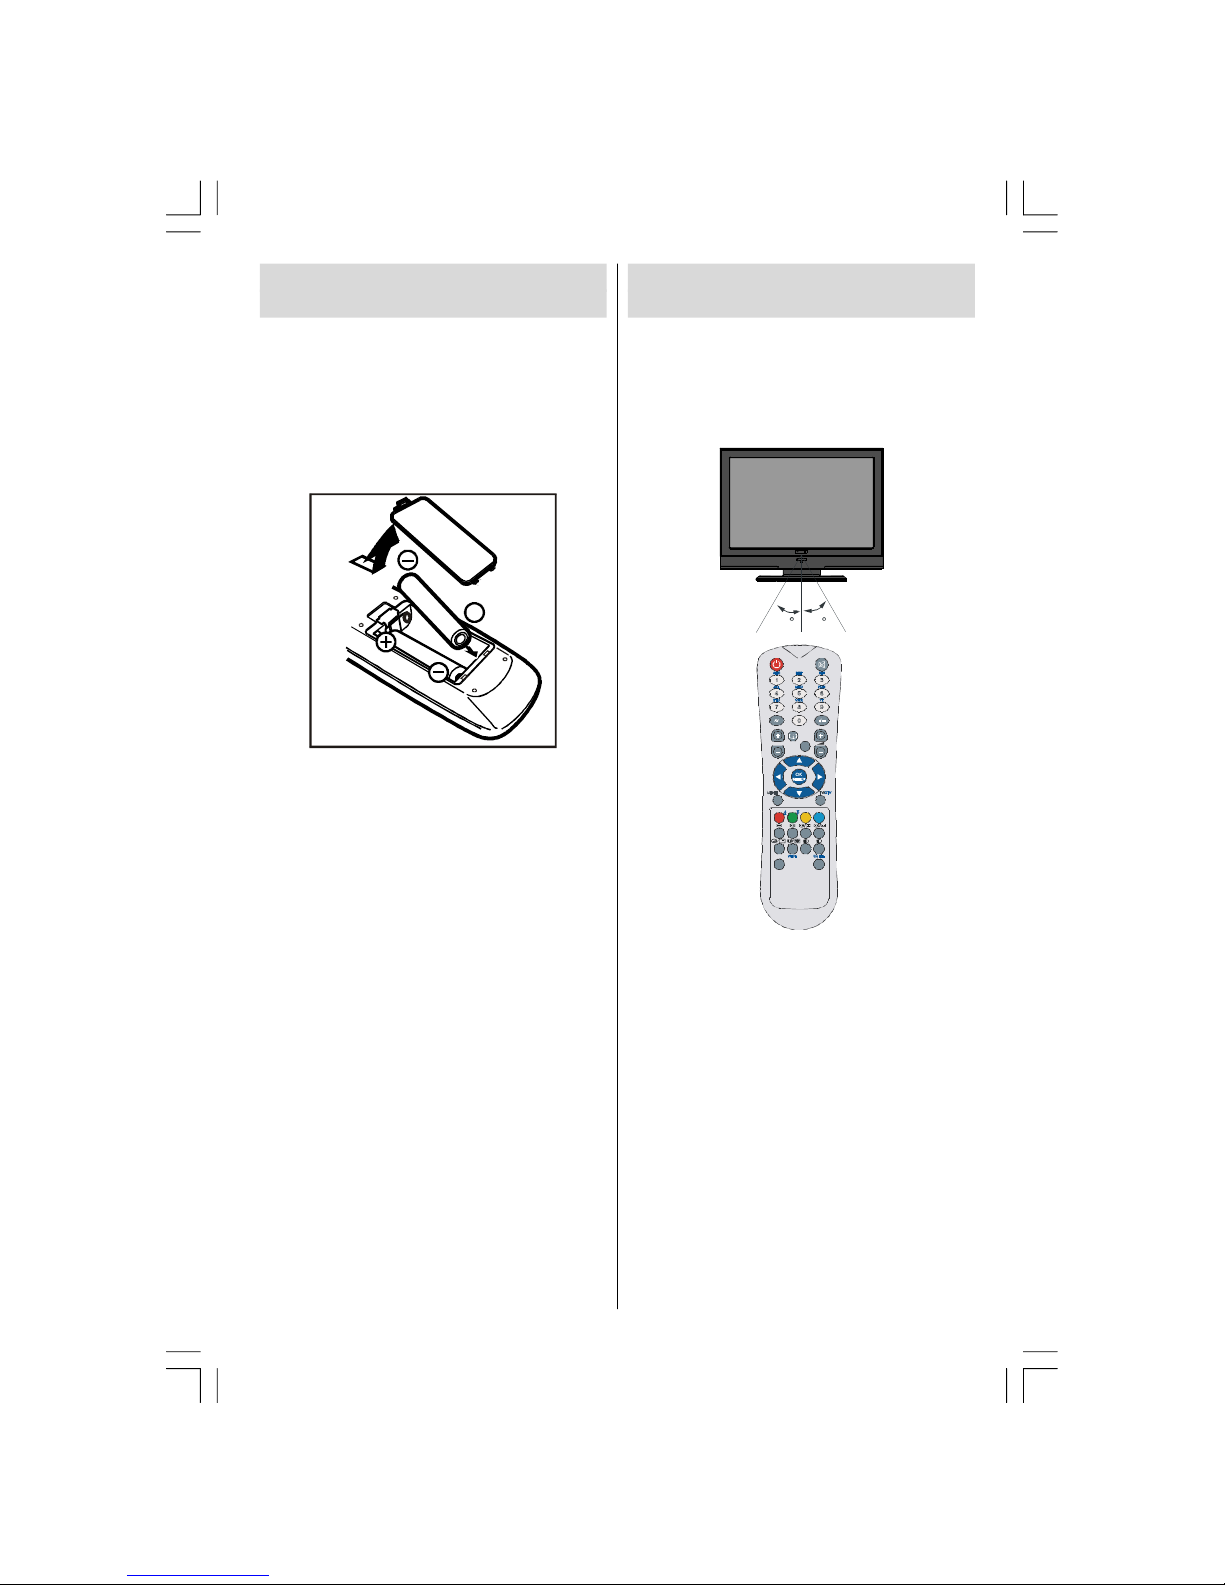
Inserting Batteries in the
Remote Control Handset
• Remove the battery cover located on the back
of the handset by gently pulling backwards
from the indicated part.
• Insert two AAA/R3 or equivalent type batteries
in si de. Place the b at teries in the r ight
directions and replace the battery cover.
Note: Remove the battery from remote control
handset when it is not to be used for a
lo ng p er io d. Oth er wi se , it c an be
damaged due to an y le ak age of
batte ries.
Operating Range for the
Remote Control
• Point the top of the remote control toward
the LCD TV's remote sensor LED while
pressing a button.
30
30
ABC
DEF
GHI
JKL
MNO
PQR
STU
VWX
YZ
1 2
3
4
5
6
7 8
9
0
AV
SOURCE
P/CH
P<P/SWAP
PP
I-II
INFO
EXIT
-/--
MENU
TV/DTV
OK
WIDE
GUIDE
Remote range is approximately 7m/23ft.
ENG-22784W-MB30-1055UK-1HDMI-YPBPR-SPDIF-LOUT-CVBS-W O PC-WO SVHS-50130255.p6502.07.2008, 17:0014
Page 16
English - 15 -
Switching the TV On/Off
To Switch the TV On
• Connect the power cord to the 220-240V AC,
50 Hz.
• Press STANDBY button. Then the standby
LED lights up.
• To switch on the TV from standby mode either:
• Press the
button, P+ / P- or a numeric
button on the remote control.
• Press the
-P/CH or P/CH+ button on the TV.
The TV will then switch on.
No te: If you sw it ch o n yo ur TV v ia
PROGRAMME UP/DOWN buttons on the
remo te control or on the TV set, the
programme that you were watching last
will be reselected.
By either method the TV will switch on. When
the TV is operate d for the first time , the
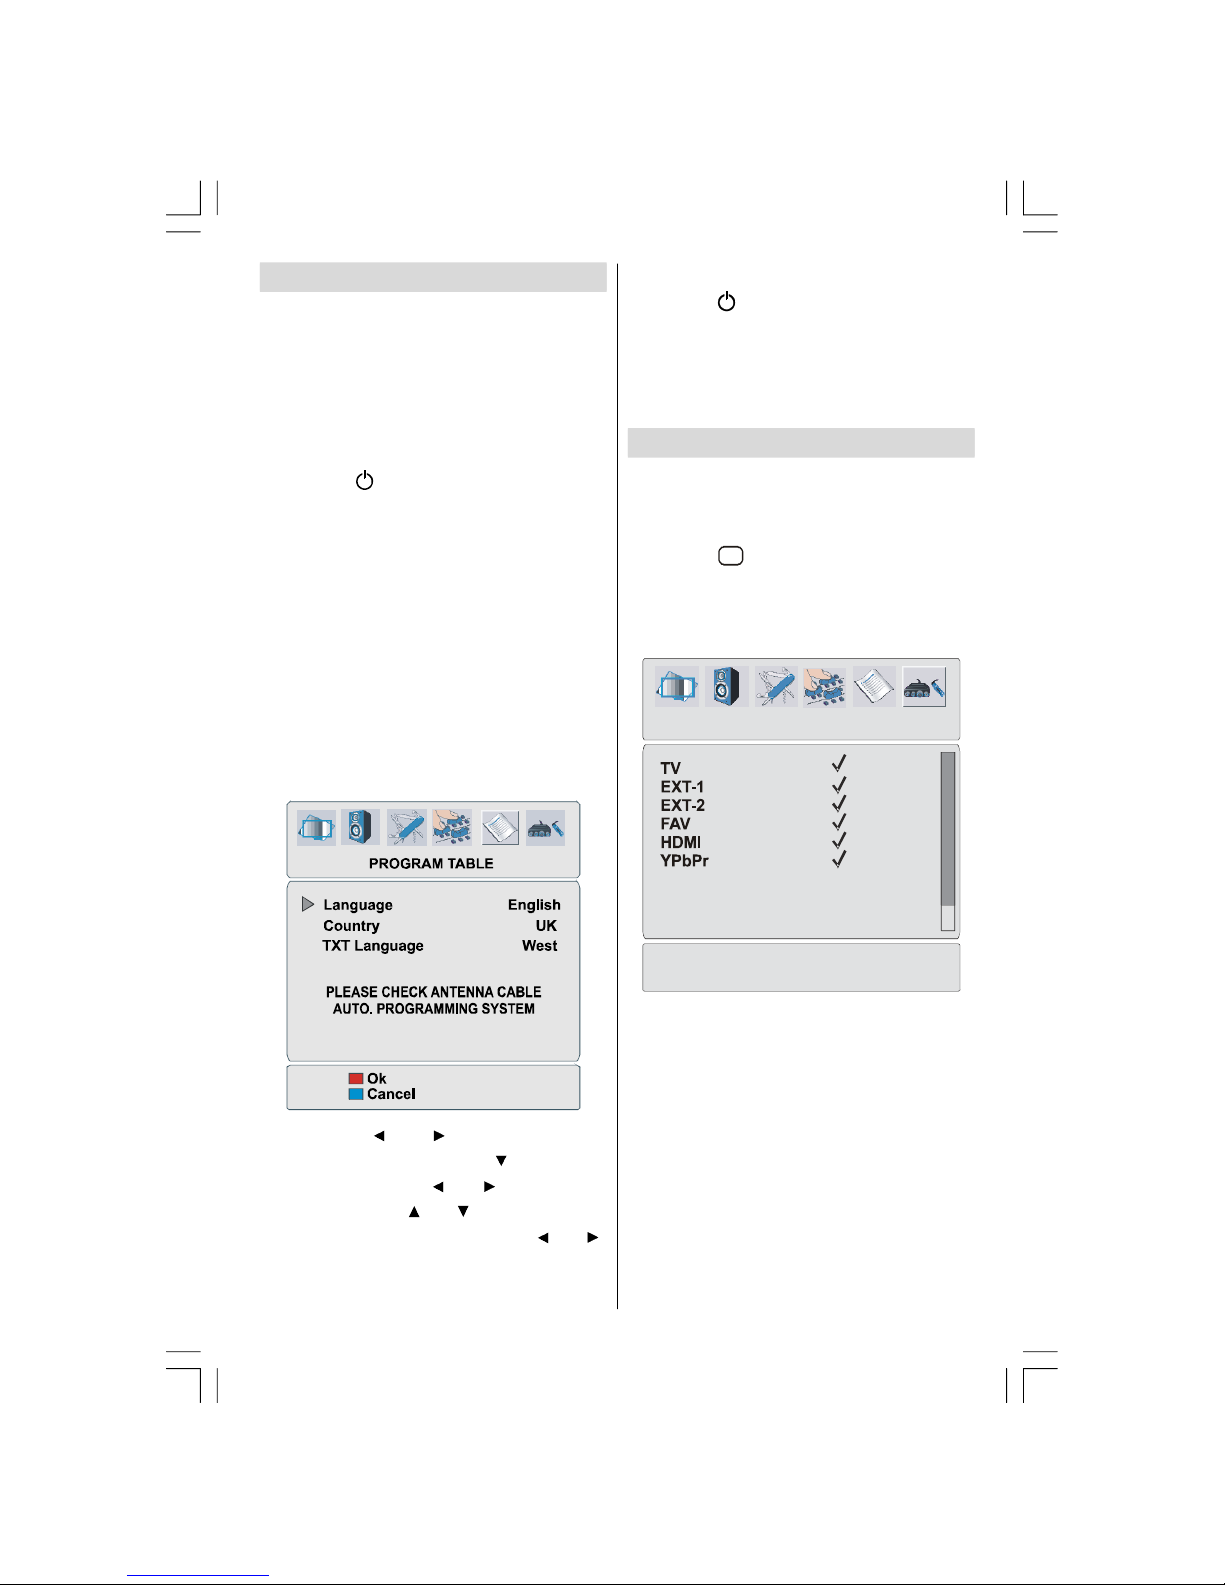
following screen appears:
By pressing “ ” or “ ” button, adjust the
“Language” item and press “ ” to highlight
“Country” item. Use “ ” or “ ” button to set
“Language”. Use “ ” or “ ” buttons to select
“TXT Language” and set it by using ” or “ ”
bu tt ons. Pr es s “
OK” or “RED” button to
continue.
To Switch the TV Off
• Press the button on the remote control or
STANDBY button on the TV, so the TV will
switch to standby mode.
• To power down the TV completely, unplug
the power cord from the mains socket.
Input Selection
Once you have connected external systems
to your TV, you can switch to different input
sources.
• Press the
AV
button on your remote control
until the desired source is highlighted. The
TV will then switch to the selected source
after a short while.
SOURCE : TV
ENG-22784W-MB30-1055UK-1HDMI-YPBPR-SPDIF-LOUT-CVBS-W O PC-WO SVHS-50130255.p6502.07.2008, 17:0015
Page 17
English - 16 -
Navigating the Menu System
MENU TV/DTV
OK
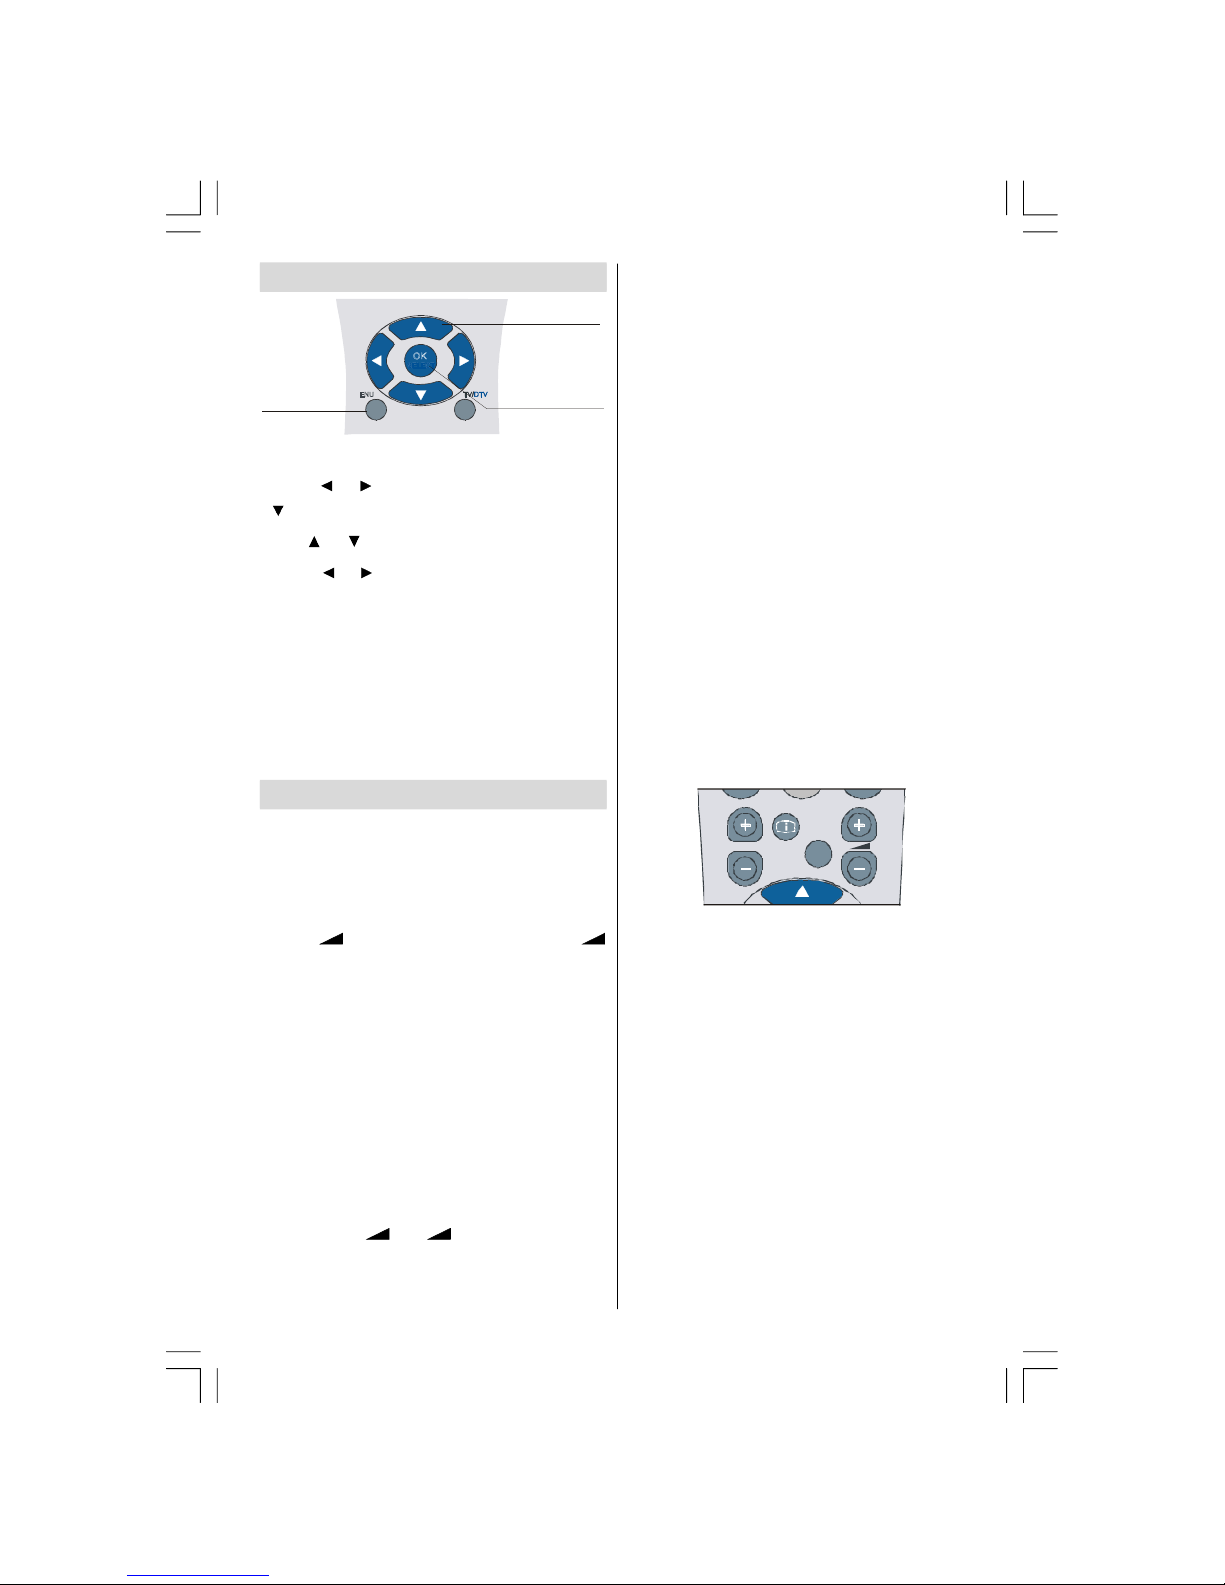
For Displaying
Menu Options
For Navigation
To Confirm Choices
• Press MENU to display the main menu.
• Press or button to select an icon. Press
or OK button for more options.
• Use or button to highlight.
• Press or buttons to change the settings.
• To exit the menu or return from sub-menu
screen, press
MENU.
Note: These expla nations are valid for the
navigation of the whole menu system.
To select options that are explained in
the following parts, refer to “Navigating
the Menu System”.
Basic Operations
You can operate your TV using both the
remote control and onset buttons.
Operation with the Buttons on the TV
Volume Setting
• Press - button to decrease volume or
+ button to increase volume, so a volume level
scale (slider) will be displayed on the screen.
Programme Selection
• Press P/CH + button to select the next
programme or
P/CH - button to select the
previous programme.
Viewing the Main Menu
• Press the MENU button to enter main menu.
In the main menu select sub-menu using
P/
CH -
or P/CH + buttons and enter the sub-
menu using
- or + buttons . To learn
the usage of the menus, refer to the menu
system sections.
AV Mode
• Press the TV/AV button at the control panel
on the the TV to switch your TV to AV modes.
Operation with the Remote Control
• The remote control of your TV is designed to
control all the functions of the mod el you
selected. The functions will be described in
accordance with the menu system of your TV.
• Functions of the menu system are described
in the following sections.
Volume Setting
Press V + button to increase the volume.
Press
V - button to decrease the volume. A
volume level scale (slider) will be displayed
on the screen.
Programme Selection (Previous or
Next Programme)
• Press P - button to select the previous programme.
• Press
P + button to select the next programme.
SOURCE
P/CH
I-II
INFO
EXIT
Programme Selection (Direct Access)
•Press numeric buttons on the remote control
to select programmes between 0 and 9. The
TV will switch to the selected programme.
To sel ec t pr ogrammes be tw een 10-99,
press the numeric buttons consec utively
(e.g. for programme 27, first press 2 and then
7). W hen the pressing time is due for the
second numeric button, only the first digit
programme will be displayed. The limit of
the delay time is 3 seconds.
• Press directly the programme number to
reselect single digit programmes.
ENG-22784W-MB30-1055UK-1HDMI-YPBPR-SPDIF-LOUT-CVBS-W O PC-WO SVHS-50130255.p6502.07.2008, 17:0016
Page 18
English - 17 -
Menu System
Picture Menu
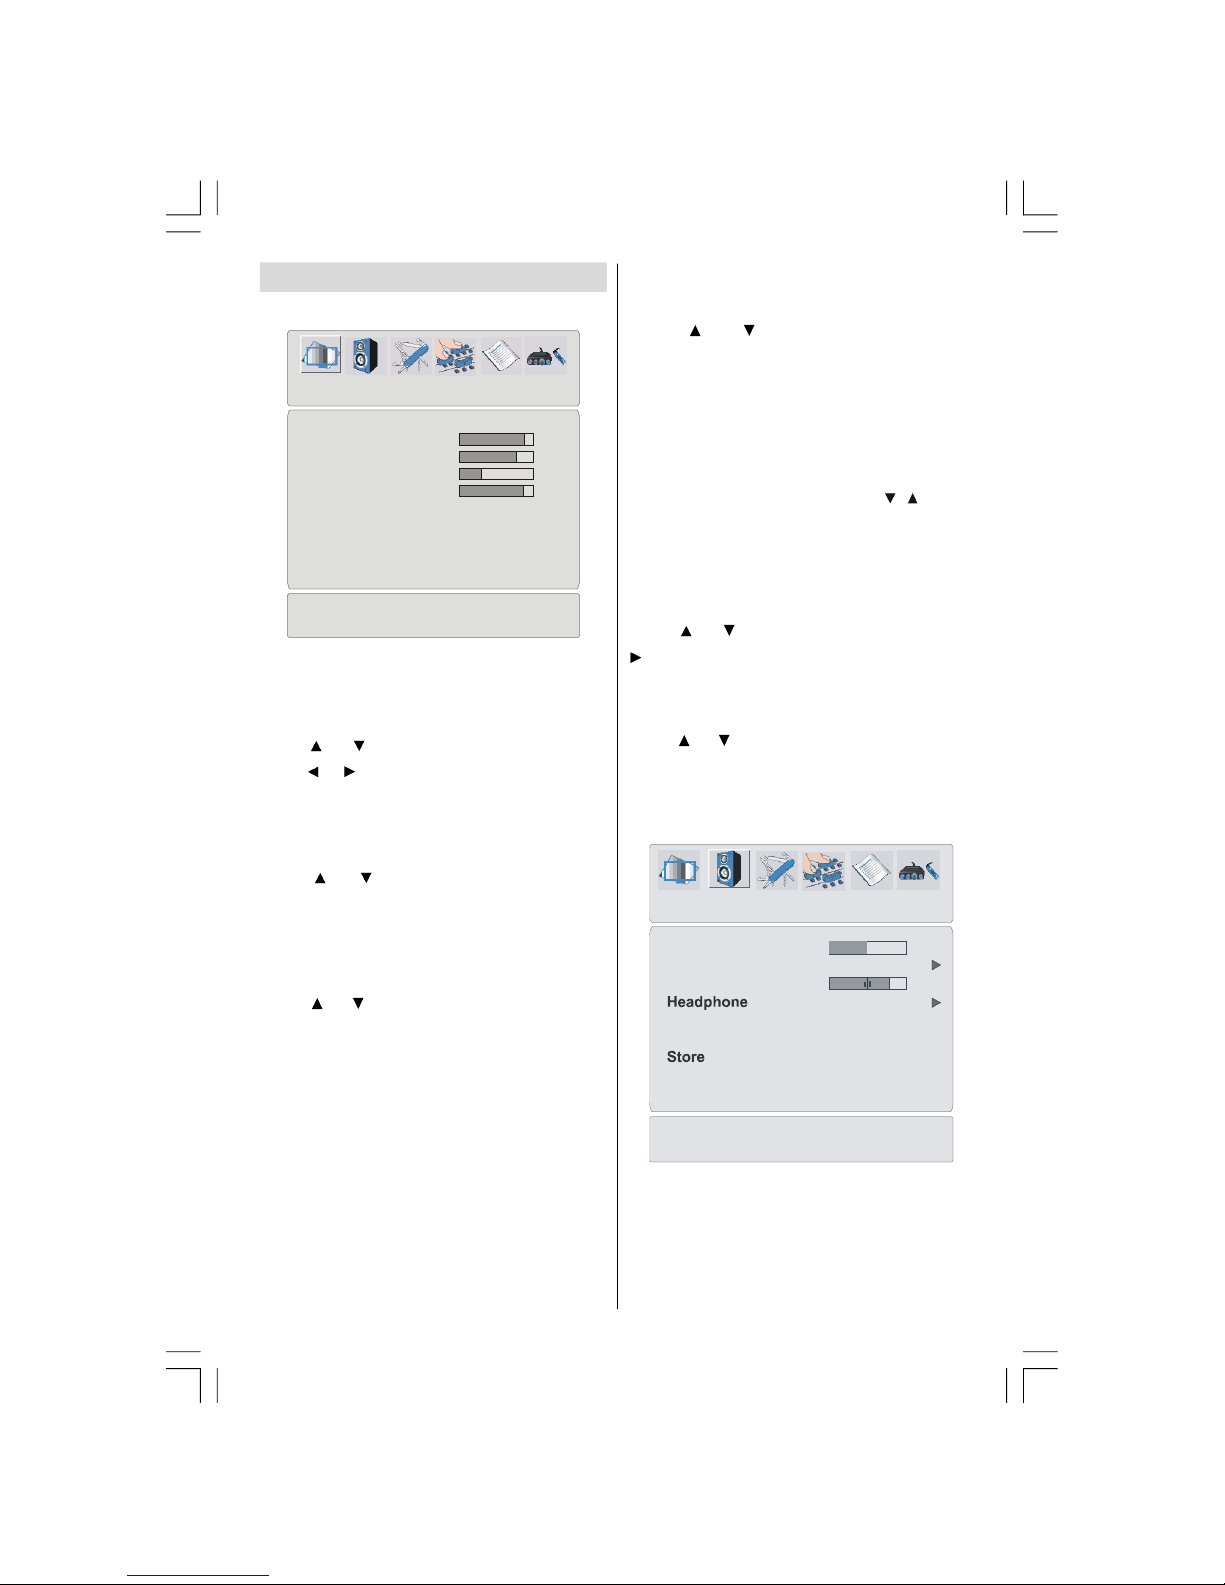
PICTURE
Mode Cinema
Contrast 59
Brightness 37
Sharpness 7
Colour 45
Colour Temp. Normal
Noise Reduction Off
Picture Zoom Panoramic
Store
Reset
Mode
For your viewing requirements, you can set
the related
mode option.
Press
or button to select Picture Mode.
Press
or button to choose from one of these
options:
Cinema, User, Dynamic and Natural.
Contrast/Brightness/Sharpness/
Colour/Tint
Press or button to select the desired
option. Press
/ button to set the level.
Hint: Tint (Hue) is displayed in picture menu when
the TV receives an NTSC signal.
Colour Temp
Press or button to select Colour Temp.
Press
/ to choose from one of these
options:
Cool, Normal and Warm.
Note:
• Setting
Cool option gives white colours a
slight blue stress.
• Setting Warm option gives white colours a
slight red stress.
• For normal colours, select
Normal option.
Noise Reduction
If the broadcast signal is weak and the picture
is noisy, use
Noise Reduction setting to
reduce the noise amount.
Press
or butto n t o s el ec t Noise
Reduction
. Press / to choose from one of
these options:
Low, Medium, High or Off.
Picture Zoom
Picture Zoom setting enables you to select
the aspect ratio of the broadcast.
Select Picture Zoom by pressing / button.
Use
/ buttons to change Picture Zoom to
Auto, 16:9, 4:3, Panoramic, 14:9, Cinema,
Subtitle
or Zoom.
Store
Press or button to select Store. Press
or OK bu tton t o s tore the se tting s.
“
Stored...” will be displayed on the screen.
Reset
Press or button to select Reset. Press
/
or OK button to reset the picture modes to
factory default settings.
Sound Menu
Volume 15
Equalizer
Balance 0
Sound Mode Mono
AVL On
SOUND
Volume
When you enter the sound menu, Volume will
be the first selected option. Press
/ button
to change the level of the Volume.
ENG-22784W-MB30-1055UK-1HDMI-YPBPR-SPDIF-LOUT-CVBS-W O PC-WO SVHS-50130255.p6502.07.2008, 17:0017
Page 19
English - 18 -
Equalizer
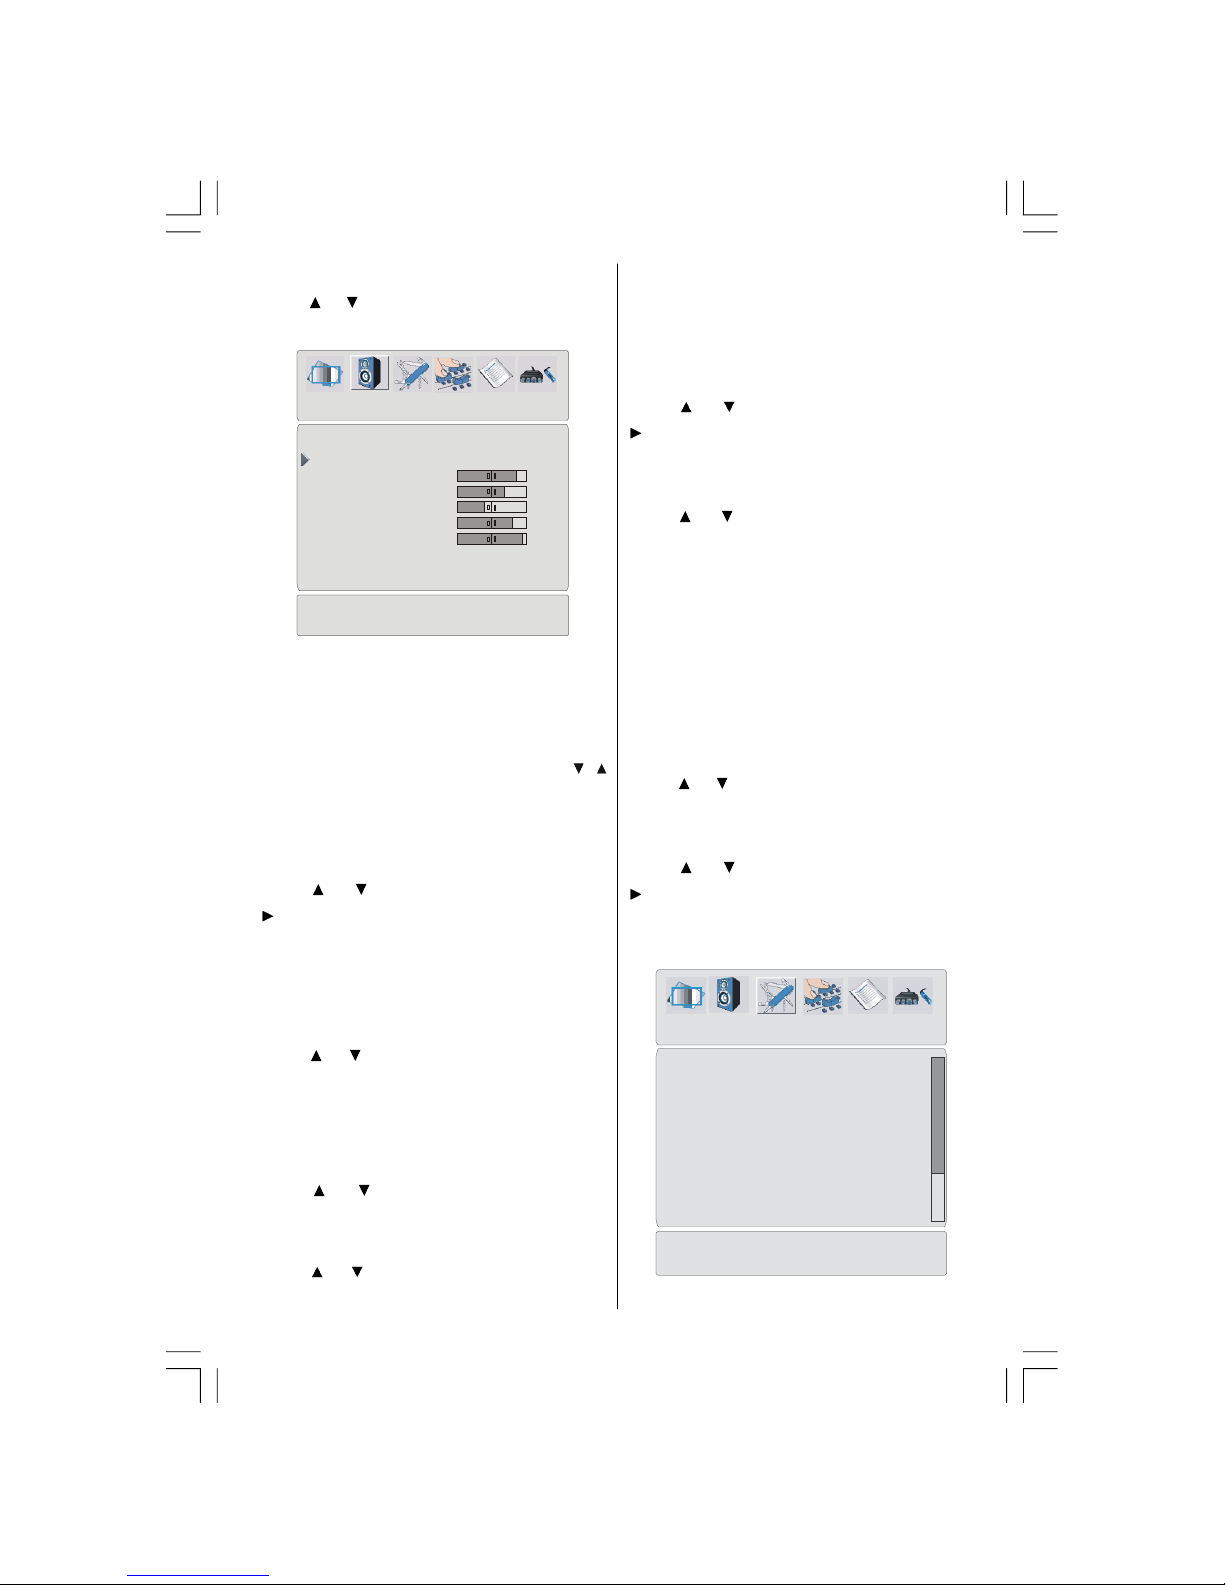
Press or button to select Equalizer. Press
button to view Equalizer submenu:
SOUND
Preset Music
120 Hz 8
500 Hz 4
1.5 KHz -4
5 KHz 6
10 KHz 10
Equalizer
Store
Press / button to change the preset. In
equalizer menu, the preset can be changed
to Music, Movie, Speech, Flat, Classic and
User.
Select the desired frequency by pressing /
button and increase or decrease the frequency
gain by pressing
/ button.
Note: Equalizer menu settings can be changed only
when the mode is in User.
Press or button to select Store. Press
or OK bu tton t o s to re the se tting s.
“
Stored...” will be displayed on the screen.
Balance
This setting is used for emphasizing the left
or right speaker balance.
Press
or button to select Balance. Press
/ button to change the level of the balance.
Balance level can be adjusted between
-32
and + 32.
Headphone
Press or button to select Headphone.
Press
button to view the headphone menu.
Volume
Press or button to select Volume. Press
button to increase headphone volume level.
Pr es s
but ton to dec rease headphone
volume level. Headphone volume level can
be adjusted between 0 and 63.
Store
Press or button to select Store. Press
or OK bu tton t o s tore the se tting s.
“
Stored...” will be displayed on the screen.
Sound Mode
Press or button to select Sound Mode.
Using
/ button, you can select Mono,
Stereo, Dual I or Dual II mode, only if the
selected channel supports that mode.
AVL
Automatic Volume Limiting (AVL) function adjusts
the sound to obtain fixed output level between
progra mmes (For instance, volume level of
advertisement s tends to be lo uder th an
programmes).
Press
or button to select AVLVL. Press /
button to set the AVL as On or Off.
Store
Press or button to select Store. Press
or OK bu tton t o s tore the se tting s.
“
Stored...” will be displayed on the screen.
Feature Menu
FEATURE
Sleep Timer Off
Child Lock Off
Language English
TXT Language West
Default Zoom 16:9
Blue Background On
Menu Background Opaque
Backlight Medium
Menu Timeout 15 sec
Ext-2/SPDIF Out EXT-1
ENG-22784W-MB30-1055UK-1HDMI-YPBPR-SPDIF-LOUT-CVBS-W O PC-WO SVHS-50130255.p6502.07.2008, 17:0018
Page 20

English - 19 -
Sleep Timer
Press or button to select Sleep Timer.
Use
/ button to set the Sleep Timer.
The timer can be programmed between
Off
and 120 minutes in steps of 10 minutes.
If
Sleep Timer is activated, at the end of the
selected time, the TV goes automatically to
standby mode.
Child Lock
Press or button to select Child Lock.
Use
/ button to set the Child Lock On or
Off. When On is selected, the TV can only be
controlled by the remote control handset. In
this case the control panel buttons (except for
the
STANDBY button) will not work.
Hence, if one of those buttons is pressed,
“Child Lock On” will be displayed on the
screen when the menu screen is not visible.
Language
Press or button to select Language. Use
/ button to select the Language.
Ext-2-SPDIF Out
Use this setting to define Ext-2 and SPDIF
Out
signal output.
Press
or button to select Ext-2/SPDIF Out.
Use
/ button to set Ext-2/SPDIF Out to TV,,
EXT1, FAV, YPbPr Audio, PC Audio
or Screen.
Note: If you select Ext-2/SPDIF Out as
“Screen”, you will get audio output from
SPDIF on the current source setting. In this
case, “SPDIF ON” will be displayed on the
bottom part of the OSD. If Ext-2/SPDIF Out is
set to another option apart from “Screen”,
SPDIF out will be off and the OSD notification
will then be changed as “SPDIF OFF”. In such
a case, you cannot get audio output from
the SPDIF out on the selected source
PC Audio In
This setting controls the PC audio signal.
Press
or button to select PC Audio In.
Use
/ button to set PC Audio In to TV,,
EXT-1, EXT-2, FAV, YPbPr Audio
or PC Audio.
Default Zoom
While zoom mode is set as AUTO, the TV will
set the zoom mode in accordance with the
signal of the broadcast. If there is no W SS or
aspect ratio information, the TV will then use
this setting to adopt.
Press
or button to select Default Zoom.
You can set
Default Zoom to 16:9, 4:3,
Panoramic
or 14:9 by pressing / button.
Blue Background
If the signal is weak or absent, the TV will
automatically change to a blue screen. To
enable this, set
Blue Background to On.
By press ing
or butto n, se lect Blue
Background.
Press / button to set Blue
Background
as On or Off.
Menu Background
Press or b utton to s elect Men u
Background.
You can set menu background
to Opaque or Translucent by pressing
/
button.
Backlight
This setting controls the backlight level. Select
Backlight by pressing
or button. Press
/ but to n to set Ba ck light to Medium ,
Maximum or Minimum.
Menu Timeout
To set a specific display timeout for menu
screens, set a value for this option.
Press or button to select Menu Timeout.
Use
/ button to change menu timeout to
15 sec, 30 sec or 60 sec.
ENG-22784W-MB30-1055UK-1HDMI-YPBPR-SPDIF-LOUT-CVBS-W O PC-WO SVHS-50130255.p6502.07.2008, 17:0019
Page 21
English - 20 -
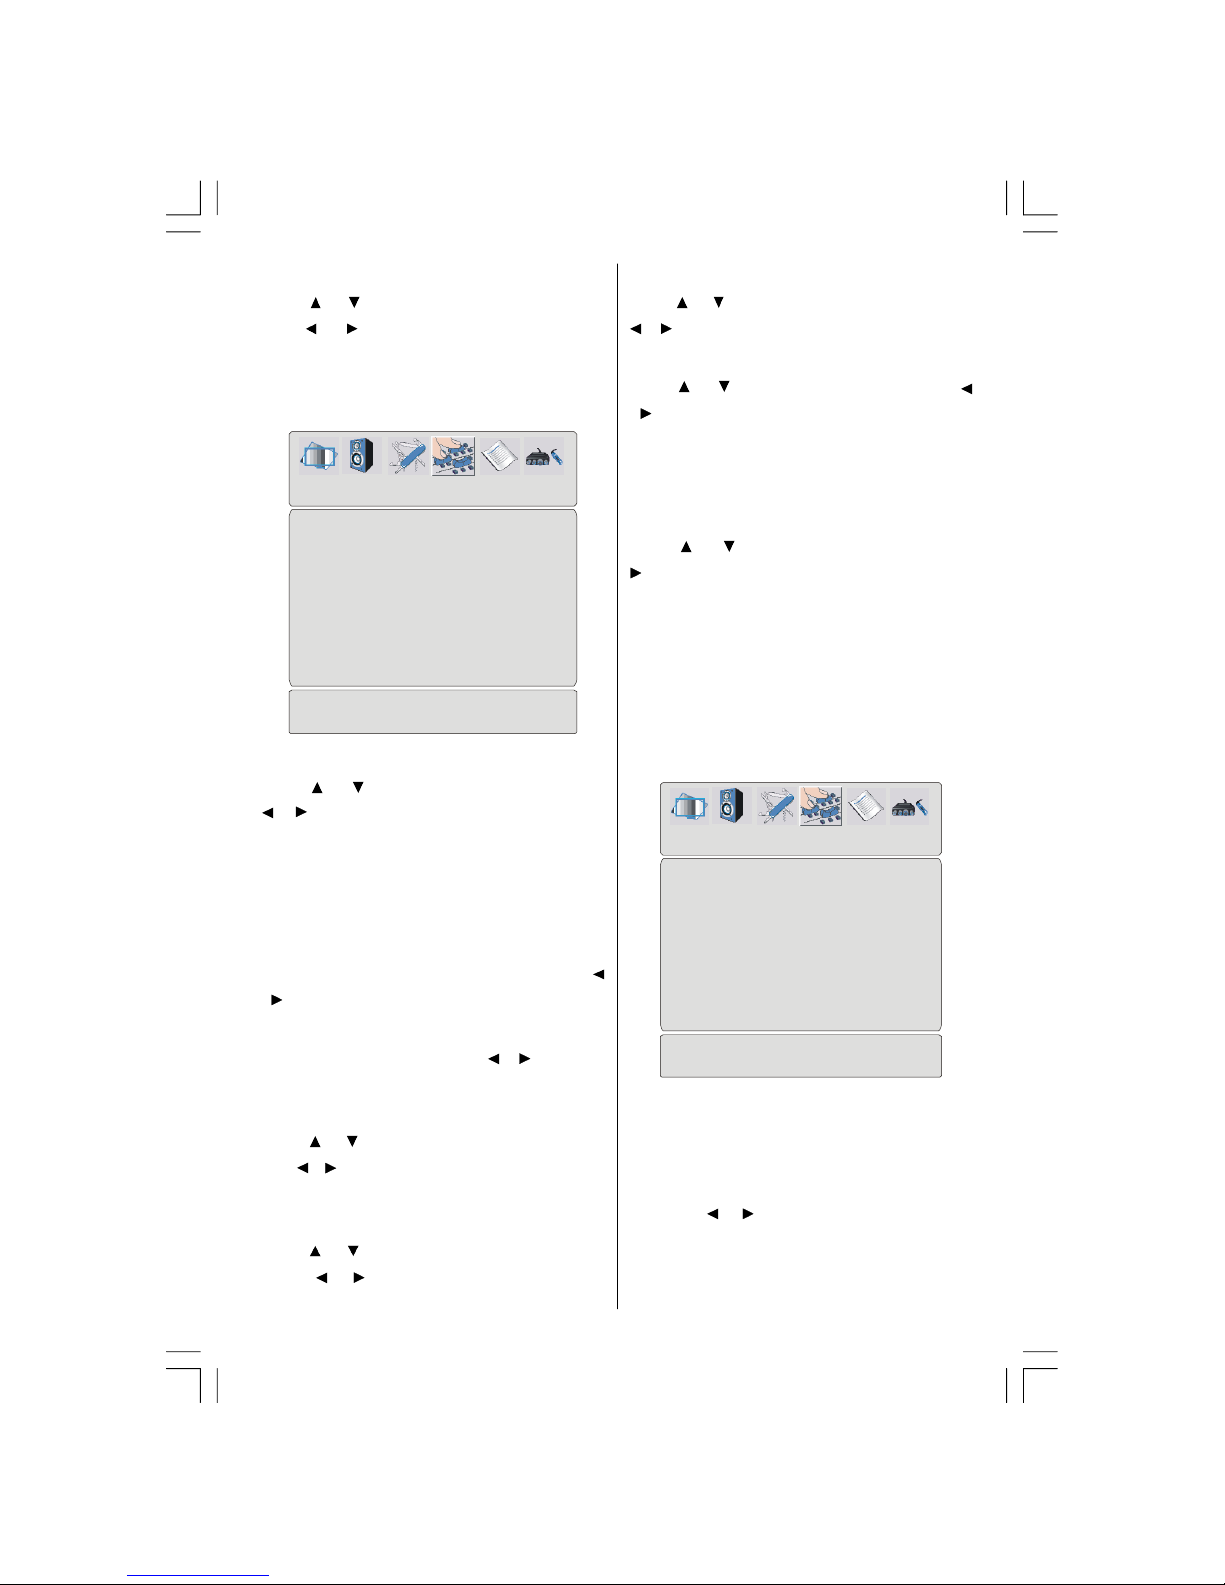
TXT Language
Press or button to select TXT Language.
Us e
/ bu tt on to chang e Te letext
Language
to West, East, Cyrillic, Turk/Gre,
Arabic or Persian.
Install Menu
INSTALL
Program 1
Band C
Channel 5
Colour System Auto
Sound System BG
Fine Tune 0
Search 175.25 MHz
Store
Program
Press or button to select Program. Use
/ button to select the program number..
You can al so ent er a nu mb er using the
numeric buttons on the remote control. There
are 100 programme storage between 0 and
99.
Band
Band can be selected either C or S. Press
/ button to select Band.
Channel
Channel can be changed by / button or
numeric buttons.
Colour System
Press or button to select Colour System.
Use
/ button to change the colour system
to
PAL, PAL 60, SECAM or AUTO.
Sound System
Press or button to select Sound System.
Press
/ button to change the sound
system to
BG,DK, I, L or L’.
Fine Tune
Press or button to select Fine Tune. Press
/ button to adjust the tuning.
Search
Press or button to select Search. Use
/ button to start programme searching. You
can also enter the desired frequency using the
nu me ri c bu tt on s wh il e Searc h i te m i s
highlighted.
Store
Press or button to select Store. Press
or OK bu tton t o s tore the se tting s.
“
Stored...” will be displayed on the screen.
Install Menu in AV Modes
The following screen app ears in the install
menu when the TV is in AV modes. Note that
limited options will be available. Switch to TV
mod e for viewing complete version of the
Install menu.
INSTALL
Colour System Auto
Store
Colour System and Store explanations are
explained in the Feature Menu items.
Program Table
Press M button to view the main menu and
then use
/ button to highlight the fifth
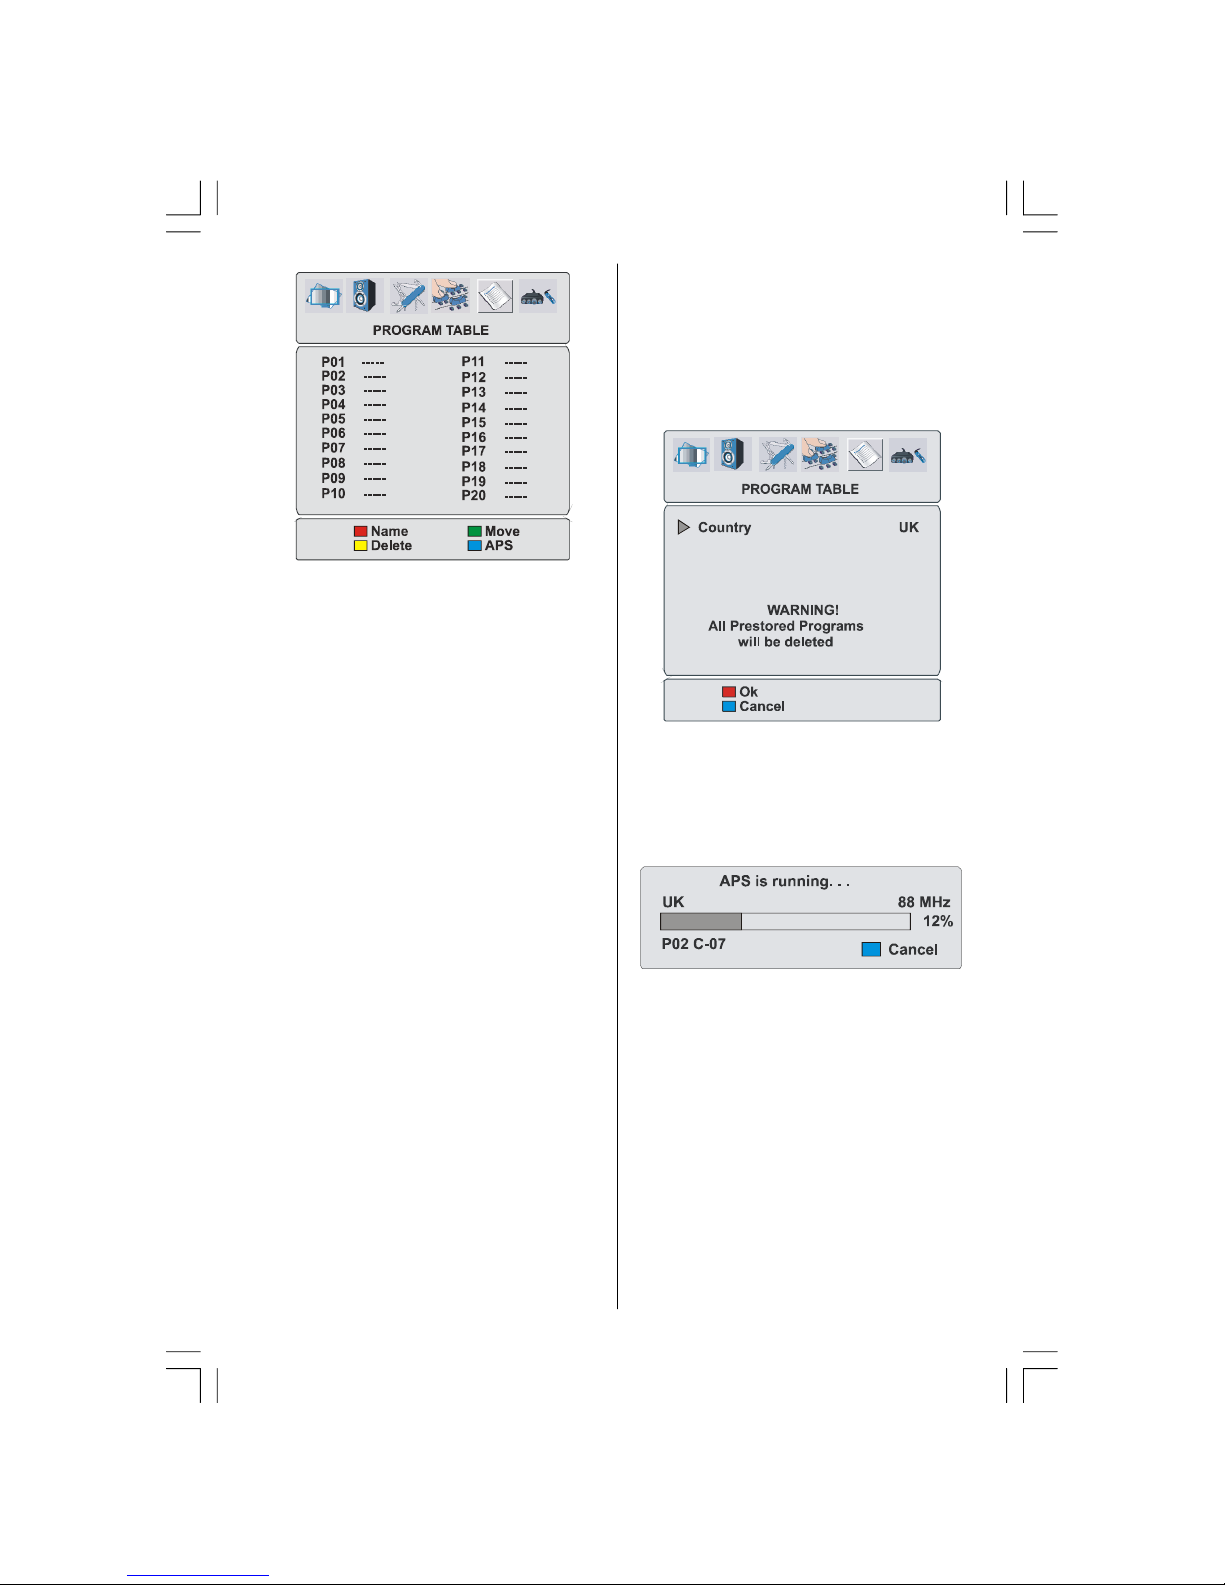
icon. Program Table appears on the screen:
ENG-22784W-MB30-1055UK-1HDMI-YPBPR-SPDIF-LOUT-CVBS-W O PC-WO SVHS-50130255.p6502.07.2008, 17:0020
Page 22
English - 21 -
Program Table lists the channels that are
stored in the memory. By moving the cursor in
four directions, you can reach 20 programmes
in the same page. You can scroll up or scroll
down to see all the programmes while in TV
mode by pressing the navigation buttons. By
cursor action, programme selection is done
automatically.
Name
To change the name of a programme, select
the desired programme and press the
RED
button.
The first letter of the selected name starts to
blink. Press / button to change that letter
and
/ button to select the other letters. By
pressing the
YELLOW button, you can store
the name.
Move
Select the programme that you want to insert
by using the navigation buttons. Press the
GREEN button. Using navigation buttons, move
th e se le cted pr og ra mm e to the de ci de d
programme sp ace and press the GREEN
button again.
Delete
To delete a programme, press the YELLOW
button. Pressing the YELLOW button again
erases the selected programme from the
programme list and the programmes below
shift one line up.
APS (Auto Programming System)
When you press the BLUE button for APS, Auto
Programming System
menu will appear on
the screen:
Set your country by using / button. If you
want to cancel the process, press the
BLUE
button. To continue automatic tuning, press
RED and the following menu will be displayed
on the screen:
After APS is finalized, the programme table
will appear on the screen.
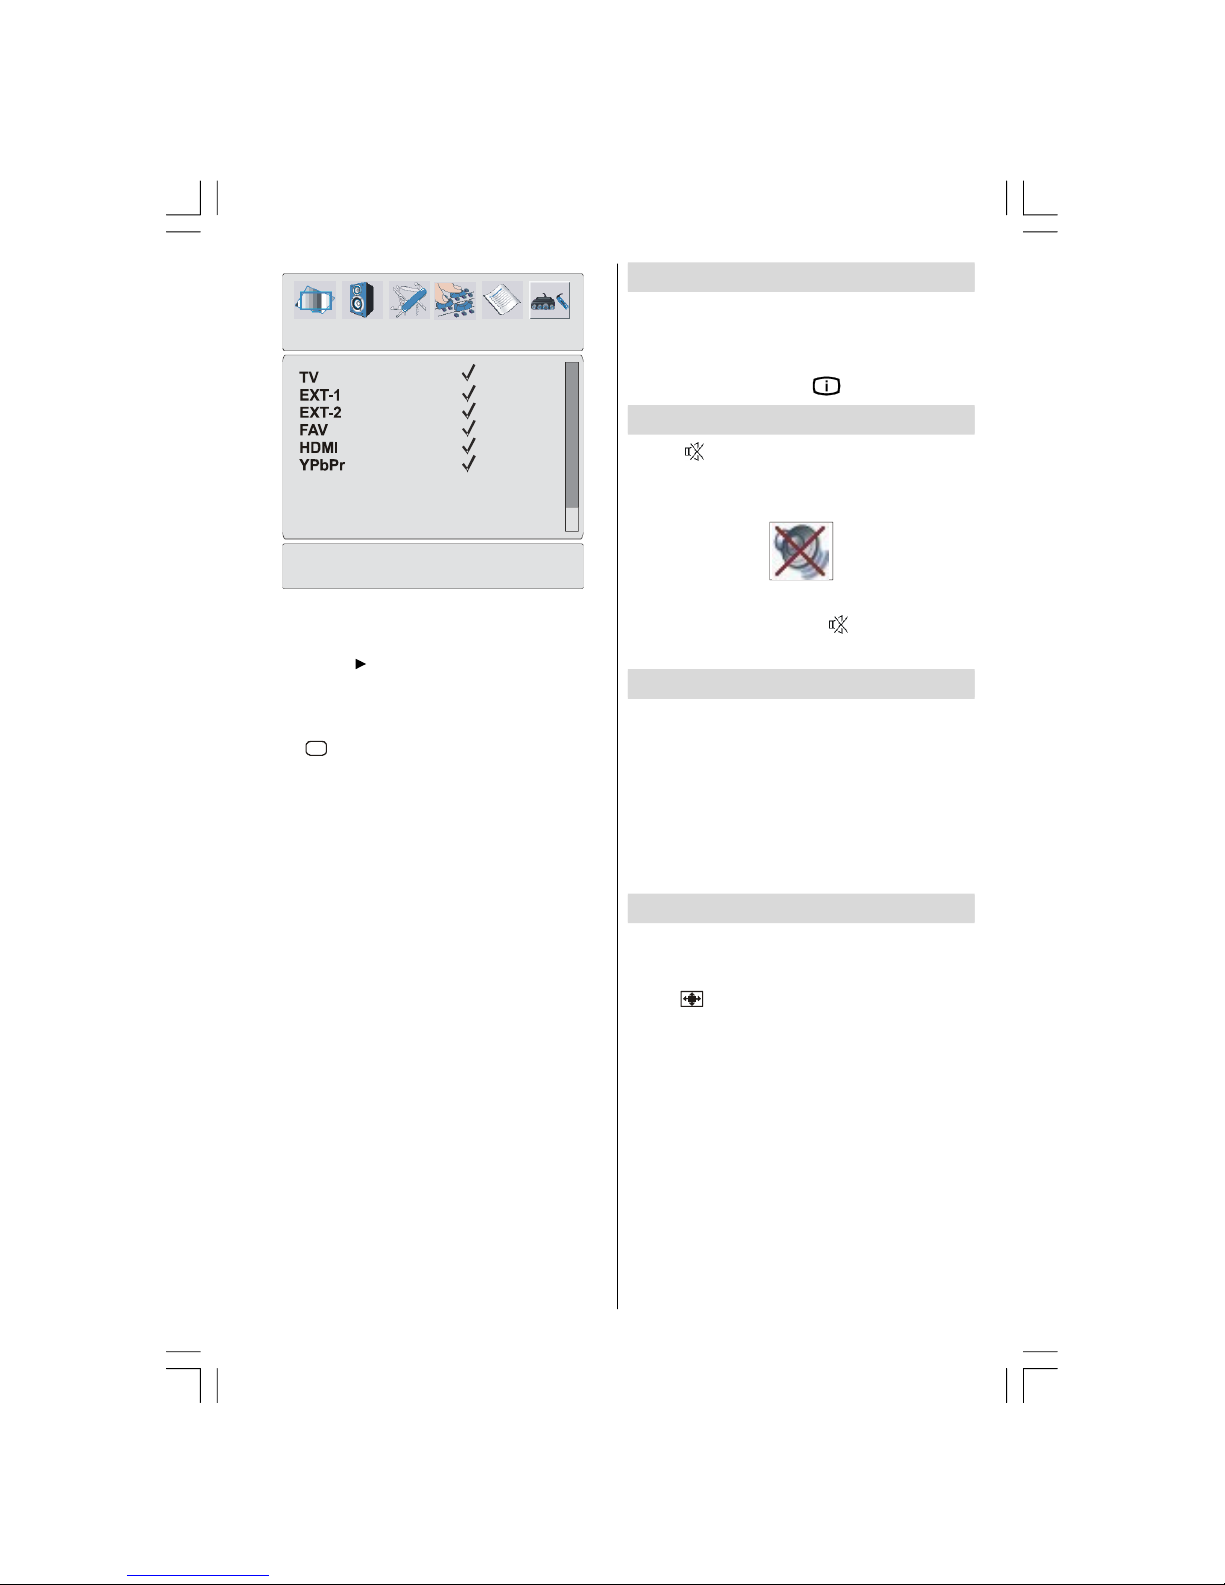
Source Menu
Select the sixth icon on the main menu by
pressing
/ button. Source menu appears
on the screen:
ENG-22784W-MB30-1055UK-1HDMI-YPBPR-SPDIF-LOUT-CVBS-W O PC-WO SVHS-50130255.p6502.07.2008, 17:0021
Page 23
English - 22 -
SOURCE : TV
In so ur ce me nu, highli gh t a sour ce by
pressing
/ button and switch to that mode
by pressing
or OK button.
Note: You can mark desired source options
by pressing
OK button. Therefore, when
AV
button is pressed, only the marked
source options will be available.
Displaying TV Information
Programme Number, Programme Name,
Sound Indicator
and Zoom Mode information
are displayed on the screen when a new
programme is entered or button is pressed.
Mute Function
Pr ess but ton to di sable sou nd. Mute
indicator will be displayed in the upper side
of the screen.
To cancel mute, there are two alternatives; the
first one is press ing the
button and the
second one is increasing the volume level.
Freezing Picture
You can freeze the picture on the screen by
pressing the
OK button on the remote control.
Press the
OK button to freeze picture. Press
again to quit freeze mode.
Note: This feature will be unavailable to be
used while watching YPBPr and HDMI
sources.
Zoom Modes
You can change the aspect ratio of the TV for
viewing the picture in different zoom modes.
Press
/WIDE button to directly change the
zoom mode. Available zoom modes are listed
below:
Auto
When a WSS (Wide Screen Signalling)
signal, which shows the aspect ratio of the
picture, is included in the broadcast signal or
the signal from an external device, the TV
au to ma tically chang es t he
ZOOM mode
according to the
WSS signal.
• When the
AUTO mode does not function
correctly due to poor
WSS signal quality or
ENG-22784W-MB30-1055UK-1HDMI-YPBPR-SPDIF-LOUT-CVBS-W O PC-WO SVHS-50130255.p6502.07.2008, 17:0022
Page 24
English - 23 -
when you want to change the ZOOM mode,
change to another
ZOOM mode manually.
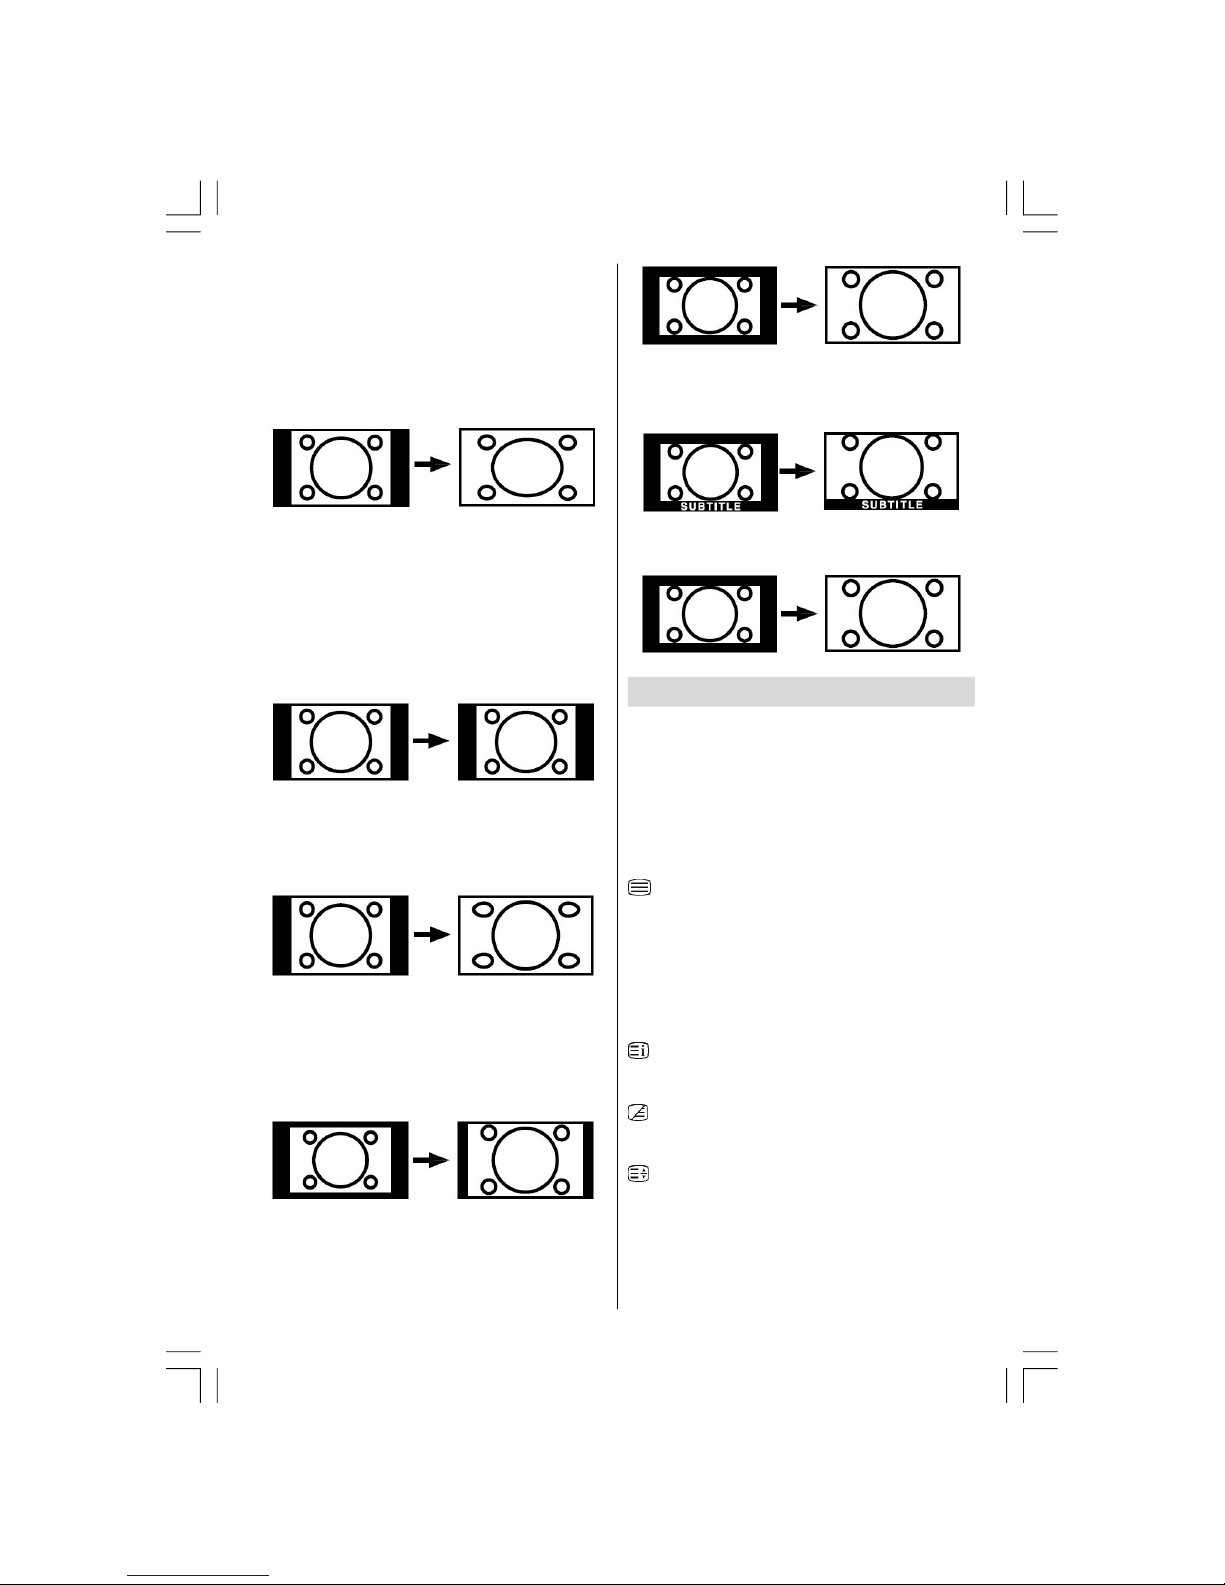
16:9
This uniformly stretches the left and right sides
of a normal picture (4:3 aspect ratio) to fill the
wide TV screen.
• For 16:9 aspect ratio pictures that have been
squeezed into a normal picture (4:3 aspect
ratio), use the 16:9 mode to restore the
picture to its original shape.
4:3
Use to view a normal picture (4:3 aspect ratio)
as this is its original size.
Panoramic
This stretches the left and right sides of a normal
picture (4:3 aspect ratio) to fill the screen, without
making the picture appear unnatural.
The top and bottom of the picture are slightly
cut off.
14:9
This zooms up the wide picture (14:9 aspect ratio)
to the upper and lower limits of the screen.
Cinema
This zooms up the wide picture (16:9 aspect
ratio) to the full screen.
Subtitle
This zooms up the wide picture (16:9 aspect
ratio) with subtitles to the full screen.
Zoom
This mode zooms to the wide picture.
Teletext
Tele text system transmits information such
as news, sports and weather on your TV. Note
that if the signal becomes insufficient, some
text errors may occur or the teletext mode may
be quitted.
Teletext function buttons are listed below:
Teletext On-Off / PAT mode
Activates teletext mode when pressed once.
Pressing this button again will split the screen
into two windows, one displaying the teletext
and the other displaying the current channel.
Pressing again will quit the teletext mode.
Index
Selects the teletext index page.
Mix
Places the teletext screen over the programme.
Expand
Press once to enlarge top half of the page,
press again to enlarge the bottom half of the
page. Press again to revert back to normal
size.
ENG-22784W-MB30-1055UK-1HDMI-YPBPR-SPDIF-LOUT-CVBS-W O PC-WO SVHS-50130255.p6502.07.2008, 17:0023
Page 25

English - 24 -
Reveal
Shows hidden information (e.g. solutions of
games).
Hold
Holds a text page when convenient. Press again to
resume.
Subcode Pages / Time
Selects subcode pages if available when the
teletext is activated. When the teletext is not
activated, displays time info if the programme
has teletext transmission.
P+ / P- and numbers (0-9)
Press to select a page.
Note: Most TV stations use code 100 for their
index pages.
Coloured Buttons
(RED/GREEN/YELLOW/BLUE)
Your TV supports both FASTEXT and TOP text
systems. When these systems are available,
the pages are divided into groups or topics.
When FASTEXT system is available, sections
in a teletext page will become colour-coded
and can be selected by pressing the coloured
buttons . Press a coloured button that
corresponds to with your needs.
The coloured writings will appear, showing
you, which coloured buttons to use when
TOP
text
transmission is present. Pressing P - or
P + co mm an ds will re qu es t th e ne xt or
previous page respectively.
Tips
Screen Care
Clean the screen with a slightly damp, soft
cloth. Do not use abrasive solvents as they
may damage the coating layer of the TV
screen.
For your safety, unplug the mains plug when
cleaning the set. When moving the TV, hold it
properly from the bottom part.
Image Persistence
Please note that ghosting may occur while
displ aying a persistent im age. LCD TVs’
image persistence may disappear after a short
time. Try turning off the TV for a while.
To avoid this, do not leave the screen in still
picture for extended periods.
No Power
If your TV system has no power, please check
the main power cable and connection to the
mains socket outlet.
Poor Picture
Have you selected the correct TV system? Is
your TV set or house aerial located too close
to a non-earthed audio equipment or neon
lights, etc.?
Mountains or high buildings can cause double
pictures or ghost images. Sometimes you can
improve the picture quality by changing the
direction of the aerial.
Is the picture or teletext unrecognisable?
Ch eck if y ou ha ve ente re d the co rr ec t
frequency.
The picture quality may degrade when two
peripherals are connected to the TV at the
same time. In such a case, disconnect one of
the peripherals.
ENG-22784W-MB30-1055UK-1HDMI-YPBPR-SPDIF-LOUT-CVBS-W O PC-WO SVHS-50130255.p6502.07.2008, 17:0024
Page 26

English - 25 -
No Picture
Is the aerial connected properly? Are the plugs
connected tightly to the aerial socket? Is the
aerial cable damaged? Are suitable plugs
used to connect the aerial? If you are in doubt,
consult your dealer.
No Picture means that your TV is not receiving
a transmission. Have you selected the correct
button on the remote control? Try once more.
Sound
You cannot hear any sound. Did you perhaps
interrupt the sound, pressing the
button?
Sound is coming from only one of th e
speakers. Is the balance set to one extreme?
See
Sound menu.
Remote Control
Your TV no longer responds to the remote
control. Perhaps the batteries are exhausted.
If so you can still use the local buttons at the
bottom of the TV.
Input Sources
If you cann ot select an input source, it is
possible that no device is connected.
Check the AV cables and connections if you
have tried to connect a device.
ENG-22784W-MB30-1055UK-1HDMI-YPBPR-SPDIF-LOUT-CVBS-W O PC-WO SVHS-50130255.p6502.07.2008, 17:0025
Page 27
English - 26 -
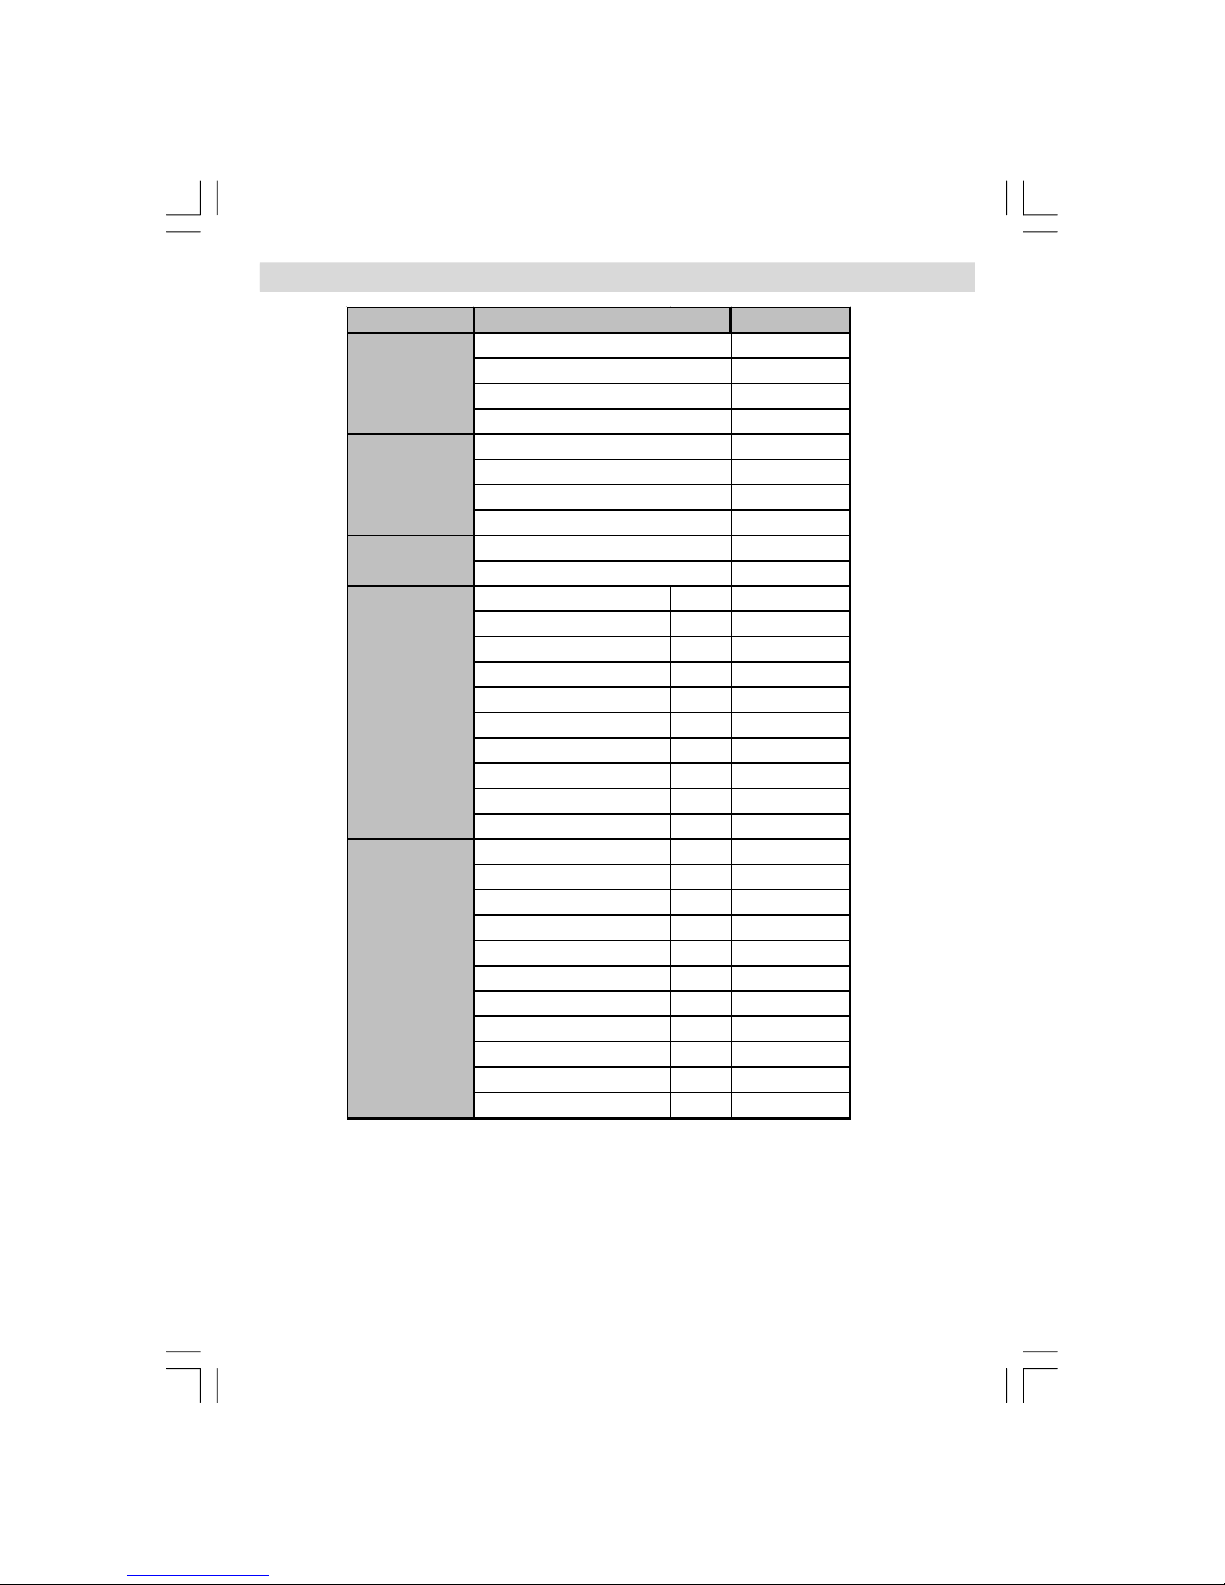
Appendix: AV and HDMI Signal Compatibility
Note
: In some cases a signal on the LCD TV may not be displayed properly. The problem
may be an inconsistency with standards from the source equipment (DVD, Set-top box, etc…).
If you do expereince such a problem please contact your dealer and also the manufacturer
of the source equipment.
(X: Not Available, O: Available)
SOURCE AVAILABLE
O
O
O
O
O
O
O
O
O
O
480I 60Hz
O
480P 60Hz
O
576I 50Hz
O
576P 50Hz
O
720P 50Hz
O
720P 60Hz
O
1080I 50Hz
O
1080I 60Hz
O
1080P 50Hz
O
1080P 60Hz
O
480I 60Hz
O
480P 60Hz
O
576I 60Hz
O
576P 60Hz
O
720P 60Hz
O
720P 50Hz
O
1080I 50Hz
O
1080I 50Hz
O
1080P 50Hz
O
1080P 60Hz
O
1080P 24 HZ
O
SUPPORTED SIGNALS
EXT-1
(SCART 1)
PAL 50/60
NTSC 60
RGB 50
RGB 60
EXT-2
(SCART-2)
PAL 50/60
NTSC 60
RGB 50
RGB 60
YPbPr
HDMI
EXT-3
(SIDE AV)
PAL 50/60
NTSC 60
ENG-22784W-MB30-1055UK-1HDMI-YPBPR-SPDIF-LOUT-CVBS-W O PC-WO SVHS-50130255.p6502.07.2008, 17:0026
Page 28
English - 27 -
Specifications
TV BROADCASTING
PAL/SECAM B/G D/K K' I/I' L/L'
RECEIVING CHANNELS
VHF (BAND I/III)
UHF (BAND U)
CABLE TV (S1-S20/ S21-S41)
NUMBER OF PRESET CHANNELS
100
CHANNEL INDICATOR
On Screen Display
RF AERIAL INPUT
75 Ohm (unbalanced)
OPERATING VOLTAGE
220-240V AC, 50 Hz.
AUDIO
German+Nicam
AUDIO OUTPUT POWER (W
RMS.
) (10% THD)
2 x 3W
POWER CONSUMPTION (W)
65 (max)
< 1 (standby)
PANEL
16:9 display, 22” Screen Size
DIMENSIONS (mm)
Weight (kg)
With stand
Without stand
D L H
DIMENSIONS (mm)
145
92
540
440
6.7
6.5
400
540
ENG-22784W-MB30-1055UK-1HDMI-YPBPR-SPDIF-LOUT-CVBS-W O PC-WO SVHS-50130255.p6502.07.2008, 17:0027
Page 29
English - 28 -
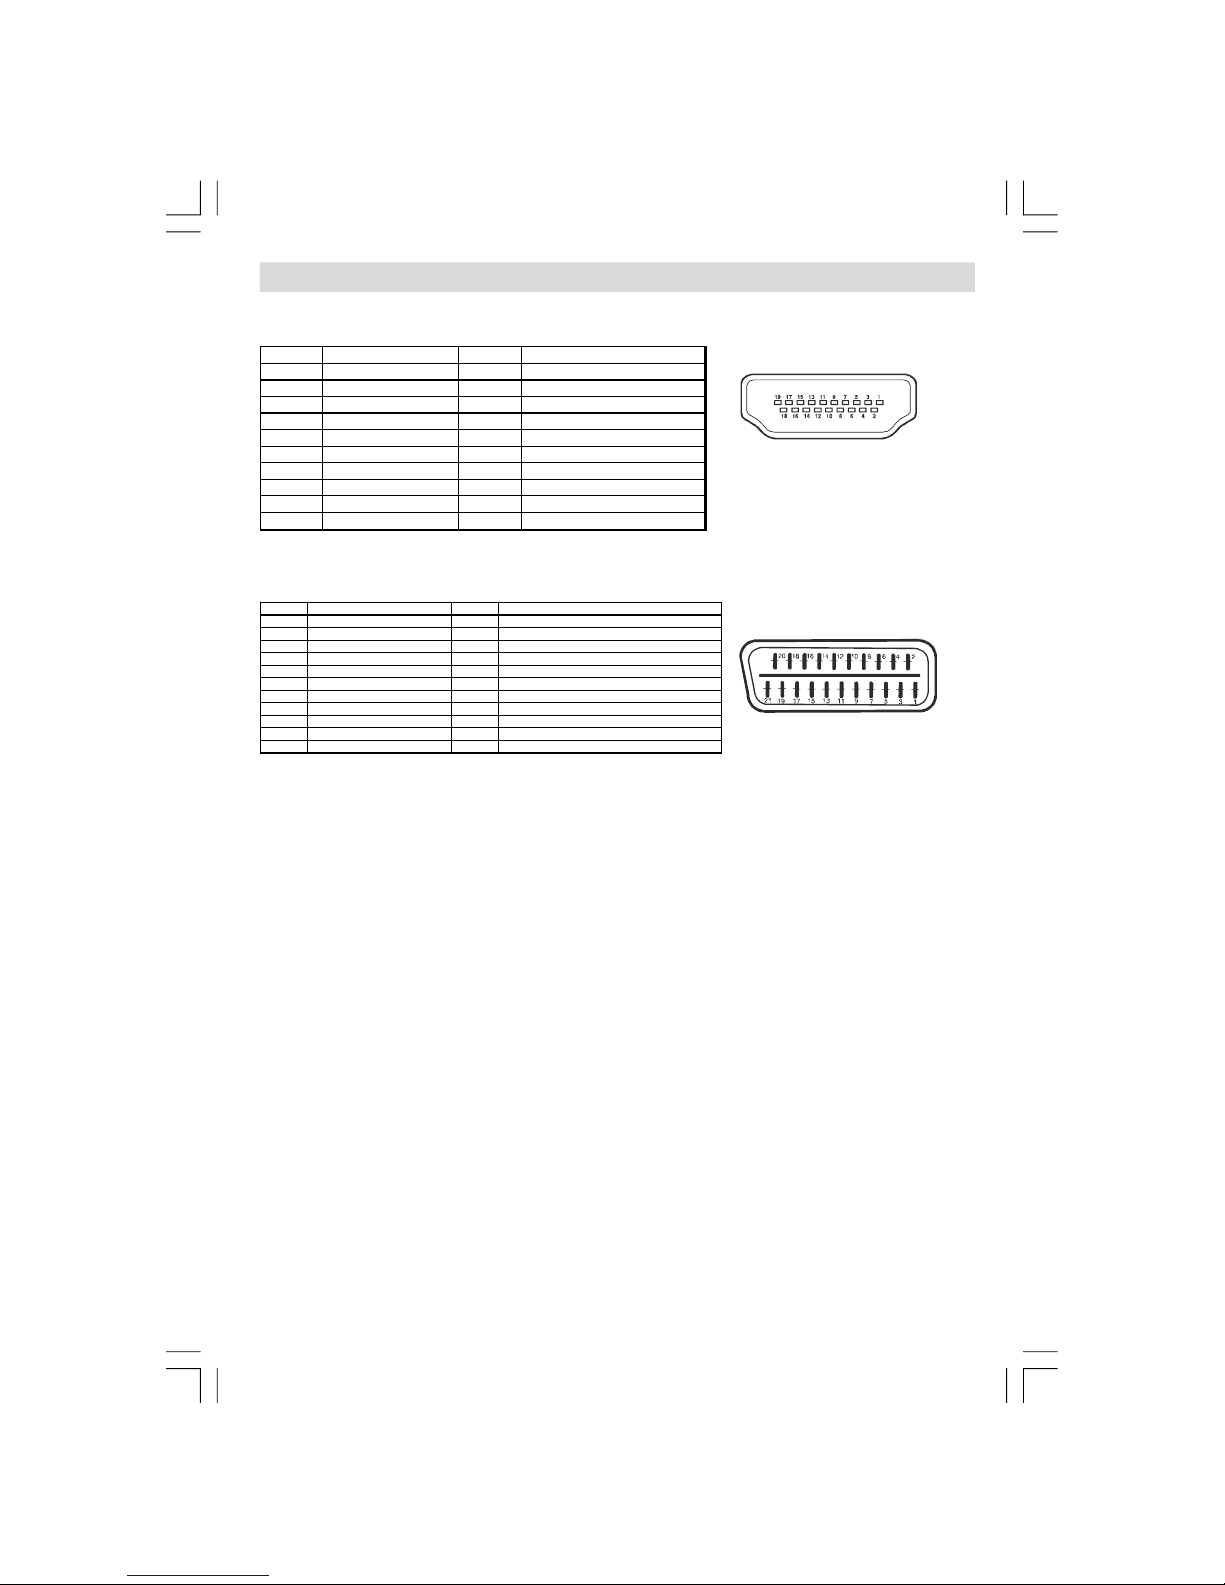
HDMI connector pin specifications
Pin Input signal Pin Input signal
1 TMDS Data2+ 11 TMDS Clock Shield
2 TMDS Data2 Shield 12 TMDS Clock 3 TMDS Data 2- 13 CEC
4 TMDS Data 1+ 14 Reserved (N.C. on devic e)
5 TMDS Data1 Shield 15 SCL
6 TMDS Data1- 16 S DA
7 TMDS Data0+ 17 DDC/CED Ground
8 TMDS Data0 Shield 18 +5V Power
9 TMDS Data0- 19 Hot Plug Detect
10 TMDS Clock+
SCART connector pin specifications
Pin Input signal Pin Input signal
1 AUDIO OUT (RIGHT) 12 Not used
2 AUDIO IN (RIGHT) 13 RGB-R GND
3 AUDIO OUT (LEFT/MONO) 14 GND
4 AUDIO GND 15 RGB-R / S.V HS CHROMINANCE IN
5 RGB-B GND 16 BLANKING SIGNAL
6 AUDIO IN (LEFT/MONO) 17 COMPOSITE VIDEO GND
7 RGB-B IN 18 BLANKING SIGNAL GND
8 AUDIO / RGB SW ITCH / 16:9 19 COMPOSITE VIDEO OUT
9 RGB-G GND 20 COMP OSITE VIDEO / S.VHS LUMINANCE IN
10 Not used 21 GND / SHIELD (CHASSIS)
11 RGB-G IN
Pin Specifications
ENG-22784W-MB30-1055UK-1HDMI-YPBPR-SPDIF-LOUT-CVBS-W O PC-WO SVHS-50130255.p6502.07.2008, 17:0028
Page 30
English - 29 -
CAUTION
TO PREVENT ELECTRIC SHOCK DISCONNECT FROM THE MAINS BEFORE
REMOVING COVER. NO USER SERVICEABLE PARTS INSIDE. REFER SERVICING
TO QUALIFIED SERVICE PERSONNEL.
SAFETY PRECAUTION
THIS DEVICE MUST BE DISCONNECTED FROM THE MAINS WHEN NOT IN USE. DO
NOT ALLOW THIS UNIT TO BE EXPOSED TO RAIN OR MOISTURE.
MAINS (AC) OPERATION
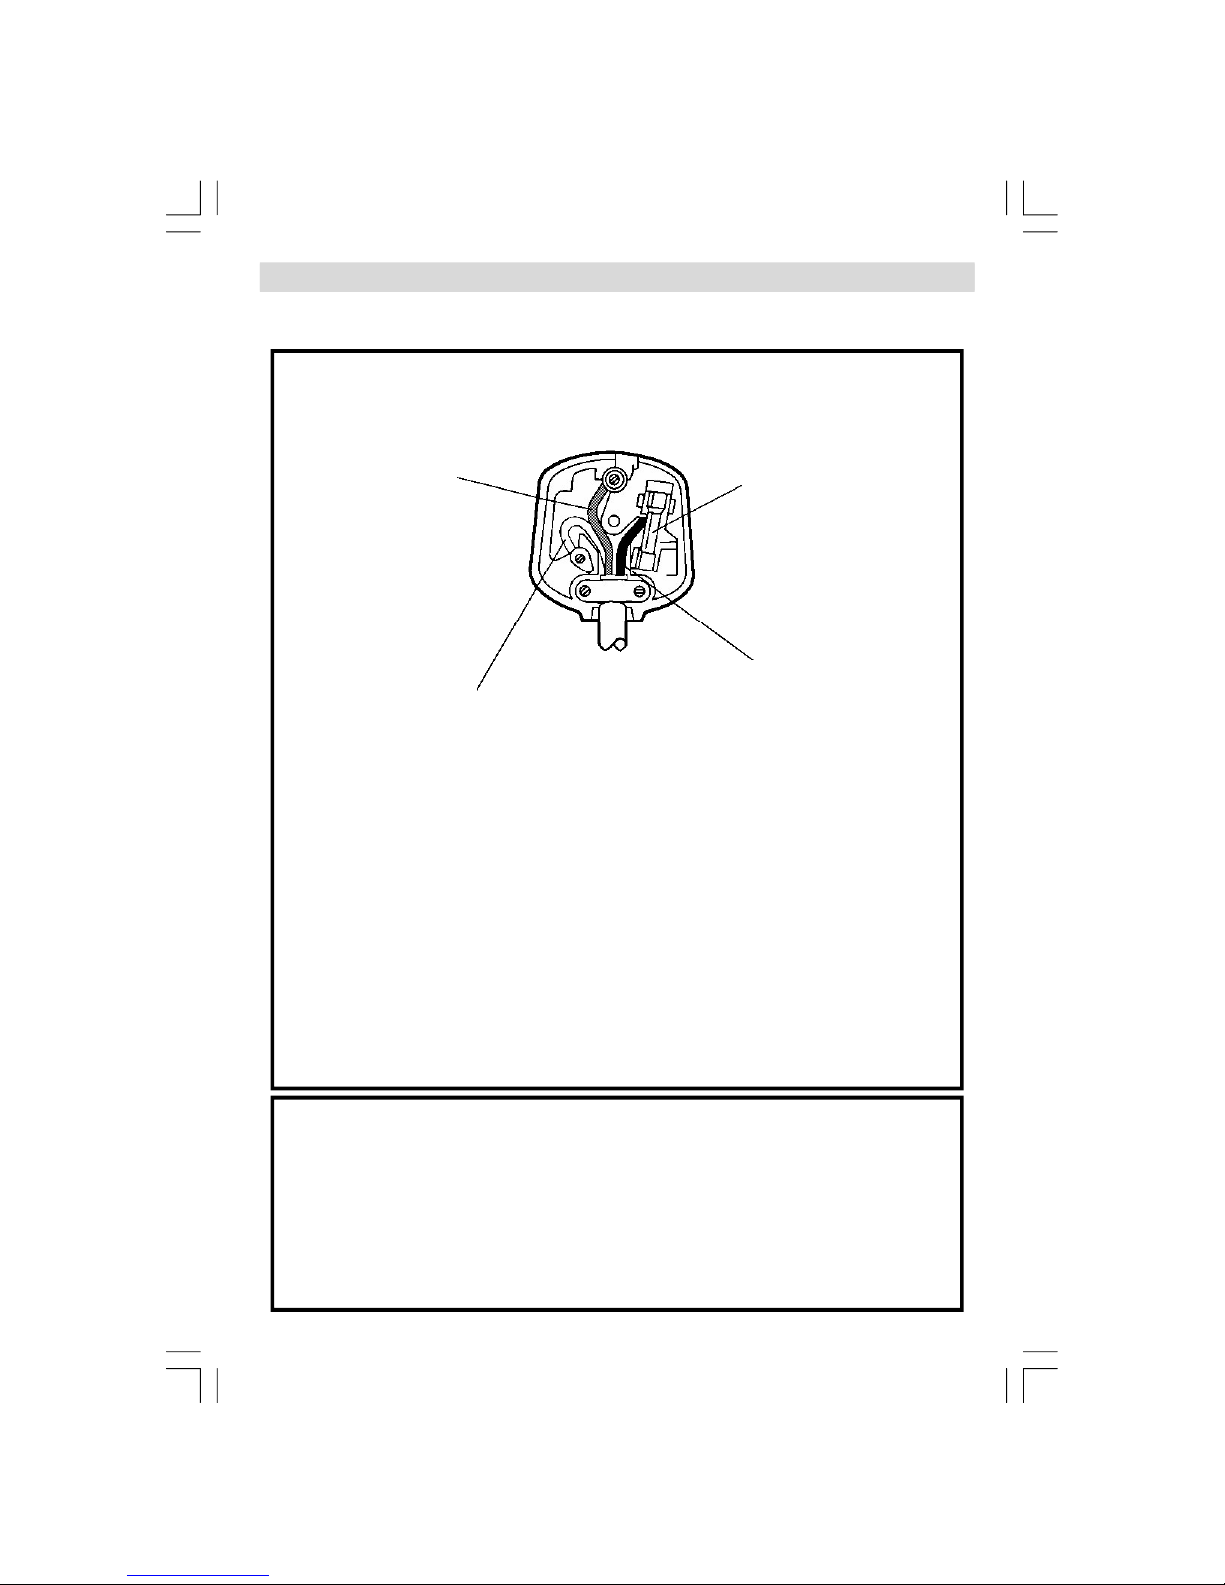
The wires in the mains lead are coloured in accordance with the following code :
IMPORTANT
As the colours of the wires in the mains lead of this appliance may not correspond
with the coloured markings identifying the terminals in your plug, proceed as follows:
The Green and Yellow coloured wire must be connected to the terminal which is
marked with the letter E, or by the earth symbol, or with Green or Green and Yellow
colors.
The Blue or Black coloured wire must be connected to the terminal which is marked
with the letter N or black colour.
The Brown or Red coloured wire must be connected to the terminal which is marked
with the letter L or Red colour.
For continued protection against risk of fire, replace only with a fuse with the same
type and rating. (ASTA approved 5A 250VAC fuse).
Important Instruction
For your own safety read following instruction carefully before attempting to connect this unit to
the mains supply.
BLUE
(Neutral)
BROWN
(Live)
FUSE
GREEN
&
YELLOW
(Earth)
(if there is
earth cable)
ENG-22784W-MB30-1055UK-1HDMI-YPBPR-SPDIF-LOUT-CVBS-W O PC-WO SVHS-50130255.p6502.07.2008, 17:0029
Page 31

5
0
1
3
0
2
5
5
 Loading...