

Page 1
Copy of Instruction Manual
CY-C Remote Trigger Set
Gewerbering 26
86666 Burgheim
Tel. +49 84 32 / 9489-0
Fax. +49 84 32 / 9489 - 8333
eMail: info@foto-walser.de
www.foto-walser.de
1
Page 2

Content
1.
How to understand the instruction manual................................... 4
1.1 Markings on the device ..................................................................... 4
1.2 Markings in the manual ..................................................................... 4
2.
Important safety notes.................................................................. 5
3.
Unpack and check the device ........................................................ 6
4.
Overview about the parts ............................................................. 7
5.
Quick-start guide ........................................................................... 7
6.
Preparation for operation ............................................................. 7
6.1 Connect the receiver with studio flash and power supply ................ 7
6.2 Connect the transmitter with the camera ......................................... 8
7.
Operation of the device ................................................................ 8
7.1 Trigger test button ............................................................................. 8
8.
Solve problems ............................................................................. 9
9.
Maintenance ................................................................................. 9
9.1 Continuous inspections ..................................................................... 9
9.2 Cleaning ............................................................................................. 9
9.3 Change batteries .............................................................................. 10
10. Accessories and options .............................................................. 10
11. Disposal and environment protection ......................................... 10
12. Technical specifications ............................................................... 11
12. Technical specifications
Receiver
Power Supply AC 220 - 230 V / 50 Hz
Weight approx. 185g
Dimensions (H x W x L) approx. 5,3 x 11,5 x 15,5 cm
Syncro Exit 6,3 mm adapter: 3,5mm
Transmitter
Battery 12 V
Hot-shoe under 0,01 mA
Weight approx. 70g
Dimensions (H x W x L) approx. 3,6 x 4,5 x 6 cm
Permitted operation
temperature
-10 °C to + 40 °C
Storage conditions Dry and dust-free in carton at
-20 °C to +50 °C
Reference to declaration of conformity:
This is a R&TTE radio terminal equipment of equipment class 1 with the
implementation of directive 1995/5/EC about FTEG (German Radio and
Telecommunications Terminal Equipment Act) and directive 2004/108/EC
about EMVG (Electromagnetic Compatibility Act).
2
11
Page 3

Screw for opening the
ADVICE: Just use the following specified cleaning supplies.
Remote Trigger Cleaning
Housing
Use a microfiber cloth to remove light and
stubborn dirt
9.3 Change batteries
WARNING
Please just use batteries, which comply with the required specifications.
See Technical Specifications.
1. Use a Phillips screwdriver to loose the screw on the bottom side of the
transmitter.
2. Take off the top side of the housing.
3. Change the battery. Pay attention to the right polarity.
4. Screw up the housing again.
Thank you very much for your confidence. We wish you much pleasure and
success with your new device.
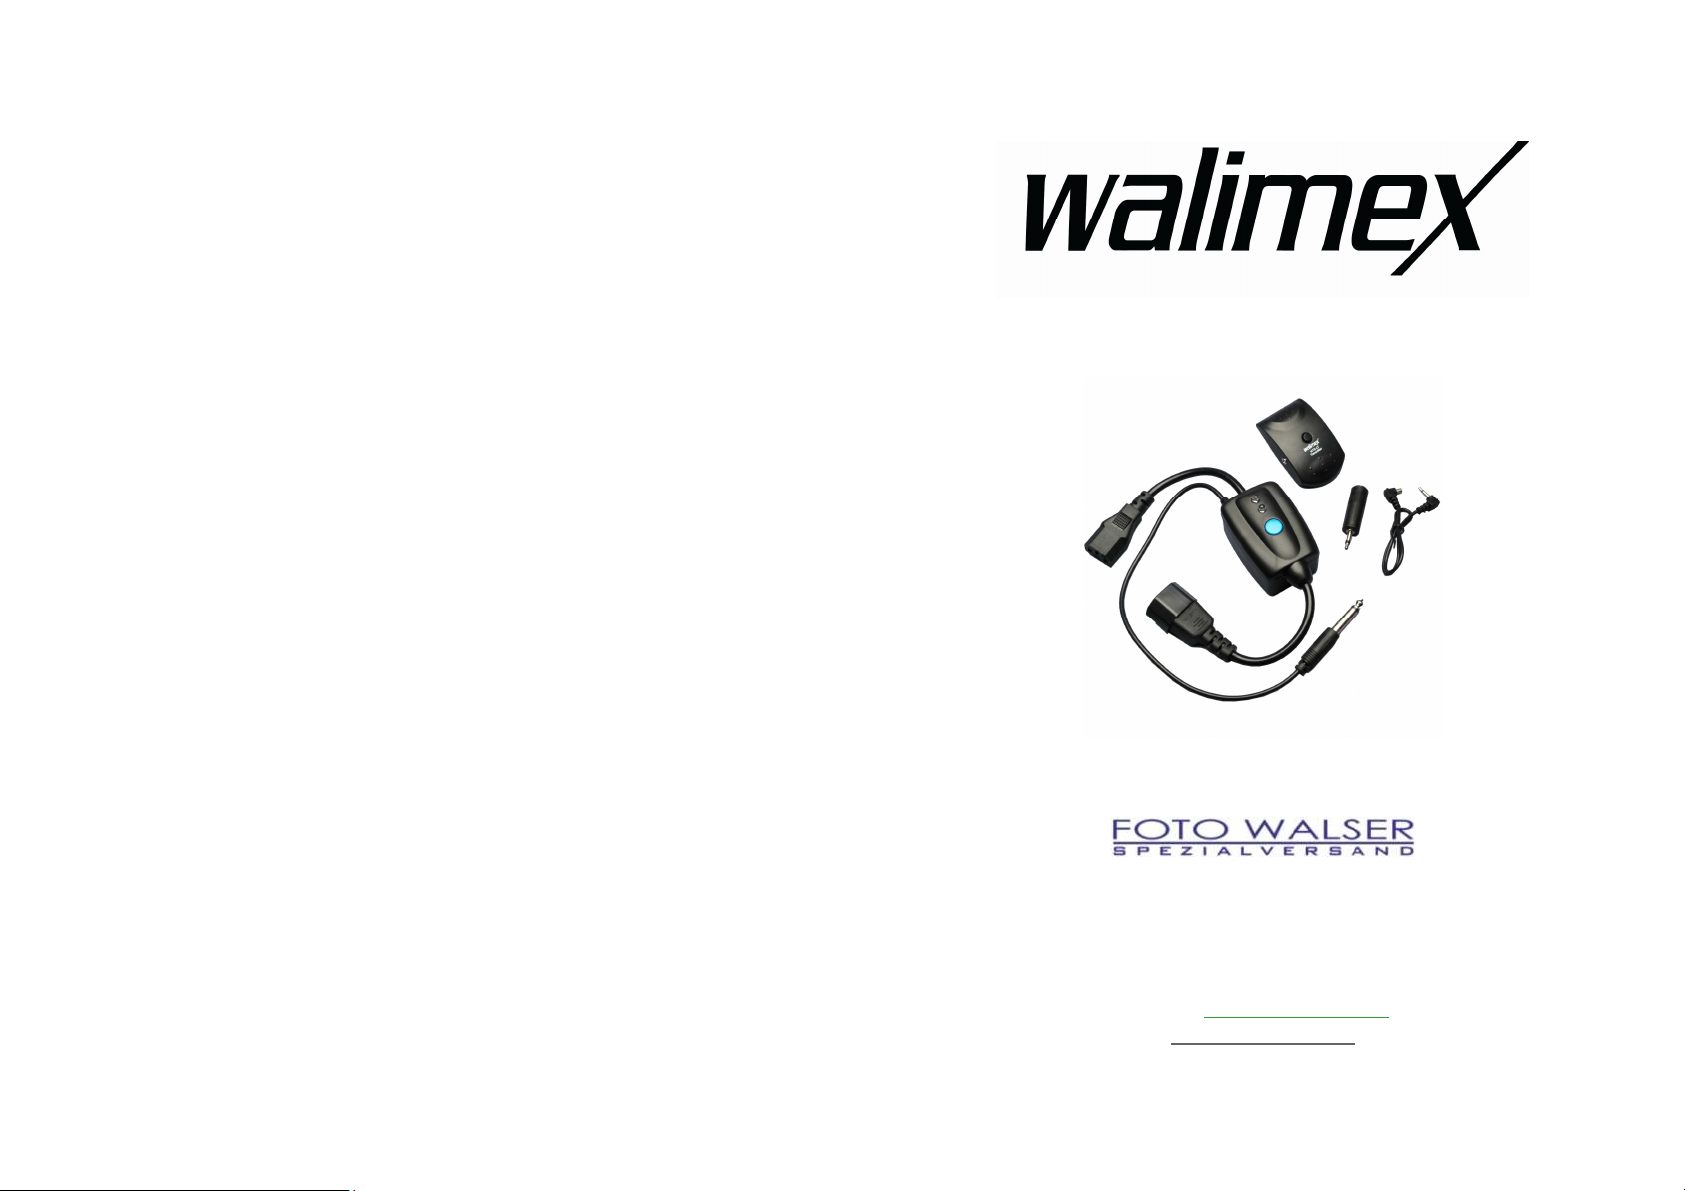
The walimex CY-C Remote Trigger Set consists of one transmitter and one
receiver. It is compatible with all studio flashes, whereby a direct
intervisibility is not necessary.
The main features of your device as follows:
− compatible with all studio flash devices
− no direct intervisibility necessary
− very lightweight
− Please read these instructions carefully before using your device for
the first time. It includes everything you need to know to avoid
physical injuries and damages.
− Please pay attention to all safety notes in this instruction manual.
− Please keep this manual safe. In case of selling or leaving the device
to other persons, please don´t forget to hand this manual over as
well.
housing
10. Accessories and options
You can find extensive accessories for your device in our webshop.
11. Disposal and environment protection
Your device should be disposed free of charge at the local disposal points.
10
3
Page 4

ADVICE
: Indicates potentially physical damages and other
1. How to understand this instruction manual
1.1 Markings on the device
This marking means, that your device meets the safety
requirements of all relevant European Directives.
This marking means, that your device should be disposed in
the local disposal points.
1.2 Markings in the manual
Marking Meaning
WARNING
Indicates the handling and consequences of safety
notes.
Indicates a hazardous situation, which, if not
avoided, could result in a serious injury or death.
important information in connection with your
device.
8. Solve problems
Problem Possible reason Remedy
Remote Trigger
has no function
9. Maintenance
9.1 Continuous inspections
What you should do?
Check all cables and plugs for damages
In case of damage:
WARNING! Danger of electric shock
and fire through short-circuit. The device
should be repaired by an electrician
immediately
Cables are not plugged
in firmly
Studio flash is
switched off
Battery in transmitter
is too weak
Plug in the cables firmly
Switch on studio flash
Change battery, see
Change battery
Before every
operation
With every
change
X
4
9.2 Cleaning
WARNING
Danger of electric shock
− The contact with moisture or water should be avoided.
− Unplug the power cord before cleaning the device.
9
Page 5

Connection Socket Sync Cord
Transmitter
with shoe
Camera
socket
See Technical Specifications.
If the values should differ, please contact info@foto-walser.de or tel. 49
84 32 / 9489-0.
5. Connect the power cord with the socket on the device and with the
power socket.
6.2 Connect the transmitter with the camera
1. Put the transmitter with the shoe on the flash socket of your
camera.
2. If your camera should not have a hot-shoe, please use the included
sync cord and connect the transmitter with your camera or flash
shoe.
7. Operation of the device
7.1 Trigger test button
1. Before starting your work, please check the function of your devices
and trigger your studio flash through the test button on the
transmitter.
Test Button
Transmitter/Camera
with flash
2. Important safety notes
WARNING
Danger of electric shock, burn hazard
Please note, that the device is still connected with the supply voltage
even if it is switched off. Just after disconnecting the device from the
power supply through pulling out the power cable, the device is actually
de-energized.
− Disconnect from power supply by unplugging the power cord before
starting any maintenance arrangements.
− Disconnect from power supply by unplugging the power cord when
the device is not in use for a longer time.
WARNING
Danger of electric shock, fire through short-circuit
A short-circuit could be caused through defect cables and through
humidity or moisture. A short-circuit can warm up the conductors, so that
there isolation will melt or even melt thoroughly. This could lead to fire.
− Don´t operate the device with wet hand or feet.
− Operate the device only in dry rooms.
− Don´t operate the device outdoors.
− Please only follow this instruction manual for cleaning the device.
− Make sure, that cables and conductors won´t be damaged. Damages
could be caused through heat impact, chemical influence or through
mechanical impacts as rubbing, bending, tearing, rolling over or
nibbling animals.
− Prevent your device for falling-off.
In case of falling-off, please let an electrician check the device before
switching on again.
− If your device should be damaged or defect or if you notice a burning
smell:
Disconnect the power supply by pulling out the power cord
immediately. Never operate your device with damaged housing,
defect lamps or damaged power cord. Don´t open the receiver. Never
8
5
Page 6

A
C
D
B
repair the device on your own. The device should only be repaired by
electricians.
− Please follow this instruction manual for maintaining your device.
− Please trigger the flash head through the test button before starting
any operation or maintenance arrangement.
3. Unpack and check the device
1. Please unpack the device carefully.
2. Please check, if the delivery is complete:
• 1 CY-C Remote Trigger Set
o 1 Receiver
o 1 Transmitter
o 1 Sync Cord
o 1 Adapter Phone Jack 3,5 mm
• 1 Instruction Manual in German and English.
3. Please check, if the delivery is undamaged.
ADVICE: If the delivery should be incomplete or damaged, please
contact info@foto-walser.de or our service hotline with the telephone
number +49 84 32 / 9489-0.
4. Overview about the parts
A Transmitter
B Receiver
C Power Cord for Studio Flash
D Sync Cord
E Jack for Power Cord Power Supply
F 3,5 mm Adapter Sync Cord
G Sync Cord Camera/Transmitter
E F G
5. Quick-start guide
ADVICE:
The detailed instruction for the following operations can be found in the
respective chapters in this instruction manual.
Keep the sequences of the following operation steps when using the device
for the first time to avoid damages on the device.
• Connect the receiver with the studio flash and the power supply.
• Mount the transmitter on the camera.
• Trigger the test button.
6. Preparation for operation
6.1 Connect the receiver with studio flash and power supply
1. Switch off studio flash.
2. Insert the sync cord in the jack of the studio flash.
3. Plug the power cord of the receiver in the jack of the studio flash.
4. Compare the local power supply with the connected load of the
Remote Trigger.
6
7
 Loading...