

Page 1

WebMaster®/WebAlert
®
USB Style
Quick Start Guide
W A L C H E M
IWAKI America Inc.
WebMaster® /WebAlert® Quick Start Guide
Five Boynton Road Hopping Brook Park Holliston, MA 01746 USA
TEL: 508-429-1110 FAX: 508-429-7433 WEB: www.walchem.com
Page 2

P/N 180273 Rev. N April 2017
2
Notice
© 2017 WALCHEM, Iwaki America Inc. (hereinafter “Walchem”)
5 Boynton Road, Holliston, MA 01746 USA (508) 429-1110
All Rights Reserved Printed in USA
SOFTWARE LICENSE AGREEMENT AND WARRANTY STATEMENT
Do NOT install or use this software until you have read and accepted all of the terms of this
License. As with all software, it is recommended that you back up your hard drive before you
begin to use this software.
WALCHEM IS WILLING TO LICENSE THE SOFTWARE ONLY UPON THE CONDITION THAT YOU ACCEPT ALL OF THE
TERMS CONTAINED IN THIS LICENSE AGREEMENT. PLEASE READ THE TERMS CAREFULLY BEFORE INSTALLING
THE SOFTWARE, AS INSTALLING THE SOFTWARE WILL INDICATE YOUR AGREEMENT WITH THEM. IF YOU DO NOT
AGREE WITH THESE TERMS, THEN WALCHEM IS UNWILLING TO LICENSE THE SOFTWARE TO YOU, IN WHICH EVENT
YOU SHOULD NOT INSTALL OR USE THE SOFTWARE.
The Software. The Software licensed under this Agreement consists of Drivers, configuration
file(s), and documentation referred to as USB DRIVER (the “Software”).
Free Use. You are authorized to use the Software on a royalty-free basis, without payment of
any kind, provided that you have accepted all terms of this Agreement. This Agreement shall take
precedence over any prior licenses, and any conflicting, inconsistent, or additional terms in
such licenses shall be null and void.
Re-Distribution is NOT PERMITTED. You may inform others about the availability of this software
and this web site, but you may not give copies of this software to others, or offer it for
direct download from another server or web site, or redistribute this software in any other form
to any third party, unless you have obtained a written permission from us to do so. You may copy
the Software for archival purposes, provided that you have not altered it in any way.
Trademarks. WebMaster®, WebAlert®, WALCHEM, and the logo images are trademarks or registered
trademarks of WALCHEM and/or its suppliers. All other product names may be trademarks of their
respective owners.
WARRANTY DISCLAIMER; LIMITATION OF LIABILITY. WALCHEM PROVIDES THE SOFTWARE “AS-IS.” NEITHER
WALCHEM NOR ANY OF ITS SUPPLIERS OR RESELLERS MAKES ANY WARRANTY OF ANY KIND, EXPRESS OR
IMPLIED. WALCHEM AND ITS SUPPLIERS SPECIFICALLY DISCLAIM THE IMPLIED WARRANTIES OF TITLE, NONINFRINGEMENT, MERCHANTABILITY, FITNESS FOR A PARTICULAR PURPOSE, SYSTEM INTEGRATION, AND DATA
ACCURACY. THERE IS NO WARRANTY OR GUARANTEE THAT THE OPERATION OF THE SOFTWARE WILL BE
UNINTERRUPTED, ERROR-FREE, OR VIRUS-FREE, OR THAT THE SOFTWARE WILL MEET ANY PARTICULAR CRITERIA
OF PERFORMANCE, QUALITY, ACCURACY, PURPOSE, OR NEED. YOU ASSUME THE ENTIRE RISK OF SELECTION,
INSTALLATION, AND USE OF THE SOFTWARE. THIS DISCLAIMER OF WARRANTY CONSTITUTES AN ESSENTIAL
PART OF THIS AGREEMENT. NO USE OF THE SOFTWARE IS AUTHORIZED HEREUNDER EXCEPT UNDER THIS
DISCLAIMER. To the extent that this Warranty Statement is inconsistent with the jurisdiction
where you use the Software, the Warranty Statement shall be deemed to be modified consistent
with such local law. Under such local law, certain limitations may not apply, and you may have
additional rights, which vary from jurisdiction to jurisdiction. For example, some states in
the United States and some jurisdictions outside the United States may: (i) preclude the
disclaimers and limitations of this Warranty Statement from limiting the rights of a consumer;
(ii) otherwise restrict the ability of a manufacturer to make such disclaimers or to impose such
limitations; or (iii) grant the consumer additional legal rights, specify the duration of
implied warranties which the manufacturer cannot disclaim, or prohibit limitations on how long
an implied warranty lasts.
INDEPENDENT OF THE FORGOING PROVISIONS, IN NO EVENT AND UNDER NO LEGAL THEORY, INCLUDING WITHOUT
LIMITATION, TORT, CONTRACT, OR STRICT PRODUCTS LIABILITY, SHALL WALCHEM OR ANY OF ITS SUPPLIERS
BE LIABLE TO YOU OR ANY OTHER PERSON FOR ANY INDIRECT, SPECIAL, INCIDENTAL, OR CONSEQUENTIAL
DAMAGES OF ANY KIND, INCLUDING WITHOUT LIMITATION, DAMAGES FOR LOSS OF GOODWILL, WORK STOPPAGE,
COMPUTER MALFUNCTION, OR ANY OTHER KIND OF COMMERCIAL DAMAGE, EVEN IF WALCHEM HAS BEEN ADVISED
OF THE POSSIBILITY OF SUCH DAMAGES. THIS LIMITATION SHALL NOT APPLY TO LIABILITY FOR DEATH OR
PERSONAL INJURY TO THE EXTENT PROHIBITED BY APPLICABLE LAW.
IN NO EVENT SHALL WALCHEM’s LIABILITY FOR ACTUAL DAMAGES FOR ANY CAUSE WHATSOEVER, AND
REGARDLESS OF THE FORM OF ACTION, EXCEED THE AMOUNT OF THE PURCHASE PRICE PAID FOR THE SOFTWARE
LICENSE OR ONE UNITED STATES DOLLAR, WHICHEVER IS THE GREATER.
MISCELLANEOUS. This Agreement constitutes the entire understanding of the parties with respect
to the subject matter of this Agreement and merges all prior communications, representations,
and agreements. This Agreement may be modified only by a written agreement signed by the
parties. If any provision of this Agreement is held to be unenforceable for any reason, such
provision shall be reformed only to the extent necessary to make it enforceable. This Agreement
shall be construed under the laws of the State of Utah, USA, excluding rules regarding conflicts
of law. The application the United Nations Convention of Contracts for the International Sale
of Goods is expressly excluded. This license is written in English and English is its
controlling language.
All rights not expressly granted here are reserved to WALCHEM.
Page 3

P/N 180273 Rev. N April 2017
3
Quick Start Guide Contents
Introduction ........................................................................................................... 5
Getting Started ...................................................................................................... 6
Section 1: WINDOWS 10 ...................................................................................... 8
1. USB DRIVER INSTALLATION FOR WINDOWS 10 .......................................... 9
Section 2: WINDOWS 8 ...................................................................................... 14
1. USB DRIVER INSTALLATION FOR WINDOWS 8.......................................... 15
2. DIRECT MODEM SET-UP FOR WINDOWS 8 ................................................ 23
Section 3: WINDOWS 7 ...................................................................................... 29
1. USB DRIVER INSTALLATION FOR WINDOWS 7.......................................... 30
2. DIRECT MODEM SET-UP FOR WINDOWS 7 ................................................ 37
Section 4: WINDOWS VISTA (32-bit) ................................................................ 38
1. USB DRIVER INSTALLATION FOR WINDOWS VISTA (32 BIT) .................... 39
2. DIRECT MODEM SET-UP FOR WINDOWS VISTA 32 .................................. 41
Section 5: WINDOWS VISTA (64-bit) ................................ ................................ 49
1. USB DRIVER INSTALLATION FOR WINDOWS VISTA (64-BIT) ................... 50
2. DIRECT MODEM SET-UP FOR WINDOWS VISTA 64 .................................. 56
Section 6: WINDOWS XP ................................................................................... 57
1. USB DRIVER INSTALLATION FOR WINDOWS XP ....................................... 58
2. DIRECT MODEM SET-UP FOR WINDOWS XP ............................................. 61
Section 7: MAC (OS Lion) ................................................................................. 67
1. USB INSTALLATION FOR MAC ..................................................................... 68
Section 8: CHECK BROWSER SETTINGS ....................................................... 71
Section 9: Troubleshooting the USB connection ............................................ 72
Page 4

P/N 180273 Rev. N April 2017
4
Computer Requirements
The computer hardware guidelines for establishing a connection
with the WebMaster/WebAlert are basically the same
requirements as surfing the Internet. You’ll need sufficient
memory to run your computer’s operating system and web
browser, and a CPU with enough processing speed to easily
handle web pages for easy viewing.
Computer requirements for all four methods of communication
are as follows:
➢ At least one available USB port
➢ 100 MHz min. processor
➢ 40MB minimum RAM
➢ Windows operating system (XP, Vista, Windows 7, 8 or
10) or MAC OSX
➢ Windows Internet Explorer (ver. 5.0 or higher), Firefox
or Safari
Support Literature
Simple Step-by-Step instructions in our support literature will help
make the start-up of your WebMaster/WebAlert quick and easy. The
following materials have been supplied to help get you started:
✓ Quick Start Guide
✓ Instruction Manual
✓ USB cable (A-B)
✓ USB Driver CD
Page 5
P/N 180273 Rev. N April 2017
5
Introduction
This Quick Start Guide is designed to help you establish basic
communications with your WebMaster/WebAlert.
There are four methods of communicating with your device.
Each connection is simple and requires no proprietary
software on your computer.
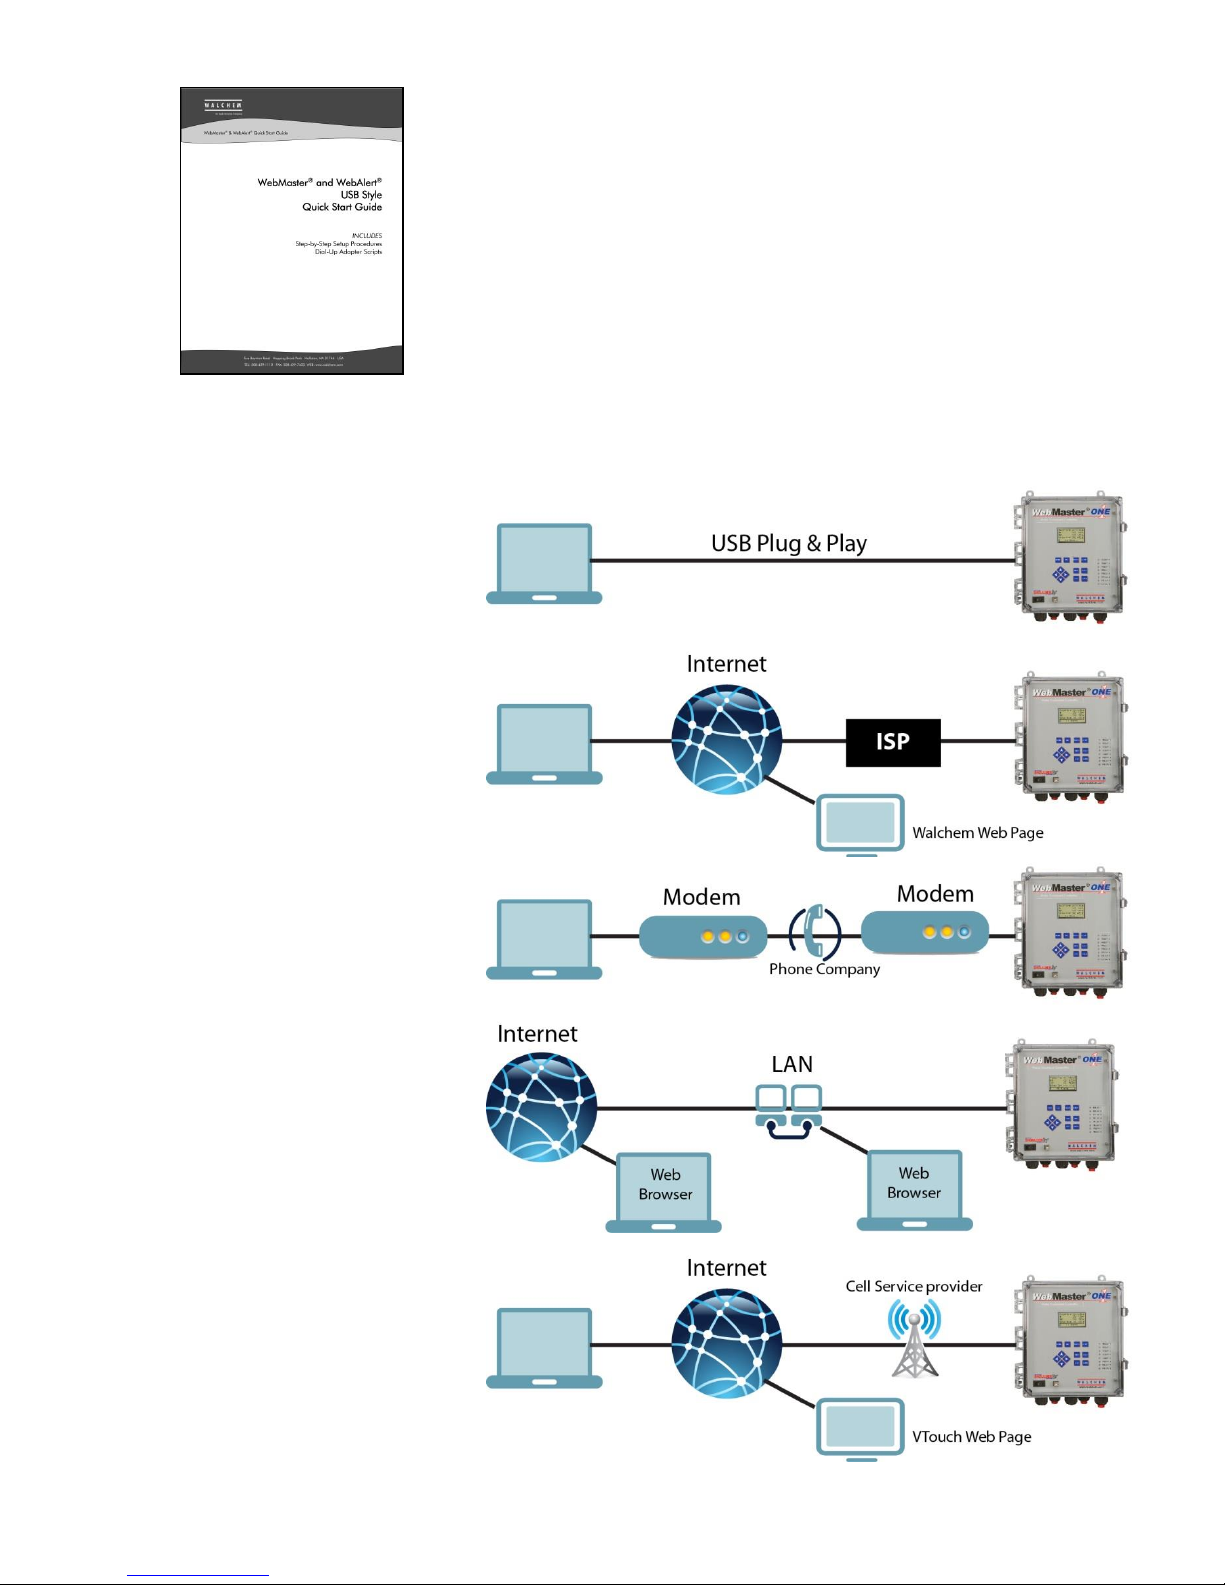
The five methods of communication with the WebMaster/WebAlert are as
follows:
1 USB (standard)
For local monitoring and reconfiguration
of your device via Laptop or dedicated
on-site desktop. (Windows XP,
Vista,Windows 7, Windows 8 or Mac
OSX)
2 ShoulderTap Internet
Communications
For monitoring and reconfiguration of
your device remotely via the Internet.
(Requires modem card option)
3 DirectTap Modem-to-Modem
For monitoring and reconfiguration of
your device remotely using traditional
modem-to-modem communications.
(Requires modem card option)
4 Ethernet
For monitoring and reconfiguration of
your device via Local Area Network
5 Cellular
For monitoring and reconfiguration of
your WebMasterONE remotely via the
Internet (requires cell modem and Vtouch
option).
Page 6

P/N 180273 Rev. N April 2017
6
Getting Started
The majority of local reconfiguration of your WebMaster/WebAlert will
be done with the USB connection. The Instruction Manual has detailed
steps for initiating USB communications.
The following steps are required to get started:
➢ A USB driver needs to be added to your PC. This driver only needs to be
installed once and can be used to communicate with any WebMaster/WebAlert.
The USB driver may only be used with Windows XP, Vista, Windows 7,
Window 8, or Mac OSX.
➢ Step-by-Step instructions for installing the USB driver are included in this guide.
Find the operating system that is installed on your computer (Windows XP,
Vista, Windows 7, Windows 8, or Mac OSX.) and follow the instructions. The
instruction manual will help guide you through the remainder of the process.
ShoulderTap®
ShoulderTap is Walchem’s patented Server On-Demand Technology. The software allows
you to communicate with the WebMaster/WebAlert over the Internet without the need to
be online all the time. Having the web-based device online only when needed makes the
connection secure and cost effective. The modem option must be installed in order to
ShoulderTap.
If you choose to utilize the ShoulderTap remote communications feature, an Internet Service
Provider (ISP) account must be established for your WebMaster/WebAlert, similar to what you
may use to access the Internet from home. This account provides the WebMaster/WebAlert
with Internet dial-up access. The following information will be needed to establish
ShoulderTap communications:
➢ ISP User Name - the name that the controller will use to connect to the ISP
➢ ISP Password - the security ID that the controller will use to connect to the ISP
➢ Controller Phone Number - the number of the analog phone line attached to
your WebMaster/WebAlert ... this is used to identify which WebMaster/WebAlert
you want to communicate with.
➢ Local Access Number For The ISP - the local phone number that the
controller will dial out to for Internet access.
The Instruction Manual provides more details on the ShoulderTap® process.
Page 7

P/N 180273 Rev. N April 2017
7
Choosing an ISP
There is a large selection of ISPs available with a variety of service plans.
Walchem recommends selecting an ISP that has easy access and is reliable.
Some ISPs can have spotty coverage that can be very unreliable during peak
hours. ISPs that require you to load software will not work.
Walchem recommends the following ISP for best results:
Information is available at www.surfbest.net or by dialing
(207)-384-4234
EARTHLINK is also reliable in many locations. Information is available at www.earthlink.com or
1-800-EARTHLINK.
If you want to receive e-mails from your controller (alarms, datalogs and system summaries) your
ISP will provide you with an SMTP server address.
The Communications section of the Instruction Manual provides additional instructions on
receiving e-mails.
The Auto Reporting section in the Instruction Manual contains detailed information on autoreporting.
DirectTap Modem-to-Modem
Your WebMaster/WebAlert can also be accessed via DirectTap modem-to-modem
communications. DirectTap is primarily used as a diagnostic tool or for initial set-up. DirectTap
enables the user to connect directly to the WebMaster/WebAlert via a phone line without using
the Internet. When the Internet is not available or at peak Internet usage, you can access your
device directly with your modem. Unlike ShoulderTap, DirectTap is limited to one user at a time.
DirectTap can be used to dial into a controller for initial set-up. The modem option is required to
DirectTap. Refer to the Instruction Manual.
Ethernet
Your WebMaster/WebAlert can be placed directly on a Wide Area Network (WAN) or Local Area
Network (LAN) just like any PC or standard piece of office equipment such as a network printer.
The device only needs to be assigned an IP address from the on-site IT administrator for access via
an Ethernet connection for a WebMaster/WebAlert.
The Instruction Manual provides a step-by-step guide for Ethernet communications.
Page 8
P/N 180273 Rev. N April 2017
8
QUICK START GUIDE
Section 1: WINDOWS 10
1. USB DRIVER INSTALLATION
Page 9
P/N 180273 Rev. N April 2017
9
1. USB DRIVER INSTALLATION FOR WINDOWS 10
**NOTE: Your computer MUST be on the Internet to complete this action! **
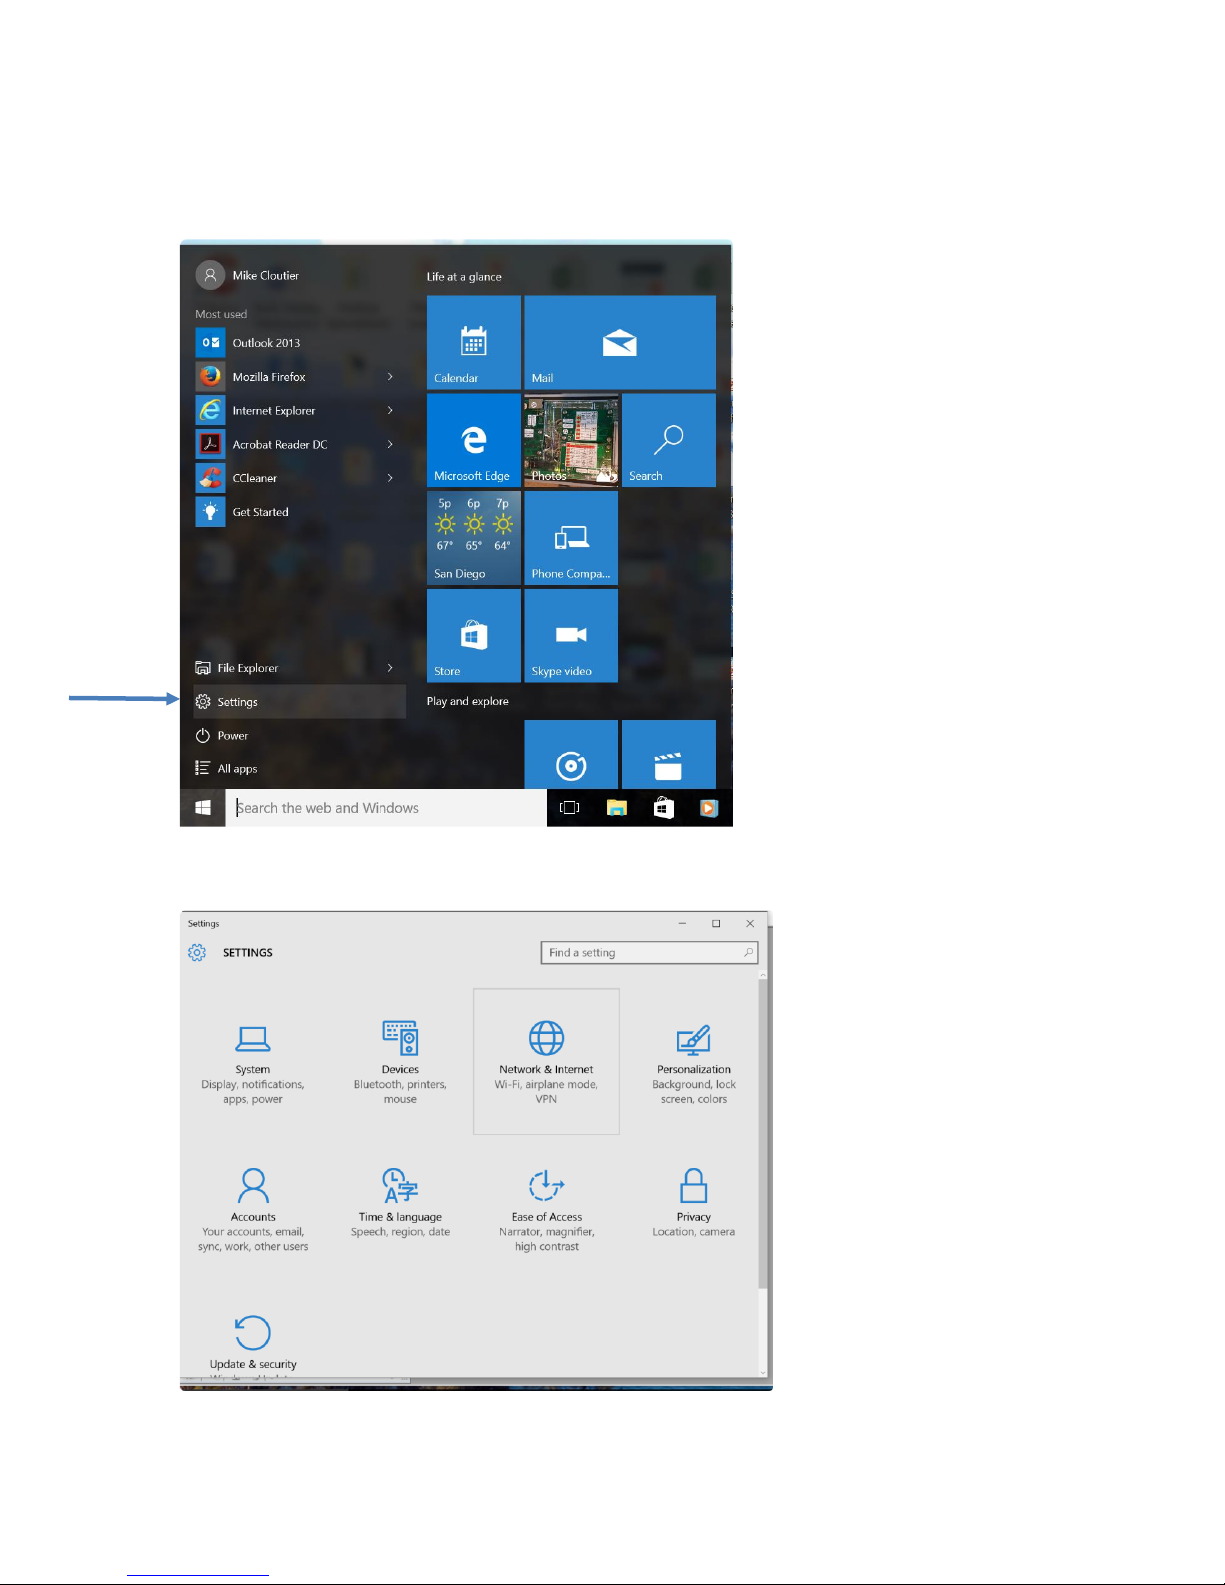
From the Start, click on Settings:
Click on Network and Internet:
Page 10
P/N 180273 Rev. N April 2017
10
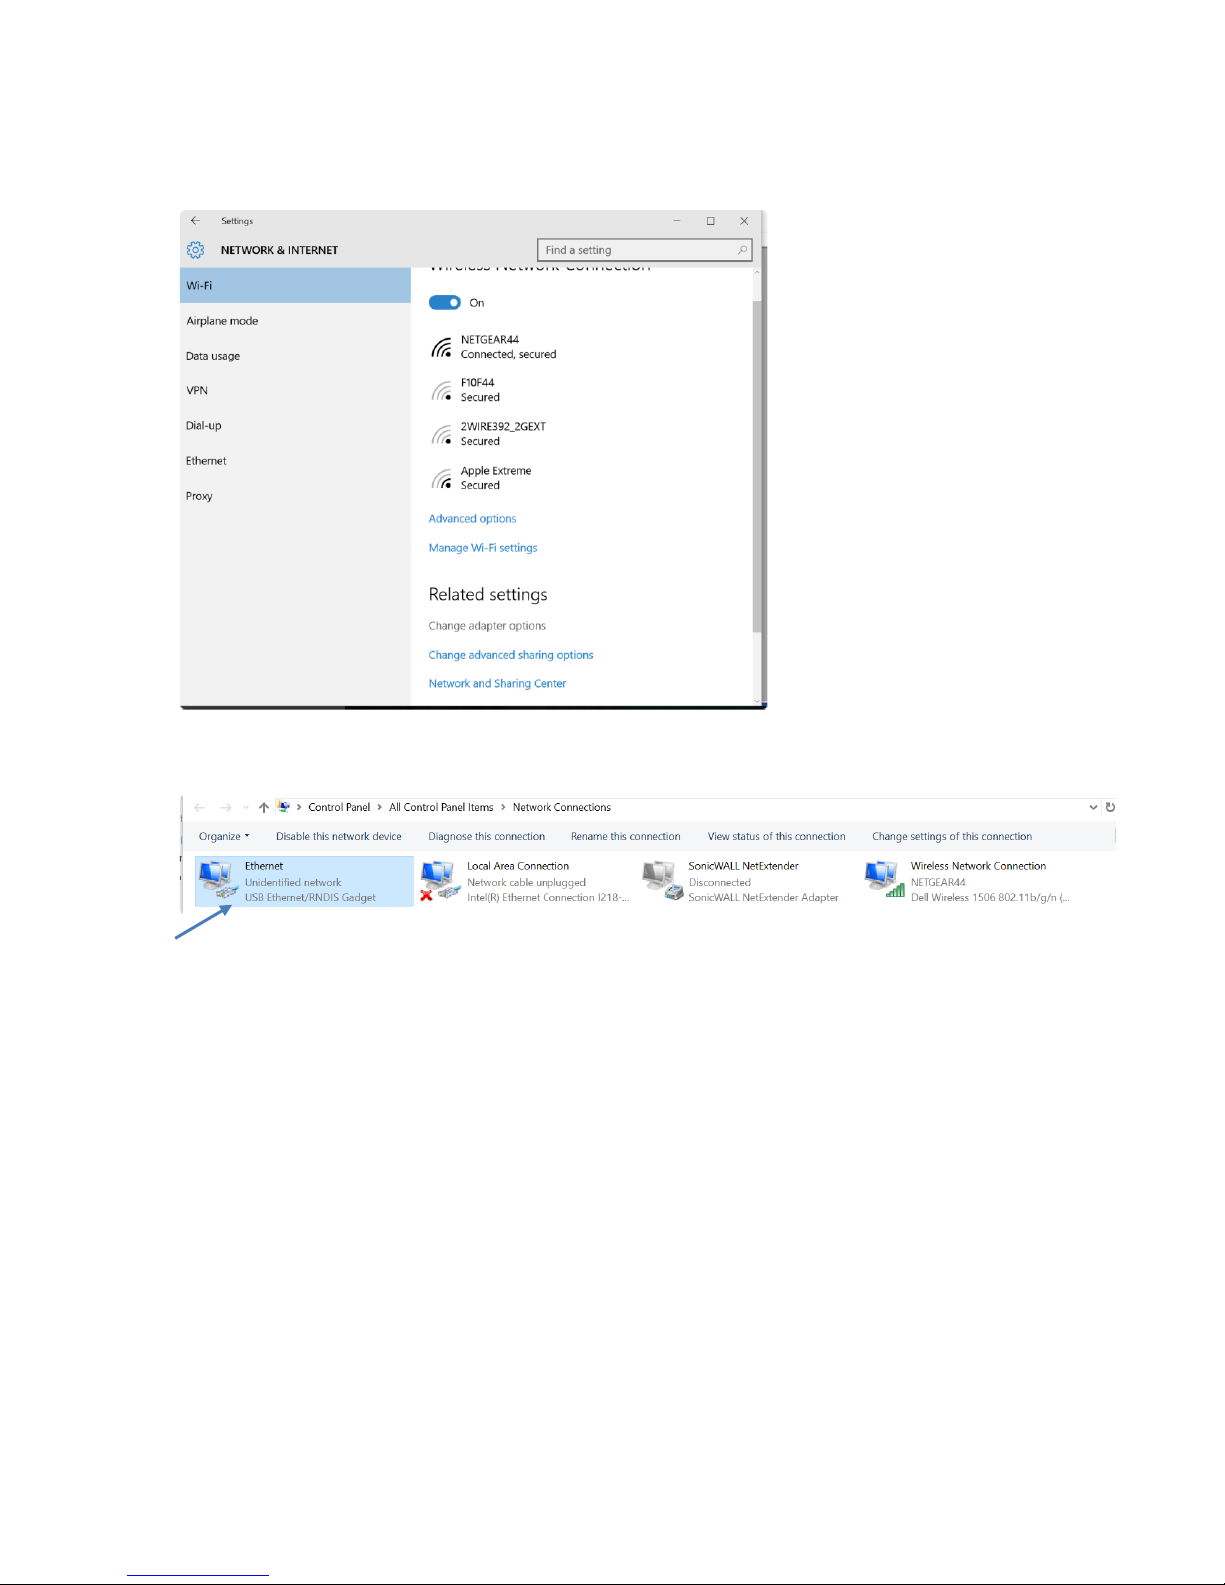
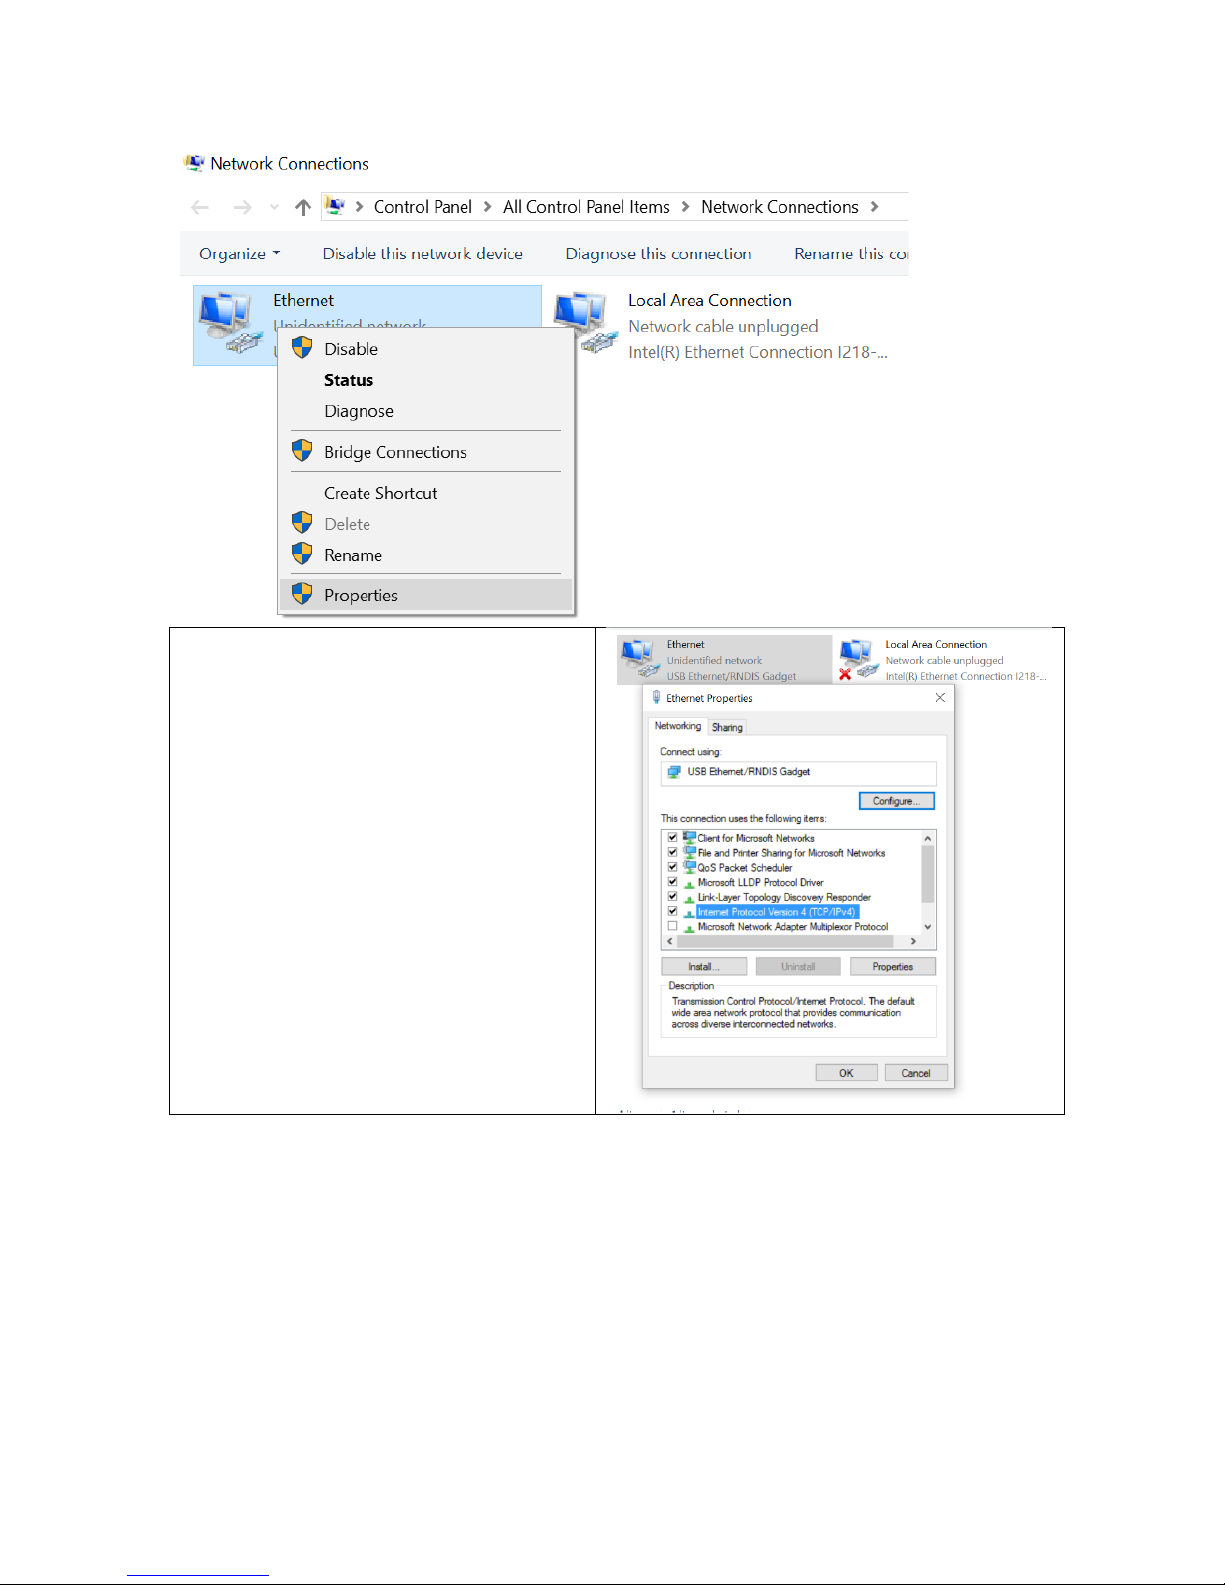
In Network & Internet, click Change adapter options:
The connection you’re looking for is Ethernet USB Ethernet/RNDIS Gadget.
Right click, and click Properties:
Page 11
P/N 180273 Rev. N April 2017
11
In the Properties screen, highlight
Internet Protocol Version 4 (TCP/IPv4),
and click Properties.
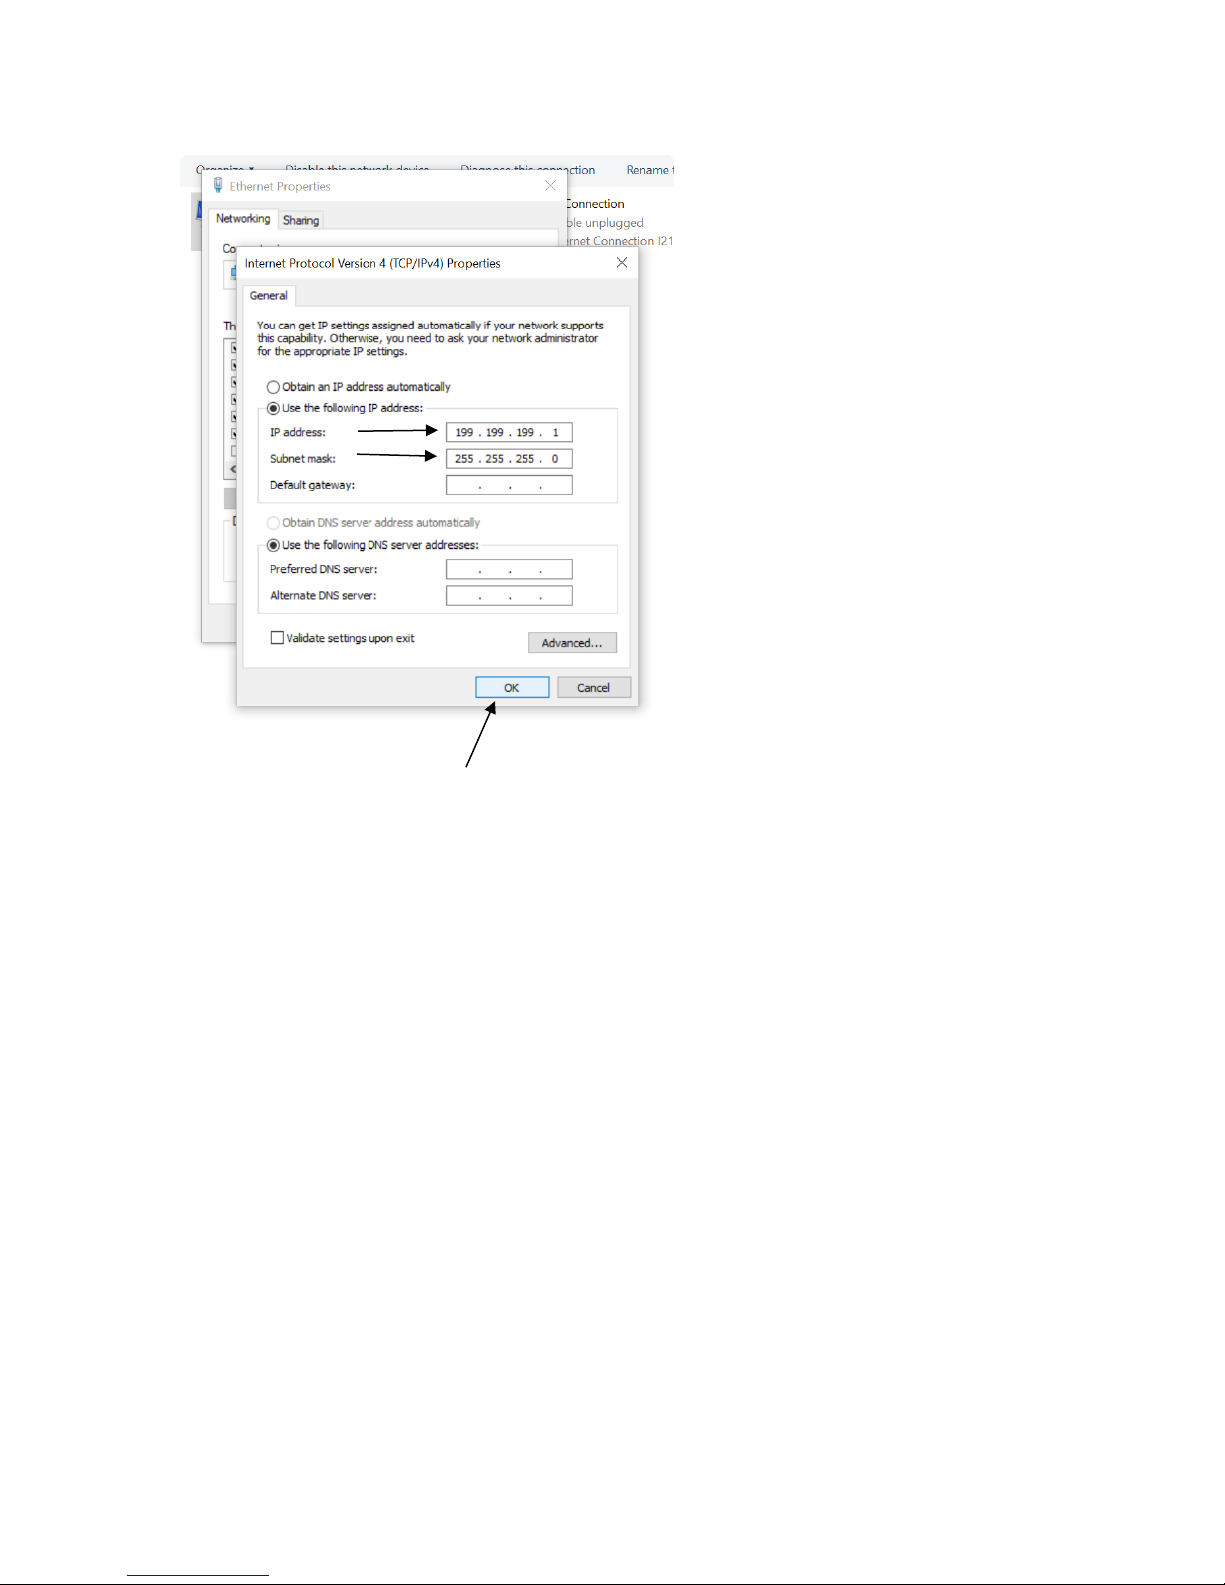
Select Use the following IP address, and enter the fields as below, then click OK:
Page 12
P/N 180273 Rev. N April 2017
12
Open your Web browser (Internet Explorer shown) and enter 199.199.199.2 in the address
bar.
The WebMaster Authentication screen appears as shown below:
Page 13

P/N 180273 Rev. N April 2017
13
Page 14
P/N 180273 Rev. N April 2017
14
QUICK START GUIDE
Section 2: WINDOWS 8
1. USB DRIVER INSTALLATION
2. DIRECT MODEM TO MODEM COMMUNICATIONS
Page 15
Quick Start Guide SECTION 2: WINDOWS 8
P/N 180273 Rev. N April 2017
15
1. USB DRIVER INSTALLATION FOR WINDOWS 8
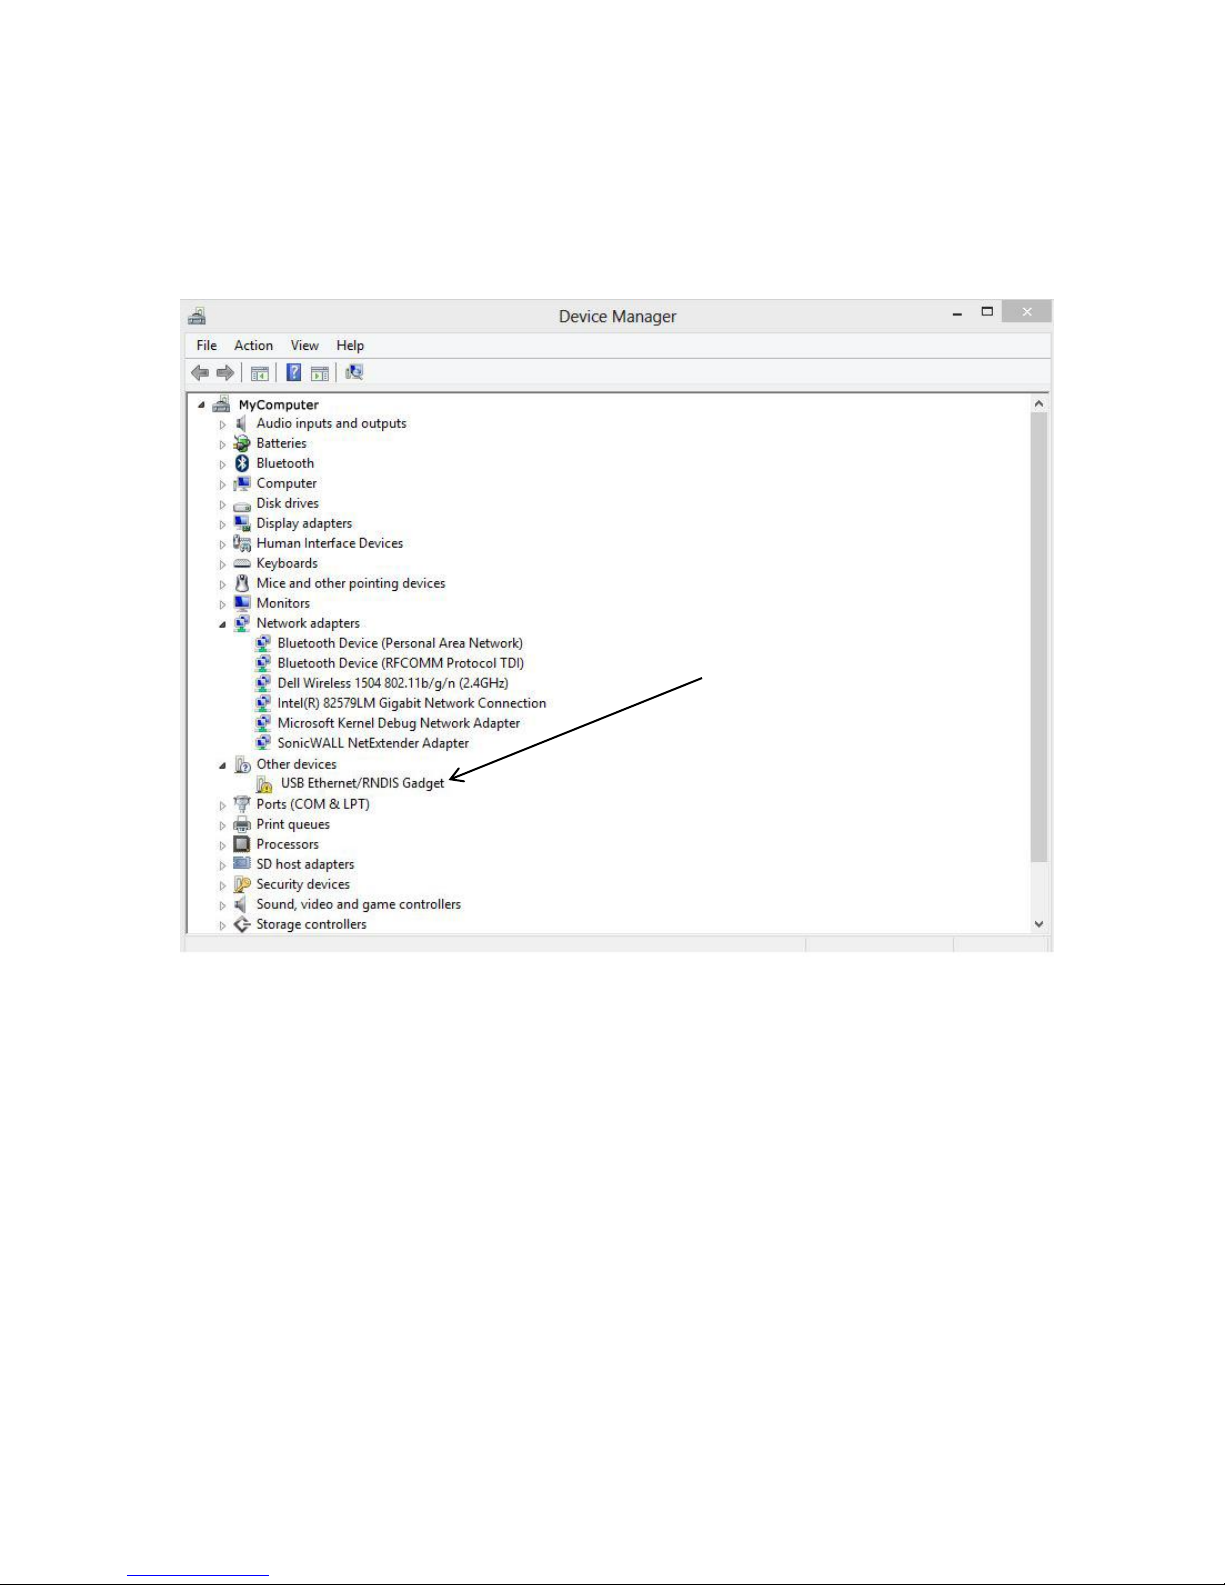
Step 1
► Plug the USB cable into the WebMaster/WebAlert and your computer.
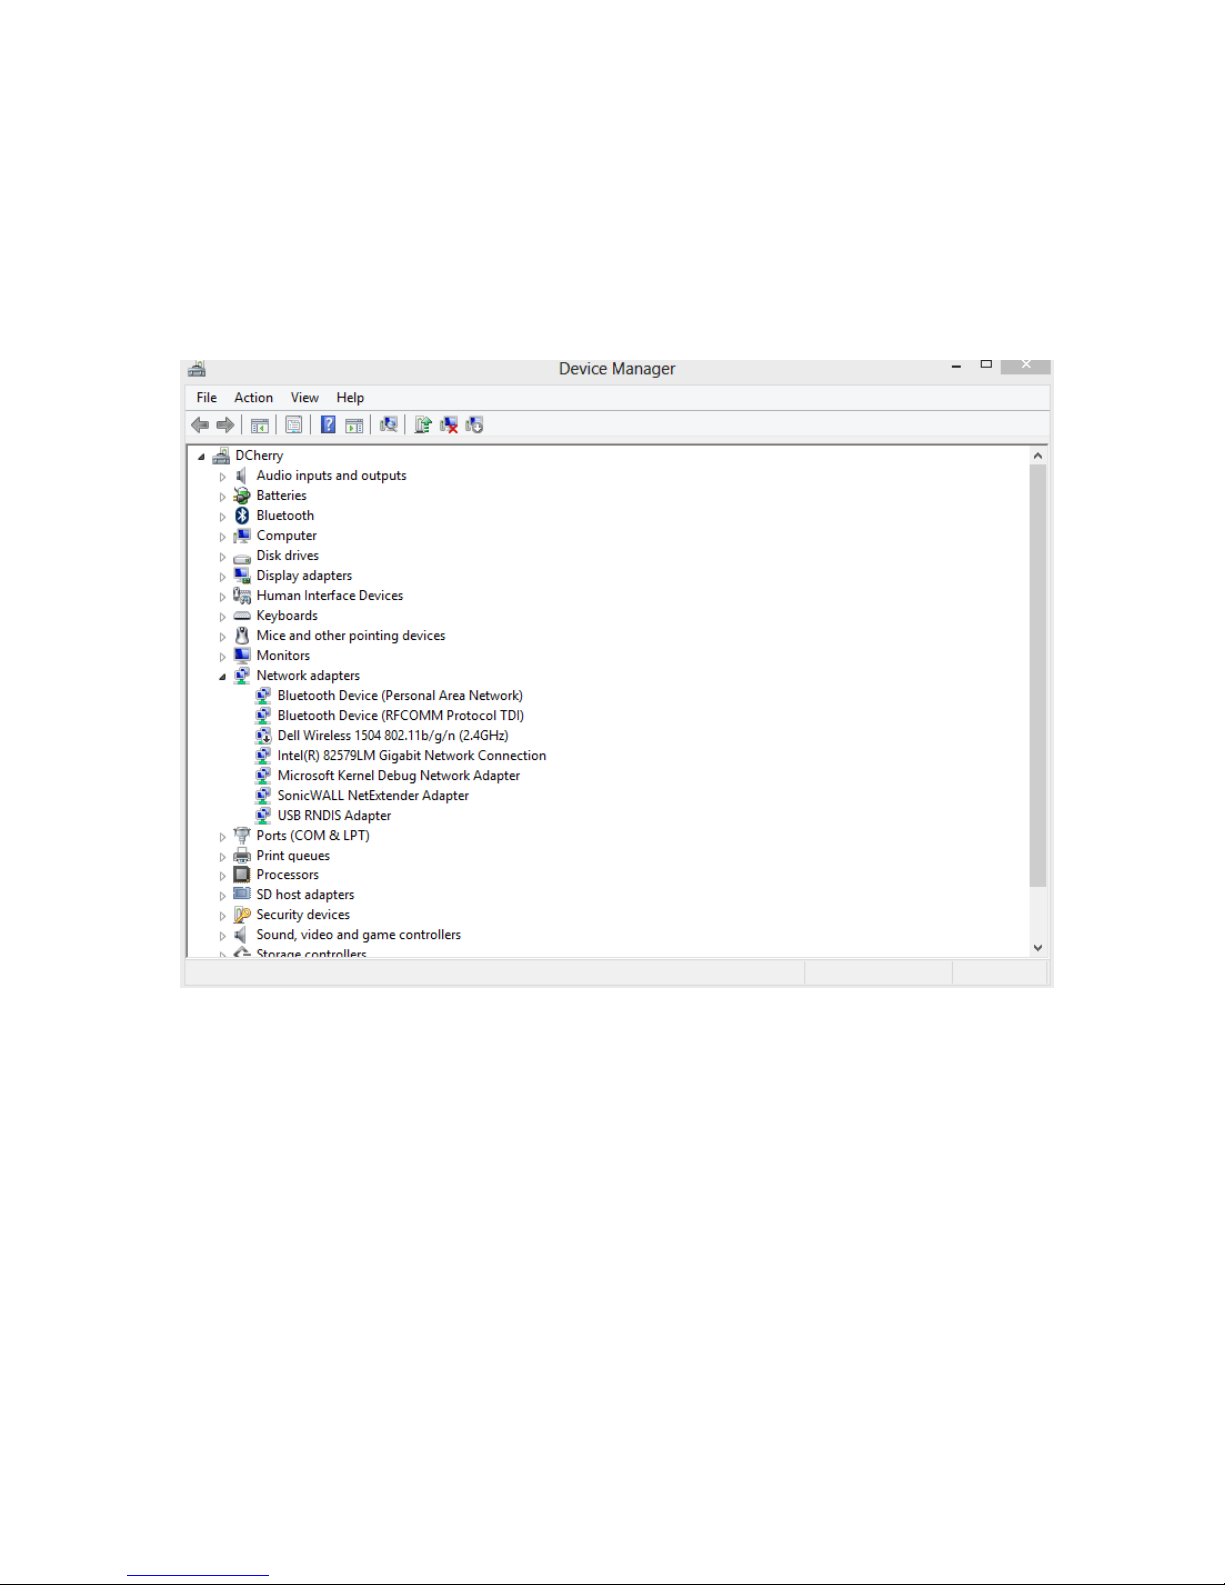
► Go to the Device Manager (right-click the lower left corner, select Control Panel, then
Device manager)
Page 16
Quick Start Guide SECTION 2: WINDOWS 8
P/N 180273 Rev. N April 2017
16
Step 2
► Right-click the RNDIS Ethernet Gadget with the yellow exclamation mark.
► Select Update Driver.
Page 17
Quick Start Guide SECTION 2: WINDOWS 8
P/N 180273 Rev. N April 2017
17
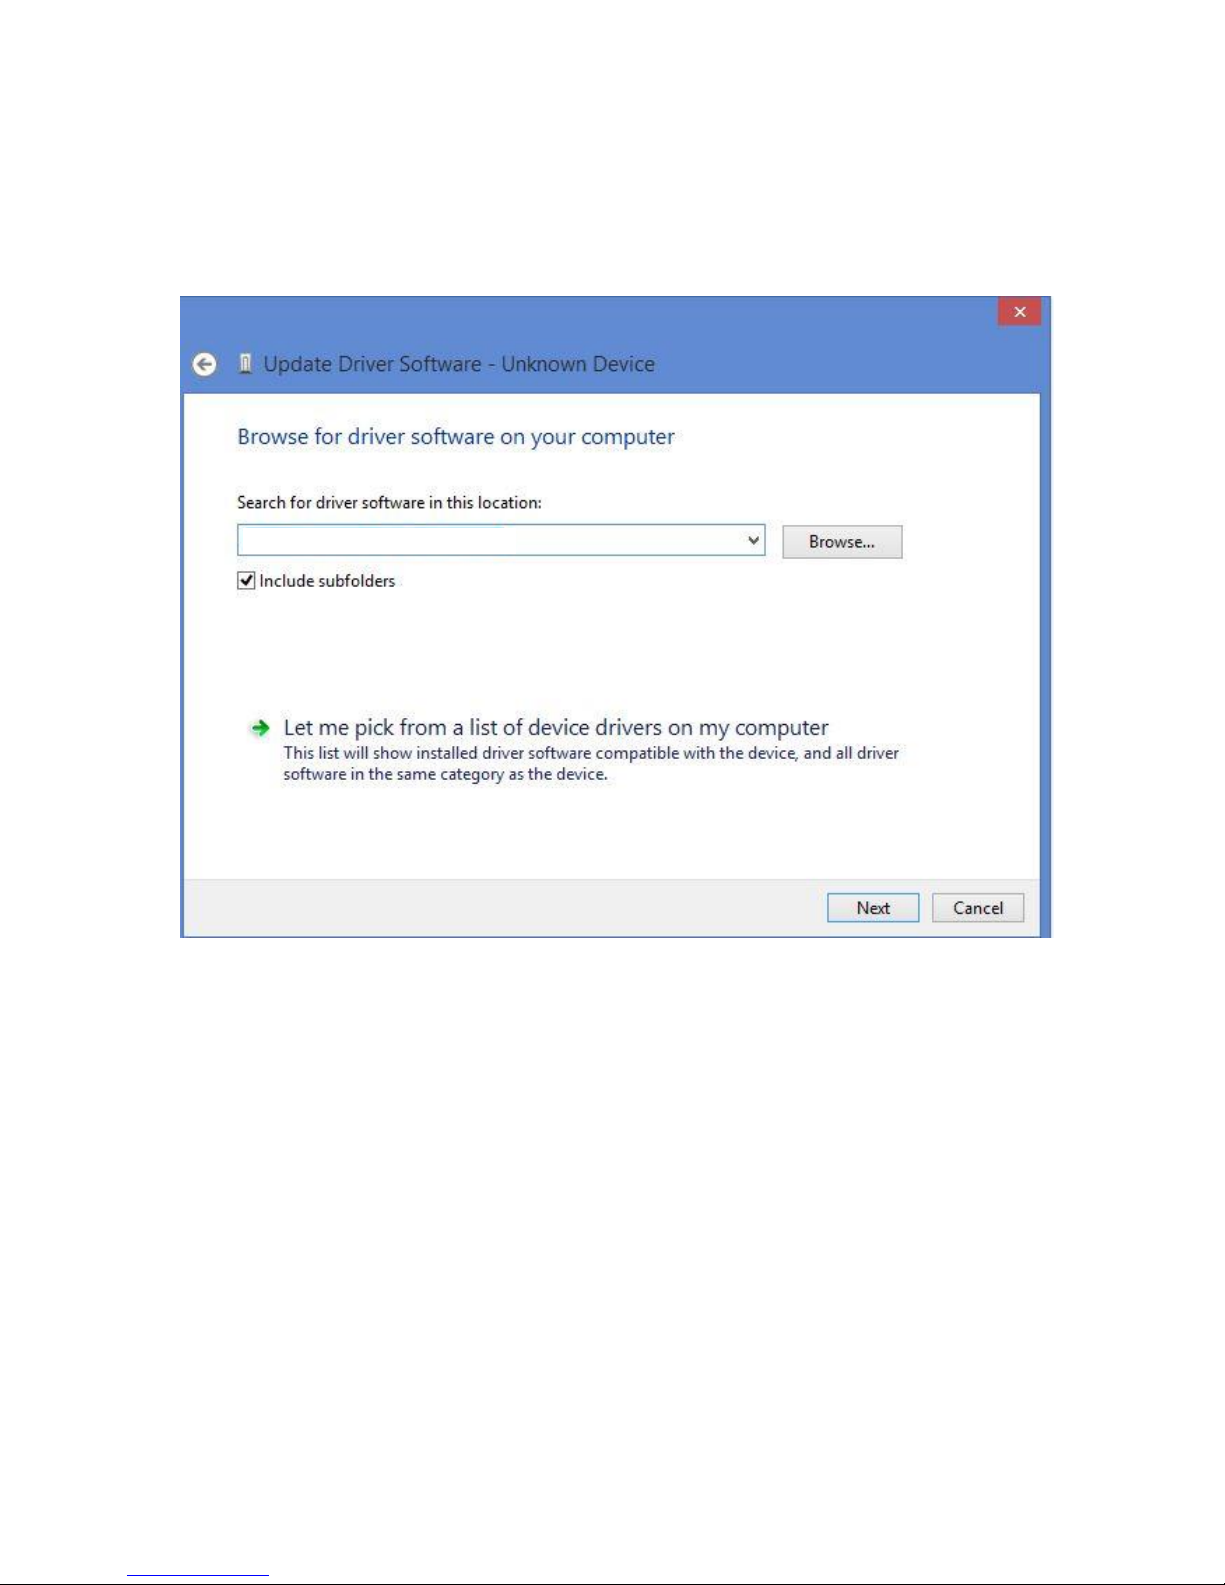
Step 3
► Select Browse my computer
► Select “Let me pick from a list of device drivers on my computer”
Page 18
Quick Start Guide SECTION 2: WINDOWS 8
P/N 180273 Rev. N April 2017
18
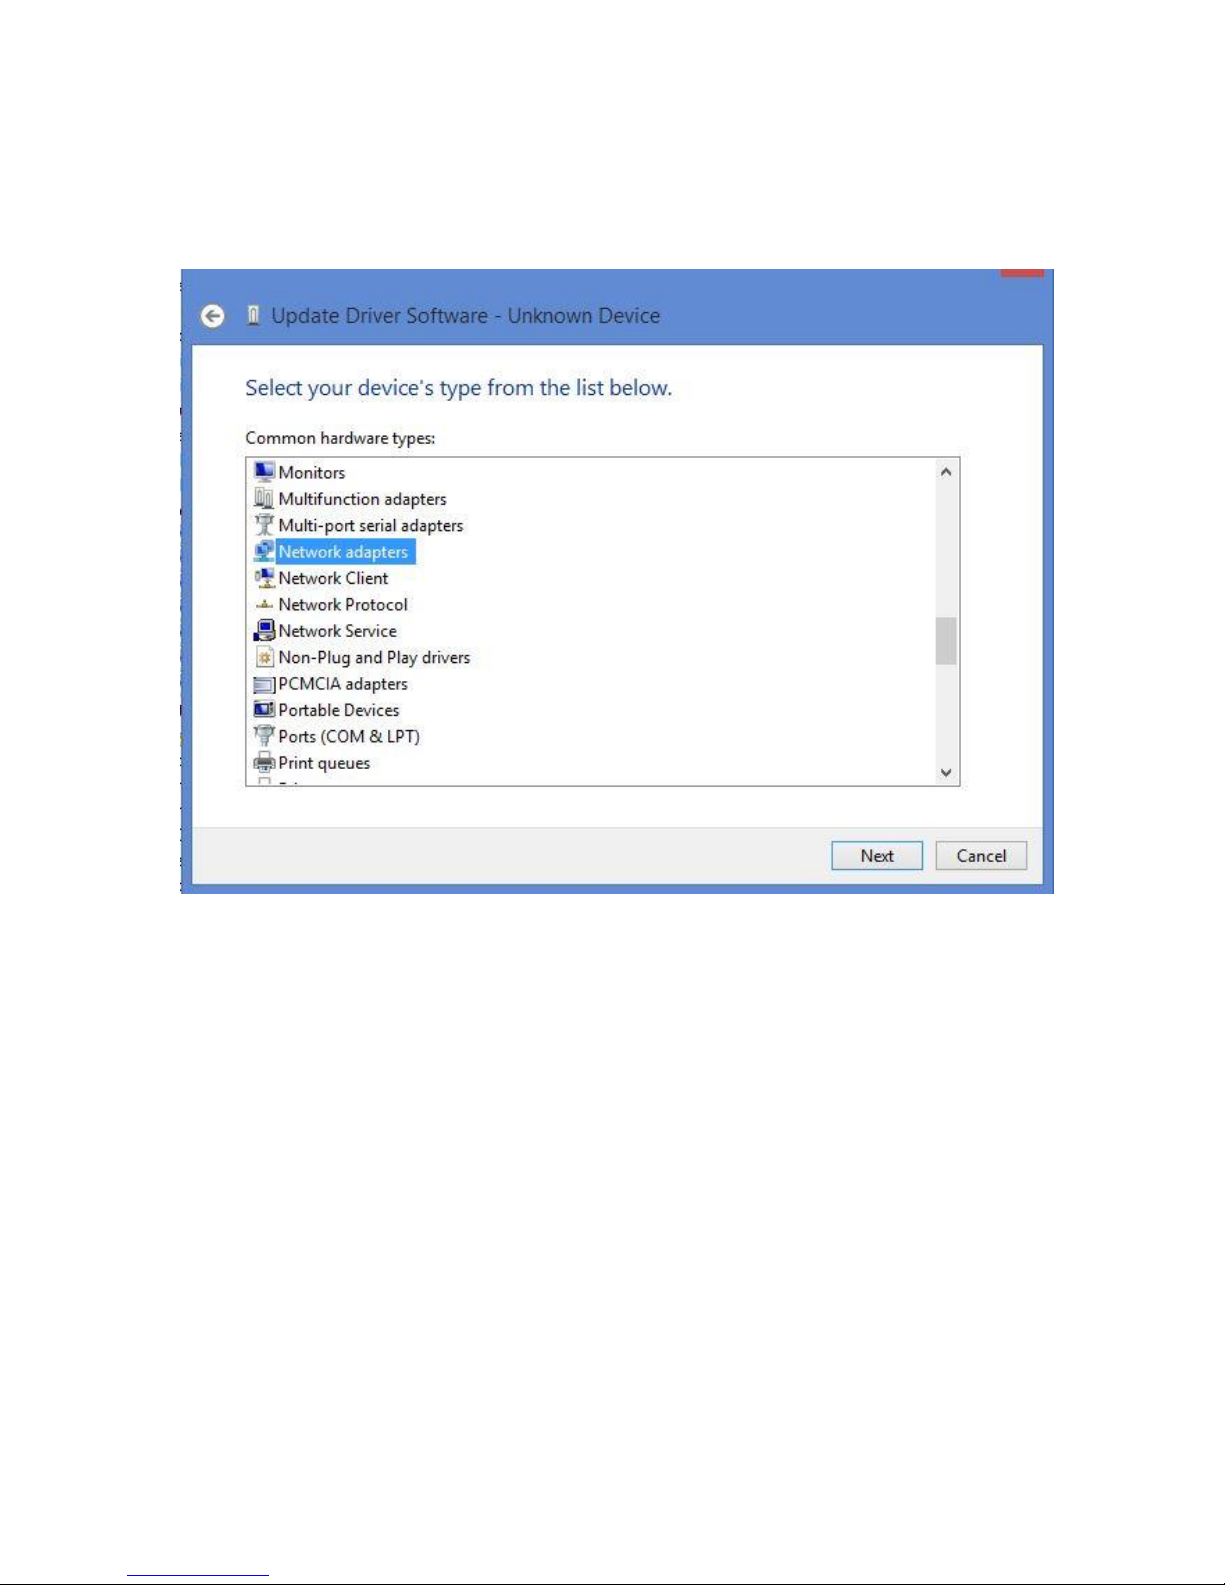
Step 4
► Select Network Adapter, click Next
Page 19
Quick Start Guide SECTION 2: WINDOWS 8
P/N 180273 Rev. N April 2017
19
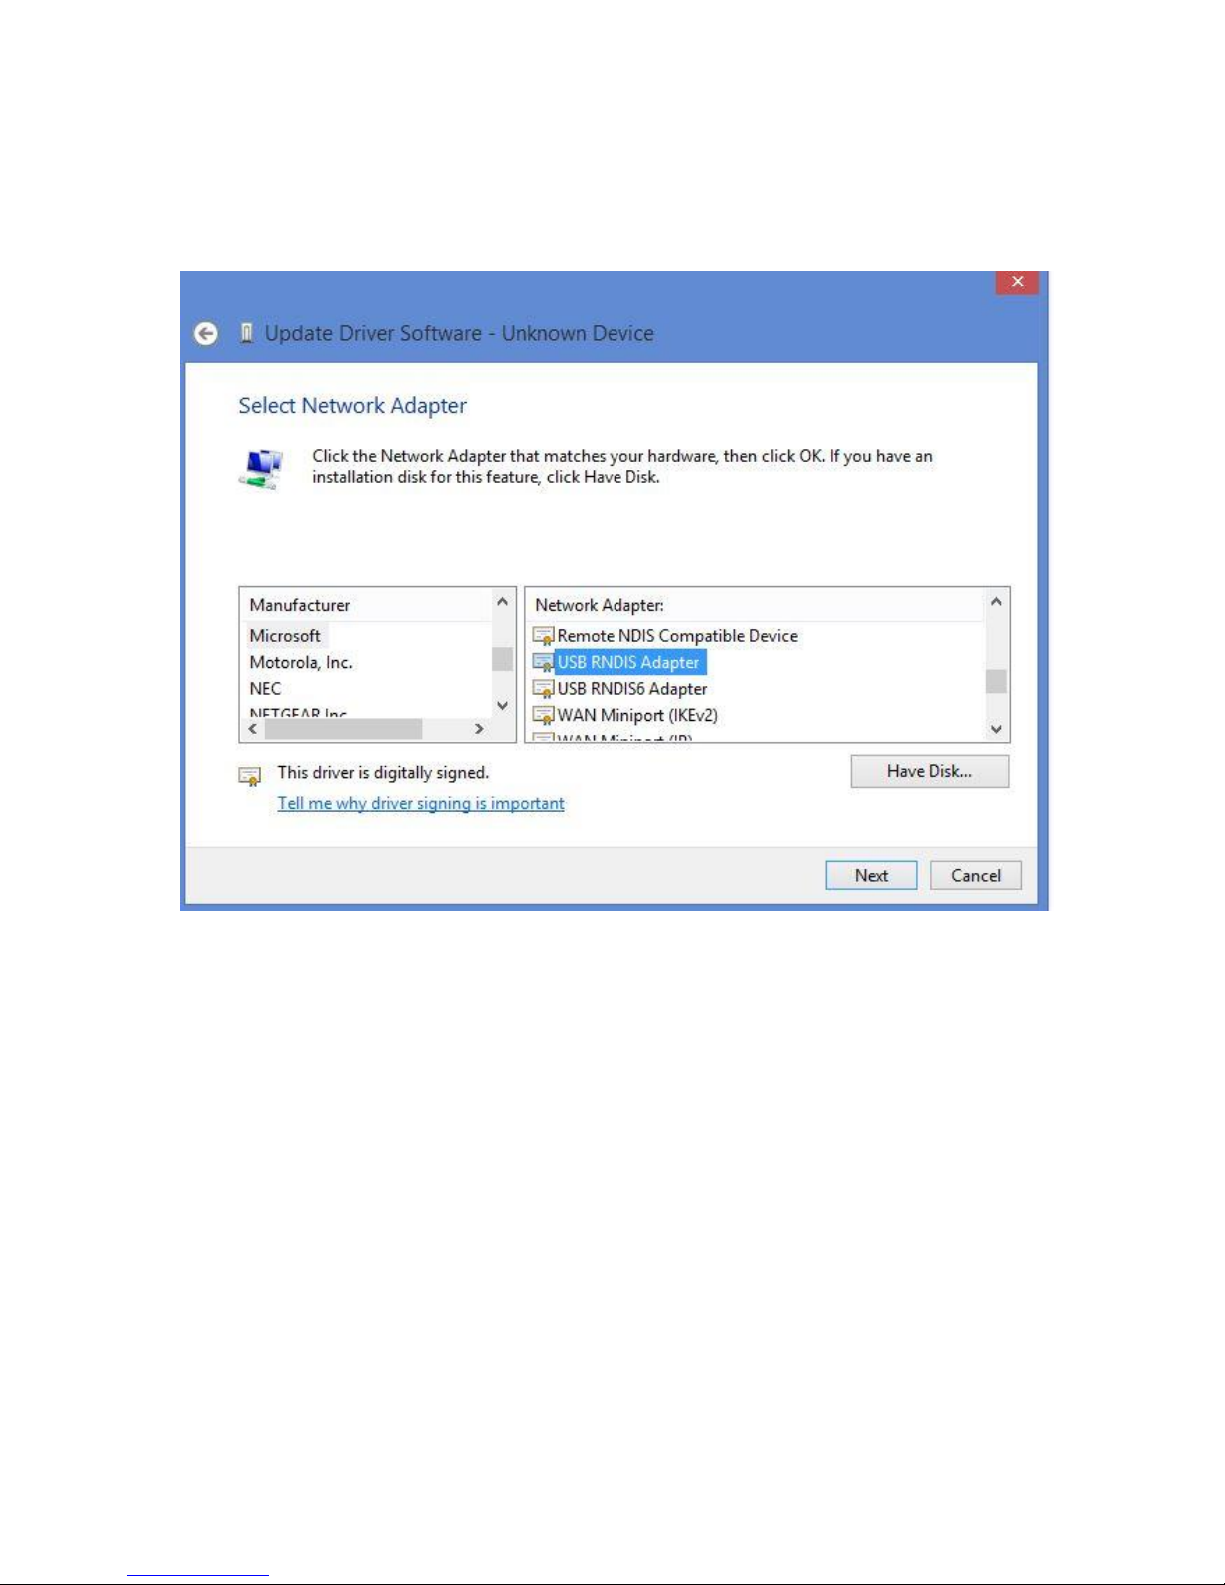
Step 5
► Select Microsoft and then USB RNDIS Adapter
Page 20

Quick Start Guide SECTION 2: WINDOWS 8
P/N 180273 Rev. N April 2017
20
Step 6
► Return to the Control Panel
► Click ‘View Network Status and Tasks’
Page 21
Quick Start Guide SECTION 2: WINDOWS 8
P/N 180273 Rev. N April 2017
21
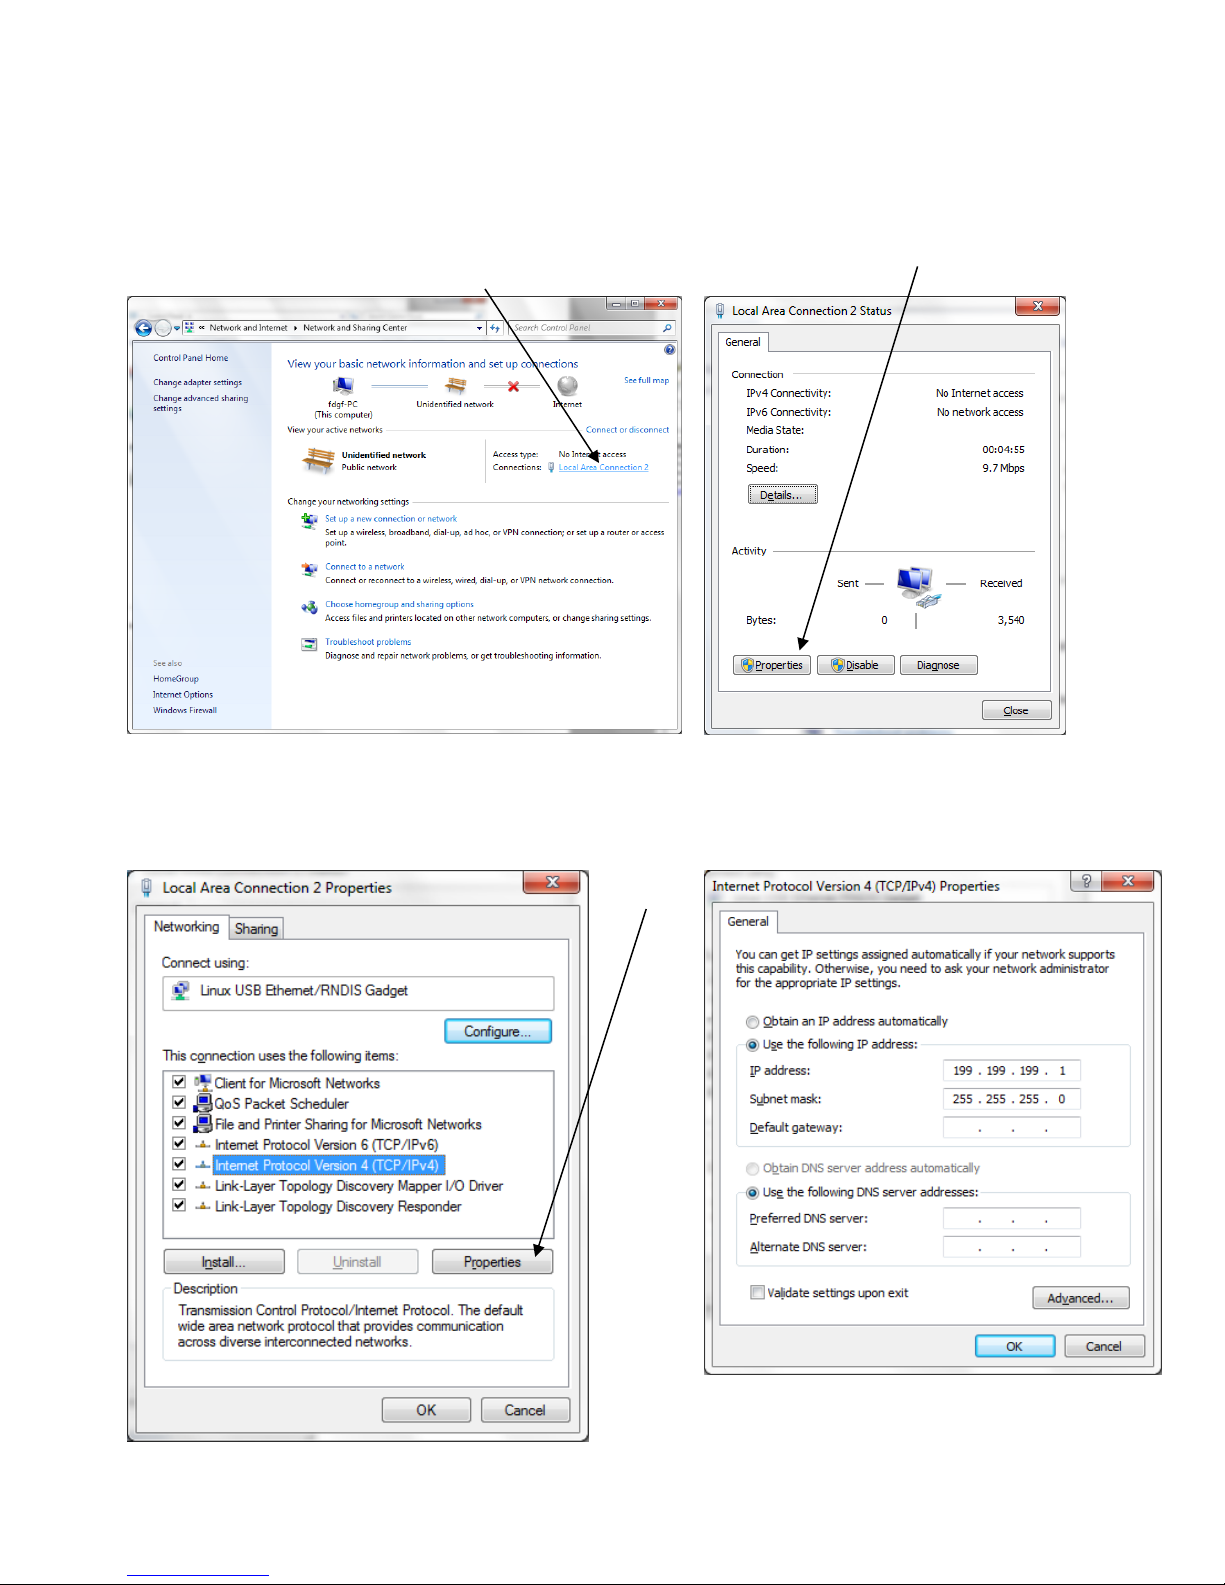
Step 7
Step 8
► Click ‘Local Area Connection 2’
► Click ‘Properties’
Step 9
Step 10
► Highlight Internet Protocol Version 4 (TCP/IPv4)
and then click ‘Properties’
► Select ‘Use the following IP address’ and
type in 199.199.199.1
► Click ‘OK’
Page 22
Quick Start Guide SECTION 2: WINDOWS 8
P/N 180273 Rev. N April 2017
22
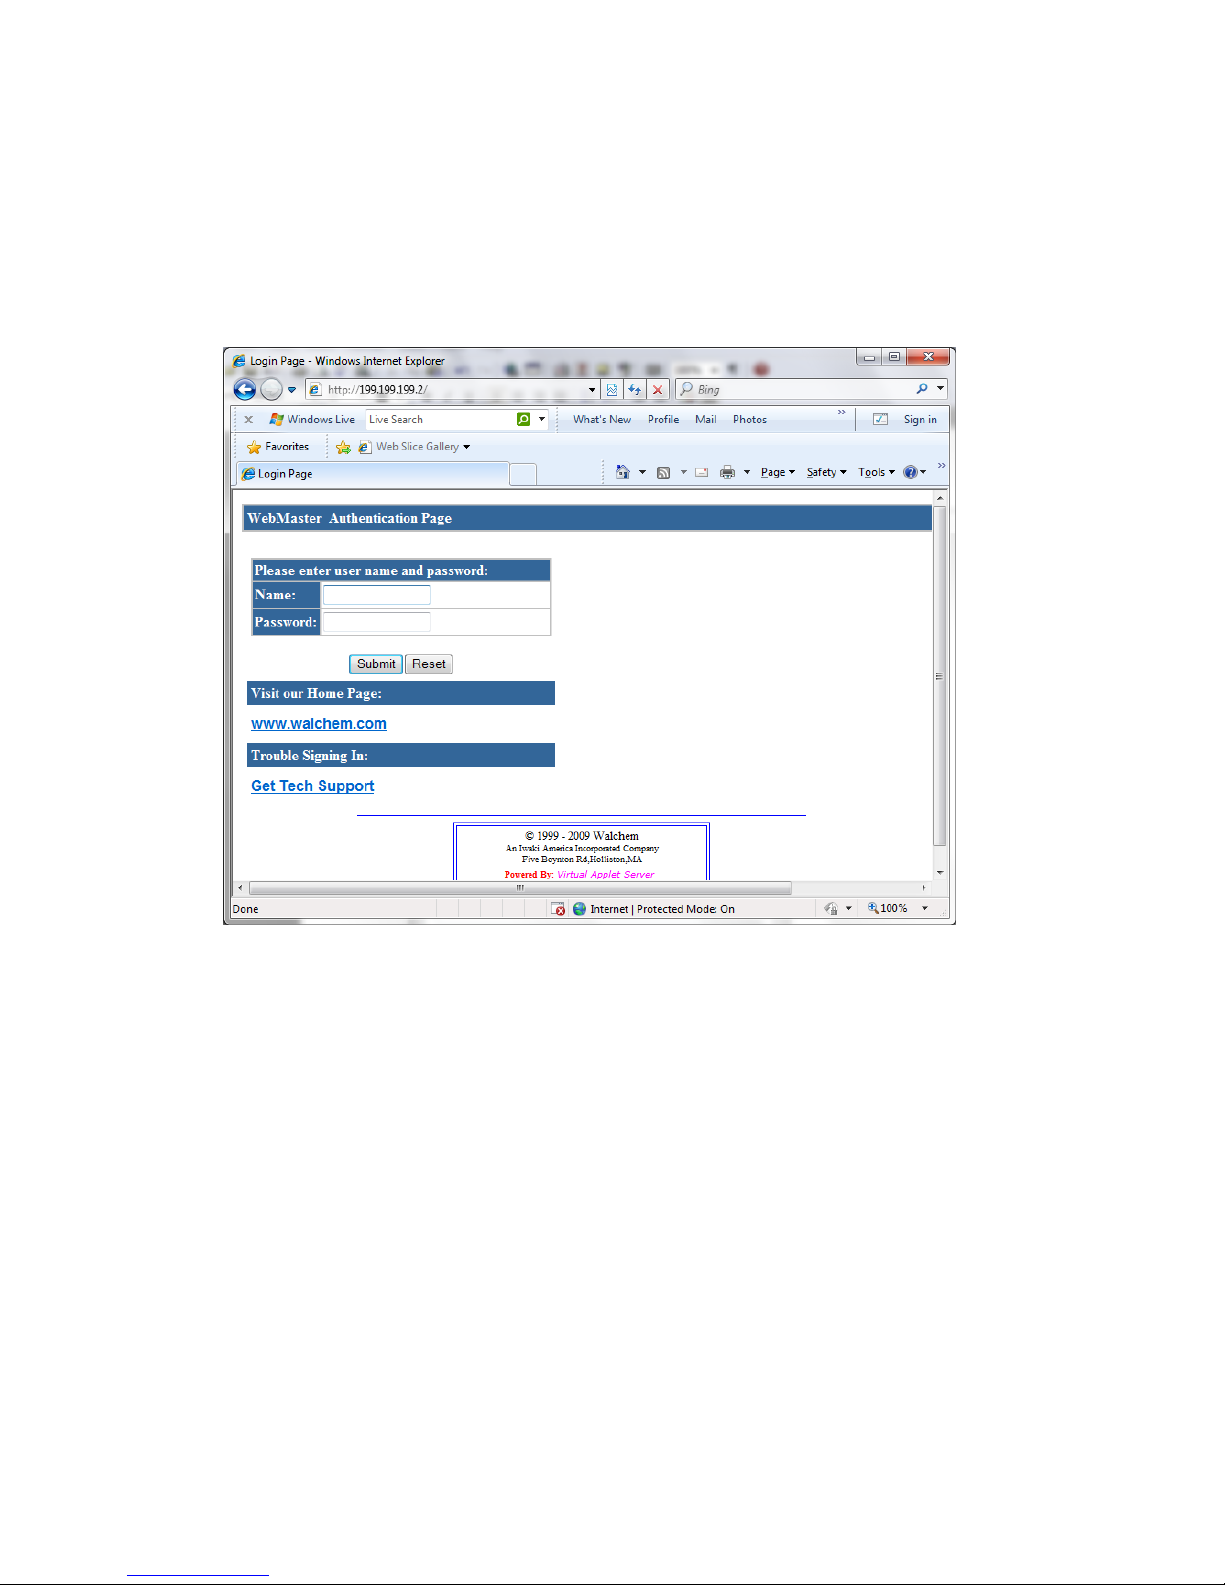
Step 11
► Open Internet Explorer and enter 199.199.199.2 in the address bar.
The WebMaster Authentication screen appears as shown below:
Page 23
Quick Start Guide SECTION 2: WINDOWS 8
P/N 180273 Rev. N April 2017
23
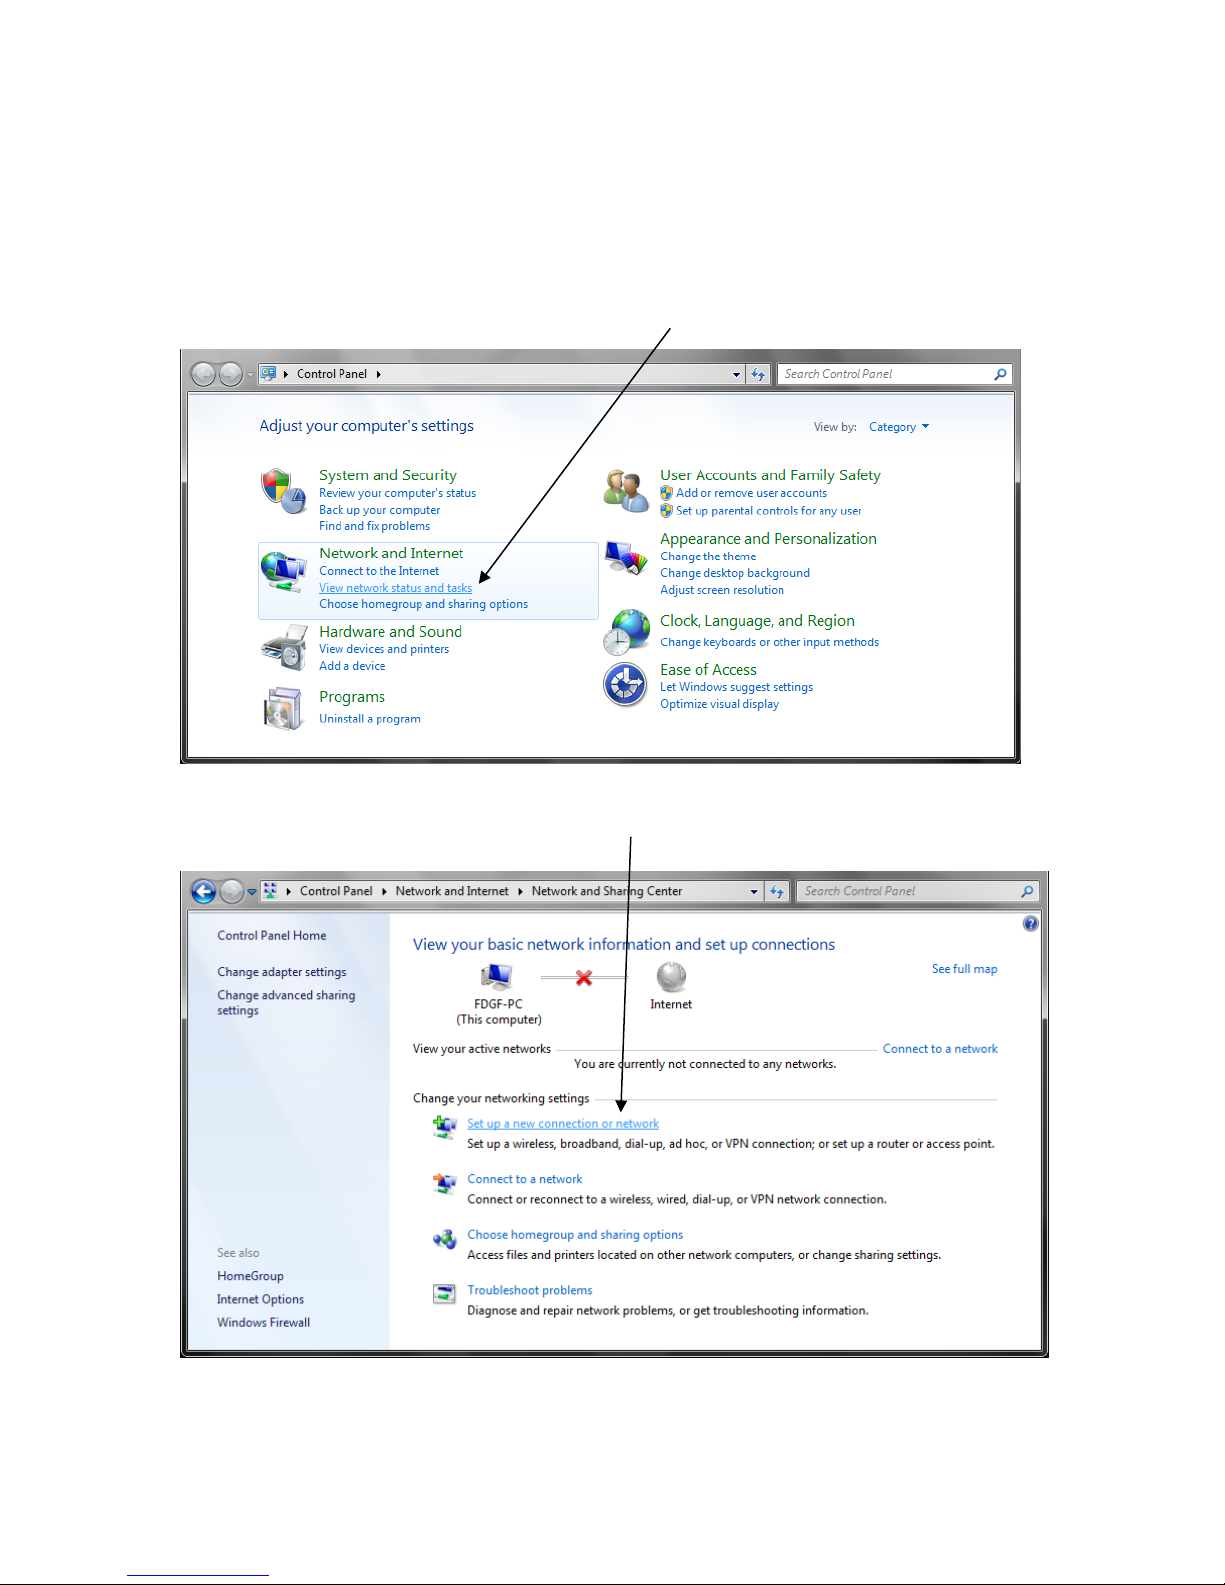
2. DIRECT MODEM SET-UP FOR WINDOWS 8
Step 1
► Go to Start, Control Panel
► Under ‘Network and Internet’, click ‘View network status and tasks’
Step 2
► Click ‘Set up a new connection or network’
Page 24
Quick Start Guide SECTION 2: WINDOWS 8
P/N 180273 Rev. N April 2017
24
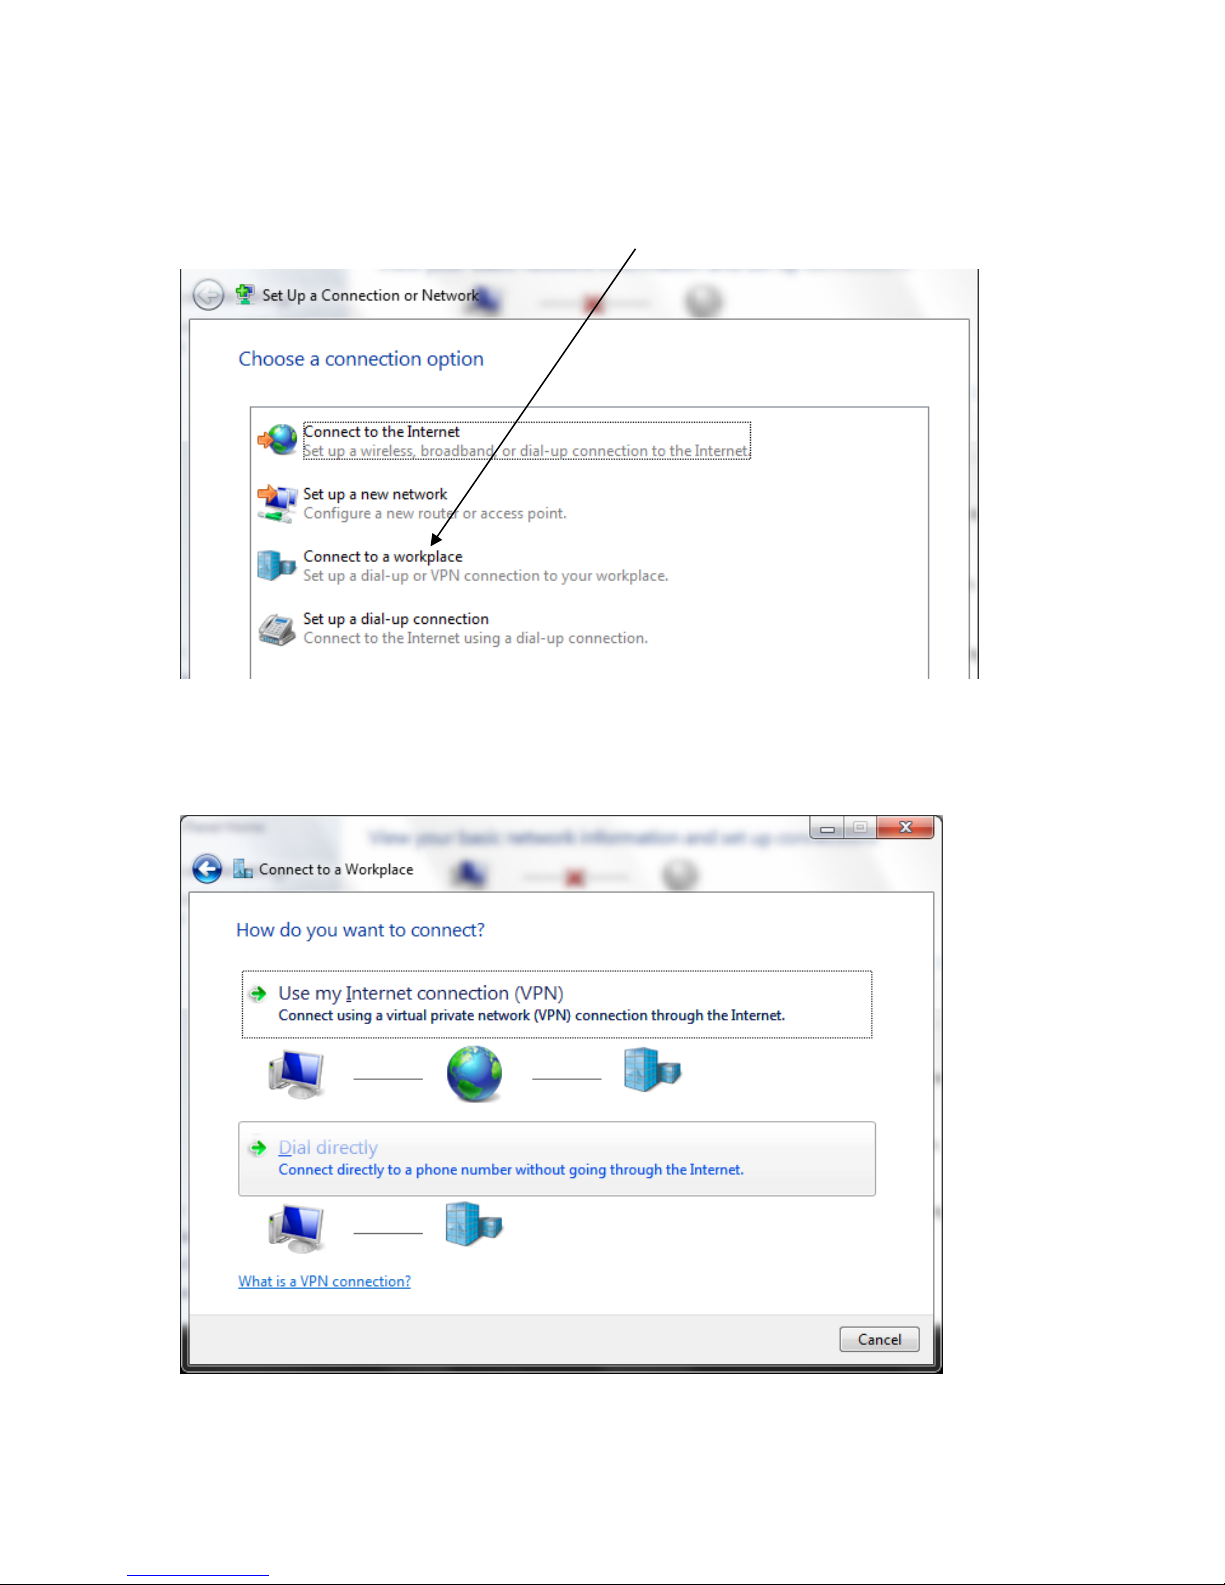
Step 3
► Select ‘Connect to a workplace’ and then ‘Next’
Step 4
► Click ‘Dial Directly’
Page 25
Quick Start Guide SECTION 2: WINDOWS 8
P/N 180273 Rev. N April 2017
25
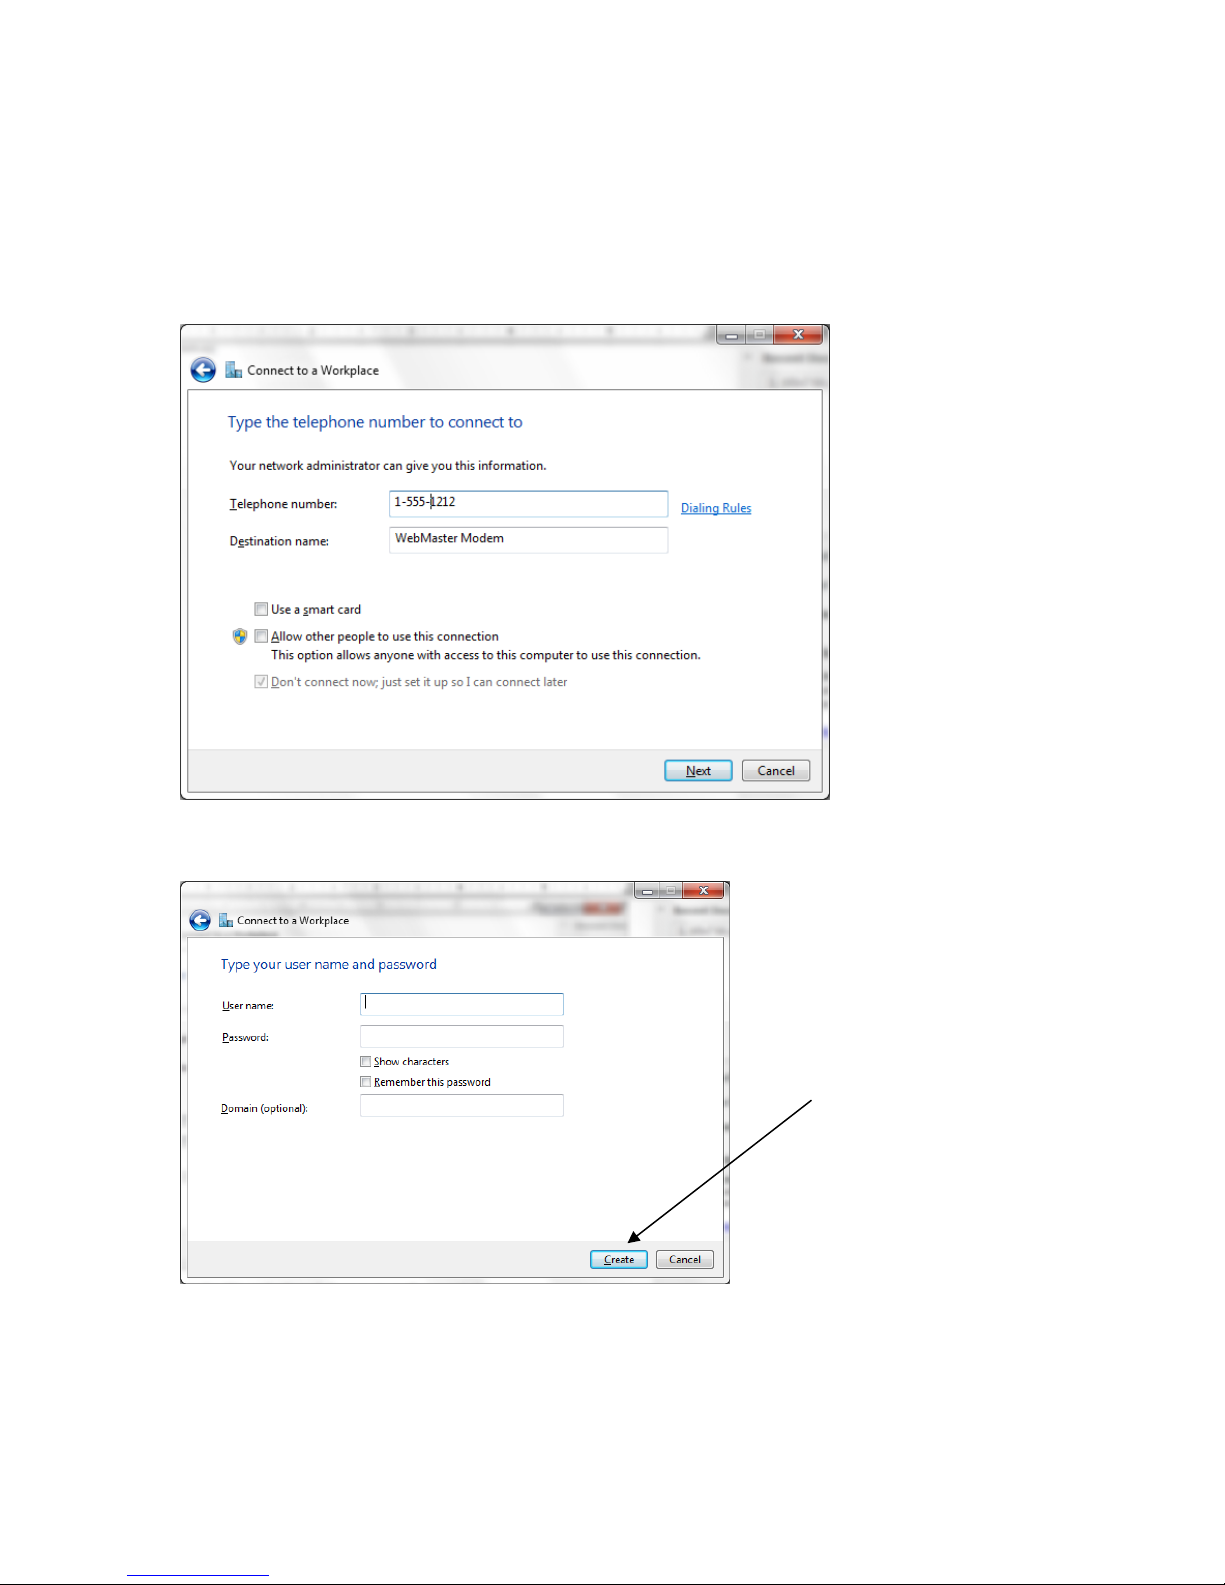
Step 5
► Add a phone number (this can be changed whenever you use the connection)
► Check the box next to ‘Don’t connect now’
► Click ‘Next’
Step 6
► Click ‘Create’
Page 26
Quick Start Guide SECTION 2: WINDOWS 8
P/N 180273 Rev. N April 2017
26
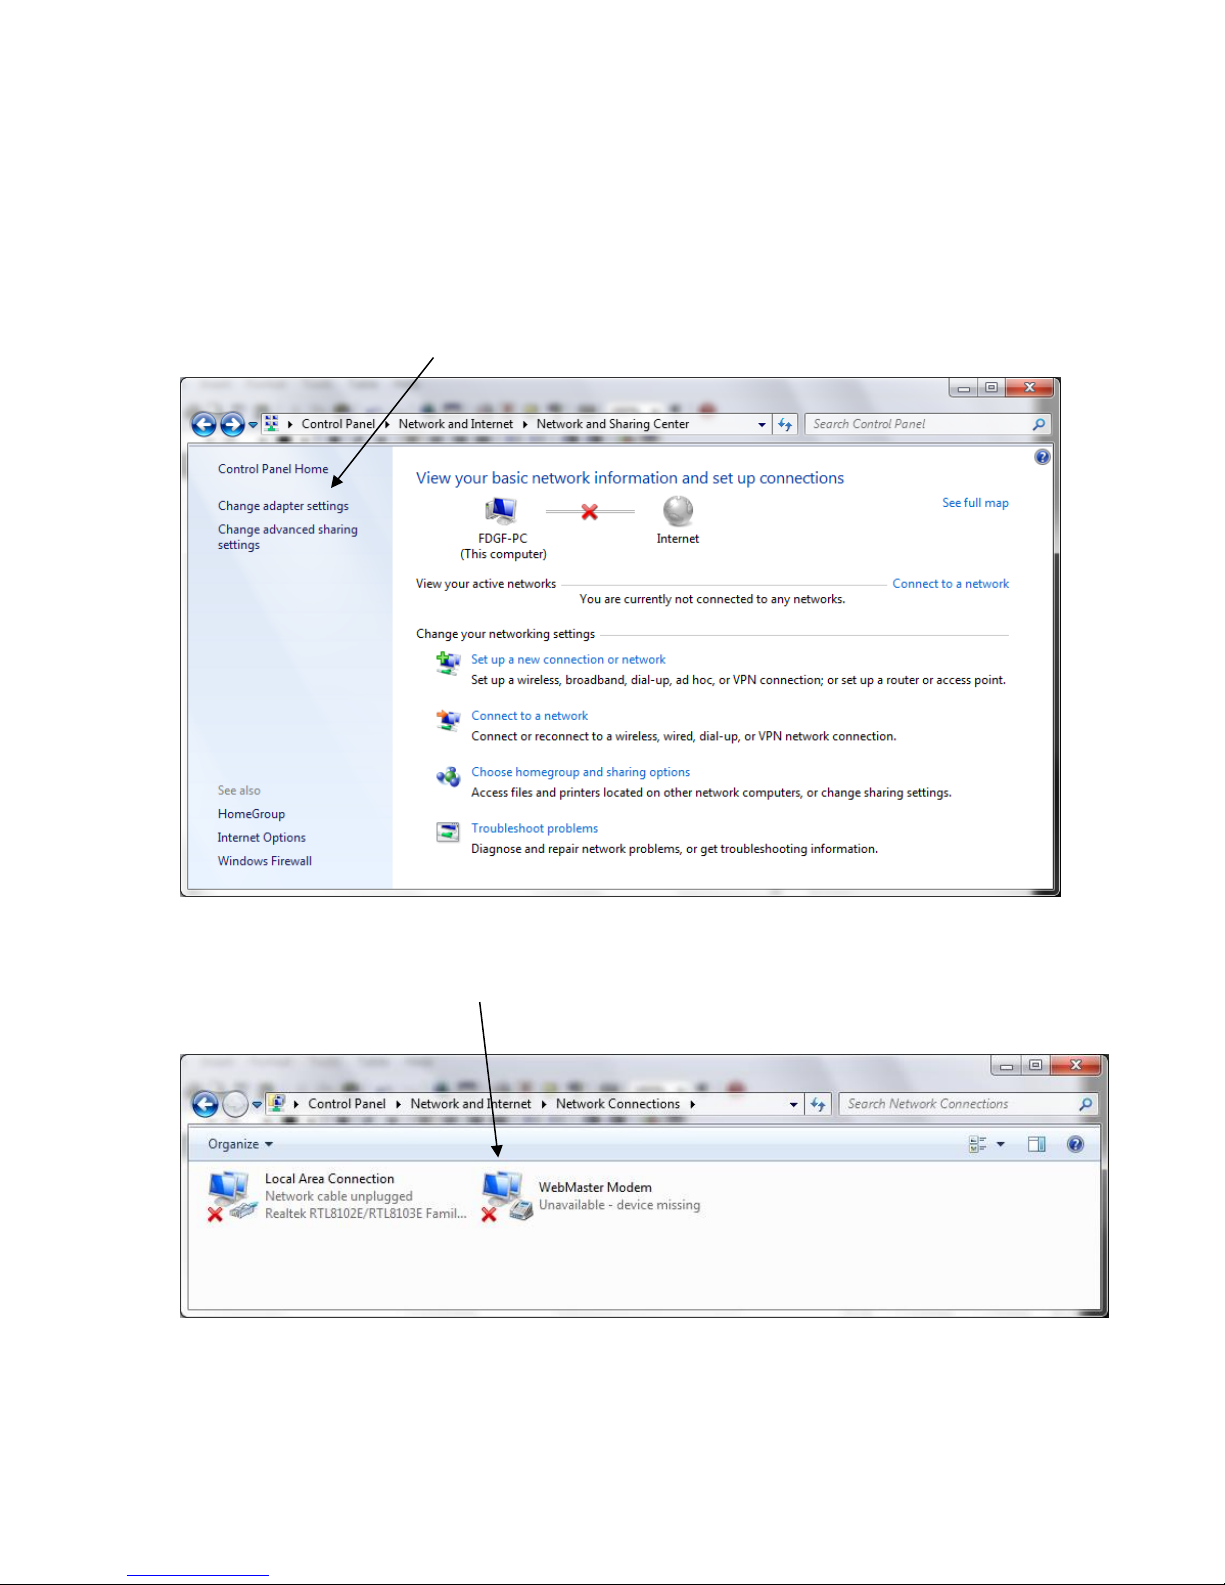
Step 7
► Click ‘Close’
► Return to the Network and Sharing Center
Step 8
► Click ‘Change adapter settings’ on the left
Step 9
► Right click ‘WebMaster Modem’
► Select ‘Properties’
Page 27
Quick Start Guide SECTION 2: WINDOWS 8
P/N 180273 Rev. N April 2017
27
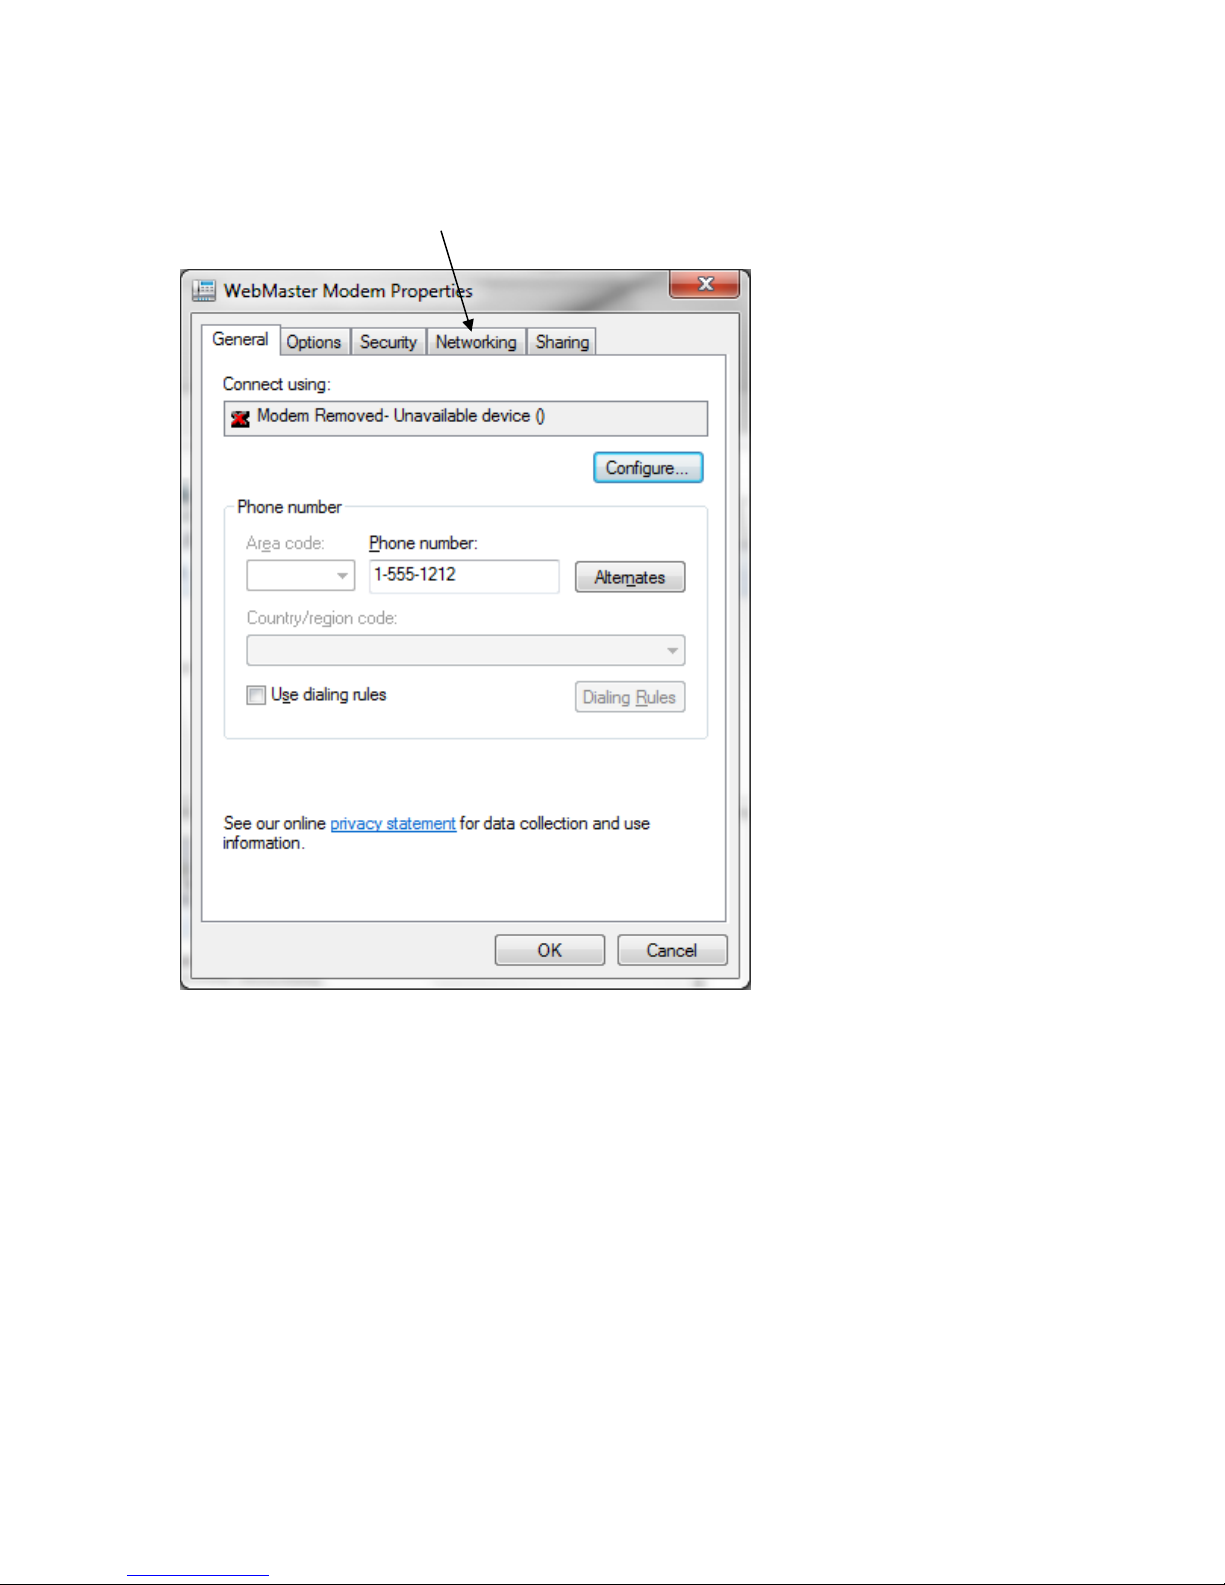
Step 10
► Click ‘Networking’ tab
Page 28
Quick Start Guide SECTION 2: WINDOWS 8
P/N 180273 Rev. N April 2017
28
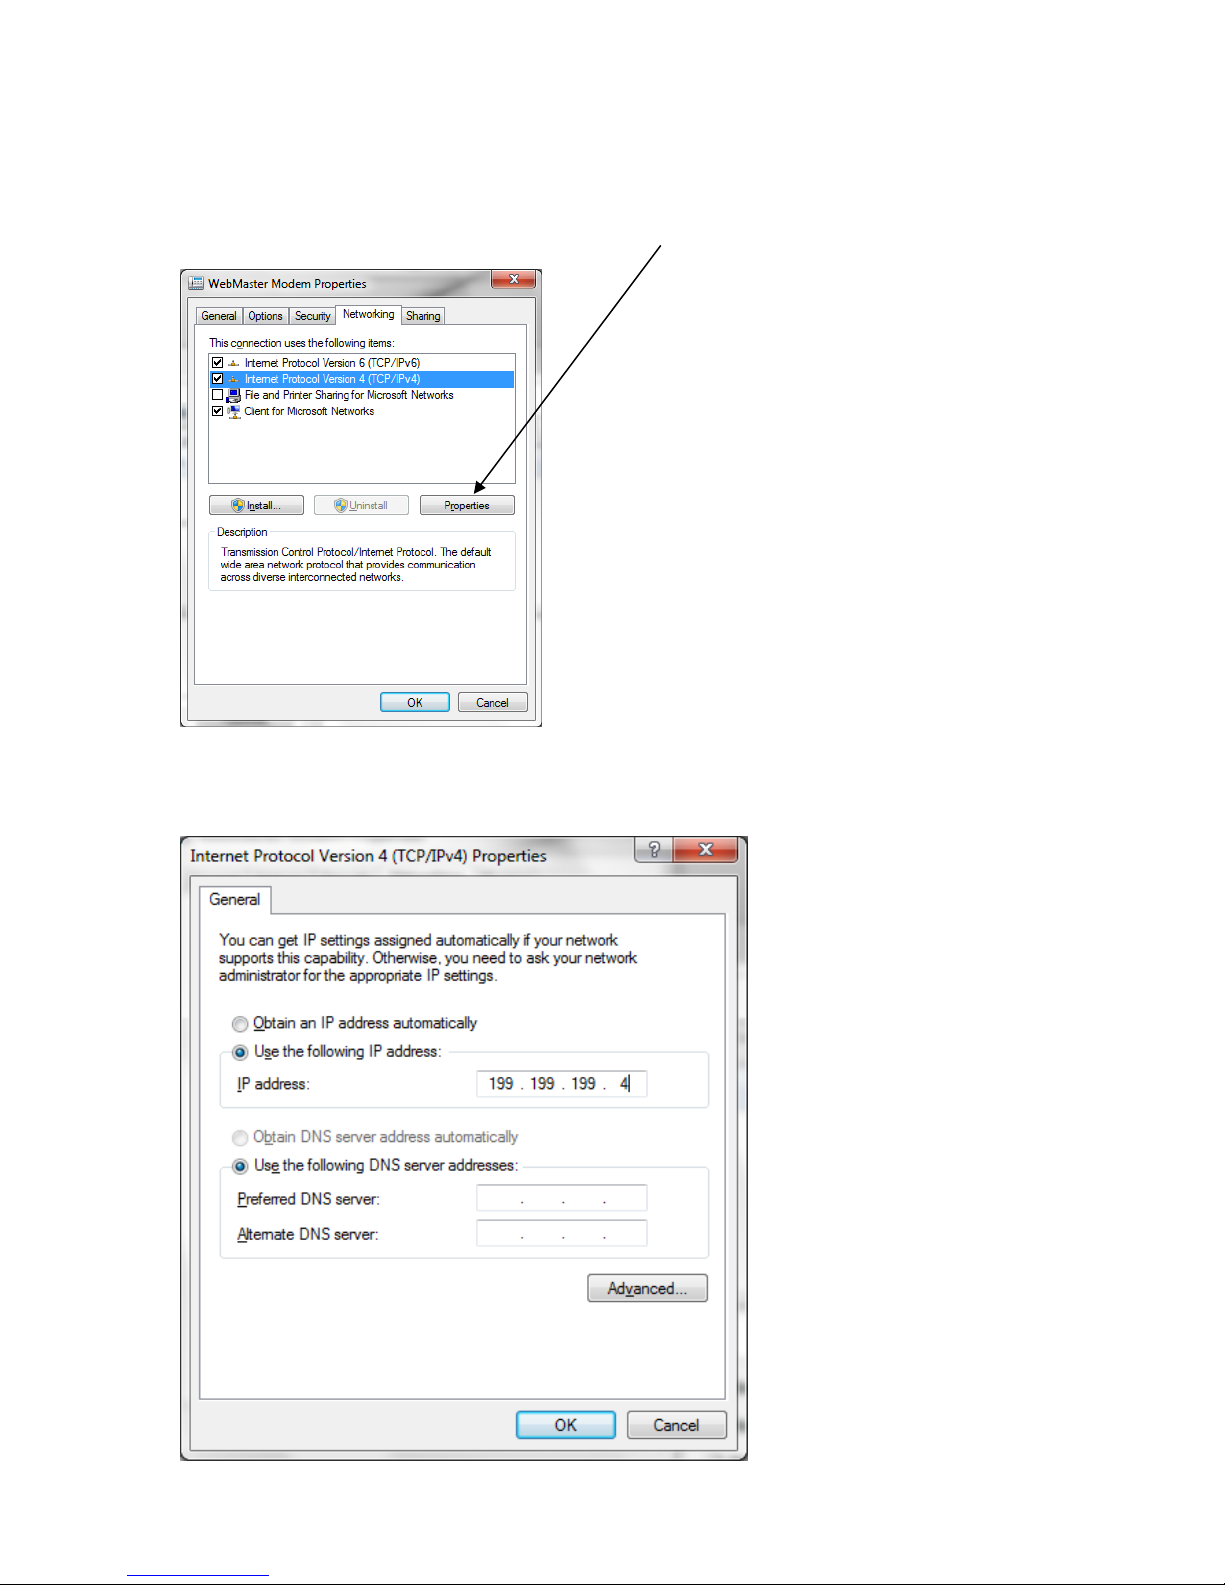
Step 11
► Select ‘Internet Protocol Version 4’ and click ‘Properties’ button
Step 12
► Select ‘Use the following IP address’ and change the IP address to 199.199.199.4
► Click ‘OK’ to save the changes
Page 29
P/N 180273 Rev. N April 2017
29
QUICK START GUIDE
Section 3: WINDOWS 7
1. USB DRIVER INSTALLATION
2. DIRECT MODEM TO MODEM COMMUNICATIONS
Page 30
Quick Start Guide SECTION 3: WINDOWS 7
P/N 180273 Rev. N April 2017
30
1. USB DRIVER INSTALLATION FOR WINDOWS 7
Step 1
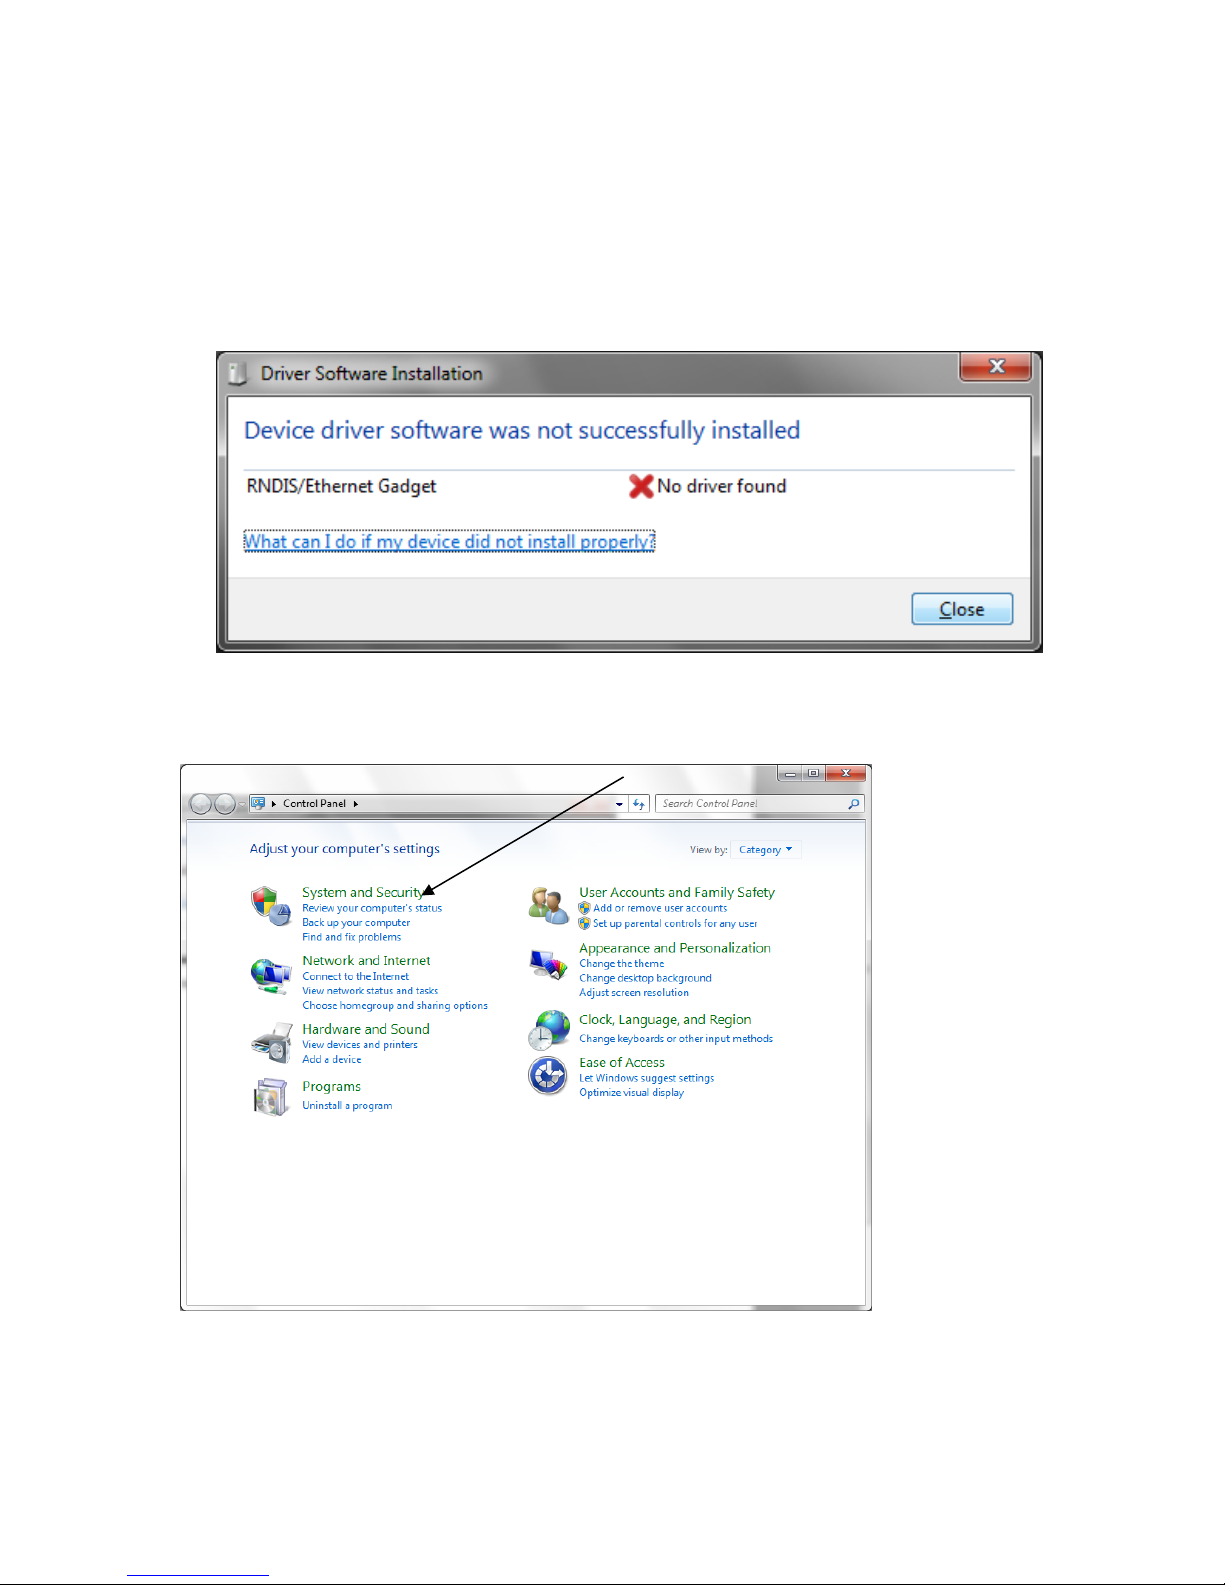
► Plug the USB cable into the WebMaster/WebAlert and your computer.
► You will see this message on your screen
Step 2
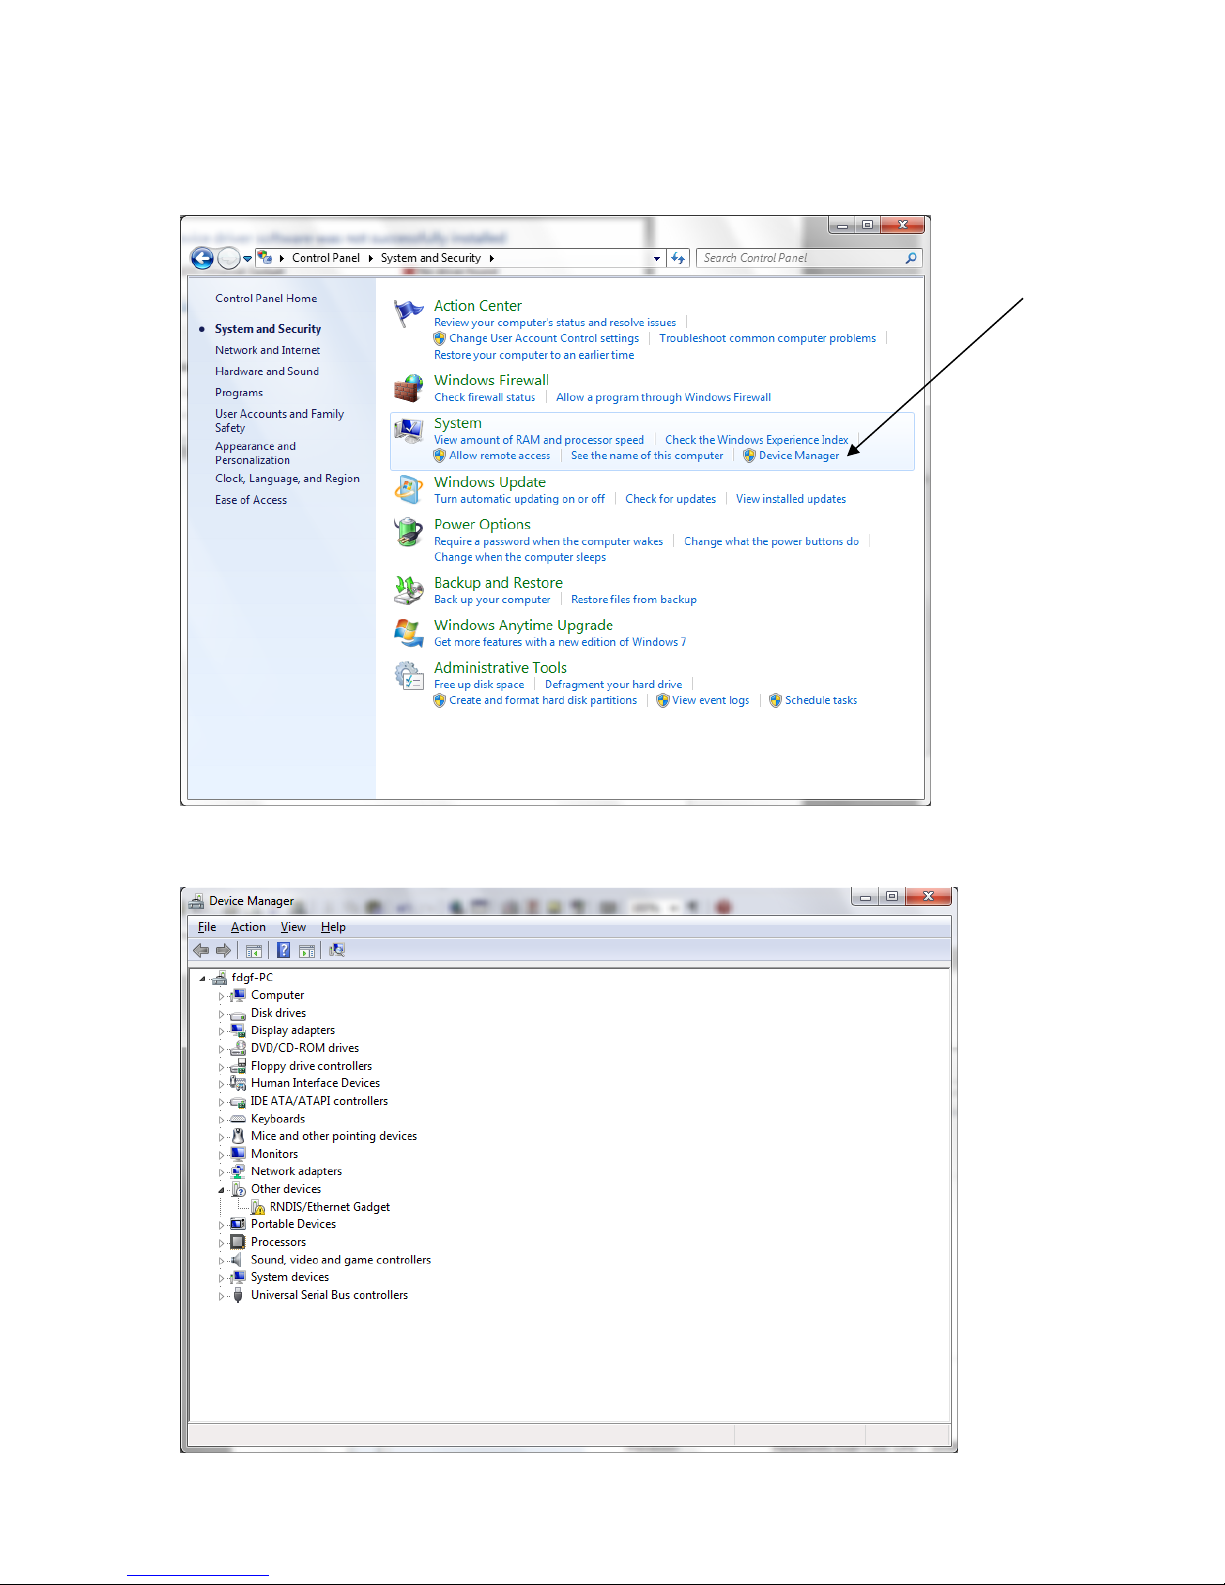
► Go to Start, Control Panel and Click ‘System and Security’
Page 31
Quick Start Guide SECTION 3: WINDOWS 7
P/N 180273 Rev. N April 2017
31
Step 3
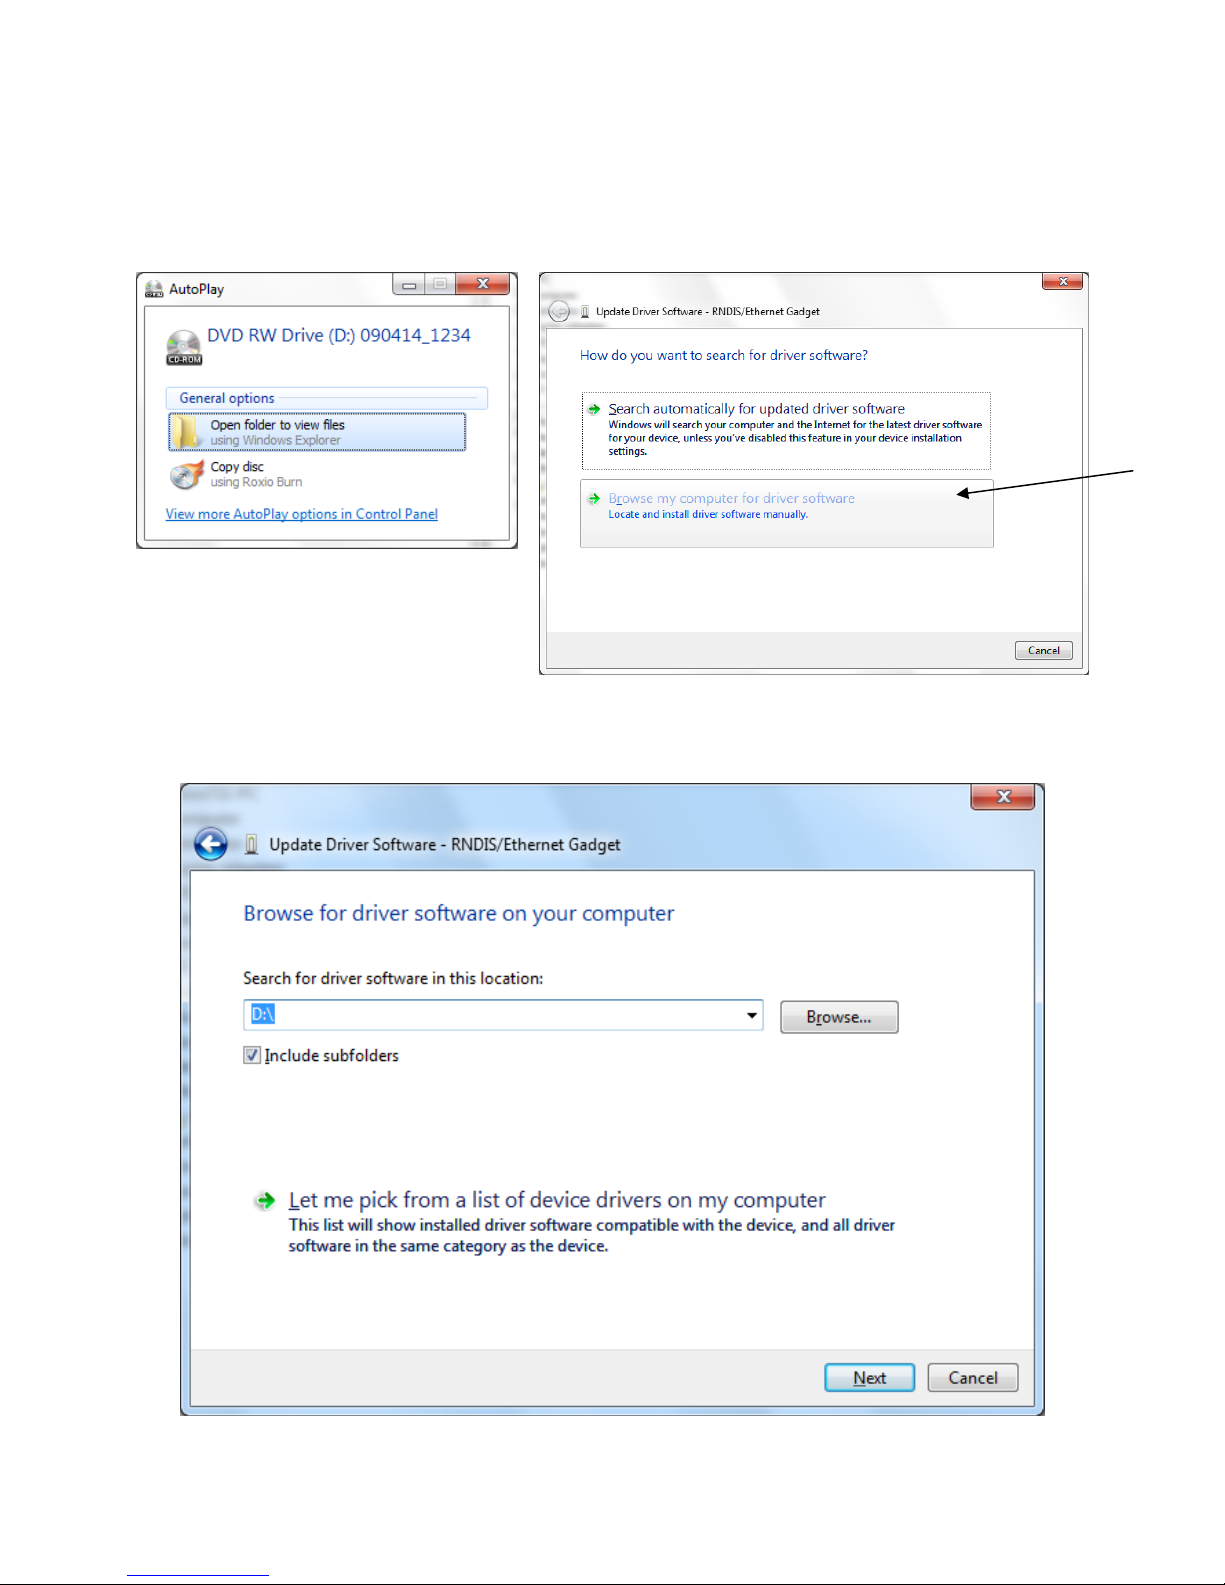
► Click ‘Device Manager’ (under ‘System’)
► Device Manager screen will look like this:
Page 32
Quick Start Guide SECTION 3: WINDOWS 7
P/N 180273 Rev. N April 2017
32
Step 4
Step 5
► Insert disc and select ‘Open
folder to View Files’
► Go back to Device Manager, and right click the
RNDIS/Ethernet Gadget.. Select ‘Update Driver
Software’.
► Select ‘Browse my computer for driver software’
Step 6
► Click ‘Browse’ to search for the CD/DVD Drive
Page 33
Quick Start Guide SECTION 3: WINDOWS 7
P/N 180273 Rev. N April 2017
33
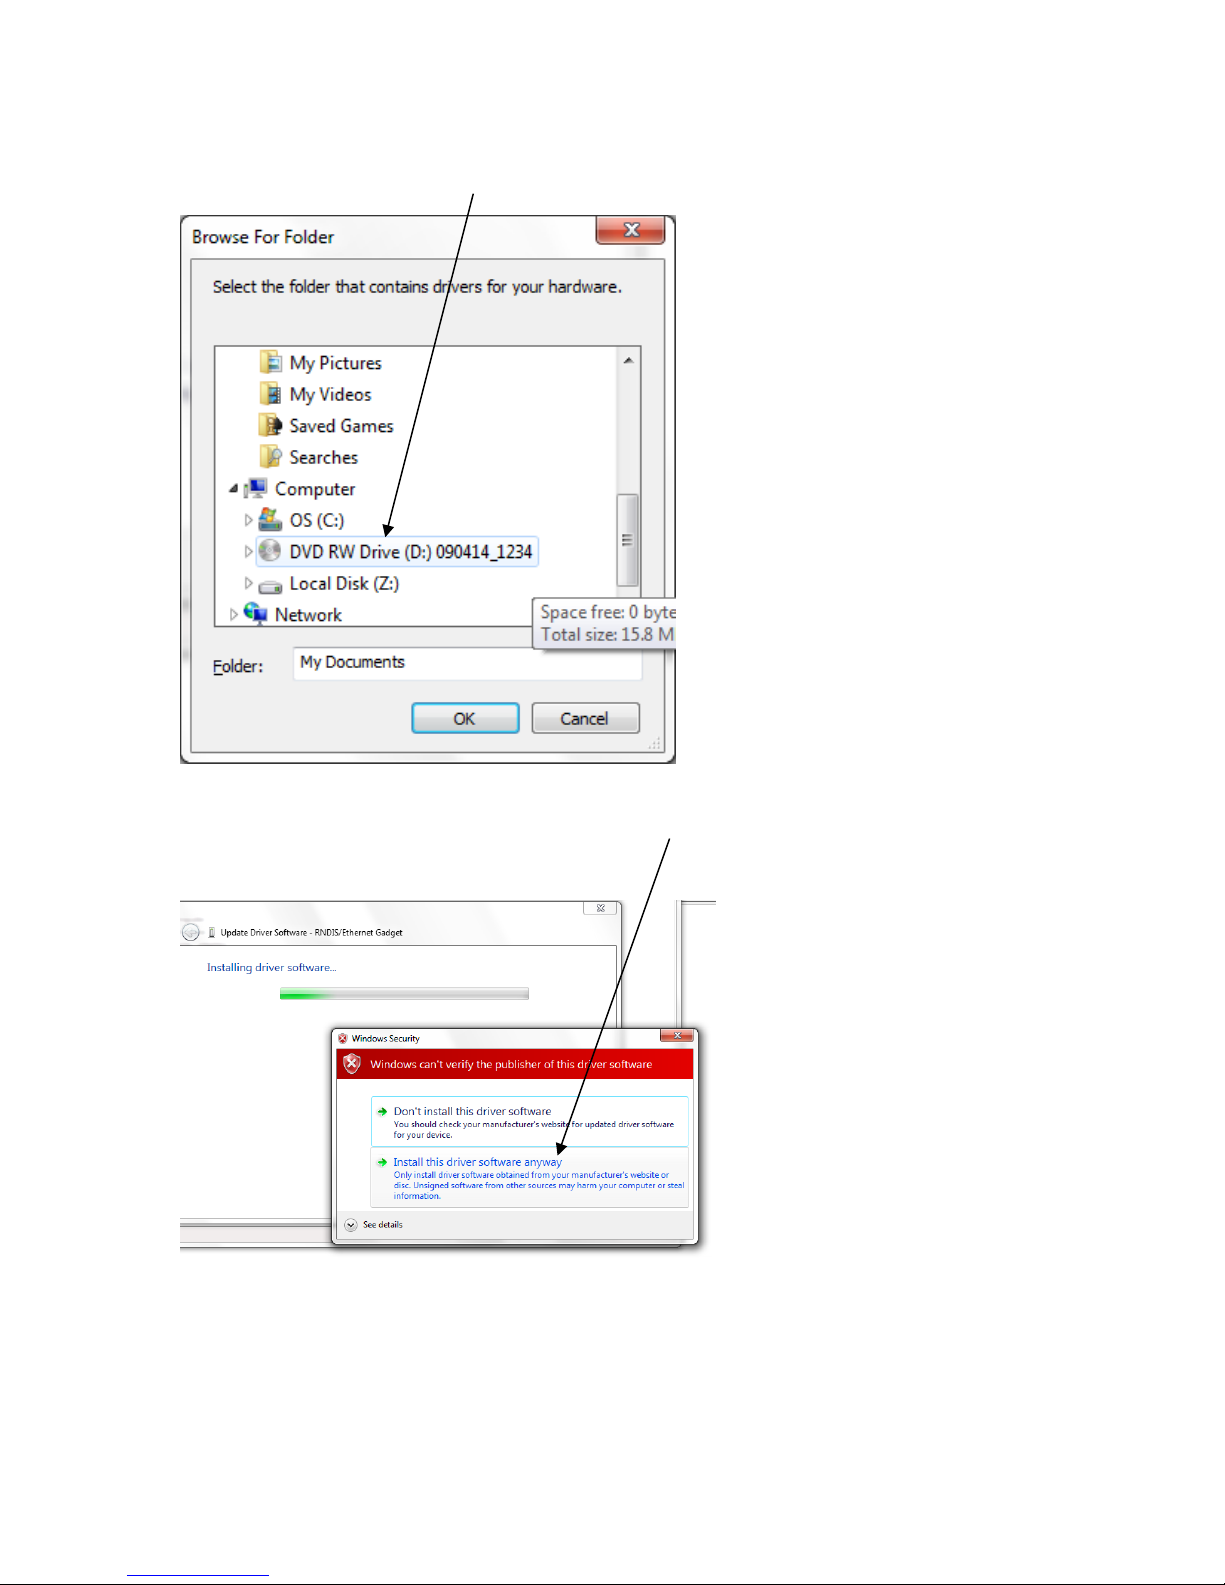
Step 7
► Browse to Computer, CD/DVD drive, click ‘OK’
Step 8
► Click ‘Install this driver software anyway’
Page 34
Quick Start Guide SECTION 3: WINDOWS 7
P/N 180273 Rev. N April 2017
34
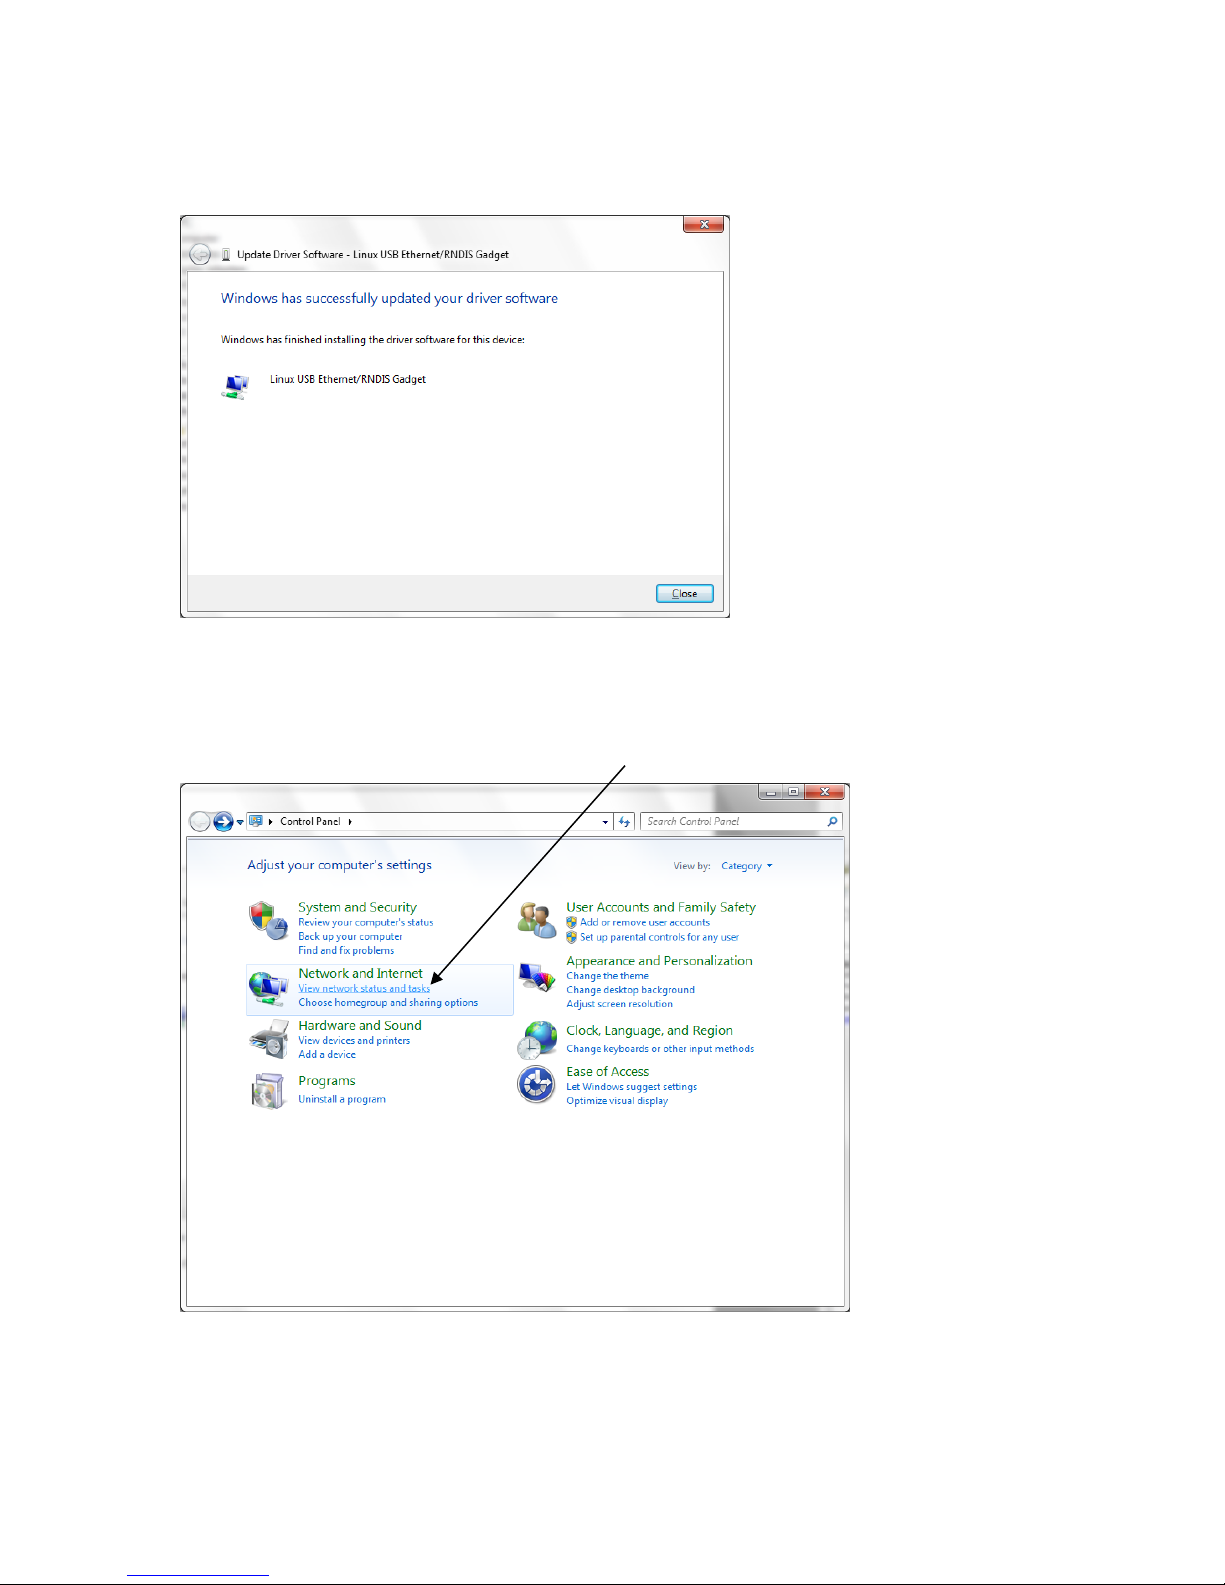
Step 9
► Click ‘Close’
Step 10
► Return to the Control Panel
► Click ‘View Network Status and Tasks’
Page 35
Quick Start Guide SECTION 3: WINDOWS 7
P/N 180273 Rev. N April 2017
35
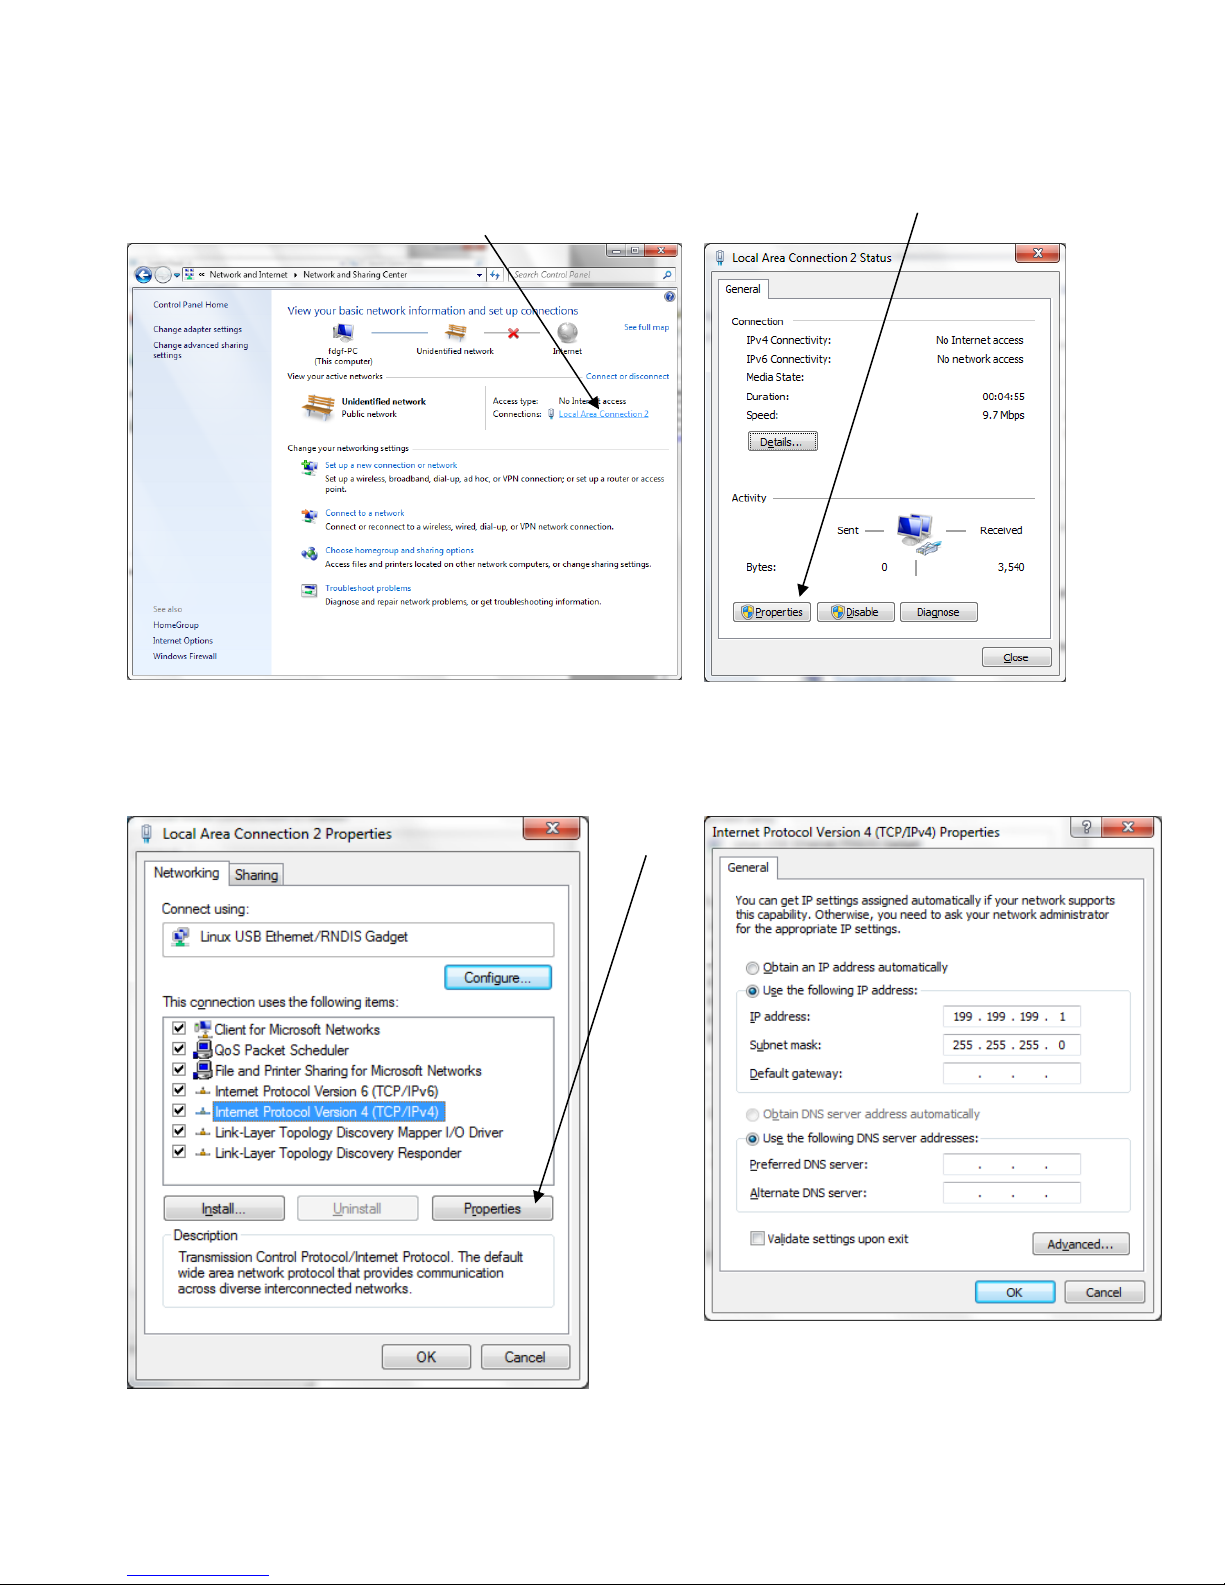
Step 11
Step 12
► Click ‘Local Area Connection 2’
► Click ‘Properties’
Step 13
Step 14
► Highlight Internet Protocol Version 4 (TCP/IPv4)
and then click ‘Properties’
► Select ‘Use the following IP address’ and
type in 199.199.199.1
► Click ‘OK’
Page 36
Quick Start Guide SECTION 3: WINDOWS 7
P/N 180273 Rev. N April 2017
36
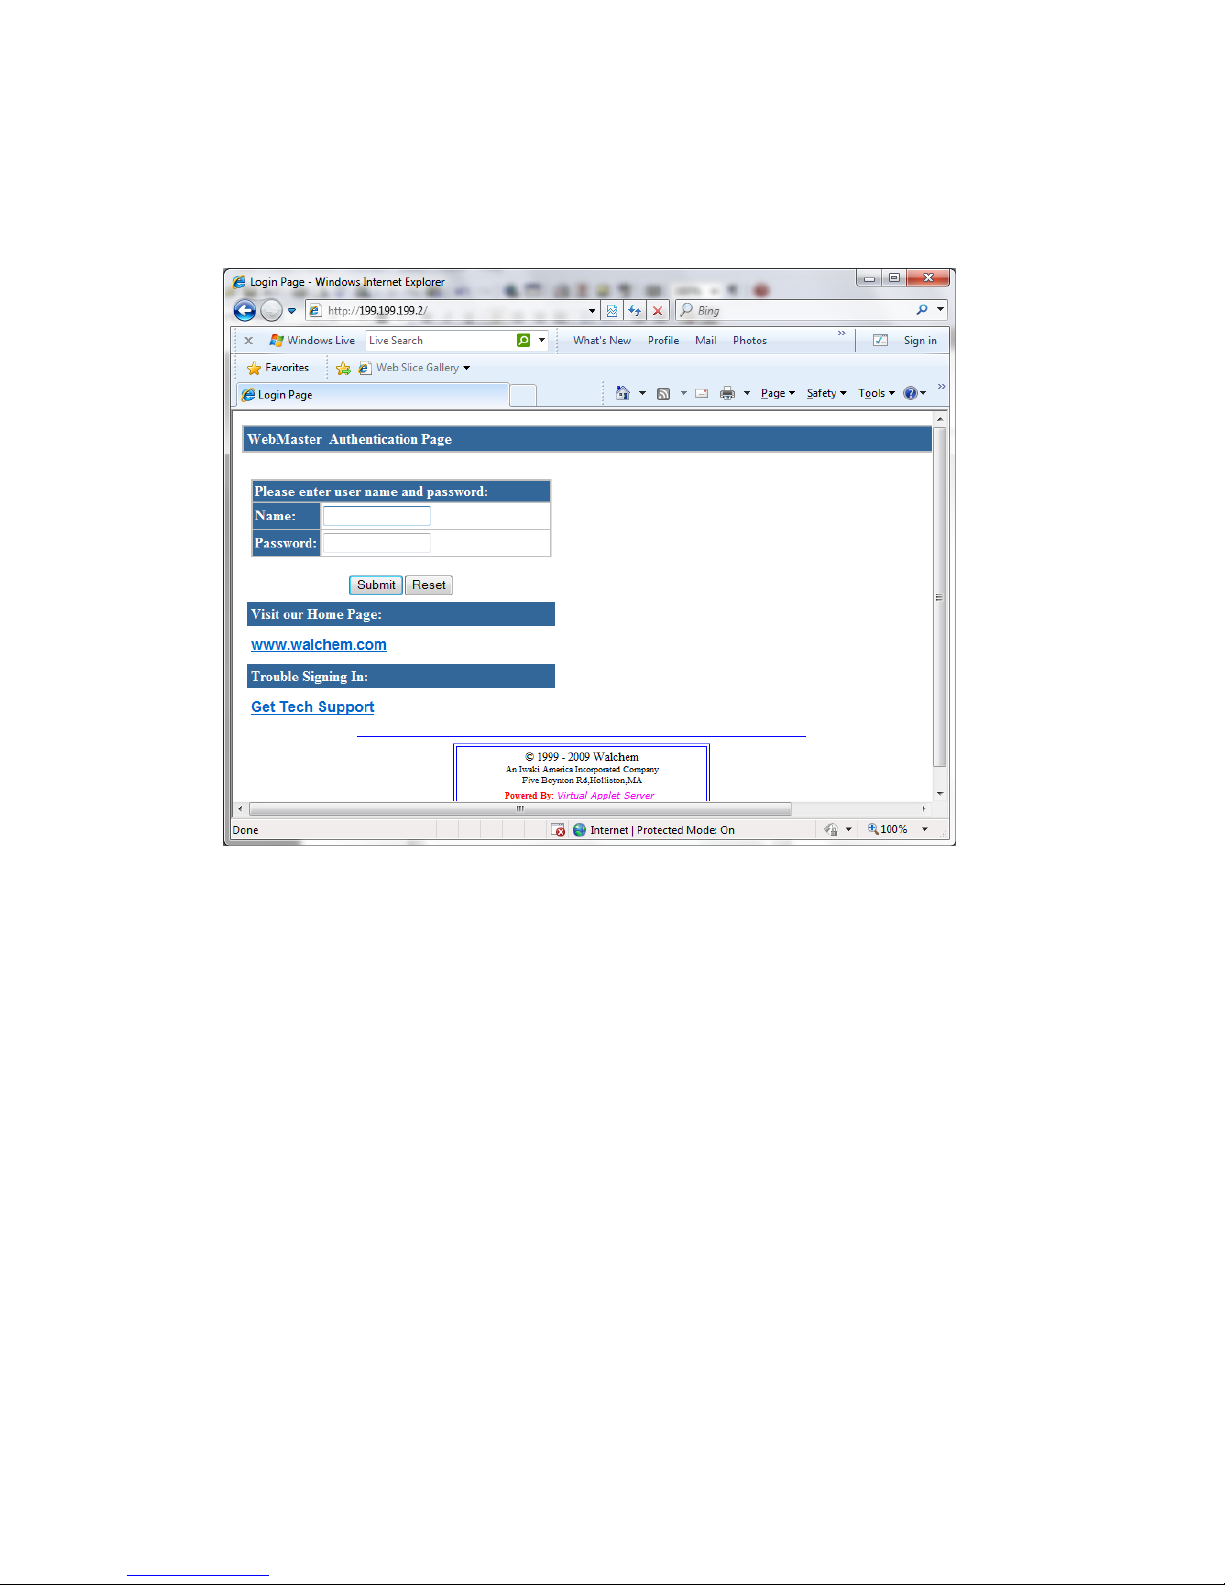
Step 15
► Open Internet Explorer and enter 199.199.199.2 in the address bar.
The WebMaster Authentication screen appears as shown below:
Page 37

P/N 180273 Rev. N April 2017
37
2. DIRECT MODEM SET-UP FOR WINDOWS 7
See Direct Modem Setup for Windows 8 section.
Page 38
P/N 180273 Rev. N April 2017
38
QUICK START GUIDE
Section 4: WINDOWS VISTA (32-bit)
1. USB DRIVER INSTALLATION
2. DIRECT MODEM TO MODEM COMMUNICATIONS
Page 39
Quick Start Guide SECTION 4: WINDOWS VISTA (32-bit)
P/N 180273 Rev. N April 2017
39
1. USB DRIVER INSTALLATION FOR WINDOWS VISTA (32 BIT)
Step 1
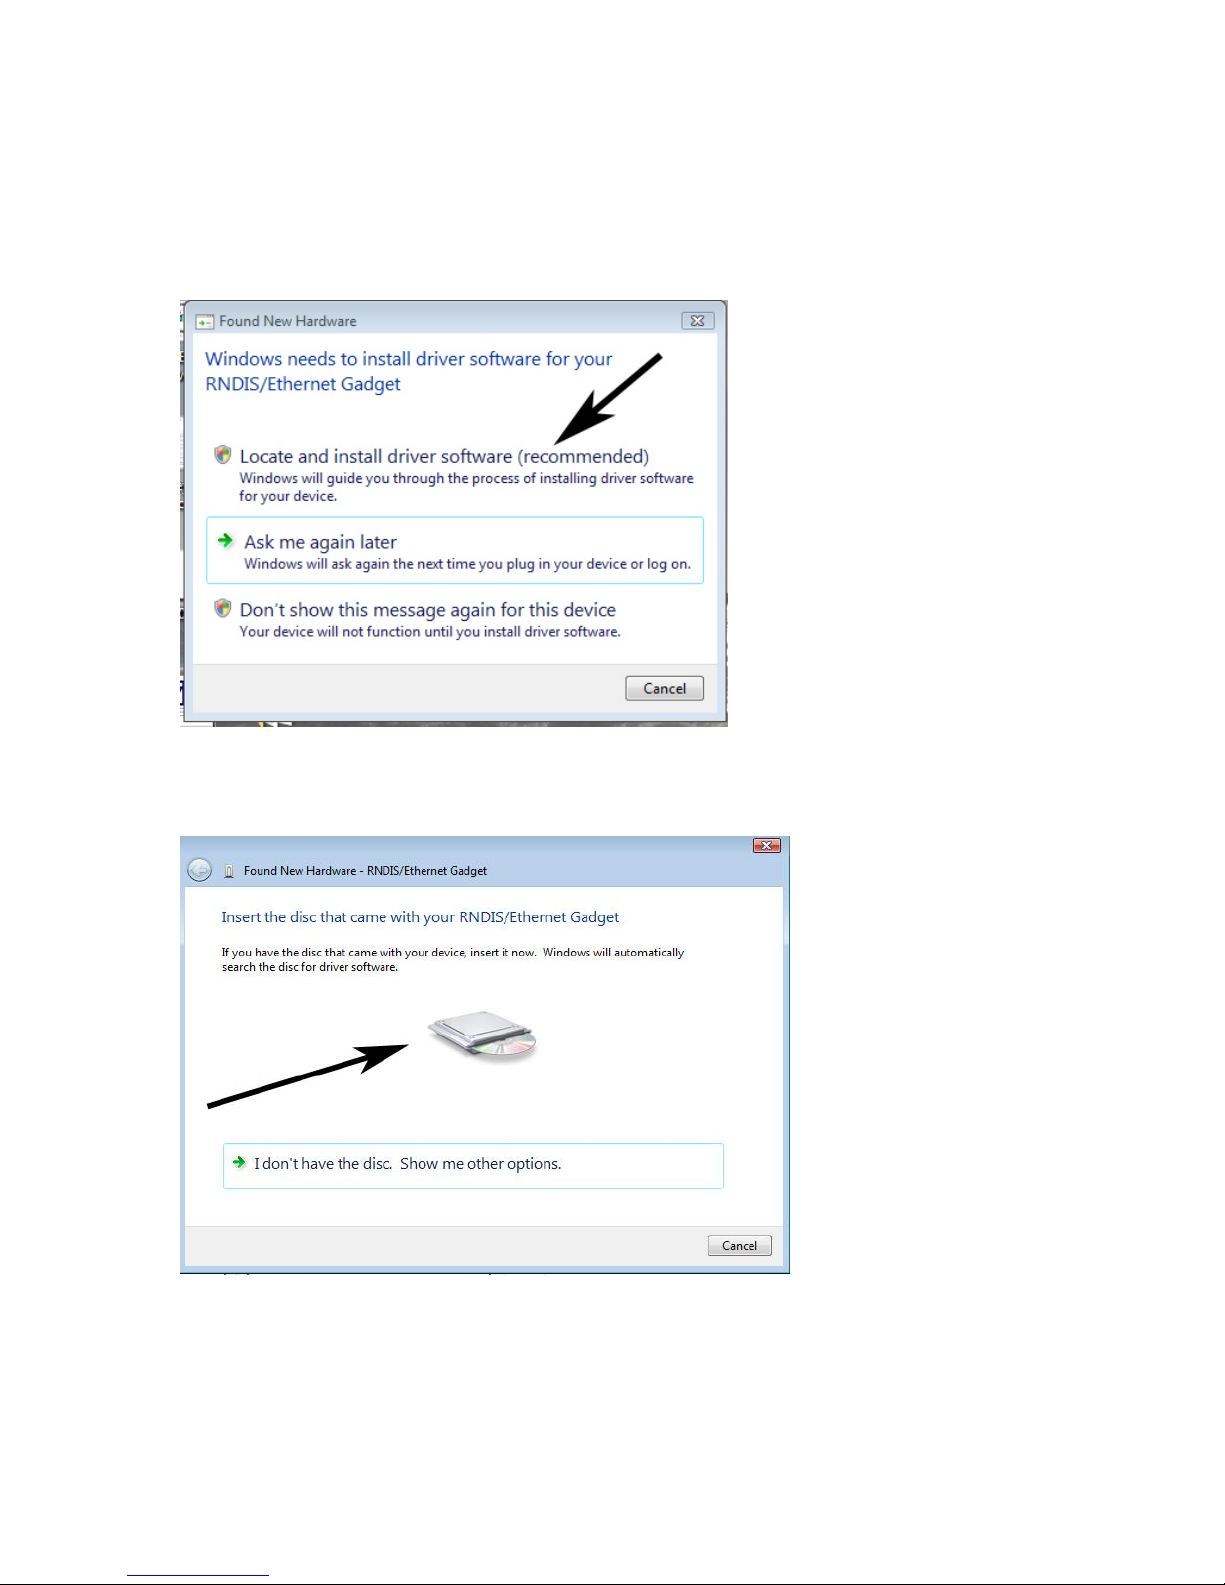
► Plug the USB cable into the WebMaster/WebAlert and your computer.
► You will see this message on your screen.
► Click ‘Locate and install driver software (recommended)’
Step 2
► You’ll then see this screen.
► Click on the disc icon and insert the USB CD in your computer’s CD drive.
Page 40
Quick Start Guide SECTION 4: WINDOWS VISTA (32-bit)
P/N 180273 Rev. N April 2017
40
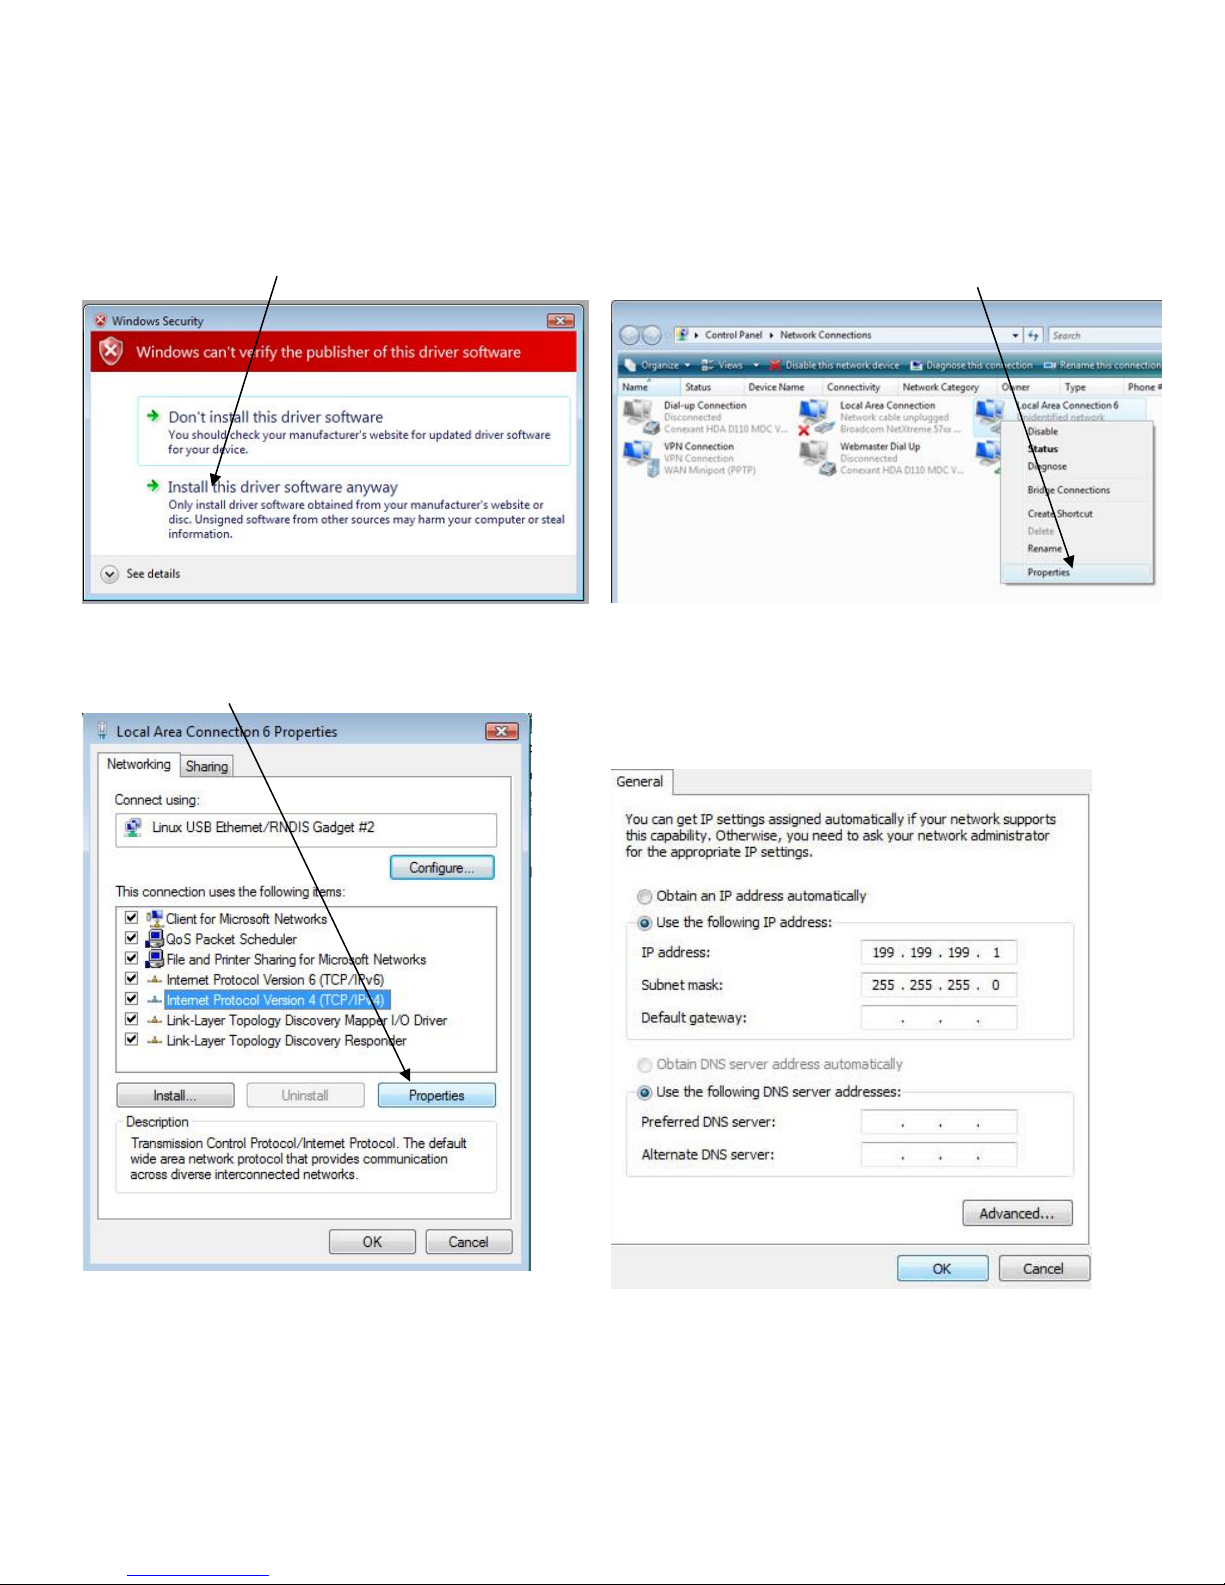
Step 3
► You will see this message.
► Click on ‘Install this driver software anyway’
► You’ll get a message confirming the software
installation.
Step 4
► Next you’ll need to change the IP settings for the
LAN connections and right-click on the new one.
► It is labeled ‘Local Area Connection 2’ or similar.
► Right-click and choose ‘Properties’.
Step 5
► Choose ‘Internet Protocol Version 4’ and click
‘Properties’.
Step 7
► Open your browser and type in 199.199.199.2 to
access the WebMaster Login Screen
Step 6
► Check ‘Use the following IP address’ and type
199.199.199.1 for the IP address and 255.255.255.0
for subnet mask.
► Click ‘OK’ and you’re done!
Page 41
Quick Start Guide SECTION 4: WINDOWS VISTA (32-bit)
P/N 180273 Rev. N April 2017
41
2. DIRECT MODEM SET-UP FOR WINDOWS VISTA 32
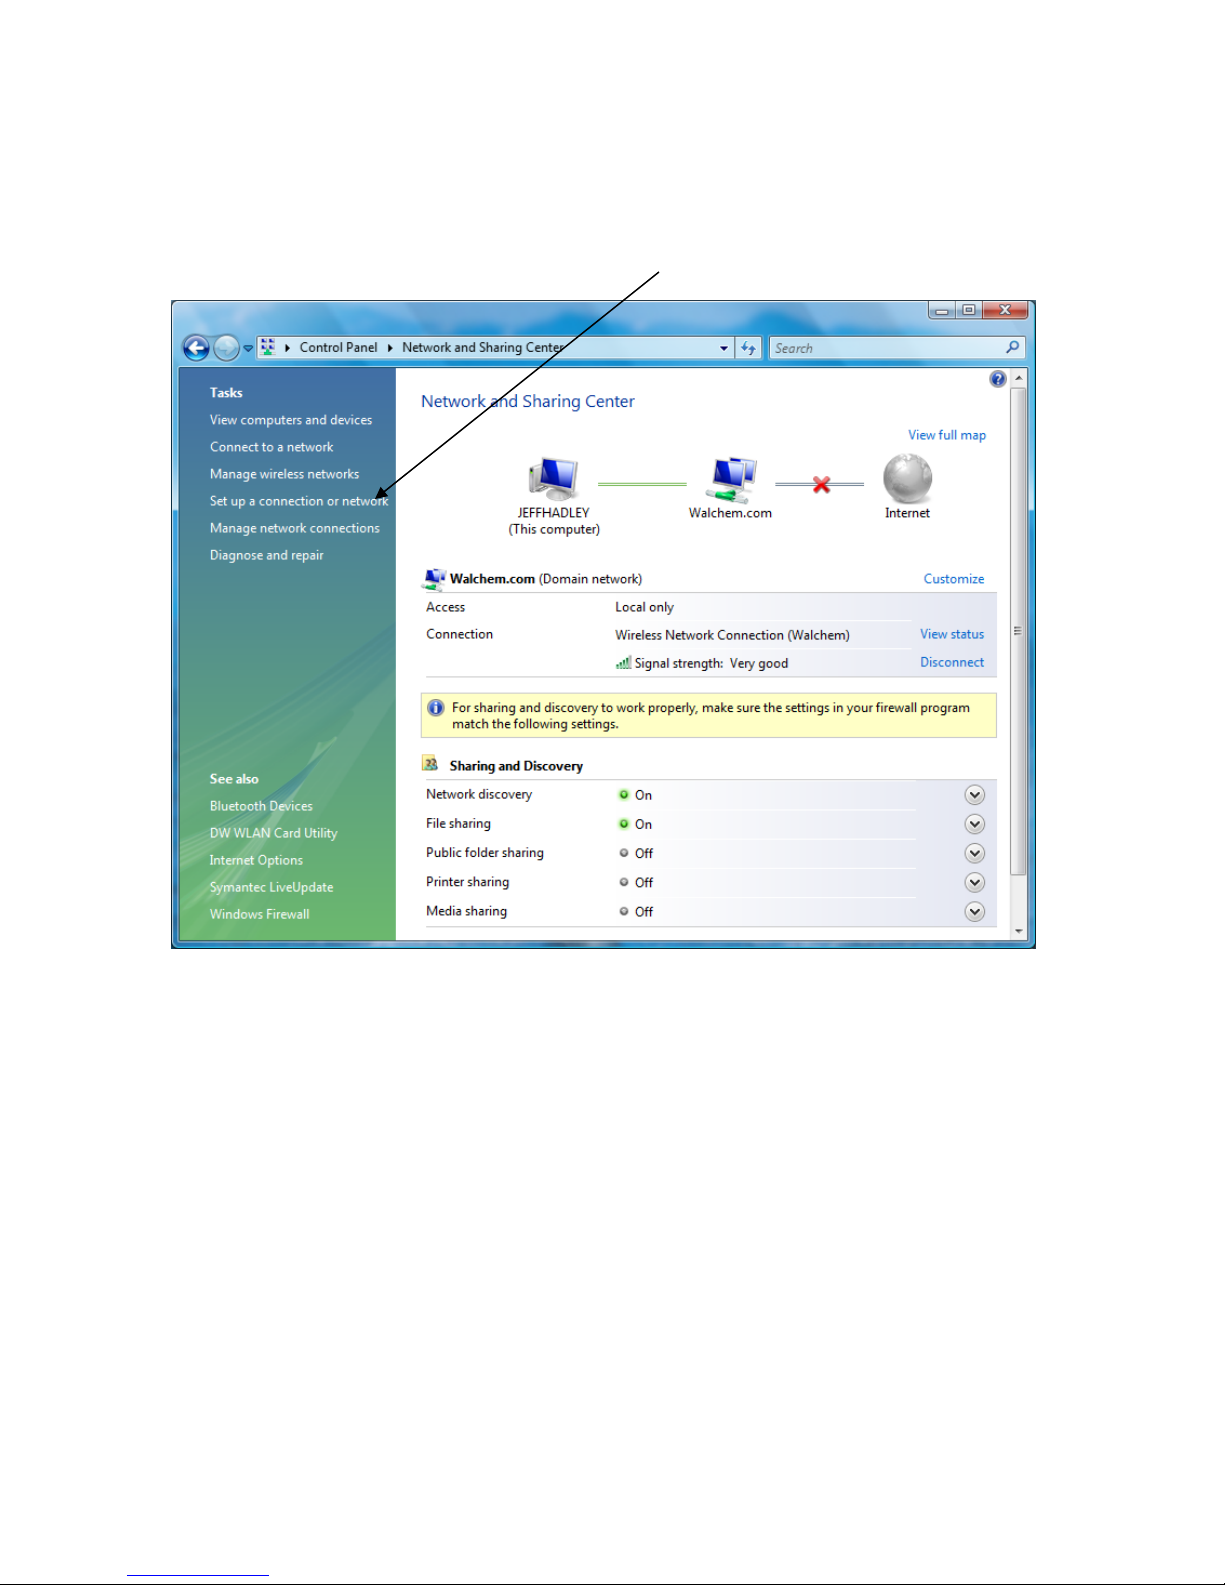
Step 1
► Go to Control Panel, Network and Sharing Center.
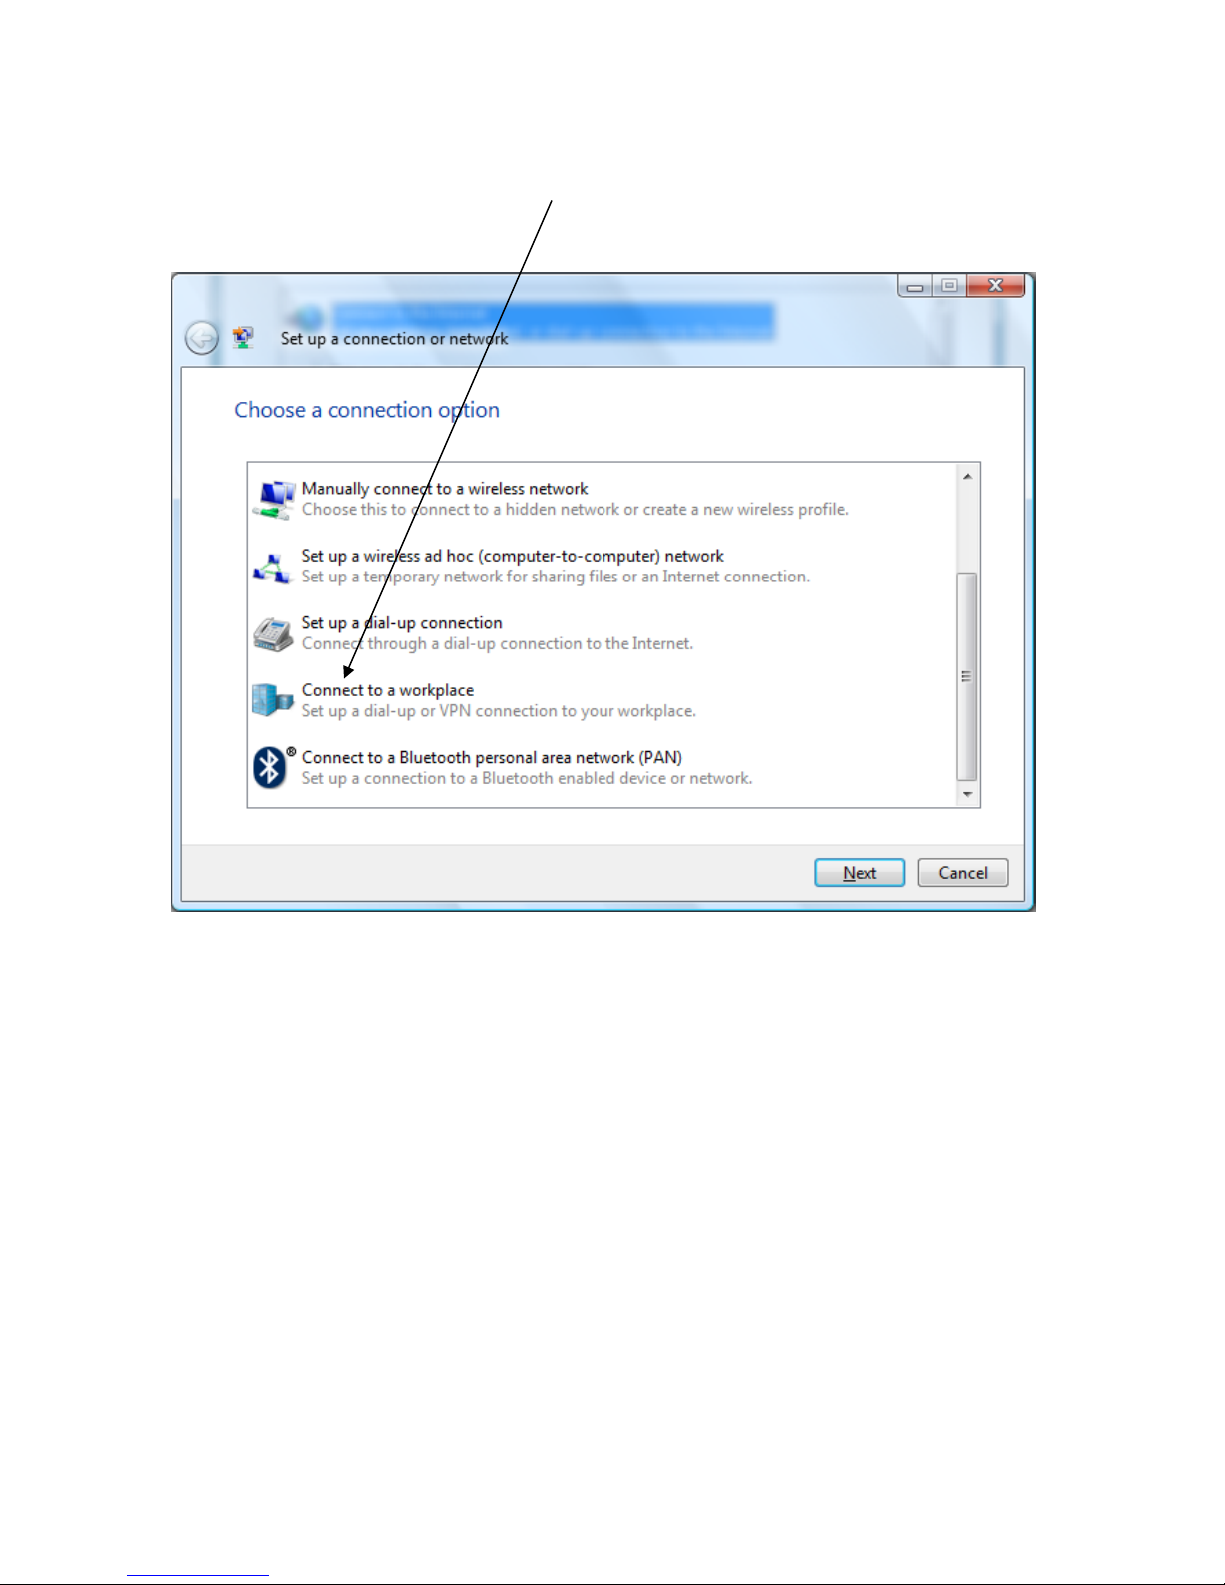
► Choose ‘Set-up a Connection or Network’ on the left.
Page 42
Quick Start Guide SECTION 4: WINDOWS VISTA (32-bit)
P/N 180273 Rev. N April 2017
42
Step 2
► Choose ‘Connect to a workplace’.
► Click ‘Next’
Page 43
Quick Start Guide SECTION 4: WINDOWS VISTA (32-bit)
P/N 180273 Rev. N April 2017
43
Step 3
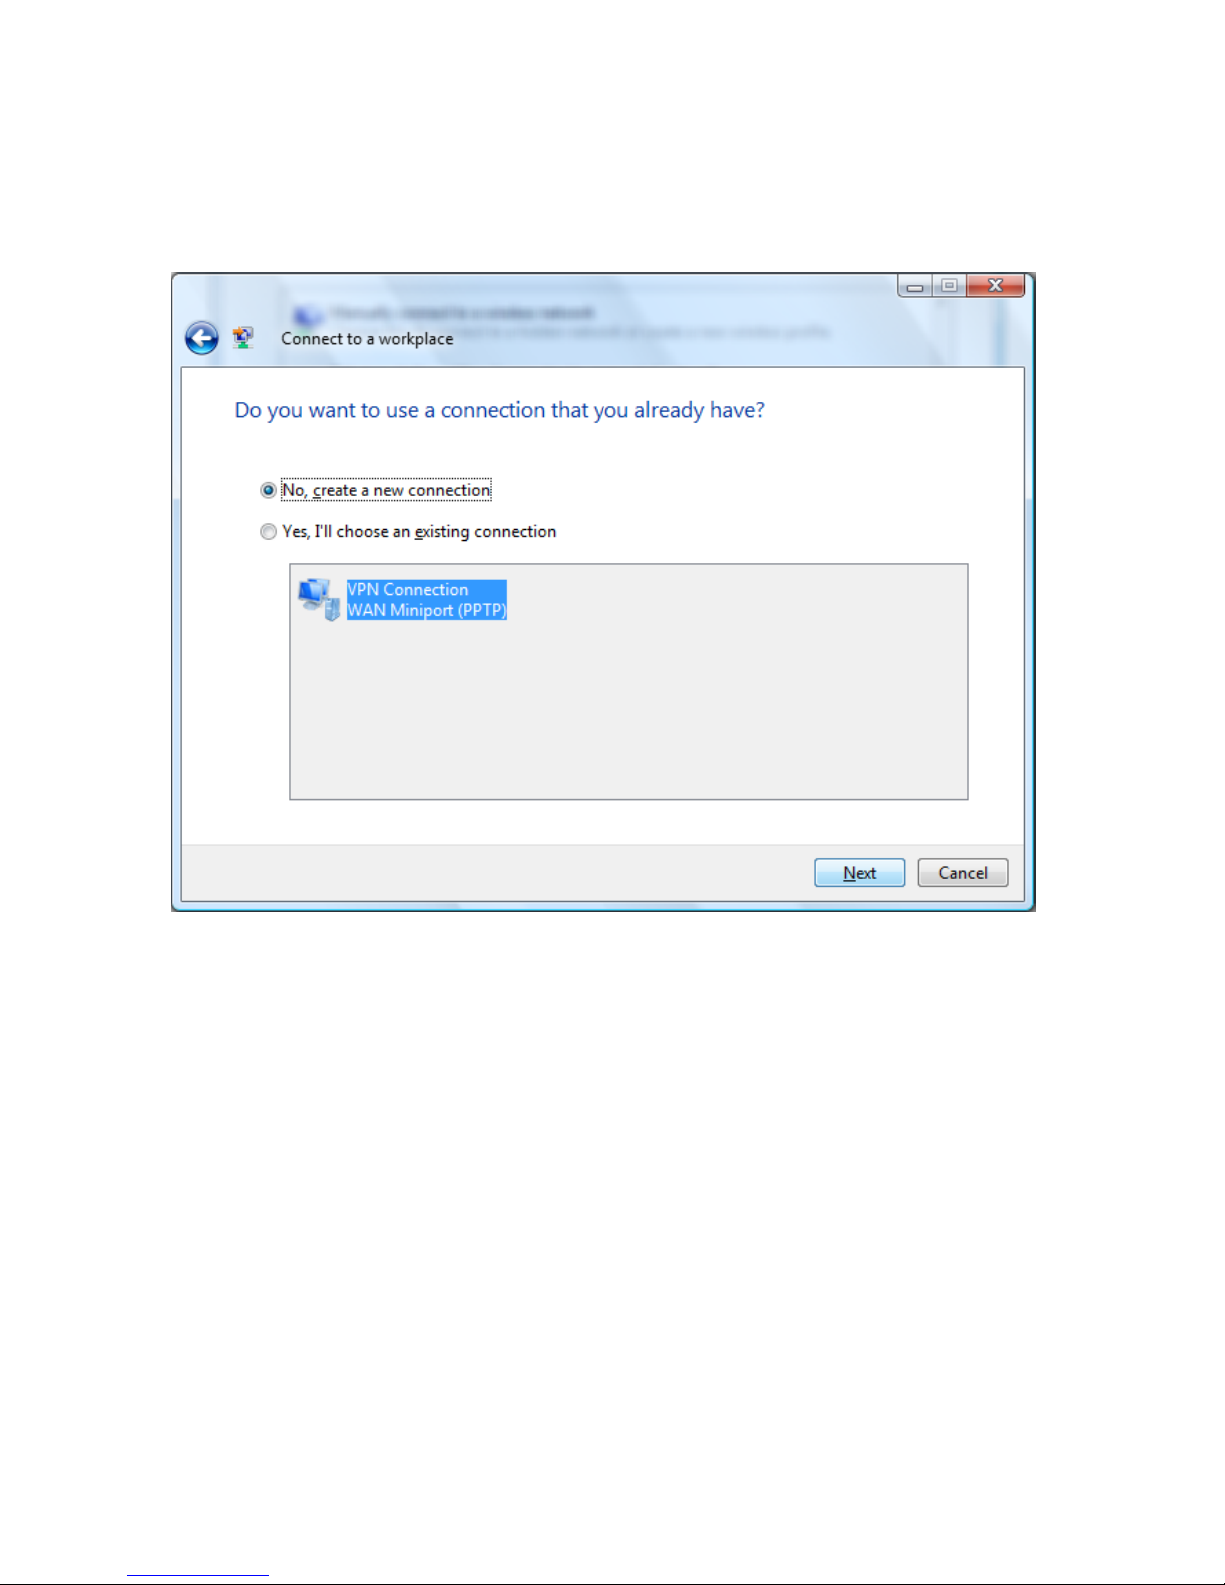
► Choose ‘No, create a new connection’
► Click ‘Next’
Page 44
Quick Start Guide SECTION 4: WINDOWS VISTA (32-bit)
P/N 180273 Rev. N April 2017
44
Step 4
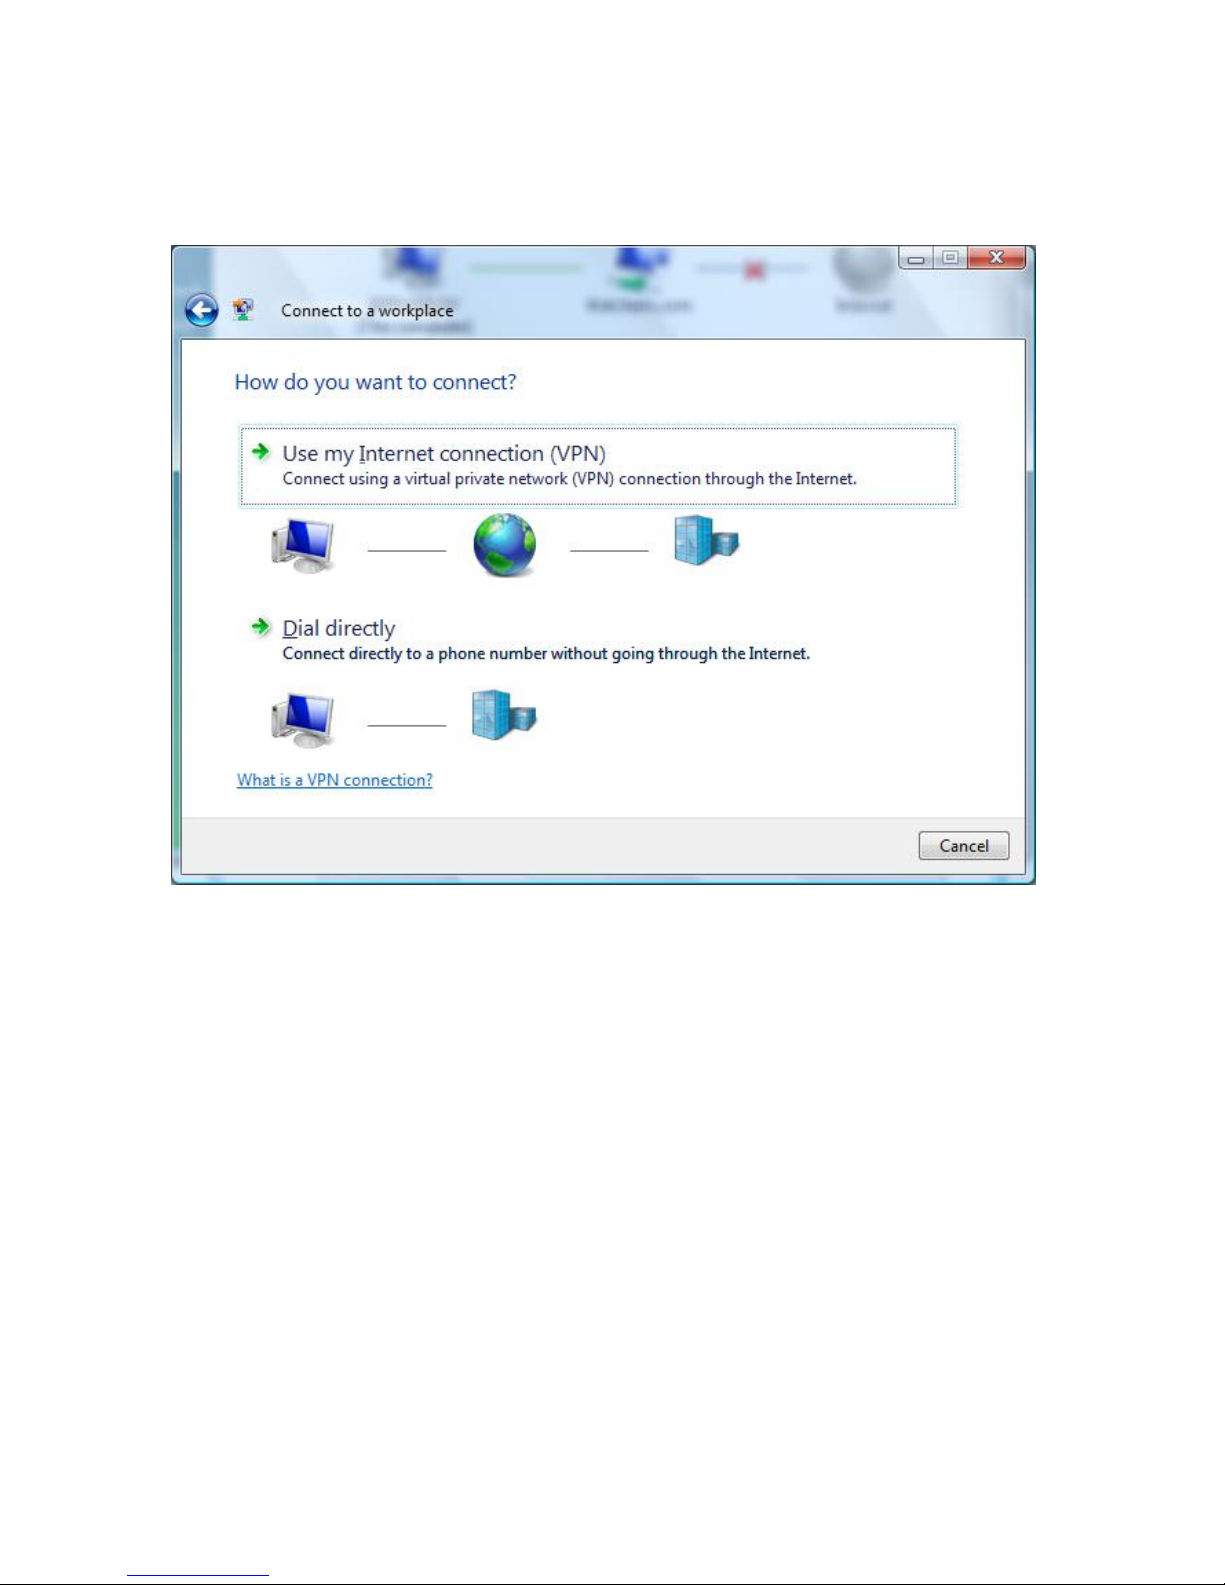
► Choose ‘Dial Directly’
Page 45
Quick Start Guide SECTION 4: WINDOWS VISTA (32-bit)
P/N 180273 Rev. N April 2017
45
Step 5
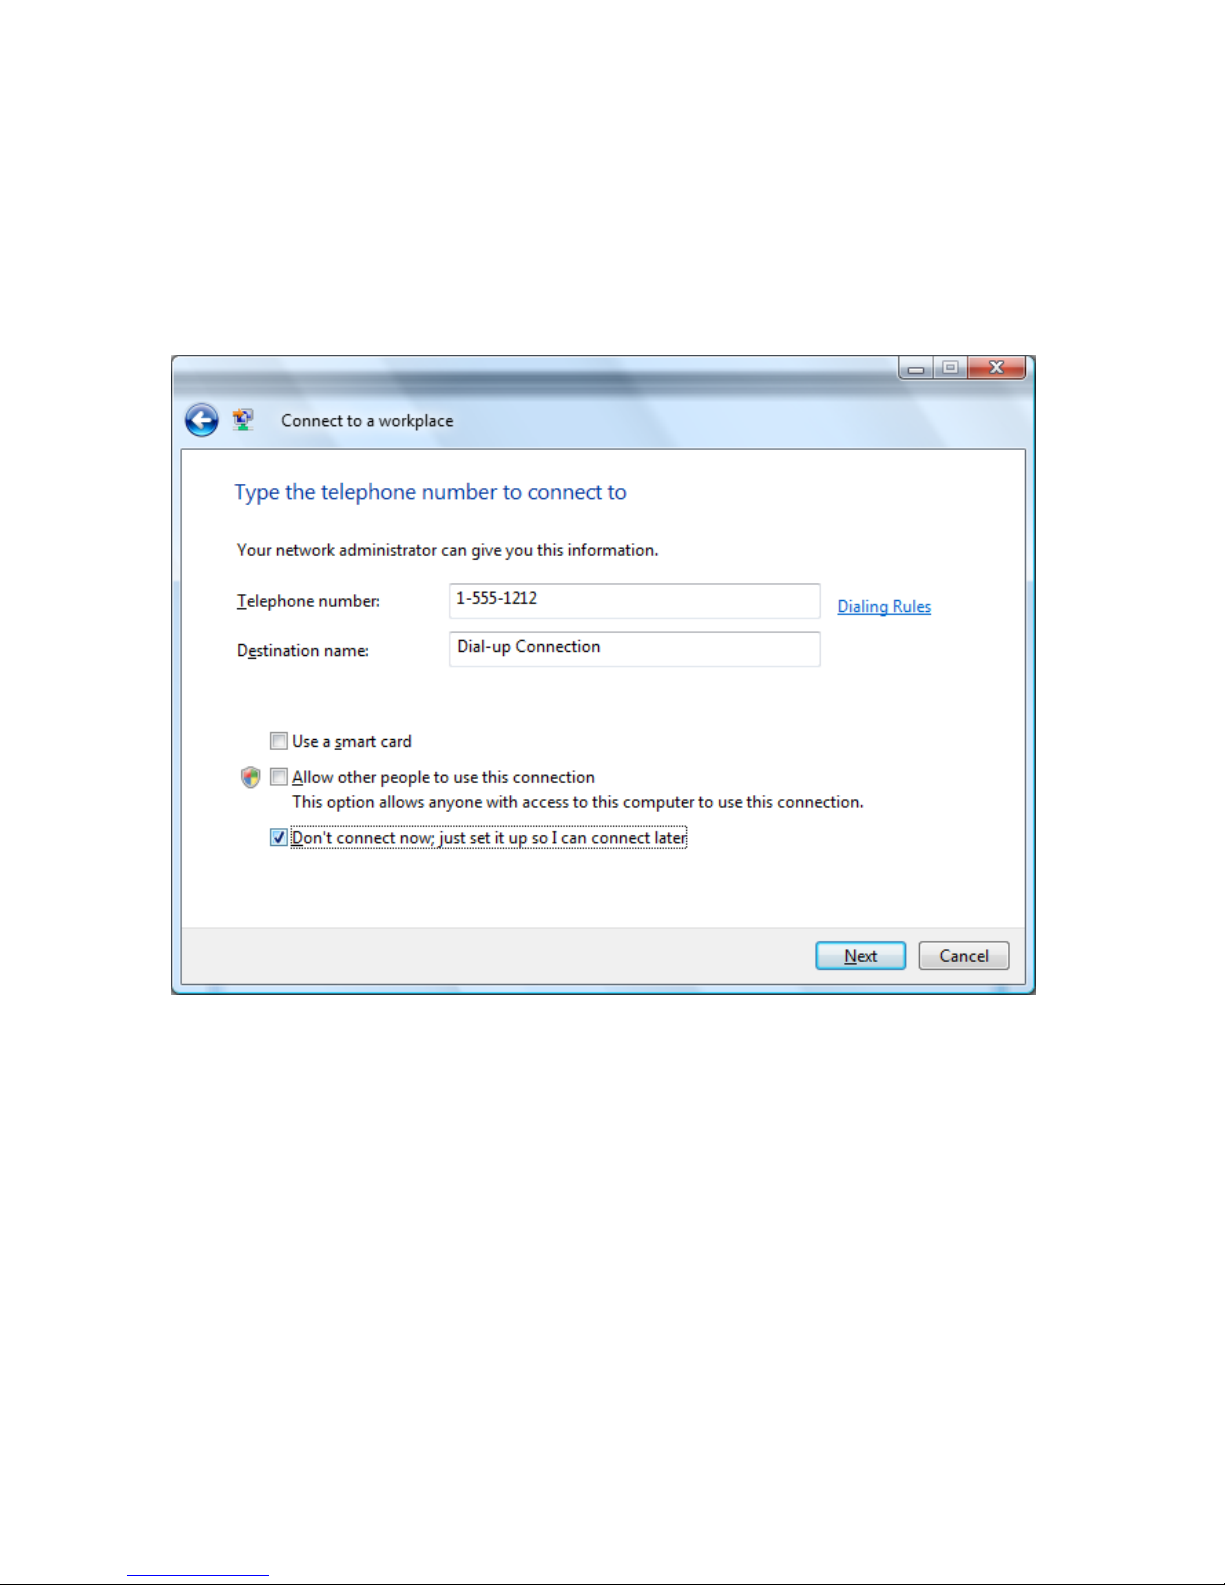
► Add a phone number. (this can be changed whenever you use the adaptor.)
► Click ‘Don’t connect now…’
► Click ‘Next’
► You do not need a username or password
► Click ‘Next’
Page 46
Quick Start Guide SECTION 4: WINDOWS VISTA (32-bit)
P/N 180273 Rev. N April 2017
46
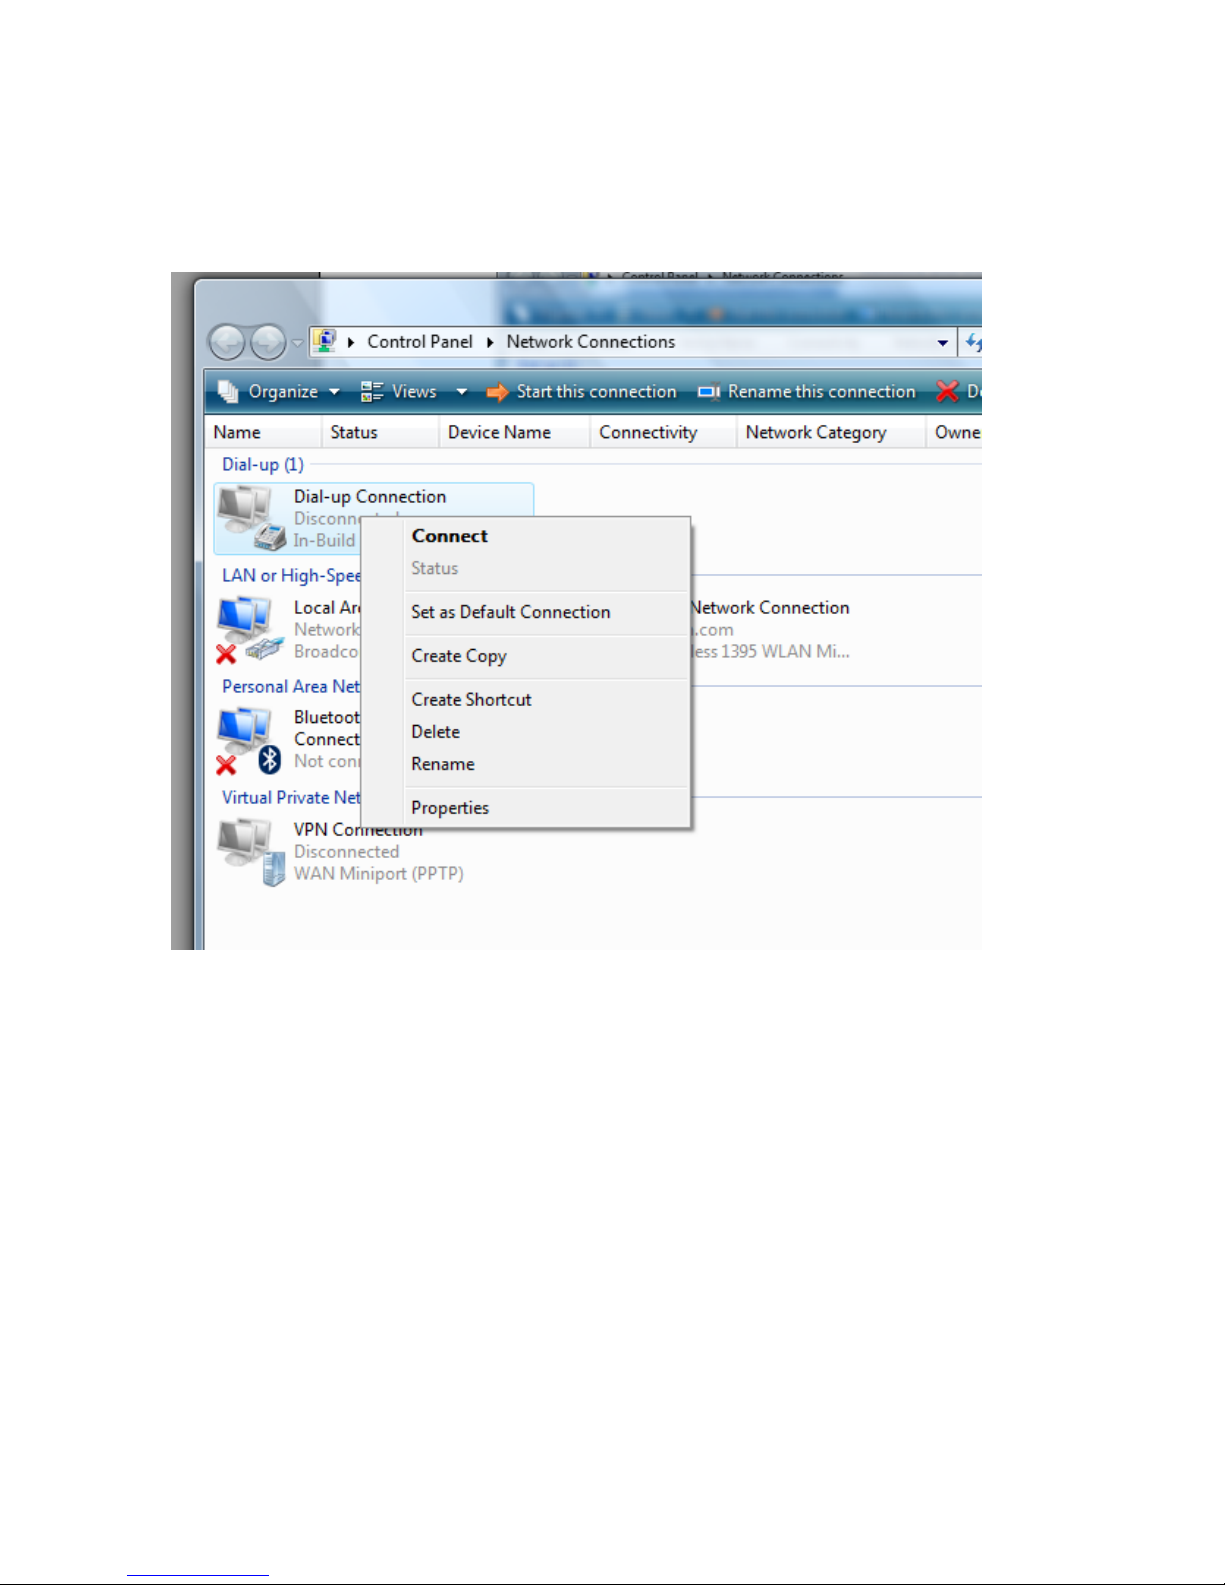
Step 6
► Go to Control Panel and Network Connections.
► Right-click the connection you just created and click ‘Properties’
Page 47
Quick Start Guide SECTION 4: WINDOWS VISTA (32-bit)
P/N 180273 Rev. N April 2017
47
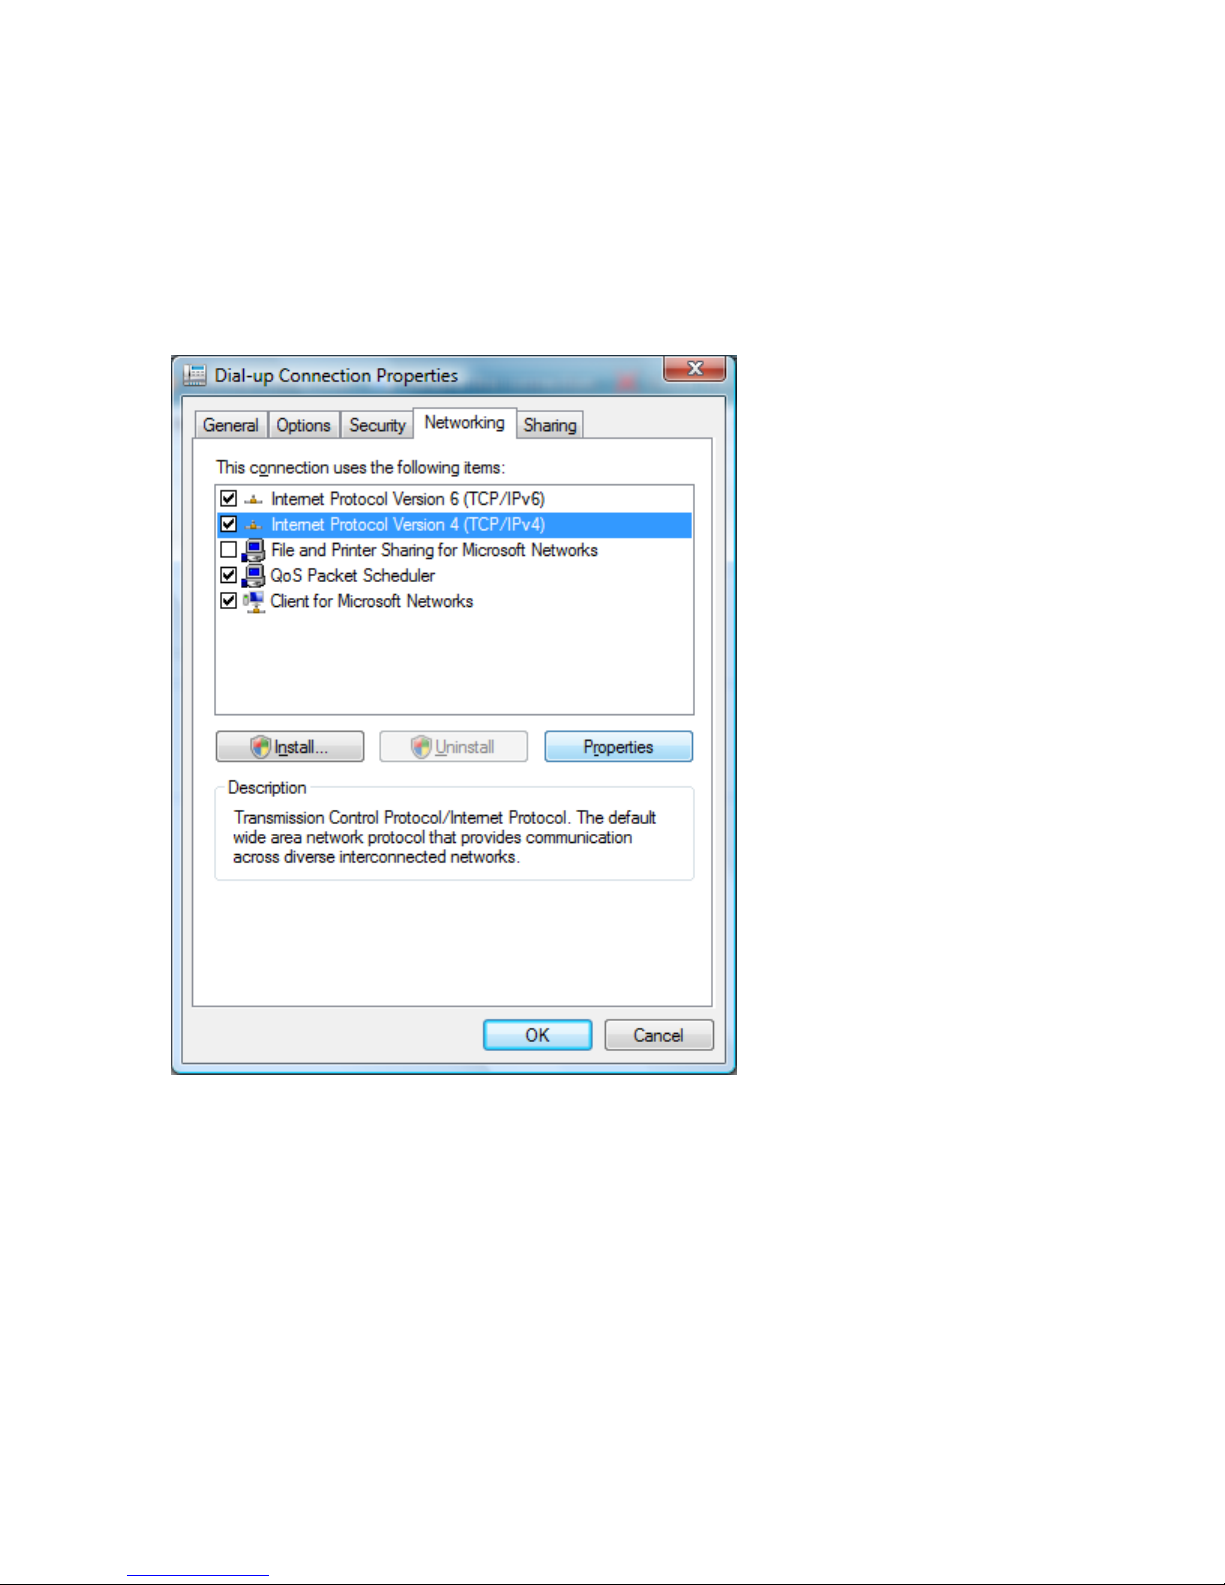
Step 7
► Click the ‘Networking’ tab
► Uncheck everything except the two TCP/IP options
► Highlight ‘Internet Protocol Version 4 (TCP/IP 4)’
► Click ‘Properties’
Page 48
Quick Start Guide SECTION 4: WINDOWS VISTA (32-bit)
P/N 180273 Rev. N April 2017
48
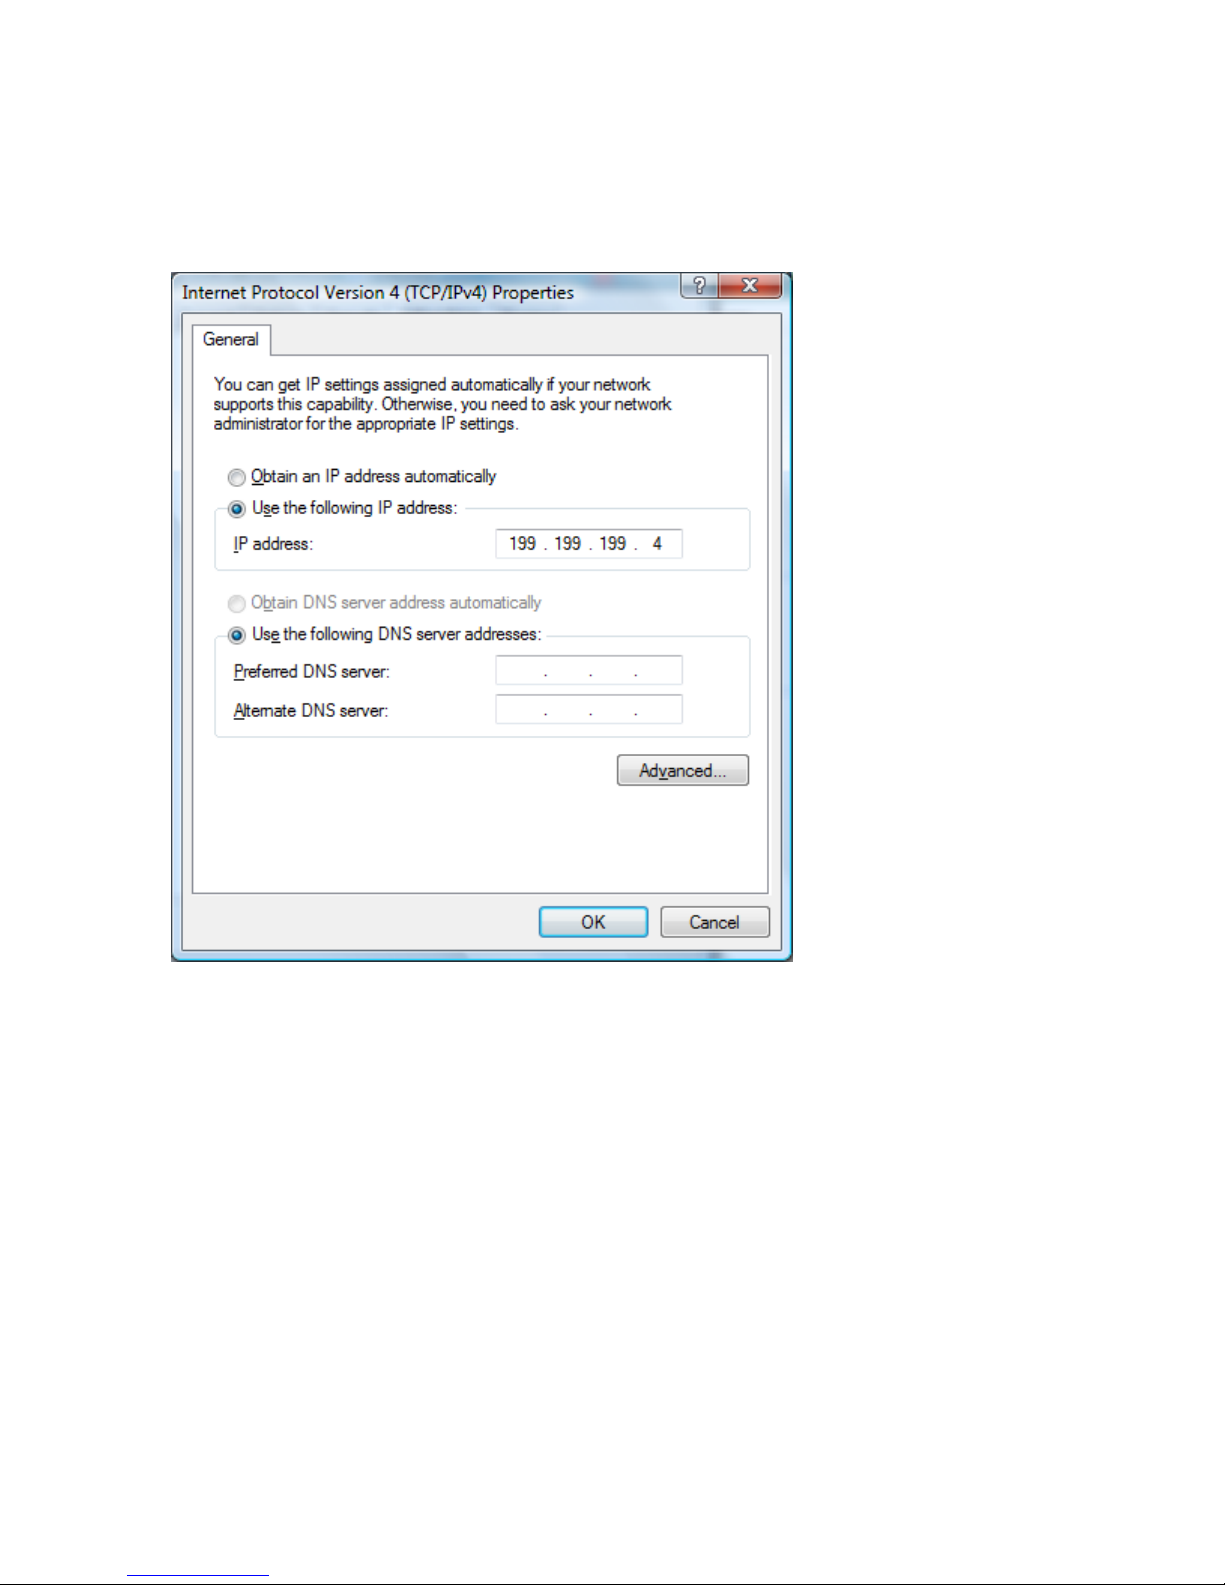
Step 8
► Select ‘Use the following IP address’ and enter 199.199.199.4
► Click ‘OK’ to save the changes
You’re done!
Page 49
P/N 180273 Rev. N April 2017
49
QUICK START GUIDE
Section 5: WINDOWS VISTA (64-bit)
1. USB DRIVER INSTALLATION
2. DIRECT MODEM TO MODEM COMMUNICATIONS
Page 50
Quick Start Guide SECTION 5: WINDOWS VISTA (64-bit)
P/N 180273 Rev. N April 2017
50
1. USB DRIVER INSTALLATION FOR WINDOWS VISTA (64-BIT)
Step 1
► Plug the USB cable into the WebMaster/WebAlert and your computer.
► You will see this message on your screen.
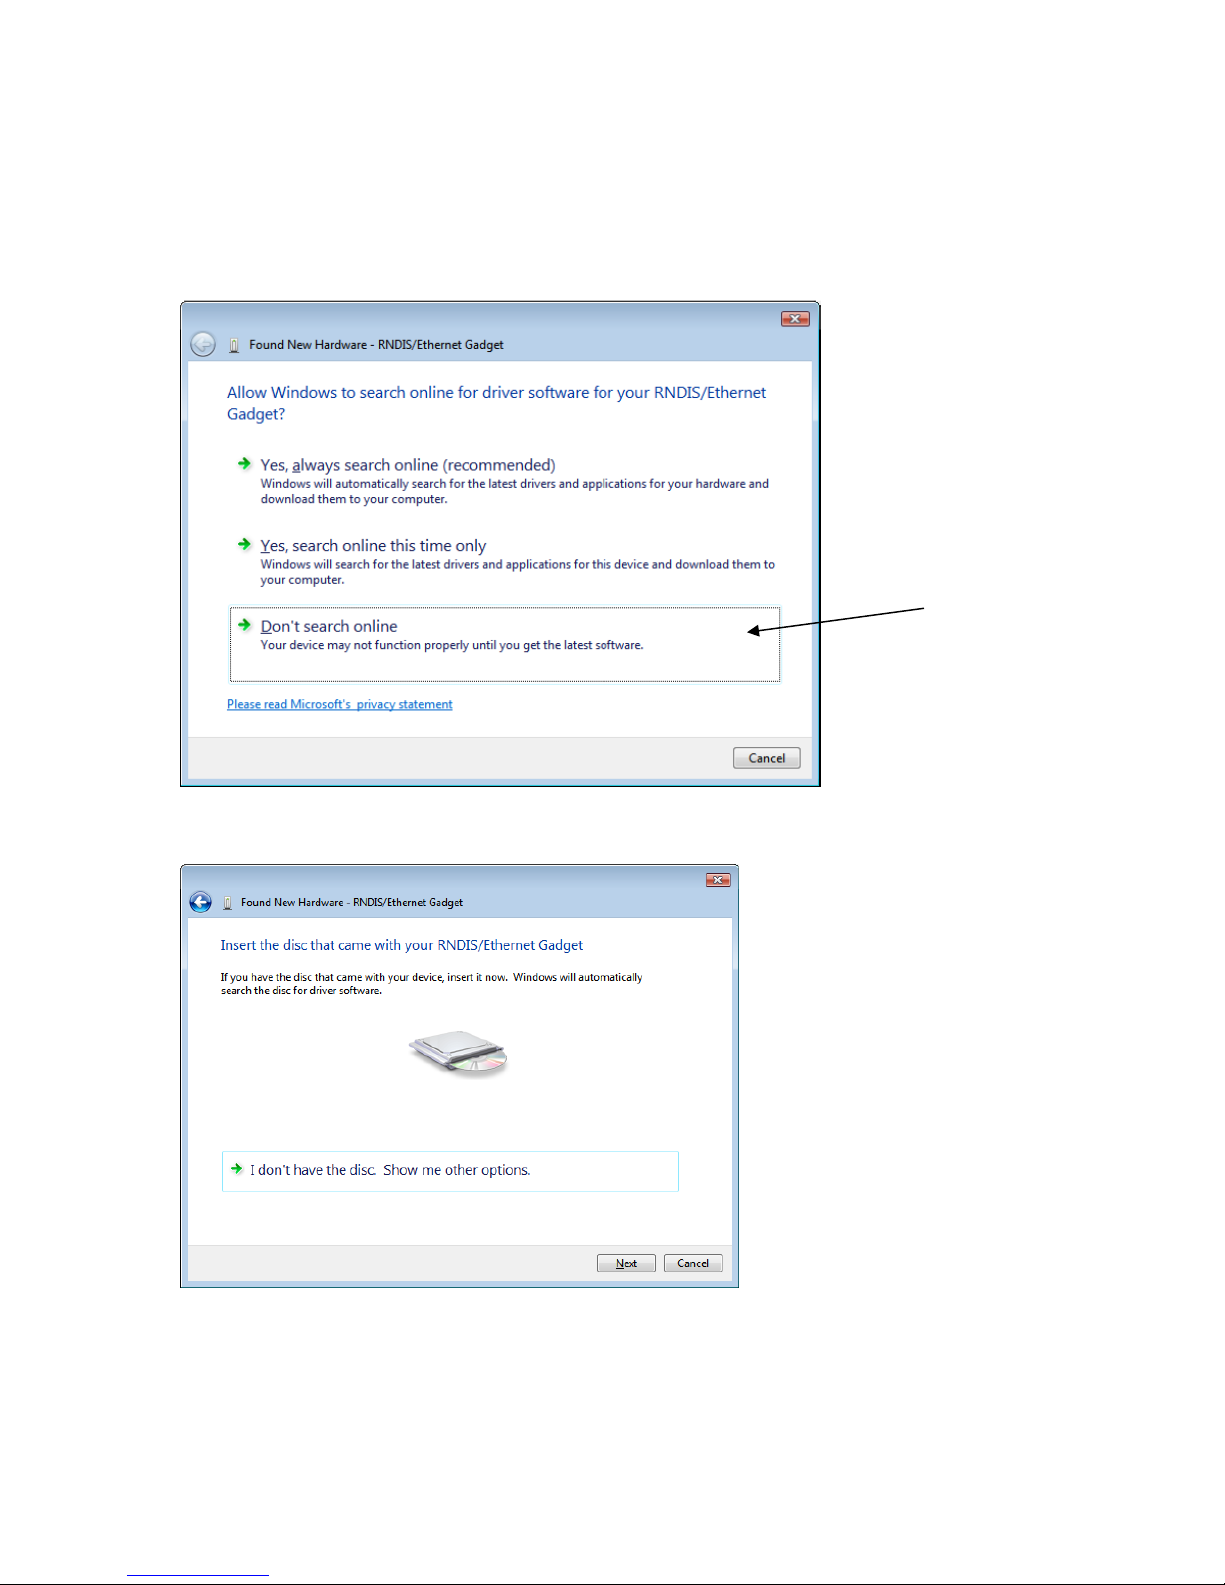
► Click ’Don’t search online’
Step 2
► Insert disc, click ‘Next’
Page 51
Quick Start Guide SECTION 5: WINDOWS VISTA (64-bit)
P/N 180273 Rev. N April 2017
51
Step 3
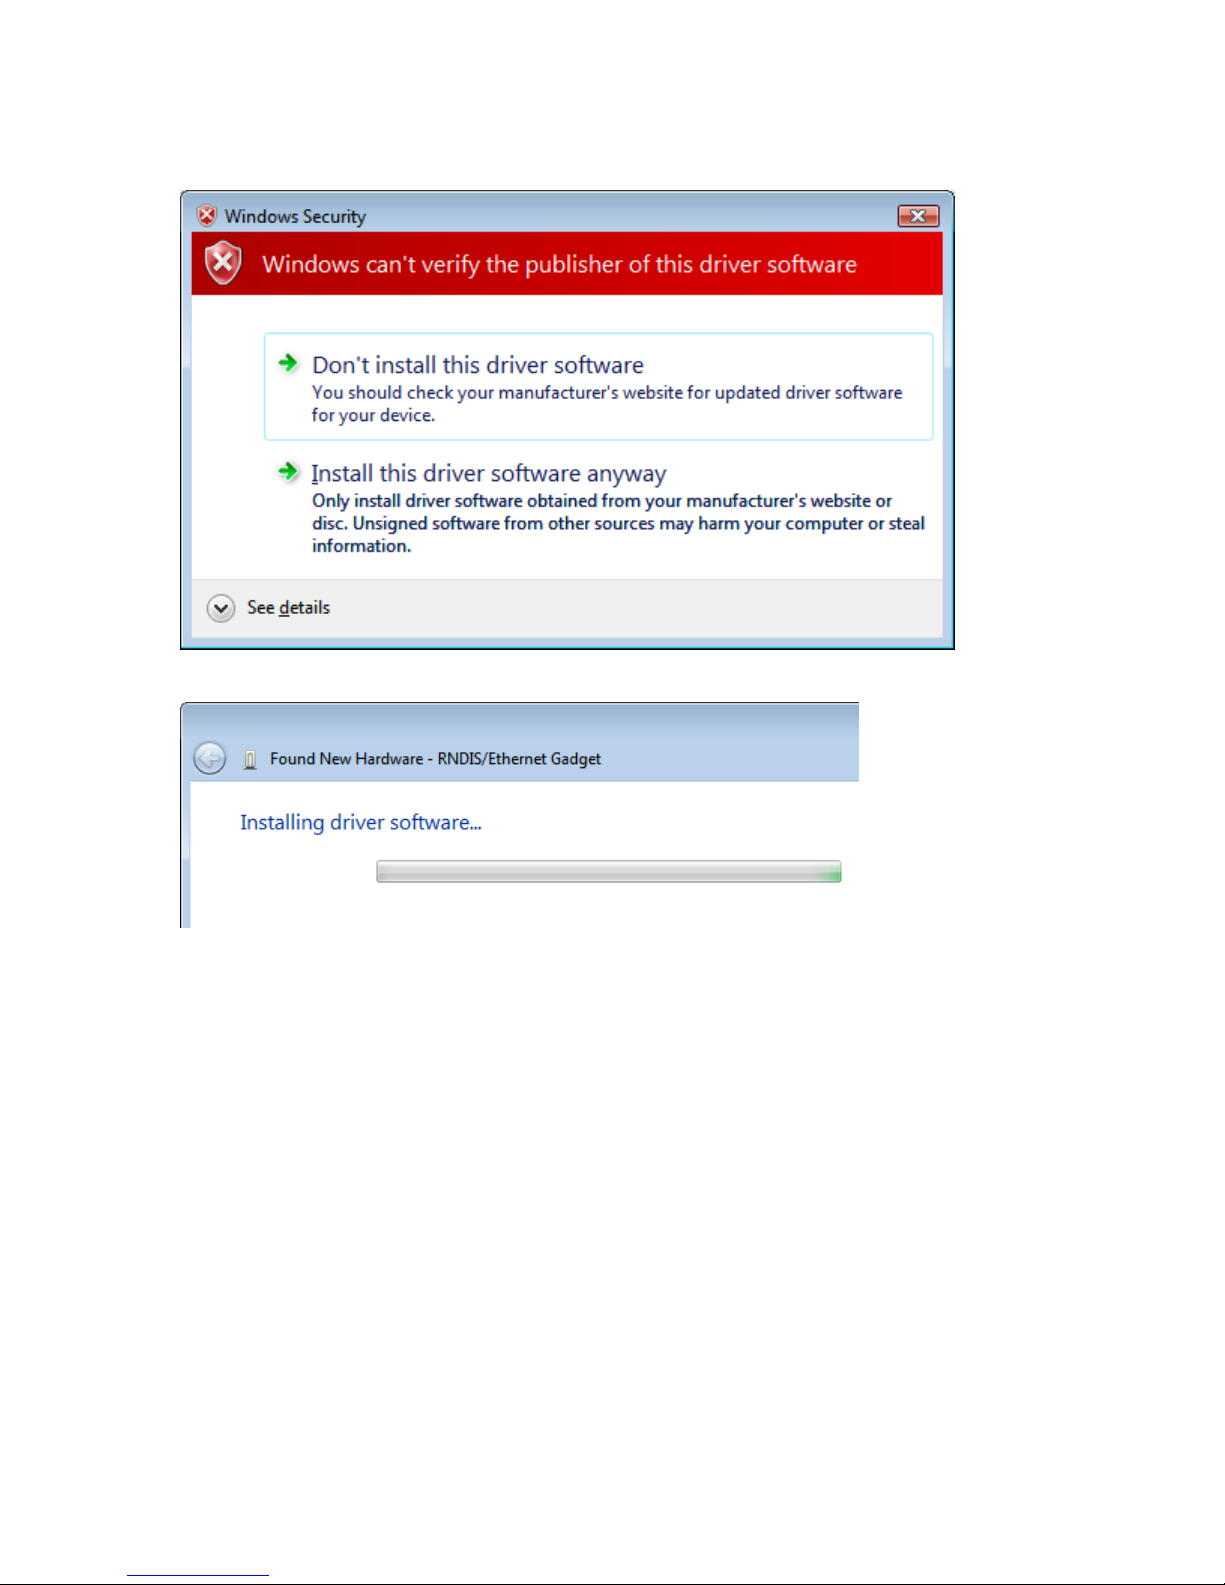
► Click ‘Install this driver software anyway’
► You will see this screen as the driver in installed
Step 4
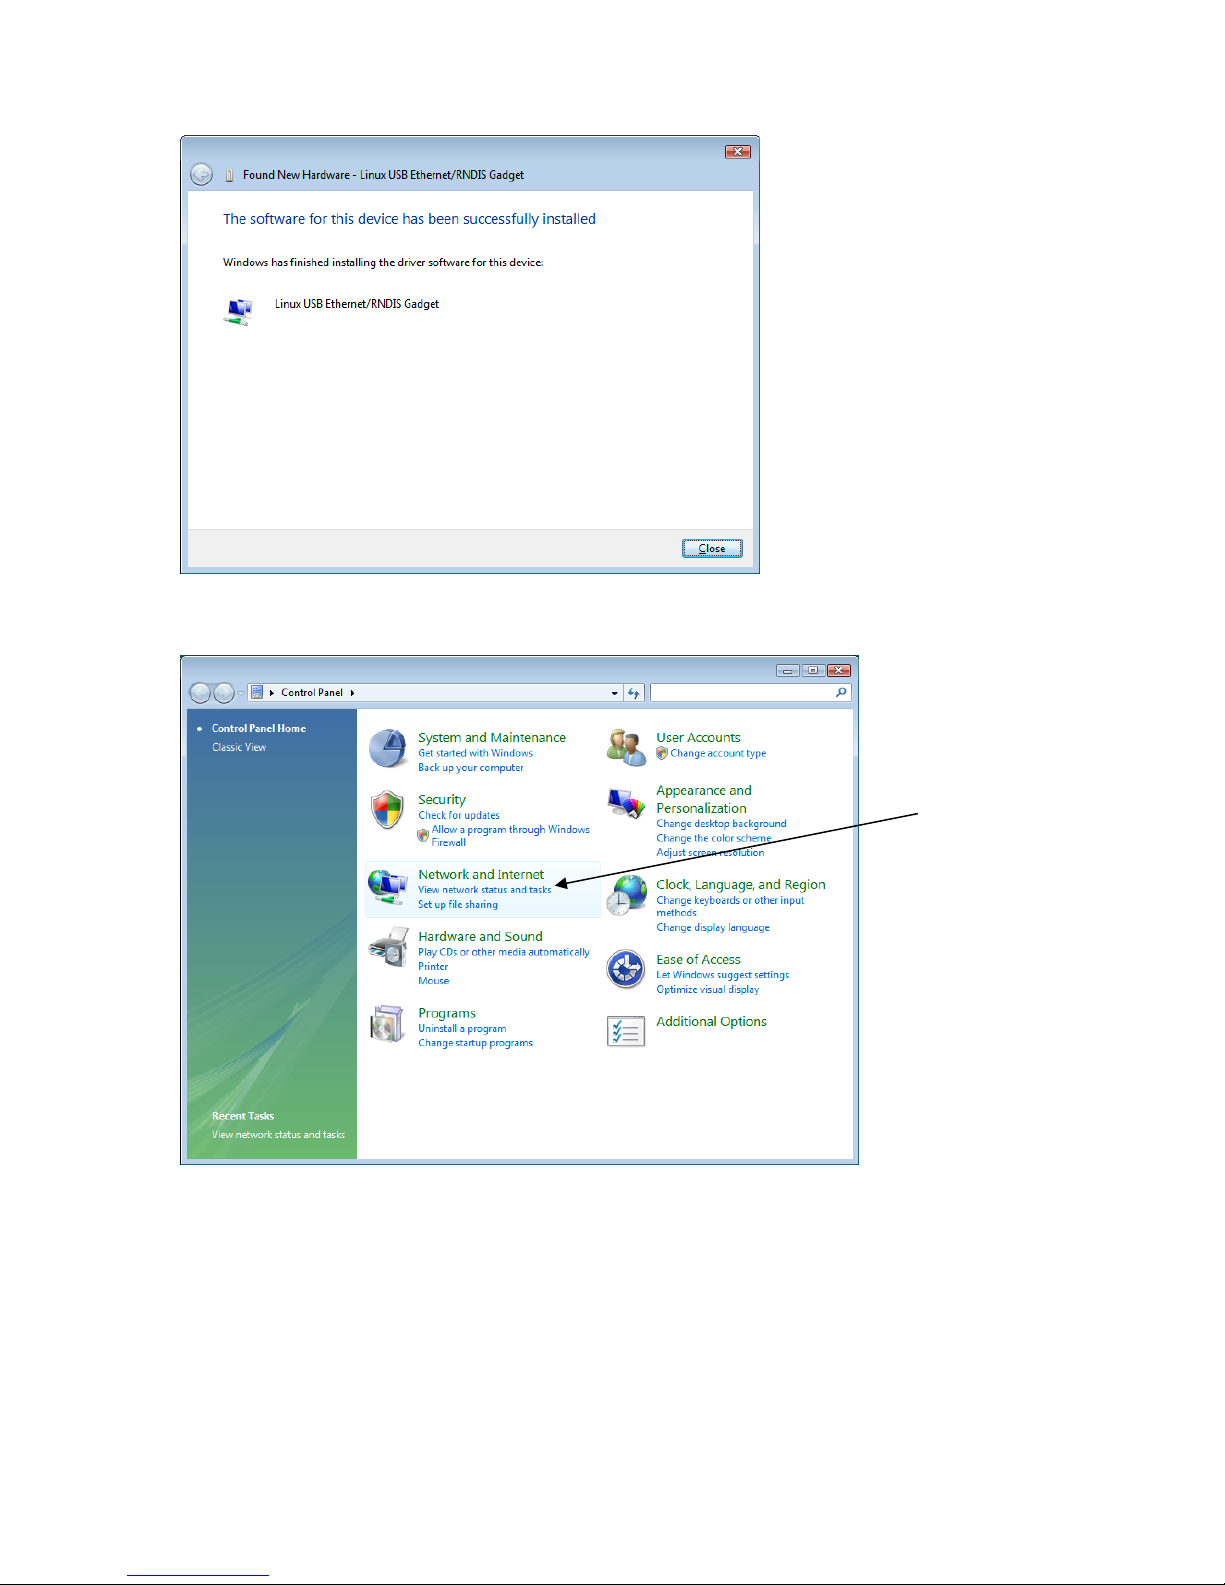
► After the software is installed, you will see this screen, click ‘Close’
Page 52
Quick Start Guide SECTION 5: WINDOWS VISTA (64-bit)
P/N 180273 Rev. N April 2017
52
Step 5
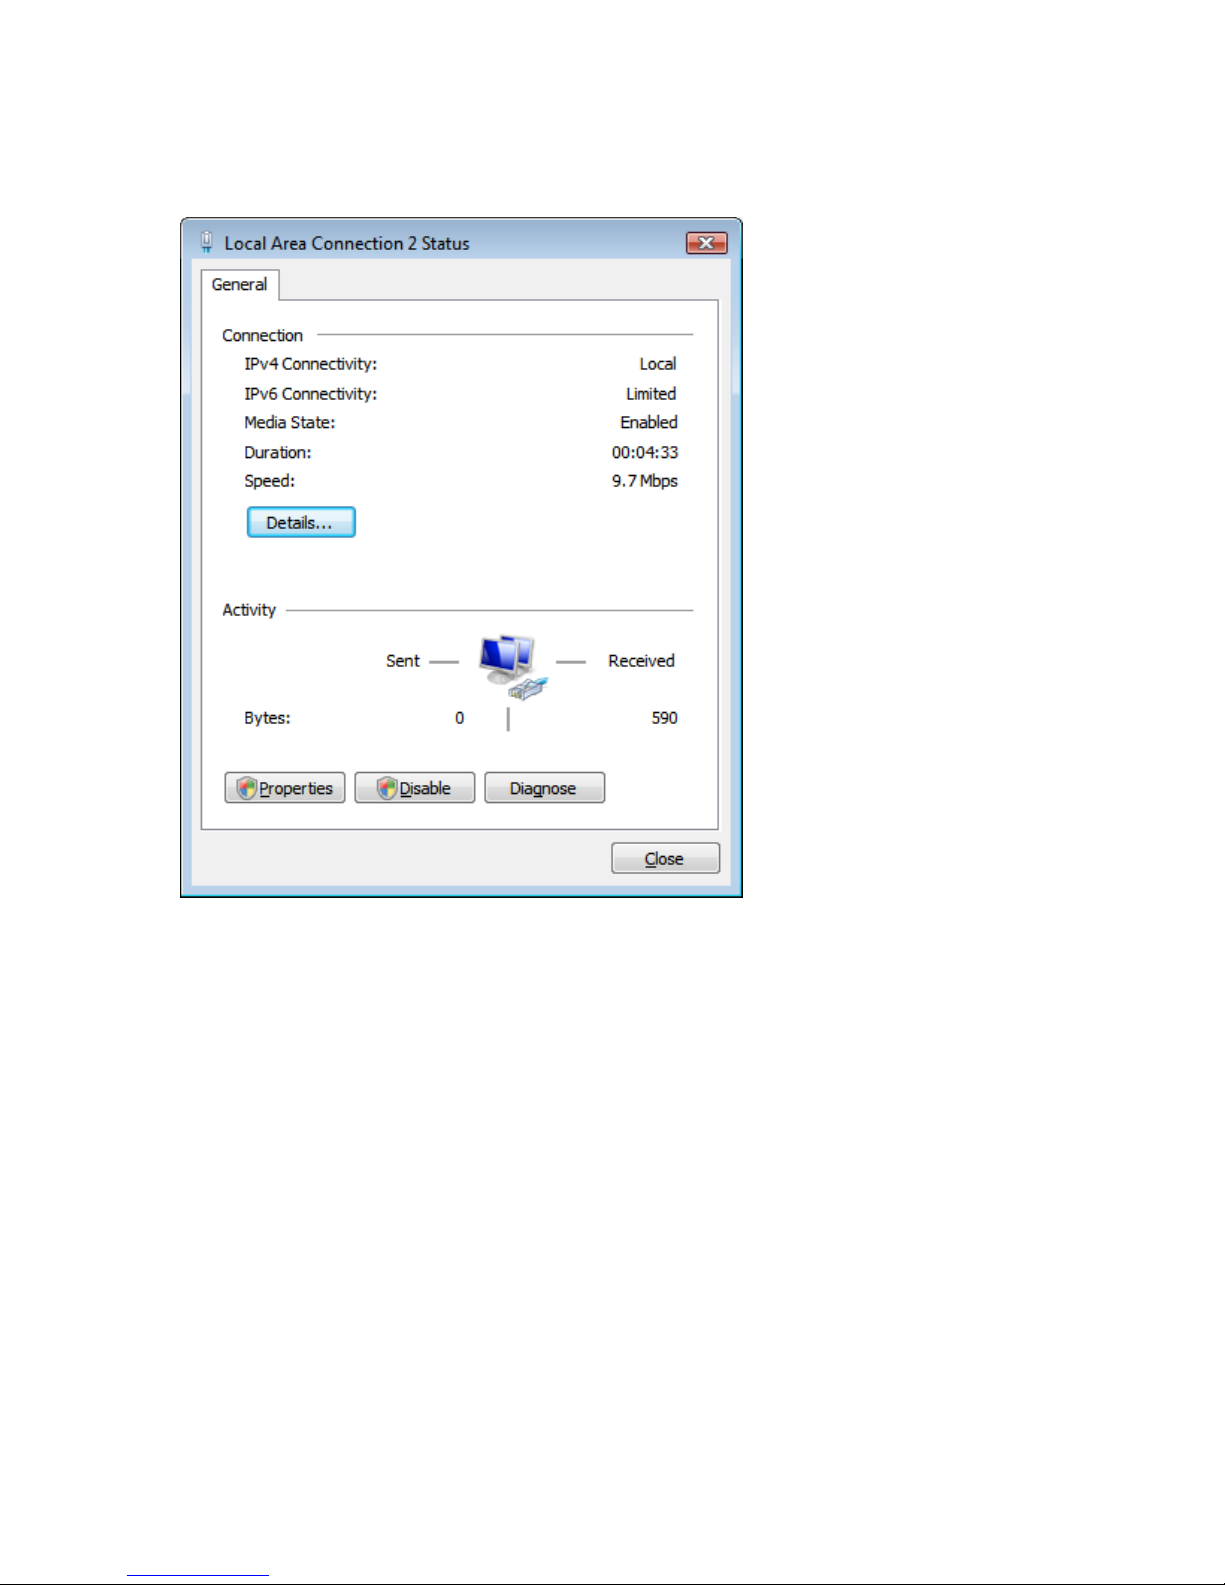
► Go to the Control Panel
► Under Network and Internet, click ‘View Network Status and Tasks’
Step 6
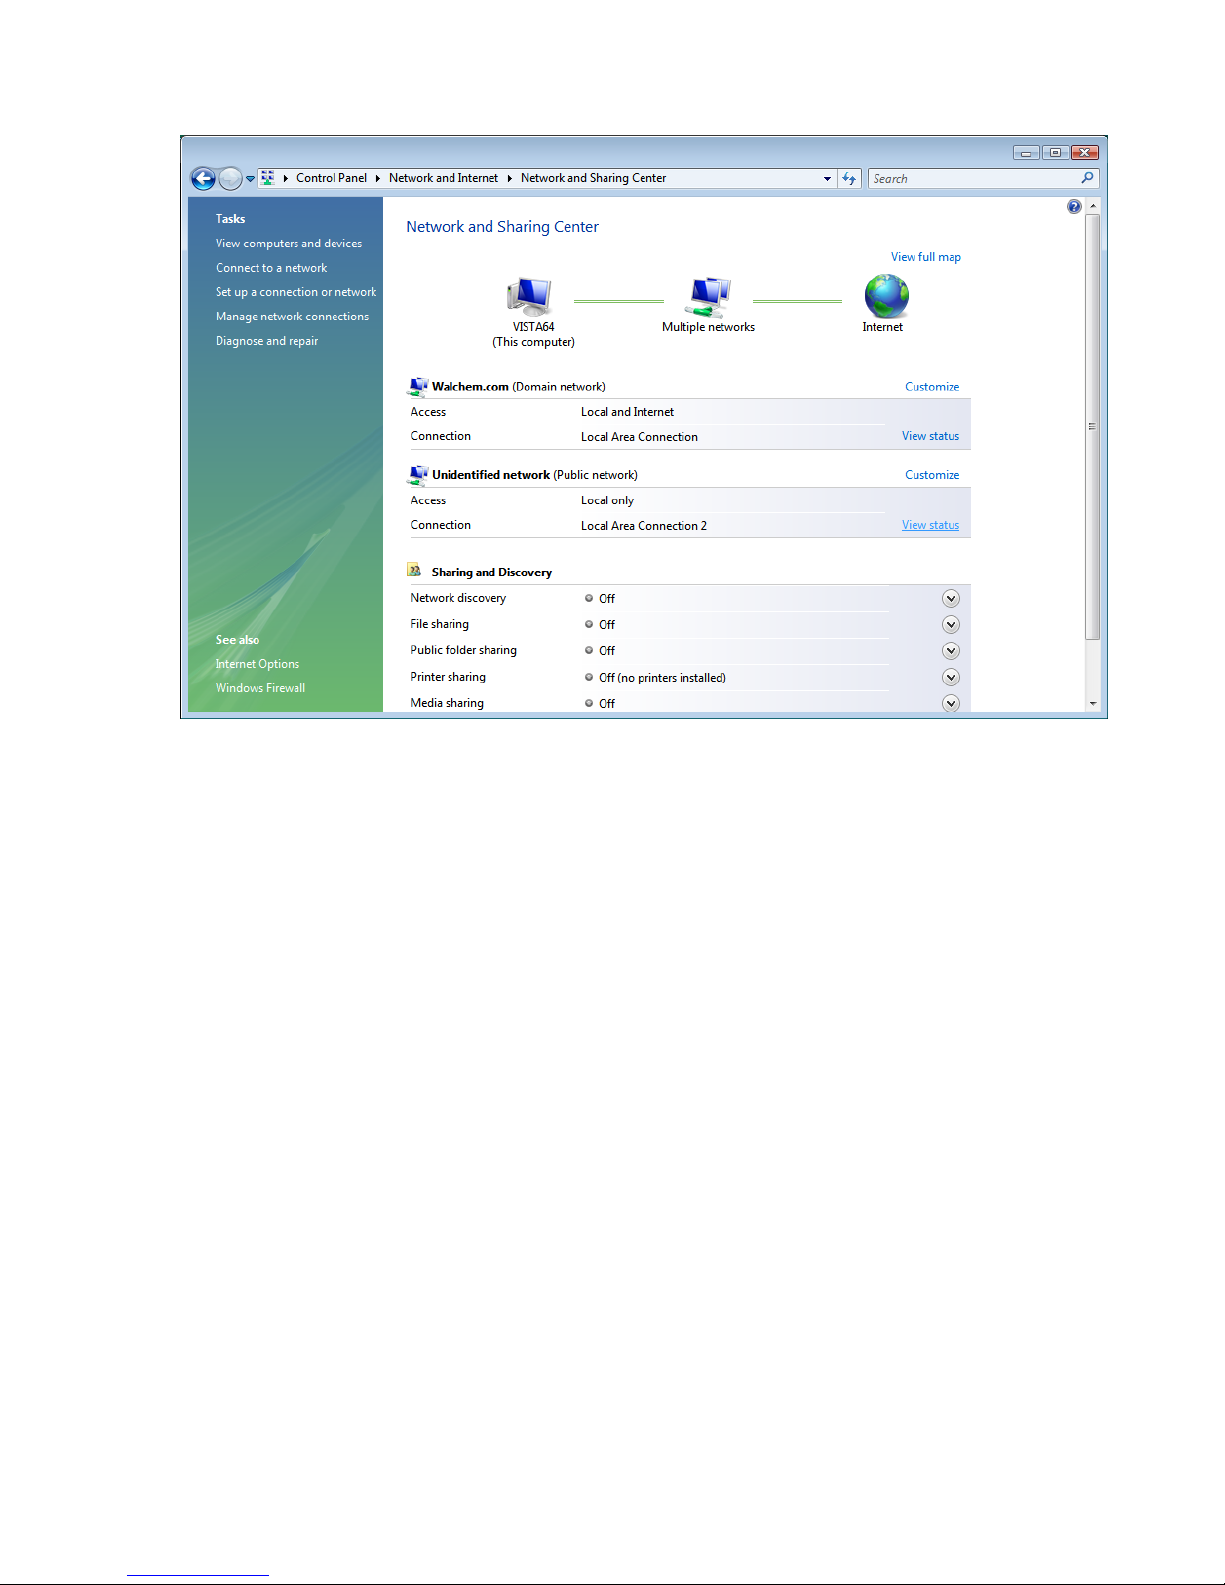
► Click ‘View Status’ to the right of ‘Local Area Connection 2’
Page 53
Quick Start Guide SECTION 5: WINDOWS VISTA (64-bit)
P/N 180273 Rev. N April 2017
53
Page 54
Quick Start Guide SECTION 5: WINDOWS VISTA (64-bit)
P/N 180273 Rev. N April 2017
54
Step 7
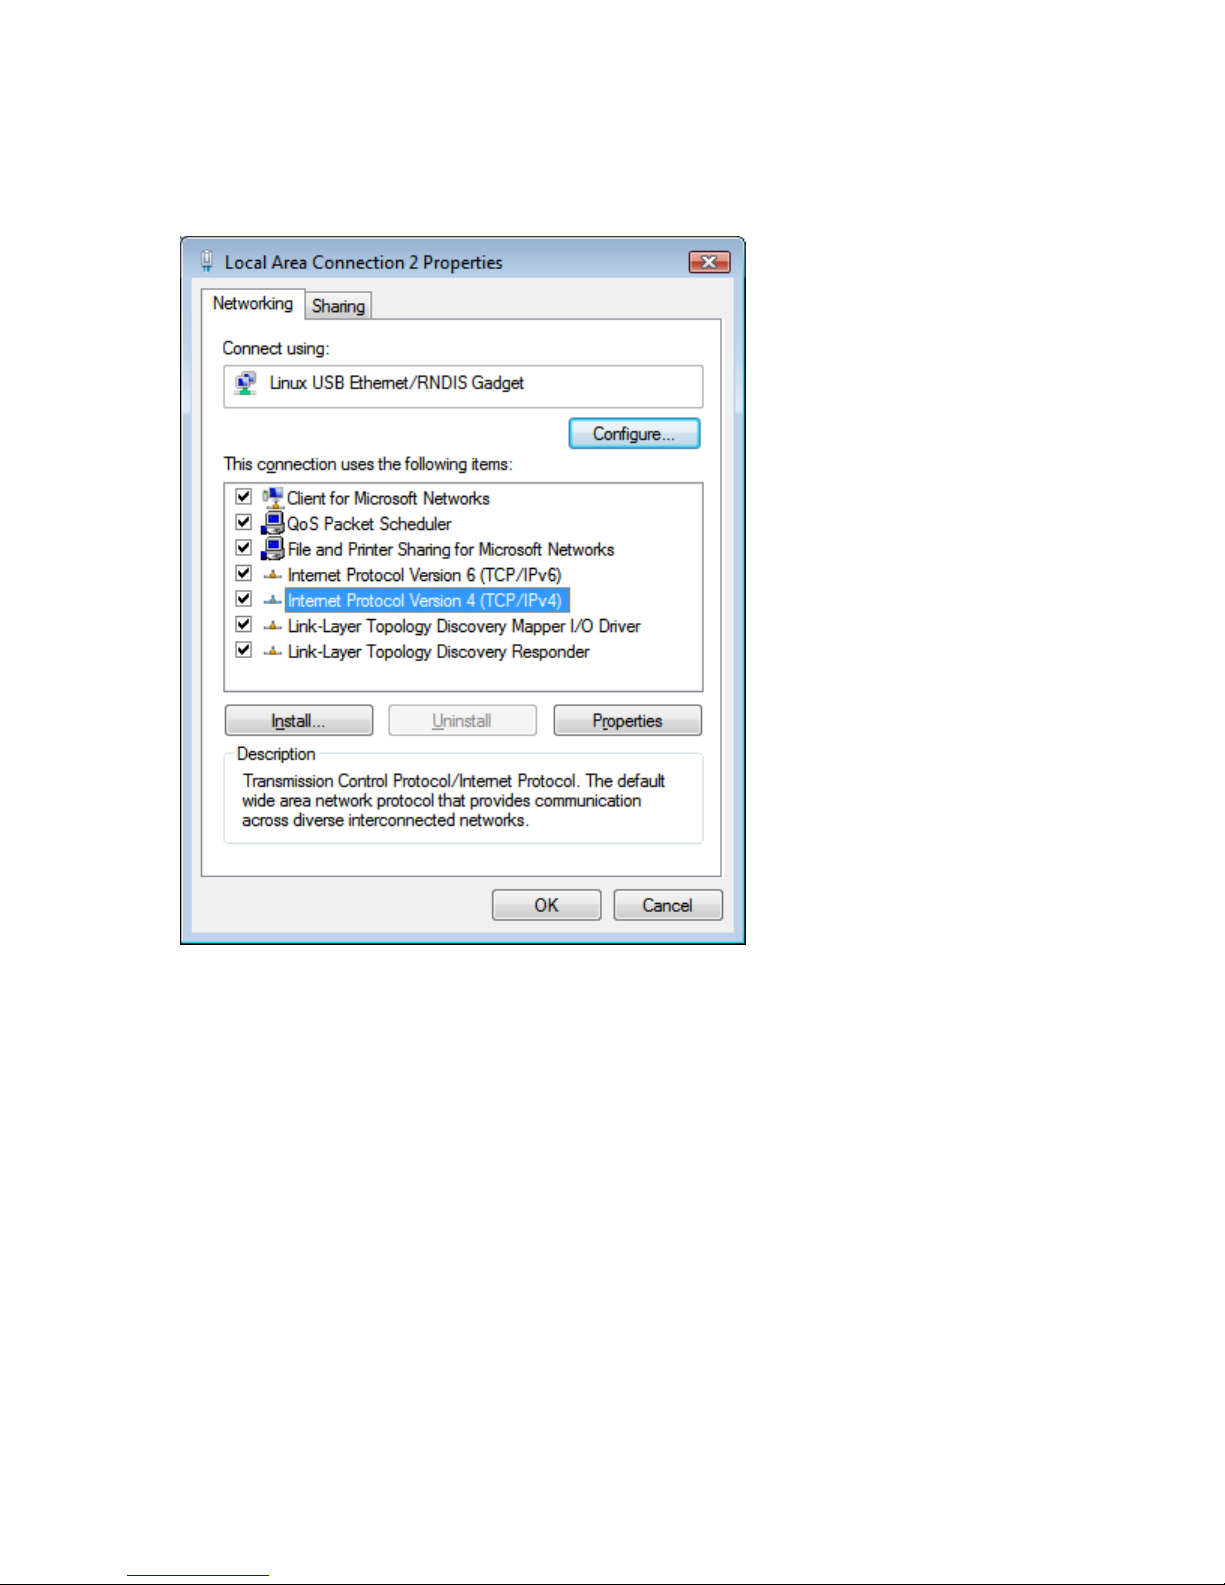
► Click ‘Properties’
Page 55
Quick Start Guide SECTION 5: WINDOWS VISTA (64-bit)
P/N 180273 Rev. N April 2017
55
Step 8
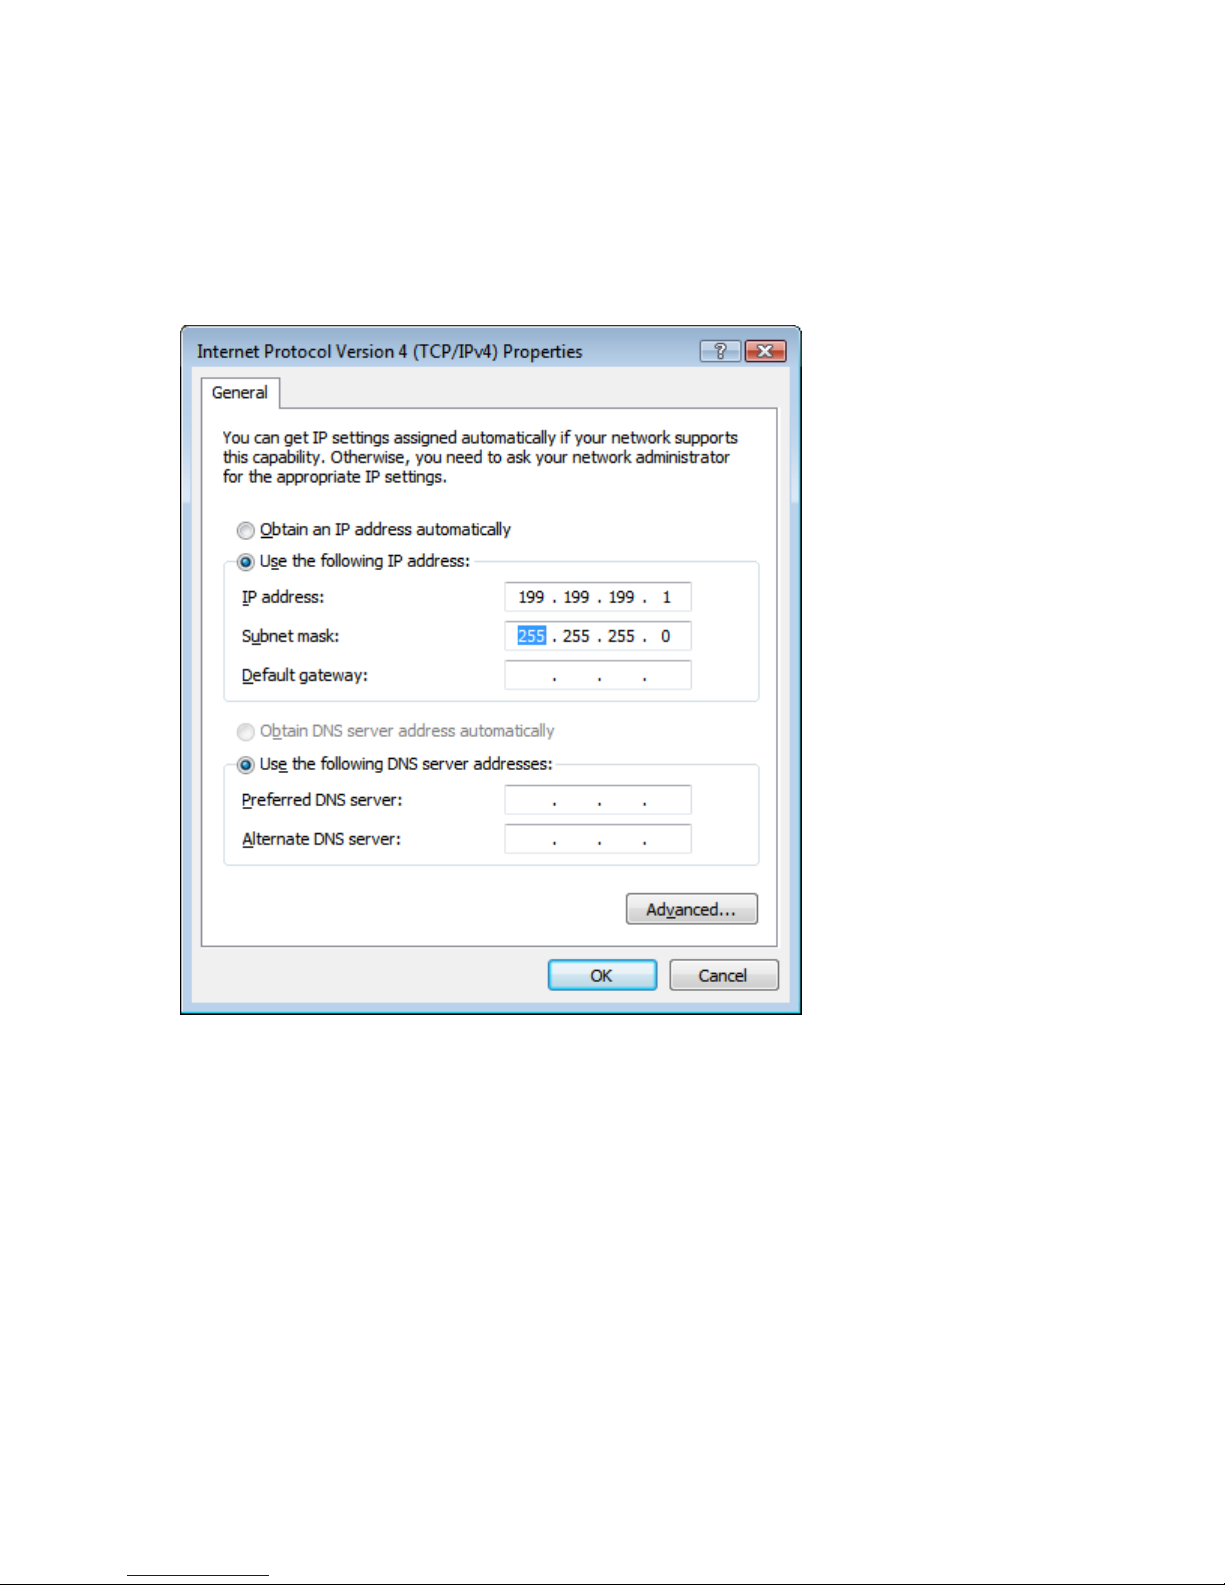
► Highlight ‘Internet Protocol Version 4 (TCP/IPv4)’ and click ‘Properties’
Page 56
Quick Start Guide SECTION 5: WINDOWS VISTA (64-bit)
P/N 180273 Rev. N April 2017
56
Step 9
► Select ‘Use the following IP address’
► Enter 199.199199.1 for the IP address and 255.255.255.0 for subnet mask
► Click ‘OK’ and you’re done!
Step 10
► Open your browser and type in 199.199.199.2 to access the WebMaster Login screen.
2. DIRECT MODEM SET-UP FOR WINDOWS VISTA 64
See Windows Vista 32 Direct Modem Set-up instructions
Page 57
P/N 180273 Rev. N April 2017
57
QUICK START GUIDE
Section 6: WINDOWS XP
1. USB DRIVER INSTALLATION
2. DIRECT MODEM TO MODEM COMMUNICATIONS
Page 58
Quick Start Guide SECTION 6: WINDOWS XP
P/N 180273 Rev. N April 2017
58
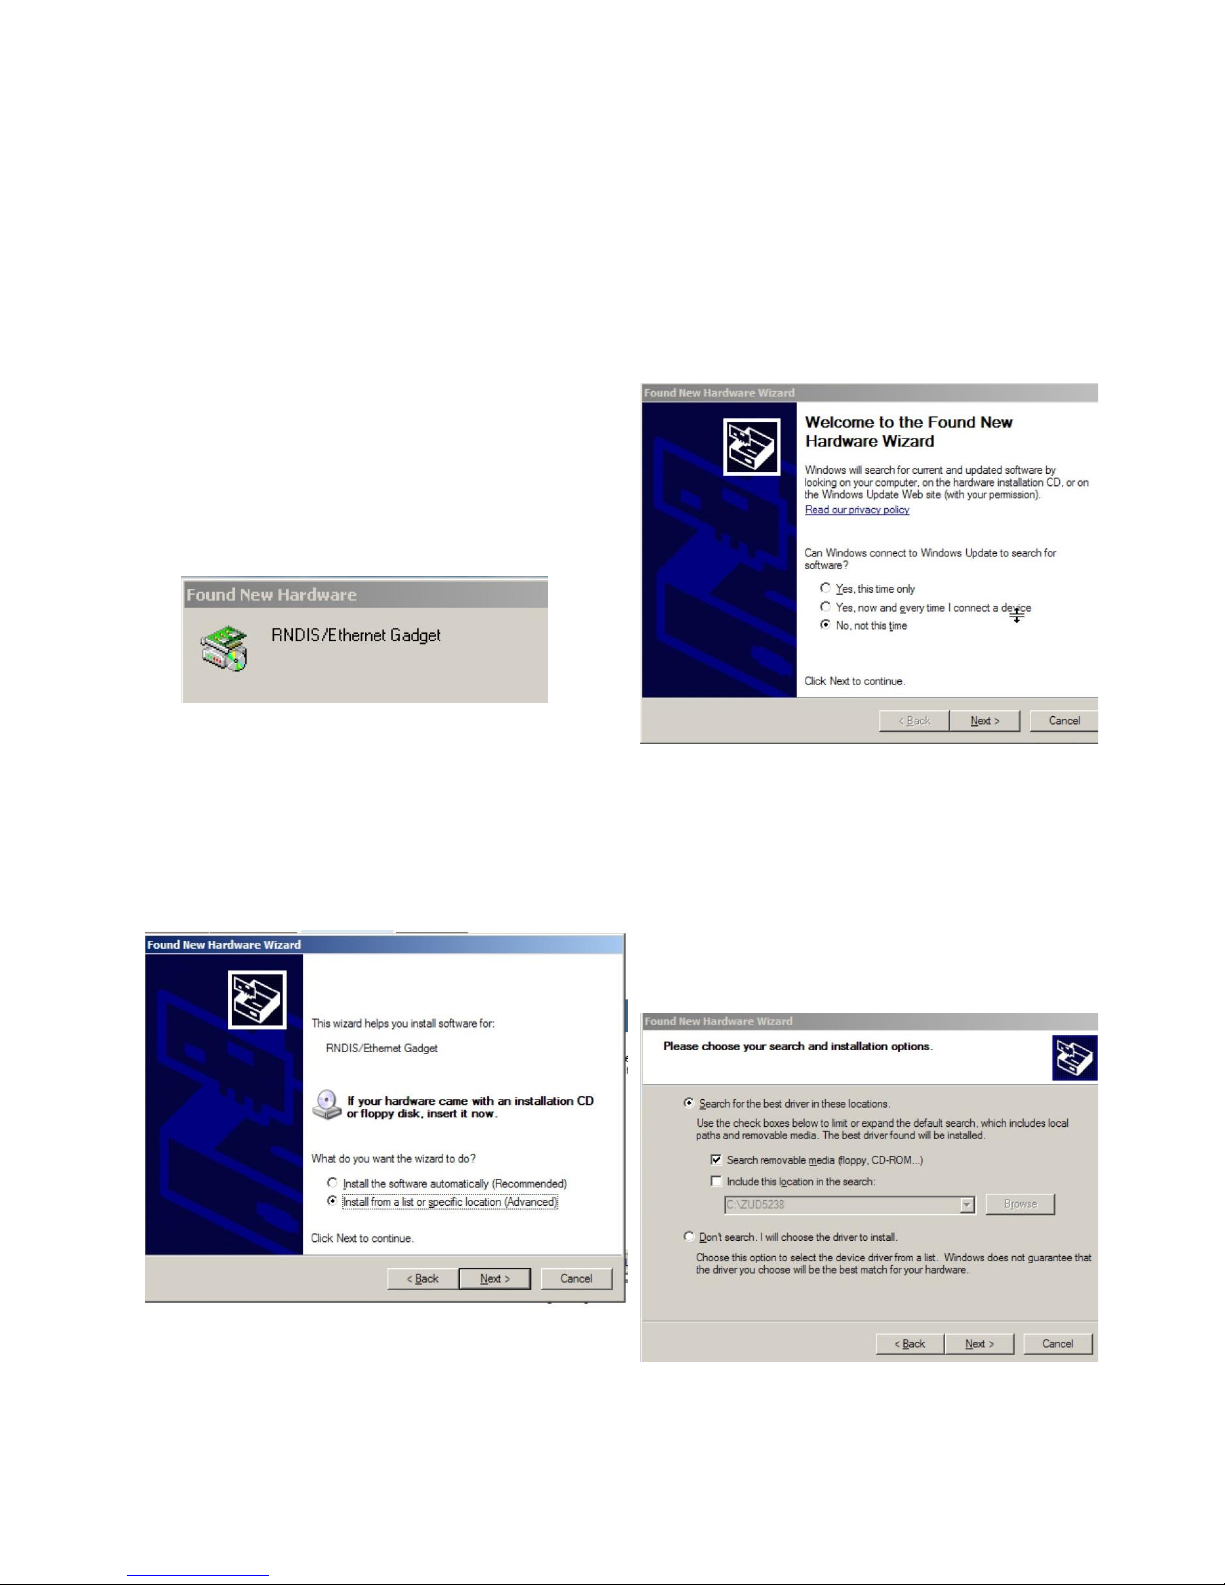
1. USB DRIVER INSTALLATION FOR WINDOWS XP
Before inserting the CD into your computer, follow Steps 1-3 below!!
Step 1
► Power up your computer and the
WebMaster/WebAlert controller.
► Connect the supplied USB cable between the
computer USB port and the WebMaster/
WebAlert USB port on the front panel.
► You'll see this ‘Found New Hardware’
message.
Step 2
► Click ‘No, not this time’
► Click ‘Next’
Step 3
► Click ‘Install from a list of specific location’
► Click ‘Next’
Step 4
► Click ‘Search for the best driver’
► Check the box next to ‘Search removable
media’ and insert the CD supplied with
your controller into the CD-ROM drive
► Click ‘Next’
Page 59
Quick Start Guide SECTION 6: WINDOWS XP
P/N 180273 Rev. N April 2017
59
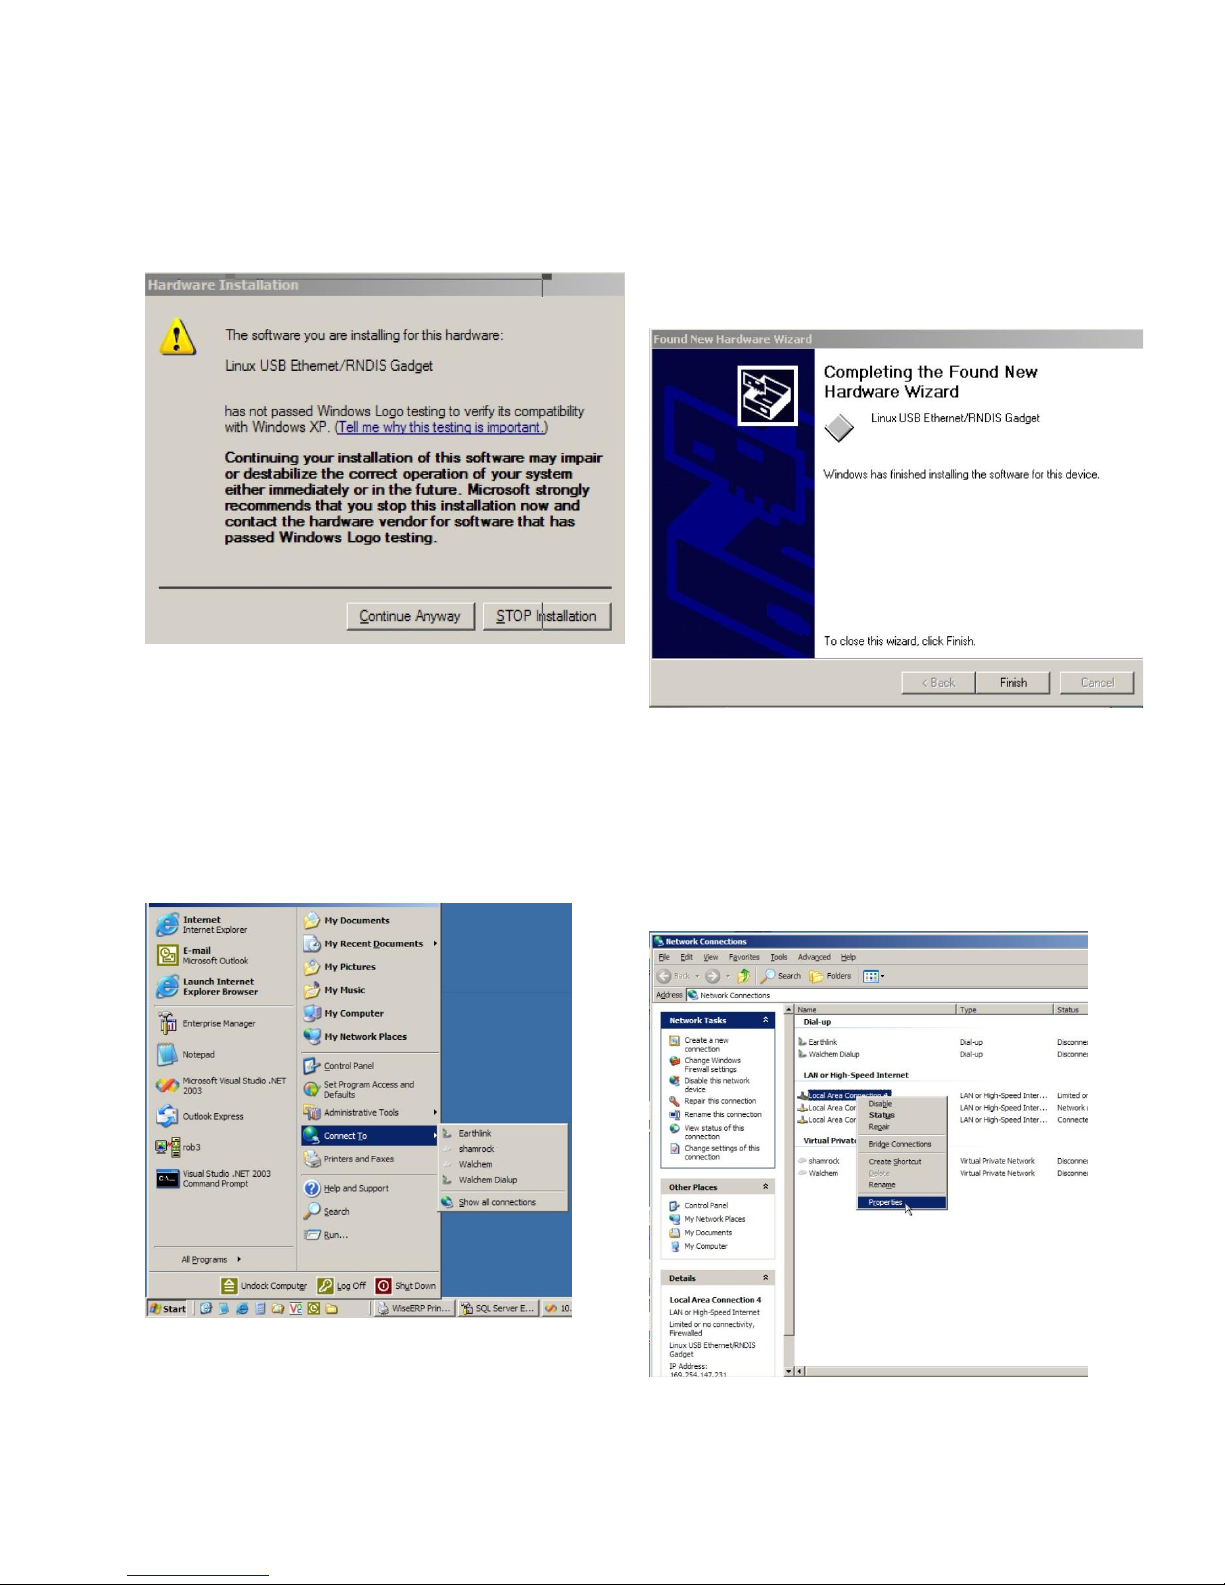
Step 5
► Click ‘Continue Anyway’
Step 6
► Click ‘Finish’
► Repeat this procedure for each USB port on
your computer that may be used for a connection.
Step 7
► Click ‘Start’, then ‘Connect to’
► Click ‘Show all connections’
Step 8
► Right-click the new ‘Local Area Connection’
(usually called #2)
► Click ‘Properties’
Page 60
Quick Start Guide SECTION 6: WINDOWS XP
P/N 180273 Rev. N April 2017
60
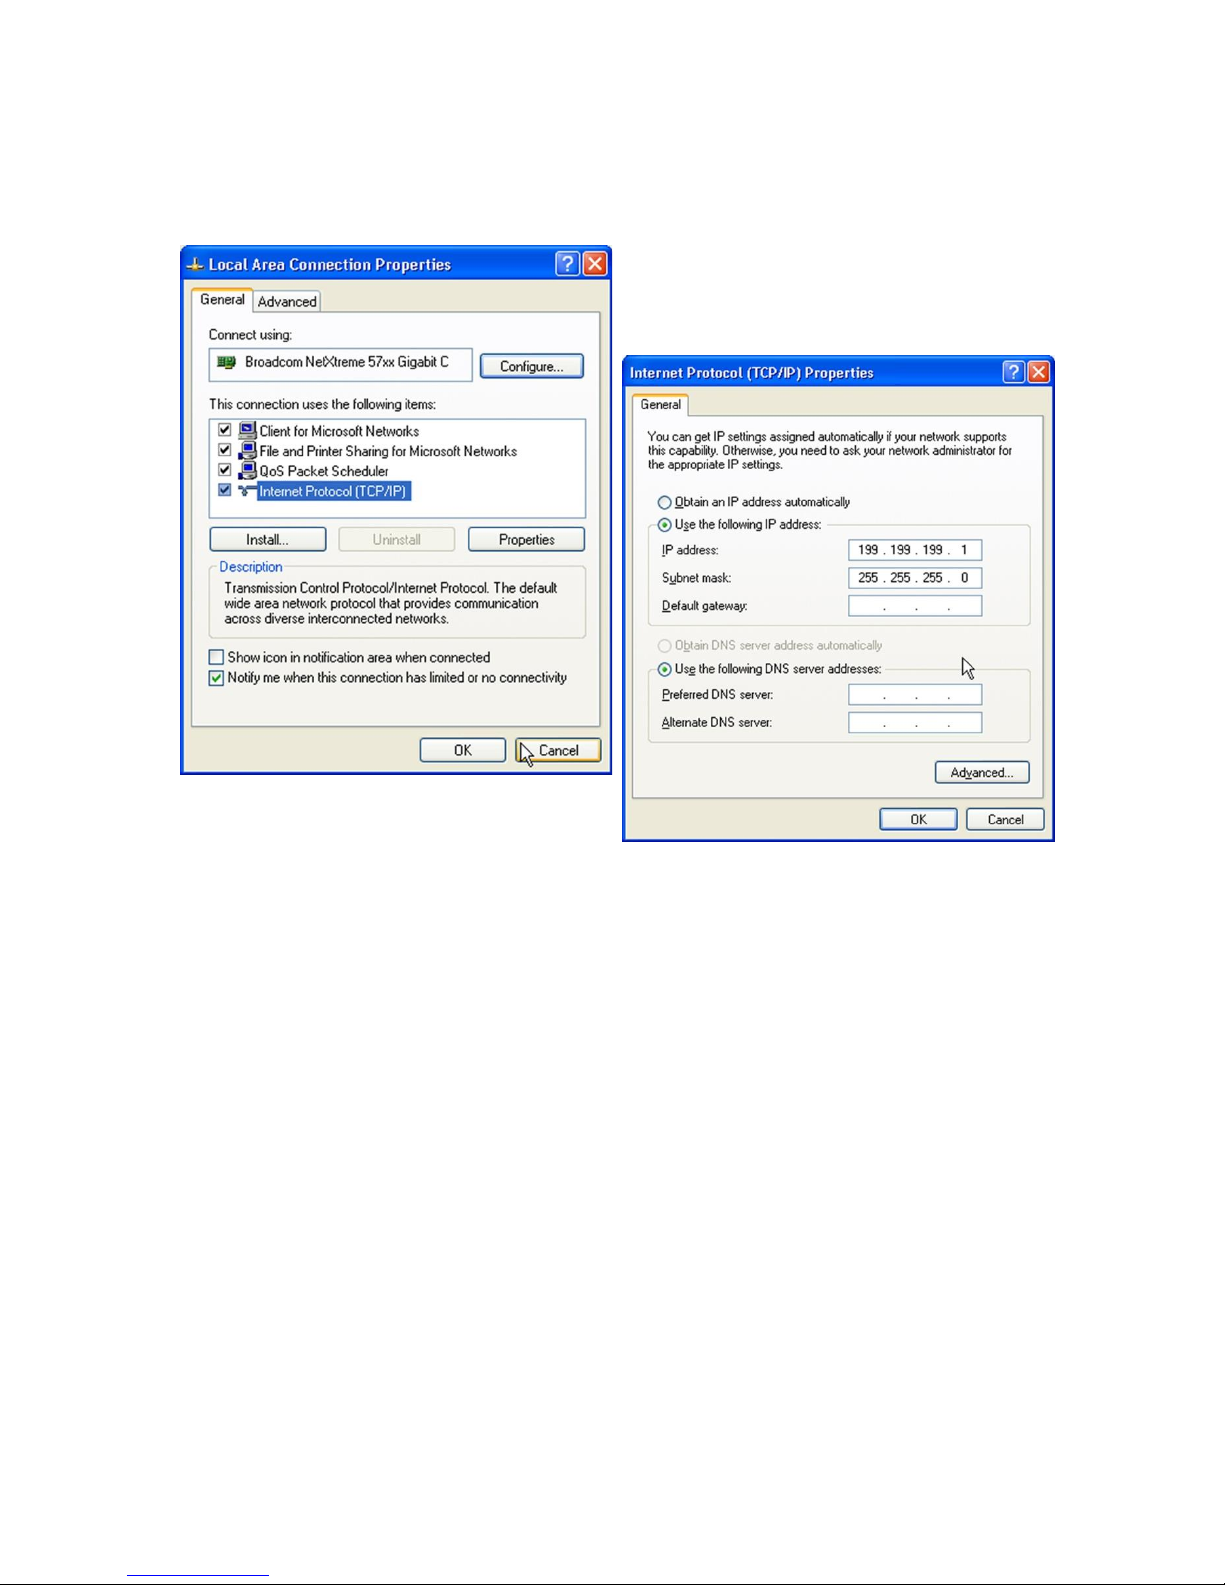
Step 9
► Select ‘Internet Protocol (TCP/IP)’
► Click ‘Properties’
Step 10
► Click ‘Use the following IP address’
► In the IP address box, type:
199.199.199.1
► In the Subnet mask box, type:
255.255.255.0
► Click ‘OK’
Step 11
► Open Internet Explorer and type"
199.199.199.2 in the address bar
► This will give you direct access to the
login page of the controller.
► From this point on, you will only need
to connect the USB cable to the
controller and type in that address to
access the local connection to your
controller.
Page 61
Quick Start Guide SECTION 6: WINDOWS XP
P/N 180273 Rev. N April 2017
61
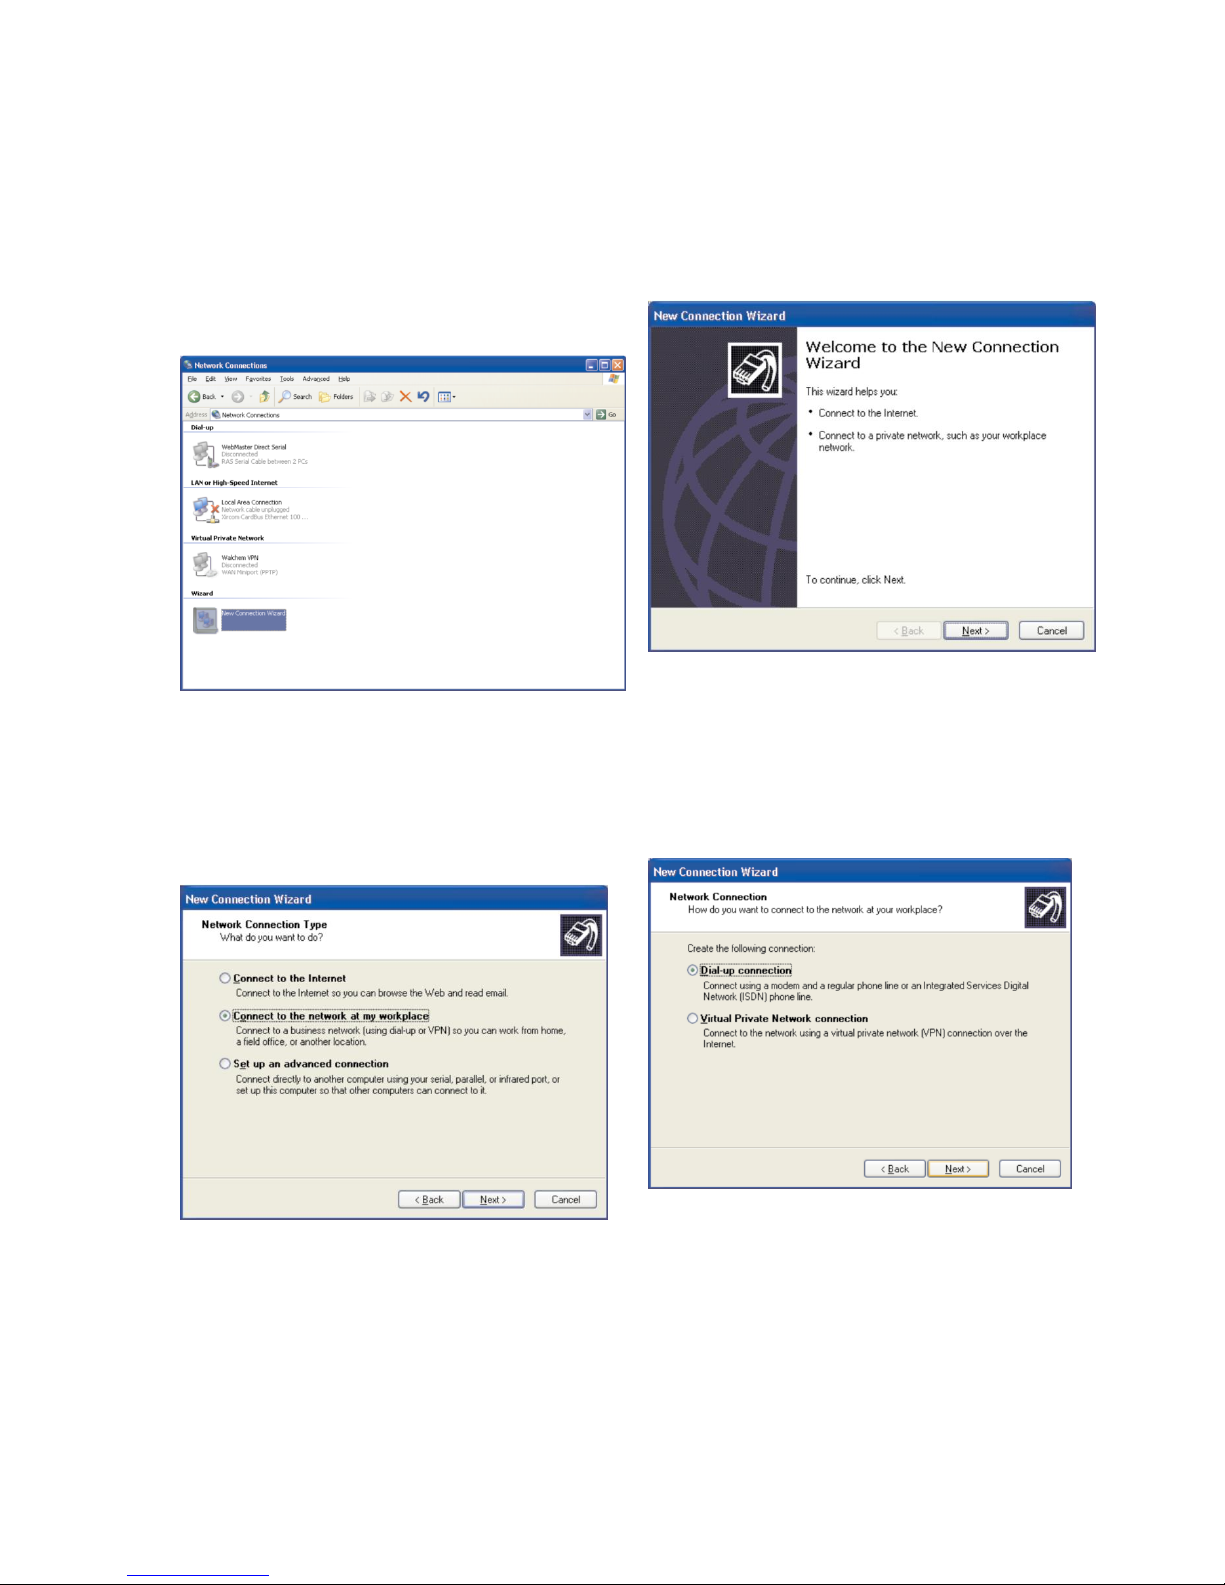
2. DIRECT MODEM SET-UP FOR WINDOWS XP
Create Direct Modem Dial-up Adapter
Step 1
► Return to Control Panel, Network
Connections
► Double-click ‘New Connection Wizard’
Step 2
► Click ‘Next’
Step 3
► Select ‘Connect to the network at my
workplace’
► Click ‘Next’
Step 4
► Select ‘Dial-up connection’
► Click ‘Next’
Page 62
Quick Start Guide SECTION 6: WINDOWS XP
P/N 180273 Rev. N April 2017
62
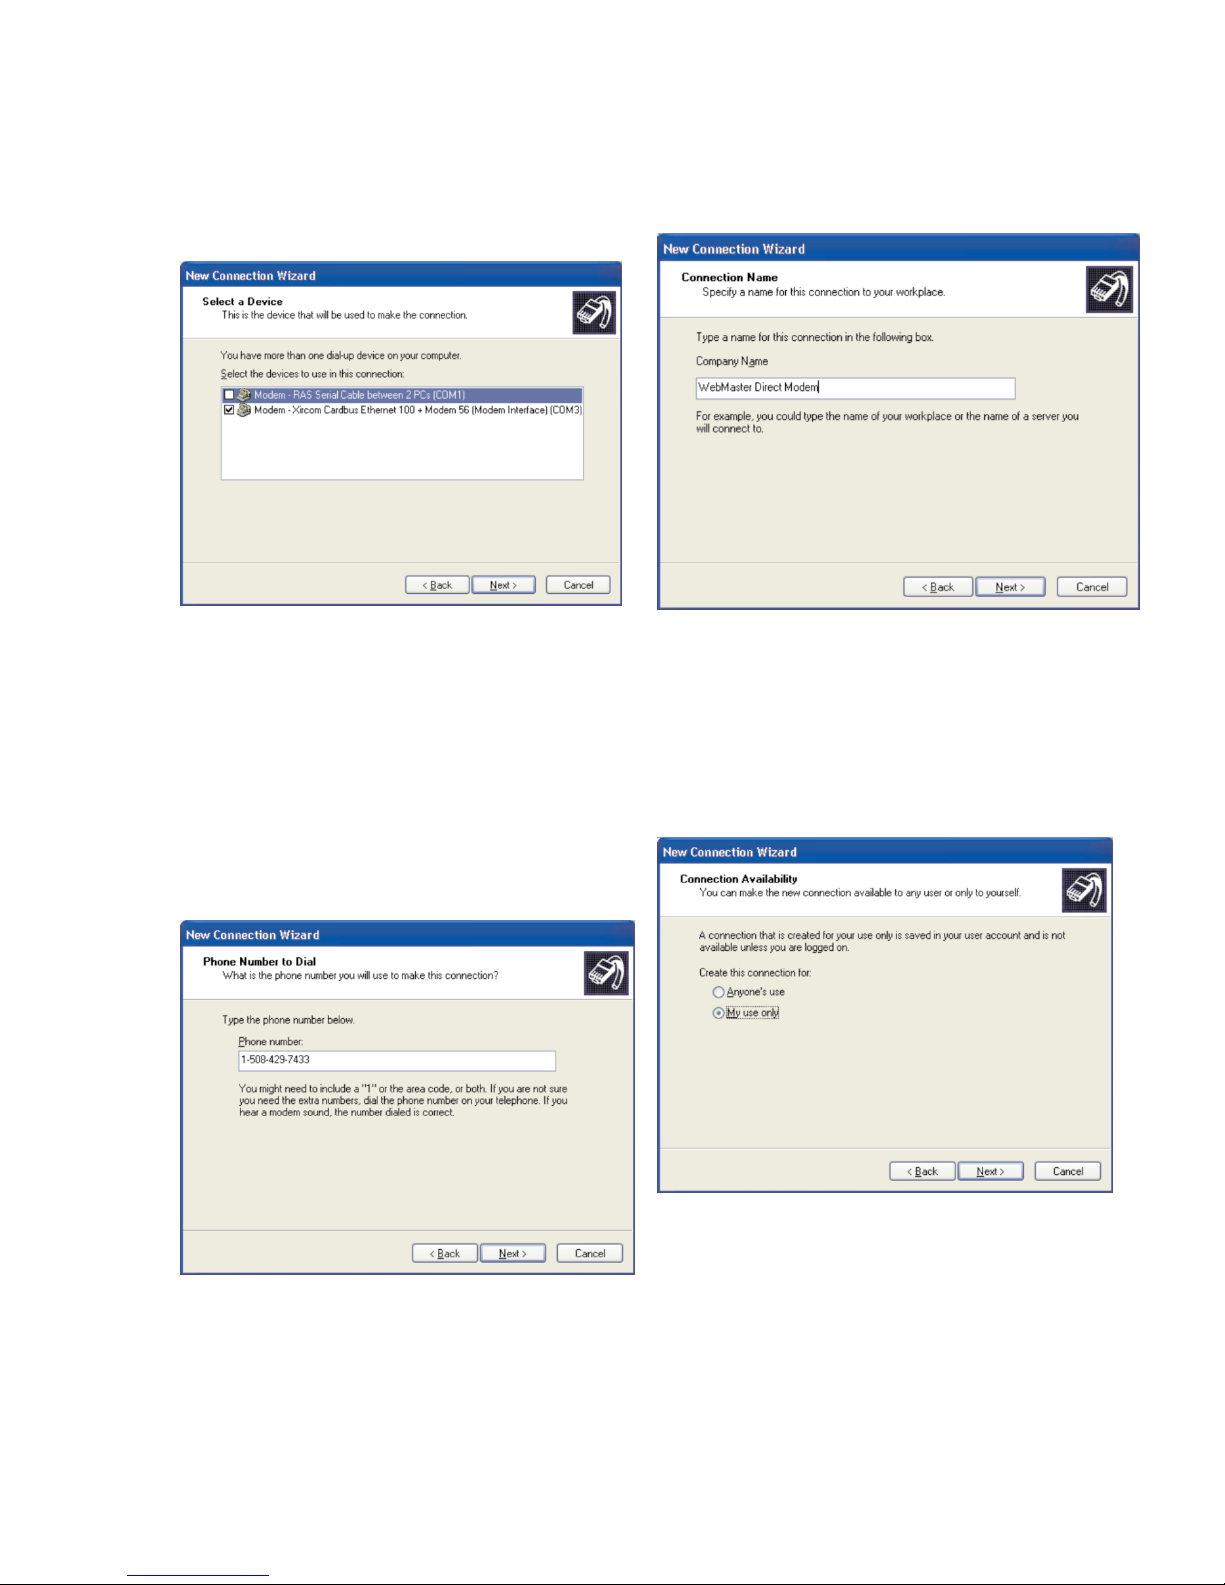
Step 5
► Check the appropriate modem
► Uncheck all the others
► Click ‘Next’
Step 6
► Type an appropriate name for the connection
► Click ‘Next’
Step 7
► Enter the phone number for the
WebMaster/WebAlert controller you will
be connecting to (include area code and '1'
if necessary)
► Click ‘Next’
Step 8
► Select ‘My use only’
► Click ‘Next’
Page 63
Quick Start Guide SECTION 6: WINDOWS XP
P/N 180273 Rev. N April 2017
63
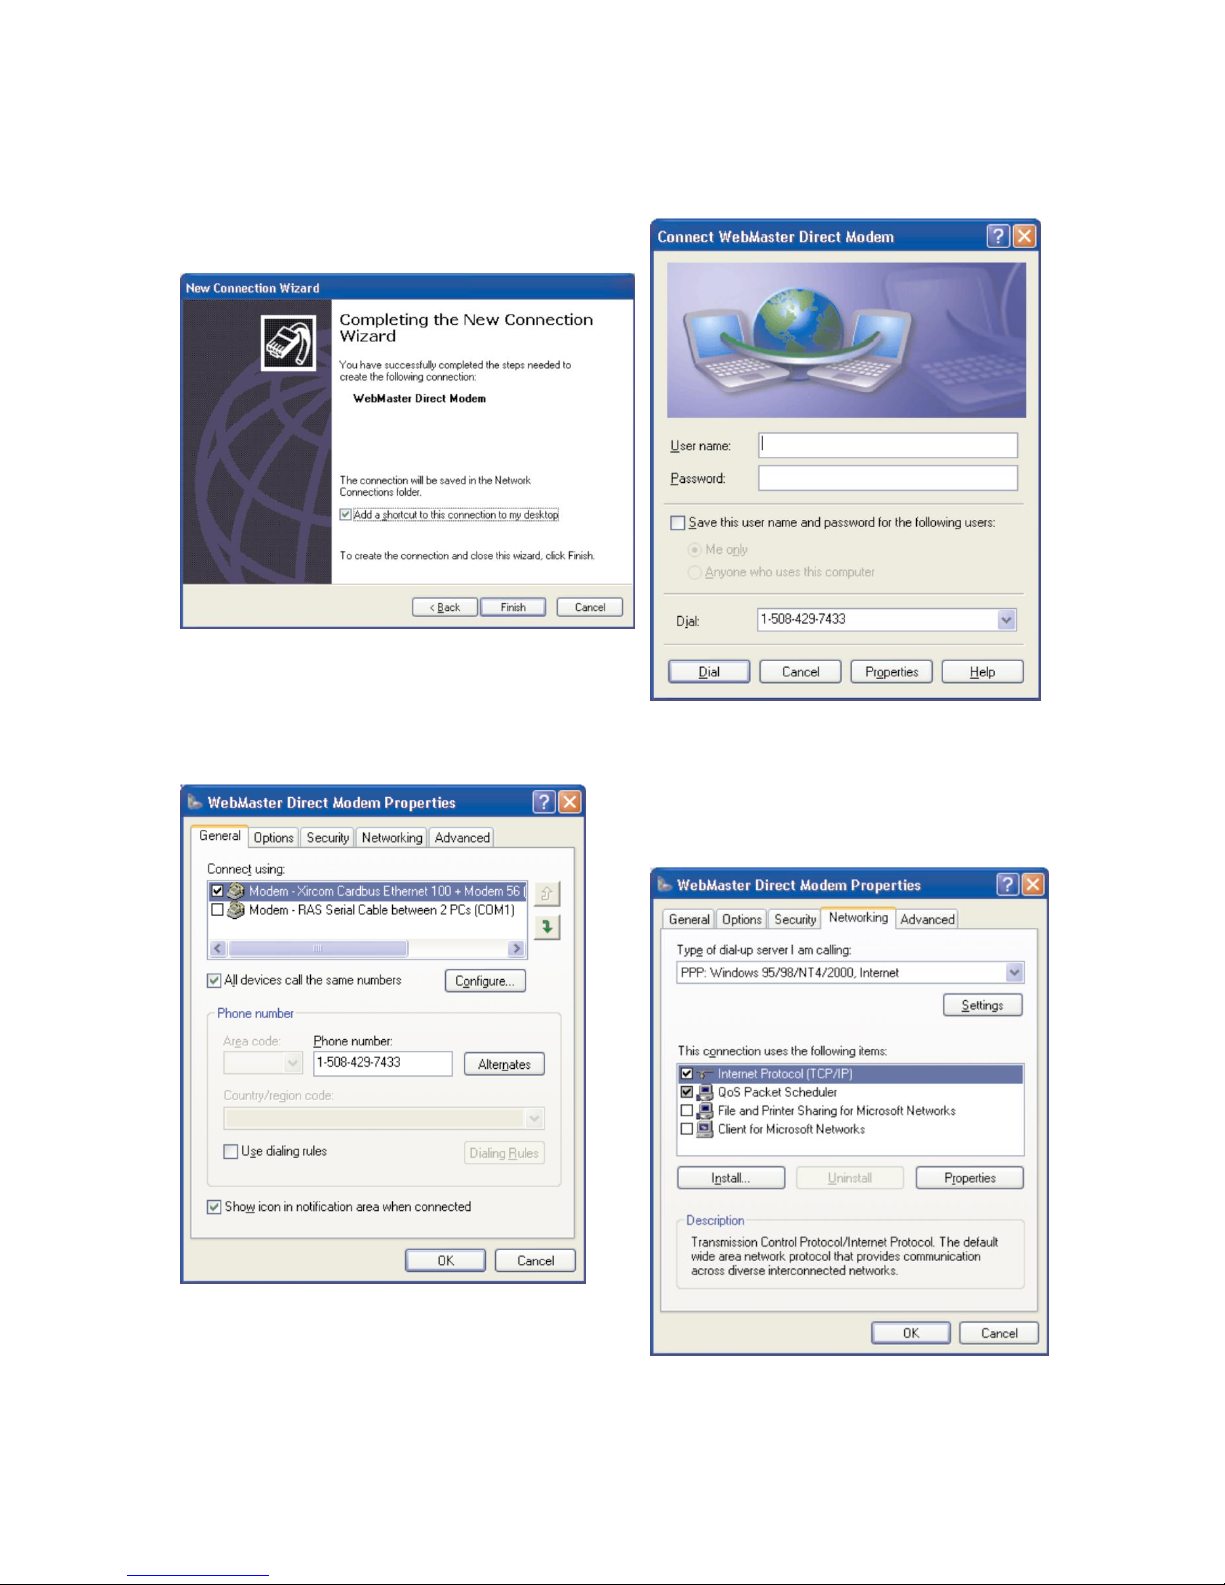
Step 9
► Check the box next to ‘Add a shortcut to
this connection to my desktop’
► Click ‘Finish’
Step 10
► Click ‘Properties’
Step 11
► Click the ‘Networking’ tab
Step 12
► Check the box next to ‘Internet
Protocol (TCP/IP)’
► Uncheck all the other boxes
► Click ‘Settings’
Page 64
Quick Start Guide SECTION 6: WINDOWS XP
P/N 180273 Rev. N April 2017
64
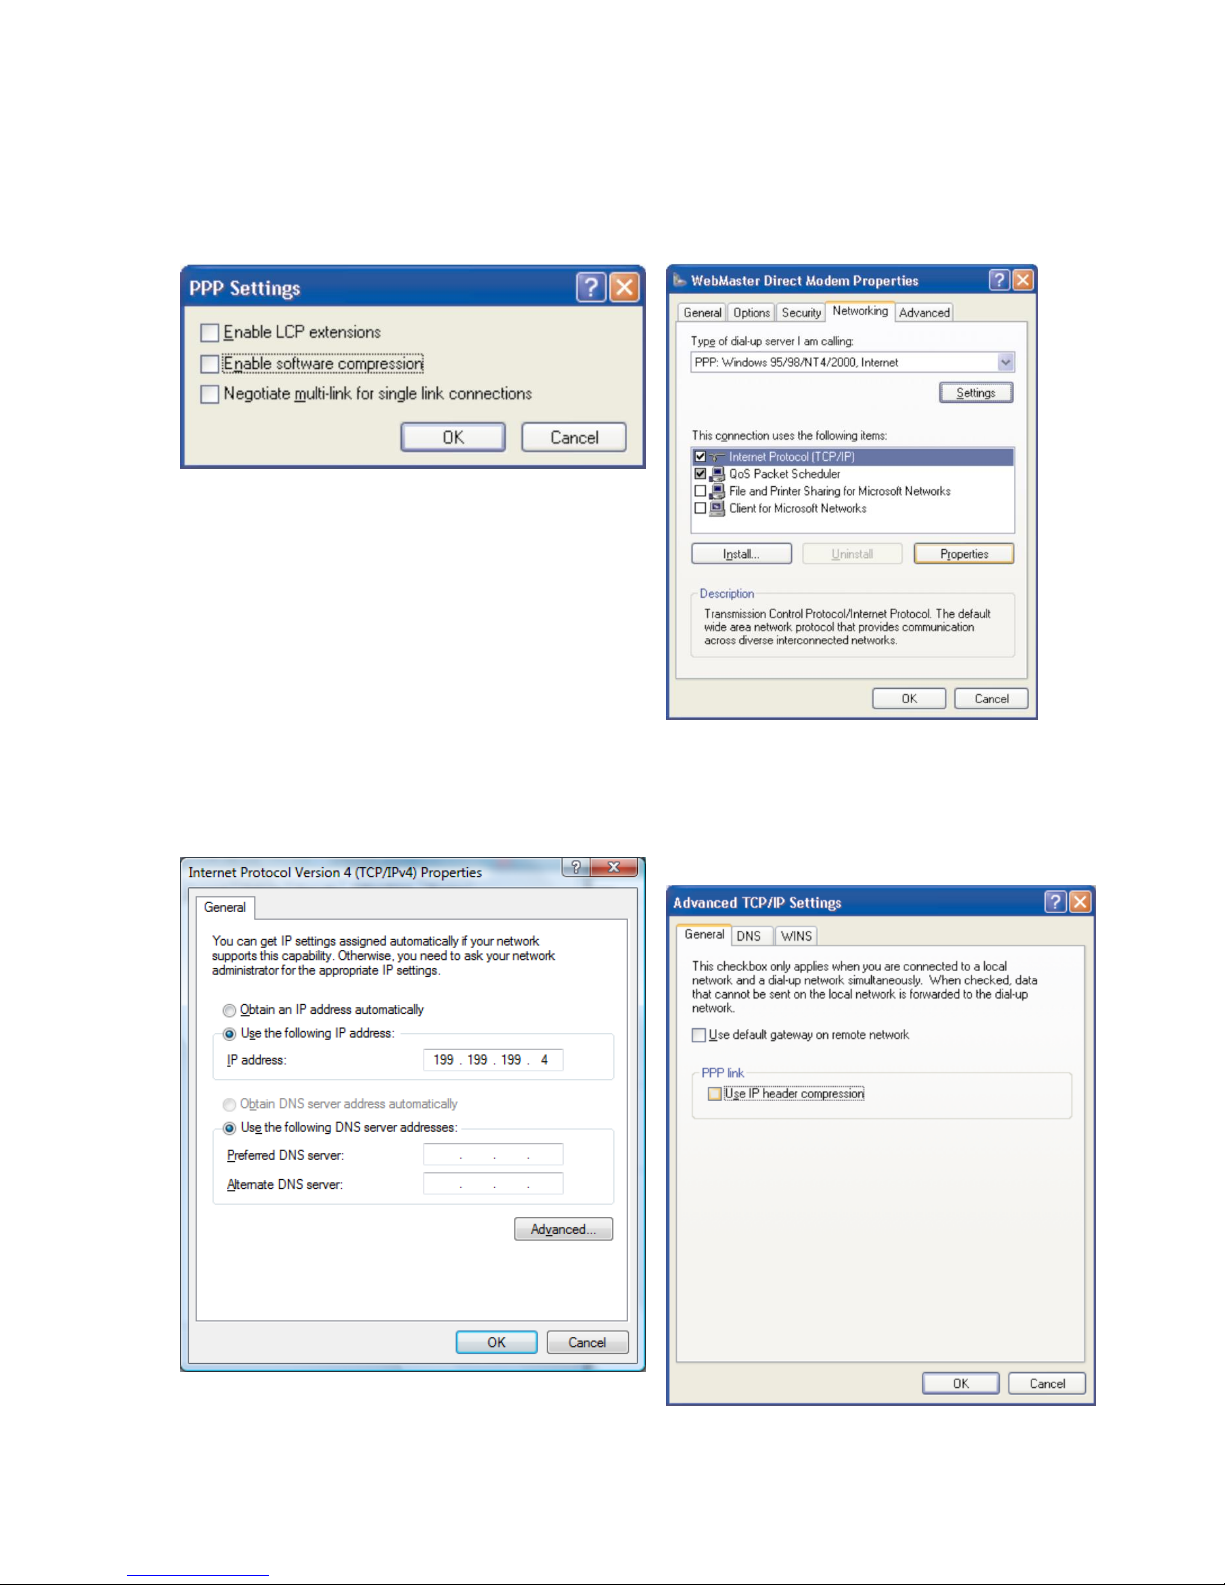
Step 13
► Uncheck all three options
► Click ‘OK’
Step 14
► Highlight ‘Internet Protocol (TCP/IP)’
► Click ‘Properties’
Step 15
► Select ‘Use the following IP address’
► Enter the IP address: 199.199.199.4
► Click ‘Advanced’
Step 16
► Uncheck both boxes
► Click ‘OK’ until you are back at the
‘Connect WebMaster Direct Modem’
screen
Page 65
Quick Start Guide SECTION 6: WINDOWS XP
P/N 180273 Rev. N April 2017
65
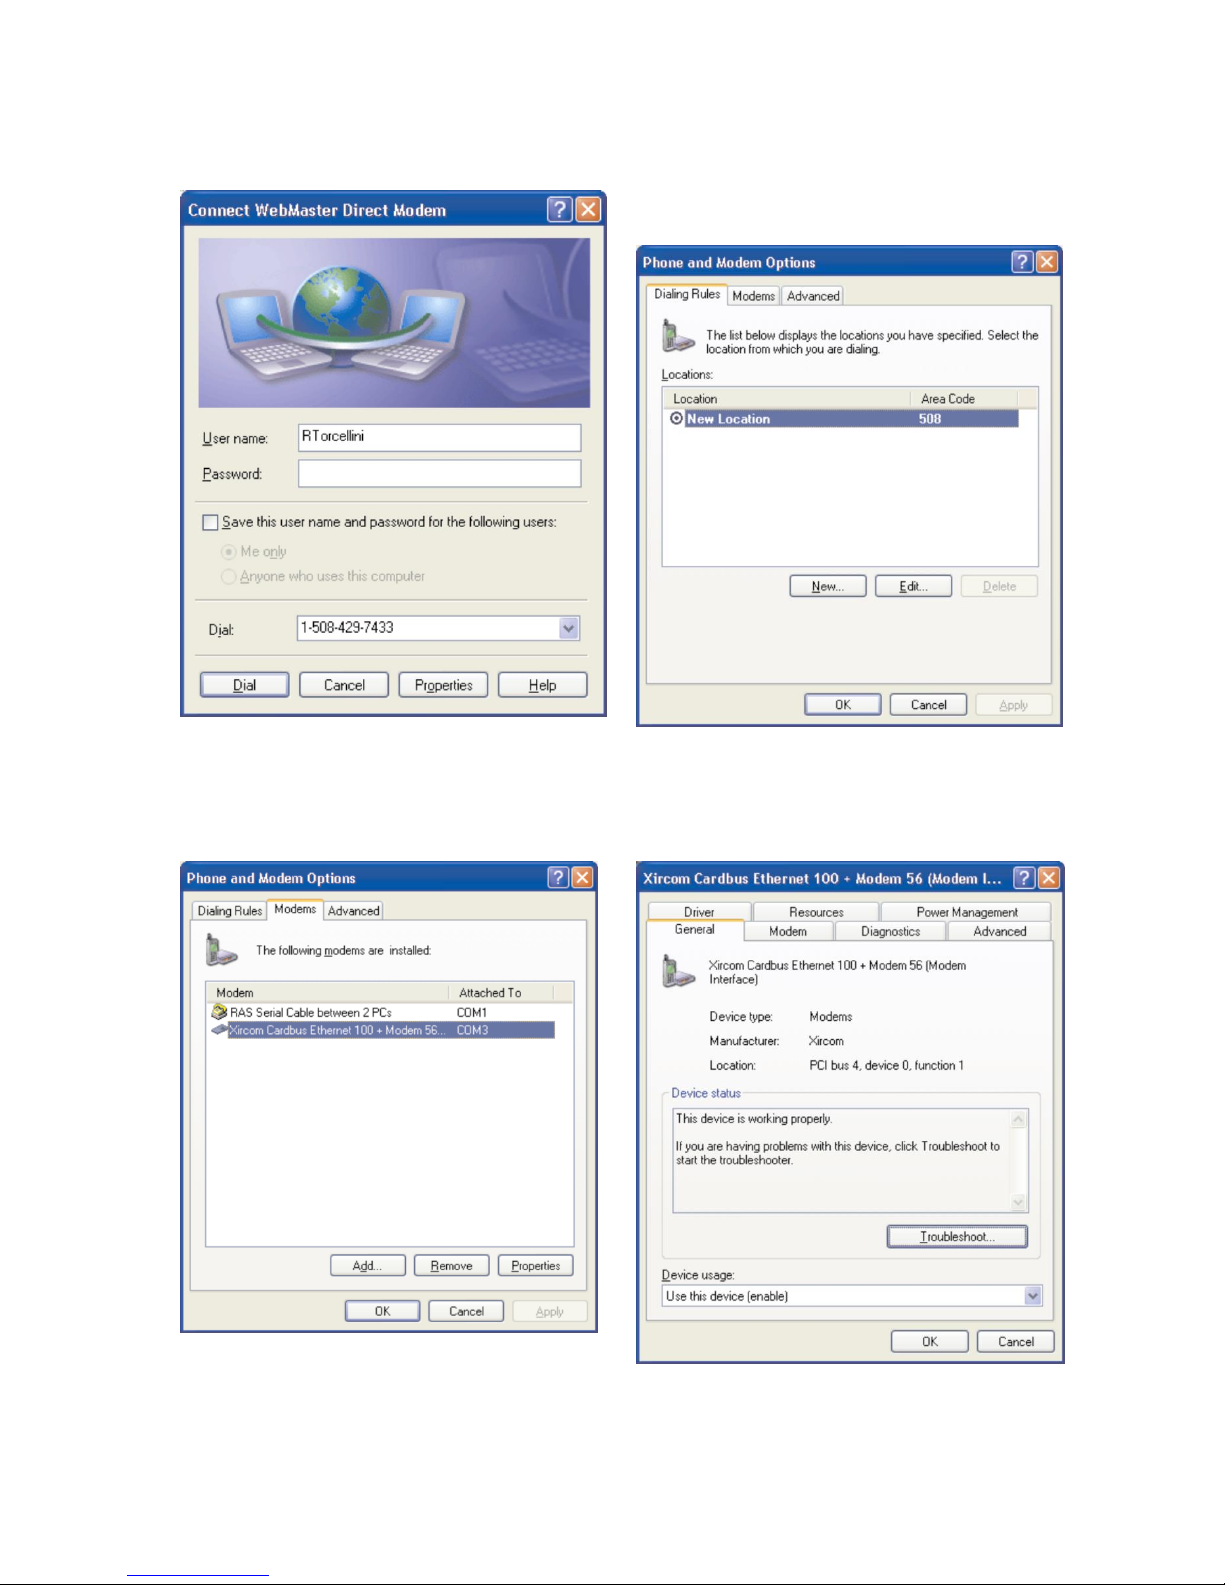
Step 17
► Click ‘Cancel’
Step 18
► Return to the Control Panel and double-
click ‘Phone and Modem Options’
► Click the ‘Modems’ tab
Step 19
► Highlight the modem to be used
► Click ‘Properties’
Step 20
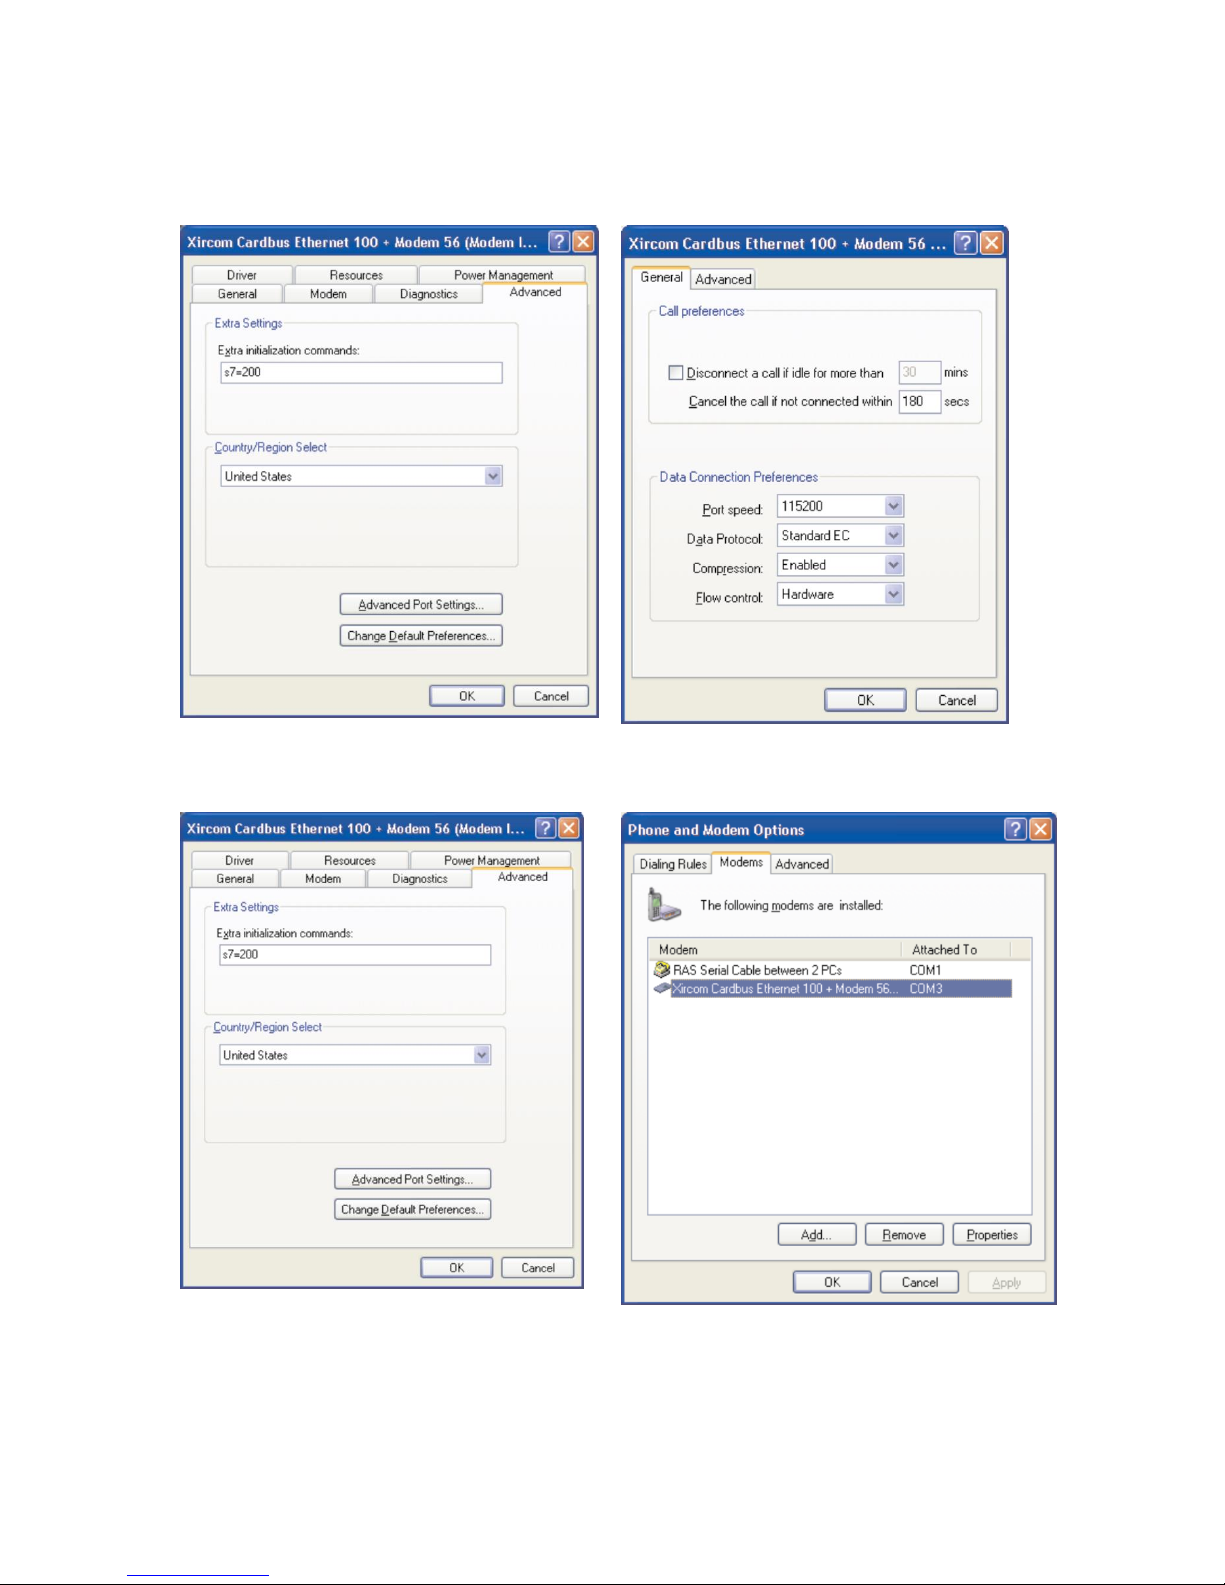
► Click the ‘Advanced’ tab
Page 66
Quick Start Guide SECTION 6: WINDOWS XP
P/N 180273 Rev. N April 2017
66
Step 21
► In the ‘Extra Initialization commands’
box, enter ‘S7=200’
► Click ‘Change Default Preferences’
Step 22
► Enter ‘180’ in '’Cancel the call if not
connected within’ box
►Click ‘OK’
Step 23
► Click ‘OK’
Step 24
► Click ‘OK’
Page 67

P/N 180273 Rev. N April 2017
67
QUICK START GUIDE
Section 7: MAC (OS Lion)
1. USB DRIVER INSTALLATION
Page 68
Quick Start Guide SECTION 7: MAC OSX
P/N 180273 Rev. N April 2017
68
1. USB INSTALLATION FOR MAC
Step 1
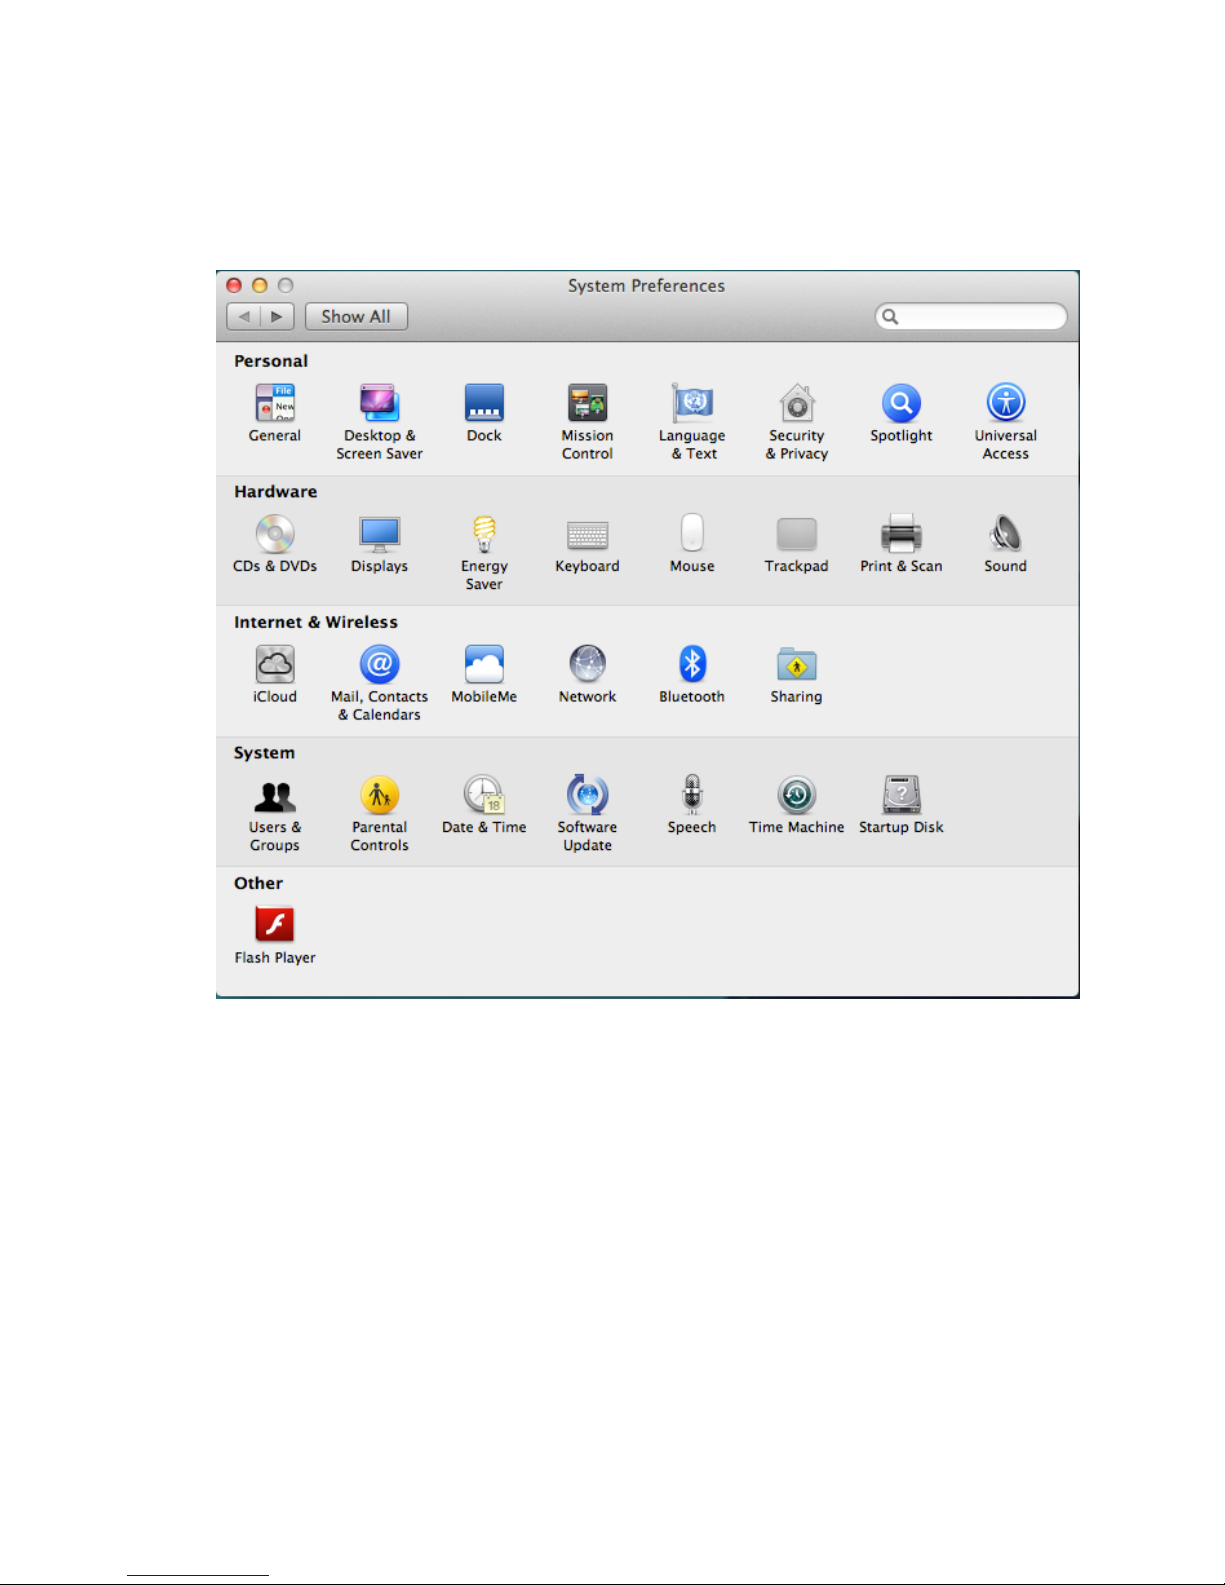
► With the USB cable plugged into the computer and controller, go to System
Preferences and click on Network:
Page 69
Quick Start Guide SECTION 7: MAC OSX
P/N 180273 Rev. N April 2017
69
Step 2
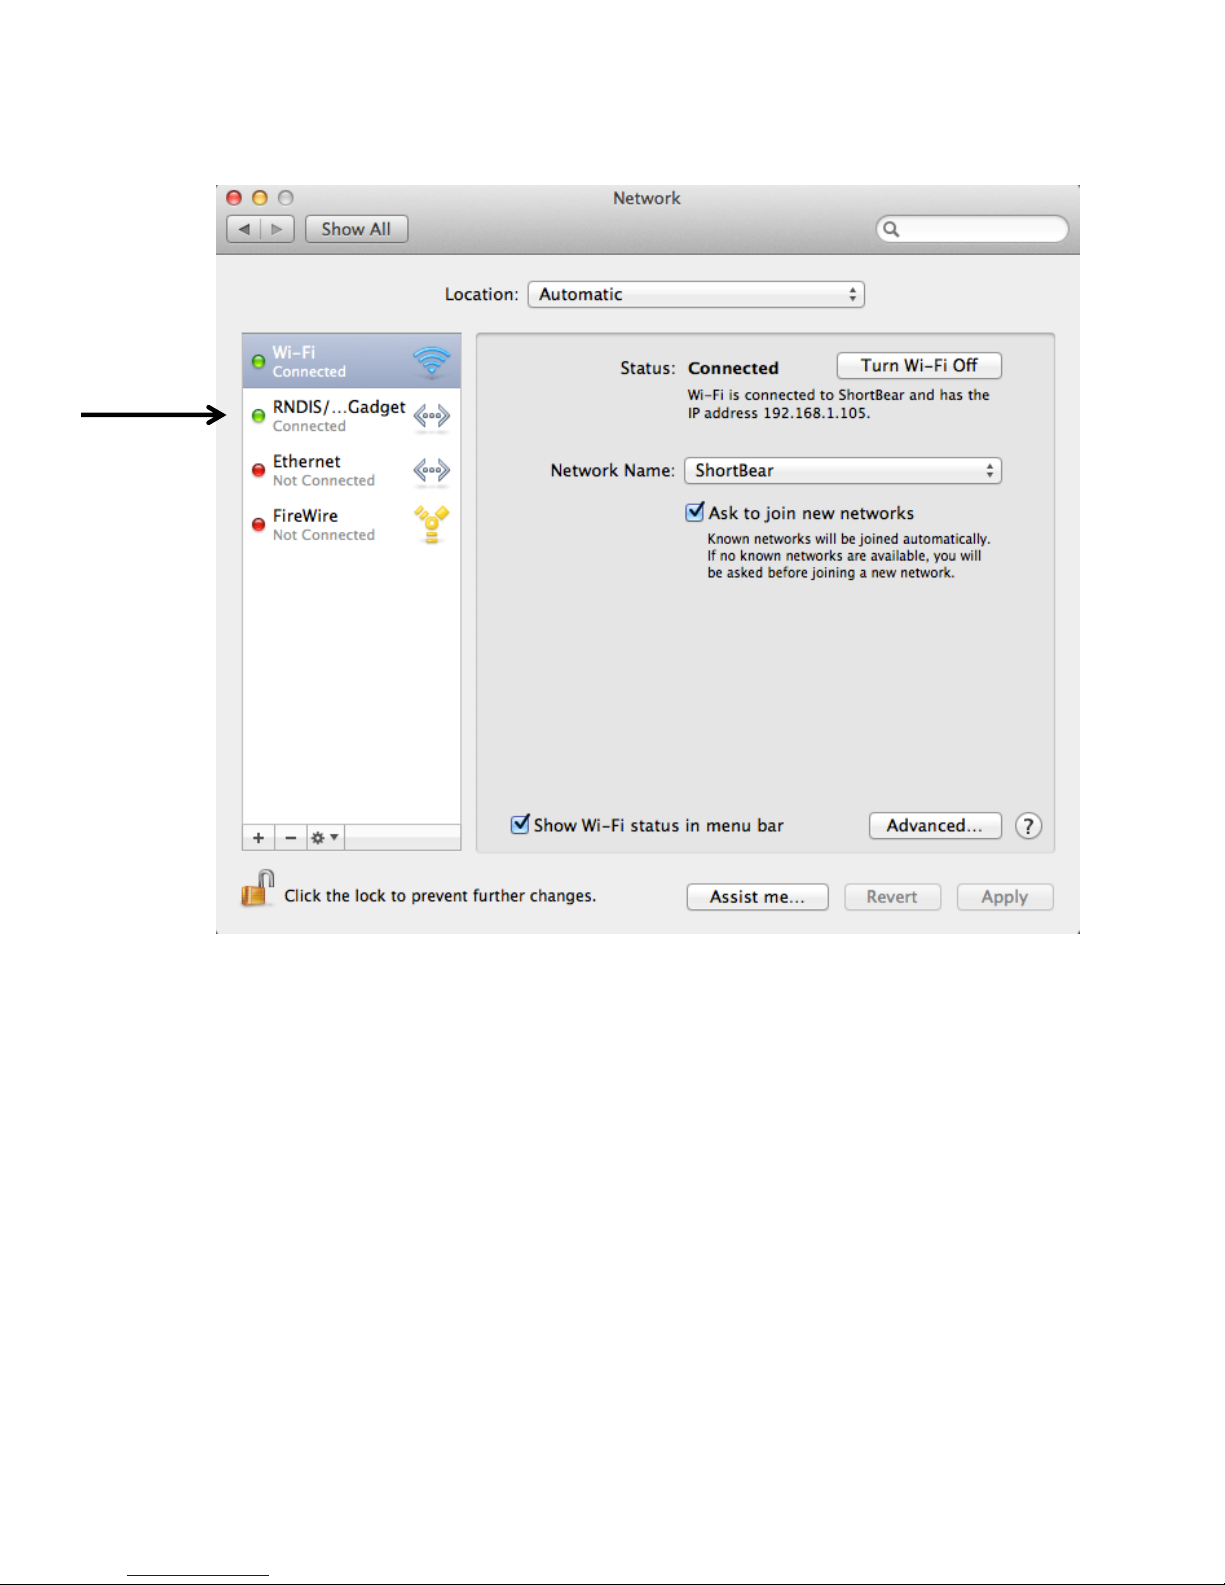
► In Network, select RNDIS Gadget::
Page 70
Quick Start Guide SECTION 7: MAC OSX
P/N 180273 Rev. N April 2017
70
Step 3
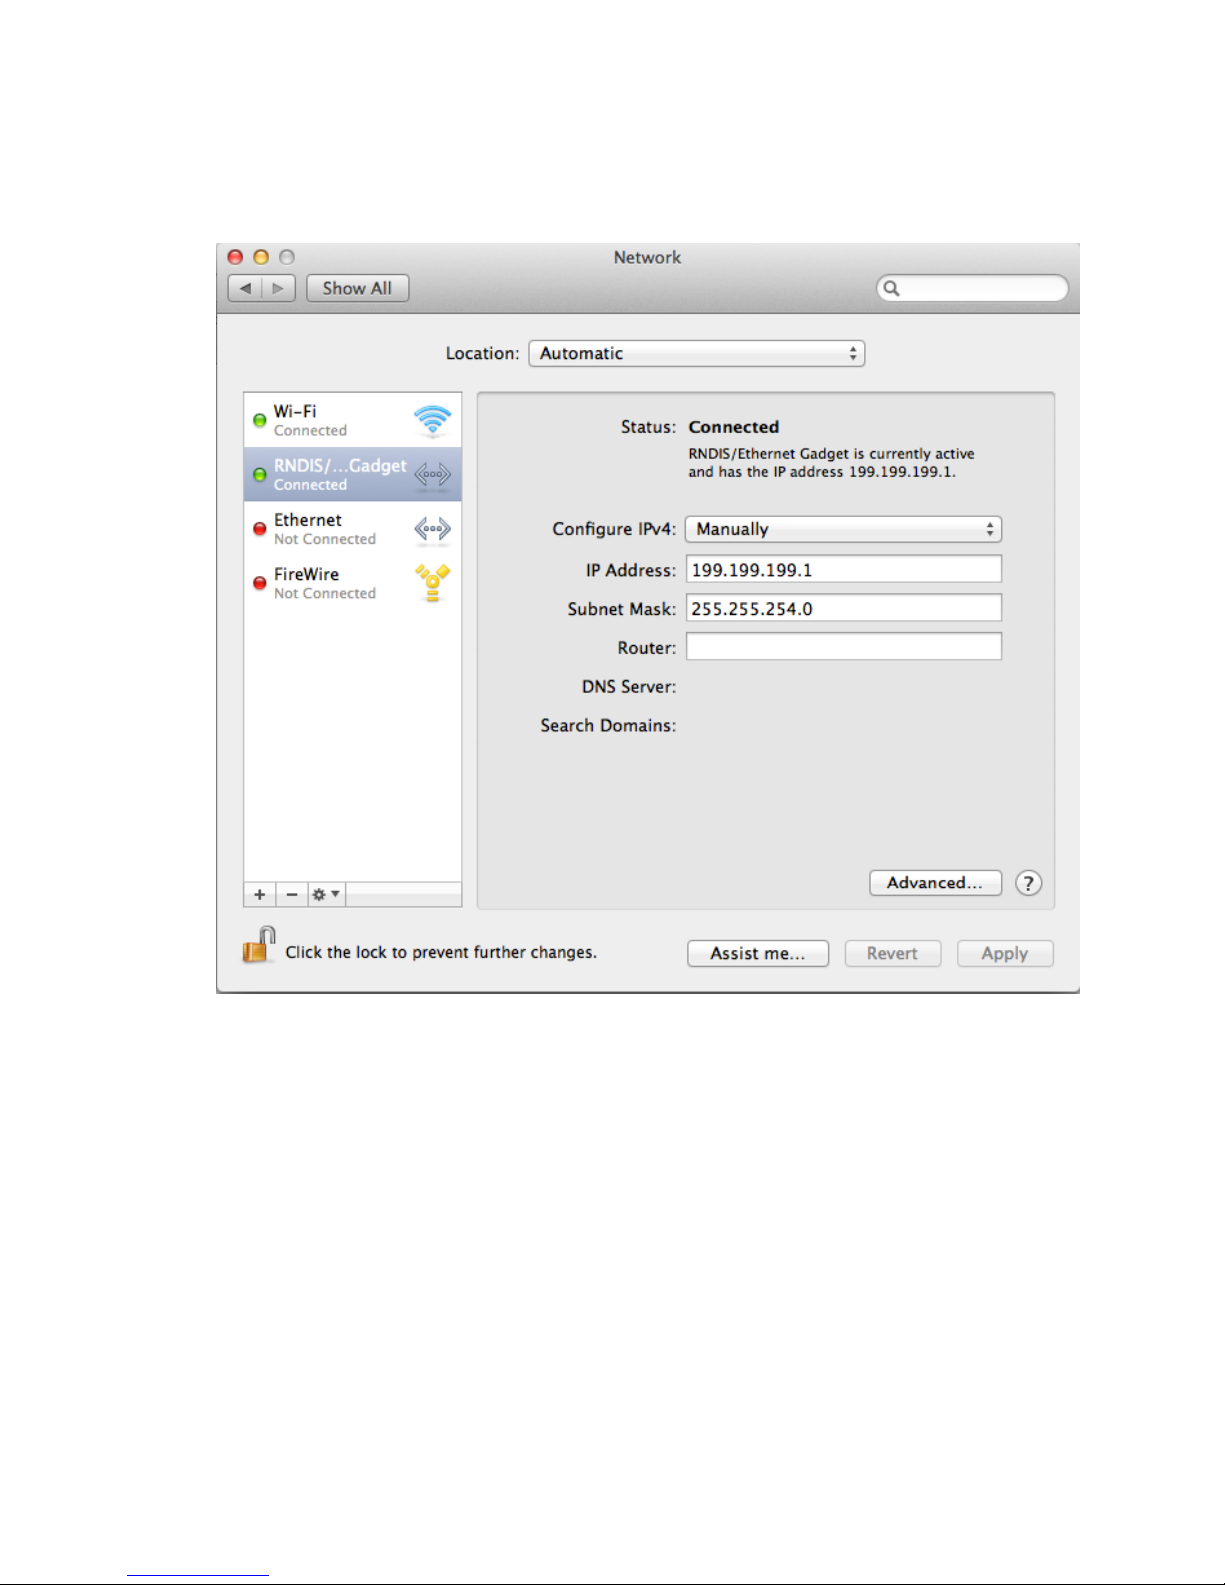
► Select Manually for Configure IPv4. IP address should be 199.199.199.1. Subnet
Mask should be 255.255.254.0. Click Apply.
Step 4
► Open Web browser (Internet Explorer, Firefox, Safari, Chrome, etc.) and type in
199.199.199.2 in the address bar to open the login screen.
Page 71
Quick Start Guide SECTION 7: Browser Settings
P/N 180273 Rev. N April 2017
71
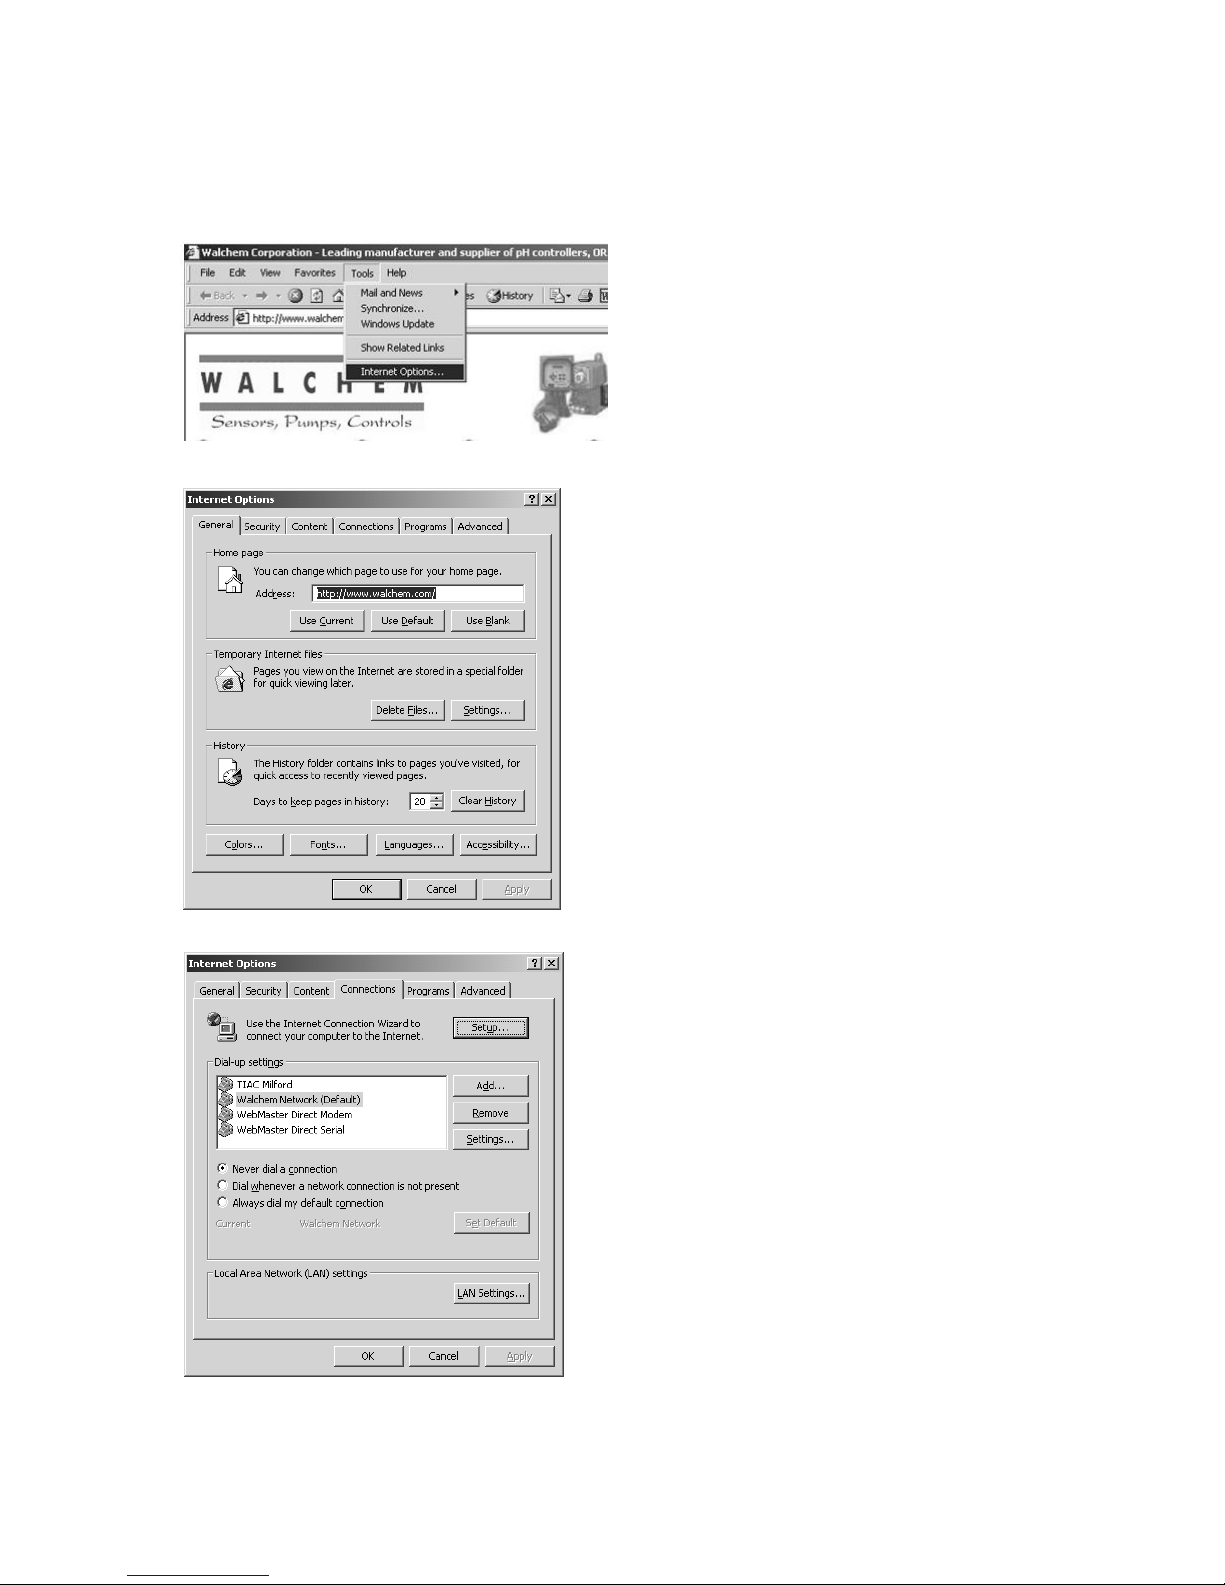
Section 8: CHECK BROWSER SETTINGS
Step 1
► Click ‘Tools’ from the top menu bar
► Select ‘Internet Options’ from the drop
down menu
Step 2
► Click the ‘Connections’ tab
Step 3
► Click ‘Never dial a connection’
► Click ‘OK’
Page 72
Quick Start Guide Section 8:
TROUBLESHOOTING THE USB CONNECTION
P/N 180273 Rev. N April 2017
72
Section 9: Troubleshooting the USB
connection
The problem: You connect to the Webmaster with your USB cable, open your browser, type in the
IP address 199.199.199.2, and the Login Page doesn’t load. What do you do?
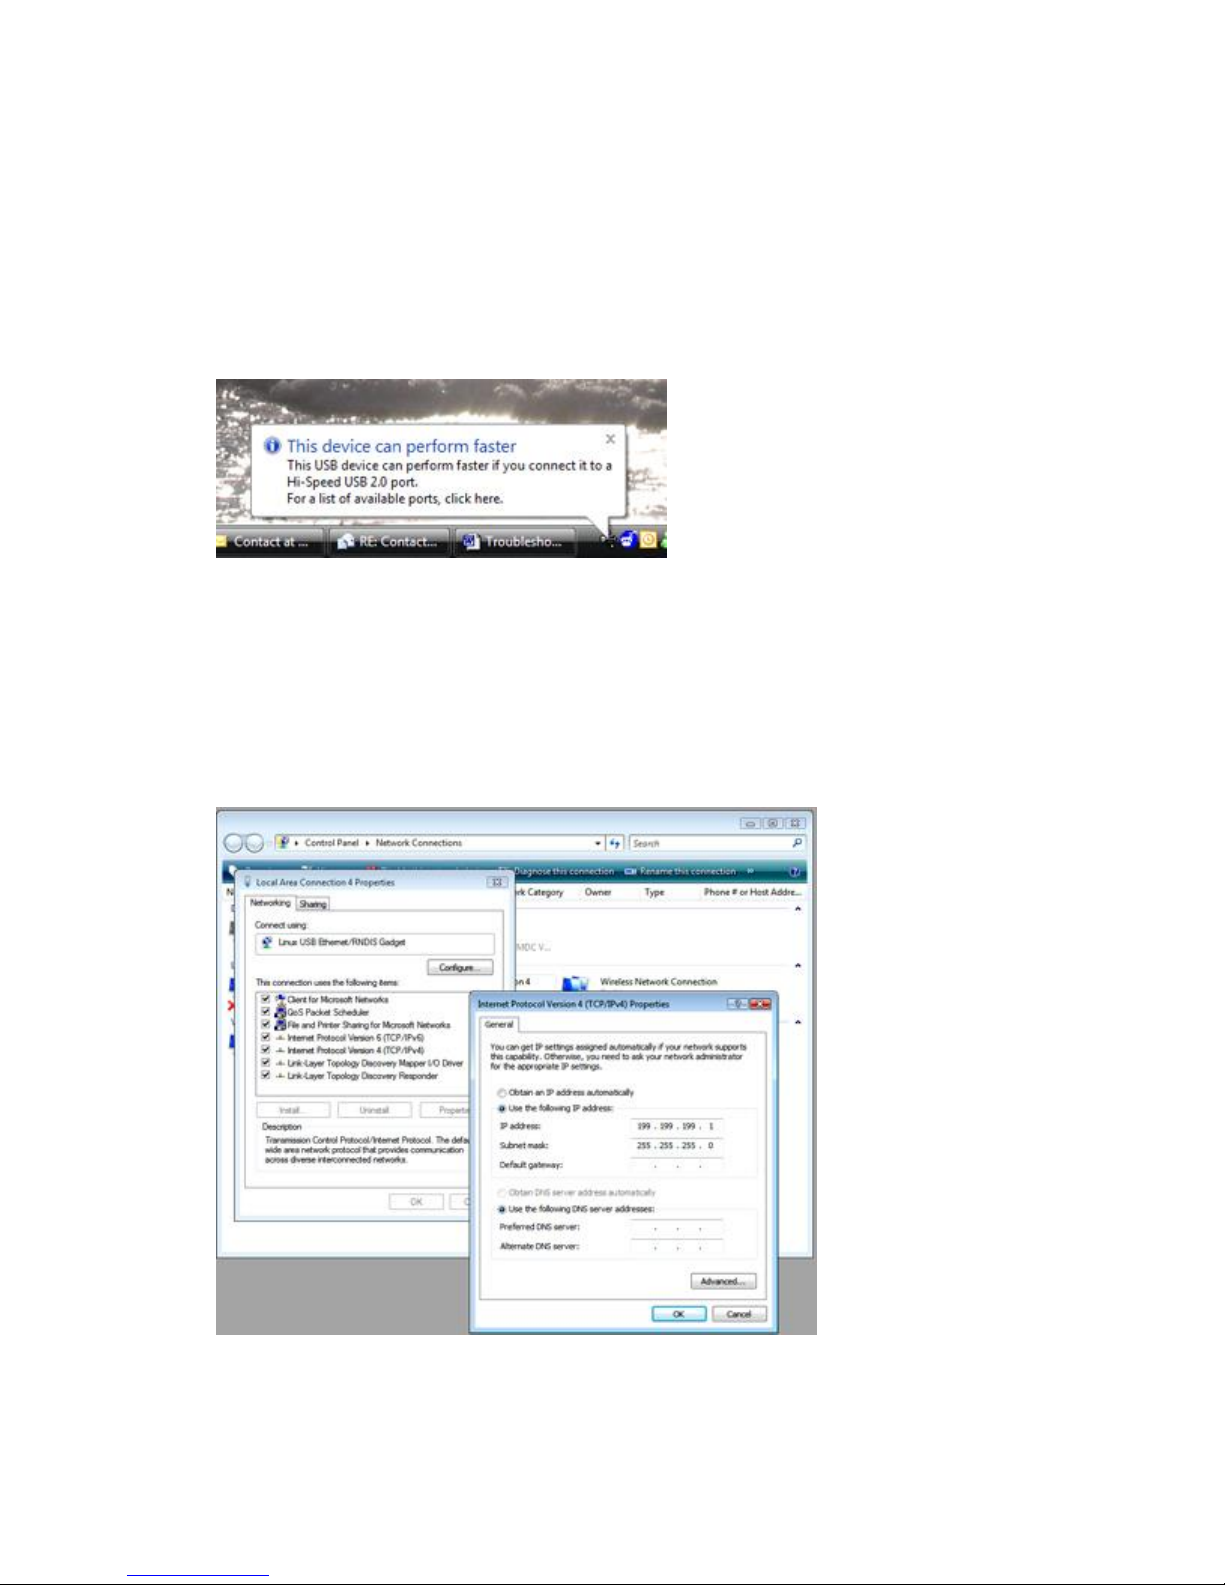
1. First, when you plug the cable in, you should see “Device can perform faster on a
USB 2.0 port….” message.
If you see this, then go to your Network Connections on your computer. Under “LAN
or High Speed Connection”, you should see Local Area Connection 2 (it may be
Local Area Connection 3, or some other number). It should be connected, and the
connection time moving. If you see this, then you’re connected.
2. Right-click on Properties. Highlight TCP-IP (in Vista, it will be TCP-IP-v4), and
click Properties. The IP address should be 199.199.199.1, and the subnet mask should
be 255.255.255.0.
3. If you don’t get the message “This device can perform faster”, or if you don’t see the
Local Area Connection 2, then unplug your USB cable, wait 3 minutes, and plug back
in.
Page 73
Quick Start Guide Section 8:
TROUBLESHOOTING THE USB CONNECTION
P/N 180273 Rev. N April 2017
73
4. If waiting 3 minutes and plugging the USB cable back in doesn’t work, re-boot both
computer and controller.
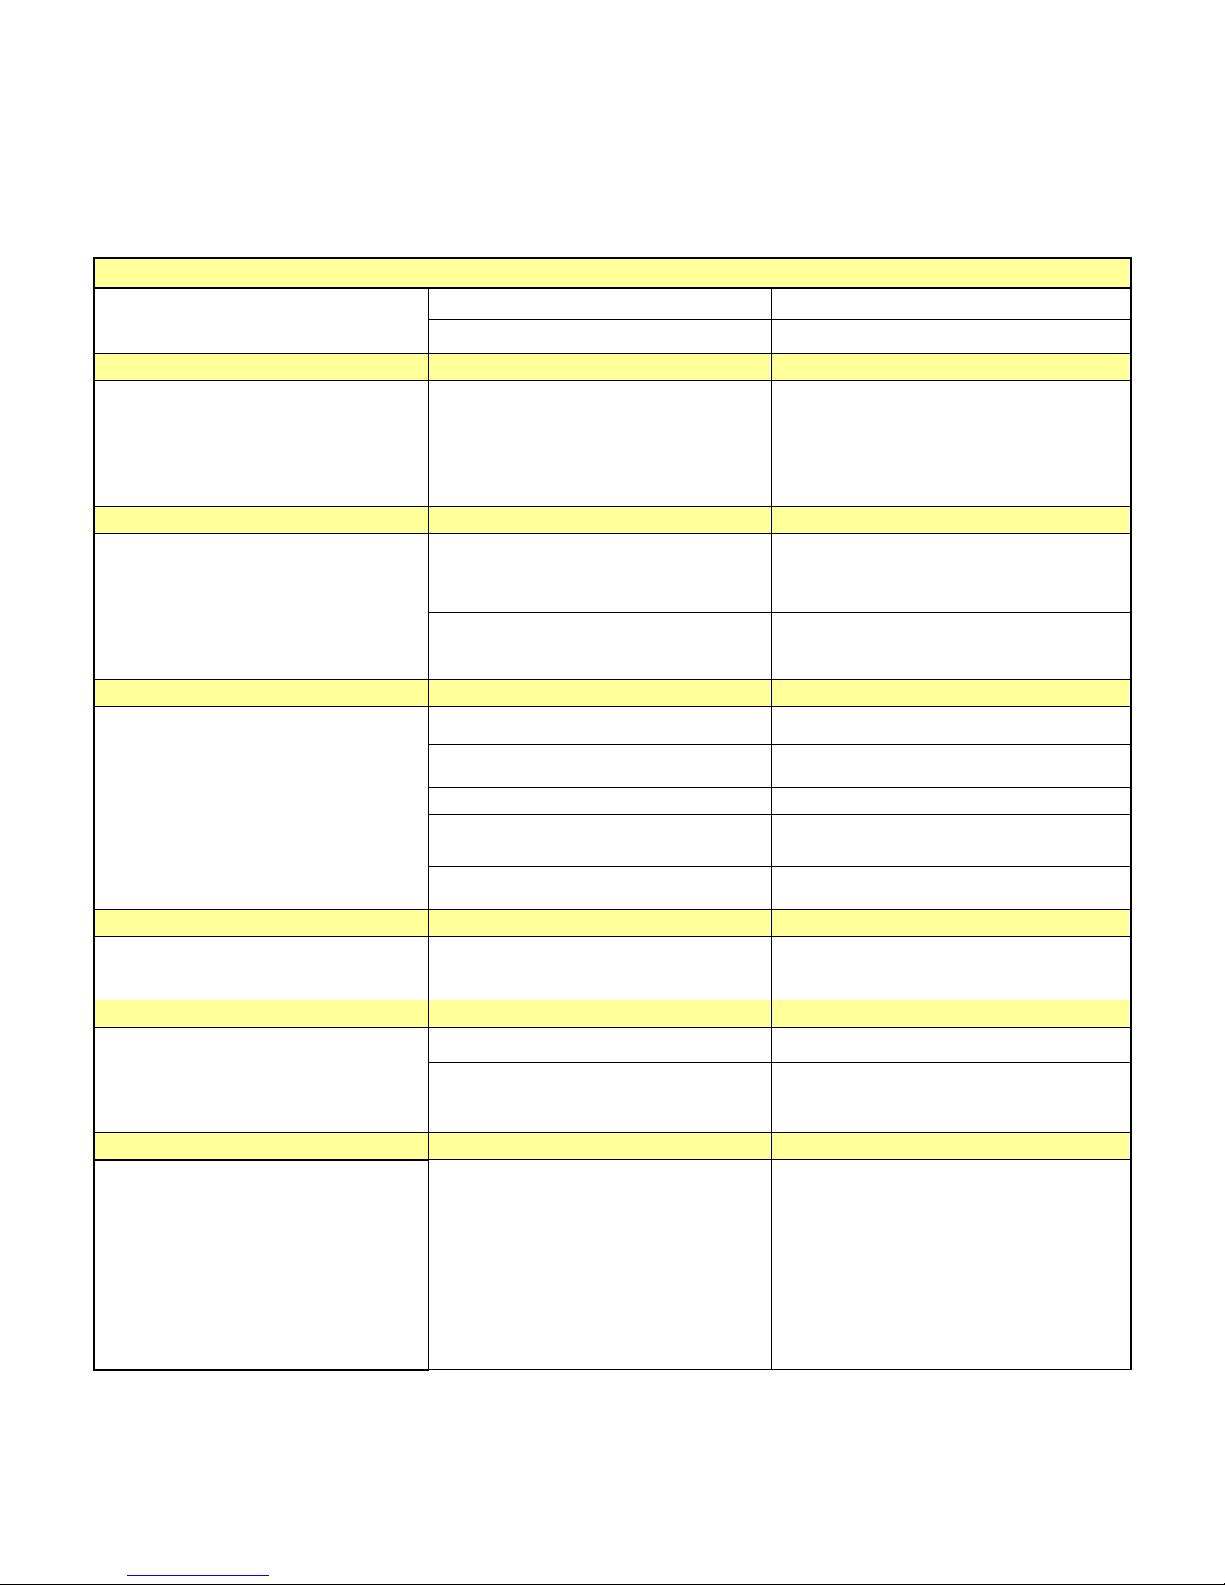
5. If this doesn’t work, read the tips below:
Scenario
Cause
Corrective Action
Connect cable and get New Hardware
Found Wizard
Driver not installed
Install driver
Driver installed on another USB port
Move cable to the other port
Connection worked normally, but after
removing cable and plugging it back in
after a minute, can't reconnect.
Get "this device can work faster"
message but No ‘Local Area Connection
2’ appears.
Driver in PC has not reset
Unplug cable and wait for 5 minutes, or
reboot PC
Get "this device can work faster"
message when cable is connected.
Local Area Connection 2 says it's
connected but time is stuck at 0:00.
Local Area Connection 2 does not
disappear when cable is disconnected
Driver in PC has crashed. Can happen
when Controller Restart button is clicked
with USB cable connected.
Reboot PC. May require a hard reboot if a
blue screen appears on restart attempt.
Driver in PC is corrupt
Uninstall and reinstall the driver
No "this device can work faster" message
when cable is connected,
No Local Area Connection 2
Faulty core interface board
Replace CI board
Foam grommet shorting to CI board (WM1
only)
Put tape between grommet and CI board, or
remove grommet
Faulty USB cable
Replace USB cable
Noisy DC power supply in controller
Install two p/n 103608 ferrite clamps on the
DC output cable of the power supply
PC does not recognize all USB 1.0
devices
Install a 2.0 USB hub between PC and cable
Get "this device can work faster"
message when cable is connected, but
No Local Area Connection 2
Driver installed improperly
Uninstall and reinstall driver
Get "this device can work faster"
message when cable is connected, get
Local Area Connection 2, but it can't be
enabled
Faulty USB cable
Replace USB cable
Noise coupling in on SI, AI, DI
Properly shield all I/O cables. Ensure proper
earth ground connection to controller.
Get "this device can work faster"
message, Local Area Connection 2
appears, but when 199.199.199.2 is
entered in the browser you get "The page
cannot be displayed"
Local Area Connection 2 not set to use
fixed IP address
Enter ‘Local Area Connection 2’ properties
and enter fixed IP address of 199.199.199.1
as described in Quick Start Guide
 Loading...