

Wai Hang Electronic Co BT988 User Manual
Model: BT-988
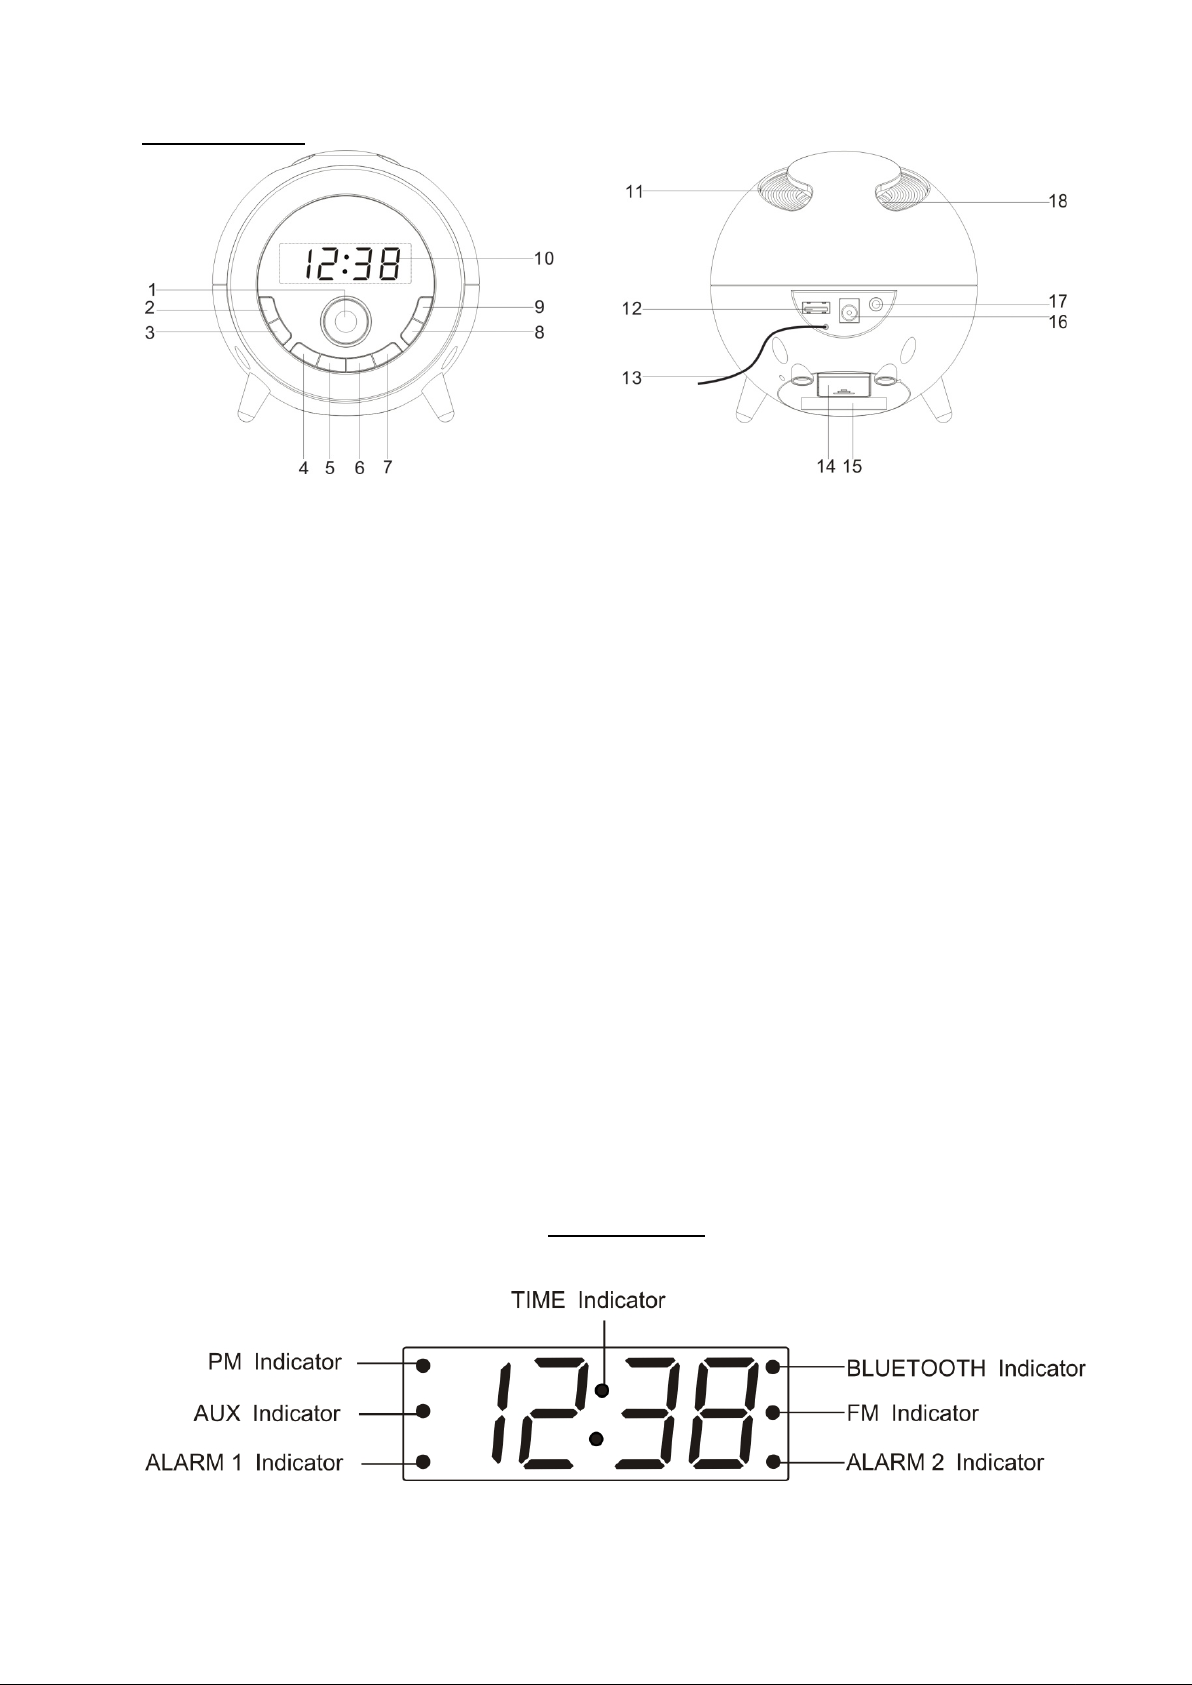
FUNCTION AND CONTROLS
1. SNOOZE / SLEEP / DIMMER BUTTON
2. SOURCE BUTTON
3. MEMORY UP / PLAY / PAUSE BUTTON/PAIR BUTTON
4. SKIP BACK / TUNING DOWN BUTTON
5. SKIP FORWARD / TUNING UP BUTTON
6. VOLUME DOWN/ ALARM 1 ON-OFF SET BUTTON
7. VOLUME UP/ ALARM 2 ON-OFF SET BUTTON
8. SET / MEMORY BUTTON
9. POWER ON – OFF / MOOD LIGHT ON-OFF / ALARM OFF BUTTON
10. DISPLAY
11. MOOD LIGHT
12. USB CHARGING SOCKET
13. FM ANTENNA
14. BATTERY COMPARTMENT
15. RATING LABEL
16. DC IN JACK
17. AUX IN JACK
18. SPEAKER
LED DISPLAY

PREPARATION FOR USE
AC-DC adaptor connection : The clock radio unit can be powered by an external
AC-DC adaptor, required the output DC 5V 1.5A (included).
POWER CONNECTION
Plug the AC-DC adaptor to a household outlet AC source, connect the adaptor’s DC
output plug to the DC IN Jack of the clock unit. This unit is equipped with a battery back
up system; it requires a 3V flat lithium battery “CR2032” (not included). Insert the
battery in the battery compartment, making certain that the positive and negative
(+and-) battery terminals are attached to the corresponding terminals on the plate in the
battery compartment. If an AC power failure occurs, the clock automatically switches to
the battery power supply, the clock and timer memory continue running. When the AC
power resumes, the clock switches back to AC again.
TIME MANUAL SETTING
With the radio OFF mode, press and hold the SET / MEMORY button (8); “24 Hr” will
blink. Press the SKIP FORWARD (5) or SKIP BACK (4) button to set the unit to the 12
hour (12 Hr) mode or 24 Hour (24 Hr) mode. Press the SET / MEMORY button (8) to
confirm and the hours will blink.
Press the SKIP FORWARD (5) or SKIP BACK (4) button to set the current hour, then
press the SET / MEMORY (8) button again to confirm the hour; then the minute digits
will blink. Press the SKIP FORWARD (5) or SKIP BACK (4) button to set the current
minutes.
When done, press SET / MEMORY (8) button once again to indicate the current time is
set.
SETTING ALARM TIME
To preview the alarm time. Press the ALARM button (6/7) once.
While the display is showing the alarm time and you hold the ALARM button (AL.1 /
AL.2) for 3 seconds and the hours will blink.
Press the SKIP FORWARD (5) or SKIP BACK (4) button to set the alarm hour.
Press the ALARM button (AL.1 / AL.2) again; the minute digits will blink. Press the SKIP
FORWARD (5) or SKIP BACK (4) button to set the alarm minutes.
Press the ALARM button (AL.1 / AL.2) and you can change the sound mode (Buzzer or
Radio) for the alarm.

ENABLE / DISABLE / STOP THE ALARM Press and hold the ALARM button “AL.1” (6) / “AL. 2” (7) to enable (or disable) the alarm. Once the alarm is activated, the small dot on the display will light on next to the bell symbol of AL1 and AL2. To stop the alarm from coming on the following day, hold the ALARM button (AL.1 / AL.2) to turn it off. The alarm icon will disappear to indicate the alarm is disarmed. To stop the alarm, press ALARM OFF (9) button.
SNOOZE FUNCTION
When Alarm rings, press Snooze button (1) to suspend the alarm & to activate the
snooze function, the alarm will stop. It will come on again 9 minutes later and the alarm
will ring again. You may repeat this cycle several times during the alarm cycle and until
the next alarm rings.
Note: The interval time of the Snooze function is 9 minutes.
- If you want to disable the SNOOZE function and stop alarm completely, press
ALARM OFF button (9).
WAKE UP TO RADIO OR BUZZER WITH M OOD-LIGHTS
Have a great start to each day with your choice of wake up call. Have a buzzer or
radio station to rouse you from slumber. Mood-lights can also come on when your
alarm sounds, making mornings ever so pleasant.
MOOD-LIGHTS
Press and hold the MOOD LIGHT ON-OFF button (9) for 3 seconds to turn the moodlights ON-OFF.
SLEEP OPERATION
When listening to radio, press Sleep button (1) to enter sleep mode. You can just adjust
the sleep timer from 120 mins to 10 mins by pressing the Sleep button (1). The unit will
automatically turn off after the selected time.
DIMMER CONTROL
In standby mode, press the DIMMER (1) button allows you to set the brightness of the
LED display to high or low levels.
 Loading...