

Wahoo KICKR Power Trainer Quick Start Manual
Learn More:
For the complete product manual,
instructional videos, compatible
Apps, FAQs and more, please visit:
www.wahoofitness.com/KICKR
Scan Me!
Quick Start Guide
Welcome!
Thanks for purchasing the Wahoo KICKR PowerTrainer! This
Quick Start Guide will help you get set up and ready to ride. For
the complete owner’s manual, please follow the link or scan the
QR Code at the bottom of this page.
At Wahoo Fitness, we run, ride, and workout every single day so
we can bring you the best product possible. Please feel free to
contact us with an questions or concerns at:
Wahoo Fitness
141 West Wieuca Rd. #104B
Atlanta, GA 30342
Email: support@wahoofitness.com
Web: www.wahoofitness.com
CAUTION
Before beginning or modifying any exercise program,
please consult your physician.
Ensure the quick release skewer is properly tightened
before riding the trainer. See Attaching Your Bicycle for
more information.
When using the KICKR PowerTrainer for extended periods
of time, the resistance unit and flywheel will heat up. DO
NOT touch the flywheel or resistance unit while in use or
while it is hot.
Do not attempt to dismount the bicycle while the flywheel
is in motion; wait for the trainer to coast to a stop; apply a
higher resistance to stop the trainer sooner.
The flywheel, belt, and drive pulley will be rotating at high
speeds; keep children and pets away from this equipment
while in use.
Only use the KICKR PowerTrainer on a stable, level surface
and only after properly adjusting the leveling feet to
eliminate wobble.
Use caution when riding out of the saddle on the KICKR
PowerTrainer. Do not do so until you are comfortable
riding at slower speeds.
Allow at least three (3) feet (1m) of space on all sides of the
trainer and bicycle during operation.
1. Unpacking
130mm Spacing
135mm Spacing
2.2
(a)
(b)
(d)
(c)
(c)
(d)
(e)
2.1
(a)
(c)
(d)
(b)
2.2
2.1
3.3
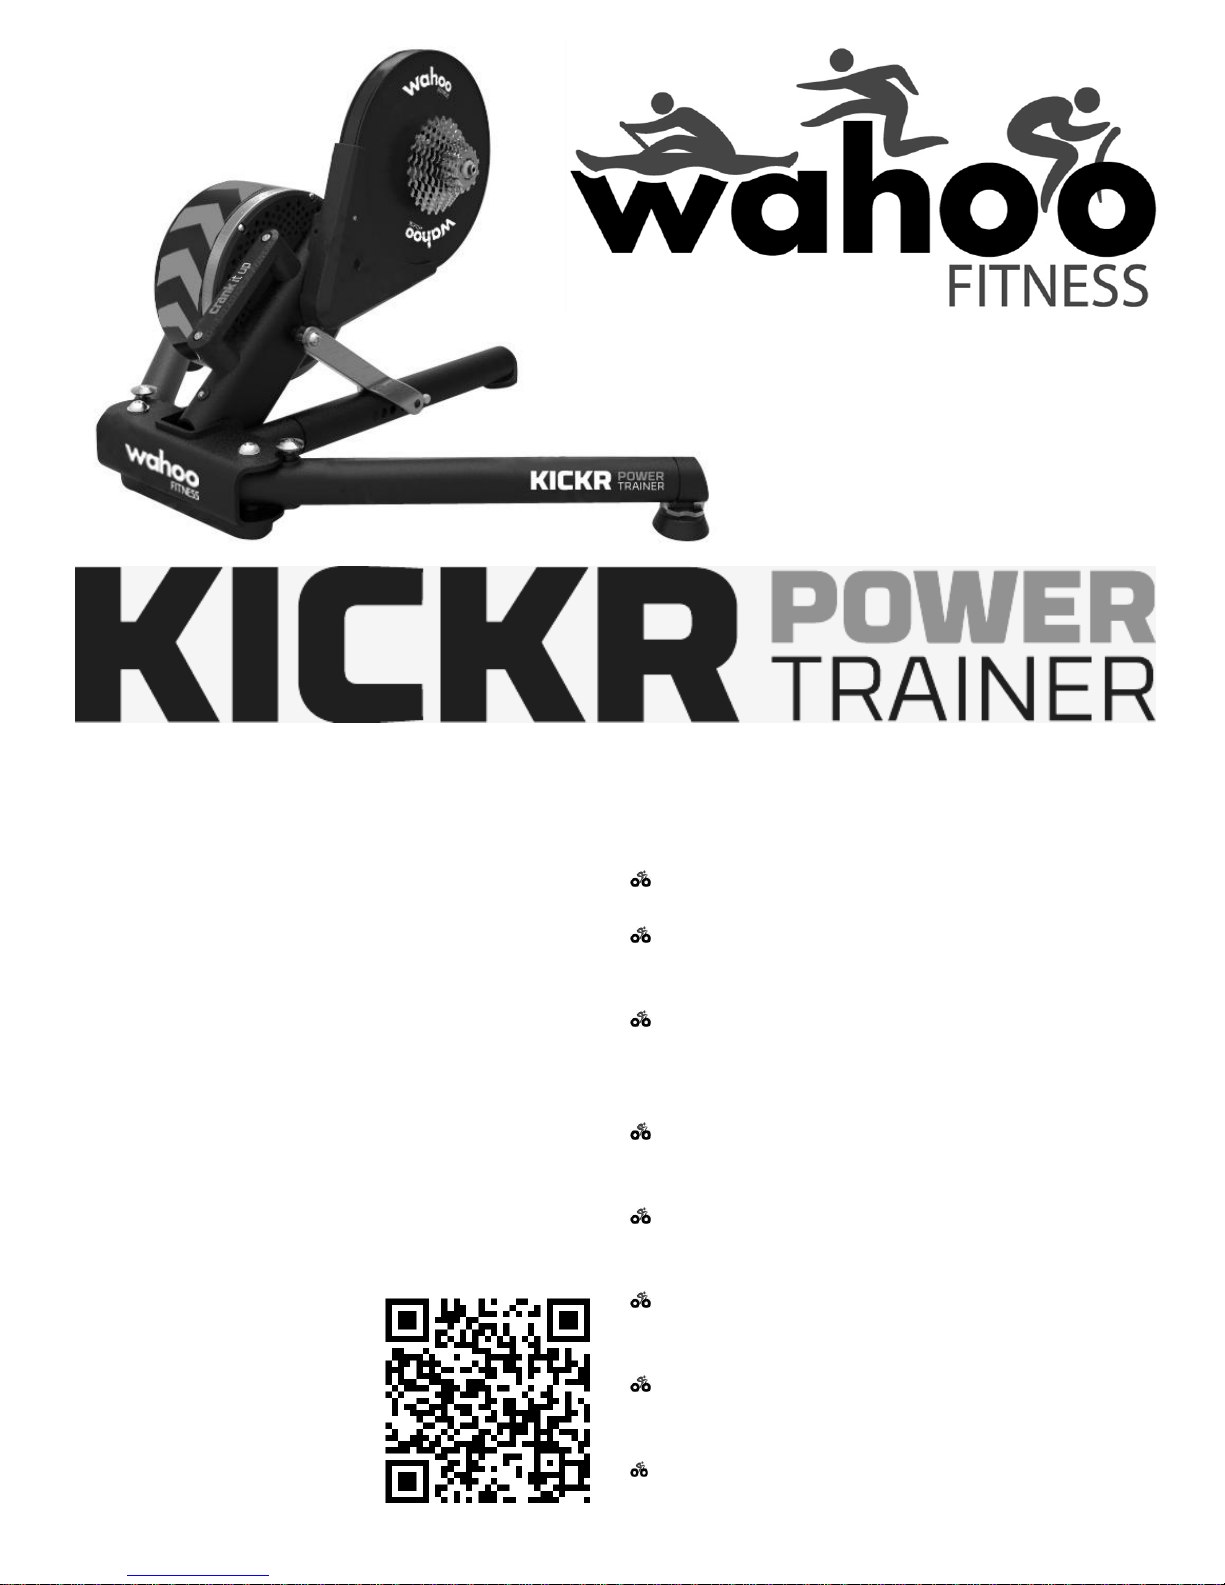
In the box you will find your (a) KICKR PowerTrainer, (b) AC power
adapter, (c) quick release skewer, and (d) reversible axle spacer. Remove
your KICKR PowerTrainer and accessories from the box. Be sure to save
the protective packaging for transportation and storage. (NOTE: Once all
protective packaging has been removed, avoid laying the trainer on its
side to protect the precision balanced flywheel and cassette.)
2. Setup
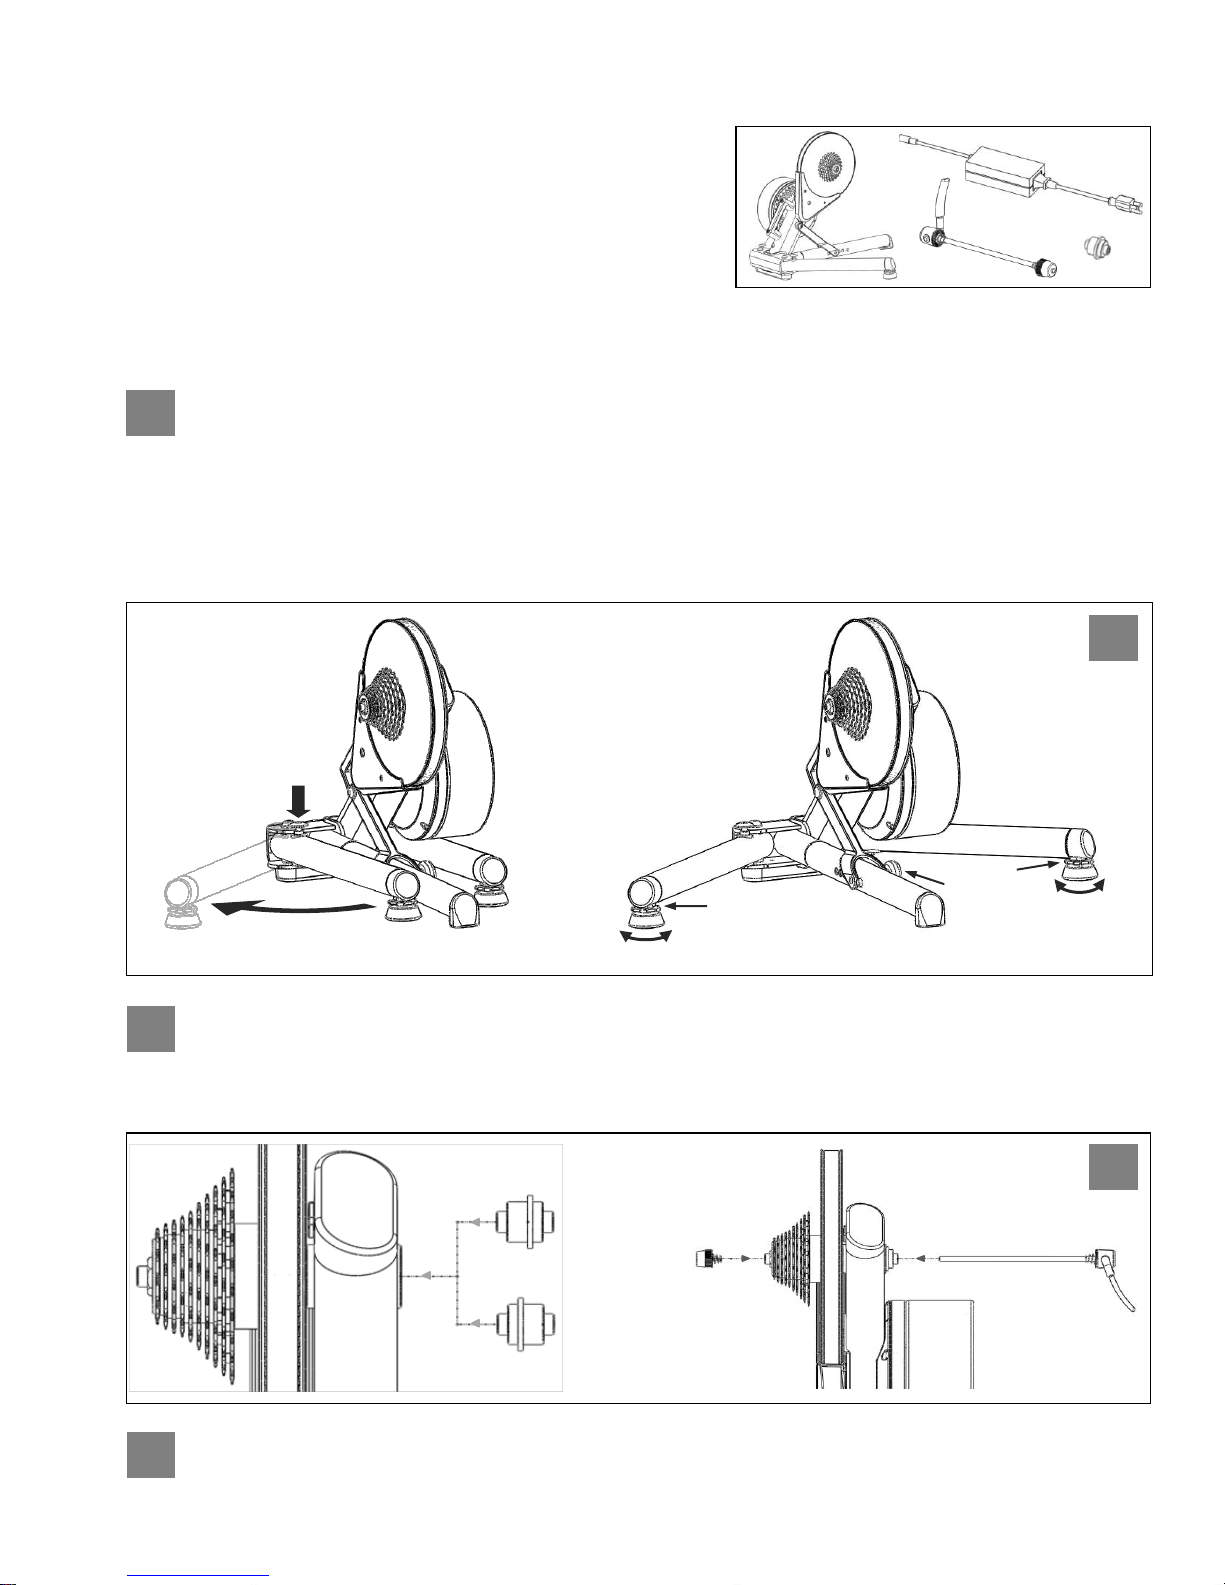
Place the KICKR PowerTrainer on a stable, level surface and open the legs by (a) pressing down on the blue leg-lock
tabs and (b) pivoting the legs outward until they snap in place. (NOTE: Ensure the leg-lock tabs have popped back up
and secured the legs in the open position.) To stabilize the trainer, adjust the two leveling feet (c) by twisting them left or
right until the trainer is level and locking them into place by (d) tightening the blue locknuts against the frame. (NOTE: Check
that your trainer is stable before every ride; if needed, readjust the leveling feet.) Adjust the height of the trainer to fit your
specific wheel size by (e) relocating the height adjustment knob on the center leg to the appropriate setting. If you are unsure
of your wheel size, check the tire side-wall or consult your local bike shop.
Your KICKR PowerTrainer comes with a reversible axle spacer to accommodate frames with different rear dropout
spacing; locate the axle spacer and install according to your rear wheel spacing. Note: a typical road bike is 130mm
spacing while a typical mountain bike is 135mm spacing. Next, install the quick release skewer as shown; leave the skewer
loose to allow for easy bicycle installation.
powering the trainer from a standard 12c car battery.
Once your KICKR PowerTrainer is set up, use the included AC power adapter to connect the trainer to a standard 120v
wall outlet. A 12v DV power adapter (sold separately, available at www.wahoofitness.com) is also available for
3. Attaching Your Bicycle
3.3
(a)
(b)
3.2
(a)
(b)
3.1
3.2
3.3
WARNING!
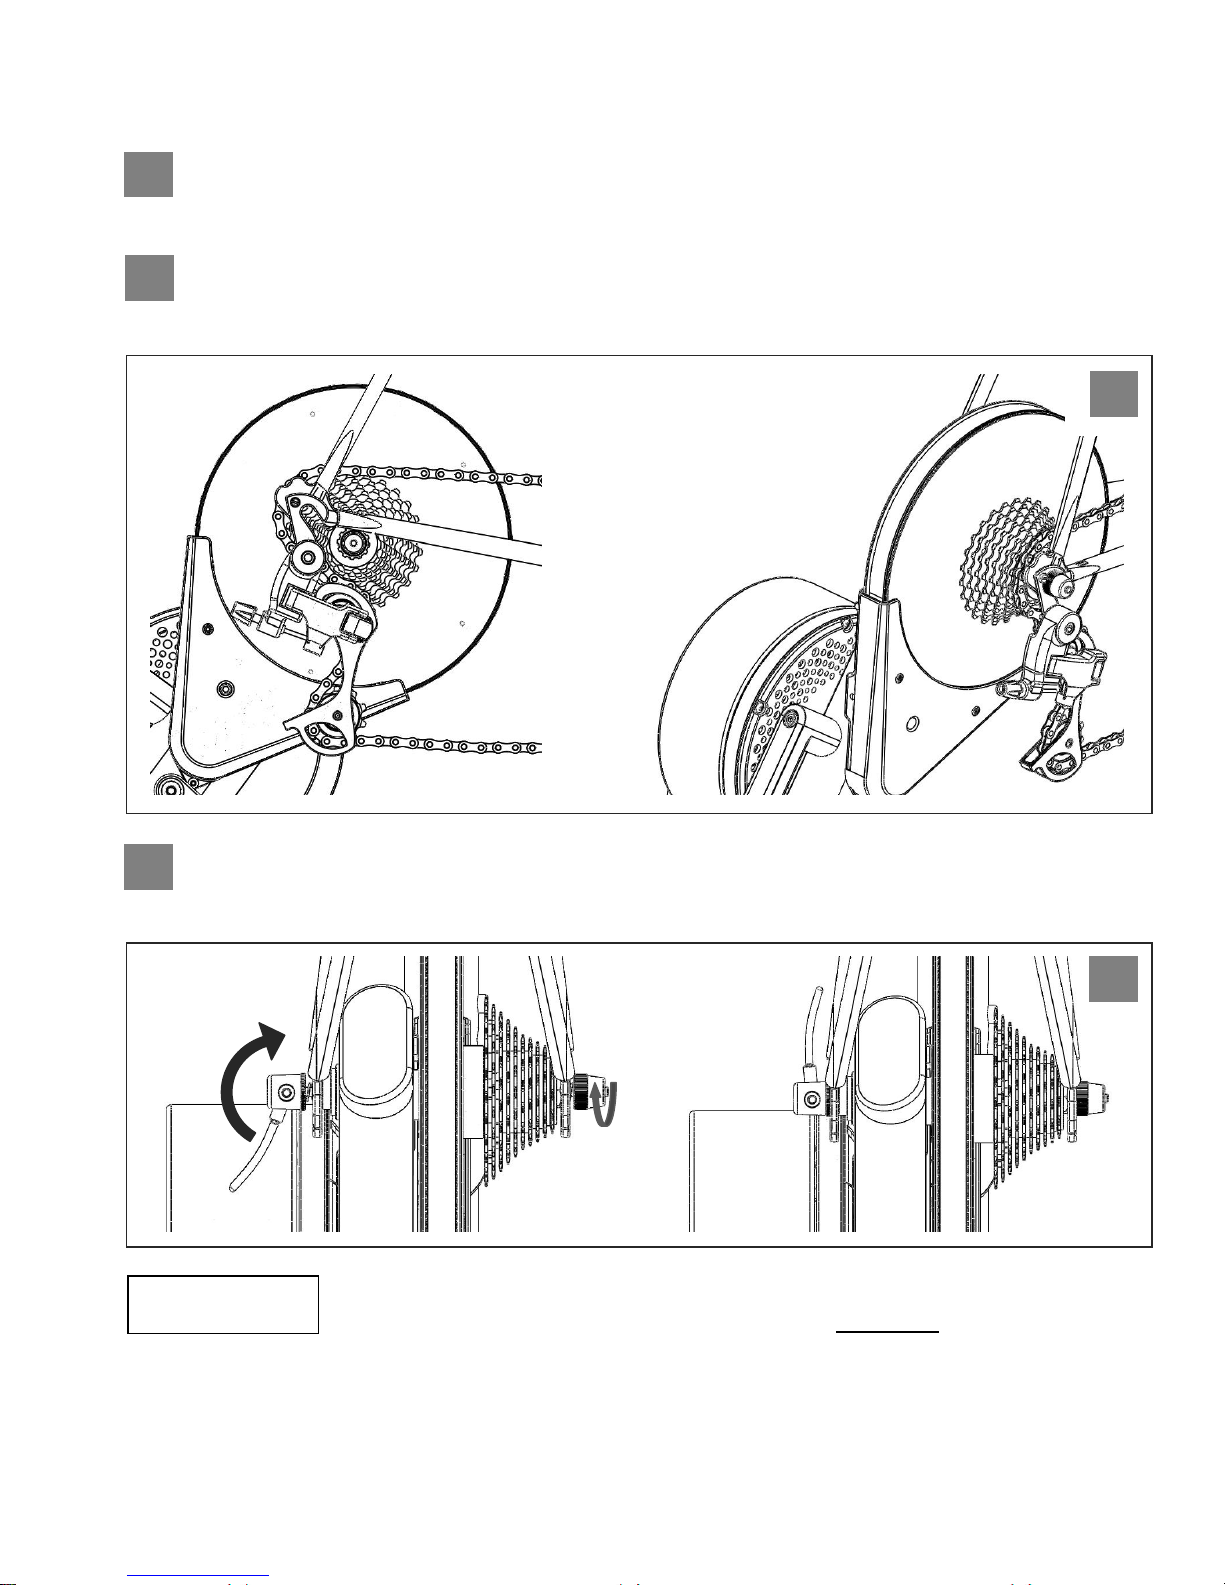
Shift your bicycle chain to the smallest sprocket in the front and rear, release the brake caliper quick release (if
equipped), open the quick release skewer and remove the rear wheel. Place your rear wheel away from the area in
which you will be using your KICKR PowerTrainer to prevent damage to the equipment.
Check that the quick release skewer on your KICKR PowerTrainer is loose and in the open position. Align the bicycle so
the dropouts are over the trainer quick release and the cassette is inside the loop created by the chain (a). Ensure
that the chain is resting on the smallest sprocket before lowering the dropouts onto the axle (b).
Ensure the dropouts are fully seated on the trainer axle before securing your bicycle by tightening the quick release
acorn nut and clamping the quick release lever shut. When the lever is ‘open’ it will curve away from the bicycle
frame (a); once the lever has been ‘closed’ it will curve towards the bicycle frame (b).
Be sure that the quick release skewer is completely tightened before riding the
KICKR PowerTrainer. The lever should require significant effort to close and
should leave a defined imprint on your hand. Failure to properly tighten the quick release may result
in property damage or personal injury. If you are unsure of the proper tension please consult your
local bike shop or contact Wahoo Fitness for assistance. DO NOT ride the KICKR PowerTrainer if you
believe your quick release skewer is not properly installed.
 Loading...