

Page 1
QUICK START GUIDE AND INSTRUCTIONS
Page 2

KICKR Quick Start Guide See full instructions for complete setup.
Español: Ver las instrucciones completas
para completar la configuración
Français: Pour une installation complète,
consulter le mode d’emploi.
Italiano: Vedi istruzioni dettagliate per una
configurazione completa
Korean: 완전 한 설치에 대 한 전체 지침을 참조 하십시오
Deutsche: Für die komplette Einrichtung lesen Sie
bitte die vollständige Anleitung
Simplied Chinese: 查看完整设置的全面操作说明
Traditional Chinese: 檢視完整設定的全面操作說明
Japanese: 完全なセットアップについての完全な説明
を参照
(1) (2)
(3)
(4)
Download
the Wahoo
Fitness app
(6)(5)
RD
700c
RD
MTB
650c
26”
MTB
RD
24”
24”
Page 3
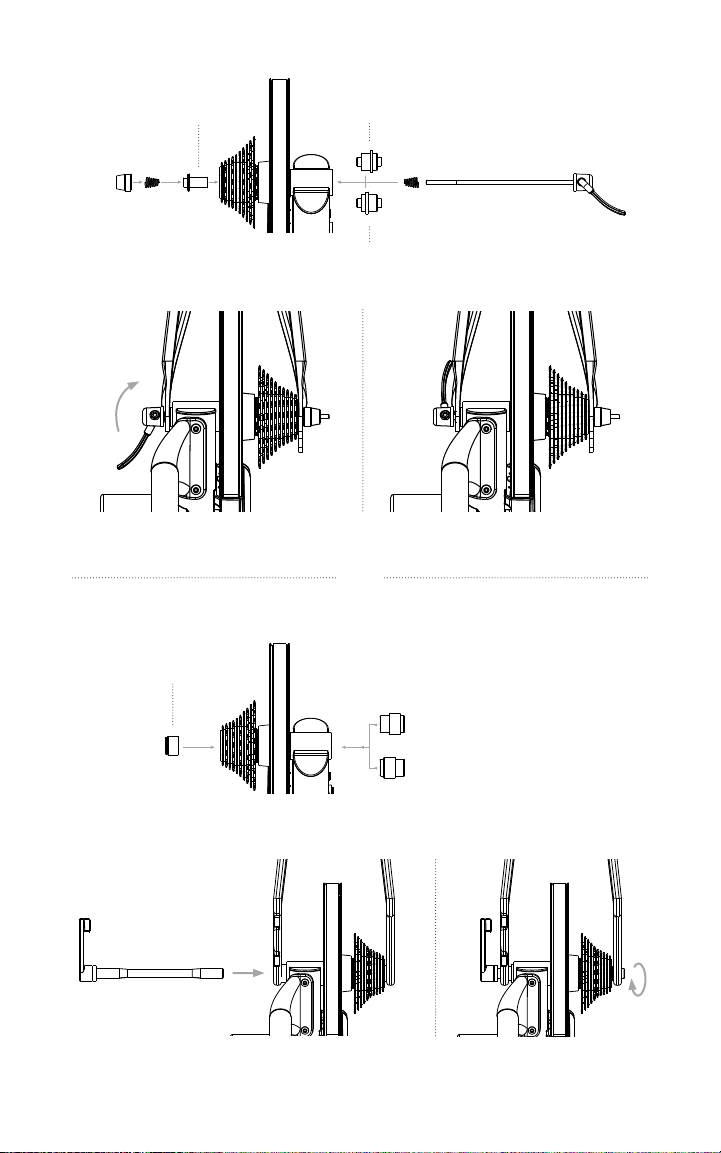
(7a)
(8a)
(7b)
Adapter A 130mm Configuration (Adapter B)
135mm Configuration (Adapter B)
OR
Adapter C
(8b)
12x142mm Configuration
(Adapter D)
12x148mm Configuration
(Adapter D)
2
Page 4
Thank you for purchasing the Wahoo KICKR!
LEARN MORE:
For instructional videos, compatible apps, FAQs, or to submit a support
request please visit: www.wahoofitness.com/support
ENGLISH
PLEASE CONTACT US WITH
QUESTIONS OR CONCERNS AT:
Wahoo Fitness
90 W. Wieuca Rd NE
Suite 110
Atlanta, GA 30342 United States
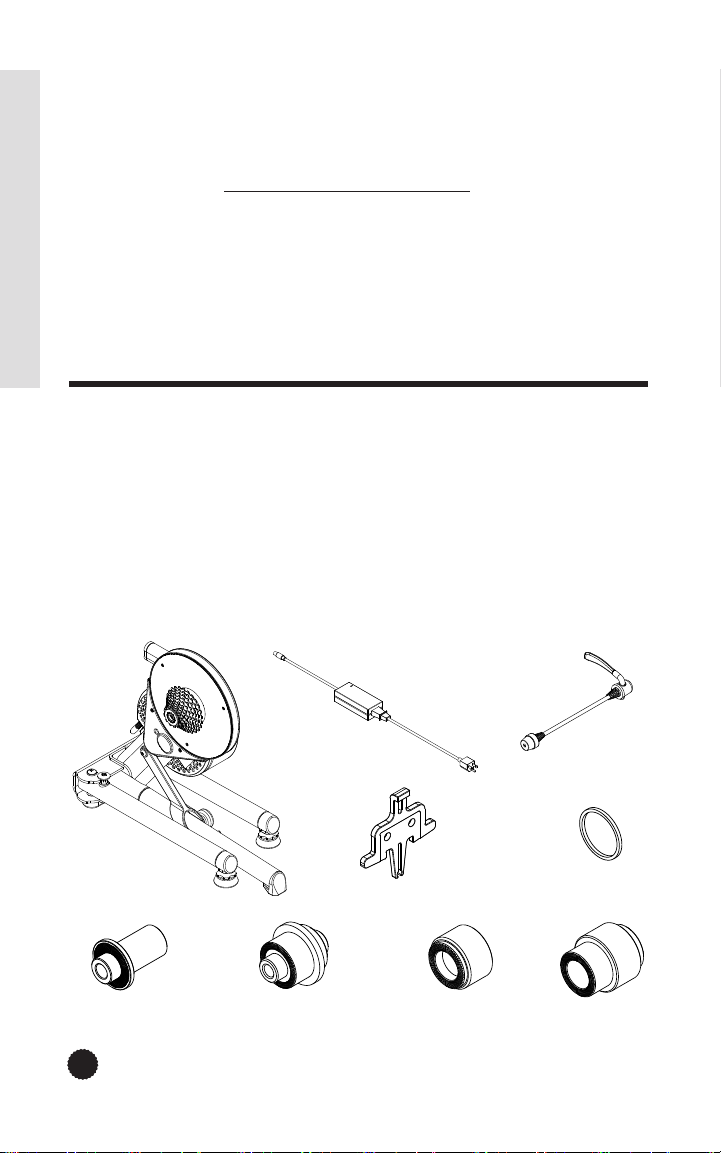
UNPACKING
(1) KICKR
(2) AC Power Adapter
(3) Quick Release Skewer
(4) Disc Brake Caliper Spacer
(5) 1.8mm Spacer
(6) Adapter A – For 130mm and 135mm
Quick Release
(1)
TELEPHONE:
United States: 1-877-978-1112
Germany: +49-30-568-373827
United Kingdom: +44-800-808-5773
Phone Hours: Monday - Friday
10am-7pm Eastern Time Zone
(7) Adapter B - Reversible hub spacer for
130mm and 135mm Quick Release
(8) Adapter C – For 12x142 and 12x148
Thru Axle
(9) Adapter D - Reversible hub spacer for
12x142 and 12x148 Thru Axle
(2)
(3)*
(4)
(5)
(6)* (7)* (8) (9)
* These items come preinstalled on the KICKR
PROTIP: Save all packaging and protective material for transportation and storage.
P
Page 5
• Before beginning or modifying
any exercise program please consult
your physician.
• Do not put hands or objects near
moving parts of the KICKR.
• The KICKR may become hot to the
touch when used for extended
periods of time.
CAUTION!
• Do not attempt to dismount the
bicycle while the flywheel
is in motion.
• Keep children and pets away from
the KICKR while in use.
• Only use the KICKR on a stable,
level surface with properly adjusted
leveling feet.
• Use caution when standing while
riding on the KICKR.
• Keep the KICKR away from water.
• Only use the power adapter that
comes with the KICKR.
• Check to make sure the bicycle is
properly secured to the KICKR before
every ride.
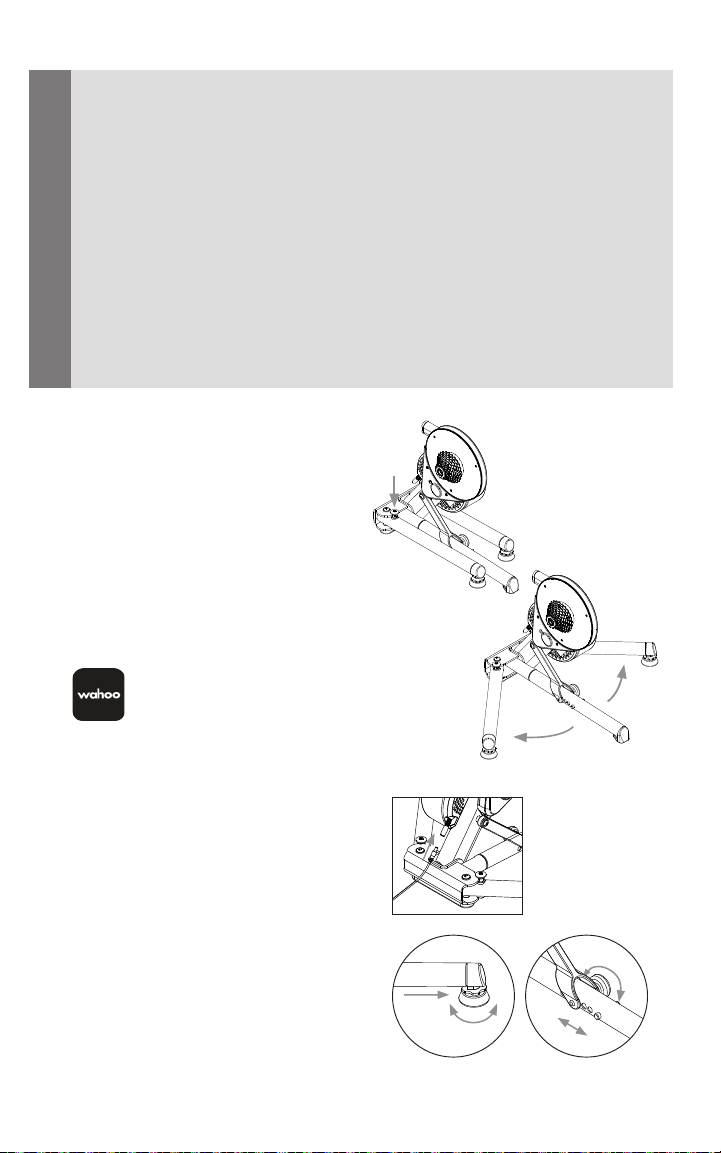
KICKR SETUP
Place your KICKR on a stable, level surface
and open the legs by (1) pressing down
on the blue leg-lock tabs and (2) pivoting
the legs outward until they snap in place.
(NOTE: Ensure the leg-lock tabs have
popped back up and secured the legs in
an open position.)
(3) Use the included AC power adapter
to connect the trainer to a standard
wall outlet.
Download the Wahoo Fitness app
for free from the Apple App Store or
from the Android Google Play Store.
Follow the in app setup guide to complete
your profile and to pair sensors.
To stabilize the trainer, adjust the two
leveling feet (4) by twisting them left or
right until the trainer is level and (5) lock
them into place by tightening the blue
locknuts against the KICKR leg frame.
(NOTE: Check that your trainer is stable
before every ride; if needed re-adjust the
leveling feet.)
Adjust the height of the trainer to fit your
specific wheel size by (6) relocating the
height adjustment knob on the center
leg to the appropriate setting. If you are
unsure of your wheel size, check the tire
sidewall or consult your local bike shop.
(1)
(3)
(5)
(2)
(6)
(4)
4
Page 6
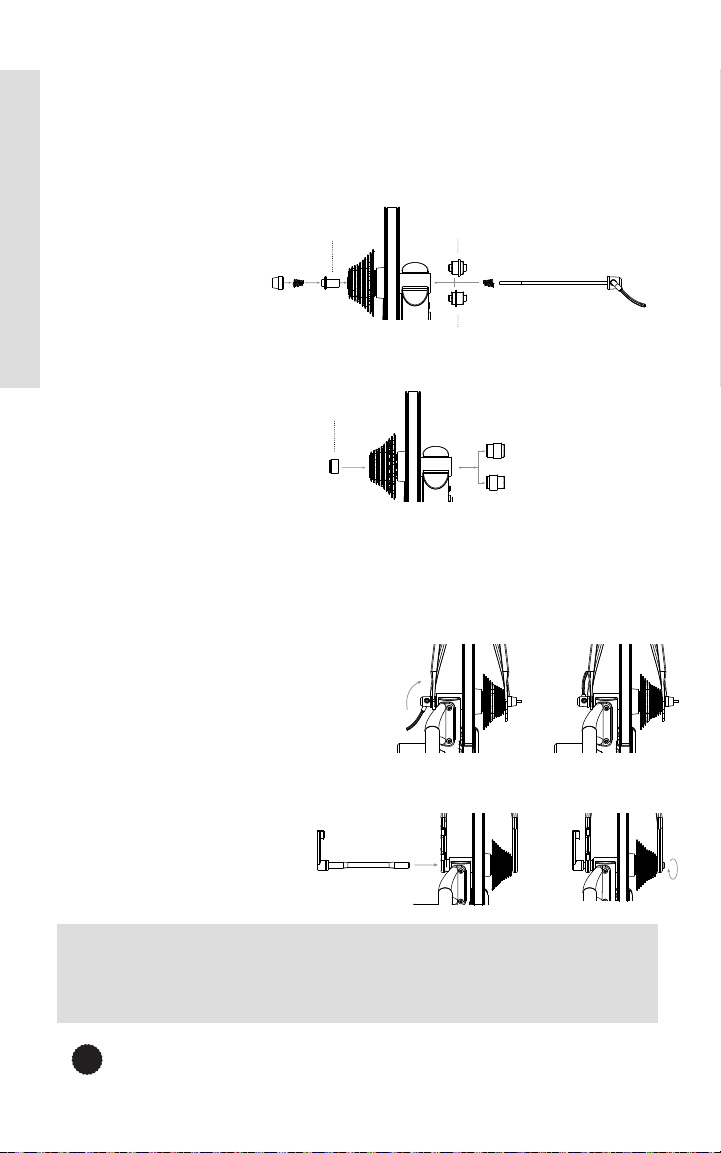
FOR 130MM OR 135MM QUICK RELEASE
Adapters Needed: A and B
KICKR comes pre-configured out of the box for bicycles with 130mm quick release
spacing. If you have a bicycle with 130mm spacing proceed to “Attaching your Bicycle”.
For 135mm spacing, remove quick release skewer, reverse Adapter B and reinstall
ENGLISH
quick release skewer.
Adapter A 130mm Configuration (Adapter B)
135mm Configuration (Adapter B)
FOR 142MM OR 148MM THRU AXLE
Adapters Needed: C and D
To be used with the 12mm thru
axle supplied with bicycle.
Adapter C
12x142mm Configuration
(Adapter D)
12x148mm Configuration
(Adapter D)
ATTACHING YOUR BICYCLE
Shift your bicycle chain into the smallest sprocket in the front and rear, then remove
your rear wheel. Install your bicycle on the KICKR by aligning the chain with the
smallest sprocket on the KICKR and pressing down to fully seat the dropouts on the
KICKR’s axle.
For bicycles with quick release - Secure your
bicycle by tightening the quick release acorn
nut and clamping the quick release lever shut.
The quick release lever is “open” when it curves
away from the bicycle frame (1); the lever is
“closed” when it curves towards the bicycle
frame (2). The handle of the quick release skewer is always on the non-drive (non cassette)
side of the KICKR. Only use the provided quick release skewer while using the KICKR.
For bicycles with thru axle -
Secure your bicycle by reinstalling
your bicycle’s thru axle (3) and
tightening to manufacturer
specifications (4).
(1) (2)
(3) (4)
CAUTION! Failure to properly tighten the quick release skewer or thru axle may result
in property damage or personal injury. If you are unsure of the proper tension, please
consult your local bike shop or contact Wahoo Fitness for assistance. Do NOT ride the
KICKR until the quick release skewer or thru axle is tightened.
PROTIP: Lift the front wheel up while pressing down on the saddle to ensure
P
the bicycle is fully seated on the trainer.
 Loading...